

Sony Vegas Pro 11
Beginner’s Guide
Edit videos with style and ease using Vegas Pro
Duncan Wood
BIRMINGHAM — MUMBAI
Sony Vegas Pro 11 Beginner’s Guide
Copyright © 2012 Packt Publishing
All rights reserved. No part of this book may be reproduced, stored in a retrieval system, or transmitted in any form or by any means, without the prior written permission of the publisher, except in the case of brief quotations embedded in critical articles or reviews.
Every effort has been made in the preparation of this book to ensure the accuracy of the information presented. However, the information contained in this book is sold without warranty, either express or implied. Neither the author, nor Packt Publishing, and its dealers and distributors will be held liable for any damages caused or alleged to be caused directly or indirectly by this book.
Packt Publishing has endeavored to provide trademark information about all of the companies and products mentioned in this book by the appropriate use of capitals. However, Packt Publishing cannot guarantee the accuracy of this information.
First published: July 2012
Production Reference: 1200712
Published by Packt Publishing Ltd. Livery Place
35 Livery Street Birmingham B3 2PB, UK.
ISBN 978-1-84969-170-3
www.packtpub.com
Cover Image by Faiz Fattohi (faizfattohi@gmail.com)
Credits
Author
Duncan Wood
Reviewers
Chris Bryant
Einar Ritsmer
Jeff Schroeder
Cooper Rory
Acquisition Editor
Wilson D’souza
Lead Technical Editor
Arun Nadar
Technical Editors
Apoorva Bolar
Conrad Neil Sardinha
Project Coordinator
Leena Purkait
Proofreader
Matthew Humphries
Indexer
Hemangini Bari
Production Coordinator
Nilesh R. Mohite
Cover Work
Nilesh R. Mohite

About the Author
A 35 year veteran of the music and video industries, Duncan Wood has certainly seen his share of changes and advances in technologies in these two fields. Having worked with a large range of music artists from household names, such as, Savage Garden, The Veronicas, and Jon English, through to a list way too long to mention of unknown and up and comers, Duncan has had hands on experience starting in the days of analogue tape and video through to today’s digital media formats. As owner and director of his company Touchwood Productions (www.touchwoodproductions.com), Duncan is active on a daily basis pushing the boundaries and forging pathways to have his productions see light of day in this ever changing landscape of the multimedia industries.
Always keen to help the next generation of music and video editors strive to succeed,
Duncan has been excited to write the Beginners Guide for Sony Vegas Pro 11. His hands on experience combined with his years of experience presented in the Packt Publishing book format will make for an exciting read for those keen to conquer this powerful software.
I would like to thank my wonderful wife Caroline Taylor-Knight for her support and encouragement in all I do, as well as Sienna Susan Wood, my
20 month old daughter (at the writing of this bio) for the amazing things that she has taught me about life, love, and family. I would also like to thank Leena Purkait and Wilson D’souza from Packt Publishing for their guidance and assistance throughout the process of writing this book.
I also want to thank the artist Dane Sharp who appears in the footage for the Music Video tutorial and is the singer of the song One Way Ride.
About the Reviewers
After standing in line for hours to watch Jurassic Park on the opening night, Chris Bryant was instantly hooked on motion pictures. He also realized at an early age that if you don’t want to be filmed, you needed to be the one holding the camera! One of his first paychecks went to purchase an 8 mm camcorder, and his passion for video production has grown ever since. He edited his first video back in high school by chaining together two VCRs to create a thematic introduction to his senior project, and was a Media Arts major at Western Connecticut State University.
He eventually went on to start his own company in 2004 (look for Bryant Productions on Facebook!) and films a range of promotional and internal training videos for companies nationwide.
For fun he produces short films including The Other Half, the first place winner of the 2009 Connecticut Film Festival’s 24 Hour Cup ‘O Joe Filmmaking Competition. Chris has experience as a voiceover artist and event videographer.
When he isn’t shooting video or editing, Chris enjoys spending time with his beautiful wife and three dogs at their home in Connecticut.
EinarRitsmer is an enthusiastic videographer recording and editing several videos every year. He has a M.Sc. in electrical engineering and IT. Einar participates in various peer-to-peer video forums giving advice on video editing and editing hardware. He is also a Sony Certified Vegas User (SCVU).

www.PacktPub.com
Support files, eBooks, discount offers and more
You might want to visit www.PacktPub.com for support files and downloads related to your book.
Did you know that Packt offers eBook versions of every book published, with PDF and ePub files available? You can upgrade to the eBook version at www.PacktPub.com and as a print book customer, you are entitled to a discount on the eBook copy. Get in touch with us at service@packtpub.com for more details.
At www.PacktPub.com,youcanalsoreadacollectionoffreetechnicalarticles,signupfora rangeoffreenewsletters,andreceiveexclusivediscountsandoffersonPacktbooksandeBooks.
http://PacktLib.PacktPub.com
Do you need instant solutions to your IT questions? PacktLib is Packt’s online digital book library. Here, you can access, read, and search across Packt’s entire library of books.
Why Subscribe?
Fully searchable across every book published by Packt Copy and paste, print, and bookmark content
On demand and accessible via web browsers
Free Access for Packt account holders
If you have an account with Packt at www.PacktPub.com, you can use this to access
PacktLib today and view nine entirely free books. Simply use your login credentials for immediate access.
Table of Contents |
|
|
Preface |
1 |
|
Chapter 1: Getting Acquainted with your New Best Friend: |
|
|
Vegas Pro 11 Overview |
5 |
|
A note on your computer |
6 |
|
System requirements |
6 |
|
Getting help |
6 |
|
Online Help |
7 |
|
Interactive Tutorials |
7 |
|
Getting to know the windows: Exploring the Vegas Pro 11 interface |
7 |
|
The Vegas Pro 11 windows |
8 |
|
Customizing the User Interface |
23 |
|
Time for action – customizing the Vegas User Interface |
23 |
|
Beginner’s Guide to Vegas Pro 11 Media |
26 |
|
Video Killed the Radio Star |
27 |
|
Summary |
28 |
|
Chapter 2: Let the Magic Begin: Beginning the Project and Acquiring Media |
29 |
|
Creating a project |
30 |
|
Project Properties |
30 |
|
Standard Definition versus High Definition |
31 |
|
Pixel Aspect Ratio |
32 |
|
FIELD ORDER |
33 |
|
FRAME RATE |
33 |
|
MATCH MEDIA SETTINGS |
34 |
|
Time for action – using the supplied clips to set Project Properties |
34 |
|
Time for action – setting Project Properties from scratch |
36 |
|
The Preview Monitor |
37 |
|
Importing media clips |
39 |
|
Time for action – importing media |
39 |
|
Importing from other sources |
42 |

Table of Contents
|
The Smart tool and media clips |
46 |
|
Keyboard Shortcuts |
53 |
|
Summary |
54 |
|
Chapter 3: Video Editing Concepts and Application |
55 |
|
Editing: A light history lesson |
56 |
|
Time for action – creating a second version of our project |
57 |
|
What makes a good edit or cut |
57 |
|
Time for action – selecting edit points in our media clips |
59 |
|
Method two: Multicamera tool |
63 |
|
Time for action – creating edits with the Multicamera tool |
63 |
|
Event panning and cropping tool |
68 |
|
Time for action – making a creative zoom with the Pan/Crop tool |
69 |
|
Time for more action – removing an unwanted shadow |
72 |
|
Slow and fast motion |
75 |
|
Time for action – using slow motion as a creative tool |
75 |
|
Summary |
79 |
|
Chapter 4: Essential Editing Tools |
81 |
|
Important preliminary points |
81 |
|
Video effects (a.k.a. FX) |
82 |
|
Time for action – applying global FX to our media |
82 |
|
Global FX (another option) |
84 |
|
Time for action – applying FX to individual clips |
85 |
|
Time for action – removing the muted media clips |
86 |
|
Transitions |
91 |
|
Time for action – using transitions |
91 |
|
Media generators |
93 |
|
Time for action – media generators |
94 |
|
The advent of 3D editing |
100 |
|
Summary |
100 |
|
Chapter 5: Eye Catching Titles, Text, and Effects |
101 |
|
Titles and text |
101 |
|
Time for action – working with the SONY Pro Type Titler |
102 |
|
Time for action – animating our title |
109 |
|
Creating opening or closing titles |
114 |
|
Time for action – making a series of credits with the Sony Pro Type Titler |
115 |
|
Transitions: The key to a smooth flow |
118 |
|
Time for action – creating effective transitions |
118 |
|
Production values |
125 |
|
Summary |
126 |
[ ii ]

|
Table of Contents |
|
|
Chapter 6: Color Correction Techniques |
127 |
|
A note on our project |
127 |
|
What are White Balance and Level Correction? |
128 |
|
Time for action – using the White Balance tool |
128 |
|
Level correction |
130 |
|
A lesson on levels |
131 |
|
Time for action – using the Levels plugin |
131 |
|
Another way of looking at changes to levels and colors |
134 |
|
The Waveform scope |
135 |
|
Time for action – practical use of Levels and the Waveform scope |
135 |
|
The RGB Parade scope |
137 |
|
The Histogram scope |
138 |
|
Time for action – using Levels and the Histogram scope on our project |
139 |
|
The Vectorscope |
141 |
|
Time for action – learning to read the Vectorscope |
141 |
|
Color correction and matching |
144 |
|
Time for action – color correction |
145 |
|
Color Corrector Secondary plugin: Reducing the red |
147 |
|
Time for action – removing the redness using the Color Corrector |
|
|
Secondary plugin |
147 |
|
Summary |
149 |
|
Chapter 7: Look, I Made it Move!!—Automating Tools in Sony Vegas |
151 |
|
Pan/crop and zooming automation |
151 |
|
Time for action – automating the pan/crop tool |
152 |
|
Zooming |
152 |
|
Panning left to right |
155 |
|
Parameter automation |
157 |
|
Time for action – automating parameters |
158 |
|
The Track Motion Tool |
162 |
|
Time for action – using Track Motion to move two tracks together |
162 |
|
The Motion Blur Tool |
167 |
|
Time for action – adding Motion Blur |
168 |
|
Summary |
173 |
|
Chapter 8: The Importance of Audio |
175 |
|
Concepts of audio |
176 |
|
Audio 101 |
176 |
|
Time for action – load and listen to the tones file |
177 |
|
Equalization |
179 |
|
Time for action – using the EQ plugin to equalize a guitar sound |
180 |
|
Compression |
186 |
[ iii ]
![]()
Table of Contents
|
Time for action – using the Compressor plugin to change |
|
|
an audio clip |
187 |
|
Noise Gate |
189 |
|
The mixing console |
190 |
|
Time for action – using the mixing console |
191 |
|
Summary |
200 |
|
Chapter 9: Soundtrack of our Lives: Audio for Video |
201 |
|
Recording the spoken word |
202 |
|
Microphones |
202 |
|
Recording a voice over into Vegas Pro 11 |
206 |
|
Time for action – recording audio into Vegas Pro 11 |
206 |
|
Music copyright |
212 |
|
Creating original music with products such as ACID Music Studio |
213 |
|
Surround sound concepts and Vegas Pro |
214 |
|
Time for action – using Surround Sound tools in Vegas Pro 11 |
215 |
|
Summary |
218 |
|
Chapter 10: Can I put this on YouTube?: Rendering and Delivering |
|
|
the Final Project |
219 |
|
Video compression |
220 |
|
Codecs |
220 |
|
Video formats available |
221 |
|
Image Sequence |
222 |
|
AVC |
222 |
|
MPG (MPEG) |
222 |
|
MOV |
223 |
|
Real Media |
223 |
|
Sony AVC |
223 |
|
Sony MXF |
223 |
|
AVI |
223 |
|
WMV |
224 |
|
XDCAM EX |
224 |
|
FLV |
224 |
|
Audio formats available |
225 |
|
ATRAC Audio |
225 |
|
AIFF (Audio Interchange File Format) |
226 |
|
DOLBY AC-3 |
226 |
|
FLAC AUDIO (Free Lossless Audio Codec) |
226 |
|
MP3 |
226 |
|
Ogg VORBIS |
227 |
|
Sony Perfect Clarity Audio |
227 |
|
Sony Wave 64 |
227 |
|
Wave |
227 |
[ iv ]

|
Table of Contents |
|
|
Windows Media Audio |
227 |
|
Rendering video and audio for DVD Architect |
228 |
|
Time for action — preparing Master Files for DVD Architect |
228 |
|
Rendering for the Web |
235 |
|
Burning DVD or Blu-ray directly from the timeline |
236 |
|
Time for action — burning a disc directly from the timeline |
236 |
|
More rendering information |
239 |
|
Summary |
240 |
|
Pop Quiz Answers |
241 |
|
Index |
243 |
[ v ]
Preface
The Beginner’s Guide to Sony Vegas Pro 11 is a great education and revision tool for the users of this powerful video editing software package. By working through the tutorial projects, the reader will gain a strong understanding of how the software works and the processes for creating exciting video projects. For the experienced user, this book will help to revise their editing workflow as well as show alternate and possibly more efficient ways of achieving professional results.
What this book covers
Chapter 1, Getting Acquainted with your New Best Friend: Vegas Pro 11 Overview, covers system requirements to run the discussed software and the process of installing Sony Vegas Pro 11. This is followed by an introduction to the user interface and its associated windows plus an overview of the Tutorial Project we will be using with this book.
Chapter 2, Let the Magic Begin: Beginning the Project and Acquiring Media, explains some of the most important topics for getting started with Vegas Pro 11. They include, How to create a Project, Pixel Aspect Ratio, The Preview Monitor, Importing of Media, The Smart Tool, and Keyboard Shortcuts.
Chapter 3, Video Editing Concepts and Application, discusses the history of film making and editing as well as information on what makes a good edit. We look at the multi-camera tool which will be used in our tutorial, plus essential functions for editing, such as panning and cropping and slow and fast motion video.
Chapter 4, Essential Editing Tools, discusses the tools and their workflows as well as gives some insight into the software’s 3D editing capabilities.
Chapter 5, Eye Catching Titles, Text, and Effects, discusses the tools that go a long way in helping the reader bring their video editing workflows into the professional league.

Preface
Chapter 6, Color Correction Techniques, shows the reader how to use the all important color correction tools to their best advantage.
Chapter 7, Look, I Made it Move!!—Automating Tools in Sony Vegas, dives into one of the biggest advantages of digital non-linear video editing, which is the ability to automate or animate most, if not all of the tools in Sony Vegas Pro 11.
Chapter 8, The Importance of Audio, discusses the importance of audio for vision and the tools used to create that experience.
Chapter 9, Soundtrack of our Lives: Audio for Video, discusses creating great audio including the spoken word and microphones, as well as music copyright, ways to create original music for your projects, and the concepts of surround sound audio.
Chapter 10, Can I put this on YouTube?: Rendering and Delivering the Final Project, helps the reader to negotiate the often scary path through video compression and codecs, video and audio formats, and confidently choosing the right formats for creating the final delivery method whether it be DVD, Blu-ray via DVD Architect, or the Internet.
What you need for this book
To successfully use this book, the most current version of Sony Vegas Pro 11 is needed and installed onto your video editing computer system. Although there may be a few small interface differences, this book will also be useful for users of the latest version of Sony Vegas Pro 10. You will also need to download the video and audio files for the project that you will be working on during the tutorials in this book.
Who this book is for
The Beginner’s Guide to Sony Vegas Pro 11, although ideally suited to the video editing newcomer, will also appeal to both professional and intermediate users looking for helpful and insightful ways of carrying out tasks in their video editing workflow.
Conventions
In this book you will find a number of styles of text that distinguish between different kinds of information. Here are some examples of these styles, and an explanation of their meaning.
[ 2 ]
Preface
New terms and important words are shown in bold. Words that you see on the screen, in menus or dialog boxes for example, appear in the text like this: «You can check if you have the latest version by selecting HELP MENU | Sony on the Web | Latest Updates«.
Warnings or important notes appear in a box like this.
Although not essential, I would highly recommend having a second hard drive to store and edit your video project’s media. This drive should also be at least a 7200 RPM drive as this will free up the system drive and be less taxing on the overall system.
Reader feedback
Feedback from our readers is always welcome. Let us know what you think about this book—what you liked or may have disliked. Reader feedback is important for us to develop titles that you really get the most out of.
To send us general feedback, simply send an e-mail to feedback@packtpub.com, and mention the book title through the subject of your message.
If there is a topic that you have expertise in and you are interested in either writing or contributing to a book, see our author guide on www.packtpub.com/authors.
Customer support
Now that you are the proud owner of a Packt book, we have a number of things to help you to get the most from your purchase.
Downloading the example code
You can download the example code files for all Packt books you have purchased from your account at http://www.packtpub.com. If you purchased this book elsewhere, you can visit http://www.packtpub.com/support and register to have the files e-mailed directly to you.
[ 3 ]

Preface
Errata
Although we have taken every care to ensure the accuracy of our content, mistakes do happen. If you find a mistake in one of our books—maybe a mistake in the text or the code—we would be grateful if you would report this to us. By doing so, you can save other readers from frustration and help us improve subsequent versions of this book. If you find any errata, please report them by visiting http://www.packtpub.com/support, selecting your book, clicking on the errata submission form link, and entering the details of your errata. Once your errata are verified, your submission will be accepted and the errata will be uploaded to our website, or added to any list of existing errata, under the Errata section of that title.
Piracy
Piracy of copyright material on the Internet is an ongoing problem across all media. At Packt, we take the protection of our copyright and licenses very seriously. If you come across any illegal copies of our works, in any form, on the Internet, please provide us with the location address or website name immediately so that we can pursue a remedy.
Please contact us at copyright@packtpub.com with a link to the suspected pirated material.
We appreciate your help in protecting our authors, and our ability to bring you valuable content.
Questions
You can contact us at questions@packtpub.com if you are having a problem with any aspect of the book, and we will do our best to address it.
[ 4 ]
1
Getting Acquainted with your New Best Friend: Vegas Pro 11 Overview
Every piece of software we utilize in our creative world seems to become one of our best friends, especially if it is our main go-to application for a specific task. We communicate with it every day and sometimes spend many hours interfacing with it. So the day comes when that software and you decide to take the relationship to a new level and it moves in with you, and takes up permanent residence on your PC. Just like a new housemate, we want to make sure it has all of the modern conveniences and space it needs to give you both a carefree coexistence.
So let’s move him / her in…
In this chapter, we shall cover:
System requirements
Exploring the Vegas Pro windows Customizing the User Interface
Overview of Vegas Project we will be working with
Getting Acquainted with your New Best Friend: Vegas Pro 11 Overview
A note on your computer
A video editor’s computer system will vary from user to user. With this in mind, Sony has made the Vegas Pro 11 software to be quite forgiving of any inefficiency that your system may have. So to ensure a happy first project, please ensure you have installed the latest version and build of Vegas Pro 11. You can check if you have the latest version by selecting
Help | Sony on the Web | Latest Updates from the menu bar.
System requirements
Included on your installation disks or bundled with your downloaded installation file from Sony Creative Software Inc., is a list of Minimum System Requirements needed to successfully run Vegas Pro 11.
In order to use this book and the downloaded project, your system must satisfy those requirements.
Please refer to your Sony Vegas Pro 11 user manual for more details on this topic.
If you purchased Vegas Pro 11 online you can download the manual from http://www.sonycreativesoftware.com/download/manuals/vegaspro.
Also technical support, reference information, program updates, tips and tricks, a user’s forum, and a knowledge base are available from http://www.sonycreativesoftware.
com/support/default.asp.
Although not essential, I would highly recommend having a second hard drive to store and edit your video project’s media. This drive should also be at least a 7200 RPM drive as this will free up the system drive and be less taxing on the overall system.
Getting help
Vegas Pro 11 also comes with two varieties of help available to you. Besides this beginners’ guide you can access powerful information via:
Online Help
Interactive Tutorials
[ 6 ]
Chapter 1
Online Help
Online help is accessible once Vegas Pro 11 is running on your computer by choosing Contents and Index from the Help menu or by pressing F1.
You can also access more help and information via the Sony Creative Software Inc website by choosing Sony on the Web from the Help menu.
Tip: Please note that your computer must be connected to the Internet for the Sony on the Web function to operate.
Interactive Tutorials
You can also learn more about the many features in Vegas Pro 11 by accessing the interactive tutorials installed with the software. The tutorials will be displayed once you start the software, but you can also access them from the Help menu listed as
Interactive Tutorials.
Tip: The automatic display of tutorials can be turned off by un-checking the Show at Start-up box at the bottom of the tutorial window.
Getting to know the windows: Exploring the Vegas Pro 11 interface
Communication is the key to any relationship, and the same applies with your newly-installed software. Knowing how and where to access the right tools while editing is crucial, and will allow you to easily interact with Vegas Pro 11. The Graphical User Interface or GUI in Vegas Pro 11 is fairly complex, with many windows that contain all of the important tools for editing your video. Here we will overview each of these user interface elements to get you more acquainted with the windows of Vegas Pro 11, before we plunge into their uses in our Beginner’s Guide Project.
[ 7 ]
![]()
Getting Acquainted with your New Best Friend: Vegas Pro 11 Overview
The Vegas Pro 11 windows
The Sony Vegas Pro 11 user interface has many windows with which to access the tools and functions of the software, so let’s go through each of the important windows to familiarize ourselves with them before we start the actual editing process:
The Track Header
The next screenshot shows you the Track Header. Here Vegas Pro Projects display Video, Audio, Video Bus, and Audio Bus tracks in the list for your Project. Extending to the right into the Timeline, the tracks allow you to arrange your audio, video, Still Images, Backgrounds, and Text. All of the settings for the tracks can be found here including volume and panning, Video Compositing Level, applying temporary Solo and Muting to both video and audio, apply Track motion, changing the Recording Mode, or changing the Track Height. If you hover your mouse over any of the buttons and icons, its name will appear for you:
[ 8 ]
Chapter 1
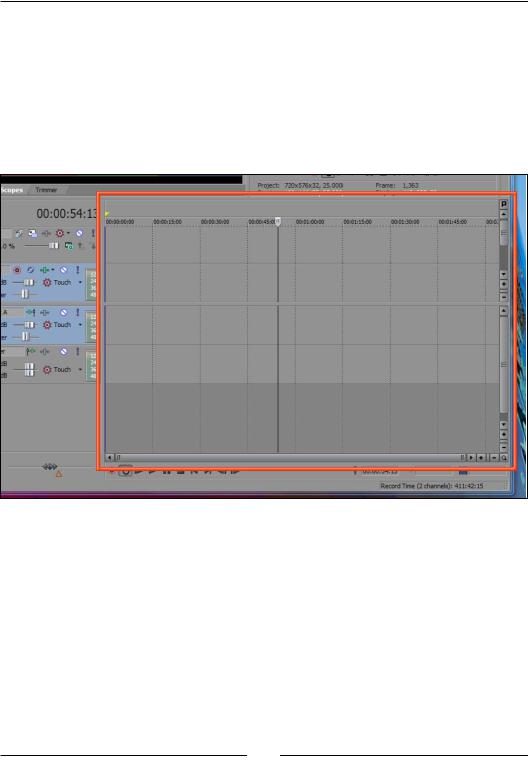
The Timeline
The Timeline is your main work area, which allows you to arrange and edit all of your audio, video, and still images to create your final project movie. Horizontally reading from left to right, the timeline represents time.
Think of a film strip or unraveled audio tape laid out on the timeline where you can see what you are editing. Vertically the timeline shows Tracks. Tracks are where you place your audio or video files and are known as Events. The timeline allows you to precisely control the length and time placements of your events:
[ 9 ]
Getting Acquainted with your New Best Friend: Vegas Pro 11 Overview
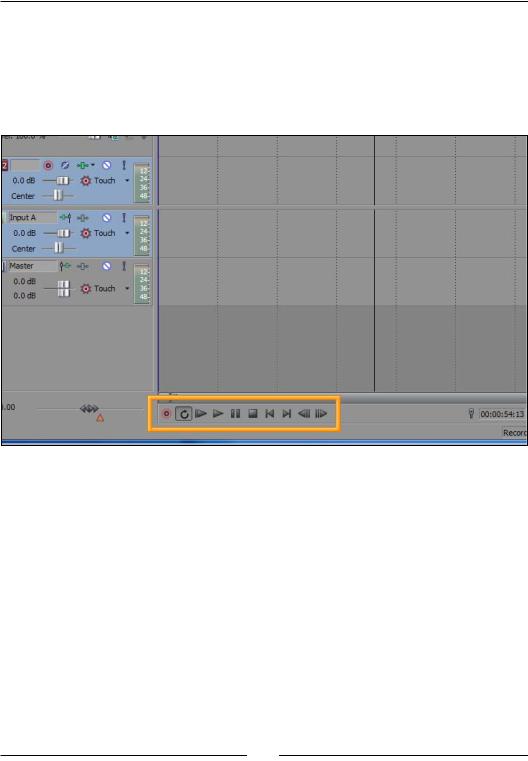
The Transport toolbar
The Transport toolbar allows you to control the playback of your project just like a tape deck or CD player. Clicking the play button will allow you to watch your video update in the Video Preview window. As with most tools in Vegas, there are multiple ways to utilize them. The Play and Stop buttons can also be accessed by pressing the Space bar to alternate between the play and stop functions of your video:
[ 10 ]
Chapter 1
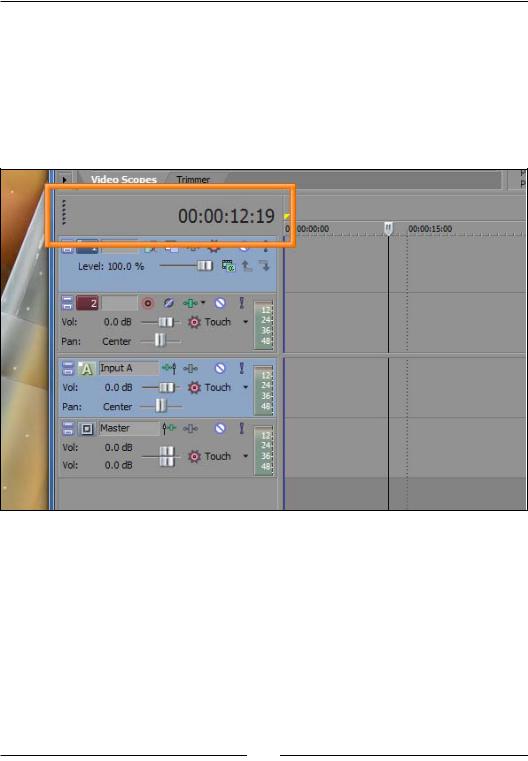
The Time Display
The Vegas Pro Time Display shows the current position of the cursor on the timeline. This display uses the industry standard format of HH:MM:SS: FF where HH is Hours,
MM is Minutes, SS is Seconds, and FF is the current video frame the cursor is on within that second. For example, the following screenshot indicates the cursor is sitting on the 12th second of the timeline and on the 19th frame of that second. If the Project Settings were set to a PAL Video, that would be the 19th Frame out of the 25 frames allocated for that second:
[ 11 ]
Getting Acquainted with your New Best Friend: Vegas Pro 11 Overview
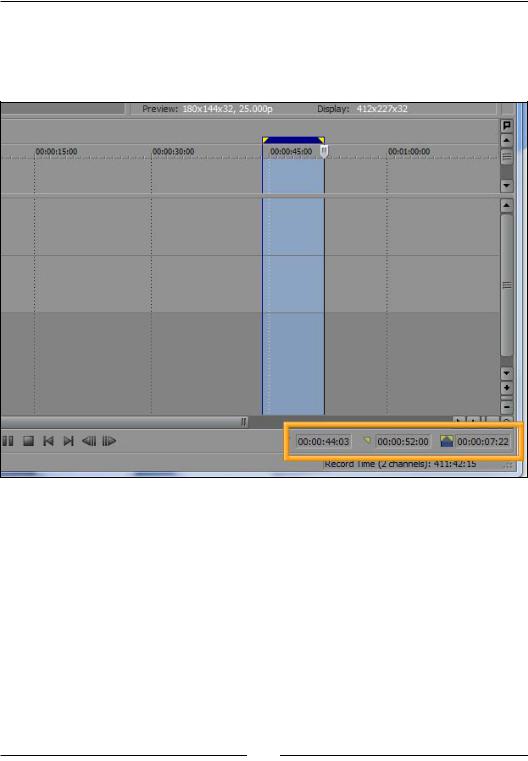
The Status bar
The Status bar of the timeline shows us three numeric boxes which represent the highlighted selection’s Starting Time, Ending Time, and Duration. If there is no selection, the first box displays the Cursor Position only:
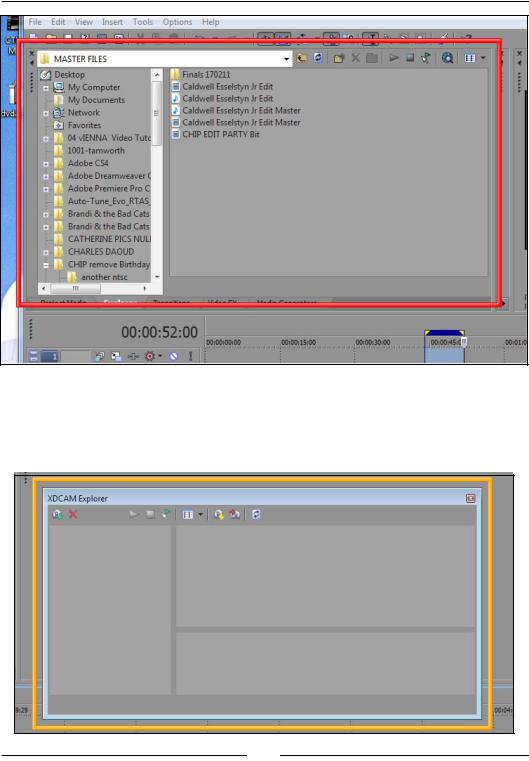
The Explorer window
By clicking on the Explorer tab just above the time display, or using key combination ALT + 1, the Explorer window is available. Here, you can quickly browse your entire computer and connected hard drives and network places for audio, video, and still images for your project. You can click-and-drag the files from the Explorer window into the timeline to make them available for use in your project. Once a file is dragged into the timeline, it automatically becomes available in the Project
Media window:
[ 12 ]
Chapter 1
XDCAM Explorer
The XDCAM Explorer window can be accessed by using CTRL + ALT + 5. XDCAM files can be efficiently handled by this window so you can select and preview the files before dropping them onto the timeline for editing:
[ 13 ]
Getting Acquainted with your New Best Friend: Vegas Pro 11 Overview
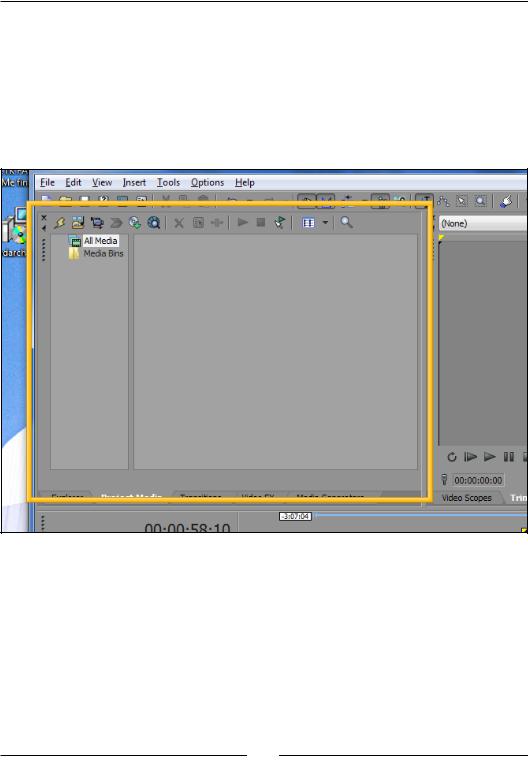
The Project Media window
Click on the Project Media tab or use ALT + 5. The Project Media window shows you all of the media being currently used in your project. Media consists of audio, video, still images, backdrops, and text. You can also add media to your project by using the appropriate icon buttons which can be found across the top of the Project Media window. These icons allow you to: Import Media, Capture Video, Get Photo from attached Scanner, Extract Audio from CD, and Get Media from the Web. Hover your mouse over the icons to reveal their function.
[ 14 ]
Chapter 1
The Trimmer
Select the Trimmer tab or use ALT + 2. The Trimmer window is another useful editing tool at your disposal. In the trimmer, a portion of a media clip can be selected or trimmed and inserted into your project. You also have the ability to create subclips in the Trimmer window. A subclip allows you to leave the original media fully intact while creating a new shorter clip extracted from the original:
[ 15 ]

Getting Acquainted with your New Best Friend: Vegas Pro 11 Overview
The Mixer window
Select the Mixer window by using ALT + 3. The Mixer window in Vegas Pro 11 is a very powerful audio tool that allows for complete Final Mixing and Processing of your project’s audio and soundtrack:
[ 16 ]
Chapter 1
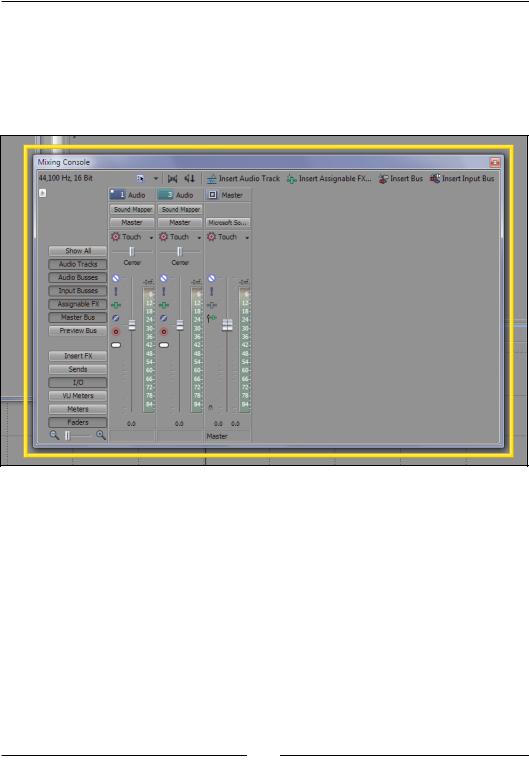
Mixing Console
The Mixing Console window is a full featured traditional audio mixing console. It contains many of the same features as the Track Header, but is laid out in a recognizable and expected Audio Console format. The complexities and fun of audio mixing will be covered in Chapter 7, Look, I Made it Move!! : Automating
Tools in Sony Vegas and Chapter 8, The Importance of Audio.
[ 17 ]
![]()
Getting Acquainted with your New Best Friend: Vegas Pro 11 Overview
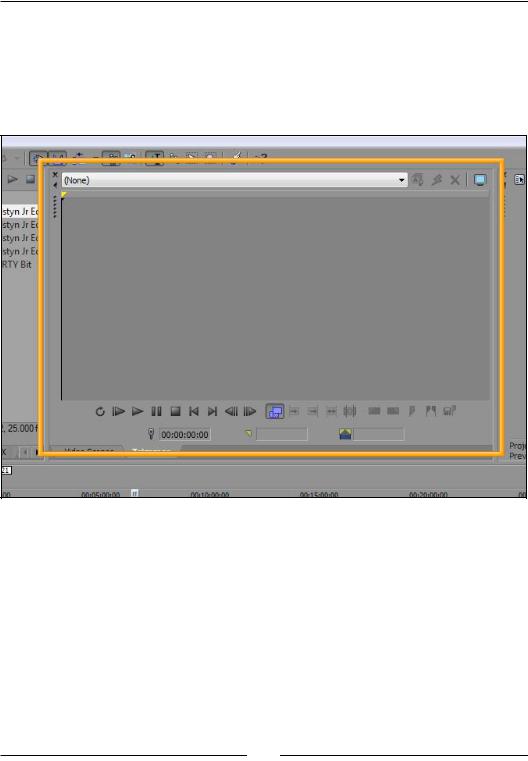
The Video Preview window
Press ALT + 4 to bring up the Video Preview window. This preview generally displays the video output from your selected point on the timeline. The smoothness, quality, and clarity of the preview window depends greatly on the fine balance between the processing power available from your CPU and video card, the number and type of FX plugins you have on your media, and the preview quality setting you have chosen. The Preview Quality settings range from Draft, Preview, Good, and Best, but generally Preview Auto will be sufficient. One of the big pluses of Vegas Pro 11 is that it will now utilize the GPU processor on your video card as long as your video card supports the OpenCL architecture.
[ 18 ]

Chapter 1
Transitions window
Select the Transitions tab or ALT + 7 to open the Transitions window. Transitions are used to smoothly connect one media clip to another. Transitions sometimes can represent things such as time passing, travelling from interior to exterior, or from one scene to another. They are itemized by category in the left column with an animated representation of how the transition works on the right. The transitions can be quickly applied to two overlapping media clips by clicking-and-dragging the transition into the cross-faded media clips to add or change the transition:
[ 19 ]

Getting Acquainted with your New Best Friend: Vegas Pro 11 Overview
Video FX
Select the Video FX tab or use ALT + 8 to open the Video FX window. Like the
Transitions window, the selection of Video FX that can be applied to your video clips are itemized into categories on the left with an appropriate animation on the right to give you an idea of what the FX does. Video FX range from creative choices, such as Blurs and Color FX, through to corrective FX such as Brightness, Contrast, and
Sharpness with a myriad of choices in between. You can click-and-drag the FX onto your media clips and you can also apply multiple FX on top of each other onto a single clip. Once in place the presets can be animated over time:
[ 20 ]

Chapter 1
Media Generators
The Media Generator window can be accessed by selecting the Media Generator tab or using ALT + 9. This window will access many backdrop FX, color gradients, checkerboards, and some very powerful text and pro type titler generators. Dragging the selected preset onto the timeline will allow you to change the properties to suit your project as well as animate the generated media for truly stunning effects.
[ 21 ]

Getting Acquainted with your New Best Friend: Vegas Pro 11 Overview
Device Explorer
Using CTRL + ALT + 7 will open the Device Explorer window. With the advent of many different format cameras available, Vegas Pro 11 can now communicate directly with these camera devices to import their clips into your project. The Device Explorer will search for any such devices and allow you to browse the files and import them. Formats such as AVCHD, XDCAM XE, and RED ONE cameras will all communicate happily via this window.
Video Scopes window
The Video Scopes window is accessed by using CTRL + ALT + 2. These Scopes and Histograms allow for accurate analyzing of the color and white balance of your video playback. They will become a very useful tool for the trained eye.
[ 22 ]

Chapter 1
Customizing the User Interface
As we have seen in the previous section, there are many windows to access the tools and functions we will need while editing. Another great feature of Vegas Pro 11 is the ability to setup and display these windows in a way that suits your own personal taste and way of working. Let’s learn how to make a custom window layout.
Time for action – customizing the Vegas User Interface
1.With a Blank Vegas Project open, select ALT + 4 to make sure your Preview window is open. You will notice a vertical row of six dots circled, in the top-left corner of the
Preview window, as shown in the following screenshot:
[ 23 ]

Getting Acquainted with your New Best Friend: Vegas Pro 11 Overview
2.These dots create a handle with which to grab and move the window either on to another part of the window dock or to a completely different position on the screen independent of the Vegas User Interface. Click-and-hold the row of dots and drag the Preview window so that it becomes independent of the other windows and floats on top of the interface, as shown in the following screenshot:
3.This free window can now be resized and positioned where ever you like on your desktop. If you had two screens attached to your computer, you could drag that window over to the second monitor.
4.So any window that has these six dots can be moved and resized independently.
5.Once you have all your windows positioned and sized to suit your working style, this unique layout can be saved into one of ten layout memory slots that are available.
[ 24 ]

Chapter 1
6.Press CTRL + ALT + D and then release the keys and immediately select one of the numbers across the top of your keyboard (not your numeric pad) to save your layout into the slot. They are numbered 0 to 9, so to save in the first slot push CTRL + ALT +
D followed by the 0 key.
7.The Save Layout As window will open which allows you to name your layout and decide which slot you wish to save it into:
8.Give your layout a name and hit OK to save the layout.
9.In the future, to recall this layout you simply press ALT + D + 0; the last number will correspond to the save slot.
10.Sony Vegas Pro 11 comes with three preset layouts that can be found by selecting
View menu | Windows Layouts and then choosing from Default Layout, Audio Mixing, or Color Correction. Or you can use the shortcuts ALT + D + D, ALT + D + A, ALT + D + C accordingly.
[ 25 ]

Getting Acquainted with your New Best Friend: Vegas Pro 11 Overview
11.Even though there are only ten slots to access your layouts, an unlimited number of layouts can be saved into the Layout folder and recalled at a later date, or even imported from another computer. These can be maintained in the Organize Layouts menu which is found in View | Organize Layouts. Layouts from the current Layout folder in the left panel can be added or removed from the Layouts Menu on the right panel, as seen in the following screenshot:
What just happened?
We now have learned the process of creating a unique Windows Layout to assist your work flow in Vegas Pro 11, as well as the ability to have 13 pre arranged layouts available to you using shortcuts, to have the windows in front of you that you need for the particular editing job you are doing.
Beginner’s Guide to Vegas Pro 11 Media
As part of the Beginner’s Guide to Vegas Pro 11, I have made available media for you to use as we work through the information and tutorials together. Once you have a full grasp of the information in each section of this book, you will be able to apply the tools to your own projects, but by using this downloaded media, you will find that the chapters will become much clearer to you far more quickly.
[ 26 ]

Chapter 1
The project we will be working on is a Music Video clip. This kind of project is a great way to discover the powerful tools available to you in Vegas Pro 11, and apply them in a
creative manner. The music bed also acts as a template that will help to guide our edits both dynamically and in the timeline.
The download files will contain a variety of video takes with scratch audio tracks and a master audio track that we will edit the video to. The files you will have downloaded are:
Take 1
Take 2
Take 3
Master Audio
The details for downloading these files are contained in the Preface of this book.
Video Killed the Radio Star
As the song goes «Video Killed the Radio Star,» but music videos also gave birth to a whole new realmofideasandtoolsalongwithanewleagueofeditorsspecializinginanexcitingcreative medium. Keeping the viewer engaged and involved for about three and a half minutes doesn’t soundlikeahardthingtodo,butinreality,keepingtheirattentionformorethan30secondsis ataskinitself.Thisfactisevenmorerelevantintoday’s»InstantGratification»mindset.
So this information brings us to the first consideration we should make when planning a new Video Project. That is: «Who is our target audience?» which will then lead to the question «What format will the final video be in?».
The answer to these questions will vary from project to project, and a variety of Video Formats are available in Vegas Pro 11. For our Beginners’ Guide Project we shall edit and render the master file in PAL DV format, with an Aspect Ratio of 16:9, and prepare and render the final project ready to burn to a DVD playable in an everyday DVD player.
Now in the previous paragraph, I have emphasized some words and phrases that may mean nothing to the beginner, but fear not as here we will define the information to begin your Video Editing Vocabulary so you can talk it up with the best of them:
Video Formats: As technology advances and more companies enter the market place tocompete,theyarefocusedoncreatinganewvideo format that is good to edit with aswellasgoodtoplaybackthefinalproduct.Afinalvideofilethatisgreatforplaying onYouTubewouldn’tnecessarilylookasgoodasitshouldonaBlu-rayplayer.Sothe morecompaniesthatcreatenewformats,themoretheeditingsoftwareneedstobe abletohandleandcreate.ForourMusicVideoproject,Ihaveselectedthe DV (Digital Video) format tokeepthefilesizessmallerforthedownloadsaswellaskeepingthe projectinthesameformattheDVDwillbecreatedin.
[ 27 ]
![]()
Getting Acquainted with your New Best Friend: Vegas Pro 11 Overview
Think of it this way: A CD you buy of your favorite artist can’t be just placed on top of your iPod to make it play the music. The songs on the CD have to be converted by iTunes software into an audio format that the iPod can recognize and play. Video Formats are similar to those conversions.
PAL: Is an acronym that stands for Phase Alternate Line. This too is a form of format that defines how the vision appears on the screen. PAL is the dominant television standard in Europe and most of the world. The USA uses a different standard called NTSC, which stands for National Television System Committee. PAL delivers 625 lines at 50 half frames per second where as NTSC delivers 525 lines at 60 half frames per second.
Aspect Ratio: This ratio represents the width and height of the picture. For many years TV was presented in the almost square ratio of 4:3, but in recent years the ratio of 16:9 has become the default standard for pretty much all projects, especially those being presented on today’s big screen LCD and Plasma TVs.
Towards the end of the Vegas Pro 11 manual you will find a glossary of terms, which will also help to advance your vocabulary and understanding of the many terms used in the world of video.
Summary
In this first chapter we have set up your computer with Vegas Pro 11 and checked that we have at least the minimum system requirements.
Specifically, we covered the minimum requirements essential to run Vegas Pro 11, where to find the built-in help and tutorials as well as the location of online help. We then explored the windows of the Vegas 11 Interface, and we also started to enrich your Video Vocabulary by addressing some common terms
We have lightly touched on most of the windows in Vegas Pro 11, so that you may start to know your way around this impressive software. I have always believed the best way to learn a software package is to actually use it in a project. So with that thought we can move forward and start to get our teeth into the ins and outs and personality traits of our new friend Vegas Pro 11.
[ 28 ]

2
Let the Magic Begin: Beginning the Project and Acquiring Media
As we progress through this guide, I will add new methods and knowledge to your arsenal of tools. Each new chapter will call on the knowledge of the previous one to help advance you as an experienced Vegas Pro editor. As with any new software, using it in an actual project will always help you to remember the tools you have used, so now that we have a better grasp of the user interface of Vegas Pro 11, it is time to jump right in and start the project at hand.
In this chapter, we shall discuss:
Creating a project
Project Properties
Standard Definition versus High Definition
Pixel Aspect Ratio
The Preview Monitor
Importing media clips
Importing from other sources
The Smart tool and media clips
Keyboard Shortcuts
So let’s get on with it…

Let the Magic Begin: Beginning the Project and Acquiring Media
Creating a project
Before we start any project we have to establish its properties. These property values are essential to ensure that the finished product will be played back correctly on the delivery-method format. For example, if you are based in the USA, you will probably need your project to conform to the NTSC format, whereas Europe and the rest of the world would use the PAL format. Playing NTSC-formatted files on a PAL system will either cause the file not to play, or have strange anomalies occur, such as stretching the pictures height.
Project Properties
The Project Properties window seen in the following screenshot can be accessed by selecting the File menu and choosing Properties or by pressing ALT + ENTER:
[ 30 ]

Chapter 2
Go ahead and open the Project Properties window. Across the top of the Project Properties window you will see five tabs. Under the Video tab the first information box is called Template. Inside this drop-down box you will find a comprehensive list of templates. Usually, one of these templates will do the job perfectly for you, but knowing what the templates contain is needed before you can decide. Let’s cover the important information and fields you need to know.
StandardDefinitionversusHighDefinition
The fast paced times we live in has seen the video production world going through some major changes due to advances in technology. Especially in the new worlds of Home Theatre, High Definition TVs, DVD and Blu-ray players, Web-based Television and podcasts, as well as Digital Cinema. Thankfully, Sony Vegas Pro 11 has all of these possible formats covered within its Project Properties Templates.
Way back in the early days of editing, we only had Standard Definition TV and Academy of Cinema Film editing formats to worry about, but now there are many formats, resolutions, and screen sizes to consider. The following chart will give you an idea of most of the screen resolutions being used, and their relationships in size with each other:
Academy 4K 3656X2664
ACADEMY 2K 1828X1332
HDTV 1920X1080
HDTV 1280X720
PAL DV 720X576
NTSC DV 720X480
As you can see, the physical screen sizes vary greatly, which also increases the amount of data being stored both on hard drives and recordable media, such as DVD or Blu-ray.
[ 31 ]

Let the Magic Begin: Beginning the Project and Acquiring Media
Depending where you live in the world, DVD video is expressed as DV (either PAL or NTSC) and can be in WIDESCREEN format for a 16:9, Pixel Aspect Ratio. This has become the default resolution for DVD creation, especially due to the size limitation of the data that can be held by the DVD. A standard DVD can only hold about 4.7 gigabytes of data and a dual Layer DVD can hold close to 8.5 gigabytes. Even at these media data sizes, the video needs to be compressed using a Codec (a mathematical algorithm to make the files smaller, deriving its name from the two words compressor and decompressor) to allow a complete movie to fit onto a single disk. Today, the increase in the amount of data needed for HD Video helped to give birth to the BLU-RAY DISK format, where a single layer disk can hold around 25 gigabytes, and a dual layer around 50 gigabytes. A compression codec is still used, but these newer codec types leave very little effect or artefacts behind in the video on the final disk.
Pixel Aspect Ratio
There are a couple of ways that the Pixel Aspect Ratio (PAR) setting is represented. Generally, the term aspect ratio refers to the ratio of a picture’s width to its height. If the aspect ratio of a picture is 1:1, the width and height would be the same, and you’d have a square. Standard PAL video has an aspect ratio of 4:3. That means for every four units width you have three units height, where as 16:9 will have 16 units width to 9 units in height. This ratio is also often defined as a decimal point number. For example, PAL DV WIDESCREEN has a PAR of 1.4568 where as the PAL DV template has a PAR of 1.0926, but you will note that both templates have the same Width and Height of 720 and 576. A TV and/or computer screen is represented by a certain number of pixels, and in both cases the DV picture is
720 pixels wide and 576 pixels high, but ends up being a different screen shape. See the following screenshot:
[ 32 ]

Chapter 2
The difference lies in the shape of the individual pixels. Like the overall screen, the pixels are square for 4:3 as in the previous screenshot, and rectangular for 16:9 as in the next screenshot:
That is, the pixels are the same shape as the screens. For HD footage, the Pixel Aspect Ratio is simply defined as 1.3333 (HDV 1080). All HD footage regardless of field order, width and height, or frame rate, will be defined as 16:9 or 1.3333. Thankfully, as the Television technology is developing, most new HD TVs can deliver all of the possible formats correctly.
FIELD ORDER
This property is derived from the difference of pictures on film and pictures on TV. In reference to PAL, a piece of film is equivalent to 25 frames (pictures) per second, whereas TV was designed to be broadcast over the airwaves as 50 separate half pictures that were stitched together at the receiver to create the 25 complete frames. This stitching together of the 25 pairs of the 50 pictures was referred to as Interlacing the picture. This was the birth of the terms Progressive footage (Film) and Interlaced footage (TV). You may have heard of the terms regarding new HD TVs as being able to produce 1080i or 1080p where the «i» and «p» refer to Interlaced and Progressive respectively. Some editors have a preference out of the two formats saying that Progressive gives a more «filmic» experience, whereas others prefer the interlaced format. Even though film may have never been used in the production of a broadcast video, if delivered in Progressive format, it is a sequence of 25 complete pictures that is used to achieve the result.
FRAME RATE
Hailing back to the days of film, frame rate specifies how many frames per second are shown. As the options in Project Properties show, PAL is 25, NTSC is 29.97 and if the end product is to be transferred back to film for it to be projected, then 24 FPS is necessary.
[ 33 ]

Let the Magic Begin: Beginning the Project and Acquiring Media
MATCH MEDIA SETTINGS
On the far right of the Video tab in line with the template options you will find a small icon, circled in red in the following screenshot:
This small button can be a great way to set up the preferences in one quick process. If you have shot or received your footage in the same format that you intend to finish the project, then you can use one of the clips to define Project Properties. I have supplied the footage for our Beginners’ Guide Project in the format we need to finalize it in. So let’s use this function to set up our Project Properties.
Time for action – using the supplied clips to set Project Properties
We are going to use one of the video clips that you have downloaded for the beginner’s guide project, to set up the Project Properties:
1.Start Vegas Pro 11, and once open, from the menu select File | New to create a new project.
2.Once created, use File | Save As, name the project Video Tutorial, and save it in the same location that you have placed the downloaded Tutorial Project media files.
3.From the menu again select File | Properties and the Project Properties box will open.
4.Select the Match Media Settings button we spoke about earlier and use the Look In explorer to find and select Take 1 of the downloaded files. Once highlighted, choose Open.
5.To finish use File | Save to save your settings.
[ 34 ]

Chapter 2
6.If you look at the Project Properties window, the properties should now have changed to look like the following:
What just happened?
By using the properties of the supplied video clips, and using the Match Media Settings function, we have set up Project Properties for our Project in a format that will be best suited to burning our final, edited project to a standard DVD.
[ 35 ]

Let the Magic Begin: Beginning the Project and Acquiring Media
Time for action – setting Project Properties from scratch
Sometime the media we have or receive for our project is not in the final delivery format, therefore we need to be able to select the correct settings.
We shall now set Project Properties from scratch, using our knowledge of the intended video format to set the values:
1.Start Vegas Pro 11, and once open, from the menu select File | New to create a new project.
2.Once created, use File | Save As and name the project what you would like. Save it in the directory of your choice.
3.By taking into consideration what our final video format will be, we can start to set the needed Project Properties. From the menu again select File | Properties and the
Project Properties window will open.
4.We have decided that our final project will be burnt to Blu-ray, and is a Full High Definition format. Select the down arrow at the end of the Template window and look through the options available. Select HD 1080-50i (1920×1080, 25.000 fps). Keep in mind that starting your project in the highest resolution required is a good thing, as it is then easier to downgrade the parameters to a lower resolution for say
DVD, Internet playback, or Podcast, depending on the client’s later decisions.
5.You will notice that all of the parameters are now set to the correct values. This means that no matter what format any media you bring into the session is, it will show you how this will look at the final resolution.
6.The Template values available in Vegas Pro 11 cover pretty much any option you may need, but even then, you can go through all of the parameters and set them to whatever value you wish to suit your creative output.
What just happened?
By using our knowledge and understanding of required formats in addition to knowing what our final video will be viewed in, we applied one of the available templates to set the Project Properties.
Tip: For those wishing to delve even more deeply into the Project
Properties, use the Interactive and Online tutorials that are under
the Help Menu in Sony Vegas Pro 11.
[ 36 ]

Chapter 2
Pop quiz – formats
Which of the following Project Properties would be incorrect if my video was to be burned to a PAL DVD disk?
a.Width of 720 pixels
b.Height of 576 pixels
c.Pixel aspect ratio of 1.4568
d.Frame rate of 24.000 frames per second
The Preview Monitor
Before we import our media into our newly-created project, I want to bring your attention to the Preview monitor. This preview screen is where you will be seeing the output of your editing and the effects you apply to your media clips. Ideally, you will have a second screen attached to your editing computer where you can either move the Preview monitor onto or where you can use the Video Preview on External Monitor function. If you are using one screen, then you will need to resize the Preview Monitor where you are able to clearly see your edits, but at the same time, leave enough acreage on your screen to be able to work with your media on the timeline.
In the previous image, you can see at the top of the Preview monitor a series of buttons. The x, <, and row of dots at the top-left are for closing the Preview monitor, sliding the monitor out of the way of other windows, and for grabbing and holding the monitor window to detach and move it around your desktop, respectively.
[ 37 ]
 Loading…
В учебнике вы найдете обучающие статьи по работе в программе Sony Vegas Pro на русском. Подробные инструкции помогут вам ознакомиться со всеми возможностями программы. Каждый урок дополнен наглядными скриншотами.
Обзорный видеоурок по программе Sony Vegas Pro на русском
Статьи о программе “Sony Vegas Pro на русском”

Как обрезать видео
Обрезать видео в русскоязычном аналоге Sony Vegas Pro очень просто! Из данной статьи вы узнаете, как быстро обрезать часть видеоролика и сохранить результат в удобном для вас формате видео.

Как добавить видео на видео
Из урока вы узнаете как добавить видео на видео на компьютере. Вы можете добавлять любое количество роликов и применять к каждому свою анимацию.

Как наложить музыку на видео
Из урока вы научитесь накладывать фоновую музыку на видео, заменять звук другим аудиофайлом или добавлять запись с микрофона.

Как сделать видео со спецэффектами
Как добавить в проект файлы, как применить эффекты и сохранить готовый результат в удобном для вас формате видео — обо всём этом вы узнаете из данного урока.

Как повернуть видео
Довольно часто при просмотре возникают проблемы с отображением видео. В данной статье вы найдете подробное описание того, как повернуть видео на 90 градусов.

Как сделать фильм из фото и видео
Данный урок позволит узнать, как сделать фильм из фото и видео с помощью новой версии Sony Vegas Pro, следуя просто пошаговой инструкции.

Как сделать мульт из фото
Создать мультфильм из фотографий довольно просто! Из данной статьи вы узнаете, как сделать мульт при помощи Сони Вегас Про на русском языке.

Как сохранить кадр из видео
Хотите узнать как сохранить кадр из видеоролика? Следуя данной пошаговой инструкции, вы научитесь делать стоп-кадры и сохранять изображения в разных форматах.

Как изменить формат видео
В русской версии Vegas Pro вы легко можете изменять формат с AVI на MP4, с WMA на MOV, с MKV на AVI и т.д. Программа позволяет сохранить видео даже для мобильных устройств! Пошаговую инструкцию вы найдете в данной статье.

Как убрать звук из видео
Из статьи вы узнаете, как убрать звук из видео при помощи Вегас Про на русском всего за пару минут и сохранить результат в удобном для вас формате!

Как вставить картинку в видео
Хотите узнать, как вставить картинку в видео? В данной статье представлена пошаговая инструкция, как добавить изображение в начало, конец или середину видеоролика.

Как сделать презентацию
Из данного урока вы узнаете, как сделать музыкальную презентацию с фото, видео, текстом, переходами, озвучкой голосом и красочными спецэффектами.

Как сделать музыкальную видео-открытку
Из руководства вы узнаете, как сделать видео-открытку с анимированными спецэффектами, фоновой музыкой и озвучкой собственным голосом.

Как наложить текст на видео
В статье мы расскажем вам, как добавить текст на видеоролик. Вы можете использовать встроенные стили и анимацию текста или создавать собственную.

Как сделать видео из фото и музыки
В Сони Вегас Про на русском можно создать красочное видео из фото и музыки, добавляя переходы, заставки, титры и эффекты. Более подробная информация указана в данной статье.
Интересные статьи

Программа для обрезки видео
В данной статье вы найдете не только описание того, как обрезать видеоролик при помощи русскоязычного аналога Vegas Pro, но и обучающий видеоурок!

Программа для озвучки видео
Необходимо добавить голосовое поздравление к слайд-шоу или озвучить фильм? Вам поможет русская версия программы Sony Vegas Pro!

Программа для создания видео из видео и фото
Из статьи вы узнаете о программе для создания видео из видео и музыки, фото и переходов, текста и анимированных спецэффектов.

Программа для склеивания видео
В русскоязычной версии Сони Вегас Про вы без труда склеите несколько видеороликов разных форматов в один видеофайл.

Программа для создания слайд-шоу из фотографий
При помощи Vegas Pro вы создадите красивое слайд-шоу из фотографий с 3D-переходами, яркими заставками, анимированным текстом и фоновой музыкой!

Программа для создания презентаций
Необходимо создать презентацию с музыкальным сопровождением? В русскоязычной версии Sony Vegas Pro вы сможете добавить в презентацию текст, переходы, эффекты и голосовые комментарии!

Программа для обработки видео на компьютере
Требуется обработать видеофайлы или создать фильм из нескольких нарезок? В данной статье мы расскажем вам, как легко и просто выполнить данную задачу при помощи аналога Сони Вегас Про.
В статье собраны самые основные операции и команды, которые помогут человеку, впервые столкнувшемуся с данной программой (после загрузки и настройки) быстро понять «где что лежит» и как этим пользоваться. Текст сопровождается скриншотами и видео. Начать хочу с команды важной, самой востребованной, спасающей положение очень часто.
Скачать и установить + настройки Сони Вегас Про 15
1. Требования к компьютеру
Статья на сайте
2. Последовательность действий
Первое — сначала скачать и установить кодеки.
Второе — скачать и установить программу.
Третье – настроить программу и проект (нужно настраивать при вставке первого видео или картинки, или аудио).
Так более правильно. Если в ходе дальнейшей работы вдруг случились какие-то сбои в распознавании видео, то кодеки можно еще раз переустановить, не удаляя предшествующую версию. По сути – произвести обновления.
Настроить проект можно по-разному. В этом руководстве я рекомендую настроить так, чтобы можно было получить качественное видео на выходе и размещать его на YouTube.
3. Где скачать и как установить кодеки.
Статья на сайте
4. Где скачать и как установить программу.
Ссылки для скачивания
5. Настройки программы.
Общие настройки программы.
6. Настройка проекта
Перед тем, как начать монтировать, настройте свой проект для публикации на YouTube. Желательно, чтобы вы использовали видео Hd или FullHD. Настройки проекта расположены вверху слева в окне превью.
 Loading…
В учебнике вы найдете обучающие статьи по работе в программе Sony Vegas Pro на русском. Подробные инструкции помогут вам ознакомиться со всеми возможностями программы. Каждый урок дополнен наглядными скриншотами.
Обзорный видеоурок по программе Sony Vegas Pro на русском
Статьи о программе “Sony Vegas Pro на русском”
Как обрезать видео
Обрезать видео в русскоязычном аналоге Sony Vegas Pro очень просто! Из данной статьи вы узнаете, как быстро обрезать часть видеоролика и сохранить результат в удобном для вас формате видео.
Как добавить видео на видео
Из урока вы узнаете как добавить видео на видео на компьютере. Вы можете добавлять любое количество роликов и применять к каждому свою анимацию.
Как наложить музыку на видео
Из урока вы научитесь накладывать фоновую музыку на видео, заменять звук другим аудиофайлом или добавлять запись с микрофона.
Как сделать видео со спецэффектами
Как добавить в проект файлы, как применить эффекты и сохранить готовый результат в удобном для вас формате видео — обо всём этом вы узнаете из данного урока.
Как повернуть видео
Довольно часто при просмотре возникают проблемы с отображением видео. В данной статье вы найдете подробное описание того, как повернуть видео на 90 градусов.
Как сделать фильм из фото и видео
Данный урок позволит узнать, как сделать фильм из фото и видео с помощью новой версии Sony Vegas Pro, следуя просто пошаговой инструкции.
Как сделать мульт из фото
Создать мультфильм из фотографий довольно просто! Из данной статьи вы узнаете, как сделать мульт при помощи Сони Вегас Про на русском языке.
Как сохранить кадр из видео
Хотите узнать как сохранить кадр из видеоролика? Следуя данной пошаговой инструкции, вы научитесь делать стоп-кадры и сохранять изображения в разных форматах.
Как изменить формат видео
В русской версии Vegas Pro вы легко можете изменять формат с AVI на MP4, с WMA на MOV, с MKV на AVI и т.д. Программа позволяет сохранить видео даже для мобильных устройств! Пошаговую инструкцию вы найдете в данной статье.
Как убрать звук из видео
Из статьи вы узнаете, как убрать звук из видео при помощи Вегас Про на русском всего за пару минут и сохранить результат в удобном для вас формате!
Как вставить картинку в видео
Хотите узнать, как вставить картинку в видео? В данной статье представлена пошаговая инструкция, как добавить изображение в начало, конец или середину видеоролика.
Как сделать презентацию
Из данного урока вы узнаете, как сделать музыкальную презентацию с фото, видео, текстом, переходами, озвучкой голосом и красочными спецэффектами.
Как сделать музыкальную видео-открытку
Из руководства вы узнаете, как сделать видео-открытку с анимированными спецэффектами, фоновой музыкой и озвучкой собственным голосом.
Как наложить текст на видео
В статье мы расскажем вам, как добавить текст на видеоролик. Вы можете использовать встроенные стили и анимацию текста или создавать собственную.
Как сделать видео из фото и музыки
В Сони Вегас Про на русском можно создать красочное видео из фото и музыки, добавляя переходы, заставки, титры и эффекты. Более подробная информация указана в данной статье.
Интересные статьи
Программа для обрезки видео
В данной статье вы найдете не только описание того, как обрезать видеоролик при помощи русскоязычного аналога Vegas Pro, но и обучающий видеоурок!
Программа для озвучки видео
Необходимо добавить голосовое поздравление к слайд-шоу или озвучить фильм? Вам поможет русская версия программы Sony Vegas Pro!
Программа для создания видео из видео и фото
Из статьи вы узнаете о программе для создания видео из видео и музыки, фото и переходов, текста и анимированных спецэффектов.
Программа для склеивания видео
В русскоязычной версии Сони Вегас Про вы без труда склеите несколько видеороликов разных форматов в один видеофайл.
Программа для создания слайд-шоу из фотографий
При помощи Vegas Pro вы создадите красивое слайд-шоу из фотографий с 3D-переходами, яркими заставками, анимированным текстом и фоновой музыкой!
Программа для создания презентаций
Необходимо создать презентацию с музыкальным сопровождением? В русскоязычной версии Sony Vegas Pro вы сможете добавить в презентацию текст, переходы, эффекты и голосовые комментарии!
Программа для обработки видео на компьютере
Требуется обработать видеофайлы или создать фильм из нескольких нарезок? В данной статье мы расскажем вам, как легко и просто выполнить данную задачу при помощи аналога Сони Вегас Про.
В статье собраны самые основные операции и команды, которые помогут человеку, впервые столкнувшемуся с данной программой (после загрузки и настройки) быстро понять «где что лежит» и как этим пользоваться. Текст сопровождается скриншотами и видео. Начать хочу с команды важной, самой востребованной, спасающей положение очень часто.
Скачать и установить + настройки Сони Вегас Про 15
1. Требования к компьютеру
Статья на сайте
2. Последовательность действий
Первое — сначала скачать и установить кодеки.
Второе — скачать и установить программу.
Третье – настроить программу и проект (нужно настраивать при вставке первого видео или картинки, или аудио).
Так более правильно. Если в ходе дальнейшей работы вдруг случились какие-то сбои в распознавании видео, то кодеки можно еще раз переустановить, не удаляя предшествующую версию. По сути – произвести обновления.
Настроить проект можно по-разному. В этом руководстве я рекомендую настроить так, чтобы можно было получить качественное видео на выходе и размещать его на YouTube.
3. Где скачать и как установить кодеки.
Статья на сайте
4. Где скачать и как установить программу.
Ссылки для скачивания
5. Настройки программы.
Общие настройки программы.
6. Настройка проекта
Перед тем, как начать монтировать, настройте свой проект для публикации на YouTube. Желательно, чтобы вы использовали видео Hd или FullHD. Настройки проекта расположены вверху слева в окне превью.
Частые вопросы по интерфейсу во время работы:
Настройки интерфейса
Интерфейс: в статье на сайте полностью описано, как настроить интерфейс под себя. Например, сделать светлыми, а не черными рабочие области, удалить ненужные окна, восстановить вид «по умолчанию» и т.д.
Как вернуть вид «по умолчанию».
Вернуть вид интерфейса по умолчанию – при нажатой кнопке ALT на клавиатуре дважды нажать англ. D (русск В)
Сони Вегас Про дорожка разделилась на а и б
- Что делать, если дорожка на таймлайне стала широкой и разделилась еще на несколько (см. скриншот ниже)

В этом случае правой кнопкой мышки кликайте по «заголовку» дорожки и снимите галочку с команды Expand Track Layers. Вид дорожки восстановится.

2. Основные действия и команды
1. Команда отмены действий
Для того, чтобы не бояться что-то «испортить», помните, что всегда есть возможность отмены последних действий.
Кнопка отмены расположена в верхнем меню.

2. Загрузка и движение файлов на таймлайн
Как загрузить в Sony Vegas видео, аудио, изображения.
Для загрузки и дальнейшей работы достаточно просто перетянуть мышкой нужный файл на таймлайн – нужная дорожка добавится автоматически и файл сам встанет на нее.

Далее мышкой можно сдвинуть медиа в любое место дорожки или даже перетянуть файл на другую дорожку выше или ниже.
3. Как в Sony Vegas разделить видео и аудио дорожки, чтобы работать с ними по отдельности
Как в Sony Vegas Pro как отделить звук от видео? Поставьте курсор в любое место видео и нажмите на клавиатуре U. Теперь можно двигать (редактировать, удалять, копировать и т.д.) каждую дорожку отдельно.
4. Разрезать видео (аудио) и удалить фрагмент
Поставьте курсор в место, где нужно разрезать файл и нажмите на клавиатуре S. В этом месте файл будет разрезан. Все отдельные фрагменты мышкрй можно двигать на дорожке, менять местами, переносить на другие дорожки.
Чтобы удалить часть файла разрежьте в нужных местах и с клавиатуры нажмите DEL или правой клавишей мыши вызовите контекстное меню и выберите команду «Delet (Удалить)».

5. Как обрезать видео в Сони Вегас Про: укоротить, видео (аудио или продолжительность картинки в кадре)
1 вариант. Потяните мышкой за край файла, сдвигая границу в нужную сторону до необходимой длины. Файл автоматически «свернет» то, что сдвигаете. Если сдвинули границу дальше, чем нужно, просто потяните ее назад.
2 вариант. Поставьте курсор в то место, где должна быть новая граница файла. Нажмите S и удалите отрезанный кусок (см. пункт выше).
6. Вставить картинку или видео (аудио) между отдельными кусками видео (аудио).
Если нужно вставить картинку или видео в целый (не разрезанный) фрагмент, то сначала нужно разрезать (см. выше как) его в том месте, где предполагается сделать вставку.
Затем раздвинуть полученные куски медиа и перетащить видео (аудио) или картинку в образовавшееся место на дорожке.
Все отдельные фрагменты можно двигать по дорожке, менять местами и т.д. обычным перетаскиванием мышкой.
7. Sony Vegas переходы: Как сделать простые переходы одного видеофрагмента (аудио) в другой
На одной дорожке расположите видео (аудио) файлы в нужной последовательности.
Для перехода сдвиньте рядом стоящие фрагменты так, чтобы один оказался частично на другом. Появятся скрещенные линии перехода (голубая и белая).
Длительность перехода регулируется сдвигом фрагментов. Чем больше они заходят друг на друга, тем длиннее (дольше в кадре) будет переход одного видео (аудио) в другое. Число кадров указывается, не ошибетесь.

8. Sony Vegas переходы: использование Transitions (с разными эффектами)
Выберите во вкладке Transitions нужный переход и перетяните его мышкой на участок смены фрагментов, про которые говорится в п.6.
Если полученный результат не нравится, выберите другой переход и перетяните его на дорожку. Предыдущий удалять не обязательно, в приоритете будет последний наложенный переход.

9. Sony Vegas переходы: Плавное и/или с эффектами появление видео (картинки) в кадре
Чтобы видео (картинка) плавно появилась в кадре или плавно ушла из него, нужно в верхнем левом (при входе) или в верхнем правом (при выходе) найти маленький синий маркер.

Наведите на него курсор так, чтобы появился значок перехода – треугольник. Потяните его в сторону и появится линия перехода.

На картинках показано выполнение на входе. Аналогично делается в конце файла для выхода.

Вкладка Transitions используется для красивого повеления или ухода (влет и вылет). Перетащите выбранный переход мышкой точно также, как показано в п. 7. Видео будет появляться с выбранными эффектами Transitions.
Если захотите сменить переход на другой, то удалять предыдущий не обязательно, новый будет в приоритете.
10. Sony Vegas Pro увеличить громкость, усиление и затухание аудио.
Выполняется точно также, как в п.8, только без наложения перехода. Просто сдвиг треугольничка в начале или конце выбранного фрагмента.

Снизить или повысить громкость можно по-разному.
Первое – потянуть мышкой за верхнюю границу (есть синий маркер-полоска) звуковой дорожки на таймлайн вниз/вверх. Так меняется громкость у конкретного файла. Другие остаются без изменений.
Второй вариант – на панели управления дорожкой (на картинке голубым цветом) сдвинуть ползунок уровня громкости. Так меняется громкость всей дорожки, то есть у всех файлов, расположенных на данном аудиотреке.

Максимально возможную громкость выставить можно в микшере в окне Master Bus

Сони Вегас Про как сохранить видео проект и рендеринг проекта
Понятия «Сохранение» и «Рендер» — разные.
Сохранить проект значит сохранить именно в формате проекта, в самой программе, чтобы потом можно было загрузить этот проект и продолжить в нем работу.
Рендер проекта – это вывод результатов редактирования уже в формат видео, Вы получаете ролик, который можно загружать в соцсети и т.д.
11. Сони Вегас Про Как сохранить проект
Кнопка сохранения расположена в верхнем меню (иконка дискеты) и в выпадающем меню при клике на «Файл». Если хотите сохранить существующий проект с другим именем, то воспользуйтесь «Save As/Сохранить как».

12. Рендер проекта
Перед ренедером проверьте настройки проекта. Уточните разрешение. Команда рендера проекта расположена во вкладке «файл»: «Render as»

Сони Вегас Про в каком формате сохранять видео лучше? Вернее, рендерить.
Тема рендера слишком большая, чтобы уместить в основных правилах, поэтому выбирайте наиболее распространенный формат ренедра, Sony AVC/MVC и вариант INERNET 1280 на 720 и частота кадров 30.

Если у вас выделен фрагмент проекта для рендера (когда хотите получить не все, что «натворили», а только часть проекта, которая выделена желтыми маркерами), то проверьте, стоит ли галочка во вкладке настроек рендера, как показано ниже.

В других частных случаях может потребоваться другой формат. Например, при сохранении Альфа канала – файлов с возможностью делать прозрачным фон.
13. Как выделить фрагмент для рендера
Если нужно отрендерить только часть проекта, то необъодимо выделить эту часть маркерами.
Кликните по какому либо фрагменту видео и появившиеся желтые маркеры перетащите в те точки, какими хотите ограничить рендер.
Выделение можно менять.

4. Наиболее часто используемые операции и команды для оформления видео или изображения (применимо к титрам)
Эффекты часто еще называют пресетами или плагинами. Перед выбором пресета нужно кликнуть фрагмент, к которому будут применены эффекты.
1. Яркость, контраст
Вкладка Video FX, далее Brightness and Contrast (Яркость и контраст) и выбор эффекта из предложенных. Появится окно настроек, где можно изменить установленные по умолчанию значения.

2. Как сделать прозрачный фон в Сони Вегас Про
Частый вопрос — как сделать видео прозрачным в Сони Вегас.
На фрагменте (видео, картинка) потяните мышкой горизонтальную линию вниз/вверх, тем самым меняя прозрачность. Процент прозрачности указан в маленьком окошке при движении линии.

3. Размытость
Вкладка Video FX, далее Gaussian Blur (Размытие по Гауссу) и выбор эффекта из предложенных. Появится окно настроек, где можно изменить установленные по умолчанию значения.

4. Виньетка или затемнение краев экрана
Вкладка Video FX, далее Vignette (Виньетка) . Появится окно настроек, где можно изменить установленные по умолчанию значения.

5. Титры и текст
1. Вставка шаблонных титров
Вкладка Media Generations, далее Titles&Text (Заголовки и текст) и выбор из предложенных. Появится окно настроек, где можно изменить текст, выбрать начертание, цвет, размер, положение текста в кадре и т.д.

2. Появление и исчезновение, эффекты
К тексту применимы все возможности, что и к другим медиа – переходы, появление и исчезновение из кадра, яркость, контраст, прозрачность и т.д.
6. Движение медиа-элементов в кадре с помощью Pan/Crop
1. Формат для видео YouTube
Кликните Pan/Crop. В открывшемся окне выберите соотношение сторон 16 к 9.

2. Изменение масштаба просмотра в окне Pan/Crop
Для изменения масштаба просмотра кликните по картинке и покрутите колесико мышки.

3. Установка синхронизации картинки в ПанКроп и в окне Превью.
Синхронизация позволяет видеть в окне превью все изменения, которые вы делаете в ПанКроп. Показывается именно то место, на котором стоит курсор-ползунок на таймлайн.
Для синхронизации кнопка Sinc Cursor должна быть синего цвета. Кликните по кнопке, если она отключена.

4. Увеличение и уменьшение картинки
Потяните за угловые маркеры и изображение или видео будут уменьшаться или увеличиваться. Чтобы соотношение сторон сохранялось, меняте размер при нажатой кнопке CTRL.

Если кнопка синхронного отображения активна, то в окне превью вы будете видеть все изменения.

Работа с проектом – важные правила
- Все файлы медиа (футажи, картинки, аудио, видео и т.д.) храните для каждого конкретного проекта в отдельной папке. Туда же сохраняйте свой проект и рендер.
ПОЧЕМУ так?
Проект содержит не сами файлы, а только указывает путь к этим файлам, которые используете.
- Полученное в результате рендера видео вы уже можете использовать для своих целей. Размещать на Ютубе, в соцсетях, на сайте.
Готовое видео вы уже отредактировать не сможете, это отдельный файл без дорожек. Если хотите что-либо изменить, то возвращайтесь в проект, то есть в программу сони вегас. И в ней меняете все, что нужно.
На этом краткое знакомство с основными командами и операциями закончено. Данная «Шпаргалка» поможет вам, если вдруг забудете, как выполняется та или иная операция, где искать кнопки, вкладки и т.д.
Помните, что это только сотая, если не меньше, часть возможностей Вегаса. С остальными лучше знакомиться в ходе работы, так как для разных задач используются разные операции.
Документ подготовлен для новичков, желающих освоить Сони Вегас.
Все скриншоты и описание сделаны на основе Vegas Pro 15 и могут отличаться в других версиях. Но суть сохраняется, поэтому вам будет легко разобраться и с другими вариантами.
Вы можете скачать весь материал со скриншотами в формате пдф, оплатив символическую сумму на развитие проекта. Кнопка ниже.
Вы можете скачать весь материал со скриншотами в формате пдф, оплатив символическую сумму на развитие проекта. Кнопка ниже.
Вопросы можно задать во ВКонтакте или на электронный адрес.