
GB
RU
Operating Instructions
Инструкция по эксплуатации
XR-CA440X
For installation and connections, see the supplied installation/connections manual.
Перед установкой и подсоединениями прочитайте прилагаемую инструкцию по
установке и подсоединению.
3-238-898-11 (2)
© 2002 Sony Corporation
FM/AM
Cassette Car Stereo
инструкцияSony XR-CA440X

GB
RU
Operating Instructions
Инструкция по эксплуатации
XR-CA440X
For installation and connections, see the supplied installation/connections manual.
Перед установкой и подсоединениями прочитайте прилагаемую инструкцию по
установке и подсоединению.
3-238-898-11 (2)
© 2002 Sony Corporation
FM/AM
Cassette Car Stereo
Посмотреть инструкция для Sony XR-CA440X бесплатно. Руководство относится к категории автомагнитолы, 1 человек(а) дали ему среднюю оценку 6.7. Руководство доступно на следующих языках: русский, английский. У вас есть вопрос о Sony XR-CA440X или вам нужна помощь? Задайте свой вопрос здесь
- GB
- RU
Главная
| Sony | |
| XR-CA440X | |
| автомагнитола | |
| русский, английский | |
| Руководство пользователя (PDF), Инструкция по установке (PDF) |
Не можете найти ответ на свой вопрос в руководстве? Вы можете найти ответ на свой вопрос ниже, в разделе часто задаваемых вопросов о Sony XR-CA440X.
В чем разница между FM и AM?
FM означает «частотная модуляция», AM — «амплитудная модуляция». Основная разница между FM- и AM-радиостанциями состоит в качестве звука.
Когда звук считается слишком громким?
Уровень звука выше 80 децибел может нанести вред слуху. Уровень звука выше 120 децибел может нанести прямое повреждение слуху. Вероятность повреждения слуха зависит от частоты и продолжительности прослушивания.
Автомобильный радиоприемник не включается, что делать?
Если автомобильный радиоприемник не включен, на него не будет подаваться питание. Убедитесь, что красный провод подключен к контактному источнику питания, а желтый провод — к источнику питания постоянной мощности.
Как лучше всего выполнять чистку автомагнитола?
Для удаления отпечатков пальцев лучше всего использовать слегка влажную салфетку для уборки или мягкую чистую ткань. Пыль в труднодоступных местах лучше всего удаляется потоком сжатого воздуха.
Что такое Bluetooth?
Bluetooth — это способ обмена данными по беспроводной сети между электронными устройствами с помощью радиоволн. Расстояние между двумя устройствами обменивающимися данными в большинстве случаев составляет не более десяти метров.
Инструкция Sony XR-CA440X доступно в русский?
Да, руководствоSony XR-CA440X доступно врусский .
Не нашли свой вопрос? Задайте свой вопрос здесь
FM/MW/SW
Cassette
Car Stereo
Installation/Connections
Instalación/ Conexiones
安裝 線路連接
XR-CA440X
XR-CA440
Sony Corporation © 2002
1
1
4
5
× 4
× 2
Equipment used in illustrations (not supplied)
Equipo utilizado en las ilustraciones (no suministrado)
插圖中的裝置(非附送)
Front speaker
Altavoces delanteros
前揚聲器
Rear speaker
Altavoces traseros
後揚聲器
3-238-178-21 (2)
Printed in Thailand
2
3
6
7
Power amplifier
Amplificador de potencia
功率放大器
CD/MD changer
Cambiador de CD/MD
CD/MD換碟機
2
A
AUDIO OUT REAR
B
BUS AUDIO IN
BUS CONTROL IN
*
Source selector
Selector de fuente
音源選擇器
BUS CONTROL IN
Parts Iist (1)
The numbers in the list are keyed to those in the
instructions.
Caution
Handle the bracket 1 carefully to avoid injuring
your fingers.
1
Cautions
• This unit is designed for negative earth 12 V
DC operation only.
• Do not get the wires under a screw, or caught
in moving parts (e.g. seat railing).
• Before making connections, turn the car
ignition off to avoid short circuits.
• Connect the yellow and red power input leads
only after all other leads have been connected.
• Run all earth wires to a common earth
point.
• Be sure to insulate any loose unconnected
wires with electrical tape for safety.
Notes on the power supply cord (yellow)
• When connecting this unit in combination with
other stereo components, the connected car
circuit’s rating must be higher than the sum of
each component’s fuse.
• When no car circuits are rated high enough,
connect the unit directly to the battery.
Connection example (2)
Notes (2-A)
• Be sure to connect the earth cord before
connecting the amplifier.
• If you connect an optional power amplifier and do
not use the built-in amplifier, the beep sound will
be deactivated.
Tip (2-B-
)
For connecting two or more CD/MD changers, the
source selector XA-C30 (optional) is necessary.
BUS AUDIO IN
* not supplied
no suministrado
非附送
Connection diagram (3)
1
To a metal surface of the car
First connect the black earth lead, then connect
the yellow and red power input leads.
2
To the power aerial control lead or power
supply lead of aerial booster amplifier
Notes
• It is not necessary to connect this lead if there
is no power aerial or aerial booster, or with a
manually-operated telescopic aerial.
• When your car has a built-in FM/MW/SW aerial
in the rear/side glass, see «Notes on the control
and power supply leads.»
3
To AMP REMOTE IN of an optional power
amplifier
This connection is only for amplifiers. Connecting
any other system may damage the unit.
4
To the +12 V power terminal which is energised
in the accessory position of the ignition key
switch
Notes
• If there is no accessory position, connect to the
+12 V power (battery) terminal which is
energised at all times.
Be sure to connect the black earth lead to it
first.
• When your car has a built-in FM/MW/SW aerial
in the rear/side glass, see «Notes on the control
and power supply leads.»
5
To the +12 V power terminal which is energised
at all times
Be sure to connect the black earth lead to it first.
Notes on the control and power supply leads
• The power aerial control lead (blue) supplies +12 V
DC when you turn on the tuner.
• When your car has built-in FM/MW/SW aerial in
the rear/side glass, connect the power aerial
control lead (blue) or the accessory power input
lead (red) to the power terminal of the existing
aerial booster. For details, consult your dealer.
• A power aerial without relay box cannot be used
with this unit.
Memory hold connection
When the yellow power input lead is connected,
power will always be supplied to the memory circuit
even when the ignition key is turned off.
Notes on speaker connection
• Before connecting the speakers, turn the unit off.
• Use speakers with an impedance of 4 to 8 ohms, and
with adequate power handling capacities to avoid its
damage.
• Do not connect the speaker terminals to the car
chassis, or connect the terminals of the right speakers
with those of the left speaker.
• Do not connect the earth lead of this unit to the
negative (–) terminal of the speaker.
• Do not attempt to connect the speakers in parallel.
• Connect only passive speakers. Connecting active
speakers (with built-in amplifiers) to the speaker
terminals may damage the unit.
• To avoid a malfunction, do not use the built-in speaker
wires installed in your car if the unit shares a common
negative (–) lead for the right and left speakers.
• Do not connect the unit’s speaker cords to each other.
-
Руководства по ремонту
1
-
Инструкции по эксплуатации
2
Языки:

SONY XR-CA440X инструкция по эксплуатации
(44 страницы)
- Языки:Русский
-
Тип:
PDF -
Размер:
733.43 KB
Просмотр

SONY XR-CA440X инструкция по эксплуатации
(60 страниц)
- Языки:Английский, Арабский, Испанский, Китайский
-
Тип:
PDF -
Размер:
1.67 MB
Просмотр
На NoDevice можно скачать инструкцию по эксплуатации для SONY XR-CA440X. Руководство пользователя необходимо для ознакомления с правилами установки и эксплуатации SONY XR-CA440X. Инструкции по использованию помогут правильно настроить SONY XR-CA440X, исправить ошибки и выявить неполадки.
 07:20
07:20
AUX выход для магнитолы сони на мой Опелёк
 04:41
04:41
Как сделать вход AUX на магнитолу SONY
 15:24
15:24
Sony XR-U500 & Sony XR-U800
 05:10
05:10
VovaMasterZvuk Как сделать AUX вход в магнитоле SONY
 02:34
02:34
Add aux port to Sony XR — C550RDS car audio system
 06:51
06:51
AUX Hack On Old Sony Car Radio XR CA360, Fail
 03:39
03:39
Sony Xplod XR-CA350X Cassette Radio Receiver Review and junk yard find
 05:30
05:30
ทดสอบวิทยุเทปอ้อโต้รีเวิสค์ติดรถยนต์ สวยเสียงดีเทปเสียงใส SONY XR-CA440H
GB
RU
Operating Instructions
Инструкция по эксплуатации
XR-CA440X
For installation and connections, see the supplied installation/connections manual.
Перед установкой и подсоединениями прочитайте прилагаемую инструкцию по
установке и подсоединению.
3-238-898-11 (2)
© 2002 Sony Corporation
FM/AM
Cassette Car Stereo

2
01GB01INT-EUR.fm
masterpage:Right
XR-CA440X
3-238-898-11 (1)
Welcome !
Thank you for purchasing this Sony Cassette
Player. You can enjoy its various features even
more with:
• Optional CD/MD units (both changers and
players)*
1
.
• CD TEXT information (displayed when a CD
TEXT disc*
2
is played on a connected optional
CD unit with the CD TEXT function).
*1
This unit works with Sony products only.
*2
A CD TEXT disc is an audio CD that includes
information such as the disc name, artist name,
and track names. This information is recorded on
the disc.


4
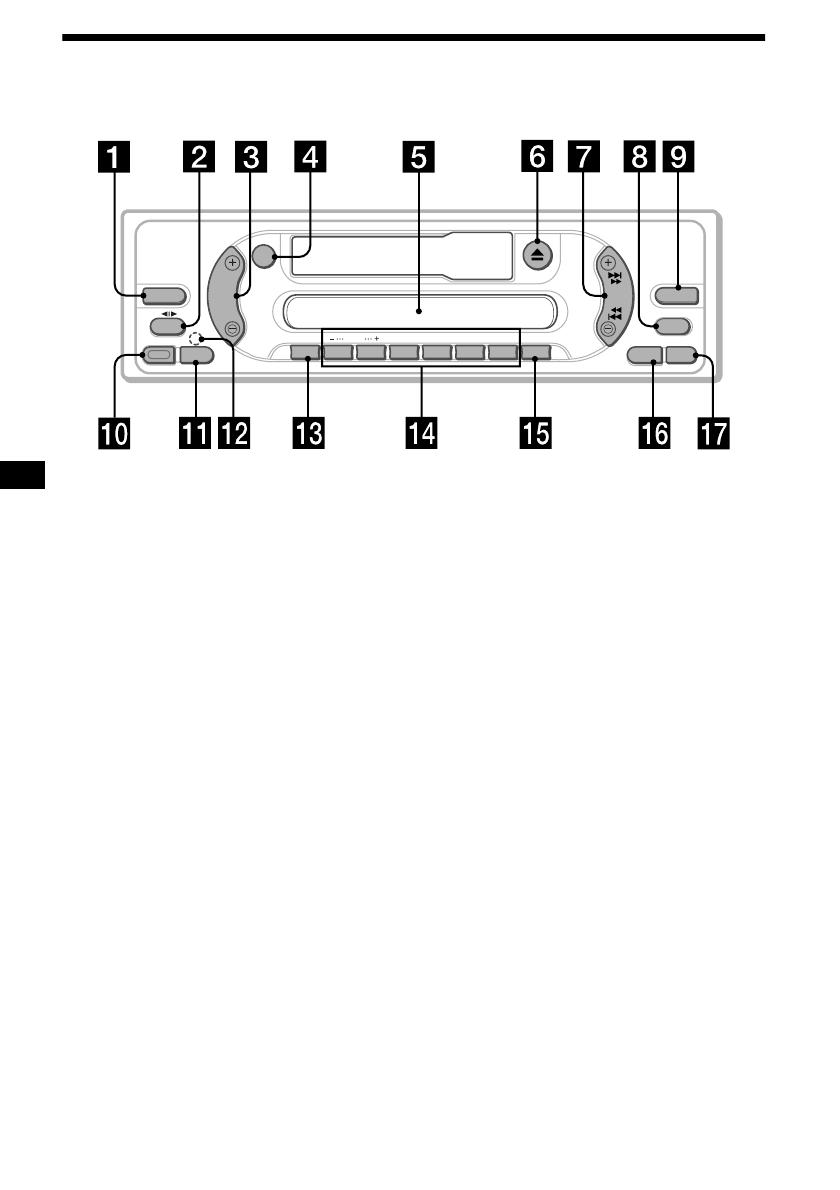
Location of controls
Refer to the pages listed for details.
a
SOURCE (Power on/Tape/Radio/CD/
MD) select button
b
MODE (
o
) button
Selecting the source.
c
VOL +/– button
d
ATT (attenuate) button
e
Display window
f Z
(eject) button 8
g
SEEK/AMS button
Tape:
Fast-forwarding, reversing a tape.
Radio:
Tuning in stations automatically.
Finding a station manually.
CD (MP3 files)/MD:
Skipping tracks.
h
MBP (My Best sound Position) button
12
i
D-BASS button 12
j
RELEASE (front panel release) button
k
SEL (select) button
Selecting items.
l
RESET button
(located on the front side of
the unit, behind the front panel)
6
m
SENS button
Storing the stations with the strongest
signals.
n
Number buttons
Tape:
(3)
: REP (Repeat)
(5)
: BL SKIP (Blank Skip)
(6)
: ATA (Automatic Tuner Activation)
Radio:
Storing the desired station on each number
button.
CD (MP3 files)/MD:
(1)
: DISC –
(2)
: DISC +
(3)
: REP (Repeat)
(4)
: SHUF (Shuffle)
MP3 files:
(5)
: ALBM –
(6)
: ALBM +
o
BTM/MTL (Best Tuning Memory/Metal)
button 9
p
DSPL (display mode change) button
q
OFF (Stop/Power off) button
*
*
Warning when installing in a car without
an ACC (accessory) position on the
ignition switch
After turning off the ignition, be sure to press
(OFF)
on the unit for 2 seconds to turn off
the clock display.
Otherwise, the clock display does not turn off
and this causes battery drain.
XR-CA440X
SOURCE
ATT
VOL
SENS
DISC
REP
SHUF BL SKIP/ ALBM
—
+/ATA MTL
MODE
SEL
RELEASE
1
2
3
4
5
6
D-BASS
SEEK
AMS
BTM
MBP
OFF
DSPL

Precautions, Notes on cassettes, Precautions notes on cassettes
Страница 5
- Изображение
- Текст
5
01GB02CAS-EUR.fm
masterpage:Right
XR-CA440X
3-238-898-11 (1)
Precautions
• If your car was parked in direct sunlight, allow
the unit to cool off before operating it.
• If no power is being supplied to the unit, check
the connections first. If everything is in order,
check the fuse.
• If no sound comes from the speakers of a two-
speaker system, set the fader control to the
centre position.
• When a tape is played back for a long period,
the cassette may become warm because of the
built-in power amplifier. However, this is not a
sign of malfunction.
If you have any questions or problems
concerning your unit that are not covered in this
manual, please consult your nearest Sony dealer.
To maintain high quality sound
Be careful not to splash juice or other soft drinks
onto the unit or tapes.
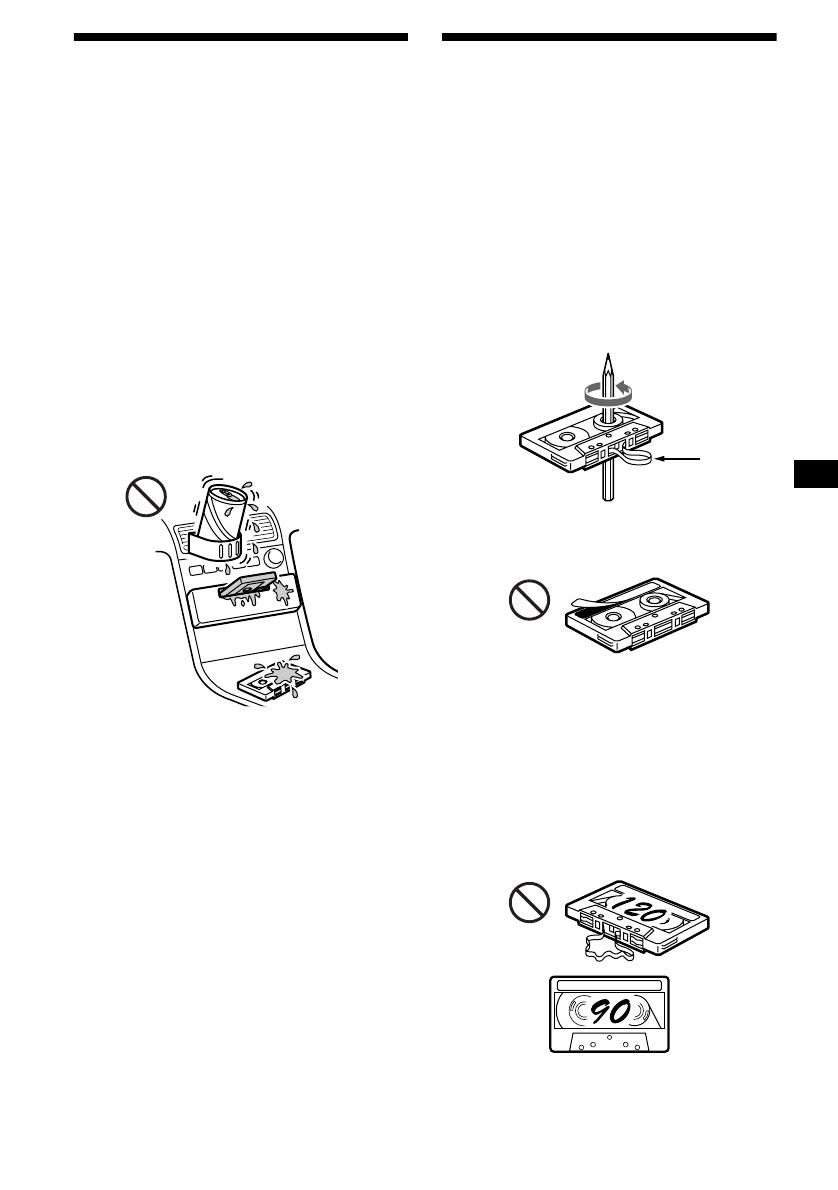
Notes on Cassettes
Cassette care
• Do not touch the tape surface of a cassette, as
any dirt or dust will contaminate the heads.
• Keep cassettes away from equipment with
built-in magnets such as speakers and
amplifiers, as erasure or distortion on the
recorded tape could occur.
• Do not expose cassettes to direct sunlight,
extremely cold temperatures, or moisture.
• Slack in the tape may cause the tape to be
caught in the machine. Before you insert the
tape, use a pencil or similar object to turn the
reel and take up any slack.
• Distorted cassettes and loose labels can cause
problems when inserting or ejecting tapes.
Remove or replace loose labels.
• The sound may become distorted while playing
the cassette. The cassette player head should be
cleaned after each 50 hours of use.
The use of cassettes longer than 90 minutes
is not recommended except for long
continuous play
The tape used for these cassettes is very thin and
tends to stretch easily.
Frequent playing and stopping of these tapes
may cause them to become entangled in the
cassette deck mechanism.
Slack

Getting started, Resetting the unit, Detaching the front panel
Resetting the unit detaching the front panel
- Изображение
- Текст
6
01GB02CAS-EUR.fm
masterpage:Right
XR-CA440X
3-238-898-11 (1)
Getting Started
Resetting the unit
Before operating the unit for the first time or
after replacing the car battery, you must reset the
unit.
Remove the front panel and press the RESET
button with a pointed object, such as a ballpoint
pen.
Note
Pressing the RESET button will erase the clock setting
and some stored contents.
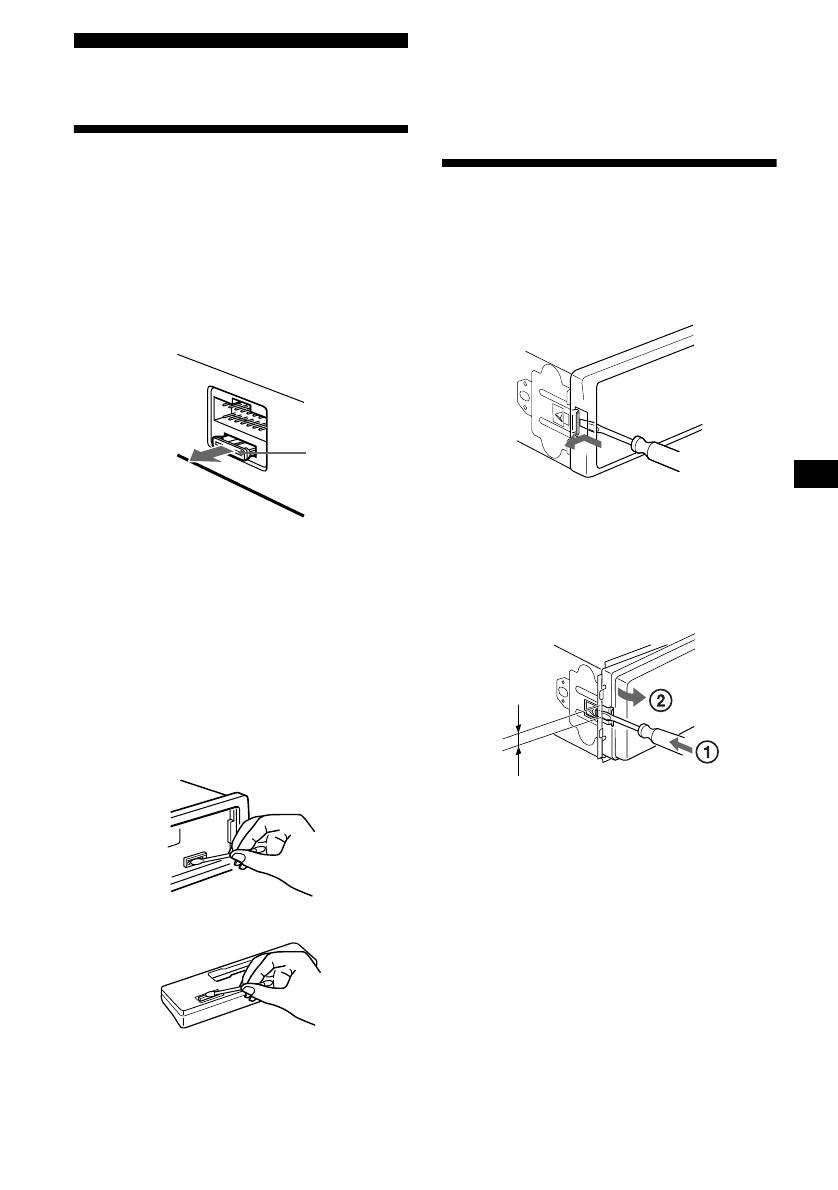
Detaching the front panel
You can detach the front panel of this unit to
protect the unit from being stolen.
Caution alarm
If you turn the ignition switch to the OFF
position without removing the front panel, the
caution alarm will beep for a few seconds.
If you connect an optional amplifier and do not
use the built-in amplifier, the beep sound will be
deactivated.
1
Press
(OFF)*
.
Tape playback or radio reception stops (the
key illumination and display remain on).
*
If your car has no ACC position on the ignition
switch, be sure to turn the unit off by pressing
(OFF)
for 2 seconds to avoid car battery drain.
2
Press
(RELEASE)
, then slide the front
panel a little to the left, and pull it off
towards you.
Notes
• Be sure not to drop the panel when detaching it from
the unit.
• If you detach the panel while the unit is still turned
on, the power will turn off automatically to prevent
the speakers from being damaged.
• When carrying the front panel with you, use the
supplied front panel case.
RESET button
(OFF)
(RELEASE)

7
01GB02CAS-EUR.fm
masterpage:Right
XR-CA440X
3-238-898-11 (1)
Attaching the front panel
Attach part A of the front panel to part B of the
unit as illustrated and push the left side into
position until it clicks.
Notes
• Be sure not to attach the front panel upside down.
• Do not press the front panel too hard against the unit
when attaching it.
• Do not press too hard or put excessive pressure on
the display window of the front panel.
• Do not expose the front panel to direct sunlight or
heat sources such as hot air ducts, and do not leave
it in a humid place. Never leave it on the dashboard
of a car parked in direct sunlight or where there may
be a considerable rise in temperature.
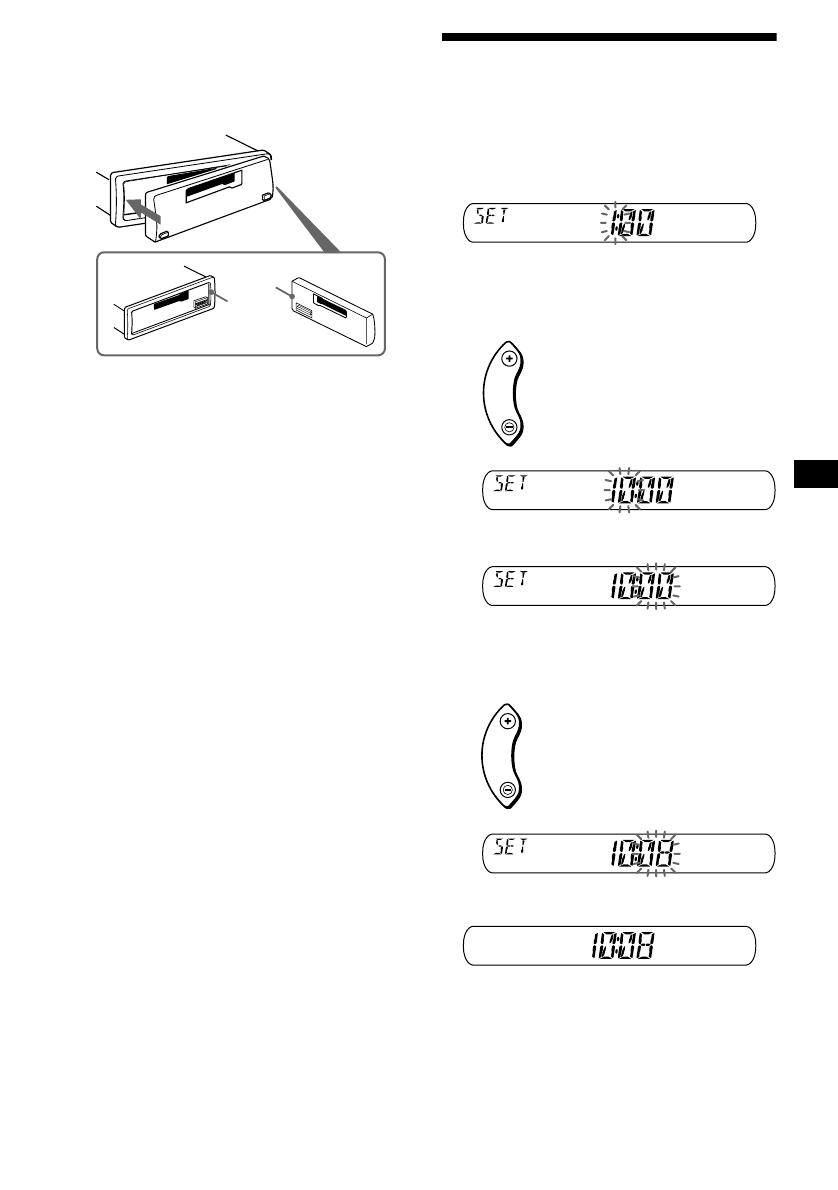
Setting the clock
The clock uses a 12-hour digital indication.
Example: To set the clock to 10:08
1
Press
(DSPL)
for 2 seconds.
The hour indication flashes.
1
Press either side of
(VOL)
to set the
hour.
2
Press
(SEL)
.
The minute indication flashes.
3
Press either side of
(VOL)
to set the
minute.
2
Press
(DSPL)
.
The clock starts.
After the clock setting is completed, the
display returns to normal play mode.
A
B
VOL
to go forward
to go back
VOL
to go forward
to go back

8
01GB02CAS-EUR.fm
masterpage:Right
XR-CA440X
3-238-898-11 (1)
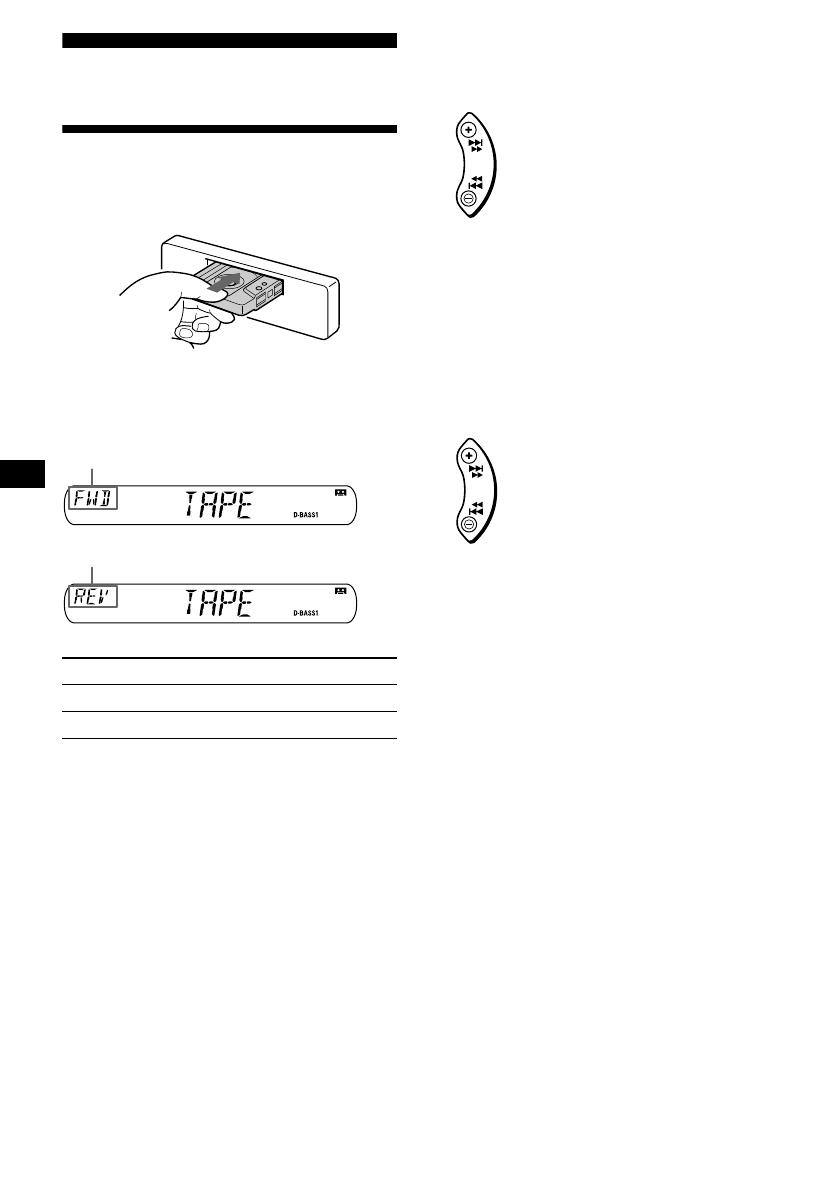
Cassette Player
Listening to a tape
Insert a cassette.
Playback starts automatically.
If a cassette is already inserted, to start playback,
press (SOURCE) repeatedly until “TAPE”
appears.
Fast-winding the tape
During playback, press and hold either
side of
(SEEK/AMS)
.
To start playback during fast-forwarding or
rewinding, press (MODE) (o).
Locating a specific track
— Automatic Music Sensor (AMS)
During playback, press either side of
(SEEK/AMS)
momentarily for each
track you want to skip.
You can skip up to nine tracks at one time.
Note
The AMS function may not work when:
– the blanks between tracks are shorter than four
seconds.
– there is noise between tracks.
– there are long sections of low volume or quiet
sections.
To
Press
Stop playback
(OFF)
Eject the cassette
Z
The side facing up is played
The side facing down is played
SEEK
AMS
Fast-forward
Rewind
SEEK
AMS
To locate succeeding tracks
To locate preceding tracks

Playing a tape in various functions, Radio, Storing stations automatically
Best tuning memory (btm)
- Изображение
- Текст
9
01GB02CAS-EUR.fm
masterpage:Right
XR-CA440X
3-238-898-11 (1)
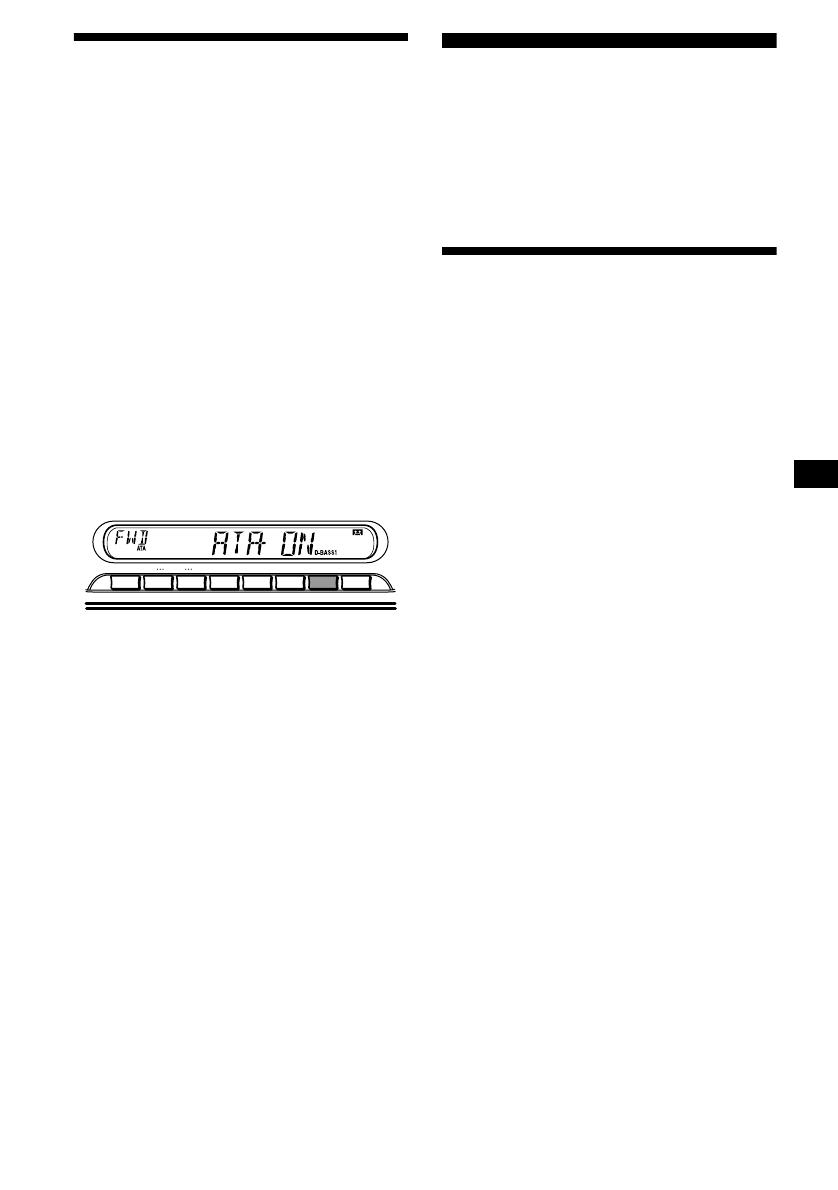
Playing a tape in various
functions
You can play the tape in various functions:
• REP (Repeat Play) repeats the current track.
• BL SKIP (Blank Skip) skips blanks longer than
8 seconds.
• ATA (Automatic Tuner Activation) turns on the
tuner automatically when fast-winding the tape.
• MTL (Metal) lets you play a metal or CrO
2
tape.
During tape playback, press the
desired function button repeatedly
until “ON” in the display appears.
Function buttons
(3)
: REP
(5)
: BL
SKIP
(6)
: ATA
(BTM)
: MTL
Example: ATA function
ATA function starts.
To return to normal playback function, select
“OFF.”
Radio
The unit can store up to 6 stations per band
(FM1, FM2, FM3, AM1, and AM2).
Caution
When tuning in stations while driving, use Best
Tuning Memory to prevent accidents.
Storing stations
automatically
— Best Tuning Memory (BTM)
The unit selects the stations with the strongest
signals within the selected band, and stores them
in the order of their frequency.
1
Press
(SOURCE)
repeatedly to select
the radio.
2
Press
(MODE)
repeatedly to select the
band.
3
Press
(BTM)
for 2 seconds.
A beep sounds when the setting is stored.
Notes
• If only a few stations can be received due to weak
signals, some number buttons will retain their former
settings.
• When a number is indicated in the display, the unit
starts storing stations from the one currently
displayed.
SENS
MTL
DISC
REP
–
+
1
2
3
4
5
6
BTM
SHUF BL SKIP/ ALBM
—
+ /ATA

Storing only the desired stations, Receiving the stored stations
Страница 10
- Изображение
- Текст
10
01GB02CAS-EUR.fm
masterpage:Right
XR-CA440X
3-238-898-11 (1)
Storing only the desired
stations
You can manually preset the desired stations on
any chosen number button.
1
Press
(SOURCE)
repeatedly to select
the radio.
2
Press
(MODE)
repeatedly to select the
band.
3
Press either side of
(SEEK/AMS)
to
tune in the station that you want to
store.
4
Press the desired number button (
(1)
to
(6)
) for 2 seconds until “MEM”
appears.
The number button indication appears in the
display.
Note
If you try to store another station on the same number
button, the previously stored station will be erased.
Receiving the stored stations
1
Press
(SOURCE)
repeatedly to select
the radio.
2
Press
(MODE)
repeatedly to select the
band.
3
Press the number button (
(1)
to
(6)
)
on which the desired station is stored.
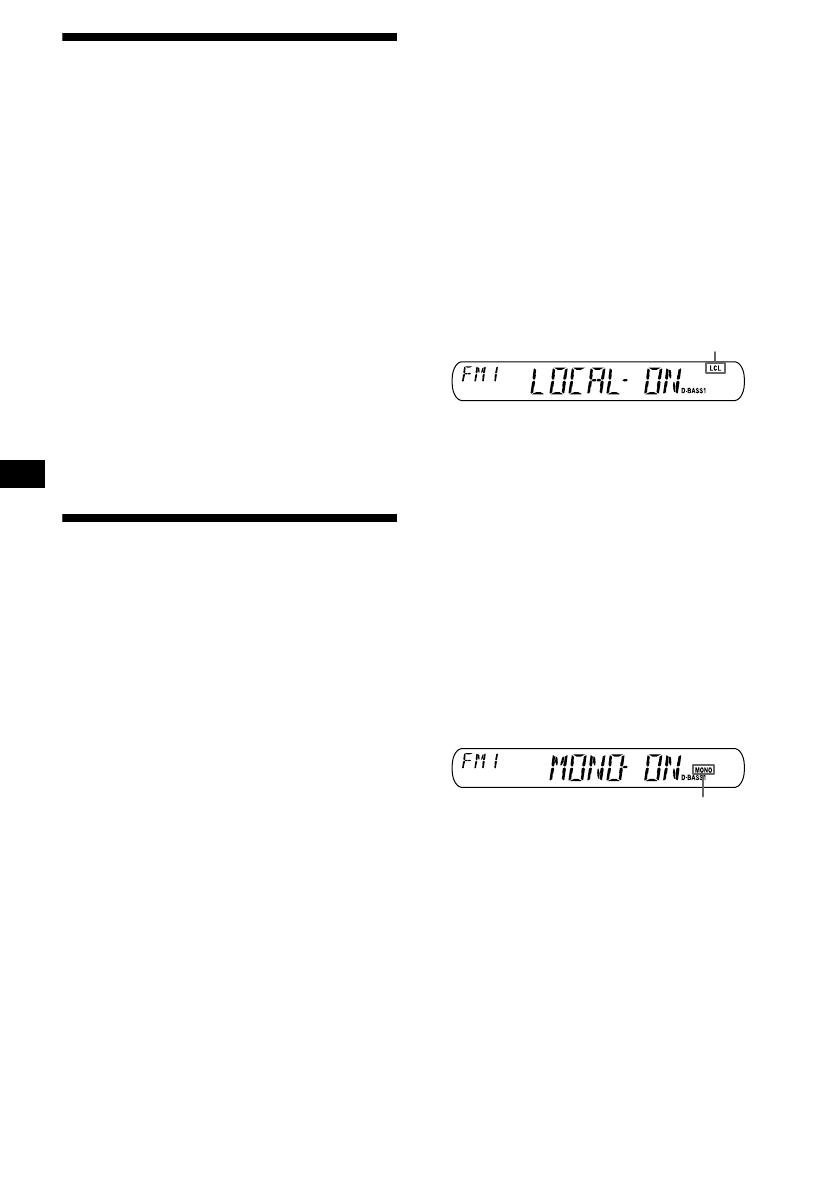
If preset tuning does not work
— Automatic tuning/Local Seek Mode
Automatic tuning:
Press either side of
(SEEK/AMS)
to
search for the station (automatic
tuning).
Scanning stops when the unit receives a
station. Repeat until the desired station is
received.
Local Seek Mode:
If the automatic tuning stops too
frequently, press
(SENS)
repeatedly
until “LOCAL-ON” appears.
Only the stations with relatively strong
signals will be tuned in.
To cancel the local seek mode, select “LOCAL-
OFF.”
Tip
If you know the frequency of the station you want to
listen to, press and hold either side of
(SEEK/AMS)
to
locate the approximate frequency, then press
(SEEK/AMS)
repeatedly to fine adjust to the desired
frequency (manual tuning).
If FM stereo reception is poor
— Monaural Mode
During radio reception, press
(SENS)
repeatedly until “MONO-ON” appears.
The sound improves, but becomes monaural
(“ST” disappears).
To return to normal mode, select “MONO-OFF.”
“LCL” indicator is displayed
“MONO” indicator is displayed

Комментарии
GB
RU
Operating Instructions
Инструкция по эксплуатации
XR-CA440X
For installation and connections, see the supplied installation/connections manual.
Перед установкой и подсоединениями прочитайте прилагаемую инструкцию по
установке и подсоединению.
3-238-898-11 (2)
© 2002 Sony Corporation
FM/AM
Cassette Car Stereo
Посмотреть инструкция для Sony XR-CA440X бесплатно. Руководство относится к категории Автомагнитолы, 1 человек(а) дали ему среднюю оценку 6.7. Руководство доступно на следующих языках: русский, английский. У вас есть вопрос о Sony XR-CA440X или вам нужна помощь? Задайте свой вопрос здесь
Не можете найти ответ на свой вопрос в руководстве? Вы можете найти ответ на свой вопрос ниже, в разделе часто задаваемых вопросов о Sony XR-CA440X.
В чем разница между FM и AM?
Когда звук считается слишком громким?
Автомобильный радиоприемник не включается, что делать?
Как лучше всего выполнять чистку Автомагнитола?
Инструкция Sony XR-CA440X доступно в русский?
Не нашли свой вопрос? Задайте свой вопрос здесь
GB
RU
Operating Instructions
Инструкция по эксплуатации
XR-CA440X
For installation and connections, see the supplied installation/connections manual.
Перед установкой и подсоединениями прочитайте прилагаемую инструкцию по
установке и подсоединению.
3-238-898-11 (2)
© 2002 Sony Corporation
FM/AM
Cassette Car Stereo

2
01GB01INT-EUR.fm masterpage:Right
XR-CA440X
3-238-898-11 (1)
Welcome !
Thank you for purchasing this Sony Cassette
Player. You can enjoy its various features even
more with:
• Optional CD/MD units (both changers and
players)*
1
.
• CD TEXT information (displayed when a CD
TEXT disc*
2
is played on a connected optional
CD unit with the CD TEXT function).
*1 This unit works with Sony products only.
*2 A CD TEXT disc is an audio CD that includes
information such as the disc name, artist name,
and track names. This information is recorded on
the disc.

3
00GB+00COV-EURTOC.fm masterpage:Right
XR-CA440X
3-238-898-11 (1)
Table of Contents
Location of controls . . . . . . . . . . . . . . . . . . . 4
Precautions . . . . . . . . . . . . . . . . . . . . . . . . . . 5
Notes on Cassettes. . . . . . . . . . . . . . . . . . . . . 5
Getting Started
Resetting the unit. . . . . . . . . . . . . . . . . . . . . . 6
Detaching the front panel . . . . . . . . . . . . . . . 6
Setting the clock . . . . . . . . . . . . . . . . . . . . . . 7
Cassette Player
Listening to a tape . . . . . . . . . . . . . . . . . . . . . 8
Playing a tape in various functions . . . . . . . . 9
Radio
Storing stations automatically
— Best Tuning Memory (BTM). . . . . . . . 9
Storing only the desired stations . . . . . . . . . 10
Receiving the stored stations. . . . . . . . . . . . 10
Other Functions
Adjusting the sound characteristics. . . . . . . 11
Quickly attenuating the sound. . . . . . . . . . . 11
Changing the sound and display settings
— Menu . . . . . . . . . . . . . . . . . . . . . . . . . 11
Selecting the sound position
— My Best sound Position (MBP). . . . . 12
Boosting the bass sound
— D-bass . . . . . . . . . . . . . . . . . . . . . . . . 12
CD/MD Unit (optional)
Playing a CD or MD. . . . . . . . . . . . . . . . . . 13
Display items . . . . . . . . . . . . . . . . . . . . . . . 13
Playing tracks repeatedly
— Repeat Play . . . . . . . . . . . . . . . . . . . . 14
Playing tracks in random order
— Shuffle Play. . . . . . . . . . . . . . . . . . . . 14
MP3 playable CD Unit (optional)
Listening to an MP3 file . . . . . . . . . . . . . . . 15
Display items . . . . . . . . . . . . . . . . . . . . . . . 15
Playing tracks repeatedly
— Repeat Play . . . . . . . . . . . . . . . . . . . . 16
Playing tracks in random order
— Shuffle Play. . . . . . . . . . . . . . . . . . . . 16
Additional Information
Maintenance . . . . . . . . . . . . . . . . . . . . . . . . 17
Removing the unit. . . . . . . . . . . . . . . . . . . . 17
Specifications . . . . . . . . . . . . . . . . . . . . . . . 18
Troubleshooting . . . . . . . . . . . . . . . . . . . . . 19
Error displays . . . . . . . . . . . . . . . . . . . . . . . 20
4
Location of controls
Refer to the pages listed for details.
a SOURCE (Power on/Tape/Radio/CD/
MD) select button
b MODE (o) button
Selecting the source.
c VOL +/– button
d ATT (attenuate) button
e Display window
f Z (eject) button 8
g SEEK/AMS button
Tape:
Fast-forwarding, reversing a tape.
Radio:
Tuning in stations automatically.
Finding a station manually.
CD (MP3 files)/MD:
Skipping tracks.
h MBP (My Best sound Position) button
12
i D-BASS button 12
j RELEASE (front panel release) button
k SEL (select) button
Selecting items.
l RESET button (located on the front side of
the unit, behind the front panel) 6
m SENS button
Storing the stations with the strongest
signals.
n Number buttons
Tape:
(3): REP (Repeat)
(5): BL SKIP (Blank Skip)
(6): ATA (Automatic Tuner Activation)
Radio:
Storing the desired station on each number
button.
CD (MP3 files)/MD:
(1): DISC –
(2): DISC +
(3): REP (Repeat)
(4): SHUF (Shuffle)
MP3 files:
(5): ALBM –
(6): ALBM +
o BTM/MTL (Best Tuning Memory/Metal)
button 9
p DSPL (display mode change) button
q OFF (Stop/Power off) button*
* Warning when installing in a car without
an ACC (accessory) position on the
ignition switch
After turning off the ignition, be sure to press
(OFF) on the unit for 2 seconds to turn off
the clock display.
Otherwise, the clock display does not turn off
and this causes battery drain.
XR-CA440X
SOURCE
ATT
VOL
SENS
DISC
REP
SHUF BL
SKIP/ ALBM
—
+
/ATA
MTL
MODE
SEL
RELEASE
123456
D-BASS
SEEK
AMS
BTM
MBP
OFFDSPL
5
01GB02CAS-EUR.fm masterpage:Right
XR-CA440X
3-238-898-11 (1)
Precautions
• If your car was parked in direct sunlight, allow
the unit to cool off before operating it.
• If no power is being supplied to the unit, check
the connections first. If everything is in order,
check the fuse.
• If no sound comes from the speakers of a two—
speaker system, set the fader control to the
centre position.
• When a tape is played back for a long period,
the cassette may become warm because of the
built-in power amplifier. However, this is not a
sign of malfunction.
If you have any questions or problems
concerning your unit that are not covered in this
manual, please consult your nearest Sony dealer.
To maintain high quality sound
Be careful not to splash juice or other soft drinks
onto the unit or tapes.
Notes on Cassettes
Cassette care
• Do not touch the tape surface of a cassette, as
any dirt or dust will contaminate the heads.
• Keep cassettes away from equipment with
built-in magnets such as speakers and
amplifiers, as erasure or distortion on the
recorded tape could occur.
• Do not expose cassettes to direct sunlight,
extremely cold temperatures, or moisture.
• Slack in the tape may cause the tape to be
caught in the machine. Before you insert the
tape, use a pencil or similar object to turn the
reel and take up any slack.
• Distorted cassettes and loose labels can cause
problems when inserting or ejecting tapes.
Remove or replace loose labels.
• The sound may become distorted while playing
the cassette. The cassette player head should be
cleaned after each 50 hours of use.
The use of cassettes longer than 90 minutes
is not recommended except for long
continuous play
The tape used for these cassettes is very thin and
tends to stretch easily.
Frequent playing and stopping of these tapes
may cause them to become entangled in the
cassette deck mechanism.
Slack

6
01GB02CAS-EUR.fm masterpage:Right
XR-CA440X
3-238-898-11 (1)
Getting Started
Resetting the unit
Before operating the unit for the first time or
after replacing the car battery, you must reset the
unit.
Remove the front panel and press the RESET
button with a pointed object, such as a ballpoint
pen.
Note
Pressing the RESET button will erase the clock setting
and some stored contents.
Detaching the front panel
You can detach the front panel of this unit to
protect the unit from being stolen.
Caution alarm
If you turn the ignition switch to the OFF
position without removing the front panel, the
caution alarm will beep for a few seconds.
If you connect an optional amplifier and do not
use the built-in amplifier, the beep sound will be
deactivated.
1 Press (OFF)*.
Tape playback or radio reception stops (the
key illumination and display remain on).
* If your car has no ACC position on the ignition
switch, be sure to turn the unit off by pressing
(OFF) for 2 seconds to avoid car battery drain.
2 Press (RELEASE), then slide the front
panel a little to the left, and pull it off
towards you.
Notes
• Be sure not to drop the panel when detaching it from
the unit.
• If you detach the panel while the unit is still turned
on, the power will turn off automatically to prevent
the speakers from being damaged.
• When carrying the front panel with you, use the
supplied front panel case.
RESET button
(OFF)
(RELEASE)
7
01GB02CAS-EUR.fm masterpage:Right
XR-CA440X
3-238-898-11 (1)
Attaching the front panel
Attach part A of the front panel to part B of the
unit as illustrated and push the left side into
position until it clicks.
Notes
• Be sure not to attach the front panel upside down.
• Do not press the front panel too hard against the unit
when attaching it.
• Do not press too hard or put excessive pressure on
the display window of the front panel.
• Do not expose the front panel to direct sunlight or
heat sources such as hot air ducts, and do not leave
it in a humid place. Never leave it on the dashboard
of a car parked in direct sunlight or where there may
be a considerable rise in temperature.
Setting the clock
The clock uses a 12-hour digital indication.
Example: To set the clock to 10:08
1 Press ( D SPL) for 2 seconds.
The hour indication flashes.
1 Press either side of (VOL) to set the
hour.
2 Press (SEL).
The minute indication flashes.
3 Press either side of (VOL) to set the
minute.
2 Press ( D SPL).
The clock starts.
After the clock setting is completed, the
display returns to normal play mode.
A
B
VOL
to go forward
to go back
VOL
to go forward
to go back
8
01GB02CAS-EUR.fm masterpage:Right
XR-CA440X
3-238-898-11 (1)
Cassette Player
Listening to a tape
Insert a cassette.
Playback starts automatically.
If a cassette is already inserted, to start playback,
press (SOURCE) repeatedly until “TAPE”
appears.
Fast-winding the tape
During playback, press and hold either
side of (SEEK/AMS).
To start playback during fast-forwarding or
rewinding, press (MODE) (o).
Locating a specific track
— Automatic Music Sensor (AMS)
During playback, press either side of
(SEEK/AMS) momentarily for each
track you want to skip.
You can skip up to nine tracks at one time.
Note
The AMS function may not work when:
– the blanks between tracks are shorter than four
seconds.
– there is noise between tracks.
– there are long sections of low volume or quiet
sections.
To Press
Stop playback (OFF)
Eject the cassette Z
The side facing up is played
The side facing down is played
SEEK
AMS
Fast-forward
Rewind
SEEK
AMS
To locate succeeding tracks
To locate preceding tracks
9
01GB02CAS-EUR.fm masterpage:Right
XR-CA440X
3-238-898-11 (1)
Playing a tape in various
functions
You can play the tape in various functions:
• REP (Repeat Play) repeats the current track.
• BL SKIP (Blank Skip) skips blanks longer than
8 seconds.
• ATA (Automatic Tuner Activation) turns on the
tuner automatically when fast-winding the tape.
• MTL (Metal) lets you play a metal or CrO
2
tape.
During tape playback, press the
desired function button repeatedly
until “ON” in the display appears.
Function buttons
(3): REP
(5): BL SKIP
(6): ATA
(BTM): MTL
Example: ATA function
ATA function starts.
To return to normal playback function, select
“OFF.”
Radio
The unit can store up to 6 stations per band
(FM1, FM2, FM3, AM1, and AM2).
Caution
When tuning in stations while driving, use Best
Tuning Memory to prevent accidents.
Storing stations
automatically
— Best Tuning Memory (BTM)
The unit selects the stations with the strongest
signals within the selected band, and stores them
in the order of their frequency.
1 Press (SOURCE) repeatedly to select
the radio.
2 Press (MODE) repeatedly to select the
band.
3 Press (BTM) for 2 seconds.
A beep sounds when the setting is stored.
Notes
• If only a few stations can be received due to weak
signals, some number buttons will retain their former
settings.
• When a number is indicated in the display, the unit
starts storing stations from the one currently
displayed.
SENS
MTL
DISC
REP
–
+
123456
BTM
SHUF BL
SKIP/ ALBM
—
+
/ATA
10
01GB02CAS-EUR.fm masterpage:Right
XR-CA440X
3-238-898-11 (1)
Storing only the desired
stations
You can manually preset the desired stations on
any chosen number button.
1 Press (SOURCE) repeatedly to select
the radio.
2 Press (MODE) repeatedly to select the
band.
3 Press either side of (SEEK/AMS) to
tune in the station that you want to
store.
4 Press the desired number button ((1)
to (6)) for 2 seconds until “MEM”
appears.
The number button indication appears in the
display.
Note
If you try to store another station on the same number
button, the previously stored station will be erased.
Receiving the stored stations
1 Press (SOURCE) repeatedly to select
the radio.
2 Press (MODE) repeatedly to select the
band.
3 Press the number button ((1) to (6))
on which the desired station is stored.
If preset tuning does not work
— Automatic tuning/Local Seek Mode
Automatic tuning:
Press either side of (SEEK/AMS) to
search for the station (automatic
tuning).
Scanning stops when the unit receives a
station. Repeat until the desired station is
received.
Local Seek Mode:
If the automatic tuning stops too
frequently, press (SENS) repeatedly
until “LOCAL-ON” appears.
Only the stations with relatively strong
signals will be tuned in.
To cancel the local seek mode, select “LOCAL—
OFF.”
Tip
If you know the frequency of the station you want to
listen to, press and hold either side of (SEEK/AMS) to
locate the approximate frequency, then press
(SEEK/AMS) repeatedly to fine adjust to the desired
frequency (manual tuning).
If FM stereo reception is poor
— Monaural Mode
During radio reception, press (SEN S)
repeatedly until “MONO-ON” appears.
The sound improves, but becomes monaural
(“ST” disappears).
To return to normal mode, select “MONO-OFF.”
“LCL” indicator is displayed
“MONO” indicator is displayed

11
01GB02CAS-EUR.fm masterpage:Right
XR-CA440X
3-238-898-11 (1)
Other Functions
Adjusting the sound
characteristics
You can adjust the bass, treble, balance, and
fader.
1 Select the item you want to adjust by
pressing (SEL) repeatedly.
Each time you press (SEL), the item changes
as follows:
BAS (bass) t TRE (treble) t BAL (left-
right)
t FAD (front-rear)
2 Adjust the selected item by pressing
either side of (VOL).
Note
Adjust within 3 seconds after selecting the item.
Quickly attenuating the
sound
Press (ATT).
After “ATT-ON” momentarily appears, the
“ATT” appears in the display.
To restore the previous volume level, press
(ATT) again.
Changing the sound and
display settings
— Menu
The following items can be set:
SET (Set Up)
• A.SCRL (Auto Scroll)* (page 13).
• M.DSPL (Motion Display)
– the demonstration mode which appears when
the tape is ejected and no source is selected
(e.g., tuner is turned off).
• BEEP — to turn the beeps on or off.
Selecting the desired item
Press ( SEL ) and the desired preset
number button simultaneously.
(SEL) + (3): A.SCRL*
(SEL) + (4): M.DSPL
(SEL) + (6): BEEP
* When no CD or MD is playing, this item will not
appear.
After the mode setting completed, the display
returns to normal play mode.
Note
The displayed item will differ depending on the source.
To cancel the item, press (SEL) and the preset
number button simultaneously again.
12
01GB02CAS-EUR.fm masterpage:Right
XR-CA440X
3-238-898-11 (1)
Selecting the sound position
— My Best sound Position (MBP)
When you drive without passengers, you can
enjoy the most comfortable sound environment
with “My Best sound Position.”
“My Best sound Position” has two presets, which
are best suited for the front seats. You can select
one very easily with the MBP button.
MBP-A: best suited for the person in the front-
left seat.
MBP-B: best suited for the person in the front-
right seat.
Press (MBP) repeatedly for the desired
listening position.
After 1 second, the display goes back to the
normal playback mode.
To cancel the MBP function, select “MBP-OFF.”
If you want to adjust the sound characteristics
more precisely, you can do it using the (SEL)
button (see “Adjusting the sound characteristics”
on page 11).
Notes
• If you adjust any sound characteristics by using the
(SEL) button (page 11), the MBP setting returns to
OFF.
• When MBP is set to OFF, the sound setting you
adjusted (page 11) is activated.
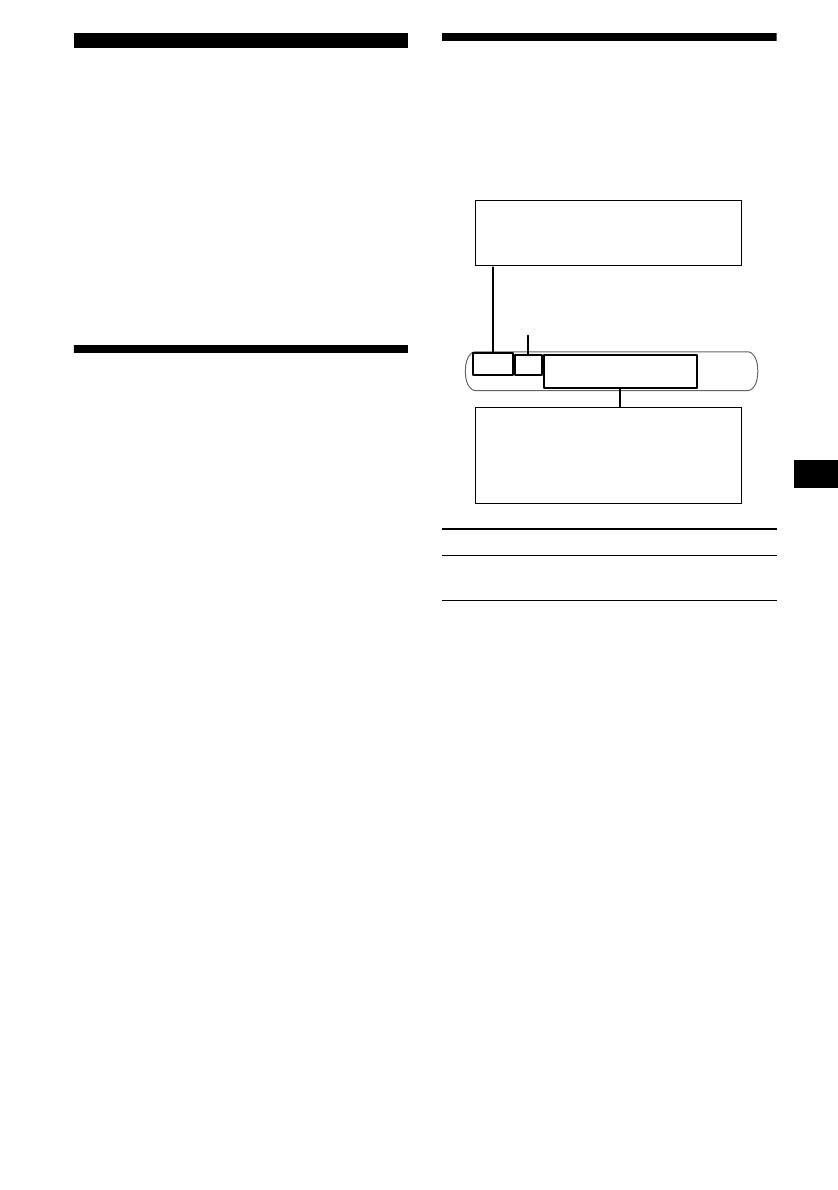
Boosting the bass sound
— D-bass
You can enjoy a clear and powerful bass sound.
The D-bass function boosts the low frequency
signal and high frequency signal with a sharper
curve than conventional bass boost.
You can hear the bass line more clearly even
while the vocal volume remains the same. You
can emphasize and adjust the bass sound easily
with the D-BASS button.
Adjusting the bass curve
Press (D-BASS) repeatedly to select
the desired bass curve.
As the D-BASS number increases so does the
effect.
D.BASS-1 t D.BASS-2 t D.BASS-3 t
D.BASS-OFF
Note
The bass sound may distort at same volume. If the
bass sound distorts, select less effective bass curve.
0dB
D.BASS-3
D.BASS-2
D.BASS-1
D.BASS-3
D.BASS-2
D.BASS-1
Frequency (Hz)
Level
13
01GB02CAS-EUR.fm masterpage:Right
XR-CA440X
3-238-898-11 (1)
CD/MD Unit (optional)
This unit can control external CD/MD units
(optional).
If you connect an optional CD unit with the CD
TEXT function, the CD TEXT information will
appear in the display when you play a CD TEXT
disc.
If you connect MP3 playable CD units (e.g. MP3
CD changer), you can play MP3 files;
compressed audio files with quality of sound.
See “MP3 playable CD Unit (optional)” on page
15.
Playing a CD or MD
1 Press (SOURCE) repeatedly to select
“CD” or “MD (MS*).”
2 Press (MODE) repeatedly until the
desired unit appears.
CD/MD playback starts.
* MS: MG Memory Stick System-up Player MGS-X1
Cautions when connecting MGS-X1 and MD unit(s)
This unit recognizes MGS-X1 as an MD unit.
• When you want to play MGS-X1, press (SOURCE) to
select “MS” or “MD.” If “MS” appears in the source
display, MGS-X1 starts to play. If “MD” appears in
the source display, press (MODE) to select “MS,” to
start playback.
• When you want to play an MD unit, press (SOURCE)
to select “MD” or “MS.” If your desired MD unit
appears in the source display, it starts to play. If “MS”
or another MD unit appears in the source display,
press (MODE) to select your desired MD unit, to
start playback.
Display items
When the disc/track changes, any prerecorded
title*
1
of the new disc/track is automatically
displayed (if the Auto Scroll function is set to
“ON,” names exceeding 8 characters will be
scrolled).
Selecting “A.SCRL-ON”
During playback, press (SEL) and (3)
simultaneously.
After 2 seconds, the display goes back to the
normal playback mode.
To select “A.SCRL-OFF”, press (SEL) and (3)
simultaneously again.
*1 “NO NAME” indicates there is no prerecorded
name to display.
*2 Only for CD TEXT discs with the artist name.
Notes
• Some characters cannot be displayed. Characters
and signs which cannot be displayed appear as “ *.”
• For some CD TEXT discs with very many
characters, information may not scroll.
• This unit cannot display the artist name for each
track of a CD TEXT disc.
Tip
When Auto scroll is set to OFF and the disc/track
name is changed, the disc/track name does not scroll.
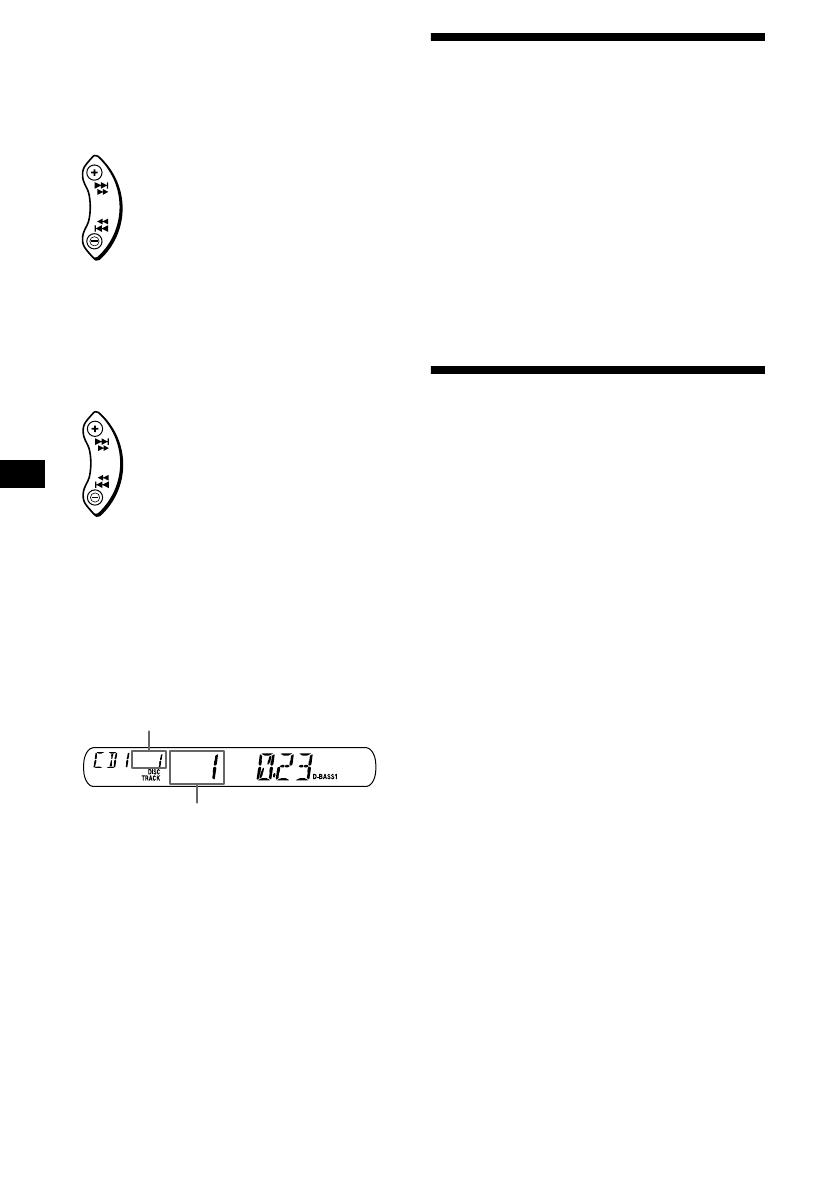
To Press
Switch display
item
(DSPL)
continue to next page t
Displayable items
• Music source
•Function
Displayable items
•Clock
• Elapsed playback time
• Disc name
*
1
/artist name*
2
•Track title*
2
Disc number
14
01GB02CAS-EUR.fm masterpage:Right
XR-CA440X
3-238-898-11 (1)
Locating a specific track
— Automatic Music Sensor (AMS)
During playback, press either side of
(SEEK/AMS) momentarily for each
track you want to skip.
Locating a specific point in a track
— Manual Search
During playback, press and hold either
side of (SEEK/AMS). Release when you
have found the desired point.
Switching to other discs
During playback, press (1) (DISC –) or
(2) (DISC +) button.
The desired disc in the current unit begins
playback.
(1) (DISC –): For preceding discs
(2) (DISC +): For succeeding discs
Playing tracks repeatedly
— Repeat Play
You can select:
• REP-TRACK — to repeat a track.
• REP-DISC* — to repeat a disc.
* Available only when one or more optional CD (MD)
units are connected.
During playback, press (3) (REP)
repeatedly until the desired setting
appears in the display.
Repeat Play starts.
To return to normal play mode, select “REP-
OFF.”
Playing tracks in random
order
— Shuffle Play
You can select:
• SHUF-DISC*
1
— to play the tracks on the
current disc in random order.
• SHUF-CHGR*
1
— to play the tracks in the
current optional CD (MD) unit in random
order.
• SHUF-ALL*
2
— to play all the tracks in all the
connected CD (MD) units in random order.
*1 Available only when one or more optional CD (MD)
units are connected.
*2 Available only when two or more optional CD/MD
units are connected.
During playback, press (4) (SHUF)
repeatedly until the desired setting
appears in the display.
Shuffle Play starts.
To return to normal play mode, select “SHUF-
OFF.”
Note
“SHUF-ALL” will not shuffle tracks between CD units
and MD units.
SEEK
AMS
To locate succeeding tracks
To locate preceding tracks
SEEK
AMS
To search forward
To search backward
Disc number
Track number
15
01GB02CAS-EUR.fm masterpage:Right
XR-CA440X
3-238-898-11 (1)
MP3 playable CD Unit
(optional)
This unit can control external MP3 playable CD
units. If you connect optional MP3 playable CD
units, you can play a disc containing MP3 files.
Listening to an MP3 file
1 Press (SOURCE) repeatedly to select
“CD.”
2 Press (MODE) repeatedly until the
appropriate indication for the MP3
playable CD unit (“CD1,” “CD2,” etc.)
appears.
Playback starts.
When the last file on the disc is over
The file number indication returns to “1,” and
playback restarts from the first file of the disc.
Notes
• If a disc with no MP3 files (tracks) is inserted, “CD”
appears in the disc type display to start playback but
there will be no sound.
• Before playing a track, this unit reads all track and
album information on the disc. Depending on the
track structure, it may take more than a minute
before play begins. During this time, “READ” is
displayed. Please wait for play to start automatically
when the reading is complete.
Display items
Selecting “A.SCRL-ON”
During playback, press (SEL) and (3)
simultaneously.
In two seconds the normal display
automatically appears.
To select “A.SCRL-OFF”, press (SEL) and (3)
simultaneously again.
*1 While displaying an ID3 tag, the album number
does not appear.
*2 When pressing ( DSPL), “NO NAME” indicates that
there is no disc name, album name, or track title,
and “NO ID3” indicates that there is no ID3 tag.
Notes
• Some characters cannot be displayed. Characters
and signs which cannot be displayed appear as “ *.”
• For some ID3 tags with very many characters,
information may not scroll.
• This unit cannot display the artist name for each
track of an album.
Tip
When Auto scroll is set to OFF and the album/track
name is changed, the album/track name does not
scroll.
To Press
Stop playback (OFF)
Skip discs
–Disc selection
(1) (–)
(2) (+)
Skip albums
–album selection
(5) (–)
(6) (+)
Skip tracks
–Automatic
Music Sensor
(SEEK/AMS) (./>)
[once for each track]
Fast-forward/
reverse
–Manual Search
(SEEK/AMS) (m/M)
[hold to desired point]
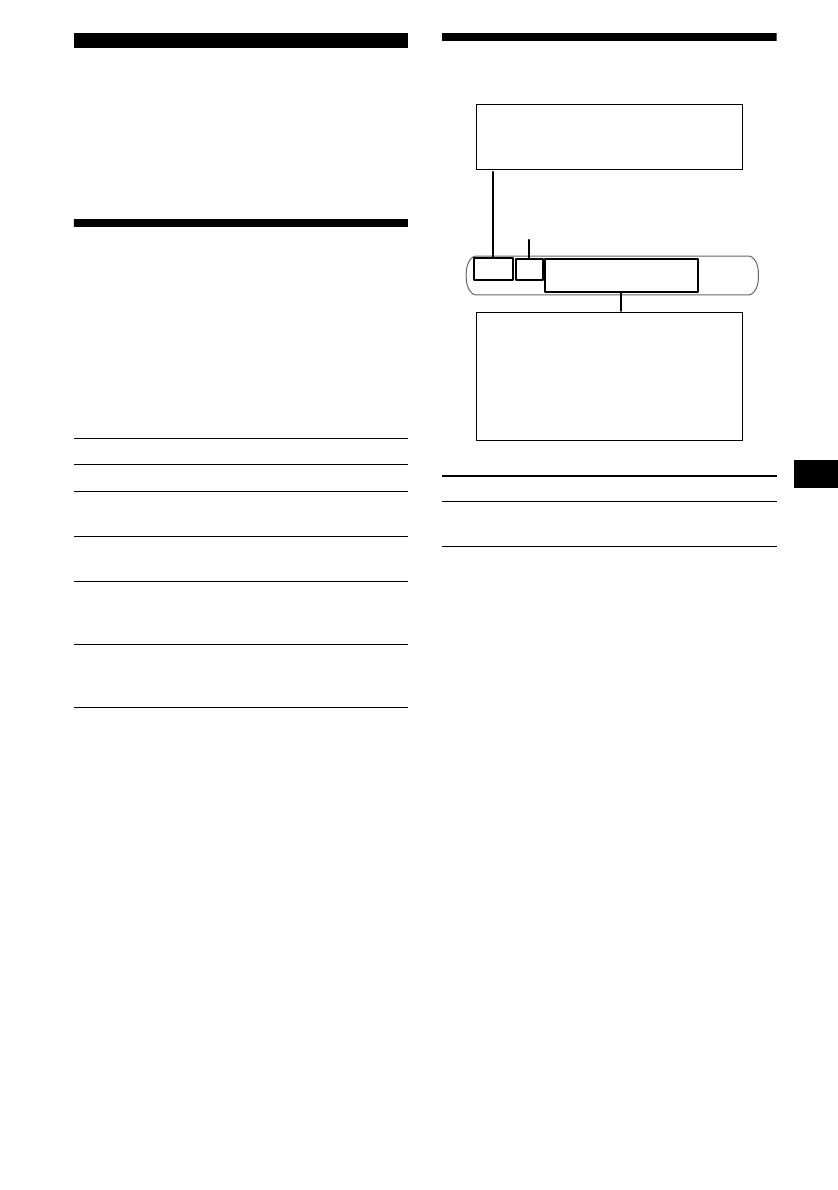
To Press
Switch display
item
(DSPL)
continue to next page t
Displayable items
• Music source
•Function
Displayable items
•Clock
• Elapsed playback time
• Disc name
*
2
• Album name*
2
• Track title*
2
•ID3 tag*
2
Album*
1
(Disc) number

16
01GB02CAS-EUR.fm masterpage:Right
XR-CA440X
3-238-898-11 (1)
Locating a specific track
— Automatic Music Sensor (AMS)
During playback, press either side of
(SEEK/AMS) momentarily for each
track you want to skip.
Locating a specific point in a track
— Manual Search
During playback, press and hold either
side of (SEEK/AMS). Release when you
have found the desired point.
Switching to other discs
During playback, press (1) (DISC –) or
(2) (DISC +) button.
The desired disc in the current unit begins
playback.
(1) (DISC –): For preceding discs
(2) (DISC +): For succeeding discs
Switching to other albums.
During playback, press (5) (ALBM –)
or (6) (ALBM +) button.
The desired album in the current unit begins
playback.
(5) (ALBM –): For preceding albums
(6)
(ALBM +): For succeeding albums
Playing tracks repeatedly
— Repeat Play
You can select:
• REP-TRACK — to repeat a track.
• REP-ALBM*
1
— to repeat an album.
• REP-DISC*
2
— to repeat a disc.
*1 Available only when optional CD unit with the MP3
file control function is connected.
*2 Available only when one or more optional CD/MD
units are connected.
During playback, press (3) (REP)
repeatedly until the desired setting
appears in the display.
Repeat Play starts.
To return to normal play mode, select “REP-
OFF.”
Playing tracks in random
order
— Shuffle Play
You can select:
• SHUF-ALBM*
1
— to play the albums in the
current optional CD unit with the MP3 data
control function in random order.
• SHUF-DISC*
2
— to play the tracks on the
current disc in random order.
• SHUF-CHGR*
2
— to play the tracks in the
current optional CD (MD) unit in random
order.
• SHUF-ALL*
3
— to play all the tracks in all the
connected CD (MD) units (including this unit)
in random order.
*1 Available only when optional CD unit with the MP3
file control function is connected.
*2 Available only when one or more optional CD (MD)
units are connected.
*3 Available only when two or more optional CD units,
or two or more optional MD units are connected.
During playback, press (4) (SHUF)
repeatedly until the desired setting
appears in the display.
Shuffle Play starts.
To return to normal play mode, select “SHUF-
OFF.”
Note
“SHUF-ALL” will not shuffle tracks between CD units
and MD units.
SEEK
AMS
To locate succeeding tracks
To locate preceding tracks
SEEK
AMS
To search forward
To search backward
Album (Disc) number
Track number
17
01GB02CAS-EUR.fm masterpage:Right
XR-CA440X
3-238-898-11 (1)
Additional Information
Maintenance
Fuse replacement
When replacing the fuse, be sure to use one
matching the amperage rating stated on the
original fuse. If the fuse blows, check the power
connection and replace the fuse. If the fuse blows
again after replacement, there may be an internal
malfunction. In such a case, consult your nearest
Sony dealer.
Warning
Never use a fuse with an amperage rating
exceeding the one supplied with the unit as this
could damage the unit.
Cleaning the connectors
The unit may not function properly if the
connectors between the unit and the front panel
are not clean. In order to prevent this, detach the
front panel (page 6) and clean the connectors
with a cotton swab dipped in alcohol. Do not
apply too much force. Otherwise, the connectors
may be damaged.
Notes
• For safety, turn off the ignition before cleaning the
connectors, and remove the key from the ignition
switch.
• Never touch the connectors directly with your fingers
or with any metal device.
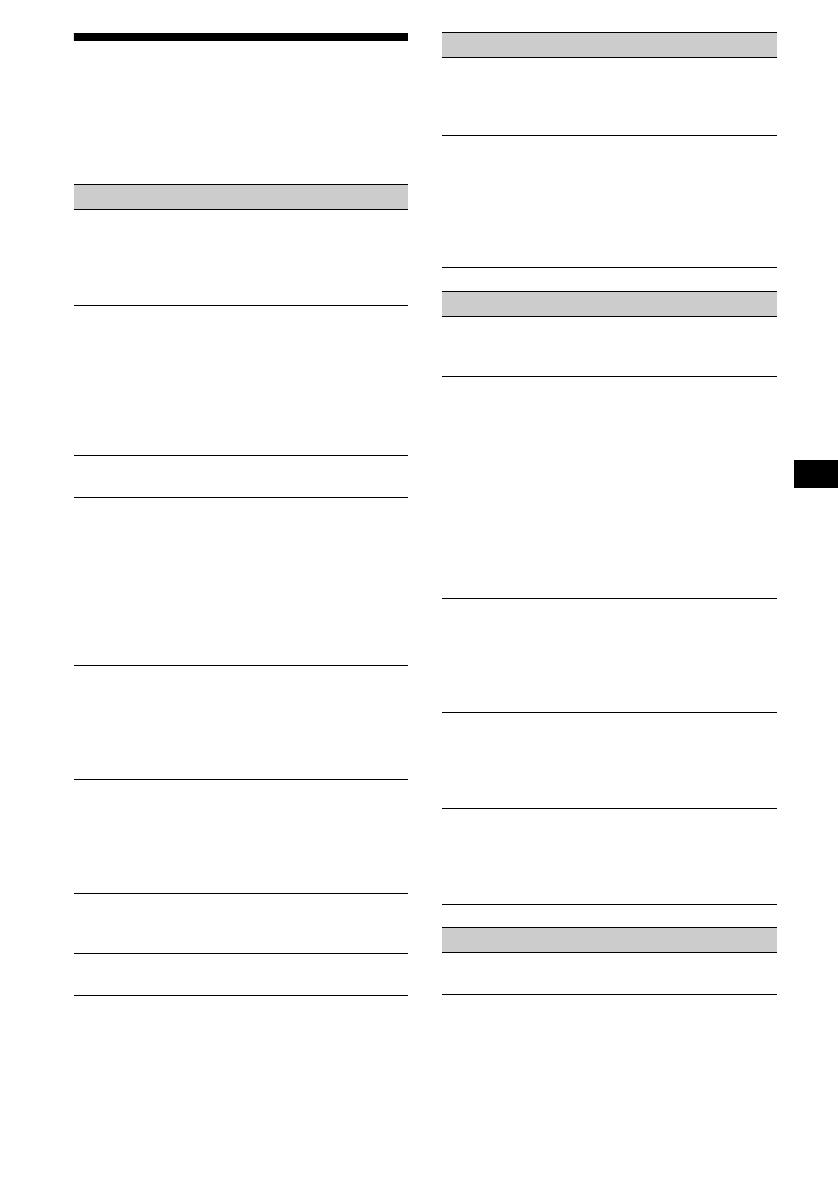
Removing the unit
1 Remove the front cover
1 Detach the front panel (page 6).
2 Press the clip inside the front cover
with a thin screwdriver.
3 Repeat step 2 for the other side.
2 Remove the unit
1 Use a thin screwdriver to push in
the clip on the left side of the unit,
then pull out the left side of the unit
until the catch clears the mounting.
2 Repeat step 1 for the right side.
3 Slide the unit out of its mounting.
Fuse (10 A)
Main unit
Back of the front panel
4 mm

18
01GB02CAS-EUR.fm masterpage:Right
XR-CA440X
3-238-898-11 (1)
Specifications
Cassette Player section
Tape track 4-track 2-channel stereo
Wow and flutter 0.08 % (WRMS)
Frequency response 30 – 18,000 Hz
Signal-to-noise ratio
Tuner section
FM
Tuning range FM tuning interval:
87.5 – 108.0 MHz
Aerial terminal External aerial connector
Intermediate frequency 10.7 MHz
Usable sensitivity 11 dBf
Selectivity 75 dB at 400 kHz
Signal-to-noise ratio 65 dB (stereo),
68 dB (mono)
Harmonic distortion at 1 kHz
0.7 % (stereo),
0.5 % (mono)
Separation 33 dB at 1 kHz
Frequency response 30 – 15,000 Hz
AM
Tuning range AM tuning interval:
531 – 1,602 kHz
Sensitivity 30 µV
Aerial terminal External aerial connector
Intermediate frequency 10.7 MHz/450 kHz
Power amplifier section
Outputs Speaker outputs
(sure seal connectors)
Speaker impedance 4 – 8 ohms
Maximum power output 50 W × 4 (at 4 ohms)
General
Outputs Audio outputs
Power aerial relay control
lead
Power amplifier control lead
Inputs BUS control input terminal
BUS audio input terminal
Aerial input terminal
Tone controls Bass ±9 dB at 100 Hz
Treble ±9 dB at 10 kHz
Power requirements 12 V DC car battery
(negative earth)
Dimensions Approx. 178 × 50 × 178
mm (w/h/d)
Mounting dimensions Approx. 182 × 53 × 161
mm (w/h/d)
Mass Approx. 1.2 kg
Supplied accessories Parts for installation and
connections (1 set)
Front panel case (1)
Optional accessories BUS cable (supplied with
an RCA pin cord)
RC-61 (1 m), RC-62 (2 m)
Optional equipment CD changer (6 discs)
CDX-T70MX, CDX-T69
MD changer (6 discs)
MDX-66XLP
MG Memory Stick
System-up Player
MGS-X1
Source selector
XA-C30
Note
This unit cannot be connected to a digital preamplifier
or an equalizer.
Design and specifications are subject to change
without notice.
Cassette type
TYPE II, IV 61 dB
TYPE I 58 dB
19
01GB02CAS-EUR.fm masterpage:Right
XR-CA440X
3-238-898-11 (1)
Troubleshooting
The following checklist will help you remedy
problems you may encounter with your unit.
Before going through the checklist below, check
the connection and operating procedures.
General
No sound.
• Adjust the volume with (+).
• Cancel the ATT function.
• Set the fader control to the centre position for
a 2-speaker system.
The contents of the memory have been
erased.
• The RESET button has been pressed.
t Store again into the memory.
• The power cord or battery has been
disconnected.
• The power connecting cord is not connected
properly.
No beep sound.
The beep sound is cancelled (page 11).
Indications disappear from/do not appear in
the display.
• The clock display disappears if you press
(OFF) for 2 seconds.
t Press (OFF) again for 2 seconds to
display the clock.
• Remove the front panel and clean the
connectors. See “Cleaning the connectors”
(page 17) for details.
Stored stations and correct time are erased.
The fuse has blown.
Makes noise when the ignition key is in the
ON, ACC, or OFF position.
The leads are not matched correctly with the
car’s accessory power connector.
No power is being supplied to the unit.
• Check the connection. If everything is in
order, check the fuse.
• The car does not have an ACC position.
t Press (SOURCE) (or insert a cassette) to
turn on the unit.
The power is continuously supplied to the
unit.
The car does not have an ACC position.
The power aerial does not extend.
The power aerial does not have a relay box.
Tape playback
The sound is distorted.
The tape head is contaminated.
t Clean the head with a commercially
available dry-tape cleaning cassette.
The AMS does not operate correctly.
• There is noise in the space between tracks.
• A blank space is too short (less than 4
seconds).
• A long pause, or a passage of low
frequencies or very low sound level is treated
as a blank space.
Radio reception
Preset tuning is not possible.
• Store the correct frequency in the memory.
• The broadcast signal is too weak.
The stations cannot be received.
The sound is hampered by noises.
• Connect a power aerial control lead (blue) or
accessory power supply lead (red) to the
power supply lead of a car’s aerial booster.
(Only when your car has built-in FM/AM
aerial in the rear/side glass.)
• Check the connection of the car aerial.
• The auto aerial will not go up.
t Check the connection of the power aerial
control lead.
• Check the frequency.
Automatic tuning is not possible.
• The local seek mode is set to “ON.”
t Set the local seek mode to “OFF” (page
10).
• The broadcast signal is too weak.
t Perform manual tuning.
The “ST” indication flashes.
• Tune in the frequency accurately.
• The broadcast signal is too weak.
t Set to the monaural reception mode (page
10).
A programme broadcast in stereo is heard
in monaural.
The unit is in monaural reception mode.
t Cancel monaural reception mode (page
10).
CD/MD playback
The sound skips.
Dirty or defective disc.
20
01GB02CAS-EUR.fm masterpage:Right
XR-CA440X
3-238-898-11 (1)
Error displays
(when an optional CD/MD unit is connected)
*1 When an error occurs during playback of a CD or
MD, the disc number of the CD or MD does not
appear in the display.
*2 The disc number of the disc causing the error
appears in the display.
If these solutions do not help improve the
situation, consult your nearest Sony dealer.
Error displays
The following indications will flash for about 5
seconds, and an alarm sound will be heard.
NO MAG
The disc magazine is not inserted in the CD/
MD unit.
t Insert the magazine in the CD/MD unit.
NO DISC
No disc is inserted in the CD/MD unit.
t Insert discs in the CD/MD unit.
NO MUSIC
A CD which is not a music file is inserted in
the MP3 playable CD unit.
t Insert a music CD in the MP3 playable CD
unit.
ERROR*
1
• A CD is dirty or inserted upside down.*
2
t Clean or insert the CD correctly.
• An MD does not playback because of some
problem.*
2
t Insert another MD.
• A CD/MD cannot play because of some
problem.
t Insert another CD/MD.
BLANK*
1
No tracks have been recorded on an MD.*
2
t Play an MD with recorded tracks on it.
RESET
The CD/MD unit cannot be operated because
of some problem.
t Press the RESET button on the unit.
NOT READY
The lid of the MD unit is open or the MDs are
not inserted properly.
t Close the lid or insert the MDs properly.
HI TEMP
The ambient temperature is more than 50°C.
t Wait until the temperature goes down
below 50°C.
FM/AM Cassette
Car Stereo
Installation/Connections
Установка/Подсоединение
XR-CA440X
Sony Corporation © 2002
1
1
2
5
4
× 4
× 2
Equipment used in illustrations (not supplied)
Аппаратура, фигурирующая в иллюстрациях (не прилагается)
Front speaker
Передний громкоговоритель
Rear speaker
Задний громкоговоритель
3-238-899-11 (1)
Printed in Thailand
3
6
7
Power amplifier
Усилитель
CD/MD changer
Проигрыватель CD/MD
2
A
AUDIO OUT REAR
B
BUS AUDIO IN
BUS CONTROL IN
*
Source selector
Селектор источника
BUS CONTROL IN
Cautions
• This unit is designed for negative earth 12 V
DC operation only.
• Do not get the wires under a screw, or caught
in moving parts (e.g. seat railing).
• Before making connections, turn the car
ignition off to avoid short circuits.
• Connect the yellow and red power input leads
only after all other leads have been connected.
• Run all earth wires to a common earth
point.
• Be sure to insulate any loose unconnected
wires with electrical tape for safety.
Notes on the power supply cord (yellow)
• When connecting this unit in combination with
other stereo components, the connected car
circuit’s rating must be higher than the sum of
each component’s fuse.
• When no car circuits are rated high enough,
connect the unit directly to the battery.
Parts Iist (1)
The numbers in the list are keyed to those in the
instructions.
Caution
Handle the bracket 1 carefully to avoid injuring
your fingers.
1
BUS AUDIO IN
* not supplied
не прилагается
Connection example (2)
Notes (2-A)
• Be sure to connect the earth cord before
connecting the amplifier.
• If you connect an optional power amplifier and do
not use the built-in amplifier, the beep sound will
be deactivated.
Tip (2-B-
)
For connecting two or more CD/MD changers, the
source selector XA-C30 (optional) is necessary.
Connection diagram (3)
1
To a metal surface of the car
First connect the black earth lead, then connect
the yellow and red power input leads.
2
To the power aerial control lead or power
supply lead of aerial booster amplifier
Notes
• It is not necessary to connect this lead if there
is no power aerial or aerial booster, or with a
manually-operated telescopic aerial.
• When your car has a built-in FM/AM aerial in
the rear/side glass, see «Notes on the control
and power supply leads.»
3
To AMP REMOTE IN of an optional power
amplifier
This connection is only for amplifiers. Connecting
any other system may damage the unit.
4
To the +12 V power terminal which is energized
in the accessory position of the ignition key
switch
Notes
• If there is no accessory position, connect to the
+12 V power (battery) terminal which is
energised at all times.
Be sure to connect the black earth lead to it
first.
• When your car has a built-in FM/AM aerial in
the rear/side glass, see «Notes on the control
and power supply leads.»
5
To the +12 V power terminal which is energised
at all times
Be sure to connect the black earth to it first.
-
Руководства по ремонту
1
-
Инструкции по эксплуатации
2
Языки:
SONY XR-CA440X инструкция по эксплуатации
(44 страницы)
- Языки:Русский
-
Тип:
PDF -
Размер:
733.43 KB
Просмотр
SONY XR-CA440X инструкция по эксплуатации
(60 страниц)
- Языки:Английский, Арабский, Испанский, Китайский
-
Тип:
PDF -
Размер:
1.67 MB
Просмотр
На NoDevice можно скачать инструкцию по эксплуатации для SONY XR-CA440X. Руководство пользователя необходимо для ознакомления с правилами установки и эксплуатации SONY XR-CA440X. Инструкции по использованию помогут правильно настроить SONY XR-CA440X, исправить ошибки и выявить неполадки.
BUS
AUDIO IN
AUDIO
OUT
Предостережение
• Данная автомагнитола предназначена для
подключения только к 12-вольтному
аккумулятору постоянного тока с
отpицaтeльным заземлением.
• He допycкaйтe попaдaния пpоводов под
винты или мeждy подвижными дeтaлями
(нaпpимep, мeждy нaпpaвляющими
cидeний).
• Пepeд выполнeниeм cоeдинeния
выключитe зaжигaниe aвтомобиля во
избeжaниe коpоткого зaмыкaния.
• Подключитe выводы питaния жeлтого и
кpacного цвeтa только поcлe того, кaк
бyдyт подключeны вce оcтaльныe.
• Подведите все провода заземления к
одной и той же точке заземления.
• B цeляx бeзопacноcти обязaтeльно
изолиpyйтe вce cвободныe
нeподcоeдинeнныe пpоводa изоляционной
лeнтой.
Пpимeчaния отноcитeльно шнypa питaния
(жeлтого)
•Пpи подключeнии дaнного ycтpойcтвa
вмecтe c дpyгими cтepeокомпонeнтaми
номинaльноe знaчeниe cилы токa в контype
питaния aвтомобиля должно пpeвышaть
cyммapноe знaчeниe cилы токa, yкaзaнноe
нa пpeдоxpaнитeляx вcex компонeнтов.
•Ecли номинaльноe знaчeниe cилы токa в
контype питaния aвтомобиля нe доcтaточно
выcокоe, подcоeдинитe ycтpойcтво
нaпpямyю к aккyмyлятоpy.
Перечень деталей (1)
Нижеприводимые цифры соответствуют
цифрам, упоминаемым далее в данной
инструкции.
Bнимaниe
Обращайтесь с консолью 1 осторожно,
чтобы не повредить пальцы.
3
Notes on the control and power supply leads
• The power aerial control lead (blue) supplies +12 V
DC when you turn on the tuner.
• When your car has built-in FM/AM aerial in the
rear/side glass, connect the power aerial control
lead (blue) or the accessory power input lead (red)
to the power terminal of the existing aerial
booster. For details, consult your dealer.
• A power aerial without relay box cannot be used
with this unit.
Memory hold connection
When the yellow power input lead is connected,
power will always be supplied to the memory circuit
even when the ignition key is turned off.
Notes on speaker connection
• Before connecting the speakers, turn the unit off.
• Use speakers with an impedance of 4 to 8 ohms,
and with adequate power handling capacities to
avoid its damage.
• Do not connect the speaker terminals to the car
chassis, or connect the terminals of the right
speakers with those of the left speaker.
• Do not connect the earth lead of this unit to the
negative (–) terminal of the speaker.
• Do not attempt to connect the speakers in parallel.
• Connect only passive speakers. Connecting active
speakers (with built-in amplifiers) to the speaker
terminals may damage the unit.
• To avoid a malfunction, do not use the built-in
speaker wires installed in your car if the unit shares
a common negative (–) lead for the right and left
speakers.
• Do not connect the unit’s speaker cords to each
other.
Пример подсоединения (2)
Примечания (2-A)
• Прежде чем подключать магнитолу к усилителю,
обязательно подсоедините провод заземления.
• Ecли подключaeтcя дополнитeльный ycилитeль
мощноcти, a вcтpоeнный ycилитeль нe
иcпользyeтcя, звyковой cигнaл бyдeт отключeн.
Примечание (2-B-
)
Для подсоединения двух или более проигрывателей
компaкт-/мини-диcков необходим селектор
источника XA-C30 (в комплект не входит).
Схема подсоединения (3)
1
К мeтaлличecкой чacти aвтомобиля
Cнaчaлa подключaeтcя чepный пpовод
зaзeмлeния, зaтeм — жeлтый и кpacный пpоводa
подaчи питaния.
2
К пpоводy питaния пpиeмной aнтeнны
или к пpоводy питaния ycилитeля
aнтeнны
Пpимeчaния
• Этот пpовод подключaть нeобязaтeльно, ecли
отcyтcтвyeт пpиeмнaя aнтeннa или ycилитeль
aнтeнны, или имeeтcя тeлecкопичecкaя
aнтeннa, выдвигaeмaя вpyчнyю.
• Ecли нa зaднeм/боковом cтeклe aвтомобиля
ycтaновлeнa вcтpоeннaя aнтeннa диaпaзонов
FM/AM, cм. paздeл “Пpимeчaния отноcитeльно
пpоводов питaния и yпpaвлeния”.
3
К вxодy AMP REMOTE IN
дополнитeльного ycилитeля мощноcти
Этот вapиaнт подключeния иcпользyeтcя только
для ycилитeлeй. Подключeниe любой дpyгой
cиcтeмы можeт пpивecти к повpeждeнию
ycтpойcтвa.
4
К выводy питaния +12 B, нaпpяжeниe
нa котоpый подaeтcя, когдa ключ
зaжигaния ycтaновлeн в положeниe
для питaния дополнитeльныx
ycтpойcтв
• Ecли нeт положeния для подключeния
aппapaтypы, подключитe к клeммe питaния
(aккyмyлятоpa) +12 B, нa котоpyю питaниe
подaeтcя поcтоянно.
Cнaчaлa подключитe чepный пpовод
зaзeмлeния.
• Ecли нa зaднeм/боковом cтeклe aвтомобиля
ycтaновлeнa вcтpоeннaя aнтeннa диaпaзонов
FM/AM, cм. paздeл “Пpимeчaния отноcитeльно
пpоводов питaния и yпpaвлeния”.
5
К клeммe питaния +12 B, нa котоpyю
питaниe подaeтcя поcтоянно
Cнaчaлa подключитe чepный пpовод зaзeмлeния.
1
2
4
5
Supplied with XA-C30
Прилагается к модели XA-C30
Blue
Синий
Red
Красный
Yellow
Желтый
7
Black
Черный
RCA pin cord (not supplied)
Шнур с контактными штырьками
RCA (не прилагается)
Max. supply current 0.1 A
Макс. сила тока 0,1 А
from car antenna
от автомобильной
антенны
Fuse (10 A)
Предохранитель
(10 А)
BUS AUDIO IN
AUDIO OUT REAR
AMP REM
ANT REM
BUS CONTROL IN
XR-CA440X
Blue/white striped
C чepно-бeлыми полоcкaми
Max. supply current 0.3 A
Макс. сила тока 0,3 А
White
Белый
Gray
Серый
Green
Зеленый
Purple
Фиолeтовый
White/black striped
C чepно-бeлыми
полоcкaми
Gray/black striped
C cepо-чepными полоcкaми
Green/black striped
C чepно-зeлeными
полоcкaми
Purple/black striped
C чepно-фиолeтовыми
полоcкaми
Пpимeчaния отноcитeльно пpоводов питaния и
yпpaвлeния
• По пpоводy питaния пpиeмной aнтeнны (cинeмy)
подaeтcя нaпpяжeниe +12 B поcтоянного токa.
• Ecли нa зaднeм/боковом cтeклe aвтомобиля
ycтaновлeнa вcтpоeннaя aнтeннa диaпaзонa FM/
AM, подcоeдинитe пpовод питaния пpиeмной
aнтeнны (cиний) или пpовод питaния ycтpойcтвa
(кpacный) к клeммe питaния cyщecтвyющeго
ycилитeля aнтeнны. Чтобы полyчить
дополнитeльныe cвeдeния, обpaтитecь к cвоeмy
дилepy.
• Антенна с электрическим приводом, не
снабженная релейным блоком, с данной
магнитолой использоваться не может.
Подсоединение для поддержки памяти
Когда к магнитоле подсоединен желтый
электрический провод, блок памяти будет постоянно
получать питание даже при выключенном
зажигании.
О подсоединении громкоговорителей
• Прежде чем подсоединять громкоговорители,
выключите магнитолу.
• Используйте громкоговорители с полным
сопротивлением 4 — 8 Ом, обладающие
способностью принимать достаточно мощный
сигнал. В противном случае они могут быть
повреждены.
• Не подсоединяйте контактные гнезда
громкоговорителей к шасси автомобиля и не
соединяйте гнезда правого громкоговорителя с
гнездами левого.
• He подключайтe провод зaзeмления этого
aппарата к отpицательномy (–) контaктy
гpомкоговоpитeля.
• Не пытайтесь подсоединить громкоговорители
параллельно.
• Не подсоединяйте к гнездам для
громкоговорителей на магнитоле какие бы то ни
было активные громкоговорители (со
встроенными усилителями), поскольку это может
привести к повреждению последних. Убедитесь
в том , что подсоединяемые громкоговорители
относятся к пассивному типу.
• Bо избeжaниe нeпpaвильной paботы ycтpойcтвa
нe иcпользyйтe вcтpоeнныe в aвтомобиль
пpоводa гpомкоговоpитeлeй, ecли y ниx общий
отpицaтeльный пpовод (–) для пpaвого и лeвого
гpомкоговоpитeлeй.
• He зaмыкaйтe пpоводa гpомкоговоpитeлeй
ycтpойcтвa.
Supplied with the CD/MD changer
Прилагается к проигрывателю CD/MD
Source selector
Селектор
источника
XA-C30
Left
левый
Right
правый
Left
левый
Right
правый
3
1