- Manuals
- Brands
- Yealink Manuals
- IP Phone
- SIP-T21 E2
- User manual
-
Contents
-
Table of Contents
-
Troubleshooting
-
Bookmarks
Quick Links
Related Manuals for Yealink SIP-T21 E2
Summary of Contents for Yealink SIP-T21 E2
-
Page 2
Copyright © 2015 YEALINK NETWORK TECHNOLOGY CO., LTD Copyright © 2015 Yealink Network Technology CO., LTD. All rights reserved. No parts of this publication may be reproduced or transmitted in any form or by any means, electronic or mechanical, photocopying, recording, or otherwise, for any purpose, without the express written permission of Yealink Network Technology CO., LTD. -
Page 3
Do not dispose of WEEE as unsorted municipal waste and have to collect such WEEE separately. We are striving to improve our documentation quality and we appreciate your feedback. Email your opinions and comments to DocsFeedback@yealink.com. -
Page 4
Yealink SIP-T21(P) E2 IP phone firmware contains third-party software under the GNU General Public License (GPL). Yealink uses software under the specific terms of the GPL. Please refer to the GPL for the exact terms and conditions of the license. -
Page 5
Thank you for choosing the SIP-T21(P) E2 IP phone, exquisitely designed to provide business telephony features, such as Call Hold, Call Transfer, Busy Lamp Field, Multicast Paging and Conference over an IP network. The difference between the SIP-T21 E2 and SIP-T21P E2 IP phones is that only SIP-T21P E2 supports PoE. -
Page 6
User Guide for the SIP-T21(P) E2 IP Phone LED Instructions on page Web User Interface on page Call Forward on page … -
Page 7: Table Of Contents
Table of Contents About This Guide …………..v In This Guide ……………………. v Summary of Changes ………………….v Changes for Release 80, Guide Version 80.60 ………….. v Table of Contents …………..vii Overview ……………… 1 Hardware Component Instructions ………………1 Icon Instructions ……………………
-
Page 8: Table Of Contents
User Guide for the SIP-T21(P) E2 IP Phone Volume ……………………..29 Ring Tones ……………………29 Contact Management ………………….. 31 Directory……………………… 31 Local Directory …………………… 33 Blacklist ……………………..43 Remote Phone Book ………………….45 Call History Management ………………..47 System Customizations …………………. 49 Logo Customization ………………….
-
Page 9: Table Of Contents
Table of Contents Busy Lamp Field (BLF) ………………… 105 BLF List ……………………..107 Call Recording ……………………109 Hot Desking ……………………111 Intercom ……………………..112 Outgoing Intercom Calls ………………..112 Incoming Intercom Calls ………………..113 Using Intercom ………………….114 Multicast Paging ………………….. 115 Sending RTP Stream …………………
-
Page 10
User Guide for the SIP-T21(P) E2 IP Phone… -
Page 11: Overview
Overview This chapter provides the overview of the SIP-T21(P) E2 IP phone. Topics include: Hardware Component Instructions Icon Instructions LED Instructions User Interfaces Documentations If you require additional information or assistance with your new phone, contact your system administrator.
-
Page 12
Secures the handset in the handset cradle when the IP phone is mounted vertically. For more information on ⑮ Hookswitch Tab Yealink Wall how to adjust the hookswitch tab, refer to Mount Quick Installation Guide for Yealink IP Phones… -
Page 13
Overview Icons appearing on the LCD screen are described in the following table: Icon Description Network is unavailable The private line registers successfully Register failed Registering The shared/bridged line registers successfully Hands-free speakerphone mode Handset mode Headset mode Multi-lingual lowercase letters input mode Multi-lingual uppercase letters input mode Alphanumeric input mode Numeric input mode… -
Page 14
User Guide for the SIP-T21(P) E2 IP Phone Icon Description Call Hold Ringer volume is 0 Phone Lock Call Mute Received Calls Placed Calls Missed Calls Recording box is full A call cannot be recorded Recording starts successfully Recording cannot be started Recording cannot be stopped The contact icon The ACD state is available… -
Page 15
Overview Power Indicator LED LED Status Description Solid red The phone is initializing. Fast flashing red (300ms) The phone is ringing. Slow flashing red (1s) The phone receives a voice mail or text message. The phone is powered off. The phone is idle. The phone is busy. -
Page 16
User Guide for the SIP-T21(P) E2 IP Phone Line key LED (associated with a shared line) The local SCA phone indicates the phone is involved in a SCA call, while the monitoring SCA phone indicates the phone is not involved in the SCA call. LED Status Description The shared line is idle. -
Page 17: User Interfaces
Overview Two ways to customize configurations of your SIP-T21(P) E2 IP phone: The user interface on the IP phone. The user interface in a web browser on your PC. The hardware components keypad and LCD screen constitute the phone user interface, which allows the user to execute all call operation tasks and basic configuration changes directly on the phone.
-
Page 18
User Guide for the SIP-T21(P) E2 IP Phone Options Phone User Interface Web User Interface —Backlight √ —Language √ —Time & Date √ —Administrator Password √ —Key as Send √ —Phone Lock √ —Ring Tones √ —Contact Management —Directory —Local Directory √… -
Page 19: Documentations
Basic call features On the website/In Quick Start Guide and phone English the package customizations Phone/Web user interface settings User Guide Basic call features On the website English and advanced phone features Note You can also download the latest documentations online: http://support.yealink.com/documentFront/forwardToDocumentDetailPage?documentId=…
-
Page 20
User Guide for the SIP-T21(P) E2 IP Phone… -
Page 21: Getting Started
Getting Started This chapter provides basic installation instructions and information for obtaining the best performance with the SIP-T21(P) E2 IP phone. Topics include: Packaging Contents Phone Installation Phone Initialization Phone Status Basic Network Settings Registration …
-
Page 22: Optional Accessories
User Guide for the SIP-T21(P) E2 IP Phone Phone Stand Handset & Handset Cord Ethernet Cable Quick Start Guide Check the list before installation. If you find anything missing, contact your system administrator. The following items are optional accessories for your SIP-T21(P) E2 IP phone. You need to purchase them separately if required.
-
Page 23
Getting Started Power Adapter Headset If your phone is already installed, proceed to Phone Initialization on page 16. This section introduces how to install the phone: 1) Attach the stand 2) Connect the handset and optional headset 3) Connect the network and power… -
Page 24
Connect the network and power You have two options for power and network connections. Your system administrator will advise you which one to use. AC power Power over Ethernet (PoE) Note PoE is not applicable to the SIP-T21 E2 IP phone. -
Page 25: Power Over Ethernet
Getting Started AC Power To connect the AC power: Connect the DC plug on the power adapter to the DC5V port on the phone and connect the other end of the power adapter into an electrical power outlet. Connect the included or a standard Ethernet cable between the Internet port on the phone and the one on the wall or switch/hub device port.
-
Page 26: Phone Initialization
User Guide for the SIP-T21(P) E2 IP Phone After your phone is powered on, the system boots up and performs the following steps: Automatic Phone Initialization The phone finishes the initialization by loading the saved configuration. The LCD screen displays “Welcome Initializing…please wait” during this process. DHCP (Dynamic Host Configuration Protocol) The phone attempts to contact a DHCP server in your network to obtain valid IPv4 network settings (e.g., IP address, subnet mask, default gateway address and DNS…
-
Page 27
Getting Started Enter the user name (admin) and password (admin) in the login page. Click Confirm to login. The phone status is displayed on the first page of the web user interface. If your phone cannot contact a DHCP server for any reason, you need to configure network settings manually. -
Page 28
User Guide for the SIP-T21(P) E2 IP Phone Press , or the Switch soft key to select IPv4, IPv6 or IPv4 & IPv6 from the IP Mode field. Press the Save soft key to accept the change or the Back soft key to cancel. To configure a static IPv4 address via phone user interface: Press Menu->Settings->Advanced Settings (default password: admin) ->Network->WAN Port. -
Page 29
Getting Started If you are using an xDSL modem, you can connect your phone to the Internet via PPPoE mode. Set the WAN port as a PPPoE port. The PPPoE port will perform a PPP negotiation to obtain the IP address. Contact your system administrator for the PPPoE user name and password. -
Page 30: Idle Screen
User Guide for the SIP-T21(P) E2 IP Phone The idle screen displays the label of current account, time and date, and four soft keys.
-
Page 31: Customizing Your Phone
Customizing Your Phone You can customize your SIP-T21(P) E2 IP phone by personally configuring certain settings, for example, contrast, language and time & date. You can add contacts to the phone’s local directory manually or from call history. You can also personalize different ring tones for different callers.
-
Page 32: Backlight
User Guide for the SIP-T21(P) E2 IP Phone You can configure the backlight to adjust the brightness of the LCD screen. Backlight status on the LCD screen can be configured from the following options: Always On: Backlight is on permanently. …
-
Page 33: Time & Date
Customizing Your Phone Text displayed on the phone user interface will change to the selected language. To change the language for the web user interface: Click on Settings->Preference. Select the desired language from the pull-down list of Language. Click Confirm to accept the change. Text displayed on the web user interface will change to the selected language.
-
Page 34
User Guide for the SIP-T21(P) E2 IP Phone Enter the domain names or IP addresses of SNTP server in the NTP Server1 and NTP Server2 fields respectively. Press , or the Switch soft key to select the desired value from the Daylight Saving field. -
Page 35: Administrator Password
Customizing Your Phone There are 7 available date formats. For example, for the date format “WWW DD MMM”, “WWW” represents the abbreviation of the weekday, “DD” represents the two-digit day, and “MMM” represents the first three letters of the month. The date formats available: Date Format Example (2015-05-16)
-
Page 36: Phone Lock
User Guide for the SIP-T21(P) E2 IP Phone You can set the “#” or “*” to perform as a send key while dialing. To configure key as send via phone user interface: Press Menu->Features->Key as send. Press , or the Switch soft key to select # or * from the Key as send field, or select Disabled to disable this feature.
-
Page 37
Customizing Your Phone To activate the phone lock via phone user interface: Press Menu->Settings->Advanced Settings (default password: admin) ->Phone Lock. Press , or the Switch soft key to select Enabled from the Lock Enable field. Press , or the Switch soft key to select the desired type from the Lock Type field. -
Page 38
User Guide for the SIP-T21(P) E2 IP Phone respectively. Press the Save soft key to accept the change or the Back soft key to cancel. Note The unlock PIN length must be within 15 digits. To unlock the phone via phone user interface: Press any locked key, the LCD screen prompts “Unlock PIN”. -
Page 39: Volume
Customizing Your Phone Press the Save soft key to accept the change. Phone lock is configurable via web user interface at the path Features->Phone Lock. You can press the Volume key to adjust the ringer volume when the phone is idle. You can also press the Volume key to adjust the receiver volume of currently engaged audio devices (handset, speakerphone or headset) when the phone is in use.
-
Page 40
User Guide for the SIP-T21(P) E2 IP Phone To select a ring tone for the phone via phone user interface: Press Menu->Settings->Basic Settings->Sound->Ring Tones->Common. Press to select the desired ring tone. Press the Save soft key to accept the change or the Back soft key to cancel. A ring tone for the phone is configurable via web user interface at the path Settings->Preference->Ring Type. -
Page 41: Directory
Customizing Your Phone In the Upload Ringtone field, click Browse to locate a ring tone (the file format must be *.wav) file from your local system. Click Upload to upload the file. Note The priority of ring tone for an incoming call on the phone is as follows: Contact ring tone (refer to Adding Contacts) >Group ring tone (refer to…
-
Page 42
User Guide for the SIP-T21(P) E2 IP Phone To remove a list from the Enabled column, select the desired list and then click To adjust the display order of enabled lists, select the desired list and then click The LCD screen displays the list(s) in the adjusted order. Click Confirm to accept the change. -
Page 43: Local Directory
Customizing Your Phone The built-in phone directory can store the names and phone numbers of your contacts. You can store up to 1000 contacts and 48 groups in your phone’s local directory. You can add new groups and contacts, edit, delete or search for a contact, or simply dial a contact number from the local directory.
-
Page 44
User Guide for the SIP-T21(P) E2 IP Phone To edit a group in the local directory: Press the Dir soft key. The IP phone enters the local directory directly as there is only Local Directory enabled in the directory by default. If Local Directory is removed from the , press Menu->Directory->Local directory… -
Page 45: Adding Contacts Manually
Customizing Your Phone The IP phone enters the local directory directly as there is only Local Directory enabled in the directory by default. If Local Directory is removed from the , press Menu->Directory->Local directory Directory to enter the local directory. Select the desired group.
-
Page 46
User Guide for the SIP-T21(P) E2 IP Phone The IP phone enters the local directory directly as there is only Local Directory enabled in the directory by default. If Local Directory is removed from the , press Menu->Directory->Local directory Directory to enter the local directory. Select the desired contact group and then press the Enter soft key. -
Page 47
Customizing Your Phone Press the Option soft key, and then select Add to Contacts. Press the OK soft key, and then edit the contact name. Press the Save soft key to accept the change. The entry is successfully saved to the local directory. Adding Contacts from Remote Phone Book To add a contact to the local directory from remote phone book: Press Menu->Directory->Remote Phone Book. -
Page 48
User Guide for the SIP-T21(P) E2 IP Phone Directory to enter the local directory. Select the desired contact group and then press the Enter soft key. Press to highlight the desired contact. Press the Option soft key, and then select Detail. Press to highlight the contact information and then edit. -
Page 49
Customizing Your Phone Delete All. To place a call to a contact from the local directory: Press the Dir soft key. The IP phone enters the local directory directly as there is only Local Directory enabled in the directory by default. If Local Directory is removed from the , press Menu->Directory->Local directory… -
Page 50
User Guide for the SIP-T21(P) E2 IP Phone Directory to enter the local directory. Press the Search soft key. Enter a few continuous characters of the contact name or continuous numbers of the contact number (office, mobile or other number) using the keypad. The contacts whose name or phone number matches the characters entered will appear on the LCD screen. -
Page 51
Customizing Your Phone The LCD screen will display search results in the adjusted order. Click Confirm to accept the change. Note Search source list in dialing is configurable via web user interface only. To search for a contact in the enabled search source lists: Pick up the handset, press the speakerphone or press the line key. -
Page 52
User Guide for the SIP-T21(P) E2 IP Phone You can manage your phone’s local directory via phone user interface or web user interface. But you can only import or export the contact list via web user interface. To import an XML file of contact list via web user interface: Click on Directory->Local Directory. -
Page 53: Blacklist
Customizing Your Phone Select the contact information you want to import into the local directory from the pull-down list of Index. At least one item should be selected to be imported into the local directory. Click Import to complete importing the contact list. To export a contact list via web user interface: Click on Directory->Local Directory.
-
Page 54
User Guide for the SIP-T21(P) E2 IP Phone Enter the name and the office, mobile or other numbers in the corresponding fields. Press , or the Switch soft key to select the desired account from the Account field. If Auto is selected, the phone will use the default account when placing calls to the contact from the blacklist directory. -
Page 55: Remote Phone Book
Customizing Your Phone You can add new contacts to the local directory, search for a contact, or simply dial a contact number from the remote phone book. You can configure your new phone to access up to 5 remote phone books. For the access URL of the remote phone book, contact your system administrator.
-
Page 56
User Guide for the SIP-T21(P) E2 IP Phone Press the Back soft key to back to the previous screen. To search for a contact in the remote phone book: Press Menu->Directory->Remote Phone Book. If Remote Phone Book is added to the directory, press Dir->Remote Phone Book to enter the remote phone book. -
Page 57
Customizing Your Phone Enter the desired refresh period in the Update Time Interval(Seconds) field. The default value is 21600 seconds. Click Confirm to accept the change. The SIP-T21(P) E2 IP phone maintains call history lists of Placed calls, Received calls, Missed calls and Forwarded calls. -
Page 58
User Guide for the SIP-T21(P) E2 IP Phone Press to select the desired entry. Press the Option soft key, and then select Detail. The detailed information of the entry appears on the LCD screen. To place a call from the call history list: Press the History soft key. -
Page 59
Customizing Your Phone The LCD screen prompts «Delete all the call records?». Press the OK soft key to confirm the deletion or the Cancel soft key to cancel. You can upload your custom logo which will be shown on the idle screen. To upload a custom logo via web user interface: Click on Features->General Information. -
Page 60: Headset Use
User Guide for the SIP-T21(P) E2 IP Phone Click Confirm to accept the change. Note custom logo, you can click Delete item will appear after you upload a Delete to delete the custom logo. The logo file format must be *.dob, contact your system administrator for more information.
-
Page 61
Customizing Your Phone Select Enabled from the pull-down list of Headset Prior. Click Confirm to accept the change. To use headset prior feature, you should activate the headset mode in advance: Physically connect the headset. Press to activate the headset mode. Note If headset prior is enabled, the headset mode will not be deactivated until you press the HEADSET… -
Page 62: Dss Keys
User Guide for the SIP-T21(P) E2 IP Phone To enable dual headset via web user interface: Click on Features->General Information. Select Enabled from the pull-down list of Dual-Headset. Click Confirm to accept the change. Note Dual headset is configurable via web user interface only. There are two types of DSS keys: Line Keys and Programable Keys.
-
Page 63
Customizing Your Phone (Optional.) Select the desired line from the Account ID field. (Optional.) Enter the corresponding value in the Value field. (Optional.) Enter the corresponding value in the Extension field. Press the Save soft key to accept the change or the Back soft key to cancel. Line key is configurable via web user interface at the path DSSKey->Line Key. -
Page 64
User Guide for the SIP-T21(P) E2 IP Phone Line You can use this key feature to accept incoming calls, place active calls on hold or resume a held call. It performs in the same way as a hard line key. Type (Line) Dependencies: Account ID (the account this feature will be applied to) -
Page 65
Customizing Your Phone their own group. Type (Key Event) Dependencies: Key Type (GPickup) Account ID (the account this feature will be applied to) Value (the group pickup feature code) Usage: Press the DSS key on your phone when a phone number in the group receives an incoming call. -
Page 66
User Guide for the SIP-T21(P) E2 IP Phone Type (Key Event) Dependencies: Key Type (XML Group) PhoneBook (the remote group name you want to access if remote phone book is configured) Usage: Press the DSS key to access the remote group specified in the PhoneBook field. XML Browser You can use this key feature to quickly access a XML browser. -
Page 67
Customizing Your Phone Key Type (FWD) Value (the number you want to forward to) Usage: Press the DSS key to forward an incoming call to the number specified in the Value field. Note If the Value field is left blank, the DSS key performs the same as the soft key when receiving an incoming call. -
Page 68
User Guide for the SIP-T21(P) E2 IP Phone (DND) on page 81. Type (Key Event) Dependencies: Key Type (DND) Usage: When DND is in phone mode: Press the DSS key to activate DND. Press the DSS key again to deactivate DND. When DND is in custom mode: Press the DSS key to access the custom DND screen. -
Page 69
Customizing Your Phone Usage: Press the DSS key to access the zero touch screen. Press the OK soft key within a few seconds. Configure the network parameters in the corresponding fields. Press the Next soft key. Configure the auto provision parameters in the corresponding fields. Press the OK soft key. -
Page 70
User Guide for the SIP-T21(P) E2 IP Phone Customize specific features for these keys. (Optional.) Enter a string that will appear on the LCD screen in the Label field. Label is configurable only when customizing SoftKey 1-4. Click Confirm to accept the change. You can click Reset to default to reset custom settings to defaults. -
Page 71
Customizing Your Phone To register an account via phone user interface: Press Menu->Settings->Advanced Settings (default password: admin) ->Accounts. Select the desired account and then press the Enter soft key. Select Enabled from the Active Line field. Enter the desired values in Label, Display Name, Register Name, User Name, Password and SIP Server1/2 fields respectively. -
Page 72: Dial Plan
User Guide for the SIP-T21(P) E2 IP Phone You can configure multiple line keys to associate with an account. This enhances call visualization and simplifies call handling. Incoming calls to this account will be distributed evenly among the available line keys. Outgoing calls will be distributed similarly.
-
Page 73
Customizing Your Phone The “$” should be followed by the sequence number of a parenthesis. The “$” plus the sequence number means the whole character or characters placed in the parenthesis. The number directs to the right parenthesis when there are more than one. Example: A replace rule configuration, Prefix: «001(xxx)45(xx)», Replace: «9001$145$2». -
Page 74
User Guide for the SIP-T21(P) E2 IP Phone When you enter the number “1” using the keypad and then press the Send soft key, the phone will dial out “1234” instead. Note The valid values of Account field can be one or two digits between 1 and 2. Each digit must be separated by a comma. -
Page 75
Customizing Your Phone For more information on the valid values of Account field, refer to Replace Rule page 63. Click Add to add the dial-now rule. When you enter the number “123” using the keypad, the phone will dial out “123” automatically without pressing any key. -
Page 76
User Guide for the SIP-T21(P) E2 IP Phone Enter the time between 1 and 14 (seconds) in the Time-Out for Dial-Now Rule field. Click Confirm to accept the change. Delay time for dial-now rule is configurable via web user interface only. Note Area codes are also known as Numbering Plan Areas (NPAs). -
Page 77
Customizing Your Phone For more information on the valid values of Account field, refer to Replace Rule page 63. Click Confirm to accept the change. Note The default value of minimum and maximum length is 1 and 15 respectively. Area code is configurable via web user interface only. You can block some specific numbers (up to 10) from being dialed on your phone. -
Page 78: Emergency Number
User Guide for the SIP-T21(P) E2 IP Phone For more information on the valid values of Account field, refer to Replace Rule page 63. Click Confirm to add the block out number. Note Block out number is configurable via web user interface only. Public telephone networks in countries around the world have a single emergency telephone number (emergency services number), that allows a caller to contact local emergency services for assistance when necessary.
-
Page 79: Live Dialpad
Customizing Your Phone For multiple numbers, enter a comma between every two emergency numbers. The default emergency numbers are 112, 911 and 110. Click Confirm to accept the change. Note Emergency number is configurable via web user interface only. You can enable live dialpad feature on the SIP-T21(P) E2 IP phone, which enables the IP phone to automatically dial out a phone number without pressing the send key.
-
Page 80: Hotline
User Guide for the SIP-T21(P) E2 IP Phone Click Confirm to accept the change. Note Live dialpad is configurable via web user interface only. You can dial a hotline number immediately upon lifting the handset, pressing the Speakerphone key or the line key. You can also configure a delay, and then the phone will dial out the hotline number automatically after the designated period of time.
-
Page 81: Basic Call Features
Basic Call Features The SIP-T21(P) E2 IP phone is designed to be easily used like a regular phone on a public switched telephone network (PSTN). You can place calls, answer calls, transfer a call to someone else, or conduct a conference call. This chapter provides basic operating instructions for the SIP-T21(P) E2 IP phone.
-
Page 82
User Guide for the SIP-T21(P) E2 IP Phone Using the speakerphone Using the headset You can also dial the number first, and then choose the way you want to speak to the other party. You can also search and dial a contact from call history, local directory or remote phone book. -
Page 83
Basic Call Features To place a call using the headset: Do one of the following: With the optional headset connected, press to activate the headset mode. Press the line key to obtain a dial tone. Enter the desired number using the keypad. Press , or the Send soft key. -
Page 84
User Guide for the SIP-T21(P) E2 IP Phone When you are not in another call, you can answer a call in one of three ways: Using the handset Using the speakerphone Using the headset Note You can reject incoming calls by pressing the Reject soft key or the X key. You can also activate Do Not Disturb mode to ignore all incoming calls without ring on your phone. -
Page 85: Recent Call In Dialing
Basic Call Features The incoming call is answered and the original call is placed on hold. Press to access the new call. Press or the Answer soft key. The incoming call is answered and the original call is placed on hold. To end a call: Do one of the following: If you are using the handset, press the EndCall soft key or hang up the handset.
-
Page 86: Auto Answer
User Guide for the SIP-T21(P) E2 IP Phone Select Enabled from the pull-down list of Recent Call In Dialing. Click Confirm to accept the change. Note Recent call in dialing is configurable via web user interface only. To view placed calls list when the phone is in the pre-dialing screen: Pick up the handset, press the speakerphone or press the line key.
-
Page 87: Auto Redial
Basic Call Features Press , or the Switch soft key to select Enabled from the Status field. Press the Save soft key to accept the change or the Back soft key to cancel. icon appears on the LCD screen. Auto answer is configurable via web user interface at the path Account->Basic. Note Auto answer is only applicable when there is no other call in progress on the phone.
-
Page 88: Call Completion
User Guide for the SIP-T21(P) E2 IP Phone Press the Save soft key to accept the change or the Back soft key to cancel. Auto redial is configurable via web user interface at the path Features->General Information. To use auto redial: When the called party is busy, the LCD screen prompts the following: Press the OK soft key to activate auto redial.
-
Page 89: Recall
Basic Call Features Call completion is configurable via web user interface at the path Features->General Information. To use call completion: When the called party is busy, the following prompt will appear on the LCD screen of the phone: Press the OK soft key, the phone returns to the idle screen and call completion is activated.
-
Page 90: Call Mute
User Guide for the SIP-T21(P) E2 IP Phone Press , or the Switch soft key to select ReCall from the Key Type field. Press the Save soft key to accept the change or the Back soft key to cancel. Recall key is configurable via web user interface at the path DSSKey->Line Key. You can mute the microphone of the active audio device during an active call so that the other party cannot hear you.
-
Page 91
Basic Call Features The line key LED flashes green. The LCD screen indicates that the call is on hold. Note The phone will beep softly every 30 seconds to remind you that you still have a call on hold. To resume a held call: Press the Resume soft key. -
Page 92
User Guide for the SIP-T21(P) E2 IP Phone To configure the DND mode via web user interface: Click on Features->Forward & DND. In the DND block, mark the desired radio box in the Mode field. Click Confirm to accept the change. Note DND mode is configurable via web user interface only. -
Page 93
Basic Call Features Incoming calls will be rejected automatically and «n New Missed Call(s)» («n» indicates the number of missed calls)will appear on the LCD screen. Note When DND and busy forward are enabled in phone mode, calls will be sent to the configured destination number. -
Page 94: Call Forward
User Guide for the SIP-T21(P) E2 IP Phone Incoming calls on the specific line will be rejected automatically, and the LCD screen will prompt «n New Missed Call(s)» («n» indicates the number of missed calls). Note When DND and busy forward are both enabled for a specific account, calls to the specific account will be sent to the configured destination number.
-
Page 95
Basic Call Features For multiple numbers, enter a comma between every two numbers. Click Confirm to accept the change. When DND is enabled on the phone, the phone can still receive incoming calls from the numbers specified in the DND Authorized Numbers field. Note DND authorized number is configurable via web user interface only. -
Page 96
User Guide for the SIP-T21(P) E2 IP Phone You can enable/disable call forward for the phone system, or you can customize call forward for each or all accounts. Two call forward modes: Phone (default): Call forward is effective for the phone system. … -
Page 97
Basic Call Features Depending on your selection: a.) If you select Always Forward: 1) Press , or the Switch soft key to select Enabled from the Always Forward field. 2) Enter the destination number you want to forward all incoming calls to in the Forward to field. -
Page 98
User Guide for the SIP-T21(P) E2 IP Phone before forwarding from the After Ring Time field. The default ring time is 12 seconds. 4) (Optional.) Enter the no answer forward on code or off code respectively in the On Code or Off Code field. Press the Save soft key to accept the change or the Back soft key to cancel. -
Page 99
Basic Call Features The LCD screen prompts “Copy to all lines?”. 3) Press the OK soft key to accept the change or the Cancel soft key to cancel. b.) If you select Busy Forward, you can enable it for a specific account. 1) Press , or the Switch soft key to select Enabled from the Busy Forward field. -
Page 100
User Guide for the SIP-T21(P) E2 IP Phone c.) If you select No Answer Forward, you can enable it for a specific account. 1) Press , or the Switch soft key to select Enabled from the No Answer Forward field. 2) Enter the destination number you want to forward all unanswered incoming calls to in the Forward to field. -
Page 101
Basic Call Features To configure the forward authorized numbers via web user interface: Click on Features->Forward & DND. Select Enabled from the pull-down list of Forward Emergency. Enter the numbers in the Forward Authorized Numbers field. For multiple numbers, enter a comma between every two numbers. Click Confirm to accept the change. -
Page 102: Call Transfer
User Guide for the SIP-T21(P) E2 IP Phone Press to select the desired account and then press the Enter soft key. Press to select the desired forwarding type and then press the Enter soft key. Press , or the Switch soft key to select Disabled to disable the call forward.
-
Page 103: Call Waiting
Basic Call Features Do one of the following: Press the Dir soft key, and then select Local Directory. Select the desired group and search for the contact (Directory should be configured in advance. Refer Directory on page for more information). Press the Dir soft key, and then select History.
-
Page 104: Conference
User Guide for the SIP-T21(P) E2 IP Phone when there is an active call on the phone. You can also enable or disable the phone to play a warning tone when receiving another call. To configure call waiting via phone user interface: Press Menu->Features->Call Waiting.
-
Page 105: Network Conference
Basic Call Features parties in the conference. You can press to see all parties in the conference. To join two calls in a conference: Place two calls using two different accounts on the phone (for example, place the first call using account 1, and then place the second call using account 2). Press to select the call for conference and ensure that the call is active (for example, select the call on account 1).
-
Page 106
User Guide for the SIP-T21(P) E2 IP Phone To configure network conference via web user interface: Click on Account->Advanced. Select the desired account from the pull-down list of Account. Select Network Conference from the pull-down list of Conference Type. Enter the conference URI (e.g., conference@example.com) in the Conference URI field. -
Page 107: Call Park
Basic Call Features You can use call park feature to place a call on hold, and then retrieve the call from another phone in the system (for example, a phone in another office or conference room). You can park an active call by pressing the call park key on the phone. If the call is parked successfully, the response is either a voice prompt confirming that the call was parked, or a visible prompt on the LCD screen.
-
Page 108: Call Pickup
User Guide for the SIP-T21(P) E2 IP Phone The system establishes call between phone C and B. Note The call park code and call park retrieve code are predefined on the system server. Contact your system administrator for more information. If the parked call is not retrieved within a period of time assigned by the system, the phone performing call park will receive call back.
-
Page 109
Basic Call Features To configure the directed call pickup code on a per-line basis via web user interface: Click on Account->Advanced. Select the desired account from the pull-down list of Account. Enter the directed call pickup code in the Directed Call Pickup Code field. Click Confirm to accept the change. -
Page 110: Group Call Pickup
User Guide for the SIP-T21(P) E2 IP Phone You can also configure a DSS key as a direct pickup key via phone user interface or web user interface. Once configured, you can pick up a call by pressing the directed pickup key directly.
-
Page 111
Basic Call Features Enter the group call pickup code in the Group Call Pickup Code field. Click Confirm to accept the change. To pick up a call in the group: Pick up the handset, press the speakerphone or press the line key. The GPickup soft key appears on the LCD screen. -
Page 112: Anonymous Call
User Guide for the SIP-T21(P) E2 IP Phone You can use anonymous call to block your identify and phone number from appearing to the called party when you call someone. For example, you want to call to consult some services, but don’t want to be harassed. Anonymous call is configurable on a per-line basis.
-
Page 113: Anonymous Call Rejection
Basic Call Features The LCD screen of phone B prompts an incoming call from anonymity. You can use anonymous call rejection to reject incoming calls from anonymous callers. Anonymous call rejection automatically rejects incoming calls from callers who deliberately block their identities and numbers from being displayed. Anonymous call rejection is configurable on a per-line basis.
-
Page 114
User Guide for the SIP-T21(P) E2 IP Phone… -
Page 115: Led Instructions On
Advanced Phone Features This chapter provides operating instructions for the advanced features of the SIP-T21(P) E2 IP phone. Topics include: Busy Lamp Field (BLF) BLF List Call Recording Hot Desking Intercom Multicast Paging Music on Hold …
-
Page 116
User Guide for the SIP-T21(P) E2 IP Phone Press , or the Switch soft key to select BLF from the Type field. Press , or the Switch soft key to select the desired line from the Account ID field. Enter the phone number or extension you want to monitor in the Value field. (Optional.) Enter the Directed Call Pickup Code in the Extension field. -
Page 117: Blf List
Advanced Phone Features The BLF key LED flashes red. The caller ID appears on the LCD screen (if enabled). In the following figure, the LCD screen shows an incoming call from 2500 on the monitored line. Note If your phone is locked and the type of the phone lock is configured as Function Keys or All Keys, you cannot use the DPickup, Send, NewCall and Cancel soft keys until unlocked.
-
Page 118
User Guide for the SIP-T21(P) E2 IP Phone in and set up a conference call. Before barging in an active call, ensure that the barge-in code has been configured in advance. If the BLF list barge in code is not configured, the phone will place a call to the monitored user instead of barging in an active call of the monitored user when you press the BLF List key. -
Page 119: Call Recording
Advanced Phone Features You can receive a visual or/and an audio alert (if enabled) on your phone when the monitored user receives an incoming call. For more information, refer to Busy Lamp Field (BLF) on page Note The pickup code is used in the following order of preference: BLF List Pickup Code (Account->Advanced)>Directed Call Pickup Code (Account->Advanced)>Directed Call Pickup Code (Features->Call Pickup).
-
Page 120
User Guide for the SIP-T21(P) E2 IP Phone Press , or the Switch soft key to select URL Record from the Type field. Enter the URL (e.g., http://10.1.2.224/phonerecording.cgi) in the Value field. Press the Save soft key to accept the change or the Back soft key to cancel. Record and URL record keys are configurable via web user interface at the path DSSKey->Line Key. -
Page 121: Hot Desking
Advanced Phone Features You can listen to the recordings stored on your server system. For example, you can dial an access code to listen to the recordings. Note The way in which you listen to the recordings may be different depending on the server. Contact your system administrator for more information.
-
Page 122: Intercom
User Guide for the SIP-T21(P) E2 IP Phone The LCD screen prompts the following warning: Press the OK soft key, registration configurations of all accounts on the phone will be cleared immediately. The login wizard will be displayed as below: Enter the login information in each field.
-
Page 123: Incoming Intercom Calls
Advanced Phone Features Press , or the Switch soft key to select Intercom from the Type field. Select the desired line from the Account ID field. Enter the target extension number in the Value field. Press the Save soft key to accept the change or the Back soft key to cancel. Intercom key is configurable via web user interface at the path DSSKey->Line Key.
-
Page 124
User Guide for the SIP-T21(P) E2 IP Phone Intercom Mute You can mute or un-mute the phone’s microphone for intercom calls automatically. If Intercom Mute is enabled, the microphone will be muted for intercom calls. If Intercom Mute is disabled, the microphone will work for intercom calls. Intercom Mute is disabled by default. -
Page 125: Multicast Paging
Advanced Phone Features the speakerphone mode by default. To end the intercom call, press the intercom key again or the EndCall soft key. You can use multicast paging to quickly and easily broadcast time sensitive announcements to users who are listening to a specific multicast group. You can configure a multicast paging key or the paging list key on the phone, which allows you to send a Real Time Transport Protocol (RTP) stream to the pre-configured multicast address(es) without involving SIP signaling.
-
Page 126
User Guide for the SIP-T21(P) E2 IP Phone Press , or the Switch soft key to select Paging List from the Key Type field. Press the Save soft key to accept the change or the Back soft key to cancel. Paging list key is configurable via web user interface at the path DSSKey->Line Key. -
Page 127
Advanced Phone Features Press the Option soft key and then select Delete. The LCD screen prompts “Delete selected paging group?”. Press the OK soft key to accept the change or the Cancel soft key to cancel. If you want to delete all paging groups, you can press the Del All soft key. You can also configure the phone to use a default codec for sending multicast RTP stream via web user interface. -
Page 128
User Guide for the SIP-T21(P) E2 IP Phone You can configure the phone to receive a Real Time Transport Protocol (RTP) stream from the pre-configured multicast address(es) without involving SIP signaling. You can specify up to 10 multicast addresses that the phone listens to on the network. How the phone handles incoming multicast paging calls depends on Paging Barge and Paging Priority Active parameters configured via web user interface. -
Page 129
Advanced Phone Features Label will appear on the LCD screen when receiving the multicast RTP stream. Click Confirm to accept the change. Note The priorities of listening addresses are predefined: 1 with the highest priority, 10 with the lowest. Multicast listening addresses are configurable via web user interface only. To configure paging barge and paging priority active features via web user interface: Click on Directory->Multicast IP. -
Page 130
User Guide for the SIP-T21(P) E2 IP Phone To send RTP stream via a multicast paging key when the receiver’s phone is idle: Press the multicast paging key when the phone is idle. The phone sends RTP to a preconfigured multicast address (IP: Port). Both the sender’s and receiver’s phones play a warning tone and the receiver automatically answers the multicast RTP session in the speakerphone mode. -
Page 131: Music On Hold
Advanced Phone Features To resume the held multicast RTP session, press the Resume soft key. The multicast RTP session is established again. To end the multicast RTP session, press the EndCall soft key. Music on hold (MoH) is the business practice of playing recorded music to fill the silence that would be heard by the party placed on hold.
-
Page 132
User Guide for the SIP-T21(P) E2 IP Phone ACD is often used in offices for customer service, such as call center. The ACD system handles large volumes of incoming calls from callers who have no need to talk to a specific person but who require assistance from any of multiple persons at the earliest opportunity. -
Page 133
Advanced Phone Features After configuring an ACD key, you can press the ACD key to log into the ACD system After logging in, you are ready to receive calls from the . You can press the ACD system ACD key to show your current ACD user status. You can press the Avail/Unavail soft key to change your ACD user status. -
Page 134
User Guide for the SIP-T21(P) E2 IP Phone line key 2 for the account 4603_1, phone C registers the account 4604. To configure the auto linekeys feature via web user interface: Click on Features-> General Information. Select Enabled from the pull-down list of Auto LineKeys. Auto LineKeys is you can automatically assign multiple DSS keys with enabled,… -
Page 135
Advanced Phone Features To configure the shared line settings and the number of line key on phone A via web user interface: Register the primary account 4603. Click on Advanced, and then select Shared Call Appearance from the pull-down list of Shared Line. Enter the desired number in the Number of line key field. -
Page 136
User Guide for the SIP-T21(P) E2 IP Phone The default value is 1. In this example, the value is set to 2. Click Confirm to accept the change. The phone A will automatically configure the line keys from the first unused DSS key, according to the configured number in the Number of line key field. -
Page 137
Advanced Phone Features (Enter the primary account 4603 in the Register Name field.) Click on Advanced, and then select Shared Call Appearance from the pull-down list of Shared Line. Enter the desired number in the Number of line key field. This field appears only if Auto Linekeys is enabled. -
Page 138
User Guide for the SIP-T21(P) E2 IP Phone The default value is 1. In this example, the value is set to 2. Click Confirm to accept the change. The phone B will automatically configure the line keys from the first unused DSS key, according to the configured number in the Number of line key field. -
Page 139
Advanced Phone Features Select Private Hold from the Unselected Softkeys column and then click The Private Hold appears in the Selected Softkeys column. Click Confirm to accept the change. To configure a private hold key via phone user interface: Press Menu->Features->DSS Keys. Select the desired DSS key. -
Page 140
User Guide for the SIP-T21(P) E2 IP Phone Enter the call pull feature access code (e.g., *11) in the Call Pull Feature Access Code field. Click Confirm to accept the change. The phone will dial out “*11” automatically when you press the CallPull soft key. This section provides you with detailed information on using the SIP-T21(P) E2 IP phone in a SCA Hybrid Key System scenario. -
Page 141
Advanced Phone Features To place a call on the shared line: Do one of following: Enter the desired number using the keypad when the phone is idle. Press , or the Send soft key. The phone will dial the entered number using the first line key. Press the line key when the phone is idle to enter the pre-dialing screen. -
Page 142
You can answer the incoming call on either phone A or phone B. The LCD screen of phone A displays the information of the incoming call (e.g., ”Incoming call: 4604 Yealink”). Note Make sure call waiting feature is enabled on phone A. For more information, refer to… -
Page 143
Advanced Phone Features To place a call on public hold: Press the Hold soft key on phone A when party A and party C are talking. The line key LEDs on phone A slow flash green and phone B slow flash red when the shared line call is placed on hold. -
Page 144
User Guide for the SIP-T21(P) E2 IP Phone Long press the desired line key. The Cancel, CallPull, NewCall and Retrieve soft keys appear on the LCD screen. Press the Retrieve soft key to retrieve the call. The conversation is established between phone B and phone C, phone A disconnects the call. -
Page 145
Advanced Phone Features key, the conference call is ended. You can also press the line key with the solid red LED indicator on phone B to set up a conference call with the other parties in the active call. If phone A has more than one call, do the following: Long press the desired line key on phone B. -
Page 146
User Guide for the SIP-T21(P) E2 IP Phone To retrieve a call from another shared phone: If there is an active call between phone A and phone C, do the following: Long press the desired line key on phone B. The Cancel, CallPull, NewCall and Barge In soft keys appear on the LCD screen of phone B. -
Page 147
Advanced Phone Features Any IP phone can be used to originate or receive calls on the bridged line. An incoming call to the BLA number can be presented to multiple phones in the group simultaneously. The incoming call can be answered on any IP phone of the group but not all. You can share a BLA number on two or more phones. -
Page 148
User Guide for the SIP-T21(P) E2 IP Phone To register account and configure BLA feature on phone A via web user interface: Register the account 14019833020. Click on Advanced, and then select Draft BLA from the pull-down list of Shared Line. -
Page 149
Advanced Phone Features Click Confirm to accept the change. To register account and configure BLA feature on phone B via web user interface: Register the account 10462190020. Click on Advanced, and then select Draft BLA from the pull-down list of Shared Line. -
Page 150
User Guide for the SIP-T21(P) E2 IP Phone Enter the desired number in the BLA Number field. Click Confirm to accept the change. This section provides you with detailed information on using the SIP-T21(P) E2 IP phone in a BLA scenario. In a BLA scenario, the status of the line key LED which associates with a bridged line will change. -
Page 151
Advanced Phone Features Press the line key when the phone is idle to enter the pre-dialing screen. Enter the desired number using the keypad and press , or the Send soft key. The phone will dial the entered number. To place multiple calls on the bridged line: You can have more than one call on the bridged line. -
Page 152: Messages
User Guide for the SIP-T21(P) E2 IP Phone The line key LEDs on phone A slow flash green and phone B slow flash red when the bridged line call is placed on hold. If there is a held call between phone A and phone C, you can retrieve a held call on either phone A or phone B.
-
Page 153
Advanced Phone Features You can store text messages in your phone’s Inbox, Sentbox, Outbox or Draftbox. Each of the boxes can store up to 100 text messages. If the number of the text messages in one box is more than 100, the phone will directly delete the oldest text message in the box. -
Page 154
User Guide for the SIP-T21(P) E2 IP Phone To reply a text message: Press Menu->Message->Text Message->Inbox. Select the desired message and press the Reply soft key. Compose the new text message. You can press the abc soft key to change the input mode. -
Page 155: Voice Mail
Advanced Phone Features You can leave voice mails for someone else using the SIP-T21(P) E2 IP phone. You can also listen to voice mails that are stored in a voice mailbox. When receiving a new voice mail, the phone will play a warning tone, and the power indicator LED will slow flash red. The LCD screen will prompt that the phone receives a new message with the number of waiting voice mails (e.g., 34 new Voice Mail) and display an icon.
-
Page 156: Message Waiting Indicator (Mwi)
User Guide for the SIP-T21(P) E2 IP Phone To listen to voice mails: When the LCD screen prompts that the phone receives a new voice mail and the power indicator LED slow flashes red, you can press or the Connect soft key to dial out the voice mail access code.
-
Page 157
Advanced Phone Features Period of MWI subscription. The IP phone sends a MWI Subscription Period refresh SUBSCRIBE request before initial SUBSCRIBE expiration. Enable or disable a subscription to the voice mail number for MWI service. Subscribe MWI to Voice Mail To use this feature, you should also configure the voice mail number. -
Page 158
User Guide for the SIP-T21(P) E2 IP Phone Select the desired account from the pull-down list of Account. Select Enabled from the pull-down list of Subscribe for MWI. Select Enabled from the pull-down list of Subscribe MWI To Voice Mail. Enter the desired voice mail number in the Voice Mail field. -
Page 159: Troubleshooting
Troubleshooting This chapter provides general troubleshooting information to help you solve the problems you might encounter when using your SIP-T21(P) E2 IP phone. If you require additional information or assistance with your new phone, contact your system administrator. Why is the LCD screen blank? Ensure that the phone is properly plugged into a functional AC outlet.
-
Page 160
User Guide for the SIP-T21(P) E2 IP Phone How to obtain the MAC address of a phone when the phone is not powered on? Three ways to obtain the MAC address of a phone: You can ask your supplier for the shipping information sheet which includes MAC … -
Page 161
Troubleshooting Activation/Deactivation on page 50. Check that the headset volume is adjusted to an appropriate level. Refer to Volume on page 29. What is the difference between user name, register name and display name? Both user name and register name are defined by the server. A user name is used to identify the account while a register name matched with a password is used for authentication if the server requires. -
Page 162
User Guide for the SIP-T21(P) E2 IP Phone How to change the user password? To change the user password via web user interface: Click on Security->Password. Select user from the pull-down list of User Type. Enter the new user password in the New Password field and Confirm Password field. -
Page 163
Troubleshooting Select the desired value (Optional or Compulsory) from the pull-down list of RTP Encryption(SRTP). Click Confirm to accept the change. Note SRTP is not available on all servers. Contact your system administrator for more information. SRTP is configurable via web user interface only. How to reboot the phone? To reboot the phone via web user interface: Click on Settings->Upgrade. -
Page 164
User Guide for the SIP-T21(P) E2 IP Phone How to export PCAP trace? We may need you to provide a PCAP trace to help analyze your problem. To export a PCAP trace via web user interface: Click on Settings->Configuration. Click Start to begin capturing signal traffic. Recreate the error to be documented in the trace. -
Page 165
Troubleshooting Mark the Local radio box in the Export System Log field. Click Export to open file download window, and then save the file to your local system. You can also export the system log to the syslog server. Contact your system administrator for more information. -
Page 166
User Guide for the SIP-T21(P) E2 IP Phone How to reset the phone? Reset the phone to factory configurations after you have tried all troubleshooting suggestions but do not solve the problem. You need to note that all customized settings will be overwritten after reset. -
Page 167: Regulatory Notices
Without prior written consent, no organization or individual is permitted to make any change to the structure or the safety design of the device. Yealink is under no circumstance liable to consequences or legal issues caused by such changes.
-
Page 168
User Guide for the SIP-T21(P) E2 IP Phone Please place no heavy objects on the device in case of damage and deformation caused by the heavy load. Keep at least 10 cm between the device and the closest object for heat … -
Page 169: Appendix A — Time Zones
Appendix A-Time Zones Time Zone Time Zone Name Samoa US-Hawaii-Aleutian, US-Alaska-Aleutian -9:30 French Polynesia US-Alaska Time Canada(Vancouver,Whitehorse), Mexico(Tijuana,Mexicali), US-Pacific Time Canada(Edmonton,Calgary), Mexico(Mazatlan,Chihuahua), US-MST no DST, US-Mountain Time Canada-Manitoba(Winnipeg), Chile(Easter Islands), Mexico(Mexico City,Acapulco), US-Central Time Bahamas(Nassau), Canada(Montreal,Ottawa,Quebec), Cuba(Havana), US-Eastern Time -4:30 Venezuela(Caracas) Canada(Halifax,Saint John), Chile(Santiago), Paraguay(Asuncion), UK(Falkland Islands),…
-
Page 170
User Guide for the SIP-T21(P) E2 IP Phone Time Zone Time Zone Name +9:30 Australia(Adelaide), Australia(Darwin) Australia(Brisbane), Australia(Hobart), Australia(Sydney,Melboume,Canberra), Russia(Vladivostok) +10:30 Australia(Lord Howe Islands) New Caledonia(Noumea), Russia(Srednekolymsk Time) +11:30 Norfolk Island New Zealand(Wellington,Auckland), Russia(Kamchatka Time) +12:45 New Zealand(Chatham Islands) Tonga(Nukualofa) +13:30 Chatham Islands Kiribati… -
Page 171: Bridged Line Appearance (Bla)
Index Dial Plan About This Guide Directory Account Management Dual Headset Account Registration Do Not Disturb (DND) Adding Contacts Documentations Adding Groups DSS Keys Administrator password Anonymous Call Anonymous Call Rejection Answering Calls Editing Contacts Area Code Editing Groups Attaching Stand Emergency Number Audio Settings Ending Calls…
-
Page 172
User Guide for the SIP-T21(P) E2 IP Phone Messages Time and Date Message Waiting Indicator Time Zones Multicast Paging Troubleshooting Music on Hold Voice Mail Network Conference Volume Network Connection No answer Forward Warranty Web User Interface Outgoing Intercom Calls WEEE Warning Overview Optional Accessories…
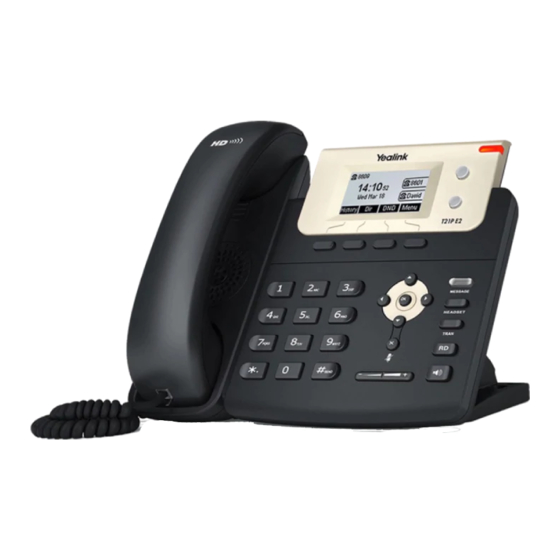
Продолжаем цикл статей по обзору и настройке IP-телефонов Yealink.
Следующим решили осветить аппарат Yealink SIP-T21P (и его родного брата Yealink SIP-T21). По своим характеристикам и внешнему виду телефоны идентичны, с одним лишь отличием — модель SIP-T21P поддерживает питание по технологии PoE, что отмечается буквой «P» в ее названии.
Несмотря на это отличие, обе модели поставляются со штатным блоком питания. Поэтому SIP-T21P можно смело рассматривать как дальновидный вариант — если в будущем компания решит перейти на PoE-технологии, то телефон менять не придется.
Заметим
для подачи электричества на телефонный аппарат Yealink SIP-T21P E2 с поддержкой PoE, необходимо, чтобы в наличии был специальный свитч с PoE-питанием. Без него телефон не будет получать питание через витую пару.
Внешний вид и функционал
Телефон Yealink SIP-T21P — отлично подойдет любому сотруднику офиса, как модель со слегка расширенными возможностями в сравнении с более простыми линейками, или как бюджетный вариант для руководителя небольшой компании.
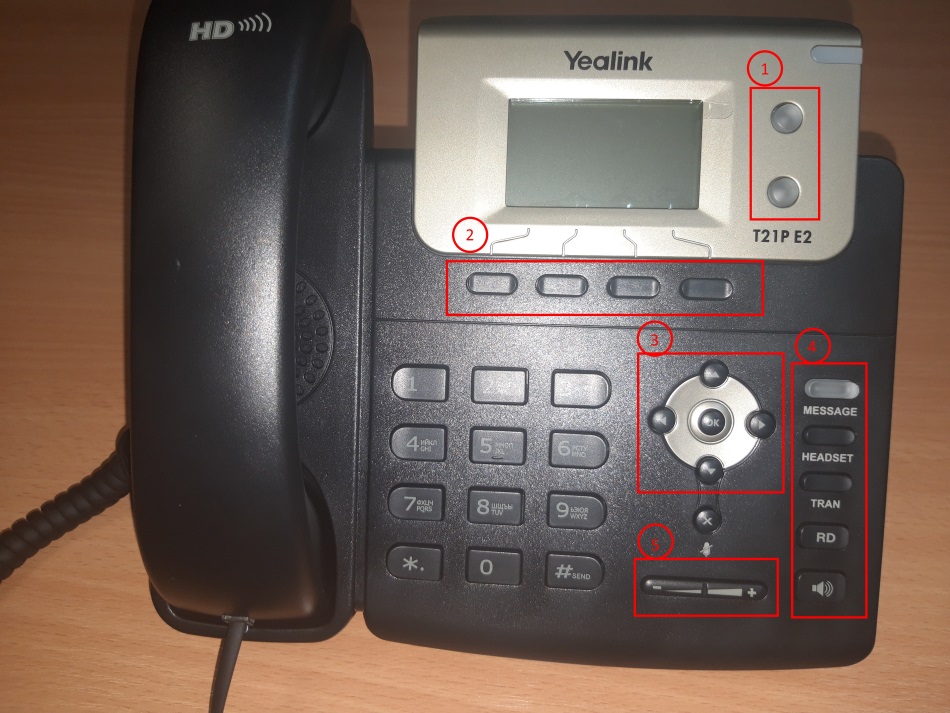
Телефон имеет набор стандартных функциональных клавиш, а также приятное дополнение — BLF клавиши.
- 2 настраиваемые BLF клавиши, к которым можно привязать множество функций, таких как: быстрый дозвон, быстрый трансфер/переадресация, отображение статуса абонента и многие другие;
- 4 контекстно-зависимые функциональные клавиши. Эти кнопки меняют свою функцию в зависимости от состояния, в котором находится телефон — состояние «покоя» (стандартное), при входящем звонке, при активном разговоре, при исходящем звонке, при наборе номера, при навигации по меню и настройкам;
- Клавиши навигации по меню и кнопка ОК;
- Фиксированные функциональные клавиши — голосовая почта, переключение на гарнитуру, трансфер звонка, список последних 100 набранных номеров, громкая связь;
- Клавиши регулирования громкости.
Узнать серийный номер Yealink SIP-T21 E2
В определённые моменты может потребоваться серийный номер, который присвоен вашему телефонному аппарату. Чаще всего такая потребность может возникнуть при обращении в сервис-центр.
Узнать серийный номер телефона достаточно просто: для этого вам необходимо перевернуть телефонный аппарат и обратить внимание на наклейки (сморите на фото).
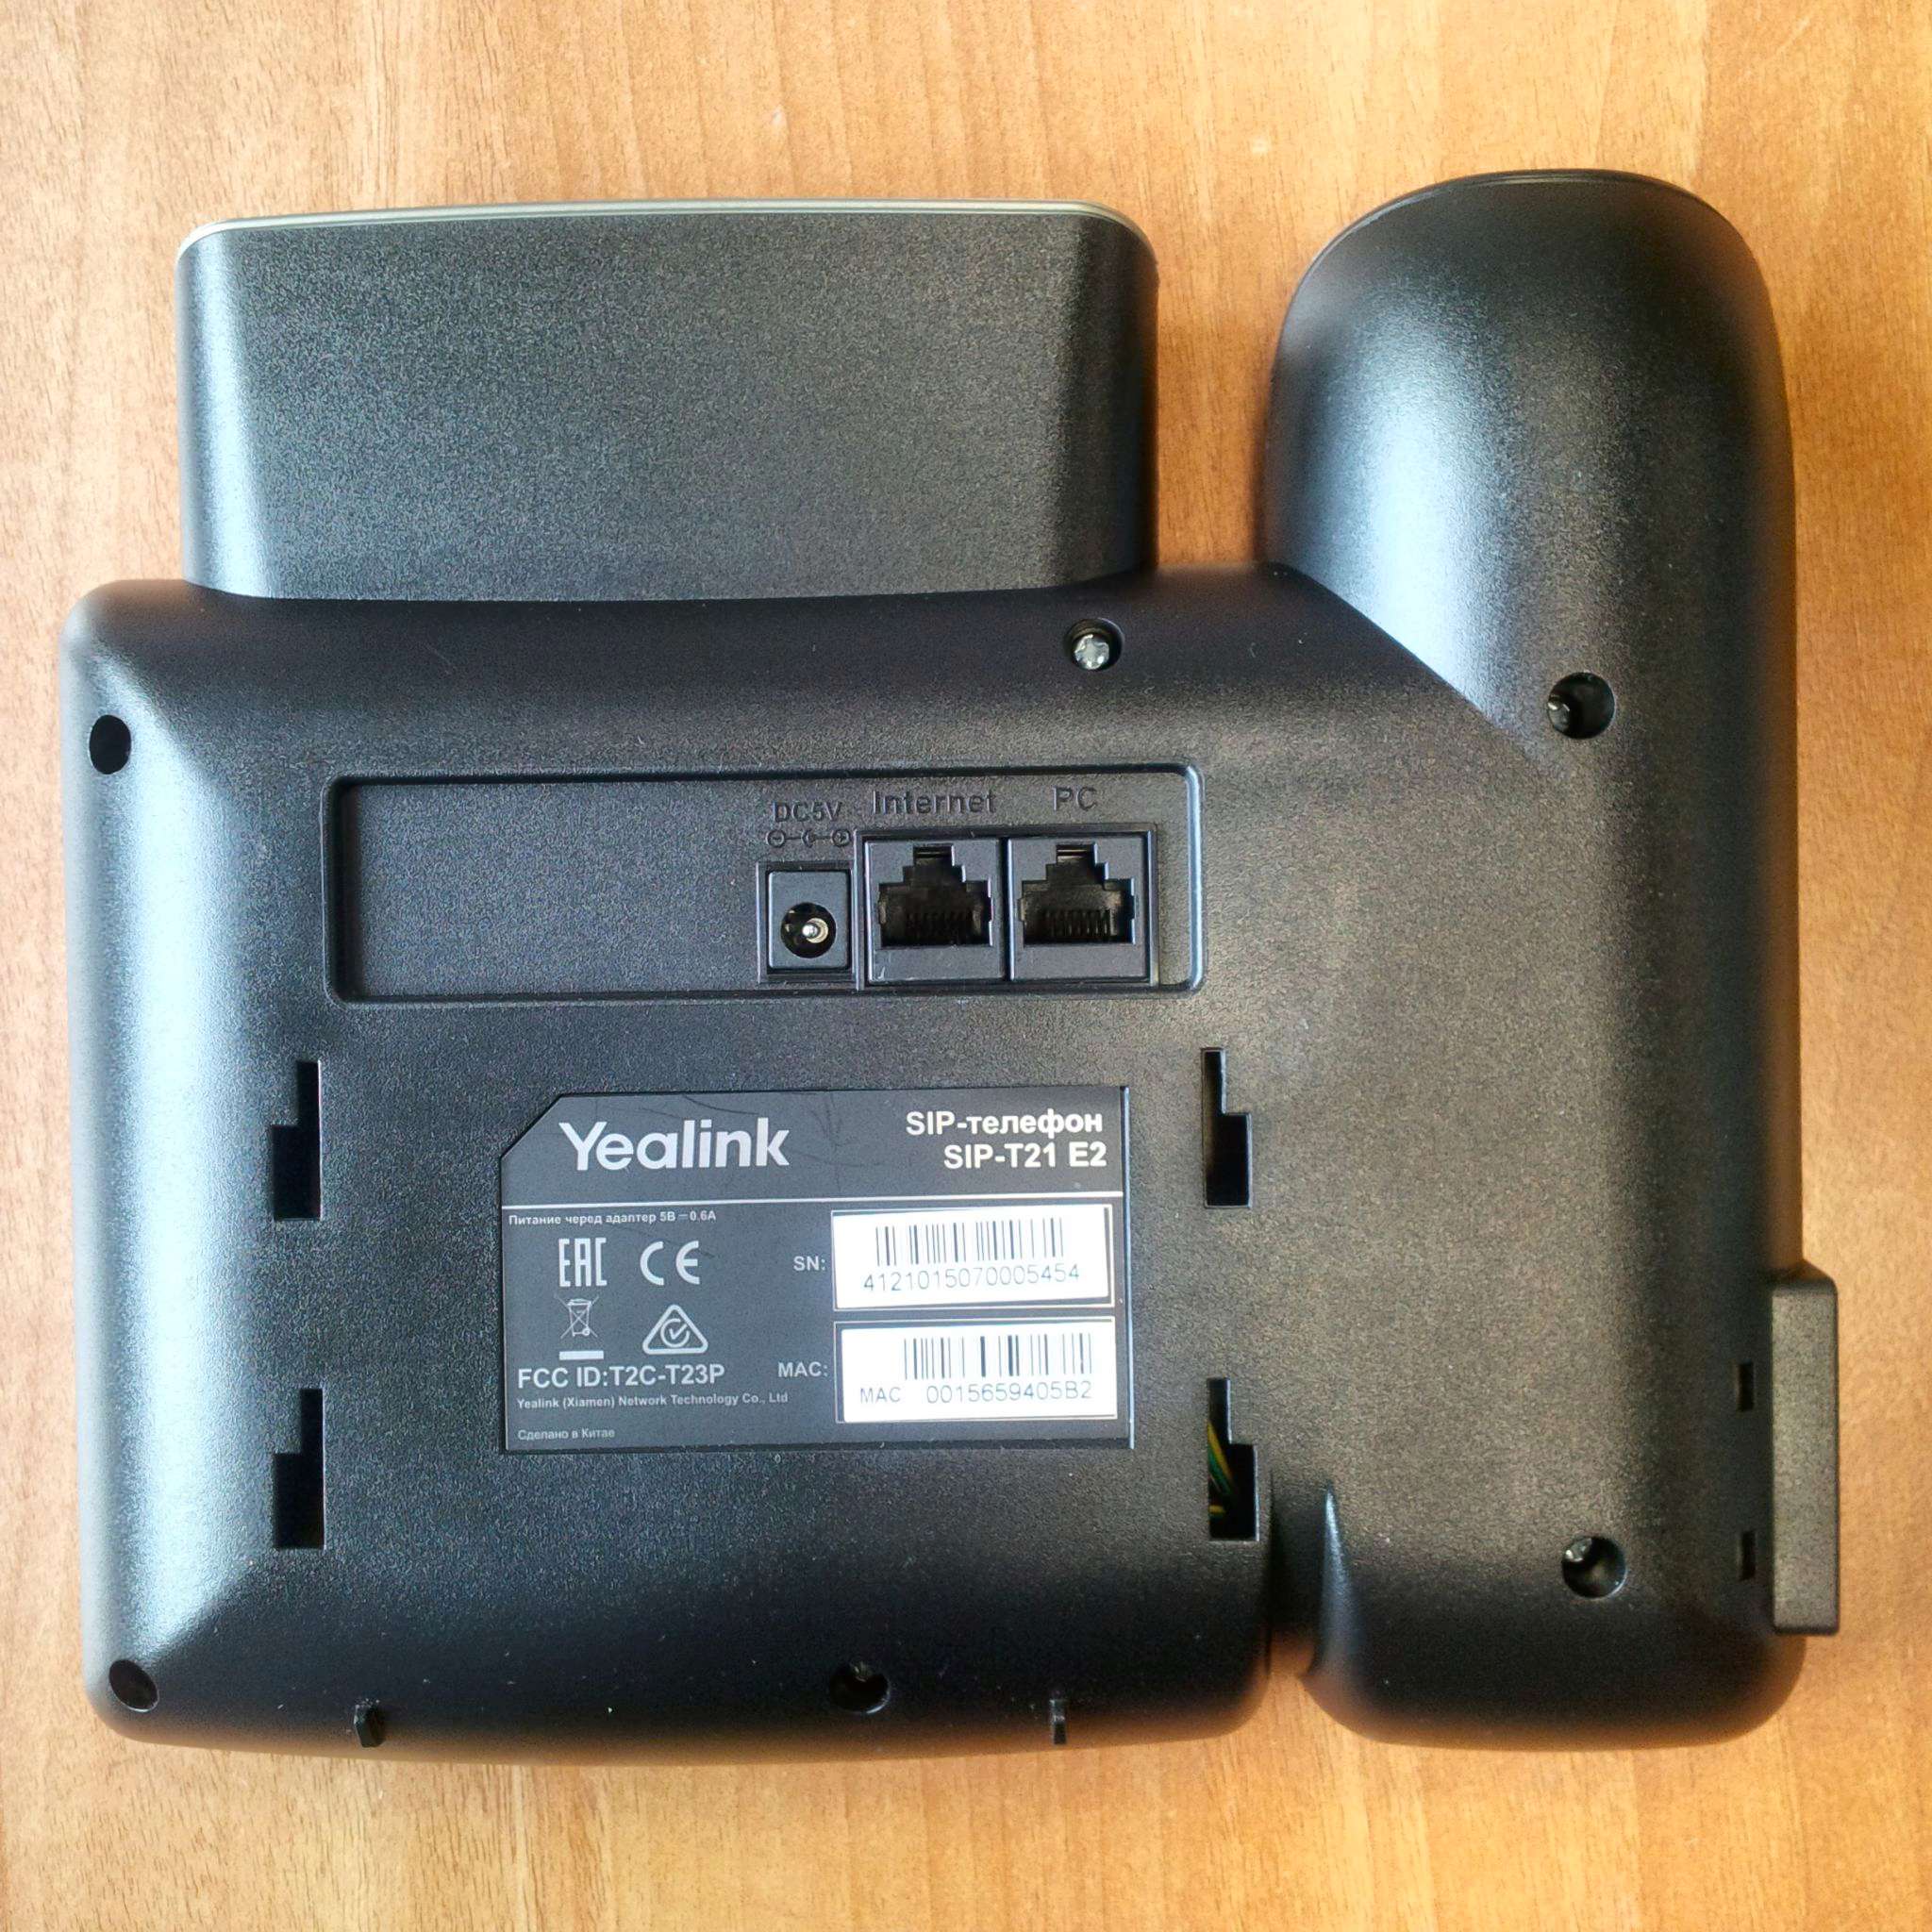
На обороте телефона присутствует наклейка, на которой указана следующая информация:
- Бренд;
- Наименование модели;
- MAC-адрес сетевого адаптера телефонного аппарата;
- Серийный номер (SN) IP-телефона;
- Другая служебная информация.
Цифры напротив надписи SN и есть истинное значение серийного номера.
Подсветка экрана IP-телефона Yealink SIP T21 E2
T21 E2 является представителем бюджетной линейки Yealink и данная модель не снабжена подсветкой экрана. Таким образом, вы не сможете включить подсветку экрана на телефоне.
Тональный режим работы телефонов Yealink
Все IP-телефоны по технологии являются цифровыми и работают только в тональном режиме, не имея в своём функционале аналогового набора. В этой связи ни один из телефонов Yealink нельзя переключать между режимами набора.
Настройка телефона
Благодаря удобному и понятному интерфейсу настройка телефонов Yealink занимает считанные минуты.
Прежде всего, необходимо зайти в веб-интерфейс телефона по его IP-адресу, узнать который можно, нажав кнопку OK. После чего, на экране откроется меню «Статус», где и будет показан адрес.
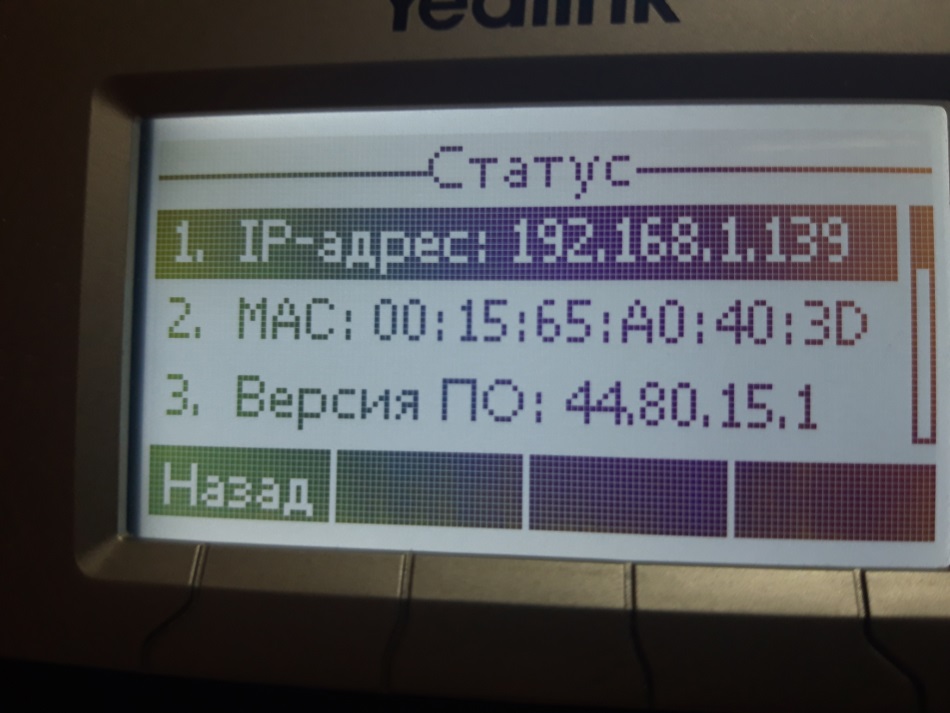
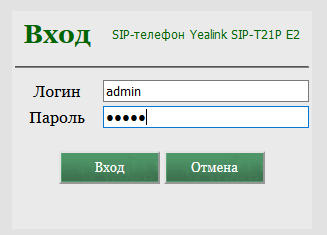
Вводим этот адрес в любом браузере компьютера, подключенного к этой же сети. Далее указываем стандартный логин и пароль: admin/admin.
Попав в режим настроек телефона, можно приступить к тем самым настройкам. В первую очередь подключаем телефон к офисной АТС или провайдеру IP-телефонии. Для этого на верхней панели выбираем вкладку «Аккаунт» и указываем следующие параметры:
- Лейбл — будет отображаться на экране телефона. Значение произвольное, это может быть ваше имя или внутренний номер в IP АТС;
- Отображаемое имя — будет отображаться у другого абонента вашей офисной АТС при звонке с этого аппарата. Значение также произвольное, для удобства стоит указать либо внутренний номер, либо должность, либо имя;
- Имя регистрации и пароль — ваши логин и пароль на АТС или сервере провайдера телефонии. Значения строгие, по нему будет проходить авторизация на сервере;
- Адрес SIP-сервера — IP-адрес сервера АТС или провайдера, к которому будет подключаться аппарат.
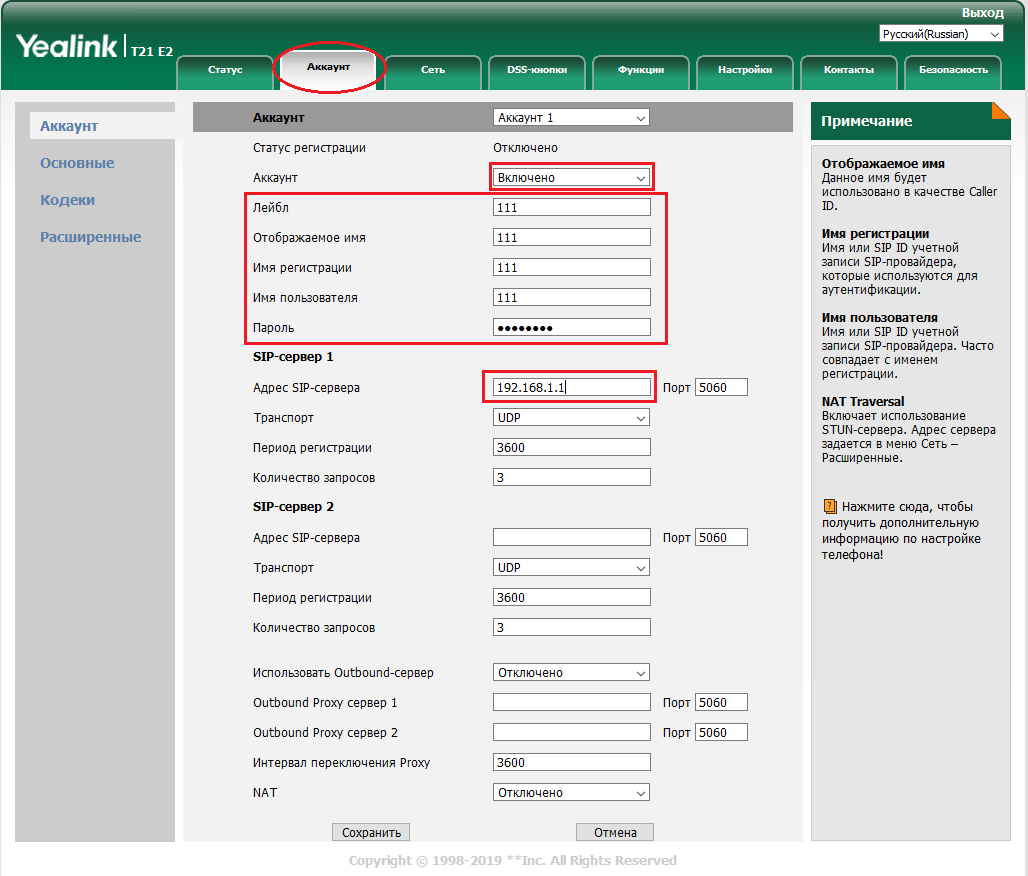
Заполнив необходимые поля, в поле аккаунт выбираем значение «Включено», и внизу экрана нажимаем «Сохранить». Если все данные были введены верно, то строка «Статус регистрации» будет отображать значение «Зарегистрировано».
На этом основные настройки аппарата закончены. Приступаем к дополнительным возможностям и повышению комфорта использования.
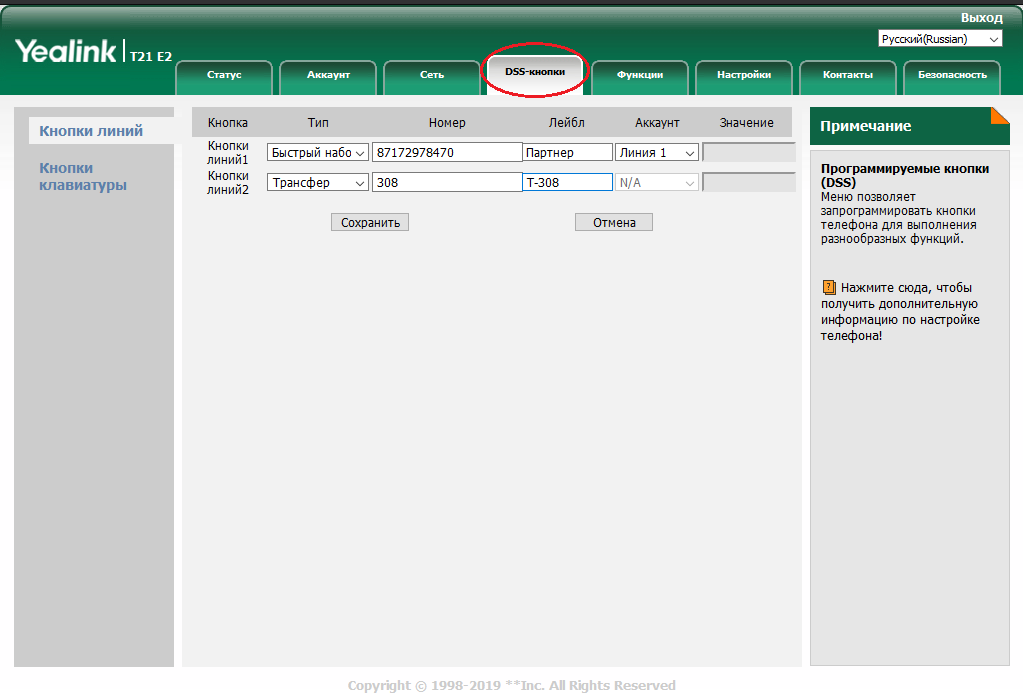
В закладке DSS-кнопки можно настроить BLF клавиши под необходимые функции. Тип действия выбирается из списка, значения и лейбл заполняются в соответствии. В данном примере мы настроили первую кнопку на быстрый дозвон часто набираемого номера, а вторую на трансфер звонка на другого менеджера.
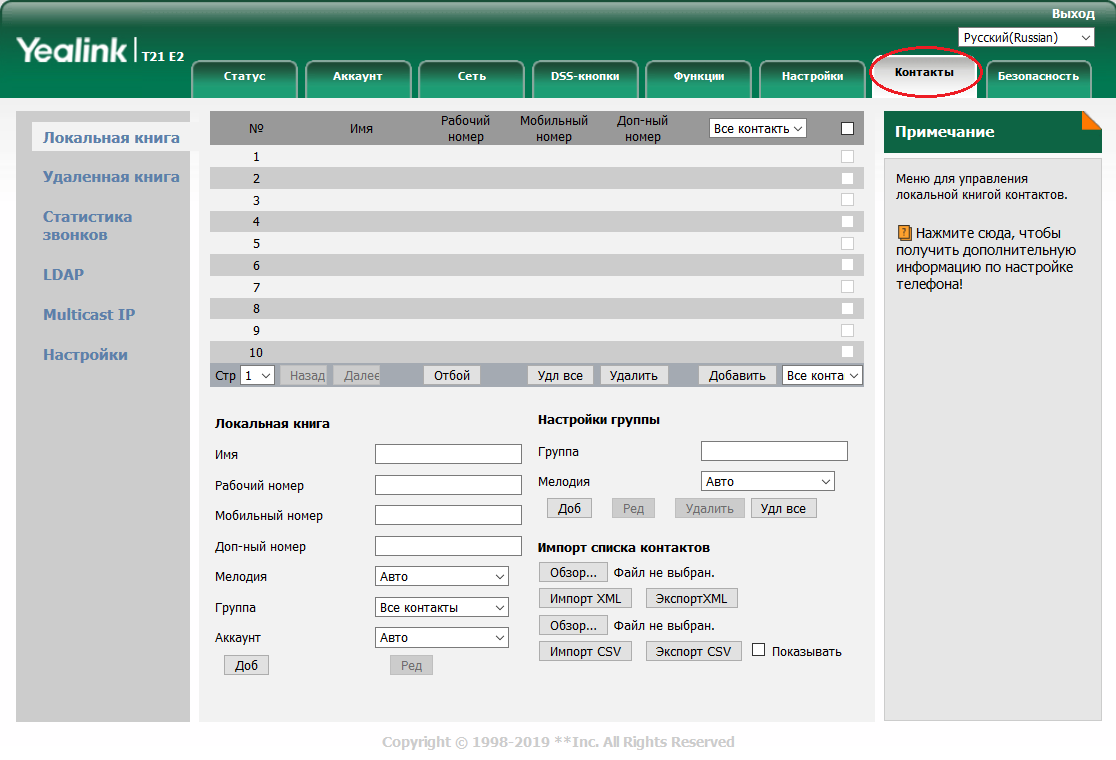
Телефон без встроенной книги контактов неудобен, это факт. Настоятельно рекомендуем воспользоваться книгой контактов, в будущем поможет сохранить огромное количество времени. В закладках выбираем «Контакты» и добавляем номера телефонов.
Контакты можно группировать и присваивать различные мелодии (которые, кстати, можно загружать на аппарат самостоятельно). Можно автоматизировать этот процесс с помощью импорта XML или CSV списка контактов. Для каждого контакта можно привязать до 3 номеров. Чтобы добавить контакты, не обязательно заходить в веб-интерфейс, это можно сделать и на самом аппарате, но занимает это немного больше времени.
Как подключить наушники к ip телефону Yealink T21 E2?
Иногда для удобства пользования телефоном и для освобождения рук, требуется подключение к телефону гарнитуры. Yealink SIP T21 E2 предоставляет такую возможность. Для этого необходимо выбрать и купить телефонные наушники с разъёмом RJ9 и подключить их в соответствующий разъём на торце телефона (обозначено соответствующей иконкой).
Для активации работы наушников телефон следует перевести в режим работы с гарнитурой, нажам на клавиатуре соответствующую клавишу.
После выполнения этих процедур вы комфортно сможете работать с гарнитурой освободив свои руки.
Резюме
Yealink SIP-T21P соответствует требованиям современного офисного работника. Он удобен в использовании, надежен и практичен. Если вы задумываетесь о приобретении SIP-аппаратов для своего офиса и готовы вложить несколько больше, чем того требуют самые бюджетные варианты, то стоит присмотреться к этой модели.
Файлы Yealink SIP T-21P E2 для скачивания
- Полная инструкция пользования
- Прошивка SIP-T21 E2

IP-телефон Yealink SIP-T21 E2 — это один из лучших SIP телефонов по соотношению цена/качество. Телефон прекрасно сочетает в себе стиль, высокое качество исполнения и передовые технические решения. Данная модель является бюджетной и отлично подойдет для малого и среднего бизнеса. Обладает высоким качеством передачи голоса, контрастной подсветкой экрана и удобной трубкой с длинным проводом.
Тарифы на IP-телефонию для Yealink SIP-T21 E2
290 руб./мес.
Прямой номер 495/499 на выборДа
Переадресация на мобильныйДа
Подключение и настройкаБесплатно
- Выгодные тарифы на звонки по России и за границу
– от 0,60 ₽/мин на городские номер по Москве и Санкт-Петербургу
– от 1,48 ₽/мин на все мобильные номера
– посекундная тарификация - Без ограничений по количеству каналов
- Бесплатное подключение и настройка
- Приземление на SIP
- Переадресация на Ваш мобильный номер
- Собственная техническая поддержка 24/7
500 руб./мес.
Прямой номер 495/499
Нет
Да
Количество пользователей
До 5
До 10
До 20
Переход без смены номераДа
Подключение и настройкаБесплатно
- Возможность использования текущих номеров Вашей компании без смены оператора связи
- Бесплатное подключение и настройка
- Запись разговоров
- Голосовое приветствие и многоуровневое голосовое меню
- Любые сценарии переадресации вызовов, в том числе на мобильные номера сотрудников
- Глубокая статистика и аналитика звонков
- Еще более 100 базовых функций
- Интеллектуальная система защиты от ddos-атак, не имеющая аналогов
- Интеграция с CRM-системой заказчика: amoCRM, Битрикс24, 1С:CRM, SugarCRM, SalesForce
200 руб./мес.
Количество sim-карт
1
2
5
10
Прямой номер 499 к каждой sim-картеБесплатно
Виртуальная АТС от ОТК
Нет
Да
Подключение и настройкаБесплатно
- Офисный телефон в любом смартфоне
- При исходящем звонке определяется прямой номер Вашей компании
- Запись разговоров, голосовое приветствие и многоуровневое меню, полная статистика звонков в личном кабинете
- Распределение звонков между sim-картами
- Бесплатные звонки между sim-картами внутри сети по короткому номеру
- Подключение на Вашу виртуальную АТС без смены оператора связи и действующих номеров
- Дополнительный пакет интернет-трафика на каждую sim-карту
- Бесплатное подключение и настройка
- Собственная техническая поддержка 24/7
Таблица технических характеристик IP-телефона Yealink SIP-T21 E2:
| Количество SIP аккаунтов | 2 |
| DND | Да |
| Трансфер | Да |
| Цветной экран | Нет |
| Подсветка экрана | Да |
| Локальная записная книга | Да, до 1000 номеров с возможностью импорта |
| Поддержка русского языка | Да |
| Lan выход для компьютера | Да |
| Разъем для подключения гарнитуры | RJ-9 |
| Габариты | 188x209x150 мм |
| Вес | 810 г |
Настройка IP-телефон Yealink SIP-T21 E2
Настройка данного телефона осуществляется через встроенный веб-сервер. Для того чтобы узнать его IP адрес, подключите телефон WAN портом на обратной стороне телефона к роутеру и выберите на телефоне Меню –> Статус. В графе IPv4 будет написан искомый Вами IP адрес.
Далее запускаем Веб-браузер и вводим полученный на предыдущем шаге IP адрес.
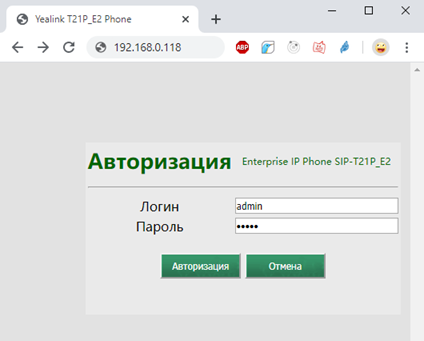
Логин: admin
Пароль по умолчанию: admin
После данных манипуляций мы попадаем на основной экран. Переходим на вкладку Аккаунт.
Выставляем настройки подобные скриншоту ниже:

Лейбл
– это имя учетной записи, которая будет видна на Вашем телефоне
Отображаемое
имя
– имя, которое будет видно Вашем собеседнику при звонках внутри одной АТС
Имя
регистрации и ID пользователя
должны быть одинаковы. Эти данные, как и пароль
Вы можете узнать в Вашем личном кабинете.
Адрес
SIP
сервера: pbx.utcorp.ru , Порт: 5060
Транспорт:
UDP
Таймаут
сервера: 1800 , Кол-во запросов:3
Остальные настройки оставляем по умолчанию и нажимаем кнопку Сохранить Названия параметров, представленных выше могут немного отличаться от Ваших ввиду большого количества разных прошивок на данную очень популярную модель.
- Manuals
- Brands
- Yealink Manuals
- IP Phone
- T21 E2
Manuals and User Guides for Yealink T21 E2. We have 4 Yealink T21 E2 manuals available for free PDF download: Administrator’s Manual, User Manual

Yealink T21 E2 Administrator’s Manual (556 pages)
Brand: Yealink
|
Category: IP Phone
|
Size: 10.7 MB
Table of Contents
-
Introduction
5
-
Related Documentations
5
-
Recommended References
6
-
Typographic and Writing Conventions
6
-
-
Table of Contents
7
-
Getting Started
23
-
Requirements
23
-
Yealink IP Phones in a Network
23
-
Initialization Process Overview
24
-
Loading the ROM File
25
-
Configuring the VLAN
25
-
Querying the DHCP (Dynamic Host Configuration Protocol) Server
25
-
Contacting the Provisioning Server
25
-
Updating Firmware
25
-
Downloading the Resource Files
25
-
-
Verifying Startup
25
-
-
Phone Network
27
-
Ipv4 and Ipv6 Network Settings
27
-
IP Addressing Mode Configuration
27
-
Ipv4 Configuration
28
-
Ipv6 Configuration
31
-
DHCP Option for Ipv4
35
-
-
Supported DHCP Option for Ipv4
35
-
DHCP Option 66, Option 43 and Custom Option
35
-
DHCP Option 42, Option 2 and Option 100
36
-
DHCP Option 12
36
-
DHCP Option 12 Hostname Configuration
36
-
-
DHCP Option 120
37
-
DHCP Option 120 Configuration
37
-
-
DHCP Option 60
38
-
DHCP Option 60 Configuration
38
-
-
DHCP Option for Ipv6
38
-
-
Supported DHCP Option for Ipv6
38
-
DHCP Option 59 and Custom Option
39
-
-
Vlan
39
-
LLDP Configuration CDP Configuration Manual VLAN Configuration DHCP VLAN
39
-
VLAN Setting Configuration
44
-
-
Wi-Fi
44
-
Wi-Fi Configuration
45
-
-
Real-Time Transport Protocol (RTP) Ports
50
-
RTP Ports Configuration
50
-
-
Network Address Translation (NAT)
51
-
NAT Traversal Configuration
51
-
Keep Alive Configuration
55
-
Rport Configuration
55
-
SIP Port and TLS Port Configuration
56
-
-
Internet Port and PC Port
56
-
Supported Transmission Methods
56
-
Internet Port and PC Port Configuration
56
-
-
Vpn
58
-
VPN Related Files
58
-
VPN Configuration
58
-
-
Quality of Service (Qos)
59
-
Voice and SIP Qos Configuration
59
-
-
802.1X Authentication
60
-
802.1X Authentication Configuration
60
-
-
TR-069 Device Management
63
-
Supported RPC Methods
63
-
TR069 Configuration
64
-
-
-
Phone Provisioning
67
-
Boot Files, Configuration Files and Resource Files
67
-
Boot Files
67
-
Boot File Attributes
68
-
Common Boot File
68
-
MAC-Oriented Boot File
68
-
Customizing a Boot File
69
-
-
Configuration Files
69
-
Common CFG File
70
-
Configuration File Customization
71
-
Customizing a Configuration File
71
-
MAC-Local CFG File
71
-
MAC-Oriented CFG File
71
-
Configuration File Attributes
72
-
Resource Files
72
-
-
Supported Resource Files
73
-
Files Download Process
73
-
-
Provisioning Methods
74
-
Provisioning Methods Priority
75
-
Web User Interface
75
-
Accessing the Web User Interface
76
-
Quick Login Configuration
76
-
Web Server Type Configuration
77
-
Navigating the Web User Interface
78
-
-
Phone User Interface
79
-
Central Provisioning
79
-
Auto Provisioning Settings Configuration
80
-
User-Triggered Provisioning Settings Configuration
85
-
-
Viewing Configurations Configured Via Different Provisioning Methods
87
-
-
Setting up a Provisioning Server
87
-
Supported Provisioning Protocols
88
-
Provisioning Protocols Configuration
88
-
-
Supported Provisioning Server Discovery Methods
88
-
Zero Touch Provision Configuration
89
-
DHCP Provision Configuration
90
-
Pnp Provision Configuration
90
-
Static Provision Configuration
91
-
-
Configuring a Provisioning Server
92
-
-
Keeping User’s Personalized Settings after Auto Provisioning
93
-
Keeping User’s Personalized Settings Configuration
93
-
Auto Provisioning Flowchart for Keep User’s Personalized Configuration Settings
94
-
Example: Keeping User’s Personalized Settings
94
-
Clearing User’s Personalized Configuration Settings
95
-
-
Example: Deploying Phones from the Provisioning Server
95
-
-
Firmware Upgrade
99
-
Firmware for each Phone Model Firmware Upgrade Configuration
99
-
-
Phone Customization
101
-
Language
101
-
Supported Languages
102
-
Language Display Configuration
102
-
Language for Phone Display Customization
103
-
Customizing a Language Pack for Phone Display
103
-
Custom Language for Phone Display Configuration
104
-
Example: Setting a Custom Language for Phone Display
104
-
-
Language for Web Display Customization
105
-
Customizing a Language Pack for Web Display
105
-
Customizing a Language Pack for Note Display
106
-
Custom Language for Web and Note Display Configuration
107
-
-
-
Contrast
107
-
Contrast Configuration
107
-
-
Wallpaper
108
-
Wallpaper Configuration
108
-
Wallpaper Customization
109
-
Custom Wallpaper Configuration
110
-
Custom Wallpaper Picture Limit
110
-
Deleting a Custom Picture
110
-
-
Adding a Wallpaper from a USB Flash Drive
110
-
Example: Setting a Custom Picture as Wallpaper
110
-
-
Transparency
111
-
Transparency Configuration
111
-
-
Screen Saver
111
-
Screensaver Display Customization
112
-
Screensaver File Elements and Attributes
113
-
Customizing the Screen Saver File
114
-
-
Custom Screensaver Picture Limit
114
-
Screensaver Configuration
114
-
Adding a Screensaver Picture from a USB Flash Drive
117
-
Deleting a Screensaver Picture
117
-
-
Backlight
117
-
Supported Backlight Options
118
-
Backlight Brightness and Time Configuration
118
-
-
Label Length for Line Key Display
120
-
Label Length Display Configuration
121
-
-
Label Alignment for Line/Ext Key Display
121
-
Label Alignment Display Configuration
121
-
-
Linekey Length in Short
122
-
Linekey Length Shorten Rules
122
-
Linekey Length in Short Configuration
123
-
-
Page Switch Key
123
-
Page Switch Key Configuration
123
-
-
Page Tips
123
-
Phone Page Tips
124
-
Phone Page Tips Configuration
124
-
Phone Page Tips Indicator
124
-
-
Expansion Module Page Tips
125
-
Expansion Module Page Tips Configuration
125
-
Expansion Module Page Tips Indicator
125
-
-
-
Time and Date
126
-
Time Zone
126
-
NTP Settings
129
-
NTP Configuration
129
-
-
DST Settings
131
-
Auto DST File Attributes
132
-
Customizing Auto DST File
132
-
DST Configuration
133
-
-
Time and Date Manually Configuration
135
-
Time and Date Format Configuration
135
-
Date Customization Rule
137
-
-
Idle Clock Display
137
-
Idle Clock Display Configuration
137
-
-
Logo Customization
138
-
Custom Logo Picture Limit
138
-
Customizing a Logo Picture
138
-
Custom Logo Configuration
139
-
Example: Setting a Custom Logo Display
140
-
-
Call Display
140
-
Call Display Configuration
141
-
-
Display Method on Dialing
143
-
Display Method on Dialing Configuration
143
-
-
Key as Send
143
-
Key as Send Configuration
143
-
-
Softkey Layout
144
-
Supported Call States and Soft Keys
145
-
Softkey Layout File Customization
148
-
Softkey Layout File Elements and Attributes
148
-
Customizing Softkey Layout File
149
-
-
Softkey Layout Configuration
150
-
Example: Setting the Soft Keys Layout in Talking State
152
-
-
Input Method
152
-
Input Method File Customization
153
-
Customizing the Input Method File
153
-
-
Input Method Configuration
154
-
-
Notification Popups
155
-
Notification Popups Configuration
156
-
-
Power LED Indicator
157
-
Power LED Indicator Configuration
157
-
-
Bluetooth
160
-
Bluetooth Configuration
160
-
-
Handset/Headset/Speakerphone Mode
162
-
Handset/Headset/Speakerphone Mode Configuration
162
-
-
DSS Keys
163
-
Supported DSS Keys
163
-
Supported Dsskey Types
164
-
Line Keys
165
-
Line Keys Configuration
165
-
Example: Set a Park/Retrieve Key for FAC Call Park Mode
169
-
Example: Set a Park/Retrieve Key for Transfer Call Park Mode
169
-
Example: Setting a Line Key as Directed Pickup Key
170
-
Example: Setting a Line Key as Group Pickup Key
170
-
Example: Setting a Line Key as Forward Key
171
-
Example: Setting a Line Key as BLF List Key
172
-
Example: Setting a Line Key as Multicast Paging Key
172
-
Example: Setting a Line Key as Private Hold Key
172
-
-
Programmable Keys
172
-
Programmable Keys Configuration
173
-
Supported Programmable Keys
173
-
-
Ext Keys
176
-
Ext Keys Configuration
177
-
-
-
Enhanced DSS Keys
179
-
Guidelines for Configuring Enhanced DSS Keys
180
-
Macro Action Strings
180
-
EDK Configuration
183
-
EDK List Configuration
184
-
EDK User Input Prompt Configuration
185
-
EDK Soft Keys Configuration
187
-
Example: Configuring EDK List for a Line Key
190
-
Example: Using EDK Macro Strings as the Contact Number
191
-
-
Power Saving
191
-
Power Saving Configuration
192
-
-
USB Port Lock
194
-
USB Port Lock Configuration
195
-
-
Search Source List in Dialing
195
-
Search Source File Customization
196
-
Search Source File Attributes
196
-
Customizing Search Source File
197
-
-
Search Source List Configuration
197
-
-
Recent Call Display in Dialing
199
-
Recent Call in Dialing Configuration
199
-
-
Icon Customization
200
-
Custom Icons Configuration
200
-
-
Warnings Display
200
-
Warnings Display Configuration
201
-
-
-
Account Settings
203
-
Account Registration
203
-
Supported Accounts
203
-
SIP Accounts Registration Configuration
203
-
PSTN Account Configuration
208
-
Registration Settings Configuration
208
-
-
Outbound Proxy in Dialog
211
-
Outbound Proxy in Dialog Configuration
211
-
-
Server Redundancy
211
-
Behaviors When Working Server Connection Fails
212
-
Registration Method of the Failover/Fallback Mode
213
-
Fallback Server Redundancy Configuration
213
-
Failover Server Redundancy Configuration
214
-
-
SIP Server Name Resolution
218
-
SIP Server Name Resolution Configuration
218
-
-
Static DNS Cache
219
-
Behave with a Configured DNS Server
220
-
Static DNS Cache Configuration
220
-
-
Logon Wizard
224
-
Logon Wizard Configuration
224
-
-
Multiple Line Keys Per Account
226
-
Multiple Line Keys Per Account Configuration
226
-
Auto Line Labels Rule Configuration
228
-
Default Account
228
-
-
-
Call Log
231
-
Call Log Display
231
-
Call Log Configuration
231
-
Call Logs Backup
234
-
-
Directory
237
-
Local Directory
237
-
Contact Avatars and Icons Picture Limit
237
-
Preparing the Tar Formatted File
238
-
Local Contact File Customization
239
-
Local Contact File Elements and Attributes
239
-
Customizing Local Contact File
241
-
-
Local Contact Files and Resource Upload
241
-
Example: Adding Contacts Using a Contact File
243
-
-
Local Contacts Backup
244
-
Favorite Contacts
245
-
Favorites Configuration
245
-
-
Google Contacts
246
-
Google Contacts Configuration
246
-
Signing in to the Google Contact Server
247
-
-
Lightweight Directory Access Protocol (LDAP)
247
-
LDAP Attributes
247
-
Securely Storing the LDAP Credentials
248
-
LDAP Configuration
248
-
-
Remote Phone Book
253
-
Remote Phone Book File Customization
254
-
Customizing Remote Phone Book File
254
-
Remote Phone Book File Elements
254
-
-
Remote Phone Book Configuration
255
-
Example: Configuring a Remote Phone Book
257
-
-
Directory List for Directory/Dir Soft Key
257
-
Directory List File Customization
257
-
Directory List File Attributes
258
-
Customizing Directory List File
259
-
-
Directory List Configuration
259
-
Example: Configuring a Directory List
261
-
-
Directory Search Settings
261
-
Directory Search Settings Configuration
261
-
-
-
Call Features
263
-
Dial Plan Defined by Four Patterns (Old Dial Plan Mechanism)
263
-
Basic Regular Expression Syntax for Four Patterns
264
-
Replace Rule File Customization
265
-
Customizing the Replace Rule File
265
-
Replace Rule File Attributes
265
-
-
Dial Now File Customization
265
-
Customizing the Dial Now File
266
-
Dial Now File Attributes
266
-
-
Replace Rule Configuration
266
-
Dial Now Configuration
267
-
Area Code Configuration
269
-
Block out Configuration
270
-
Example: Adding Replace Rules Using a Replace Rule File
271
-
-
Dial Plan Defined by Digit Map (New Dial Plan Mechanism)
271
-
Basic Regular Expression Syntax for Digit Map
271
-
Digit Map for All Lines Configuration
272
-
Digit Map for a Specific Line Configuration
276
-
-
Emergency Dialplan and Enhanced 911
279
-
Emergency Dialplan and Enhanced 911 Configuration
280
-
-
Hotline
284
-
Hotline Configuration
284
-
-
Off Hook Hot Line Dialing
285
-
Off Hook Hot Line Dialing Configuration
285
-
-
Live Dialpad
286
-
Live Dialpad Configuration
286
-
-
Auto Redial
287
-
Auto Redial Configuration
287
-
-
Recall Configuration
288
-
Speed Dial
288
-
Speed Dial Key Configuration
288
-
-
Password Dial
289
-
Password Dial Configuration
289
-
-
Call Timeout
290
-
Call Timeout Configuration
290
-
-
Anonymous Call
290
-
Anonymous Call Configuration
290
-
-
Call Number Filter
292
-
Call Number Filter Configuration
292
-
-
IP Address Call
293
-
IP Address Call Configuration
293
-
-
Ignoring Incoming Calls
293
-
Ignoring Incoming Calls Configuration
294
-
-
Off Hook Answering
294
-
Off Hook Answering Configuration
294
-
-
Auto Answer
295
-
Auto Answer Configuration
295
-
-
Anonymous Call Rejection
297
-
Anonymous Call Rejection Configuration
298
-
-
Call Waiting
299
-
Call Waiting Configuration
299
-
-
Do Not Disturb (DND)
301
-
DND Settings Configuration
301
-
DND Feature Configuration
303
-
DND in Phone Mode Configuration
303
-
DND in Custom Mode Configuration
304
-
-
DND Synchronization for Server-Side Configuration
305
-
-
Multiple Call Appearances
307
-
Multiple Call Appearances Configuration
307
-
-
Call Hold
308
-
Call Hold Configuration
308
-
Music on Hold (Moh) Configuration
310
-
-
Call Mute
311
-
Microphone Mute Configuration
311
-
Keep Mute
311
-
Keep Mute Configuration
312
-
-
Mute Alert Tone
312
-
Mute Alert Tone Configuration
312
-
-
-
Call Forward
313
-
Call Forward Settings Configuration
313
-
Call Forward Feature Configuration
315
-
Call Forward in Phone Mode Configuration
315
-
Call Forward in Custom Mode Configuration
319
-
-
Call Forward Synchronization for Server-Side Configuration
323
-
-
Call Transfer
324
-
Call Transfer Configuration
325
-
Transfer Mode for Dsskey Configuration
326
-
-
Conference
326
-
Conference Type Configuration
326
-
Local Conference Configuration
327
-
Network Conference Configuration
328
-
-
USB Recording
328
-
USB Recording Configuration
329
-
-
Multicast Paging
330
-
Multicast Paging Group Configuration
330
-
Multicast Listening Group Configuration
331
-
Multicast Paging Settings
332
-
Multicast Paging Settings Configuration
333
-
-
-
Advertisement
Yealink T21 E2 Administrator’s Manual (622 pages)
SIP-T2 Series; SIP-T4 Series; SIP-T5 Series
Brand: Yealink
|
Category: IP Phone
|
Size: 6.25 MB
Table of Contents
-
Introduction
5
-
Related Documentations
5
-
Recommended References
6
-
Typographic and Writing Conventions
6
-
Table of Contents
9
-
-
Table of Contents
11
-
Getting Started
21
-
Requirements
21
-
Yealink IP Phones in a Network
21
-
Initialization Process Overview
22
-
Loading the ROM File
23
-
Configuring the VLAN
23
-
Querying the DHCP (Dynamic Host Configuration Protocol) Server
23
-
Contacting the Provisioning Server
23
-
Updating Firmware
24
-
Downloading the Resource Files
24
-
-
Verifying Startup
24
-
-
Phone Network
25
-
Ipv4 and Ipv6 Network Settings
25
-
IP Addressing Mode Configuration
26
-
Ipv4 Configuration
27
-
Ipv6 Configuration
30
-
-
DHCP Option for Ipv4
34
-
Supported DHCP Option for Ipv4
34
-
DHCP Option 66, Option 43 and Custom Option
35
-
DHCP Option 42, Option 2 and Option 100
36
-
DHCP Option 12
36
-
DHCP Option 120
37
-
DHCP Option 60
38
-
-
DHCP Option for Ipv6
39
-
Supported DHCP Option for Ipv6
39
-
DHCP Option 59 and Custom Option
39
-
-
Vlan
39
-
LLDP Configuration
40
-
CDP Configuration
41
-
Manual VLAN Configuration
42
-
Dhcp Vlan
45
-
VLAN Setting Configuration
46
-
-
Wi-Fi
46
-
Wi-Fi Configuration
46
-
-
Real-Time Transport Protocol (RTP) Ports
53
-
RTP Ports Configuration
53
-
-
Network Address Translation (NAT)
54
-
NAT Traversal Configuration
54
-
Keep Alive Configuration
58
-
Rport Configuration
59
-
SIP Port and TLS Port Configuration
59
-
-
Internet Port and PC Port
60
-
Supported Transmission Methods
60
-
Internet Port and PC Port Configuration
60
-
-
Vpn
62
-
VPN Related Files
62
-
VPN Configuration
63
-
-
Quality of Service (Qos)
63
-
Voice and SIP Qos Configuration
64
-
-
802.1X Authentication
65
-
802.1X Authentication Configuration
65
-
-
TR-069 Device Management
68
-
Supported RPC Methods
68
-
TR069 Configuration
69
-
-
-
Phone Provisioning
73
-
Boot Files, Configuration Files and Resource Files
73
-
Boot Files
73
-
Configuration Files
76
-
Resource Files
82
-
Files Download Process
83
-
-
Provisioning Methods
84
-
Provisioning Methods Priority
85
-
Manual Provisioning
85
-
Central Provisioning
91
-
-
Setting up a Provisioning Server
100
-
Supported Provisioning Protocols
101
-
Supported Provisioning Server Discovery Methods
102
-
Configuring a Provisioning Server
106
-
-
Keeping User’s Personalized Settings after Auto Provisioning
107
-
Auto Provisioning Flowchart for Keep User’s Personalized Configuration Settings
108
-
-
Example: Deploying Phones from the Provisioning Server
109
-
-
Firmware Upgrade
111
-
Firmware for each Phone Model
111
-
Firmware Upgrade Configuration
112
-
-
Phone Customization
113
-
Language
114
-
Supported Languages
114
-
Language Display Configuration
115
-
Language Customization
116
-
Example: Setting a Custom Language for Phone Display
121
-
-
Contrast
121
-
Contrast Configuration
121
-
-
Wallpaper
122
-
Wallpaper Configuration
122
-
Wallpaper Customization
124
-
Adding a Wallpaper from a USB Flash Drive
125
-
Example: Setting a Custom Picture as Wallpaper
125
-
-
Transparency
125
-
Transparency Configuration
126
-
-
Screen Saver
126
-
Screensaver Display Customization
127
-
Custom Screensaver Picture Limit
129
-
Screensaver Configuration
130
-
Adding a Screensaver Picture from a USB Flash Drive
133
-
Deleting a Screensaver Picture
133
-
-
Backlight
133
-
Supported Backlight Options
134
-
Backlight Brightness and Time Configuration
134
-
-
Label Length for Line Key Display
136
-
Label Length Display Configuration
137
-
-
Label Alignment for Line/Ext Key Display
137
-
Label Alignment Display Configuration
138
-
-
Linekey Length in Short
138
-
Linekey Length Shorten Rules
139
-
Linekey Length in Short Configuration
139
-
-
Page Switch Key
140
-
Page Switch Key Configuration
140
-
-
Page Tips
140
-
Phone Page Tips
141
-
Expansion Module Page Tips
142
-
-
Time and Date
143
-
Time Zone
144
-
NTP Settings
147
-
DST Settings
150
-
Time and Date Manually Configuration
154
-
Time and Date Format Configuration
155
-
Date Customization Rule
156
-
-
Idle Clock Display
157
-
Idle Clock Display Configuration
157
-
-
Logo Customization
157
-
Custom Logo Picture Limit
158
-
Customizing a Logo Picture
158
-
Custom Logo Configuration
159
-
Example: Setting a Custom Logo Display
160
-
-
Call Display
160
-
Call Display Configuration
161
-
-
Display Method on Dialing
163
-
Display Method on Dialing Configuration
163
-
-
Key as Send
164
-
Key as Send Configuration
164
-
-
Softkey Layout
165
-
Supported Call States and Soft Keys
165
-
Softkey Layout File Customization
169
-
Softkey Layout Configuration
170
-
Example: Setting the Soft Keys Layout in Talking State
173
-
-
Input Method
174
-
Input Method File Customization
174
-
Input Method Configuration
175
-
-
Notification Popups
177
-
Notification Popups Configuration
178
-
-
Power LED Indicator
179
-
Power LED Indicator Configuration
179
-
-
Bluetooth
182
-
Bluetooth Configuration
182
-
-
Handset/Headset/Speakerphone Mode
184
-
Handset/Headset/Speakerphone Mode Configuration
184
-
-
DSS Keys
185
-
Supported DSS Keys
185
-
Supported Dsskey Types
186
-
Line Keys
187
-
Programmable Keys
195
-
Ext Keys
200
-
-
Enhanced DSS Keys
203
-
Some Guidelines for Configuring Enhanced DSS Keys
203
-
Macro Action Strings
204
-
EDK Configuration
208
-
EDK List Configuration
209
-
EDK Prompt Configuration
210
-
EDK Soft Keys Configuration
212
-
Example: Configuring EDK List for a Line Key
217
-
-
Power Saving
217
-
Power Saving Configuration
218
-
-
USB Port Lock
221
-
USB Port Lock Configuration
221
-
-
Search Source List in Dialing
221
-
Search Source File Customization
222
-
Search Source List Configuration
223
-
-
Recent Call Display in Dialing
225
-
Recent Call in Dialing Configuration
226
-
-
-
Account Settings
227
-
Account Registration
227
-
Supported Accounts
227
-
Accounts Registration Configuration
228
-
Registration Settings Configuration
232
-
-
Outbound Proxy in Dialog
235
-
Outbound Proxy in Dialog Configuration
235
-
-
Server Redundancy
236
-
Behaviors When Working Server Connection Fails
237
-
Registration Method of the Failover/Fallback Mode
238
-
Fallback Server Redundancy Configuration
238
-
Failover Server Redundancy Configuration
240
-
-
SIP Server Name Resolution
245
-
SIP Server Name Resolution Configuration
245
-
-
Static DNS Cache
246
-
Behave with a Configured DNS Server
246
-
Static DNS Cache Configuration
247
-
-
Logon Wizard
251
-
Logon Wizard Configuration
251
-
-
Multiple Line Keys Per Account
253
-
Multiple Line Keys Per Account Configuration
253
-
Auto Line Labels Rule Configuration
255
-
Default Account
256
-
-
-
Call Log
259
-
Call Log Display
259
-
Call Log Configuration
260
-
Call Logs Backup
261
-
-
Directory
265
-
Local Directory
265
-
Contact Avatars and Icons Picture Limit
265
-
Preparing the Tar Formatted File
266
-
Local Contact File Customization
267
-
Local Contact Files and Resource Upload
269
-
Example: Adding Contacts Using a Contact File
272
-
-
Local Contacts Backup
272
-
Favorite Contacts
274
-
Favorites Configuration
275
-
-
Lightweight Directory Access Protocol (LDAP)
275
-
LDAP Attributes
276
-
LDAP Configuration
276
-
-
Remote Phone Book
282
-
Remote Phone Book File Customization
283
-
Remote Phone Book Configuration
285
-
Example: Configuring a Remote Phone Book
286
-
-
Directory List for Directory/Dir Soft Key
287
-
Directory List File Customization
287
-
Directory List Configuration
289
-
Example: Configuring a Directory List
291
-
-
Directory Search Settings
291
-
Directory Search Settings Configuraion
291
-
-
-
Call Features
293
-
Dial Plan
294
-
Dial Plan Defined by Four Patterns
294
-
Dial Plan Defined by Digit Map
303
-
-
Emergency Dialplan and Enhanced 911
313
-
Emergency Dialplan and Enhanced 911 Configuration
314
-
-
Hotline
318
-
Hotline Configuration
319
-
-
Off Hook Hot Line Dialing
320
-
Off Hook Hot Line Dialing Configuration
320
-
-
Live Dialpad
321
-
Live Dialpad Configuration
321
-
-
Auto Redial
322
-
Auto Redial Configuration
322
-
-
Recall Configuration
323
-
Speed Dial
324
-
Speed Dial Key Configuration
324
-
-
Password Dial
324
-
Password Dial Configuration
325
-
-
Call Timeout
326
-
Call Timeout Configuration
326
-
-
Anonymous Call
326
-
Anonymous Call Configuration
327
-
-
Call Number Filter
329
-
Call Number Filter Configuration
329
-
-
IP Address Call
329
-
IP Address Call Configuration
329
-
-
Ignoring Incoming Calls
330
-
Ignoring Incoming Calls Configuration
331
-
-
Off Hook Answering
331
-
Off Hook Answering Configuration
331
-
-
Auto Answer
331
-
Auto Answer Configuration
332
-
-
Anonymous Call Rejection
334
-
Anonymous Call Rejection Configuration
334
-
-
Call Waiting
336
-
Call Waiting Configuration
336
-
-
Do Not Disturb (DND)
338
-
DND Settings Configuration
338
-
DND Feature Configuration
340
-
DND Synchronization for Server-Side Configuration
343
-
-
Multiple Call Appearances
344
-
Multiple Call Appearances Configuration
344
-
-
Call Hold
345
-
Call Hold Configuration
346
-
Music on Hold (Moh) Configuration
348
-
-
Call Mute
349
-
Microphone Mute Configuration
350
-
Keep Mute
350
-
-
Call Forward
351
-
Call Forward Settings Configuration
351
-
Call Forward Feature Configuration
353
-
Call Forward Synchronization for Server-Side Configuration
363
-
-
Call Transfer
365
-
Call Transfer Configuration
365
-
Transfer Mode for Dsskey Configuration
367
-
-
Conference
367
-
Conference Type Configuration
367
-
Local Conference Configuration
368
-
Network Conference Configuration
369
-
-
USB Recording
370
-
USB Recording Configuration
370
-
-
Multicast Paging
371
-
Multicast Paging Group Configuration
371
-
Multicast Listening Group Configuration
373
-
Multicast Paging Settings
374
-
-
Yealink T21 E2 Administrator’s Manual (625 pages)
T2 Series; T4 Series
Brand: Yealink
|
Category: IP Phone
|
Size: 15.29 MB
Table of Contents
-
About this Guide
5
-
Table of Contents
9
-
-
Table of Contents
11
-
Product Overview
15
-
Voip Principle
15
-
SIP Components
15
-
SIP IP Phone Models
15
-
Physical Features of IP Phones
18
-
Key Features of IP Phones
18
-
-
-
Getting Started
29
-
Connecting the IP Phones
29
-
Initialization Process Overview
29
-
Verifying Startup
29
-
Reading Icons
29
-
Configuration Methods
29
-
Phone User Interface
39
-
Configuration Files
40
-
-
Provisioning Server
42
-
Deploying Phones from the Provisioning Server
43
-
Dhcp
44
-
Pppoe
55
-
-
Upgrading Firmware
64
-
-
Configuring Basic Features
71
-
Power Indicator LED
72
-
Notification Popups
76
-
Contrast
79
-
Wallpaper
80
-
Backlight
84
-
Call Display
88
-
Web Server Type
91
-
User Password
94
-
Administrator Password
96
-
Phone Lock
98
-
Time and Date
106
-
Language
118
-
Input Method Customization
127
-
Logo Customization
132
-
Softkey Layout
135
-
Dial Plan
145
-
Replace Rule
146
-
Dial-Now
149
-
Area Code
153
-
Block out
156
-
-
Hotline
158
-
Off Hook Hot Line Dialing
160
-
Directory
162
-
Call Log
165
-
Missed Call Log
167
-
Local Directory
168
-
Live Dialpad
173
-
Call Waiting
175
-
Auto Redial
179
-
Auto Answer
181
-
Call Completion
185
-
Anonymous Call
186
-
Anonymous Call Rejection
191
-
Do Not Disturb
194
-
Busy Tone Delay
205
-
Return Code When Refuse
207
-
Early Media
208
-
Use Outbound Proxy in Dialog
210
-
SIP Session Timer
212
-
Session Timer
214
-
Call Hold
217
-
Call Forward
222
-
Call Transfer
241
-
Network Conference
244
-
Feature Key Synchronization
246
-
Transfer on Conference Hang up
248
-
Directed Call Pickup
249
-
Group Call Pickup
258
-
Dialog Info Call Pickup
267
-
Recall
268
-
Call Park
272
-
Calling Line Identification Presentation
276
-
Connected Line Identification Presentation
278
-
Dtmf
279
-
Suppress DTMF Display
285
-
Transfer Via DTMF
287
-
Intercom
289
-
Intercom Key
290
-
Incoming Intercom Calls
293
-
-
Advertisement
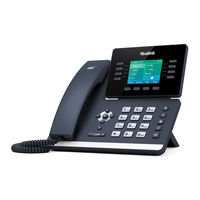
Yealink T21 E2 User Manual (131 pages)
T5 series
Brand: Yealink
|
Category: IP Phone
|
Size: 4.42 MB
Table of Contents
-
End User License Agreement
2
-
Patent Information
3
-
Technical Support
3
-
Gnu Gpl Information
4
-
Table of Contents
5
-
Tableofcontents
13
-
About this Guide
13
-
Related Documentation
13
-
In this Guide
13
-
-
Getting Started with Your Phone
15
-
Hardware Overview
15
-
T5X Series Hardware
15
-
Power LED Indicator
16
-
Line Key LED
17
-
-
Screen and Icons
18
-
Idle Screen
19
-
Dialing/Pre-Dialing Screen
20
-
Calls Screen
20
-
Icons in the Status Bar
20
-
Line Key Icons
21
-
Call History Icons
25
-
-
Entering Characters
25
-
-
Customizing Your Phone
27
-
Changing the Administrator Password Wallpaper
27
-
Changing Idle Screen Wallpaper
27
-
Adding a Wallpaper from a USB Flash Drive
28
-
-
Adjusting Transparency
28
-
Screen Saver
29
-
Changing the Waiting Time for Screen Saver
29
-
Enabling/Disabling Time & Date and Status Icons Display
29
-
Adding a Screen Saver from a USB Flash Drive
30
-
Setting the Screen Saver Type
30
-
-
Changing the Screen Backlight Brightness and Time
31
-
Changing the Language
31
-
Time & Date
31
-
Disabling Idle Clock Display
32
-
Setting the Time and Date Manually
32
-
Changing the Date Format
32
-
-
Setting a Key as Send
33
-
Phone Lock
33
-
Phone Lock Types and Waiting Time
33
-
Setting the Phone Lock
34
-
Locking Your Phone Manually
34
-
Unlocking Your Phone
34
-
Changing Your Phone Unlock PIN
35
-
-
Bluetooth
35
-
Activating the Bluetooth Mode
35
-
Deactivating the Bluetooth Mode
35
-
Using Bluetooth Feature
35
-
Pairing and Connecting the Bluetooth Headset
36
-
Pairing and Connecting the Bluetooth-Enabled Mobile Phone
36
-
Enabling the Mobile Contacts Sync Feature
37
-
Syncing the Mobile Contacts to the IP Phone
37
-
Disabling the Mobile Contacts Sync Feature
38
-
Handling a Mobile Phone Call on the IP Phone
38
-
Viewing Your Mobile Contacts on the IP Phones
38
-
Editing Device Name of Your Phone for Recognition
39
-
Viewing the Bluetooth Device Information
39
-
Deleting the Paired Bluetooth Device
40
-
Disconnecting the Bluetooth Device
40
-
-
-
-
Audio Settings
41
-
Adjusting the Volume
41
-
Adjusting the Audio Volume
41
-
Adjusting the Ringer Volume
41
-
-
Setting the Ring Tone
41
-
Setting a Ring Tone for the Phone
42
-
Setting a Ring Tone for an Account
42
-
Setting a Ring Tone for a Group
42
-
Setting a Ring Tone for a Contact
43
-
-
Setting the Key Tone
43
-
-
Directory
45
-
Local Directory
45
-
Managing the Local Directory Groups
45
-
Adding Contact Groups
45
-
Editing Contact Groups
45
-
Deleting Contact Groups
46
-
-
Managing the Local Directory Contacts
46
-
Adding Contacts
46
-
Deleting a Contact
47
-
Deleting All Contacts
47
-
Deleting Contacts
47
-
Editing Contacts
47
-
-
Moving a Local Directory Contact to Blacklist
48
-
Searching for Local Directory Contacts
48
-
-
Favorites
48
-
Adding Favorites
49
-
Adding a Favorite from Local Directory
49
-
Adding a Favorite While Adding a Contact
49
-
-
Viewing Favorites
50
-
Reordering Favorites
50
-
Deleting Favorites
50
-
Deleting a Favorite by Deleting the Favorite Index Number
50
-
Deleting a Favorite by Removing a Contact from Favorites Directory
50
-
-
-
Blacklist
51
-
Managing the Blacklist Contacts
51
-
Adding a Blacklist Contact
51
-
Deleting Blacklist Contacts
51
-
Editing a Blacklist Contact
51
-
Deleting a Blacklist Contact
52
-
Deleting All Blacklist Contacts
52
-
-
Moving a Blacklist Contact to the Local Directory
52
-
-
Mobile Contacts
52
-
Adding a Mobile Contact to the Local Directory/Blacklist
52
-
Searching for Mobile Contacts
53
-
Updating the Mobile Contacts
53
-
-
Remote Phone Book
54
-
Adding a Remote Phone Book Contact to the Local Directory/Blacklist
54
-
Searching for Remote Phone Book Contacts
54
-
-
-
Call History
55
-
Viewing History Records
55
-
Adding a History Record to Local Directory/Blacklist
55
-
Deleting History Records
55
-
Deleting a Call Record
55
-
Deleting All Call Records
56
-
-
Disabling History Record
56
-
-
Call Features
57
-
Switching Among the Handset, Speakerphone and Headset Modes
57
-
Changing the Default Account
57
-
Placing Calls
58
-
Placing a Call from the Dialer
58
-
Placing Multiple Calls
59
-
Placing a Call with a Speed Dial Key
59
-
Setting a Speed Dial Key Manually
59
-
Speed Dialing a Contact Using a Speed Dial Key
60
-
-
Placing a Call Back to the Last Incoming Number
60
-
Setting a Recall Key
60
-
Recalling a Contact
61
-
-
Redialing a Number
61
-
Dialing a Hotline Number
61
-
Setting a Hotline Number and Delay Time
61
-
-
Placing an International Call
61
-
Placing a Call from the Call History
62
-
Placing a Call from the Directory
62
-
-
Placing an Anonymous Call
62
-
Enabling Anonymous Call
62
-
Placing a Anonymous Call
63
-
-
Answering Calls
64
-
Answering a Call
64
-
Answering a Call When in a Call
64
-
Enabling Call Waiting
65
-
-
Answering Calls Automatically
65
-
-
Silencing or Rejecting Incoming Calls
65
-
Silencing a Call
66
-
Rejecting a Call Manually
66
-
Rejecting Anonymous Calls Automatically
66
-
-
Ending Calls
66
-
Auto Redial
67
-
Setting the Auto Redial
67
-
Redialing a Call Automatically
67
-
-
Call Mute
68
-
Muting/Unmuting Audio
68
-
Keep Mute
68
-
-
Call Hold
69
-
Holding a Call
69
-
Resuming a Held Call
70
-
Swapping between Active and Held Calls
70
-
-
Do Not Disturb (DND)
70
-
Rejecting Calls with DND on All Lines
70
-
Rejecting Calls with DND on Specific Lines
71
-
Deactivating DND
71
-
-
Redirecting Incoming Calls
72
-
Forwarding Calls
72
-
Forwarding All Incoming Calls to a Contact
72
-
Forwarding All Incoming Calls on All Lines
73
-
Forwarding All Incoming Calls on Specific Lines
73
-
Deactivating Call Forward
74
-
Forwarding an Incoming Call Manually
74
-
Forwarding Incoming Calls with a Forward Key
74
-
Setting a Forward Key
74
-
Forwarding Incoming Calls Using a Forward Key
75
-
-
Diverting Calls to a Contact
75
-
-
Transferring Calls
75
-
Performing a Blind Transfer
76
-
Performing a Semi-Attended/Attended Transfer
76
-
Performing Transfer with a Transfer Key
76
-
Performing a Blind Transfer Using a Transfer Key
77
-
Performing a Semi-Attended/Attended Using a Transfer Key
77
-
Setting a Transfer Key
77
-
-
Conference Calls
78
-
Local Conference
78
-
Setting up a Local Conference Call
78
-
Holding/Resuming a Conference Call
79
-
Joining a Transfer Target and a Transferee into a Conference
79
-
Joining Two Calls in a Conference
79
-
Ending a Conference Call
80
-
Managing Conference Participants
80
-
Muting/Unmuting a Conference Call
80
-
Network Conference
80
-
Splitting a Conference Call
80
-
Setting up a Network Conference
81
-
-
Call Recording
81
-
Recording a Call
81
-
Managing a Call While Recording
82
-
Pausing a Recording
82
-
Resuming a Recording
82
-
Stopping a Recording
82
-
Playing a Recorded Call
83
-
Deleting a Recorded Call
84
-
Fast Forwarding/Rewinding a Played Recorded Call
84
-
Pausing/Resuming a Recording
84
-
Stopping a Playback
84
-
Viewing the Available Recording Time
84
-
-
Multicast Paging
85
-
Sending Multicast Paging
85
-
Setting a Multicast Paging Key
86
-
Setting a Paging Group
86
-
Setting a Paging List Key
86
-
Deleting a Paging Group
87
-
Sending a Paging by a Multicast Paging Key
87
-
Sending Pages by a Paging List Key
87
-
Managing a Paging Call
88
-
Receiving Multicast Paging
88
-
-
-
Advertisement
Related Products
-
Yealink Telkom T21P E2
-
Yealink T21
-
Yealink T21PE2
-
Yealink T22P
-
Yealink T26P
-
Yealink T20
-
Yealink T22
-
Yealink T26
-
Yealink T28
-
Yealink T23P
Yealink Categories
IP Phone
![]()
Telephone
Conference System
Conference Phone
![]()
Cordless Telephone
More Yealink Manuals