-
Contents
-
Table of Contents
-
Troubleshooting
-
Bookmarks
Related Manuals for Johnson & Johnson Sterrad 100NX
Summary of Contents for Johnson & Johnson Sterrad 100NX
-
Page 1
STERRAD STERRAD 100NX ® ® ® ® STERRAD 100NX Sterilization System User’s Guide Ref 99994 99994_05 January 2017… -
Page 2
® ® STERRAD 100NX Sterilization System User’s Guide 1-888-STERRAD ASP U.S.A. Professional Services ASP International 949-581-5799 Please visit www.aspjj.com For warranty information, please visit our website or contact ASP Professional Services. ASP International Customer Support; call your local ASP Representative ®… -
Page 3: Table Of Contents
Contents Chapter 1. Introduction ………………5 How to Use This Guide ………………..5 Intended Use ………………….5 ® The STERRAD Sterilization Process …………..6 If You Have Questions …………………6 Chapter 2. Safety Information …………….7 Personal Safety and First Aid ……………….7 Personal Protective Equipment …………….9 Device Safety ………………….9 Warnings, Cautions, and Notes …………….13 Symbols……………………14…
-
Page 4
Chapter 4. Operation ………………31 Before You Start …………………31 Start and Warm-up ………………..31 Biological Indicators ………………..31 Login ……………………32 Entering Load Information ………………33 Enter Load Item Data ………………33 Loading the Chamber …………………36 Selecting and Starting a Cycle …………….40 System Ready Screen ………………41 Inserting a Cassette ……………….41 Cycle in Progress ………………..43 Canceling a Cycle …………………44… -
Page 5
Disposing of Cassettes ……………….64 Removing a Cassette Disposal Box …………..65 Replacing the Printer Paper ……………….66 Cleaning the Sterilizer Exterior …………….69 Cleaning the Hydrogen Peroxide Monitor Detector Lens ……..70 PCMCIA Card Handling and Replacement …………71 Data Transfer Using a Memory Stick…………..72 Sterilizer Disposal ………………..73 Chapter 8. -
Page 6
User Administration ………………..88 Add User ………………….89 Modify User ………………….90 Upload User Data ………………..91 Cassette Functions ………………..93 Dispose Cassette………………..94 Peroxide Clearance………………..95 Network ……………………96 Diagnostics ………………….96 Diagnostic Tests ………………..97 Service Functions ………………..97 File Management ………………..98 Calibration Files ………………..98 Diagnostic Files ………………..98 Upload File ………………….99 Input/Output Doors ………………..100 Product Options ………………..100 Appendix A. -
Page 7: Chapter 1. Introduction
Introduction Chapter 1. Introduction Introduction How to Use This Guide ® ® If you are a STERRAD 100NX Sterilizer operator, you must read the “Safety Information, “ the “Introduction,” “Load Preparation,” and “Operation” chapters prior to operating the sterilizer. This “Introduction” explains the features and parts of the sterilizer.
-
Page 8: Sterilization Process
Introduction ® The STERRAD Sterilization Process ® ® The STERRAD 100NX Sterilizer sterilizes medical devices by diffusing hydrogen peroxide vapor into the chamber and then electromagnetiy exciting the hydrogen peroxide molecules into a low-temperature plasma state. The combined use of hydrogen peroxide vapor and plasma safely and rapidly sterilizes medical instruments and materials without leaving toxic residue.
-
Page 9: Chapter 2. Safety Information
Safety Information Chapter 2. Safety Information Safety Information Your safety is of primary concern to Advanced Sterilization Products (ASP). ® ® This chapter provides information on safely using the STERRAD 100NX Sterilizer. You must read and understand the safety information in this chapter before operating the sterilizer.
-
Page 10
Safety Information WARNING! RISK OF SKIN INJURY. Direct hydrogen peroxide contact with the skin can cause severe irritation. Wear chemical resistant latex, PVC (vinyl), or nitrile gloves when handling new, used, or ejected cassettes, items from a cancelled cycle, or items that have moisture present after a completed cycle. -
Page 11: Personal Protective Equipment
Safety Information WARNING! RISK OF BREATHING DIFFICULTIES. On rare occasions, the outlet fi lter on the vacuum pump can prematurely fail. If this occurs, you may see mist or what some users have described as “haze” or “smoke” in the room where the sterilizer is operating. The chemical composition of the mist is primarily airborne mineral oil with trace amounts of other compounds.
-
Page 12
Safety Information CAUTION: KNOW WHAT YOU CAN PROCESS. ® ® Before processing any item in the STERRAD 100NX Sterilizer, make sure you know how the STERRAD Sterilization Process will affect the item. Read, understand, and follow the medical device manufacturers’ instructions for their products. -
Page 13
Safety Information Guidance And Declaration-Electromagnetic Emissions The STERRAD ® 100NX ® Sterilizer is intended for use in the electromagnetic environment specifi ed below. Assure that it is used in such an environment. Emissions Test Compliance Electromagnetic Environment — Guidance RF emissions CISPR 11 Group 1 ®… -
Page 14
Safety Information FCC Rules and Industry Canada (IC) Regulatory Information Compliance Statement (Part 15.19) The equipment device complies with Part 15 of the FCC Rules. Operation is subject to the following two conditions: (1) This device may not cause harmful interference, and (2) This device must accept any interference received including interference that may cause undesired operation. -
Page 15: Warnings, Cautions, And Notes
Safety Information Warnings, Cautions, and Notes Warnings and cautions are accompanied by symbols surrounded by a triangle or a square and are printed in the text in bold. Warnings indicate events or conditions that can result in serious injury or death. Cautions indicate events or conditions that can result in severe damage to the equipment.
-
Page 16: Symbols
Safety Information Symbols Hot surfaces present. Do not touch without protection. Hazardous chemical present. Use personal protective equipment. Corrosive chemical present. Use personal protective equipment. Oxidizing chemical present. Avoid exposure, contact, or ingestion. Use personal protective equipment. WEEE Symbol Toxic chemical present. Avoid exposure, contact, or ingestion.
-
Page 17: Chapter 3. Load Preparation
Load Preparation Chapter 3. Load Preparation Load Preparation ® ® The STERRAD 100NX Sterilizer is designed for sterilization of both ® metal and nonmetal medical devices at low temperatures. The STERRAD sterilization process is a multiphase sterilization process that utilizes a combination of exposure to hydrogen peroxide vapor and plasma to safely sterilize medical instruments and materials without leaving toxic residue.
-
Page 18
Load Preparation STANDARD Cycle Processing ® ® The STERRAD 100NX Sterilizer can sterilize instruments which have diffusion-restricted spaces, such as the hinged portion of forceps and scissors. Medical devices with the following materials and dimensions can be ® ® processed in the STERRAD 100NX Sterilizer STANDARD cycle: Single channel stainless steel lumens with an inside diameter of 0.7 mm… -
Page 19
Load Preparation EXPRESS Cycle Processing The following types of medical devices can be sterilized in the EXPRESS Cycle: General medical devices requiring surface sterilization, or sterilization of mated titanium and stainless steel surfaces. Rigid or semi-rigid endoscopes without lumens; for example da Vinci ®… -
Page 20: Cycles And Materials Processing
Load Preparation Cycles and Materials Processing CAUTION: RISK OF DAMAGE TO LOAD OR STERILIZER. Do not attempt to sterilize items or materials that do not comply with the guidelines specifi ed in this user’s guide. Consult the medical device manufacturer’s instructions or call your ASP Representative to determine if an item can be sterilized by the ®…
-
Page 21
Load Preparation ® ® STERRAD 100NX User’s Guide… -
Page 22
Load Preparation ® ® STERRAD 100NX User’s Guide… -
Page 23
Load Preparation ® ® STERRAD 100NX User’s Guide… -
Page 24: Recommended Materials
Load Preparation Recommended Materials There is a wide variety of materials and devices that may be sterilized in the sterilizer. The materials listed below are commonly found in medical devices and represent typical classes of materials used to construct medical devices. The items marked with an asterisk (*) may have limited life after repeated sterilization.
-
Page 25: Thermosetting Elastomers
Load Preparation Thermosetting Elastomers Silicone Polyurethane Glass Glass Metal Aluminum Brass Gold Stainless steel Titanium Items Not To Be Processed Single use items for which the manufacturer does not recommend …
-
Page 26: Do Not Process In The Express Cycle
Load Preparation Devices with internal parts, such as sealed bearings, that cannot be immersed, may present diffi culties in cleaning and should not be ® ® processed in the STERRAD 100NX Sterilizer. Implants for which the manufacturer has not specifi cally recommended …
-
Page 27: Guidelines For Preparing Items To Be Sterilized
Load Preparation Guidelines for Preparing Items to Be Sterilized Note: All items must be cleaned, rinsed, and thoroughly ® ® dried before being placed in the STERRAD 100NX Sterilizer. Loads containing moisture may cause cycle cancellations. Cleaning, Rinsing, and Drying Cleaning and sterilization are two separate processes.
-
Page 28
Load Preparation Dry all items thoroughly. An acceptable method for drying is to blow compressed gas through the lumen until no moisture exits the distal end of the device. Please ensure that any method used to dry the devices is in accordance with the manufacturers’… -
Page 29: Packaging And Loading
Load Preparation Packaging and Loading If you choose to package the instruments (highly recommended), proper use and preparation of trays, pouches, and instruments can minimize or prevent cycle cancellations and positive biological indicator (BI) results due to load related problems. All instruments must be cleaned, rinsed, and thoroughly dried before loading into the sterilizer.
-
Page 30: Loading
Load Preparation Do not use paper pouches or sterilization wraps containing cellulose or cotton. Do not use any wraps or packaging that are not approved by ASP or materials listed in the “Items Not To Be Processed” section. In the USA, use only FDA-cleared polypropylene wraps.
-
Page 31: Chemical Indicators
Load Preparation EXPRESS Cycle Loading Preparation ® ® The STERRAD 100NX Sterilizer EXPRESS Cycle was validated using a load weight of 4.9 kg (10.7 lbs) on the bottom shelf only. When constructing your load, the total weight of the load to be sterilized should not exceed 4.9 kg (10.7 lbs).
-
Page 32
Load Preparation FLEX Cycle: A maximum of 2 fl exible endoscopes can be processed per load, with or without silicone mats. Do not add any additional items to the load. DUO Cycle: A maximum of 2 fl exible endoscopes can be processed per load, with or without silicone mats. -
Page 33: Chapter 4. Operation
Operation Chapter 4. Operation Operation Before You Start ® ® Each time you use the STERRAD 100NX Sterilizer, follow the instructions provided in the “Load Preparation” chapter. It is your responsibility to be familiar with the load preparation and safety information provided in this user’s guide.
-
Page 34: Login
Operation The absence of a color change and turbidity in the processed ® ® STERRAD CYCLESURE 24 vial (i.e. the media remains purple as compared directly to a negative control) indicates that ® the sterilization conditions were achieved in the STERRAD Sterilizer (suffi…
-
Page 35: Entering Load Information
Operation Figure 1. Operator Login Screen. Touch the Operator fi eld. The cursor appears in the fi eld. Note: Operator and Password fi elds are case-sensitive. Use the on-screen keyboard to type your assigned operator identifi cation. Touch the ENTER key. The cursor jumps to the Password fi eld. Type your password.
-
Page 36
Operation Items can be typed into the screen or selected from a predefi ned list of items. This information is stored and printed on a cycle report. It can also be transferred to a host computer over a network connection. Figure 2. -
Page 37
Operation Cycle Notes Note: If your sterilizer has been confi gured not to require cycle notes, this screen will not appear. The Cycle Notes screen allows you to enter information about the cycle. For example; record information about biological indicators used in the cycle or other information that should be stored in the cycle history fi… -
Page 38: Loading The Chamber
Operation Loading the Chamber Note: The door is equipped with a safety mechanism that prevents it from closing if it encounters an obstruction. If this occurs, the door stops immediately. You must use the touch screen to open the door. Open the active chamber door by pressing the Open Door foot pad, or by touching Open Door on the display, and place your load on the shelves.
-
Page 39
Operation When placing the load on the shelves, make certain that you do not block the ultraviolet lamp beam in the front right (your right) side of the chamber. Make sure the load is centered on the shelves and that the shelves are centered in the chamber. -
Page 40
Operation Figure 8. Load Correctly Placed for STANDARD Cycle Processing. Figure 9. Load Correctly Placed for DUO and FLEX Cycle Processing. When you are fi nished loading the chamber, close the door by tapping the foot pad or pressing the Close Door button on the touch screen. If a message requesting that the door be closed is displayed, the door is not securely closed. -
Page 41
Operation Loading Requirements for the EXPRESS Cycle ® ® Only the bottom shelf of the STERRAD 100NX Sterilizer should be used when processing loads in the EXPRESS Cycle. The following fi gure shows a correctly placed load. Figure 10. Load Correctly Placed for EXPRESS Cycle Processing. ®… -
Page 42: Selecting And Starting A Cycle
Operation Selecting and Starting a Cycle When the load has been placed in the chamber, and the door has been closed, use the System Ready screen to start the cycle. The following display shows ® ® all the cycles available for the STERRAD 100NX Sterilizer.
-
Page 43: System Ready Screen
Operation System Ready Screen The System Ready screen displays a number of buttons allowing you to select cycles based on the cycles that are loaded and enabled on your sterilizer. Cycle Types STANDARD cycle sterilizes the load in about 47 minutes. This cycle is …
-
Page 44
Operation Position the cassette so that the arrows are pointing straight into the cassette door slot of the sterilizer. Do not insert the cassette at an angle. Figure 12a. Inserting the Cassette into the Slot. Completely insert the cassette into the cassette slot until it reaches a stop, the cassette must be fl… -
Page 45: Cycle In Progress
Operation Cycle in Progress When you touch the Start Cycle button (after selecting the cycle type), the sterilizer starts a “countdown clock” and begins the sterilization cycle. Figure 13. Cycle In Progress. The Countdown Clock is Displayed. The clock displays the estimated number of minutes and seconds remaining before the cycle is fi…
-
Page 46: Canceling A Cycle
Operation Canceling a Cycle There may be occasions when it is necessary to cancel a cycle before it is completed. To cancel a cycle, do the following: Touch the Cancel Cycle button. The screen displays a confi rmation message. Figure 14. Cancel Cycle Confi rmation. Touch Yes or No. Touch No to continue with the cycle.
-
Page 47: Cycle Completed
Operation Loads from canceled cycles should be rewrapped using new packaging ® ® materials, STERRAD Chemical Indicator Strips, and STERRAD ® SEALSURE Chemical Indicator Tape. If a biological indicator was used in the canceled load, the previously used biological indicator must be discarded and a new biological indicator must be placed in the chamber before restarting the new cycle.
-
Page 48: Processing A Sterilized Load
Operation Processing a Sterilized Load When you touch the Done button, how the sterilizer responds depends upon the confi guration of your sterilizer. If login is required before the door can be opened, the Login screen is displayed. When this occurs, enter your operator identifi cation and password and touch Enter.
-
Page 49
Operation Cycle Completion Flowchart ® ® STERRAD 100NX User’s Guide… -
Page 50
Operation ® STERRAD CYCLESURE 24 Biological Indicator Flowchart ® ® STERRAD 100NX User’s Guide… -
Page 51: Chapter 5. Troubleshooting
Troubleshooting Chapter 5. Troubleshooting Troubleshooting Note: Repairs and adjustments should only be made by ASP trained and authorized personnel. Most sterilizer operating problems are accompanied by a system message. These messages are useful in determining the source of the problem. In many cases you can take remedial actions to return the sterilizer to normal operation.
-
Page 52: System Message Table
Troubleshooting System Message Table Temperature Messages WARNING! HOT SURFACES. When a temperature message is displayed, this may mean that the interior of the sterilizer may be very hot. Do not touch the inside of the chamber, electrode, or doors with your bare or gloved hands. Allow the sterilizer to cool before touching interior surfaces.
-
Page 53
Troubleshooting If this message appears. . . Do this . . . Cassette Used, Disposing The inserted cassette does not have any unused cells remaining. Insert a new cassette. Cycle Canceled By Operator The operator canceled the cycle. Repackage the load. Restart the cycle after cancellation is complete. -
Page 54
Troubleshooting If this message appears. . . Do this . . . Peak Constant Too High The load is decomposing the H . Check the load for absorbent materials. Repackage, and restart the cycle. If the problem persists, call your ASP Representative. WARNING! HYDROGEN PEROXIDE MAY BE PRESENT. -
Page 55
Troubleshooting If this message appears. . . Do this . . . Please Enter Valid User Name and After the valid user name and password are entered, press OK. Password Please Insert New Cassette Insert a new, unused cassette. WARNING! HYDROGEN PEROXIDE MAY BE PRESENT. Wear chemical resistant latex, PVC (vinyl), or nitrile gloves whenever handling new or used cassettes. -
Page 56: Call Your Asp Representative
Troubleshooting If this message appears. . . Do this . . . Unable to Evacuate Chamber . . . Remove the load and run diagnostics. Reboot the system. If the Ensure Load is Dry before Starting problem persists, call your ASP Representative. Cycle Unable to Open One Second Data File Replace the PCMCIA card with a new one.
-
Page 57: Chapter 6. Sterilizer Overview
Sterilizer Overview Chapter 6. Sterilizer Overview Sterilizer Overview Sterilizer Cycles ® The following display shows all the cycles available for the STERRAD ® 100NX Sterilizer. This guide contains detailed instructions for each cycle. Make sure you understand the differences in the cycles and what types of instruments can be sterilized in each cycle.
-
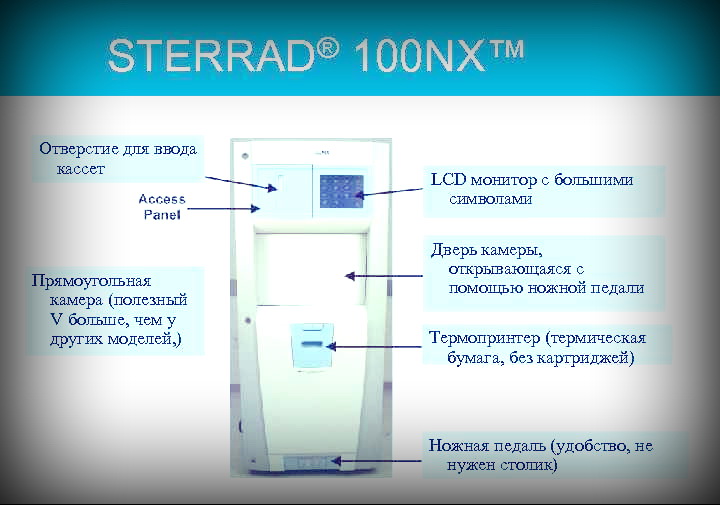
Page 58: Sterilizer Features
Sterilizer Overview Sterilizer Features The cassette slot, the cassette drawer, the touch screen, PCMCIA slot (inside the access panel), the chamber door, the printer, and the foot pad are found on the input side of the sterilizer (the front of single-door units). On a two door unit the touch screen, chamber door, foot pad, and printer are found on both the input and output sides.
-
Page 59: Cassette
Sterilizer Overview The items to be sterilized are placed on the shelves and the door is closed using either the close door button on the touch screen or by tapping the foot pad with your foot. The foot pad is located on the lower portion of the front panel.
-
Page 60: Cassette Disposal Box
Sterilizer Overview WARNING! HYDROGEN PEROXIDE IS CORROSIVE. Concentrated hydrogen peroxide is corrosive to skin, eyes, nose, throat, lungs, and the gastrointestinal tract. Always wear chemical resistant latex, PVC (vinyl), or nitrile gloves when handling new or used cassettes and while removing items from the sterilizer following a cancelled cycle.
-
Page 61: Chamber
Sterilizer Overview Figure 21. Using the Touch Screen. An internal loudspeaker emits “beep” tones to call for user attention or indicate errors. A single long beep indicates a successfully completed cycle. A series of ten short beeps indicates a canceled cycle. Chamber The load is placed in the chamber for sterilization.
-
Page 62: Printer
Sterilizer Overview Printer The sterilizer has an integrated internal printer located in the front panel. On two door units, a printer is located in the main panel on each side. The printer prints cycle reports and other information on a roll of thermal paper.
-
Page 63: Touch Screen Data Entry
Sterilizer Overview Touch Screen Data Entry The following fi gure shows a typical data entry screen. The typewriter “keys” input the indicated character each time a key is touched. Touch the screen to move the cursor from place-to-place. The load list can be predefi ned and used repeatedly.
-
Page 64
Sterilizer Overview Function Buttons Most screens provide function buttons that display other screens or select sterilizer functions. Common function buttons are shown in the following table. Button Function Done. Touch this button to indicate that you are fi nished using the screen. -
Page 65: Chapter 7. Maintenance
Maintenance Chapter 7. Maintenance Maintenance Note: Repairs and adjustments should only be attempted by experienced technicians who are fully trained ® ® to maintain and repair the STERRAD 100NX Sterilizer. Use of unauthorized parts for maintenance or repair could cause personal injury, result in costly damage, or sterilizer malfunction and voids the warranty.
-
Page 66: Manual Maintenance
Maintenance Manual Maintenance The following maintenance procedures are performed by the user: Disposing of cassettes. Inserting a new cassette disposal box. Replacing the printer paper roll. Cleaning the sterilizer exterior. Cleaning the hydrogen peroxide monitor detector lens. …
-
Page 67: Removing A Cassette Disposal Box
Maintenance Removing a Cassette Disposal Box WARNING! HYDROGEN PEROXIDE MAY BE PRESENT. Wear chemical resistant latex, PVC (vinyl), or nitrile gloves. This will protect you from contact with any residual hydrogen peroxide that may be present in the cassettes. 1. Open the cassette access door. Pull the tab on the cassette disposal box to more easily slide it completely out.
-
Page 68: Replacing The Printer Paper
Maintenance 4. Insert a new box making sure the lid is open and not caught in the opening, and the tab is facing you. Figure 27. Insert the New Cassette Box with the Lid Open so the Tab is on the Left. 5.
-
Page 69
Maintenance Figure 29. Remove the Empty Paper Roll. 3. Insert a new paper roll as shown in the following fi gure. The paper should feed from the top of the roll. Figure 30. Insert a New Paper Roll. 4. Pull a short length of paper over the top of the printer door. 5. -
Page 70
Maintenance 6. Push the door shut making sure the paper stays in place. Figure 31. Make sure the Printer Door Latches Securely and the Paper is in Place. 7. Press the paper advance button. Check the alignment of the paper and make certain it does not jam or misfeed. -
Page 71: Cleaning The Sterilizer Exterior
Maintenance Cleaning the Sterilizer Exterior Note: Do not attempt to clean the chamber, door, interior surfaces, shelves, or electrode. If these items need cleaning, call your local ASP Representative for assistance. The sterilizer exterior can be cleaned with a soft cloth and a mild, nonabrasive detergent solution if necessary.
-
Page 72: Cleaning The Hydrogen Peroxide Monitor Detector Lens
Maintenance Cleaning the Hydrogen Peroxide Monitor Detector Lens The hydrogen peroxide monitor lens is located on the input side of the sterilizer. The lens must be kept clean. Wipe off the lens once every three months or when an accumulation of debris is noted. This is shown in the following fi…
-
Page 73: Pcmcia Card Handling And Replacement
Maintenance PCMCIA Card Handling and Replacement The PCMCIA card contains the fl ash memory used to store cycle data. It should not be removed arbitrarily. If you need to remove or replace it, use the following steps: 1. Turn off the sterilizer, or go to the “Additional Utilities” menu and press the PCMCIA button.
-
Page 74: Data Transfer Using A Memory Stick
Maintenance 3. Insert the card into the PCMCIA card slot. 4. Press the end of the PCMCIA card until the card is fi rmly seated in the slot (you will feel a “click” as the card is seated in the connector). Figure 35.
-
Page 75: Sterilizer Disposal
Maintenance Rebooting the System If it becomes necessary to reboot the system, fl ip the main switch on the sterilizer to turn off the system and then turn it back on. Main Circuit Breaker Figure 37. The Main Power Switch/Circuit Breaker is Located on the Side of the Sterilizer at your Left.
-
Page 76
Maintenance ® ® STERRAD 100NX User’s Guide… -
Page 77: Chapter 8. Reports And Files
Reports and Files Chapter 8. Reports and Files Reports and Files Displayed Reports Users with Operator-level access can display the Cycle History fi les. Users with Supervisor-level access can display the Cycle History fi les, as well as Calibration fi les and Diagnostic fi les. All fi…
-
Page 78
Reports and Files Touch the scroll bars to scroll through the list. Touch the line you wish to select. Figure 38. Select Cycle History File. Print List prints a list of all cycle history fi les stored in the sterilizer. View Cycle displays the selected Cycle History fi… -
Page 79: Printed Reports
Reports and Files Printed Reports Every time a cycle is completed, a cycle completion report is printed. Depending upon how your sterilizer has been confi gured, the report will either be a short-format report, a parametric report, or a long-format report. Each report extracts data from the cycle history record created by the cycle.
-
Page 80
Reports and Files ® ® STERRAD 100NX User’s Guide… -
Page 81: Chapter 9. Access Levels And Supervisor Tasks
Access Levels and Supervisor Tasks Chapter 9. Access Levels and Supervisor Tasks Access Levels and Supervisor Tasks Overview Users with Supervisor-level access privileges (see below) are permitted to perform a set of restricted sterilizer functions. These functions are not used in daily sterilizer operation and some of them are designed to control access, manage system records, and perform advanced diagnostic functions.
-
Page 82: Additional Utilities Menu
Access Levels and Supervisor Tasks Supervisor-level access includes all of the privileges of Operator-level access and additionally provides the ability to: Add, delete, and modify user names, passwords, and access levels. Select, view, and print all sterilizer fi les. …
-
Page 83: Date And Time Settings
Access Levels and Supervisor Tasks System Confi g allows you to set sterilizer features. User Admin allows you to add, delete, or modify operator identifi cations, passwords, and access levels. Cassette Functions allows you to automatically dispose a cassette into the collection box or perform the peroxide clearance procedure.
-
Page 84: Set Date
Access Levels and Supervisor Tasks Set Date Use the MM box to set the month (01-12), the DD box to set the day (01-31), and the YY box to set the year. Set Time Use the HH box to set the hour (01-12 if 12-hour format is selected, 00-23 if 24-hour format is selected).
-
Page 85: System Confi Guration
Access Levels and Supervisor Tasks System Confi guration Use the System Confi guration screen to set sterilizer features. Selections on this screen allow you to set the volume of the alarm loudspeaker, the language used in displays and reports, and several access, report, and connection features.
-
Page 86: Load Data Entry Option
Access Levels and Supervisor Tasks Load Data Entry Option Enabled causes the Enter Load Item Data screen to be displayed after login. This is the factory default setting. Disabled skips the Enter Load Item Data screen. Load Removal Option With Login requires that a user enter a user identifi cation and password to open the sterilizer door when a cycle is complete.
-
Page 87: Sterilizer Settings
Access Levels and Supervisor Tasks Sterilizer Settings Touch Sterilizer Settings to display the following screen. The information entered here is included in the printout, but its use is optional. Touch Done to save the settings and return to the previous screen. Figure 42.
-
Page 88: Printer Settings
Access Levels and Supervisor Tasks Printer Settings Touch Printer Settings to display the following screen: Touch Done to save the changes. Figure 43. Printer Settings. Internal Printer Input Side allows you to select the printer on the input side. This is the default. Internal Printer Output Side allows you to select the printer on the output side (2 door confi…
-
Page 89: Transfer Settings
Access Levels and Supervisor Tasks Transfer Settings When you touch Transfer Settings from the System Confi guration menu, the following screen appears. This screen displays selectable report types that automatically transfer via a network to a remote PC upon cycle completion. Touch Done to save the settings.
-
Page 90: User Administration
Access Levels and Supervisor Tasks User Administration Use the User Administration screen to add, modify, or delete user names, passwords, and access levels. A button on this screen allows you to upload user information from a USB memory stick. Supervisor-level access allows you to add, edit or delete a User or another Supervisor.
-
Page 91: Add User
Access Levels and Supervisor Tasks Add User Use the Add User screen to enter a new user’s identifi cation, password, and access level. Figure 46. Add User. Enter the user’s operator “identifi cation” in the Operator fi eld. The entry must be alpha-numeric and no more than 10 characters.
-
Page 92: Modify User
Access Levels and Supervisor Tasks Modify User Use the Modify User screen to modify an existing user’s identifi cation, password, and access level. Figure 47. Modify User. Touch the user’s name whose information you wish to edit or delete. Touch Delete User to remove the user from the access list and revoke access to sterilizer operation.
-
Page 93: Upload User Data
Access Levels and Supervisor Tasks To modify the selected user’s information, touch the Edit User button. To change the user’s operator name, make changes in the Operator fi eld. To change the user’s password, make changes in the Password fi eld. …
-
Page 94
Access Levels and Supervisor Tasks Steps to Upload a User Database To upload a list of user identifi cations and passwords, perform the following steps: Create an ASCII text fi le called “users.rec” that contains the user identifi cations, passwords, and access levels. Use Microsoft Notepad to create the entry. -
Page 95: Cassette Functions
Access Levels and Supervisor Tasks Cassette Functions WARNING! HYDROGEN PEROXIDE MAY BE PRESENT. Wear chemical resistant latex, PVC (vinyl), or nitrile gloves whenever handling a load after a cycle cancellation or a new or used cassette. Hydrogen peroxide liquid may be present on the cassette, the load or in the chamber. This function has two options: Dispose Cassette which is used to remove the currently loaded cassette from the sterilizer to resolve an error message or to move a cassette that may be stuck in place;…
-
Page 96: Dispose Cassette
Access Levels and Supervisor Tasks Dispose Cassette The Dispose Cassette function moves the cassette from inside the sterilizer to the cassette box. The remaining volume of hydrogen peroxide is displayed on the screen. Touch Dispose Cassette to move the cassette into the cassette disposal box. Figure 51.
-
Page 97: Peroxide Clearance
Access Levels and Supervisor Tasks Peroxide Clearance The DUO Cycle requires the sterilizer to hold peroxide in a reservoir to optimize sterilization. If this peroxide expires, you must dispose of the peroxide remaining in the system. “Peroxide Clearance,” must be performed when a message appears or no subsequent DUO cycles can be run.
-
Page 98: Network
Access Levels and Supervisor Tasks Network ® ® STERRAD 100NX Sterilizer can be confi gured to communicate with a remote personal computer over a network. If you need to use this feature, please contact Advanced Sterilization Products for details on performing this setup.
-
Page 99: Diagnostic Tests
Access Levels and Supervisor Tasks Diagnostic Tests Order Test Name What is tested Average Time to Run* Power Supply Test DC power supply 30 sec. Vacuum Test 12 min. Vacuum pump, pressure sensors and valves (vacuum control, vent, inlet, transition, delivery, and oil return) Door Test Door Motor and sensors…
-
Page 100: File Management
Access Levels and Supervisor Tasks File Management Use the File Management screen to select and display calibration fi les or diagnostic report fi les. Figure 55. File Management. Calibration Files Touch the Calibration Files button to display a list of calibration fi les created during a sterilizer calibration.
-
Page 101: Upload File
Access Levels and Supervisor Tasks Upload File This screen allows you to upload item information from a separate database to the sterilizer using the USB memory port. Figure 56. Load Items Files. Using Microsoft “Notepad,” create a list of load items similar to the example shown in the fi…
-
Page 102: Input/Output Doors
Access Levels and Supervisor Tasks Input/Output Doors The doors can be opened or closed via the foot pad that you tap with your foot or by touching the Input or Output Door buttons. If the system has only one door, only the Input Close Door and Input Open Door buttons are available for use.
-
Page 103
Access Levels and Supervisor Tasks Install guides you to install any newly purchased features. Back returns you to the Additional Utilities Menu. Enabled displays any cycle in your sterilizer which can be selected (enabled). The choices appear on the Start Cycle display. Disabled removes the selected cycle buttons from the Start Cycle Screen. -
Page 104
Access Levels and Supervisor Tasks ® ® STERRAD 100NX User’s Guide… -
Page 105: Appendix A. Sterilizer Specifi Cations
Sterilizer Specifi cations Appendix A. Sterilizer Specifi cations Sterilizer Specifi cations Power The phase rotation is adjusted to match the system requirements at installation. 208V 60 Hz Power: For versions employing 208V, 60 Hz power, the sterilizer requires a NEMA L21-30 fi ve-wire grounding twist lock outlet attached to a dedicated 30 Amp 3 phase 208 Volt circuit with separate neutral and ground conductors.
-
Page 106
Sterilizer Specifi cations Humidity Operating: 10% – 85% up to 30 Linearly decreasing from 85% at 30 C to 70% at 40 C non-condensing Storage: 10% – 100% (rainfall will be permitted). Altitude/Pressure Operating altitude up to 3095 m (10,152 ft.). Atmospheric pressure 520 –… -
Page 107
Sterilizer Specifi cations Medical Device Medical Device Directive 2007/47/EC Requirements and IEC/EN 61010-1: Safety Requirements For Electrical Equipment Guidelines For Measurement, Control, And Laboratory Use – Part 1: General Requirements EN 61010-2-040: Safety Requirements for Electrical Equipment, Control and laboratory Use. Particular requirements for sterilizer and washer- disinfectors used to treat medical devices. -
Page 108
Sterilizer Specifi cations ® ® STERRAD 100NX User’s Guide… -
Page 109: Appendix B. Consumables, Accessories, And Additional Parts
Consumables, Accessories, and Additional Parts Appendix B. Consumables, Accessories, and Additional Parts Consumables, Accessories, and Additional Parts Consumable Products Product Code Description ® ® STERRAD 100NX Cassette 10144 2 cassettes per case. Thermal Printer Paper Roll-Case 10305 Used with the thermal printer to record sterilizer information.
-
Page 110
Consumables, Accessories, and Additional Parts Consumable Products Product Code Description Barcode Reader 11142 Optional barcode scanner for tracking instruments and other information in the cycle history fi le. Independent Monitoring System (IMS) 10140 For compliance with ISO 14937. The Independent Monitoring System (IMS) is an optional feature that may be purchased and installed on the sterilizer. -
Page 111: Appendix C. User’s Network Connection Information Guide
User’s Network Connection Information Guide Appendix C. User’s Network Connection Information Guide User’s Network Connection Information Guide ® ® STERRAD 100NX User’s Guide…
-
Page 112
User’s Network Connection Information Guide Contents Section 1. Digital Transfer Interface …………….111 Network Connection Specifi cations ………………111 Security Reminders ……………………112 For Health Care Facilities:………………….113 If You Have Questions ……………………113 Section 2. Setting Up the Network …………….114 Network Settings Display ………………….114 Confi… -
Page 113: Section 1. Digital Transfer Interface
Digital Transfer Interface Section 1. Digital Transfer Interface Digital Transfer Interface This guide is designed for the individuals who are performing and/or overseeing the connection of the STERRAD ® 100NX ® Sterilizer to a network. This procedure should be done in collaboration with your facility’s computer network department.
-
Page 114: Security Reminders
Digital Transfer Interface Use of DHCP IP Addressing (“Auto” mode) is highly recommended. Static (“Manual” mode) confi guration (IP Address, Subnet Mask, Gateway, Primary Domain Name System (DNS), and Secondary DNS assigned by the Information Technology [IT] department) will also be supported.
-
Page 115: For Health Care Facilities
Digital Transfer Interface For Health Care Facilities: *The FDA is recommending that you take steps to evaluate your network security and protect your hospital system. In evaluating network security, hospitals and health care facilities should consider: Restricting unauthorized access to the network and networked medical …
-
Page 116: Section 2. Setting Up The Network
Setting Up the Network Section 2. Setting Up the Network Setting Up the Network Network Settings Display Use the Network Settings screen to confi gure the sterilizer’s network connection. Note: Always check with your facility’s Network Administrator before confi guring or changing any of the settings on this screen.
-
Page 117: Hostname
Setting Up the Network Or, Select Manual to confi gure the IP address manually. Obtain the static IP settings; (e.g., IP Address, Subnet Mask, Gateway, Primary, and Secondary DNS IP addresses) from your Network Administrator. Refer to the table below for acceptable character use for each parameter. Parameters Acceptable Characters Hostname…
-
Page 118: Subnet Mask
Setting Up the Network Subnet Mask A 32-bit value that enables the recipient of IP packets to distinguish the network ID and host ID portions of the IP address. For example, subnet masks use the format 255.255.255.0. This fi eld cannot be changed in Auto confi guration mode. In Manual confi…
-
Page 119: User Name
Setting Up the Network Figure 59. Network Settings Display. The data shown in this screen’s fi eld is for context. Note: The sterilizer does not logon to the domain or workgroup User Name Enter the User Name information to login onto the PC or Server. Obtain this information from your network administrator.
-
Page 120: Shared Folder Name
Setting Up the Network Shared Folder Name Enter the name of the shared folder located on the remote PC or Server. The folder must be confi gured with shared and security permissions. Obtain this information from your network administrator. One shared folder for each connected sterilizer is required to avoid overwriting existing data fi…
-
Page 121
Setting Up the Network Figure 60. Cycle Selection. Your System May Have Other Cycle Options. 3. Touch Additional Utilities on the System Ready screen. 4. Login with Supervisor Level account. Figure 61. Additional Utilities Menu. Touch Network. 5. Touch Network on the Additional Utilities Menu. ®… -
Page 122
Setting Up the Network Figure 62. Network Settings 1. The data shown in this screen’s fi eld is for context. Use the completed form F-107773 to complete the setup: 6. Select Auto if box 3 is checked. Proceed to step 14. 7. -
Page 123
Setting Up the Network Figure 63. Enter Network Settings 2. The data shown in this screen’s fi eld is for context. 15. Enter the information from line 11 for the User Account (Username). 16. Have the facility’s network administrator enter the Password. 17. -
Page 124
Setting Up the Network Figure 64. System Confi guration Screen. 21. For Auto Send Network Files option, select Enabled. 22. Touch Transfer Settings. Figure 65. Transfer Settings. Note: If your sterilizer is confi gured with an Instrument Tracking Software (ITS), a CSV fi le will be transferred by default. -
Page 125
Setting Up the Network Figure 66. System Ready Screen Showing Cycles to be Transferred. The number of Cycles Pending Transfer is displayed in the upper right of the screen. Up to 200 cycles will be queued if the network connection is lost. CAUTION! Under this condition, when the 201 cycle is started, the fi… -
Page 126: Section 3. Manual Network File Transfer
Manual Network File Transfer Section 3. Manual Network File Transfer Manual Network File Transfer With the network successfully confi gured, cycle fi les can be manually transferred to the computer server. 1. Navigate to the System Ready Screen. Figure 67. Cycle Selection. 2.
-
Page 127
Manual Network File Transfer Figure 68. Network Transfer Screen. 5. Select the cycle(s) from the list of Cycles Available. 6. Select desired PDF printout format Short, Long, Medium, Alarm Limit) and/or One Sec File (.CSV) to transfer. 7. Touch Transfer. The fi les should begin transferring to the computer server. -
Page 128: Section 4. Troubleshooting Utilities
Troubleshooting Utilities Section 4. Troubleshooting Utilities Troubleshooting Utilities If the cycle fi les are not appearing on the computer server or if the number of cycle fi les pending transfer from the System Ready screen is 10 or more cycles, contact your IT department to perform the following: 1.
-
Page 129
Troubleshooting Utilities Figure 70. Network Diagnostics Screen. The data shown in this screen’s fi eld is for context. The Command pull down menu has the following utilities ping — to test the reachability of a computer server. ipconfi g — displays all current TCP/IP network confi guration values. … -
Page 130: Section 5. Network Message Table
Network Message Table Section 5. Network Message Table Network Message Table If this message appears… Do this… Another Device On The Network Has The Contact hospital IT for assistance. Same IP Address. Contact Hospital IT For Confi rm that no other device on the network has …
-
Page 131
Network Message Table If this message appears… Do this… Feature Is Not Available Or Network Is Confi rm network settings are confi gured. Not Confi gured Properly. Please Call ASP Contact ASP Representative for more Representative For More Information information. -
Page 132
Network Message Table If this message appears… Do this… Contact the hospital IT for assistance. Unable To Establish Connection. Confi rm Entered Settings Are Correct. Contact Hospital Check that the network settings on the sterilizer IT For Assistance. are correct. -
Page 133: Section 6. Testing The Network Connection
Testing the Network Connection Section 6. Testing the Network Connection Testing the Network Connection ® ® To ensure that the STERRAD 100NX can send data to the network, a “ping” test can be performed. A network crossover cable is required for this test. ®…
-
Page 134
Testing the Network Connection 3. Select Network and Sharing Center. 4. Select Change Adapter Settings. a. Select Local Area Connection. b. Press Properties (not shown). ® ® STERRAD 100NX User’s Guide… -
Page 135
Testing the Network Connection a. Select Internet Protocol Version 4 (TCP/IPv4). b. Press Properties. 7. Select Use the following IP address: and then enter the following sample network number information. IP Address (192.168.1.127), Subnet Mask (255.255.255.0), Default gateway (192.168.1.1), Preferred DNS server (192.168.1.5), Alternate DNS server (192.168.1.6). -
Page 136
Testing the Network Connection a. Press Close on the “Local Area Connection Status”. b. Press Close on the next screen. a. You can verify that the LAN information is correct. From the taskbar, click on the (start icon). Select Command Prompt from the list of programs. b. -
Page 137
Testing the Network Connection c. This screen will display. If the LAN was set up correctly, the network information you entered in step 7 will be on the screen. The ping test can be run from the sterilizer. B. Temporarily Turning Off the Windows Security Feature on the Remote Host Computer 1. -
Page 138
Testing the Network Connection a. Press Stop in the Service status fi eld. b. Press OK to close the screen. 5. Scroll down the menu options and double click on Windows Firewall. a. Press Stop in the Service status fi eld b. -
Page 139
Testing the Network Connection Turn off Windows Firewall. a. Click Windows START, Control Panel, Windows Firewall. b. Click Turn Windows Firewall On or Off on the side panel of the Windows screen. Click on User Recommended Settings, select the radio button Turn off Windows Firewall from each of the following section: a. -
Page 140
Testing the Network Connection 1. Navigate to the System Ready Screen and press Additional Utilities. 2. Press Network on the “Additional Utilities Menu”. a. Press Manual in the Confi guration Mode of the Network Settings screen. Enter the following information for the fi elds in the screen. -
Page 141
Testing the Network Connection 4. Press Diagnostics on the Network Settings Screen. 5. Select ping from the pull down “Command” options choices. 6. Enter the remote host computer’s IP address as 192.168.1.127 in the “IP Address /Hostname” fi eld. ® ®… -
Page 142
Testing the Network Connection 7. Press Run. The sterilizer performs a network ping test by sending 10 data packets to the remote host computer. 8. If the sterilizer’s ping test is successful from the sterilizer, then the messages from the 10 packets will display. -
Page 143
Testing the Network Connection D. Reset the LAN Settings on your Laptop After the ping test is complete, you will need to reset the LAN network properties on your laptop. a. Go to the Local Area Connection Properties screen. Select Internet Protocol Version 4 (TCP/ IPv4). -
Page 144
Testing the Network Connection 3. Press Close on the “Local Area Connection Status”. Reboot the computer to complete the reset of the LAN. E. Reset the Network Settings of the Sterilizer These steps are performed to reset the network settings of the sterilizer. Disconnect the cross-over network cable from the network port of the sterilizer and connect the customer’s LAN straight network cable.

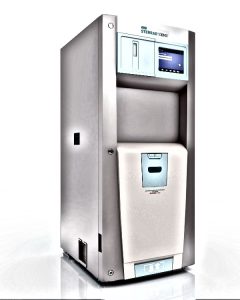
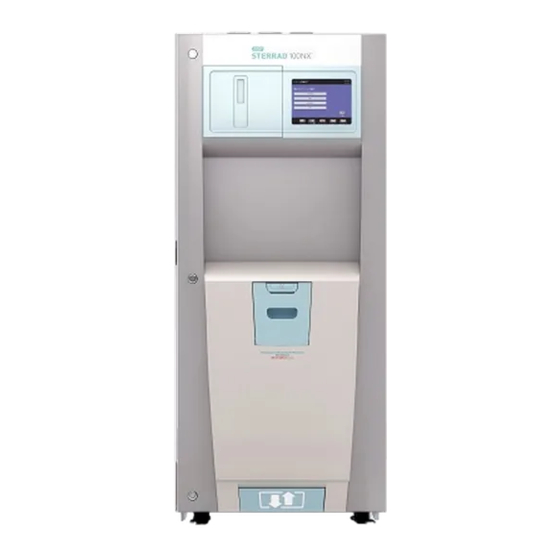
Отделение ASP компании Джонсон & Джонсон имеет честь представить Вам новейшую систему плазменной стерилизации – STERRAD 100 NX. Она представляет собой новое поколение системы СТЕРРАД 100S, обладая всеми ее достоинствами, а также рядом усовершенствований и новых уникальных характеристик. По прогнозам многих авторитетных специалистов в области эпидемиологии и стерилизационного оборудования, новое поколение – СТЕРРАД 100NX – станет новым стандартом и в ближайшие пять лет будет абсолютным лидером в области низкотемпературной стерилизации. Инновационная технология низкотемпературной стерилизации плазмой пероксида водорода, в 1992 году воплощенная компанией Johnson & Johnson в оборудовании STERRAD, позволила решить проблему стерилизации всего спектра термолабильных инструментов в ЛПУ.
Основные характеристики и возможности STERRAD 100 NX
- длительность цикла стерилизации: Стандартный 42 мин., Для гибких эндоскопов — 47 минут;
- прямоугольная камера объемом 152 л (полезный объем 93,4 л) с двумя выдвижными полками;
- широкие возможности стерилизации (например, гибкие эндоскопы, изделия с узкими каналами) без применения бустеров;
- автоматическая система контроля наличия влаги в загрузке, а так же впитывающих материалов, запрещенных при стерилизации плазмой пероксида водорода; монитор концентрации пероксида водорода в течение всего цикла; автоматическая система ежесекундного контроля параметров
цикла; - большой сенсорный экран управления (touch-screen) с крупными символами и русифицированным меню;
- встроенный термопринтер для документации цикла, без необходимости в замене картриджа с чернилами;
- USB-порт для загрузки списка инструментов с внешнего носителя и копирования на него информации о циклах;
- возможность подключения к компьютерной сети больницы;
- занимаемая площадь — 1 м2, электропитание – 380В, потребляемая мощность – 4кВт;
- проходная (двухдверная) модель стерилизатора для установки в ЦСО
- доказанная эффективность в отношении прионов (результаты независимых исследований)
Базовая комплектация системы STERRAD 100 NX
- Система СТЕРРАД 100NX
- Набор для запуска СТЕРРАД 100NX
- Кассет комплект (1 кассета со стерилизующим агентом — ампулы пероксида водорода — используется в течение 5 циклов, обеспечивая стерилизацию от 20 до 25 комплектов инструментов)
- Лотков комплект необходимых типов/размеров, предназначенных для укладки различных групп изделий (хирургические и микрохирургические инструменты, эндоскопы, электроинструмент, кабели и т.д.)
- Упаковочных материалов комплект
- Химических индикаторов комплект
- Биологических индикаторов комплект
- Инкубатор для периодической оценки степени стерилизации
- Монтаж, ввод в эксплуатацию, обучение персонала (осуществляется авторизованными специалистами компании Джонсон и Джонсон).
Технические требования к установке стерилизаторов STERRAD 100 NX
- Распаковка и транспортировка стерилизатора до места его установки должны
осуществляться в присутствии инженера сервисной службы ООО «Джонсон & Джонсон». - Путь транспортировки стерилизатора в больнице от места разгрузки до места установки
должен быть ровным: без ступеней, порогов и т. д. - Размеры дверных проемов на пути транспортировки стерилизатора должны быть не менее 80 х 200 см.
- Габариты стерилизатора: 775 мм ´ 1020 мм ´ 1790 мм, вес 420 кг (без упаковки). Минимальная площадь помещения для установки стерилизатора 8 — 9 м2, пол ровный, горизонтальный с наклоном не более 5 мм/м. В помещении должен обеспечиваться свободный доступ к стерилизатору не менее 1м с трех сторон (кроме задней стенки прибора). В помещении должны отсутствовать источники повышенного загрязнения воздуха, например, волокнами текстиля, бумаги, пылью из вентиляционных коробов и т. п.
- Помещение должно быть убрано и вымыто от остатков строительного мусора.
- В помещении должны размещаться: стол для упаковочной машины HAWO; стол для упаковки инструментов; стеллаж для размещения упаковок с инструментами.
Электропитание
- Электропитание: трехфазное, 380 Вольт, 5-ти проводной кабель сечением 4 мм2 (медь), с разделенной «землей» и нейтралью, автомат защиты 25А, трехфазный. Ротация фаз CBA (проверяется при запуске стерилизатора инженером ООО «Джонсон & Джонсон»). Иная фазировка категорически запрещена т. к. ведет к повреждению стерилизатора. Отклонение питающего напряжения от номинала не более 10%. Сеть должна обеспечивать максимальное (суммарное трехфазное) энергопотребление в процессе стерилизации 4 кВА. Потребление стерилизатора в режиме ожидания – не более 0,5 кВА.
- 3-х фазную розетку поставляет инженер ООО «Джонсон & Джонсон» в день запуска прибора. Прокладка кабеля производится силами больницы до приезда инженера. Монтаж розетки производится также силами больницы в день запуска стерилизатора.
- При изменении коммутации питающей электрической сети во время эксплуатации прибора необходимо, предварительно, отключить стерилизатор. Последующее включение допускается только инженером ООО «Джонсон & Джонсон».
- В непосредственной близости от места установки стерилизатора должны располагаться две однофазных розетки (10 А) для питания упаковочной машины, термостата и электронных приборов, применяемых при запуске стерилизатора.
- Специальных требований по вентиляции нет.
- Температура окружающей среды при работе стерилизатора не должна превышать 40 ºС.
Почему выбирают STERRAD 100 NX
Обеспечение клиники терминальной стерилизацией (в упаковке)
Все изделия в системе Стеррад проходят стерилизацию в упаковке. Это позволяет обеспечить гарантированную стерильность инструментов даже после длительного хранения. Отпадает необходимость в постоянной перестерилизации наборов инструментов, что значительно продлевает срок их службы.
Сохранение дорогостоящего инструментария
За счет деликатной, неповреждающей стерилизации срок службы
инструментов, обрабатываемых в системах Стеррад, значительно
увеличивается, что подтверждается многочисленными отзывами
пользователей. Широкий спектр инструментов ведущих производителей протестирован на совместимость с системами Стеррад. Метод Стеррад включен в перечень методов обработки в инструкциях к ним (например, инструкции Olympus, Shtorz и др.).
Система идентичных ампул в картриджах для каждого цикла стерилизации
Все циклы стерилизации в системе Стеррад полностью идентичны
благодаря точно дозированному на заводе-изготовителе количеству
стерилизующего агента в каждой ампуле в кассете. Данная особенность систем Стеррад гарантирует точную концентрацию агента для образования плазмы при небольшом его количестве в камере. Это и обеспечивает безопасность для инструментов и гарантированную их производителями доказанную совместимость.
В аппаратах, работающих с банками со стерилизующим агентом и самостоятельно дозирующих агент на каждый цикл. Качество стерилизации постоянно зависит от возможных сбоев электропитания, внешних электромагнитных помех, разъюстировки
дозирующей системы, «ухода» настроек и т.д. Все эти недостатки полностью отсутствуют в системах Стеррад благодаря кассетной технологии с идентичными ампулами на каждый цикл стерилизации.
Возможность отказаться от жидкостной стерилизации
Медицинские инструменты, обычно стерилизующиеся в химических
растворах, более быстро и безопасно стерилизуются в Стерраде.
Применение низкоплазменного стерилизатора исключает человеческий фактор ошибки (недостаточная выдержка, повторная контаминация, неполный отмыв от стерилянта и т.д.), повреждения инструментов, проблемы с большим объемом стерильной воды, необходимым для отмыва от стерилизующих веществ, а также обеспечивает терминальную стерилизацию в упаковке и длительное хранение в стерильном состоянии.
Экономия времени
При обработке в плазменном стерилизаторе значительно снижается время, затрачиваемое персоналом на стерилизацию инструментов, обеспечивается высокий оборот инструментов (Стеррад NX – 28 мин.)
Экономическая эффективность
Многие современные стационары, использующие технологию Стеррад, отмечают снижение общих затрат на стерилизацию инструментов благодаря, прежде всего, отказу от использования трудоемкой жидкостной стерилизации с большими объемами химических средств и стерильной воды (либо физ. раствора), которые оказываются весьма дороги.
Значительная экономия средств на ремонтах инструментов, при использовании систем Стеррад, хорошо известна и отмечена западными и российскими специалистами в докладах и статьях.
Безопасность при эксплуатации и удобство инсталляции
Действующее вещество (пероксид водорода) по завершении цикла
стерилизации в системах Стеррад, благодаря наличию стадии плазмы, распадается на незначительное количество молекул воды и кислорода, не оставляя токсичных отходов. Поэтому система плазменной стерилизации Стеррад безопасна для пациентов, сотрудников ЛПУ и окружающей среды.
Для ее функционирования не требуется монтаж дорогостоящих дополнительных систем приточно-вытяжной вентиляции, аэрации, подачи сжатого воздуха, утилизации отработанных газов, мониторинга утечки газа, подвода воды и дренажа. Для работы необходима только электрическая розетка. Монтаж возможен как в ЦСО, так и в операционном блоке ЛПУ, что на практике наиболее удобно для пользователей.
Поддержка пользователей
Компания Johnson&Johnson в настоящий момент является единственной компанией в РФ, организовавшей штат специалистов по клиническому обучению и поддержке пользователей, которые обучают специалистов медицинских учреждений правилам использования низкотемпературной стерилизации. Также осуществляющих постоянный контроль работы стерилизующей аппаратуры и ежегодную ре-сертификацию специалистов ЛПУ для обеспечения корректной работы со стерилизующей техникой Стеррад.
Скачать инструкцию на STERRAD 100 NX
Скачать инструкцию и другую документацию на STERRAD 100 NX можно здесь.
Руководство пользователя ( user manual ) STERRAD 100 NX на английском языке скачать.
Основные характеристики, комплектация STERRAD 100 NX скачать.
Регистрационное удостоверение STERRAD 100 NX скачать.
Также смотрите сушильные / сухожаровые шкафы Binder ED и FD.
41
Physical Specifications ……………………………………………………………………………………………………… 41
Environmental Conditions …………………………………………………………………………………………………. 42
Electrical Requirements …………………………………………………………………………………………………….. 43
Heater Impedance …………………………………………………………………………………………………………….. 43
Thermocouples…………………………………………………………………………………………………………………. 44
Standards…………………………………………………………………………………………………………………………. 44