Сформировать обращение на ремонт можно с 8 утра до 22 вечера по телефонам:
+7 (495) 215 – 14 – 41
+7 (903) 722 – 17 – 03
Либо в любое время суток с помощью специальной формы на сайте. В обращении сообщите, пожалуйста:
- Марку-модель вашей машинки.
- Характер неисправности. Например, стиральная машина не закрывается, не включается или не забирает стиральный порошок из кюветы для моющих средств.
- Удобное вам время ремонта.
- Ваши имя, адрес, телефон.
В назначенный вами день ремонта мастер позвонит для уточнения времени приезда.
Не медлите с вызовом специалиста, если ваша машинка Electrolux EWF 1005 не работает. Поломка одной из деталей увеличивает нагрузку на другие элементы, которые также могут выйти из строя. Обнаружив неисправность, сразу звоните в «РемБытТех»! Наш мастер приедет к вам в течение 24 часов после вызова и отремонтирует стиральную машинку с гарантией до 2 лет.

Данный раздел представляет большой выбор инструкций по эксплуатации стиральных машин Electrolux. Вы можете бесплатно скачать любое руководство.
Ежегодно компания продает более 60 миллионов своих изделий потребителям из 150 стран под брендами Electrolux, Zanussi, AEG, Grand Cuisine, Frigidaire, REX, Zoppas, Flymo, Partner, Westinghouse, McCulloch, Eureka и другими. Общая численность сотрудников транснациональной компании Electrolux на 2016 год составляет 58 тыс. человек. Актуальное продуктовое портфолио Electrolux включает в себя встраиваемую и отдельно стоящую технику: духовые шкафы, варочные поверхности, вытяжки, холодильники, морозильные лари, винные шкафы, плиты, посудомоечные и стиральные машины, пылесосы, малую бытовую технику, бытовую химию, посуду и разнообразные, полезные аксессуары для приготовления пищи. Компания также производит прачечное и профессиональное кухонное оборудование. По данным компании Electrolux, не менее 50% шеф-поваров ресторанов, отмеченных звездами Мишлен, предпочитают использовать профессиональную технику Electrolux на своей кухне.
Бумажное руководство, даже если имеется, не всегда удобно в использовании, поэтому мы собрали некоторое количество инструкций на нашем сайте. Вы можете абсолютно бесплатно скачать любую из инструкций в формате pdf или воспользоваться просмотром в браузере.
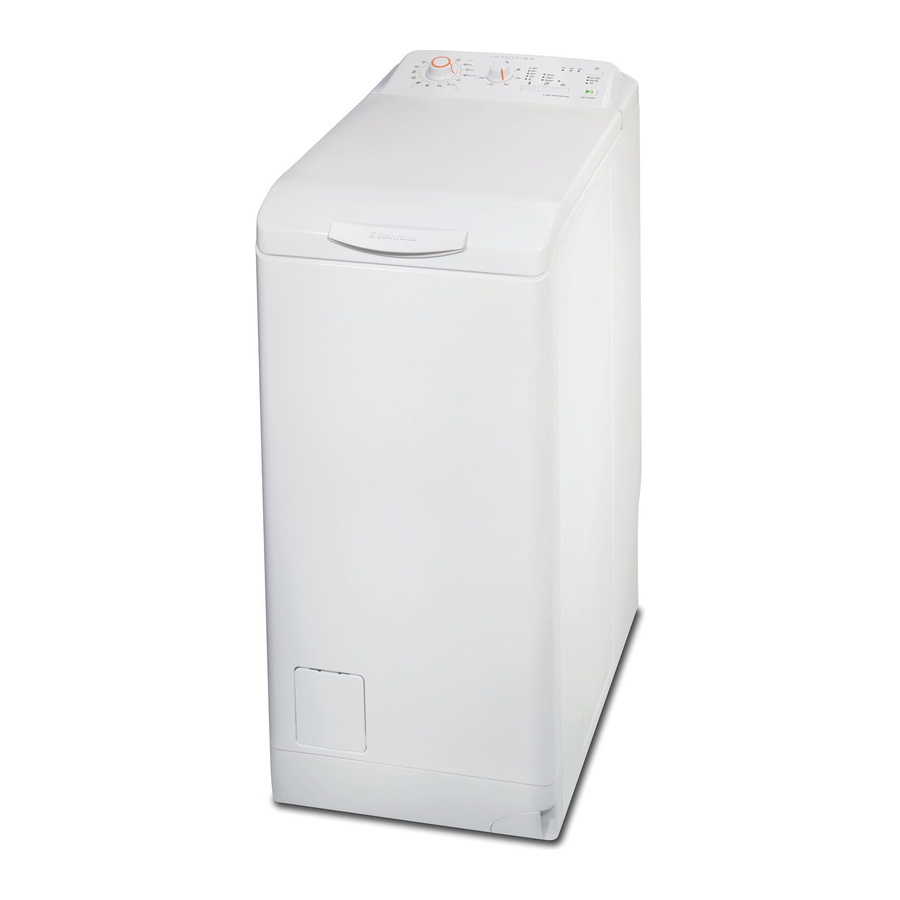
Electrolux EWT 9120 W — Washing Machine Manual
Description

- The control panel
- Lid handle
- Adjustable levelling feet
Control panel

- Pushbuttons and their functions
- Lights of cycle progress
- «Start/Pause» pushbutton
- «Delay start» pushbutton
Dispenser box
 Prewash
 Wash
Wash Softener (do not fill above the MAX symbol
  )
)
Safety Information
Please read these points carefully before installing and using your appliance. Keep this user manual with your appliance.
General safety
- Do not modify or attempt to modify this appli-ance. This would put yourself in danger.
- Ensure that all coins, safety pins, brooches, screws etc have been removed before starting a washing programme. If left in washing, they can seriously damage the appliance.
- Use the recommended quantity of detergent.
- Put small items together (socks, belts etc.) in asmall linen bag or pillow case.
- Unplug and close inlet hose tap after using ap-pliance.
- Always disconnect the power supply from theappliance before cleaning or maintenance.
- Do not machine wash clothes with ribbing, un-finished or torn material.
Installation
- Unpack or ask for the appliance to be unpackedimmediately upon delivery. Check the outside of the appliance is not damaged in any way. Report all transit damage to your retailer.
- Remove all transit bolts and packaging beforeinstalling the appliance.
- Connection to the water supply must be carriedout by a qualified plumber.
- If your domestic electrical circuit needs adaptingto allow the appliance to be plugged in, use a qualified electrician.
- Ensure that, after installation, the power cable isnot trapped under the appliance.
- If the appliance is installed on carpeted floor, ensure that the carpet does not obstruct any ventilation ducts located at the base of the appliance.
- The appliance must be equipped with an earth-ed power plug which conforms to regulations.
- Before connecting your appliance to the powersupply, carefully read the instructions in the chapter entitled «Electrical connection».
- Replacing the power cable should only be car-ried out by an authorised service engineer.
- The manufacturer cannot be held responsiblefor any damage resulting from incorrect installation.
Precautions to be taken against frost
If your appliance is exposed to temperatures below 0°C, the following precautions must be taken:
- Close the tap and disconnect the inlet hose.
- Place the end of this hose and the drain hose in a basin on the floor.
- Select the Drain programme let it run until theend of the cycle.
- Disconnect the appliance from the power supplyby turning the programme selector to «Stop»
 .
. - Unplug the appliance.
- Replace the inlet hose and drain hose.
This way, the water remaining in the hoses will be drained away, avoiding any ice formation which would damage your appliance. Before turning your appliance on again, ensure that it is installed in an area where the temperature will not fall below freezing.
Use
- Your appliance is intended for normal domesticuse. Do not use the appliance for commercial or industrial purposes or for any other purpose.
- Refer to the instructions on the label of each itembefore washing.
- Do not put items into the washing machine which have had stains removed with petrol, alcohol, trichlorethylen etc. If such stain removers have been used, wait until the product has evaporated before putting these items into the drum.
- This appliance is not intended for use by per-sons (including children) with reduced physical, sensory or mental capabilities, or lack of experience and knowledge, unless they have been given supervision or instruction concerning use of the appliance by a person responsible for their safety.
Children should be supervised to ensure that they do not play with the appliance.
How to run a wash cycle
Using for the first time
Ensure the electrical and water connec-tions comply with the installation instructions.
- Remove the polystyrene insert and all otheritems inside the drum.
- Run an initial wash cycle at 90°C, without any washing but with detergent to clean the water tank.
Daily use
Loading washing
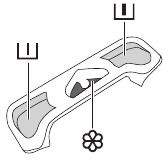
- Open the lid of the appliance.
- Open the drum bydepressing the locking button A:
The two shutters unlock automatically.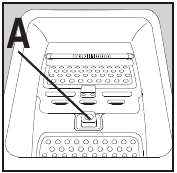
- Load the washing, close the drum and the lid of your washing machine.
Before closing the lid of your appliance, ensure that the drum is properly closed:
- When the two shutters are closed,
- locking button A released.
Proportioning of detergents
Pour the amount of washing powder into the washing ![]() and prewash
and prewash  compartments if you have selected the «prewash» option. Pour fabric softener into the compartment
  if necessary.
Selection of desired programme
Turn the programme selector to the required programme. The «Start/Pause» pushbutton flashes green.
If you turn the programme selector to another programme while a cycle is in progress, the appliance will ignore the new selected programme. The «Start/Pause» pushbutton flashes red for a few seconds.
Selecting the temperature
Press the «Temperature»  pushbutton repeatedly to increase or decrease the temperature (see «Programmes table»). The
  symbol means a cold wash.
Selecting the spin speed
Turn the spin speed selector on the desired position.
The maximum spin speeds are:
for Cottons, Synthetics, Easy iron, Wool, Handwash: 900 rpm, for Delicates, Silk, Mini programme: 700 rpm.
At the end of the programme, if you have selected «Rinse hold» ![]() or «Night silence plus»
or «Night silence plus» ![]() , you then need to select a «Spin» or «Drain» programme to finish the cycle and empty the water.
, you then need to select a «Spin» or «Drain» programme to finish the cycle and empty the water.
Selecting options
You must select the different options after selecting the programme and before pressing the «Start/ Pause» pushbutton (see «Programmes table»). Press the desired button(s): the corresponding lights come on. If pressed again, the lights go out. If one of the options is not compatible with the selected programme, the «Start/Pause» pushbutton flashes red.
Prewash option
The appliance runs a prewash at 30°C max.
Eco option
This option allows you to choose a lower temperature programme which is as effective as a higher temperature wash programme.
Super quick option
The washing time will be reduced depending on the programme selected.
Rinse plus option
The washing machine will add one or more rinses during the cycle. This option is recommended for people with sensitive skin and in soft water areas.
Temporary: Press the «Rinse plus» ![]() pushbutton. The option is only active for the selected programme.
pushbutton. The option is only active for the selected programme.
Permanent: Hold down the «Temperature» ![]() and «Options» pushbuttons for a few seconds. The option is permanently activated, even if the appliance is switched off. To deactivate it, repeat the process.
and «Options» pushbuttons for a few seconds. The option is permanently activated, even if the appliance is switched off. To deactivate it, repeat the process.
Delay start
This option allows you to delay the start of a wash programme by 3, 6 or 9 hours by pressing the «Delay start» pushbutton.
You can change or cancel the delayed start time at any time before you press the «Start/Pause» pushbutton by pressing the «Delay start» pushbutton again (when all indicators are off, the wash programme will start immediately).
If you have already pressed the «Start/Pause» pushbutton and you want to change or cancel the delayed start, proceed as follows:
- To cancel the delay start and start the cycle im-mediately, press «Start/Pause» and then «Delay start». Press «Start/Pause» to start the cycle.
- To change the timer delay period, you must go through the «Stop» position
 and reprogramme your cycle.
The lid will be locked during the delayed start time. If you need to open it, you must first pause the appliance by pressing the «Start/Pause» pushbutton. After closing the lid again, press the «Start/Pause» pushbutton.
Start of the programme
Press the «Start/Pause» pushbutton to start the cycle. The corresponding light will come on green. It is normal for the programme selector to remain stationary during the cycle. The light corresponding to the current cycle is illuminated. : Prewash + Wash
 +
+  : Rinses + Spin
 : End of cycle
Interrupting a programme
Adding washing during the first 10 minutes
Press the «Start/Pause» pushbutton: the corresponding light will flash green while the appliance is paused. The lid can only be opened around 2 minutes after the washing machine has come to a stop. Press the «Start/Pause» pushbutton again to continue the programme.
Modifying the programme in progress
Before making any changes to the current programme, you need to pause the washing machine by pressing the «Start/Pause» pushbutton. If the modification is not possible, the «Start/Pause» pushbutton flashes red for a few seconds. If you still decide to change the programme, you must cancel the current programme (see below).
Cancelling the programme
If you want to cancel the programme, turn the programme selector to the «Stop» position.
End of the programme
The washing machine stops automatically, the «Start/Pause» pushbutton goes out and the light «End of cycle» comes on. The lid can only be opened around 2 minutes after the washing machine has come to a stop. Turn the programme selector to the «Stop» position ![]() . Remove washing. Unplug and close water inlet tap.
. Remove washing. Unplug and close water inlet tap.
Standby mode
If the appliance is on but no commands are selected for 10 min before or after a cycle, it goes into standby mode. All the lights go out and «Start/ Pause» flashes slowly.
To exit standby mode, simply press any pushbutton or turn the programme selector.
Programmes table
| Programme / Type of washing | Load/Time | Possible options |
| Cottons1) (cold — 90°): White or colour, e.g. normally soiled work clothes, bed linen, table linen, body linen, towels. | 5,5 kg 140-150 min |
Night silence plus, Rinse hold, Prewash, Eco2), Super quick, Rinse plus, Delay start |
| Synthetics (cold — 60°): Synthetic fabrics, body linen, fab, coloured farics, non-iron shirts, blouses. | 2,5 kg 90-100 min |
Night silence plus, Rinse hold, Prewash, Eco2), Super quick, Rinse plus, Delay start |
| Easy iron (cold — 60°): Reduces creasing and makes ironing easier. | 1,0 kg 100-110 min |
Rinse hold, Prewash, Rinse plus, Delay start |
| Delicates (cold — 40°): For all delicate materials, for example curtains. | 2,5 kg 60-70 min |
Night silence plus, Rinse hold, Prewash, Super quick, Rinse plus, Delay start |
 Wool (cold — 40°): Very delicate items carrying the «wash by hand» label. Wool (cold — 40°): Very delicate items carrying the «wash by hand» label. |
1,0 kg 55-65 min |
Night silence plus, Rinse hold, Delay start |
 Handwash (cold — 40°): Very delicate items carrying the «wash by hand» label. Handwash (cold — 40°): Very delicate items carrying the «wash by hand» label. |
1,0 kg 55-65 min |
Night silence plus, Rinse hold, Delay start |
| Silk (30°): Fabric machine washable at 30°C. | 1,0 kg 25-35 min |
Night silence plus, Rinse hold, Delay start |
| Soak (30°): Soaking for very dirty washing. The drum stops full of water. | 5,5 kg 15-25 min |
Delay start |
 Mini programme (30°): For lightly soiled fabrics except for wool. Mini programme (30°): For lightly soiled fabrics except for wool. |
2,5 kg 25-35 min |
Delay start |
| Rinses: Hand washed items can be rinsed in this programme. | 5,5 kg 50-60 min |
Night silence plus, Rinse hold, Rinse plus, Delay start |
| Delicate rinse: Hand washed items can be rinsed in this programme. | 2,5 kg 35-45 min |
Night silence plus, Rinse hold, Rinse plus, Delay start |
| Drain: Runs an empty cycle after a Rinse hold (or Night silence plus). | 5,5 kg 0-10 min |
|
| Spin: A spin cycle from 500 to 900 rpm after a Rinse hold (or Night silence plus). | 5,5 kg 10-20 min |
Delay start |
| Delicate spin: A delicate spin cycle after a Rinse hold (or Night silence plus). | 2,5 kg 5-15 min |
Delay start |
1) Reference programme for test confirming to CEI 456 standard (Cottons 60° programme, Eco option): 49 L / 1,04 kWh / 170 min
2) Available with programmes with wash temperatures of 40°C and above.
Care and cleaning
Unplug the appliance before cleaning.
Descaling the appliance
To descale the appliance, use an appropriate noncorrosive product designed for washing machines. Read product label for recommended amounts and how often descaling should be carried out.
The exterior
Use warm soapy water to clean the exterior of the appliance. Never use alcohol, solvents or similar products.
Dispenser box
To clean, proceed as follows:
Object trap
Regularly clean out the object trap which is located at the bottom of the drum:

Check if the filter being coupled well before closing the trap to pull up and down the central wall.
Water inlet filters
To clean, proceed as follows:
Operating Problems
Numerous checks were carried out on your appli- notice a malfunction, please refer to the sections ance before it left the factory. However, should you below before contacting the after-sales service.
| Problems | Causes |
| The washing machine doesn’t start or doesn’t fill: |
|
| The appliance fills but empties straight away: |
|
| The washing machine doesn’t rinse or doesn’t empty: |
|
| You have found water around the washing machine: |
|
| Wash is unsatisfactory: |
|
| The appliance vibrates, is noisy: |
|
| The wash cycle is much too long: |
|
| The washing machine stops during a wash cycle: |
|
| The lid doesn’t open at the end of the cycle: |
|
| Softener runs directly into the drum when filling the dispenser box: |
|
| The «Start/Pause» pushbutton 1) flashes red 2): |
|
1) On some models, the auditable signals can sound
2) After solving any problems, press «Start/Pause» pushbutton to restart the interrupted programme.
Detergents and Additives
Only use detergents and additives designed for use in a washing machine. We do not recommend mixing different types of detergents. This may spoil the washing. There are no restrictions on the use of powder detergents. Liquid detergents must not be used when a prewash has been selected. For cycles without prewash, they must be added via means of a dosing ball. Detergent tablets or doses must be placed in the detergent compartment of your appliance’s dispenser box.
Technical Specifications
| DIMENSIONS | Height | 850 mm |
| Width | 400 mm | |
| Depth | 600 mm | |
| LINE VOLTAGE /FREQUENCY POWER CONSUMPTION |
230 V / 50 Hz 2300 W |
|
| WATER PRESSURE | Minimum | 0,05 MPa (0,5 bar) |
| Maximum | 0,8 MPa (8 bar) | |
| Connection to water supply | Type 20/27 |
Installation
Remove all protective packaging for transit before using for the first time. Keep in case needed for future transit: Transporting a non-secured appliance may damage internal components and cause leakages and malfunctions. The appliance can also be damaged through physical contact.
Unpacking


Untying

To install your washing machine at the same level as surrounding furniture, proceed as shown on picture 4.
Water supply
Install the supplied water inlet hose at the rear of your washing machine by proceeding as follows. Do not reuse an old hose. The water inlet hose can not be extended. If it is too short, please contact the after-sales service.
Open the water inlet tap. Check there are no leaks.
Drainage
Fit the U-piece on the drainage hose. Place everything in a drainage point (or in a sink) at a height of between 70 and 100 cm. Ensure it is positioned securely. Air must be able to enter the end of the hose, to avoid any risk of siphoning.
The drain hose must never be stretched. If it is too short, contact an engineer.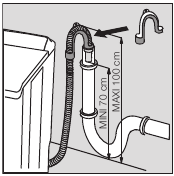
Electrical connection
This washing machine must only be connected in single-phased 230 V. Check the fuse size: 13 A for 230 V. The appliance must not be connected with an extension lead or multi-plug adaptor. Ensure that the plug is earthed and that it is in accordance with current regulations.
Positioning
Position the appliance on a flat and hard surface in a ventilated location. Ensure the appliance does not come into contact with the wall or other furniture. Accurate levelling avoids vibrations, noise and prevents the appliance from moving when running.
Environment
Disposing of the appliance
 All materials carrying the
  symbol are recyclable. Dispose of them at a waste collection site (enquire at your local council) for collection and recycling. When disposing of your appliance, remove all parts which could be dangerous to others: cut off the power supply cable at the base of the appliance.
The symbol  on the product or on its packaging indicates that this product may not be treated as household waste. Instead it should be taken to the appropriate collection point for the recycling of electrical and electronic equipment. By ensuring this product is disposed of correctly, you will help prevent potential negative consequences for the environment and human health, which could otherwise be caused by inappropriate waste handling of this product. For more detailed information about recycling of this product, please contact your local council, your household waste disposal service or the shop where you purchased the product.
Protecting the environment
![]() To save water and energy and therefore help protect the environment, we recommend the following:
To save water and energy and therefore help protect the environment, we recommend the following:
- Whenever possible, use the appliance at full ca-pacity and avoid partial loads.
- Only use the prewash and soak programmes forheavily soiled items.
- Use an appropriate amount of detergent for thehardness of the water, the size of the load and how soiled the washing is.

Documents / Resources
Download manual
Here you can download full pdf version of manual, it may contain additional safety instructions, warranty information, FCC rules, etc.
Download Electrolux EWT 9120 W — Washing Machine Manual
Посмотреть инструкция для Electrolux EW 1030f intuition бесплатно. Руководство относится к категории стиральные машины, 3 человек(а) дали ему среднюю оценку 6.7. Руководство доступно на следующих языках: -. У вас есть вопрос о Electrolux EW 1030f intuition или вам нужна помощь? Задайте свой вопрос здесь
Не можете найти ответ на свой вопрос в руководстве? Вы можете найти ответ на свой вопрос ниже, в разделе часто задаваемых вопросов о Electrolux EW 1030f intuition.
При какой температуре следует стирать одежду?
Рекомендуемая температура стирки указывается на этикетке.
Стоит ли использовать средство для удаления накипи при стирке в стиральной машине?
Необходимость использования средства для удаления накипи отсутствует. Предотвратить появление накипи можно уменьшив количество стирок при высокой температуре и благодаря использованию рекомендуемого количества моющего средства при стирке.
Как предотвратить появление неприятного запаха в стиральной машине?
Возникновения неприятных запахов можно избежать периодической стиркой при 60 градусах и благодаря использованию рекомендуемого количества моющего средства.
Инструкция Electrolux EW 1030f intuition доступно в русский?
К сожалению, у нас нет руководства для Electrolux EW 1030f intuition, доступного в русский. Это руководство доступно в -.
Не нашли свой вопрос? Задайте свой вопрос здесь
Как пользоваться стиральной машиной Электролюкс
Мощнейший концерн по производству бытовой техники, является одним из лидеров по внедрению новейших технологий. Хорошо это или плохо сказать трудно, как по мне, так чем меньше электроники напичкано в стиральную машину, тем дольше она проработает, но всё-таки эти стиралки очень качественные и не зря пользуются большим спросом у потребителей. Конечно есть небольшие проблемы в самой эксплуатации этих СМА. Дело в том, что они очень чувствительны к недостаточному напору воды и перепадам напряжения. Если вы решили купить стиральную машину Electrolux, то вам в первую очередь надо замерить ток в вашей розетке, если он меньше чем 210 вольт или выше 245 вольт, то лучше отказаться от покупки СМ данного производителя. Вот так потихоньку мы подошли к правилам пользования, а вернее к тому, какие требования предъявляет этот бренд к потребителям. Не надо думать, что Электролюкс это какая-то особенная машинка, требования практически такие же как и у всех остальных, ниже я попробую их перечислить
- Напор воды → Должен быть не меньше 1 бар. В случае если давление воды в водопроводе будет ниже, стиральная машина может не успеть набрать воду за отведенное на это время, в результате высветится ошибка. Тут надо заметить, что к примеру на Индезите, отведённое время на набор воды, значительно больше по продолжительности, чем в Zanussi и Electrolux, то есть Индезит не страдает такой болячкой
- Напряжение тока → Я уже писал выше, что оно должно быть не меньше 210 вольт и не выше 245, иногда бывает так, что машинка просто встаёт и всё, и дальше не стирает, даже не выдает каких-либо ошибок — виновником такого положения, очень часто бывает несоответствие напряжения
- Место установки → Обычно СМА нашего производителя, неприхотливы к вопросу высокой влажности в помещении, но всё-таки лучше установить СМ в комнату, в которой присутствует, как можно меньше влаги
В принципе каких-то сверхъестественных требований, этот бренд не предъявляет и если у вас с напором воды и электричеством всё в порядке, то эта техника будет работать довольно долго. Вот теперь можно поговорить и о том, как увеличить срок службы стиральные машины Электролюкс, ниже я дам несколько советов по этому поводу
- Лимонная кислота и калгон → Ни в коем случае не пользуйтесь этой гадостью, эта хрень разъедает крестовину, которая сделана из силумина. Поймите, в самом порошке уже есть присадки, которые убирают накипь и чистят стиральную машину — большего вы не добьётесь
- Удлинители и переходники → Это первые враги любых стиральных машин, в следующем пункте я объясню, почему нельзя пользоваться этой хренью
- Отдельная розетка → На данный момент в очень многих домах и квартирах стоят бойлеры, когда я приезжаю на вызов, я наблюдаю такую картину — к бойлеру проведена отдельная проводка с отдельной розеткой, а для стиральной машины кинута обыкновенная переноска, в которую воткнут переходник с евро на советскую розетку и в этот переходник всунута вилка от стиральной машины — вам смешно, а обратите внимание как у вас подключена стиральная машина, не думаю что лучше. Теперь давайте посмотрим на то сколько электроэнергии потребляет бойлер — обычно это до 2 кВт, а теперь глянем сколько потребляет тока стиральная машина Электролюкс — от 2,5 до 3 кВт. У вас возникает вопрос, откуда такая мощность, всё просто — на СМА стоит тэн, примерно такой же как на бойлере, мощность его равна 2-2,2 кВт, плюс к этому ещё другая периферия, такая как мотор, мозги, клапан и так далее. Вот теперь подумайте, нужна ли отдельная розетка для стиральной машины?
- Режим отжима → Обороты не должны превышать 800 об/мин. Нормальный отжим начинается с 600 оборотов в минуту, а всё что выше 800 это уже замануха от производителя — может быть чуть-чуть лучше выжмет, но зато бельё будет помятым. К тому же вы сократите срок службы подшипников и сальника
- Резиновый коврик → Казалось бы мелочь, но эта мелочь поможет стиральной машине уменьшить вибрацию при отжиме, а если в вашем помещении, где стоит стиральная машина, лежит плитка, то резиновый коврик будет способствовать тому, что СМА будет стоять на месте, а не гулять по всей комнате
- Стекло люка → Желательно протирать после каждой стирки, таким образом вы будете убирать накипь, которая скапливается при стирке. Если этого не делать, через три-четыре года, на стекле образуется небольшой слой накипи и эта гадость будет действовать как наждачка, приводя в негодность манжету, то есть уплотнительную резинку
- По окончанию стирки → Во-первых обязательно выключите стиральную машину из розетки, во-вторых приоткройте дверцу люка и контейнер для порошка на 3-4 см. Такая несложная процедура способствует вентиляции в стиральной машине, благодаря этому вы не будете знать, что такое неприятный запах
Если вы будете следовать всем советам, которые я написал выше, гарантированно срок эксплуатации вашей стиралки увеличится на несколько лет. Я не стал писать про высокую температуру, на которой любят стирать многие хозяйки, так как у каждого есть своё мнение, но я скажу так — если вы будете злоупотреблять стиркой на 90оС, то такие детали как: тэн, замок, блок управления и т.д. прослужат намного меньше, чем вы того ожидали, к тому же проводка на машине будет перегреваться, а это также влияет на срок работы. В общем не пренебрегайте теми советами, которые я вам дал — всё взято из личного опыта и практики
Скачать инструкцию для стиральной машины Electrolux
Весь мануал закачен на яндекс диск, все инструкции находятся в свободном доступе и их можно не только скачать, но и посмотреть в режиме онлайн, без всяких sms и абонплат. Как качать с яндекс диска я рассказывать не буду, думаю вы люди взрослые сами разберётесь в этом вопросе. Если вы житель Украины, то рекомендую установить на google Chrome расширение Yandex Access или просто скачать яндекс браузер, можно также воспользоваться браузером опера с поддержкой VPN, короче говоря способов много. В инструкции по эксплуатации вы можете найти информацию про то, как подсоединить стиральную машину к канализации и водопроводу, а также как пользоваться разными программами. Особое внимание обратите на страничку, где рассказано про чистку системы слива, чтобы ваша стиральная машина нормально работала, фильтр желательно чистить после каждой двадцатой стирки. Если вы не нашли инструкцию именно для своей модели, то можете воспользоваться более-менее похожим руководством, поверьте за исключением дополнительных функций, все остальные программы во многих моделях мало чем отличаются, тут главное вникнуть в суть
- Electrolux EW 821 T
- Electrolux EW 920 S
- Electrolux EW 970 C
- Electrolux EW 1022 T
- Electrolux EW 1063 S
- Electrolux EW 1075 F
- Electrolux EW 1077 F
- Electrolux EW 1170 C
- Electrolux EW 1237 T
- Electrolux EW 1277 F
- Electrolux EW 1477 F
- Electrolux EW 1677 F
- Electrolux EWB 105205 W
- Electrolux EWC 1050
- Electrolux EWC 1150
- Electrolux EWC 1350
- Electrolux EWF 10020 W
- Electrolux EWF 1020
- Electrolux EWF 1025
- Electrolux EWF 1030
- Electrolux EWB 95205 W
- Electrolux EWF 106410 W
- Electrolux EWF 106510 W
- Electrolux EWF 1086
- Electrolux EWF 1225
- Electrolux EWF 1234
- Electrolux EWF 1245
- Electrolux EWF 126410 W
- Electrolux EWF 127413 W
- Electrolux EWF 127570 W
- Electrolux EWF 1286
- Electrolux EWF 129442 W
- Electrolux EWF 1434
- Electrolux EWF 1445
- Electrolux EWF 146410 W
- Electrolux EWF 1486
- Electrolux EWF 1645
- Electrolux EWG 12740 W
- Electrolux EWG 14550 W
- Electrolux EWM 126410 W
- Electrolux EWN 1030
- Electrolux EWN 1220
- Electrolux EWN 1220 A
- Electrolux EWN 127540 W
- Electrolux EWP 106100 W
- Electrolux EWP 106300 W
- Electrolux EWP 126100 W
- Electrolux EWP 126300 W
- Electrolux EWN 127540 W
- Electrolux EWP 86100 W
- Electrolux EWS 800
- Electrolux EWS 900 S
- Electrolux EWS 1005
- Electrolux EWS 1020
- Electrolux EWS 1030
- Electrolux EWS 1046
- Electrolux EWS 1230
- Electrolux EWS 10400 W
- Electrolux EWS 10412 W
- Electrolux EWS 12412 W
- Electrolux EWS 85210 A
- Electrolux EWS 86110 W
- Electrolux EWS 103410 A
- Electrolux EWS 105210 A
- Electrolux EWS 105215 A
- Electrolux EWS 105410 A
- Electrolux EWS 105415 A
- Electrolux EWS 106110 W
- Electrolux EWS 106210 W
- Electrolux EWS 106410 S
- Electrolux EWS 106410 W
- Electrolux EWS 106430 W
- Electrolux EWS 106540 W
- Electrolux EWS 125210 A
- Electrolux EWS 125410 A
- Electrolux EWS 126410 W
- Electrolux EWS 126510 W
- Electrolux EWS 126540 W
- Electrolux EWT 811
- Electrolux EWT 825
- Electrolux EWT 1001
- Electrolux EWT 1011
- Electrolux EWT 1021
- Electrolux EWT 1221
- Electrolux EWT 1340
- Electrolux EWT 9120 W
- Electrolux EWT 10620 W
- Electrolux EWT 13620 W
- Electrolux EWT 105210 W
- Electrolux EWT 105410 W
- Electrolux EWT 105510 W
- Electrolux EWT 106411 W
- Electrolux EWT 106511 W
- Electrolux EWT 135210 W
- Electrolux EWT 135410 W
- Electrolux EWT 135510 W
- Electrolux EWT 136411 W
- Electrolux EWT 136511 W
- Electrolux EWT 136551 W
- Electrolux EWT 136640 W
- Electrolux EWW 12470 W
- Electrolux EWW 126410 W
- Electrolux EWW 167580 W
- Electrolux EWW 168540 W
- Electrolux EWX 12540 W
- Electrolux EWX 14550 W
- Electrolux NEAT 1200
- Electrolux NEAT 1600