
3001
18
Повышение уровня воды
• Для улучшения эффекта полоскания, что важно при
повышенной чувствительности к стиральным средствам.
• Для стирки сильно загрязненного белья.
Программа «Самоочистка» (SterilTub)
Поможет избавиться от загрязнений, бактерий и неприятного
запаха в стиральной машине.
Перед запуском программы выньте белье из машины;
во время выполнения программы в барабане не должно
находиться никакого белья.
При добавлении небольшого количества порошкообразного
стирального средства эффективность программы
увеличится.
Для включения программы поверните программатор А в
положение «Хлопок 95°С», затем нажмите и удерживайте
три секунды кнопку (E) («Повышение уровня воды»).
На дисплее попеременно высвечивается надпись «cln» и
время, оставшееся до конца программы.
Если вы не используете регулярно программы, при которых
температура стирки выше 60°С, рекомендуем пользоваться
программой «Самоочистка» раз в месяц.
— Выбор дополнительных программ (
,
,
,
)
Это самостоятельные программы, которые используются
в том случае, если Вам не нужен полный цикл стирки.
Если Вы хотите использовать последовательно несколько
дополнительных программ, каждый раз перед выбором
очередной дополнительной программы на 1 секунду
устанавливайте программатор в положение “0”.
Полоскание
Это самостоятельная программа для полоскания
чувствительного белья, без промежуточного отжима и с
сокращенным финальным отжимом. Ее можно использовать
для полоскания выстиранного вручную чувствительного
белья. Можно также включить функцию снижения скорости
отжима.
Смягчение
Программа предназначена для смягчения и
подкрахмаливания выстиранного белья. Она завершается
отжимом при макс. 1000 об./мин. Можно также включить
функцию снижения скорости отжима.
Слив воды
Эту программу можно использовать, если Вы остановили
выполнявшуюся программу стирки, или если Вы
14

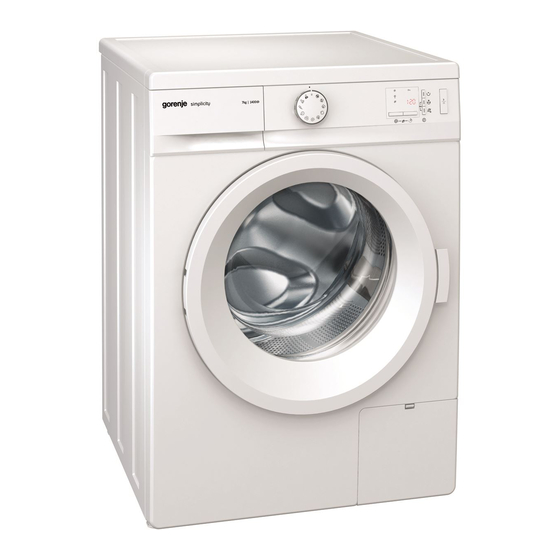
Данный раздел представляет большой выбор инструкций по эксплуатации стиральных машин Gorenje. Вы можете бесплатно скачать любое руководство.
Для Gorenje инновации и дизайн были важны с самого начала. Свой первый патент компания получила в 1956 году, и далее на протяжении 60лет запатентовала 151 изобретение и получила 26 престижных международных наград в области дизайна.
В 2000 году компания Gorenje реализовала планы, вынашиваемые с начала девяностых, и выпустила первую линейку бытовой техники за подписью иконы итальянского дизайна — Паоло Пининфарина. Воодушевленная превзошедшим все ожидания успехом первой коллекции Gorenje приступило к разработке второго поколения линии Gorenje Pininfarina, со временем ставшей синонимом узнаваемого и классического дизайна. В 2007 году была запущена черная коллекция Gorenje Pininfarina Black, в 2010-м — стальная Gorenje Pininfarina Steel, которые в совершенстве синтезируют технологические новинки и непревзойденный дизайн.
Если Вы утратили инструкцию из комплекта, то, надеемся, без труда сможете найти ее на нашем сайте.
Если, по каким-то причинам, Вы не смогли найти нужное руководство, не стесняясь пишите запрос нам.
 Режим самоочистки в стиральных машинах Gorenje ещё называется SterilTub, что дословно можно перевести как «стерильный бак». Это прекрасная возможность обеспечить лучшую гигиену устройству, а также избежать неприятностей.
Для чего служит
Обслуживание стиральной машины, как и другой техники, имеет свои нюансы. Например, необходимо смотреть, чтобы влажность, оставшаяся после завершения цикла, успевала вовремя выветриваться или хорошо выводиться. Иначе она, с учётом микрочастиц, возникающих после грязной одежды, станет отличной средой для размножения бактерий, а также различных неприятных грибков. Обычно стирка производится при температуре в диапазоне от 30 до 60 градусов. Таких показателей недостаточно, чтобы вымыть из бака частички грязи и бактерии.
Принцип работы
Функцию самоочистки в стиральных машинах Горение необходимо запускать без находящихся внутри вещей. Иными словами — заставить аппарат работать вхолостую. Данная программа сможет удалить остатки моющих средств (если вдруг вы перестарались с порошками или гелями), а также избавиться от патогенных микроорганизмов. Сама работа проходит при температуре порядка 80 градусов, что достаточно для уничтожения самых распространённых организмов: стрептококков, кишечной палочки и пр.
Как использовать
Чтобы активировать этот режим в стиральных машинах Gorenje, нужно повернуть поворотный регулятор в положение «Самоочистка». При этом использование иных функций становится невозможным. Программа выполняется без загрузки белья и длится непродолжительное количество времени. Для эффективности можно добавить спиртовой уксус (примерно 200 мл) или соду (1 столовую ложку /15 гр.). Производитель советует применять данную опцию не реже раза в месяц, а также после использования очистки от известкового отложения. О необходимости активации вас предупредит система — выведет на дисплей сообщение CLN.
Данную программу можно встретить в следующих моделях: WT 62093, WEI62SDS, WP723, WHE72S3, WE62SDS.
Опубликовано: 25.03.2021
- Manuals
- Brands
- Gorenje Manuals
- Washer
- Simplicity WA74SY2W
- Instructions for use manual
-
Contents
-
Table of Contents
-
Troubleshooting
-
Bookmarks
Quick Links
Related Manuals for Gorenje Simplicity WA74SY2W
Summary of Contents for Gorenje Simplicity WA74SY2W
-
Page 1
Instructions for Use… -
Page 2
We thank you for your trust and the purchase of our washing machine. Your new washing machine complies with the requirements of modern laundry care. Your laundry will be impeccably white even at low temperatures. Your washing machine is highly economical when it comes to use of power, water, and detergent. -
Page 3: Table Of Contents
Table of contents INTRODUCTION SAFETY PRECAUTIONS 10 WASHING MACHINE Technical information 12 Front panel 14 INSTALLATION AND CONNECTION PREPARING 14 Removal of transport brackets APPLIANCE 15 Selecting the room FOR THE FIRST 15 Installation 17 Water inlet connection 18 Aqua-stop 18 Total aqua — stop 19 Water outlet connection 20 Connect the appliance to the mains supply…
-
Page 4: Safety Precautions
SAFETY PRECAUTIONS Please, do not use the washing machine without reading and understanding these instructions or use first. Be sure to remove transport brackets prior first use of the appliance. Attempted operation of the blocked machine may result in irreparable damage which is not covered by the manufacturer’s warranty! When connecting your washing machine to water supply, be sure to use the supplied water inlet hose…
-
Page 5
Follow the instructions for correct installation and water and mains connections (see chapter «Installation and connections»). Never immerse the end of the drain hose into the draining water. Prior starting the washing cycle lock the door by pressing them at the designed spot. Door may not be open during the washing cycle. -
Page 6
Never use detergents containing solvents, since there is a danger of creating toxic gasses which may damage the machine and result in ignition or explosion. This product does not release silver ions during the washing cycle. Upon completion of the washing cycle, close the water faucet and unplug the mains cord. -
Page 7
The warranty shall not apply to consumables, minor discoloration or deviations of colour, increased noise level as a consequence of appliance age, which does not affect appliance functionality, and aesthetical deficiencies which do not affect appliance functionality or safety. The appliance is intended exclusively for use in households. -
Page 8
Children under 3 years should be kept away from the machine unless they are not constantly supervised at all times. The appliance is manufactured in compliance with all relevant safety standards. This appliance can be used by children aged from 8 years and above and persons with reduced physical, sensory or mental capabilities or lack of experience and knowledge if they have been given supervision or… -
Page 9
BEFORE CONNECTING THE WASHING MACHINE Carefully read the instructions for use before connecting the washing machine. Repair or any warranty claim resulting from incorrect connection or use of the washing machine shall not be covered by the warranty. The appliance is to be connected to the water mains using new hose-sets and that old hosesets should not be reused. -
Page 10: Washing Machine
WASHING MACHINE (WASHING MACHINE DESCRIPTION) FRONT Front panel Dispenser Door Filter BACK Water inlet pipe Power cord Water discharge pipe Adjustable feet…
-
Page 11: Technical Information
TECHNICAL INFORMATION (DEPENDING ON THE MODEL) The rating plate with the basic information on the washing machine is located under the washing machine door. Maximum load See rating plate See rating plate (SLIM) Width 600 mm 600 mm Height 850 mm 850 mm Depth 600 mm…
-
Page 12: Front Panel
FRONT PANEL Washing machine ON/ TEMPERATURE OFF and program INDICATION FOR THE SELECTOR DIAL SELECTED PROGRAM, displayed on the circumference of the knob…
-
Page 13
SPIN CYCLE RATE (RPM) ADDITIONAL START/PAUSE key SELECTION KEY FUNCTION keys Use this key to start or stop the program. SPINNING RATE indicator 5a Prewash LIGHTS 5b Extra water When the machine is turned 3a Regular spin 5c Eco care on, the signal light on the 3b Minimum spin 5d CHILD LOCK indicator… -
Page 14: Installation And Connection
INSTALLATION AND CONNECTION REMOVAL OF TRANSPORT BRACKETS Move the pipes. Loosen screws at the rear of the machine. Remove the brackets. Slide brackets into the groove on the blocking rod — the right one should be turned around. Use the brackets to rotate blocking rods Close the openings with attached…
-
Page 15: Selecting The Room
SELECTING THE ROOM The appliance should be placed on a surface with concrete base; the surface should be dry and clean in order to prevent slipping. The adjustable feet should also be cleaned before installation. INSTALLATION Use a water scale and spanner No. 32 (for feet) and 17 (for the nut). Put the appliance in horizontal position by turning…
-
Page 16
If you have a tumble dryer of the same dimensions, you can place it on top of the washing machine by using the vacuum feet or side by side. Before connecting the appliance, let it warm up to room temperature (wait at least two hours). -
Page 17: Water Inlet Connection
WATER INLET CONNECTION Insert the gasket with a filter net into the straight inlet hose attachment nut and screw the nut onto the water tap (with some models, the gasket with filter net is AQUASTOP already fitted and any additional fitting into the nut on the straight attachment is not required).
-
Page 18: Aqua-Stop
AQUA-STOP (CERTAIN MODELS ONLY) In case of damage on the interior pipe, leaking is prevented by automatic closing system which stops water inlet to the machine. In such cases display (A) turns red. Inlet pipe must be replaced. TOTAL AQUA — STOP (CERTAIN MODELS ONLY) In case of damage on the interior pipe, leaking is prevented by automatic closing system which stops water inlet to the machine.
-
Page 19: Water Outlet Connection
WATER OUTLET CONNECTION Fix the drain hose to run into the sink or the bathtub, or connect it directly to the wall drain outlet (diameter min. 4 cm). The end Outlet hose of outlet hose should be placed between minimum 60 cm and can be led into maximum 100 cm above the floor level.
-
Page 20: Connect The Appliance To The Mains Supply
CONNECT THE APPLIANCE TO THE MAINS SUPPLY After it is installed for the first time, the washing machine should be left to stand still for two hours before it is connected to the power mains. Use the power cord to connect the washing machine to the power mains through a power outlet.
-
Page 21: Moving And Transport
MOVING AND TRANSPORT After transport, the washing machine should be left to stand still for at least two hours before it is connected to the power mains. We recommend that installation and connection should be done by a qualified person. Before connecting the appliance, read the instructions for use.
-
Page 22: Before The Use
BEFORE THE USE Open the door of the unplugged washing machine by pulling the lever towards you. Clean the washing machine drum before using the appliance for the first time. Use a damp cloth and a mild cleaning agent, or run the self- cleaning program (SterilTub).
-
Page 23: Washing Steps
WASHING STEPS (1 — 7) 1. STEP: CHECK THE TAGS ON YOUR LAUNDRY Normal wash Max. Max. Max. Max. Manual Washing Delicate wash washing washing washing washing washing 95°C 60°C 40°C 30°C allowed Whitening Whitening in cold water Whitening not allowed Dry cleaning Dry cleaning in Perchloret-…
-
Page 24
2. STEP: PREPARING THE WASHING PROCESS Sort the laundry by type of fabric, colour, soiling, and allowed washing temperature (see Program table). Close the buttons and zippers, tie any ribbons, and turn the pockets inside-out; remove any metal clips that could damage the laundry and washing machine interior, or clog the drain. -
Page 25
SWITCHING ON THE WASHING MACHINE Connect the washing machine to the power mains using the power cord, and connect it to water supply. To light up the drum (certain models only), rotate the program selector dial to any position. LOADING THE WASHING MACHINE Open the door of the washing machine by pulling the lever towards you. -
Page 26
3. STEP: CHOOSING A PROGRAMME To select a program, rotate the program selector dial to the left or to the right (according to the type or how soiled the laundry is). See Program Table. During operation, the dial will not rotate automatically. Washing programs are entire programs that include all washing stages, including conditioning and spinning. -
Page 27
PROGRAM TABLE Program: ˚C Type of laundry Possible Max. load combinations Cotton: Non-sensitive cotton and linen • spinning 7 kg/ laundry (towels, underwear, • normal 6 kg 95˚ • eco care T-shirts, terry towelling and Heavily soiled • prewash* underwear, stockinette, 6 kg»… -
Page 28
4. STEP: CHOOSING THE SETTINGS Each program features basic settings which, however, can be changed. To change a setting, press the relevant key (before pressing the START/PAUSE key). Some settings cannot be selected with some programs; an acoustic signal and a flashing light will remind you of such cases (see Program Table). -
Page 29
Spinning To change the spinning rate by levels, from preset spinning rate for each program (3a) to minimum spin rate (3b). The last choice is pumping without a spin cycle (3c). Program: ˚C Spinning [rpm] 1400 1200 1000 Cotton 95°C 1400 1000 1200… -
Page 30
Start delay Use this function to start the washing cycle after a certain amount of time has elapsed. Press the (4) key to display 00:00 on the display unit (4a). By pressing the (4) key, you can adjust the time in 30-minute steps up to 2 hours, and by 1-hour steps up to 24 hours. -
Page 31
5. STEP: SELECTING ADDITIONAL FUNCTIONS To activate/deactivate a function, press the relevant key (before pressing the START/PAUSE key). Some functions cannot be selected with some programs; an acoustic signal and a flashing light will remind you of such cases (see Program Table). Prewash Washing heavily soiled laundry, particularly with stubborn superficial stains. -
Page 32
ACOUSTIC SIGNAL Select the acoustic signal loudness by simultaneously pressing the (5c) key and rotating the program selector dial (1) clockwise to the initial position (if nothing is pressed for 5 seconds, actual washing time will be displayed). Each time a key is pressed, the final loudness level is changed (three levels;… -
Page 33
6. STEP: PROGRAM START Press the (6) key START/PAUSE. Time remaining to the end of the program or start delay time (if set) will appear on the display. Signal lights on the selected functions will be lit. After pressing the START/PAUSE key, you may adjust the spinning speed and activate or deactivate the child lock;… -
Page 34: Cleaning And Maintenance
CLEANING AND MAINTENANCE Disconnect the washing machine from the mains before cleaning! Do not allow children to clean the appliance or perform any maintenance tasks without proper supervision! CLEANING THE DETERGENT DISPENSER If necessary, clean the detergent dispenser. Pull it out from its casing completely by pressing the flap. Wash it under running water using a brush, and…
-
Page 35: Cleaning The Dispenser Housing, Inlet Hose Screen And Door Rubber Gasket
CLEANING THE DISPENSER HOUSING, INLET HOSE SCREEN AND DOOR RUBBER GASKET Clean the water inlet hose screen frequently under running water. Clean the entire rinsing area of the washing machine with a brush, especially the nozzles on the upper side of the rinsing chamber.
-
Page 36: Cleaning The Filter
CLEANING THE FILTER During cleaning, some water may leak. Therefore, we recommend spreading an absorbent cloth on the floor before starting. Open the filter lid using flat screwdriver or similar tool. Remove the water outlet funnel before cleaning the filter. Gradually rotate the filter in the counter-clockwise…
-
Page 37: Cleaning The Washing Machine
CLEANING THE WASHING MACHINE The casing should be cleaned with soft cloth and mild detergent. Disconnect the washing machine from the mains before cleaning!
-
Page 38: Inerrupting And Chanching The Program
INERRUPTING AND CHANCHING THE PROGRAM Manual (physical) termination FAULTS The program can be cancelled / terminated In case of a fault, the program will be by rotating the program selector dial (1) to interrupted. Flashing signal lights and the position. “0FF” position. an acoustic signal will warn about such If there is water in the machine, select an occurrence (see section Troubleshooting),…
-
Page 39
Opening the door in case of a power Opening the door (Temporary outage interruption/ Permanent suspension — In models with an electromagnetic door change of program) lock, the door can only be opened by Washing machine door may only be opened simultaneously pulling the special lever if the water level is sufficiently low. -
Page 40: What To Do
WHAT TO DO …? The washing machine shall automatically control the operation of particular functions during the washing cycle. If any irregularity is identified, this will be indicated by reporting (Ex) on the display. The machine will signal the fault until it is turned off. If the fault is on the heating system, the machine will complete the washing program, but without heating the water.
-
Page 41: Troubleshooting Table
TROUBLESHOOTING TABLE Failure Possible cause What to do…? The machine does not • Machine is not powered. Check if: • power in the socket, work – the display is not • the fuse is OK, lit. • plug is in the socket. Water is leaking from the •…
-
Page 42
Failure Possible cause What to do…? Unpleasant smell in the • Remains of fabrics, washing • Check whether the filter is clean. agent and softener in the • Run the auto-clean (SterilTub) washing machine drum. filter. program (see chapter: selecting •… -
Page 43: Recommendations For Washing And Economic Use Your Washing Machine
RECOMMENDATIONS FOR WASHING AND ECONOMIC USE YOUR WASHING MACHINE Wash new coloured garments separately If water hardness level exceeds 14°dH the first time. degrees, the use of water conditioner is required. Any damage to the heater due to Wash heavily soiled laundry in smaller failure to use a water conditioning agent amounts, with more detergent or a prewash shall not be covered by this warranty.
-
Page 44
Hardness scale Degree of hardness °dH (°N) m mol/l °fH(°F) p.p.m. 1 — soft < 8,4 < 1,5 < 15 < 150 2 — medium 8,4 — 14 1,5 — 2,5 15 — 25 150 — 250 3 — hard >… -
Page 45: Grandma’s Advice For Natural Stain Removal
GRANDMA’S ADVICE FOR NATURAL STAIN REMOVAL Before using special-purpose stain removers, try using the natural methods that do not harm the environment on less stubborn stains. However, prompt action is required! Soak the stain with an absorbent sponge or a paper towel; then, rinse with cold (lukewarm) water — but never with hot water! Stain Stain removal…
-
Page 46
Stain Stain removal Glue soak in spirit/denatured alcohol (or a mixture of vinegar and water); rinse Make-up use a glass cleaner and a paper towel rinse with hot soapsuds (if the fabric permits); Butter tablecloth – sprinkle with baking soda, brush after a while wool –… -
Page 47: Disposal
DISPOSAL Our appliances are packed in environmentally friendly materials which may be recycled, deposited or decomposed without any threat to the environment. To this end all wrappings are marked accordingly. The symbol on the product or on its packaging indicates that this product may not be treated as household waste.
-
Page 48: Typical Consumption Table
TYPICAL CONSUMPTION TABLE Program Cotton (A-30%) ECO* 7 / 3,5** 800-1400 62-53 181 / 161** 0,84 / 0,73** (A-30%) ECO* 7 / 3,5** 800-1400 62-53 160 / 150** 0,67 / 0,58** (A-30%) ECO* 6 / 3** 800-1400 62-53 181 / 160** 0,70 / 0,67** (A-30%) ECO* 6 / 3**…
-
Page 49
We reserve the rights to make any changes or mistakes in these operation instructions. -
Page 52
PS10 CLASS SYM2 OEM en (02-18)
Стиральная машина с резервуаром Gorenje – настоящая «палочка-выручалочка» для домов, не подключенных к централизованному водоснабжению. Однако подобная бытовая техника требует повышенной заботы: пользоваться стиральной машиной с баком для воды следует более внимательно и аккуратно. Важно не только заполнить ее водой, но и подготовить жидкость специальным образом. Существуют и другие нюансы пользования агрегатом, которые следует знать ее владельцам.
Готовим воду для стирки
Стиральная машина Gorenje с баком для воды работает практически в полном автономном режиме. Перед ее запуском в резервуар наливают необходимое количество воды – приблизительно 30-40 литров, все зависит от объема бака. К качеству воды предъявляются определенные требования: она не должна содержать мусора и насекомых, которые в последствии могут попасть во внутренние составляющие бытовой техники и спровоцировать ее поломку. Поэтому наливать в емкость следует очищенную или отстоянную воду, а при использовании речной или озерной воды ее необходимо предварительно отфильтровать.
Сам резервуар оснащен фильтром, но он способен улавливать лишь крупные частицы мусора, поэтому о чистоте воды придется заботиться владельцу бытовой техники. Для заливки воды следует открыть крышку резервуара и наполнить его жидкостью до указанной отметки. После закрытия крышки стиральная машина готова к стирке.
Загрузка средства для стирки
Каждая модель бытовой техники имеет руководство по эксплуатации, где находится пошаговая инструкция рассказывающая как пользоваться прибором. Однако до сих пор находятся хозяйки, которые загружают стиральный порошок не в специальный лоток, а непосредственно в барабан стиральной машины. Производитель техники Gorenje предостерегает от такого шага, ведь современные моющие средства содержат агрессивные составляющие, способные повредить ткань или оставить на ней не выводимые следы и пятна. Поэтому загружать моющие средства следует строго в специальный отсек.
Лоток – порошкоприемник бытовой техники Gorenje разделен на отсеки для:
- основной стирки – загрузка сухого или жидкого стирального порошка, отмечен он символами «В» или «II»;
- предварительной стирки – предназначен для сухого порошка или геля, он маркирован «А» или «I»;
- ополаскивателя – самое маленькое отделение, куда заливается кондиционер для белья, маркируется символом в виде цветка или звездочки.
Чаще всего используется отсек для основной стирки, остальные отделения востребованы время от времени.
Также в отделение для основной стирки загружаются все дополнительные средства:
- пятновыводитель;
- отбеливатель;
- средства против накипи.
Очень важно не перепутать отсеки, ведь неправильная загрузка средств для стирки может стать причиной нежелательных последствий для вещей и работы самого бытового прибора.
Программные установки и закладка белья
Программатор на стиральной машинке Gorenje достаточно прост и понятен, поэтому с подбором нужного режима стирки проблем у хозяйки не возникнет. Ручка переключения программ вращается по часовой стрелке до нужной отметки, после чего нажимается кнопка «Старт/Стоп». До запуска программы можно внести изменения в температурный режим и параметры отжима.
Загрузка белья в барабан – один из важных и ответственных этапов стирки. Правильное расположение вещей позволяет не только получить качественный результат их очищения, но и значительно продлить срок эксплуатации бытового прибора.
Для этого следует соблюдать ряд правил. Первое, сортировка вещей по типу ткани, цветам и степени загрязнения. Все виды деликатных тканей: шелк, лен, синтетику – необходимо стирать отдельно друг от друга. Если на вещах есть старые, сильные или глубокие пятна, для нее стоит выбирать режимы: интенсивный, предварительной стирки или замачивания. Повседневные вещи, которые нужно просто освежить, вполне можно стирать на ежедневной или быстрой программе.
Перед помещением одежды в барабан следует проверить все карманы и вытащить из них находящиеся там предметы, чтобы они не испортились сами и/или не повредили бытовой прибор. Все съемные части тоже лучше отстегнуть и очистить их вручную. Все застежки рекомендуется привести в закрытый вид, а верхнюю одежду, трикотажные и махровые вещи вывернуть наизнанку. Это позволит им не испортиться при стирке и не потерять свой первоначальный вид.
Начинаем стирку
После помещения вещей в стиральную машину Gorenje следует плотно закрыть люк барабана и порошкоприемник. Удостоверится, что резервуар заполнен водой до соответствующей отметки. Ручку программатора следует установить в нужное положение и запустить бытовой прибор кнопкой «Старт/Стоп».
Техника начнет работу. Стиральная машина будет функционировать в автономном режиме, контролировать ее не требуется. Когда цикл закончится, техника сообщит об этом звуковым сигналом.
Переживать, что вода закончится, не следует – объем резервуара рассчитан минимум на один цикл работы, независимо от выбранного режима.
По окончании работы в течение 1-2 минут будет действовать блокировка люка. После, барабан можно будет открыть и достать чистые вещи. Люк и порошкоприемник рекомендуется оставить открытыми для просушки внутренних комплектующих техники и предотвращения развития в них грибка.
- Поделитесь своим мнением — оставьте комментарий