&
+15
Запуск машины. Программы
Таблица программ
Т к а н ь и с те п е н ь
з а г р я з н е н и я
П р о г р . Т е м п е —
р а тур а
М о ю щ е е
с р е д с тв о
С м яг-
читель
У д ален ие
п ятен /
Отбели ватель
Д ли те ль —
н о с ть
ц и к л а,
м и н .
О п и с а н и е ц и к л а с ти р к и
п р е д в а р .
с т и р к а
о с н о в .
с т и р к а
О б ы ч н ы е п р о гр а м м ы
О чень сильно загрязненное белое
белье (просты ни, скатерти и т.п.)
1
9 0 °C
1 3 5
П р е д ва р и те л ьн а я с ти р к а , с ти р к а ,
п о л о с к а н и е , п р о м е ж у то ч н ы й и
о к о н ч а те л ьн ы й о тж и м
О чень сильно загрязненное белое
белье (просты ни, скатерти и т.п.)
2
9 0 °C
Деликатн./
О бы чны й
1 2 5
С тирка, полоскание, проме ж уточны й
и окончате льны й отж им
С ильно за грязне н ное бе лое и
устойчивое цве тное бе лье
2
6 0 °C
Деликатн./
О бы чны й
1 1 0
С тирка, полоскание, проме ж уточны й
и окончате льны й отж им
С ильно за грязне н ное бе лое и
линяю щ е е ц ве тн ое б е лье
2
4 0 °C
Деликатн./
О бы чны й
1 0 5
С тирка, полоскание, проме ж уточны й
и окончате льны й отж им
С л а б о за гр я зн е н н о е б е л о е и
л и н я ю щ е е ц ве тн о е б е л ье
(п р о с ты н и , с к а те р ти и т.п .)
3
4 0 °C
Деликатн./
О бы чны й
7 0
С тирка, полоскание, проме ж уточны й
и окончате льны й отж им
С ильно загрязненное устойчивое
цветное белье (детская одежда и пр.)
4
6 0
°C
Д е л и к а тн ы й
7 5
С ти р к а , п о л о с к а н и е , о с та н о вк а с
во д о й и л и д е л и к а тн ы й о тж и м
С ильно загрязненное устойчивое
цветное белье (детская одежда и пр.)
4
4 0 °C
Д е л и к а тн ы й
6 0
С ти р к а , п о л о с к а н и е , о с та н о вк а с
во д о й и л и д е л и к а тн ы й о тж и м
Ш е р с ть
5
4 0 °C
5 0
С ти р к а , п о л о с к а н и е , о с та н о вк а с
во д о й и д е л и к а тн ы й о тж и м
О собо деликатны е ткани и одежда
(занавеси, ш елк, вискоза и пр.)
6
3 0 °C
4 5
С ти р к а , п о л о с к а н и е , о с та н о вк а с
во д о й и л и с л и в
4 п р о гр а м м ы д л я В а с
С ильно за грязне н ное и
устойчивое цве тное бе лье
7
6 0 °C
6 5
С тирка, полоскание, проме ж уточны й
и окончате льны й отж им
С л а б о за гр я зн е н н о е б е л о е и
л и н я ю щ е е ц ве тн о е б е л ье
(со р о ч к и , м а й к и и п р .)
8
4 0 °C
5 5
С тирка, полоскание, проме ж уточны й
и окончате льны й отж им
С л а б о за гр язне нн ое ли няю щ е е
ц ве тн ое бе лье (лю б а я о де ж д а )
9
4 0
°C
4 5
С ти р к а , п о л о с к а н и е , д е л и к а тн ы й
о тж и м
С л а б о за гр язне нн ое ли няю щ е е
ц ве тн ое бе лье (лю б а я о де ж д а )
1 0
3 0 °C
3 0
С ти р к а , п о л о с к а н и е , д е л и к а тн ы й
о тж и м
С п о р т
С порти вна я обувь
(
м а к с . 2 п а р ы .
)
1 1
3 0
°C
5 0
С ти р к а в х о л о д н о й во д е (б е з
м о ю щ е г о с р е д с тва ), с ти р к а ,
п о л о с к а н и е и д е л и к а тн ы й о тж и м
С порти вна я оде ж да (спортивны е
костю мы , ш орты и пр.)
1 2
3 0 °C
6 0
С тирка, полоскание, проме ж уточны й
и окончате льны й отж им
M E M O
П о зво л я е т вве с ти в п а м я ть м а ш и н ы л ю б у ю п р о г р а м м у с ти р к и
Ч а с т н ы е п р о г р а м м ы
П о л о с к а н и е
Деликатн./
О бы чны й
П о л о с к а н и е и о тж и м
О тж и м
С л и в и о тж и м
С л и в
С л и в
Краткие инструкции: Порядок
запуска программы
1. Включите стиральную машину, нажав кнопку .
2. Загрузите белье и закройте дверцу машины.
3. Установите рукоятку программатора на нужную
программу. На дисплее появится прогнозируемая
продолжительность выбранного цикла. Температу-
ра и скорость отжима задаются автоматически в
соответствии с выбранной программой (как изме-
нить их см. на с. 19).
4. Выберите дополнительные функции (см. стр. 19).
5. Добавьте в распределитель моющее средство,
ополаскиватель, отбеливатель (см. с. 20).
6. Запустите программу, нажав кнопку ПУСК/СБРОС
(Start/Reset).
Для отмены запуска держите нажатой кнопку ПУСК/
СБРОС (Start/Reset) в течение 2-х секунд.
По окончании программы на дисплее появится со-
общение END (Конец). Подождите пока на дисплее
погаснет символ блокировки дверцы. Выключите сти-
ральную машину, нажав кнопку
. Откройте дверцу
машины. Вынув белье, оставьте дверцу машины при-
открытой, чтобы дать испариться оставшейся влаге.
Обязательно перекройте кран подачи воды и отклю-
чите машину из сети.
Примечание
-Рекомендуется, чтобы для программ 7 — 8 загрузка белья не превышала 3,5 кг.
-Для программы 12 рекомендуется, чтобы вес загружаемого белья не превышал 2 кг.
—
«Остановка с водой»: см. дополнительную функцию «Легкая глажка» на с. 7. Данные в таблице, являются справочны-
ми и могут меняться в зависимости от конкретных условий стирки (объем стирки, температура воды в водопроводной
системе, температура в помещении и др.).
Специальная программа
Повседневная стирка 30′ мин (программа 10 для Синтетических тканей) предназначена для быстрой стирки слабо-
загрязненного белья: цикл длится всего 30 минут, что позволяет сэкономить время и электроэнергию. Установив эту
программу (10 при температуре 30°С), Вы можете стирать различные виды тканей вместе (за исключением шерсти и
шелка) при максимальной загрузке белья 3 кг. Мы рекомендуем использовать жидкое моющее средство.
(см. с. 17).

Instructions for use
WASHING MACHINE
Contents
GB
Installation, 2-3
GB
CIS
SL
Unpacking and levelling, 2
Electric and water connections, 2-3
English,1
ÐÓÑÑÊÈÉ,13
Slovenèina,25
The first wash cycle, 3
Technical details, 3
Washing machine description, 4-5
HR
HU
GR
Control panel, 4
Display, 5
Hrvatski,37
Magyar,4 9
ÅËËÇÍÉÊÁ,61
MEMO Programme, 5
Starting and Programmes, 6
Briefly: how to start a programme, 6
Programme table, 6
Personalisations, 7
Setting the spin cycle, 7
WIE 107
Setting the Delay Timer, 7
Setting the temperature, 7
Functions, 7
Detergents and laundry, 8
Detergent dispenser, 8
Bleach cycle, 8
Preparing your laundry, 8
Special items, 8
Precautions and advice, 9
General safety, 9
Disposal, 9
Saving energy and respecting the environment, 9
Care and maintenance, 10
Cutting off the water or electricity supply, 10
Cleaning your appliance, 10
Cleaning the detergent dispenser, 10
Caring for your appliance door and drum, 10
Cleaning the pump, 10
Checking the water inlet hose, 10
Troubleshooting, 11
Service, 12
Before calling for Assistance, 12
1
Installation
Keep this instruction manual in a safe place for
Levelling your appliance correctly will provide it with
GB
future reference. Should the appliance be sold,
stability and avoid any vibrations, noise and shifting
transferred or moved, make sure the instruction
during operation. If it is placed on a fitted or loose
manual accompanies the washing machine to inform
carpet, adjust the feet in such a way as to allow
the new owner as to its operation and features.
enough room for ventilation beneath the washing
machine.
Read these instructions carefully: they contain vital
information on installation, use and safety.
Electric and water connections
Unpacking and levelling
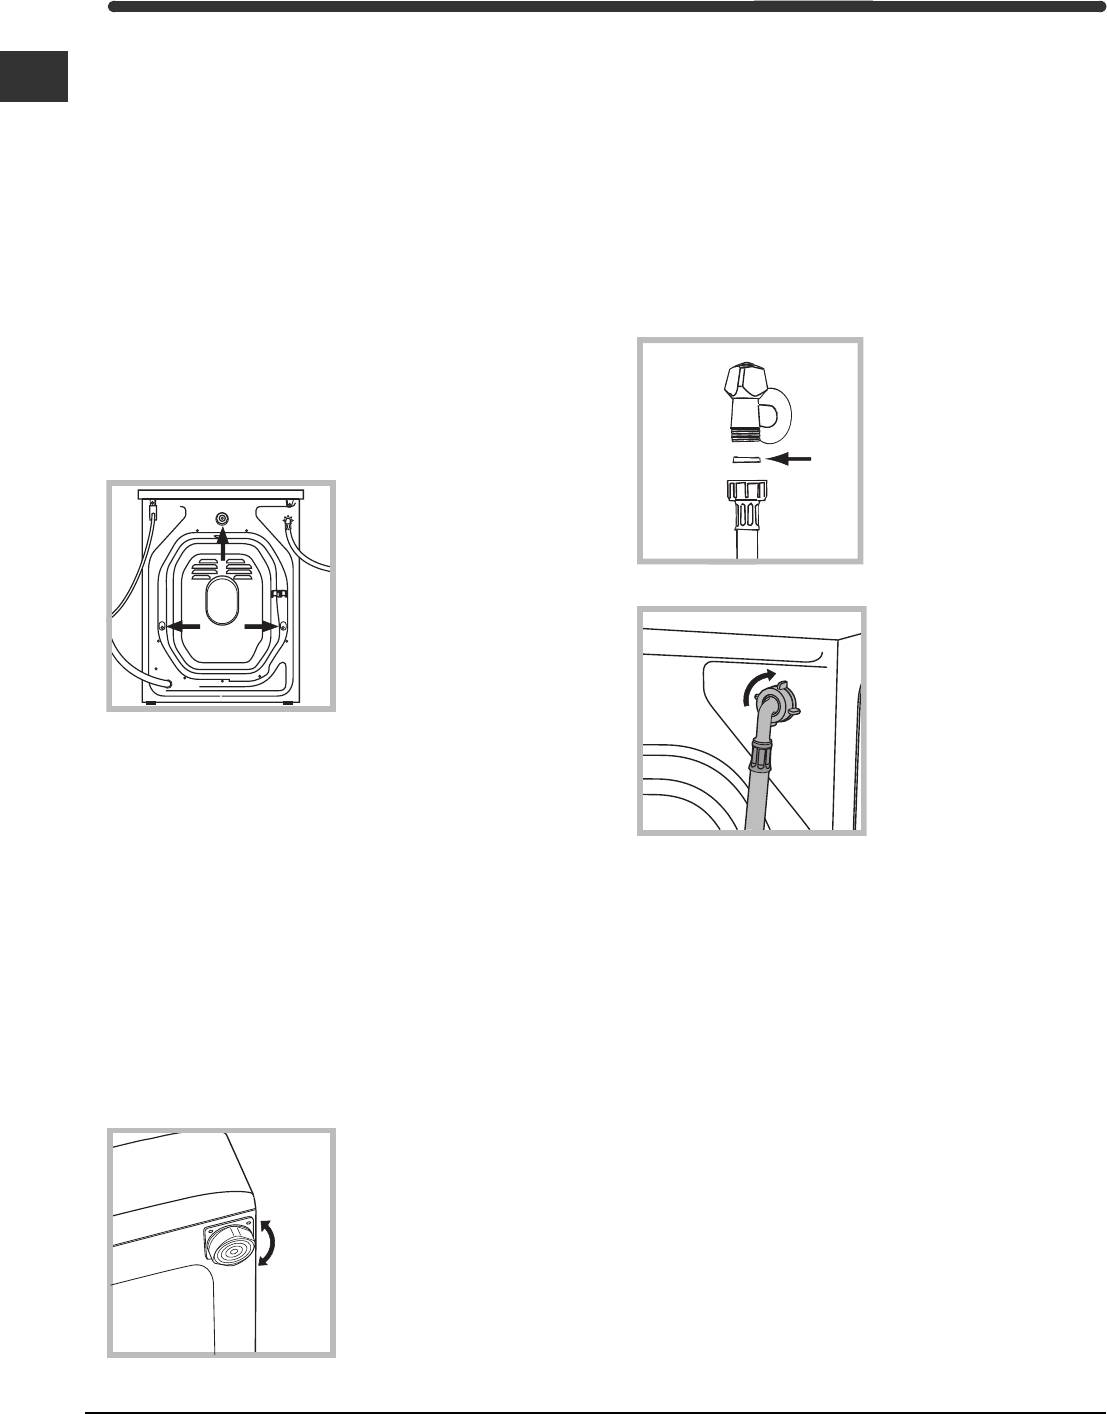
Connecting the water inlet hose
Unpacking
1. Insert seal A into the
1. Unpack the washing machine.
end of the inlet hose
2. Check whether the washing machine has been
and screw the latter
damaged during transport. If this is the case, do not
onto a cold water tap
install it and contact your retailer.
with a 3/4 gas threaded
A
mouth (see figure).
3. Remove the 3
Before making the
protective screws and
connection, allow the
the rubber washer with
water to run freely until
the respective spacer,
it is perfectly clear.
situated on the rear of
the appliance (see
2. Connect the other end
figure).
of the water inlet hose to
the washing machine,
screwing it onto the
appliance’s cold water
inlet, situated on the top
right-hand side on the
4. Seal the gaps using the plastic plugs provided.
rear of the appliance
5. Use the plug provided to seal the three holes
(see figure).
where the plug was housed, situated on the lower
right-hand side on the rear of your appliance.
6. Keep all the parts: you will need them again if the
3. Make sure there are no kinks or bends in the
washing machine needs to be moved to another
hose.
location.
The water pressure at the tap must be within the
Packaging materials are not children’s toys.
values indicated in the Technical details table
(on the next page).
Levelling
If the water inlet hose is not long enough, contact
1. Install the washing machine on a flat sturdy floor,
a specialist store or an authorised serviceman.
without resting it up against walls, furniture cabinets
or other.
2. If the floor is not
perfectly level, compen-
sate for any unevenness
by tightening or
loosening the adjustable
front feet (see figure);
the angle of inclination,
measured according to
the worktop, must not
exceed 2°.
2
Connecting the drain hose
Do not use extensions or multiple sockets.
GB
Connect the drain hose,
The power supply cable must never be bent or
without bending it, to a
dangerously compressed.
draining duct or a wall
drain situated between
The power supply cable must only be replaced by
65 and 100 cm from
an authorised serviceman.
65 — 100 cm
the floor;
Warning! The company denies all liability if and when
these norms are not respected.
The first wash cycle
Once the appliance has been installed, and before
alternatively, place it
you use it for the first time, run a wash cycle with
over the edge of a
detergent and no laundry, setting the 90°C
basin, sink or tub,
programme without a pre-wash cycle.
fastening the duct
supplied to the tap (see
figure). The free end of
the hose should not be
underwater.
We advise against the use of hose extensions; in
case of absolute need, the extension must have the
same diameter as the original hose and must not
Technical details
exceed 150 cm in length.
Electric connection
Model
WIE 107
Before plugging the appliance into the mains
59.5 cm wide
Dimensions
85 cm high
socket, make sure that:
52.5 cm deep
the socket is earthed and in compliance with the
applicable law;
Capacity
from 1 to 5 kg
the socket is able to sustain the appliance’s
Electric
voltage 220/230 Volts 50 Hz
maximum power load indicated in the Technical
connections
maximum absorbed power 1850 W
details table (on the right);
maximum pressure 1 MPa (10 bar)
Water
minimum pressure 0.05 MPa (0.5 bar)
connections
the supply voltage is included within the values i
drum capacity 46 litres
ndicated on the Technical details table
(on the right);
Spin speed
up to 1000 rpm
Control
the socket is compatible with the washing
programmes
programme 2; temperature 60°C;
machine’s plug. If this is not the case, replace
according to
run with a load of 5 kg.
the socket or the plug.
IEC456 directive
This appliance is compliant with the
The washing machine should not be installed in an
following European Community
outdoor environment, not even when the area is
Directives:
sheltered, because it may be very dangerous to
— 73/23/CEE of 19/02/73 (Low
ServiceTroubleshootingPrecautions CareProgrammes DetergentsInstallation Description
leave it exposed to rain and thunderstorms.
Voltage) and subsequent amendments
— 89/336/CEE of 03/05/89
When the washing machine is installed, the mains
(Electromagnetic Compatibility) and
subsequent amendments
socket must be within easy reach.
3
- Manuals
- Brands
- Indesit Manuals
- Washer
- WIE 107
- Instructions for use manual
-
Contents
-
Table of Contents
-
Troubleshooting
-
Bookmarks
Available languages
-
EN
-
PL
Quick Links
English, 13
Downloaded From WashingMachine-Manual.com Manuals
Related Manuals for Indesit WIE 107
Summary of Contents for Indesit WIE 107
-
Page 1
English, 13 Downloaded From WashingMachine-Manual.com Manuals… -
Page 2
(zobacz rysunek). (zobacz rysunek). (zobacz rysunek). (zobacz na s¹siedniej stronie). (zobacz rysunek) . Downloaded From WashingMachine-Manual.com Manuals… -
Page 3
zobacz rysunek (zobacz obok); zobacz obok ° Po zainstalowaniu pr Downloaded From WashingMachine-Manual.com Manuals… -
Page 4
Pokrêt³o Wyœwietlacz Szufladka œrodków pior¹cych (display) Szufladka na œrodki pior¹ce zobacz str. 8 zobacz str. 7 (zobacz str. 7). Pokrêt³o zobacz str. 7 Wyœwietlacz (display) Downloaded From WashingMachine-Manual.com Manuals… -
Page 5
(zobacz str. 7) zobacz str. 7 Zablokowane drzwiczki pralki: (zobacz str. 12). Downloaded From WashingMachine-Manual.com Manuals… -
Page 6
zobacz str. 8 zobacz str. 7 (zobacz str. 7). 9 0 °C 9 0 °C 6 0 °C 4 0 °C 4 0 °C °C 4 0 °C 4 0 °C 3 0 °C 6 0 °C 4 0 °C °C 3 0 °C °C… -
Page 7
(zobacz str. 8 Downloaded From WashingMachine-Manual.com Manuals… -
Page 8
zobacz str. 6 Tradycyjnego delikatnego zobacz rysunek) zobacz str. 7 Downloaded From WashingMachine-Manual.com Manuals… -
Page 9
• zobacz str. 7 Downloaded From WashingMachine-Manual.com Manuals… -
Page 10
zobacz rysunek ; zobacz rysunek zobacz rysunek : Downloaded From WashingMachine-Manual.com Manuals… -
Page 11
zobacz str. 12 zobacz str. 7). zobacz str. 3). zobacz str. 3). zobacz str. 6 zobacz str. 7). zobacz str. 3 zobacz str. 2). zobacz str. 2 zobacz str. 2 zobacz str. 2 zobacz str. 10 zobacz str. 3 Downloaded From WashingMachine-Manual.com Manuals… -
Page 12
• zobacz str. 11); Downloaded From WashingMachine-Manual.com Manuals… -
Page 13: Table Of Contents
Starting and Programmes, 18 Briefly: how to start a programme, 18 Programme table, 18 Personalisations, 19 Setting the spin cycle, 19 WIE 107 Setting the Delay Timer, 19 Setting the temperature, 19 Functions, 19 Detergents and laundry, 20 Detergent dispenser, 20…
-
Page 14: Installation
Installation Keep this instruction manual in a safe place for Levelling your appliance correctly will provide it with future reference. Should the appliance be sold, stability and avoid any vibrations, noise and shifting transferred or moved, make sure the instruction during operation.
-
Page 15: The First Wash Cycle
Technical details exceed 150 cm in length. Electric connection Model WIE 107 Before plugging the appliance into the mains 59.5 cm wide Dimensions 85 cm high socket, make sure that: 53,5 cm deep •…
-
Page 16: Washing Machine Description
Washing machine description Control panel FUNCTION Buttons START/RESET button START/STOP button Display Control knob Detergent dispenser TEMPERATURE button SPIN DELAY TIMER button button Detergent dispenser to add detergent and fabric FUNCTION buttons: to select the functions softener (see page 20). available.
-
Page 17: Display
Display In addition to being a practical tool to programme your appliance (see page 19), the display provides useful information concerning the wash cycle. Once you have pressed the START/RESET button to start the programme, the display will indicate the amount of time left until the end of the wash cycle.
-
Page 18: Starting And Programmes
Starting and Programmes Briefly: starting a programme 5. Add the detergent and any fabric softener (see page 20). 1. Turn the washing machine on by pressing button 6. Start he programme by pressing the START/RESET 2. Load your laundry into the washing machine and button.
-
Page 19: Personalisations
Personalisations Setting the spin cycle FUNCTION buttons If, when the appliance is switched on, the KNOB is positioned on a programme with a spin cycle, a fixed appears. Press button and the maximum spin speed allowed for the programme set will be displayed, and the icon flashes.
-
Page 20: Detergents And Laundry
Detergents and laundry Detergent dispenser The use of extra compartment 4 excludes the possibility of using the pre-wash cycle. In addition, Good washing results also depend on the correct the bleach cycle cannot be run with programmes 6 dose of detergent: adding too much detergent won’t (Silk) and Daily (see page 18).
-
Page 21: Precautions And Advice
If you only see a little water through your appliance not be changed. door, this is because thanks to the latest Indesit technology, your washing machine only needs less • This washing machine should only be used by…
-
Page 22: Care And Maintenance
Care and maintenance Cutting off the water or electricity Cleaning the pump supply The washing machine is fitted with a self-cleaning • Turn off the water tap after every wash. This will pump that does not require any maintenance. limit the wear of your appliance’s water system Sometimes, small items (such as coins or buttons) and also prevent leaks.
-
Page 23: Troubleshooting
Troubleshooting Your washing machine could fail to work. Before calling for Assistance (see page 24), make sure the problem can’t easily be solved by consulting the following list. Possible causes/Solution: Problem • The appliance is not plugged into the socket, or not enough to The washing machine won’t make contact.
-
Page 24: Service
Service 195042001.00 11/2003 — Xerox Business Services Before calling for Assistance: • Check whether you can solve the problem on your own (see page 23); • Restart the programme to check whether the problem has been solved; • If this is not the case, contact an authorised Technical Service Centre on the telephone number provided on the guarantee certificate.
Страницы и текст этой инструкции
 Руководство пользователя стиральной машины Indesit WIE 107
 Информация отображена на картинке
 Информация отображена на картинке
 Информация отображена на картинке
 Информация отображена на картинке
Как использовать наш сайт инструкций OnlineManuals.ru
Наша цель состоит в том, чтобы предоставить вам быстрый доступ к содержанию инструкции для стиральной машины Indesit WIE 107.
С помощью онлайн просмотра, Вы можете быстро просмотреть содержимое инструкции и найти решение проблемы с стиральной машины Indesit WIE 107.
Для Вашего удобства
Если листать руководство пользователя стиральной машины Indesit WIE 107 прямо на сайте, не очень удобно для Вас, есть два возможных решения:
• Просмотр в полноэкранном режиме — легко просмотреть руководство пользователя (без загрузки его на свой компьютер), Вы можете использовать режим полноэкранного просмотра.
Для просмотра инструкции пользователя стиральной машины Indesit WIE 107 на полном экране, используйте кнопку «Открыть в Pdf-viewer».
• Загрузка на компьютер — Вы можете также скачать Руководство пользователя стиральной машины Indesit WIE 107 на свой компьютер и сохранить его в файлах.
Многие люди предпочитают читать документы не на экране, а в печатной версии.
Возможность печати руководства пользователя также была предусмотрена на нашем сайте,
и вы можете использовать ее, нажав на иконку «печать» в Pdf-viewer.
Нет необходимости печатать все руководство стиральной машины Indesit WIE 107, можно выбрать только нужные страницы инструкции.
Руководство пользователя стиральной машины Indesit WIE 107
Информация отображена на картинке
Информация отображена на картинке
Информация отображена на картинке
Информация отображена на картинке
Как использовать наш сайт инструкций OnlineManuals.ru
Наша цель состоит в том, чтобы предоставить вам быстрый доступ к содержанию инструкции для стиральной машины Indesit WIE 107.
С помощью онлайн просмотра, Вы можете быстро просмотреть содержимое инструкции и найти решение проблемы с стиральной машины Indesit WIE 107.
Для Вашего удобства
Если листать руководство пользователя стиральной машины Indesit WIE 107 прямо на сайте, не очень удобно для Вас, есть два возможных решения:
• Просмотр в полноэкранном режиме — легко просмотреть руководство пользователя (без загрузки его на свой компьютер), Вы можете использовать режим полноэкранного просмотра.
Для просмотра инструкции пользователя стиральной машины Indesit WIE 107 на полном экране, используйте кнопку «Открыть в Pdf-viewer».
• Загрузка на компьютер — Вы можете также скачать Руководство пользователя стиральной машины Indesit WIE 107 на свой компьютер и сохранить его в файлах.
Многие люди предпочитают читать документы не на экране, а в печатной версии.
Возможность печати руководства пользователя также была предусмотрена на нашем сайте,
и вы можете использовать ее, нажав на иконку «печать» в Pdf-viewer.
Нет необходимости печатать все руководство стиральной машины Indesit WIE 107, можно выбрать только нужные страницы инструкции.