
- Manuals
- Brands
- KaVo Manuals
- Dental equipment
- ESTETICA E30
- Instructions for use manual
-
Contents
-
Table of Contents
-
Troubleshooting
-
Bookmarks
Quick Links
Instructions for use
ESTETICA E30
Related Manuals for KaVo ESTETICA E30
Summary of Contents for KaVo ESTETICA E30
-
Page 1
Instructions for use ESTETICA E30… -
Page 2
Manufacturer: Distributed by: Kaltenbach & Voigt GmbH KaVo Dental GmbH Bismarckring 39 Bismarckring 39 D-88400 Biberach D-88400 Biberach www.kavo.com Phone +49 (0) 7351 56-0 Fax +49 (0) 7351 56-1488… -
Page 3: Table Of Contents
3 Product description ………………….18 3.1 Treatment unit versions………………..18 3.1.1 KaVo ESTETICA E30 S………………18 3.1.2 KaVo ESTETICA E30 TM ………………18 3.2 Patient chair……………………19 3.3 Unit with patient element ………………..20 3.4 Dentist unit versions …………………. 20 3.4.1 TM table ………………….
-
Page 4
Instructions for use ESTETICA E30 Table of contents 4.3 Adjusting the dental chair ………………..44 4.3.1 Adjusting the armrest (optional)…………….44 4.3.2 Adjust head rest ………………..45 4.3.3 Positioning the dental chair manually …………..46 4.3.4 Automatic positioning of dental chair …………..48 4.3.5… -
Page 5
Instructions for use ESTETICA E30 Table of contents 4.14Using the camera………………….98 4.15Using the screen………………….98 5 Preparation methods DIN EN ISO 17664 …………….99 6 Accessories and kits ………………….100 6.1 Device …………………….. 100 6.2 Dental chair ……………………100 6.3 Assistant unit …………………… -
Page 6: User Instructions
Instructions for use ESTETICA E30 1 User instructions | 1.1 User guide 1 User instructions 1.1 User guide Requirement Read these instructions prior to first use to avoid misuse and prevent damage. 1.1.1 Abbreviations Explanation brevi- ation Instructions for use…
-
Page 7: Service
For further information, please visit: www.kavo.com 1.3 Terms and conditions of warranty KaVo provides the final customer with a warranty that the product cited in the handover certificate will function properly and guarantees zero defects in the material or processing for a period of 12 months from data of purchase, subject…
-
Page 8: Damage In Transit
Terms and Conditions, Art. 28). Outside Germany Note KaVo shall not be held liable for damage arising from transportation. The shipment must be checked on arrival. If the packaging is visibly damaged on delivery, please proceed as follows: 1. The recipient of the package must record the loss or damage on the delivery receipt.
-
Page 9: Information On The Packaging: Storage And Transportation
Instructions for use ESTETICA E30 1 User instructions | 1.4 Transportation and storage 1.4.3 Information on the packaging: Storage and transportation Note Please keep the packaging in case you need to return the product for servi- cing or repair. The symbols printed on the outside are for transportation and storage, and…
-
Page 10: Safety
Instructions for use ESTETICA E30 2 Safety | 2.1 Description of safety instructions 2 Safety 2.1 Description of safety instructions 2.1.1 Warning symbol Warning symbol 2.1.2 Structure DANGER The introduction describes the type and source of the hazard. This section describes potential consequences of non-compliance.
-
Page 11
ISO 7494 equipped with a patient chair in accordance with ISO 6875. This KaVo product is designed for use in dentistry only and may only be used by trained medical personnel. Any other type of use is not permitted. -
Page 12
Note The MULTIflex couplings, the current K/KL motors, and the ultrasonic scaler hoses of KaVo are equipped as standard with a protective device to prevent treatment water from being drawn back into the treatment centre via the handpieces. If products from other manufacturers are used at the standard-… -
Page 13: Product-Specific
Designated use and target group KaVo ESTETICA E30 is designed for dental treatment of children and adults. The KaVo ESTETICA E30 equipment system is a dental treatment centre in ac- cordance with ISO 7494 equipped with a patient chair in accordance with ISO 6875.
-
Page 14: Safety Instructions
DANGER Explosion hazard. Risk of fatal injury. ▶ Do not use KaVo product in areas subject an explosion hazard. WARNING Inappropriate operating conditions. Impairment of the electrical safety of the device. ▶ It is essential to comply with the operating conditions specified in the «Technical Specifications»…
-
Page 15
Instructions for use ESTETICA E30 2 Safety | 2.3 Safety instructions WARNING Injury or damage from damaged functional parts. Damage to functional parts can cause further damage or personal injury. ▶ Check the device, electrical cables and any accessories for possible damage to the insulation and replace if necessary. -
Page 16: Product-Specific
Instructions for use ESTETICA E30 2 Safety | 2.3 Safety instructions 2.3.2 Product-specific WARNING Injury or infection hazard from laid down instruments. Given the arrangement of the instruments, injury or infections in the hand and underarm may occur when reaching for the tray holder or operating device. In- creased risk of infection from ill patients.
-
Page 17
Instructions for use ESTETICA E30 2 Safety | 2.3 Safety instructions CAUTION Electrical power. Electrical shock. ▶ Set up the external PC outside of the patient environment keeping a min- imal distance of 1.5 m. ▶ Connect the PC and equipment connected to the PC in accordance with IEC 60601-1 / 60950. -
Page 18: Product Description
Instructions for use ESTETICA E30 3 Product description | 3.1 Treatment unit versions 3 Product description 3.1 Treatment unit versions 3.1.1 KaVo ESTETICA E30 S ESTETICA E30 S 3.1.2 KaVo ESTETICA E30 TM ESTETICA E30 TM 18 / 134…
-
Page 19: Patient Chair
Instructions for use ESTETICA E30 3 Product description | 3.2 Patient chair 3.2 Patient chair ① Headrest ② Backrest ③ Kickplate (base plate) ④ Seat ⑤ Armrest (optional) 19 / 134…
-
Page 20: Unit With Patient Element
Instructions for use ESTETICA E30 3 Product description | 3.3 Unit with patient element 3.3 Unit with patient element ① Patient element ② Spittoon bowl ③ Tumbler filler ④ Unit body ⑤ Pressurised water bottle ⑥ Supply element Customer-provided connection of…
-
Page 21: S Table
Instructions for use ESTETICA E30 3 Product description | 3.4 Dentist unit versions ① Handle ② Triple function handpiece ③ Turbine (multiflex coupling) ④ INTRA LUX Motor KL 701 / KL 703 ⑤ Scaler PIEZOsoft/PiezoLED ⑥ Tray support ⑦ Knob for locking brake of spring ⑧…
-
Page 22
Instructions for use ESTETICA E30 3 Product description | 3.4 Dentist unit versions S table with handle trough | S table with handle trough left/right (optional) ① Control element ② Triple function handpiece ③ Turbine (multiflex coupling) ④ INTRAlux Motor KL 701 / KL 703 ⑤… -
Page 23: Assistant Unit
3 Product description | 3.5 Assistant unit 3.5 Assistant unit ① Triple function handpiece ② High volume aspirator ③ Control element ④ Saliva ejector ⑤ KaVo Poly One / Satelec Mini LED ⑥ Tray holder for assistant 23 / 134…
-
Page 24: Triple-Function Handpieces
Instructions for use ESTETICA E30 3 Product description | 3.6 Triple-function handpieces 3.6 Triple-function handpieces Triple function handpiece One ① Cannula ② Water button (green ring) ③ Air button (blue ring) ④ Handpiece and hose Triple-function handpiece ① Air button (A) ②…
-
Page 25: X-Ray Viewer 1440
3 Product description | 3.7 X-ray viewer 1440 3.7 X-ray viewer 1440 X-ray viewer 1440 Note The KaVo X-ray viewer 1440 is a type 1 radiological viewing device in accord- ance as defined in DIN 6856-3. 3.8 Controls 3.8.1 Dentist’s unit TM table…
-
Page 26: Dentist’s Unit S Table
Instructions for use ESTETICA E30 3 Product description | 3.8 Controls 3.8.2 Dentist’s unit S table Group of keys for the menu Group of keys for illumination Group of keys for hygiene Group of keys for the handpieces Group of keys for the timer Group of keys for the dental chair 3.8.3 Assistant unit…
-
Page 27
Instructions for use ESTETICA E30 3 Product description | 3.8 Controls Assistant element key Dentist element key Name «AP 0» key (automatic position 0) «Chair down» key «SP» key (rinsing position) «LP» key (last position) «AP» key (activate automatic posi- tion) «Backrest down»… -
Page 28
Instructions for use ESTETICA E30 3 Product description | 3.8 Controls Name Control element «Cold light» button Dentist element Group of keys for hygiene Name Control element «Tumbler filler» key Dentist element and assistant element «Bowl rinsing» key Dentist element and assistant element «Bell»… -
Page 29: Foot Control
Instructions for use ESTETICA E30 3 Product description | 3.9 Rating plate and serial number plates 3.8.5 Foot control The footswitches of the foot control have two functions. The functions of the footswitches depend on if an instrument is mounted or removed.
-
Page 30
Instructions for use ESTETICA E30 3 Product description | 3.9 Rating plate and serial number plates Site for affixing the rating plate and serial number plate ① Serial number plate of the chair ② Rating plate Serial number Read and take note of the content of accompanying documents… -
Page 31
Instructions for use ESTETICA E30 3 Product description | 3.9 Rating plate and serial number plates DVGW ID (Deutscher Verein des Gas- und Wasserfaches e.V.) (Equipment-dependent DVGW mark with certification number) See also: 2 Technical Data HIBC Code eLabeling ID Serial number plate and dentist element ID Nameplate dentist element (e.g. -
Page 32
Instructions for use ESTETICA E30 3 Product description | 3.9 Rating plate and serial number plates Marks and labels of triple-function handpieces SN YY-??????? X.XXX.XXXX 3FH-One XXXX YYYY-MM Marks and labels of triple-function handpiece One ① Company logo of the manufacturer ② Can be sterilised at up to 135°C ③… -
Page 33: Rating Plate 1440
⑥ Expiration date (year) ⑦ Storage temperature ⑧ Please comply with accompanying documents Note The specified concentration of KaVo OXYGENAL 6 must not be exceeded. 3.9.1 Rating plate 1440 Rating plate X-ray viewer 1440 ① Device type ② SN: Year and month manufactured — Serial number ③…
-
Page 34: Technical Data
Instructions for use ESTETICA E30 3 Product description | 3.10 Technical data 3.10 Technical data Drilling template and setup plan Layout plan (Mat. no. 1.009.2781) Electrical system Electrical lead 3 x 1.5 mm (customer-provided fuse protection 10 A) 3 x 2.5 mm…
-
Page 35
Air flow at least 16 Nl/min Water supply CAUTION The ESTETICA E30 treatment centre, as delivered, is not equipped with an amalgam separator. Contamination of wastewater. ▶ Disposing wastewater, it is imperative to comply with the national regula- tions, in particular with regard to amalgam loads. -
Page 36
▶ If the Water bottle assembly kit is used with the enclosed dosing attach- ment (Mat. no. 10020287), add the proper amount of KaVo OXYGENAL 6 (Mat. no. 04893451) with each filling. For the correct amount, please refer to the instructions of the dosing attachment for water germ reduction. -
Page 37
Instructions for use ESTETICA E30 3 Product description | 3.10 Technical data Air supply WARNING Non-adherence to national guidelines regarding the quality of the dental air. Infection hazard. ▶ Observe and adhere to the national guidelines regarding the quality of the dental air — if any. -
Page 38
Instructions for use ESTETICA E30 3 Product description | 3.10 Technical data Cannula connecting pieces according to DIN EN ISO 7494 — 2 Diameter of cannula of saliva ejector 7 mm and surgical suction Diameter of cannula of spray mist 15 mm… -
Page 39
Instructions for use ESTETICA E30 3 Product description | 3.10 Technical data Weight Treatment centre with 305 kg gross, 243 kg net patient chair Standard For more information about the packages, please refer to Assembly Instructions X-ray viewer 1440 Input voltage… -
Page 40: Operation
Instructions for use ESTETICA E30 4 Operation | 4.1 Switching the device on and off 4 Operation 4.1 Switching the device on and off Note Always switch the machine off before leaving the office. ▶ Switch on the device using the main switch.
-
Page 41
Instructions for use ESTETICA E30 4 Operation | 4.2 Converting from right handed to left handed NOTICE Instrument hoses getting caught on the patient chair or other objects. ▶ When you swivel the dentist element or rotate the hinge body make sure that the instrument hoses do not get caught anywhere. -
Page 42
Instructions for use ESTETICA E30 4 Operation | 4.2 Converting from right handed to left handed ▶ Swivel the dentist and assistant element to the other chair side and re- tighten the screw. 42 / 134… -
Page 43
Instructions for use ESTETICA E30 4 Operation | 4.2 Converting from right handed to left handed ▶ Undo the locking and swivel the patient unit by 180° until the locking snaps-in again. patient element 43 / 134… -
Page 44: Adjusting The Dental Chair
Instructions for use ESTETICA E30 4 Operation | 4.3 Adjusting the dental chair ▶ Fasten the seat again proceeding in reverse order. 4.3 Adjusting the dental chair 4.3.1 Adjusting the armrest (optional) To make it easier for the patient to sit in the chair, the armrest can be swung…
-
Page 45: Adjust Head Rest
Instructions for use ESTETICA E30 4 Operation | 4.3 Adjusting the dental chair CAUTION The patient’s hands are in a bad position when the chair is rising Danger of crushing fingers between the backrest and armrest. ▶ Make sure that the patient is sitting in the right position (especially chil- dren).
-
Page 46: Positioning The Dental Chair Manually
Instructions for use ESTETICA E30 4 Operation | 4.3 Adjusting the dental chair ▶ Push in or pull out the headrest depending on the patient’s size. ▶ To swing the headrest, turn the locking dial to the left, move the headrest into position, and turn the dial to the right to lock it.
-
Page 47
Instructions for use ESTETICA E30 4 Operation | 4.3 Adjusting the dental chair Positioning the chair and backrest manually using the dentist or assistant unit Use the following buttons to adjust the chair height and position of the back- rest: Function The chair moves up. -
Page 48: Automatic Positioning Of Dental Chair
Instructions for use ESTETICA E30 4 Operation | 4.3 Adjusting the dental chair ▶ Backrest down: Move the cross switch on the foot control in direction ④. 4.3.4 Automatic positioning of dental chair CAUTION Danger of injury from overload or dynamic load.
-
Page 49
Instructions for use ESTETICA E30 4 Operation | 4.3 Adjusting the dental chair «AP 1» button: treatment position, e.g. for lower jaw treatment «AP 2» button: treatment position, e.g. for upper jaw treatment «Collape position» button: collapse position ▶ Move the chair to the desired position. -
Page 50
Instructions for use ESTETICA E30 4 Operation | 4.3 Adjusting the dental chair ▶ During these four seconds, press the «AP 0», «AP 1», «AP 2», «SP» or «LP» button, until a signal sound is transmitted. ð LED of the pressed button lights up. The chair position is saved. -
Page 51
Instructions for use ESTETICA E30 4 Operation | 4.3 Adjusting the dental chair Move the chair when the instrument is removed Note If an instrument is removed, the chair functions of the foot control are blocked. The blocking can be removed by briefly pressing the stirrup switch. -
Page 52: Safety Shut-Off
Instructions for use ESTETICA E30 4 Operation | 4.3 Adjusting the dental chair 4.3.5 Safety shut-off To prevent collisions arising from the movement of the patient chair, safety shutoff switches are installed to protect the patient and practice personnel from injury and the treatment centre from damage.
-
Page 53
Instructions for use ESTETICA E30 4 Operation | 4.3 Adjusting the dental chair Pos. Safety switch-off ac- LED on assistant LED on dentist ele- tuated element ment Bracket on the foot ① control ② Assistant element Backrest ③ ④ Kickplate Seat ⑤… -
Page 54: Moving The Patient Chair
Instructions for use ESTETICA E30 4 Operation | 4.4 Moving the patient chair ▶ Press and hold down the «LP/AP» key on the assistant element. ▶ Move the chair using the button wheel buttons of the chair. 4.4 Moving the patient chair 4.5 Moving the dentist unit…
-
Page 55: Moving The Dentist Unit Tm
Instructions for use ESTETICA E30 4 Operation | 4.5 Moving the dentist unit ① Knob for locking brake of spring ▶ To adjust the height of the dentist unit, release the brake ① adjust the height, and lock the brake again.
-
Page 56: Moving The Dentist Unit S
Instructions for use ESTETICA E30 4 Operation | 4.6 Moving the patient unit 4.5.2 Moving the dentist unit S CAUTION Risk of injury by suspended instruments (S table). Patients may get injured by sharp instrument tips. ▶ When you move the dentist’s unit, make sure that nobody is injured.
-
Page 57: Moving The Patient Element (Optional)
Instructions for use ESTETICA E30 4 Operation | 4.6 Moving the patient unit 4.6.1 Moving the patient element (optional) CAUTION The left armrest can collide with the manually adjusted patient’s unit when the chair moves. Injury hazard. ▶ Each time before the chair is adjusted (automatic and manual), swing the manually adjusted patient’s unit into resting position.
-
Page 58: Attaching The Tray Holder (Optional)
Instructions for use ESTETICA E30 4 Operation | 4.7 Attaching the tray holder (optional) 4.7 Attaching the tray holder (optional) ① Tray holder ② Holder The support ② for the tray holder ①is an optional accessory. 4.8 Using functions through the menu 4.8.1 General menu navigation…
-
Page 59
Instructions for use ESTETICA E30 4 Operation | 4.8 Using functions through the menu Feature Description tion Time/date display mode Set display mode for time of day and date: ▪ Time of day only ▪ Time of day without seconds ▪… -
Page 60
Instructions for use ESTETICA E30 4 Operation | 4.8 Using functions through the menu Option 1: Set number of users ▶ Press the «S1», «S2», «S3» key to select user 1, 2, and 3, respectively. ▶ Press the «S4» button to call up the second level. -
Page 61
Instructions for use ESTETICA E30 4 Operation | 4.8 Using functions through the menu Option 4: Set LUX afterglow period ▶ Press the «reduce value» or «increase value» key to set the afterglow period between 0 to 10 seconds. The default value is 3 seconds. -
Page 62
Instructions for use ESTETICA E30 4 Operation | 4.8 Using functions through the menu ▶ Press the «reduce value» or «increase value» key to set the marked time of day. ▶ Press the «SS:MM» (S1) key to switch between hours and minutes. -
Page 63
Instructions for use ESTETICA E30 4 Operation | 4.8 Using functions through the menu ▶ The following displays can be selected: time of day only, time of day<no seconds> only, time of day and date, date only, day of the week, no display Option 9: Setting the display contrast ▶… -
Page 64: Standby Menu
Instructions for use ESTETICA E30 4 Operation | 4.8 Using functions through the menu Option 14: Displaying the firmware version The firmware version is displayed 4.8.3 Standby menu The stand-by menu is used to start the device. The device switches to the stand-by menu upon closing of the handpiece and endo menus.
-
Page 65: Selecting The Dentist
Instructions for use ESTETICA E30 4 Operation | 4.8 Using functions through the menu ▶ Press the function keys to navigate between the messages. Settings Previous message Next message Switch to stand-by menu Error messages in the status display See also: 2 Troubleshooting 4.8.4 Selecting the dentist…
-
Page 66
Instructions for use ESTETICA E30 4 Operation | 4.8 Using functions through the menu The display depends on which instrument was withdrawn. Changing motor settings in the menu Note Following instructions for use, service instructions and installation instructions in the instrument packaging. -
Page 67
Instructions for use ESTETICA E30 4 Operation | 4.8 Using functions through the menu ▶ Settings can be changed using the corresponding keys on the control panel or on the foot control. The light intensity is set with the foot control only. -
Page 68: Endo Menu (Optional)
Instructions for use ESTETICA E30 4 Operation | 4.8 Using functions through the menu Power output as a function of operating mode and tip load Power output as a function of device pre-setting (foot control) and tip load (shown using modes P3…
-
Page 69
Instructions for use ESTETICA E30 4 Operation | 4.8 Using functions through the menu ENDO status menu The status of the ENDO motor is displayed in the ENDO menu: Parameters Values Transmission factor 1:1, 3:1 Parameter memory P1,P2,P3,P4,P5,P6 Torque mode TQ-Ctrl, Autoreverse, AutoRev/Forw. -
Page 70
Instructions for use ESTETICA E30 4 Operation | 4.8 Using functions through the menu Settings Saves the parameters. Selects the ENDO menu. Changes the value. Changes the value. Moves the flashing cursor: Torque mode, speed, torque, torque mode, … (ring counter). -
Page 71
Instructions for use ESTETICA E30 4 Operation | 4.8 Using functions through the menu Settings Saves the parameters Selects the ENDO menu Changes the speed Range: 100 rpm to 500 rpm: in 10 rpm increments Range: 500 rpm to 1,000 rpm: in 50 rpm increments… -
Page 72
Instructions for use ESTETICA E30 4 Operation | 4.8 Using functions through the menu Option 1: Transmission ratio ▶ Press the «S2» or «S3» key to set the transmission factor. Settings Saves the option Selects the ENDO menu Changes the transmission factor… -
Page 73: Using The Conexiocom (Optional)
The function of the CONEXIOcom menu is to control the display of previously recorded and saved images and videos. In order to use the function, the unit must have access to the data of the KaVo Software «CONEXIO» software. For details on the configuration, please refer to the «CONEXIO» installation instruc- tions.
-
Page 74
Instructions for use ESTETICA E30 4 Operation | 4.8 Using functions through the menu If no patient is selected, images from the clipboard are displayed. If the clip- board is empty, no image is displayed. The clipboard is deleted automatically when the patient is logged off the corresponding PC. -
Page 75
Instructions for use ESTETICA E30 4 Operation | 4.8 Using functions through the menu ▪ Opening the patient file of the patient on the PC workstation in the treat- ment room. The patient is now automatically activated on the treatment centre. -
Page 76: Using Function Through The Dentist Or Assistant Unit
Instructions for use ESTETICA E30 4 Operation | 4.9 Using function through the dentist or assistant unit 4.9 Using function through the dentist or assistant unit 4.9.1 Using the hygiene functions The following buttons are available for the hygiene functions:…
-
Page 77: Using The Illumination Functions For Kavolux 540 Led T
▶ When using the KaVo KEY Laser III or the KEY Laser 3+, switch the operat- ing light to laser mode. ▶ Or switch off the operating light, do not use the KaVo KEY Laser III or KEY Laser 3+ and the KaVoLUX 540 LED operating light simultaneously.
-
Page 78
▪ Dimmed light: approx. 4,000 Kelvin; equivalent to the light of a halogen op- erating light ▪ Laser mode: Light mode with no detrimental effect on the KaVo KEY Laser III, the KEY Laser 3+ or the KaVo DIAGNOdent When operated In dimmed mode, the LED lamp functions according to a dimmed halogen lamp. -
Page 79
Instructions for use ESTETICA E30 4 Operation | 4.9 Using function through the dentist or assistant unit ▶ Press the «Operating light» button on the dentist or assistant element. ð The operating light is switched on in its most recent active state: operating light on, COMPOsave mode on or dimmed light. -
Page 80
▪ Dimmed light: approx. 4,000 Kelvin; equivalent to the light of a halogen op- erating lamp ▪ Laser mode: Light mode, which has no negative influence on the KaVo KEY Laser III, the KEY Laser 3+ or the KaVo DIAGNOdent. -
Page 81
Instructions for use ESTETICA E30 4 Operation | 4.9 Using function through the dentist or assistant unit Sensor KaVoLUX 540 LED ▶ Press the «operating light» button. ▶ Hold your hand in front of the sensor for 2 sec. ð… -
Page 82
In laser mode, another light mode is generated, which has no negative influ- ence on the KaVo KEY Laser III, the KEY Laser 3+ or the KaVo DIAGNOdent. Sensor KaVoLUX 540 LED ▶ Press the „operating light“ button and the «operating light dimming» button on the operating light simultaneously. -
Page 83: Using The Illumination Functions For Edi And Maia
Instructions for use ESTETICA E30 4 Operation | 4.9 Using function through the dentist or assistant unit ð Laser mode is activated: the operating light shines for 1 second in green and then changes to a white light. ▶ Hold your hand in front of the sensor for 3 sec.
-
Page 84: Using The Bell
Instructions for use ESTETICA E30 4 Operation | 4.9 Using function through the dentist or assistant unit 4.9.5 Using the bell ▶ Press the «Bell» key to activate the bell relay. ð The bell relay is activated for as long as the key is being pressed.
-
Page 85: Operating The Foot Switch
Instructions for use ESTETICA E30 4 Operation | 4.10 Operating the foot switch 4.10 Operating the foot switch 4.10.1 General functions The footswitches of the foot control have two functions. The function of the con- trol depends on whether an instrument is in its holder or whether it has been removed.
-
Page 86: Setting The Cooling Condition
Instructions for use ESTETICA E30 4 Operation | 4.10 Operating the foot switch ð The right stop corresponds to the maximum speed/intensity. 4.10.5 Setting the cooling condition ▶ Remove the handpiece (e.g., turbine, motor) from the holder. ð The handpiece is active.
-
Page 87: Using Conexiocom (Fee-Based Additional Option)
Instructions for use ESTETICA E30 4 Operation | 4.10 Operating the foot switch ð Cold light «On» (even if Cold light «Off» is preselected). ▶ Slide the cross switch to the left. ð Change the cold light status: «On/Off». 4.10.9 Using CONEXIOcom (fee-based additional option) Setting ①…
-
Page 88: Using Instruments
The adjusting screws for spray air and spray water are situated on the under- side of the table and correspond to the handpiece that is actually connected. For KaVo Midwest handpieces, spray air and spray water are pre-set suitable at the factory such that no re-adjustment is required.
-
Page 89: Using Suction Hoses
Instructions for use ESTETICA E30 4 Operation | 4.11 Using instruments Borden handpieces Note In the case of Borden handpieces, the drive air needs to be adjusted for each handpiece by a Service Technician using adjusting screw ③. The adjustment can be made using the measuring set Mat.
-
Page 90: Using Triple-Function Handpieces
Instructions for use ESTETICA E30 4 Operation | 4.11 Using instruments ▪ Cannula adapter, reducing handpiece to 7 mm ② (Mat. no. 0.764.5873) ▪ Cannula adapter, reducing handpiece to 11 mm ② (Mat. no. 0.764.5883) Vacuum stop CAUTION Danger of backflow Swallowing or choking hazard for the patient ▶…
-
Page 91
Instructions for use ESTETICA E30 4 Operation | 4.11 Using instruments Triple function handpiece One ① Cannula ② Water button (green ring) ③ Air button (blue ring) ④ Handpiece and hose Triple-function handpiece ① Air button (A) ② Cannula ③ Gripping sleeve ④… -
Page 92: Using The Piezosoft/Piezoled
Instructions for use ESTETICA E30 4 Operation | 4.11 Using instruments Removing the cannulas ▶ Hold the valve body of the triple-function handpiece and screw off the can- nula. 4.11.4 Using the PIEZOsoft/PiezoLED CAUTION Handpiece inserts can be damaged from long-term use, or when dropped or bent.
-
Page 93: Using The Kl 703 Led In Endo Mode (Optional Accessory)
Incorrect transmission ratio. Damage from incorrect speed / incorrect torque. ▶ Only use KaVo 1:1 reducing shanks 20LH or 20LP or MASTERmatic LUX M20 L with 1:1 INTRA LUX head L68 B (Mat. no. 1.008.1834) or 3:1 IN- TRA head L66 B (Mat. no. 1.008.1831).
-
Page 94: Open Endo Mode
Instructions for use ESTETICA E30 4 Operation | 4.12 Using the KL 703 LED in ENDO mode (optional accessory) CAUTION Excessive torque. Injury or damage to instruments. ▶ Use root canal instruments in ENDO mode only. Technical specifications for the KL 703 LED in ENDO…
-
Page 95: Set Torque Mode
Instructions for use ESTETICA E30 4 Operation | 4.12 Using the KL 703 LED in ENDO mode (optional accessory) Parameters Values Transmission factor 1:1, 3:1 Parameter memory P1,P2,P3,P4,P5,P6 Torque mode TQ-Ctrl, Autoreverse, AutoRev/Forw. Direction of motor rotation R, L Speed…
-
Page 96: Changing Settings In The Menu
Instructions for use ESTETICA E30 4 Operation | 4.12 Using the KL 703 LED in ENDO mode (optional accessory) ▶ Push 4-way button on the foot control upward in order to switch to counter- clockwise rotation. Torque mode Autorev / Forward ▶…
-
Page 97: Use Usb Interface
The treatment unit may be fitted with up to three USB ports. Camera interfaces are situated on the underside of the dentist element (T-table) or in the dentist element (S-table). Only the cameras approved/enclosed in the delivery by KaVo may be connected to these interfaces.
-
Page 98: Using The Camera
Instructions for use ESTETICA E30 4 Operation | 4.14 Using the camera 4.14 Using the camera See also: 2 Instructions for Use ERGOcam One See also: 2 Instructions for Use DIAGNOcam 2170 U 4.15 Using the screen See also: 2 Instructions for use Screen One…
-
Page 99: Preparation Methods Din En Iso 17664
Instructions for use ESTETICA E30 5 Preparation methods DIN EN ISO 17664 5 Preparation methods DIN EN ISO 17664 Note The preparation methods can be found in the care instructions. 99 / 134…
-
Page 100: Accessories And Kits
Instructions for use ESTETICA E30 6 Accessories and kits | 6.1 Device 6 Accessories and kits 6.1 Device Name Description Water inlet block Without DVGW permit. With water filter and pressure controller. Water bottle For a water supply for tumbler and handpieces inde- pendent of the public water supply.
-
Page 101
Instructions for use ESTETICA E30 6 Accessories and kits | 6.4 Dentist element Name Description Borden hose For Borden (2-hole) handpieces. Assembly kit INTRA LUX Brushless motor with light. motor KL 703 LED Assembly kit INTRA LUX Brushless motor with light. -
Page 102: Safety Checks — Testing Instructions
If the unit comprises several electrical devices or electrical devices from sev- eral manufacturers that are connected to a system in connection with the KaVo dental unit, the manufacturer data contained in the instructions for use for all products subject to safety controls must also be observed.
-
Page 103: Notes For Medical Electrical Systems
7 Safety checks — testing instructions | 7.1 Introduction Note KaVo offers a medical device book for keeping an inventory and recording es- sential master data on the medical device. The medical device book is only available in German (Mat. no. 0.789.0480).
-
Page 104: Essential Parts Of The Safety Check
Instructions for use ESTETICA E30 7 Safety checks — testing instructions | 7.1 Introduction Note In ME systems, in which more than one ME device are interconnected via data lines or otherwise, e.g. via electrically conductive attachments or coolant tubes, the earth wire resistance of every single device must be checked.
-
Page 105: Notes On Repeat Testing
Instructions for use ESTETICA E30 7 Safety checks — testing instructions | 7.2 Instructions for safety checks *The EUL limit corresponds to the value defined in IEC 60601 (DIN EN 60601), taking comment 2 from table 2 into consideration. 7.1.6 Notes on repeat testing…
-
Page 106: Visual Inspection (Inspection By Examination)
Instructions for use ESTETICA E30 7 Safety checks — testing instructions | 7.2 Instructions for safety checks ▶ Take the cover off proceeding in upward direction. 7.2.2 Visual inspection (inspection by examination) Check the following items in advance: ▪ Has the equipment of the ME device or the ME system been changed since the last inspection? ▪…
-
Page 107
Instructions for use ESTETICA E30 7 Safety checks — testing instructions | 7.2 Instructions for safety checks Visual inspection and appraisal of the medical device and accessories The following list is for exemplary purposes and makes no claim of being com- plete. -
Page 108
Instructions for use ESTETICA E30 7 Safety checks — testing instructions | 7.2 Instructions for safety checks Site for affixing the rating plate and serial number plate ① Serial number plate of the chair ② Rating plate E30 TM E30 S… -
Page 109: Measurements
Connection cables such as data cables and cables for the functional earth could simulate protective conductor connections. These types of supplement- ary but unintentional protective earth connections could lead to erroneous measurements. Note The following measuring aids can be ordered: KaVo measuring cable (Mat. no. 0.411.8811) 109 / 134…
-
Page 110
▶ Disconnect plug X2 from the unit control and plug it into the matching con- nector X2 of the KaVo measuring cable (Mat. no. 0.411.8811). ▶ Connect the second plug X2 of the KaVo measuring cable to the unit control (X2). -
Page 111
Instructions for use ESTETICA E30 7 Safety checks — testing instructions | 7.2 Instructions for safety checks Connecting the safety tester without the KaVo measuring cable to the treatment centre. ① Protective earth conductor terminal (PE) ▶ Switch L + N of the on-site power supply cord to be voltage-free. -
Page 112
ACPs on the treatment centre No ACPs need to be connected to the protective conductor (PE) during the measurement on the treatment centre ESTETICA E30, as all relevant parts are connected to the PE at the factory and are included in the test. -
Page 113
Instructions for use ESTETICA E30 7 Safety checks — testing instructions | 7.2 Instructions for safety checks Measure protective conductor resistance Limit < 0,3 Ω (maximum value!) Note The integrity of the power supply cable, in particular the protective earth wire of the power cable must be ensured. -
Page 114
Instructions for use ESTETICA E30 7 Safety checks — testing instructions | 7.2 Instructions for safety checks Scan the treatment centre with the test tip Measuring points on the device base ① Surroundings of the protective ② Main switch holding plate earth conductor terminal ③… -
Page 115
Instructions for use ESTETICA E30 7 Safety checks — testing instructions | 7.2 Instructions for safety checks Standard dental chair measuring points ▶ Check firm seating of the PE headless screw ②. ▶ Scan headless screw ② with the measuring probe. -
Page 116
Instructions for use ESTETICA E30 7 Safety checks — testing instructions | 7.2 Instructions for safety checks ① Assistant element: Fastening screw on the bottom of the assistant ele- ment Scan the treatment lamp with the test tip Operating light KaVoLUX 540 LED U ①… -
Page 117
Instructions for use ESTETICA E30 7 Safety checks — testing instructions | 7.2 Instructions for safety checks Protection class 1 WARNING Electrical power. Death or injury from electric shock. ▶ Conduct test for leakage current in devices of Protection Class 1 only after the protective earth test has been passed. -
Page 118: Functional Test
Instructions for use ESTETICA E30 7 Safety checks — testing instructions | 7.2 Instructions for safety checks Note An additional measurement of the leakage current from type B applied parts need only be carried out if this is specified by the manufacturer (see accom- panying documents).
-
Page 119
Instructions for use ESTETICA E30 7 Safety checks — testing instructions | 7.2 Instructions for safety checks Pos. Safety switch-off ac- LED on assistant LED on dentist ele- tuated element ment Bracket on the foot ① control Assistant element ②… -
Page 120: Assessment And Documentation
▶ Final evaluation ▶ Name, date and signature of test engineer There is a copy of a test report template at the end of chapter STK. KaVo re- commends the use of this template. Note Following testing, repair or adjustment, it must be verified whether the ME equipment or ME system has been restored to the state that is required for the intended usage before it is employed once again.
-
Page 121
Instructions for use ESTETICA E30 7 Safety checks — testing instructions | 7.2 Instructions for safety checks 121 / 134… -
Page 122: Appendix — Additional Measuring Sites
Instructions for use ESTETICA E30 8 Appendix — Additional measuring sites | 8.1 Additional scanning sites SL X in the protective conductor measure- ment 8 Appendix — Additional measuring sites Note With reference to accessories, which are not listed here, the specifications of the relevant instructions for use must be observed.
-
Page 123
Instructions for use ESTETICA E30 8 Appendix — Additional measuring sites | 8.1 Additional scanning sites SL X in the protective conductor measure- ment Ceiling adapter for operating light assembly kit ① Base plate for the ceiling adapter ② Surroundings of the protective con- ductor connector ③… -
Page 124: Additional Measuring Sites Ap X For Eul/Epl Measurement
Instructions for use ESTETICA E30 8 Appendix — Additional measuring sites | 8.2 Additional measuring sites AP X for EUL/EPL measurement ▶ Scan the measuring point ② after removing the display cover. 8.2 Additional measuring sites AP X for EUL/EPL…
-
Page 125: Troubleshooting
Instructions for use ESTETICA E30 9 Troubleshooting 9 Troubleshooting Note In case of malfunctions of the individual handpieces (e.g. turbine, motor, camera, Satelec, Mini LED etc.), consult the separate instructions for the use and care of the individual instruments. Malfunction…
-
Page 126
Instructions for use ESTETICA E30 9 Troubleshooting Malfunction Cause Remedy ▶ Preselect spray. No spray in the hand- No spray preselected. Check setting on butterfly valves of the dentist pieces. element. ▶ Open the ring for controlling the spray on the Close the ring for con- handpieces. -
Page 127
Instructions for use ESTETICA E30 9 Troubleshooting Malfunction Cause Remedy ▶ Turn on the computer. ERGOcam/DIAGNOcam PC is switched off. does not work. ▶ Make sure that the cable length does not ex- USB cable too long. ceed 10 m (2 x 5 m passive with repeater). -
Page 128: 10Information About Electromagnetic Compatibility In Accordance With En60601-1-2
10.1 Electromagnetic Transmissions The treatment unitESTETICA E30 is designed for operation in an environment as specified below. The customer or user of the ESTETICA E30 should make sure that the device is used in an environment of the specified type.
-
Page 129: Recommended Safe Distance Between Portable And Mobile Hf Telecommunications Equipment And The Treatment Unit
HF telecommunications equipment and the treatment unit The ESTETICA E30 is intended for use in an electromagnetic environment in which the HF interference parameters are controlled. The customer or user of the ESTETICA E30 can help prevent electromagnetic interference by maintain-…
-
Page 130: Immunity To Electromagnetic Interference
10.4 Immunity to electromagnetic interference The treatment unitESTETICA E30 is designed for operation in an environment as specified below. The customer or user of the ESTETICA E30 should make sure that the device is used in an environment of the specified type.
-
Page 131
A site study should be considered to determine the electromagnetic environment in terms of stationary transmitters. If the meas- ured field strength at the site, at which the ESTETICA E30 is used, exceeds the compliance levels shown above, the ESTETICA E30 should be monitored to demonstrate proper function.
(Ocr-Read Summary of Contents of some pages of the KaVo ESTETICA E30 Document (Main Content), UPD: 08 May 2023)
-
120, KaVo ESTETICA E30 Instructions for use ESTETICA E30 7 Safety checks — testing instructions | 7.2 Instructions for safety checks 120 / 134 7.2.5 Assessment and documentation Note All tests conducted must be documented comprehensively. The doc- uments must contain at least the following particulars: ▶ Name of the test centre ▶ Name of the test engineer ▶ Name of the tested device (e. g. type, serial number) ▶ Tests and measurements �…
-
112, Instructions for use ESTETICA E30 7 Safety checks — testing instructions | 7.2 Instructions for safety checks 112 / 134 See also: 2 8 Annex — Additional measuring points, Page 122 Connect accessible conductive parts [ACP] with PE ACP = accessible conductive parts ACP ACP Note Additional measuring points ACP X must be taken into consideration in the presence of accessories. See also: 2 8 Annex — Additional measurin…
-
123, Instructions for use ESTETICA E30 8 Appendix — Additional measuring sites | 8.1 Additional scanning sites SL X in the protective conductor measure- ment Ceiling adapter for operating light assembly kit 2 3 ① Base plate for the ceiling adapter ② Surroundings of the protective con- ductor connector ③ Surroundings of the protective con- nector terminal Touch monitor with test tip ▶ Scan the measuring point ① with the test tip. or 123 / 134
… -
44, KaVo ESTETICA E30 Instructions for use ESTETICA E30 4 Operation | 4.3 Adjusting the dental chair 44 / 134 ▶ Fasten the seat again proceeding in reverse order. 4.3 Adjusting the dental chair 4.3.1 Adjusting the armrest (optional) To make it easier for the patient to sit in the chair, the armrest can be swung up.
… -
124, Instructions for use ESTETICA E30 8 Appendix — Additional measuring sites | 8.2 Additional measuring sites AP X for EUL/EPL measurement 124 / 134 ▶ Scan the measuring point ② after removing the display cover. 8.2 Additional measuring sites AP X for EUL/EPL measurement Scan the PIEZO ultrasonic scaler with test probe 1 Exemplary presentation of the measuring point on the PiezoLEDultrasonic scaler ① Test probe on ultrasonic scaler tip in ultrasonic scaler handpiece
… -
26, Instructions for use ESTETICA E30 3 Product description | 3.8 Controls 26 / 134 3.8.2 Dentist’s unit S table A B C D F E A Group of keys for the menu B Group of keys for illumination C Group of keys for hygiene D Group of keys for the handpieces E Group of keys for the timer F Group of keys for the dental chair 3.8.3 Assistant unit A Group of keys for hygiene B Group of keys for illumination C Group of keys for the timer D Group of keys for t…
-
131, Instructions for use ESTETICA E30 10 Information about electromagnetic compatibility in accordance with EN60601-1-2 | 10.4 Immunity to electro- magnetic interference b The compliance levels in the ISM frequency bands between 150 kHz and 80 MHz and in the frequency range from 80 MHz to 2.5 GHz are intended to re- duce the probability of mobile/handheld communications facilities causing inter- ference when they are inadvertently introduced into the patient area. For this reason, the ad…
-
35, Instructions for use ESTETICA E30 3 Product description | 3.10 Technical data Water pressure 1.5 ± 0.3 bar; Flow pressure; 4 x manometer Max. static pressure water 2.5 ± 0.3 bar Water flow 80 ± 10 ml/min Air pressure 3.3 ± 0.1 bar; Flow pressure; 4 x manometer Max. static pressure air 4 + 0.5 bar Air flow at least 16 Nl/min Water supply CAUTION The ESTETICA E30 treatment centre, as delivered, is not equipped with an amalgam separator. Contamination of wastewater. ▶ Disposing wastewater, i…
-
75, Instructions for use ESTETICA E30 4 Operation | 4.8 Using functions through the menu ▪ Opening the patient file of the patient on the PC workstation in the treat- ment room. The patient is now automatically activated on the treatment centre. 75 / 134
… -
127, Instructions for use ESTETICA E30 9 Troubleshooting Malfunction Cause Remedy ERGOcam/DIAGNOcam does not work. PC is switched off. ▶ Turn on the computer. USB cable too long. ▶ Make sure that the cable length does not ex- ceed 10 m (2 x 5 m passive with repeater). No data transmission to the multimedia menu of the unit. No or faulty ethernet connection between dental unit and office network. ▶ Notify network administrator. Camera images shows im…
-
118, Instructions for use ESTETICA E30 7 Safety checks — testing instructions | 7.2 Instructions for safety checks 118 / 134 Note An additional measurement of the leakage current from type B applied parts need only be carried out if this is specified by the manufacturer (see accom- panying documents). Note A separate measurement is not usually required for type B applied parts. The applied parts are connected to the casing (see diagram) and included in the measurement of the leakage…
-
18, Instructions for use ESTETICA E30 3 Product description | 3.1 Treatment unit versions 18 / 134 3 Product description 3.1 Treatment unit versions 3.1.1 KaVo ESTETICA E30 S ESTETICA E30 S 3.1.2 KaVo ESTETICA E30 TM ESTETICA E30 TM
… -
113, KaVo ESTETICA E30 Instructions for use ESTETICA E30 7 Safety checks — testing instructions | 7.2 Instructions for safety checks Measure protective conductor resistance Limit < 0,3 Ω (maximum value!) Note The integrity of the power supply cable, in particular the protective earth wire of the power cable must be ensured. As this is a fixed installation, the evalu- ation can be conducted by means of a visual inspection. If damage…
-
116, Instructions for use ESTETICA E30 7 Safety checks — testing instructions | 7.2 Instructions for safety checks 116 / 134 ① Assistant element: Fastening screw on the bottom of the assistant ele- ment Scan the treatment lamp with the test tip Operating light KaVoLUX 540 LED U ① Fastening screw of the handle sup- port when the gripping sleeve has been removed Operating light EDI/MAIA No measuring points need to be scanned on the operating lights EDI and MAIA. Measure pr…
-
95, KaVo ESTETICA E30 Instructions for use ESTETICA E30 4 Operation | 4.12 Using the KL 703 LED in ENDO mode (optional accessory) S1 S2 S3 S4 Parameters Values Transmission factor 1:1, 3:1 Parameter memory P1,P2,P3,P4,P5,P6 Torque mode TQ-Ctrl, Autoreverse, AutoRev/Forw. Direction of motor rotation R, L Speed 100 to 6,000 rpm Torque Transmission ratio 1:1: 0.15 to 2.50 Ncm Transmission ratio 3:1: 0.4 to 8.0 Ncm CAUTION Incorrectly set parameters. Injury or property damage from incorrect input values. ▶ Check al…
-
5, 4.14Using the camera…………………………………………………………………………………………….. 98 4.15Using the screen……………………………………………………………………………………………… 98 5 Preparation methods DIN EN ISO 17664…………………………………………………………………99 6 Accessories and kits …………………………………….…
-
125, Instructions for use ESTETICA E30 9 Troubleshooting 9 Troubleshooting Note In case of malfunctions of the individual handpieces (e.g. turbine, motor, camera, Satelec, Mini LED etc.), consult the separate instructions for the use and care of the individual instruments. Malfunction Cause Remedy Nothing works. Main switch is off. ▶ Turn on the main switch. Main service fuse inter- rupted the electric cir- cuit. ▶ Unplug the unit from the …
-
115, Instructions for use ESTETICA E30 7 Safety checks — testing instructions | 7.2 Instructions for safety checks Standard dental chair measuring points ▶ Check firm seating of the PE headless screw ②. ▶ Scan headless screw ② with the measuring probe. ① Dentist element S: installation site of the tray holder ② Dentist element TM: installation site of the tray holder 115 / 134
…
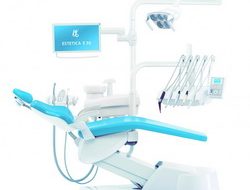
Система Kavo Estetica e30 является стоматологической установкой, соответствующей ISO 7494, со стоматологическим креслом пациента, соответствующим ISO 6875. Данное изделие KaVo предназначено только для использования медицинским персоналом и только в области стоматологии. Любое использование не по назначению запрещено. Использование по назначению также подразумевает соблюдение всех указаний инструкции по эксплуатации и выполнение работ по осмотру, контролю и техническому обслуживанию.
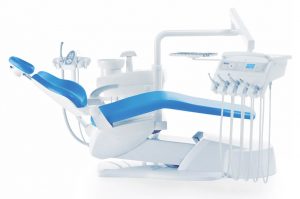
При вводе изделия KaVo в эксплуатацию и во время эксплуатации в соответствии с предписанным назначением необходимо применять и выполнять правила и/или национальные законы, национальные предписания и технические правила, относящиеся к медицинским изделиям.
Estetica e30 гарантия
Фирма KaVo несет ответственность за безопасность, надежность и характеристики компонентов, поставляемых фирмой, при следующих условиях:
- Установка, инструктаж, расширение, переналадка, изменения и ремонт должны выполняться фирмой KaVo или авторизированным техником или персоналом предприятий, имеющих специальное разрешение.
- Аппарат эксплуатируется согласно инструкции по эксплуатации, уходу и монтажу.
- Компоненты оборудования для обработки информации, поставляемые заказчиком, отвечают техническим требованиям к оборудованию и программному обеспечению, приведенным в настоящей инструкции по эксплуатации, и были установлены и настроены согласно действующим для этих компонентов описаниям.
- При устранении неисправностей следует в полной мере выполнять требования стандарта VDE 0751-1 «Повторные проверки и проверки перед использованием медицинских электрических приборов и систем — общие правила».
В обязанности пользователя входит
- использовать только исправное оборудование,
- следить за своей безопасностью, а также за безопасностью пациентов и третьих лиц,
- не допускать загрязнения изделия.
Kavo Estetica e30 техническое обслуживание
В целях обеспечения постоянной готовности к работе и сохранения функциональных характеристик изделия KaVo необходимо ежегодно выполнять рекомендуемые работы по обслуживанию. Необходимо проводить через каждые 2 года проверку технического состояния с позиции техники безопасности.
К выполнению ремонта и технического обслуживания продукта КаVо допу скаются:
▪ Технические специалисты представительств KaVo, прошедшие специальное обучение.
▪ Технические специалисты договорных продавцов, которые были специально обучены в KaVo.
Стоматологическая установка Kavo Estetica e30 варианты
Варианты поставки стоматологической установки Kavo Estetica e30.
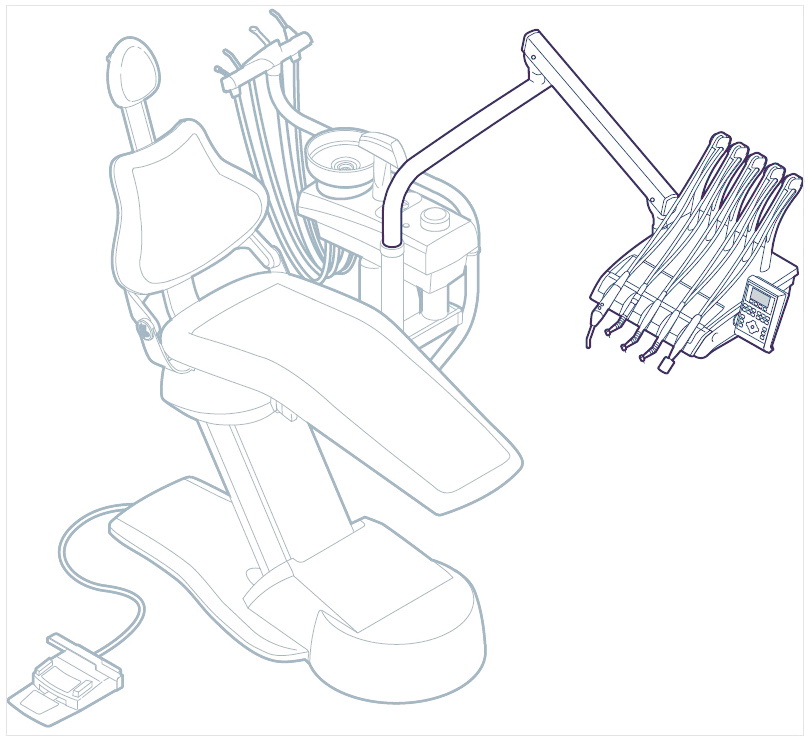
Kavo Estetica e30 S
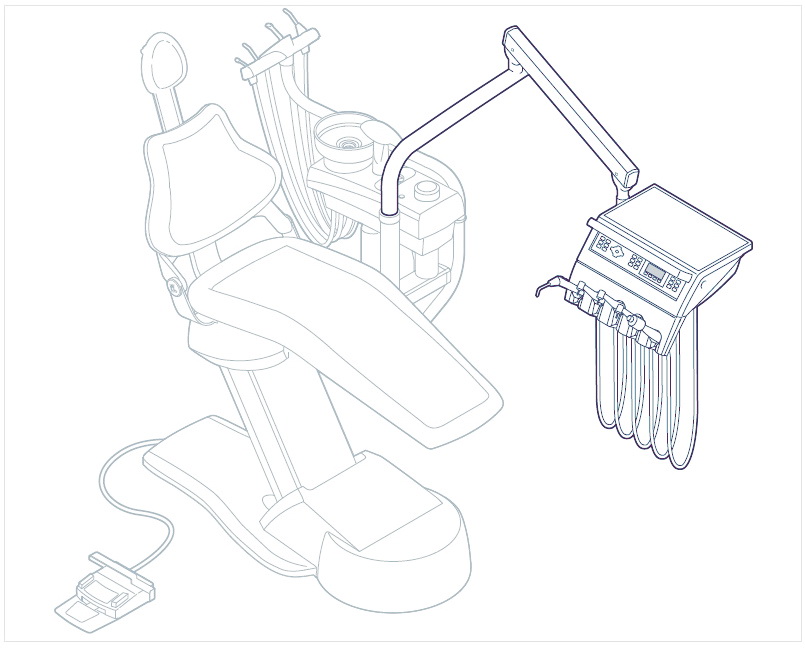
Kavo Estetica e30 TM
Estetica e30 описание
Кресло пациента Estetica e30
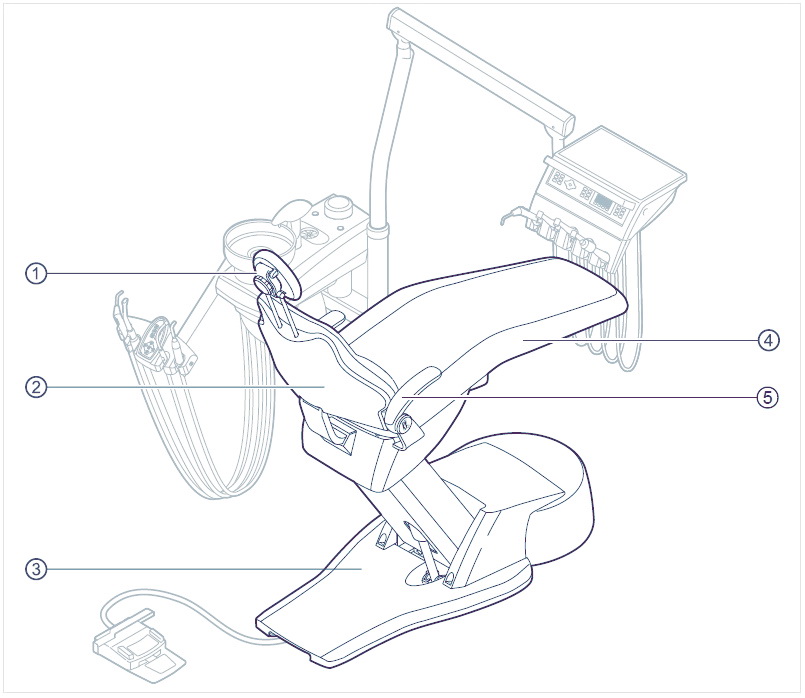
- Подголовник
- Спинка
- Основание кресла (площадка педали)
- Сиденье
- Подлокотник (опция)
Аппарат с блоком пациента Estetica e30
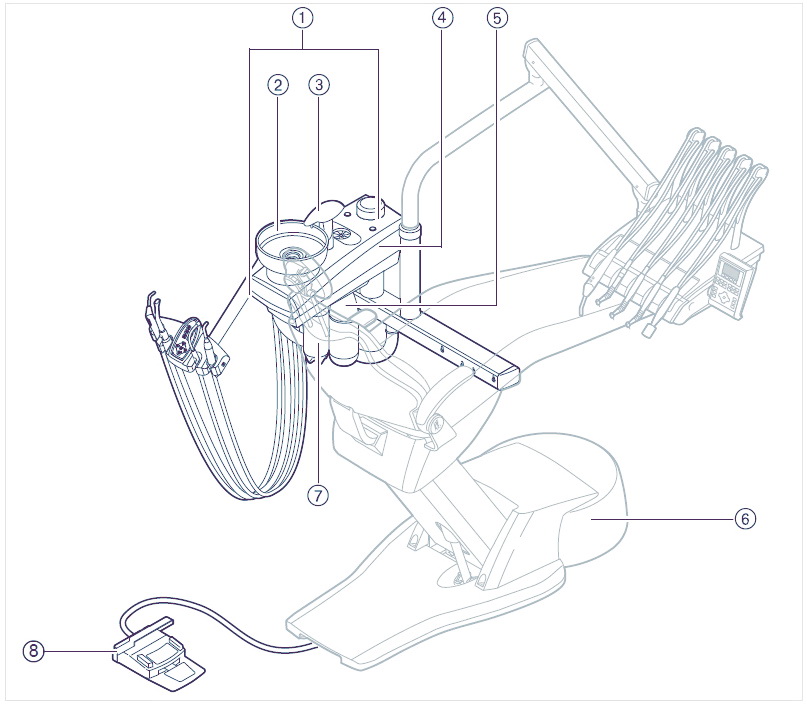
- Блок пациента
- Плевательница
- Устройство для набора воды в стакан для полоскания (дополнительное оснащение)
- Корпус аппарата
- Баллон с водой под давлением
- Элемент питания. Подключение центрального управления, подачи электропитания, воды, сжатого воздуха, канализации и отсоса воздуха выполняется заказчиком
- Бутылка для интенсивной стерилизации
- Ножная педаль
Estetica e30 TM-стол
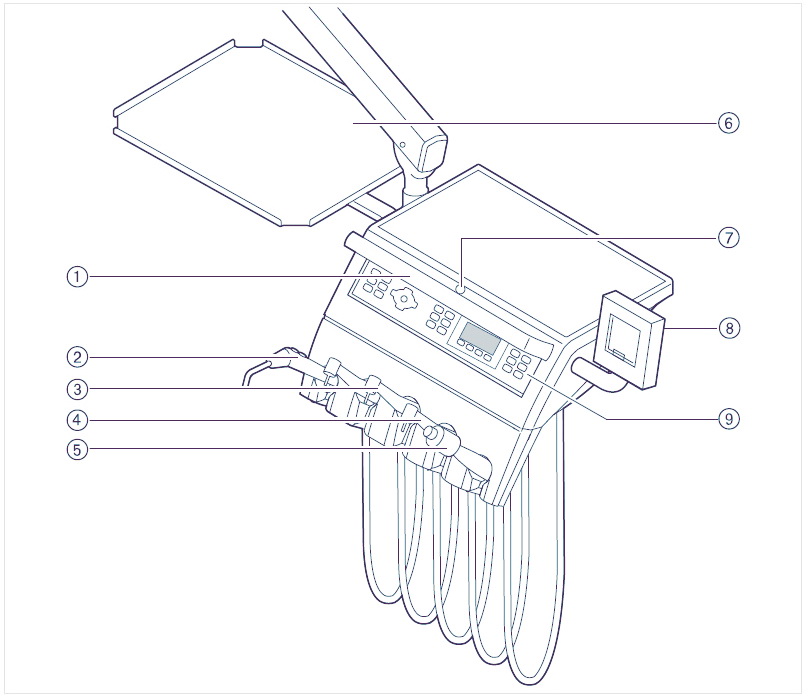
- Ручка
- Трехфункциональный шприц
- Турбина (переходник Multiflex)
- Микромотор INTRA LUX KL 701/KL 703
- Насадка Scaler PiezoLED
- Опора для подноса с инструментами
- Кнопка для тормоза со стопорным устройством пружинного рычага
- Малый негатоскоп
- Элемент управления
Estetica e30 S-стол
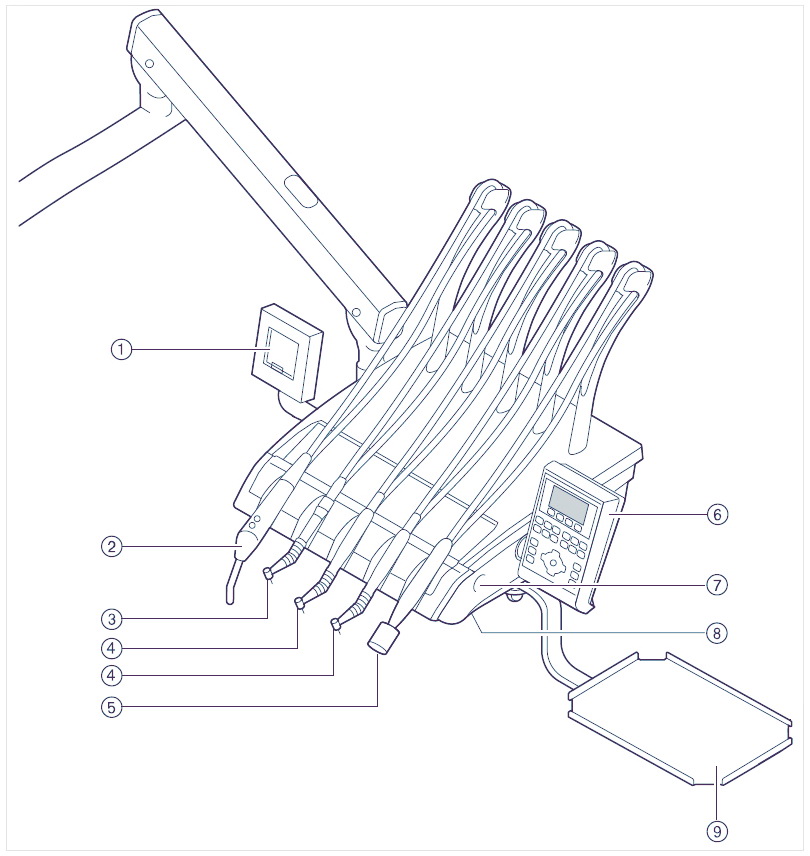
- Малый негатоскоп
- Трехфункциональный шприц
- Турбина (переходник Multiflex)
- Микромотор INTRAlux KL 701/KL 703
- Насадка Scaler PiezoLED
- Элемент управления
- Кнопка для тормоза со стопорным устройством пружинного рычага
- Ручка-желобок
- Опора для подноса с инструментами
Модуль ассистента Estetica e30
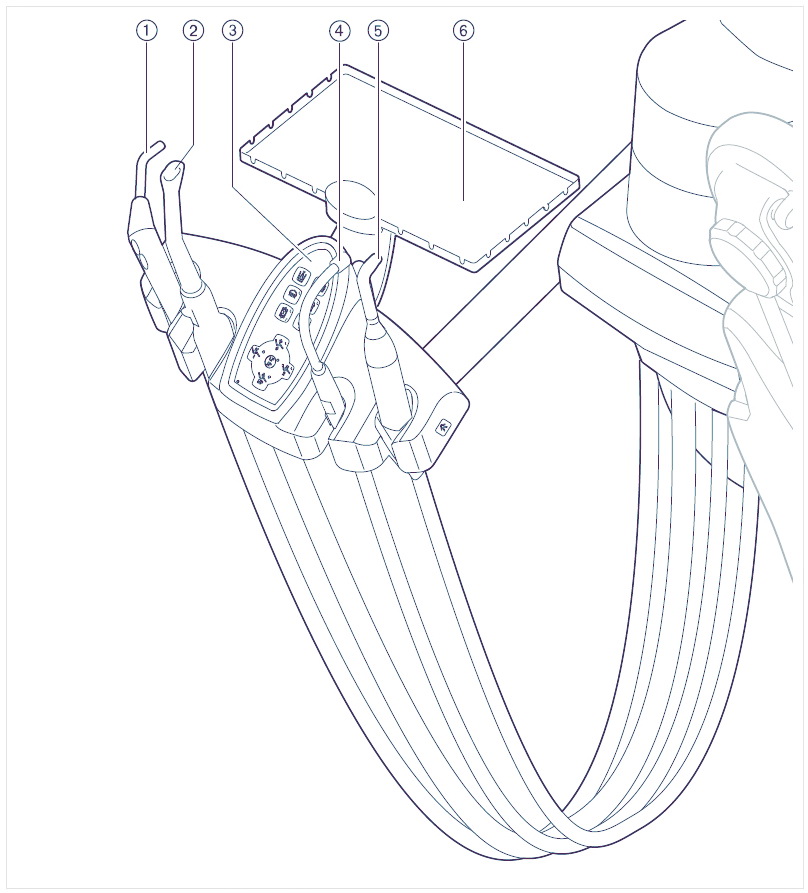
- Трехфункциональный шприц
- Система отсоса брызг распылителя
- Элемент управления
- Слюноотсос
- Полимеризационная лампа Satelec Mini LED
- Опора для подноса инструментов в блоке ассистента
Estetica e30 элементы управления
Модуль врача TM-стол

A) Группа клавиш Кресло пациента
B) Группа клавиш Освещение
C) Группа клавиш Ручные инструменты
D) Группа клавиш Меню
E) Группа клавиш Гигиена
F) Группа клавиш Таймер
Модуль врача S-стол
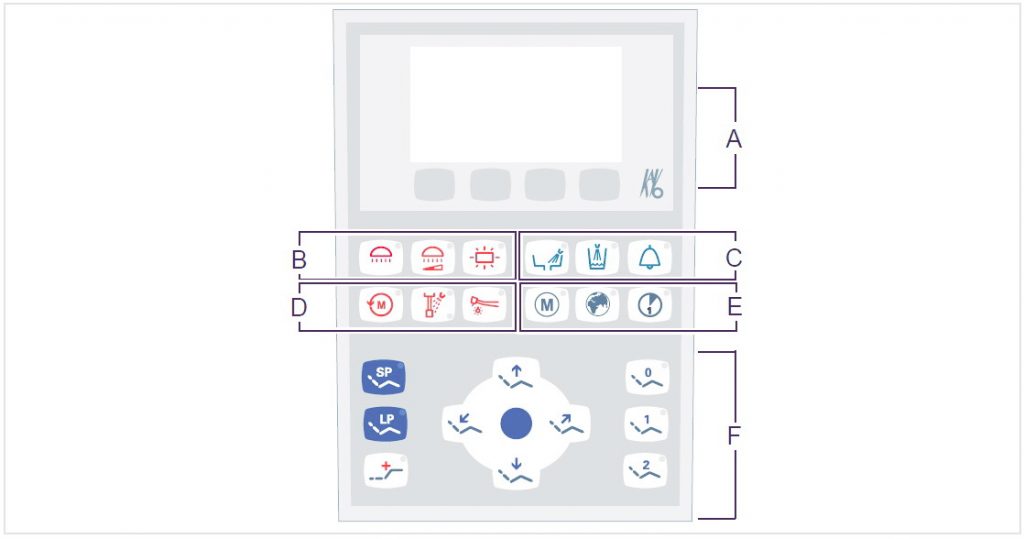
A) Группа клавиш Меню
B) Группа клавиш Освещение
C) Группа клавиш Гигиена
D) Группа клавиш Ручные инструменты
E) Группа клавиш Таймер
F) Группа клавиш Кресло пациента
Блок ассистента
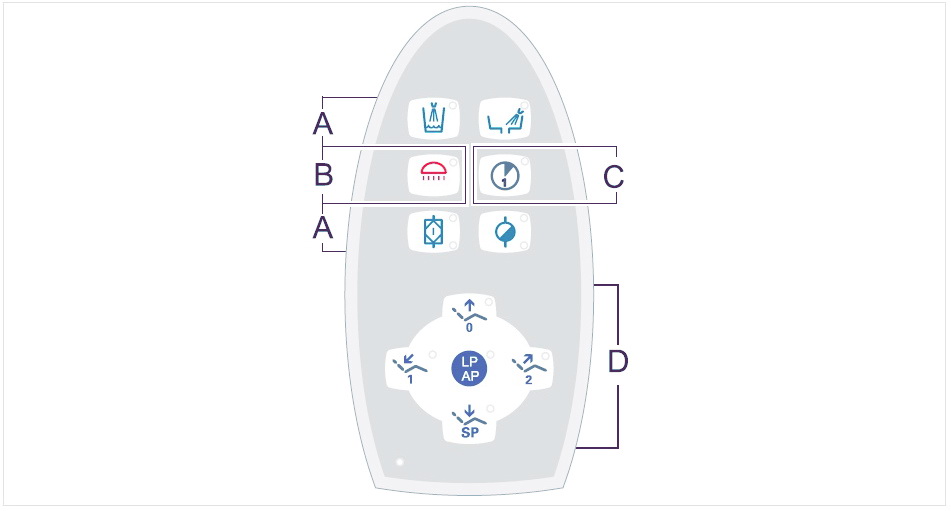
A) Группа клавиш Гигиена
B) Группа клавиш Освещение
C) Группа клавиш Таймер
D) Группа клавиш Кресло пациента
Ножная педаль
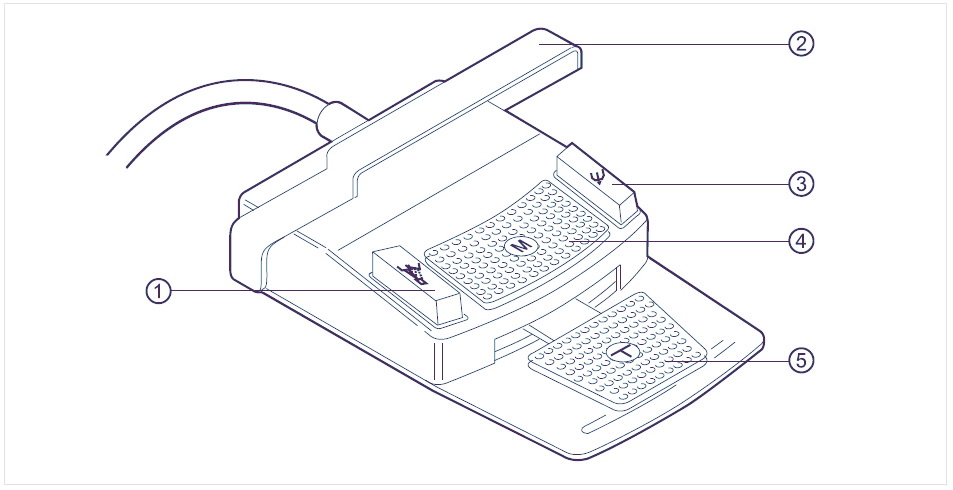
Кнопки ножной педали имеют по две функции. Функция кнопок зависит от того, уложен ли инструмент в держатель или взят из него.
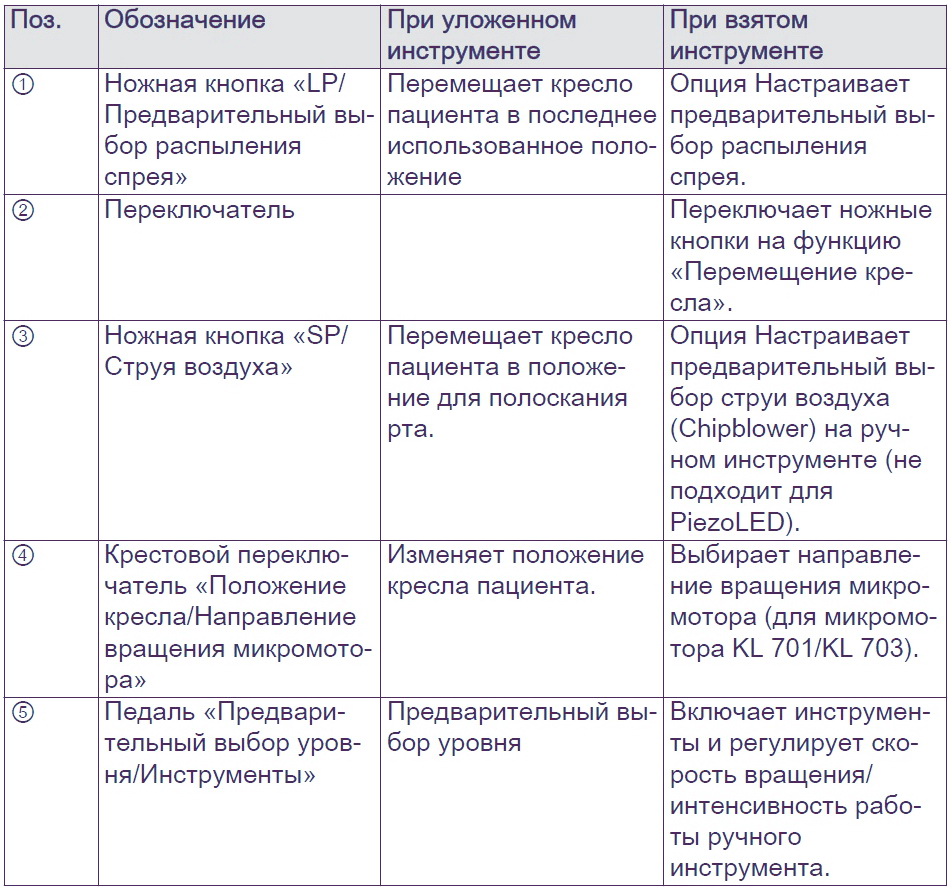
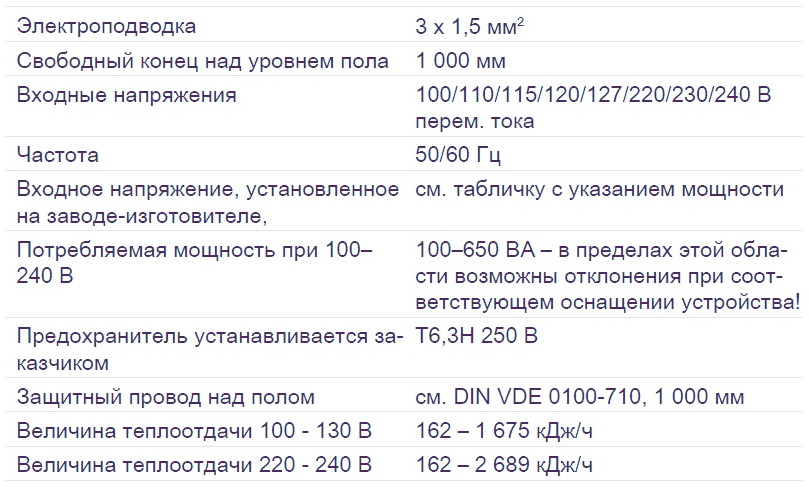
Kavo Estetica e30 Технические характеристики
Электрическая часть
Трехфункциональный шприц
Перед началом рабочего дня и перед каждым приемом пациента промойте в течение 20–30 секунд водой и просушите.

Подача воды
В сочетании баллона с водой с ручной дозировкой Oxygenal 6 через насадку и баллоном с интенсивной стерилизацией встроен также модуль обеззараживания воды.


Подача воздуха

Максимальные нагрузки

Вес
Стоматологическая установка с стандартным креслом пациента весит 279 кг брутто, 224 кг нетто.
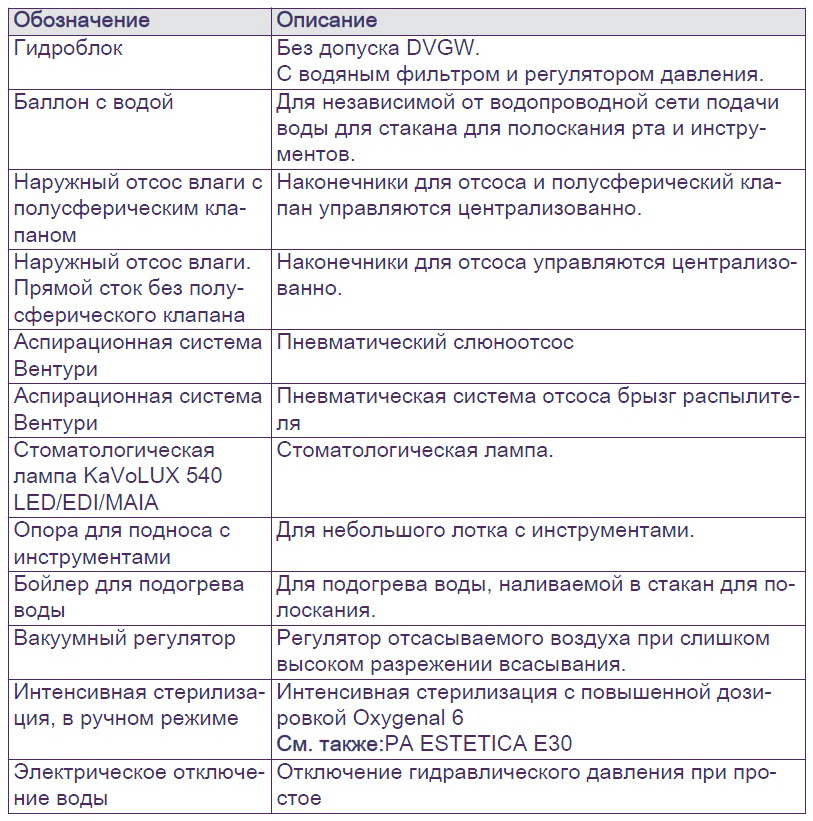
Принадлежности и интегрированные устройства
Аппарат
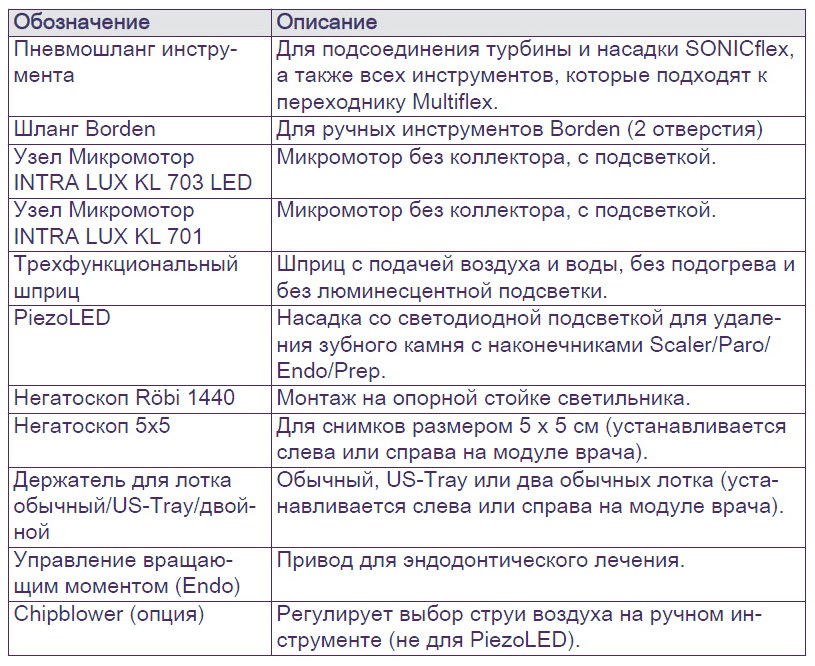
Кресло пациента

Блок ассистента

Модуль врача
Скачать инструкцию на Kavo Estetica e30
Скачать инструкцию, инструкцию по монтажу и другую документацию на стоматологическую установку Kavo Estetica e30 можно здесь.
Руководство пользователя ( user manual ) на русском языке Kavo Estetica e30 скачать.
Краткие указания по обслуживанию на русском языке Kavo Estetica e30 скачать.
Регистрационное удостоверение Estetica e30 скачать.
| Document’s Content and Additional Information | Share Manual |
|---|---|
|
KaVo ESTETICA E30 Care instructions
Pages Preview: Document Transcription:
See Details |
|
|
KaVo ESTETICA E30 User manual manual
Pages Preview: Document Transcription:
See Details |
|
|
KaVo ESTETICA E30 Service instructions manual
Pages Preview: Document Transcription:
See Details |
|
|
KaVo ESTETICA E30 Short instructions for use
Pages Preview: Document Transcription:
See Details |
|
|
KaVo ESTETICA E30 Short instructions for use
Pages Preview: Document Transcription:
See Details |

-
Contents
-
Table of Contents
-
Bookmarks
Quick Links
Wartungsanleitung / Service instructions
ESTETICA E30
Wartungskit E30 1.009.8613
Immer auf der sicheren Seite.
Related Manuals for KaVo ESTETICA E30
Summary of Contents for KaVo ESTETICA E30
-
Page 1
Wartungsanleitung / Service instructions ESTETICA E30 Wartungskit E30 1.009.8613 Immer auf der sicheren Seite. -
Page 2
Vertrieb: Hersteller: KaVo Dental GmbH Kaltenbach & Voigt GmbH Bismarckring 39 Bismarckring 39 D-88400 Biberach D-88400 Biberach Tel. +49 (0) 7351 56-0 www.kavo.com Fax +49 (0) 7351 56-1488… -
Page 3: Table Of Contents
Wartungsanleitung / Service instructions ESTETICA E30 Wartungskit E30 1.009.8613 Inhaltsverzeichnis Inhaltsverzeichnis Eingangs- Funktionsprüfung / Incoming / function test …………….2 Abfluss / Absaugung / Drainage / suction ………………..3 Wasserblock / Water block ……………………5 Patiententeil / patient element ……………………6 Arztelement / dentist unit ………………………
-
Page 4: Eingangs- Funktionsprüfung / Incoming / Function Test
Wartungsanleitung / Service instructions ESTETICA E30 Wartungskit E30 1.009.8613 1 Eingangs- Funktionsprüfung / Incoming / function test 1 Eingangs- Funktionsprüfung / Incoming / function test ▶ Tastenfunktionen: Alle Tasten am Arzt- und Helferinnenelement prüfen. Key functions: Check all keys on the dentist and assistant unit.
-
Page 5: Abfluss / Absaugung / Drainage / Suction
Wartungsanleitung / Service instructions ESTETICA E30 Wartungskit E30 1.009.8613 2 Abfluss / Absaugung / Drainage / suction 2 Abfluss / Absaugung / Drainage / suction ▶ Mundspülbeckenabfluß und alle Siebe im Absaug- und Abflußsystem reinigen. Schwerteilesammler reinigen, falls vorhanden. Clean every filter in the internal drainage- and suction system.
-
Page 6
Wartungsanleitung / Service instructions ESTETICA E30 Wartungskit E30 1.009.8613 2 Abfluss / Absaugung / Drainage / suction ▶ Abflussschlauch und internen Saugschlauch kontrollieren, ggf. ersetzen. Check drain tube and internal suction tube, replace if necessary. ▶ Sollte ein Austausch der internen Abflussschläuche oder Saugschläuche er‐… -
Page 7: Wasserblock / Water Block
Wartungsanleitung / Service instructions ESTETICA E30 Wartungskit E30 1.009.8613 3 Wasserblock / Water block 3 Wasserblock / Water block ▶ Gesamtfunktion und Dichtheit prüfen. Check overall function / check for leakage. ▶ Wasserfilter, Membrane und Dichtungen erneuern. Replace water filter, membrane, and seals.
-
Page 8: Patiententeil / Patient Element
Wartungsanleitung / Service instructions ESTETICA E30 Wartungskit E30 1.009.8613 4 Patiententeil / patient element 4 Patiententeil / patient element ▶ Mundglaseinlauf: Funktion und Dichtheit prüfen. Cup filler: Check function / check for leakage. ▶ Schalenspülung: Funktion und Dichtheit prüfen. Bowl flush: Check function/check for leakage.
-
Page 9: Arztelement / Dentist Unit
Wartungsanleitung / Service instructions ESTETICA E30 Wartungskit E30 1.009.8613 5 Arztelement / dentist unit 5 Arztelement / dentist unit ▶ Turbinenrückluftfilter erneuern. Replace turbine return air filter. Turbinenrückluftfilter ist bei E30 TM und E30 S an der gleichen Position. Return air turbine filter E30 TM and E30 S is situated at the same position.
-
Page 10
Wartungsanleitung / Service instructions ESTETICA E30 Wartungskit E30 1.009.8613 5 Arztelement / dentist unit ▶ O-Ringe an 3F-Handstück erneuern. Replace O-rings on 3F handpieces. 0.272.3042 0.200.6043 0.200.6223 8/14… -
Page 11: Kontrollen / Checks
Wartungsanleitung / Service instructions ESTETICA E30 Wartungskit E30 1.009.8613 6 Kontrollen / Checks | 6.1 Sicherheitstechnische Kontrolle / Safety regulations check 6 Kontrollen / Checks 6.1 Sicherheitstechnische Kontrolle / Safety regulations check ▶ Sicherheitstechnische Kontrolle durchführen und dokumentieren (wenn not‐…
-
Page 12: Checkliste Wartung / Check List Maintenance
Wartungsanleitung / Service instructions ESTETICA E30 Wartungskit E30 1.009.8613 7 Checkliste Wartung / Check list maintenance 7 Checkliste Wartung / Check list maintenance 10/14…
-
Page 13
Wartungsanleitung / Service instructions ESTETICA E30 Wartungskit E30 1.009.8613 7 Checkliste Wartung / Check list maintenance 11/14… -
Page 14
Wartungsanleitung / Service instructions ESTETICA E30 Wartungskit E30 1.009.8613 7 Checkliste Wartung / Check list maintenance 12/14… -
Page 15
Wartungsanleitung / Service instructions ESTETICA E30 Wartungskit E30 1.009.8613 7 Checkliste Wartung / Check list maintenance 13/14… -
Page 16
Wartungsanleitung / Service instructions ESTETICA E30 Wartungskit E30 1.009.8613 7 Checkliste Wartung / Check list maintenance 14/14…


