Требуется руководство для вашей Subaru Forester (2018)? Ниже вы можете просмотреть и загрузить бесплатно руководство в формате PDF. Кроме того, приведены часто задаваемые вопросы, рейтинг изделия и отзывы пользователей, что позволит оптимально использовать ваше изделие. Если это не то руководство, которое вы искали, – свяжитесь с нами.
Ваше устройство неисправно, и в руководстве отсутствует решение? Перейдите в Repair Café для получения бесплатных ремонтных услуг.
Руководство

Рейтинг
Сообщите нам, что вы думаете о Subaru Forester (2018), оставив оценку продукта. Хотите поделиться вашими впечатлениями от данного изделия или задать вопрос? Вы можете оставить комментарий в нижней части страницы.
Довольны ли вы данным изделием Subaru?
Да Нет
4 голоса
Часто задаваемые вопросы
Наша служба поддержки выполняет поиск полезной информации по изделиям и отвечает на часто задаваемые вопросы. Если вы заметили неточность в наших часто задаваемых вопросах, сообщите нам об этом с помощью нашей контактной формы.
В моей машине есть цепь ГРМ. С каким интервалом ее нужно менять? Проверенный
При нормальной эксплуатации цепь ГРМ должна прослужить весь срок службы автомобиля и не нуждается в замене.
Это было полезно (2391)
Почему я не могу открыть одну или несколько дверей изнутри? Проверенный
Вероятно, в машине активирован детский замок. Обычно его можно разблокировать с помощью механизма в двери.
Это было полезно (753)
Как часто следует менять масло? Проверенный
Практически для каждого автомобиля есть свои точные рекомендации, однако в целом масло разумно менять каждые 10 000–15 000 км пробега или один раз в год. Загрязненное масло может со временем серьезно повредить двигатель.
Это было полезно (637)
Когда следует отключать подушку безопасности сбоку от пассажирского сиденья? Проверенный
При движении с ребенком в автокресле на пассажирском сиденье необходимо выключить подушку безопасности с этой стороны. Это также рекомендуется для детей до 12 лет, которые размещаются на пассажирском сиденье. Это необходимо для предотвращения травм в случае аварии.
Это было полезно (578)
Ключи от машины больше не будут открывать машину на расстоянии, почему? Проверенный
Автомобильные ключи, которые можно разблокировать на расстоянии, обычно работают от аккумулятора. Когда он закончится, ключ перестанет работать. Замените аккумулятор и попробуйте еще раз.
Это было полезно (567)
Приведет ли более низкое давление в шинах к большему сцеплению с дорожным покрытием при езде по снегу? Проверенный
Нет, несмотря на то что при снижении давления пятно контакта шин с дорогой увеличивается, автомобиль становится менее устойчивым. Садитесь за руль, только если в шинах правильное давление!
Это было полезно (323)
Я залил в машину не то топливо, что мне делать? Проверенный
Не садитесь за руль! Неважно, заливаете ли вы дизельное топливо в автомобиль с бензиновым двигателем или бензин в автомобиль с дизельным двигателем. В обоих случаях это может привести к повреждению машины и / или других частей автомобиля. Обратитесь в службу технической поддержки на дорогах.
Это было полезно (218)
Где я могу найти VIN-номер моей машины? Проверенный
Это может варьироваться в зависимости от марки и модели, но на многих автомобилях номер VIN можно найти на дверном косяке, под капотом или на металлическом полу переднего сиденья.
Это было полезно (182)
Как часто нужно менять щетки дворников? Проверенный
Желательно заменять щетки стеклоочистителя не реже одного раза в год. Признаками необходимости замены лезвий являются полосы, дымка, шум или отслоение резины.
Это было полезно (160)
Сколько миль в одном километре? Проверенный
1 километр равен 0,621 мили. 10 километров равны 6,21 мили. 1 миля равна 1,609 километра. 10 миль равны 16,09 километра.
Это было полезно (135)
Какой номер VIN? Проверенный
VIN означает идентификационный номер автомобиля и является уникальным номером, который есть у каждого автомобиля. Это делает автомобиль не идентифицируемым, например, после аварии или в случае отзыва. Это также позволяет идентифицировать автомобиль в случае отсутствия номерных знаков.
Это было полезно (133)
Могу ли я использовать дворники, когда на лобовом стекле обледенел? Проверенный
Нет, это не рекомендуется. Лед острый и может повредить резину на щетках стеклоочистителя.
Это было полезно (130)
Информация касательно стоимости, модельного ряда, характеристик, наличия комплектации продукции/автомобиля и наличия опции и/или оборудования в такойкомплектации (далее – «Информация»), изложенная на данном сайте и прайс-листах, носит исключительно информативный характер, зависит от местных условий, ограничений и, следовательно может различаться в зависимости от моделей и комплектаций, и не является публичной офертой, согласно ст. 447 Гражданского Кодекса РК. Максимальные цены и Информация изложенные на данном сайте и прайс-листах могут, без предварительного уведомления со стороны Дистрибутора, отличаться от фактических цен и информаций Дилера на местах продаж, в связи с чем подробную и актуальную Информацию Вы можете получить у официального Дилера в Вашем городе. Основные условия приобретения какого-либо автомобиля или продукции определяются в соответствующих договорах купли-продажи.
![]()
2023 TOO «Subaru Kazakhstan» в составе КМК «Астана Моторс»
© 2023
Представленная ниже информация для ознакомления, а не для коммерческого использования.
Если что-то не открывается, пишите в личку. При репосте не забывайте ссылки на этот БЖ.
+++++++++++++++++++++++++++++++++++++++++++++++
+++++++++++++++++++++++++++++++++++++++++++++++
Руководство владельца Subaru Forester I (SF) — файл pdf
disk.yandex.ru/i/DtLIPRMqvXHX4g
Руководство по сервисному обслуживанию Subaru Forester I (SF) 1997-2001 MY — zip-архив
(Мультимедийная книга Subaru Forester с 1997 г.)
disk.yandex.ru/d/2LtfvY0NzRmzww
Subaru Forester с 1997 г. выпуска. Устройство Обслуживание Ремонт (Переработанное издание) — файл pdf
drive.google.com/file/d/0…4WWNjQzg/view?usp=sharing
+++++++++++++++++++++++++++++++++++++++++++++++
Руководство по техническому обслуживанию Subaru Forester II (SG) 2004 MY — файл pdf
yadi.sk/i/NKxH1DR4m68Wzg
Руководство по эксплуатации Subaru Forester II (SG) 2005 MY — файл pdf
drive.google.com/file/d/0…5MHJmYlk/view?usp=sharing
Руководство по эксплуатации Subaru Forester II (SG) 2007 MY — файл pdf
drive.google.com/file/d/0…zdi1Cb0E/view?usp=sharing
Руководство по обслуживанию Subaru Forester II (SG) 2008 MY — файл pdf
drive.google.com/file/d/0…5ell0MDg/view?usp=sharing
+++++++++++++++++++++++++++++++++++++++++++++++
Руководство по ремонту и эксплуатации Subaru Forester III (SH) 2009 MY — файл pdf
drive.google.com/file/d/0…SUkVMT2M/view?usp=sharing
Руководство по сервисному обслуживанию Subaru Forester III (SH) 2009 MY — сжатый архив
disk.yandex.ru/d/B96-Gk7pODUIYQ
drive.google.com/file/d/0…PR21RT2c/view?usp=sharing
Руководство по сервисному обслуживанию Subaru Forester III (SH) 2012 MY — zip-архив
yadi.sk/d/WyoA6UE8prtNW
+++++++++++++++++++++++++++++++++++++++++++++++
Руководство по сервисному обслуживанию Subaru Forester IV (SJ) 2014 MY — zip-архив
drive.google.com/file/d/0…ydE1vTEk/view?usp=sharing
или
disk.yandex.ru/d/ZmJB58ifGLEsRg
Руководство по эксплуатации Subaru Forester IV (SJ) 2014 MY — файл pdf
drive.google.com/file/d/0…kM1dnS00/view?usp=sharing
+++++++++++++++++++++++++++++++++++++++++++++++
Руководство по обслуживанию и ремонту Subaru Forester SK (SM G8240GR FORESTER 19MY, версия 002) — файл ISO в rar-архиве.
yadi.sk/d/nnaihovx9Le_dQ или drive.google.com/file/d/1…_mFo-IS9/view?usp=sharing
Взято здесь cloud.mail.ru/public/HRZT/mfMRZ48dH
Руководство по эксплуатации Subaru Forester V (SK) 2019 MY — файл pdf
yadi.sk/i/H3Eh8Lm1IYQYgA
Краткое руководство по эксплуатации Subaru Forester V (SK) 2019 MY — файл pdf
yadi.sk/i/Fe1V-7hYZE59pA
Eyesight Руководство SK — файл pdf
yadi.sk/i/hZXPw5enDtoTqw
Starlink Руководство SK — файл pdf
yadi.sk/i/yDhy1Qx86FDbbg
+++++++++++++++++++++++++++++++++++++++++++++++
+++++++++++++++++++++++++++++++++++++++++++++++
Инструкция по эксплуатации автомобиля Subaru Forester 2005 модельного года (SG) — файл pdf
drive.google.com/file/d/0…BZkhGTEU/view?usp=sharing
Инструкция по эксплуатации автомобиля Subaru Forester 2007 модельного года (SG) — файл pdf
drive.google.com/file/d/0…SMzFxSHc/view?usp=sharing
Инструкция по эксплуатации автомобиля Subaru Forester 2011 модельного года (SH) — файл pdf drive.google.com/file/d/0…Ib0lEbm8/view?usp=sharing
Инструкция по эксплуатации автомобиля Subaru Forester 2012 модельного года (SH) — файл pdf drive.google.com/file/d/0…0cEE1bDg/view?usp=sharing
Инструкция по эксплуатации автомобиля Subaru Forester 2013 модельного года (SJ) — файл pdf drive.google.com/file/d/0…LZEgxbGM/view?usp=sharing
Инструкция по эксплуатации автомобиля Subaru Forester 2014 модельного года (SJ) — файл pdf drive.google.com/file/d/0…tOWt4elk/view?usp=sharing
Инструкция по эксплуатации автомобиля Subaru Forester 2015 модельного года (SJ) — файл pdf
drive.google.com/file/d/0…WZkI5SWs/view?usp=sharing
Инструкция по эксплуатации автомобиля Subaru Forester 2016 модельного года (SJ) — файл pdf
drive.google.com/file/d/0…kS3FSQVU/view?usp=sharing
+++++++++++++++++++++++++++++++++++++++++++++++
Subaru Forester Owner’s Manuals (ENG) — руководства по эксплуатации Subaru Forester на английском языке
Subaru Forester I (SF) 1998 Owner’s Manual ENG yadi.sk/d/OApC-oKBFMhGo
Subaru Forester I (SF) 1999 Owner’s Manual ENG yadi.sk/d/V6d3vPaGFMi5X
Subaru Forester I (SF) 2000 Owner’s Manual ENG yadi.sk/d/1Kb7E0RLFMiAS
Subaru Forester I (SF) 2001 Owner’s Manual ENG yadi.sk/d/OeuIrbH-FMiE2
Subaru Forester I (SF) 2002 Owner’s Manual ENG yadi.sk/d/7dlwPQT5FMiHm
Subaru Forester II (SG) 2003 Owner’s Manual ENG yadi.sk/d/8B5M3PEuFMiNv
Subaru Forester II (SG) 2004 Owner’s Manual ENG yadi.sk/d/DTiMBz4WFMiTP
Subaru Forester II (SG) 2005 Owner’s Manual ENG yadi.sk/d/tG-w1PzAFMiYG
Subaru Forester II (SG) 2006 Owner’s Manual ENG yadi.sk/d/h8RcBfgFFMic2
Subaru Forester II (SG) 2007 Owner’s Manual ENG yadi.sk/d/5heDeXV3FMifh
Subaru Forester II (SG) 2008 Owner’s Manual ENG yadi.sk/d/KTL_5eO7FMikE
Subaru Forester III (SH) 2009 Owner’s Manual ENG yadi.sk/d/CEPVhIngFMipG
Subaru Forester III (SH) 2010 Owner’s Manual ENG yadi.sk/d/Ee_eL7omFMiti
Subaru Forester III (SH) 2011 Owner’s Manual ENG yadi.sk/d/1Jacl7TMFMizz
Subaru Forester III (SH) 2012 Owner’s Manual ENG yadi.sk/d/44rqNMDzFMj7A
Subaru Forester IV (SJ) 2013 Owner’s Manual ENG yadi.sk/d/k40hjMB8FMjAd
Subaru Forester IV (SJ) 2014 Owner’s Manual ENG yadi.sk/d/mTlbnLRoFMjEX
Subaru Forester V (SK) 2019 Owner’s Manual ENG yadi.sk/d/8BgNvdXr5ryIxg
+++++++++++++++++++++++++++++++++++++++++++++++
Subaru Forester 2001 Service Manual ENG yadi.sk/d/PQ4ylgUpFNzot взято здесь manualov.net/Subaru.php
Subaru Forester 2003 Service Manual ENG — файл pdf yadi.sk/i/Yd-Gbfua3E38PH взято здесь
www.drive2.ru/l/466065937657758129/
Subaru Forester 2004 Service Manual ENG yadi.sk/d/_BMMdFxqFP28v взято здесь manualov.net/Subaru.php
Subaru Forester 2007 Service Manual (ENG) yadi.sk/d/B6rTskG3cxMbq взято здесь manualov.net/Subaru.php
Subaru Forester 2007 Service Manual ENG yadi.sk/d/X4CZKXSDcxMGW взято здесь auto-b.ru/blog/Subaru/2065.html
Subaru Forester IV (SJ) 2014 MY Service Manual (ENG) yadi.sk/d/zl1LmYEebjUsr + дополнение по ремонту кузова yadi.sk/d/hcob_9VJBQkDZ
пароль к архивам: forestermoscowclub взято здесь forester-moscowclub.ru/showthread.php?p=694911
+++++++++++++++++++++++++++++++++++++++++++++++
Схемы электропроводки:
Subaru Forester I (SF) 1998 Wires Diagram Section (EN) Электросхемы дорестайл SF — файлы pdf в архиве
yadi.sk/d/aCZSAQ2GqQQxT или
drive.google.com/file/d/1…ziEs-HcU/view?usp=sharing
Subaru Forester I (SF) 2001 Wires Diagram Section (EN) Электросхемы рестайл SF — файлы pdf в архиве
yadi.sk/d/f7GjJ6MIqQR3m
Схема электропроводки Subaru Forester SG 02-05 дорестайл Русский мануал — файл pdf
yadi.sk/i/daoWHmQ_qQQW7 или
drive.google.com/file/d/0…d1jolSTlJMVlJZFMwMW8/view
Схема электропроводки Subaru Forester SG 06-08 рестайл Русский мануал — файл pdf
yadi.sk/i/LfAHumyGqQQWD
+++++++++++++++++++++++++++++++++++++++++++++++
Мануалы и аксессуары для других Subaru (cпасибо tarasusNN): здесь.
+++++++++++++++++++++++++++++++++++++++++++++++

Foreword
Foreword
SFWAA
Congratulations on choosing a SUBARU vehicle. This Owner’s
Manual has all the information necessary to keep your SUBARU in
excellent condition and to properly maintain the emission control
system for minimizing emission pollutants. We urge you to read this
manual carefully so that you may understand your vehicle and its
operation. For information not found in this Owner’s Manual, such
as details concerning repairs or adjustments, please contact the
SUBARU dealer from whom you purchased your SUBARU or the
nearest SUBARU dealer.
The information, specifications and illustrations found in this
manual are those in effect at the time of printing. SUBARU
CORPORATION reserves the right to change specifications and
designs at any time without prior notice and without incurring any
obligation to make the same or similar changes on vehicles
previously sold. This Owner’s Manual applies to all models and
covers all equipment, including factory installed options. Some
explanations, therefore may be for equipment not installed in your
vehicle.
Please leave this manual in the vehicle at the time of resale. The next
owner will need the information found herein.
SUBARU CORPORATION, TOKYO, JAPAN
is a registered trademark of SUBARU CORPORATION.
*
C
Copyright 2017 SUBARU CORPORATION
This manual describes the following vehicle types.

S00
Warranties
S00AA
& Warranties for U.S.A.
S00AA01
All SUBARU vehicles distributed by
Subaru of America, Inc. and sold at retail
by an authorized SUBARU dealer in the
United States come with the following
warranties:
. SUBARU Limited Warranty
. Emission Control Systems Warranty
. Emissions Performance Warranty
All warranty information, including details
of coverage and exclusions, is in the
“Warranty and Maintenance Booklet”.
Read these warranties carefully.
& Warranties for Canada
S00AA05
All SUBARU vehicles distributed by
Subaru Canada, Inc. and sold at retail by
an authorized SUBARU dealer in Canada
come with the following warranties:
. SUBARU Limited Warranty
. Anti-Corrosion Warranty
. Emission Control Warranty
All warranty information, including details
of coverage and exclusions, is in the
“Warranty and Service Booklet”. Read
these warranties carefully.
& Warranties except for U.S.A.
and Canada
S00AA06
All warranty information, including details
of coverage and exclusions, is in the
“Warranty and Maintenance Booklet”.
Read these warranties carefully.
How to use this Owner’s
Manual
S00AB
& Using your Owner’s Manual
S00AB01
Before you operate your vehicle, carefully
read this manual. To protect yourself and
extend the service life of your vehicle,
follow the instructions in this manual.
Failure to observe these instructions may
result in serious injury and damage to your
vehicle.
This manual is composed of fourteen
chapters. Each chapter begins with a brief
table of contents, so you can usually tell at
a glance if that chapter contains the
information you want.
Chapter 1: Seat, seatbelt and SRS air-
bags
This chapter informs you how to use the
seat and seatbelt and contains precau-
tions for the SRS airbags.
Chapter 2: Keys and doors
This chapter informs you how to operate
the keys, locks and windows.
Chapter 3: Instruments and controls
This chapter informs you about the opera-
tion of instrument panel indicators and how
to use the instruments and other switches.
– CONTINUED –
1
Chapter 4: Climate control
This chapter informs you how to operate
the climate control.
Chapter 5: Audio
This chapter informs you how to operate
your audio system.
Chapter 6: Interior equipment
This chapter informs you how to operate
interior equipment.
Chapter 7: Starting and operating
This chapter informs you how to start and
operate your SUBARU.
Chapter 8: Driving tips
This chapter informs you how to drive your
SUBARU in various conditions and ex-
plains some safety tips on driving.
Chapter 9: In case of emergency
This chapter informs you what to do if you
have a problem while driving, such as a flat
tire or engine overheating.
Chapter 10: Appearance care
This chapter informs you how to keep your
SUBARU looking good.
Chapter 11: Maintenance and service
This chapter informs you when you need to
take your SUBARU to the dealer for
scheduled maintenance and informs you
how to keep your SUBARU running
properly.
Chapter 12: Specifications
This chapter informs you about dimen-
sions and capacities of your SUBARU.
Chapter 13: Consumer information and
Reporting safety defects
This chapter informs you about Uniform
tire quality grading standards and Report-
ing safety defects.
Chapter 14: Index
This is an alphabetical listing of all that’s in
this manual. You can use it to quickly find
something you want to read.
For models with the EyeSight system:
For details about the EyeSight system,
refer to the Owner’s Manual supplement
for the EyeSight system.
& Safety warnings
S00AB02
You will find a number of WARNINGs,
CAUTIONs and NOTEs in this manual.
These safety warnings alert you to poten-
tial hazards that could result in injury to you
or others.
Please read these safety warnings as well
as all other portions of this manual care-
fully in order to gain a better understanding
of how to use your SUBARU vehicle safely.
WARNING
A WARNING indicates a situation in
which serious injury or death could
result if the warning is ignored.
CAUTION
A CAUTION indicates a situation in
which injury or damage to your
vehicle, or both, could result if the
caution is ignored.
NOTE
A NOTE gives information or sugges-
tions how to make better use of your
vehicle.
2
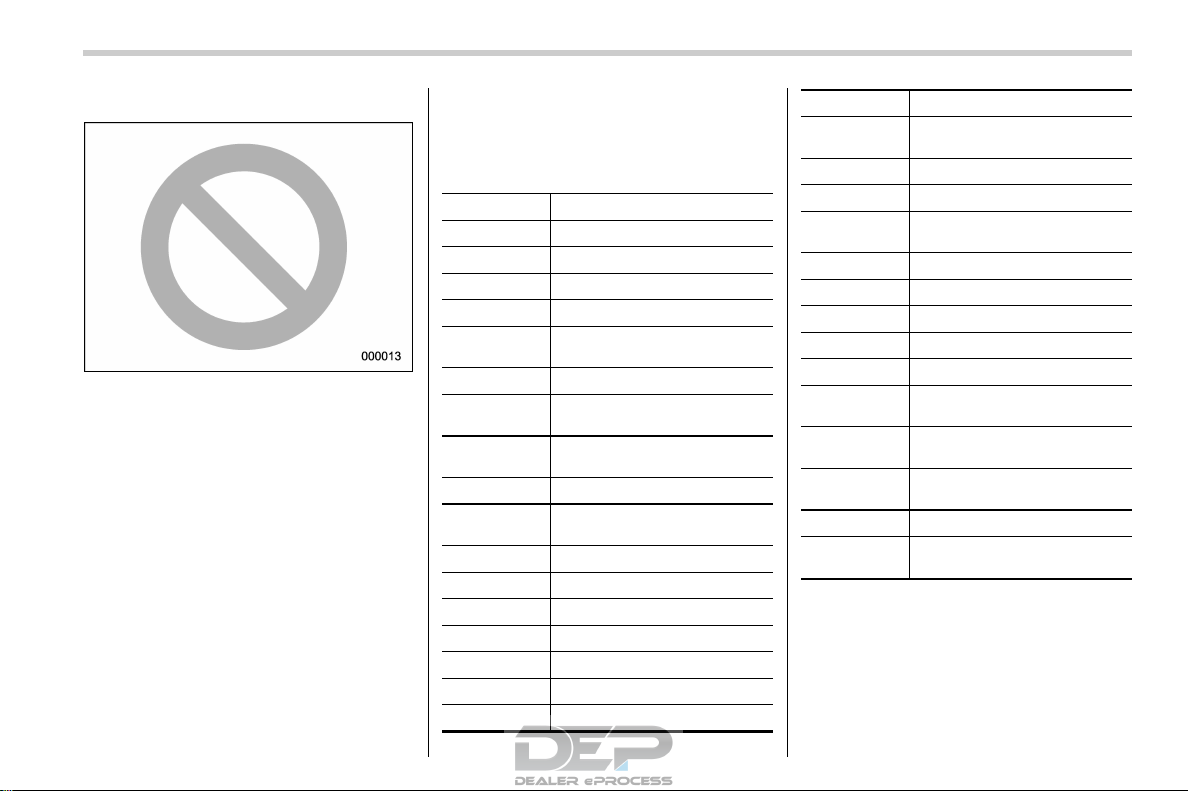
& Safety symbol
S00AB03
You will find a circle with a slash through it
in this manual. This symbol means “Do
not”, “Do not do this”, or “Do not let this
happen”, depending upon the context.
& Abbreviation list
S00AB04
You may find several abbreviations in this
manual. The meanings of the abbrevia-
tions are shown in the following list.
Abbreviation Meaning
A/C Air conditioner
ABS Anti-lock brake system
AKI Anti knock index
ALR Automatic locking retractor
ALR/ELR
Automatic locking retractor/
Emergency locking retractor
AWD All-wheel drive
BSD/RCTA
Blind Spot Detection/Rear
Cross Traffic Alert
CVT
Continuously variable trans-
mission
DRL Daytime running light
EBD
Electronic brake force distri-
bution
ELR Emergency locking retractor
GAW Gross axle weight
GAWR Gross axle weight rating
GPS Global positioning system
GVW Gross vehicle weight
GVWR Gross vehicle weight rating
INT Intermittent
Abbreviation Meaning
LATCH
Lower anchors and tethers for
children
LED Light emitting diode
MIL Malfunction indicator light
MMT
Methylcyclopentadienyl man-
ganese tricarbonyl
MT Manual transmission
OBD On-board diagnostics
RAB Reverse Automatic Braking
RON Research octane number
SI-DRIVE SUBARU Intelligent Drive
SRF
Steering responsive fog lights
system
SRH
Steering Responsive Head-
light
SRS
Supplemental restraint sys-
tem
TIN Tire identification number
TPMS
Tire pressure monitoring sys-
tem
3
Vehicle symbols
S00AC
There are some of the symbols you may
see on your vehicle.
For warning and indicator lights, refer to
“Warning and indicator lights” F23.
Mark Name
WARNING
CAUTION
Safety precautions when
driving
S00AD
& Seatbelt and SRS airbag
S00AD01
WARNING
. All persons in the vehicle should
fasten their seatbelts BEFORE
the vehicle starts to move. Other-
wise, the possibility of serious
injury becomes greater in the
event of a sudden stop or acci-
dent.
. To obtain maximum protection in
the event of an accident, the
driver and all passengers must
always wear seatbelts when in
the vehicle. The SRS (Supple-
mental Restraint System) airbag
does not do away with the need to
fasten seatbelts. In combination
with the seatbelts, it offers the
best combined protection in case
of a serious accident.
Not wearing a seatbelt increases
the chance of severe injury or
death in a crash even when the
vehicle has the SRS airbag.
. The SRS airbags deploy with
considerable speed and force.
Occupants who are out of proper
position when the SRS airbag
deploys could suffer very serious
injuries. Because the SRS airbag
needs enough space for deploy-
ment, the driver should always sit
upright and well back in the seat
as far from the steering wheel as
practical while still maintaining
full vehicle control and the front
passenger should move the seat
as far back as possible and sit
upright and well back in the seat.
For instructions and precautions, carefully
read the following sections.
. For the seatbelt system, refer to “Seat-
belts” F1-16.
. For the SRS airbag system, refer to
“*SRS airbag (Supplemental Restraint
System airbag)” F1-43.
4

& Child safety
S00AD02
WARNING
. Never hold a child on your lap or
in your arms while the vehicle is
moving. The passenger cannot
protect the child from injury in a
collision, because the child will
be caught between the passen-
ger and objects inside the vehi-
cle.
. While riding in the vehicle, infants
and small children should always
be placed in the REAR seat in an
infant or child restraint system
which is appropriate for the
child’s age, height and weight. If
a child is too big for a child
restraint system, the child should
sit in the REAR seat and be
restrained using the seatbelts.
According to accident statistics,
children are safer when properly
restrained in the rear seating
positions than in the front seating
positions. Never allow a child to
stand up or kneel on the seat.
. Place children in the REAR seat
properly restrained at all times in
a child restraint device or in a
seatbelt. The SRS airbag deploys
with considerable speed and
force and can injure or even kill
children, especially if they are not
restrained or improperly re-
strained. Because children are
lighter and weaker than adults,
their risk of being injured from
deployment is greater.
. NEVER INSTALL A FORWARD OR
REARWARD FACING CHILD
SEAT IN THE FRONT SEAT.
DOING SO RISKS SERIOUS IN-
JURY OR DEATH TO THE CHILD
BY PLACING THE CHILD’S HEAD
TOO CLOSE TO THE SRS AIR-
BAG.
. Always turn the child safety locks
to the “LOCK” position when
children sit in the rear seat.
Serious injury could result if a
child accidentally opens the door
and falls out. Refer to “Child
safety locks” F2-32.
. Always lock the passenger’s win-
dows using the lock switch when
children are riding in the vehicle.
Failure to follow this procedure
could result in injury to a child
operating the power window. Re-
fer to “Windows” F2-32.
. Never leave unattended children,
adults or animals in the vehicle.
They could accidentally injure
themselves or others through
inadvertent operation of the ve-
hicle. Also, on hot or sunny days,
temperature in a closed vehicle
could quickly become high en-
ough to cause severe or possibly
fatal injuries to them.
. When leaving the vehicle, close
all windows and lock all doors.
. In models with power rear gate,
when it operates, the rear gate
moves with remarkable force. It is
possible to be injured if anyone is
caught in or hit by the rear gate so
be sure to obey the following
cautions.
– Check that there are no chil-
dren around the rear gate
before operating the power
rear gate.
– Do not allow children to oper-
ate the power rear gate.
For instructions and precautions, carefully
read the following sections.
. For the seatbelt system, refer to “Seat-
belts” F1-16.
– CONTINUED –
5
. For the child restraint system, refer to
“Child restraint systems” F1-30.
. For the SRS airbag system, refer to
“*SRS airbag (Supplemental Restraint
System airbag)” F1-43.
& Engine exhaust gas (carbon
monoxide)
S00AD03
WARNING
. Never inhale engine exhaust gas.
Engine exhaust gas contains
carbon monoxide, a colorless
and odorless gas which is dan-
gerous, or even lethal, if inhaled.
. Always properly maintain the en-
gine exhaust system to prevent
engine exhaust gas from entering
the vehicle.
. Never run the engine in a closed
space, such as a garage, except
for the brief time needed to drive
the vehicle in or out of it.
. Avoid remaining in a parked ve-
hicle for a lengthy time while the
engine is running. If that is un-
avoidable, then use the ventila-
tion fan to force fresh air into the
vehicle.
. Always keep the front ventilator
inlet grille free from snow, leaves
or other obstructions to ensure
that the ventilation system al-
ways works properly.
. If at any time you suspect that
exhaust fumes are entering the
vehicle, have the problem
checked and corrected as soon
as possible. If you must drive
under these conditions, drive
only with all windows fully open.
. Keep the rear gate closed while
driving to prevent exhaust gas
from entering the vehicle.
& Drinking and driving
S00AD04
WARNING
Drinking and then driving is very
dangerous. Alcohol in the blood-
stream delays your reaction time
and impairs your perception, judg-
ment and attentiveness. If you drive
after drinking – even if you drink just
a little – it will increase the risk of
being involved in a serious or fatal
accident, injuring or killing yourself,
your passengers and others. In
addition, if you are injured in the
accident, alcohol may increase the
severity of that injury.
Please don’t drink and drive.
Drunken driving is one of the most frequent
causes of accidents. Since alcohol affects
all people differently, you may have con-
sumed too much alcohol to drive safely
even if the level of alcohol in your blood is
below the legal limit. The safest thing you
can do is never drink and drive. However if
you have no choice but to drive, stop
drinking and sober up completely before
getting behind the wheel.
& Drugs and driving
S00AD05
WARNING
There are some drugs (over the
counter and prescription) that can
delay your reaction time and impair
your perception, judgment and at-
tentiveness. If you drive after taking
them, it may increase your, your
passengers’ and other persons’ risk
of being involved in a serious or fatal
accident.
If you are taking any drugs, check with
your doctor or pharmacist or read the
literature that accompanies the medication
to determine if the drug you are taking can
6
impair your driving ability. Do not drive
after taking any medications that can make
you drowsy or otherwise affect your ability
to safely operate a motor vehicle. If you
have a medical condition that requires you
to take drugs, please consult with your
doctor.
Never drive if you are under the influence
of any illicit mind-altering drugs. For your
own health and well-being, we urge you
not to take illegal drugs in the first place
and to seek treatment if you are addicted
to those drugs.
& Driving when tired or sleepy
S00AD06
WARNING
When you are tired or sleepy, your
reaction time will be delayed and
your perception, judgment and at-
tentiveness will be impaired. If you
drive when tired or sleepy, your,
your passengers’ and other per-
sons’ chances of being involved in
a serious accident may increase.
Please do not continue to drive but instead
find a safe place to rest if you are tired or
sleepy. On long trips, you should make
periodic rest stops to refresh yourself
before continuing on your journey. When
possible, you should share the driving with
others.
& Modification of your vehicle
S00AD07
CAUTION
Your vehicle should not be modified
other than with genuine SUBARU
parts and accessories. Other types
of modifications could affect its
performance, safety or durability,
and may even violate governmental
regulations. In addition, damage or
performance problems resulting
from modification may not be cov-
ered under warranties.
& Car phone/cell phone and
driving
S00AD08
CAUTION
Do not use a car phone/cell phone
while driving; it may distract your
attention from driving and can lead
to an accident. If you use a car
phone/cell phone, pull off the road
and park in a safe place before using
your phone. In some States/Pro-
vinces, only hands-free phones
may legally be used while driving.
& Driving vehicles equipped
with navigation system
S00AD09
WARNING
Do not allow the monitor to distract
your attention from driving. Also, do
not operate the controls of the
navigation system while driving.
The loss of attention to driving could
lead to an accident. If you wish to
operate the controls of the naviga-
tion system, first take the vehicle off
the road and stop it in a safe
location.
& Driving with pets
S00AD10
Unrestrained pets can interfere with your
driving and distract your attention from
driving. In a collision or sudden stop,
unrestrained pets or cages can be thrown
around inside the vehicle and hurt you or
your passengers. Besides, the pets can be
hurt under these situations. It is also for
their own safety that pets should be
properly restrained in your vehicle. Re-
strain a pet with a special traveling harness
which can be secured to the rear seat with
– CONTINUED –
7
a seatbelt or use a pet carrier which can be
secured to the rear seat by routing a
seatbelt through the carrier’s handle.
Never restrain pets or pet carriers in the
front passenger’s seat. For further infor-
mation, consult your veterinarian, local
animal protection society or pet shop.
& Tire pressures
S00AD11
Check and, if necessary, adjust the pres-
sure of each tire (including the spare) at
least once a month and before any long
journey.
Check the tire pressure when the tires are
cold. Use a pressure gauge to adjust the
tire pressures to the values shown on the
tire placard. For detailed information, refer
to “Tires and wheels” F11-23.
WARNING
Driving at high speeds with exces-
sively low tire pressures can cause
the tires to deform severely and to
rapidly become hot. A sharp in-
crease in temperature could cause
tread separation, and destruction of
the tires. The resulting loss of vehi-
cle control could lead to an accident.
& On-road and off-road driving
S00AD13
This vehicle is classified as a utility vehicle.
Utility vehicles have a significantly higher
rollover rate than other types of vehicles.
Your vehicle has a higher ground clear-
ance and higher center of gravity, making it
more likely to roll over than ordinary
passenger cars. It also handles and
maneuvers differently from other passen-
ger cars. For this reason, please read
carefully the following section and follow
the instructions and precautions in order to
prevent serious injury or death due to loss
of control, rollover and other accidents.
Refer to “On-road and off-road driving”
F8-6.
& Attaching accessories
S00AD15
WARNING
. Do not attach any accessories,
labels or stickers (other than
properly placed inspection stick-
ers) to the windshield. Such
items may obstruct your view.
. If it is necessary to attach an
accessory (such as an electronic
toll collection (ETC) device or
security pass) to the windshield,
consult your SUBARU dealer for
details on the proper location.
8
General information
S00AK
& California proposition 65
warning
S00AK02
WARNING
Engine exhaust, some of its consti-
tuents, and certain vehicle compo-
nents contain or emit chemicals
known to the State of California to
cause cancer and birth defects or
other reproductive harm. In addi-
tion, certain fluids in vehicles and
certain components of product wear
contain or emit chemicals known to
the State of California to cause
cancer and birth defects or other
reproductive harm.
& California Perchlorate Advi-
sory
S00AK03
Certain vehicle components such as air-
bag modules, seatbelt pretensioners and
keyless entry transmitter batteries may
contain perchlorate material. Special
handling may apply for service or vehicle
end of life disposal. See www.dtsc.ca.gov/
hazardouswaste/perchlorate.
& Noise from under the vehicle
S00AK01
NOTE
You may hear a noise from under the
vehicle approximately 5 to 10 hours
after the engine is turned off. However,
this does not indicate a malfunction.
This noise is caused by the operation of
the fuel evaporation leakage checking
system and the operation is normal.
The noise will stop after approximately
15 minutes.
& Event data recorder
S00AK04
This vehicle is equipped with an event data
recorder (EDR). The main purpose of an
EDR is to record, in certain crash or near
crash-like situations, such as an air bag
deployment or hitting a road obstacle, data
that will assist in understanding how a
vehicle’s systems performed. The EDR is
designed to record data related to vehicle
dynamics and safety systems for a short
period of time, typically 30 seconds or less.
The EDR in this vehicle is designed to
record such data as:
. How various systems in your vehicle
were operating;
. Whether or not the driver and passen-
ger safety belts were buckled/fastened;
. How far (if at all) the driver was
depressing the accelerator and/or brake
pedal; and,
. How fast the vehicle was traveling.
These data can help provide a better
understanding of the circumstances in
which crashes and injuries occur. NOTE:
EDR data are recorded by your vehicle
only if a non-trivial crash situation occurs;
no data are recorded by the EDR under
normal driving conditions and no personal
data (e.g., name, gender, age, and crash
location) are recorded. However, other
parties, such as law enforcement, could
combine the EDR data with the type of
personally identifying data routinely ac-
quired during a crash investigation.
To read data recorded by an EDR, special
equipment is required, and access to the
vehicle or the EDR is needed. In addition
to the vehicle manufacturer, other parties,
such as law enforcement, that have the
special equipment, can read the informa-
tion if they have access to the vehicle or
the EDR.
9

————————————————————————————————————————
————————————————————————————————————————
————————————————————————————————————————
————————————————————————————————————————
————————————————————————————————————————
————————————————————————————————————————
————————————————————————————————————————
————————————————————————————————————————
————————————————————————————————————————
————————————————————————————————————————
————————————————————————————————————————
————————————————————————————————————————
————————————————————————————————————————

Table of contents
Seat, seatbelt and SRS airbags
1
Keys and doors
2
Instruments and controls
Climate control
4
Audio
5
Interior equipment
6
Starting and operating
7
Driving tips
8
In case of emergency
9
Appearance care
10
Maintenance and service
11
Specifications
12
Consumer information and Reporting safety defects
13
Index
14
3
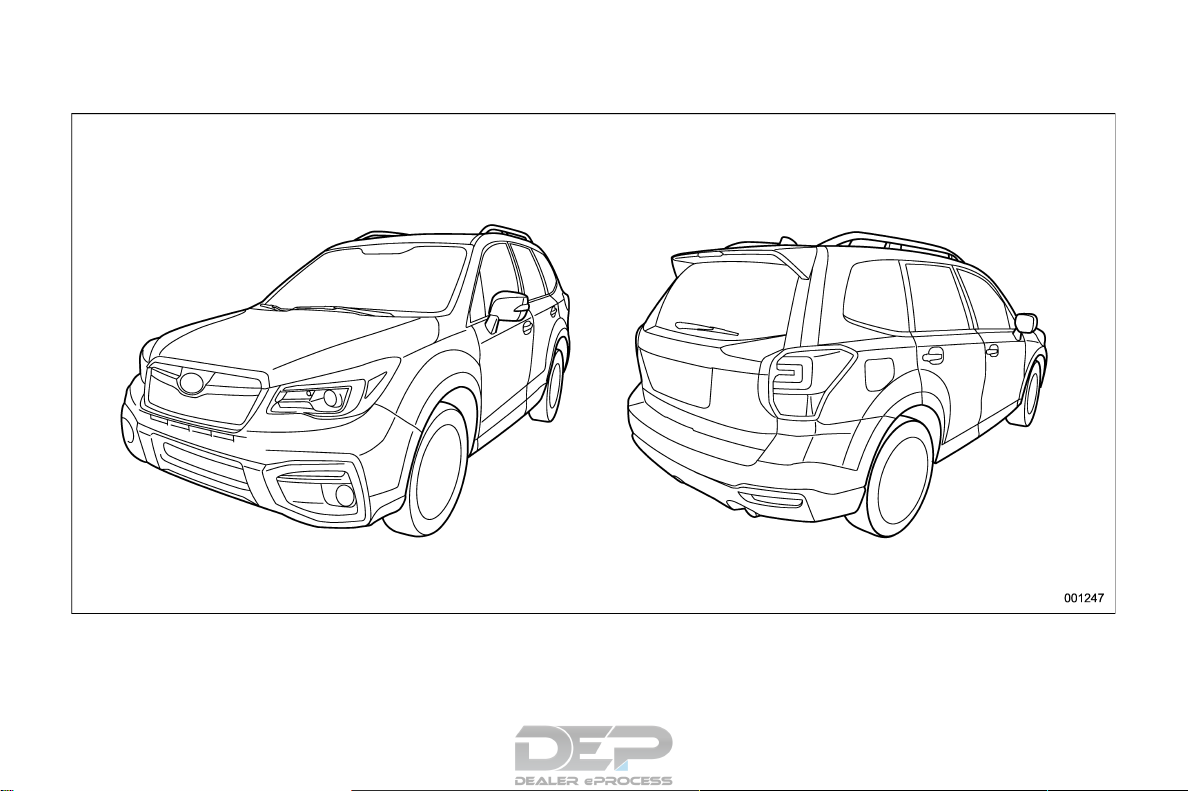
Illustrated index
S00AE
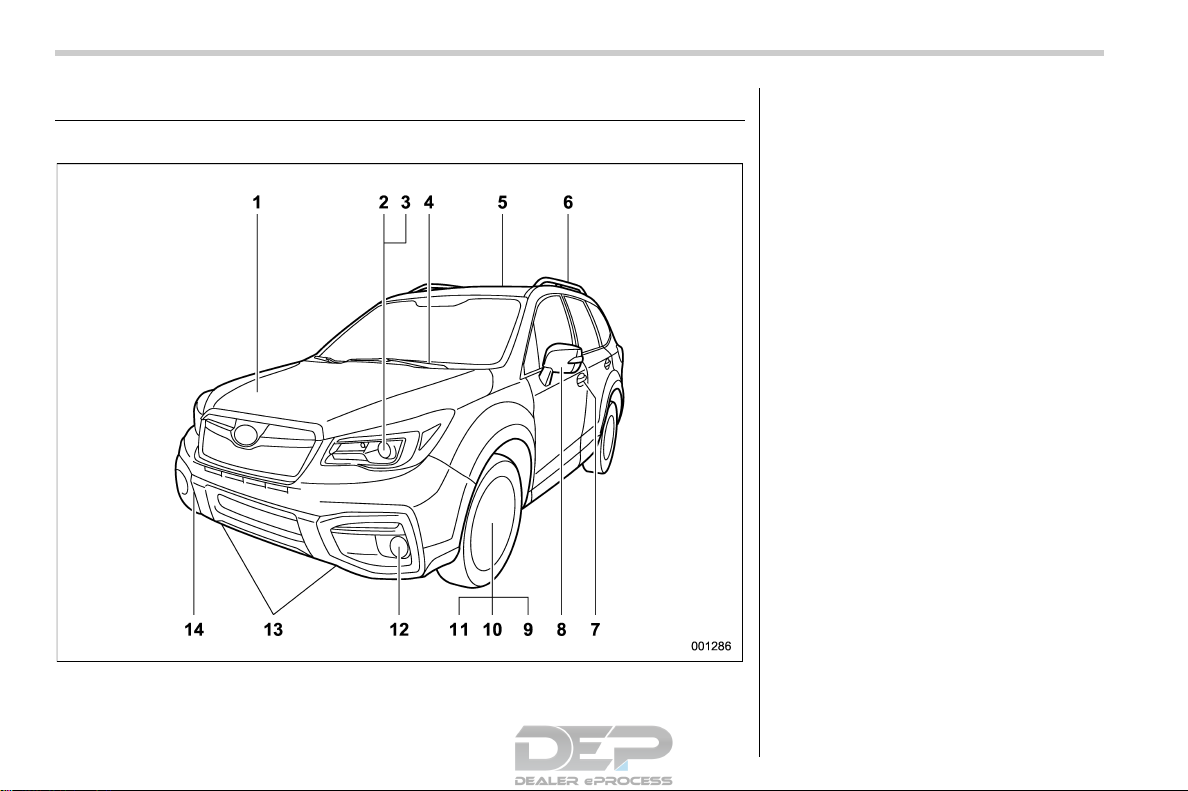
& Exterior
S00AE01
1) Engine hood (page 11-7)
2) Headlight (page 3-93)
3) Replacing bulbs (page 11-39)
4) Front wiper (page 3-105)
5) Moonroof (page 2-46)
6) Roof rails (page 8-14)
7) Door locks (page 2-6)
 Outside mirrors (page 3-116)
9) Tire pressure (page 11-25)
10) Flat tires (page 9-5)
11) Snow tires (page 8-11)
12) Fog light (page 3-102)
13) Tie-down hooks (page 9-13)
14) Towing hook (page 9-13)
12

1) Rear window defogger (page 3-116)
2) Fuel filler lid and cap (page 7-5)
3) Child safety locks (page 2-32)
4) Tie-down hole (page 9-13)
5) Rear gate (page 2-38)
6) Towing hook (page 9-13)
– CONTINUED –
13
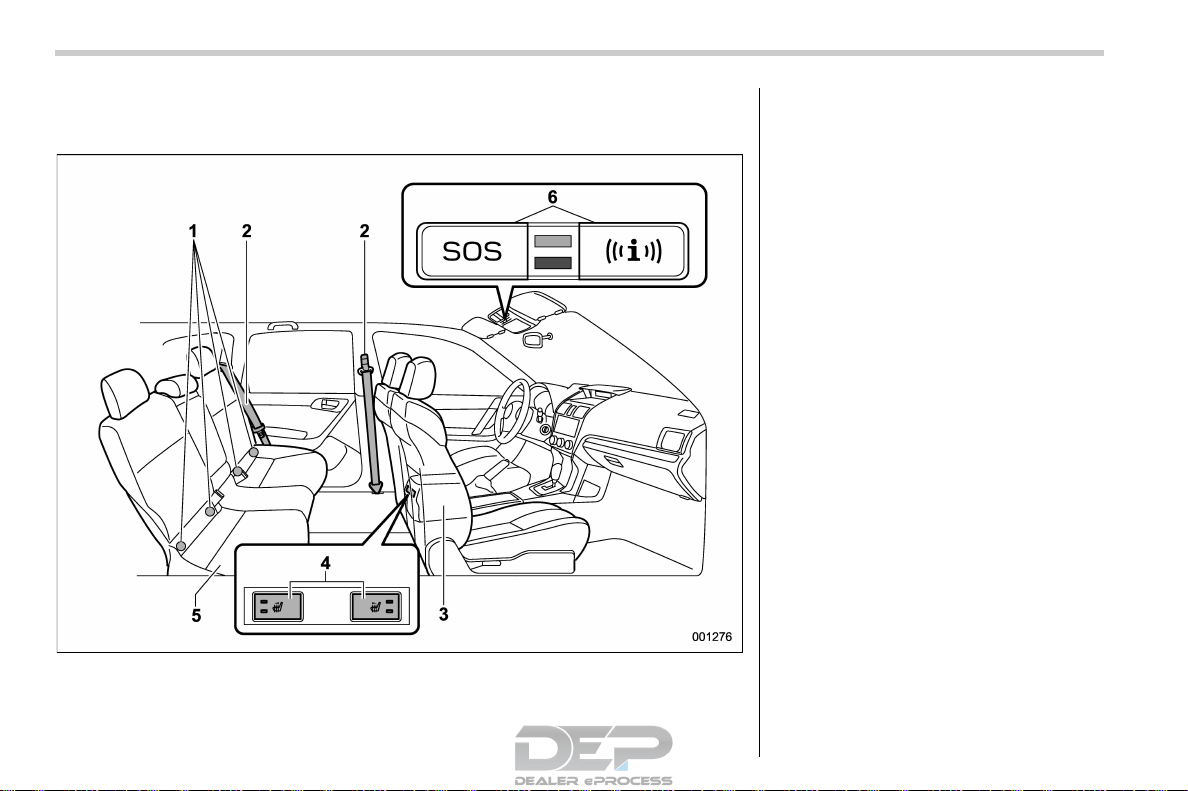
& Interior
S00AE02
! Passenger compartment area
S00AE0201
1) Lower anchorages for child restraint
system (page 1-38)
2) Seatbelt (page 1-16)
3) Front seat (page 1-2)
4) Rear seat heater switch (page 1-10)
5) Rear seat (page 1-11)
6) Buttons for SUBARU STARLINK
NOTE
For U.S.-spec. models with SUBARU
STARLINK: Refer to the Owner’s Man-
ual supplement for SUBARU
STARLINK.
14

1) Power windows (page 2-32)
2) Door locks (page 2-6)
3) Glove box (page 6-6)
4) Front power supply socket (page 6-9)
5) Shift lever (MT) (page 7-22)/Select lever
(CVT) (page 7-25)
6) Parking brake lever (page 7-48)
7) Cup holder (page 6-7)
Center console (page 6-6)
– CONTINUED –
15

& Instrument panel
S00AE03
1) Outside mirror switch (page 3-116)
2) Seat position memory switch (page 1-5)
3) Steering Responsive Headlight OFF
switch (models with Steering Respon-
sive Headlight) (page 3-99)/Steering re-
sponsive fog light off switch (if equipped)
(page 3-103)
4) Illumination brightness control
(page 3-101)
5) BSD/RCTA OFF switch (page 7-59)
6) Vehicle Dynamics Control OFF switch
(models without power rear gate)
(page 7-41)/Memory switch (models with
power rear gate) (page 2-43)
7) Combination meter (page 3-9)
Information display (page 3-34)/Multi
function display (page 3-44)
9) Hazard warning flasher switch (models
with multi function display) (page 3-8)
10) Hazard warning flasher switch (models
without multi function display) (page 3-8)
11) Multi function display control switch
(page 3-44)
12) Audio (page 5-1)
13) Climate control (page 4-1)
14) Power rear gate switch (page 2-39)
15) Fuse box (page 11-37)
16) Hood lock release (page 11-7)
17) Vehicle Dynamics Control OFF switch
(models with power rear gate)
(page 7-41)
16
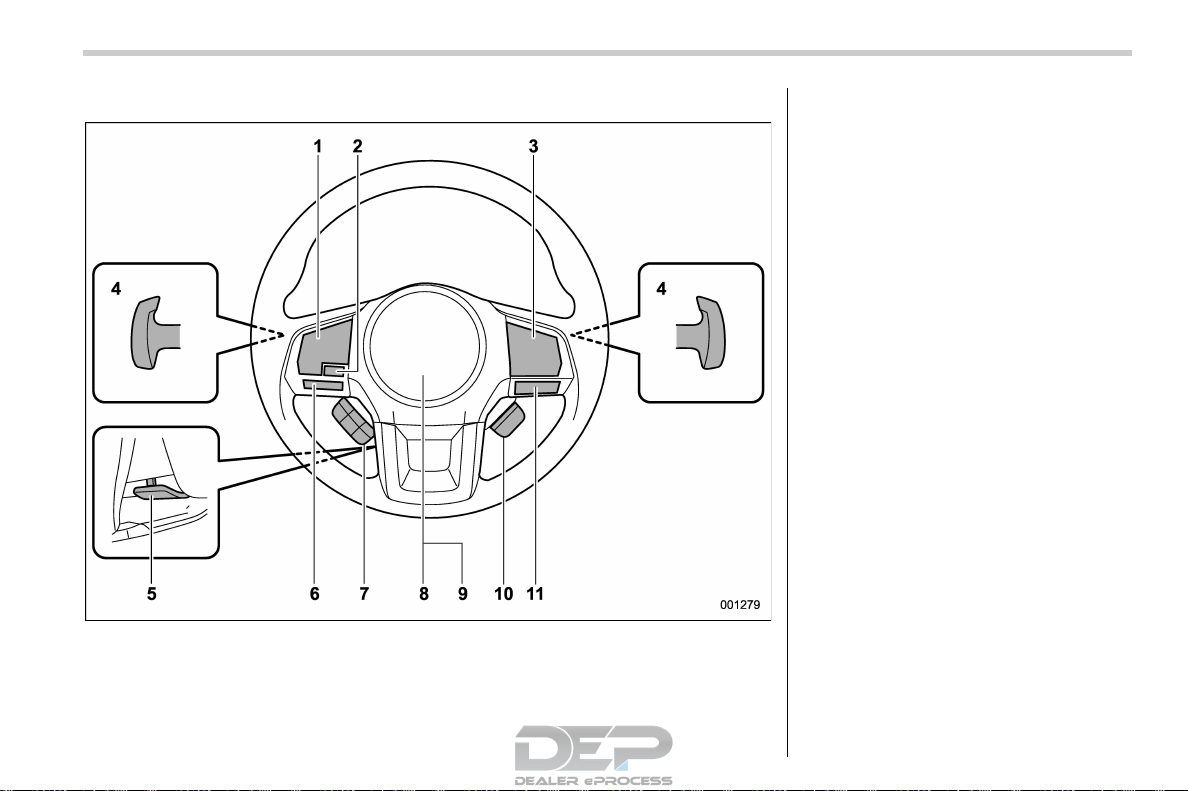
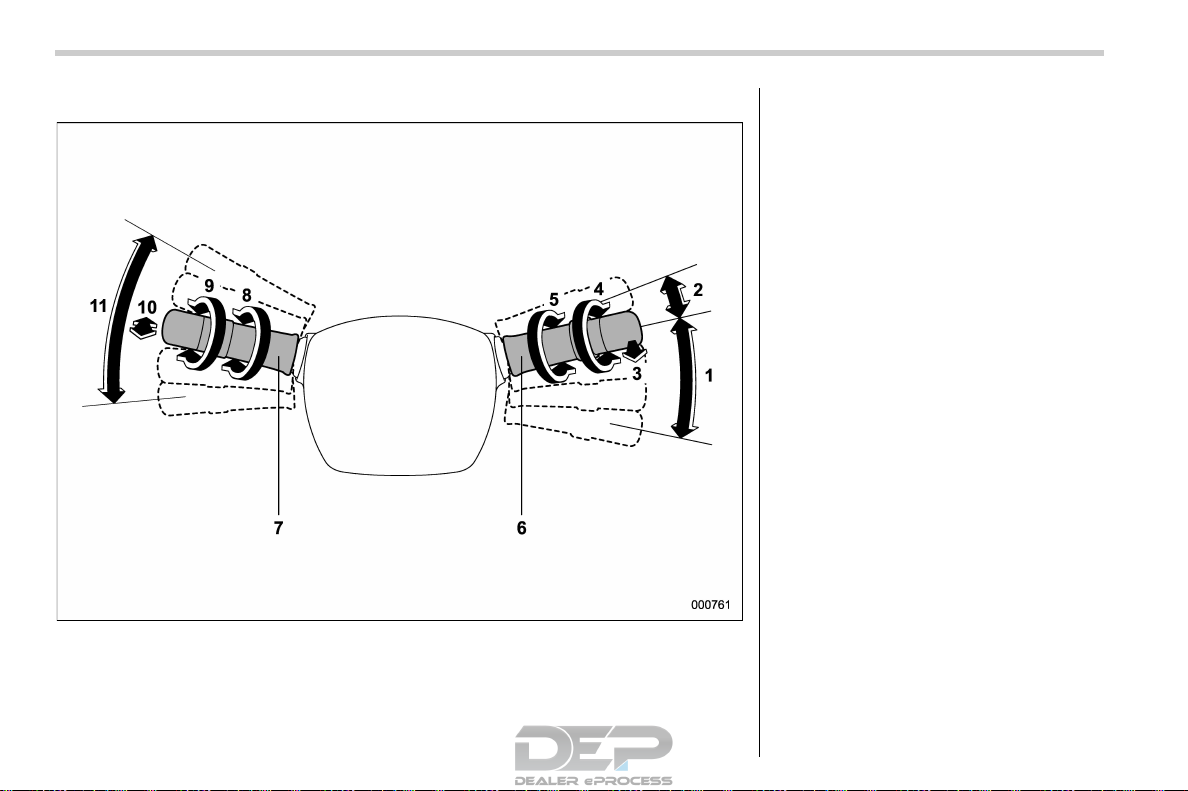
& Steering wheel
S00AE09
1) Audio control switches (page 5-63)
2) Talk switch for voice command system
(page 5-81)
3) Cruise control (page 7-54)
4) Shift paddle (page 7-28)
5) Tilt/telescopic lock lever (page 3-118)
6) Hands-free phone switches (page 5-73)
7) Multi information display control switches
(page 3-39)
SRS airbag (page 1-43)
9) Horn (page 3-119)
10) Heated steering wheel switch
(page 3-119)
11) SI-DRIVE switches (page 7-34)
– CONTINUED –
17
& Light control and wiper control levers/switches
S00AE04
1) Windshield wiper (page 3-104)
2) Mist (page 3-105)
3) Windshield washer (page 3-106)
4) Rear window wiper and washer switch
(page 3-106)
5) Wiper intermittent time control switch
(page 3-105)
6) Wiper control lever (page 3-105)
7) Light control switch (page 3-93)
Fog light switch (page 3-102)
9) Headlight ON/OFF/AUTO (page 3-93)
10) Headlight flasher High/Low beam change
(page 3-95)
11) Turn signal lever (page 3-100)
18
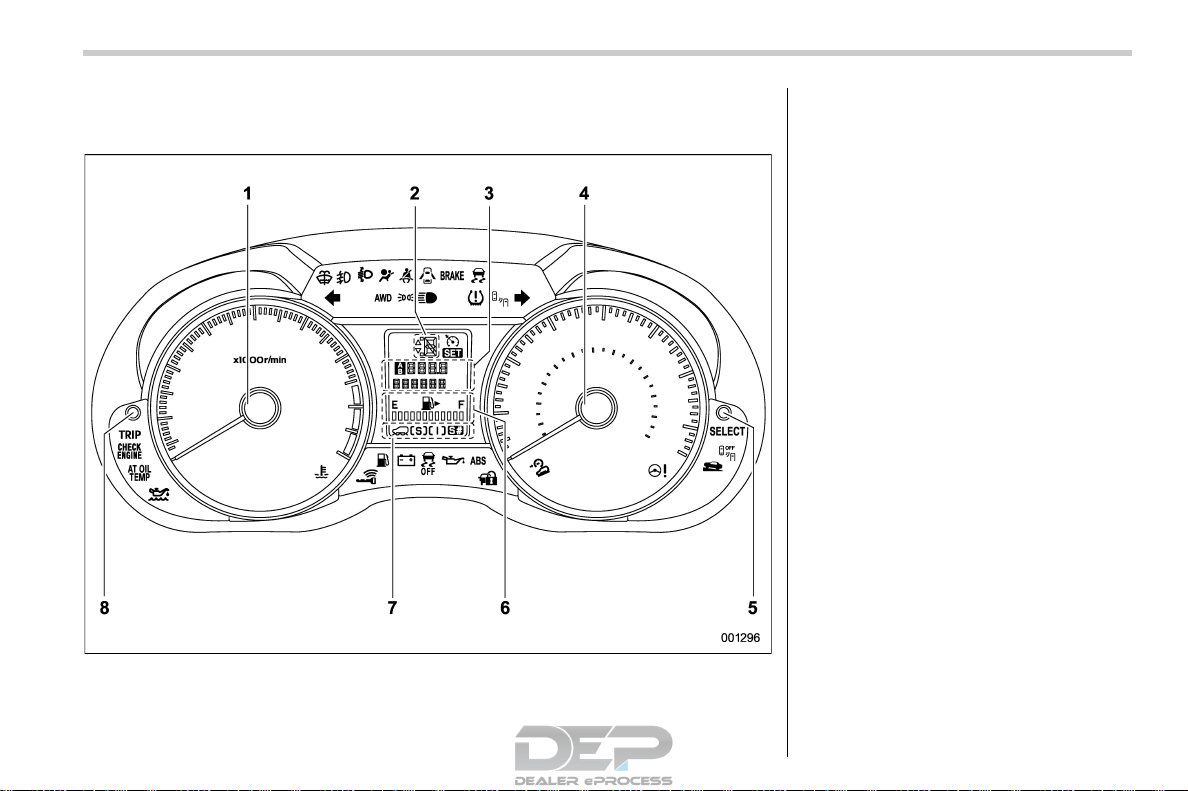
& Combination meter
S00AE05
! U.S.-spec. models (type A)
S00AE0538
The illustration above is a typical example. For some models, the combination meter may
be slightly different than that shown in the illustration.
1) Tachometer (page 3-11)
2) Select lever/gear position indicator
(page 3-31)
3) Trip meter and odometer (page 3-10)
4) Speedometer (page 3-10)
5) Information display selection knob
(page 3-34)
6) Fuel gauge (page 3-12)
7) X-mode (if equipped) (page 7-43)/SI-
DRIVE (if equipped) (page 7-32)
Trip meter A/B selection and trip meter
reset knob (page 3-10)
– CONTINUED –
19
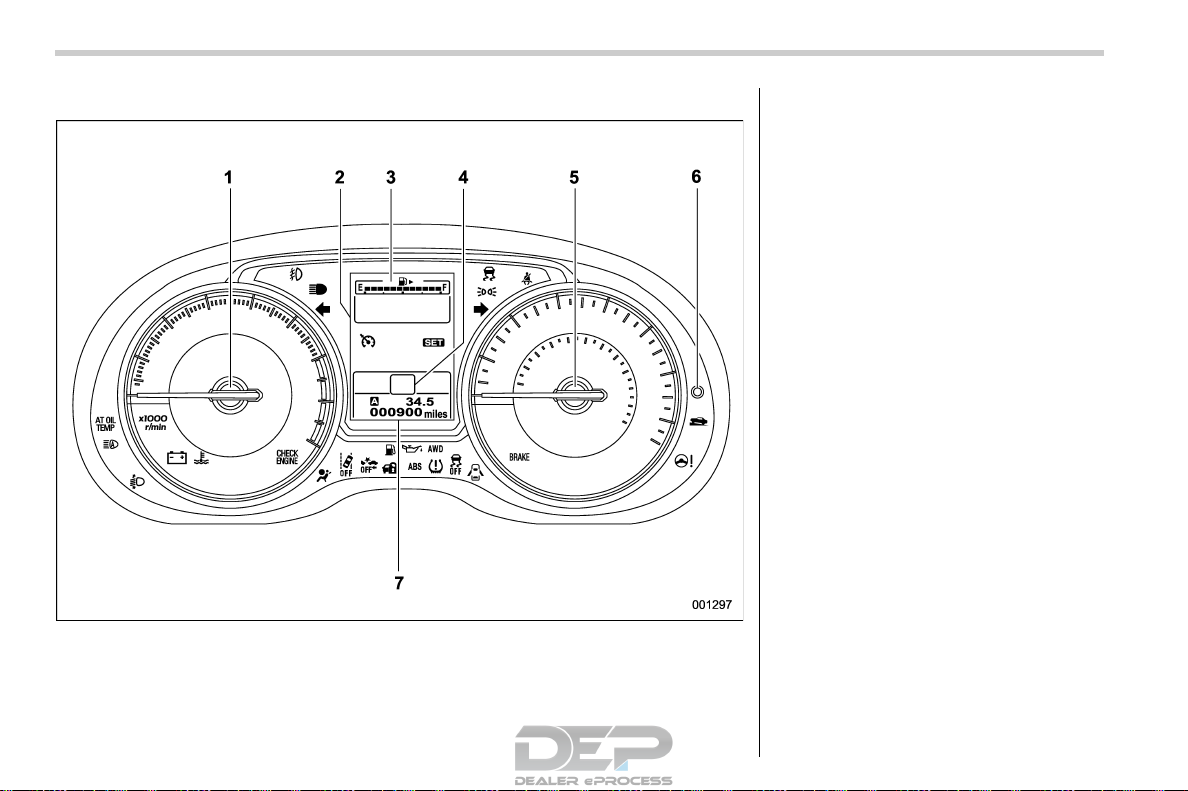
! U.S.-spec. models (type B)
S00AE0549
The illustration above is a typical example. For some models, the combination meter may
be slightly different than that shown in the illustration.
1) Tachometer (page 3-11)
2) Multi information display (page 3-39)
3) Fuel gauge (page 3-12)
4) Select lever/gear position indicator
(page 3-31)
5) Speedometer (page 3-10)
6) Trip meter A/B selection and trip meter
reset knob (page 3-10)
7) Trip meter and odometer (page 3-10)
20
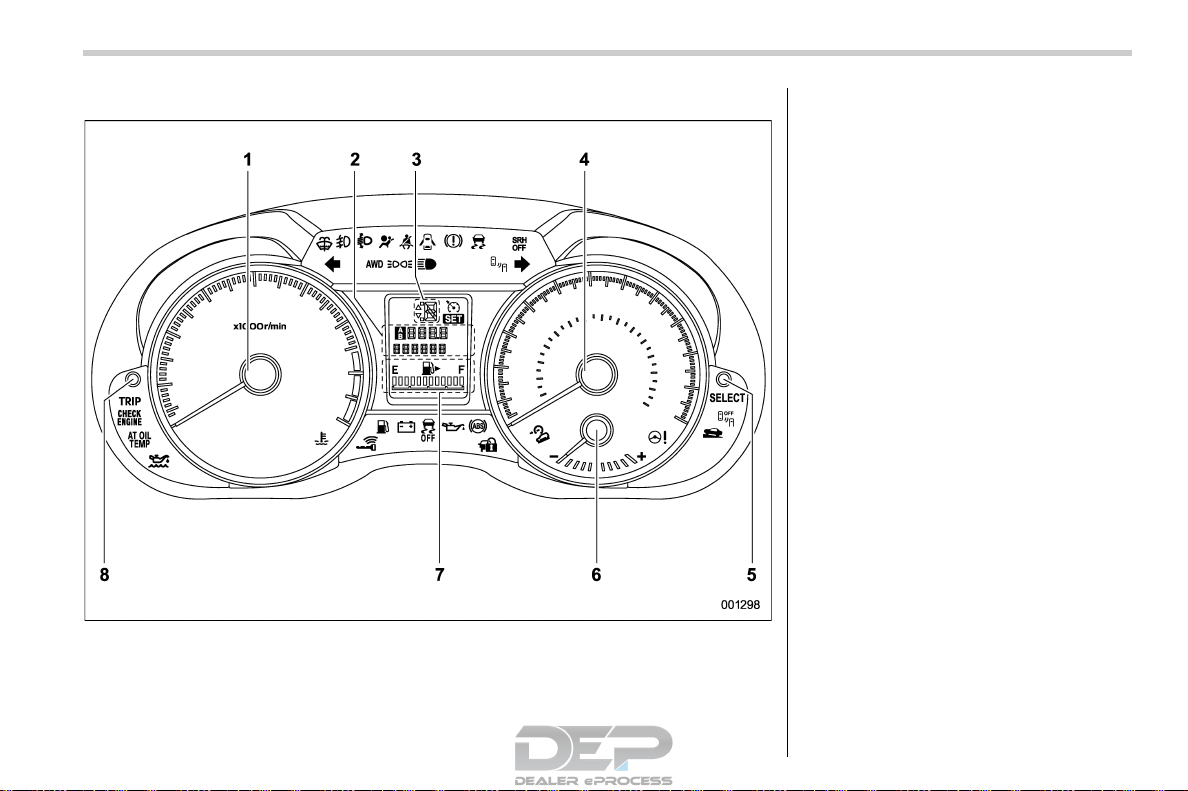
! Canada-spec. and Mexico-spec. models (type A)
S00AE0558
The illustration above is a typical example. For some models, the combination meter may
be slightly different than that shown in the illustration.
1) Tachometer (page 3-11)
2) Trip meter and odometer (page 3-10)
3) Select lever/gear position indicator
(page 3-31)
4) Speedometer (page 3-10)
5) Information display selection knob
(page 3-34)
6) ECO gauge (Mexico-spec. models)
(page 3-12)
7) Fuel gauge (page 3-12)
Trip meter A/B selection and trip meter
reset knob (page 3-10)
– CONTINUED –
21

! Canada-spec. and Mexico-spec. models (type B)
S00AE0559
The illustration above is a typical example. For some models, the combination meter may
be slightly different than that shown in the illustration.
1) Tachometer (page 3-11)
2) Multi information display (page 3-39)
3) Fuel gauge (page 3-12)
4) Select lever/gear position indicator
(page 3-31)
5) Speedometer (page 3-10)
6) Trip meter A/B selection and trip meter
reset knob (page 3-10)
7) Trip meter and odometer (page 3-10)
22
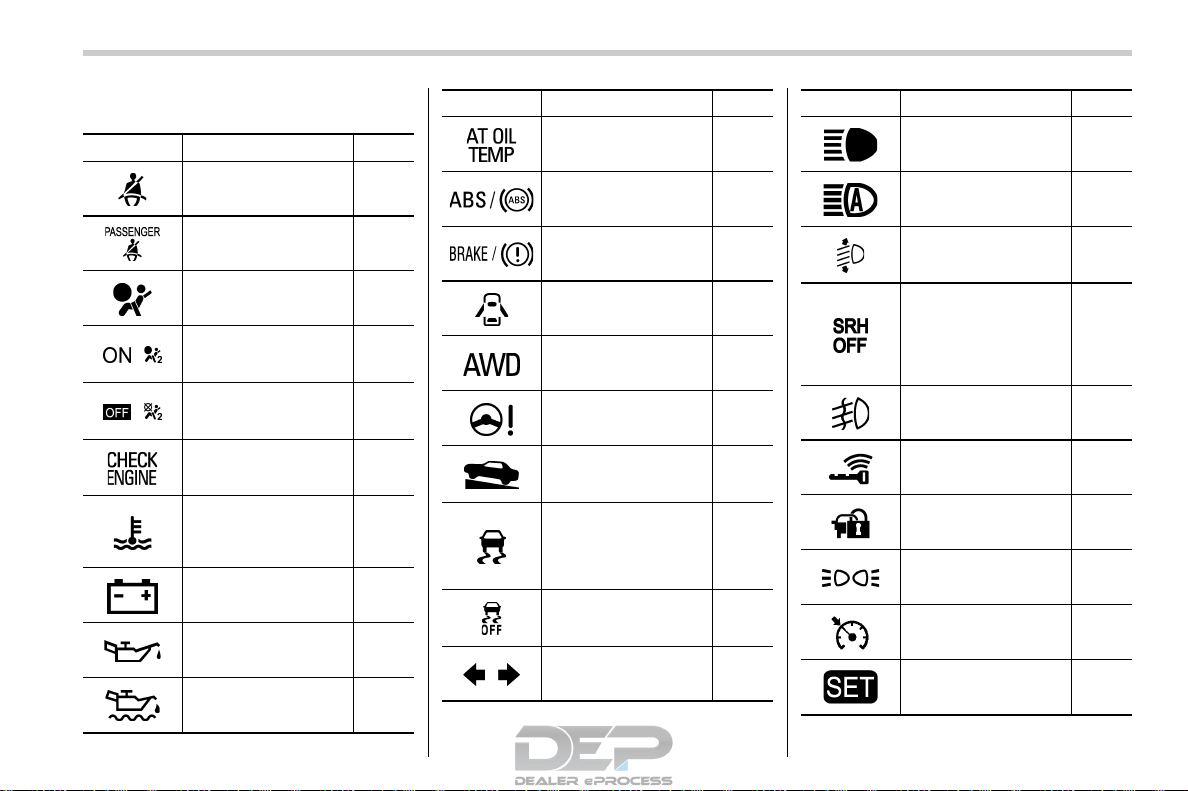
& Warning and indicator lights
S00AE06
Mark Name Page
Seatbelt warning light 3-14
Front passenger’s
seatbelt warning light
3-14
SRS airbag system
warning light
3-15
/
Front passenger’s
frontal airbag ON indi-
cator
3-16
/
Front passenger’s
frontal airbag OFF in-
dicator
3-16
CHECK ENGINE
warning light/Malfunc-
tion indicator light
3-16
Coolant temperature
low indicator light/
Coolant temperature
high warning light
3-17
Charge warning light 3-18
Oil pressure warning
light
3-18
Engine low oil level
warning light
3-18
Mark Name Page
AT OIL TEMP warning
light (CVT models)
3-19
ABS warning light 3-21
Brake system warning
light
3-21
Door open warning
light
3-23
AWD warning light
(CVT models)
3-23
Power steering warn-
ing light
3-23
Hill start assist warning
light/Hill start assist
OFF indicator light
3-23
Vehicle Dynamics
Control warning light/
Vehicle Dynamics
Control operation indi-
cator light
3-24
Vehicle Dynamics
Control OFF indicator
light
3-25
Turn signal indicator
lights
3-32
Mark Name Page
High beam indicator
light
3-32
High beam assist indi-
cator light (if equipped)
3-32
Automatic headlight
beam leveler warning
light (if equipped)
3-32
Steering Responsive
Headlight warning
light/Steering Respon-
sive Headlight OFF in-
dicator light (if
equipped)
3-99
Front fog light indicator
light (if equipped)
3-33
Access key warning
light (if equipped)
3-26
Security indicator light 3-30
Headlight indicator
light (if equipped)
3-33
Cruise control indica-
tor light
3-32
Cruise control set indi-
cator light
3-32
– CONTINUED –
23
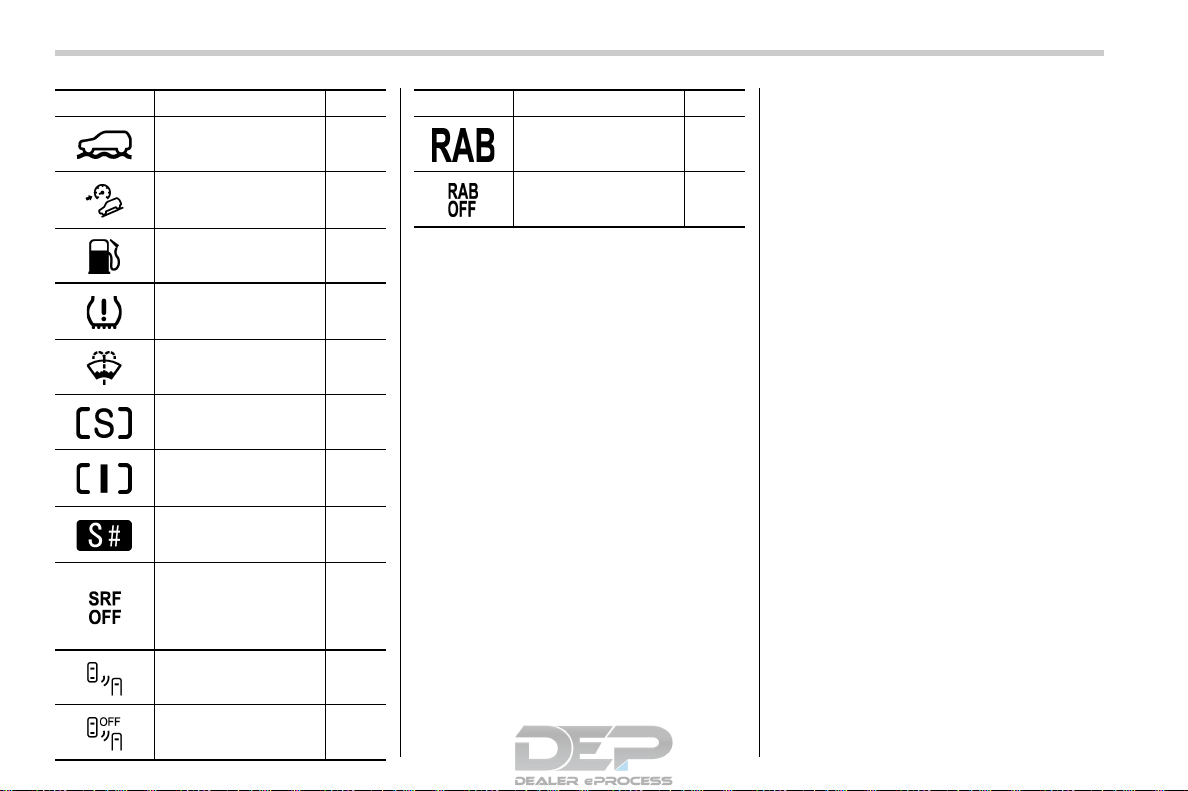
Mark Name Page
X-mode indicator light
(if equipped)
3-33
Hill descent control in-
dicator light (if
equipped)
3-33
Low fuel warning light 3-22
Low tire pressure
warning light
(U.S.-spec. models)
3-19
Windshield washer
fluid warning light
3-19
Sport (S) mode indica-
tor light (if equipped)
3-31
Intelligent (I) mode in-
dicator light (if
equipped)
3-31
Sport Sharp (S#)
mode indicator light (if
equipped)
3-31
Steering responsive
fog lights warning indi-
cator/Steering respon-
sive fog lights OFF
indicator (if equipped)
3-33
BSD/RCTA warning
indicator (if equipped)
3-33
BSD/RCTA OFF indi-
cator (if equipped)
3-34
Mark Name Page
RAB warning light (if
equipped)
3-34
RAB OFF indicator (if
equipped)
3-34
24

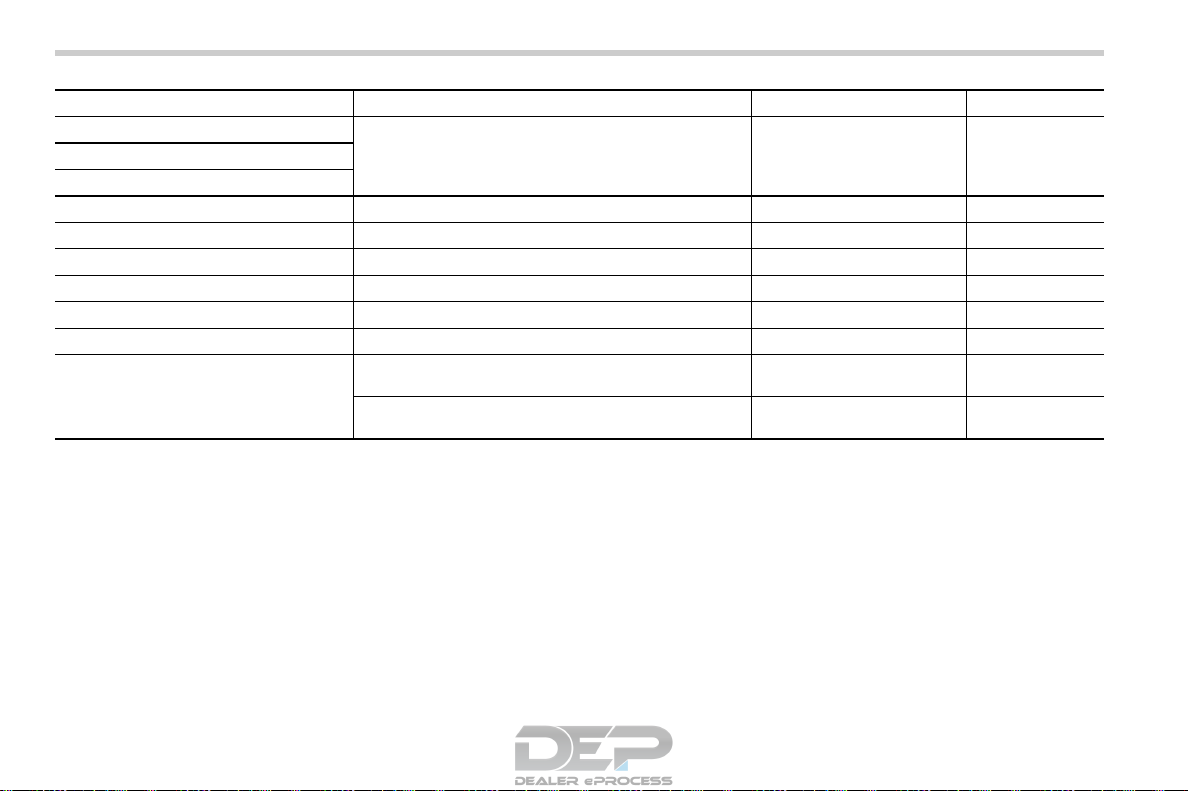
Function settings
S00AF
A SUBARU dealer can change the settings of the functions shown in the following table to meet your personal requirements. Contact the
nearest SUBARU dealer for details. If your vehicle is equipped with a multi function display, the settings for some of these functions can
be changed using the display. For details, refer to “Multi function display” F3-44.
Item Function Possible settings Default setting
Alarm system Alarm system Operation/Non-operation Operation
Monitoring start delay time (after closure of doors) 0 seconds/30 seconds 30 seconds
Impact sensor operation (only models with shock
sensors (dealer option))
Operation/Non-operation Non-operation
Passive arming (models without “keyless access with
push-button start system”)
Operation/Non-operation Non-operation
Dome light and map lights illumination ON/OFF OFF
Keyless access (if equipped) Hazard warning flasher Operation/Non-operation Operation
Audible signal Operation/Non-operation Operation
Audible signal volume Level 1 to 7 Level 5
Door unlock selection function (driver’s door unlock) Driver’s door only/All doors Driver’s door only
Door unlock selection function (rear gate unlock) Rear gate only/All doors Rear gate only
Remote keyless entry system Hazard warning flasher Operation/Non-operation Operation
Audible signal Operation/Non-operation Operation
Audible signal volume Level 1 to 7 Level 5
Key lock-in prevention Key lock-in prevention Operation/Non-operation Operation
Defogger and deicer system for models
with the automatic climate control system
Rear window defogger, outside mirror defogger and
windshield wiper deicer
Operation for 15 minutes/
Continuous operation
Operation for 15
minutes
– CONTINUED –
25
Item Function Possible settings Default setting
Dome light Operation of dome light/map light/cargo area light OFF
delay timer
OFF/10 seconds/20 sec-
onds/30 seconds
30 seconds
Map light
Cargo area light
Battery drainage prevention function Battery drainage prevention function Operation/Non-operation Operation
Seatbelt warning Sounds a chime while driving Operation/Non-operation Operation
Auto on/off headlights (if equipped) Sensitivity of the operation of the auto on/off headlights Low/Mid/High/Max Mid
Reverse gear interlocked rear wiper Reverse gear interlocked rear wiper operation Operation/Non-operation Non-operation*
1
One-touch lane changer Operation of the one-touch lane changer Operation/Non-operation Operation
High beam assist function (if equipped) High beam assist function Operation/Non-operation Operation
Welcome lighting function (if equipped) Welcome lighting function (when approaching) OFF/30 seconds/60 sec-
onds/90 seconds
30 seconds
Welcome lighting function (when exiting) OFF/30 seconds/60 sec-
onds/90 seconds
30 seconds
*1
: Except for U.S. model, the default setting will be “Operation”.
26
S01
Front seats …………………………..…………..……………. 1-2
Manual seat .……..…..…..…..…..……..…..…..…..….... 1-4
Power seat (driver’s seat – if equipped)…..…..…..… 1-5
Head restraint adjustment .…..……..…..…..…..…..…. 1-8
Seat heater (if equipped) ….……………………..………. 1-9
Front seat heater (if equipped) ...…..…..……..…..….1-10
Rear seat heater (if equipped) ..…..…..……..…..…...1-10
Rear seats.……………………..…………..………………… 1-11
Armrest (if equipped) .…..…..…..…..…..……..…..….. 1-12
Head restraint adjustment .…..……..…..…..…..…..… 1-12
Folding down the rear seatback ..…..…..…..……..… 1-13
Reclining the seatback (if equipped)…..…..…..….... 1-15
Seatbelts……..…………..…………..…………………….... 1-16
Seatbelt safety tips ....…..…..…..……..…..…..…..….. 1-16
Emergency Locking Retractor (ELR)...…..……..…...1-17
Automatic Locking Retractor/Emergency Locking
Retractor (ALR/ELR)...……..…..…..…..…..……..….. 1-18
Seatbelt warning light and chime ....…..…..…..…….1-18
Fastening the seatbelt .…..…..…..…..……..…..…..….1-18
Seatbelt maintenance ....…..…..…..…..……..…..….... 1-25
Front seatbelt pretensioners………………………….. 1-25
Seatbelt with shoulder belt pretensioner.…..…..….. 1-25
Seatbelt with shoulder belt and lap belt
pretensioners....…..…..……..…..…..…..…..…..…….1-27
System monitors ...…..…..…..…..……..…..…..…..…. 1-28
System servicing …...…..…..…..…..……..…..…..…... 1-28
Precautions against vehicle modification ....…..….. 1-29
Child restraint systems …………………………..…….. 1-30
Safety tips for installing child restraint systems .… 1-31
Where to place a child restraint system ..…..……... 1-31
Choosing a child restraint system…..…..…..…..….. 1-33
Installing child restraint systems with ALR/ELR
seatbelt ..……..…..…..…..…..…..……..…..…..…..… 1-33
Installing a booster seat ..…..……..…..…..…..…..…. 1-37
Installation of child restraint systems by use of
lower and tether anchorages (LATCH)..…..…..…. 1-38
Top tether anchorages …..…..……..…..…..…..…..…. 1-41
*SRS airbag (Supplemental Restraint System
airbag) ..……………………..…………..…………………. 1-43
General precautions regarding SRS airbag
system ..…..…..…..…..…..……..…..…..…..…..….... 1-43
Components..…..…..…..……..…..…..…..…..……..…. 1-50
SUBARU advanced frontal airbag system...…..…... 1-52
SRS side airbag and SRS curtain airbag ...……..…. 1-62
SRS airbag system monitors....…..…..…..……..…... 1-70
SRS airbag system servicing ..…..…..…..……..….... 1-72
Precautions against vehicle modification ....…..….. 1-73
Seat, seatbelt and SRS airbags
1

Front seats
S01AA
WARNING
. Never adjust the seat while driv-
ing to avoid loss of vehicle con-
trol and personal injury.
. Before adjusting the seat, make
sure the hands and feet of rear
seat passengers and cargo are
clear of the adjusting mechan-
ism.
. After adjusting the seat, push it
slightly to make sure it is se-
curely locked. If the seat is not
securely locked, it may move or
the seatbelt may not operate
properly.
. Do not put objects under the front
seats. They may interfere with
front seat locking and cause an
accident.
. Seatbelts provide maximum re-
straint when the occupant sits
well back and upright in the seat.
To reduce the risk of sliding
under the seatbelt in a collision,
the front seatbacks should be
always used in the upright posi-
tion while the vehicle is running.
If the front seatbacks are not
used in the upright position in a
collision, the risk of sliding under
the lap belt and of the lap belt
sliding up over the abdomen will
increase, and both can result in
serious internal injury or death.
. The SRS airbags deploy with
considerable speed and force.
Occupants who are out of proper
position when the SRS airbag
deploys could suffer very serious
injuries. Because the SRS airbag
needs enough space for deploy-
ment, the driver should always sit
upright and well back in the seat
as far from the steering wheel as
practical while still maintaining
full vehicle control and the front
passenger should move the seat
as far back as possible and sit
upright and well back in the seat.
WARNING
Place children in the rear seat prop-
erly restrained at all times. The SRS
airbag deploys with considerable
speed and force and can injure or
even kill children, especially if they
are not restrained or improperly
restrained. Because children are
lighter and weaker than adults, their
risk of being injured from deploy-
ment is greater. For that reason, we
strongly recommend that ALL chil-
dren (including those in child seats
and those that have outgrown child
restraint devices) sit in the REAR
seat properly restrained at all times
in a child restraint device or in a
seatbelt, whichever is appropriate
Seat, seatbelt and SRS airbags/Front seats
1-2

for the child’s age, height and
weight. Secure ALL types of child
restraint devices (including forward
facing child seat) in the REAR seats
at all times.
NEVER INSTALL A FORWARD OR
REARWARD FACING CHILD SEAT IN
THE FRONT SEAT. DOING SO RISKS
SERIOUS INJURY OR DEATH TO
THE CHILD BY PLACING THE
CHILD’S HEAD TOO CLOSE TO
THE SRS AIRBAG.
According to accident statistics,
children are safer when properly
restrained in the rear seating posi-
tions than in the front seating posi-
tions. For instructions and precau-
tions concerning child restraint sys-
tems, refer to “Child restraint sys-
tems” F1-30.
WARNING
To prevent the passenger from slid-
ing under the seatbelt in the event of
a collision, always put the seatback
in the upright position while the
vehicle is in motion. Also, do not
place objects such as cushions
between the passenger and the seat-
back. If you do so, the risk of sliding
under the lap belt and of the lap belt
sliding up over the abdomen will
increase, and both can result in
serious internal injury or death.
WARNING
Do not let rear passengers rest their
feet between the front seatback and
seat cushion. Doing so may lead to
defective operation of the following
systems and could result in serious
injury.
. Occupant detection system
. SRS side airbag
. Seat heater (if equipped)
. Power seat (if equipped)
– CONTINUED –
Seat, seatbelt and SRS airbags/Front seats
1-3
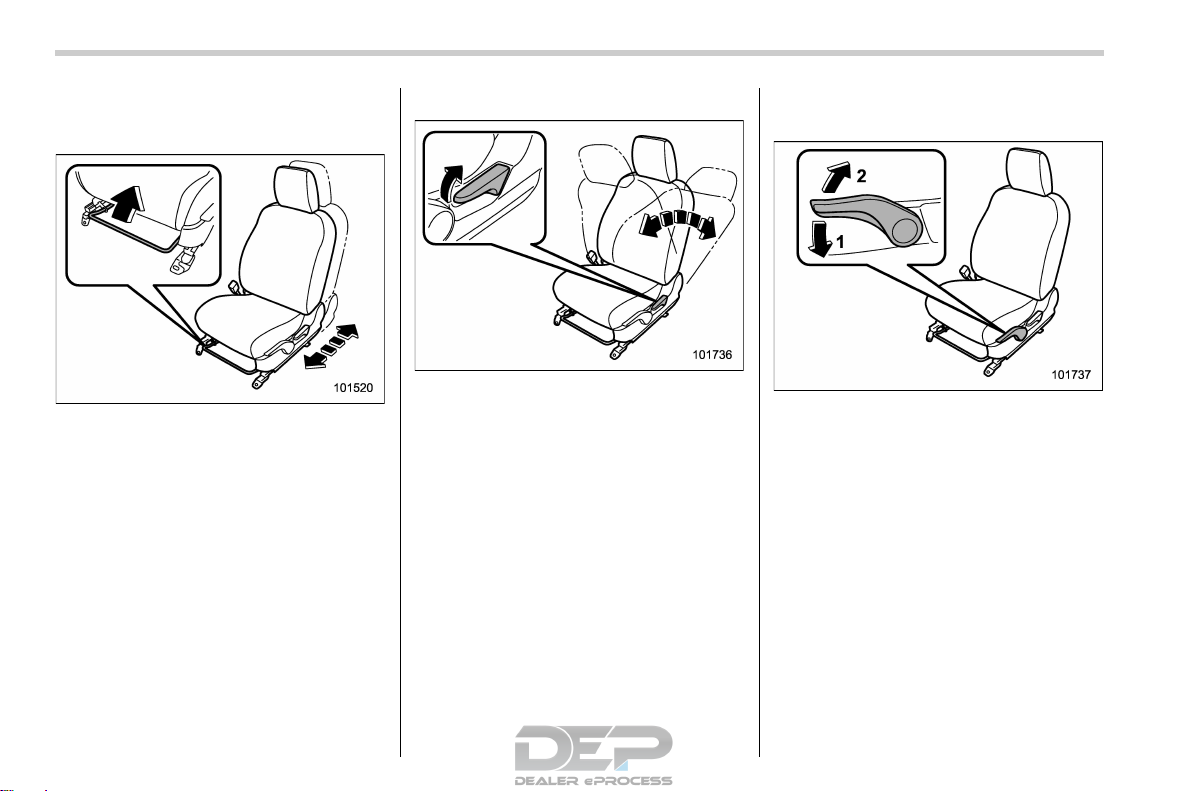
& Manual seat
S01AA01
! Forward and backward adjustment
S01AA0101
Pull the lever upward and slide the seat to
the desired position. Then release the
lever and try to move the seat back and
forth to make sure that it is securely locked
into place.
! Reclining the seatback
S01AA0102
Pull the reclining lever up and adjust the
seatback to the desired position. Then
release the lever and make sure the
seatback is securely locked into place.
The seatback placed in a reclined position
can spring back upward with force when
the lever is pulled. While operating the
lever to return the seatback, hold the
seatback lightly so that it may be raised
back gradually.
! Seat height adjustment (driver’s
seat)
S01AA0103
1) When the lever is pushed down, the seat
is lowered.
2) When the lever is pulled up, the seat
rises.
The height of the seat can be adjusted by
moving the seat adjustment lever up and
down.
Seat, seatbelt and SRS airbags/Front seats
1-4

& Power seat (driver’s seat – if
equipped)
S01AA02
1) Seat position forward/backward con-
trol switch
To adjust the seat forward or backward,
move the control switch forward or
backward. During forward/backward ad-
justment of the seat, you cannot adjust
the seat cushion angle or seat height.
2) Seat cushion angle control switch
To adjust the seat cushion angle, pull up
or push down the front end of the control
switch.
3) Seat height control switch
To adjust the seat height, pull up or push
down the rear end of the control switch.
4) Seatback angle (reclining) control
switch
To adjust the angle of the seatback, move
the control switch.
5) Lumbar support control switch
To increase lower back support, push the
front side of the switch. To decrease
lower back support, push the rear side of
the switch.
! Memory function (driver’s seat – if
equipped)
S01AA0207
WARNING
. Never adjust the seat while driv-
ing to avoid loss of vehicle con-
trol and personal injury.
. Before adjusting the seat, make
sure that cargo or the hands and
feet of rear seat passengers are
clear of the adjusting mechan-
ism.
. Never retrieve the seat position
while driving to avoid loss of
vehicle control and personal in-
jury.
. Perform the seat position retrie-
val before driving. Be sure to
confirm that the select lever is in
the “P” position, and the parking
brake is applied, when adjusting
the seat position. Do not drive
until the retrieval of the seat
position is complete.
. When retrieving a registered seat
position, make sure the hands,
feet and possessions of rear seat
passengers are clear of the seat
adjusting mechanism.
. When any unusual conditions or
malfunctions occur during the
retrieval of the seat position, stop
the retrieval of the seat position
by performing any of the follow-
ing procedures.
– Operate any of the power seat
switches
– Press the “SET” button
– Press button “1” or “2”
Some of your desired seat positions can
be registered. Register the seat position
with button “1” or “2” or each of the access
keys and retrieve the seat position.
– CONTINUED –
Seat, seatbelt and SRS airbags/Front seats
1-5
The following seat positions can be regis-
tered.
. Forward/backward position of the seat
. Angle of seatback
. Angle of seat cushion
. Height of seat
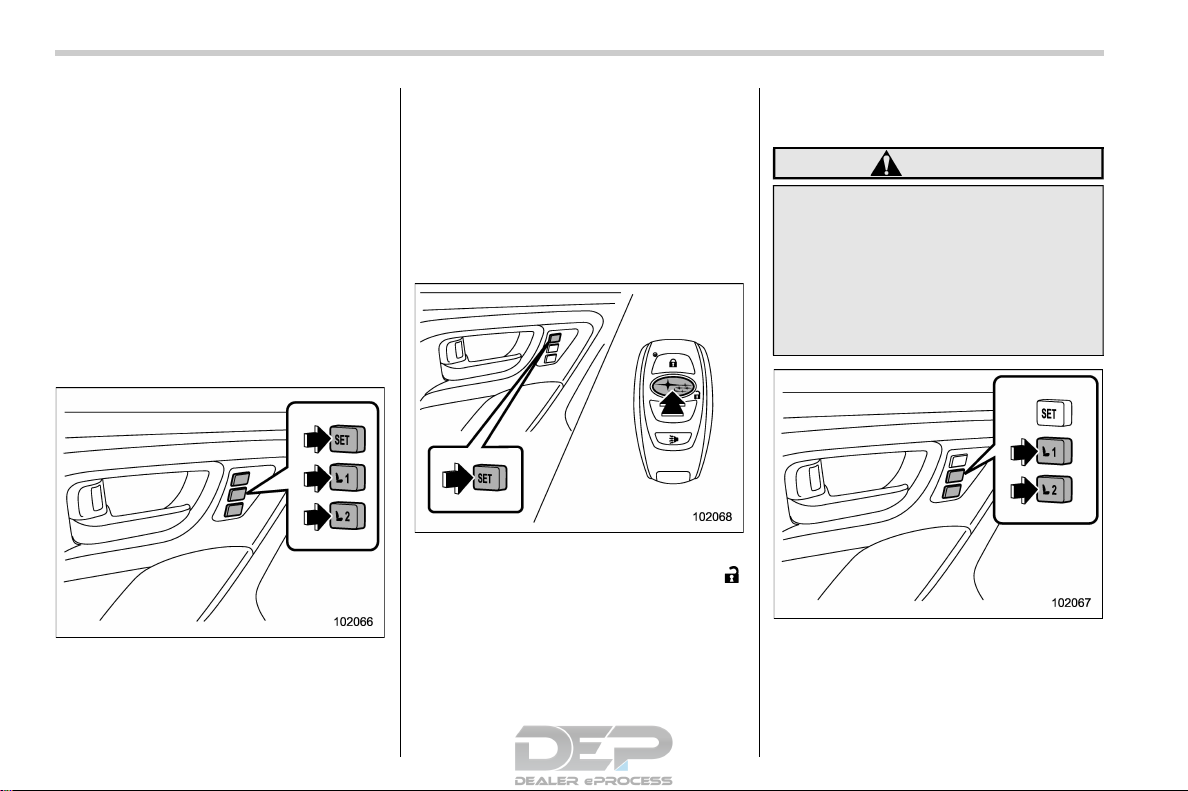
! Registration of seat position with
button “1” or “2”
S01AA020701
1. Adjust the seat position under the
following conditions.
. The parking brake is applied.
. The select lever is in the “P” position.
2. While pressing the “SET” button, press
and hold the desired button “1” or “2”.
A chirp sounds once, and the seat position
is registered.
! Registration of seat position with
each access key
S01AA020703
1. Adjust the seat position under the
following conditions.
. The parking brake is applied.
. The ignition switch is in the “LOCK”/
“OFF” position.
. The select lever is in the “P” position.
2. While holding the access key fob and
pressing the “SET” button, press the “
”
button of the access key fob.
A chirp sounds once, and the seat position
is registered.
! Retrieval of seat position regis-
tered with button “1” or “2”
S01AA020702
WARNING
Be sure to press the correct button
to retrieve your registered seat posi-
tion. If the seat position is not
optimum for you, it may adversely
affect your driving and may reduce
the effectiveness of the seatbelt.
That could result in an accident
involving serious injury or death.
1. Turn the ignition switch to the “ON”
position.
2. While the select lever is in the “P”
position and the parking brake is applied,
press button “1” or “2”.
Seat, seatbelt and SRS airbags/Front seats
1-6

A chirp sounds and the seat moves to the
registered position. When the seat moves
to the registered position, a chirp will
sound.
NOTE
. If a new position is registered for the
same button, the previously registered
seat position is deleted.
. If the vehicle battery is removed, the
registered seat position is not deleted.
. When the button “1” or “2” is
pressed within 45 seconds after the
driver’s door is opened, the registered
seat position can be retrieved even if
the ignition switch is in the “LOCK” or
“OFF” position.
! Retrieval of the seat position
registered with access key
S01AA020704
1. Hold the registered access key fob.
2. Unlock the driver’s door by pressing
the “
” button or gripping the door handle.
3. Open the driver’s door.
A chirp sounds and the seat moves to the
registered position. When the seat moves
to the registered position, a chirp will
sound.
NOTE
. If the registered seat position cannot
be retrieved after performing the pre-
vious procedures, try the following
procedures.
(1) Press the “SET” button on the
driver’s door.
(2) Press the “
” button on the
access key fob or touch the door
lock sensor to lock the doors.
(3) Perform the prior procedures
again.
. If the keyless access function is
disabled, the seat position cannot be
retrieved by gripping the driver’s door
handle. However, the seat position can
still be retrieved by pressing the “
”
button on the access key fob. For
information about how to enable/dis-
able the keyless access function, refer
to “Disabling keyless access function”
F2-17.
. If a new position is registered for the
same access key fob, the previously
registered seat position is deleted.
! Clearing the registered seat posi-
tion with access key
S01AA020705
1. Close the driver’s door.
2. While holding the access key fob and
pressing the “SET” button, press the “
”
button on the access key fob.
A chirp will sound, and the registered seat
position will be cleared.
– CONTINUED –
Seat, seatbelt and SRS airbags/Front seats
1-7
& Head restraint adjustment
S01AA04
WARNING
. Never drive the vehicle with the
head restraints removed because
they are designed to reduce the
risk of serious neck injury in the
event that the vehicle is struck
from the rear. Also, never install
the head restraints the opposite
way round. Doing so will prevent
the head restraints from function-
ing as intended. Therefore, when
you remove the head restraints,
you must reinstall all head re-
straints correctly to protect vehi-
cle occupants.
. All occupants, including the dri-
ver, should not operate a vehicle
or sit in a vehicle’s seat until the
head restraints are placed in their
proper positions in order to mini-
mize the risk of neck injury in the
event of a crash.
. The front seat head restraints are
designed to be installed into the
front seats only. The rear seat
head restraints are designed to
be installed into the rear seats
only. Do not attempt to install the
front seat head restraints into the
rear seats, or the rear seat head
restraints into the front seats.
Both the driver’s seat and front passen-
ger’s seat are equipped with head re-
straints. Both head restraints are adjusta-
ble in the following ways.
NOTE
It is possible to adjust the angle of the
front seat head restraints only. When
installing the front seat head restraints,
make sure that the angle of the head
restraints can be adjusted.
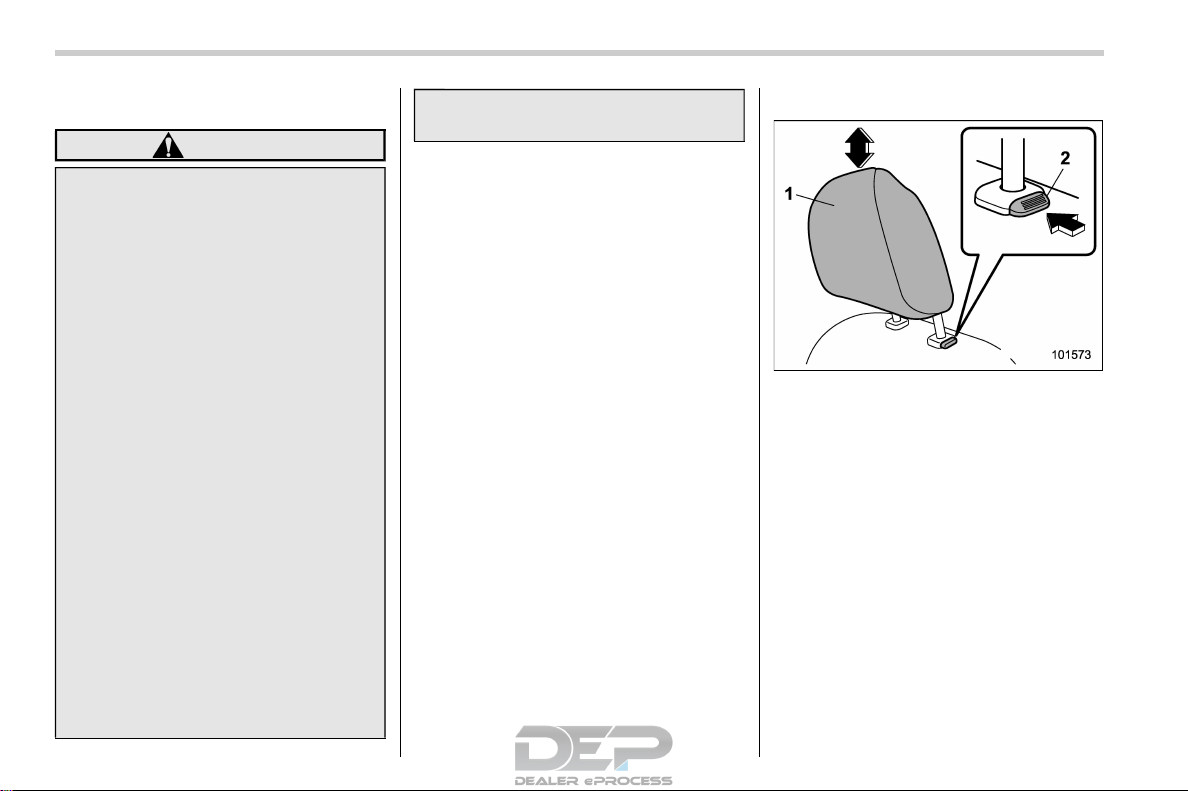
! Head restraint height adjustment
S01AA0401
1) Head restraint
2) Release button
To raise:
Pull the head restraint up.
To lower:
Push the head restraint down while press-
ing the release button on the top of the
seatback.
To remove:
While pressing the release button, pull out
the head restraint.
To install:
Install the head restraint into the holes that
are located on the top of the seatback until
the head restraint locks. Press and hold
the release button to lower the head
restraint.
Seat, seatbelt and SRS airbags/Front seats
1-8
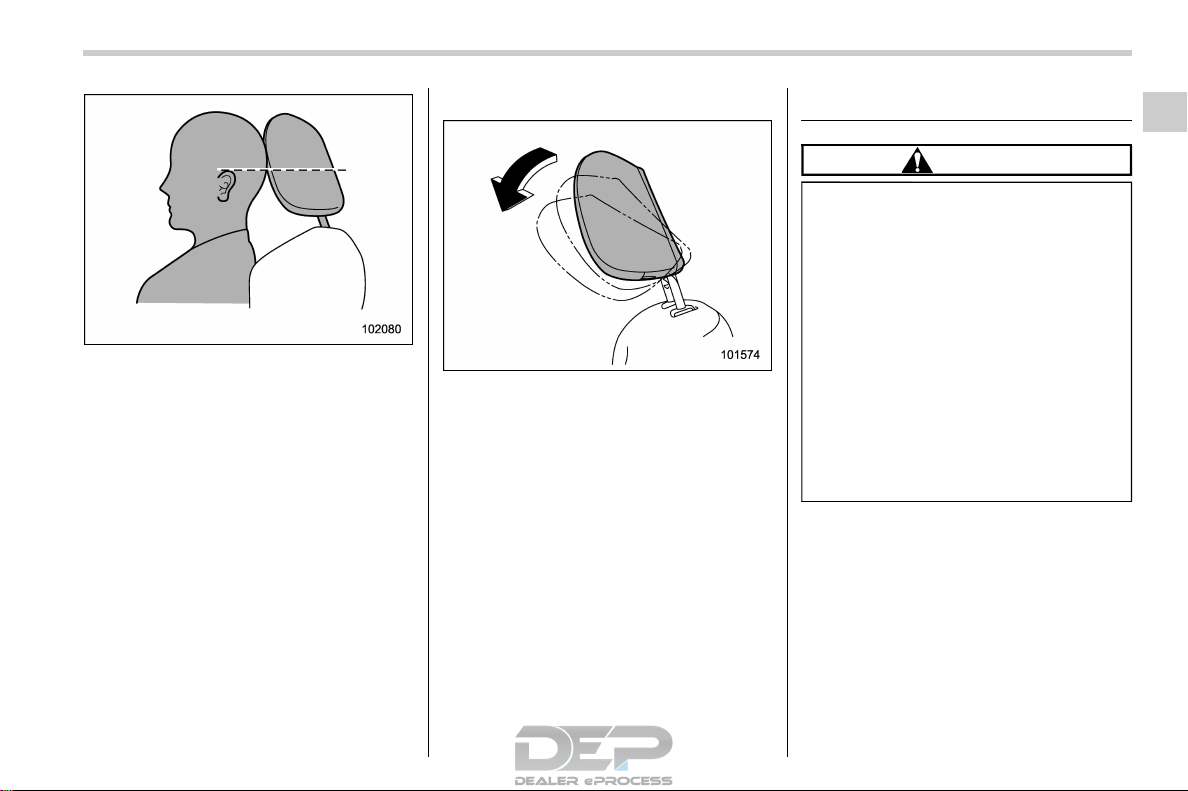
Each head restraint should be adjusted so
that the center of the head restraint is
closest to the top of the occupant’s ears.
NOTE
When the head restraint cannot be
pulled out or installed due to insuffi-
cient clearance between the head re-
straint and the roof, tilt the seat and
then perform the installation and re-
moval tasks.
! Head restraint angle adjustment
S01AA0402
The angle of the head restraint can be
adjusted in several steps. While maintain-
ing a suitable driving posture, adjust the
head restraint to a position where the back
of your head is as close to the head
restraint as possible.
To tilt:
Tilt the head restraint by hand to the
preferred position. A click will be audible
when the head restraint is locked.
To return:
Tilt the head restraint once as far forward
as it can go. The head restraint will
automatically return to the fully upright
position. Then, adjust the head restraint
again to the preferred angle.
Seat heater (if equipped)
S01AB
CAUTION
. People with delicate skin may
suffer slight burns even at low
temperatures if they use the seat
heater for a long period of time.
When using the heater, always be
sure to warn the persons con-
cerned.
. Do not put anything on the seat
which insulates against heat,
such as a blanket, cushion, or
similar items. This may cause the
seat heater to overheat.
. When the seat is warmed enough
or before you leave the vehicle,
be sure to turn off the seat heater.
NOTE
Use of the seat heater for a long period
of time while the engine is not running
can cause battery discharge.
– CONTINUED –
Seat, seatbelt and SRS airbags/Seat heater
1-9

& Front seat heater
(if equipped)
S01AB05
The seat heater operates when the ignition
switch is either in the “ACC” or “ON”
position.
Front seat heater switch
1) HIGH – Rapid heating
2) LOW – Normal heating
3) Off
A) Left-hand side
B) Right-hand side
To turn on the seat heater, push the “LOW”
or “HIGH” position on the switch, as
desired, depending on the temperature.
Selecting the “HIGH” position will cause
the seat to heat up quicker.
To turn off the seat heater, lightly press the
opposite side of the current position.
The indicator located on the switch illumi-
nates when the seat heater is in operation.
& Rear seat heater (if equipped)
S01AB06
The seat heater operates when the ignition
switch is in the “ON” position.
Rear seat heater switch
1) HIGH mode indicator
2) LOW mode indicator
A) Left-hand side
B) Right-hand side
Seat, seatbelt and SRS airbags/Seat heater
1-10

Press the rear seat heater switch to turn on
the rear seat heater. Then select the
“HIGH” or “LOW” mode, as desired,
depending on the temperature. Each time
you press the switch, the mode will change
as follows.
When LOW mode is selected, the LOW
mode indicator on the rear seat heater
switch illuminates. When HIGH mode is
selected, both the LOW and HIGH mode
indicators illuminate. When the OFF mode
is selected, all the indicators turn off.
Selecting “HIGH” mode will cause the seat
to heat up quicker.
NOTE
Only the front seat heater switches
retain the previous switch position
even if the engine has restarted. The
rear seat switch will reset.
Rear seats
S01AC
WARNING
Seatbelts provide maximum re-
straint when the occupant sits well
back and upright in the seat. Do not
put cushions or any other materials
between occupants and seatbacks
or seat cushions. If you do so, the
risk of sliding under the lap belt and
of the lap belt sliding up over the
abdomen will increase, and both can
result in serious internal injury or
death.
WARNING
Never stack luggage or other cargo
higher than the top of the seatback
because it could tumble forward and
injure passengers in the event of a
sudden stop or accident.
– CONTINUED –
Seat, seatbelt and SRS airbags/Rear seats
1-11
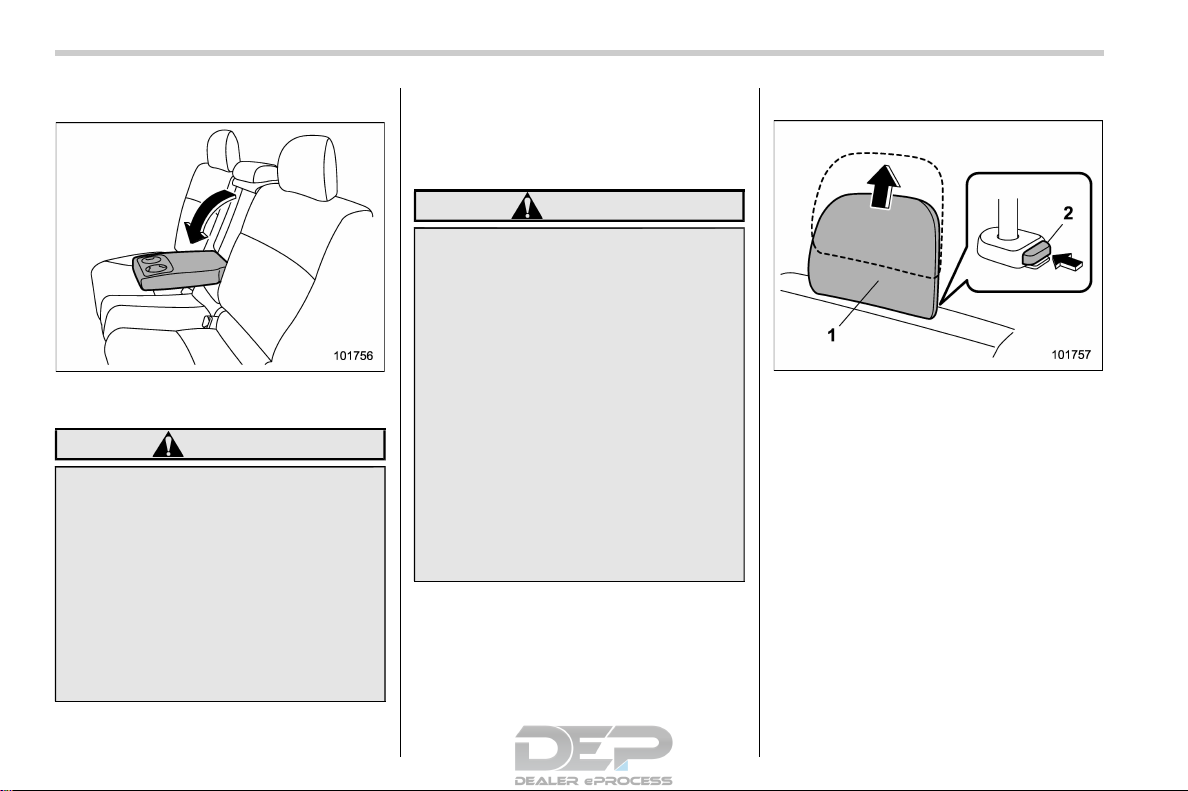
& Armrest (if equipped)
S01AC01
To lower the armrest, pull on the top edge
of the armrest.
WARNING
. Make sure to have the rear pas-
sengers wear the seatbelts be-
fore lowering the armrest. If the
rear passengers wear the seat-
belts after lowering the armrest,
seatbelts cannot provide maxi-
mum restraint, causing serious
injuries.
. To avoid serious injury, passen-
gers must never be allowed to sit
on the center armrest.
& Head restraint adjustment
S01AC03
Both the rear window side seats and the
rear center seat are equipped with head
restraints.
WARNING
. Never drive the vehicle with the
head restraints removed because
they are designed to reduce the
risk of serious neck injury in the
event that the vehicle is struck
from the rear. Therefore, when
you have removed the head re-
straints, you must reinstall all
head restraints to protect vehicle
occupants.
. All occupants, including the dri-
ver, should not operate a vehicle
or sit in a vehicle’s seat until the
head restraints are placed in their
proper positions in order to mini-
mize the risk of neck injury in the
event of a crash.
! Rear windows side seating position
S01AC0301
1) Head restraint
2) Release button
To remove:
While pressing the release button, pull out
the head restraint.
To install:
Install the head restraint into the holes that
are located on the top of the seatback until
the head restraint locks. Press and hold
the release button to lower the head
restraint.
After installing the head restraint, make
sure it is securely locked.
Seat, seatbelt and SRS airbags/Rear seats
1-12
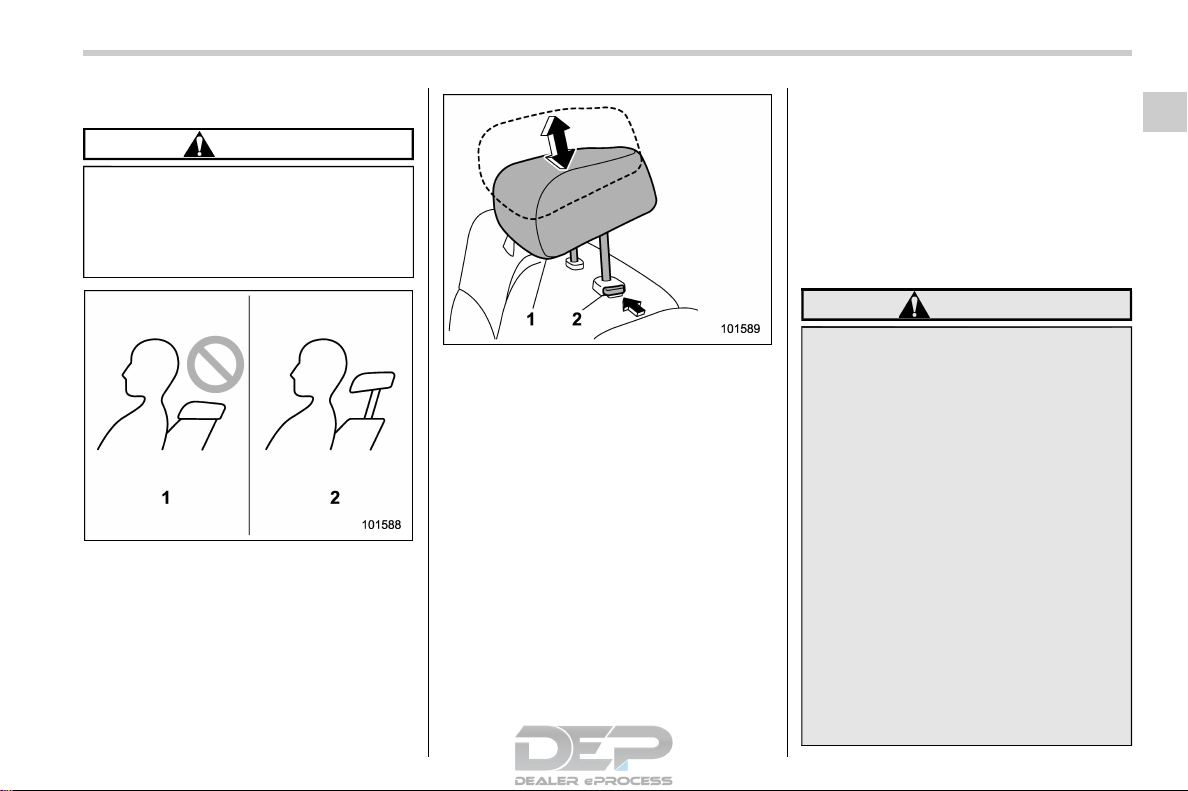
! Rear center seating position
S01AC0304
CAUTION
The head restraint is not intended to
be used at the lowest position.
Before sitting on the seat, raise the
head restraint to the extended posi-
tion.
1) When not used (retracted position)
2) When used (extended position)
1) Head restraint
2) Release button
To raise:
Pull the head restraint up.
To lower:
Push the head restraint down while press-
ing the release button on the top of the
seatback.
To remove:
While pressing the release button, pull out
the head restraint.
To install:
Install the head restraint into the holes that
are located on the top of the seatback until
the head restraint locks. Press and hold
the release button to lower the head
restraint.
When the rear-center seating position is
occupied, raise the head restraint to the
extended position. When the rear center
seating position is not occupied, lower the
head restraint to improve rearward visibi-
lity.
& Folding down the rear seat-
back
S01AC02
WARNING
. When you fold down the seat-
back, check that there are no
passengers or objects on the rear
seat. Not doing so creates a risk
of injury or property damage if
the seatback suddenly folds
down.
. Never allow passengers to ride
on the folded rear seatback or in
the cargo area. Doing so may
result in serious injury or death.
. Secure all objects and especially
long items properly to prevent
them from being thrown around
inside the vehicle and causing
serious injury during a sudden
stop, a sudden steering maneu-
ver or a rapid acceleration.
. When you return the seatback to
its original position, shake the
– CONTINUED –
Seat, seatbelt and SRS airbags/Rear seats
1-13
seatback slightly to confirm that
it is securely fixed in place. If the
seatback is not securely fixed in
place, the seatback may sud-
denly fold down in the event of
sudden braking, or objects may
move out from the cargo area,
which could cause serious injury
or death.
1) Securing hook
WARNING
When the seatback is returned to its
original position, observe the fol-
lowing precautions. Failure to do so
may lead to serious injury or an
accident because the operation effi-
ciency of the seatbelt is inhibited.
. Be careful to prevent the seatbelt
from running off the belt guide.
. The seatbelt should not be
caught in the seatback and it
should be fully visible.
. The seatbelt should not pass
behind the securing hook for the
seatback.
CAUTION
. Do not hang luggage etc. on the
securing hook. The possibility
exists that the seatback may not
be able to be fixed firmly in place.
This could lead to unexpected
accidents.
. While driving, if something hits
the release latch, it is possible
that the seatback will fold down.
Be careful that no luggage etc.
hits the latch.
1. Lower the head restraint of the rear
center seating position.
Seat, seatbelt and SRS airbags/Rear seats
1-14

Release knob
Release latch on both sides of the cargo
area (if equipped)
2. Unlock the seatback by pulling the lock
release knob or release latch (if equipped)
and then fold the seatback down.
To return the seatback to its original
position, raise the seatback until it locks
into place and make sure that it is securely
locked referring to the following descrip-
tion.
Lock release knob
1) Unlocked
2) Locked
A) Unlocking marker in red
When the seatback is locked, the lock
release knob is automatically pulled into
the seatback and the unlocking marker,
which is red colored and attached to the
bottom of the lock release knob, will no
longer be visible.
WARNING
After returning the seatback to its
original position, confirm that the
unlocking marker of the lock release
knob is no longer visible. Failure to
do so could lead to serious injury or
death in the event of an accident.
When you return the seatback to its
original position, shake the seat-
back slightly to confirm that it is
securely fixed in place.
& Reclining the seatback
(if equipped)
S01AC06
– CONTINUED –
Seat, seatbelt and SRS airbags/Rear seats
1-15

WARNING
To prevent the passenger from slid-
ing under the seatbelt in the event of
a collision, observe the following
precautions:
. Keep the seatback in the upright
position while the vehicle is in
motion.
. Do not place objects such as
cushions between the passenger
and the seatback.
Otherwise, the risk of sliding under
the lap belt and of the lap belt sliding
up over the abdomen will increase,
and both can result in serious inter-
nal injury or death.
CAUTION
If your vehicle is equipped with a
cargo area cover, observe the fol-
lowing precautions.
. Be careful not to pinch your hand
between the head restraint and
the cargo area cover when you
recline the rear seat.
. Move the front cover of the cargo
area cover backward so that the
cover is not damaged by the
reclined seatback. Refer to “Car-
go area cover” F6-14.
Pull the strap and adjust the seatback to
the desired position.
Then release the strap and make sure the
seatback is securely locked into place.
Seatbelts
S01AE
& Seatbelt safety tips
S01AE01
WARNING
. All persons in the vehicle should
fasten their seatbelts BEFORE
the vehicle starts to move. Other-
wise, the possibility of serious
injury becomes greater in the
event of a sudden stop or acci-
dent.
. All belts should fit snugly in order
to provide full restraint. Loose
fitting belts are not as effective in
preventing or reducing injury.
. Each seatbelt is designed to sup-
port only one person. Never use a
single belt for two or more per-
sons – even children. Otherwise,
in an accident, serious injury or
death could result.
. Replace all seatbelt assemblies
including retractors and attach-
ing hardware worn by occupants
of a vehicle that has been in a
serious accident. The entire as-
sembly should be replaced even
if damage is not obvious.
. Place children in the rear seat
Seat, seatbelt and SRS airbags/Seatbelts
1-16
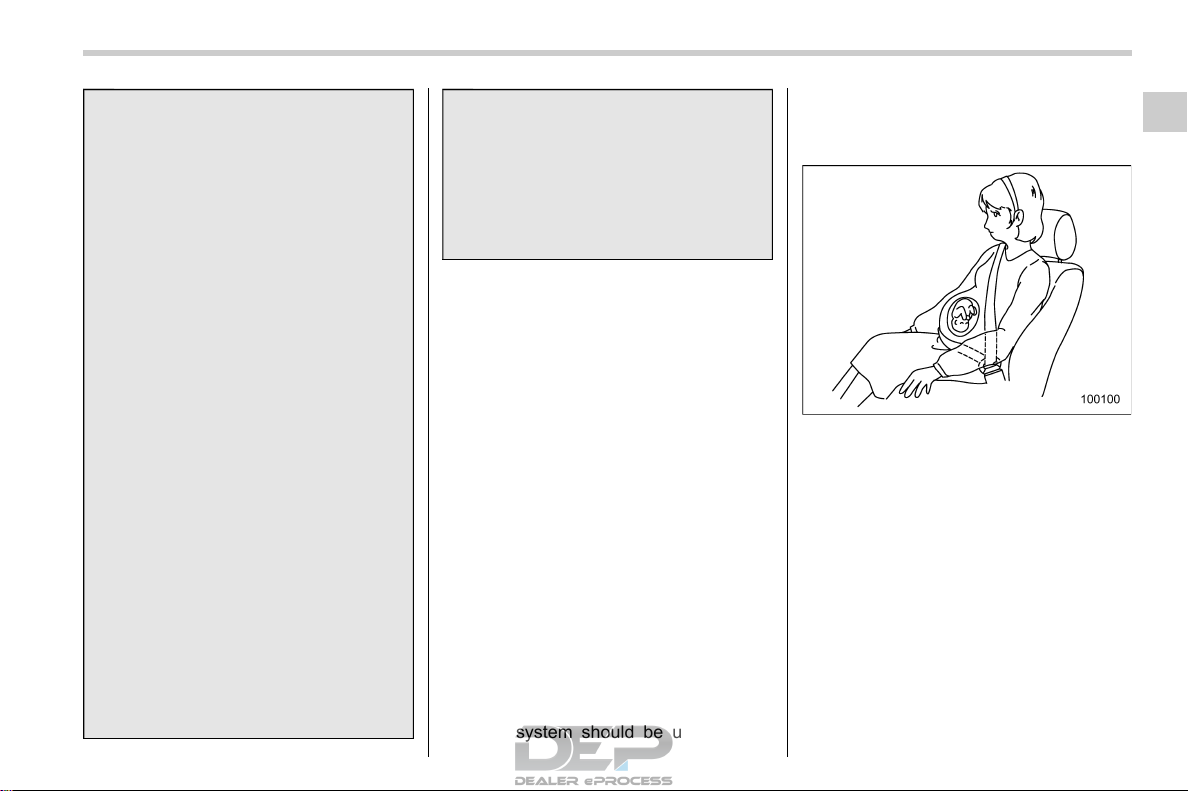
properly restrained at all times.
The SRS airbag deploys with
considerable speed and force
and can injure or even kill chil-
dren, especially if they are not
restrained or improperly re-
strained. Because children are
lighter and weaker than adults,
their risk of being injured from
deployment is greater. For that
reason, we strongly recommend
that ALL children (including
those in child seats and those
that have outgrown child re-
straint devices) sit in the REAR
seat properly restrained at all
times in a child restraint device
or in a seatbelt, whichever is
appropriate for the child’s height
and weight.
Secure ALL types of child re-
straint devices (including for-
ward facing child seats) in the
REAR seats at all times.
NEVER INSTALL A FORWARD
OR REARWARD FACING CHILD
SEAT IN THE FRONT SEAT.
DOING SO RISKS SERIOUS IN-
JURY OR DEATH TO THE CHILD
BY PLACING THE CHILD’S HEAD
TOO CLOSE TO THE SRS AIR-
BAG.
According to accident statistics,
children are safer when properly
restrained in the rear seating
positions than in the front seating
positions. For instructions and
precautions concerning the child
restraint system, refer to “Child
restraint systems” F1-30.
! Infants or small children
S01AE0101
Use a child restraint system that is suitable
for your vehicle. Refer to “Child restraint
systems” F1-30.
! Children
S01AE0102
If a child is too big for a child restraint
system, the child should sit in the rear seat
and be restrained using the seatbelts.
According to accident statistics, children
are safer when properly restrained in the
rear seating positions than in the front
seating positions. Never allow a child to
stand up or kneel on the seat.
If the shoulder portion of the belt crosses
the face or neck, move the child closer to
the belt buckle to help provide a good
shoulder belt fit. Care must be taken to
securely place the lap belt as low as
possible on the hips and not on the child’s
waist. If the shoulder portion of the belt
cannot be properly positioned, a child
restraint system should be used. Never
place the shoulder belt under the child’s
arm or behind the child’s back.
! Expectant mothers
S01AE0103
Expectant mothers also need to use the
seatbelts. They should consult their doctor
for specific recommendations. The lap belt
should be worn securely and as low as
possible over the hips, not over the waist.
& Emergency Locking Retrac-
tor (ELR)
S01AE02
The driver’s seatbelt has an Emergency
Locking Retractor (ELR).
The emergency locking retractor allows
normal body movement but the retractor
locks automatically during a sudden stop,
impact or if you pull the belt very quickly
out of the retractor.
– CONTINUED –
Seat, seatbelt and SRS airbags/Seatbelts
1-17

& Automatic Locking Retractor/
Emergency Locking Retrac-
tor (ALR/ELR)
S01AE03
Each passenger’s seatbelt has an Auto-
matic Locking Retractor/Emergency Lock-
ing Retractor (ALR/ELR). The Automatic
Locking Retractor/Emergency Locking
Retractor normally functions as an Emer-
gency Locking Retractor (ELR). The ALR/
ELR has an additional locking mode
“Automatic Locking Retractor (ALR)
mode” intended to secure a child restraint
system. When the seatbelt is once drawn
out completely and is then retracted even
slightly, the retractor locks the seatbelt in
that position and the seatbelt cannot be
extended. As the belt is rewinding, clicks
will be heard which indicate the retractor
functions as an ALR. When the seatbelt is
retracted fully, the ALR mode is released.
When securing a child restraint system on
the rear seats by the use of the seatbelt,
the seatbelt must be changed over to the
Automatic Locking Retractor (ALR) mode.
When the child restraint system is re-
moved, make sure that the seatbelt re-
tracts fully and the retractor returned to the
Emergency Locking Retractor (ELR)
mode.
For instructions on how to convert the
retractor to the ALR mode and restore it to
the ELR mode, refer to “Installing child
restraint systems with ALR/ELR seatbelt”
F1-33.
& Seatbelt warning light
and chime
S01AE04
Refer to “Seatbelt warning light and chime”
F3-14.
& Fastening the seatbelt
S01AE06
WARNING
. Never use a belt that is twisted or
reversed. In an accident, this can
increase the risk or severity of
injury.
. Keep the lap belt as low as
possible on your hips. In a colli-
sion, this spreads the force of the
lap belt over stronger hip bones
instead of across the weaker
abdomen.
. Seatbelts provide maximum re-
straint when the occupant sits
well back and upright in the seat.
To reduce the risk of sliding
under the seatbelt in a collision,
the front seatbacks should be
always used in the upright posi-
tion while the vehicle is running.
If the front seatbacks are not
used in the upright position in a
collision, the risk of sliding under
the lap belt and of the lap belt
sliding up over the abdomen will
increase, and both can result in
serious internal injury or death.
. Do not put cushions or any other
materials between occupants
and seatbacks or seat cushions.
If you do so, the risk of sliding
under the lap belt and of the lap
belt sliding up over the abdomen
will increase, and both can result
in serious internal injury or death.
Seat, seatbelt and SRS airbags/Seatbelts
1-18
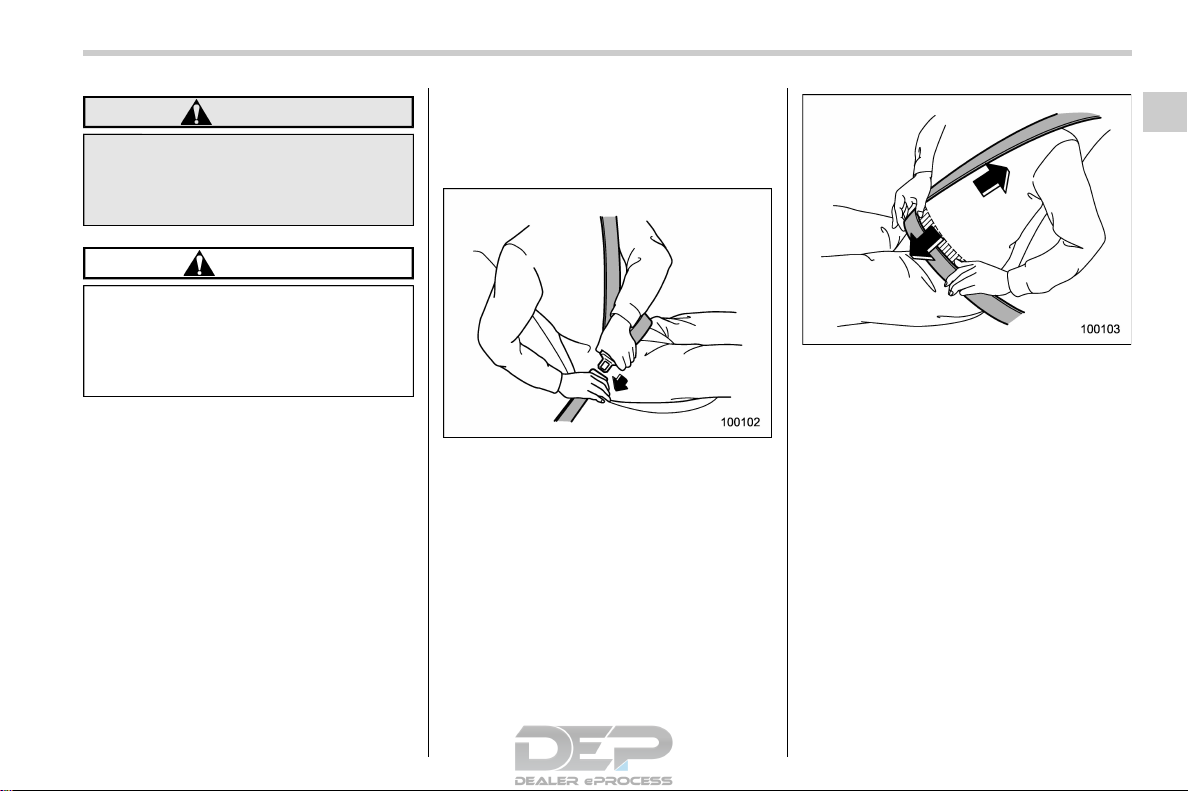
WARNING
Never place the shoulder belt under
the arm or behind the back. If an
accident occurs, this can increase
the risk or severity of injury.
CAUTION
Metallic parts of the seatbelt can
become very hot in a vehicle that has
been closed up in sunny weather;
they could burn an occupant. Do not
touch such hot parts until they cool.
! Front seatbelts
S01AE0601
1. Adjust the seat position according to
the following procedure.
Driver’s seat: Adjust the seatback to the
upright position. Move the seat as far from
the steering wheel as practical while still
maintaining full vehicle control.
Front passenger’s seat: Adjust the seat-
back to the upright position. Move the seat
as far back as possible.
2. Sit well back in the seat.
3. Pick up the tongue plate and pull the
belt out slowly. Do not let it get twisted.
. If the belt stops before reaching the
buckle, return the belt slightly and pull it
out more slowly.
. If the belt still cannot be unlocked, let
the belt retract slightly after giving it a
strong pull, then pull it out slowly again.
4. Insert the tongue plate into the buckle
until you hear a click.
5. To make the lap part tight, pull up on
the shoulder belt.
6. Place the lap belt as low as possible on
your hips, not on your waist.
– CONTINUED –
Seat, seatbelt and SRS airbags/Seatbelts
1-19

! Adjusting the front seat shoulder
belt anchor height
S01AE060101
The shoulder belt anchor height should be
adjusted to the position best suited for the
driver/front passenger. Always adjust the
anchor height so that the shoulder belt
passes over the middle of the shoulder
without touching the neck.
To raise:
Slide the anchor up.
To lower:
Pull the release knob and slide the anchor
down.
Pull down on the anchor to make sure that
it is locked in place.
WARNING
When wearing the seatbelts, make
sure the shoulder portion of the
webbing does not pass over your
neck. If it does, adjust the seatbelt
anchor to a lower position. Placing
the shoulder belt over the neck may
result in neck injury during sudden
braking or in a collision.
! Unfastening the seatbelt
S01AE060102
1. Push the button on the buckle.
2. Have the seatbelt retracted slowly to
avoid the seatbelt being tangled or twisted.
Before closing the door, make sure that the
belts are retracted properly to avoid
catching the belt webbing in the door.
! Rear seatbelts (except rear center
seatbelt)
S01AE0602
1. Sit well back in the seat.
2. Pick up the tongue plate and pull the
belt out slowly. Do not let it get twisted.
. If the belt stops before reaching the
buckle, return the belt slightly and pull it
out more slowly.
. If the belt still cannot be unlocked, let
the belt retract slightly after giving it a
strong pull, then pull it out slowly again.
3. Insert the tongue plate into the buckle
until you hear a click.
Seat, seatbelt and SRS airbags/Seatbelts
1-20

4. To make the lap part tight, pull up on
the shoulder belt.
5. Place the lap belt as low as possible on
your hips, not on your waist.
! Unfastening the seatbelt
S01AE060201
1. Push the button on the buckle.
2. Have the seatbelt retracted slowly to
avoid the seatbelt being tangled or twisted.
Before closing the door, make sure that the
belts are retracted properly to avoid
catching the belt webbing in the door.
! Rear center seatbelt
S01AE0603
1) Center seatbelt tongue plate
2) Connector (tongue)
3) Connector (buckle)
4) Center seatbelt buckle
– CONTINUED –
Seat, seatbelt and SRS airbags/Seatbelts
1-21
 Loading…

一般Model «A8230GE-B» EDITED: 2017/ 7/ 27
Foreword
Foreword
SFWAA
Congratulations on choosing a SUBARU vehicle. This Owner’s
Manual has all the information necessary to keep your SUBARU in
excellent condition and to properly maintain the emission control
system for minimizing emission pollutants. We urge you to read this
manual carefully so that you may understand your vehicle and its
operation. For information not found in this Owner’s Manual, such
as details concerning repairs or adjustments, we recommend that
you contact the SUBARU dealer from whom you purchased your
SUBARU or the nearest SUBARU dealer.
The information, specifications and illustrations found in this
manual are those in effect at the time of printing. SUBARU
CORPORATION reserves the right to change specifications and
designs at any time without prior notice and without incurring any
obligation to make the same or similar changes on vehicles
previously sold. This Owner’s Manual applies to all models and
covers all equipment, including factory installed options. Some
explanations, therefore may be for equipment not installed in your
vehicle.
Please leave this manual in the vehicle at the time of resale. The next
owner will need the information found herein.
NOTE: “SUBARU dealer” means an authorized SUBARU dealer and/
or repairer.
SUBARU CORPORATION, TOKYO, JAPAN
is a registered trademark of SUBARU CORPORATION.
*
C
Copyright 2017 SUBARU CORPORATION
*On the 1st of April 2017, the corporate name was changed from Fuji Heavy Industries LTD. to SUBARU
CORPORATION.