-
Contents
-
Table of Contents
-
Bookmarks
Quick Links
TBS CROSSFIRE R/C System
Adaptive Long Range Remote Control System
The TBS CROSSFIRE (XF) system is a R/C link system made for FPV enthusiasts. It features unheard of range
without sacrificing basic functionality such as being immune to interference from onboard equipment, low
latency control or two-way communications including telemetry functionality.
Key features
•
Long range, adaptive and robust remote control system for your aircraft
•
Immune to on-board noise
•
Two-way communication link with real-time link vitals and telemetry
•
Self-healing frequency hopping link
•
Receiver beacon mode to recover your downed aircraft
•
Super easy binding and configuration via built-in OLED display, OpenTX LUA or TBS TANGO remote
•
Low latency control for perfect immersive feeling
•
Free output mappable outputs diversity
•
Ability to fly with multiple friends at the same time (10 or more)
•
Dynamic self-selecting or selectable RF power (local restrictions apply)
•
Dedicated head-tracking input option for full FPV immersion (Standard/ Lite TX only)
•
Transmitter LED shows link health, OLED display for built in configuration (Standard/ Lite TX only)
1
Revision 2020-10-08
Summary of Contents for Team Blacksheep CROSSFIRE
— швейцарский лидер в производстве разнообразной высококачественной FPV продукции
TBS в среде FPV-шников давно имеет репутацию фирмы, которая выпускает ЛУЧШЕЕ на FPV рынке. Их продукты ждут, на их продукты равняются и их продукты всегда имеют репутацию стильных, ультимативных и инновационных новинок. TBS не делает дешевые вещи, TBS делает офигенные и крутые FPV девайсы, которые тут же становятся популярными. Не удивительно, что их последняя LRS следует тому же курсу.
В то время, как большинство выпускает LRS системы на частоте 433Mhz, TBS рвет шаблоны и выпускает LRS на частоте 915Mhz на RF чипах последнего поколения с умопомрачительной чувствительностью. Кроме дальности, которая уже в тестах зашкаливает за 100км(!!!) TBS решили не останавливаться и сделать действительно очень крутой продукт с кучей инноваций.
Особенности:
Встроенный HD OLED экран для настроек и демонстрации режимов. Теперь не обязательно подключать LRS к компьютеру. Все настройки, включая бинд, мощность можно настроить тут же, «не отходя от кассы» — просто и быстро.
Частоты 868/915Mhz и хорошая чувствительность -130dB позволяют летать на умопомрачительные расстояния особенно там, где эфир зашумлен довольно популярными частотами 433Mhz
Настраиваемая мощность от 10mW до 2W
Очень низкие задержки
Фулл-дуплекс линк с поддержкой телеметрии — приемник общается с передатчиком и сообщает ему полетные данные!
Поддержка блутус для передачи телеметрии на телефон
Встроенный маяк с поддержкой GPS
TX можно вставлять в слот JR или использоваться отдельно (по желанию)
Поддержка хэдтрекера
EXT порт для дальнейшего наращивания функционала
Стильный дизайн
Спецификации:
Частоты: 868MHz/915MHz
Вольтаж: 3.5 — 13V
Потребляемая мощность: 1.1W (@10mW) — 3.2W (@2000mW)
Размеры: 55x89x15мм
Вес: 76гр
Комплектация:
TBS Crossfire передатчик — 1шт.
JR адаптер — 1шт.
Настроенная антенна — 1шт.
Futaba кабель — 1шт.
Graupner кабель — 1шт.
PWM Pigtail — 1шт.
Переходник JST-XT30 — 1шт.
Инструкция: http://www.team-blacksheep.com/tbs-crossfire-manual.pdf
Программное обеспечение для обновления: http://www.team-blacksheep.com/corepro/agent
В этом руководстве показано как настроить TBS Crossfire для работы с Taranis X9D Plus и Jumper T16. Я покажу вам как подключить приемник к полетному контроллеру и как настроить Betaflight. Аналогично можно настроить и другие передатчики с прошивкой OpenTX.
Оригинал: TBS Crossfire Setup For Taranis & T16 (Betaflight)
Дополнительная информация: как выбрать хорошую аппаратуру управления?
Содержание
- Что особенного в Crossfire?
- Обновление прошивки
- Ставим радиомодуль Crossfire в Taranis
- Настраиваем Taranis для использования Crossfire
- Подключаем приёмник к полетному контроллеру
- Привязываем приёмник Crossfire к передатчику
- Настраиваем приемник в Таранисе
- Настраиваем Betaflight для работы с Crossfire
- Устанавливаем антенну приемника
- Настраиваем LUA скрипты
TBS Crossfire — это популярная система радиоуправления для полетов на дальние расстояния.
Одна из составных частей — внешний радиомодуль, который устанавливается в отсек аппаратуры управления типа Taranis или Nirvana (англ), так что вы сможете использовать весь функционал OpenTX.
Crossfire работает на частоте 900 МГц, более низкая частота означает, что сигнал лучше проходит через препятствия. По сравнению с традиционными системами, работающими на частоте 2,4 ГГц, это дает больший радиус работы и более надежный прием сигнала. Однако есть и недостаток — более длинные и крупные антенны.
Frsky Taranis с двухантенными приемниками (R-XSR и X4R-SB) теоретически дает до 1,5 км, чего более чем достаточно для большинства пилотов мини-коптеров. Однако, иногда хочется полетать подальше, или иметь более надежное управление в условиях, когда есть много деревьев или зданий; вот тут-то и пригодится Crossfire.
Ещё одно преимущество Crossfire над другими системами — меньшая задержка сигнала, что по словам многих известных пилотов заметно улучшает управляемость. Мы говорим о разнице, измеряемой миллисекундами, так что можете заметить, а можете и не заметить её.
Модули и комплектующие для Crossfire:
Не знаете какой модуль выбрать? Вот их сравнение.
Антенны для радиомодулей
Приёмники
| Crossfire Micro RX | Crossfire Nano RX | Crossfire Diversity Nano RX |
 |
 |
 |
| Используются JST разъемы | Те же возможности, что и у Micro RX, но размер меньше! Подключение пайкой |
Двойная антенна, лучше приём |
| Amazon | GetFPV | GetFPV | Amazon | Amazon | RMRC | GetFPV |
Антенны для приёмников
Вот статья, в которой мы сравниваем две популярные дальнобойные системы Crossfire и Frsky R9M.
Обновление прошивки
Обновляем OpenTX
Чтобы избежать ненужных проблем и багов, установите свежую версию OpenTX. Вот инструкция для Тараниса.
Не забудьте скачать содержимое SD карты, т.к. там есть файлы, которые нам понадобятся для настройки передатчика и приемника Crossfire (например, LUA скрипты), подробнее описано в руководстве, ссылка чуть выше.
Обновляем прошивку TBS Crossfire
Чтобы обновить прошивку TBS Crossfire скачайте и установите TBS Agent http://www.team-blacksheep.com/corepro/agent
Запустите TBS Agent и подключите радиомодуль к компьютеру при помощи MicroUSB кабеля. Если есть более новая прошивка, то нажмите кнопку «Update», обновление займет всего несколько минут.

TBS Agent — обновление прошивки передающего радиомодуля
Каждый раз, когда вы обновляете прошивку в радиомодуле-передатчике нужно обновлять прошивку и в приёмниках. Это делается «по воздуху», без проводов. Ниже, в разделе про привязку мы расскажем подробнее.
Ставим радиомодуль Crossfire в Taranis
Радиомодуль просто вставляется в отсек позади пульта. Ставьте его аккуратно, не повредите контакты.
TBS Crossfire Micro Module установлен в Taranis X9D
Crossfire полностью совместим с Taranis X9D+ и Jumper T16. Работает с Taranis QX7 и Horus X10S, но есть небольшие недостатки, например, нельзя использовать макс. скорость передачи, что вызывает сообщение о потере телеметрии. К счастью, эти проблемы легко решаются самостоятельно.
Настраиваем Taranis для использования Crossfire
Создаем новую модель в передатчике. Проще всего сделать копию существующий и переименовать ее, например, в Crossfire. Если хотите создать модель с нуля — вот инструкция (англ).
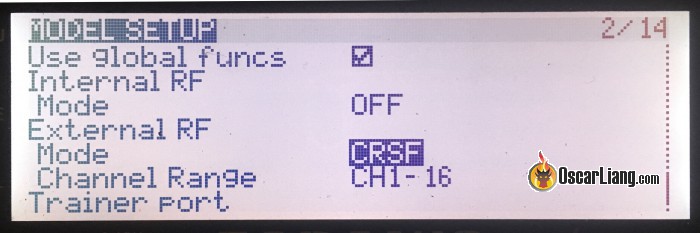
Кратко нажимаем Menu, переходим на страницу Model Setup, перемещаемся вниз до «Internal RF» (внутренний модуль) и выбираем режим «OFF» (отключить).
Далее настраиваем параметр «External RF» (внешний модуль), ставим «CRSF» и меняем параметр Channel Range (диапазон каналов) на «CH1-16«.
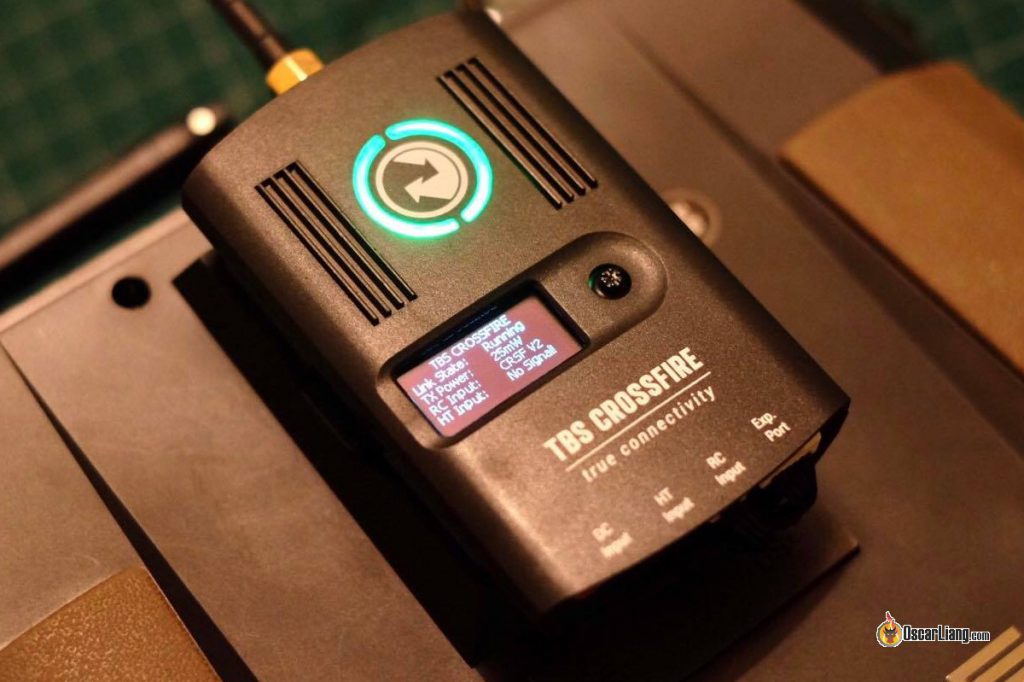
После того, как вы это сделали и вышли из меню, модуль Crossfire должен включиться (на нём загорятся светодиоды).
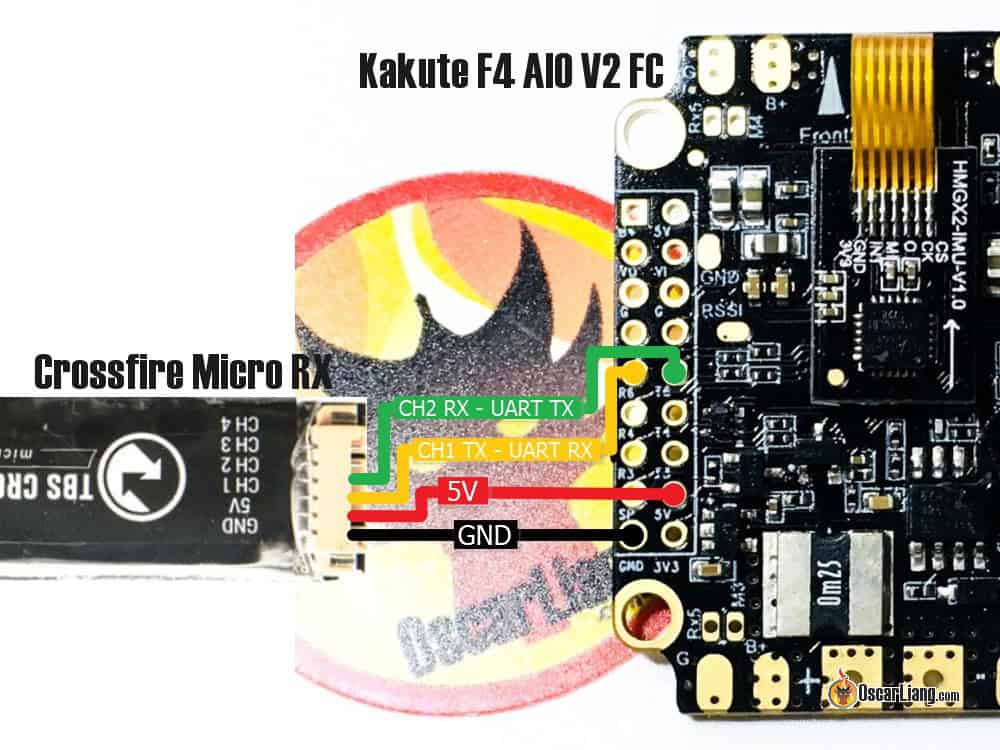
Подключаем приемник к полетному контроллеру
Помните, что практически все выходы в приёмнике можно программно переназначить. Это значит, что вы можете настроить их на любую функцию, поэтому есть куча способов подключения приёмника к полетному контроллеру.
Я покажу свой, можете сделать также:
- 5V к 5V
- GND к GND
- CH1 (Crossfire) к UART RX
- CH2 (Crossfire) к UART TX
На полетном контроллере можно использовать любой свободный последовательный порт (UART).
Можно подключить только CH1 и выбрать выход SBUS, но т.к. я хотел использовать протокол CRSF с телеметрией, то пришлось подключить оба провода.
Дополнительная информация: настраиваем SBUS у Crossfire (англ).
Замечу, что протокол CRSF имеет обычный, не инвертированный сигнал (как у SBUS и SmartPort), следовательно нельзя использовать выделенные для SBUS/SmartPort разъемы, т.к. там есть встроенный инвертор. Однако всё это не важно, если у вас ПК на F3 или F7, т.к. инверсия настраивается программно.
Программная эмуляция последовательного порта работает не очень быстро, поэтому её нельзя использовать с Crossfire.
В примере ниже я подключаю RX приёмника к UART6 полетника Kakute F4 AIO V2 FC.
Crossfire Micro Receiver:

Crossfire Nano Receiver:

Привязываем приёмник Crossfire к передатчику
Привязка приёмников Crossfire делается очень просто (в большинстве случаев), активировать режим привязки можно при помощи LUA скрипта. Такие скрипты поставляются с OpenTX начиная с версии 2.2., так что ничего не придется качать. 🙂
TBS Crossfire “Full” Module установлен в Horus X10
Пошаговая инструкция для привязки приемников Crossfire:
- Включаем приёмник, должен мигать зеленый светодиод, это значит, что он ждет начала процедуры привязки (если горит красный, тогда нажмите кнопку bind на приёмнике)
- Включаем передатчик и запускаем Crossfire LUA скрипт:
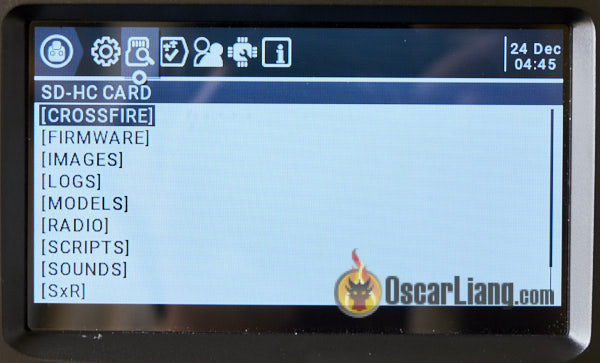
- Долгое нажатие на Menu, входим в Radio Setup (настройки передатчика). Нажимаем Page чтобы добраться до страницы «SD Card«
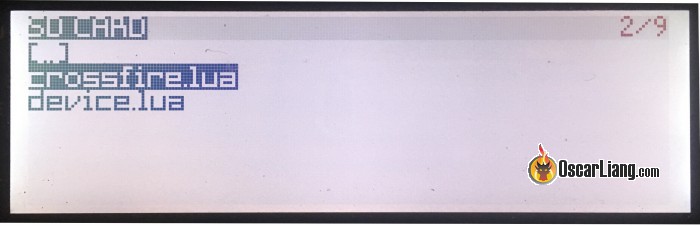
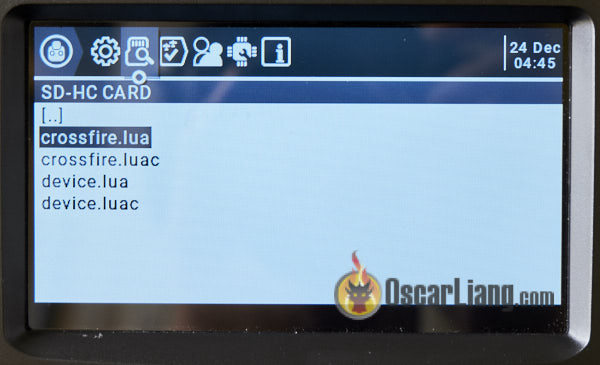
- Выбираем папку CROSSFIRE и долго жмем enter на файле crossfire.lua, в меню выбираем «execute» (выполнить)
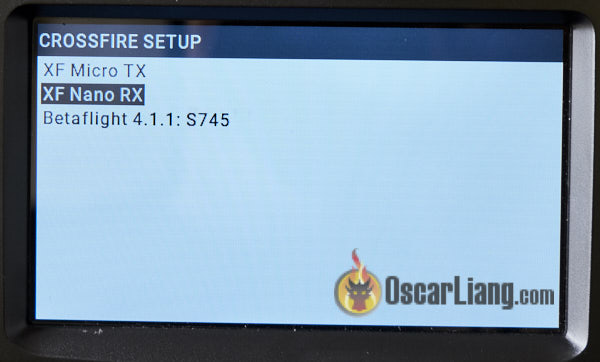
- На следующем экране выбираем XF Micro TX
- Далее выбираем Binding (как показано на картинке)

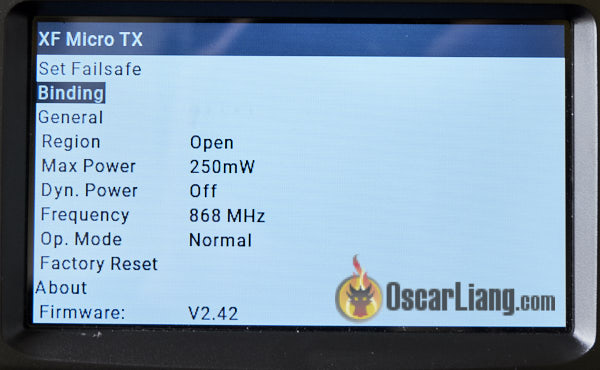
- Появится сообщение «Binding…», сам процесс привязки займет несколько секунд
- Если в приемнике слишком старая прошивка, тогда вам предложат её обновить, это займет несколько минут. После перепрошивки приемник будет быстро мигать зеленым (загрузка), затем зеленые светодиоды на приемнике и передатчике перестанут мигать и будут гореть постоянно.
- После привязки T16 автоматически переходит в обычный режим, а светодиод на приемнике перестает мигать и постоянно горит зеленым.
Выходим из меню, нажав Exit. Переходим к настройке приёмника.
Настраиваем приёмник в Таранисе
После привязки приёмника можно настраивать как передатчик, так и приёмник при помощи LUA скриптов. Если вы не видите пункта «XF Micro/Nano RX», это значит, что приёмник не привязан или выключен.

Первое что нужно сделать — это настроить выходы на приёмнике, чтобы он мог обмениваться данными с полетным контроллером.
Чтобы это сделать, выбираем «XF Micro/Nano RX«, прокручиваем вниз до «Output Map» (карта выходов) и выбираем «Output 1» = «CRSF TX«, а для «Output 2» ставим «CRSF RX«. Всё! 🙂

Теперь настраиваем передающий радиомодуль.
Самое важное — убедиться, что выбран правильный частотный диапазон, в США это 915 МГц, а в Европе — 868 МГц. Если использовать не тот диапазон, то результат будет не очень надежным, а сигнал слабым и некачественным.
Для типичной конфигурации коптера в большинстве случаев будет достаточно 250 мВт выходной мощности. А автоматическое изменение мощности (Dyn. power) можно отключить.
Начиная с версии 2.4. максимальная выходная мощность Micro-модуля увеличена со 100 мВт до 250 мВт (англ).
Параметр Mode — задает число каналов, при использовании 8 каналов задержка при передаче сигнала будет меньше, чем при использовании 12 каналов. Убедитесь, что телеметрия включена, а failsafe в режиме Cut, т.е. моторы остановятся в случае пропадания сигнала, а коптер просто упадет, что минимизирует риски.
Настраиваем Betaflight для работы с Crossfire
Заключительный этап — настройка Betaflight.
Переходим на вкладку Ports в Betaflight Configurator, включаем «Serial RX» на том порту, куда подключен Crossfire приемник. Нажимаем «Save«.
Открываем вкладку «Configuration«, в разделе «Receiver» выбираем «Serial-based receiver«, и затем, ниже, «CRSF«.
Не забудьте включить телеметрию (Telemetry) и нажать «Save«.
Последний шаг, переходим на вкладку «Receiver«, тут вы должны видеть реакцию на движения стиков. Это значит, что приёмник работает! Если реакции нет, тогда попробуйте проверить и поменять «Channel Map» (см выше).
Проверяем конечные точки (1000 и 2000), затем средние точки (1500), читаем тут про настройку.
Стики не двигаются? Возможно, включена инверсия сигнала. Попробуйте дать команду в консоли:
set serialrx_inverted = OFF
Если ничего не работает, возвращаемся к началу инструкции и проверяем провода, настройки Output Map, и параметры Betaflight.
На этом всё, Betaflight настроена для работы с Crossfire! 🙂
Чтобы убедиться в правильности работы телеметрии перейдите на страницу Telemetry в аппаратуре управления, затем выберите пункт «Discover new sensors», после этого должны появиться новые данные, включая VFAS — напряжение аккумулятора.
Устанавливаем антенну приемника
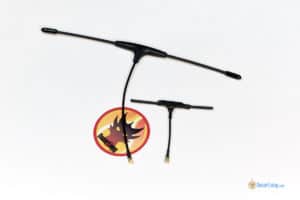
Если вы уже использовали другие системы радиоуправления, то вы удивитесь необычно крупной антенне и столкнетесь с проблемой — как её крепить? Вот статья (англ.) с описанием способов крепления антенн Crossfire.
Там несколько примеров с разными антенными: включая стоковый диполь и не убиваемую «Immortal T».
beeb
Чтобы добиться максимально возможного радиуса уверенного приема постарайтесь располагать антенну так, чтобы рама её не затеняла. Не сгибайте антенну и старайтесь правильно её ориентировать.
Антенну можно поставить практически в любое место на коптере, главное, чтобы её не повредили винты, все очень сильно зависит от рамы. Не забудьте поискать 3Д-печатный крепеж на Thingiverse.
Настраиваем LUA скрипты
На пульте можно запустить LUA скрипты для изменения кучи параметров Betaflight, например: PID, рейты, looptime, параметры фильтров, канал видеопередатчика и его выходную мощность!
Настройка практически такая же, как и для SmartPort, только не нужно менять настройки Betaflight, т.к. мы это уже сделали (например, включили телеметрию). Единственная вещь, которую нужно сделать — загрузить LUA скрипты в Таранис!
Настраиваем LQ и RSSI в OSD и в предупреждениях Тараниса
Вот руководство, в котором объясняется что такое LQ и RSSI, и как их отобразить на экране (англ).
FAQ
Несколько наиболее популярных вопросов.
Сколько человек может одновременно летать, используя Crossfire?
Согласно данным от TBS — одновременно может летать до 50 человек. В тесте летало 12 человек, связь была заметно хуже, но все равно можно было летать, так что TBS не рекомендует превышать это значение 🙂
История изменений
- Март 2018 — первая версия статьи
- Январь 2019 — обновлены ссылки и настройка
- Декабрь 2019 — добавлены скриншоты для Jumper T16
This tutorial explains how to setup TBS Crossfire for OpenTX radios such as the TX16S. I will also show you how to connect Crossfire receiver to a flight controller and configure it in Betaflight. Tracer is similar to Crossfire when it comes to setup, so most of the steps in this guide also apply.

Some of the links on this page are affiliate links. I receive a commission (at no extra cost to you) if you make a purchase after clicking on one of these affiliate links. This helps support the free content for the community on this website. Please read our Affiliate Link Policy for more information.
Further Reading: How to choose radio transmitter?
What’s TBS Crossfire?
TBS Crossfire is a popular radio control link for FPV drones, which is known to be reliable, easy to setup and great for long range flying.
Crossfire is an external RF module that can be installed directly on the back of a radio transmitter (i.e. JR module bay). The TBS Tango 2 radio also has Crossfire built in.
Rather than using the more common 2.4GHz, Crossfire operates on the 900MHz band. The low frequency is better at signal penetration through obstacles. Many pilots prefer Crossfire even though they don’t intent to fly long range but for the stable link connection and resistance to failsafe in challenging environment. Range can largely depend on the conditions of the environment, but based on personal experience, I can fly 5 miles out easily using 250mW, and I wasn’t even pushing the limit there. One of the main downsides of Crossfire is perhaps the larger receiver antennas which can be challenging to mount on smaller FPV drones.
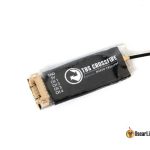
Crossfire TX Modules
I think the Micro V2 module is more than capable for most people flying freestyle and racing. The built-in screen in the full size module is no big deal as you can change pretty much all the settings in the radio. The additional features of the full size module are not really that useful to be honest for most pilots. The only advantage IMO is having the 2W output power option, and I don’t remember a time I need more than 250mW 
TX Antennas
Receivers
| Crossfire Diversity Nano RX | ||||||||

Some of the links on this page are affiliate links. I receive a commission (at no extra cost to you) if you make a purchase after clicking on one of these affiliate links. This helps support the free content for the community on this website. Please read our Affiliate Link Policy for more information. Further Reading: How to choose radio transmitter? What’s TBS Crossfire?TBS Crossfire is a popular radio control link for FPV drones, which is known to be reliable, easy to setup and great for long range flying. Crossfire is an external RF module that can be installed directly on the back of a radio transmitter (i.e. JR module bay). The TBS Tango 2 radio also has Crossfire built in. Rather than using the more common 2.4GHz, Crossfire operates on the 900MHz band. The low frequency is better at signal penetration through obstacles. Many pilots prefer Crossfire even though they don’t intent to fly long range but for the stable link connection and resistance to failsafe in challenging environment. Range can largely depend on the conditions of the environment, but based on personal experience, I can fly 5 miles out easily using 250mW, and I wasn’t even pushing the limit there. One of the main downsides of Crossfire is perhaps the larger receiver antennas which can be challenging to mount on smaller FPV drones. Crossfire TX ModulesI think the Micro V2 module is more than capable for most people flying freestyle and racing. The built-in screen in the full size module is no big deal as you can change pretty much all the settings in the radio. The additional features of the full size module are not really that useful to be honest for most pilots. The only advantage IMO is having the 2W output power option, and I don’t remember a time I need more than 250mW TX AntennasReceivers
RX Antennas
Updating EdgeTXBefore we begin setting up Crossfire, it’s always a good idea to make sure your radio’s operating system (i.e. OpenTX or EdgeTX) is up to date for bug fixes and improvements.
Make sure to update SD card content as well as it contains the latest Crossfire LUA script for configuring Crossfire module and receivers. Updating TBS Crossfire FirmwareThe first thing you should do is to update the firmware on your Crossfire TX module for the latest features and bug fixes. Back in the days (before 2020), we had to download and install TBS Agent on our computers, but now we can use a web based tool to do flash firmware on our Crossfire module which is super handy. The online tool is called AgentM, it’s basically just a website: https://www.team-blacksheep.com/agentm/ (Note: it only supports Google Chrome and Microsoft Edge browsers at the moment) Login with the same account that you use on TBS’s website, username should be your email address. If you don’t have a login, just register on TBS’s website (https://www.team-blacksheep.com).
|
||||||||
| 2g lighter than Immortal T and much smaller, great for micro drones, but range is largely reduced compared to full size antenna | ||||||||
| Review (Discontinued) |
Updating EdgeTX
Before we begin setting up Crossfire, it’s always a good idea to make sure your radio’s operating system (i.e. OpenTX or EdgeTX) is up to date for bug fixes and improvements.
- how to update OpenTX
- how to update EdgeTX
Make sure to update SD card content as well as it contains the latest Crossfire LUA script for configuring Crossfire module and receivers.
Updating TBS Crossfire Firmware
The first thing you should do is to update the firmware on your Crossfire TX module for the latest features and bug fixes.
Back in the days (before 2020), we had to download and install TBS Agent on our computers, but now we can use a web based tool to do flash firmware on our Crossfire module which is super handy.
The online tool is called AgentM, it’s basically just a website: https://www.team-blacksheep.com/agentm/ (Note: it only supports Google Chrome and Microsoft Edge browsers at the moment)
Login with the same account that you use on TBS’s website, username should be your email address. If you don’t have a login, just register on TBS’s website (https://www.team-blacksheep.com).

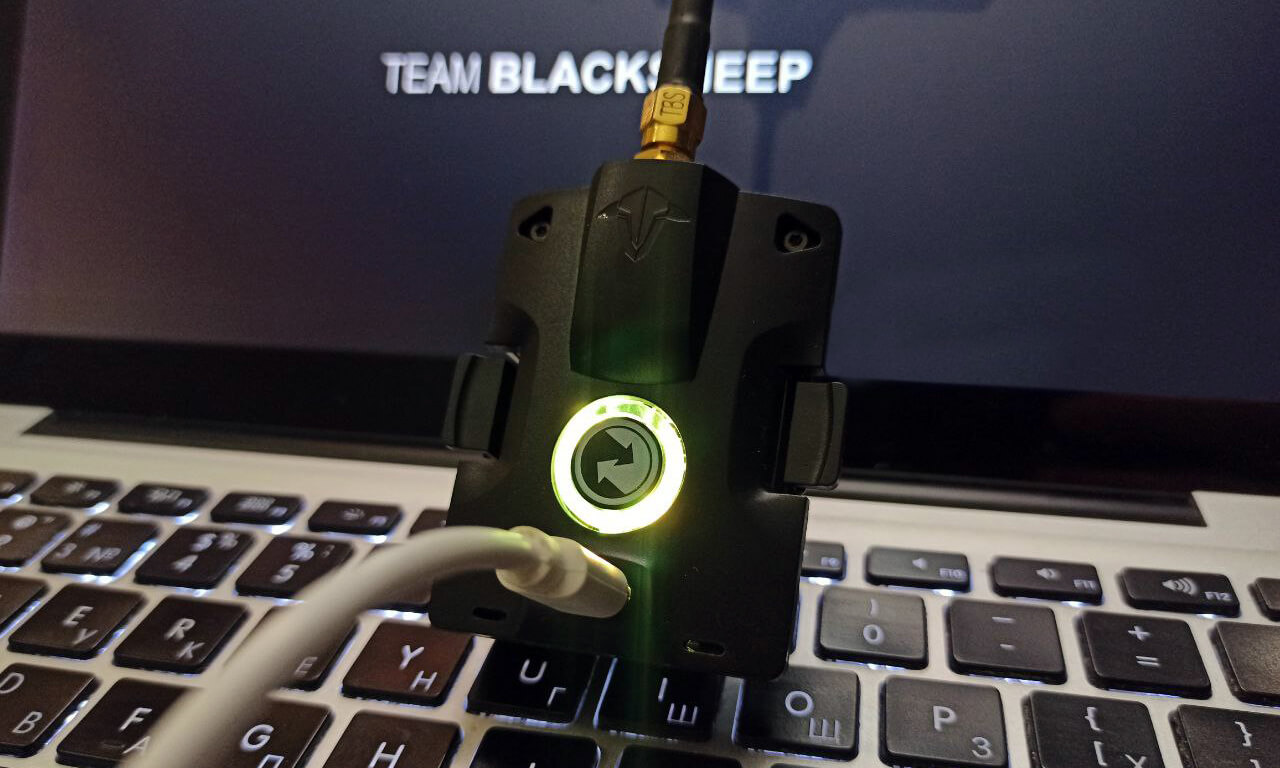
Connect your Crossfire TX module to the computer using a USB cable. No need to power on your radio for this to work, the module gets power from USB.

And in Agent M, click “link USB device”, you will be prompted to connect to TBS Crossfire.

And in Agent M, click “link USB device”, you will be prompted to connect to TBS Crossfire.
Once connected, you will land on a new page where you can configure the Crossfire TX module.
To update the firmware, click the “Firmware” button at the bottom, you should see a list of available firmware. The firmware version you are currently on will be marked with a blue tag “Current”.

The update should only take a minute or two to complete.
Every time you update the firmware on your TX module, you also need to update the firmware on your receivers – this cannot get any simpler, just power on your radio and your quad, try to bind them again and you should be prompted to update firmware on the receiver (wirelessly).
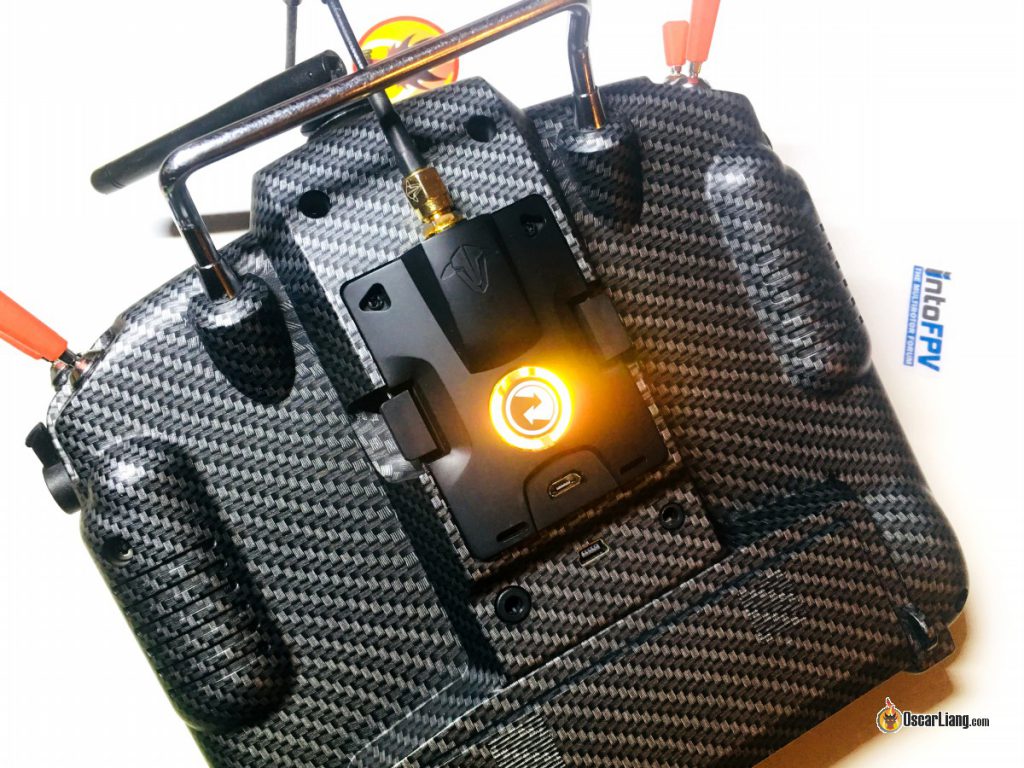
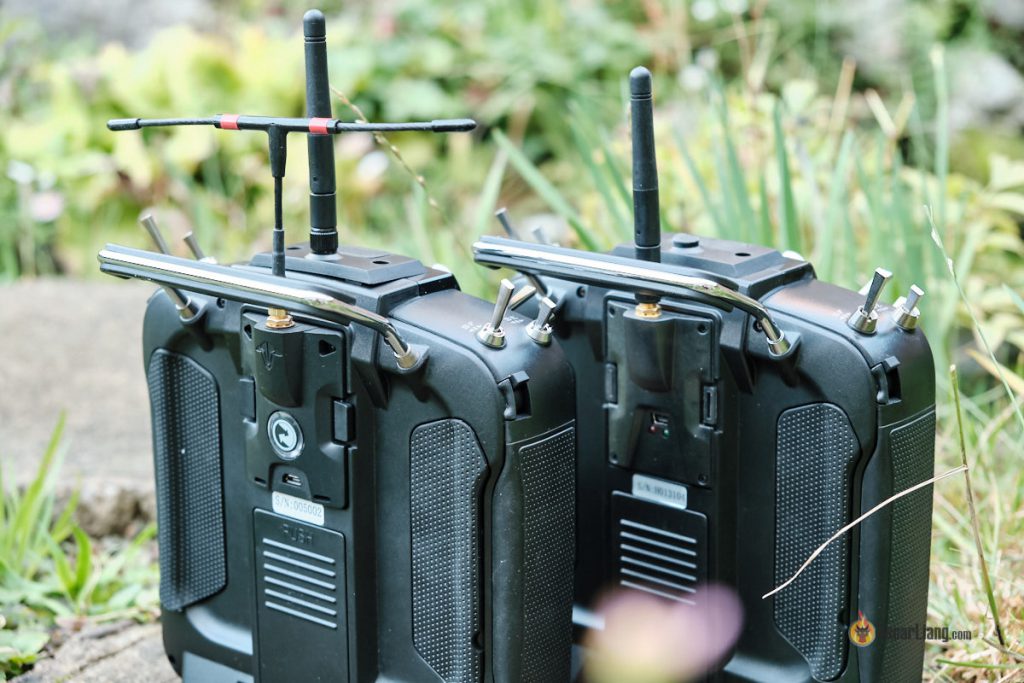
Installing Crossfire TX module in the Radio
You can install the Crossfire TX module directly in the external JR module bay on the back of the radio. Insert the module carefully, make sure all the pins go into the sockets of the Crossfire module properly.
![]()
The update should only take a minute or two to complete.
Every time you update the firmware on your TX module, you also need to update the firmware on your receivers – this cannot get any simpler, just power on your radio and your quad, try to bind them again and you should be prompted to update firmware on the receiver (wirelessly).
Installing Crossfire TX module in the Radio
You can install the Crossfire TX module directly in the external JR module bay on the back of the radio. Insert the module carefully, make sure all the pins go into the sockets of the Crossfire module properly.
![]()
The Crossfire module is fully compatible with radios with a JR module bay such as the Frsky Taranis X9D+, Jumper T18, T16, the RadioMaster TX16S and Radiomaster Boxer.
It also works with Taranis Q X7, and Horus X10S, but there are some minor issues due to these radios’ inability to operate at full baud rate, causing problems such as constant warning of “telemetry lost”. There is a DIY mod you can do to fix it, but it’s quite difficult to do (involves soldering to the main processor) and therefore I don’t recommend using these radios with Crossfire. Update: by flashing EdgeTX to these radios, you no longer need to do this hardware mod.
Setup Radio to Enable Crossfire TX Module
You will have to create a new model in the radio for Crossfire. A simple way is to duplicate an existing model and rename it to “Crossfire”. If you want to set it up from scratch, here is a tutorial on how to.
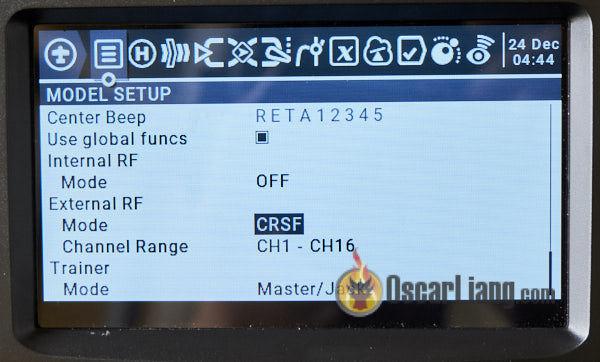
Short press the Menu button to enter the Model Setup page, scroll down to “Internal RF” and set mode to “OFF“.
Next set the mode under “External RF” to “CRSF” and change “Channel Range” to “CH1-16“.

Once you’ve done this and exit this menu, the Crossfire TX module should power up (LED lights up on the back).

Once you’ve done this and exit this menu, the Crossfire TX module should power up (LED lights up on the back).
RX and FC Connection
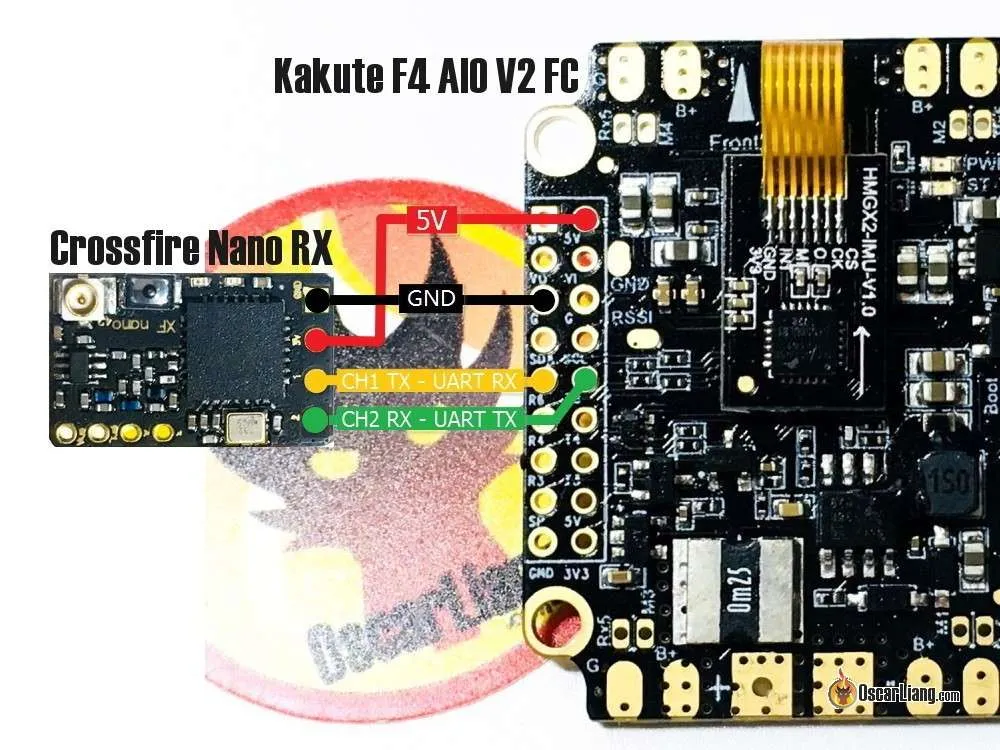
Remember that almost all of the pins on the Crossfire receiver can be mapped in software. This means you can configure them to output whatever you want, and so there are more than 1 way to connect your RX to the flight controller.
The way I show you here is kind of the standard way that most people use, here are the connections:
- 5V to 5V
- GND to GND
- CH1 (Crossfire TX) to UART RX (FC)
- CH2 (Crossfire RX) to UART TX (FC)
You can use any spare UART on the flight controller.
Tutorial: How to setup Crossfire to output SBUS instead of CRSF
You can also configure Crossfire receiver to output SBUS, this allows you to connect only CH1 to an RX pin on the FC, and leave CH2 unconnected. This is useful if you don’t have a TX pin on the FC, but CRSF is a better protocol than SBUS because it’s faster and also allows telemetry and that’s what I would recommend.
You must not use Soft Serial for Crossfire receiver because it’s not fast enough to handle CRSF signal.
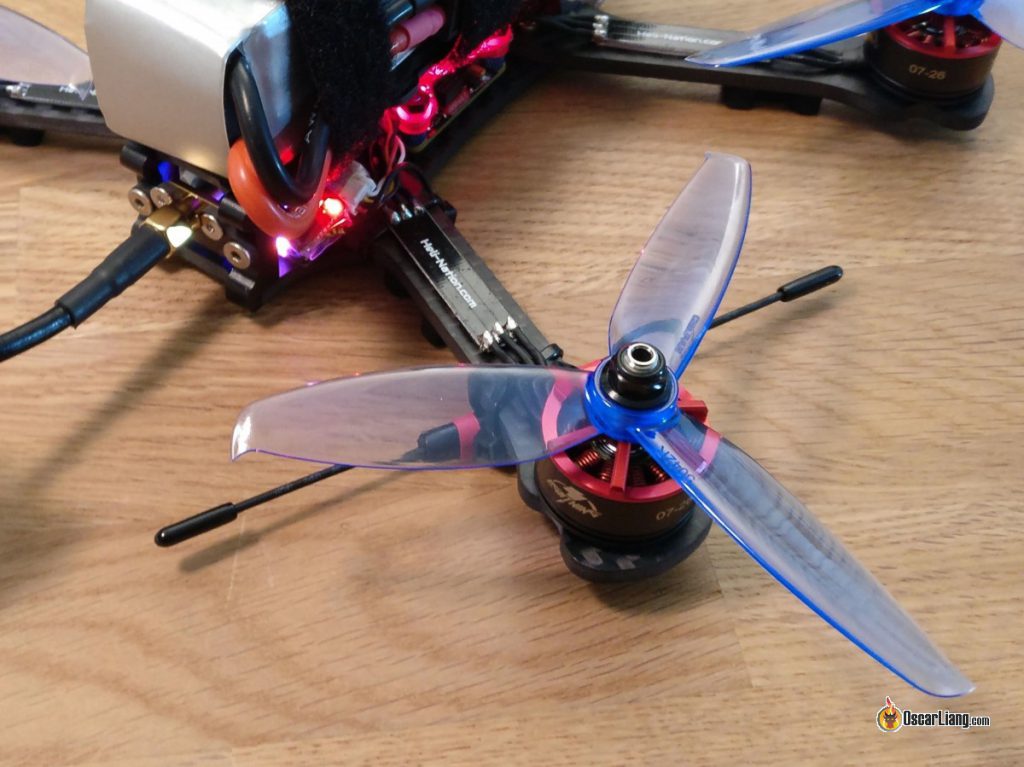
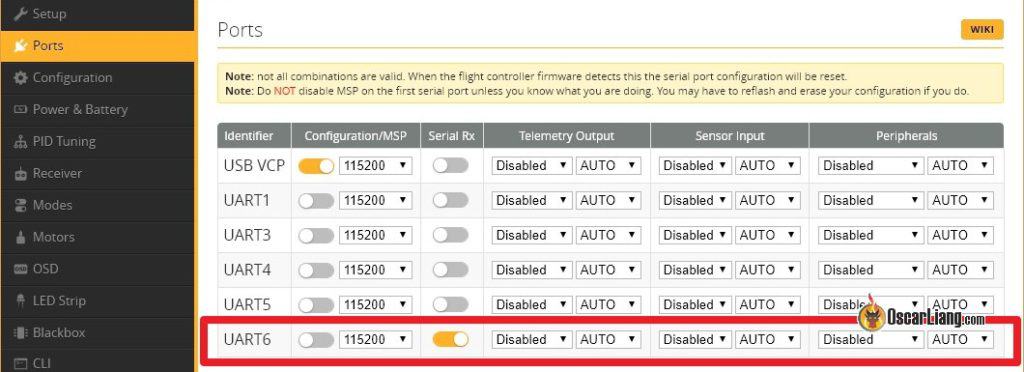
In this example, I am connecting the Crossfire receiver to the UART 6 of the Kakute F4 AIO V2 FC.
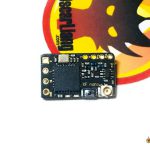
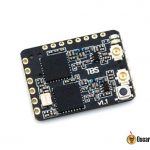
Crossfire Micro Receiver:
Crossfire Nano Receiver:
Binding Crossfire Receiver
Crossfire Receiver Binding is very simple (most of the times), you can activate binding mode in the Crossfire LUA script. This LUA script comes with the latest version of EdgeTX and OpenTX, so you DO NOT need to download anything.

Binding Crossfire Receiver
Crossfire Receiver Binding is very simple (most of the times), you can activate binding mode in the Crossfire LUA script. This LUA script comes with the latest version of EdgeTX and OpenTX, so you DO NOT need to download anything.
TBS Crossfire “Full” Module Installed on the back of the Horus X10
Here are the steps to bind the Crossfire TX module and RX:
- Power on the RX, it should be flashing green, which indicates it’s waiting to bind (if it’s LED stays red, press the bind button on the RX, it should start flashing green)
- Turn on your radio, long press the System button to go to Radio Setup
- On the “Tools” page, select “TBS Agent Lite”

In the next screen, select “XF Micro TX” (that’s your TX module).

In the next screen, select “XF Micro TX” (that’s your TX module).
In the next screen, select the second option “Bind”.

You will be prompted the message “Binding…”, It should only take a few seconds to bind.
If the RX has outdated firmware, you will be prompted to update it, which will take a few minutes. Once it’s done, the receiver will flash green rapidly for a few seconds (loading firmware), then the green lights on both the RX and TX module will become solid. If update got stuck or fail, just try again.
When binding is complete the radio will automatically exit binding mode, and the receiver LED should turn from red to green (solid).
Hit the exit button on your radio to configure the Crossfire Nano receiver.
Configuring RX from Radio
Once your receiver is bound, you can now configure both the TBS Crossfire TX module and receiver from your radio’s Crossfire Configure Tool. If you don’t see the option “XF Micro/Nano RX”, it means your receiver is either not bound or it’s powered off.
The first thing you want to configure would be your receiver output mapping to get it talking to your flight controller.
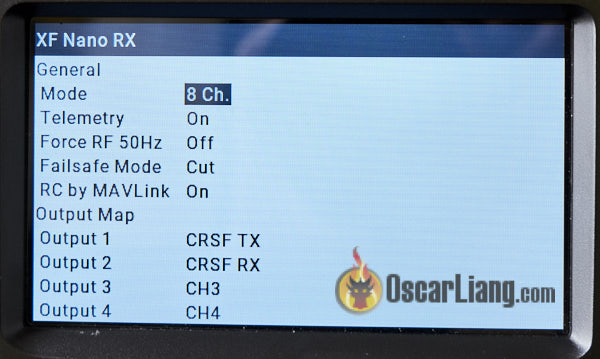
To do this, select “XF Nano RX“, scroll down to “Output Map“, and change “Output 1” to “CRSF TX“, “Output 2” to “CRSF RX“. That’s it

The first thing you want to configure would be your receiver output mapping to get it talking to your flight controller.
To do this, select “XF Nano RX“, scroll down to “Output Map“, and change “Output 1” to “CRSF TX“, “Output 2” to “CRSF RX“. That’s it

Now you can configure the TX module.
Region
Leaving the “Region” setting to “Open” will allow maximum output power regardless which frequency you select.

Now you can configure the TX module.
Region
Leaving the “Region” setting to “Open” will allow maximum output power regardless which frequency you select.

Credit: Crossfire Manual
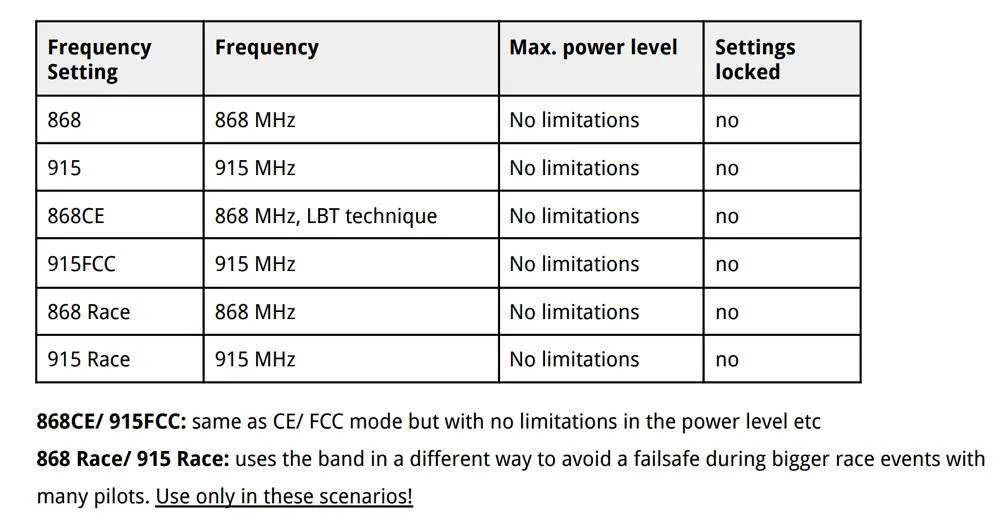
Frequency
It’s important to make sure you are using the correct frequency depends on where you fly. You have two options, 868MHz and 915MHz, one of these frequency will be used by the cellular system, which you should avoid otherwise you will get interference from cellular system, causing dropouts and failsafe.
According to the Crossfire manual, the Blue and Purple regions should be using 915MHz while the Yellow region should be using 868MHz. For example, US should be using 915MHz while Europe should be using 868MHz.

Credit: Crossfire Manual
Frequency
It’s important to make sure you are using the correct frequency depends on where you fly. You have two options, 868MHz and 915MHz, one of these frequency will be used by the cellular system, which you should avoid otherwise you will get interference from cellular system, causing dropouts and failsafe.
According to the Crossfire manual, the Blue and Purple regions should be using 915MHz while the Yellow region should be using 868MHz. For example, US should be using 915MHz while Europe should be using 868MHz.
Credit: Crossfire Manual
Here are the different frequency options. Only use the Race frequencies if you are actually racing as they sacrifice range for bandwidth for more consistent data packets. LBT means “listen before talk”.
 Region and frequency are not available for Tracer as it’s on 2.4GHz which the same frequency band worldwide.
Max Power
Higher output power means more range, but you don’t always want to run at max output power.
Firstly, higher output power drains the battery faster. Secondly if you fly with other people (especially if you are all using Crossfire or other 900MHz systems), it can interfere with other pilots and cause signal dropouts and failsafe if all are using max output power. For short distance (such as racing), it’s probably a good idea to use 25mW.
For a typical FPV drone setup, setting power to around 250mW is adequate in most situations, which can give you miles of range in line of sight.
Dyn. Power
The dynamic output power option can help mitigate some of the problems mentioned with maximum output power. It dynamically adjusts the output power depending on signal strength. Beware that as soon as you unplug the quad, the transmitter will automatically go to maximum output power, which is not a good idea when you fly with other people who are also using Crossfire.
In Tracer, you have 25mW, 100mW and Ludicrous which is about 1W. Because Tracer doesn’t have as much range as Crossfire most people would just run Ludicrous with Dynamic power enabled so it brings the power down when you are flying nearby.
Receiver Mode
There’s one more settings you want to change, which is “Mode” in Receiver settings. You can only access receiver option when you have your receiver bound to the transmitter and powered on. These options are saved per receiver, so you have to set these for every quad you have.
Mode is the number of channels you want to use, you have two options, 8 Ch and 12 Ch.
Just select 12 channels.
You will get four more channels to use. Maybe you don’t need them, but 8Ch mode and 12Ch modes have basically no difference in terms of performance, the extra 4 channels will come in handy when you need them.
However for fixed wings if you want all channels to have full resolution, you should leave it at 8Ch instead. But for multirotor it’s fine to use 12ch.
Make sure telemetry is on, and set Failsafe to Cut so that the motors stop spinning in the event of signal loss, and your quad will drop out of the sky to minimize damage.
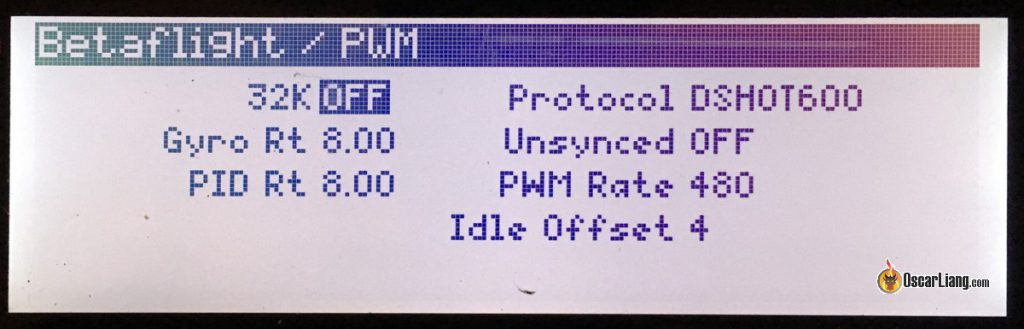
RF Profile
You can select which packet rate you want to run, options are 50Hz, 150Hz or Dynamic.
It depends on if you want lower latency or long distance. 50Hz will have higher latency but gives you way more range because it has higher receiver sensitivity and also uses LORA modulation while 150Hz has lower latency but less range.
You can set it to dynamic, it will shift to the lower latency as your signal gets weaker. However Betaflight devs actually don’t recommend using Dynamic due to RC signal smoothing in the FC firmware which is tied to a fixed packet rate value, it won’t work properly with dynamically changing packet rate. If you fly long range, lock it to 50Hz, if you do racing or just in close range, 150Hz should be fine.
Configure Betaflight for Crossfire
The last step in our software setup is enabling Crossfire protocol in Betaflight.
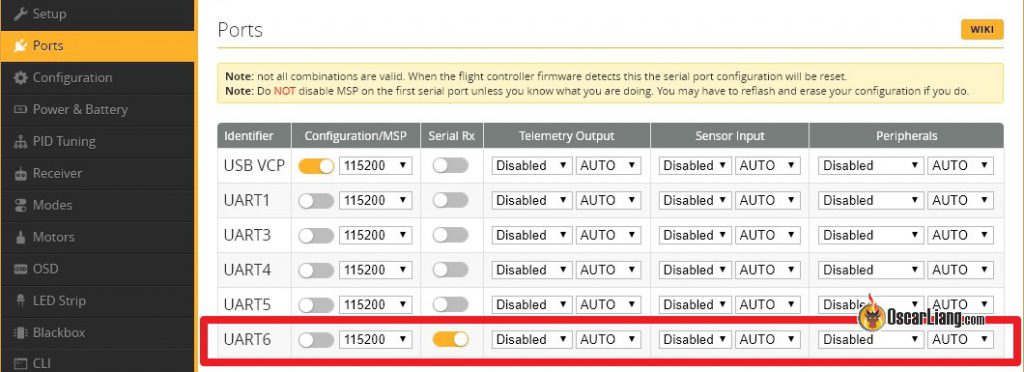
Go to the “Ports” tab in the Betaflight configurator, and enable “Serial RX” in the UART you’ve connected to the TBS Crossfire receiver. Press “Save”.
 Region and frequency are not available for Tracer as it’s on 2.4GHz which the same frequency band worldwide.
Max Power
Higher output power means more range, but you don’t always want to run at max output power.
Firstly, higher output power drains the battery faster. Secondly if you fly with other people (especially if you are all using Crossfire or other 900MHz systems), it can interfere with other pilots and cause signal dropouts and failsafe if all are using max output power. For short distance (such as racing), it’s probably a good idea to use 25mW.
For a typical FPV drone setup, setting power to around 250mW is adequate in most situations, which can give you miles of range in line of sight.
Dyn. Power
The dynamic output power option can help mitigate some of the problems mentioned with maximum output power. It dynamically adjusts the output power depending on signal strength. Beware that as soon as you unplug the quad, the transmitter will automatically go to maximum output power, which is not a good idea when you fly with other people who are also using Crossfire.
In Tracer, you have 25mW, 100mW and Ludicrous which is about 1W. Because Tracer doesn’t have as much range as Crossfire most people would just run Ludicrous with Dynamic power enabled so it brings the power down when you are flying nearby.
Receiver Mode
There’s one more settings you want to change, which is “Mode” in Receiver settings. You can only access receiver option when you have your receiver bound to the transmitter and powered on. These options are saved per receiver, so you have to set these for every quad you have.
Mode is the number of channels you want to use, you have two options, 8 Ch and 12 Ch.
Just select 12 channels.
You will get four more channels to use. Maybe you don’t need them, but 8Ch mode and 12Ch modes have basically no difference in terms of performance, the extra 4 channels will come in handy when you need them.
However for fixed wings if you want all channels to have full resolution, you should leave it at 8Ch instead. But for multirotor it’s fine to use 12ch.
Make sure telemetry is on, and set Failsafe to Cut so that the motors stop spinning in the event of signal loss, and your quad will drop out of the sky to minimize damage.
RF Profile
You can select which packet rate you want to run, options are 50Hz, 150Hz or Dynamic.
It depends on if you want lower latency or long distance. 50Hz will have higher latency but gives you way more range because it has higher receiver sensitivity and also uses LORA modulation while 150Hz has lower latency but less range.
You can set it to dynamic, it will shift to the lower latency as your signal gets weaker. However Betaflight devs actually don’t recommend using Dynamic due to RC signal smoothing in the FC firmware which is tied to a fixed packet rate value, it won’t work properly with dynamically changing packet rate. If you fly long range, lock it to 50Hz, if you do racing or just in close range, 150Hz should be fine.
Configure Betaflight for Crossfire
The last step in our software setup is enabling Crossfire protocol in Betaflight.
Go to the “Ports” tab in the Betaflight configurator, and enable “Serial RX” in the UART you’ve connected to the TBS Crossfire receiver. Press “Save”.
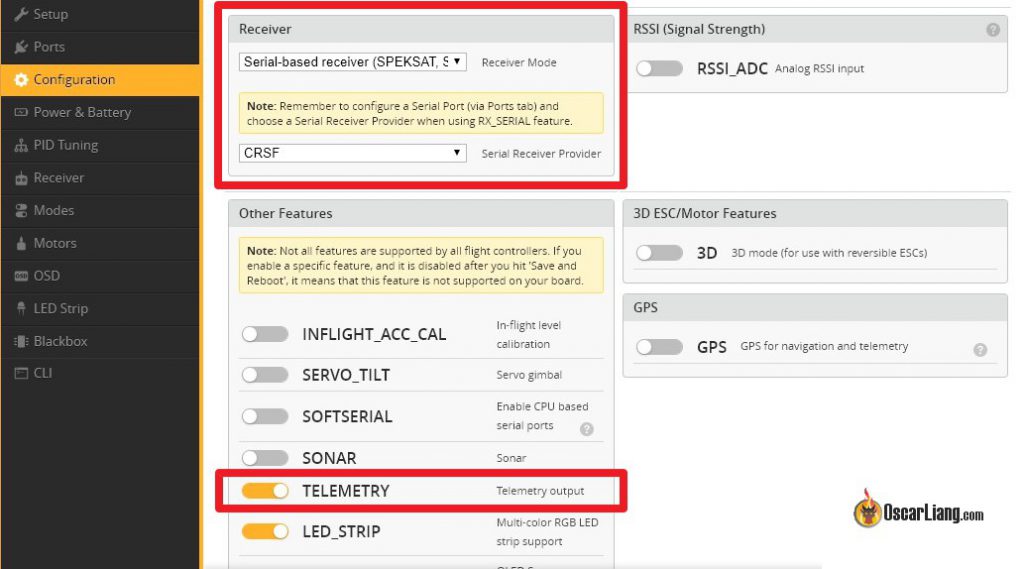
Now go to the “Receiver” tab, under the “Receiver” Section, select “Serial (via UART)“, and select “CRSF” in the second option. Don’t forget to enable “Telemetry” as well before pressing “Save“.

That’s it, you have successfully setup Crossfire in Betaflight
Go back to the “Receiver” tab, you should now see response from stick movement. This means your receiver is working! If the channels are in the wrong order, just try a different “Channel Map”.
Check if end points (1000 and 2000) and mid points (1500) are correct, see this guide how to adjust if they aren’t correct.
No stick movement? Try this command in CLI: set serialrx_inverted = OFF
If you are still not getting any stick response, go back and check your wiring, Output Map setting in the receiver, and Betaflight configurations. Still nothing? Get some help over at IntoFPV.com!
Telemetry
To make sure Telemetry is working correctly, go to the Telemetry page in the radio, and select the option “Discover new sensors”, it should begin to pick up data from the flight controller including RxBt (drone battery voltage).
Here is a list of available Crossfire Telemetry data, and what each means. To name a few frequently used ones: RxBt = Battery voltage, RQly = Link Quality, RFMD = Update Rate.
Mounting Crossfire Receiver Antenna
If you have been using other radio systems, the first problem you are going to run into is mounting the unusually large receiver antenna. Learn about the different ways of mounting Crossfire antenna and their effects.

LQ and RSSI
LQ and RSSI are the two measurements of how good your radio signal is. I have a detail tutorial explaining how to read LQ and RSSI in Crossfire. In this tutorial I will also explain how to display them on your Betaflight OSD, and setup voice warning in your radio.
How many people can fly on Crossfire?
According to TBS, theoretically, up to 50 people can fly at the same time using Crossfire. Real life tests have shown when 12 people are flying at the same time, radio link quality becomes noticeably worse but still flyable, so TBS don’t recommend any more than that flying at the same time
Edit History
- Mar 2018 – Guide created
- Jan 2019 – Updated product links and setup detail
- Dec 2019 – Added screenshots for Jumper T16
- Jun 2020 – Updated Agent X new version, Crossfire LUA script changed to Tools in OpenTX, added Micro TX V2
- Feb 2023 – Updated instructions and product links
Обновление
Привет бро! Давай покажу как обновить приемник и передатчик TBS Crossfire, а после забиндим их через приложение TBS Agent.
Для начала надо скачать TBS Agent на сайте Team BlackSheep. Перейди по ссылки и пролистай страницу до раздела DOWNLOAD, выбери свою ОС, скачай и установи агент. При первом запуске агент попросит тебя авторизоваться, создай учетку и авторизируйся.
Обновление передатчика
Обновление приемника
А что если не получилось?
Если делать это через TBS Agent то должно получиться с 99% вероятностью. Но возможно что обновление повисло, аккум умер или что то еще и биндинг не происходит, а приемник моргает красным сразу после включения.
Для этого зажми кнопку на приемнике и подключи бату к кваду при этом держа кнопку на приемники. После того как квад включится отпусти кнопку и снова нажми и держи ее 4 секунды. Приемник начнет быстро мигать зеленым цветом. Нажми на кнопку BIND в TBS Agent и жди поиска и обновления приемника.
На этом все, удачного апгрейда и бинда, увидимся!

Новые посты в моем Телеграмм канале