Требуется руководство для вашей Tefal VS400332 Vitacuisine Compact Пароварка? Ниже вы можете просмотреть и загрузить бесплатно руководство в формате PDF. Кроме того, приведены часто задаваемые вопросы, рейтинг изделия и отзывы пользователей, что позволит оптимально использовать ваше изделие. Если это не то руководство, которое вы искали, – свяжитесь с нами.
Ваше устройство неисправно, и в руководстве отсутствует решение? Перейдите в Repair Café для получения бесплатных ремонтных услуг.
Руководство

Рейтинг
Сообщите нам, что вы думаете о Tefal VS400332 Vitacuisine Compact Пароварка, оставив оценку продукта. Хотите поделиться вашими впечатлениями от данного изделия или задать вопрос? Вы можете оставить комментарий в нижней части страницы.
Довольны ли вы данным изделием Tefal?
Да Нет
6 голоса
Часто задаваемые вопросы
Наша служба поддержки выполняет поиск полезной информации по изделиям и отвечает на часто задаваемые вопросы. Если вы заметили неточность в наших часто задаваемых вопросах, сообщите нам об этом с помощью нашей контактной формы.
Как приготовить рис в пароварке? Проверенный
Это можно сделать, положив рис в миску и поставив миску в пароварку. Некоторые модели поставляются с подходящей чашей. Время приготовления может варьироваться в зависимости от марки и модели.
Это было полезно (315)
Tefal Vitacuisine Compact VS4003 Manual
Important safeguards
Safety instructions
- Read and follow the instructions for use. Keep them safe. This appliance is not intended to be operated using an external timer or separate remote control system. For your safety, this appliance complies with the safety regulations and directives in effect at the time of manufacture (Low-voltage Directive, Electromagnetic Compatibility, Food Contact Materials Regulations, Environment…).
- Check that the power supply voltage corresponds to that shown on the appliance (alternating current).
- Given the diverse standards in effect, if the appliance is used in a country other than that in which it is purchased, have it checked by an approved service centre.
- Do not place the appliance near a heat source or in a hot oven, as serious damage could result.
- Use a flat, stable, heat-resistant work surface away from any water splashes.
- Never leave the appliance in operation unattended. Keep away from children.
- This appliance is not intended for use by persons (including children) with reduced physical, sensory or mental capabilities, or lack of experience and knowledge, unless they have been given supervision or instruction concerning use of the appliance by a person responsible for their safety.
- Children should be supervised to ensure that they do not play with the appliance.
- Do not leave the cord hanging.
- Always plug the appliance into an earthed socket.
- Do not use an extension lead. If you accept liability for doing so, only use an extension lead which is in good condition, has an earthed plug and is suited to the power of the appliance.
- Do not unplug the appliance by pulling on the cord.
- Do not use the appliance if:
- the appliance or the cord is damaged.
- the appliance has fallen or shows visible damage or does not work properly. In the event of the above, the appliance must be sent to an approved Service Centre. Do not take the appliance apart yourself.
- If the power supply cord is damaged, it must be replaced by the manufacturer, an authorised service centre or a similarly qualified person in order to avoid any danger.
- Burns can occur by touching the hot surface of the appliance, the hot water, steam or the food.
- Always unplug the appliance:
- immediately after use,
- when moving it,
- prior to any cleaning or maintenance.
- Never immerse the appliance in water!
- Do not place the appliance near a wall or a cupboard: the steam produced by the appliance can cause damage.
- Do not move the appliance when it is full of liquids or hot foods.
- This appliance is designed for domestic use only. In case of professional use, inappropriate use or failure to comply with the instructions, the manufacturer accepts no responsibility and the guarantee does not apply.
- It is not intended to be used in the following applications, and the guarantee will not apply for:
- staff kitchen areas in shops, offices and other working environments;
- farm houses;
- by clients in hotels, motels and other residential type environments;
- bed and breakfast type environments.
- Cooking times are given as a guide only.
- Do not touch the appliance when it is steaming and use oven gloves to remove the lid and steam baskets.
- If one of the steaming cups is damaged do not use it anymore.
- For any problems or queries please contact our Customer Relations Team or consult our web site:
Helpline:
UK 0845 602 1454 www.tefal.co.uk
Ireland (01) 677 4003
Australia 02 9748 7944 www.tefal.com.au
NZ 0800 700711 www.tefal.co.nz
- If your appliance is fitted with a removable power cord: if the power cord is damaged, it must be replaced by a special cord or unit available from a Tefal authorised service centre.
- If your appliance is fitted with a fixed power cord: if the power supply cord is damaged, it must be replaced by a Tefal authorised service centre or a similarly qualified person in order to avoid any danger.
Protect the environment
- Your appliance has been designed to run for many years. However, when you decide to replaceit, remember to think about how you can contribute to protecting the environment.
- Before discarding your appliance you should remove the battery from the timer and dispose ofit at a local civic waste collection centre (according to model).

Environment protection first!
Your appliance contains valuable materials which can be recovered or recycled.
→ Leave it at a local civic waste collection point.
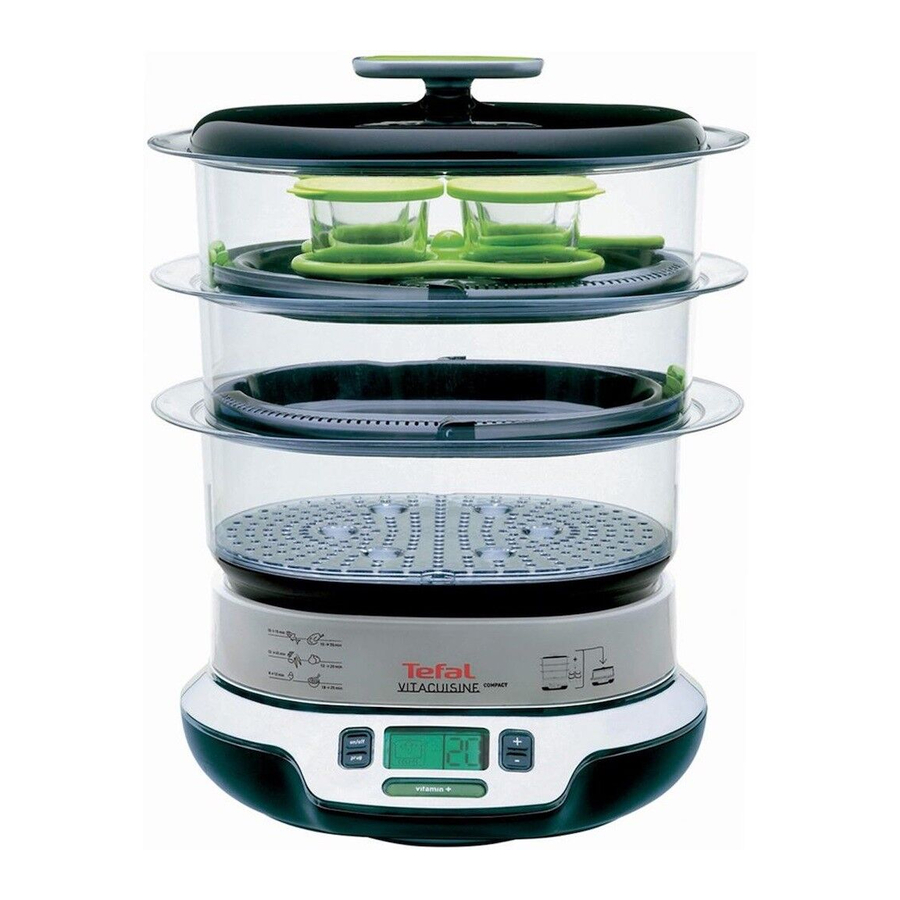
Description

- Lid
- Cooking trays
- Steam baskets – numbered 1, 2 & 3
- Removable base
- Juice collector
- Interior water level indicator
- Heating element
- Water tank
- Power supply base
- Steaming cups and lids
- Steaming cups holder
- On/off touchpad
- Programme touchpad
- + Touchpad
- – Touchpad
- LCD screen
- Cooking level indicator
- Clock
- Low water level indicator
- Timer
- « vitamin + » touchpad
Instructions for Use
Before first use
- Clean the water tank using a damp, non-abrasive sponge — fig. 1.
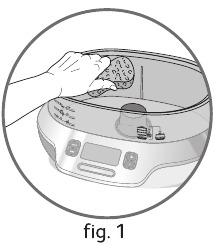
- Wash all removable parts using warm water and washing up liquid, rinse and dry.
Do not immerse the power supply base in water.
Fill the water tank
Do not use seasoning, herbs or any liquid other than water in the water tank. Ensure that the water tank (8) is filled with water to the maximum level before using the steamer.
Cooking
Choose the cooking time
A long press on the + or – touchpad allows you to increase or decrease the cooking time more quickly.
Using the « vitamin + » touchpad
After a few minutes cooking, you can manually stop the « vitamin + » programme by pressing the illuminated touchpad — fig. 9.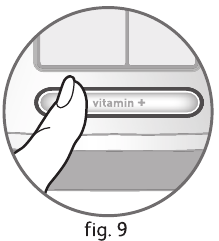
- Your steamer is fitted with a « vitamin + » touchpad which reduces cooking time and preserves the full vitamin content.
- The touchpad lights up when cooking starts. This allows a faster start to the cooking process owing to a higher steam output.
- The « vitamin + » touchpad light goes out automatically when the quantity of steam is sufficient for the cooking process.
- If the « vitamin + » touchpad is not illuminated and you intervene during the cooking process (such as inserting a basket, removing the lid to check the cooking progress, etc.), press the « vitamin + » touchpad to replace the lost steam — fig. 9.
During cooking
If ![]() is displayed (+ sound alarm) — fig. 10 carefully remove the baskets and juice collector using oven gloves, add water up to the maximum level. The steamer will automatically continue the cooking process.
is displayed (+ sound alarm) — fig. 10 carefully remove the baskets and juice collector using oven gloves, add water up to the maximum level. The steamer will automatically continue the cooking process.
Do not touch hot surfaces or hot food during cooking. Use oven gloves.
If the water tank is empty, the steamer stops heating.
Delayed start
The delayed start time can be changed at any point.
Keep warm function
While the keep warm function is in operation, no other action is possible, except stop when required.
Removing the food
Use oven gloves when handling the baskets, handles and lid.
To stop the steamer
If you want to switch off the steamer when the « low water level » indicator is on, you must press twice on the on/off touchpad.
Table of cooking times
Cooking times are approximate and may vary depending on the size of the food, the space between the food, the amount of food, individual preferences, and the mains voltage.
Use oven gloves when handling the baskets during the cooking time.
Meat — Poultry
| Preparation | Type | Quantity | Cooking time | Recommendations |
| Chicken breast (boneless) | Fresh Whole |
350 g | 20 min | 2 chicken breast in a steam basket |
| Small pieces | 450 g | 17 min | ||
| Chicken drumsticks | Fresh Whole |
2 | 36 min | |
| Turkey escalope | Thin | 600 g | 24 min | |
| Pork fillet | Fresh | 700 g | 38 min | Cut in 1 cm thickness slice |
| Lamb steak | Fresh | 500 g | 14 min | |
| Frankfurters | Fresh | 10 | 10 min |
Fish — Shellfish
| Preparation | Type | Quantity | Cooking time | Recommendations |
| Thin fish fillets (cod, haddock, plaice, sole, salmon…) | Fresh | 450 g | 15 min | |
| Frozen | 370 g | 18 min | ||
| Fish steaks (cod, haddock, plaice, sole, salmon…) | Fresh | 400 g | 15 min | |
| Whole fish (trout, salmon trout, sea bass) | Fresh | 600 g | 25 min | |
| Mussels | Fresh | 1 kg | 20 min | |
| Prawns | Fresh | 200 g | 5 min | |
| Scallops | Fresh | 100 g | 5 min |
Vegetables
| Food | Type | Quantity | Cooking time | Recommendations |
| Artichoke | Fresh | 2 | 55 min | Whole in steam basket 1 and 2 (without cooking trays) |
| Potatoes | Fresh | 600 g | 20 min | Sliced or cubed. Small new potatoes can be cooked whole |
| Asparagus | Fresh | 600 g | 17 min | |
| Broccoli | Fresh | 500 g | 18 min | Small florets |
| Frozen | 500 g | 18 min | ||
| Celeriac | Fresh | 350 g | 22 min | In cubes |
| Mushrooms | Fresh | 500 g | 22 min | Whole |
| Cauliflower | Fresh | 1 medium | 19 min | Small florets |
| Cabbage (red-green) | Fresh | 600 g | 22 min | Sliced |
| Courgette | Fresh | 600 g | 12 min | Sliced |
| Spinach | Fresh | 300 g | 13 min | Toss halfway through cooking |
| Frozen | 300 g | 15 min | ||
| Fine green beans | Fresh | 500 g | 35 min | |
| Frozen | 500 g | 35 min | ||
| Carotts | Fresh | 500 g | 15 min | Thinly sliced |
| Corn on the cob | Fresh | 500 g | 45 min | |
| Green beans | Fresh | 500 g | 35 min | Whole |
| Leeks | Fresh | 500 g | 30 min | Sliced |
| Sweet peppers | Fresh | 300 g | 20 min | Cut in wide strips |
| Peas | Fresh | 400 g | 20 min | Shelled |
| Frozen | 400 g | 20 min |
Rice
| Food | Weight | Quantity | Cooking time | Recommendations |
| For one cup of white long grain or basmati | g | ml | min |
Wash rice well before cooking. Place rice and cold water in the steaming cup without the lid on. Use steam basket n° 3. |
Fruits
| Food | Type | Quantity | Cooking time | Recommendations |
| Pears | Fresh | 4 | 25 min | With steam basket 1 and 2 (without cooking trays). Steam whole or halved. |
| Bananas | Fresh | 4 | 15 min | Whole |
| Apples | Fresh | 5 | 20 min | Quartered |
Steaming Tips and Techniques
- Do not pack food too tightly in the steam baskets. Leave some space for steam to circulate as much as possible.
- For best results, use pieces of food of approximately the same size (such as potatoes, vegetables and chicken breasts) so that they cook at the same time. The size and thickness of the food will alter the cooking time.
- Avoid lifting the lid to check on the cooking progress too often, as this allows loss of steam and can lengthen the cooking time.
- If recipes require the use of cling film, always use the all purpose type suitable for use in microwave ovens. Cling film is often used to prevent condensation forming and spoiling delicates foods such as egg custards. Avoid using foil as this tends to increase the steaming time.
- When choosing food for steaming, select suitable size food to fit the steaming basket, especially if it is cooked whole such as fish.
- Subtle flavour can be given to steamed food with the addition of fresh herbs, slices of lemon or orange, garlic and onion. These may be placed either directly underneath or on top of the food in the steaming basket.
- To give meat, poultry and fish a delicious flavour plus make then moist and tender, marinade for a few hours before steaming. The marinade can be as simple as a blend of wine and fresh herbs, or it can be a spicy barbecue or tandoori mix.
- Frozen vegetables can be steamed from frozen. All shellfish, poultry and meat must be completely thawed before steaming.
- For some recipes with a long cooking time, such as steamed sponge pudding, you will need to top up with more cold water during steaming.
- Always use oven gloves when handling the baskets or steaming cups during or after cooking.
Steaming Cup Recipes
Preparing steaming cup recipes
You can cook recipes in the steaming cups, either from the steamer recipe book or from your own recipes. Put the prepared mixture into the cups, taking care not to overfill them to prevent spillages as some recipes may rise during cooking. Cover the cups if necessary, using the lids. Place the four cups in the holder fig. 16.
Take the holder by the handle and place it in the basket — fig. 17.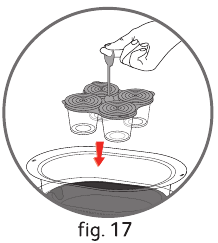
The cups must always be placed in the top basket (basket no. 3) immediately under the lid.
Removing the steaming cups
Use oven gloves. Remove the lid by the handle. Remove the cups using the holder handle. Take the cups out of the holder and remove the lids (if your recipe uses lids). If necessary you can cool the cups by standing them in cold water. Do this using the holder. Wait until the cups are at room temperature before placing them in the refrigerator. Serve the recipe in the cups.
Maintenance and cleaning
Cleaning the steamer
- Unplug the steamer after use.
- Allow it to cool completely before cleaning.
- Check that the steamer has cooled completely before emptying the juice collector and water tank.
- Wash all removable parts using warm water and washing up liquid, rinse and dry.
- All parts except the power supply base are dishwasher safe.
Do no immerse the power supply base in water. Do not use abrasive cleaning products.
Descaling your steamer
For best results, descale the steamer after every 8 uses. To do this:
- Remove the juice collector.
- Pour 1 litre of cold water into the water tank.
- Add 1 glass (about 150 ml) of white vinegar (available from hardware stores).
- Leave it to descale overnight.
- Rinse out the inside of the water tank several times using warm water.
- Do not use other scale removing products.
Storage
All parts can be stored inside the steamer.

Documents / Resources
References
Download manual
Here you can download full pdf version of manual, it may contain additional safety instructions, warranty information, FCC rules, etc.
Download Tefal Vitacuisine Compact VS4003 Manual
Да, конечно. Установите таймер примерно на 10 минут (это зависит от продукта) и убедитесь, что в резервуаре достаточно воды.
Со временем в емкости для сбора сока могут появиться пятна от насыщенных натуральных соков, например моркови или свеклы. Это нормальное явление. Их можно очистить с помощью лимонного сока сразу после приготовления пищи.
Мы рекомендуем помещать самые большие куски, которые требуют максимального времени приготовления, в нижнюю корзину.
Ингредиенты очень плотные и имеют разное время приготовления. Продлите время приготовления.
Для приготовления введено слишком много ингредиентов. Самые крупные ингредиенты и продукты с максимальным временем приготовления помещайте в нижнюю чашу.
Не перегружайте чаши пароварки.
Удалите накипь в устройстве.
Нарежьте ингредиенты на небольшие кусочки.
Пища, приготавливаемая в пароварке, имеет отличный вкус и аромат, поэтому любую приправу следует добавлять в минимальном количестве.
При необходимости вы можете добавить небольшое количество специй к пище или добавить травы к паровой воде для придания пище приятного вкуса.
Да. Никогда не оставляйте работающий маленький электроприбор без присмотра. Однако вам не обязательно все время смотреть за пароваркой. Просто установите таймер, и звуковой сигнал даст вам знать, когда пища будет готова к употреблению. Продукт не подгорает, и его не нужно перемешивать.
Осторожно! Не забудьте налить воду в резервуар.
В эту емкость стекает весь сок от приготавливаемого на пару продукта. Сок можно использовать как основной ингредиент для бульонов и соусов.
Если время приготовления продуктов, помещенных в чаши, разное, начните с того продукта, который готовится дольше, поместив его в нижнюю чашу. Затем, в процессе варки, закладывайте верхние чаши, чтобы завершить цикл приготовления.
Все замороженные овощи можно готовить на пару.
Мы рекомендуем использовать в пароварке только консервированные или предварительно проваренные бобовые и бобы. Воду необходимо слить, бобовые сполоснуть, затем положить в корзину пароварки. Их не нужно предварительно замачивать или отваривать.
Да, его можно готовить на пару в пароварке. На это потребуется столько же времени, как и на приготовление/варку на медленном огне в кастрюле. Просто проверяйте уровень воды и доливайте ее.
Да — если у корзин пароварки съемное основание, вы сможете снять основание с корзин 2 и 3 и положить в нижнюю корзину пароварки небольшую целую курицу для приготовления на пару.
Да, чтобы приготовить сочное мясо, курицу и рыбу, их можно замариновать за несколько часов до приготовления на пару.
При приготовлении долго готовящегося пудинга необходимо доливать воду в резервуар во время приготовления. Чтобы залить воду в резервуар, используйте варежки-прихватки, чтобы поднять крышку и корзину пароварки. Осторожно слейте воду, скопившуюся в накопителе для сока, затем наполните резервуар холодной необработанной водой из-под крана.
Время приготовления будет одинаковым независимо от того, сколько уровней вы используете. Старайтесь не загружать продукты слишком плотно на первом уровне, чтобы пар мог свободно проникнуть на второй уровень.
Поместите яйца в корзину для приготовления на пару. Чтобы приготовить шесть яиц вкрутую понадобится 12 минут, для приготовления шести яиц всмятку — 8 минут.
Environment protection first!
Your appliance contains valuable materials which can be recovered or recycled.
→ Leave it at a local civic waste collection point.
Description
- Lid
- Cooking trays
- Steam baskets – numbered 1, 2 & 3
- Removable base
- Juice collector
- Interior water level indicator
- Heating element
- Water tank
- Power supply base
- Steaming cups and lids
- Steaming cups holder
- On/off touchpad
- Programme touchpad
- + Touchpad
- – Touchpad
- LCD screen
- Cooking level indicator
- Clock
- Low water level indicator
- Timer
- « vitamin + » touchpad
Instructions for Use
Before first use
- Clean the water tank using a damp, non-abrasive sponge — fig. 1.
- Wash all removable parts using warm water and washing up liquid, rinse and dry.
Do not immerse the power supply base in water.
Fill the water tank
Do not use seasoning, herbs or any liquid other than water in the water tank. Ensure that the water tank (8) is filled with water to the maximum level before using the steamer.
Cooking
Choose the cooking time
A long press on the + or – touchpad allows you to increase or decrease the cooking time more quickly.
Using the « vitamin + » touchpad
After a few minutes cooking, you can manually stop the « vitamin + » programme by pressing the illuminated touchpad — fig. 9.
- Your steamer is fitted with a « vitamin + » touchpad which reduces cooking time and preserves the full vitamin content.
- The touchpad lights up when cooking starts. This allows a faster start to the cooking process owing to a higher steam output.
- The « vitamin + » touchpad light goes out automatically when the quantity of steam is sufficient for the cooking process.
- If the « vitamin + » touchpad is not illuminated and you intervene during the cooking process (such as inserting a basket, removing the lid to check the cooking progress, etc.), press the « vitamin + » touchpad to replace the lost steam — fig. 9.
During cooking
If ![]() is displayed (+ sound alarm) — fig. 10 carefully remove the baskets and juice collector using oven gloves, add water up to the maximum level. The steamer will automatically continue the cooking process.
is displayed (+ sound alarm) — fig. 10 carefully remove the baskets and juice collector using oven gloves, add water up to the maximum level. The steamer will automatically continue the cooking process.
Do not touch hot surfaces or hot food during cooking. Use oven gloves.
If the water tank is empty, the steamer stops heating.
Delayed start
The delayed start time can be changed at any point.
Keep warm function
While the keep warm function is in operation, no other action is possible, except stop when required.
Removing the food
Use oven gloves when handling the baskets, handles and lid.
To stop the steamer
If you want to switch off the steamer when the « low water level » indicator is on, you must press twice on the on/off touchpad.
Table of cooking times
Cooking times are approximate and may vary depending on the size of the food, the space between the food, the amount of food, individual preferences, and the mains voltage.
Use oven gloves when handling the baskets during the cooking time.
Meat — Poultry
| Preparation | Type | Quantity | Cooking time | Recommendations |
| Chicken breast (boneless) | Fresh Whole |
350 g | 20 min | 2 chicken breast in a steam basket |
| Small pieces | 450 g | 17 min | ||
| Chicken drumsticks | Fresh Whole |
2 | 36 min | |
| Turkey escalope | Thin | 600 g | 24 min | |
| Pork fillet | Fresh | 700 g | 38 min | Cut in 1 cm thickness slice |
| Lamb steak | Fresh | 500 g | 14 min | |
| Frankfurters | Fresh | 10 | 10 min |
Fish — Shellfish
| Preparation | Type | Quantity | Cooking time | Recommendations |
| Thin fish fillets (cod, haddock, plaice, sole, salmon…) | Fresh | 450 g | 15 min | |
| Frozen | 370 g | 18 min | ||
| Fish steaks (cod, haddock, plaice, sole, salmon…) | Fresh | 400 g | 15 min | |
| Whole fish (trout, salmon trout, sea bass) | Fresh | 600 g | 25 min | |
| Mussels | Fresh | 1 kg | 20 min | |
| Prawns | Fresh | 200 g | 5 min | |
| Scallops | Fresh | 100 g | 5 min |
Vegetables
| Food | Type | Quantity | Cooking time | Recommendations |
| Artichoke | Fresh | 2 | 55 min | Whole in steam basket 1 and 2 (without cooking trays) |
| Potatoes | Fresh | 600 g | 20 min | Sliced or cubed. Small new potatoes can be cooked whole |
| Asparagus | Fresh | 600 g | 17 min | |
| Broccoli | Fresh | 500 g | 18 min | Small florets |
| Frozen | 500 g | 18 min | ||
| Celeriac | Fresh | 350 g | 22 min | In cubes |
| Mushrooms | Fresh | 500 g | 22 min | Whole |
| Cauliflower | Fresh | 1 medium | 19 min | Small florets |
| Cabbage (red-green) | Fresh | 600 g | 22 min | Sliced |
| Courgette | Fresh | 600 g | 12 min | Sliced |
| Spinach | Fresh | 300 g | 13 min | Toss halfway through cooking |
| Frozen | 300 g | 15 min | ||
| Fine green beans | Fresh | 500 g | 35 min | |
| Frozen | 500 g | 35 min | ||
| Carotts | Fresh | 500 g | 15 min | Thinly sliced |
| Corn on the cob | Fresh | 500 g | 45 min | |
| Green beans | Fresh | 500 g | 35 min | Whole |
| Leeks | Fresh | 500 g | 30 min | Sliced |
| Sweet peppers | Fresh | 300 g | 20 min | Cut in wide strips |
| Peas | Fresh | 400 g | 20 min | Shelled |
| Frozen | 400 g | 20 min |
Rice
| Food | Weight | Quantity | Cooking time | Recommendations |
| For one cup of white long grain or basmati | g | ml | min |
Wash rice well before cooking. Place rice and cold water in the steaming cup without the lid on. Use steam basket n° 3. |
Fruits
| Food | Type | Quantity | Cooking time | Recommendations |
| Pears | Fresh | 4 | 25 min | With steam basket 1 and 2 (without cooking trays). Steam whole or halved. |
| Bananas | Fresh | 4 | 15 min | Whole |
| Apples | Fresh | 5 | 20 min | Quartered |
Steaming Tips and Techniques
- Do not pack food too tightly in the steam baskets. Leave some space for steam to circulate as much as possible.
- For best results, use pieces of food of approximately the same size (such as potatoes, vegetables and chicken breasts) so that they cook at the same time. The size and thickness of the food will alter the cooking time.
- Avoid lifting the lid to check on the cooking progress too often, as this allows loss of steam and can lengthen the cooking time.
- If recipes require the use of cling film, always use the all purpose type suitable for use in microwave ovens. Cling film is often used to prevent condensation forming and spoiling delicates foods such as egg custards. Avoid using foil as this tends to increase the steaming time.
- When choosing food for steaming, select suitable size food to fit the steaming basket, especially if it is cooked whole such as fish.
- Subtle flavour can be given to steamed food with the addition of fresh herbs, slices of lemon or orange, garlic and onion. These may be placed either directly underneath or on top of the food in the steaming basket.
- To give meat, poultry and fish a delicious flavour plus make then moist and tender, marinade for a few hours before steaming. The marinade can be as simple as a blend of wine and fresh herbs, or it can be a spicy barbecue or tandoori mix.
- Frozen vegetables can be steamed from frozen. All shellfish, poultry and meat must be completely thawed before steaming.
- For some recipes with a long cooking time, such as steamed sponge pudding, you will need to top up with more cold water during steaming.
- Always use oven gloves when handling the baskets or steaming cups during or after cooking.
Steaming Cup Recipes
Preparing steaming cup recipes
You can cook recipes in the steaming cups, either from the steamer recipe book or from your own recipes. Put the prepared mixture into the cups, taking care not to overfill them to prevent spillages as some recipes may rise during cooking. Cover the cups if necessary, using the lids. Place the four cups in the holder fig. 16.
Take the holder by the handle and place it in the basket — fig. 17.
The cups must always be placed in the top basket (basket no. 3) immediately under the lid.
Removing the steaming cups
Use oven gloves. Remove the lid by the handle. Remove the cups using the holder handle. Take the cups out of the holder and remove the lids (if your recipe uses lids). If necessary you can cool the cups by standing them in cold water. Do this using the holder. Wait until the cups are at room temperature before placing them in the refrigerator. Serve the recipe in the cups.
Maintenance and cleaning
Cleaning the steamer
- Unplug the steamer after use.
- Allow it to cool completely before cleaning.
- Check that the steamer has cooled completely before emptying the juice collector and water tank.
- Wash all removable parts using warm water and washing up liquid, rinse and dry.
- All parts except the power supply base are dishwasher safe.
Do no immerse the power supply base in water. Do not use abrasive cleaning products.
Descaling your steamer
For best results, descale the steamer after every 8 uses. To do this:
- Remove the juice collector.
- Pour 1 litre of cold water into the water tank.
- Add 1 glass (about 150 ml) of white vinegar (available from hardware stores).
- Leave it to descale overnight.
- Rinse out the inside of the water tank several times using warm water.
- Do not use other scale removing products.
Storage
All parts can be stored inside the steamer.
Documents / Resources
References
Download manual
Here you can download full pdf version of manual, it may contain additional safety instructions, warranty information, FCC rules, etc.
Download Tefal Vitacuisine Compact VS4003 Manual
Да, конечно. Установите таймер примерно на 10 минут (это зависит от продукта) и убедитесь, что в резервуаре достаточно воды.
Со временем в емкости для сбора сока могут появиться пятна от насыщенных натуральных соков, например моркови или свеклы. Это нормальное явление. Их можно очистить с помощью лимонного сока сразу после приготовления пищи.
Мы рекомендуем помещать самые большие куски, которые требуют максимального времени приготовления, в нижнюю корзину.
Ингредиенты очень плотные и имеют разное время приготовления. Продлите время приготовления.
Для приготовления введено слишком много ингредиентов. Самые крупные ингредиенты и продукты с максимальным временем приготовления помещайте в нижнюю чашу.
Не перегружайте чаши пароварки.
Удалите накипь в устройстве.
Нарежьте ингредиенты на небольшие кусочки.
Пища, приготавливаемая в пароварке, имеет отличный вкус и аромат, поэтому любую приправу следует добавлять в минимальном количестве.
При необходимости вы можете добавить небольшое количество специй к пище или добавить травы к паровой воде для придания пище приятного вкуса.
Да. Никогда не оставляйте работающий маленький электроприбор без присмотра. Однако вам не обязательно все время смотреть за пароваркой. Просто установите таймер, и звуковой сигнал даст вам знать, когда пища будет готова к употреблению. Продукт не подгорает, и его не нужно перемешивать.
Осторожно! Не забудьте налить воду в резервуар.
В эту емкость стекает весь сок от приготавливаемого на пару продукта. Сок можно использовать как основной ингредиент для бульонов и соусов.
Если время приготовления продуктов, помещенных в чаши, разное, начните с того продукта, который готовится дольше, поместив его в нижнюю чашу. Затем, в процессе варки, закладывайте верхние чаши, чтобы завершить цикл приготовления.
Все замороженные овощи можно готовить на пару.
Мы рекомендуем использовать в пароварке только консервированные или предварительно проваренные бобовые и бобы. Воду необходимо слить, бобовые сполоснуть, затем положить в корзину пароварки. Их не нужно предварительно замачивать или отваривать.
Да, его можно готовить на пару в пароварке. На это потребуется столько же времени, как и на приготовление/варку на медленном огне в кастрюле. Просто проверяйте уровень воды и доливайте ее.
Да — если у корзин пароварки съемное основание, вы сможете снять основание с корзин 2 и 3 и положить в нижнюю корзину пароварки небольшую целую курицу для приготовления на пару.
Да, чтобы приготовить сочное мясо, курицу и рыбу, их можно замариновать за несколько часов до приготовления на пару.
При приготовлении долго готовящегося пудинга необходимо доливать воду в резервуар во время приготовления. Чтобы залить воду в резервуар, используйте варежки-прихватки, чтобы поднять крышку и корзину пароварки. Осторожно слейте воду, скопившуюся в накопителе для сока, затем наполните резервуар холодной необработанной водой из-под крана.
Время приготовления будет одинаковым независимо от того, сколько уровней вы используете. Старайтесь не загружать продукты слишком плотно на первом уровне, чтобы пар мог свободно проникнуть на второй уровень.
Поместите яйца в корзину для приготовления на пару. Чтобы приготовить шесть яиц вкрутую понадобится 12 минут, для приготовления шести яиц всмятку — 8 минут.
Не дотрагивайтесь до емкостей и порционных стаканчиков во время готовки, не дотрагивайтесь до устройства, когда оно производит пар; никогда не дотрагивайтесь до включенного устройства, всегда отключайте его.
Не передвигайте устройство, когда в нем находятся горячие жидкости или пища.
Дотрагиваясь до емкостей и порционных стаканчиков после приготовления пищи, всегда используйте прихватки или защитные рукавицы.
Попробуйте добавить свежие травы, лимон, чеснок, апельсин или лук прямо в приготовляемую пищу.
Чтобы усилить вкус курицы, мяса или рыбы, приготовляемых в маринаде, используйте соус-барбекю или смеси приправ.
Да, особенно если ваш рецепт требует долгого времени готовки.
Продолжайте следить за уровнем воды в процессе готовки, возможно, потребуется долив воды.
Используйте только воду из под крана.
Для приготовления некоторых блюд необходимо использовать пищевую пленку, чтобы избежать образования конденсата и защитить нежные продукты.
Используйте специальную пищевую пленку, предназначенную для использования во время приготовления пищи, или пленку, пригодную для использования в микроволновой печи.
Избегайте использования алюминиевой фольги — она может замедлить процесс приготовления блюда.
Поместите рис в чашу для риса и заполните ее водой.
Поместите чашу для риса в корзинку-пароварку или в самую большую чашу и начните готовить.
Да, но в посудомоечной машине желательно установить самую низкую температуру или режим предварительной промывки.
Да, удалять накипь следует после каждых 7–10 циклов работы. Для этого просто залейте в резервуар для воды 1/3 белого уксуса и 2/3 воды.
Оставьте на 1 ночь, не нагревая.
Промойте резервуар для воды изнутри несколько раз теплой водой.
Никогда не используйте абразивные чистящие средства.
Ориентировочно рекомендуем удалять накипь из прибора через каждые 7–10 циклов работы, чтобы обеспечить эффективность прохождения пара и продлить срок службы прибора.
Для этого просто залейте в резервуар для воды 1/3 белого уксуса и 2/3 воды.
Оставьте на 1 ночь, не нагревая.
Промойте резервуар для воды изнутри несколько раз теплой водой.
Никогда не используйте абразивные чистящие средства.
Из прибора не была удалена накипь после 7–10 циклов работы. Удалите накипь.
[Проверка 1] Правильно ли вы залили воду?
Воду нужно заливать в резервуар с серой частью посередине (нагреватель).
[Проверка 2] Достаточно ли воды вы залили в резервуар?
Если в резервуаре мало воды, пар образовываться не будет. Даже если ваше блюдо требует совсем короткого времени приготовления, воду нужно заливать до верха нагревателя (серой части). И даже если воды в резервуаре достаточно, пар появится только через некоторое время.
[Проверка 3] Не загрязнен ли нагреватель (серая часть)?
Если на нагревателе скопился слой накипи, передача тепла может быть неэффективной, и пара может не быть. При наличии изменений в нагревателе, например, изменения цвета на коричневый, черный или белый, отслоения на поверхности, необходимо выполнить операции по его обслуживанию. Выполните процедуру удаления накипи.
Все правильно. Турбо-кольцо охватывает нагреватель, обеспечивая эффективный нагрев воды внутри. По своей конструкции оно не должно надеваться вровень, и вода в промежуточном пространстве используется для образования пара. Убедитесь, что турбо-кольцо расположено правильно – желобком вниз.
Сама поверхность нагревателя не может расслаиваться. Возможно, это отстает пленка, образовавшаяся на ней. Выполните процедуру удаления накипи.
Когда воды в резервуаре недостаточно, устройство перестает нагреваться.
Долейте воды до отметки максимально допустимого уровня и устройство автоматически возобновит выбранную программу готовки.
Доливая воду в резервуар, используйте прихватки, не дотрагивайтесь до горячих поверхностей и приготовляемой пищи.
Каждая емкость, кроме поддона для сбора капель, оснащена съемной решеткой; решетка поддона всегда должна находится на своем месте.
Снимая решетки, вы увеличиваете объем зоны готовки для крупных продуктов (целой курицы, артишоков, омара, цветной капусты, брокколи и т.д.)
Чтобы установить решетки в правильное положение:
• Следите, чтобы решетка была установлена правильной стороной (зажимом вниз)
• Поместите решетку в емкость.
• Нажмите на зону зажима, чтобы прикрепить емкость.
Чтобы снять решетку, нажмите на нее.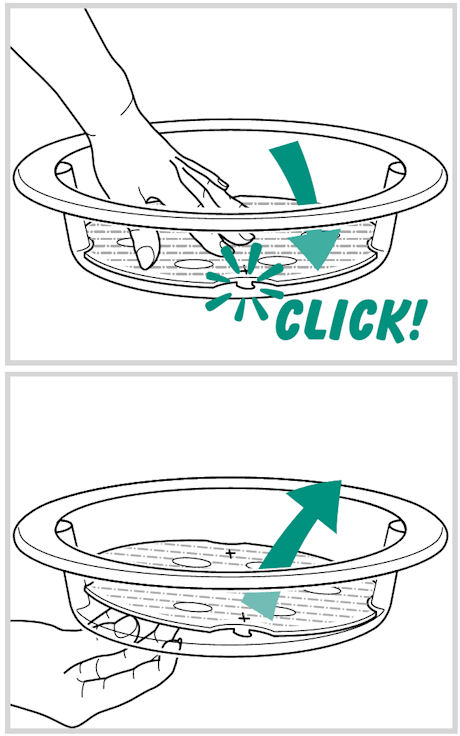
После ознакомления с инструкциями по запуску прибора в руководстве пользователя убедитесь, что электрическая розетка находится в рабочем состоянии, подключив к ней другое устройство. Если прибор не заработал, не пытайтесь разобрать или отремонтировать его. Отнесите прибор в авторизованный центр технического обслуживания.
Не пользуйтесь устройством. Во избежание опасности, замените кабель в центре технического обслуживания.
Если прибор оснащен индикатором уровня воды, для выключения дважды нажмите на кнопку «on/off» (вкл/выкл).
Никогда не отключайте питание прибора, просто вынув штепсель из розетки, прибор должен быть предварительно выключен с помощью кнопки.
В режиме поддержания температуры невозможны никакие иные действия, кроме отключения.
Поэтому необходимо отключить режим поддержания температуры и перепрограммировать прибор.
Режим Vitamin + отключается автоматически при образовании достаточного количества пара для приготовления пищи.
Нет. Вы можете готовить на пару все виды продуктов: мясо, рыбу, яйца, картофель, десерты, рис, кускус и т. п.
Нет. Преимущество приготовления на пару состоит в том, что ароматы овощей не передаются друг другу, даже если они смешаны.
Пароварочный аппарат не готовит под давлением, вместо этого используется давление окружающей среды.
Температура пара в пароварочном аппарате равна температуре кипения воды, около 100°С.
Да, но не делайте этого слишком часто, поскольку это приводит к понижению температуры и потере пара, а это может привести к замедлению процесса готовки.
В Вашем приборе содержатся ценные материалы, которые могут быть подвергнуты вторичной переработке. Отнесите его на городской пункт сбора отходов.
Пожалуйста, перейдите в раздел «Аксессуары» веб-сайта, чтобы легко найти то, что вам нужно для вашего продукта.
Дополнительные сведения содержатся в разделе «Гарантия» этого веб-сайта.
Если вам кажется, что каких-то частей не хватает, позвоните в центр обслуживания покупателей, и мы поможем вам найти приемлемое решение.
В режиме поддержания температуры прибор работает в течение 60 минут, до тех пор, пока резервуар содержит достаточное количество воды.
Если Вы предпочитаете более медленное приготовление пищи, режим Vitamin + может быть отключен вручную путем нажатия на световой индикатор.
При нажатии на кнопку Vitamin + сокращается время приготовления пищи, что позволяет сохранить все витамины.
Для получения оптимального результата стаканчики всегда следует размещать в верхней емкости, под крышкой.
Для приготовления большинства блюд стаканчики должны быть закрыты крышками или пергаментной бумагой, в каждом отдельном случае следуйте указаниям рецепта.
Страницы и текст этой инструкции
 Инструкция пароварки Tefal VS4003 VitaCuisine Compact
 Информация отображена на картинке
 Информация отображена на картинке
 Информация отображена на картинке
 Информация отображена на картинке
Как использовать наш сайт инструкций OnlineManuals.ru
Наша цель состоит в том, чтобы предоставить вам быстрый доступ к содержанию инструкции для пароварки Tefal VS4003 VitaCuisine Compact.
С помощью онлайн просмотра, Вы можете быстро просмотреть содержимое инструкции и найти решение проблемы с пароварки Tefal VS4003 VitaCuisine Compact.
Для Вашего удобства
Если листать руководство пользователя пароварки Tefal VS4003 VitaCuisine Compact прямо на сайте, не очень удобно для Вас, есть два возможных решения:
• Просмотр в полноэкранном режиме — легко просмотреть руководство пользователя (без загрузки его на свой компьютер), Вы можете использовать режим полноэкранного просмотра.
Для просмотра инструкции пользователя пароварки Tefal VS4003 VitaCuisine Compact на полном экране, используйте кнопку «Открыть в Pdf-viewer».
• Загрузка на компьютер — Вы можете также скачать Инструкция пароварки Tefal VS4003 VitaCuisine Compact на свой компьютер и сохранить его в файлах.
Многие люди предпочитают читать документы не на экране, а в печатной версии.
Возможность печати руководства пользователя также была предусмотрена на нашем сайте,
и вы можете использовать ее, нажав на иконку «печать» в Pdf-viewer.
Нет необходимости печатать все руководство пароварки Tefal VS4003 VitaCuisine Compact, можно выбрать только нужные страницы инструкции.
-
Инструкции по эксплуатации
1

TEFAL VS4003 VitaCuisine Compact инструкция по эксплуатации
(54 страницы)
- Языки:Русский
-
Тип:
PDF -
Размер:
4.73 MB -
Описание:
Пароварка
Просмотр
На NoDevice можно скачать инструкцию по эксплуатации для TEFAL VS4003 VitaCuisine Compact. Руководство пользователя необходимо для ознакомления с правилами установки и эксплуатации TEFAL VS4003 VitaCuisine Compact. Инструкции по использованию помогут правильно настроить TEFAL VS4003 VitaCuisine Compact, исправить ошибки и выявить неполадки.