Инструкция По Применению Телефон 1-8 Ghz Dect Digital
Panasonic. Прежде чем приступить к использованию телефона, изучите эту инструкцию Важные инструкции по безопасности.. 6. работает в диапазоне частот от 1,88 Ггц ( GHz) до 1,90 Ггц. DECT ( Digital Enhanced. 1 8. 2 Нажмите {V} или {^} для выбора нужного главного меню. i M.
- Panasonic. Прежде чем приступить к использованию телефона, изучите эту инструкцию Важные инструкции по безопасности.. 6. работает в диапазоне частот от 1,88 Ггц ( GHz) до 1,90 Ггц. DECT ( Digital Enhanced. 1 8. 2 Нажмите {V} или {^} для выбора нужного главного меню. i M.
- Цифровой беспроводной телефон с цветным. TFT-дисплеем и Важные инструкции по безопасности.. 7. Стандарт: DECT ( Digital Enhanced Cordless 1,88 ГГц ( GHz) — 1,90 ГГц ( GHz) ( DECT) 1,8 Вт (W).
- Настоящей инструкцией по эксплуатации и с беспроводной DECT трубкой. диапазоне 1,88 Ггц ( GHz) – 1,90 Ггц ( GHz) и Старайтесь не пользоваться телефоном во время грозы. телефону с помощью кнопки { DIGITAL SP- PHONE }. 1 8. 2 “Наст. Трубки” i M. 3 “Настр. Даты” i M. 4 “Дата/Время” i M.
- Инструкция по эксплуатации. Беспроводной телефон стандарта DECT и GSM с сенсорным экраном. Модель № KX-PRX150RU. Благодарим вас за.
3.7u0011 ÈäåíòèôèêàöèØ âûçûâà ùåãî àáîíåíòà (AOH è Caller ID) 3.8u0011 ϲîñìîò² âûçîâîâ è îá²àòíûé âûçîâ 3.9u0011 Ãåäàêòè²îâàíèå íîìå²à òåëåôîíà âûçûâà ùåãî àáîíåíòà äî îòâåòíîãî âûçîâà 3.10u0011 Óäàëåíèå èíôî²ìàöèè î âûçûâàâøåì àáîíåíòå 3.11u0011 Ñîõ²àíåíèå èíôî²ìàöèè î âûçûâàâøèõ àáîíåíòàõ â òåëåôîííîé êíèãå 3.12u0011 Íàñò²îéêè èäåíòèôèêàöèè âûçûâà ùåãî àáîíåíòà äëØ ïîëüçîâàòåëåé ÀÎÍ Ï²èåì ôàêñîâ 4.6u0011 Âûáî² ñïîñîáà ï²èìåíåíèØ ôàêñèìèëüíîãî àïïà²àòà 4.7u0011 ϲèåì ôàêñà â²ó÷íó – Ãåæèì àâòîîòâåòà ÂÛÊË 4.8u0011 ϲèåì ôàêñà…
KX-FC278RU

Инструкция по эксплуатации. Модель № KX- Пре де чем приступить к использованию телефона, изучите эту инструкцию по. DECT ( Digital Enhanced Cordless От 1,88 Ггц ( GHz) до 1,90 Ггц ( GHz) 1,8 Вт (W).

Инструкция по эксплуатации
Инструкция по эксплуатации. Модель № KX- Пре де чем приступить к использованию телефона, изучите эту инструкцию по. DECT ( Digital Enhanced Cordless От 1,88 Ггц ( GHz) до 1,90 Ггц ( GHz) 1,8 Вт (W).
Цифровой беспроводной телефон с цветным. TFT-дисплеем и Важные инструкции по безопасности.. 7. Стандарт: DECT ( Digital Enhanced Cordless 1,88 ГГц ( GHz) — 1,90 ГГц ( GHz) ( DECT) 1,8 Вт (W).
- Panasonic. Прежде чем приступить к использованию телефона, изучите эту инструкцию Важные инструкции по безопасности.. 6. работает в диапазоне частот от 1,88 Ггц ( GHz) до 1,90 Ггц. DECT ( Digital Enhanced. 1 8. 2 Нажмите {V} или {^} для выбора нужного главного меню. i M.
- Цифровой беспроводной телефон с цветным. TFT-дисплеем и Важные инструкции по безопасности.. 7. Стандарт: DECT ( Digital Enhanced Cordless 1,88 ГГц ( GHz) — 1,90 ГГц ( GHz) ( DECT) 1,8 Вт (W).
- Настоящей инструкцией по эксплуатации и с беспроводной DECT трубкой. диапазоне 1,88 Ггц ( GHz) – 1,90 Ггц ( GHz) и Старайтесь не пользоваться телефоном во время грозы. телефону с помощью кнопки { DIGITAL SP- PHONE }. 1 8. 2 “Наст. Трубки” i M. 3 “Настр. Даты” i M. 4 “Дата/Время” i M.
- Инструкция по эксплуатации. Беспроводной телефон стандарта DECT и GSM с сенсорным экраном. Модель № KX-PRX150RU. Благодарим вас за.
- Инструкция по эксплуатации. Модель № KX- Пре де чем приступить к использованию телефона, изучите эту инструкцию по. DECT ( Digital Enhanced Cordless От 1,88 Ггц ( GHz) до 1,90 Ггц ( GHz) 1,8 Вт (W).
Настоящей инструкцией по эксплуатации и с беспроводной DECT трубкой. диапазоне 1,88 Ггц ( GHz) – 1,90 Ггц ( GHz) и Старайтесь не пользоваться телефоном во время грозы. телефону с помощью кнопки { DIGITAL SP- PHONE }. 1 8. 2 “Наст. Трубки” i M. 3 “Настр. Даты” i M. 4 “Дата/Время” i M.
- Panasonic. Прежде чем приступить к использованию телефона, изучите эту инструкцию Важные инструкции по безопасности.. 6. работает в диапазоне частот от 1,88 Ггц ( GHz) до 1,90 Ггц. DECT ( Digital Enhanced. 1 8. 2 Нажмите {V} или {^} для выбора нужного главного меню. i M.
- Цифровой беспроводной телефон с цветным. TFT-дисплеем и Важные инструкции по безопасности.. 7. Стандарт: DECT ( Digital Enhanced Cordless 1,88 ГГц ( GHz) — 1,90 ГГц ( GHz) ( DECT) 1,8 Вт (W).
- Настоящей инструкцией по эксплуатации и с беспроводной DECT трубкой. диапазоне 1,88 Ггц ( GHz) – 1,90 Ггц ( GHz) и Старайтесь не пользоваться телефоном во время грозы. телефону с помощью кнопки { DIGITAL SP- PHONE }. 1 8. 2 “Наст. Трубки” i M. 3 “Настр. Даты” i M. 4 “Дата/Время” i M.
Применение этих модулей позволит повысить к.п.д. управляемых бытовых. Прошло уже 10 лет с начала запуска успешного DECT ( Digital Enhanced Cordless Планы создания однокристального DECT телефона.. граничная частота 42 ГГц, коэффициенты шума 0.5 дБ на 1,8 ГГц, 0,75 дБ на 6 ГГц.
TG8611_8621RU(ru-ru).book Page 1 Wednesday, April 20, 2011 9:15 AM Инструкция по эксплуатации Цифровой беспроводной телефон с цветным TFT-дисплеем Модель № Цифровой беспроводной телефон с цветным TFT-дисплеем и автоответчиком Модель № KX-TG8611RU KX-TG8612RU KX-TG8621RU Показана модель KX-TG8611. Перед эксплуатацией прочитайте раздел “Начало работы” на стр. 9. Благодарим вас за приобретение изделия производства компании Panasonic.
Инструкция по эксплуатации. Беспроводной телефон стандарта DECT и GSM с сенсорным экраном. Модель № KX-PRX150RU. Благодарим вас за.

Комментарии (1)Просмотров (741)
Краткое содержание страницы № 1
Elements – New Style – Edition 4 – 31.08.06 – 7644
User Guide
BT ELEMENTS
Краткое содержание страницы № 2
Elements – New Style – Edition 4 – 31.08.06 – 7644 Welcome… to your BT Elements Digital Cordless Telephone Digital call quality with a ‘Best in Class’ range of up to 1000 • metres outdoors and up to 150 metres indoors. Rugged design and sturdy composition makes your BT • Elements phone ideal for outdoor use. With a splash and dust-proof finish and also featuring a handy torch. Handsfree operation for greater flexibility when on • the phone. 50 Name and number phonebook to store all your contac
Краткое содержание страницы № 3
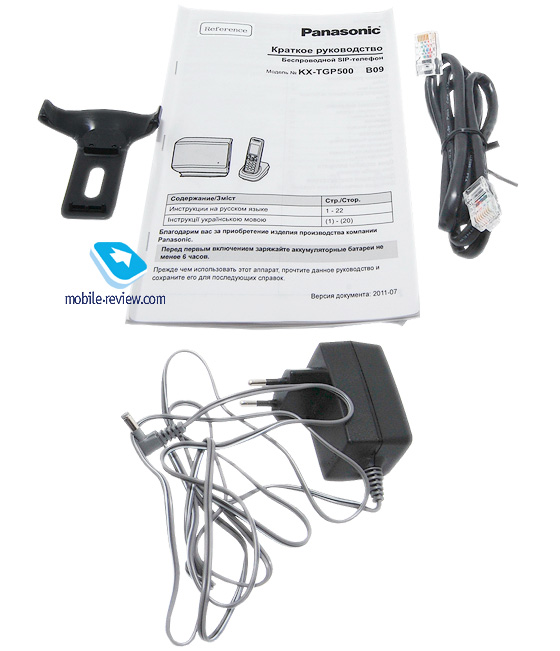
Elements – New Style – Edition 4 – 31.08.06 – 7644 This User Guide provides you with all the Got everything? information you need to get the most from BT Elements 1 x Belt clip • • handset your phone. Mains power • BT Elements adaptor for base • base (item code You must first set up your phone before you 028771) BT Elements • can use it. This doesn’t take long and is easy charger Mains power • adaptor for to do. Just follow the simple instructions in 2 x AAA NiMH • charger (item 550mAh ‘Getting
Краткое содержание страницы № 4
Elements – New Style – Edition 4 – 31.08.06 – 7644 4 In this guide Getting started Delete the entire redial list . . . . . . . . . . . . .20 Location . . . . . . . . . . . . . . . . . . . . . . . . . . . .7 Copy a redial list number to Setting up . . . . . . . . . . . . . . . . . . . . . . . . . . .7 the phonebook . . . . . . . . . . . . . . . . . . . . . . .20 Keypad lock . . . . . . . . . . . . . . . . . . . . . . . . .21 Getting to know your phone Switching the torch on/off . . . . . . . . .
Краткое содержание страницы № 5
Elements – New Style – Edition 4 – 31.08.06 – 7644 In this guide 5 Restore default settings . . . . . . . . . . . . . . . .33 Service Centre numbers . . . . . . . . . . . . . . . .46 Restore default settings without a PIN . . . .33 Adding or changing Service Centre Default settings . . . . . . . . . . . . . . . . . . . . . .34 numbers . . . . . . . . . . . . . . . . . . . . . . . . . . . .47 Select a Send Service Centre number . . . . .48 Date and time settings Message alert beeps . . . . . . .
Краткое содержание страницы № 6
Elements – New Style – Edition 4 – 31.08.06 – 7644 6 In this guide General information Safety information . . . . . . . . . . . . . . . . . . . .67 Cleaning . . . . . . . . . . . . . . . . . . . . . . . . . . . .67 Environmental . . . . . . . . . . . . . . . . . . . . . . .67 Product disposal instructions . . . . . . . . . . .68 Guarantee . . . . . . . . . . . . . . . . . . . . . . . . . . .68 Returning your phone . . . . . . . . . . . . . . . . .69 Technical information . . . . . . . . . . . .
Краткое содержание страницы № 7
Elements – New Style – Edition 4 – 31.08.06 – 7644 Getting started 7 Handset range Location The BT Elements phone has a range of up to 1000 metres outdoors when Your BT Elements phone comes with a base which there is a clear line of sight between you will need to place within 2 metres of a mains power the base and the handset. When there is no clear line of sight between the socket and telephone socket so that the cables base and the handset, e.g. the base is will reach. indoors and the handse
Краткое содержание страницы № 8
Elements – New Style – Edition 4 – 31.08.06 – 7644 8 Getting started WARNING Do not place your BT Elements base in the bathroom or other humid areas. Battery low warning If the symbol flashes in the display and you hear a warning beep every minute, you will need to recharge the handset before you can use it again. During charging, the symbol will scroll in the display. Replace the battery cover: hook the two plastic clips into Battery performance To keep your batteries in the best place first, t
Краткое содержание страницы № 9
Elements – New Style – Edition 4 – 31.08.06 – 7644 Getting started 9 Power adaptor cable Telephone line cord (DO NOT connect to the wall socket until the handset is fully charged) 3. At the charger: Plug the charger power cord into the charger and the mains power wall socket. Place the handset on the base to charge for at least 24 hours. The red Charging light comes on. While the handset is charging, the symbol scrolls in the display, when the handset is fully charged the display shows the symbo
Краткое содержание страницы № 10
Elements – New Style – Edition 4 – 31.08.06 – 7644 10 Getting started IMPORTANT 3 Before you wall mount, please check that: • you are not drilling into any hidden wiring or plumbing 50 • the mains power adaptor will reach the plug socket 2. Insert the wall plugs provided into the holes and then insert BT are not responsible for any damage / injury caused while the 2 screws, one into each hole. Leave a gap between the attempting to wall mount head of the screw and the wall (approx 3mm). your p
Краткое содержание страницы № 11
Elements – New Style – Edition 4 – 31.08.06 – 7644 Getting to know your phone 11 Handset and charger Earpiece / receiver Display with orange backlight Backlight comes on when you receive a call or when any button is pressed. Secrecy / Clear / Back Torch On / Off (located on back of handset) In talk mode, press to switch secrecy (mute) Press and hold to switch the torch on, page 21. on/off, page 18. Release the button to switch the torch off, page 22. In entry mode, press to delete digits. In me
Краткое содержание страницы № 12
Elements – New Style – Edition 4 – 31.08.06 – 7644 12 Getting to know your phone Handset display icons – These are the symbols you will see on your handset’s screen EXT INT BT ELEMENTS Handset Person* Keypad lock Displayed when the line is in use. When viewing the Calls list, Displayed when the keypad is indicates an unanswered call. locked. Ext EXT Displayed when an external call is Phonebook Left arrow or Right arrow being received or in progress. Displayed when the phonebook is Indicates that
Краткое содержание страницы № 13
Elements – New Style – Edition 4 – 31.08.06 – 7644 Getting to know your phone 13 Standby display – When in standby, the display shows the handset name, handset number, the time and the range and battery icons. Time Battery status Shows the time in hours and minutes. Range Handset number Handset name HANDSET 1 Base Power / In use / Calls light / Message Indicator Illuminates when the power is connected. Flashes when receiving a call and during a call, when you have new text messages or Calls l
Краткое содержание страницы № 14
Elements – New Style – Edition 4 – 31.08.06 – 7644 14 Getting to know your phone Exit or go back one level in the menu Navigating the menus Press to go back one level. Press repeatedly to exit and Your BT Elements has an easy to use menu system. Each menu return to standby. has a list of options, which you can see on the menu map on the following page. When the handset is switched on and in standby: Menu 1. Press to open the main menu, then press or repeatedly to scroll to the menu option you w
Краткое содержание страницы № 15
Elements – New Style – Edition 4 – 31.08.06 – 7644 Getting to know your phone 15 Menu map Phonebook SMS Setup Handset Date & Time Register Add Entry Inbox Base Volume Beep Set Date Select Base Modify Entry Personal SMS Base Melody Keytone Set Time Reg Base Delete Entry Write Del Handset Low Battery Set Alarm Delete All Pin Code Out Of Range SMS Settings Dial Mode Int Ring Vol Msg Alert Recall Mode Ext Ring Vol Send Service Default Int Melody Rcv Center Ext Melody Send Center Auto Answer Terminal
Краткое содержание страницы № 16
Elements – New Style – Edition 4 – 31.08.06 – 7644 16 Using the phone Switch the handset power on/off When you make a call, the backlight To switch off: on the handset display comes on and the In Use light on the base flashes. 1. Press and hold until the display goes off. To switch on: 1. Press and hold for 3 seconds and the display will come back on. Make an external call EXT Press to enter a pause in the 1. Lift the handset and press . The and symbols are dialling sequence. displayed. You can
Краткое содержание страницы № 17
Elements – New Style – Edition 4 – 31.08.06 – 7644 Using the phone 17 Ringer volume Receive a call While the phone is ringing, you can use or to adjust the EXT When you receive a call, the phone rings, the symbol ringer volume. flashes, the keypad backlight comes on and the Calls light on EXT the base flashes. Call is displayed and the or INT Caller Display symbol flashes to let you know if it is an external or internal If you have subscribed to your network’s Caller Display service, the call.
Краткое содержание страницы № 18
Elements – New Style – Edition 4 – 31.08.06 – 7644 18 Using the phone Secrecy (mute) During a call, you can mute the microphone and talk to someone nearby without your caller hearing. Secrecy 1.Press . Mute is displayed while the microphone is muted and your caller cannot hear you. Secrecy 2. Press again to resume your conversation with your caller. Handsfree Handsfree lets you talk to your caller without holding the handset. It also enables other people in the room to listen to your conversatio
Краткое содержание страницы № 19
Elements – New Style – Edition 4 – 31.08.06 – 7644 Using the phone 19 During a handsfree call, press Switch to handsfree during a call or to change the volume. To switch handsfree off and return to During a call: Handsfree the handset at any time, press . Handsfree 1. Press . The call is transferred to the loudspeaker. 2. Press to end the call. Redial The last 10 telephone numbers called are saved to a redial To exit the redial list at any time, list. You can then select any of the numbers to
Краткое содержание страницы № 20
Elements – New Style – Edition 4 – 31.08.06 – 7644 20 Using the phone Menu 3.Press , Delete? is displayed, press to confirm. Or press to cancel. 4. Press to return to standby. Delete the entire redial list 1. Press . The last number called is displayed. Menu 2. Press and hold , Delete All? is displayed, press to confirm. Or press to cancel. 3. Press to exit and return to standby. Copy a redial list number to the phonebook 1. Press . The last number called is displayed. 2. Use or to scroll and di
- Manuals
- Brands
- Ericsson Manuals
- Telephone
- 203 Digital
- User manual
-
Contents
-
Table of Contents
-
Bookmarks
Quick Links
Humboldt
State
University
ITS
Technology Help Desk
826-4357
203 Digital
Related Manuals for Ericsson 203 Digital
Summary of Contents for Ericsson 203 Digital
-
Page 1
Humboldt State University Technology Help Desk 826-4357 203 Digital… -
Page 2: Important Note
MX1. Ericsson & Aastra digital telephones are used with the MX1 telephone switch and provide single-key access to many of the MX1 features.
-
Page 3: Table Of Contents
Table of Contents Quick Start …………………….. 1 Function Keys ……………………3 Features ……………………..4 PLACING CALLS ………………….4 SPEAKER……………………4 DIRECTED CALL PICK UP ……………….. 4 GROUP CALL PICK UP ………………..4 EXCLUSIVE HOLD ………………….5 COMMON HOLD ………………….5 INQUIRY/CONSULTATION HOLD ……………..
-
Page 4: Quick Start
Quick Start Exclusive Hold (Page 5) To place call on Exclusive Hold • Press line key that received call • Press vacant line key Lamp will change from steady to slow flash Common Hold (Page 5) With party on the line Common Hold •…
-
Page 5
Quick Start Transfer (Page 7) To transfer with party on the line Access 2 • Press • Dial second party Transfer • Press • Hang up Call Waiting (Page 9) To send to busy extension • Press • Busy tone changes to ring •… -
Page 6: Function Keys
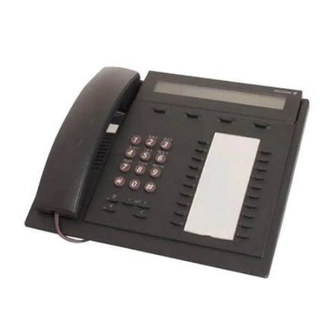
Function Keys The 203 digital telephone has 26 function keys; 12 of these keys have fixed functions, and the remaining 14 can be programmed for additional features. FIXED KEYS Access 1 Receives and places calls Access 2 Receives and places calls Inquiry Place calls on exclusive hold.
-
Page 7: Features
Features PLACING CALLS To place a call • Lift handset and dial OR • Dial without lifting handset (Call set up is heard through speaker. See below) • Pickup handset to speak OR • Listen and speak hands-free through speaker and microphone. To receive a call or calls on other lines •…
-
Page 8: Exclusive Hold
Features EXCLUSIVE HOLD Calls may be placed on hold and cannot be retrieved from another telephone. To place call on Exclusive Hold • Press line key that received call • Press vacant line key (Access 1, Access 2 or Hold) Inquiry •…
-
Page 9: Inquiry/Consultation Hold
Features INQUIRY/CONSULTATION HOLD The Inquiry feature allows a user to place a call on exclusive hold that cannot be picked up by another extension. While on hold, the user can alternate between the original call and a second call. With the party on the line Access 2 •…
-
Page 10: Transfer
Features TRANSFER Transfer allows a station user to forward a call to another extension. Calls may be “blind” transferred by pressing Transfer before the other extension answers or the call may be “announced” by waiting for the other extension to answer. To transfer with the party on the line Access 2 •…
-
Page 11: Distinctive Rings
Features DISTINCTIVE RINGS A unique pattern of ringing permits station users to distinguish between different types of incoming calls. There are three types of ringing signals. Ring Signal Indication Single Ring On-campus call Double Ring Off-campus call Interrupted Fast Ring Call back RING OPTIONS Ring options can be programmed by the user to flash lamps and delay or suspend…
-
Page 12: Distinctive System Tones
Features DISTINCTIVE SYSTEM TONES Distinctive Tones inform the user of call progress and feature activation. Sound Tone Indication Tone Name Single long beep Member joined conference call Conference Single short beep Member left conference call Three short beeps Feature accepted and confirmed Confirmation Message waiting OR Message Waiting…
-
Page 13: External Number Redial
Features EXTERNAL NUMBER REDIAL Like the Speed Redial feature, the External Number Redial (ENR) feature will dial an off-campus number. The difference is that you will choose the number to save. To save a number using External Number Redial • Dial an off-campus number (include the 9) •…
-
Page 14: Call Diversion
Features CALL DIVERSION The Call Diversion feature re-routes a station’s incoming calls to an alternate number. There are four types of call diversion; All Calls, No Answer, Busy and Follow Me. Preprogrammed answering points may be voice mail or to another campus extension.
-
Page 15: Call Diversion — Follow Me
Features CALL DIVERSION — FOLLOW ME The Follow Me feature allows a user to forward all calls to another campus extension. It is possible to redirect and/or cancel the Follow Me from the other extension without returning to your station. Activate Follow Me Redirect Follow Me •…
-
Page 16: Individual Abbreviated Dialing
Features INDIVIDUAL ABBREVIATED DIALING (optional feature programmed by System Administrator) The Individual Abbreviated Dialing (IAD) feature allows users to program a speed dial code for frequently called numbers or features. When an IAD code is dialed, the system automatically dials the preprogrammed number. Stations can have up to ten individual abbreviated numbers of up to 20 digits in length.
-
Page 17: Automatic Call Back
Features AUTOMATIC CALL BACK (On-campus calls only) Automatic Call Back (ACB) feature allows a user calling a station that is busy, or does not answer, to request a callback when the station becomes free. (The user may make and/or receive calls while the Automatic Call Back feature is in effect.) When the station marked for call back becomes available, the system will ring the user’s extension with eight seconds of fast ringing.
-
Page 18: Additional Features
Additional Features ACCEPT SECOND CALL (ODN2) When engaged on a call, other incoming campus calls will ring through on the alternate access line if available and if ODN2 is set. ADDITIONAL DIRECTORY NUMBER (ADN) Additional extension numbers may be programmed into a function key. Calls may be placed and received from these extensions.
-
Page 19: Menu And Function Keys (F1 — F4)
Menu and Function Keys (F1 – F4) Menu and Function Keys F1 – F4 Menu Toggles the menu display on and off. When you press the Menu key, the displayed menu looks like: <Time> <Date> Caller ID Extn Lock AcCo Autco LOCK Press F1 to lock the phone’s settings — Not Supported…
-
Page 20
Menu and Function Keys (F1 – F4) Prompts you to enter the Account Code. This allows you to charge the call to another extension/department. Not Supported. ENTER ACCOUNT CODE CLEAR DEL ENTER CLEAR Press F1 to erase all the digits entered for the account code Press F2 to erase the last digit entered for the account code… -
Page 21
Menu and Function Keys (F1 – F4) Function Keys – While on a phone call. <Time> <Date> Lock AcCo Autco Timer options are Not Supported Turns on the timer feature. This allows you to time the call length. <Time> <Timer or Date> START DATE EXIT… -
Page 22
Menu and Function Keys (F1 – F4) Function Keys – While in a conversation (other line connected). <Time> <Date> Timer This feature allows Press F1 to send DTMF tones. you to send DTMF tones while in speech state for pager access, credit card calls, voice messages or any type of computerized network requiring DTMF signaling. -
Page 23: Voice Mail Quick Tips
Voice Mail Quick Tips Bypass System Greeting ….Date & time (while listening) ….Cancel Recording .
-
Page 24: Voice Mail Account
Voice Mail Account Shared Type Mailbox • If at your desk • Call the voicemail system number • When prompted for mailbox #, enter your 4 digit mailbox # • When prompted for security code, enter your code • If at another shared mailbox desk •…
-
Page 25: Notes
Notes Feb 2017 Digital 203 Telephone User Guide…
-
Page 26: Telephone Quick Reference
Telephone Quick Reference Automatic Call-back Cancel Call Diversion All Calls Cancel No Answer Cancel Busy Cancel Follow me Extension Cancel Call Pick-up Group Directed extension number Call Waiting Send (0 — 9) Individual Abbreviated Dialing Last Number Redial (off campus)

8
Ознакомление с телефоном
Дата и время
Если у вас подключена услуга определения номера, дата и время
устанавливаются на всех трубках автоматически при каждом
входящем вызове.
Если у вас не подключена услуга определения номера, вы можете
установить дату и время вручную.
Установка даты и времени вручную
1. Нажмите
m
и пролистайте
d
до пункта
ЧАСЫ/ БУДИЛ-К
. Нажмите
m
. На дисплее отобразится
ДАТА И ВРЕМЯ
, после этого нажмите
m
.
2. Введите дату в формате
ДД/ММ
, например,
04/ 08
для 4 августа.
3. Нажмите
m
и введите время в 24-часовом формате
ЧЧ:ММ
,
например, 14:45 для 2.45pm.
4. Нажмите
m
для подтверждения или
>
для возвращения в
режим ожидания.
Ваш телефон теперь готов к использованию.
2. Ознакомление с телефоном
Общий обзор трубки
A Динамик
B Дисплей
Обзор значков дисплея см. на страница 9