-
Contents
-
Table of Contents
-
Bookmarks
Quick Links
Related Manuals for Yealink CP960
Summary of Contents for Yealink CP960
-
Page 2
Yealink and/or its respective suppliers are not responsible for the suitability of the information contained in this doc- ument for any reason. The information is provided “as is”, and Yealink does not provide any warranty and is subject to change without notice. All risks other than risks caused by use of the information are borne by the recipient. In no… -
Page 3
We are striving to improve our documentation quality and we appreciate your feedback. Email your opinions and com- ments to DocsFeedback@yealink.com. Technical Support Visit Yealink WIKI (http://support.yealink.com/) for the latest firmware, guides, FAQ, Product documents, and more. For better service, we sincerely recommend you to use Yealink Ticketing system (https://ticket.yealink.com) to submit all your technical issues. -
Page 4
Yealink CP960 HD IP conference phone firmware contain third-party software under the GNU General Public License (GPL). Yealink uses software under the specific terms of the GPL. Please refer to the GPL for the exact terms and con- ditions of the license. -
Page 5: Table Of Contents
The Home Screen The DSS Key Screen Configuration Screen Dialing Screen Calls Screen Icons in the Status Bar CP960 Line Key Icons Call History Icons Navigating Menus and Fields Entering Characters Using the Onscreen Keyboard English (UK) Input Method Google Pinyin Input Method…
-
Page 6
Yealink CP960 User Guide Phone Lock Phone Lock and Waiting Time Setting the Phone Lock Setting a Phone Lock Key Locking Your Phone Manually Unlocking Your Phone Changing Your Phone Unlock PIN Line Keys Assigning Functionality to a Line Key… -
Page 7
Table of Contents Configuring Notification Sound Enabling Silent Mode Directory Local Directory Managing the Local Directory Groups Adding Contact Groups Editing Contact Groups Deleting Contact Groups Managing the Local Directory Contacts Adding Contacts Editing Contacts Deleting a Contact Deleting All Contacts Moving a Local Directory Contact to Blacklist Searching for Contacts Blacklist… -
Page 8
Yealink CP960 User Guide Dialing a Hotline Number Setting a Hotline Number and Delay Time Placing a Call from the Call History Placing a Call from the Directory Placing an Anonymous Call Enabling Anonymous Call Placing an Anonymous Call Answering Calls… -
Page 9
Table of Contents Holding/Resuming a Conference Call Muting/Unmuting a Conference Call Splitting a Conference Call Managing the Conference Participants Enabling/Disabling the DND Mode for a Conference Call Managing the Conference Participants Network Conference Setting Up a Network Conference Call Recording Recording a Call Recording a Conference Managing a Call While Recording… -
Page 10
Yealink CP960 User Guide Configuring a Call Park Key Using Call Park Feature Busy Lamp Field (BLF) Setting a BLF Key State Indicator of Remote Line by BLF Key Visual Alert for Monitored Lines Picking up a Remote Call by BLF Key… -
Page 11
Table of Contents Receiving a Voice Message Leaving Voice Mails Listening to Voice Mails Hot Desking System Applications Recorder Recording Audios Playing the Recorded Audios Pause/Resuming a Playback Fast Forwarding/Rewinding a Playback Stopping a Playback Copying Recorded Audios to USB Flash Drive Copying All Recorded Audios to USB Flash Drive Renaming the Recorded Audios Deleting a Recorded File… -
Page 12
Finding the CPW90 Charging the CPW90 CPW90 LED Instructions CPW90 Working Frequency Using CP960 Star Connection Feature State Indicator of CP960 Star Connection Configuring the Master Phone Setting Up a Star Connection Group Sending Broadcast from Master Phone Removing a Slave Phone… -
Page 13: About This Guide
About This Guide About This Guide Thanks for choosing Yealink CP960 IP conference phone, which comprises the power of the Android 5.1 operating sys- tem and is exquisitely designed for the medium-to-large conference room. CP960 is a 5-inch touchable conference…
-
Page 14
Yealink CP960 User Guide… -
Page 15: Getting Started With Your Phone
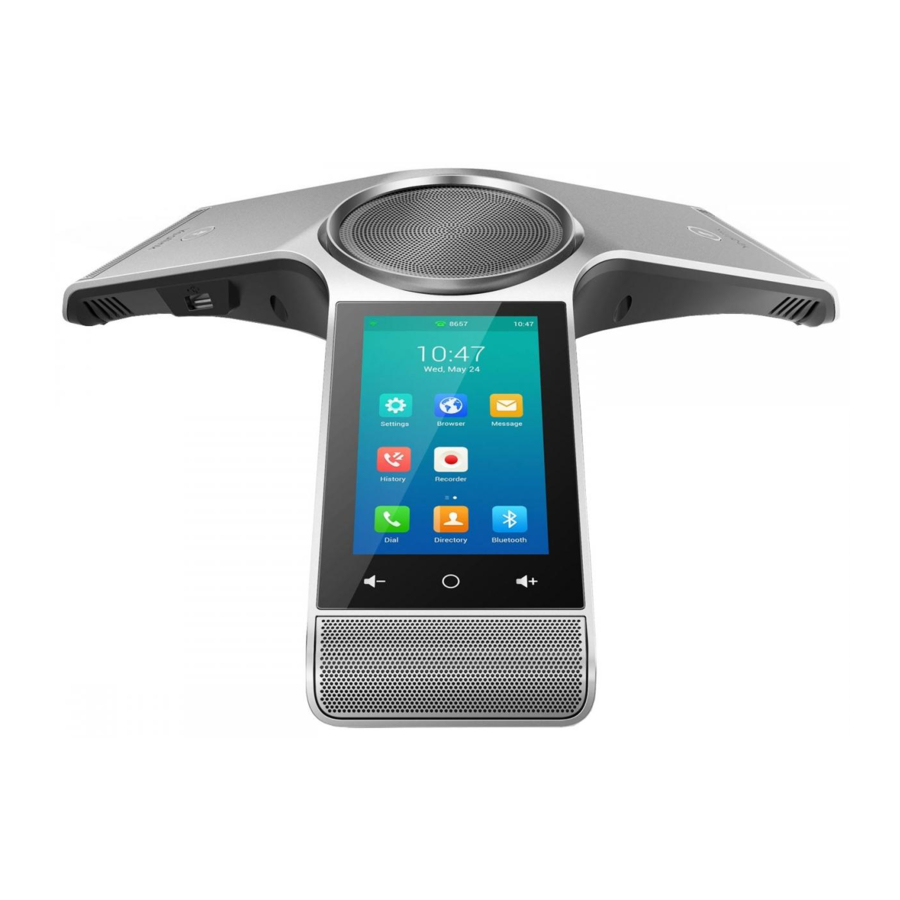
Topics Hardware Overview Screen and Icons Navigating Menus and Fields Entering Characters Hardware Overview Topics CP960 Hardware Mute Touch Key LED Indicators CP960 Hardware The following figure shows the primary hardware component of CP960 IP phone:…
-
Page 16
Yealink CP960 User Guide Item Description Three Internal Provide 20-feet and 360-degree coverage to transmit sound to other phones. Microphones • Indicate phone statuses. Mute Touch Keys • Toggle mute feature. Speaker Provides hands-free (speakerphone) audio output. 5 inches (720 x 1280) capacitive (5 points) touch screen with two idle screens. Tap to select items and navigate menus. -
Page 17: Mute Touch Key Led Indicators
Description USB Ports Allow you to connect an optional USB flash drive or CPW90 charging cradle. Allows you to connect a PC and turn CP960 into an external speaker and microphone for Micro USB Port your PC. Mute Touch Key LED Indicators…
-
Page 18
Yealink CP960 User Guide Name Description Time and date Display the phone’s time and date. • Indicate the number of the connected wireless microphones. • Tap to enter the wireless microphone settings screen. Backlight Slider Drag the slider to adjust the screen brightness quickly. -
Page 19: Idle Screen
1. Swipe up from the bottom of the screen or tap the Home touch key to exit the control center and the notification center. Idle Screen The CP960 IP phone supports two idle screens by default. You can swipe left or right to switch between two idle screens. Note A third idle screen will appear if your system administrator customizes shortcut keys for you.
-
Page 20: The Dss Key Screen
Yealink CP960 User Guide Name Description Service. If the phone is registered and there is a Bluetooth-Enabled mobile phone con- nected with the phone, this field will display Multiple account. Time The phone’s time is displayed on the right of the status bar.
-
Page 21: Configuration Screen
Getting Started with Your Phone Application Description Page Keys Tap to turn to the corresponding page. Related Topic Line Keys Configuration Screen You can tap to access phone settings and features, and then configure the corresponding settings and features. Name Description Title Area Displays the title of the current menu screen.
-
Page 22: Calls Screen
Yealink CP960 User Guide Calls Screen All of your active and held calls are displayed on the calls screen. You can tap Previous call/Next call or swipe left or right to switch to desired calls screen. When there is an active call and a held call, the calls screen on the IP phone is shown as below:…
-
Page 23: Icons In The Status Bar
Bluetooth-enabled mobile phone paired and con- nected Wi-Fi enabled Wi-Fi signal strength from weak to strong after con- necting successfully USB flash drive detected Phone Warning CP960 Line Key Icons Icon indicator (associated with line key features): Icons Description Hold/Public Hold Private Hold Voice Mail…
-
Page 24
Yealink CP960 User Guide Icons Description Group Pickup DTMF Prefix LDAP Local Group XML Group XML Browser Forward ReCall Record URL Record Recording starts successfully (Record/URL Record) Multicast Paging Paging List Hot Desking Zero Touch Phone Lock Directory Speed Dial… -
Page 25
Getting Started with Your Phone Icons Description Registered shared line Icon indicator (associated with the mobile account) Icons Description Mobile Account (Bluetooth-Enabled mobile phone is both paired and connected) Mobile Account (Bluetooth-Enabled mobile phone fails to connect) Mobile Account (Bluetooth-Enabled mobile phone is connecting) (Flashing) Icon indicator (associated with BLF/BLF List) -
Page 26: Call History Icons
Yealink CP960 User Guide Icon indicators (associated with a shared line) The Local SCA Phone is involved in an SCA call, while the Monitoring SCA Phone is not involved in the SCA call and used for monitoring shared line. Icons Description The shared line is idle.
-
Page 27: Entering Characters
Getting Started with Your Phone Gesture Action Touch an item on the screen with your finger, and then lift your finger. Touch an item for about 2 seconds without lifting your finger from the screen till an action Long Tap occurs.
-
Page 28: English (Uk) Input Method
Yealink CP960 User Guide If you want to Action • Drag / to select all characters. 1. Long tap the entered character(s). 2. Drag / to select the characters you want to cut/copy. 3. Tap / on the top of the touch screen.
-
Page 29
Getting Started with Your Phone Item Description Next Key Tap to go to the next field. Done Tap to confirm the settings. Label automatically to identify the context-sensitive features. Send Tap to dial out the number. Go Key Tap to browse the web page. •… -
Page 30: Google Pinyin Input Method
Yealink CP960 User Guide Item Description Go Key Tap to browse the web page. • Tap to enter spaces. Space Key • Long tap to change input method. Tap to switch to the lowercase input mode. Tap to switch to the symbolic input mode.
-
Page 31: Using The Dial Pad
Getting Started with Your Phone Using the Dial Pad You can use the dial pad on the dialing screen to enter data. The onscreen dial pad only provides digit keys, # key and * key. You can tap to use the onscreen keyboard. Related Topic Using the Onscreen Keyboard…
-
Page 32
Yealink CP960 User Guide… -
Page 33: Customizing Your Phone
Customizing Your Phone Customizing Your Phone You can make your IP phone more personalized by customizing various settings. Topics Changing the Administrator Password Wallpaper Screen Saver Changing the Screen Backlight Brightness and Time Changing the Language Changing the Input Method Time &…
-
Page 34: Screen Saver
Yealink CP960 User Guide 1. Navigate to Settings->Basic Settings->Display->Wallpaper. 2. Select the desired wallpaper image. 3. Tap Set wallpaper. Screen Saver The screen saver starts automatically when the IP phone has been idle for the preset waiting time. You can stop the screen saver at any time by touching the screen or tapping any key.
-
Page 35: Changing The Screen Backlight Brightness And Time
Customizing Your Phone Changing the Screen Backlight Brightness and Time You can change the backlight brightness of the touch screen during phone activity and inactivity. The backlight bright- ness automatically changes when the phone is idle for a specified time. You can change the screen backlight brightness and time in the following settings: Backlight Active Level: The intensity of the touch screen when the phone is active.
-
Page 36
Yealink CP960 User Guide 2. Do one of the following: Drag the backlight slider. When dragging the slider, the control center (except the backlight slider) and notification center will be hidden. You can view the intensity changes of the touch screen in real-time. -
Page 37: Changing The Language
Customizing Your Phone Changing the Language The default phone language is English. You can change the phone language. Procedure 1. Navigate to Settings->Basic Settings->Language & Input->Language. 2. Select the desired language. 3. Tap The phone language is changed to the selected one. Changing the Input Method The phone supports two kinds of input methods: Android Keyboard (AOSP) –…
-
Page 38: Changing The Time And Date Format
Yealink CP960 User Guide Check with your system administrator to find out if the manual mode has been enabled. Procedure 1. Navigate to Settings->Basic Settings->Time & Date->General. 2. Enter the date and time in the corresponding fields. 3. Tap The time and date set on the phone will be changed accordingly.
-
Page 39: Phone Lock And Waiting Time
Customizing Your Phone Phone Lock and Waiting Time When the phone is locked, mute touch keys and touch screen (except ) are locked. You are only allowed to: Dial emergency numbers. Reject incoming calls. Answer incoming calls. End the call You can set a waiting time to lock your phone automatically.
-
Page 40: Unlocking Your Phone
Yealink CP960 User Guide Setting the Phone Lock Setting a Phone Lock Key Unlocking Your Phone Procedure 1. Tap the screen or tap the Mute touch key, the phone screen prompts you to enter a unlock PIN. 2. Enter the desired PIN (default: 123) in the Unlock PIN field.
-
Page 41: Changing The Location Of The Line Keys
Customizing Your Phone From the Home screen, and then navigate to Settings->Features->Dsskey. Tap the desired line key. 2. Select the desired key type from the Type field. 3. Configure the settings for the corresponding key type. For example, if you want to a line key for intercom, configure the Account ID, Label, Value, and Extension for the line key.
-
Page 42: Deleting A Line Key
Yealink CP960 User Guide Deleting a Line Key Procedure 1. Drag the desired line key to the Delete field. The phone screen prompts you whether to delete the DSS key. 3. Tap OK. Wireless Network The IP phone can be connected to the wireless network if Wi-Fi is available within the area. For more information, con-…
-
Page 43: Activating The Wi-Fi Mode
Customizing Your Phone Note Enabling Bluetooth may degrade your wireless network connection. For improved wireless network performance, you should disable Bluetooth when it is not in use. Related Topics Deactivating the Bluetooth Mode Topics Activating the Wi-Fi Mode Deactivating the Wi-Fi Mode Connecting to the Wireless Network Viewing the Wireless Network Information Disconnecting the Wireless Network Connection…
-
Page 44: Connecting To An Available Wireless Network Manually
(SSID) and strong WPA data encryption and authen- tication. Two methods supported by Yealink IP phones in the Wi-Fi protected setup: Push Button Configuration (PBC): The user simply has to push the WPS key on both the IP phone and gate-…
-
Page 45: Adding A Wireless Network Manually
Customizing Your Phone Personal Identification Number (PIN): The user has to enter a WPS PIN generated randomly by the IP phone on the gateway/router to connect. Before You Begin Make sure that the Wi-Fi mode is activated. Push Button Configuration (PBC) Procedure 1.
-
Page 46: Viewing The Wireless Network Information
Yealink CP960 User Guide Tap the Show password radio box to make the password visible. Tap the Show advanced options radio box to configure the HTTP proxy for the Browser application. 7. Tap Save. Viewing the Wireless Network Information Procedure 1.
-
Page 47: Connecting A Mobile Phone Using Bluetooth
Customizing Your Phone 4. Tap Forget. You can also disconnect the wireless network by deactivating the Wi-Fi mode. Related Topic Deactivating the Wi-Fi Mode Connecting a Mobile Phone Using Bluetooth Bluetooth enables low-bandwidth wireless connections within a range of 10 meters (32 feet). The best performance is in the 1 to 2 meters (3 to 6 feet) range.
-
Page 48: Activating The Bluetooth Mode
Yealink CP960 User Guide Configuring the Media Audio Feature Renaming the Paired Bluetooth-enabled Mobile Phone Making the IP Phone Discoverable Editing Device Name of Your Phone for Recognition Unpairing the Mobile Phone Disconnecting the Bluetooth-enabled Mobile Phone Activating the Bluetooth Mode Procedure 1.
-
Page 49: Configuring The Phone Audio Feature
Customizing Your Phone And the IP phone automatically assigns a Mobile Account key. Related Topic Activating the Bluetooth Mode Configuring the Phone Audio Feature After connecting your Bluetooth-enabled mobile phone, you can enable the phone audio feature to make/receive a mobile call using the IP phone.
-
Page 50: Configuring The Media Audio Feature
Yealink CP960 User Guide 1. Navigate to Settings->Basic Settings->Bluetooth. 2. Tap after the desired Bluetooth-enabled mobile phone name. 3. Turn on Phone audio. 4. Tap Related Topic Pairing and Connecting the Bluetooth-enabled Mobile Phone Handling a Mobile Phone Call on the IP Phone…
-
Page 51: Renaming The Paired Bluetooth-Enabled Mobile Phone
Customizing Your Phone Answering Calls Ending Calls Call Mute Call Hold Renaming the Paired Bluetooth-enabled Mobile Phone Before You Begin You have paired and connected the Bluetooth-enabled mobile phone. Procedure 1. Navigate to Settings->Basic Settings->Bluetooth. 2. Tap after the connected mobile phone name. 3.
-
Page 52: Editing Device Name Of Your Phone For Recognition
Yealink CP960 User Guide 1. Navigate to Settings->Basic Settings->Bluetooth->Edit My Device Information. 2. Turn on Open Discover. 4. Tap Related Topic Activating the Wi-Fi Mode Editing Device Name of Your Phone for Recognition Before You Begin Make sure you have activated the Bluetooth mode.
-
Page 53: Unpairing The Mobile Phone
Customizing Your Phone 4. Tap You should make your IP phone discoverable first, and then the pre-configured Bluetooth device name will display in scanning list of another device. Related Topics Activating the Wi-Fi Mode Making the IP Phone Discoverable Unpairing the Mobile Phone You can unpair your mobile phone with your IP phone.
-
Page 54: Disconnecting The Bluetooth-Enabled Mobile Phone
Yealink CP960 User Guide Disconnecting the Bluetooth-enabled Mobile Phone Procedure 1. Do one of the following: Tap Swipe down from the top of the screen to enter the control center. Long tap Bluetooth. Navigate to Settings->Basic Settings->Bluetooth. 2. Tap the connected mobile phone.
-
Page 55: Audio Settings
Audio Settings Audio Settings The audio settings contain the volume settings, and the available ring tone and key tone settings. You can also enable touch sounds, silent mode or configure notification sound on the phone. Topics Adjusting the Volume Setting the Ring Tone Setting the Key Tone Enabling Touch Sounds Configuring Notification Sound…
-
Page 56: Setting The Ring Tone
Yealink CP960 User Guide Procedure 1. Tap one of the Volume touch keys to adjust the media volume. The volume slider appears, you can also drag the volume slider to adjust the media volume. Setting the Ring Tone You can choose from a variety of ring tones to distinguish your phone from your neighbor’s. You can set distinctive ring tones for groups or contacts in your local directory, so you can identify the caller when your phone rings.
-
Page 57: Setting A Ring Tone For An Account
Audio Settings 3. Tap Related Topic Adjusting the Audio Volume Setting a Ring Tone for an Account You can select a unique ring tone for an individual account. Procedure 1. Navigate to Settings->Basic Settings->Sound->Ring Tones. 2. Select the desired account. 3.
-
Page 58: Setting The Key Tone
Yealink CP960 User Guide 1. Tap 2. Tap Local Directory to select the desired contact group. 3. Tap after the desired contact. 4. Select the desired ring tone from the Ring field. The ring tone is played automatically. You can tap the Volume key to adjust the ringtone volume.
-
Page 59
Audio Settings Turn on Silent Mode and then tap Long tap the left Volume touch key to decrease the ringer volume to the minimum. Swipe down from the top of the screen to enter the control center and toggle Silent on. Note You may have no permission to turn on the silent mode. -
Page 60
Yealink CP960 User Guide… -
Page 61: Directory
Directory Directory The Yealink IP phones provide several types of phone directories and what the system administrator has set for you. The phones provide the following types of directories: Local Directory Blacklist Remote Phone Book Local Directory You can store up to 1000 contacts and 48 groups in your local directory, allowing you to edit, delete, search or simply dial a contact from the local directory.
-
Page 62: Deleting Contact Groups
Yealink CP960 User Guide 1. Tap ->Local Directory . 2. Tap after the desired group and then tap Rename. 3. Edit the group name in the highlighted field. 4. Tap OK. Deleting Contact Groups You can delete a group from the local directory at any time.
-
Page 63: Editing Contacts
Directory Editing Contacts You can change or add more information to your contacts at any time. Procedure 1. Tap 2. If you want to edit a contact from the specified contact group, tap Local Directory to select the desired contact group.
-
Page 64: Searching For Contacts
Yealink CP960 User Guide 3. Tap after the desired contact. 4. Tap Blacklist. The phone screen prompts you whether to move this contact to the blacklist. 5. Tap OK. Searching for Contacts In the Local Directory, you can enter search criteria to find your desired contact quickly.
-
Page 65: Adding A Blacklist Contact
Directory Adding a Blacklist Contact Procedure 1. Navigate to ->Local Directory->Blacklist. 2. Tap 3. Edit the blacklist contact’s information. 4. Tap the Account field and select the desired account in the pop-up dialog box. 5. Tap Editing a Blacklist Contact You can edit your blacklist contacts at any time.
-
Page 66: Moving A Blacklist Contact To The Local Directory
Yealink CP960 User Guide 5. Tap OK. Moving a Blacklist Contact to the Local Directory You can move a blacklist contact to a local directory. Incoming calls from this contact will not be rejected auto- matically. Procedure 1. Navigate to ->Local Directory->Blacklist.
-
Page 67
Directory 3. Tap after the desired contact in the remote phone book. 4. Tap Add. 5. Tap the Group field and then select Local Directory or Blacklist. 6. Tap… -
Page 68
Yealink CP960 User Guide… -
Page 69: Call History
Call History Call History The IP phones maintain call history lists of Missed Calls, Placed Calls, Received Calls and Forwarded Calls. Topics Viewing History Records Adding a History Record to Local Directory or Blacklist Deleting History Records Disabling History Record Viewing History Records You can view a list of up to 100 Missed Calls, Placed Calls, Received Calls and Forwarded Calls.
-
Page 70: Deleting All Call Records
Yealink CP960 User Guide 1. Tap The phone displays all call records. 2. Tap Local Calls to select the desired list. 3. Tap after the desired entry, and then tap Delete The phone prompts whether to delete the record. 5. Tap OK.
-
Page 71: Call Features
Call Features Call Features You can place a call, answer a call, transfer a call, etc. on Yealink IP phone. Topics Placing Calls Answering Calls Silencing or Rejecting Incoming Calls Ending Calls Auto Redial Call Mute Call Hold Do Not Disturb (DND)
-
Page 72: Placing Multiple Calls
Yealink CP960 User Guide Note Your system administrator can enable live dialpad feature, which enables your phone to automatically dial out the phone Send number after a period of time without tapping the soft key. Check with your system administrator to find out if this feature is available on your phone.
-
Page 73: Placing A Call Back To The Last Incoming Number
Call Features Related Topic Setting a Speed Dial Key Manually Placing a Call Back to the Last Incoming Number You can place a call back to the last incoming number quickly by using a Recall key. Topics Setting a Recall Key Recalling a Contact Setting a Recall Key You can set a line key as a Recall key.
-
Page 74: Dialing A Hotline Number
Yealink CP960 User Guide Dialing a Hotline Number You can configure a hotline number and hotline delay. Then the IP phone will dial out the hotline number auto- matically after the delay time when you tap or the desired line key.
-
Page 75: Enabling Anonymous Call
Call Features Note Anonymous call is not available on all servers. Check with your system administrator to find out if this feature is available on your phone. You need to enable anonymous call for a specific line first, and then place calls in this line. Topics Enabling Anonymous Call Placing an Anonymous Call…
-
Page 76: Answering Calls
Yealink CP960 User Guide If the callee enables anonymous rejection feature, you may be prompted that the callee does not accept calls from an anonymous number. Related Topics Enabling Anonymous Call Rejecting Anonymous Calls Automatically Answering Calls When you receive a call, you can choose to manually answer it or answer it automatically.
-
Page 77: Answering A Call
Call Features Answering a Call When in a Call Answering a Call Automatically Answering a Call Procedure 1. Tap Answer. Answering a Call When in a Call When you are in an active call and an incoming call arrives on the phone, the call waiting tone beeps, and the incom- ing call information is displayed.
-
Page 78: Silencing Or Rejecting Incoming Calls
Yealink CP960 User Guide 1. Navigate to Settings->Features->Auto Answer. 2. Turn on Auto Answer. 3. Turn on Auto Answer Mute. 4. Tap If the auto answer feature is enabled, the auto answer icon appears on the phone screen. Silencing or Rejecting Incoming Calls When you receive an incoming call, you can choose to silence or reject the call instead of answering.
-
Page 79: Rejecting Anonymous Calls Automatically
Call Features Rejecting Anonymous Calls Automatically You can set your phone to automatically reject incoming calls from callers who have withheld their caller ID inform- ation (including the name or phone number). As a result, your phone will not ring and you will not be notified of an attempted call.
-
Page 80: Redialing A Call Automatically
Yealink CP960 User Guide 5. Tap Redialing a Call Automatically Before You Begin Enable auto redial feature on the phone. Procedure 1. When the callee is busy, the phone screen prompts whether to auto redial the contact, tap OK to activate auto redial.
-
Page 81: Call Hold
Call Features Call Hold You can place an active call on hold and resume the call when you are ready. When you place a call on hold, your IP PBX may play music to the other party while waiting. Topics Holding a Call Resuming a Held Call Swapping Between Active and Held Calls…
-
Page 82: Do Not Disturb (Dnd)
Yealink CP960 User Guide Do Not Disturb (DND) DND enables your phone to reject all incoming calls automatically when you do not want to be interrupted. If you want to receive specific numbers when DND is enabled, you can ask your system administrator to set DND Authorized Numbers.
-
Page 83: Forwarding All Incoming Calls To A Contact
Call Features Forwarding All Incoming Calls to a Contact Forwarding an Incoming Call Manually Forwarding All Incoming Calls to a Contact You can set up the IP phone to forward all incoming calls to a contact. Procedure 1. Navigate to Settings->Features->Call Forward. 2.
-
Page 84: Forwarding Incoming Calls Using A Forward Key
Yealink CP960 User Guide 3. Select Key Event from the Type field. 4. Select Forward from the Key Type field. 5. (Optional.) Enter the string that will display on the phone screen in the Label field. 6. Enter the contact number you want to forward the incoming calls to in the Value field.
-
Page 85: Performing A Semi-Attended/Attended Transfer
Setting a Speed Dial Key Manually Conference Calls The Yealink IP phones support a five-way local conference and multi-way network conference. Note Network conference is not available on all servers. Check with your system administrator to find out if it is available on your phone.
-
Page 86: Local Conference
Local Conference Network Conference Local Conference The CP960 IP phone supports up to five parties (including yourself) in a conference call. There are three ways to create a conference: Initiating a conference by dialing multiple numbers. Initiating a conference by inviting participants.
-
Page 87: Initiating A Conference By Inviting Participants
Call Features 3. Enter the number of the first party then tap Add members or select a contact from Directory or History. The avatar of the first party appears on the top of touch screen. You can tap the avatar to cancel the addition. 4.
-
Page 88: Merging Multiple Calls Into A Conference Call
Yealink CP960 User Guide Tap , tap the desired contact to dial out. Tap , tap the desired history record to dial out. Tap Call multiple members? Click here >>. Enter the number or select the contact, and then tap Add members to add multiple members.
-
Page 89: Creating A Hybrid Uc Conference
Call Features Creating a Hybrid UC Conference You can merge the calls on your IP phones, the PC and connected mobile phone into to a hybrid UC conference. There are many ways to create a hybrid UC conference, the following shows an example. Before You Begin Make sure you have an active PC audio and connected a mobile phone to your IP phone.
-
Page 90: Holding/Resuming A Conference Call
Yealink CP960 User Guide Related Topics Managing the Conference Participants Managing the Conference Participants Managing the Conference Participants Holding/Resuming a Conference Call When you place a conference call on hold, both other participants are placed on hold. Other participants cannot hear each other until you resume the held conference call.
-
Page 91: Enabling/Disabling The Dnd Mode For A Conference Call
Call Features Enabling/Disabling the DND Mode for a Conference Call Procedure 1. Tap DND to enable the DND mode. 2. Tap DND again to disable the DND mode. Managing the Conference Participants You can manage conference participants in the following ways: Mute a participant.
-
Page 92: Call Recording
Yealink CP960 User Guide Note Contact your system administrator for more information. Call Recording By default, the recorded files are saved in the internal SD card. You can connect a USB flash drive to your phone, and save the recorded audios to the connected USB flash drive.
-
Page 93: Recording A Conference
Call Features Recording a Conference You can record conference calls in the same way as other calls with the following exceptions: All conference participants are recorded while recording. If one of the participants holds the conference call, only that participant is recorded. When a conference call is placed on hold, recording of the conference is paused. You can place or answer other calls, which will be recorded in the same file.
-
Page 94: Playing A Recorded Call
Yealink CP960 User Guide The recording icon and recording duration disappears. A message is displayed, prompting that the call is recor- ded successfully. Tap End Call. The recording icon and recording duration disappears, and the phone returns to the Idle screen. A prompt mes- sage is displayed, prompting that the call is recorded successfully.
-
Page 95: Deleting A Recorded File
The IP phone supports the following 31 channels: 0: Broadcasts are sent to channel 0. Note that the Yealink IP phones running old firmware version (old paging mech- anism) can be regarded as listening to channel 0. It is the default channel.
-
Page 96: Sending Multicast Paging
Managing a Paging Call Sending Multicast Paging Yealink IP phone supports up to 31 groups for paging. You can assign a label to each group to identify the phones in the group, such as All, Sales, or HR. You can set a line key as Multicast Paging key or Paging list key on the phone, which allows you to send announce- ments to the phones with pre-configured multicast address(es) on specific channel(s).
-
Page 97: Setting A Paging List Key
Call Features Setting a Paging List Key You can set a Paging List key to easily access the paging groups on the idle screen. Procedure 1. Navigate to Settings->Features->Dsskey. 2. Select the desired line key. 3. Select Key Event from the Type field. 4.
-
Page 98: Sending A Paging By A Multicast Paging Key
Yealink CP960 User Guide Sending a Paging by a Multicast Paging Key Before You Begin You need to set a Multicast Paging key in advance. Procedure 1. Tap the Multicast Paging key when the phone is idle. Both your phone and receiver’s phone play a warning tone and the multicast RTP session will be automatically answered on the receiver’s phone in the speakerphone (hands-free) mode.
-
Page 99: Receiving Multicast Paging
Call Features Receiving Multicast Paging Your system administrator has set a listening paging group for you, and then you can receive a paging call when the phone is idle. The paging call is automatically answered on your phone. When there is a voice call or a paging call in progress, the phone handles the new paging call differently according to the multicast listening settings configured by your system administrator.
-
Page 100
Yealink CP960 User Guide… -
Page 101: Advanced Features
Advanced Features Advanced Features This chapter explains how to use the advanced features on the IP phone. Topics Call Completion Call Pickup Call Park Busy Lamp Field (BLF) BLF List Shared Line Intercom Voice Mail Hot Desking If you require additional information or assistance with your new phone, contact your system administrator. Hot Desking Call Completion When you place a call and the callee is temporarily unavailable to answer the call, call completion allows your phone to…
-
Page 102: Call Pickup
You can use call pickup to answer someone else’s incoming call on your phone. Check with your system administrator to find out if this feature is available on your phone. The Yealink IP phone supports Directed Call Pickup and Group Call Pickup. Directed Call Pickup: allows you to pick up incoming calls from another phone.
-
Page 103: Picking Up A Group Call Directly
Advanced Features 4. Tap DPickup again. The call is answered on your phone. When the phone is idle, you can use a Directed Pickup or BLF/BLF List key to pick up a call to a specific contact directly. Related Topics Picking up a Call with a Directed Pickup Key Picking up a Remote Call by BLF Key Picking up a Remote Call by BLF List Key…
-
Page 104: Directed Picking Up A Call Using A Directed Pickup Key
Yealink CP960 User Guide 4. Select DPickup from the Key Type field. 5. Select the desired line from the Account ID field. 6. (Optional.) Enter the string that will appear on the touch screen in the Label field. 7. Enter the directed call pickup code followed by the specific extension in the Value field.
-
Page 105: Picking Up A Group Call Using A Group Pickup Key
Advanced Features Picking up a Group Call Using a Group Pickup Key Before You Begin You need to set a Group Pickup key. Any phone within a predefined group of phones receives an incoming call. Procedure 1. Tap the Group Pickup key. The call is answered on your phone.
-
Page 106: Busy Lamp Field (Blf)
Yealink CP960 User Guide Procedure 1. During a call, tap More->Dsskey. 2. Tap the call park key. 3. If you want to retrieve the call, dial the call park retrieve code to retrieve the parked call. If the parked call is not retrieved within a period of time assigned by the system, the phone performing call park will receive a call back.
-
Page 107: State Indicator Of Remote Line By Blf Key
Advanced Features 7. Tap Note You can drag the line key to the Edit field to set a BLF key. State Indicator of Remote Line by BLF Key The following table shows the icon indicator associated with the line you are monitoring. Icons Description The monitored line is idle.
-
Page 108: Picking Up A Remote Call By Blf Key
Yealink CP960 User Guide Picking up a Remote Call by BLF Key When a monitored line receives an incoming call, you can pick up the incoming call by tapping the BLF key. For example, if the monitor users are not at their desks and someone rings their lines, you can pick up the desired call simply by tapping the flashing BLF key.
-
Page 109: Transferring A Call By Blf Key
Advanced Features Procedure 1. Tap the BLF key to pick up the call for the monitored line directly. Related Topic Setting the Directed Call Pickup Code for BLF key Transferring a Call by BLF Key When there is already an active call on the IP phones, you can transfer the active call to the monitored line by tapping the BLF key.
-
Page 110: State Indicator Of Remote Line By Blf List Key
Yealink CP960 User Guide State Indicator of Remote Line by BLF List Key Visual Alert for Monitored Lines Picking up a Remote Call by BLF List Key Transferring a Call by BLF List Key Retrieving a Call by a BLF List Key…
-
Page 111: Picking Up A Remote Call By Blf List Key
Advanced Features Picking up a Remote Call by BLF List Key When a monitored line receives an incoming call, you can pick up the incoming call by tapping the BLF List key. For example, if the monitor user is not at his/her desk and someone rings his/her line, you can pick up the call simply by tapping the flashing BLF List key.
-
Page 112: Barging In An Active Call By Blf List Key
Shared Line Yealink IP phone supports using Shared Call Appearance (SCA) to share a line. So that this line can be registered on more than one IP phone at the same time.
-
Page 113: Placing Calls On A Shared Line
Advanced Features Icon Description The shared line is idle. The shared line is seized. (monitoring SCA phone) The shared line receives an incoming call. The shared line is dialing. The shared line is busy or is in a call. The call on the shared line is placed on public hold. (local SCA phone) The call on the shared line is placed on private hold.
-
Page 114: Placing A Call On Public Hold
Yealink CP960 User Guide Note If the number of incoming calls is greater than the configured line keys, the line keys will be used by sequence circulation. Contact your system administrator for more information. Related Topic Answering Calls Placing a Call on Public Hold You can place a call on public hold that any shared line phone can retrieve the held call.
-
Page 115: Retrieving A Held Call Remotely On A Shared Line
Advanced Features Retrieving a Held Call Remotely on a Shared line If you place a call on hold on a shared line, you can resume this call at any time. When the shared line key shows a call that is in a held state, you can resume the held call remotely from other user’s phone. Before You Begin There is at least one call placed on public hold on the shared line.
-
Page 116: Intercom
Yealink CP960 User Guide Before You Begin There is an active or held call on the shared line. Procedure 1. Long tap the shared line key. 2. Tap CallPull to pull the call. Intercom Intercom is a useful feature in an office environment to quickly connect with the operator or the secretary. This enables you to place an intercom call that is answered automatically on the contact’s phone as long as the contact is not in an active call.
-
Page 117: Setting An Intercom Key
Advanced Features Setting an Intercom Key Procedure 1. Navigate to Settings->Features->Dsskey. 2. Select the desired line key. 3. Select Intercom from the Type field. 4. Select the desired line from the Account ID field. 5. (Optional.) Enter the string that will display on the touch screen in the Label field. 6.
-
Page 118: Picking Up A Remote Call By Intercom Key
Yealink CP960 User Guide Before You Begin Get the directed call pickup code from your system administrator. Procedure 1. Drag the intercom key to the Edit field. 2. Enter the directed call pickup code in the Extension field. 3. Tap…
-
Page 119: Answering An Intercom Call
Advanced Features Intercom Mute feature allows the IP phones to mute the microphone when incoming intercom calls are answered auto- matically. Intercom Mute is disabled by default. Intercom Tone Intercom Tone feature allows the IP phones to play a warning tone before answering an intercom call automatically. Intercom Tone is enabled by default.
-
Page 120: Receiving A Voice Message
Yealink CP960 User Guide Before You Begin Get the voice mail code from your system administrator. Procedure 1. Tap to launch Message application. 2. Tap Set Voice Mail. 3. Enter the voice mail code (for example, *4) in the desired account field.
-
Page 121: Hot Desking
Advanced Features You can also listen to your voice mails after the voice mail pop-up message box disappears. Before You Begin You need to set the voice mail code in advance. Procedure 1. Tap to launch Message application. 2. Tap View Voice Mail. The phone screen displays the amount of new and old voice mails.
-
Page 122
Yealink CP960 User Guide Procedure 1. Tap the hot desking key from the DSS key screen. The phone screen prompts you whether to clear the account configuration. 2. Tap OK. Registration configurations of all accounts on the phone will be cleared immediately. -
Page 123: System Applications
Note For more information on how to attach a USB flash drive, please refer to the Quick Start Guide for your IP phone on your Yealink Support phone’s support page on Procedure 1. Tap …
-
Page 124: Playing The Recorded Audios
Yealink CP960 User Guide The icon changes to , the number will increase if you set more marks. And there is a red flag on this moment when playing the recorded audio. 5. Tap to end the recording and save the recorded audio.
-
Page 125: Copying Recorded Audios To Usb Flash Drive
System Applications Copying Recorded Audios to USB Flash Drive Before You Begin Before copying recorded audios to USB flash drive, you should connect a USB flash drive first. Procedure 1. Tap to launch the Recorder application. 2. Tap after the desired recorded audios. 3.
-
Page 126: Deleting All Recorded Audios
Browser The use of browser applications is similar to PC’s web browser, which allows you to browse web pages, set bookmarks, set home pages, clear history records, and so on. The default home page is the Yealink website. Topics Browsing a Web Page…
-
Page 127: Browsing A Web Page
System Applications Managing Bookmarks Setting a Home Page Clearing the Navigation History Modifying Browser Settings Browsing a Web Page Procedure 1. Tap to launch the Browser application. 2. Enter a part of URL in the address input field of the browser. The phone will automatically retrieve and list similar websites.
-
Page 128: Opening A Web Page From The Bookmarks List
Yealink CP960 User Guide 4. Edit the bookmark information in corresponding fields. 5. Tap OK. The web page is added to the BOOKMARKS list. Opening a Web Page from the Bookmarks List Procedure 1. Tap to launch the Browser application.
-
Page 129: Editing A Bookmark
System Applications Editing a Bookmark Procedure 1. Tap to launch the Browser application. 2. Tap -> to access the BOOKMARKS list. All pre-configured bookmarks are in the list. 3. Long tap the bookmark you want to edit. 4. Tap Edit bookmark in the pop-up dialog box. 5.
-
Page 130: Clearing The Navigation History
Yealink CP960 User Guide 3. Tap the web page you want to set as the home page in the pop-up dialog box. BOOKMARKS Set as homepage You can also long tap a web page in list and then tap Clearing the Navigation History You can periodically clear your navigation history to protect your privacy and prevent information disclosure.
-
Page 131
System Applications… -
Page 132
Yealink CP960 User Guide… -
Page 133: Using Your Ip Phone With Pc
Creating a Hybrid UC Conference. Answer calls from other IP phones. You can install .a softphone (e.g., Yealink VC Desktop) on PC to make IP calls. Topics Setting the Phone Play the PC Audio Managing the PC Audio…
-
Page 134: Managing The Pc Audio
Yealink CP960 User Guide When there is a call or conference call on your IP phones, the original call or conference call is placed on hold. The PC audio plays through your phone’s speaker. When you are placing a call, the dialing is cancelled. The PC audio plays through your phone’s speaker.
-
Page 135: Hold/Resume The Pc Audio
Then you can play audio from the calls using the IP phone speakers and use the IP phone as your microphone. The following takes setting the IP phone as PC audio input and output device via Yealink VC Desktop as an example. If…
-
Page 136: Disabling The Pc Audio
Yealink CP960 User Guide 1. Click Start->Control Panel->Sound. 2. Click CP960 and click Set Default. 3. Click OK. Disabling the PC Audio Procedure 1. Disconnect the USB cable from the IP phone.
-
Page 137: Using The Cp Wireless Expansion Mic Cpw90
Using the CP Wireless Expansion Mic CPW90 Using the CP Wireless Expansion Mic CPW90 This chapter provides basic operating instructions for the wireless expansion microphone CPW90. Topics Placing the CPW90 Turning the CPW90 On or Off Registering the CPW90 Registering the CPW90 with Another IP Phone Unregistering the CPW90 Muting or Unmuting the CPW90 Idle Mode…
-
Page 138: Registering The Cpw90
Registering the CPW90 The Yealink CPW90 is a CP Wireless Expansion Mic which works as an audio input device for CP960 IP phone. It features superior audio technology and supports 360-degree voice pickup range at a radius of up to 10 feet (3 meters) without any wiring troubles.
-
Page 139: Registering The Cpw90 With Another Ip Phone
Using the CP Wireless Expansion Mic CPW90 Registering the CPW90 with Another IP Phone Procedure 1. Navigate to Settings->Basic Settings->Wireless Microphone. 2. Tap to search for CPW90. 3. Put the CPW90 on the charging cradle and make sure it is charging. 4.
-
Page 140: Idle Mode
Yealink CP960 User Guide Idle Mode When the CPW90 registers with the IP phone successfully, the CPW90 enters the idle mode. You can tap the Mute key on the CPW90, the battery LED indicator on the CPW90 glows solid green for 3 seconds and then goes out.
-
Page 141: Cpw90 Led Instructions
The CPW90 has registered with the phone, but the CPW90 is out of range. Slowly flashing yellow The CPW90 has registered with the phone, but the CP960 is turned off. Flashing red and The phone is searching for the CPW90 which has registered with it.
-
Page 142
Yealink CP960 User Guide RF Carrier Index (DECT tester Numbering) Freq (MHz) 1883.- 1885.248 1886.976 1888.704 1890.432 1892.160 1893.888 1895.616 4(F1) 1897.344 3(F2) 1899.072 2(F3) 1900.800 1(F4) 1902.528 0(F5) 1904.256 1905.984 1907.712 1909.440 1911.168 1912.896 1914.624 1916.352 1918.080 1919.808 1921.536 1923.264… -
Page 143
Using the CP Wireless Expansion Mic CPW90 RF Carrier Index (DECT tester Numbering) Freq (MHz) 1789.- 1791.072… -
Page 144: Using Cp960 Star Connection Feature
Using CP960 Star Connection Feature You can deploy up to four CP960 phones in a star layout. In the star connection group, one phone acts as a master phone, while other phones act as the slave phones. The master phone keeps all features, while the slave phones only sync some key features of the master phone, such as DND and call mute.
-
Page 145: Sending Broadcast From Master Phone
Using CP960 Star Connection Feature After the slave phones join the star connection group, a star connection icon appears in the status bar. Related Topic Sending Broadcast from Master Phone Sending Broadcast from Master Phone If your system administrator has specified your phone as a master phone, or you have set up a star connection group on the phone, you can make the phone send broadcast for waiting for other slave phones to join the star connection group.
-
Page 146: Stop Finding A Slave Phone
Yealink CP960 User Guide 1. Navigate to Settings->Advanced Settings (default password: admin)->CP Star Connection. 2. Tap the desired slave phone. 3. Tap Find. The master phone will automatically find the slave phone in your area. The slave phone will play the ring tone, and the mute key LED indicators on the phone flash green and red altern- ately.
-
Page 147: Quitting A Star Connection Group
Using CP960 Star Connection Feature The star connection name (for example, CP960-S1) is displayed on the idle screen, and a star connection icon appears in the status bar. Note One CP960 phone can only join one star connection group. Related Topics…
-
Page 148
Yealink CP960 User Guide Finding a Master Phone… -
Page 149: Maintaining Your Phone
Maintaining Your Phone Maintaining Your Phone When your phone is unable to operate properly, you need to investigate or troubleshoot issues among other tasks your system administrator may ask you to perform. Topics Investigating Warnings Clearing Warnings Rebooting Your Phone Resetting to Factory Settings Updating the Phone Configuration Investigating Warnings…
-
Page 150: Rebooting Your Phone
Yealink CP960 User Guide Rebooting Your Phone The improper operation may cause malfunction. If the malfunction occurs, your system administrator may ask you to reboot your phone. Procedure 1. Navigate to Settings->Advanced Settings (default password: admin)->Reboot->Reboot. The phone screen prompts you whether to reboot the phone.
-
Page 151: Appendix — Menu Structure
Appendix — Menu Structure Appendix — Menu Structure…

- Информационный экран
- Световой индикатор (мигает при звонках и в беззвучном режиме)
- Софт-клавиши. Меняют свои значения для управления в пунктах меню. На главном экране являются «быстрыми» клавишами для часто используемых функций. Могут быть перепрограммированы через WEB-интерфейс телефона.
- Клавиши для перемещения по меню.
- Клавиша доступа к голосовой почте.
- Клавиша переключения между трубкой и гарнитурой.
- Отключение микрофона.
- Клавиша перевода звонков. (Call Transfer).
- Клавиша включения спикера (динамика)
- Клавиша повторного звонка на последние набранные номера.
- Клавиши регулировки громкости. Регулируют громкость звонка в спокойном состоянии и громкость звука при разговоре.
- Клавиши набора.
- Динамик громкой связи
- Фиксатор трубки при вертикальном расположении аппарата.
- Рычаг отбоя.
Функции телефона.
Исходящий звонок. Снимите трубку, наберите номер. Вызов начнется через 3 секунды. Либо нажмите {Вызов} (Рис. п.3) или # (клавиши набора) или ✔(Рис. п.4) Исходящий звонок через гарнитуру или по громкой связи осуществляется так же, только вначале нужно нажать соответствующую клавишу (Рис. п.6 или Рис. п.9). Входящие вызовы. В организации три входящие линии с номерами +7(495)626-23-52, +7(495)626-24-52 и +7(495)626-24-62. Будьте внимательны! Случайное нажатие на клавишу DND под дисплеем приводит к отключению звонков поступающего вызова. Проверьте: при нажатой клавише DND, в правом верхнем углу дисплея появляется квадрат с вписанными буквами DND. При звонке на номер +7(495)626-23-52 после информационного сообщения автосекретаря, звонок переключается на диспетчерскую службу, на номера 100, 101 или 102. При звонке на номер +7(495)626-24-52 после звукового приветствия можно набрать внутрений номер сотрудника (в цифровом формате набора) или 0 для соединения с помощью секретаря. При вызове на номер +7(495)626-24-62 соединение с сотрудником происходит с помощью секретаря. Для приема входящего звонка достаточно поднять трубку или нажать соответствующую клавишу: Гарнитура (Рис. п.6) или Громкая связь (Рис. п.9).
Повторный набор номера. Нажмите клавишу повторного набора номера (Рис. п.10) и при помощи клавиш перемещения по меню выберите нужный номер (Рис. п.4). После чего нажмите {Вызов} (Рис. п.3) Или дважды нажмите клавишу повторного набора для вызова последнего набранного номера.
Трансфер (Перевод вызова)
Слепой трансфер Во время разговора нажмите клавишу перевода звонка (Рис. п.8). Наберите номер, на который нужно перевести звонок. Еще раз нажмите клавишу перевода звонка и повесьте трубку.
Полуавтоматический трансфер. Во время разговора нажмите клавишу перевода звонка (Рис. п.8). Наберите номер, на который нужно перевести звонок, затем нажмите # для вызова абонента. Нажмите клавишу перевода звонка, когда услышите гудки дозвона.
Сопроводительный трансфер. Во время разговора нажмите клавишу перевода звонка (Рис. п.8). Наберите номер, на который нужно перевести звонок, затем нажмите # для вызова абонента. Дождитесь ответа и предупредите о переводе звонка, затем нажмите клавишу перевода.
Переадресация вызова
Для включения переадресации на заданный номер выполните следующие действия.
- Нажмите {Меню} (Рис. п.3) и выберете ФункцииПереключить вызов.
- Клавишами навигации выберете тип переадресации:
Всегда: переадресация всех вызовов Когда занято: переадресация при занятом телефоне Нет ответа: переадресация если нет ответа в течении заданного времени
- Выбираем Открытие (при помощи клавиш Влево и Вправо (Рис. п.4)
- Нажимаем клавишу Вниз (Рис. п.4) и в поле Номер вводим абонента для переадресации
- Если выбрано условие переадресации Нет ответа то еще раз нажимаем Вниз и вводим время ожидания ответа.
- Нажимаем {Сохр} (Рис. п.3)
Условия переадресации можно комбинировать. Для отключения режима переадресации проделываем обратные действия.
Режим конференции
Во время активного разговора нажмите клавишу {Конф} (Рис. п.3). Затем наберите номер абонента которого хотите присоединить к разговору и нажмите {Вызов} (Рис. п.3). Дождитесь ответа и еще раз нажмите {Конф}. Проделайте это необходимое количество раз.
Для завершения конференц-звонка достаточно просто положить трубку.
Перехват вызова
Для перехвата вызова существует код АТС *04. Для осуществления перехвата необходимо снять трубку на своем телефоне, набрать код *04 и номер звонящаего аппарата, например *0412346
Уважаемые партнеры!
Компания Yealink рекомендует всем пользователям IP-телефонов Yealink серии Т3 использовать обновленную версию «Краткого руководства пользователя».
Новая версия «Руководства» содержит дополнительную информацию по настройке IP-телефонов.
Скачать обновленную локализованную версию «Краткого руководства пользователя» для IP-телефонов Yealink серии Т3 можно на странице с описанием модели в разделе «Файлы» или по ссылкам:
Yealink SIP-T30/SIP-T30P
Yealink SIP-T31/SIP-T31P/SIP-T31G
Yealink SIP-T33P/SIP-T33G

Основные характеристики серии Yealink T3:
- высокое качество передачи звука (HD);
- технология шумоподавления Smart Noise Filtering;
- возможность организации 5-сторонней аудиоконференции;
- поддержка платформы управления устройствами YDMP;
- унифицированная прошивка;
- мощный процессор;
- эргономичный дизайн.
Высокая производительность, больше возможностей
Наличие мощного процессора наделяет IP-телефоны Yealink серии T3 широкими вычислительными возможностями и предоставляет возможность использования усовершенствованных функций, а также обеспечивает более высокую производительность в офисе, расширяя спектр услуг для различных потребностей бизнеса.
Качество аудио HD, эффективные коммуникации
Серия Yealink T3 обеспечивает бесперебойную связь, используя передовую технологию Smart Noise Filtering, которая предоставляет превосходное качество звука без посторонних шумов.
Классический дизайн и практичность
Серия T3 унаследовала концепцию дизайна старшего семейства IP-телефонов Yealink. Современный дизайн и эргономичные комплектующие облегчают работу пользователей.
Принцип «все-в-одном» для удобного управления
Поддержка платформы управления устройствами YDMP, а также унифицированная прошивка упрощают развертывание и управление телефонами серии T3, что позволяет значительно сократить расходы на их эксплуатацию и обслуживание.
Становитесь партнером Yealink! Становитесь партнером компании АйПиМатика!
По вопросам приобретения оборудования Yealink обращайтесь по адресам:
|
в Москве |
в Санкт-Петербурге |
|
в Екатеринбурге |
в Новосибирске |
|
в Казани |
|
|
в Алматы |
в Нур-Султане |
|
в Киеве |
в Минске |
|
в Бишкеке |
в Ташкенте |