


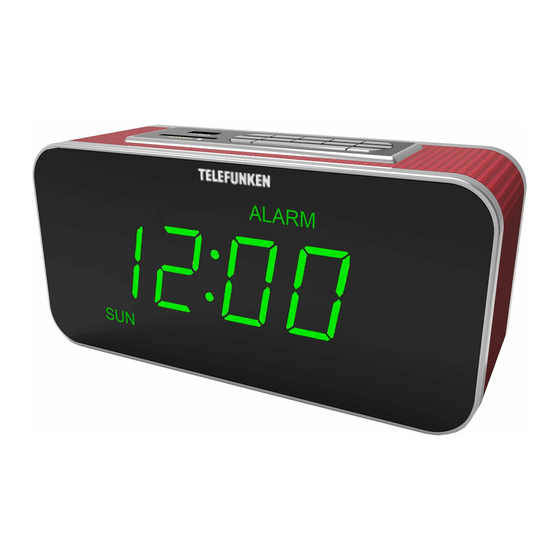
Описание
Радиоприемник Telefunken TF-1503U порадует превосходным качеством звука!
Функциональный будильник облегчит утреннее пробуждение.
Благодаря компактным габаритам вы без труда возьмете данную модель с собой куда угодно.
Самое приятное, что треки можно прослушивать как с флешек, так и с карт памяти.
Характеристики Радиоприемник с часами Telefunken TF-1503U
Технические характеристики
Настройка частоты
цифровая
Отображение информации
дисплей
Дополнительная информация
календарь, повтор сигнала будильника, таймер сна, линейынй вход
Поддержка носителей
SD, USB
Все характеристики
Не является публичной офертой
Информация о товаре носит справочный характер и не является публичной офертой. Характеристики, комплект поставки и внешний вид товара могут отличаться от указанных или быть изменены производителем без предварительного уведомления. Перед покупкой проверяйте информацию на официальном сайте производителя.
Если вы заметили ошибку или неточность в описании товара, пожалуйста, выделите часть текста с ошибкой и нажмите кнопку «Сообщить об ошибке».
4.0
5 звёзд
0
4 звезды
2
3 звезды
0
2 звезды
0
1 звезда
0
Фотографии покупателей

Радиоприемник с часами Telefunken TF-1503U
Достоинства
Большой и яркий дисплей, с крупными цифрами увидит каждый, радио, читает карты памяти и флешки. В управлении все понятно. Приятный цвет. Возможность слушать от батареек на природе.
Недостатки
Антенна, хотелось её не в виде проводка, а в виде телескопической выдвижной металлической так как прием сигнала таким образом будет лучше.
Комментарий
В целом товар удовлетворил ожидаемые впечатления от него. Покупал на дачу для родителей. Работает без нареканий.

Радиоприемник с часами Telefunken TF-1503U
Геннадий
Достоинства
USB, Внешний блок питания, Точность хода часов, Расширенный УКВ диапазон, Электронная настройка. Вход AUX IN.
Недостатки
Слишком громкий звук на минимальной громкости. По этой причине не хватает выхода на наушники.
Комментарий
Если не слушаете когда близкие спят, то рекомендую.
Все отзывы
9
Руководство по эксплуатации
ВНИМАНИЕ: Батарейки AG13 являются
расходным материалом, гарантия на них
не распространяется, и их выход из строя
(разрядка) не является основанием для
обращения в сервисные центры.
Общие операции
Часы
• В режиме часов нажмите и удержи-
вайте кнопку SET, чтобы включить режим
настройки часов. Нажимайте кнопку SET,
чтобы выбрать параметр для настройки в
следующем порядке: 12/24 часа => часы =>
минуты => год => месяц => число => выход.
Параметр, выбранный для настройки, будет
мигать.
• Нажимайте кнопку SKIP UP, чтобы
увеличить значение параметра. Нажимайте
кнопку SKIP DN, чтобы уменьшить значение
параметра.
• День недели будет настроен автомати-
чески.
• В режиме настройки времени, если
никакая кнопка не будет нажата в тече-
ние 10 секунд после выбора параметра
для настройки, устройство автоматически
перейдет в режим часов.
• В режиме настройки времени нажмите
кнопку MODE для возврата к режиму часов.
• Нажмите кнопку DISPLAY, на
экране циклически будет отображаться
информация о годе/месяце/дате/времени.
Нажимайте это кнопку повторно для
возврата в режим часов.
Входной разъем AUX
Для подключения линейного аудиовыхода
внешнего аудиоустройства (напр. MP3-
плеера) к входу AUX данного устройства
используется кабель со штекерами 3,5 мм.
Функции LED дисплея
• Вы можете, в целях экономии заряда
батарей, или электроэнергии, при питании
от адаптера, выключить дисплей, передви-
нув выключатель DISPLAY OFF/ON в поло-
жение “OFF“. В данном режиме Вы можете
вернуть подсветку дисплея на 10 секунд,
нажав на любую кнопку или издав громкий
звук(например, хлопнув в ладони).
• В промежуток времени 21:00 — 6:59:59
яркость дисплея будет вдвое ниже. Также
можно настроить яркость вручную с помо-
щью кнопки SNOOZE/DIMMER.
Операции с радио
• В режиме часов нажмите кнопку
FUNCTION, чтобы выбрать режим радио.
• Нажимайте кнопки SKIP UP/SKIP DN
для настройки частоты радиосигнала вверх
или вниз с шагом в 100 КГц. Нажмите и
удерживайте кнопки SKIP UP/SKIP DN для
автоматического поиска радиостанций с
сильным сигналом.
Нажмите кнопку MEMORY, на экране
начнет мигать надпись P01. С помощью
кнопок MEM-UP/MEM-DN выберите
позицию для сохранения текущей частоты.
Нажмите кнопку MEMORY чтобы сохранить
частоту в выбранной позиции (P01-P20).
Нажмите и удерживайте кнопку MEMORY:
устройство начнет поиск доступных
радиостанций и будет автоматически
сохранять их (вплоть до 20 позиций). Когда
станции будут сохранены, нажимайте
кнопки MEM-UP/MEM-DN для выбора
нужной позиции.
В режиме сохранения станций, если
никакая кнопка не была нажата в течение
нескольких секунд, устройство вернется к
режиму радио.
• Для регулирования уровня громкости
звука от 00 до 15 нажимайте кнопки VOL+/
VOL-.
• Радио отключается нажатием и удер-
живанием кнопки FUNCTION в течение 2
секунд.
- Manuals
- Brands
- Telefunken Manuals
- Radio
- TF-1503U
- Instruction manual
Radio with alarm
Hide thumbs
Also See for TF-1503U:
- Instruction manual (14 pages)
1
2
3
4
5
6
7
8
9
10
11
12
13
-
page
of
13/
13 -
Bookmarks
Advertisement
Available languages
-
EN
Available languages
-
ENGLISH, page 2
Quick Links
Download this manual
Previous Page
Next Page
- 1
- 2
- 3
- 4
- 5
Advertisement
Related Manuals for Telefunken TF-1503U
-

Clock Radio Telefunken TF-1503U Instruction Manual
(14 pages)
-

Radio Telefunken TF-1505 Instruction Manual
Radio with alarm (10 pages)
-

Radio Telefunken TF-1508 Instruction Manual
Radio with alarm (18 pages)
-

Radio Telefunken TF-1506 Instruction Manual
Radio with alarm (20 pages)
-

Radio Telefunken TF-1507 Instruction Manual
Radio with alarm (17 pages)
-

Radio Telefunken TF-1507 Instruction Manual
Radio with alarm (10 pages)
-

Radio Telefunken TF-1583UB Instruction Manual
Radio with alarm (20 pages)
-

Radio Telefunken TF-1569U Instruction Manual
Radio with alarm (19 pages)
-

Radio Telefunken TF-1592 Instruction Manual
Radio with alarm (14 pages)
-

Radio Telefunken TF-1593 Instruction Manual
Radio with alarm (15 pages)
-

Radio Telefunken TF-1593 Instruction Manual
Radio with alarm (14 pages)
-

Radio Telefunken TF-1596 Instruction Manual
Radio with alarm (17 pages)
-

Radio Telefunken TF-1572 Instruction Manual
Radio with alarm (14 pages)
-

Radio Telefunken TF-1589B Instruction Manual
Radio with alarm (16 pages)
-

Radio Telefunken TF-1551 Instruction Manual
Radio with alarm (15 pages)
-

Radio Telefunken TF-1568U Instruction Manual
Radio with alarm (19 pages)
Summary of Contents for Telefunken TF-1503U
-
Page 2
ALARM SLEEP STOP MEN-UP MEMORY VOL+ SKIP UP SKIP DN MEN-DN VOL- POWER SNOOZE/DIMMER FUNCTION 14 13 12 11 10 9 FM ANT DISPLAY DC6V IN AUX IN… -
Page 7
STOP MEN-UP MEMORY VOL+ ALARM SLEEP SKIP DN MEN-DN SKIP UP VOL- SNOOZE/DIMMER FUNCTION POWER 14 13 12 11 10 9 FM ANT DISPLAY DC6V IN AUX IN…
Просмотр
Доступно к просмотру 13 страниц. Рекомендуем вам скачать файл инструкции, поскольку онлайн просмотр документа может сильно отличаться от оригинала.
-
RADIO WITH ALARM /
РАДИОПРИЁМНИК C БУДИЛЬНИКОМ
TF-1503U
Instruction manual
Руководство по
эксплуатации
-
Instruction manual
Dear customer!
Thank you for purchasing our product. For safety, it is strongly recommended to read
this manual carefully before connecting, operating and/or adjusting the product and keep
the manual for future reference.
Description
Top panel                             2   3   4   5  6
1. USB port                   1
2. ALARM button
3. SLEEP button                       ALARM  SLEEP  STOP   MEN-UP  MEMORY  VOL+
4. STOP MEM-UP
button                                                        7
5. MEMORY                             SET  SKIP   DN  MEN-DN  SKIP   UP  VOL-
button                                POWER  SNOOZE/DIMMER  FUNCTION
6. VOL+ button
7. VOL- button                   15  14  13  12  11  10 9  8
8. FUNCTION
button
9. SKIP UP button
10.   /MEM-DN button
11. SNOOZE/DIMMER button
12. SKIP DN button                            1
13. POWER button
14. SET button
15. SD/MMC memory card slot
Back panel
1.  Battery compartment
2.  AUX input
3.  Power (DC6V) input                          FM ANT
4.  DISPLAY ON/OFF switch                               +
DISPLAY
OFF  ON  DC6V IN  AUX IN
Not indicated: display (front panel)
4    3  2
2
-
Instruction manual
Utilization of the product          Additional power
•  There are 2 extra AG13 batteries (1.5 V)
included with the receiver to be inserted to the
If you want to dispose of this product, do not   terminal inside the battery compartment. This
mix it with general household waste. There is a   is additional power intended for saving the
separate collection system for used electronic   clock and alarm settings. Without the additional
products in accordance with legislation that   power the time and alarm settings will not be
requires proper treatment, recovery and   stored if the power is switched off.
recycling.                           •  When the batteries are exhausted they
Please contact your local authorities for   should be replaced. New batteries should be
the correct method of disposal. By doing so,   aquired by user. Replace the batteries only
you will ensure that your disposed product   with batteries of the same type.
undergoes the necessary treatment, recovery   ATTENTION: AG13 batteries are
and recycling and thus prevent potential   consumables not covered by warranty, and
negative effects on the environment and   their failure (discharge) is not a ground for
human health.
addressing to service and repair centers
Important safeguards
AC adaptor power
•  Plug the supplied AC/DC power adaptor
•  The instruction manual contains important   into the power input on the back of the unit.
operating and maintenance instructions. For   Connect the power cord to a household mains
your safety, it is necessary to refer to the   outlet. Make sure the voltage is compatible.
manual. Keep the manual at hand for future   •  Always remember to disconnect the
use.                                power cord from the main supply before
•  Do not hit or drop the unit.    disconnecting it from the unit.
•  Do not expose the unit to vibration, direct   •  Disconnect the power cord from the mains
sunlight, too high or low temperature or humidity.  when not in use.
•  Do not disassemble the unit yourself.
Refer servicing to qualified service personnel.
•  When the battery is exhausted, it should   General operations
be removed from the set to prevent leakage.
Clock
Power supply                        •  In clock mode press and hold SET button
to enable time setting mode. Press repeatedly
SET button to go to setting of parameters in
Battery power                      following sequence: 12/24 hours => hours =>
•  Open the battery compartment cover.   minutes => year => month => date => exit.
Insert 4 x AA (1.5 V) batteries (not included).   The selected parameter will blink meaning
Please observe correct battery polarities   readiness for adjustment.
or the unit will not work. Close the battery   •  Press SKIP UP button to adjust the
compartment cover.                  parameter up. Press SKIP DN to adjust the
•  When the batteries are exhausted, they   parameter down.
should be replaced.                  •  Day of week will be set automatically.
•  Do not use new and old batteries together.
3
- 1
- 2
- 3
- 4
- 13
![]()
RADIO WITH ALARM /
РАДИОПРИЁМНИК C БУДИЛЬНИКОМ
TF-1503U
Instruction manual
Руководство по
эксплуатации

Instruction manual
Dear customer!
Thank you for purchasing our product. For safety, it is strongly recommended to read this manual carefully before connecting, operating and/or adjusting the product and keep the manual for future reference.
|
Description |
||||||||
|
Top panel |
1 |
2 |
3 |
4 |
5 |
6 |
||
|
1. |
USB port |
|||||||
|
2. |
ALARM button |
|||||||
|
3. |
SLEEP button |
ALARM |
SLEEP |
STOP MEN-UP |
MEMORY |
VOL+ |
||
|
4. STOP MEM-UP |
||||||||
|
button |
||||||||
|
5. MEMORY |
SET |
SKIP DN |
MEN-DN SKIP UP |
VOL- |
||||
|
button |
POWER |
SNOOZE/DIMMER |
FUNCTION |
|||||
|
6. |
VOL+ button |
15 14 13 |
||||||
|
7. |
VOLbutton |
12 |
11 |
10 |
9 |
8 |
||
|
8. FUNCTION |
||||||||
|
button |
||||||||
|
9. |
SKIP UP button |
|||||||
|
10. /MEM-DN button |
||||||||
|
11. SNOOZE/DIMMER button |
|
12. |
SKIP DN button |
1 |
|
|
13. POWER button |
|||
|
14. |
SET button |
||
|
15. |
SD/MMC memory card slot |
Back panel
1.Battery compartment
2.AUX input
|
3. |
Power (DC6V) input |
FM ANT |
|
|
4. |
DISPLAY ON/OFF switch |
DISPLAY |
+ |
|
Not indicated: display (front panel) |
OFF ON |
DC6V IN AUX IN |
|
|
4 |
3 |
2

Instruction manual
Utilization of the product
If you want to dispose of this product, do not mix it with general household waste. There is a separate collection system for used electronic products in accordance with legislation that requires proper treatment, recovery and recycling.
Please contact your local authorities for the correct method of disposal. By doing so, you will ensure that your disposed product undergoes the necessary treatment, recovery and recycling and thus prevent potential negative effects on the environment and human health.
Important safeguards
•The instruction manual contains important operating and maintenance instructions. For your safety, it is necessary to refer to the manual. Keep the manual at hand for future use.
•Do not hit or drop the unit.
•Do not expose the unit to vibration, direct sunlight, too high or low temperature or humidity.
•Do not disassemble the unit yourself. Refer servicing to qualified service personnel.
•When the battery is exhausted, it should be removed from the set to prevent leakage.
Power supply
Battery power
•Open the battery compartment cover. Insert 4 x AA (1.5 V) batteries (not included). Please observe correct battery polarities
or the unit will not work. Close the battery compartment cover.
•When the batteries are exhausted, they should be replaced.
•Do not use new and old batteries together.
Additional power
•There are 2 extra AG13 batteries (1.5 V) included with the receiver to be inserted to the terminal inside the battery compartment. This is additional power intended for saving the clock and alarm settings. Without the additional power the time and alarm settings will not be stored if the power is switched off.
•When the batteries are exhausted they should be replaced. New batteries should be aquired by user. Replace the batteries only with batteries of the same type.
ATTENTION: AG13 batteries are consumables not covered by warranty, and their failure (discharge) is not a ground for addressing to service and repair centers
AC adaptor power
•Plug the supplied AC/DC power adaptor into the power input on the back of the unit. Connect the power cord to a household mains outlet. Make sure the voltage is compatible.
•Always remember to disconnect the power cord from the main supply before disconnecting it from the unit.
•Disconnect the power cord from the mains when not in use.
General operations
Clock
•In clock mode press and hold SET button to enable time setting mode. Press repeatedly SET button to go to setting of parameters in following sequence: 12/24 hours => hours => minutes => year => month => date => exit. The selected parameter will blink meaning readiness for adjustment.
•Press SKIP UP button to adjust the parameter up. Press SKIP DN to adjust the parameter down.
•Day of week will be set automatically.
3

Instruction manual
•In time setting mode, if no button is pressed within 10 seconds after a parameter is selected, the unit will automatically go to clock mode.
•Press DISPLAY button, year/month/date/ time will be displayed in a cycle, press this button repeatedly to return to clock mode.
AUX input
To connect an external audio device (e.g. MP3-player), please use a standard stereo cable with 3.5 mm to 3.5 mm plugs to connect the audio line-out of the external device to the AUX input socket of this unit.
LED display functions
•You can turn the display off by setting the DISPLAY OFF/ON switch to “OFF“ position. In this mode you can switch it on for 10 seconds by pushing any button or by a loud sound (e.g. clapping your hands).
•The brightness of the display is set to
be half-bright during 21:00PM — 6:59:59AM. Alternatively, press the SNOOZE/DIMMER button to adjust the brightness manually.
Radio operation
•In clock mode press FUNCTION button to choose the radio mode.
•Press SKIP UP/SKIP DN buttons on the unit to change the current frequency upwards or downwards by 100 KHz. Press and hold SKIP UP/SKIP DN buttons to search the nearest strong signal station upwards or downwards automatically. Press MEMORY button, P01 will blink on the screen. Press repeatedly MEM-UP/MEM-DN buttons to select the preset number for the current frequency. Press MEMORY to save the frequency in selected position (P01-P20). Press and hold the MEMORY button: the device will start scanning from the lowest frequency and automatically save all available stations in positions (up to 20). When stations are saved in the memory, repeatedly press MEM-UP/ MEM-DN buttons to select the saved stations.
 During program saving, if no button is pressed within several seconds, the unit will return to normal radio mode.
•To adjust volume level from 00 to 15, in radio mode press repeatedly VOL+/VOLbuttons.
•To switch off the radio, hold the FUNCTION button for 2 seconds.
USB/SD/MMC operation
Connecting USB/SD/MMC
• Insert a USB device into the USB port or insert a memory card into the memory card slot. Press FUNCTION button to enable USB or SD/MMC mode. The unit will start reading the device.
Playback operations
•During playback press button to pause playback. Press this button again to resume playback.
•During playback press SKIP DN/UP buttons to go to previous or next track.
•To adjust volume, press repeatedly VOL+/ VOLbuttons.
•In playback mode, press STOP button to switch off the player and go to clock mode.
General USB/SD/MMC notes
•This unit is equipped with a USB socket that can accept and play MP3 files stored on standard USB flash (compatible with USB version 2.0) up to 32 GB.
•This unit is also equipped with an SD/ MMC card socket that can accept and play MP3 files stored on standard SD/MMC cards up to 32 GB.
 Always switch off the unit or change mode to another one before removing a USB flash drive or SD/MMC card, to prevent damage to your USB device or memory card.
Note: Although this product is fully compatible with USB 2.0 and SD/MMC card
 Loading…