-
Contents
-
Table of Contents
-
Bookmarks
Quick Links
Related Manuals for Celestron NexStar 4SE
Summary of Contents for Celestron NexStar 4SE
-
Page 1
INSTRUCTION MANUAL… -
Page 2: Table Of Contents
INTRODUCTION… 4 … 4 ARNING ASSEMBLY… 6 … 6 SSEMBLING THE Powering the NexStar… 6 The Hand Control… 6 The Eyepiece… 7 The Star Pointer Finderscope … 7 HAND CONTROL… 10 … 11 ONTROL PERATION Alignment Procedure… 11 Sky Align… 12 Auto Two-Star Align…
-
Page 3
Get Axis Position …24 Goto Axis Postion …24 Hibernate …24 Sun Menu …24 Scrolling Menu …24 Calibrate Goto…24 Set Mount Position…25 Hand Control Command Tree … 26 TELESCOPE BASICS … 26 … 27 MAGE RIENTATION … 28 OCUSING … 28 ALCULATING AGNIFICATION … -
Page 4: Introduction
Congratulations on your purchase of the Celestron NexStar! The NexStar ushers in a whole new generation of computer automated technology. Simple and friendly to use, the NexStar is up and running after locating just three bright objects. It’s the perfect combination of power and portability.
-
Page 5
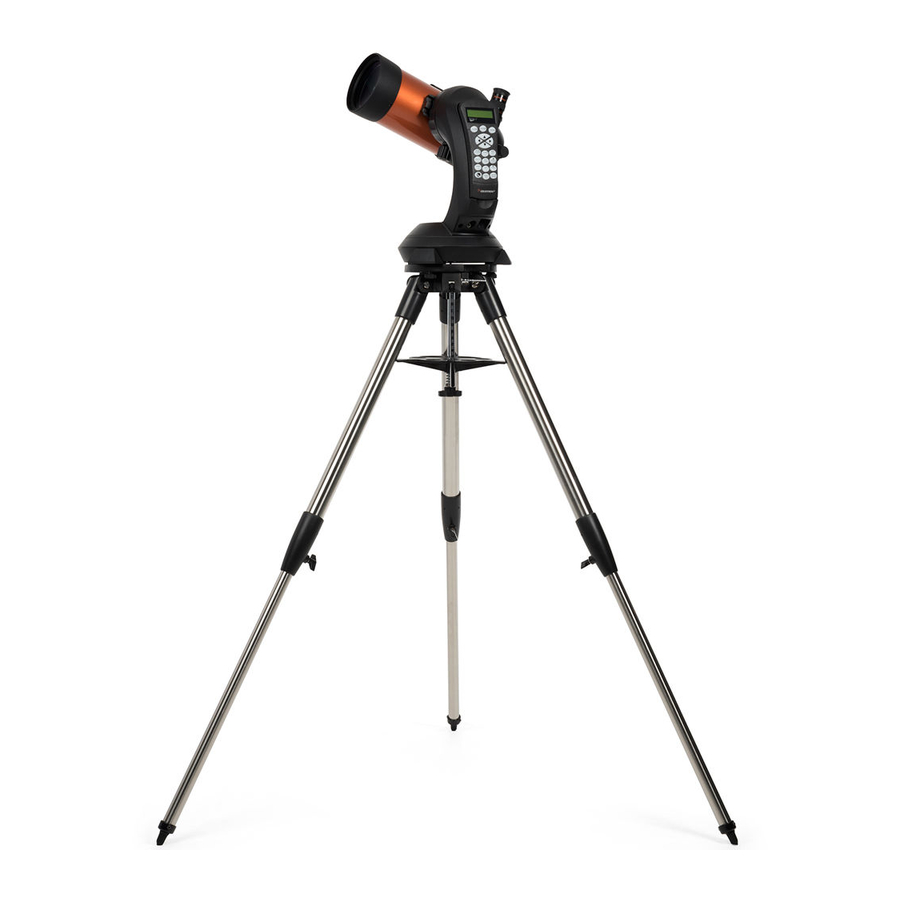
NexStar 4 SE Optical Tube Star Pointer Finderscope Eyepiece Focuser Knob Threaded Photographic Adapter Flip Mirror Control Battery Compartment Tripod Accessory Tray / Leg Brace ON/OFF Switch Hand Control Liquid Crystal Display… -
Page 6: Assembly
Computerized Hand Control with nearly 40,000 Object Database Start by removing the telescope from its shipping carton and setting the round base on a flat table or surface. It is best to carry the telescope by holding it from the lower portion of the fork arm and from the bottom of the base. Remove all of the accessories from their individual boxes.
-
Page 7: The Eyepiece
The Star Pointer Finderscope The Star Pointer is the quickest and easiest way to point your telescope exactly at a desired object in the sky. It’s like having a laser pointer that you can shine directly onto the night sky. The Star Pointer is a zero magnification pointing tool that uses a coated glass window to superimpose the image of a small red dot onto the night sky.
-
Page 8: Star Pointer Operation
The star pointer is powered by a long life 3-volt lithium battery (#CR2032) located underneath the front portion of the Star Pointer. Like all finderscopes, the Star Pointer must be properly aligned with the main telescope before it can be used. This is a simple process using the azimuth and altitude control knobs located on the side and bottom of the Star Pointer.
-
Page 9
Tighten the locking lever to hold the tilt plate securely in place. Set the base of the telescope on the wedge tilt plate so that the hole in the center of the base goes over the positioning pin on top of the tilt plate. -
Page 10: Hand Control
Liquid Crystal Display (LCD) Window: Has a dual-line, 16 character display screen that is backlit for comfortable viewing of telescope information and scrolling text. Align: Instructs the NexStar to use a selected star or object as an alignment position.
-
Page 11: Hand Control Operation
This section describes the basic hand control procedures needed to operate the NexStar. These procedures are grouped into three categories: Alignment, Setup and Utilities. The alignment section deals with the initial telescope alignment as well as finding objects in the sky; the setup section discusses changing parameters such as tracking mode and tracking rate;…
-
Page 12: Sky Align
You may even select a planet or the moon. The NexStar is then ready to start finding and tracking any of the objects in its object database. Before the telescope is ready to be aligned, it should be set up in an outside location with all accessories (eyepiece, diagonal and finderscope) attached and lens cover removed.
-
Page 13: Auto Two-Star Align
As with Sky Align, Auto Two-Star Align requires you to enter all the necessary time/site information as before. entered, NexStar will prompt you to select and point the telescope at one known star in the sky. The NexStar now has all the information it needs to automatically choose a second star that will assure the best possible alignment.
-
Page 14: Two Star Alignment
Once in position, the NexStar will model the sky based on this information and display Align Successful. ote: Once a One-Star Alignment has been done, you can use the Re-alignment feature (later in this section ) to improve your telescope’s pointing accuracy.
-
Page 15
Press ENTER to automatically slew the telescope to the displayed star. If for some reason you do not wish to select one of these stars (perhaps it is behind a tree or building), you can either: •… -
Page 16: Improving Pointing Accuracy
The telescope then asks you to center in the eyepiece the alignment object you selected. Use the direction arrow buttons to slew the telescope to the alignment object and carefully center it in the finderscope. Press ENTER when centered. Then, center the object in the eyepiece and press ALIGN.
-
Page 17: Sync
Your telescope’s pointing accuracy will now be improved in that area of the sky. NOTE: Sync can improve your telescope’s pointing accuracy over a wide area or over smaller areas of the sky depending on the quality of the initial alignment, as well as where the telescope was pointing when the Sync was done.
-
Page 18: Slewing To An Object
Constellation Tour In addition to the Tour Mode, the NexStar telescope has a Constellation Tour that allows the user to take a tour of all the best objects within a particular constellation. Selecting Constellation from the LIST menu will display all the constellation names that are above the user defined horizon (filter limits).
-
Page 19: Direction Buttons
The NexStar has four direction buttons in the center of the hand control which control the telescope motion in altitude (up and down) and azimuth (left and right). The telescope can be controlled at nine different speed rates. 1 = .5x…
-
Page 20: View Time-Site
The camera feature comes with an easy to use Camera Wizard that allows you to save a list of as many as nine targets. Then with a DSLR attached or piggyback mounted to your telescope, NexStar will automatically slew to the specified targets and take an exposure of each one.
-
Page 21: Controlling Camera
The Camera Wizard is the quickest way to build an imaging sequence of targets and exposure times. The Wizard will ask you to point the telescope/camera to up to 9 objects. After the user selects 9 objects or presses UNDO it asks you whether the sequence should repeat forever (perhaps for security monitoring) or whether it should stop when it gets to the end.
-
Page 22: Get Ra/Dec
Additionally, Identify Mode can be used to find other celestial objects that are close to the objects you are currently observing. For example, if your telescope is pointed at the brightest star in the constellation Lyra, choosing Identify and then searching the Named Star catalog will no doubt return the star Vega as the star you are observing.
-
Page 23: Slew Limits
Slew Limits – Sets the limits in altitude that the telescope can slew without displaying a warning message. The slew limits prevent the telescope tube from slewing to an object below the horizon. The slew limits can be customized depending on your needs. For example, if you would like to slew to an object that is close to the zenith but you have a camera attached that prevents it from pointing straight up, you can set the maximum altitude to 80 or 85 degrees to prevent the tube from ever pointing straight up.
-
Page 24: Utility Features
Power off the telescope. Remember to never move your telescope manually while in Hibernate mode. Once the telescope is powered on again the display will read Wake Up. After pressing Enter you have the option of scrolling through the time/site information to confirm the current setting. Press ENTER to wake up the telescope.
-
Page 25: Set Mount Position
Set Mount Position from the Utilities menu. Since the telescope has been moved, the pointing accuracy will be diminished. But now you can slew to a new set of alignment stars and replace any of…
-
Page 26: Hand Control Command Tree
MENU ALIGNMENT TRACKING MODE ALT-AZ EQ NORTH EQ SOUTH RATE SIDEREAL SOLAR LUNAR VIEW TIME-SITE SCOPE SETUP SETUP TIME-SITE ANTI-BACKLASH SLEW LIMITS FILTER LIMITS DIRECTION BUTTONS GOTO APPROACH CORDWRAP UTILITIES LIGHT CONTROL FACTORY SETTING VERSION GET AXIS POSITION GOTO AXIS POSITION HIBERNATE SUN MENU SCROLLING TEXT…
-
Page 27: Image Orientation
A telescope is an instrument that collects and focuses light. The nature of the optical design determines how the light is focused. Some telescopes, known as refractors, use lenses. Other telescopes, known as reflectors, use mirrors. The Maksutov-Cassegrain optical system uses a combination of mirrors and lenses and is referred to as a compound or catadioptric telescope.
-
Page 28: Focusing
You can change the power of your telescope just by changing the eyepiece (ocular). To determine the magnification of your telescope, simply divide the focal length of the telescope by the focal length of the eyepiece used. In equation format, the formula looks like this: Magnification = Let’s say, for example, you are using the 25mm eyepiece.
-
Page 29: General Observing Hints
Never look through window glass. Glass found in household windows is optically imperfect, and as a result, may vary in thickness from one part of a window to the next. This inconsistency can and will affect the ability to focus your telescope. In most cases you will not be able to achieve a truly sharp image, while in some cases, you may actually see a double image.
-
Page 30: The Celestial Coordinate System
Up to this point, this manual covered the assembly and basic operation of your NexStar telescope. However, to understand your telescope more thoroughly , you need to know a little about the night sky. This section deals with observational astronomy in general and includes information on the night sky and polar alignment.
-
Page 31: Motion Of The Stars
The daily motion of the Sun across the sky is familiar to even the most casual observer. This daily trek is not the Sun moving as early astronomers thought, but the result of the Earth’s rotation. The Earth’s rotation also causes the stars to do the same, scribing out a large circle as the Earth completes one rotation.
-
Page 32: Polar Alignment
After performing either an EQ AutoAlign or Two-Star Alignment, Wedge Align will slew the telescope to where Polaris should be. By adjusting the tripod’s tilt plate to center Polaris in the eyepiece, the fork arm (polar axis) will then be pointing towards the actual North Celestial Pole.
-
Page 33: Photography With The Nexstar 4
Minolta, Pentax, Canon and others have made such camera bodies. The camera must have interchangeable lenses so you can attach it to the telescope and so you can use a variety of lenses for piggyback photography. If you can’t find a new camera, you can purchase a used camera body that is not 100-percent functional. The light meter, for example, does not have to be operational since you will be determining the exposure length manually.
-
Page 34: Finding The North Celestial Pole
For example, in the northern hemisphere all stars move around the north celestial pole. When the telescope’s polar axis is pointed at the celestial pole, it is parallel to the Earth’s rotational axis.
-
Page 35: Celestial Observing
This can damage the telescope and/or any accessories attached to the telescope. For safe solar viewing, use a Celestron solar filter (see Optional Accessories section of manual) that reduces the intensity of the Sun’s light, making it safe to view. With a filter you can see sunspots as they move across the solar disk and faculae, which are bright patches seen near the Sun’s edge.
-
Page 36: Observing Deep Sky Objects
The best time to observe the Sun is in the early morning or late afternoon when the air is cooler. • To center the Sun without looking into the eyepiece, watch the shadow of the telescope tube until it forms a circular shadow. •…
-
Page 37: Telescope Maintenance
This will prevent contaminants from entering the optical tube. Internal adjustments and cleaning should be done only by the Celestron service department. If your telescope is in need of internal cleaning,…
-
Page 38
Celestron offers the Car Battery Adapter that allows you to run the NexStar drive off an external Diagonal, 45 degree, erect image (#94116) – Threads on to the back of the NexStar 4. This design allows you to look into the telescope at a 45°… -
Page 39
Sky Maps (#93722) — Celestron Sky Maps are the ideal teaching guide for learning the night sky. You wouldn’t set off on a road trip without a road map, and you don’t need to try to navigate the night sky without a map either. Even if you already know your way around the major constellations, these maps can help you locate all kinds of fascinating objects. -
Page 40: Appendix A — Technical Specifications
Near Focus standard eyepiece or camera Field of View: Standard Eyepiece : 35mm Camera Linear Field of View (at 1000 yds) Magnification: Standard Eyepiece : Camera Optical Tube Length Weight of Telescope Weight of Tripod Input Voltage Batteries Required Power Supply Requirements Motor: Type Resolution…
-
Page 41: Appendix B — Glossary Of Terms
Sun against the stars». Equatorial mount A telescope mounting in which the instrument is set upon an axis which is parallel to the axis of the Earth; the angle of the axis must be equal to the observer’s latitude.
-
Page 42
1 and those increasingly fainter from 2 down to magnitude 5. The faintest star that can be seen without a telescope is about magnitude 6. Each magnitude step corresponds to a ratio of 2.5 in brightness. Thus a star of magnitude 1 is 2.5 times brighter than a star of magnitude 2, and 100 times brighter than a magnitude 5 star. -
Page 43: Appendix C — Rs 232 Connection
RS-232 cable . For information about using NexRemote to control your telescope, refer to the help files located on the disk. In addition to NexRemote, the telescope can be controlled using other popular astronomy software programs.
-
Page 44: Appendix D — Maps Of Time Zones
Appendix D – Maps of Time Zones…
-
Page 52
Parts or product for which replacement is made shall become the property of Celestron. The customer shall be responsible for all costs of transportation and insurance, both to and from the factory of Celestron, and shall be required to prepay such costs. -
Page 53
Celestron 2835 Columbia Street Torrance, CA 90503 Tel. (310) 328-9560 Fax. (310) 212-5835 Web site at http//www.celestron.com Copyright 2006 Celestron All rights reserved. (Products or instructions may change without notice or obligation.) This device complies with Part 15 of the FCC Rule. Operation is subject to the…

Опоры штатива выдвигаются на желае-
мую длину, регулируя высоту монтиро-
вки. Для этого ослабьте зажим винта —
фиксатора на каждой опоре, выдвиньте
опоры на желаемую высоту.
Поставьте штатив вертикально и разд-
виньте его ноги на максимальное расс-
тояние. Теперь штатив может стоять без
посторонней поддержки, и можно
приступать к регулировке его высоты.
Item #31132
Сборка телескопа
1
2
3
Наденьте полочку для аксессуаров снизу
на центральную направляющую и подни-
мите вверх.
4
7
Установите основание монтировки теле-
скопа на площадку треноги так, чтобы
отверстие в основании монтировки
совпало с положением штыря площадки
треноги.
Придерживая одной рукой полочку для
аксессуаров, другой рукой затяните винт
крепления полочки .
5
6
Закрутите крепежные болты в каждое
из отверстий основания телескопа.
Ваш телескоп NexStar установлен
на треногу и готов к использованию.
8
Телескоп NexStar оснащен пультом ручно-
го управления, встроенным в боковую
панель вилки монтировки, подключите
шнур в разъем расположенный в нижней
части боковой панели.
9
NexStar 4SE
Артикул #11049
В комплект поставки входит: монтировка,
оптическая труба, штатив, лоток для
аксессуаров, окуляр 25 мм 1,25″, искатель
Star Pointer, диск The Sky™ X,
программное обеспечение NexRemote,
кабель RS232, пульт управления,
инструкция.
Отрегулируйте высоту опор таким обра-
зом, чтобы пузырек воздуха в пузырько-
вом уровне находился в центре окружности.
Предложите, как улучшить StudyLib
(Для жалоб на нарушения авторских прав, используйте
другую форму
)
Ваш е-мэйл
Заполните, если хотите получить ответ
Оцените наш проект
1
2
3
4
5
Телескоп Celestron Nexstar 4 SE — это компактный и мощный инструмент для наблюдения за звездами и планетами. Он обладает высоким разрешением и яркостью изображения, позволяя любителям астрономии получить неповторимый опыт наблюдения за космическими объектами.
Однако, чтобы достичь наилучших результатов с использованием Celestron Nexstar 4 SE, важно правильно настроить телескоп. В этой статье мы расскажем вам о нескольких основных шагах, которые помогут вам начать наблюдение небесных тел.
Первым шагом в настройке телескопа является установка его на стабильной поверхности. Вы можете использовать специальные треноги или стойки, чтобы обеспечить устойчивую и неподвижную платформу для вашего телескопа.
Затем необходимо провести выравнивание телескопа. Для этого вы можете использовать встроенную систему автоматического выравнивания Nexstar. Система автоматически определит местоположение и время, а затем отправит телескоп в несколько звезд и планет, чтобы точно выровнять его. Следуйте инструкциям в руководстве пользователя для выполнения данной процедуры.
Не забывайте о правильной подготовке и настройке своего телескопа — это ключ к успешному наблюдению за звездами и планетами. Регулярное обслуживание и правильное использование помогут вам получить максимальное удовольствие от своего Celestron Nexstar 4 SE.
Содержание
- Содержание:
- Настройка телескопа Celestron Nexstar 4 SE
- Подключение к электропитанию и установка на треногу
- Калибровка компаса и GPS-модуля
- Настройка автоматического поиска и отслеживания объектов
Содержание:
1. Введение
2. Шаг 1: Сборка и установка телескопа
2.1 Сборка телескопа
2.2 Установка телескопа на штатив
3. Шаг 2: Выбор места для наблюдений
4. Шаг 3: Выравнивание телескопа
4.1 Режим All-Star
4.2 Режим двух звезд
5. Шаг 4: Настройка GPS
6. Шаг 5: Подключение к компьютеру
6.1 Установка программного обеспечения
6.2 Подключение через порт USB
7. Заключение
Настройка телескопа Celestron Nexstar 4 SE
1. Соберите телескоп, следуя инструкциям в поставке. Установите его на прочной и устойчивой поверхности.
2. Подключите телескоп к источнику питания, используя прилагаемый адаптер переменного тока.
3. Включите телескоп, нажав на кнопку питания. Дождитесь автоматической инициализации и когда система будет готова к работе, на дисплее появится информация о текущем времени.
4. Выберите яркую звезду в небе, которую можно визуально увидеть. Она будет использоваться телескопом в качестве эталона при настройке.
5. Включите функцию помощника по настройке телескопа (Alignment Assist), следуя инструкциям в меню управления. Она поможет вам точно установить телескоп.
6. После активации помощника по настройке, телескоп даст указания о необходимости направить его на выбранную яркую звезду. Постарайтесь точно следовать указаниям и навести телескоп на звезду с помощью движения телескопа в горизонтальном и вертикальном направлениях.
7. Когда телескоп будет наведен на выбранную звезду, нажмите кнопку «Подтвердить» или аналогичную на пульте управления.
8. Повторите процесс настройки с помощью еще одной яркой звезды, чтобы обеспечить более точное положение телескопа.
9. После завершения настройки, вы можете начать наблюдения или съемку. Используйте пульт управления для выбора объектов на небе и телескоп автоматически будет наводиться на них.
10. Наслаждайтесь наблюдениями с телескопом Celestron Nexstar 4 SE!
Подключение к электропитанию и установка на треногу
Перед началом использования телескопа Celestron Nexstar 4 SE необходимо правильно подключить его к электропитанию и установить на треногу. Следующие шаги помогут вам выполнить это:
- Разместите треногу на ровной поверхности в удобном для вас месте.
- Убедитесь, что тренога установлена стабильно и надежно закреплена.
- Расположите горизонтальную площадку телескопа на верхушке треноги.
- Аккуратно установите телескоп на площадке и убедитесь, что он надежно закреплен.
- Подключите шнур питания телескопа к розетке электропитания.
- Убедитесь, что телескоп включен и готов к использованию.
Правильное подключение к электропитанию и установка на треногу позволяют обеспечить стабильную работу телескопа Celestron Nexstar 4 SE и получить наилучшие результаты при наблюдении небесных объектов.
Калибровка компаса и GPS-модуля
Для калибровки компаса и GPS-модуля следуйте указаниям ниже:
- Убедитесь, что ваш телескоп находится на открытом месте, где нет металлических или магнитных объектов.
- Включите телескоп и дождитесь, пока он установит соединение с GPS-модулем.
- Перейдите в меню телескопа, выберите опцию «Калибровка» или «Настройка» и найдите подменю, связанное с компасом и GPS-модулем.
- Следуйте инструкциям на экране, чтобы выполнить калибровку компаса. Обычно вам будет предложено провести несколько оборотов с телескопом вокруг вертикальной оси.
- Продолжайте следовать инструкциям, чтобы осуществить калибровку GPS-модуля. Обычно вам потребуется подождать несколько минут, пока телескоп получит достаточную информацию о спутниках для точного определения местоположения.
- После завершения калибровки компаса и GPS-модуля, вы можете проверить точность позиционирования телескопа, выбрав какой-либо объект на небе и сравнив его положение с ожидаемым.
Калибровка компаса и GPS-модуля рекомендуется выполнять периодически, особенно в случае перемещения телескопа на значительное расстояние или при наличии возможных помех магнитного поля.
Настройка автоматического поиска и отслеживания объектов
Для настройки автоматического поиска и отслеживания объектов на телескопе Celestron Nexstar 4 SE нужно выполнить несколько простых шагов.
1. Включите телескоп и дождитесь, пока он завершит процесс инициализации.
2. Используйте кнопки управления для выбора режима «Автоматический поиск» или «Автоматическое отслеживание». Обычно эти режимы находятся на панели управления или на пульте дистанционного управления.
3. Введите имя или номер объекта, который вы хотите найти или отследить. При необходимости используйте пульт дистанционного управления или клавиатуру на панели управления телескопа.
4. Нажмите кнопку «Поиск» или «Отслеживать» для запуска процесса. Телескоп автоматически начнет поиск или отслеживание выбранного объекта.
5. Ориентируйтесь по индикаторам на панели управления или на экране пульта дистанционного управления, чтобы следить за процессом поиска или отслеживания.
6. Когда телескоп найдет или начнет отслеживать выбранный объект, вы сможете наблюдать его через окуляр.