Use this guide to import, upscale, and enhance your first video.
Import Your File
There are two ways to bring files into Topaz Video AI.
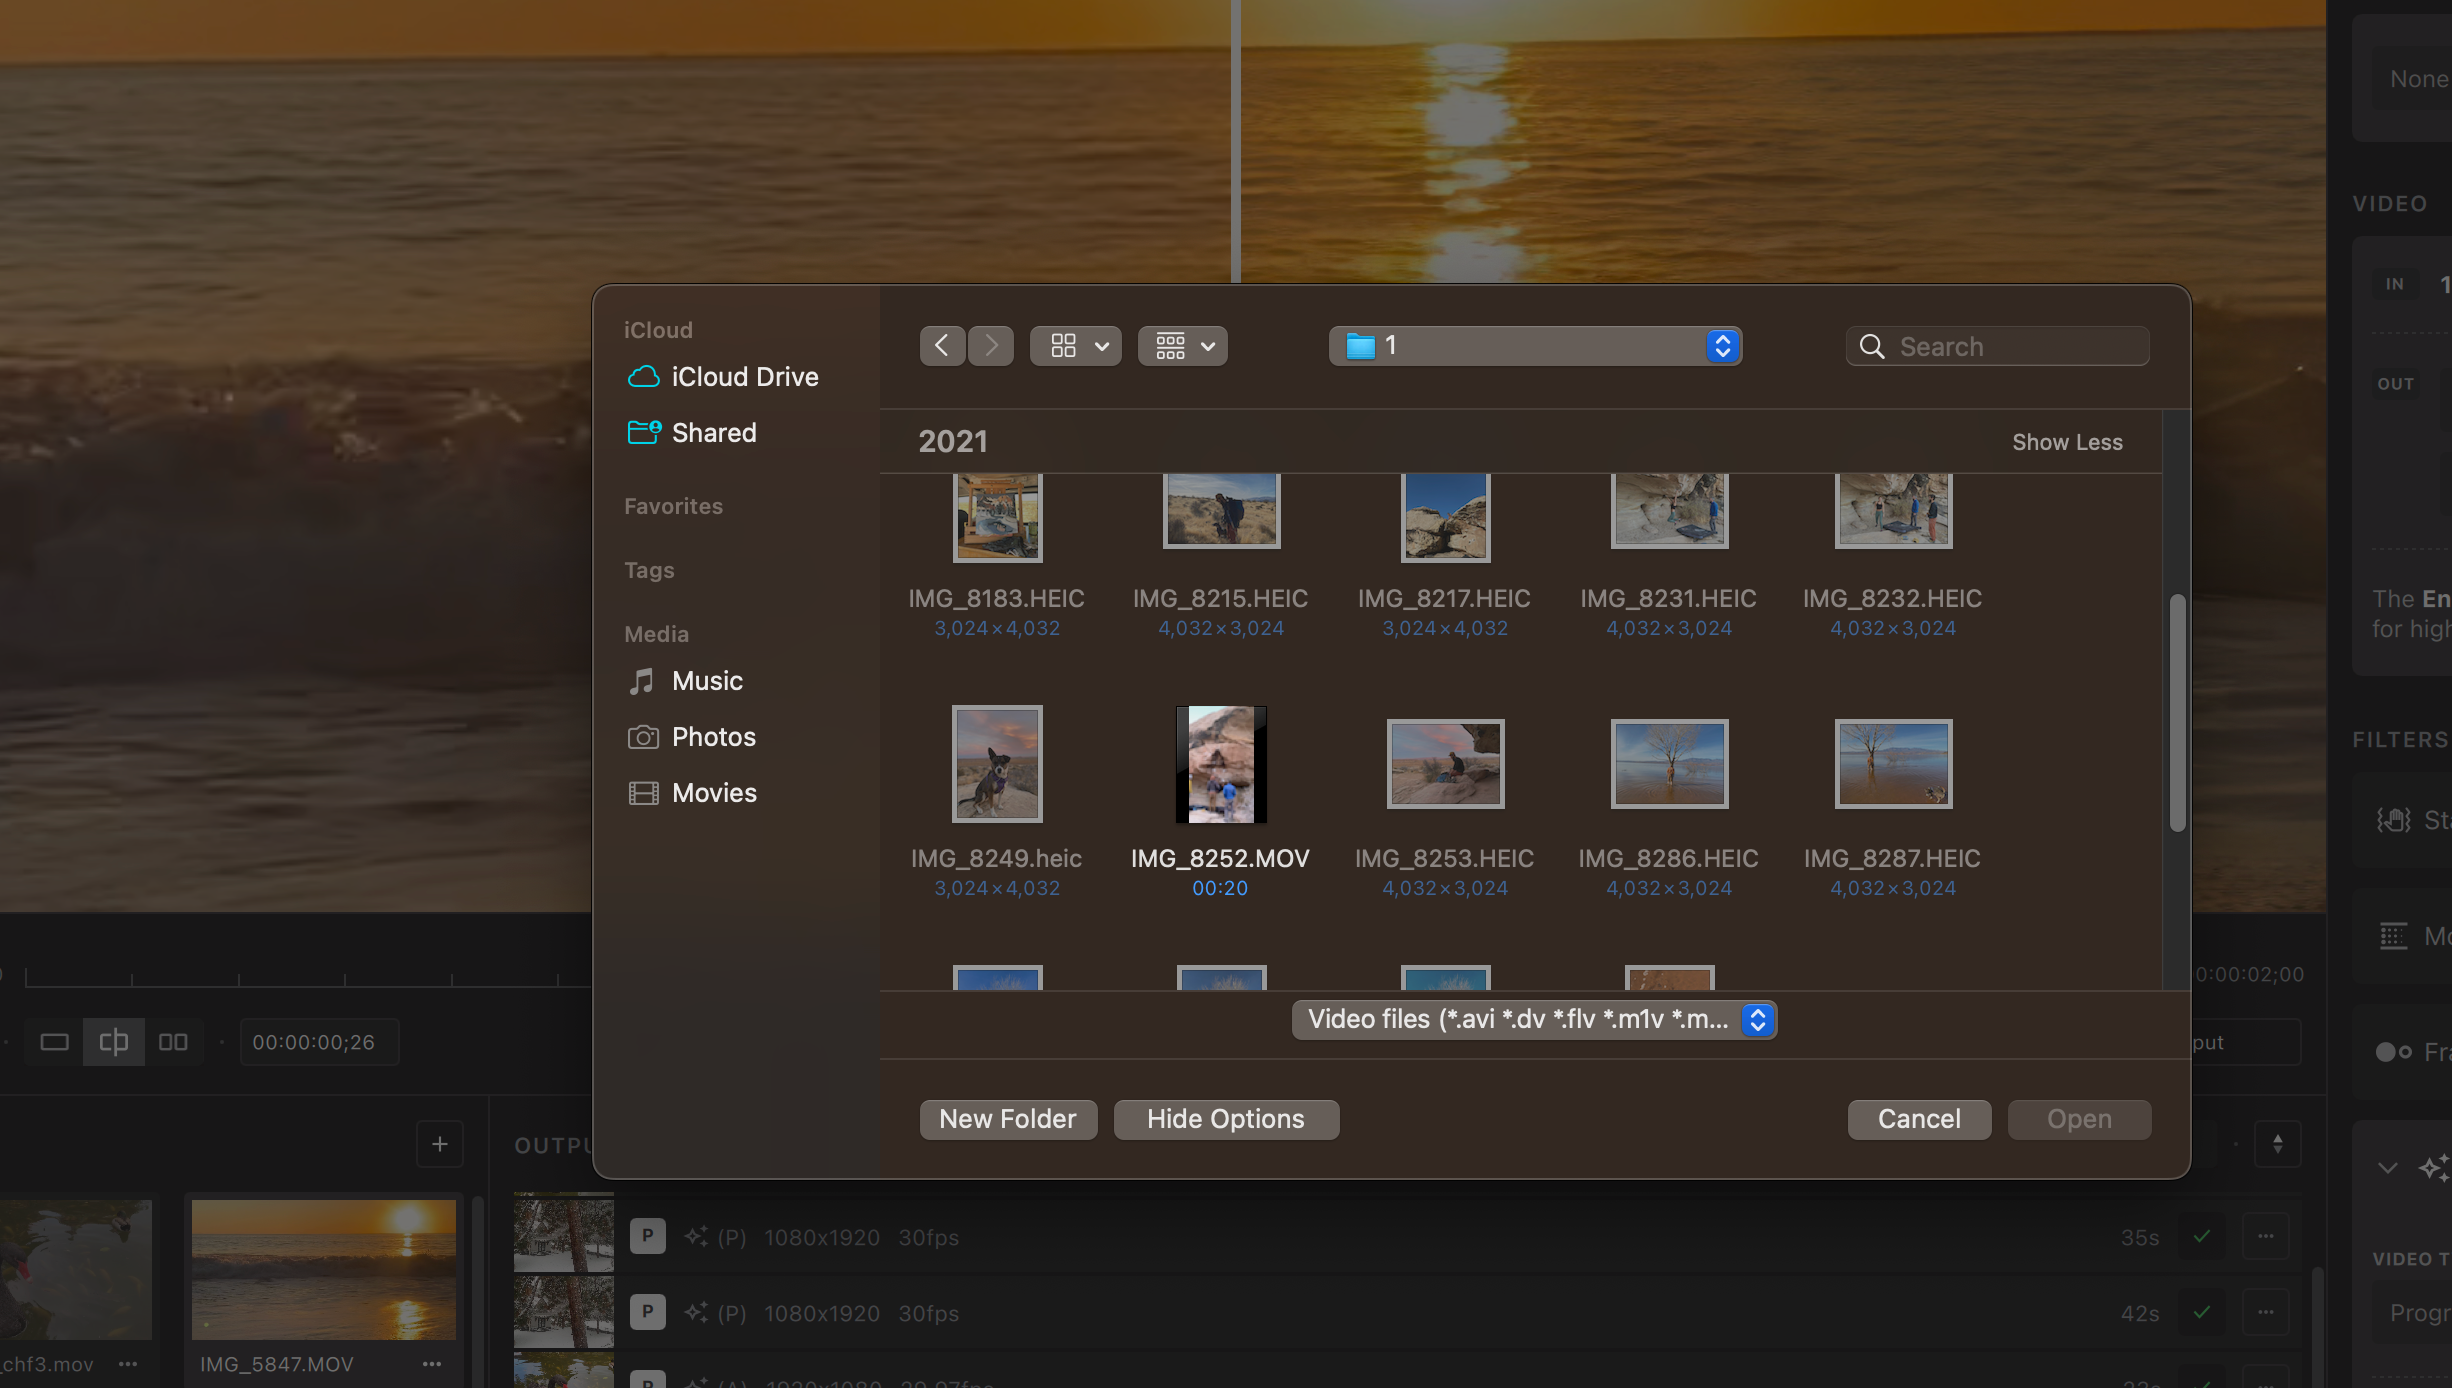
- Open the app and select Browse.
- Drag-and-drop files directly into the app.
Import an Image Sequence
- Make sure all frames are in one folder.
- Check that frames in consecutive order.
- At least 5 frames must be in the sequence.
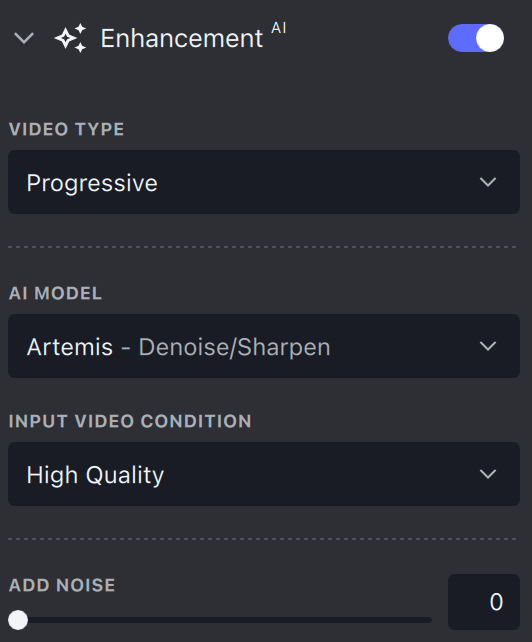
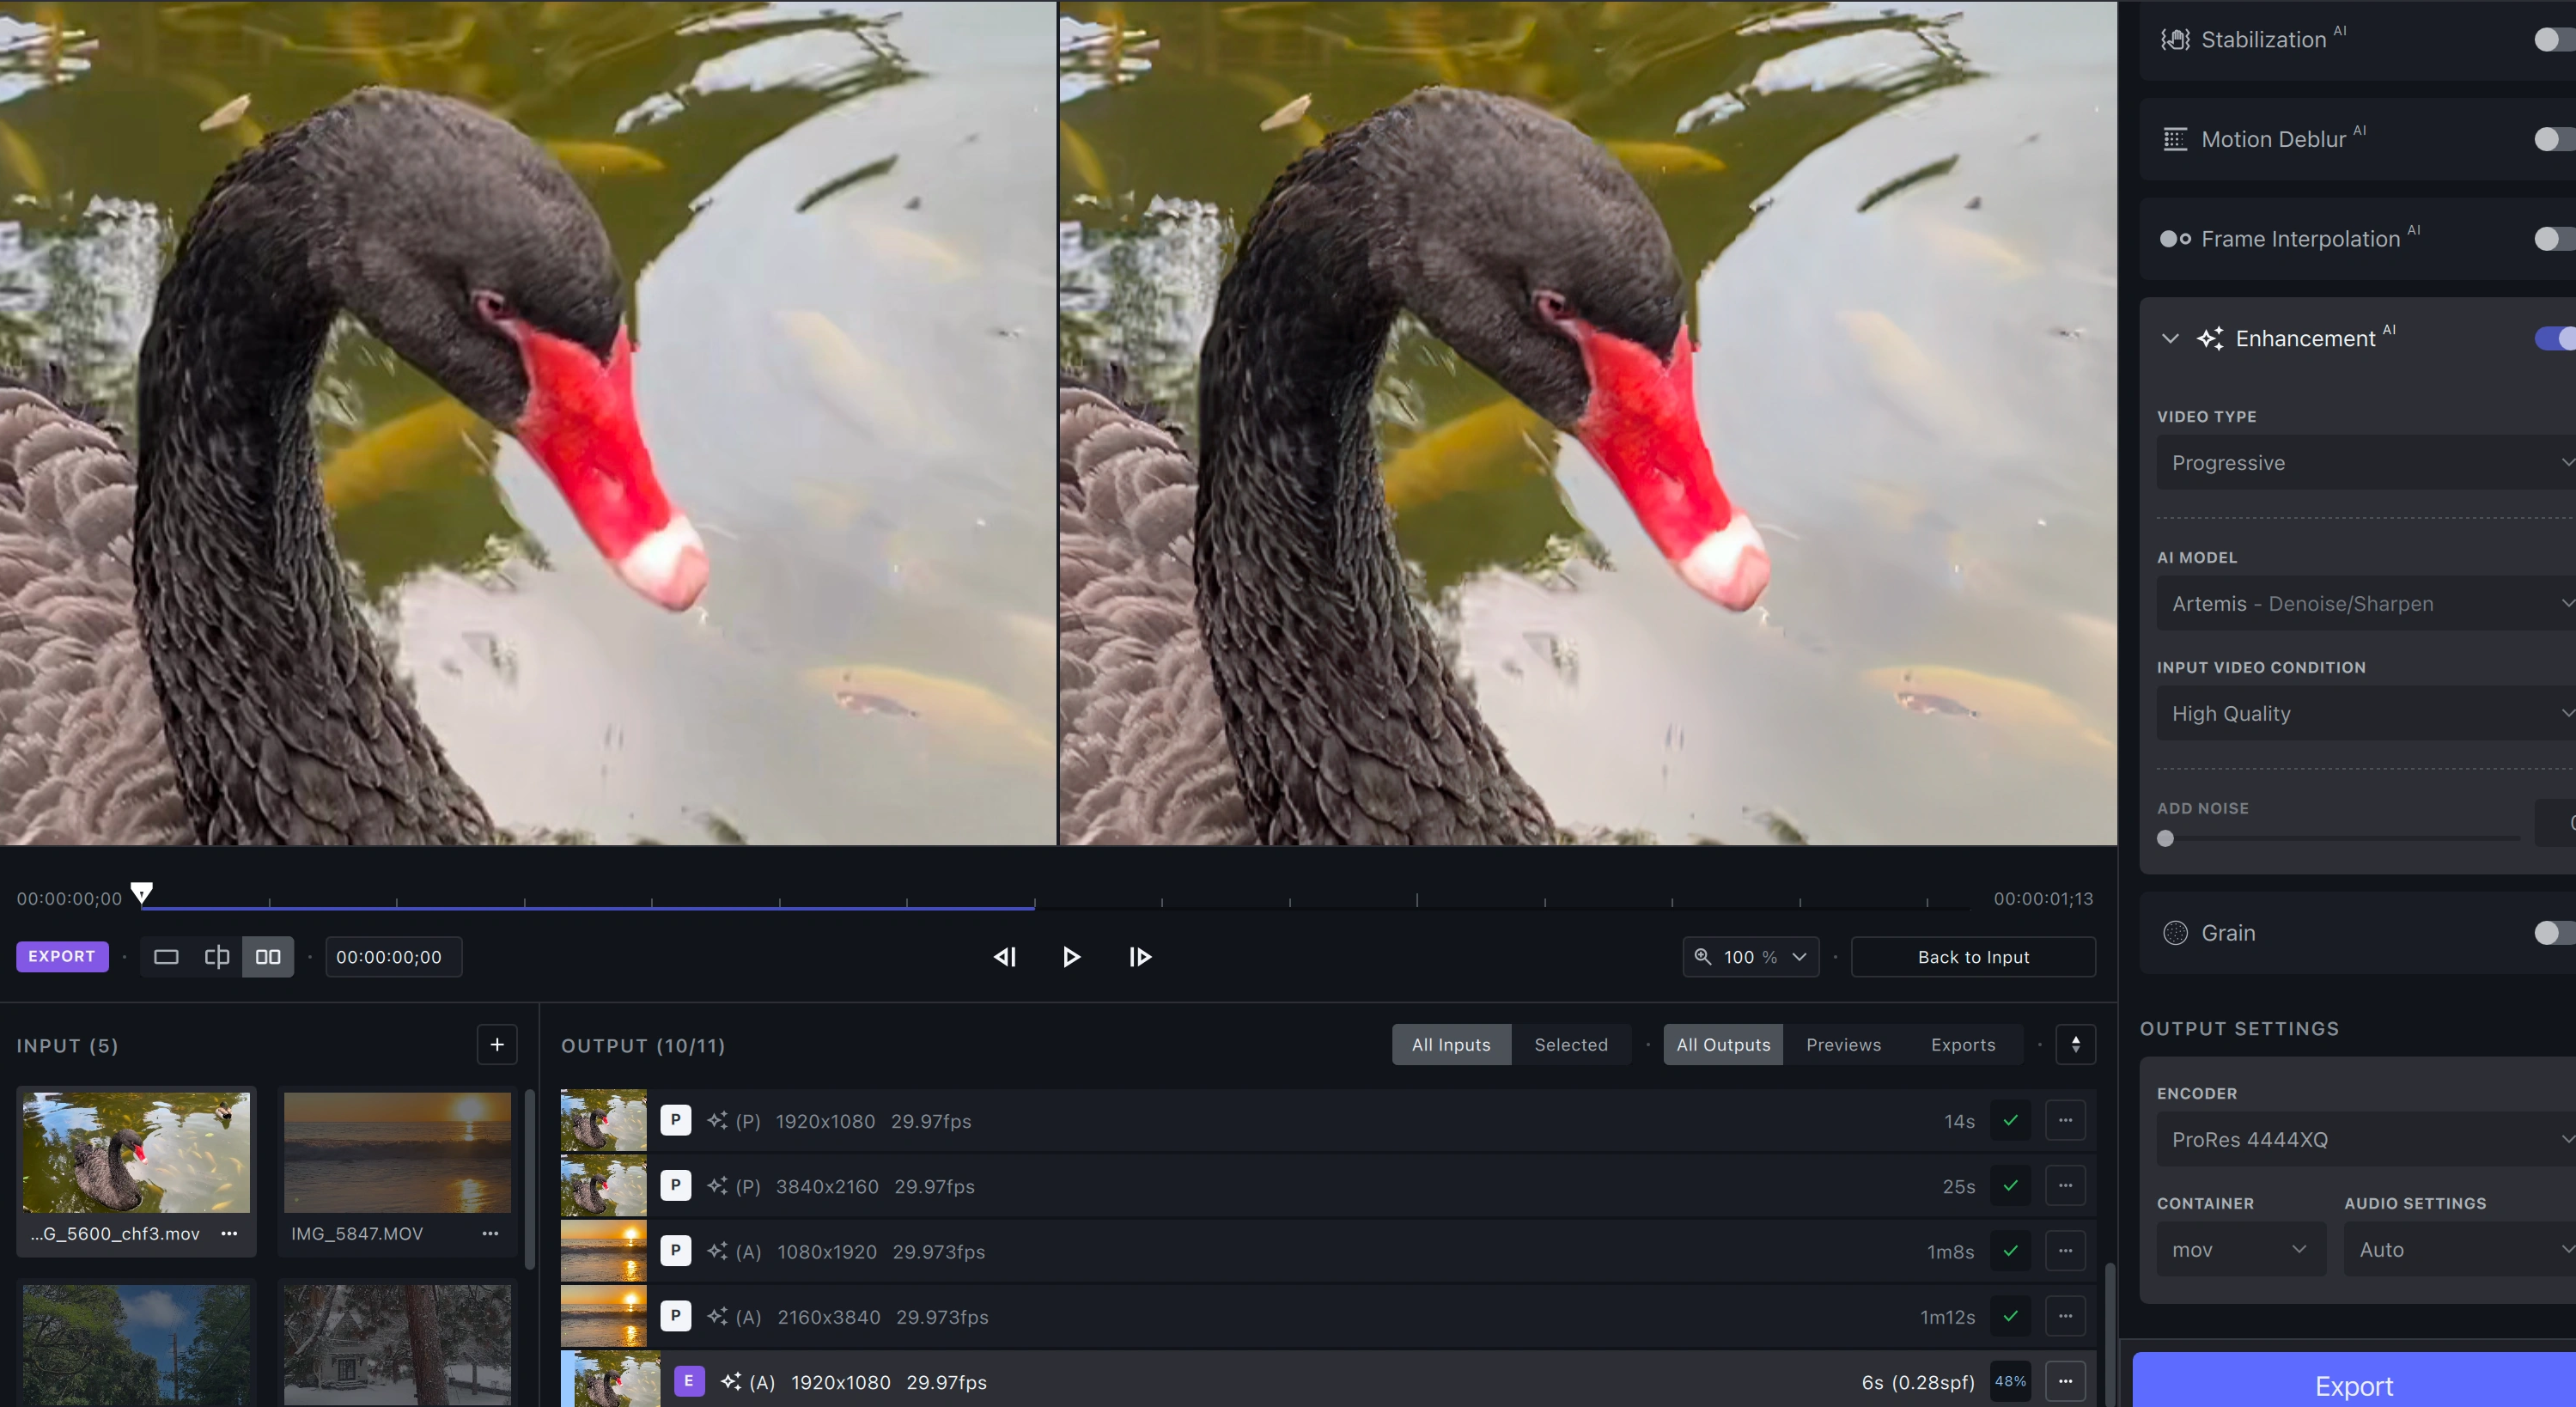
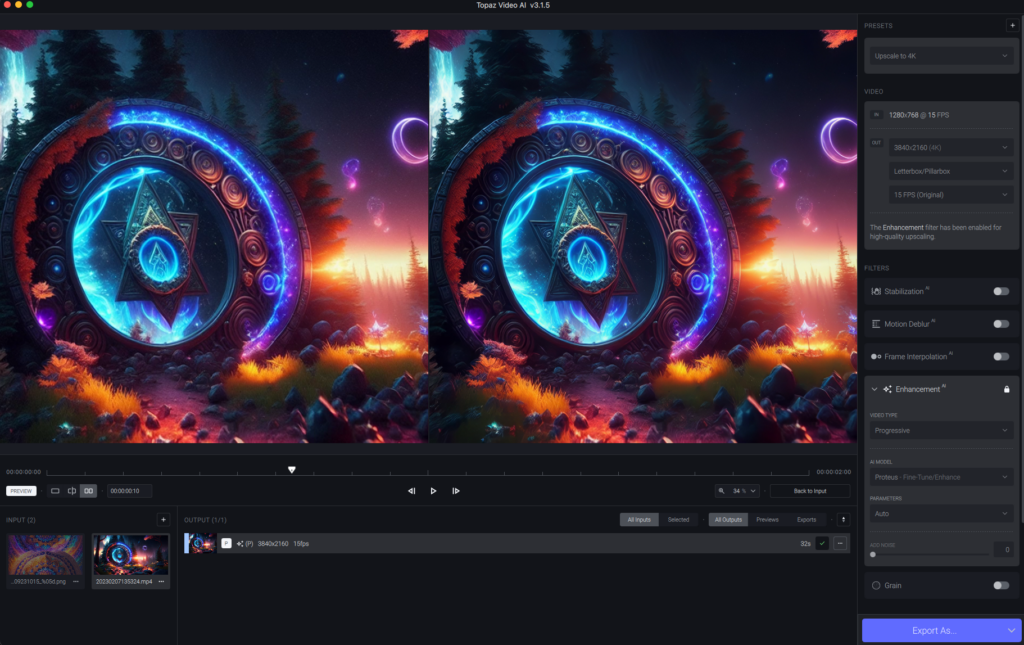
Get the result you want out of the app by using the settings in the sidebar.
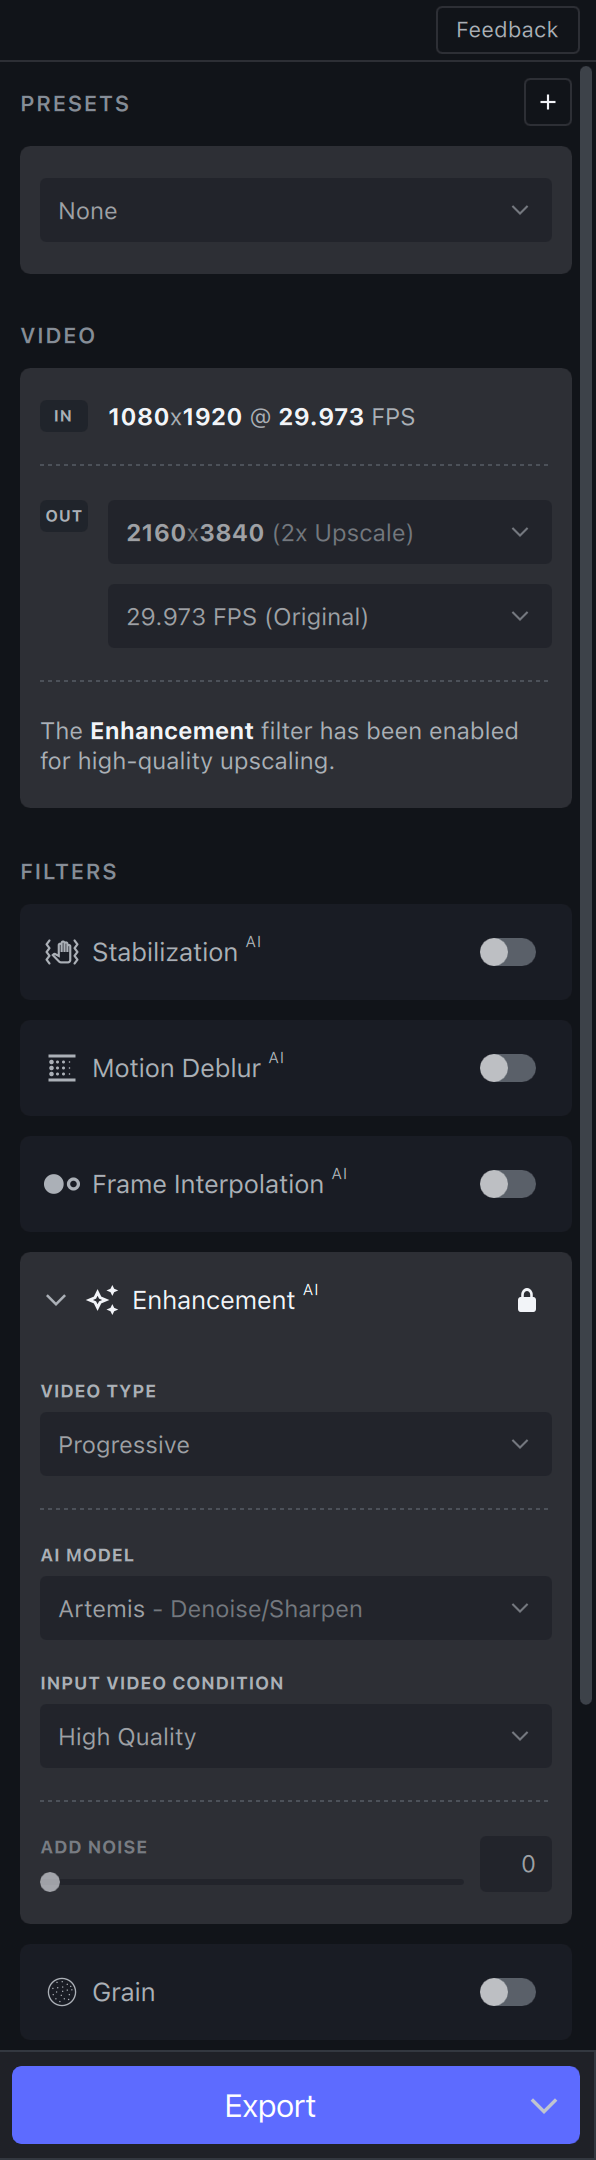
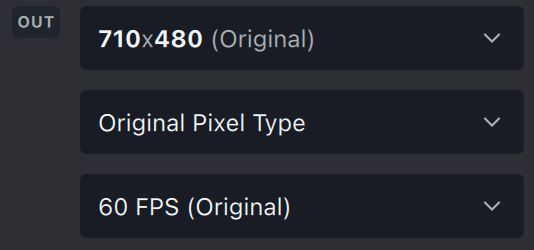
The «Video-In» menu will display the input file’s resolution, aspect ratio, and frame rate.

The «Video Out» menu allows you to alter the output file’s resolution and frame rate.
Filters
Each Topaz Video AI filter has been trained for a specific situation, such as deinterlacing, adjusting the frame rate, or creating a slow-motion output.
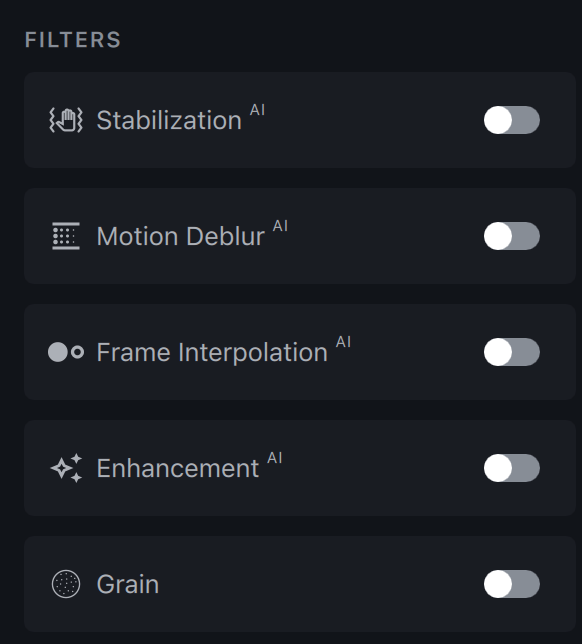
Use the toggle switch to enable the filter(s) you wish to use. We recommend using one to two per file.
Learn more about Topaz Video AI filters.
The Output Settings menu will allow you to select the export Encoder, Container, and audio settings.
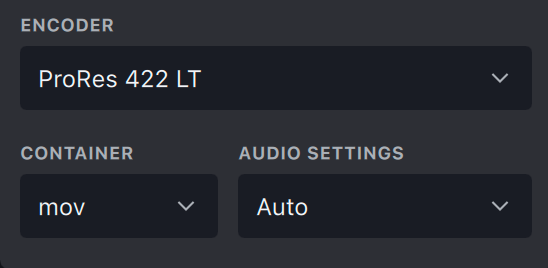
Learn more about Topaz Video AI’s Encoders and Containers.
Preview Your File
To generate a preview, select the desired resolution, filters, and output settings and press the purple Preview button.
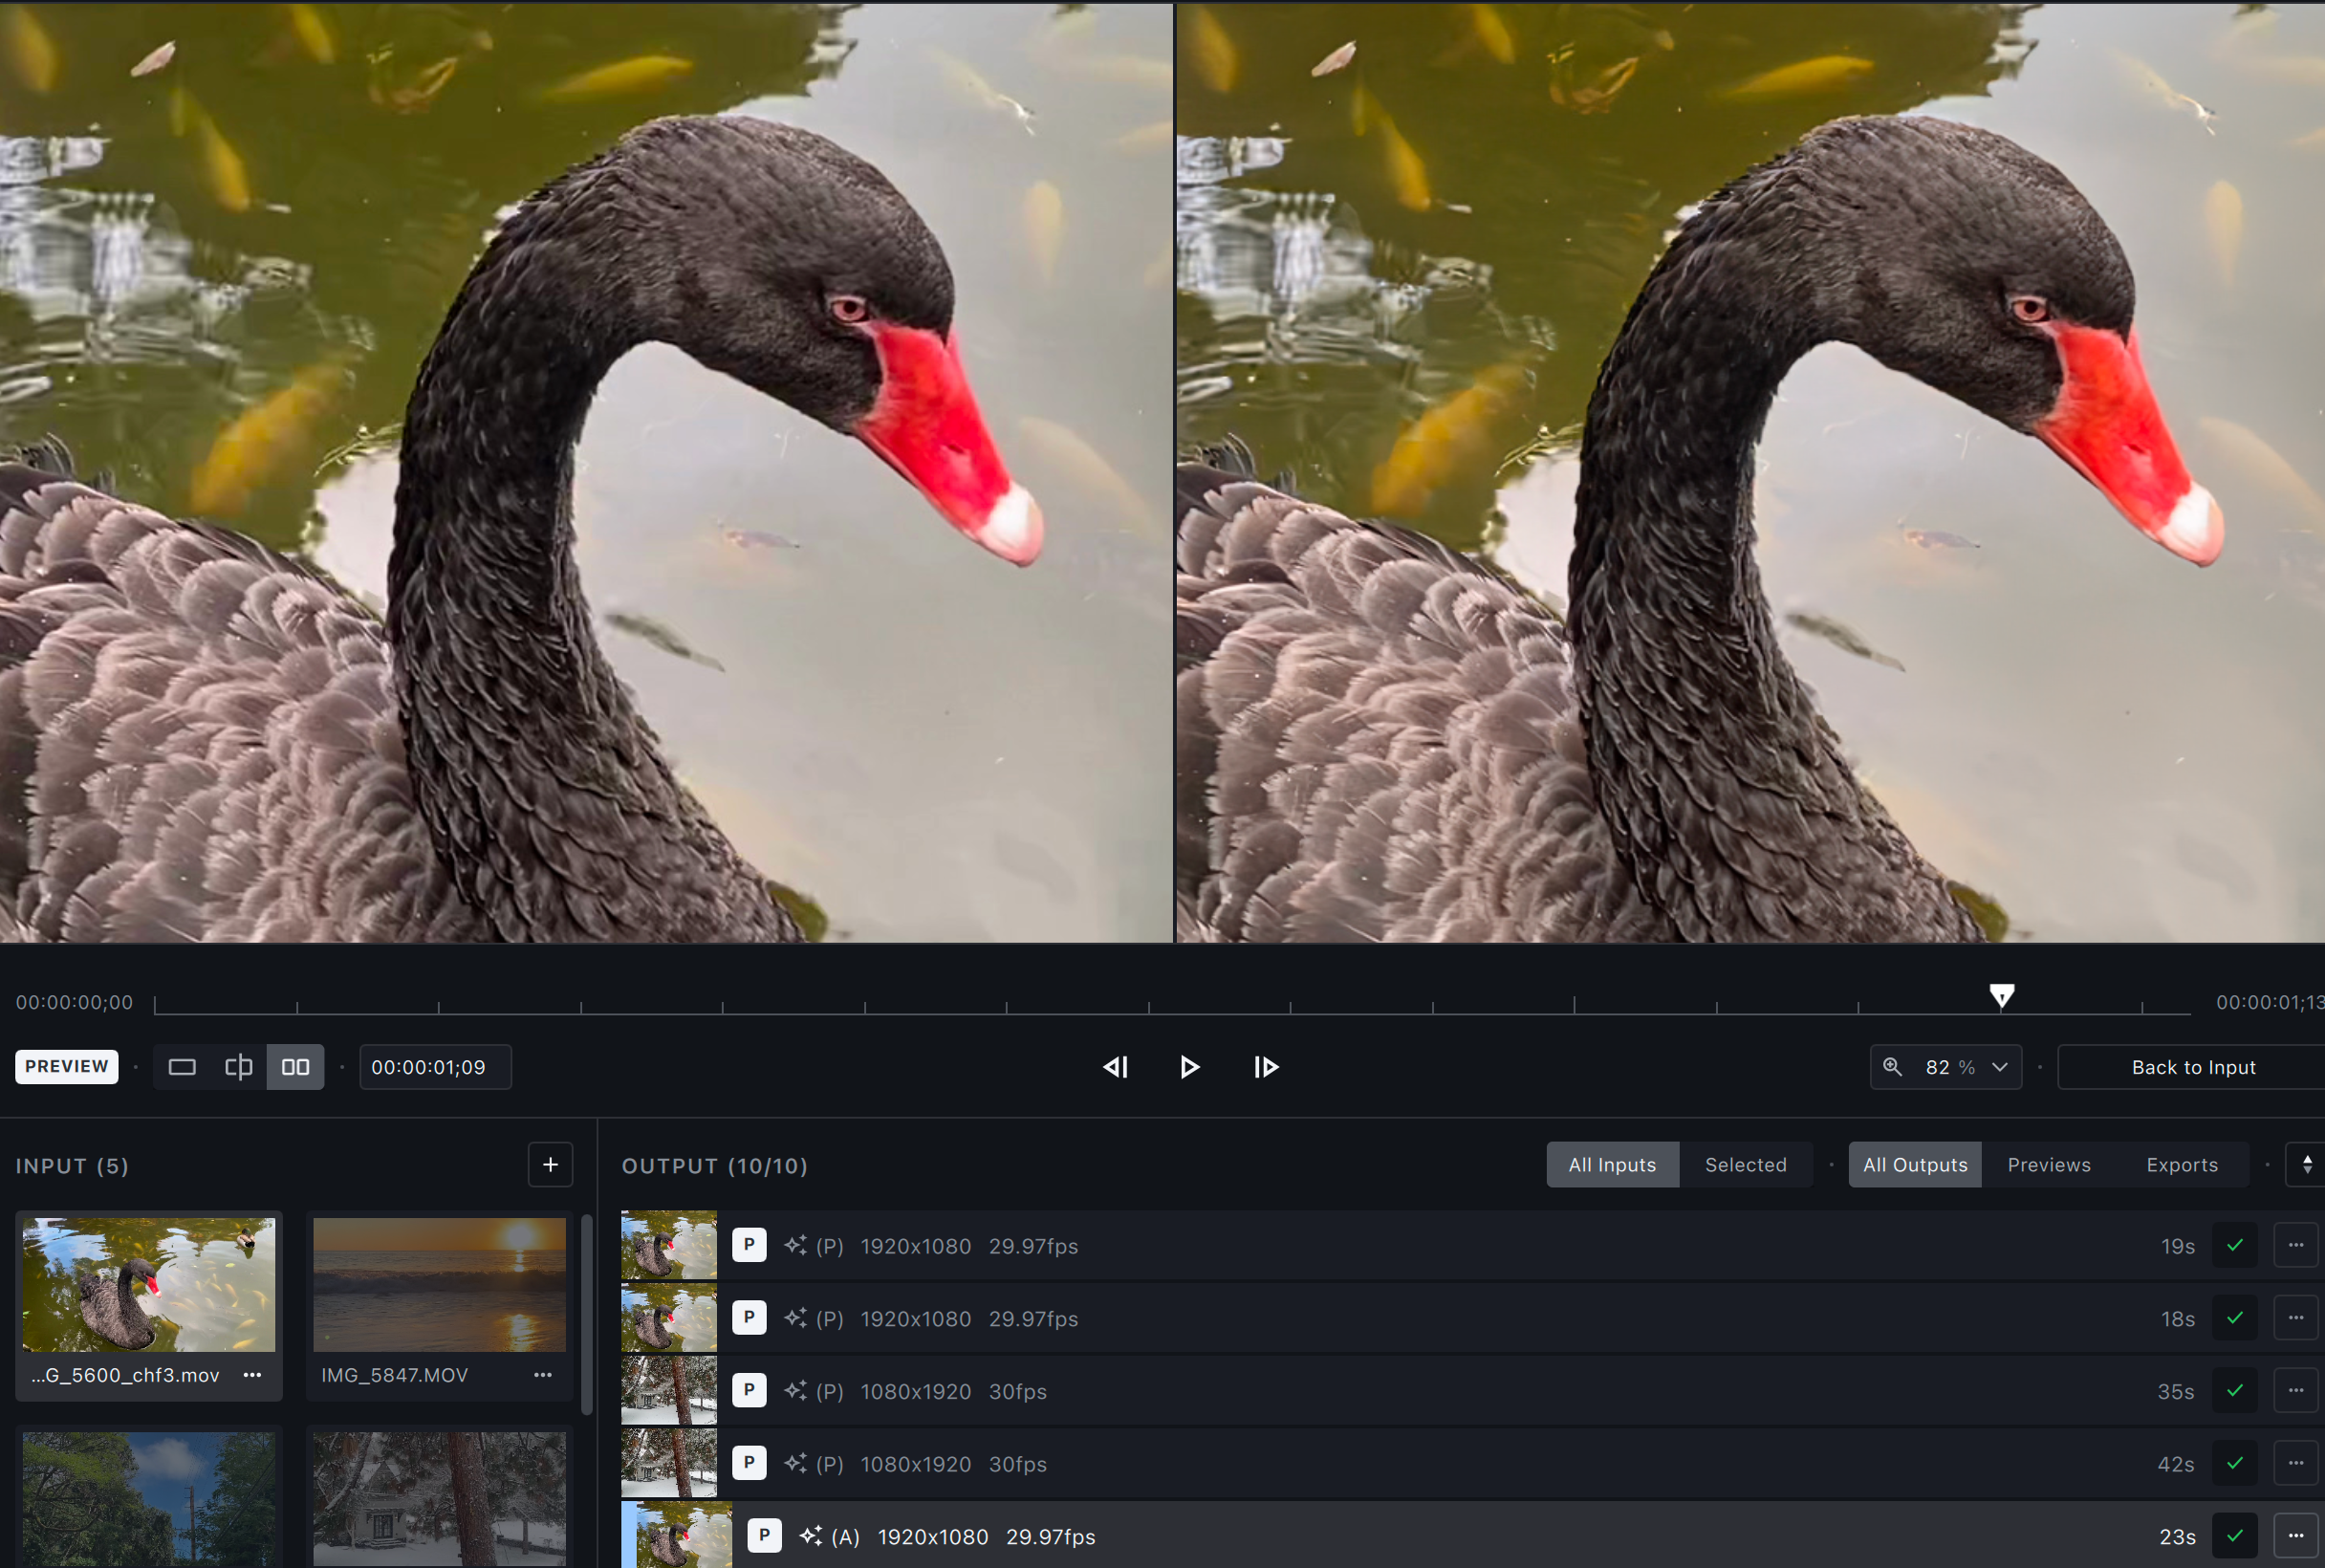
Select up to 15 seconds to preview. Adjust the view and zoom to inspect the results.

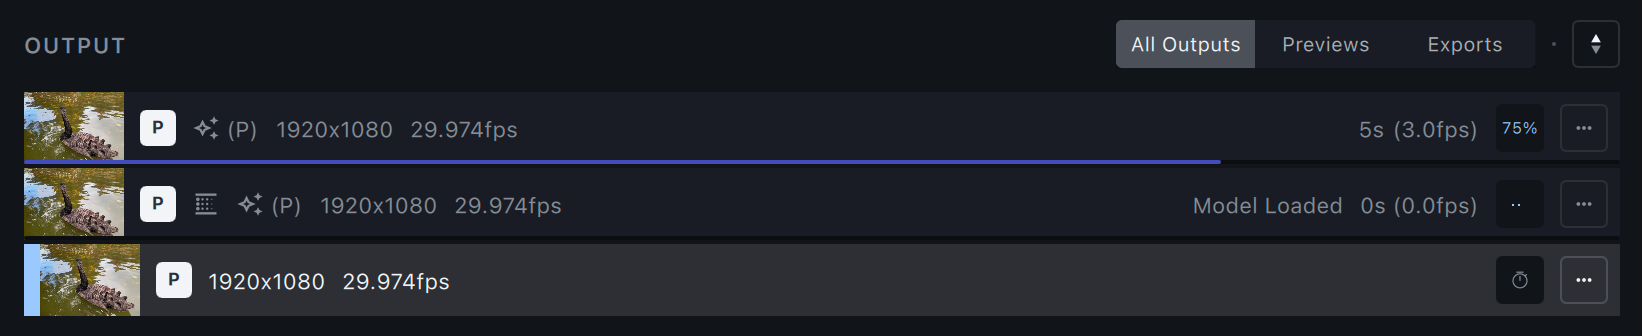
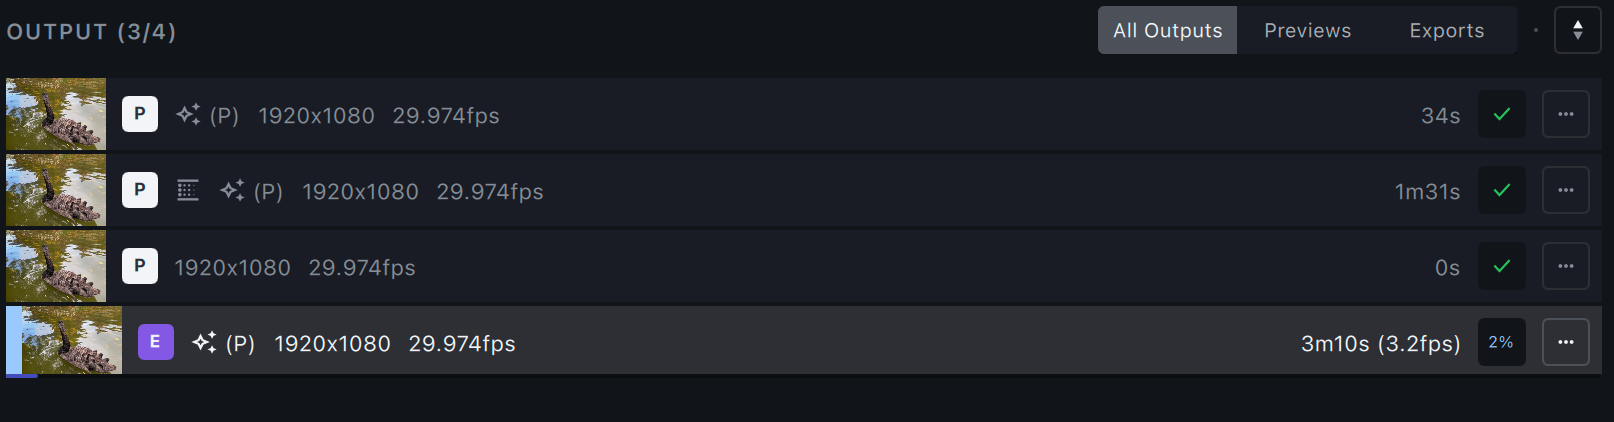
You can generate as many previews as you need. Progress for each preview will be displayed in the Output library.
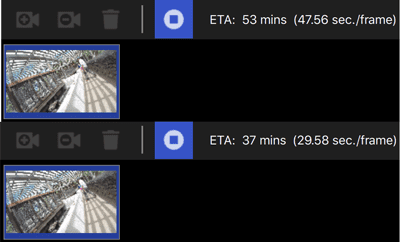
- A purple progress bar and an ETA will appear for each file.
- A green check mark indicates that the preview is complete.
To view the Preview using your default video player, double-click on the preview or use the triple dot menu to open an external player.
Export Your File
Once you have found the best settings for your file and you have inspected the preview, you are ready to Export.
By default, the exported file will be saved to the input file’s location. You can select the carrot next to Export to choose Export As to change the save location.
- Save As is not available when batch exporting.
- You can differentiate between the previews and exports by taking a look at the icon on the left side of the Output library. P for Preview and E for Export.
What’s Next?
Congratulations on improving your first video! Learn how to use Topaz Video AI filters, encoders, and more!
![]()
Features
![]()
User Guides
![]()
Topaz Video Enhance AI

5.0
Оценок: 5
(Ваша: )
Скачать бесплатно![]()
 Для Windows 11, 10, 8, 7
Обзор Topaz Video Enhance AI
Topaz Video Enhance AI – удобная программа для автоматического улучшения качества видео с помощью функций на основе искусственного интеллекта. Она позволяет быстро увеличить разрешение кадра, убрать цифровые шумы, сделать эффект «замедленной съемки» и многое другое. Topaz Video Enhance AI 2.6.4 скачать бесплатно на русском языке можно по проверенной ссылке с нашего сайта.
Редактор подходит новичкам, так как выполняет обработку в автоматическом режиме. Пользователь может выбрать готовые настройки из списка. Софт содержит пресеты для:
- увеличения разрешения кадра до 4K;
- удаления шумов и помех в старых видео;
- создания эффекта «замедленной съемки» за счет установки частоты кадров на 60.
Самостоятельно пользователь может указать желаемое разрешение, FPS, тип видеозаписи, добавить зернистость. За счет ручных настроек можно:
- перевести ролики с разрешением 480p, 720p и 1080p в клипы 4K или 8K без снижения качества и потери детализации;
- приблизить определенный участок видео без добавления шумов и размытия;
- удалить полосы в старых видеоклипах, оцифрованных с кассеты.
Обратите внимание, что официальная версия программы представлена только на английском языке. Вы сможете загрузить переведенную RePack-версию с торрента или скачать отдельно русификатор. Однако файлы из непроверенных источников могут подвергнуть ваше устройство опасности. Многие torrent-сервисы не проверяют опубликованные материалы, и они могут содержать вирусы, трояны и другие вредоносные объекты.
Topaz Video Enhance подходит только для улучшения качества видеоролика и удаления любых цифровых
недочетов: шумов, артефактов сжатия и т.д. В софте нет инструментов для обрезки клипа, объединения
нескольких файлов, наложения музыки. Если вы ищете редактор, который позволит обработать картинку
и сделать красивый ролик, воспользуйтесь приложением ВидеоМОНТАЖ.

Как улучшить качество видео в Topaz Video Enhance AI

Особенности Topaz Video Enhance

Автоматическая обработка видео
Редактирование выполняет обученная нейронная сеть. Она убирает недочеты без участия пользователя и восстанавливает любые детали в кадре. Например, если в ролике было много шумов на лице человека, то ИИ самостоятельно сгладит кожу, подберет подходящую текстуру на замену помехам и применит резкость к носу, губам и т.д.

Изменение частоты кадров
Данный параметр влияет на плавность картинки и скорость перехода от одной сцены к другой. За счет настройки FPS вы сможете создать ролик с эффектом «slow motion» или ускорить видео. Софт автоматически генерирует дополнительные схожие кадры и позволяет увеличить значение частоты с 24 до 60.
![]()
Удаление шумов
Topaz Video Enhance AI позволяет устранить цифровые шумы, которые могли возникнуть в роликах, снятых в ночное время, записанных на телефон и т.д.

Отключение аудио
В редакторе можно заглушить исходный звук. Благодаря этой опции при изменении скорости видеоряда вы не получите видео- и аудиодорожки, которые рассинхронизированы.

Предварительный просмотр результата
Перед сохранением работы вы сможете воспроизвести видео во встроенном плеере и оценить итог преобразования. Рядом с обработанным клипом будет отображаться оригинал, чтобы пользователь мог детально сравнить две картинки.

Поддержка популярных форматов
Вы сможете импортировать видеоролики MP4, AVI, MKV, FLV и другие. Экспортировать файлы можно MP4 и MOV или в качестве последовательности изображений JPG, PNG, TIFF.

Пакетная обработка
В редактор можно загрузить несколько файлов одновременно и установить для них одинаковые параметры редактирования. Рендеринг обычно занимает продолжительное время, поэтому вы сможете оставить ПК включенным и позволить софту преобразовать два и более видео без вашего участия.

Загрузка дополнительных предустановок
Если предложенных профилей улучшения видео недостаточно, то вы сможете импортировать пресеты с ПК. Файлы можно найти на официальном сайте или в сообществах пользователей.

Выбор оборудования для рендеринга
Для преобразования роликов можно использовать как графический процессор, так и CPU. Также вы сможете регулировать максимальный процент используемой памяти, чтобы не нагружать видеокарту.
Плюсы и минусы Топаз Видео Энхансер
✔️ Плюсы:
- изменение интерфейса ПО: указание подходящей темы, цвета фона и т.д.;
- установка пользовательских горячих клавиш;
- инструкции внутри софта и подсказки к каждой опции;
- скачать Topaz Video Enhancer можно бесплатно с ограничениями.
❌ Минусы:
- для скачивания пробной версии требуется указать адрес электронной почты;
- в демонстрационном пакете поверх видео накладывается водяной знак;
- для работы без сбоев требуется мощный ПК с 16 ГБ ОЗУ и 6 ГБ видеопамяти.
Системные требования Topaz Video Enhance
Лицензия: условно-бесплатная
Версия: v2.6.4
ОС: Windows 11, 10 / Mac OS
Русский язык: нет
Размер дистрибутива: 221 MB
Скачать Topaz Video Enhance бесплатно
 Для Windows 11, 10, 8, 7
Рекомендуем

Простой аналог Topaz Video Enhance AI — ВидеоМОНТАЖ
![]()
Topaz Video Enhance AI

русский интерфейс

каталог титров, мелодий, стикеров
объединение и обрезка роликов
замена фона и стабилизация видео
совместимость с Windows 8, 7, Vista, XP
Обзор Topaz Video Enhance AI. Апскейл видео для ленивых
Наверняка вы видели в сети видео типа Нью-Йорк 40-ых в цвете и 4K. А когда хотели сделать так же со своими видео из детского сада, выяснилось, что нужны какие-то там нейросети. А я расскажу, как сделать это почти в один клик.
Topaz Video Enhance AI — приложение для Windows и macOS, которое легко помогает произвести апскейл видео до 8K без потери качества, а даже с его улучшением.
Теория
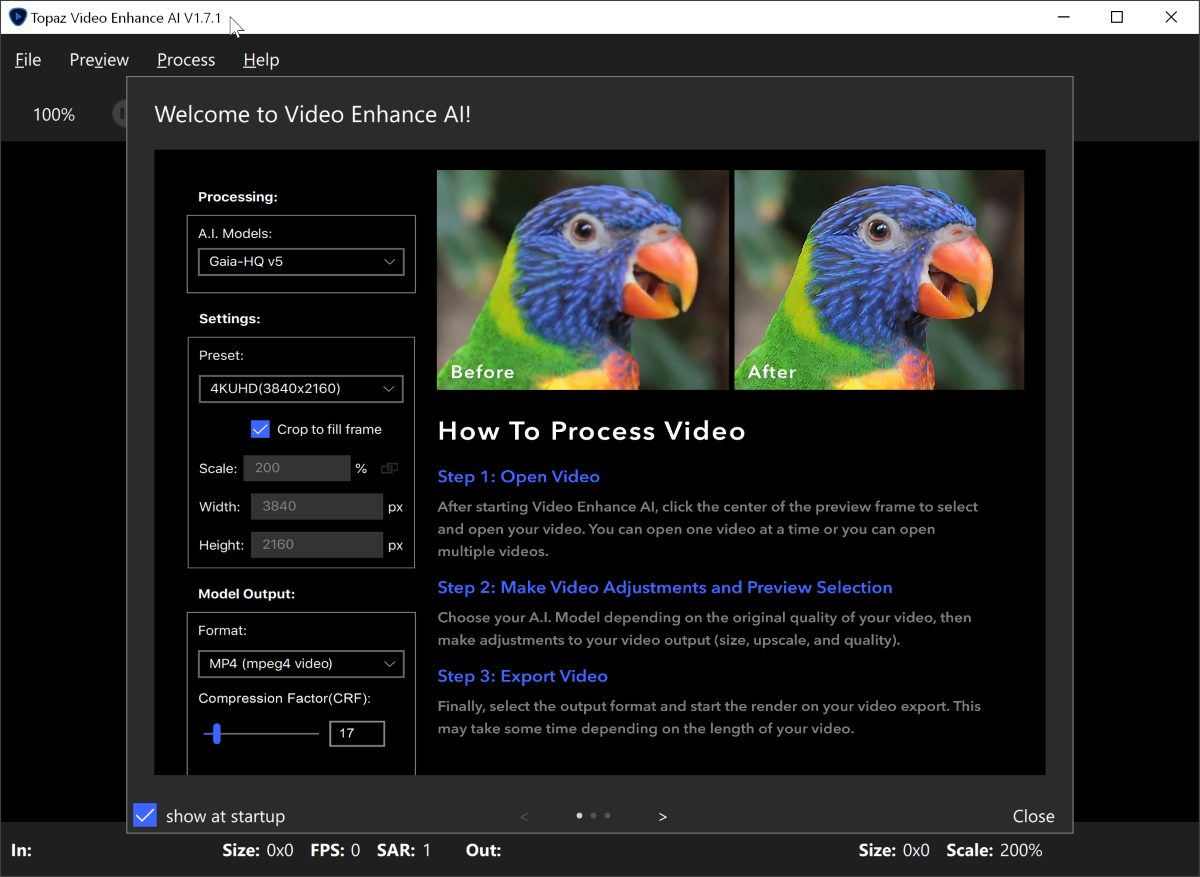
При первом запуске приложения вас ожидает экран с обучением из трёх шагов. По сути, для улучшения видео требуется всего три действия: открыть видео, выбрать желаемые параметры, сохранить видео.
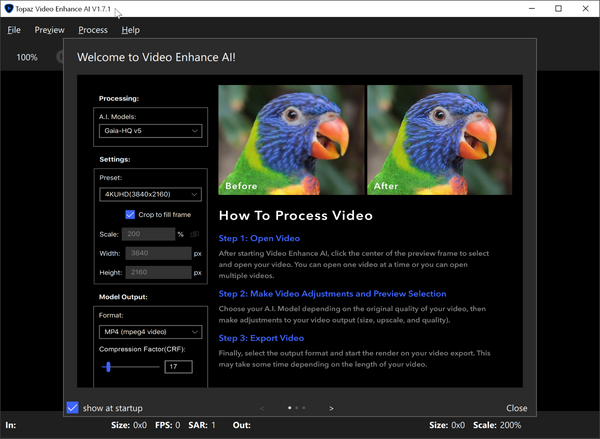
И на самом деле именно так просто всё и происходит. Для примера я скачал вот это видео с YouTube в разрешении 480P, и добавил его в Topaz Video Enhance AI.
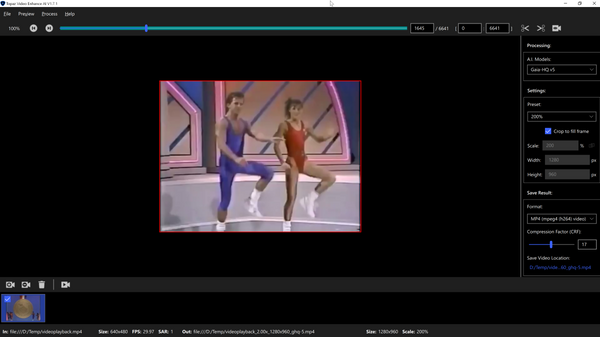
На следующем этапе нужно задать параметры для апскейла видео.
В разделе Processing можно выбрать одну из шести нейросетей, которая будет обрабатывать видео. В чём разница между ними, я не буду рассказывать — в приложении всё написано.
Setting отвечает за качество видео на выходе. Можно выбрать разрешение в процентах, ввести свои или выбрать значения — вплоть до 8K.
В разделе Format нужно выбрать формат файла на выходе и путь сохранения.
Дополнительно можно обрезать видео и выбрать видеокарту, с которой будете работать.
После настройки всех параметров остаётся нажать Start Processing, и в выбранной папке через какое-то время появится улучшенная версия видео.

Практика
На практике всё не так радужно, и результат полностью зависит от мощности вашего компьютера. Сделать из видео (длительностью даже в 10 секунд) шедевр в 8K на слабом железе не получится ни при каких условиях.
На своём компьютере с Intel Core i7 и 32 Гб оперативы я так и не смог сделать даже апскейла до 1080p. Процесс шёл либо ооооооооочень медленно, либо не шёл вообще, либо постоянно начинался заново.
Вероятно, если бы я занимался этим не для поста на сайте, а для дела, я бы всё-таки добился результата. Но мне лень, поэтому вот вам пример с сайта разработчика.
Лицензия на Topaz Video Enhance AI стоила на момент написания поста $200, при этом на пробу даётся 30-дневная версия без каких-либо ограничений. Поэтому в первую очередь я рекомендую просто попробовать демку, и понять, надо ли оно вам вообще.
Enhance Your Videos with Topaz Video Enhance AI
Do you have a collection of low-resolution videos that you wish you could improve the quality of? Topaz Video Enhance AI may be the solution you need. With its advanced AI video upscaling technology, this software can enhance the details, colors, and sharpness of your videos, resulting in better quality footage. Here are the benefits of using Topaz Video Enhance AI, which we use here all the time to upscale our videos at Dreaming Computers from 1280 x 720 to 4k which are then finally posted on YouTube.
Short Video of the benefits, and I cant stress this enough this is my goto upscaler for AI related video
If you’re looking for an easy-to-use video upscaling software, Video Enhance AI might be worth considering. According to [1], this software has a sleek interface and user-friendly presets that allow you to quickly upscale videos on either a Windows PC or Mac. The software uses artificial intelligence to upscale videos to higher resolutions, including 4K.
The interface of Video Enhance AI appears to be quite intuitive, with preset options that allow users to quickly get started with upscaling their videos. As noted in [1], the software also offers a preview window that allows users to see the results of their settings before rendering the final video. This can be helpful for fine-tuning the settings to achieve the desired result.
The sleek interface and preset gets you quickly upscaling your videos on either a Windows PC or Mac. Shown below is a screen shot of a video rendered out with Deforum Stable Diffusion at 1280×704. The left side is the 720p video and the right side is the 3840×2160 4k resolution.
 Video Upscaling with Topaz Video Enhance AI for your AI videos

Sacred Geometry All Seeing Eye T-Shirt – Psychedelic Design
This All Seeing Eye T-Shirt features intricate sacred geometry designs in a vibrant psychedelic color scheme. The eye represents spiritual enlightenment and awakening, making this tee perfect for those seeking to expand their consciousness.
The unisex heavy cotton tee is the basic staple of any wardrobe. It is the foundation upon which casual fashion grows. All it needs is a…
Topaz Video Enhance AI uses a neural network that has been trained on a vast dataset of high-quality video content. The network is capable of learning and identifying patterns in the video data that it analyzes. When you load your video into the software, it uses this neural network to enhance the quality of your video by upscaling it and reducing noise.
The software also has several other features, including deinterlacing, motion interpolation, and shake stabilization. These features can be used to further improve the quality of your videos by reducing motion blur and other artifacts that can occur during filming.
In addition to being user-friendly, Video Enhance AI is also powerful, with the ability to upscale videos up to 8K resolution. The software uses machine learning algorithms to enhance video quality and remove artifacts, resulting in a smoother and more natural-looking video. As noted in [2], the software can also upscale videos without introducing significant noise or blurriness.
The software and use images sequences as well to generate a upscaled video. This in-turn can potentially remove the need for using Flow Frames (Rife) because they also have the ability to do frame interpolation.
Btw check out my thoughts also on Topaz Photo AI which I use quite a bit for my photography business.
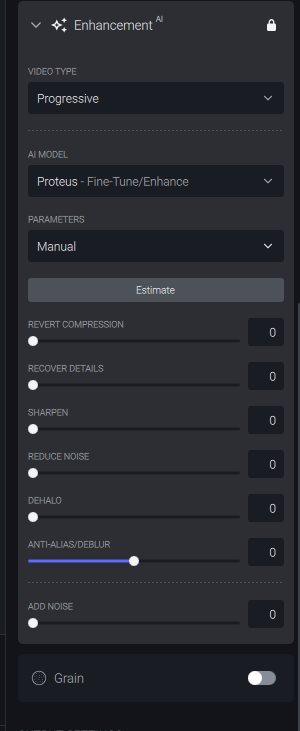
If you’re looking for a way to enhance the quality of your videos, Topaz Video Enhance AI with the Proteus AI model might be worth considering. Here are some benefits of using Topaz Video Enhance AI with the Proteus AI model for fine-tuned enhancements:
- Fine-tuned enhancement control: The Proteus AI model provides six customizable sliders that give you even more control over the output quality of your video clips. This allows you to fine-tune your enhancements and adjust parameters such as sharpness, compression recovery, and anti-aliasing to achieve your desired result. [3]
- Reduced halos from over-sharpening: The fine-tuned enhancement control can help you reduce halos that may result from over-sharpening your footage. This can improve the overall visual quality of your video and give it a more natural look. [3]
- Recover lost detail due to compression: The Proteus AI model can help recover lost detail in your footage that may have been lost due to compression. This can result in a more detailed and visually pleasing video. [3]
- Minimize aliasing for sharper footage: The Proteus AI model can also help minimize aliasing, which can result in less sharp footage. This can help you achieve sharper and more detailed video quality, especially when upscaling lower resolution footage. [3]
- Create smooth slow-motion effects: In addition to enhancing the quality of your footage, Video Enhance AI can also use AI to create smooth, non-stuttering slow-motion effects. You can apply the Chronos AI model to your footage and adjust the percentage amount to create a custom slow-motion effect. [2]
Overall, Topaz Video Enhance AI with the Proteus AI model offers advanced enhancement controls that can help you achieve high-quality and visually stunning videos. With fine-tuned enhancements, reduced halos, recovered detail, minimized aliasing, and smooth slow-motion effects, Video Enhance AI can take your video quality to the next level.
I realize their may be additional tools out there that are free and can do similar if not the same and I have seen some arguments on Discord and other social platforms but in the long run this is my go to because I can run it on my Mac’s or Windows machines and upscale videos if my other machine are busy rendering out animations. also the Proteus fine tune options give me a bit more flexibility on how I want to clean up or adjust the upscaled video.
Here is a video that we processed recently and upscaled. Please make sure to go to the full link and select the 4k version but you get the idea.
Overall we like to use this video upscaler and it appears that Video Enhance AI is a powerful and easy-to-use video upscaling software. The software offers presets and a sleek interface that can help users quickly get started with upscaling their videos, while also providing advanced options for fine-tuning the settings. If you’re looking to upscale your videos to higher resolutions, Video Enhance AI is definitely worth considering.
So the last thing to address is the price at $299 its pretty steep but if your making money off of doing your videos its a game changer and really worth the extra money. You can also try the free trial first if you want. As of writing and it probably wont work get 15% off with the coupon code DSCC15, these usually die pretty quickly but try it.
Topaz Video Enhance AI Review – Updated 2022+ Video Tutorial
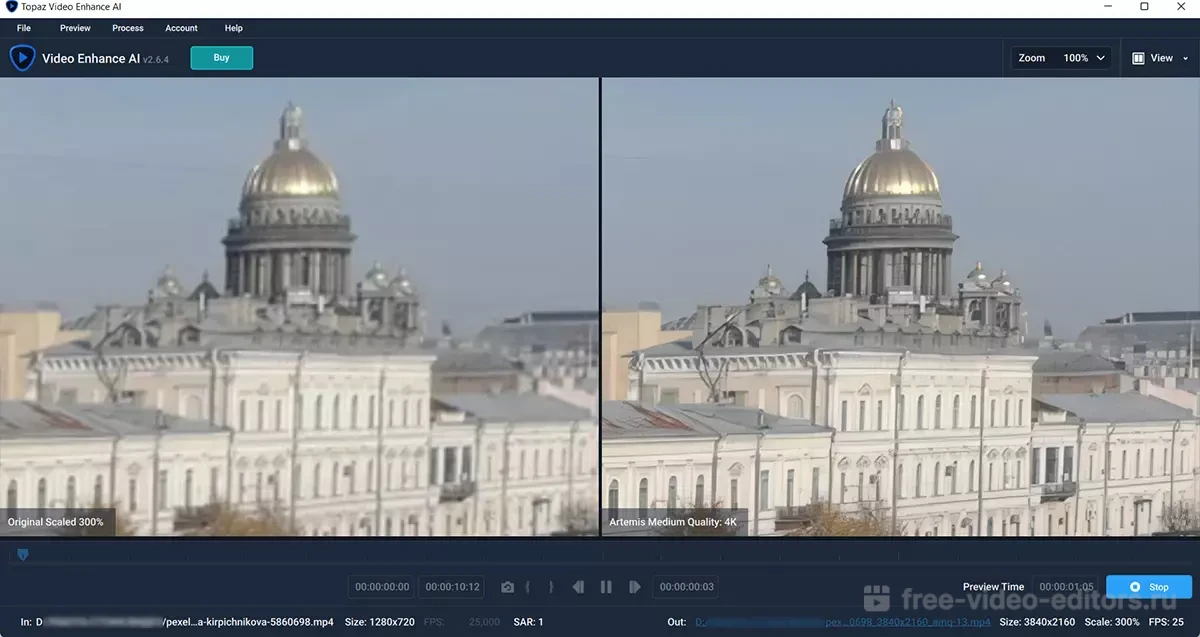
Topaz Video Enhance AI is now called Topaz Video AI, a video enlarger that allows users to upsize videos up to 8K ultra-high definition. Upscaling standard definition videos to HD enriches the view experience. In this Topaz Video Enhance AI review, I’m going to test some of my HD videos and upsize them to 4K resolution.
Planning to buy the new Video AI instead? Follow this link and use coupon code GETVIDEOAI for a 15% discount.
Read the Topaz Video AI review now.
Topaz Labs usually creates software, mainly AI-powered, for still images. Video Enhance AI is their first app for video. I’m going to provide a summary of how their latest software works. But first, a few housekeeping items.
Topaz Video Enhance AI Review
In my test cases, I used old video footage that I recorded using a GoPro Hero 3 Black at 1080p resolution.
The video quality isn’t the greatest but sets a good benchmark.
Also, no editing such as lighting or color corrections were done to the videos other than cropping and upsizing.
The videos were upsized from 1080p to 4K resolution.
https://amdy.su/wp-admin/options-general.php?page=ad-inserter.php#tab-8
I viewed the quality of the original videos and the 4K videos on my 5K iMac at the native resolution of 5120 x 2880 pixels and also at my working scaled resolution of 2048 x 1152 pixels.
The 4K video has a noticeable improvement in detail.
In order to notice the quality of the videos, I recommend pausing the video at different times. You may also have to view the video at full screen.
Note: In order to view video in 4K or higher, you need to have a 4K resolution display or higher.
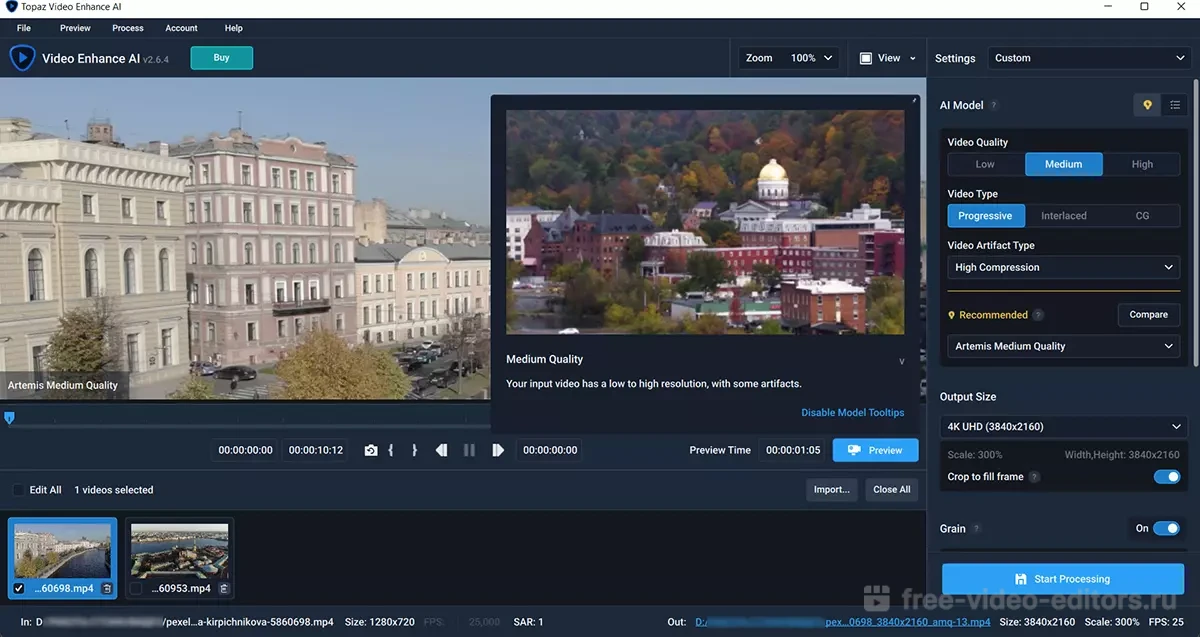
- Artemis HQ v12 – Upscale or sharpen high-quality input video, reducing motion flicker.
- Artemis MQ v13 – Upscale or enhance medium-quality video with moderate noise or compression artifacts.
- Artemis LQ v13 – Upscale or sharpen low-quality video with high noise or strong compression artifacts.
- Artemis Dehalo v2 – Upscale and enhance medium-quality progressive video containing haloing, moderate noise, or compression artifacts.
- Artemis Strong Dehalo v2 – Upscale and sharpen low-quality video containing haloing, moderate noise, or compression artifacts.
- Artemis Aliased & Moire v10 – Upscale video with haloing or moire patterns. Aliasing is common in computer-generated (CG) content or from line-skipping cameras.
- Dione Interlaced DV v3 – Deinterlace and upscale interlaced videos. Made for interlaced videos such as DV, DVCPRO, DVCAM, 720i, or 1080i sources.
- Dione Interlaced TV v4 – Deinterlace and upscale interlaced TV source. Made for videos captured from analog TV 480i/576i captured from analog TV/camcorder/camera, or DVDs.
- Dione Interlaced Robust v4 – Deinterlace and upscale interlaced videos. Try this when Dione DV/TV fails. For videos with interlaced frames like 480i, 576i, 720i, 1080i.
- Dione Interlaced Dehalo v2 – Deinterlace and upscale interlaced TV source that contains haloing. Made for videos captured from analog TV 480i/576i captured from analog TV/camcorder/camera, or DVDs.
- Dione Interlaced Robust Dehalo v2 – Deinterlace and upscale interlaced TV source that contains haloing. Try this when Dione DV/TV fails. For videos with interlaced frames like 480i, 576i, 720i, 1080i.
- Proteus Fine Tune v3 – Upscale video with multiple parameters for fine-tuning.
- Chronos SloMo v2 – An FPS conversion model that allows you to change the framerate and apply slow motion effects.
- Chronos Fast v3 – An FPS conversion model that allows you to change the framerate and apply slow motion effects. Input video has a fast frame rate.
I’ll explain a couple of the terms for the upscaling or enhancing models that may sound confusing.
Progressive video sources display even and odd scan lines — at the same time — to make up the entire video frame. On the other hand, interlaced video sources display even and odd scan lines separately — one after the other — to make up the entire video frame.
The p in 1080p stands for progressive. NTSC analog television signals are broadcasted in 480i (interlaced).
Performance
I used my iMac 6-core i5, 32 GB RAM, Radeon Pro 570X 4 GB GPU, to test the software.
When I initially reviewed Topaz Video Enhance AI, it was not optimized for Mac.
It took about 5 hours to enlarge and process a 10-second video at 1080p (60 fps) video to 4K. I just ended up letting the upsizing complete overnight.
The reason Topaz Video Enhance AI was slow on Mac is it required an Nvidia GPU which Macs don’t typically have but is readily available on Windows. The software relied on the integrated GPU and eventually the CPU to render the videos on Mac.
The recommended GPU is Nvidia 1080 GTX 8GB or better. You’ll need to make sure you have the latest Nvidia driver installed.
You can view the system requirements here. But to cut the chase, Topaz Video Enhance will require an Nvidia or AMD GPU with a modern CPU. The new M1 chip from Apple is supported.
It actually took me over 24 hours, with my iMac and unsupported AMD GPU to enlarge a 61-second video from 1080p to 4K with version 1.1.1. But this was the past.
Then Video Enhance AI just got better.
With the latest updates to Video Enhance AI v2.2.0 in 2021, Topaz Labs made significant improvements to the software, especially to rendering times. Even better, it now supports AMD GPUs on Mac.
What used to take me hours to upsize a video with Video Enhance AI on my iMac, I can now render them in a few minutes. That’s progress.
If you have a 60-second video at 30 fps, and Video Enhance AI processes at 30 sec/frame, then your video will take 15 hours to enlarge. If the video was recorded at 60 fps, then it would take 30 hours. These are only estimates and can vary widely. Remember, this is on my iMac and not a Windows machine. For comparison and according to Topaz Labs, on a Windows machine with Nvidia GTX 1080, it usually takes 3-4 seconds to process each frame from HD to 8K. Video Enhance AI is far more superior on Windows than macOS.
When Video Enhance AI used to be slow for Mac. Now it’s faster.
I also noticed a very slight color shift from my 1080p to 4K video. You should be able to notice it in the video. It’s not a big deal since the color isn’t super off but you can always adjust it in post which most videographers do anyways.
Price
Topaz Video Enhance AI used to cost $299.99 and included one year of free updates. Now the price is $199.99
An additional 12-month upgrade costs $199.99.
Follow this link and use discount code aperlust for an additional 15% off.
You can try a 30-day, fully operational Video Enhance AI for free without a credit card
Verdict
Topaz Video Enhance AI works. And now it’s faster on Mac. Really fast. Before I could only recommend it for Windows, but it’s now good to go for macOS with AMD and M1 GPUs.
If you’re working on a video project that requires video enlarging with Windows or macOS, then this product is a great fit. It’s the best video ai upscaling software on the market.
The Topaz Video Enhance AI for Mac was only released on March 5, 2020. I expect them to resolve this Nvidia-GPU-only issue since it will decrease revenue. Topaz Labs actually resolved this statement I made in 2020.
However, enlarging videos is a CPU/GPU intensive task, regardless of the operating system or GPU compatibility. Therefore, a mid to high-performance computer will be required. Remember, the software is working pixel by pixel, frame by frame. Furthermore, upsizing video from SD to HD will be faster than HD to 4K.
One license of Topaz Video Enhance AI can be used on both a Mac and Windows computer.
If you end up downloading the software with the 30-day free trial, please let me know its performance in the comments below. It’ll help other consumers.
If you’re looking for an image enlarger, then you should check out Gigapixel AI. It works well on both Mac and Windows. You can read the Gigapizel review here.
Let me know if you still have any questions from my Topaz Video Enhance AI review in the comments below.
Frequently Asked Questions
What is Topaz Video Enhance AI?
Topaz Video Enhance AI is a video enlarging software developed by Topaz Labs. Its was first released in March 2020 and currently version 2 is the latest. The software can improve video quality in standard definition videos and upscale them to 8K. Video Enhance AI is available on Windows and Mac, and requires a GPU.
Is Topaz Video Enhance AI good?
Yes, the software is great at upscaling videos to HD or UHD. Video Enhance AI is probably the best consumer software to enlarge videos from standard definition like 480i to 4K or 8K. It can also upscale interlaced videos that were originally on TV. You can also try the software with a 30-day free trial.
How does Topaz Video Enhance AI work?
Topaz Labs used artificial intelligence (machine learning) in Topaz Video Enhance AI to determine detail and noise in videos before upscaling them. This allows the software to upscale only the required data needed and not increase noise or reduce detail.
How to use Topaz Video Enhance AI
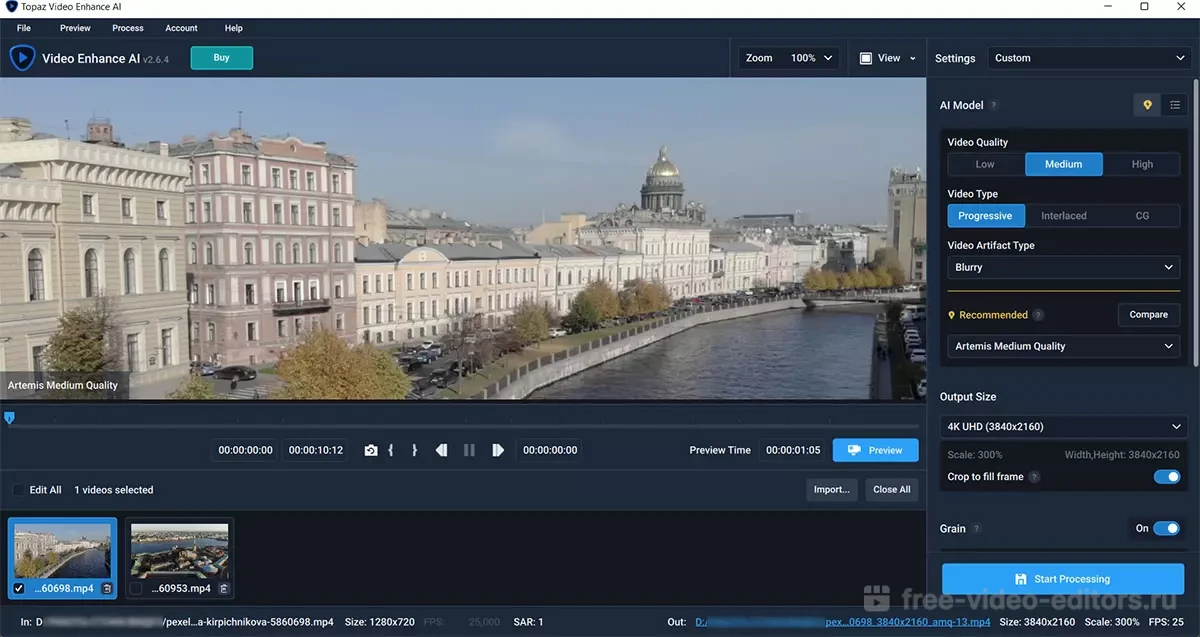
1. Import video(s). Import video by dragging them from the folder into Video Enhance AI.
2. Crop start and endpoints of footage if needed. Use the curly brackets icons to crop the start and endpoints of the video.
3. Select one of the rendering AI models for upsizing. You can either manually select the AI processing model or allow Topaz Enhance AI to recommend the best model
4. Choose output dimensions – usually will be UHD. Select the preferred final size of the video up to 8K.
5. Choose output format. Select the desired final file type – usually will be mpeg4 (.mp4).
6. Click on ‘start processing’ to begin upsizing. The software will take several minutes or hours to finish enlarging the video.
7. Enlarged video completed. The enlarged video will be located in the same source folder.
I’m the founder of Aperlust. I enjoy web development and SEO and am into snowboarding and linguistics. In my spare time, you can find me destroying my opponents in chess across the globe.
21 Comments
Had the same experience on my iMac 27 Core i7 with 32 gig ram. Upsized a video form the 1990s shot with a Hi 8 camera, so it was approx 640×480 to 1080p. Took forever but there is some noticeable increase in sharpness, if not resolution. I believe it is more of a sharpening algorithm than a resolution fix. Will experiment further. BTW my fan ran constantly, which I have never even heard on this machine before.
so far on my macbook pro, it is running wicked slow. I took a 2 hour movie that is a favorite of mine (turner bringing up baby colorized) and streamed it into FCP. I then exported it as an MP4, then took this output into topaz video enhance ai as LQ video to 4K. estimated rendering time was 2.5 days. I am on the second day and it is running a bit behind that estimate. My guess is this will take a lot longer. The system fan is running like a bat out of hell. Thank god I have an external cooling fan to help.
I know they say they are going to improve mac support, but guessing they will make that fix not free for us. Instead since we need to purchase a yearly license to receive upgrades, don’t you think they will only upgrade after each license period? LOL
Trust me, it isn’t any better on a PC running Windows 10 Pro. i7 3.5 ghz processor. For a short 15 second video, I gave up after letting it process for over 6 hours. At that point it wasn’t even 1/4 of the way finished. Not ready for consumer use as far as I’m concerned.
Tried it out with version 1.3.8.
A 21 second video from 1080p to 2160p took around 35 minutes.
Configuration:
CPU: i9-9900 @ 3.6 GHz
Memory: 64 GB.
Video card: NVidia Quadro P4000
Windows 10
Obviously if i convert some (4mins) music video from 480p to 1080p, it takes 3-5hrs – 8GBRAM, intel i5/GTX 1050.
Folks…can’t you even read? This thing was designed to be processed by GPUs…your CPUs don’t matter.
I used a Nvidia GPU (1060, 6GB – not the best but it will do for testing) on a Windows 10 machine. I get 5 sec/frame. I tested with converting a 10sec clip from 1080p to 4K at 60fps. Took about 55mins. The match adds up – 10 * 60 * 5 / 60 = 50 mins. The converted video looks awesome. I also tried Gigapixel. I am impressed with the result. However, I must say that for the amount of processing time, converting a picture is totally acceptable but video conversion just take too long. My 10 secs video is equivalent to 600 pictures. However, that is no fault of the product – AI just take that long. If you want shorter processing time, then you should try a different product (FCP, Premiere). You definitely get faster conversion but the quality also suffers. I wanted to upscale my old videos (mostly 1 hr) to 4K but I don’t see how that can happen with current processing time – will take at least 12.5 days for 1 video not too mention the constant fan spinning (was worried that my machine will blow because of the heat).
Build a Windows 10 gaming PC and you’ll be ready to begin. So I did that with a GTX 1080 Ti. It’s way faster than CPU only, but after reading that the new RTX 3080 is 2.5 times faster, I’m trying to get one of those. The queue to get one is so long that maybe sometime next year I’ll be able to get one. As I’m not a gamer, I just have it hooked to a standard monitor and access the PC remotely via VNC. I had to buy a small window air conditioner and run the compressor on low, with the thermostat on max (so it doesn’t shut off), to deliver a continuous 18 deg C air stream to the GPU. The AC just sits on my table, blowing into the GPU, no venting to the outside. The GPU now runs 55 to 58 deg C. It was going over 90 deg C and shutting down the PC… believe it or not, this is a cheaper solution than watercooling. If I get serious about upscaling, I envision 12 or more PCs inside a small room with a 1.5 ton split AC unit keeping it about 20 deg C inside.
I’ve had it for 3 weeks now and finally got one project done- upscaling a DVD 480i letterboxed movie (one unlikely to come out on Bluray or webstreaming). The movie really wasn’t watchable on DVD with so little resolution and interlaced. After deinterlacing with QTGMC, I had a watchable movie, but not enough resolution.
I wanted control of the x264 encoder, plus I needed to do cleanup on this video with Photoshop (dirt and hair), so I have Topaz outputting to .tiff images.
Topaz VEAI does add detail magically, but no where as much as they claim. I was able to get 706x346p to 1116x576p. I tried 720p too but it looked poor. So I got about 166% more resolution using Topaz. I tried all the models, the Gaia-CG model did best, but there’s no CGI in the movie.
I’m experimenting with encoding to a higher than the final resolution and later downscaling to see if that improves quality any. The theory being that giving it a higher goal will make it work harder.
I have several low and high quality 1280x720p videos I want to see if I can make 1920x1080p. 150% bigger. Most are 50 to 60 FPS (and need to be for the fast action content shown). I’m doing tests with 3 minute segments to find the best models and settings. I’m trying to see if there is any pattern to determine which model (and settings) to use based on the video content.
I’m waiting for the folks on Doom9 and Videohelp to start testing this software. I’d have thought they’d be all over it even with only a 150% increase in detail, but not yet. Maybe I need to start some threads.
I am using Topaz VEAI now for 2 weeks and i got a RTX 3090 on a win10 pc with I-10900kf and 32gb 4266 ram.
For a 1h 1080p 30fps video it still takes 25-30hours rendering it to 4K. Meanwhile the pc takes constand 680 watts and i can heat the house with the hot airstream coming out of the case for 25-30h … and even more hours.
But the render results are not just in upscaling amazing. If you just keep the resolution and render a video it enhances it very viseable. Upscvaling results from old SD to 1080p or 4k (like marriage/family dvds or so) will blow you away.
Before the 3090 beast i got the 3070. And i fear now, topaz has not yet fully implemeted that RTX 30×0 cards yet.
I even used the nvidia studio drivers (not for gamers)
Because the 3090 is in topaz only 20-30% faster than the 3070.
Topas 2.2.0 – MacBook Pro (15-inch, 2017) – Big Sur 11.3.1 – Radeon Pro 560 4 GB 16 GB RAM
SD (DV) – HD (1080P) 0,5 – 0,9 sek /frame
0.55 sec /frame with my amd rx 5700 with artemis high quality v12 1080p>2160p. Obviously your overpriced low-end apple hardware will be MUCH slower.
Someone is bitter and doesn’t understand variables. ��
I don’t know why some people are getting such awful performance with this software. I downloaded the trial version and I’m getting really good performance with various different Mac and Windows systems.
I have a newer PC running Windows 10 and a Ryzen 5000 series CPU with a pair of RTX 3000 series GPUs. The video files are stored on a SSD. Currently I’m getting 0.8 to 0.12 seconds per frame converting a low resolution video to 1080p. I’m trying another lower resolution video to a 400% upscale and getting 0.22 to 0.25 seconds per frame. Maybe its user error on their part, maybe they are using a slow mechanical hard drive for their video files, or maybe they think a 8-10+ year old system is much more powerful than it really is.
My only complaint of the software is it can’t take advantage of multiple GPUs and doesn’t seem to do a good job of taking advantage of newer GPUs such as the RTX 3000 series. My GPU usage is rather low when upscaling video and improving its quality/details.
I’m building a video with a mix of 1080p and 4k clips. Should I be working in a 4k timeline and upscale the 1080 to 4k individually or work in a 1080 timeline and convert the final project to 4k?
I’m not exactly sure of your question. The timelines in VEAI provide the original resolution with the option of viewing upscaled previews in the timeline at the same time. Are you referring to the timeline in a video editor?
Unfortunately not usable software. The processing time is way too long, really unacceptable. Converting 480p video to 1080p, will take you anywhere from 4 to 9 days, depending on the mode you choose. Thats just 1 video, its only a 2gb size vid I’m converting. And this thing destroys your computers fan.
I was just about to purchase this software until I read that it’s a killer running on an iMac 27 with extremely long render times (compared to a Windows PC). GPU and CPU and fans running at full speed for many hours. Just sound like you’ll end up spending more money to fix or repair your iMac with this much stress on the machine.
If you plan on upscaling anything of any length i.e. a film, then the process is estimated to take 7.5 days @ 29.97 fps for a 2 hour movie. Even a low resolution dvd upscale to 1080P @ 1 hour 20 minutes length (with interlacing so doubles the frame rate) is going to take 1 day 22 hours on my GTX1080 machine which I really don’t plan on leaving it on overnight for 8 days AND not being able to do anything else with my pc other than web browse. Gaming is out of the question while this is ongoing so it’s not practical even if it does improve the picture quality. Compare this to say Xmedia Recode for example, yes the results aren’t as good but the same film de-interlaced and upscaled takes 29 minutes…. So unless the processing time comes down dramatically it’s impractical.
Wow! It must a wonderful experience being as important and superior as you believe yourself to be. Why anyone that is not running the latest GPU or CPU is a full 8-10 years behind you. There’s nothing in between there at all? Wow that’s quite a difference between you and the next person down on the list. I’m running a and getting decent rates but I have a friend running a 3000 series processor and 2000 series GPU with an extremely fast WD black 850 NVME getting results as poor as some mentioned here. I had not even considered it was due to him running an antique piece of crap. it’s always a pleasure to get the facts from a self-absorbed know it all like yourself. Thanks for being there as I would have continued to be stumped by the difference in the performance of out 2 machines if not for your valuable insight and knowledge.
Not sure what you are on about Tim as I was simply pointing out that with the minimum GTX1080 processing times for a film length movie are still incredibly long with an example and comparison. Honestly an Nvme hard drive is going to have very little impact. It’s all about the processing either CPU or GPU depending which AI model you use. Unless you have some uber pc for most people the time taken to upscale probably isn’t a viable option.
I found a way to let Topaz run on my notebook so that the fast-driven fan doesn’t bother me. I reduce the processor output with “Battle Encoder Shirasé” for Topaz to 30%. Instead of shutdown, I use the Power Save Mode. This means that the project continues automatically after leaving the Power Save Mode.
Leave a Reply Cancel reply
This site uses Akismet to reduce spam. Learn how your comment data is processed.
7 инструментов на основе нейросетей для улучшения качества видео

Эта программа предназначена для обработки видео в локальном режиме на компьютере. Topaz Video AI пригодится для повышения разрешения до 8K, удаления шумов и деинтерлейсинга. Приложение справляется как с улучшением старых записей с портативных камер, так и с мультфильмами.
С помощью нейросетей Topaz Video AI также может достраивать новые кадры для повышения плавности или создания эффекта замедления. Кроме того, программу получится использовать для стабилизации дрожания, если видео снято без штатива.
Topaz Video AI способна увеличивать насыщенность и контрастность цветов в видео, а также раскрашивать монохромные кадры записей. Также система умеет повышать резкость границ объектов в видеоклипах, что влияет на общую чёткость изображения.
Приложение подходит как профессиональным видеографам, так и любителям. Topaz Video AI можно протестировать бесплатно. В пробной версии к сохранённому файлу добавляется водяной знак. Стоимость программы — 249 долларов.
2. PikaVue
- Платформы: веб.
Онлайн‑приложение с простым интерфейсом умеет повышать разрешение роликов до 16К, а также удалять шумы и восстанавливать детали в кадре. Старым записям можно добавить «сочности» и преобразовать в более чёткие. Качество результата, конечно, зависит от состояния исходного материала.
Pikavue — платный сервис, но в нём нет тарифных планов. Пользователю после регистрации вручают 300 монет, которые можно потратить на улучшение 300 секунд видео. Дополнительные лимиты необходимо докупать. Альтернативный вариант — заводить новые аккаунты, если у вас нет возможности оплачивать обработку.
3. Video2X
- Платформы: Windows.
Бесплатная программа с открытым исходным кодом для масштабирования видео. Использует нейросети для увеличения разрешения до 4K. Video 2X также хорошо справляется с улучшением цвета и резкости кадров. Поддерживает широкий спектр видеоформатов, что позволяет использовать его для больших архивов без дополнительного перекодирования.
Это не лучший вариант для новичков — графический интерфейс не очень дружелюбный, необходимо разбираться в нюансах обработки видеофайлов. Но если у вас есть необходимые знания и навыки, то можно смело выбрать Video 2X и сэкономить деньги. Программа доступна для загрузки в готовой версии, но для опытных пользователей разработчики также предлагают исходный код, который можно скомпилировать самостоятельно.
4. Aimages
- Платформы: веб.
Aimages — это онлайн‑сервис, который предлагает инструменты для повышения разрешения видео до 4К, устранения размытия, добавления плавности, восстановления цветов и деинтерлейсинга.
Система подойдёт для новичков: для обработки видео достаточно загрузить файл, указать нужные фильтры, выбрать кодек и формат ролика, а затем запустить процесс. В Aimages есть бесплатный режим для тестирования, а стоимость подписки с полным набором возможностей начинается от 11 евро в месяц.
5. AVCLabs Video Enhancer AI
- Платформы: macOS, Windows.
AVCLabs Video Enhancer AI по своим возможностям похожа на Topaz Video AI. Это программа для компьютера, в которой скорость обработки зависит от мощности начинки вашего устройства. Приложение позволяет масштабировать видео до 8К, повышать чёткость картинки, проводить деинтерлейсинг, удалять шумы и улучшать качество цветов.
Программа проста в использовании и подойдёт для новичков. Она доступна в бесплатном режиме, но для регулярных экспериментов необходимо купить подписку. Месяц работы стоит 39,95 доллара, один год — 119,95 доллара, а пожизненное неограниченное использование — 240 долларов.
6. Pixop
- Платформы: веб.
Pixop — облачный сервис, предназначенный в большей степени для профессионалов. Но интерфейс достаточно прост, чтобы в нём мог разобраться и новичок. Система предлагает масштабирование и ремастеринг видео с использованием автоматических фильтров.
Инструмент позволяет повысить разрешение видео до 8K, а также проводит шумоподавление, деинтерлейсинг, устранение дрожания и добавление новых кадров для плавности. Pixop подойдёт не только для реставрации, но и для добавления текста, изображений и музыки к роликам. Кроме того, здесь есть инструменты для нарезки коротких записей в социальные сети. Для ускорения работы предусмотрен набор шаблонов.
Pixop интегрируется с большинством популярных программ для видеомонтажа, поэтому сервис без проблем можно использовать в своём рабочем процессе. Объёмных подписок здесь нет, платить нужно за каждую функцию по улучшению видео и за продолжительность видеофрагмента.
7. bigMP4
- Платформы: веб, Windows, macOS.
Этот сервис предлагает повышение разрешения до 8K, раскрашивание видео и увеличение числа кадров для плавности или замедленной съёмки. bigMP4 можно использовать через веб‑интерфейс или как десктопное приложение.
Онлайн‑инструмент очень прост в использовании и лучше всего подойдёт для новичков, которым нужно быстро обработать ролики из домашнего архива или материалы для простого монтажа. Загруженные файлы и результаты обработки автоматически удаляются в течение недели для сохранения конфиденциальности.


Наверняка вы видели в сети видео типа Нью-Йорк 40-ых в цвете и 4K. А когда хотели сделать так же со своими видео из детского сада, выяснилось, что нужны какие-то там нейросети. А я расскажу, как сделать это почти в один клик.
Topaz Video Enhance AI — приложение для Windows и macOS, которое легко помогает произвести апскейл видео до 8K без потери качества, а даже с его улучшением.
Теория
При первом запуске приложения вас ожидает экран с обучением из трёх шагов. По сути, для улучшения видео требуется всего три действия: открыть видео, выбрать желаемые параметры, сохранить видео.
И на самом деле именно так просто всё и происходит. Для примера я скачал вот это видео с YouTube в разрешении 480P, и добавил его в Topaz Video Enhance AI.

На следующем этапе нужно задать параметры для апскейла видео.
В разделе Processing можно выбрать одну из шести нейросетей, которая будет обрабатывать видео. В чём разница между ними, я не буду рассказывать — в приложении всё написано.
Setting отвечает за качество видео на выходе. Можно выбрать разрешение в процентах, ввести свои или выбрать значения — вплоть до 8K.
В разделе Format нужно выбрать формат файла на выходе и путь сохранения.
Дополнительно можно обрезать видео и выбрать видеокарту, с которой будете работать.
После настройки всех параметров остаётся нажать Start Processing, и в выбранной папке через какое-то время появится улучшенная версия видео.
Практика
На практике всё не так радужно, и результат полностью зависит от мощности вашего компьютера. Сделать из видео (длительностью даже в 10 секунд) шедевр в 8K на слабом железе не получится ни при каких условиях.
На своём компьютере с Intel Core i7 и 32 Гб оперативы я так и не смог сделать даже апскейла до 1080p. Процесс шёл либо ооооооооочень медленно, либо не шёл вообще, либо постоянно начинался заново.
Вероятно, если бы я занимался этим не для поста на сайте, а для дела, я бы всё-таки добился результата. Но мне лень, поэтому вот вам пример с сайта разработчика.
Лицензия на Topaz Video Enhance AI стоила на момент написания поста $200, при этом на пробу даётся 30-дневная версия без каких-либо ограничений. Поэтому в первую очередь я рекомендую просто попробовать демку, и понять, надо ли оно вам вообще.
А сказать, работает ли приложение, я не могу. У меня не получилось…
Скачать
Теги:
Обзор
Windows
macOS
Topaz Video Enhance AI
Цитата
Подскажите пожалуйста лучший алгоритм для обработки старых 240-480р видео.
Если видео с чересстрочной развёрткой, записанное с аналоговых видеовходов (телевизоров, видеокамер, dvd и т.д.) в разрешениях 480i, 576i и менее.
Тогда наверно подойдёт модель Dione Interlaced TV v3
Если видео с чересстрочной развёрткой и записанное в цифре, в хорошем качестве 480i, 576i, 720i, 1028i, тогда лучше использовать модель Dione Interlaced Robust v3.
Примеры видео, с исходным разрешение 544×576, 720×576 увеличенных на 200% через эту модель: #1, #2, #3, #4, #5, #6, #7 (учтите, что Youtube ухудшает качество, исходик был немного лучше)
Устраняется не только чересстрочная развёртка, а так же зернистость и артефакты. Для придания естественности, надо экспериментировать с параметрами Amount и Size, в закладке Grain Setting. В моём случае использовались дефолтные параметры настройки Amount 1.8 и Size 1.0.
Для современных цифровых видео (без чересстрочной развёртки), неплохие результаты даёт модель Gaia High Quality
Примеры увеличения DVB-S mpeg2 видео в разрешениях 544×576 — 720×576, с помощью этой модели, в старой версии Topaz Video Enchance AI: #1, #2, #3, #4
Кое где можно заметить эффект гребёнки, так как чересстрочная развёртка не устраняется в этой модели, а исходники с чересстрочной развёрткой. Но старые видео, записанные с цифры — подойдут для этой модели, если видео не имеет динамических сцен и в основном всё снято крупным планом.
Многие хвалят модель Artemis, но с обработкой MPEG2 DVB-S видеофайлов, записанных с спутника, у меня получались только плачевные результаты.
Интересно услышать, какие вы используете настройки.
![]()
Topaz Video Enhance AI
5.0
Оценок: 4
(Ваша: )
Скачать бесплатно![]()
Для Windows 11, 10, 8, 7
Обзор Topaz Video Enhance AI
Topaz Video Enhance AI – удобная программа для автоматического улучшения качества видео с помощью функций на основе искусственного интеллекта. Она позволяет быстро увеличить разрешение кадра, убрать цифровые шумы, сделать эффект «замедленной съемки» и многое другое. Topaz Video Enhance AI 2.6.4 скачать бесплатно на русском языке можно по проверенной ссылке с нашего сайта.
Редактор подходит новичкам, так как выполняет обработку в автоматическом режиме. Пользователь может выбрать готовые настройки из списка. Софт содержит пресеты для:
- увеличения разрешения кадра до 4K;
- удаления шумов и помех в старых видео;
- создания эффекта «замедленной съемки» за счет установки частоты кадров на 60.
Самостоятельно пользователь может указать желаемое разрешение, FPS, тип видеозаписи, добавить зернистость. За счет ручных настроек можно:
- перевести ролики с разрешением 480p, 720p и 1080p в клипы 4K или 8K без снижения качества и потери детализации;
- приблизить определенный участок видео без добавления шумов и размытия;
- удалить полосы в старых видеоклипах, оцифрованных с кассеты.
Обратите внимание, что официальная версия программы представлена только на английском языке. Вы сможете загрузить переведенную RePack-версию с торрента или скачать отдельно русификатор. Однако файлы из непроверенных источников могут подвергнуть ваше устройство опасности. Многие torrent-сервисы не проверяют опубликованные материалы, и они могут содержать вирусы, трояны и другие вредоносные объекты.
Topaz Video Enhance подходит только для улучшения качества видеоролика и удаления любых цифровых
недочетов: шумов, артефактов сжатия и т.д. В софте нет инструментов для обрезки клипа, объединения
нескольких файлов, наложения музыки. Если вы ищете редактор, который позволит обработать картинку
и сделать красивый ролик, воспользуйтесь приложением ВидеоМОНТАЖ.
Как улучшить качество видео в Topaz Video Enhance AI
Особенности Topaz Video Enhance
Автоматическая обработка видео
Редактирование выполняет обученная нейронная сеть. Она убирает недочеты без участия пользователя и восстанавливает любые детали в кадре. Например, если в ролике было много шумов на лице человека, то ИИ самостоятельно сгладит кожу, подберет подходящую текстуру на замену помехам и применит резкость к носу, губам и т.д.
Изменение частоты кадров
Данный параметр влияет на плавность картинки и скорость перехода от одной сцены к другой. За счет настройки FPS вы сможете создать ролик с эффектом «slow motion» или ускорить видео. Софт автоматически генерирует дополнительные схожие кадры и позволяет увеличить значение частоты с 24 до 60.
![]()
Удаление шумов
Topaz Video Enhance AI позволяет устранить цифровые шумы, которые могли возникнуть в роликах, снятых в ночное время, записанных на телефон и т.д.
Отключение аудио
В редакторе можно заглушить исходный звук. Благодаря этой опции при изменении скорости видеоряда вы не получите видео- и аудиодорожки, которые рассинхронизированы.
Предварительный просмотр результата
Перед сохранением работы вы сможете воспроизвести видео во встроенном плеере и оценить итог преобразования. Рядом с обработанным клипом будет отображаться оригинал, чтобы пользователь мог детально сравнить две картинки.
Поддержка популярных форматов
Вы сможете импортировать видеоролики MP4, AVI, MKV, FLV и другие. Экспортировать файлы можно MP4 и MOV или в качестве последовательности изображений JPG, PNG, TIFF.
Пакетная обработка
В редактор можно загрузить несколько файлов одновременно и установить для них одинаковые параметры редактирования. Рендеринг обычно занимает продолжительное время, поэтому вы сможете оставить ПК включенным и позволить софту преобразовать два и более видео без вашего участия.
Загрузка дополнительных предустановок
Если предложенных профилей улучшения видео недостаточно, то вы сможете импортировать пресеты с ПК. Файлы можно найти на официальном сайте или в сообществах пользователей.
Выбор оборудования для рендеринга
Для преобразования роликов можно использовать как графический процессор, так и CPU. Также вы сможете регулировать максимальный процент используемой памяти, чтобы не нагружать видеокарту.
Плюсы и минусы Топаз Видео Энхансер
✔️ Плюсы:
- изменение интерфейса ПО: указание подходящей темы, цвета фона и т.д.;
- установка пользовательских горячих клавиш;
- инструкции внутри софта и подсказки к каждой опции;
- скачать Topaz Video Enhancer можно бесплатно с ограничениями.
❌ Минусы:
- для скачивания пробной версии требуется указать адрес электронной почты;
- в демонстрационном пакете поверх видео накладывается водяной знак;
- для работы без сбоев требуется мощный ПК с 16 ГБ ОЗУ и 6 ГБ видеопамяти.
Системные требования Topaz Video Enhance
Лицензия: условно-бесплатная
Версия: v2.6.4
ОС: Windows 11, 10 / Mac OS
Русский язык: нет
Размер дистрибутива: 221 MB
Скачать Topaz Video Enhance бесплатно
Для Windows 11, 10, 8, 7
Рекомендуем
Простой аналог Topaz Video Enhance AI — ВидеоМОНТАЖ
![]()
Topaz Video Enhance AI
русский интерфейс
каталог титров, мелодий, стикеров
объединение и обрезка роликов
замена фона и стабилизация видео
совместимость с Windows 8, 7, Vista, XP
Use this guide to import, upscale, and enhance your first video.
Import Your File
There are two ways to bring files into Topaz Video AI.
- Open the app and select Browse.
- Drag-and-drop files directly into the app.
Import an Image Sequence
- Make sure all frames are in one folder.
- Check that frames in consecutive order.
- At least 5 frames must be in the sequence.
Get the result you want out of the app by using the settings in the sidebar.
The «Video-In» menu will display the input file’s resolution, aspect ratio, and frame rate.
The «Video Out» menu allows you to alter the output file’s resolution and frame rate.
Filters
Each Topaz Video AI filter has been trained for a specific situation, such as deinterlacing, adjusting the frame rate, or creating a slow-motion output.
Use the toggle switch to enable the filter(s) you wish to use. We recommend using one to two per file.
Learn more about Topaz Video AI filters.
The Output Settings menu will allow you to select the export Encoder, Container, and audio settings.
Learn more about Topaz Video AI’s Encoders and Containers.
Preview Your File
To generate a preview, select the desired resolution, filters, and output settings and press the purple Preview button.
Select up to 15 seconds to preview. Adjust the view and zoom to inspect the results.
You can generate as many previews as you need. Progress for each preview will be displayed in the Output library.
- A purple progress bar and an ETA will appear for each file.
- A green check mark indicates that the preview is complete.
To view the Preview using your default video player, double-click on the preview or use the triple dot menu to open an external player.
Export Your File
Once you have found the best settings for your file and you have inspected the preview, you are ready to Export.
By default, the exported file will be saved to the input file’s location. You can select the carrot next to Export to choose Export As to change the save location.
- Save As is not available when batch exporting.
- You can differentiate between the previews and exports by taking a look at the icon on the left side of the Output library. P for Preview and E for Export.
What’s Next?
Congratulations on improving your first video! Learn how to use Topaz Video AI filters, encoders, and more!
![]()
Features
![]()
User Guides
-
-
March 4 2021, 21:57
- ИИ
- Кино
- Cancel
Решил тут поиграться с увеличением разрешения. Взял нашего Маугли, т.к. оказывается его нормальный ремастеринг не делали.
Увеличивал покадрово до 4К, т.е. на 400% с помощью алгоритма Артемида версии 11. Он именно для таких материалов предназначен. Скорость 1,5 кад/сек.
Забавно смотреть за происходящим, т.к. ты видишь как строиться кадр и что и как перемещается. Интересно.
Параллельно можно работать, но комп дико греется.
Отработав первый блок VOB’а с ДВД пока остановился (40 тысяч кадров, 326 гигабайт).
Вторым шагом — прогоняю через Topaz DeNoise AI, чтобы убрать шум. Пока сделал 50 секунд.
4К уменьшил до FullHD, чтобы скрасть недостатки сильного увеличения.
Результат можете глянуть:
Оригинал DVD 720х576 https://disk.yandex.ru/d/W71alDwaF2uZCg
И увеличение до FullHD через 4К, первые 50 секунд без звука https://disk.yandex.ru/i/B5mbNL4lt6e9bw