КаталогПрайс-лист
Например: ГНСС, тахеометр, нивелир, теодолит, дальномер, штатив, рейка, рулетка
0
Инструкции
Тахеометры SOKKIA
- Тахеометры Sokkia серии iM (PDF, 10 Mb) Модели iM-102, iM-102L, iM-103, iM-105, iM-105L, iM-52, iM-55)
- Тахеометры Sokkia серии CX (PDF, 12.1 Mb) Модели CX-102, CX-102L, CX-105, CX-105L, CX-103, CX-106
- Тахеометры Sokkia серии CX-LN (PDF, 14.7 Mb) Модели CX-102 LN, CX-102 LNL, CX-105 LN, CX-105 LNL
- Тахеометры Sokkia серии FX (PDF, 7.7 Mb) Модели FX-101, FX-102, FX-105
- Краткое справочное руководство FX – Functional X-ellence Station (PDF, 2.8 Mb) Модели FX-101, FX-102, FX-105
- Тахеометры Sokkia серии DX (PDF, 2.5 Mb) Модели DX-101AC, DX-103AC, DX-105AC
- Тахеометры Sokkia серии PowerSet (PDF, 15.9 Mb) Модели SET1000, SET2000, SET3000, SET4000, SET400S
- Тахеометры Sokkia SET4110R (PDF, 1.1 Mb) Модель SET4110R
- Тахеометры Sokkia серии SETx00 (PDF, 6.16 Mb) Модели SET300, SET300s, SET500, SET500s, SET600, SET600s
- Тахеометры Sokkia серии SET10 (PDF, 9.0 Mb) Модели SET210, SET310, SET310S, SET510, SET510S, SET610, SET610S
- Тахеометры Sokkia серии SET30R (PDF, 7.5 Mb) Модели SET230R, SET330R, SET530R, SET530RS, SET630R
- Тахеометры Sokkia серии SET30RK (PDF, 11.6 Mb) Модели SET230RK, SET230RK3, SET330RK, SET330RK3, SET530RK, SET530RK3, SET630RK
- Тахеометры Sokkia серии SET50RX (PDF, 12.7 Mb) Модели SET250X, SET250RX, SET350X, SET350RX, SET550X, SET550RX, SET650X, SET650RX
- Тахеометры Sokkia серии SETX (PDF, 4.5 Mb) Модели SET1X, SET2X, SET3X, SET5X
Тахеометры TOPCON
- Тахеометры Topcon серии GM (PDF, 3 Mb) Модели GM-102, GM-105, GM-52, GM-55
- Тахеометры Topcon серии ES (PDF, 12.5 Mb) Модели ES-102L, ES-102, ES-103, ES-105L, ES-105
- Тахеометры Topcon серии ES-50 (PDF, 5.38 Mb) Модели ES-52, ES-52L, ES-55, ES-55L
- Тахеометры Topcon серии OS (PDF, 7.1 Mb) Модели OS-101L, OS-103L, OS-105L
- Тахеометры Topcon серии DS (PDF, 2.5 Mb) Модели DS-101, DS-103, DS-105
- Тахеометры Topcon серии IS-200 (PDF, 11.3 Mb) Модели IS-201, IS-203, IS-205
- Тахеометры Topcon серии IS-300 (PDF, 16.8 Mb) Модели IS-301, IS-303, IS-305
- Тахеометры Topcon серии GPT-3000 (PDF, 2.35 Mb) Модели GPT-3002, GPT-3003, GPT-3005, GPT-3007
- Тахеометры Topcon серии GPT-3100N (PDF, 2.38 Mb) Модели GPT-3102N, GPT-3103N, GPT-3105N, GPT-3107N
- Тахеометры Topcon серии GPT-7000 (PDF, 4.5 Mb) Модели GPT-7001, GPT-7002, GPT-7003, GPT-7005
- Тахеометры Topcon серии GPT-8200A (PDF, 3.65 Mb) Модели GPT-8201A, GPT-8202A, GPT-8203A, GPT-8203A
- Тахеометры Topcon серии GTS-100N (PDF, 2.2 Mb) Модели GTS-102N, GTS-105N
- Тахеометры Topcon серии GTS-230 (PDF, 3.5 Mb) Модели GTS-233, GTS-235, GTS-236, GTS-239
- Тахеометры Topcon серии GTS-230N (PDF, 1.5 Mb) Модели GTS-233N, GTS-235N, GTS-236N, GTS-239N
- Тахеометры Topcon серии GTS-720 (PDF, 2.1 Mb) Модели GTS-721, GTS-722, GTS-723, GTS-725
- Тахеометры Topcon серий GTS-750, GPT-7500 (PDF, 3.25 Mb) Модели GTS-751, GTS-753, GTS-755, GPT-7501, GPT-7503, GPT-7505
- Тахеометры Topcon серий GTS-900A, GPT-9000A (PDF, 4.65 Mb)
Нивелиры SOKKIA
- Оптические нивелиры Sokkia B20/B30/B40 (PDF, 0.8 Mb) Модели B20, B30-35, B40-35
- Оптические нивелиры Sokkia C300/310/320/330 (PDF, 2.35 Mb) Модели C300, C310, C320, C330
- Электронный нивелир Sokkia SDL50 (PDF, 2 Mb) Модель SDL50
- Электронный нивелир Sokkia SDL1X (PDF, 2.5 Mb) Модели SDL1X Standard, SDL1X Advanced
Полевые контроллеры TOPCON
- Полевой контроллер Topcon FC-200 (PDF, 0.6 Mb)
- Полевой контроллер Topcon FC-336 (PDF, 1.1 Mb)
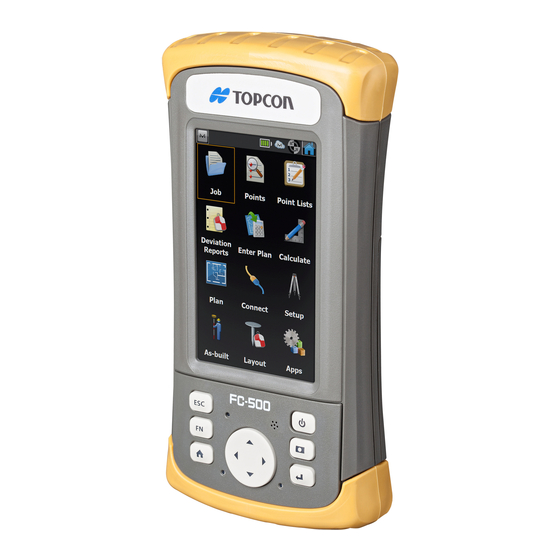
- Полевой контроллер Topcon FC-500 (PDF, 2.1 Mb)
Полевые контроллеры SOKKIA
- Полевой контроллер Sokkia SHC336 (PDF, 1.1 Mb)
- Полевой контроллер Sokkia SHC-5000 (PDF, 15.6 Mb)
- Полевой контроллер Sokkia T-18 (PDF, 7.6 Mb)
- Полевой контроллер Sokkia Archer2 (PDF, 2.41 Mb)
ГНСС приемники SOKKIA
- Спутниковые приемники Sokkia GRX3 (PDF, 5.98 Mb)
- Спутниковые приемники Sokkia GRX2 (PDF, 3 Mb)
- Спутниковые приемники Sokkia GRX1 (PDF, 3.75 Mb)
- Спутниковые приемники Sokkia GSX2 (PDF, 1.5 Mb)
- Спутниковые приемники Sokkia GCX3 (PDF, 35.5 Mb)
- Выполнение RTK съемки приемниками GRX2 с GSM модемами (PDF, 1.1 Mb)
- Выполнение RTK съемки приемниками GRX2 с УВЧ модемами (PDF, 1.2 Mb)
- Подготовка приёмника Sokkia GRX1 (2) — Topcon HiPer II (V) для совместной работы с внешним радиомодемом Satelline Easy Pro 35W (PDF, 0.2 Mb)
- Настройка проекта съемки для GRX2 с внешним радиомодемом (PDF, 1.2 Mb)
- Создание проекта для выполнения RTK съемки ГНСС приемниками GRX2 (PDF, 2.2 Mb)
- Создание проекта MAGNET Field и выполнение съемки точек в режиме RTK ГНСС от базовых станций ГСИ (PDF, 2.4 Mb)
ГНСС приемники TOPCON
- Спутниковые приемники Topcon GR-3 (PDF, 2.8 Mb)
- Спутниковые приемники Topcon GR-5 (PDF, 6.65 Mb)
- Спутниковые приемники Topcon GRS-1 (PDF, 2.75 Mb)
- Спутниковые приемники Topcon Hiper (PDF, 0.3 Mb)
- Спутниковые приемники Topcon Hiper SR (PDF, 3.0 Mb)
- Спутниковые приемники Topcon Hiper V (PDF, 1.6 Mb)
- Выполнение RTK съемки приемниками GR-5 с GSM модемами (PDF, 1.2 Mb)
- Выполнение RTK съемки приемниками GR-5 с УВЧ модемами (PDF, 1.2 Mb)
- Руководство по созданию проекта RTK съемки ГНСС (PDF, 2.1 Mb)
- Создание проекта MAGNET Field и выполнение съемки точек в режиме RTK ГНСС от базовых станций ГСИ (PDF, 2.4 Mb)
ГНСС приемники COMNAV
- Руководство пользователя T300 Plus (pdf, 4 MB)
- Подключение к сети Topnet Live в ПО Survey Master GSM модем в контроллере (pdf, 0.7 MB)
- Подключение к сети Topnet Live в ПО Survey Master GSM модем в приемнике (pdf, 0.7 MB)
Программное обеспечние
- Программа PC-CDU (PDF, 3.2 Mb)
- Программа Topcon Tools (PDF, 21.1 Mb)
- Программа Magnet Office Tools Adv. Post processing (PDF, 3.36 Mb)
- Использование лазерного дальномера для определения координат недоступного объекта (PDF, 0.4 Mb)
Заполните поля формы, специалист в течении дня обработает Ваше сообщение и ответит на электронную почту, или перезвонит. Отправляя заявку, Вы соглашаетесь с обработкой собственных персональных данных в соответствии с Политикой конфиденциальности компании.
Имя*:
Телефон или E-mail*:
Сообщение:
Спасибо, Ваше сообщение отправлено!
- Manuals
- Brands
- Topcon Manuals
- Measuring Instruments
- FC-500
- Owner’s manual
-
Bookmarks
Quick Links
Related Manuals for Topcon FC-500
Summary of Contents for Topcon FC-500
-
Page 1
Owner’s Manual… -
Page 2
Microsoft Corporation in the United States and/or other countries. The Bluetooth word mark is owned by the Bluetooth SIG, Inc. ® and any use of such marks by Topcon Positioning Systems, Inc. is under license. Adobe Acrobat and Adobe… -
Page 3
Contents Getting Started The Anatomy of the FC-500 Perform Initial Tasks Home Screen and Windows Start Menu Navigating Around Your FC-500 Hardware Components Keypad Features Display and Touchscreen Power Management LED Activity Indicators Flashlight SD Cards Connector I/O Module Audio Features… -
Page 4
Install the SIM Card Set up the Cell Modem Wireless Safety Maintenance of Your Modem Storage, Maintenance and Recycling Storing the FC-500 and Battery Pack Protecting the Touchscreen Cleaning the FC-500 Recycling the FC-500 and Batteries Warranty and Repair Information… -
Page 5
Getting Started… -
Page 6
Getting Started The FC-500 Handheld Field Controller™ from Topcon Positioning Systems features Bluetooth and Wi-Fi. Standard accessories include a lithium-ion battery pack, AC wall charger, USB micro client sync cable, hand strap, and a capacitive stylus and tether. A camera, GPS/GNSS, and cellular data modem are options. -
Page 7
5 9-pin Serial Port 6 12V DC Jack 7 Connector Protector Perform Initial Tasks When you receive your FC-500, perform the tasks outlined in this section before first use. Review Documentation You can download the FC-500 Handheld Field Controller operator’s manual and quick start guide from www. -
Page 8
Apply a Screen Protector (Optional) The touchscreen is extremely scratch resistant, so a screen protector is not included with the FC-500. If you decide to apply one, refer to the installation instructions included with your screen protector for specific details. -
Page 9
4. Replace the door and tighten the screws. 5. Plug the AC wall power charger that came with the FC-500 into a wall socket. Plug the other end into the DC power jack on the FC-500. The red LED on the keypad blinks when the battery pack is charging. -
Page 10
2. A Microsoft Windows Embedded Handheld screen is ® shown. 3. The Clock and Alarms control panel appears. Adjust the time zone, date and time if necessary and tap OK. FC-500 Handheld Field Controller Owner’s Manual… -
Page 11
The Home screen appears (layout varies by model). 4. Press the power button to suspend the handheld. Charge the battery pack at room temperature (68° F or 20° C) for 4 to 5 hours. While the battery pack is charging, the red LED blinks. When it is fully charged, the red LED is solid. -
Page 12
The content varies based on which model you have and can be customized. It is automatically shown when the FC-500 is turned on. You can get to it from any other screen by pressing and releasing the Home screen button on the keypad. -
Page 13
Navigating Around Your FC-500 Using Gestures and Making Selections The Windows Embedded Handheld operating system ® enhances the ability of the handheld to recognize touch gestures, making it easy to use a finger to navigate. Use of the capacitive stylus is an option. The keypad buttons can also be used. -
Page 14
Updates to the Operating System and Documents Updates to the operating system and technical documents are located on our website at www.TopconTotalCare.com. View System Information for Your FC-500 To view your operating system version number, press the System Info icon on the Home screen or go to Start >… -
Page 15
Hardware Components… -
Page 16
Hardware Components This chapter discusses the FC-500 Handheld Field Controller hardware features and usage. Keypad Features The FC-500 has a keypad with sealed buttons, backlight illumination, and LED indicators. Button Action + Button (Action) Escape Backlight toggle Function Function lock… -
Page 17
Programmable Function The FN-ESC function is programmable. 1. To bring up the Program Buttons control panel, select the Settings icon on the Home screen, and then Personal > Buttons. You can also go to the Start screen by selecting the Windows soft key and then select Settings >… -
Page 18
3. At the bottom of the screen under 2. Assign a program, select the down arrow button to display a list of programs and functions. Select the item you want to reassign to the FN-Esc function. FC-500 Handheld Field Controller Owner’s Manual… -
Page 19
Move the Keypad slider up to brighten the backlight or down to dim it. Dimming the keypad backlight saves battery power when the FC-500 is in use. Note: The keypad backlight turns off when the display backlight dims or the FC-500 is suspended. -
Page 20
Display and Touchscreen The FC-500 has a bright color display and capacitive touchscreen with a diagonal viewing area of 4.3 inches (109 mm). It is easy to view outdoors and is sealed against water and dust. The Windows Embedded Handheld operating ®… -
Page 21
Touchscreen Modes The touchscreen is optimally designed for finger use. The default touchscreen mode can be adjusted to best match your application and environment, especially if you are using a capacitive stylus. To adjust the touchscreen profile, go to the Touch control panel by pressing Start >… -
Page 22
This zooms in on the content. Move the screen around with your finger until you find the information you want. Select the magnifying glass symbol in the upper right corner of the screen to return the view to the regular size. FC-500 Handheld Field Controller Owner’s Manual… -
Page 23
Dimming the Display Automatically The display has a minimum brightness setting that it dims to when the FC-500 is idle for the time interval indicated. The display backlight dims by 50%, so the display is still partially visible. You can adjust the dim time interval (see the previous screen) for battery and/or external power. -
Page 24
You can disable the touchscreen. This is useful when you are running an application and you want to see the screen while avoiding accidental touchscreen activation. The touchscreen can also be disabled for cleaning purposes. FC-500 Handheld Field Controller Owner’s Manual… -
Page 25
The Li-Ion battery pack is charged most efficiently at room temperature (68°F or 20°C). The battery pack will not charge if it is too hot or too cold. CAUTION: The FC-500 is not sealed against water and dust when the battery door is not installed properly. Battery Life Battery life on a full charge is generally up to 20 hours. -
Page 26
Dim the backlight after a set interval. See Adjusting the „ Keyboard Backlight and Adjusting the Display Backlight earlier in this chapter. Disable radios when not in use. Turn radios off from the „ FC-500 Handheld Field Controller Owner’s Manual… -
Page 27
Home screen or press Start > Settings > Connections > Wireless Manager. LED Activity Indicators LED activity indicators are located on the keypad underneath the four-way directional button. Red LED on the right (associated with power adapter): Blinking: AC adapter is plugged in, and the battery is „… -
Page 28
Tap the gadget again for medium brightness, and a third time to turn it off. SD Cards The FC-500 has a slot for a micro SD card located in the battery compartment. To insert or remove a card follow these steps: 1. -
Page 29
Connector I/O Module The FC-500 connector I/O module has the following jacks, connectors, and connector protector: 1 USB Client, Micro 2 Microphone/Speaker Jack 3 USB Host, Full Size 4 9-pin Serial Port 5 12V DC Jack 6 Connector Protector (connectors are sealed… -
Page 30
From the Output screen you can adjust the speaker options. Select the Input screen from the horizontal menu near the top of the screen. You can adjust the onboard and headset microphones as desired. FC-500 Handheld Field Controller Owner’s Manual… -
Page 31
Programs and Settings… -
Page 32
This chapter discusses the FC-500 Handheld Field Controller programs and settings. Home Screen The Home screen is your main control center for the FC-500. View vital system information and quickly access functions and applications that are frequently used. The default home screen for a basic unit is shown below. -
Page 33
Title Bar and Pop-Up Icons The title bar is at the top of every screen. It identifies the page and shows status icons indicating functions like connectivity status, audio, power, and time. Tap the title bar to bring up larger, touchable icons in a horizontal-scrolling bar. -
Page 34
3G Data Modem (Geo model with cell modem): Shows the on/off state of the optional cellular modem. Flashlight: Shows the on/dim/off state of flashlight feature (included with camera). FC-500 Handheld Field Controller Owner’s Manual… -
Page 35
Gadget Color Indicators Wi-Fi, Bluetooth, GPS/GNSS and 3G data modem gadgets indicate status using these colors: Gray: Off or inactive Yellow: Partial state (getting satellite fix, etc.) Green: Active and available Blue: Notification state (on or connected) Red: Error state, powering up or down, no GPS/GNSS fix, or unavailable (3G data modem is red when power is changing from on/off. -
Page 36
Start menu, 2) the back tile that takes you to the last application running, and 3) the menu tile that lists options for customizing the dashboard. The third and fifth tile positions are empty. Tap on a tile to perform the actions associated with it. FC-500 Handheld Field Controller Owner’s Manual… -
Page 37
On-screen keyboard Windows Start Menu The Windows Start menu gives you access to all of the applications on the FC-500. You can get to the Start menu from any screen by tapping the Windows tile (soft key) on the display. On the touchscreen, tap the application icon you want to select. -
Page 38
To navigate to different screens, press the modifier keys in the lower left corner of each screen as shown in the following example for the lowercase keyboard. Press the up arrow to go to FC-500 Handheld Field Controller Owner’s Manual… -
Page 39
the uppercase keyboard, the number key to go to the numeric keyboard, and the symbol key to go to the symbols keyboard. Tap on the shift key for a single uppercase letter. Tap on „ the shift key twice to lock uppercase on. Tap once more to return to the lowercase keyboard. -
Page 40
Suspend, Reset, Power Off, and Restore Defaults Use the power button to suspend, reset, power off, or restore the FC-500 to its factory state. To access the Power Button menu, press and hold the power button. Suspending and Resuming the FC-500 We recommend suspending your handheld if you plan to turn it off for less than two weeks. -
Page 41
Powering Off and On the FC-500 To preserve battery power, we recommend you power off the FC-500 if it will not be used for two weeks or longer. CAUTION: Be aware that when the FC-500 is powered off, it closes all programs and powers down all system components except for the real-time clock. -
Page 42
CAUTION: Restoring the FC-500 to its original factory state permanently erases data saved on the handheld, any software you installed, and any changes you made to the handheld, including changes to settings. 1. Back up files and programs you want to keep onto another computer. -
Page 43
Backlight control panel. Compass and Accelerometer Calibration The FC-500 has a built-in compass and accelerometer. The compass is used for embossing GPS/GNSS information on pictures taken with the camera, or embedding GPS/GNSS information into jpg files. -
Page 44
It is important that the handheld is laying on its back on a level surface. If the stylus holder on the hand strap makes the handheld uneven, you can try placing it on two equal- FC-500 Handheld Field Controller Owner’s Manual… -
Page 45
Communicating with a Computer The FC-500 can connect to a desktop or laptop computer, allowing you to synchronize information and download software and files. Installing the Software Install free synchronization software from Microsoft on your desktop computer. -
Page 46
Getting Started Screen The Getting Started screen provides information on current settings, help for setting up features and applications, and shortcuts to set up screens. To see a list of topics press Start > Getting Started. FC-500 Handheld Field Controller Owner’s Manual… -
Page 47
Bluetooth Wireless Communication… -
Page 48
2. Place them within at least 100 feet (30 meters) of one another. 3. Make Bluetooth discoverable on both devices. Bluetooth on the FC-500 is on and discoverable by default. The gadget on the Home screen turns green. FC-500 Handheld Field Controller Owner’s Manual… -
Page 49
Connections. Note: If the Bluetooth radio is turned on and then the handheld is suspended, wireless Bluetooth turns off to save battery power. When the FC-500 resumes (turns on), the radio turns on automatically. Bluetooth Control Panel To create a partnership with and connect to other… -
Page 50
2. Select the Headphones, Modem, Keyboard. The following Bluetooth control panel, Devices screen is shown: 3. Tap Add New Device. The FC-500 searches for other devices with wireless Bluetooth technology and displays them in a list. Select the device you want to connect to, and tap Next. -
Page 51
a. If the device has an assigned passcode, enter the number and press Next. b. If a passcode is required but has not been assigned, enter an alphanumeric passcode between 1 and 16 characters in length. Press Next. c. If a passcode is not required, leave the box blank and press Next. -
Page 52
You can change it to another COM port if desired. 3. The FC-500 automatically tries to discover the PIN. You might be required to enter a PIN. You should now be connected to the COM device. -
Page 53
Wi-Fi Wireless Networking… -
Page 54
Wi-Fi Wireless Networking The FC-500 has built-in Wi-Fi wireless networking to connect to the Internet or a office network. Connecting to a Wi-Fi Network To use Wi-Fi, you need to be in range of a Wi-Fi access point to make a connection. To actively look for a network connection complete the following steps: 1. -
Page 55
Explorer and begin using the Internet. Once a Wi-Fi network is set up, the icon on the Home Page turns blue and the name of the network is shown. The FC-500 remembers the Wi-Fi network connections created. Ch 5 Wi-Fi Wireless Networking… -
Page 56
Whenever Wi-Fi is turned on, a dialog box might appear at the bottom of the screen indicating the Wi-Fi networks the FC-500 has located. You can select a new network from this dialog box without opening the Wi-Fi control panel. -
Page 57
GPS/GNSS… -
Page 58
GPS/GNSS FC-500 Geo models have GPS/GNSS with 2 to 5 meter accuracy. Using GPS/GNSS To use GPS/GNSS, tap on the GPS/GNSS status gadget turn it on. The GPS/GNSS starts looking for satellites to use for a fix. The green LED on the keypad blinks periodically, and a satellite icon appears on the title top bar. -
Page 59
A measure of accuracy. The lower the number, the more accurate the fix is. Note: When you suspend the FC-500, the receiver is in a low power mode to retain its almanac. When you resume the FC-500, it takes a few seconds to get a fix. -
Page 60
GPS/GNSS. This prevents the camera geotagging and GPS/ GNSS from functioning. GPS/GNSS Accuracy The GPS/GNSS antenna is in the top of the FC-500. Do not put your hand or another object over the cap. This reduces accuracy. The more items between you and the satellites, the lower the accuracy. -
Page 61
JSNav Application JSNav is a GPS/GNSS application that lets you easily collect waypoint or track data. Note: Calibrate the compass and accelerometer before you use JSNav. Refer to Chapter 3, Programs and Settings, Compass and Accelerometer Calibration. From the Home screen tap on the JSNav gadget . -
Page 62
Waypoint Settings: Set up the waypoint file naming „ scheme, including the waypoint prefix, increment step size, and current value. For example, if the waypoint prefix is Point, increment step size is 10, current value is FC-500 Handheld Field Controller Owner’s Manual… -
Page 63
100, and default file type is .kml, file names would be Point110.kml, Point120.kml, Point130.kml, etc.) Also select the number of points to average. The default is 1. Track Settings: Set up the track file naming scheme (see „ Waypoint Settings). You can select a minimum time and minimum distance needed before a point is collected. -
Page 64
GPS Settings. Tap the disc icon to save the waypoint to My „ DocumentsMy Waypoints. Collect Track Data From the main JSNav screen tap the track icon to open the Collect Track screen. FC-500 Handheld Field Controller Owner’s Manual… -
Page 65
To collect points in a track, tap the play button and „ start moving along the desired track. Tap the pause button as needed, and tap play to start again. Current position information, total distance, altitude change, and points in the track are collected. When you are finished, tap the stop button. -
Page 66
The distance shown decreases as you get closer. When you reach the navigation distance threshold set up in the settings, text saying Arrived is shown and you hear a beep if audio notification has been set up. FC-500 Handheld Field Controller Owner’s Manual… -
Page 67
Camera… -
Page 68
Camera FC-500 Geo models have a 5MP camera and a video option. Geotagging gives you the ability to embed and emboss photos with the date, time, and GPS/GNSS position. The camera window and flash are located on the back of the FC-500. -
Page 69
Flash To use the flash, select Flash from the Menu, then select On. The flash automatically turns on each time you take a photo. To turn it off, select Flash from the menu and select Off. Pictures & Videos Control Panel To view or change additional settings, select Options from the Menu soft key. -
Page 70
The following Emboss Options screen is shown: Select the information you want to emboss on pictures, the position, and the color. The selected information is embossed on pictures, making it part of the images. FC-500 Handheld Field Controller Owner’s Manual… -
Page 71
3. 3. You can build GPS/GNSS information into jpg files from the Embed Options screen. (This information does not appear on the images.) You can select Use True North. Embed GPS allows you to put images into programs like Google Earth and sort them by location, etc. -
Page 72
While the photo is being saved, a disk symbol is shown briefly. The full photo is then shown on the screen. FC-500 Handheld Field Controller Owner’s Manual… -
Page 73
Photo Options Select the Menu soft key to see a list of options for a particular photo. (The photo must appear on the screen.) To take another photo, press the Camera soft key. To see a library of photos and pictures, press Thumbnails. Ch 7 Camera… -
Page 74
Press the camera button to turn on the camera. Select the Menu soft key, and select Video. Press Menu again to view and adjust settings as desired. Note: A portrait orientation is the default for videos. FC-500 Handheld Field Controller Owner’s Manual… -
Page 75
Press the camera button to start recording a video. Press it again to end the video. Note: To take photos instead of videos, press Menu and select Still (see previous screen). Audio You can record sound with videos. From the Pictures & Videos application screen, tap Menu >… -
Page 76
Library Menu Options Select a photo or video, then the Menu soft key. You can send, delete, edit, etc. the selected photo or video. FC-500 Handheld Field Controller Owner’s Manual… -
Page 77
3G Data Modem… -
Page 78
3G Data Modem The 3G data modem is an option for FC-500 Geo models, adding Wide Area Network data modem capability. The modem is installed at the factory. The modem is a cellular data modem, type GSM/UMTS. It is five band modem compatible. The modem operates in different modes, depending on the wireless provider and the signal strength. -
Page 79
3. Remove the battery pack. CAUTION: The FC-500 is not sealed against water and dust when the battery door is not installed. 4. An image on the battery compartment label shows the correct location and orientation for the SIM card. Pull out the SIM card tray. -
Page 80
. After about 30 seconds it turns green, indicating that the modem is available. Once the modem is available, configure it to make a connection. Tap and hold the modem gadget to open the Connections control panel. FC-500 Handheld Field Controller Owner’s Manual… -
Page 81
Select Automatically configure connection. The name of your carrier appears. Tap Next. A progress graphic is shown on the next screen while your Internet settings are configured. You can now access the Internet. Open Internet Explorer to test your setup. Connection Problems If the connection fails to automatically configure, there might not be a signal where you are located. -
Page 82
The modem may affect the information contained on discs or cards. Maintenance of Your Modem Do not attempt to disassemble the cell modem. No user serviceable parts exist inside the cell modem. FC-500 Handheld Field Controller Owner’s Manual… -
Page 83
Storage, Maintenance and Recycling… -
Page 84
We recommend charging the handheld each night or weekend when it is in suspend mode. If the FC-500 is not charged while in suspend mode and the battery reaches a low charge, it automatically powers off to prevent further drain on the battery. -
Page 85
CAUTION: Be sure to replace the screen protector as often as the screen protector instructions recommend. Cleaning the FC-500 Touchscreen 1. Disable the touchscreen by pressing the power button until the Power Button menu appears. Tap on Disable TS. -
Page 86
Recycling the FC-500 and Batteries When the FC-500 reaches the end of its life, it must not be disposed of with municipal waste. It is your responsibility to dispose of your waste equipment by handing it over to a designated collection point for the recycling of waste electrical and electronic equipment. -
Page 87
Warranty and Repair Information… -
Page 88
Limited Product Warranty Topcon Positioning Systems, Inc. (“TPS”) warrants that the FC-500 Handheld Field Controller shall be free from defects in materials and workmanship, under normal intended use, for a period of 24 months from the date of shipment. TPS warrants that the following items shall be free from… -
Page 89
express or implied, including, without limitation, any warranty as to merchantability, fitness for a particular purpose, non-infringement or any warranties arising from the course of performance, dealing, or usage of trade. TPS specifically makes no warranties as to the suitability of its products for any particular application. -
Page 90
Warranty Repairs To obtain warranty repair or service on the FC-500, submit a repair order on our website at www.TopconTotalCare. or contact an authorized repair center within the applicable warranty period. Products returned for repair or service without proper authorization may acquire an additional handling fee and/or delay in the repair. -
Page 91
FC-500 When you contact a repair center you need some unique system ID information for your FC-500 (serial number, model number, etc.). Tap Start > Settings > System > System Information to view the following menu. Select System ID. -
Page 92
FC-500 Handheld Field Controller Owner’s Manual… -
Page 93
Warnings and Regulatory Information… -
Page 94
Product Warnings Follow the warnings listed below to use the FC-500 and accessories safely. Battery Warnings WARNING! This device comes with a lithium ion rechargeable battery pack. To reduce the risk of fire or burns, do not disassemble, crush, puncture, short external contacts, or expose the battery pack to fire. -
Page 95
Do not pull on a cord or cable. When unplugging the wall charger from the electrical outlet, pull on the plug, not the cord. Use only wall chargers intended for the FC-500. Using any other external power source can damage your product and void your warranty. -
Page 96
Do not operate the cell modem outside of this temperature range. Industry Canada In compliance with Industry Canada rules, the following statement must appear on the device or in the user documentation: This Class B digital apparatus complies with Canadian ICES-003. FC-500 Handheld Field Controller Owner’s Manual… -
Page 97
Cables connecting to the USB host port must use a ferrite core/bead on the cable. The ferrite core must be placed on the cable near the end that connects to the FC-500. This device has been evaluated using the following standards to demonstrate compliance with applicable directives: EN 60950-1:2006 „… -
Page 98
2483.5 MHz is limited to 10 mW. The latest requirements may be found at: http://www.art-telecom.fr Australia (not sure about this yet) Declaration of Conformity The Declaration of Conformity for CE Marking is available at: www.TopconTotalCare.com. FC-500 Handheld Field Controller Owner’s Manual… -
Page 99
Specifications… -
Page 100
38 mm) Weight, standard: 1.3 lbs (590g), FC- „ 500 Geo with battery: 2.34 lbs (1061g), FC-500 Geo 3G with battery and cell modem: 2.36 lbs (1070 g) Durable hardened plastic in a shear „ proof, shock resistant design Shock resistant bumpers „… -
Page 101
FEATURE SPECIFICATION Touchscreen Capacitive touch interface optically „ bonded to display to increase visibility Chemically strengthened scratch „ resistant glass Touchscreen disable function „ Touchscreen profile options „ Keyboard Numeric keypad „ Shift functions „ Programmable key and LEDs „ Backlight „… -
Page 102
MIL-STD810G standard for water, „ Standards humidity, sand and dust, vibration, altitude, shock, low temperature, high temperature, temperature shock Warranties 24 months for FC-500 „ 90 days for accessories „ Extended service and maintenance „ plans FC-500 Handheld Field Controller Owner’s Manual… -
Page 103
FEATURE SPECIFICATION Software ActiveSync „ Included Adobe Reader LE „ Alarms „ Calculator „ Calendar „ Contacts „ E-Mail „ File Explorer „ Getting Started „ Help „ Internet Explorer „ Internet Sharing „ JSNav „ Home screen, customizable with „… -
Page 104
Home screen JSNav application „ 3G Data Integrated Cinterion PH8P module „ Modem (Geo (Pentaband Worldwide), 800/850/ model option) 900/1800/1900/2100 MHz data speeds, UMTS/HSPA+3GPP Does not support voice calls „ Communicates on GSM-based „ networks FC-500 Handheld Field Controller Owner’s Manual… -
Page 105
FEATURE SPECIFICATION Certifications FCC Class B „ and Standards CE Marking (applicable EMC, R&TTE, „ and LVD directives) Industry Canada „ EN60950 Safety „ Bluetooth SIG qualification „ USB client „ IP68 waterproof and dustproof „ Designed to MIL-STD 810G „… -
Page 106
FC-500 Handheld Field Controller Owner’s Manual… -
Page 107
Index… -
Page 108
Bluetooth Wireless Communication 44 Microsoft Bluetooth Control Panel 45 Serial Device (COM) Control Panel 47 Camera 64 Button 12 Embed GPS Information Into Files 67 Embed User Note 67 Emboss Picture Options 65, 66 Flash Option 65 FC-500 Handheld Field Controller Owner’s Manual… -
Page 109
Geotagging Pictures 65 GPS Intermediate Driver Issues 56 Photo and Video Library 71 Specifications 100 Videos 65 Care and Maintenance 80 Cleaning 81 Storage 80 Cautions 4, 21, 24, 37, 38, 74, 75, 81, 82, 86 Certifications and Standards 91 Cleaning 81 Communicating With a Computer 41 ActiveSync 41… -
Page 110
See Zoom in on Display Hold to Zoom. Home Screen 8 Button 12 Dashboard 28, 29 Dashboard Gadgets 30 Status Icons 28, 29 Tile Bar 28, 32 Title Bar 28, 29 Touchable Tiles 28, 32 JSNav Application 57 FC-500 Handheld Field Controller Owner’s Manual… -
Page 111
Language Installs 7 Limitation of Liability 85 Mega Keys 34 Microphone 25, 97 Microsoft® Windows® Embedded Handheld 6.5.3 96 Navigating Around Your FC-500 9 Touch Gestures 9 Navigating to a Waypoint or Track 62 Online Help 42 On-Screen Keyboard 33… -
Page 112
Touchable Tiles (Soft Keys) 28, 32 Touch Gestures 9 Touchscreen Disabling and Enabling 16 Display Backlight 19 Modes 17 Protecting the Touchscreen 80 Settings 16 Specifications 97 Touchscreen Modes 17 Touchscreen Profile 17 Tracks 60 FC-500 Handheld Field Controller Owner’s Manual… -
Page 113
Updates, Operating System and Documentation 7 USB Client 25, 101 USB Host 25 Warnings 90, 91 Warranty 84–87 Exclusions 84 Extended Warranties 86 Limitation of Liability 85 Remedy 85 Repairs 86 Services 86 Warranty Exclusions 84 Warranty Repairs 86 Waypoints 59 Wi-Fi Wireless Networking 50 Connecting to a Wi-Fi Network 50 Managing Connections 51…
| Document’s Content and Additional Information | Share Manual |
|---|---|
|
Topcon FC-500 Owner’s manual
Pages Preview: Document Transcription:
See Details |


Цена по запросу
Нужны дополнительные вводные для просчета цены, закажите звонок или напишите менеджеру в WhatsApp:
Спасибо за заявку
Наш менеджер свяжется с вами в ближайшее время
Узнать цену в WhatsApp
- Наличие
- уточняйте
- Гарантия
- 12
- Самовывоз
-
Тюмень
- Возможна доставка до адреса
-
Способы оплаты
Описание
Характеристики
Комплектация
-
В состав комплекта входят: GPS, ГЛОНАСС, L1, L2, RTK 10 Гц, встроенный УКВ/GSM модем, 2хLi-Ion аккумулятора, зарядное устройство, кабель USB, кабель питания SAE, антенна 450-470 МГц, SD 2 Гб, свидетельство о поверке, FC-500, Magnet Field GPS+, крепление контроллера на веху.
Файлы

Оформить заказ
Экспертные мнения
Экспертные мнения
Купить Topcon GR-5 с контроллером FC-500 в Тюмени легко — просто позвоните по телефону:: 8-800-551-11-01
КаталогПрайс-лист
Например: ГНСС, тахеометр, нивелир, теодолит, дальномер, штатив, рейка, рулетка
0
Инструкции
Тахеометры SOKKIA
- Тахеометры Sokkia серии iM (PDF, 10 Mb) Модели iM-102, iM-102L, iM-103, iM-105, iM-105L, iM-52, iM-55)
- Тахеометры Sokkia серии CX (PDF, 12.1 Mb) Модели CX-102, CX-102L, CX-105, CX-105L, CX-103, CX-106
- Тахеометры Sokkia серии CX-LN (PDF, 14.7 Mb) Модели CX-102 LN, CX-102 LNL, CX-105 LN, CX-105 LNL
- Тахеометры Sokkia серии FX (PDF, 7.7 Mb) Модели FX-101, FX-102, FX-105
- Краткое справочное руководство FX – Functional X-ellence Station (PDF, 2.8 Mb) Модели FX-101, FX-102, FX-105
- Тахеометры Sokkia серии DX (PDF, 2.5 Mb) Модели DX-101AC, DX-103AC, DX-105AC
- Тахеометры Sokkia серии PowerSet (PDF, 15.9 Mb) Модели SET1000, SET2000, SET3000, SET4000, SET400S
- Тахеометры Sokkia SET4110R (PDF, 1.1 Mb) Модель SET4110R
- Тахеометры Sokkia серии SETx00 (PDF, 6.16 Mb) Модели SET300, SET300s, SET500, SET500s, SET600, SET600s
- Тахеометры Sokkia серии SET10 (PDF, 9.0 Mb) Модели SET210, SET310, SET310S, SET510, SET510S, SET610, SET610S
- Тахеометры Sokkia серии SET30R (PDF, 7.5 Mb) Модели SET230R, SET330R, SET530R, SET530RS, SET630R
- Тахеометры Sokkia серии SET30RK (PDF, 11.6 Mb) Модели SET230RK, SET230RK3, SET330RK, SET330RK3, SET530RK, SET530RK3, SET630RK
- Тахеометры Sokkia серии SET50RX (PDF, 12.7 Mb) Модели SET250X, SET250RX, SET350X, SET350RX, SET550X, SET550RX, SET650X, SET650RX
- Тахеометры Sokkia серии SETX (PDF, 4.5 Mb) Модели SET1X, SET2X, SET3X, SET5X
Тахеометры TOPCON
- Тахеометры Topcon серии GM (PDF, 3 Mb) Модели GM-102, GM-105, GM-52, GM-55
- Тахеометры Topcon серии ES (PDF, 12.5 Mb) Модели ES-102L, ES-102, ES-103, ES-105L, ES-105
- Тахеометры Topcon серии ES-50 (PDF, 5.38 Mb) Модели ES-52, ES-52L, ES-55, ES-55L
- Тахеометры Topcon серии OS (PDF, 7.1 Mb) Модели OS-101L, OS-103L, OS-105L
- Тахеометры Topcon серии DS (PDF, 2.5 Mb) Модели DS-101, DS-103, DS-105
- Тахеометры Topcon серии IS-200 (PDF, 11.3 Mb) Модели IS-201, IS-203, IS-205
- Тахеометры Topcon серии IS-300 (PDF, 16.8 Mb) Модели IS-301, IS-303, IS-305
- Тахеометры Topcon серии GPT-3000 (PDF, 2.35 Mb) Модели GPT-3002, GPT-3003, GPT-3005, GPT-3007
- Тахеометры Topcon серии GPT-3100N (PDF, 2.38 Mb) Модели GPT-3102N, GPT-3103N, GPT-3105N, GPT-3107N
- Тахеометры Topcon серии GPT-7000 (PDF, 4.5 Mb) Модели GPT-7001, GPT-7002, GPT-7003, GPT-7005
- Тахеометры Topcon серии GPT-8200A (PDF, 3.65 Mb) Модели GPT-8201A, GPT-8202A, GPT-8203A, GPT-8203A
- Тахеометры Topcon серии GTS-100N (PDF, 2.2 Mb) Модели GTS-102N, GTS-105N
- Тахеометры Topcon серии GTS-230 (PDF, 3.5 Mb) Модели GTS-233, GTS-235, GTS-236, GTS-239
- Тахеометры Topcon серии GTS-230N (PDF, 1.5 Mb) Модели GTS-233N, GTS-235N, GTS-236N, GTS-239N
- Тахеометры Topcon серии GTS-720 (PDF, 2.1 Mb) Модели GTS-721, GTS-722, GTS-723, GTS-725
- Тахеометры Topcon серий GTS-750, GPT-7500 (PDF, 3.25 Mb) Модели GTS-751, GTS-753, GTS-755, GPT-7501, GPT-7503, GPT-7505
- Тахеометры Topcon серий GTS-900A, GPT-9000A (PDF, 4.65 Mb)
Нивелиры SOKKIA
- Оптические нивелиры Sokkia B20/B30/B40 (PDF, 0.8 Mb) Модели B20, B30-35, B40-35
- Оптические нивелиры Sokkia C300/310/320/330 (PDF, 2.35 Mb) Модели C300, C310, C320, C330
- Электронный нивелир Sokkia SDL50 (PDF, 2 Mb) Модель SDL50
- Электронный нивелир Sokkia SDL1X (PDF, 2.5 Mb) Модели SDL1X Standard, SDL1X Advanced
Полевые контроллеры TOPCON
- Полевой контроллер Topcon FC-200 (PDF, 0.6 Mb)
- Полевой контроллер Topcon FC-336 (PDF, 1.1 Mb)
- Полевой контроллер Topcon FC-500 (PDF, 2.1 Mb)
Полевые контроллеры SOKKIA
- Полевой контроллер Sokkia SHC336 (PDF, 1.1 Mb)
- Полевой контроллер Sokkia SHC-5000 (PDF, 15.6 Mb)
- Полевой контроллер Sokkia T-18 (PDF, 7.6 Mb)
- Полевой контроллер Sokkia Archer2 (PDF, 2.41 Mb)
ГНСС приемники SOKKIA
- Спутниковые приемники Sokkia GRX3 (PDF, 5.98 Mb)
- Спутниковые приемники Sokkia GRX2 (PDF, 3 Mb)
- Спутниковые приемники Sokkia GRX1 (PDF, 3.75 Mb)
- Спутниковые приемники Sokkia GSX2 (PDF, 1.5 Mb)
- Спутниковые приемники Sokkia GCX3 (PDF, 35.5 Mb)
- Выполнение RTK съемки приемниками GRX2 с GSM модемами (PDF, 1.1 Mb)
- Выполнение RTK съемки приемниками GRX2 с УВЧ модемами (PDF, 1.2 Mb)
- Подготовка приёмника Sokkia GRX1 (2) — Topcon HiPer II (V) для совместной работы с внешним радиомодемом Satelline Easy Pro 35W (PDF, 0.2 Mb)
- Настройка проекта съемки для GRX2 с внешним радиомодемом (PDF, 1.2 Mb)
- Создание проекта для выполнения RTK съемки ГНСС приемниками GRX2 (PDF, 2.2 Mb)
- Создание проекта MAGNET Field и выполнение съемки точек в режиме RTK ГНСС от базовых станций ГСИ (PDF, 2.4 Mb)
ГНСС приемники TOPCON
- Спутниковые приемники Topcon GR-3 (PDF, 2.8 Mb)
- Спутниковые приемники Topcon GR-5 (PDF, 6.65 Mb)
- Спутниковые приемники Topcon GRS-1 (PDF, 2.75 Mb)
- Спутниковые приемники Topcon Hiper (PDF, 0.3 Mb)
- Спутниковые приемники Topcon Hiper SR (PDF, 3.0 Mb)
- Спутниковые приемники Topcon Hiper V (PDF, 1.6 Mb)
- Выполнение RTK съемки приемниками GR-5 с GSM модемами (PDF, 1.2 Mb)
- Выполнение RTK съемки приемниками GR-5 с УВЧ модемами (PDF, 1.2 Mb)
- Руководство по созданию проекта RTK съемки ГНСС (PDF, 2.1 Mb)
- Создание проекта MAGNET Field и выполнение съемки точек в режиме RTK ГНСС от базовых станций ГСИ (PDF, 2.4 Mb)
Программное обеспечние
- Программа PC-CDU (PDF, 3.2 Mb)
- Программа Topcon Tools (PDF, 21.1 Mb)
- Программа Magnet Office Tools Adv. Post processing (PDF, 3.36 Mb)
- Использование лазерного дальномера для определения координат недоступного объекта (PDF, 0.4 Mb)
Заполните поля формы, специалист в течении дня обработает Ваше сообщение и ответит на электронную почту, или перезвонит. Отправляя заявку, Вы соглашаетесь с обработкой собственных персональных данных в соответствии с Политикой конфиденциальности компании.
Имя*:
Телефон или E-mail*:
Сообщение:
Спасибо, Ваше сообщение отправлено!
Цена по запросу
Нужны дополнительные вводные для просчета цены, закажите звонок или напишите менеджеру в WhatsApp:
Спасибо за заявку
Наш менеджер свяжется с вами в ближайшее время
Узнать цену в WhatsApp
- Наличие
- уточняйте
- Гарантия
- 12
- Самовывоз
-
Тюмень
- Возможна доставка до адреса
-
Способы оплаты
Описание
Характеристики
Комплектация
-
В состав комплекта входят: GPS, ГЛОНАСС, L1, L2, RTK 10 Гц, встроенный УКВ/GSM модем, 2хLi-Ion аккумулятора, зарядное устройство, кабель USB, кабель питания SAE, антенна 450-470 МГц, SD 2 Гб, свидетельство о поверке, FC-500, Magnet Field GPS+, крепление контроллера на веху.
Файлы
Оформить заказ
Экспертные мнения
Экспертные мнения
Купить Topcon GR-5 с контроллером FC-500 в Тюмени легко — просто позвоните по телефону:: 8-800-551-11-01