
-
Contents
-
Table of Contents
-
Bookmarks
Quick Links
User Guide
AX3000 Gigabit Wi-Fi 6 Router
Archer AX50
©2020 TP-Link
REV1.0.0 1910012590
Related Manuals for TP-Link Archer AX50
Summary of Contents for TP-Link Archer AX50
-
Page 1
User Guide AX3000 Gigabit Wi-Fi 6 Router Archer AX50 ©2020 TP-Link REV1.0.0 1910012590… -
Page 2: Table Of Contents
Chapter 5. TP-Link Cloud Service ……..24…
-
Page 3
7. 1. 1. Access the USB Device Locally ……..33 7. -
Page 4
13. 2. Control LEDs …………. . . 77 13. -
Page 5: About This Guide
*Use of 1024-QAM requires clients to also support those functions. More Info The latest software, management app and utility can be found at Download Center https://www.tp-link.com/support. The Quick Installation Guide can be found where you find this guide or inside the package of the router.
-
Page 6
Specifications can be found on the product page at https://www.tp-link.com. The TP-Link Community is provided for you to discuss our products at https://community.tp-link.com. Our Technical Support contact information can be found at the Contact Technical Support page at https://www.tp-link.com/support. -
Page 7: Chapter 1. Get To Know About Your Router
Chapter Get to Know About Your Router This chapter introduces what the router can do and shows its appearance. It chapter contains the following sections: • Product Overview • Appearance…
-
Page 8: Product Overview
1024QAM improve throughput by 4 times and dramatically increase the whole network capacity and efficiency. It’s also backwards compatible with 802.11a/b/g/n/ac. Moreover, it is simple and convenient to set up and use the TP-Link router due to its intuitive web interface and the powerful Tether app.
-
Page 9: The Back Panel
Chapter 1 Get to Know About Your Router LED Explanation Status Indication The system has started up successfully. Flashing The system is starting up or the firmware is being upgraded. Do slowly not disconnect or power off your router. (Power) Flashing WPS connection is in process.
-
Page 10
Chapter 1 Get to Know About Your Router Button and Port Explanation Item Description Power Port For connecting the router to a power socket via the provided power adapter. Power On/Off Button Press this button to power on or off the router. WAN Port For connecting to a DSL/Cable modem, or an Ethernet jack. -
Page 11: Chapter 2. Connect The Hardware
Chapter Connect the Hardware This chapter contains the following sections: • Position Your Router • Connect Your Router…
-
Page 12: Position Your Router
Chapter 2 Connect the Hardware 2. 1. Position Your Router • The product should not be located in a place where it will be exposed to moisture or excessive heat. • Place the router in a location where it can be connected to multiple devices as well as to a power source.
-
Page 13
Chapter 2 Connect the Hardware 1. Connect the powered-off modem to the router’s WAN port with an Ethernet cable. 2. Power on the modem, and then wait about 2 minutes for it to restart. 3. Connect the power adapter to the router and turn on the router. 4. -
Page 14
WPS. 1 ) Tab the WPS icon on the device’s screen. Here we take an Android phone for instance. 2 ) Within two minutes, press the WPS button on your router. WLAN TP-Link MyHome David close to HomeNetwork… -
Page 15: Chapter 3. Log In To Your Router
Chapter Log In to Your Router…
-
Page 16
• If the login window does not appear, please refer to the Section. • If you have registered a TP-Link ID and bound your cloud router to it, the login password you created here will be invalid. Please log in to the cloud router using your TP-Link ID. -
Page 17: Chapter 4. Set Up Internet Connection
Furthermore, you can also set up an IPv6 connection if your ISP provides IPv6 service. It contains the following sections: • Use Quick Setup Wizard • Quick Setup Via TP-Link Tether App • Manually Set Up Your Internet Connection • Set Up the Router as an Access Point •…
-
Page 18: Use Quick Setup Wizard
• To learn more about the TP-Link Cloud service, please refer to the TP-Link Cloud Service section. • If you do not want to register a TP-Link ID now, you may click Log In Later to proceed. • If you have changed the preset wireless network name (SSID) and wireless password during the Quick Setup process, all your wireless devices must use the new SSID and password to connect to the router.
-
Page 19: Manually Set Up Your Internet Connection
4. Connect your devices to the newly configured wireless networks of the router and enjoy the internet! Note: To enjoy a more complete service from TP-Link, register and bind your TP-Link ID to the router. 4. 3. Manually Set Up Your Internet Connection In this part, you can check your current internet connection settings.
-
Page 20
Chapter 4 Set Up Internet Connection 2 ) If you choose Static IP, enter the information provided by your ISP in the corresponding fields. 3 ) If you choose PPPoE, enter the username password provided by your ISP. PPPoE users usually have DSL cable modems. -
Page 21
Chapter 4 Set Up Internet Connection 4 ) If you choose L2TP, enter the username password and choose the Secondary Connection provided by your ISP. Different parameters are needed according to the Secondary Connection you have chosen. 5 ) If you choose PPTP, enter the username and password, and choose the Secondary Connection… -
Page 22
Chapter 4 Set Up Internet Connection 5. Click Save. 6. To check your internet connection, click Network Map on the left of the page. After the connection succeeds, the screen will display as follows. Here we take PPPoE as an example. Note: It may take 1-2 minutes to make the settings valid. -
Page 23: Set Up The Router As An Access Point
Set Up the Router as an Access Point The router can work as an access point, transforming your existing wired network to a wireless one. 1. Visit http://tplinkwifi.net, and log in with your TP-Link ID or the password you set for the router. 2. Go to Advanced >…
-
Page 24: Set Up An Ipv6 Internet Connection
Your ISP provides information about one of the following IPv6 internet connection types: PPPoE, Dynamic IP(SLAAC/DHCPv6), Static IP, 6to4 tunnel, Pass-Through (Bridge). 1. Visit http://tplinkwifi.net, and log in with your TP-Link ID or the password you set for the router.
-
Page 25
Chapter 4 Set Up Internet Connection Tips: If you do not know what your internet connection type is, contact your ISP or judge according to the already known information provided by your ISP. 4. Fill in information as required by different connection types. Red blanks must be filled Static IP: Fill in blanks and click Save. -
Page 26
Chapter 4 Set Up Internet Connection PPPoE: By default, the router uses the IPv4 account to connect to the IPv6 server. Click Advanced to input further information if your ISP requires. Click Save and then click Connect. Note: If your ISP provides two separate accounts for the IPv4 and IPv6 connections, please untick the PPPoE same session with IPv4 connection checkbox and manually enter the username and password for the IPv6 connection. -
Page 27
Chapter 4 Set Up Internet Connection 5. Configure LAN ports. Windows users are recommended to choose from the first two types. Fill in Address Prefix provided by your ISP, and click Save. Tips: Find Help on the web management page to know more about items. 6. -
Page 28: Chapter 5. Tp-Link Cloud Service
TP-Link Cloud service provides a better way to manage your cloud devices. Log in to your router with a TP-Link ID, and you can easily monitor and manage your home network when you are out and about via the Tether app on your smartphone or tablet. To ensure that your router stays new and gets better over time, the TP-Link Cloud will notify you when an important firmware upgrade is available.
-
Page 29: Register A Tp-Link Id
IDs. • Once the router is bound to your TP-Link ID, you need to log in to the router with the TP-Link ID. • Once you have registered a TP-Link ID on the web management page, you can only register another TP-Link ID via the Tether APP.
-
Page 30: Manage The User Tp-Link Ids
2. Enter the current password, then a new password twice. And click Save. 5. 3. Manage the User TP-Link IDs The TP-Link ID used to log in to the router for the first time will be automatically bound as the Admin account.
-
Page 31: Add Tp-Link Id To Manage The Router
3. Click , enter another TP-Link ID as needed and click Save. Note: If you need another TP-Link ID, please register a new one via the Tether app. Please refer to Manage the Router via the TP-Link Tether App to install the app and register a new TP-Link ID.
-
Page 32: Manage The Router Via The Tp-Link Tether App
QR code to download and install the app. 2. Connect your device to the router’s wireless network. 3. Launch the Tether app, select the model of your router and log in with your TP-Link ID or the password your set for the router.
-
Page 33: Chapter 6. Guest Network
Chapter Guest Network This function allows you to provide Wi-Fi access for guests without disclosing your main network. When you have guests in your house, apartment, or workplace, you can create a guest network for them. In addition, you can customize guest network options to ensure network security and privacy.
-
Page 34: Create A Network For Guests
Chapter 6 Guest Network 6. 1. Create a Network for Guests 1. Visit http://tplinkwifi.net, and log in with your TP-Link ID or the password you set for the router. 2. Go to Advanced > Guest Network. Locate the Wireless section.
-
Page 35: Customize Guest Network Options
Chapter 6 Guest Network 6. 2. Customize Guest Network Options 1. Visit http://tplinkwifi.net, and log in with your TP-Link ID or the password you set for the router. 2. Go to Advanced > Guest Network. Locate the Settings section. 3. Customize guest network options according to your needs.
-
Page 36: Chapter 7. Usb Settings
Chapter USB Settings This chapter describes how to use the USB ports to share files and media from the USB storage devices over your home network locally, or remotely through the internet. The router supports USB external flash drives and hard drives. It contains the following sections: •…
-
Page 37: Access The Usb Storage Device
Chapter 7 USB Settings 7. 1. Access the USB Storage Device Insert your USB storage device into the router’s USB port and then access files stored there locally or remotely. Tips: • If you use USB hubs, make sure no more than 4 devices are connected to the router. •…
-
Page 38: Access The Usb Device Remotely
Chapter 7 USB Settings • Method 2: Open the Windows Explorer (or go to Computer) and type the server address \\tplinkwifi.net ftp://tplinkwifi.net in the address bar, then press Enter. Windows computer 1 ) Select > Connect to Server. 2 ) Type the server address smb://tplinkwifi.net. 3 ) Click Connect.
-
Page 39
If your ISP assigns a private WAN IP address (such as 192.168.x.x or 10.x.x.x), you cannot use this feature because private addresses are not routed on the internet. Follow the steps below to configure remote access settings. 1. Visit http://tplinkwifi.net, and log in with your TP-Link ID or the password you set for the router. 2. Go to Advanced >… -
Page 40: Customize The Access Settings
1. Visit http://tplinkwifi.net, and log in with your TP-Link ID or the password you set for the router.
-
Page 41
Chapter 7 USB Settings 2. Now you can access the USB storage device by visiting \\MyShare (for Windows) or smb://MyShare (for Mac). • To Customize Sharing Folders Focus on the Sharing Contents section. Click the button to select specific folders that you want to share and click Save. -
Page 42: Media Sharing
USB storage device directly from DLNA-supported devices, such as your computer, tablet and PS2/3/4. 1. Visit http://tplinkwifi.net, and log in with your TP-Link ID or the password you set for the router. 2. Go to Advanced >…
-
Page 43: Time Machine
Time Machine backs up all files on your Mac computer to a USB storage device connected to your router. 1. Visit http://tplinkwifi.net, and log in with your TP-Link ID or the password you set for the router. 2. Go to Advanced >…
-
Page 44
Chapter 7 USB Settings 4. Click Select to select a location for Time Machine backups. 5. Set the Size Limit for Backups. Note: 0 means no limit for the space. 6. Click Save. -
Page 45: Chapter 8. Homecare — Parental Controls, Qos, Anti-Virus
Chapter HomeCare – Parental Controls, QoS, Anti-Virus TP-Link HomeCare powered by Trend Micro provides a kit of features to help you create a personalized network that caters for the whole family. You can ensure appropriate internet access for everyone with Parental Controls, save bandwidth for…
-
Page 46
Antivirus provides malicious content filtering and intrusion prevention for your home network, as well as a quarantine for infected devices. An active database protects every connected device from external threats. Download the TP-Link Tether app to enjoy HomeCare services: Launch the Apple App Store or Google Play store and search “TP-Link… -
Page 47: Chapter 9. Network Security
Chapter Network Security This chapter guides you on how to protect your home network from cyber attacks and unauthorized users by implementing these three network security functions. You can block or allow specific client devices to access your network using Access Control, or you can prevent ARP spoofing and ARP attacks using IP &…
-
Page 48: Firewall
This function is enabled by default. 1. Visit http://tplinkwifi.net, and log in with your TP-Link ID or the password you set for the router. 2. Go to Advanced >…
-
Page 49
Chapter 9 Network Security 1 ) Select Blacklist and click Save. 2 ) Select the device(s) to be blocked in the Online Devices table by ticking the checkbox(es). 3 ) Click Block above the Online Devices table. The selected devices will be added Devices in Blacklist automatically. -
Page 50: Ip & Mac Binding
Binding list, but unrecognized MAC address. I want to: Prevent ARP spoofing and ARP attacks. How can I do that? 1. Visit http://tplinkwifi.net, and log in with your TP-Link ID or the password you set for the router. 2. Go to Advanced >…
-
Page 51: Chapter 10. Nat Forwarding
The TP-Link router supports four forwarding rules. If two or more rules are set, the priority of implementation from high to low is Virtual Servers, Port Triggering, UPNP and DMZ.
-
Page 52: Share Local Resources On The Internet By Virtual Servers
WAN: 218.18.232.154 How can I do that? 1. Assign a static IP address to your PC, for example 192.168.0.100. 2. Visit http://tplinkwifi.net, and log in with your TP-Link ID or the password you set for the router. 3. Go to Advanced >…
-
Page 53: Open Ports Dynamically By Port Triggering
VoIPs, video players and common applications including MSN Gaming Zone, Dialpad and Quick Time 4 players, etc. Follow the steps below to configure the Port Triggering rules: 1. Visit http://tplinkwifi.net, and log in with your TP-Link ID or the password you set for the router. 2. Go to Advanced >…
-
Page 54: Make Applications Free From Port Restriction By Dmz
Chapter 10 NAT Forwarding 3. Click View Existing Applications, and select the desired application. The Triggering Port, External Port Protocol will be automatically filled in. The following picture takes application MSN Gaming Zone as an example. 4. Click OK. Tips: •…
-
Page 55: Make Xbox Online Games Run Smoothly By Upnp
DMZ host with all ports open. How can I do that? 1. Assign a static IP address to your PC, for example 192.168.0.100. 2. Visit http://tplinkwifi.net, and log in with your TP-Link ID or the password you set for the router. 3. Go to Advanced >…
-
Page 56
Therefore, you can play Xbox online games without a hitch. Internet XBOX Router If necessary, you can follow the steps to change the status of UPnP. 1. Visit http://tplinkwifi.net, and log in with your TP-Link ID or the password you set for the router. 2. Go to Advanced >… -
Page 57: Chapter 11. Vpn Server
Chapter VPN Server The VPN (Virtual Private Networking) Server allows you to access your home network in a secured way through internet when you are out of home. The router offers two ways to setup VPN connection: OpenVPN and PPTP (Point to Point Tunneling Protocol) VPN. OpenVPN is somewhat complex but with greater security and more stable.
-
Page 58: Use Openvpn To Access Your Home Network
OpenVPN connection. INTERNET Home Network Router Remote Devices Step1. Set up OpenVPN Server on Your Router 1. Visit http://tplinkwifi.net, and log in with your TP-Link ID or the password you set for the router. 2. Go to Advanced > VPN Server >…
-
Page 59: Use Pptp Vpn To Access Your Home Network
Please follow the steps below to set up a PPTP VPN connection. Step 1. Set up PPTP VPN Server on Your Router 1. Visit http://tplinkwifi.net, and log in with your TP-Link ID or the password you set for the router. 2. Go to Advanced >…
-
Page 60
Chapter 11 VPN Server Note: Before you enable Server, we recommend you configure Dynamic DNS Service (recommended) or assign a static IP address for router’s WAN port and synchronize your System Time with internet. 3. In the Client IP Address filed, enter the range of IP addresses (up to 10) that can be leased to the devices by the PPTP VPN server. -
Page 61
Chapter 11 VPN Server 1 ) Click Add. 2 ) Enter the Username Password to authenticate devices to the PPTP VPN Server. 3 ) Click OK. Step 2. Configure PPTP VPN Connection on Your Remote Device The remote device can use the Windows built-in PPTP software or a third-party PPTP software to connect to PPTP Server. -
Page 62
Chapter 11 VPN Server 4. Select Use my Internet connection (VPN). 5. Enter the internet IP address of the router (for example: 218.18.1.73) in the Internet address field. Click Next. -
Page 63
Chapter 11 VPN Server 6. Enter the User name Password you have set for the PPTP VPN server on your router, and click Connect. 7. The PPTP VPN connection is created and ready to use. -
Page 64
Chapter 11 VPN Server… -
Page 65: Chapter 12. Customize Your Network Settings
Chapter Customize Your Network Settings This chapter guides you on how to configure advanced network features. It contains the following sections: • Change the LAN Settings • Set Up Link Aggregation • Configure to Support IPTV Service • Specify DHCP Server Settings •…
-
Page 66: Change The Lan Settings
If the IP address conflicts with another device on your local network or your network requires a specific IP subnet, you can change it. 1. Visit http://tplinkwifi.net, and log in with your TP-Link ID or the password you set for the router. 2. Go to Advanced >…
-
Page 67: Configure To Support Iptv Service
Configure IPTV setup to enable Internet/IPTV/Phone service provided by my internet service provider (ISP). How can I do that? 1. Visit http://tplinkwifi.net, and log in with your TP-Link ID or the password you set for the router. 2. Go to Advanced >…
-
Page 68: Specify Dhcp Server Settings
IP Address Pool. You can change the settings of the DHCP Server if necessary, and you can reserve LAN IP addresses for specified client devices. 1. Visit http://tplinkwifi.net, and log in with your TP-Link ID or the password you set for the router.
-
Page 69: Set Up A Dynamic Dns Service Account
Note: DDNS does not work if the ISP assigns a private WAN IP address (such as 192.168.1.x) to the router. 1. Visit http://tplinkwifi.net, and log in with your TP-Link ID or the password you set for the router. 2. Go to Advanced >…
-
Page 70
Chapter 12 Customize Your Network Settings Note: To enjoy TP-Link’s DDNS service, you have to log in with a TP-Link ID. If you have not logged in with one, click 4. Click Register in the Domain Name List if you have chosen TP-Link, and enter the Domain Name as needed. -
Page 71: Create Static Routes
Chapter 12 Customize Your Network Settings 5. Click Login and Save. Tips: If you want to use a new DDNS account, please click Logout first, and then log in with a new account. 12. 6. Create Static Routes Static routing is a form of routing that is configured manually by a network administrator or a user by adding entries into a routing table.
-
Page 72
1. Change the routers’ LAN IP addresses to two different IP addresses on the same subnet. Disable Router B’s DHCP function. 2. Visit http://tplinkwifi.net, and log in with your TP-Link ID or the password you set for Router A. 3. Go to Network >… -
Page 73: Specify Wireless Settings
The preset SSID and password can be found on the label of the router. You can customize the wireless settings according to your needs. Visit http://tplinkwifi.net, and log in with your TP-Link ID or the password you set for the router.
-
Page 74
Chapter 12 Customize Your Network Settings • To use OFDMA function: The OFDMA feature enables multiple users to transmit data simultaneously, and thus greatly improves speed and efficiency. Note: Only when your clients also support OFDMA can you fully enjoy the benefits. 1. -
Page 75: Use Wps For Wireless Connection
Wi-Fi Protected Setup (WPS) provides an easier approach to set up a security-protected Wi-Fi connection. 1. Visit http://tplinkwifi.net, and log in with your TP-Link ID or the password you set for the router. 2. Make sure the Wi-Fi of your router is on and go to Advanced >…
-
Page 76: Push The Wps Button
Chapter 12 Customize Your Network Settings 12. 8. 1. Push the WPS Button Click Start WPS on the screen. Within two minutes, press the WPS button on your device. Success will appear on the above screen and the LED of the router should change from circulating blue in parallel to solid blue, indicating successful WPS connection.
-
Page 77: Schedule Your Wireless Function
The wireless network can be automatically off at a specific time when you do not need the wireless connection. 1. Visit http://tplinkwifi.net, and log in with your TP-Link ID or the password you set for the router. 2. Go to Advanced >…
-
Page 78: Chapter 13. Manage The Router
Chapter Manage the Router This chapter will show you the configuration for managing and maintaining your router. It contains the following sections: • Set Up System Time • Control LEDs • Test the Network Connectivity • Upgrade the Firmware • Backup and Restore Configuration Settings •…
-
Page 79: Set Up System Time
Parental Controls. You can choose the way to obtain the system time as needed. 1. Visit http://tplinkwifi.net, and log in with your TP-Link ID or the password you set for the router.
-
Page 80
Chapter 13 Manage the Router • To manually set the date and time: 1. In the Set Time field, select Manually. 2. Set the current Date MM/DD/YYYY format). 3. Set the current Time HH/MM/SS format). 4. Click Save. • To set up Daylight Saving Time: 1. -
Page 81: Control Leds
The router‘s LEDs indicate router’s activities and status. You can turn on or turn off the LEDs either from the web management page or by pressing the LED button. 1. Visit http://tplinkwifi.net, and log in with your TP-Link ID or the password you set for the router.
-
Page 82
Chapter 13 Manage the Router 1. Visit http://tplinkwifi.net, and log in with your TP-Link ID or the password you set for the router. 2. Go to Advanced > System Tools > Diagnostics. 3. Enter the information with the help of page tips:… -
Page 83: Upgrade The Firmware
Do NOT turn off the router during the firmware upgrade. 13. 4. 1. Online Upgrade 1. Visit http://tplinkwifi.net, and log in with your TP-Link ID or the password you set for the router. 2. When the latest firmware is available for your router, the update icon will display in the top-right corner of the page.
-
Page 84: Manual Upgrade
Firmware Upgrade page. 13. 4. 2. Manual Upgrade 1. Download the latest firmware file for the router from www.tp-link.com. 2. Visit http://tplinkwifi.net, and log in with your TP-Link ID or the password you set for the router. 3. Go to Advanced >…
-
Page 85: Backup And Restore Configuration Settings
Moreover, if necessary you can erase the current settings and reset the router to the default factory settings. 1. Visit http://tplinkwifi.net, and log in with your TP-Link ID or the password you set for the router.
-
Page 86: Set The Router To Reboot Regularly
Note: • During the resetting process, do not turn off the router. • After reset, you can still use the current login password or the TP-Link ID to log in to the web management page. • To reset the router to factory default settings: 1.
-
Page 87: Change The Administrator Account
The account management feature allows you to change your login password of the web management page. Note: If you are using a TP-Link ID to log in to the web management page, the account management feature will be disabled. To manage the TP-Link ID, go to Basic >…
-
Page 88: Local Management
Chapter 13 Manage the Router Note: If you are using a TP-Link ID to log in to the web management page, the Password Recovery feature will be disabled. To manage the TP-Link ID, go to Basic > TP-Link Cloud. 1. Visit http://tplinkwifi.net, and log in with the password you set for the router.
-
Page 89
Chapter 13 Manage the Router 2. Go to Advanced > System Tools > Administration and complete the settings In Local Management section as needed. • Access the router via HTTPS and HTTP: Toggle on Local Management via HTTPS to access the router via HTTPS and HTTP, or keep it disabled to access the router only via HTTP. -
Page 90: Remote Management
Manage the Router 13. 10. Remote Management This feature allows you to control remote devices’ authority to manage the router. 1. Visit http://tplinkwifi.net, and log in with your TP-Link ID or the password you set for the router. 2. Go to Advanced >…
-
Page 91
It would be great if the system logs could be sent to my mailbox at 8 a.m. every day. 1. Visit http://tplinkwifi.net, and log in with your TP-Link ID or the password you set for the router. -
Page 92: Monitor The Internet Traffic Statistics
The Traffic Statistics page displays the network traffic of the LAN, WAN and WLAN sent and received packets, allowing you to monitor the volume of internet traffic statistics. 1. Visit http://tplinkwifi.net, and log in with your TP-Link ID or the password you set for the router.
-
Page 93: System Parameters
You can configure the parameters of traffic transmission rules in wireless networks. It’s recommended to keep the default settings if you are not sure of the proper ones in the case. 1. Visit http://tplinkwifi.net, and log in with your TP-Link ID or the password you set for the router. 2. Go to Advanced >…
-
Page 94
Chapter 13 Manage the Router • Bacon Interval — Enter a value between 40 and 1000 to determine the duration between beacon packets that are broadcasted by the router to synchronize the wireless network. The default is 100 milliseconds. • RTS Threshold –… -
Page 95: Nat
IP address to communicate with devices on the internet, which protects the local network by hiding IP addresses of the devices. 1. Visit http://tplinkwifi.net, and log in with your TP-Link ID or the password you set for the router.
-
Page 96: Chapter 14. Work With Alexa
Chapter Work with Alexa This chapter will show you how to configure your router to work with Alexa.
-
Page 97
LED or ask Alexa to read out the password of the guest network, all without stopping what you’re doing. 1. Visit http://tplinkwifi.net, and log in with your TP-Link ID or the password you set for the router. 2. Go to Advanced >… -
Page 98: Faq
Q2. What should I do if I forget my web management password? • If you are using a TP-Link ID to log in, or you have enabled the Password Recovery feature of the router, click…
-
Page 99
4 ) Click LAN settings and deselect the following three options and click OK. 5 ) Go to Advanced > Restore advanced settings, click to save the settings. -
Page 100
Note: You’ll need to reconfigure the router to surf the internet once the router is reset. Q4. What should I do if I can’t access the internet even though the configuration is finished? 1. Visit http://tplinkwifi.net, and log in with your TP-Link ID or the password you set for the router. 2. Go to Advanced >… -
Page 101
• Your computer might not recognize any DNS server addresses. Please manually configure the DNS server. 1 ) Go to Advanced > Network > DHCP Server. 2 ) Enter 8.8.8.8 as Primary DNS, click Save. Tips: 8.8.8.8 is a safe and public DNS server operated by Google. •… -
Page 102
• Make sure the physical connection between the router and the modem is proper. • Clone the MAC address of your computer. 1 ) Visit http://tplinkwifi.net, and log in with your TP-Link ID or the password you set for the router. -
Page 103
• Modify the LAN IP address of the router. Note: Most TP-Link routers use 192.168.0.1/192.168.1.1 as their default LAN IP address, which may conflict with the IP range of your existing ADSL modem/router. If so, the router is not able to communicate with your modem and you can’t access the internet. -
Page 104
1 ) If you see the message Windows cannot configure this wireless connection, this is usually because windows configuration utility is disabled or you are running another wireless configuration tool to connect the wireless. 2 ) Exit the wireless configuration tool (the TP-Link Utility, for example). -
Page 105
3 ) Select and right click on My Computer on desktop, select Manage to open Computer Management window. 4 ) Expand Services and Applications > Services, find and locate Wireless Zero Configuration in the Services list on the right side. 5 ) Right click Wireless Zero Configuration, and then select Properties. -
Page 106
2 ) If you cannot find the PIN or PIN failed, you may choose Connecting using a security key instead, and then type in the Wireless Password/Network Security Key. 3 ) If it continues to show note of Network Security Key Mismatch, it is suggested to confirm the wireless password of your wireless router. -
Page 107
Component Name Model I.T.E. Power GQ24-120200-AU Responsible party: TP-Link USA Corporation, d/b/a TP-Link North America, Inc. Address: 145 South State College Blvd. Suite 400, Brea, CA 92821 Website: http://www.tp-link.com/us/ Tel: +1 626 333 0234 Fax: +1 909 527 6803 E-mail: sales.usa@tp-link.com This equipment has been tested and found to comply with the limits for a Class B digital device, pursuant to part 15 of the FCC Rules. -
Page 108
We, TP-Link USA Corporation, has determined that the equipment shown as above has been shown to comply with the applicable technical standards, FCC part 15. There is no unauthorized change is made in the equipment and the equipment is properly maintained and operated. -
Page 109
Any changes or modifications not expressly approved by the party responsible for compliance could void the user’s authority to operate the equipment. We, TP-Link USA Corporation, has determined that the equipment shown as above has been shown to comply with the applicable technical standards, FCC part 15. -
Page 110
5250 MHz -5350 MHz (23dBm) 5470 MHz -5725 MHz (30dBm) EU declaration of conformity TP-Link hereby declares that the device is in compliance with the essential requirements and other relevant provisions of directives 2014/53/EU, 2009/125/ EC, 2011/65/EU and (EU)2015/863. The original EU declaration of conformity may be found at https://www.tp-link.com/en/ce… -
Page 111
1. This device may not cause interference. 2. This device must accept any interference, including interference that may cause undesired operation of the device. L’émetteur/récepteur exempt de licence contenu dans le présent appareil est conforme aux CNR d’Innovation, Sciences et Développement économique Canada applicables aux appareils radio exempts de licence. -
Page 112
Korea Warning Statements: 당해 무선설비는 운용중 전파혼신 가능성이 있음. NCC Notice & BSMI Notice: 注意! 依據 低功率電波輻射性電機管理辦法 第十二條 經型式認證合格之低功率射頻電機,非經許可,公司、商號或使用者均 不得擅自變更頻率、加大功率或變更原設計之特性或功能。 第十四條 低功率射頻電機之使用不得影響飛航安全及干擾合法通信;經發現有干 擾現象時,應立即停用,並改善至無干擾時方得繼續使用。前項合法通信,指依 電信規定作業之無線電信。低功率射頻電機需忍受合法通信或工業、科學以及醫 療用電波輻射性電機設備之干擾。 4.7.9.1 應避免影響附近雷達系統之操作。 4.7.9.2 高增益指向性天線只得應用於固定式點對點系統。 安全諮詢及注意事項 • 請使用原裝電源供應器或只能按照本產品注明的電源類型使用本產品。 • 清潔本產品之前請先拔掉電源線。請勿使用液體、噴霧清潔劑或濕布進行清 潔。 • 注意防潮,請勿將水或其他液體潑灑到本產品上。 • 插槽與開口供通風使用,以確保本產品的操作可靠並防止過熱,請勿堵塞或 覆蓋開口。 •… -
Page 113
Продукт сертифіковано згідно с правилами системи УкрСЕПРО на відповідність вимогам нормативних документів та вимогам, що передбачені чинними законодавчими актами України. Safety Information • Keep the device away from water, fire, humidity or hot environments. • Do not attempt to disassemble, repair, or modify the device. •…
 Доброго дня!
В сегодняшней заметке хочу остановиться на настройке бюджетного роутера AX50 из популярной линейки TP-LINK Archer, позволяющим организовать дома Wi-Fi 6 (скорость до 2402 Мбит/с на 5 ГГц и до 574 Мбит/с на 2,4 ГГц // Если верить рекламе 😉).
Чем вообще интересна эта линейка роутеров (помимо Wi-Fi 6):
- несколько антенн (4-8) + технология Beamforming позволяют обеспечить достаточно неплохое покрытие (за 1-2 стенками с Wi-Fi сетью вполне себе можно работать);
- технология OFDMA — позволяет увеличить производительность работы сети, при подкл. нескольких устройств к роутеру;
- низкая задержка (пинг) — актуально для любителей онлайн-игр. Разработчики утверждают, что им удалось добиться снижения отклика до 75% по сравнению с предыдущими линейками роутеров;
- встроенный антивирус + родительский контроль (опасные ресурсы будут автоматически заблокированы роутером при вкл. соответствующих опций // На основе антивируса Trend Micro);
- двухдиапазонный: 2,4 + 5 GHz сеть работает одновременно;
- русский веб-интерфейс (личный кабинет), всё продумано и удобно. Благодаря этому настраивать роутер относительно легко и просто.
Как видите, роутер из данной линейки может стать неплохим домашним устройством для подкл. к сети Интернет (особенно, если ваш «старый» маршрутизатор стал постоянно подвисать, перезагружаться…).
Собственно, теперь подробнее о подключении и настройке…
📌Примечание!
Приобрести роутер TP-LINK Archer ax50 и др. — можно на офиц. сайте Tp-Link (там все ссылки на комп. магазины представлены: Озон, DNS, Яндекс-маркет и т.д.
*
Содержание статьи📎
- 1 Настройка TP-LINK Archer (AX50)
- 1.1 ШАГ 1: распаковка, подкл. кабелей
- 1.2 ШАГ 2: уточняем название сети и пароль для первичного подключения
- 1.3 ШАГ 3: настраиваем доступ к сети интернет, Wi-Fi сеть
- 1.4 ШАГ 4: доп. настройки (опционально, обзор)
- 1.4.1 Вкладка «Состояние»
- 1.4.2 Вкладка «Сеть»
- 1.4.3 Вкладка «Рабочий режим»
- 1.4.4 Вкладка «Беспроводной режим»
- 1.4.5 Вкладка «Гостевая сеть»
- 1.4.6 Вкладка «Обмен данными по USB»
- 1.4.7 Вкладка «Родительский контроль»
- 1.4.8 Вкладка «Приоритезация данных»
- 1.4.9 Вкладка «Защита»
- 1.4.10 Вкладка «NAT переадресация»
- 1.4.11 Вкладка «IPv6»
- 1.4.12 Вкладка «VPN-сервер»
- 1.4.13 Вкладка «Системные инструменты»
→ Задать вопрос | дополнить
Настройка TP-LINK Archer (AX50)
ШАГ 1: распаковка, подкл. кабелей
Упаковка и комплектация AX50 стандартны — внутри картонной коробки:
- сам роутер (с установленными 4-ю антеннами);
- блок питания;
- один LAN-кабель (в принципе, он и не нужен, если вы не собираетесь подключать стационарный ПК к роутеру);
- инструкция по эксплуатации. Пару фото ниже… 👇
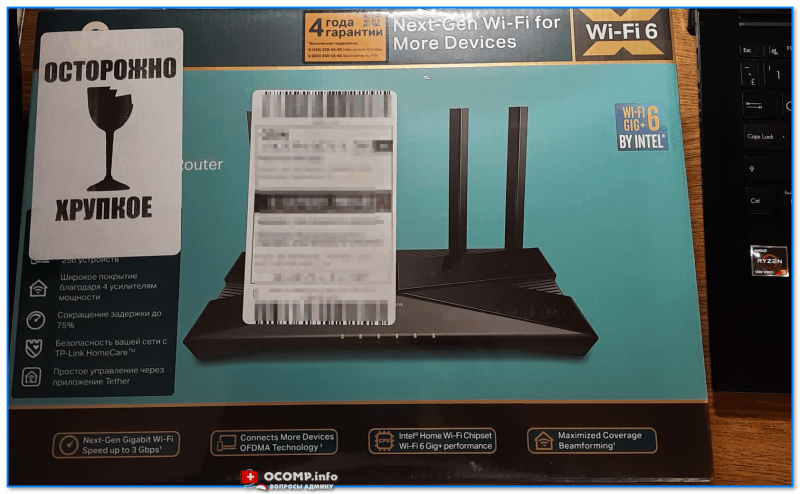
Упаковка AX50 (вид спереди)
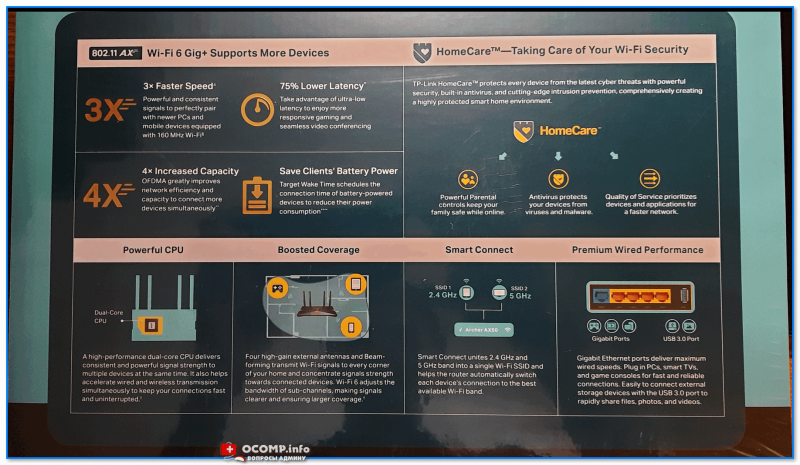
Упаковка AX50 (вид сзади)
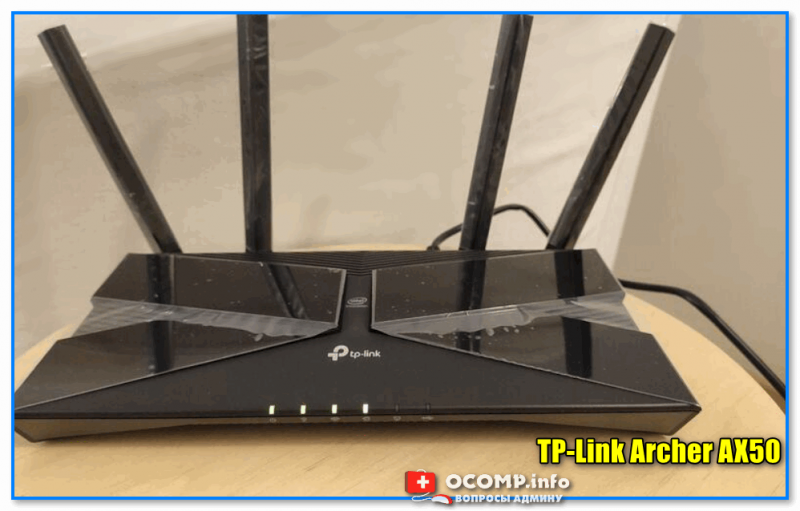
TP-Link Archer AX50
📌Что касается подключения — то здесь все стандартно:
- после того, как вынете роутер из коробки — подключите к WAN-порту кабель от Интернет-провайдера, а к порту Power — адаптер питания;
- при необходимости: к одному из LAN-портов (их здесь 4) — подключите компьютер (благо, что кабель идет в комплекте к роутеру);
- нажмите кнопку включения устройства (цифра-3 на фото ниже);
- на корпусе устройства должен загореться зеленый светодиод питания;
- Всё! Теперь понадобиться компьютер (ноутбук) для настройки устройства… См. следующий шаг.
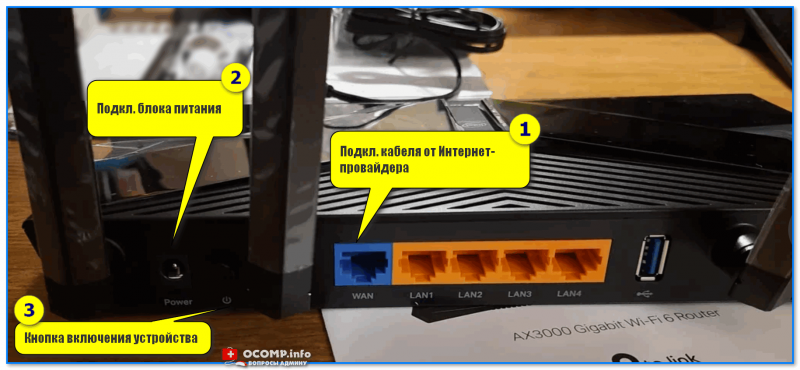
TP-Link Archer AX50 — вид сзади
*
ШАГ 2: уточняем название сети и пароль для первичного подключения
Этот шаг понадобиться в том случае, когда вы будете настраивать роутер с компьютера/ноутбука, подключившись к Wi-Fi сети (если вы подключили ПК с помощью LAN-кабеля — этот шаг можно опустить).
*
Переверните роутер — на его дне должна быть фирменная заводская наклейка с важной информацией для настройки устройства:
- название Wi-Fi сети по умолчанию (например, «TP-Link_609C»);
- пароль для подключения к этой Wi-Fi сети;
- адрес странички настроек роутера (на текущий день актуальный адрес: tplinkwifi.net).
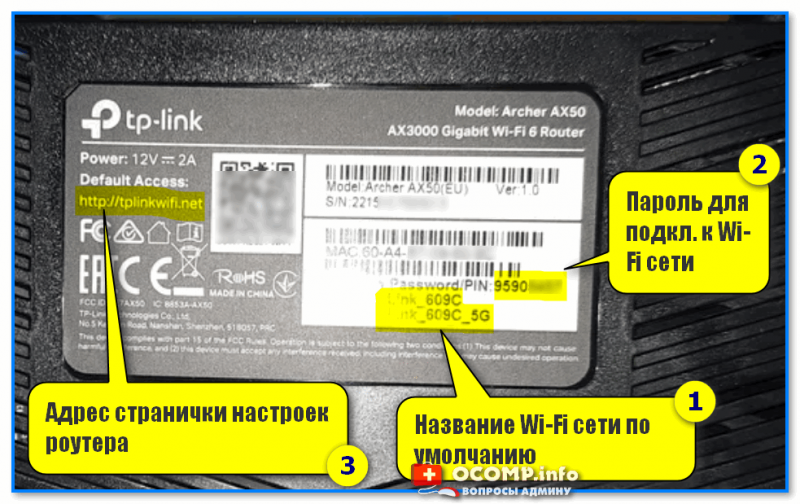
Наклейка на корпусе устройства
Теперь нужно кликнуть по значку сети в трее Windows (рядом с часами), в появившемся окне выбрать Wi-Fi сеть (название нужной вы уже должны знать 👆) и ввести пароль (который был на наклейке 👆).
Если все введено корректно — ноутбук (компьютер) должен подключиться к Wi-Fi сети (но она пока еще может быть без доступа к Интернету!).
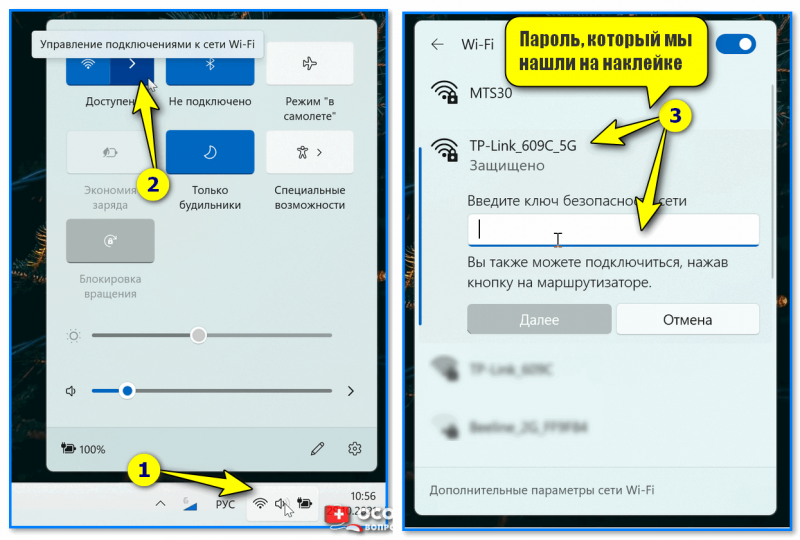
Подключаемся к Wi-Fi сети
*
ШАГ 3: настраиваем доступ к сети интернет, Wi-Fi сеть
Чтобы вы смогли войти в веб-интерфейс (личный кабинет) роутера — ваш компьютер должен быть подключен к его Wi-Fi сети (см. ШАГ 2), либо соединен с ним LAN-кабелем!
*
Теперь нужно запустить браузер (рекомендуется Edge или Chrome) и перейти по адресу:
- tplinkwifi.net (тот, который был на наклейке);
- 192.168.0.1 (работает на большинстве роутеров TP-Link. К линейке Archer подходит).
- если ни тот, ни другой адрес не откроет страницу настроек — 📌прочитайте эту заметку.
*
Если все предыдущие шаги вы выполнили правильно — перед вами появится страничка с предложением задать пароль администратора. Это нужно для того, чтобы никто, кроме вас, не мог изменять настройки как ему заблагорассудиться.
Прим.: пароль можно установить любой…
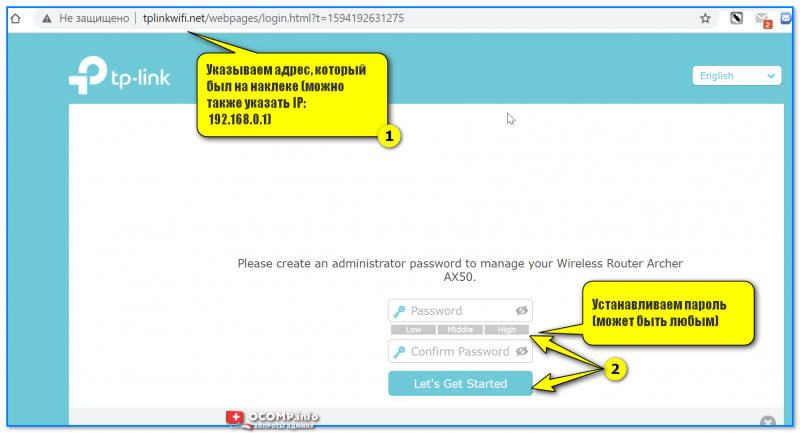
Первый вход в настройки роутера
Далее появится окно быстрой настройки (Quick Setup) — рекомендую сразу же включить русский язык (справа, в углу) и перейти в режим расширенных настроек (Advanced).
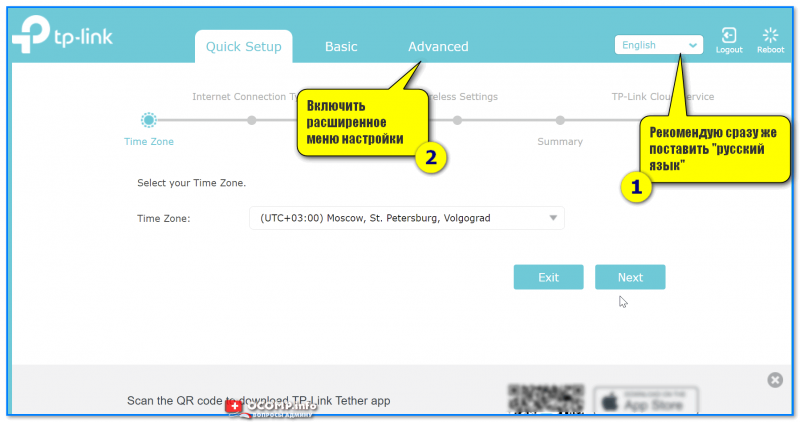
Включаем русский в меню
📌 Следующий важный момент: настройка доступ в Интернет. Для этого нужно открыть вкладку «Сеть /интернет» и:
- указать тип подключения к сети (📌возможно понадобиться указать также IP-адреса, пароли, и пр. информацию. Эти данные должен предоставить вам ваш Интернет-провайдер, обычно, они есть в договоре на оказание услуг связи!);
- нажать кнопку «Сохранить». 👇
Если все настройки введены корректно — через некоторое время на устройствах, подключенных к роутеру, должно появиться подключение к Интернету!
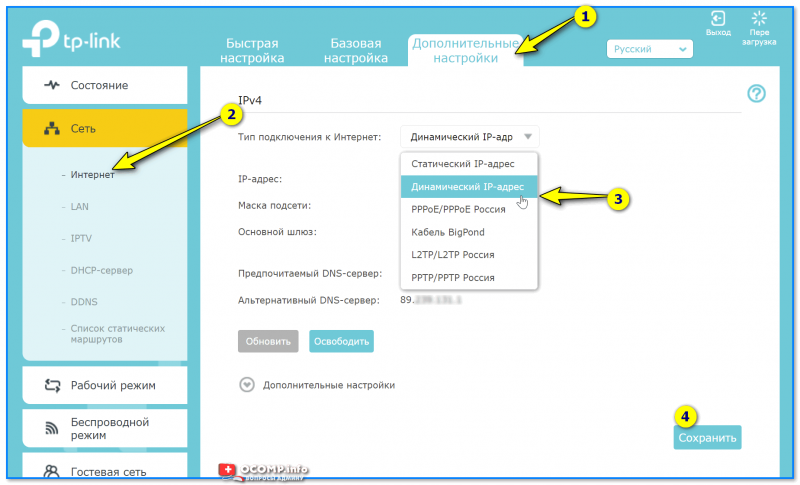
Настройка доступа в интернет
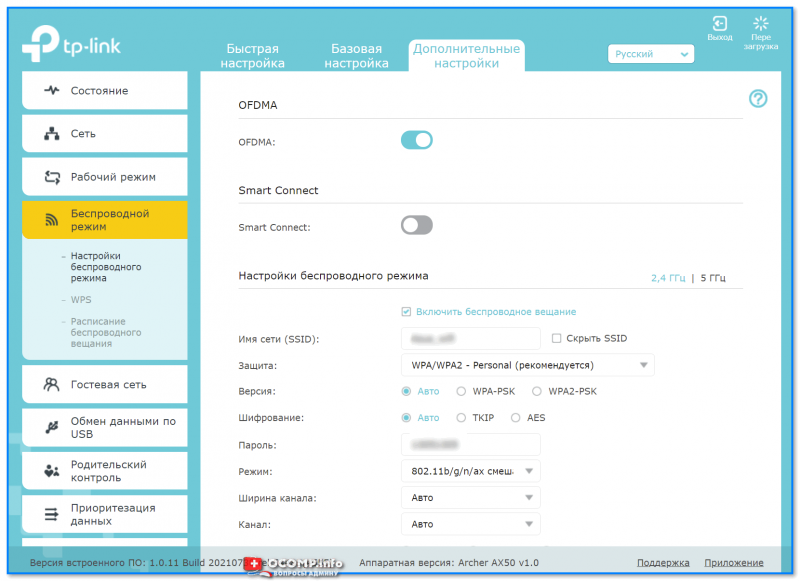
📌Еще один важный момент: поменять название Wi-Fi сети, пароль, проверить уровень сигнала и пр. Сделать это можно в разделе «Настройка беспроводного режима». См. скрин ниже. 👇
На что обратить внимание:
- желательно включить опцию OFDMA (В Wi-Fi 6 OFDMA — одна из важнейших функций для повышения производительности сети);
- имя сети и пароль рекомендуется изменить (не использовать те, что были на наклейке по умолчанию);
- установить нужную мощность передатчика (слабая, средняя, сильная);
- задать нужный канал (при необходимости) и пр.
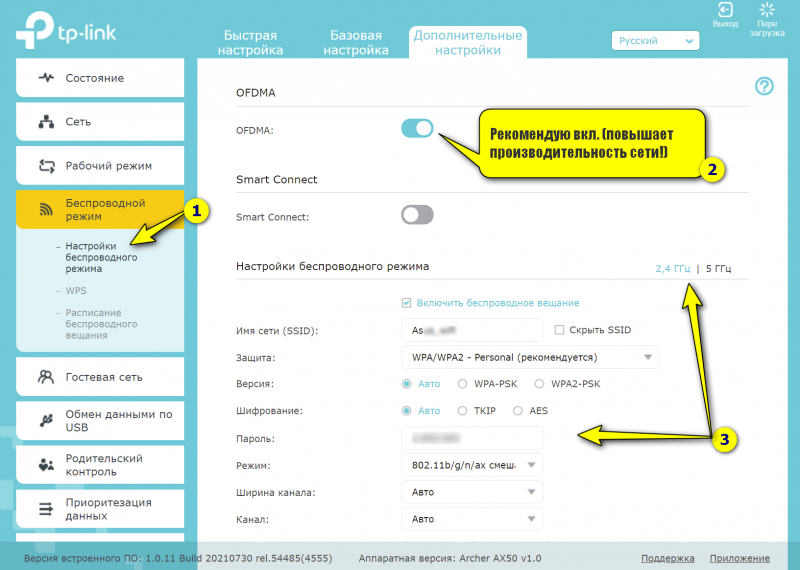
Настройки беспроводного режима
Собственно, на этом базовая настройка роутера завершена. После этого у вас должен быть доступ к сети Интернет у всех устройств, которые подключены к роутеру (через Wi-Fi / или LAN-кабель).
В следующем шаге я покажу еще неск. скринов с интересными настройками роутера (однако, задавать их не обязательно, и нужно это далеко не всем!).
*
ШАГ 4: доп. настройки (опционально, обзор)
Вкладка «Состояние»
Позволяет узнать, подключен ли роутер к Интернету, посмотреть IP-адреса, нагрузку на ядра ЦП, память, сколько проводных и беспроводных устройств подключено к нему.
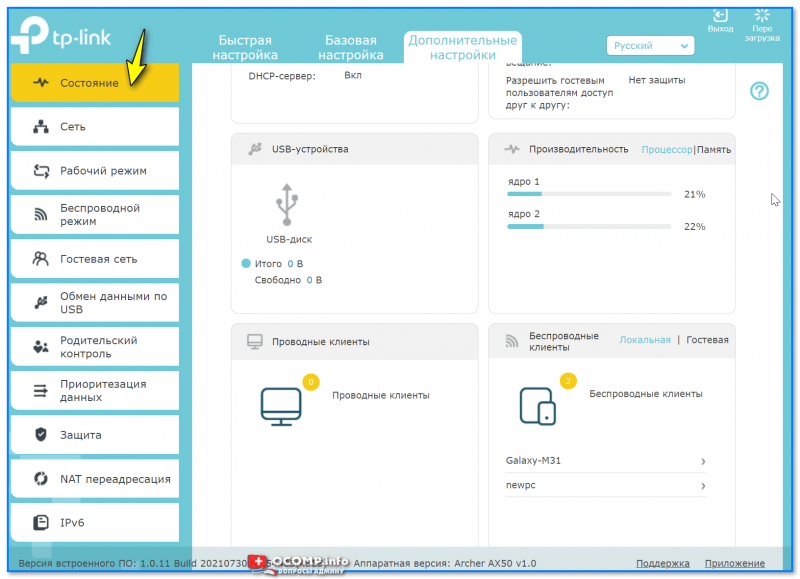
Вкладка состояния — TP-Link Archer (AX50)
*
Вкладка «Сеть»
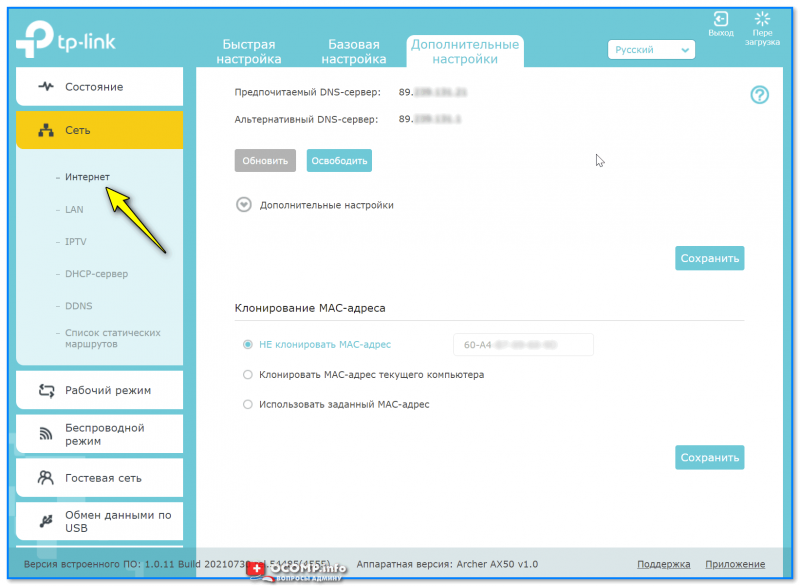
Отвечает за настройки доступа к сети Интернет, IPTV, LAN, DHCP и пр. параметры (в общем-то, многое как и у других роутеров — почти «ничего» уникального в этой вкладке нет). См неск. скринов ниже… 👇
Интернет
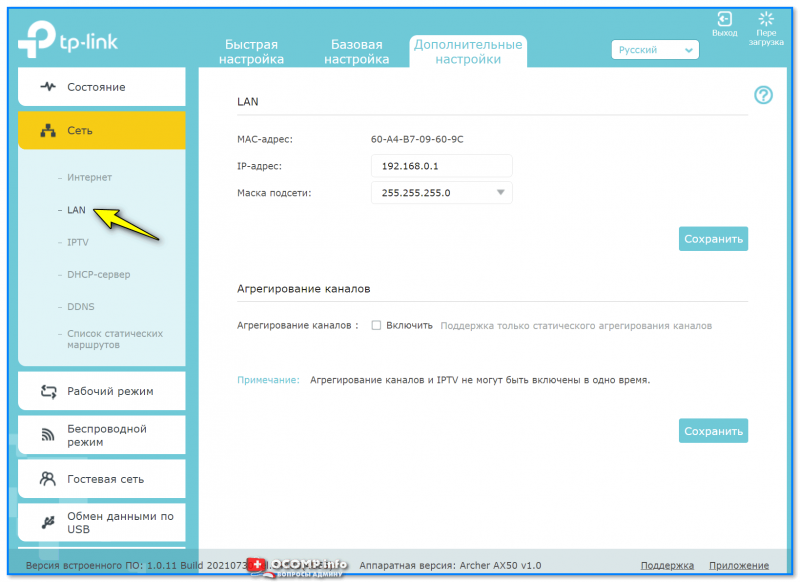
LAN
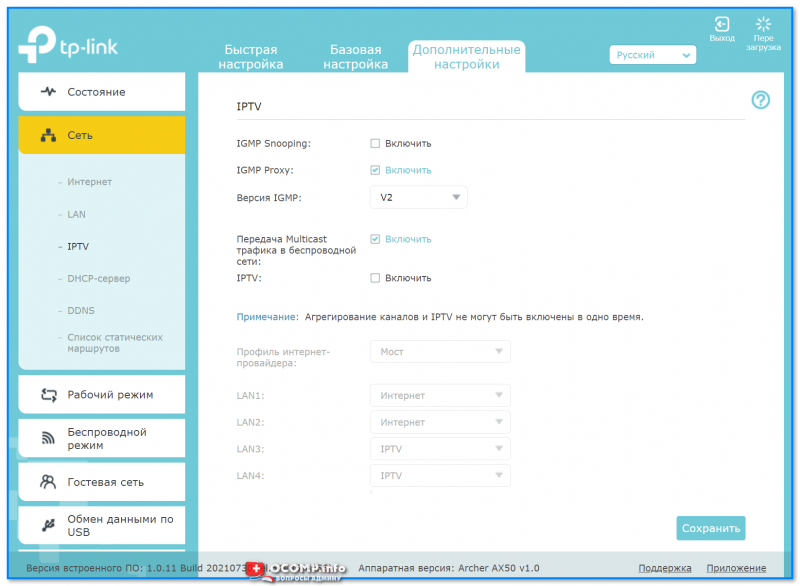
IPTV
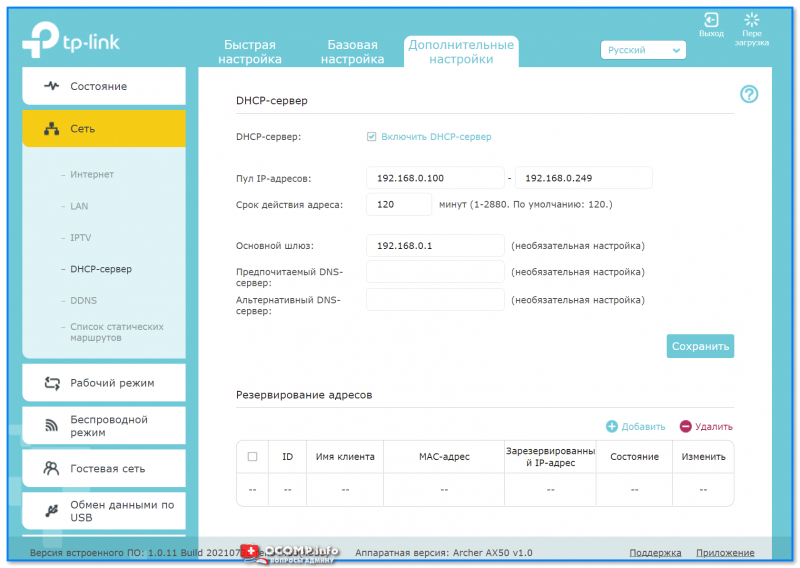
DHCP-сервер
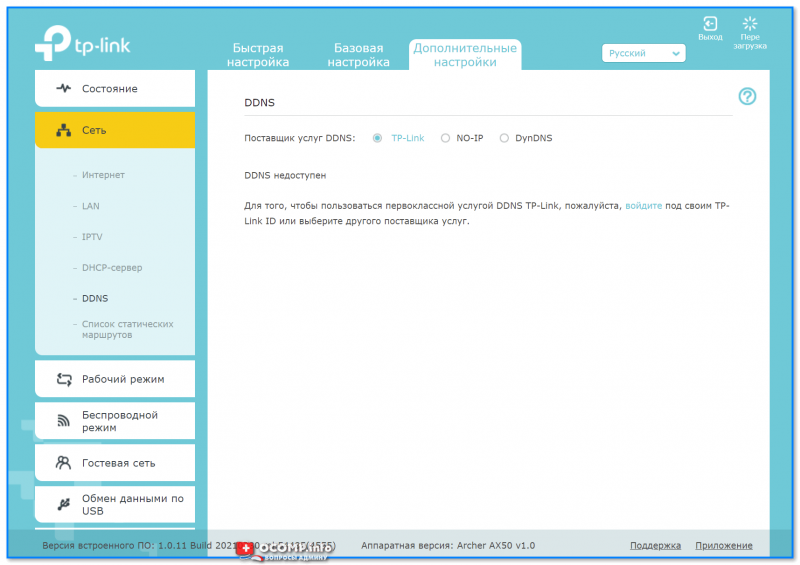
DDNS
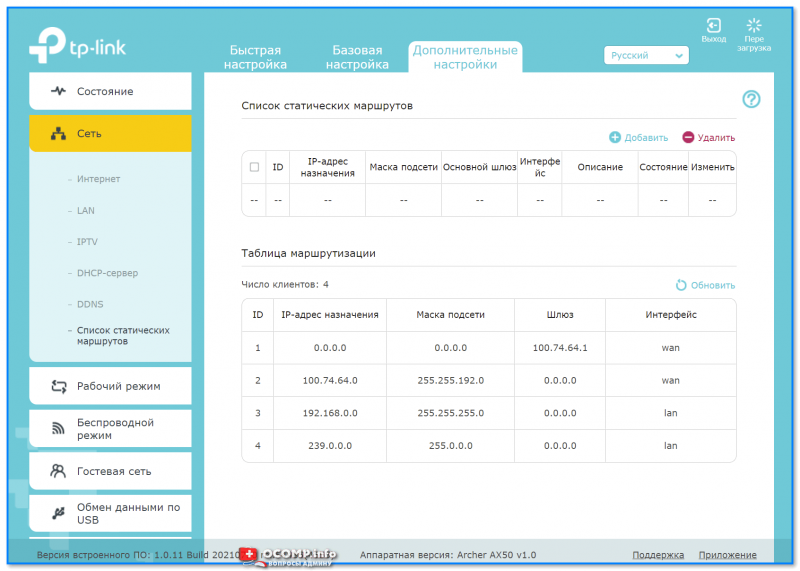
Список статических маршрутов
*
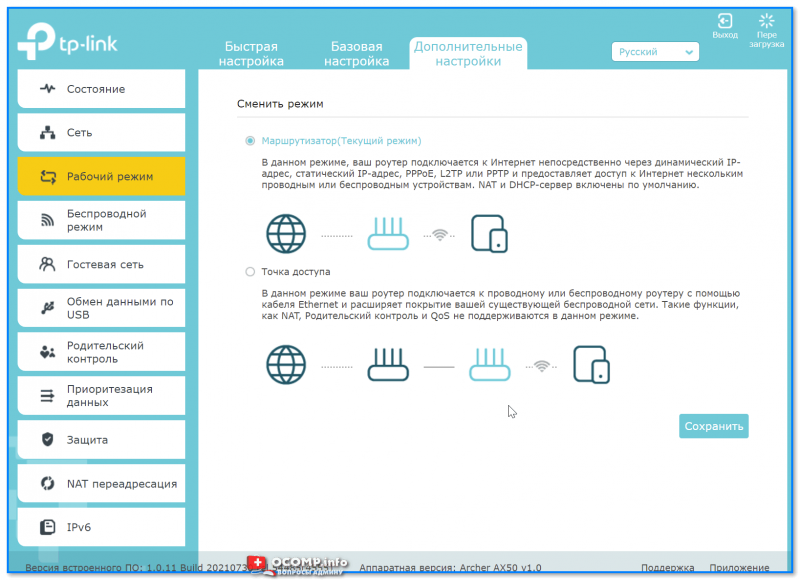
Вкладка «Рабочий режим»
Предназначена для переключения работы устройства с маршрутизатора в режим точки доступа (это может быть весьма удобно, если вам нужно расширить уже существующую Wi-Fi сеть).
Рабочий режим
*
Вкладка «Беспроводной режим»
Настройка Wi-Fi сети: название, пароль, выбор канала и его ширины, уровень сигнала, расписание работы сети и т.д. (например, можно настроить работу роутера так, чтобы ночью он автоматически выключался, а днем — автоматически включался // без вашего участия 👌).
Настройки беспроводного режима

WPS
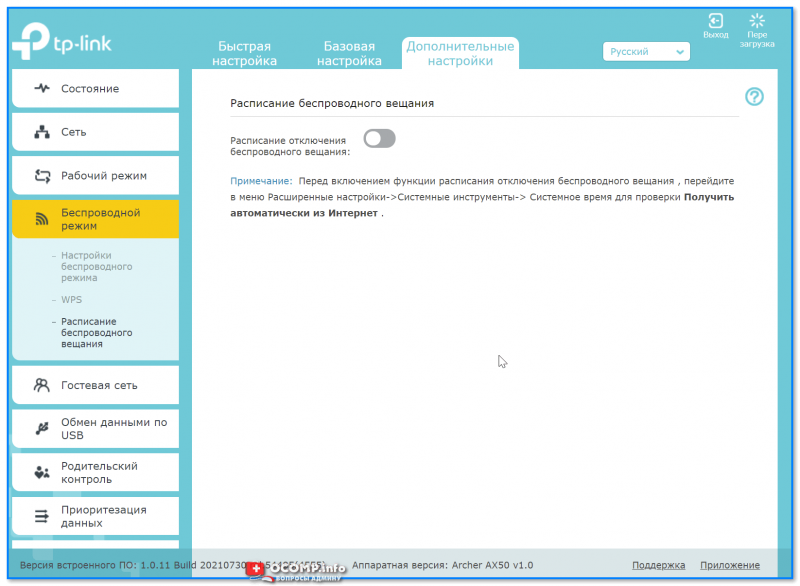
Расписание беспроводного вещания
*
Вкладка «Гостевая сеть»
Предназначена для создания доп. Wi-Fi сети, которая может использоваться для выхода в Интернет вашим гостям, посетителям, клиентам (в общем тем людям, которым вы хотите дать возможность выхода в Интернет, но при этом не доверяете доступ к своим ПК и ноутбукам, подключенным к основной сети. Прим.: при подключении к гостевой сети — нельзя увидеть устройства, подключенные к основной сети!).
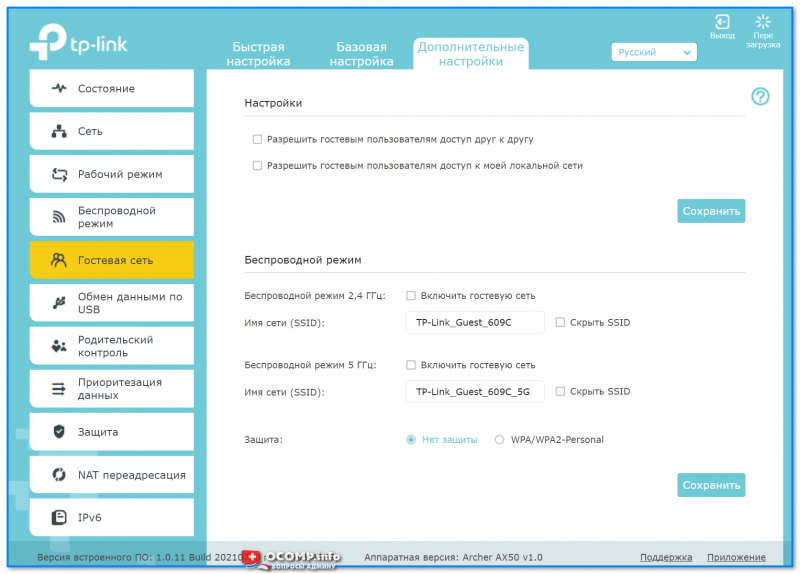
Гостевая сеть
*
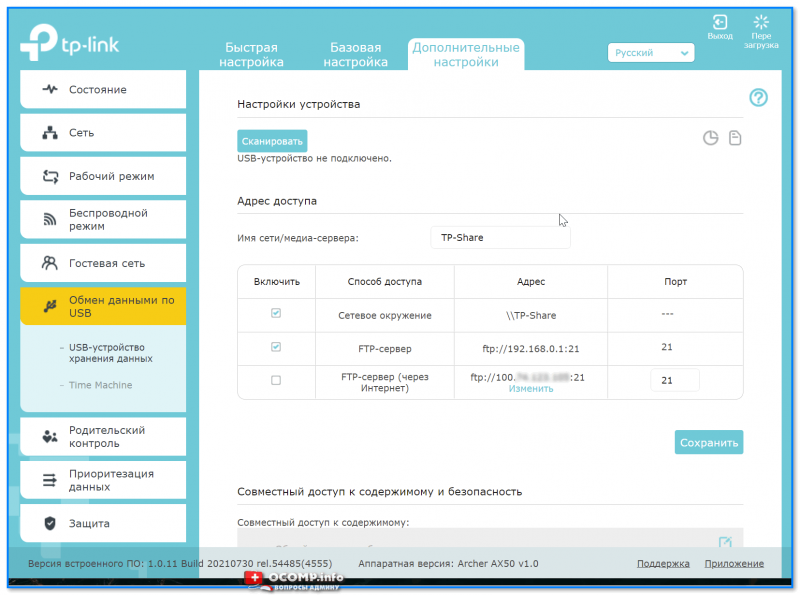
Вкладка «Обмен данными по USB»
Позволяет создать FTP-сервер (общий диск) для всех пользователей, подключенных к вашему роутеру. Может быть весьма удобно, если у вас есть большой внешний диск, и вы хотите получить к нему доступ со всех домашних устройств.
Причем, есть опция для создания FTP-сервера с доступом по Интернету.
USB-устройство для хранения данных
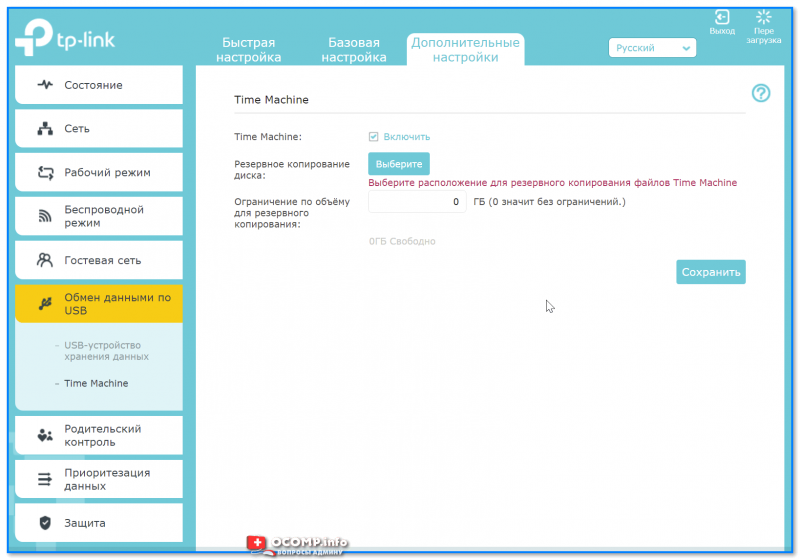
Time Machine
*
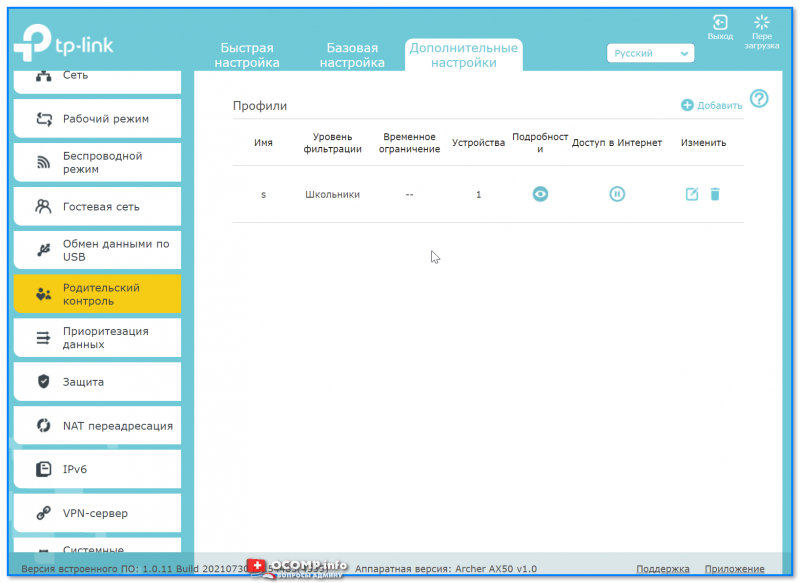
Вкладка «Родительский контроль»
Предназначена для ограничения доступа к Интернету. Например, можно запретить просматривать определенные группы сайтов (либо поставить ограничение по времени работы Интернета).
Обычно, используется для ограничения доступа «детского» ПК…
Родительский контроль
*
Вкладка «Приоритезация данных»
Эта вкладка позволяет ограничить скорость доступа определенных устройств (например, если у вас подключено 2 компьютера к сети — вы можете одному из них поставить ограничение: не более 5 Мбайт\с и тем самым, он не будет забивать весь канал связи…).
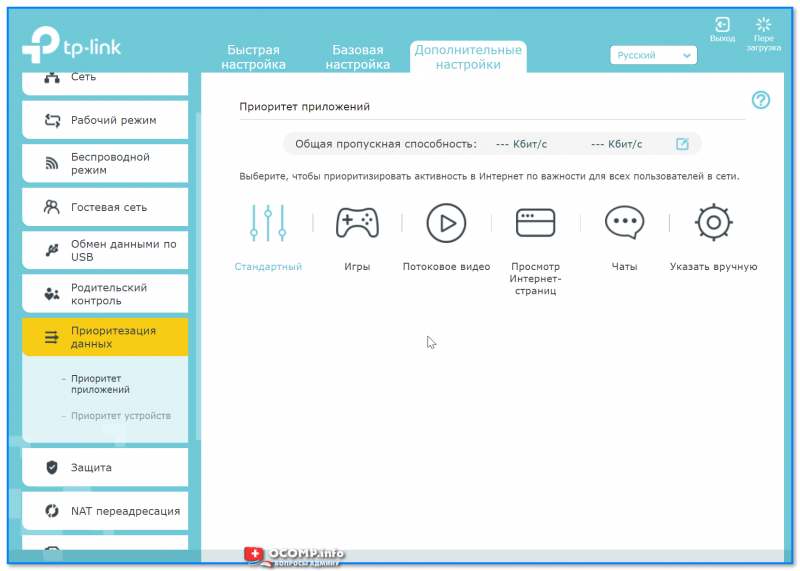
Приоритет приложений
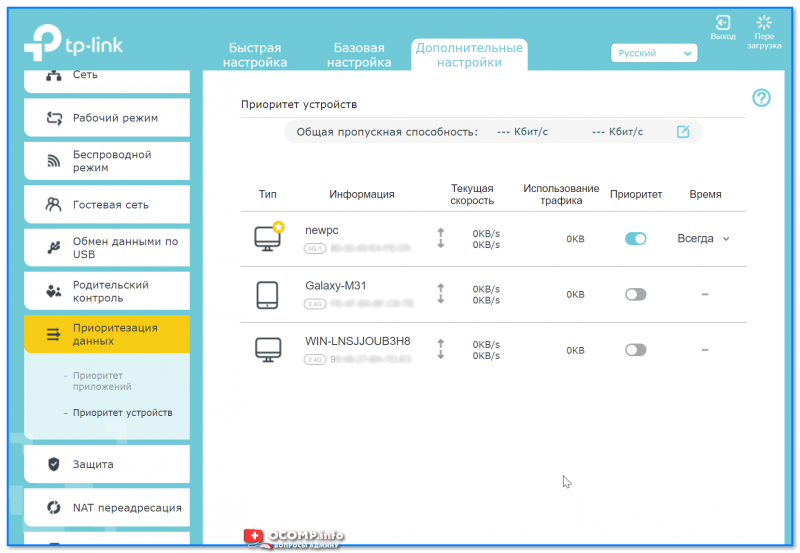
Приоритет устройств
*
Вкладка «Защита»
Предназначена для вкл. антивирусной проверки открываемых веб-страничек (Trend Micro), контроля доступа устройств (например, можно создать белый список устройств, которым разрешается подключаться к Wi-Fi сети, а всех остальных блокировать).
Также есть возможность «привязать» IP и MAC-адреса: т.е. сделать так, чтобы при каждом подключении компьютера к роутеру — ему выдавался один и тот же IP-адрес (это может быть нужно для проброски портов или для организации сетевых игр).
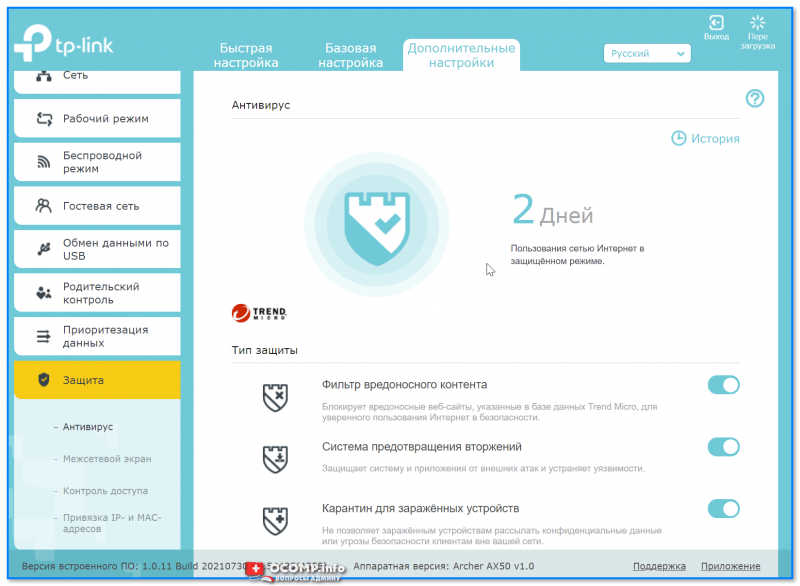
Антивирус
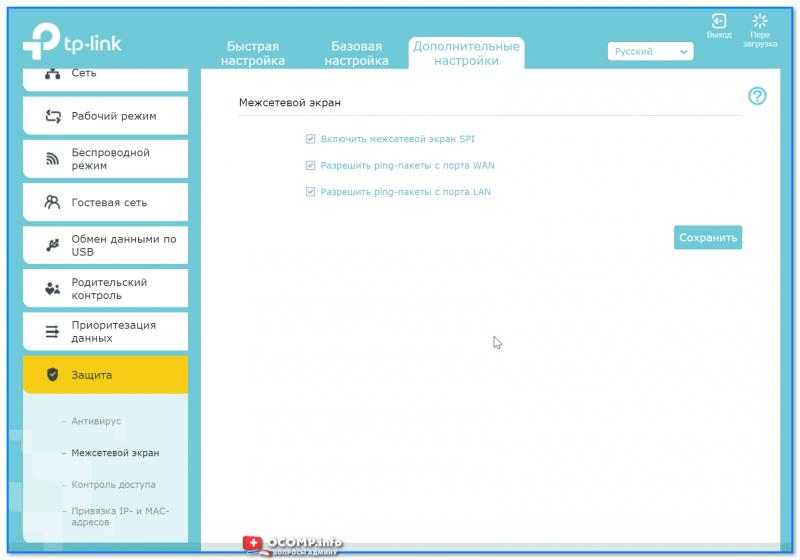
Межсетевой экран
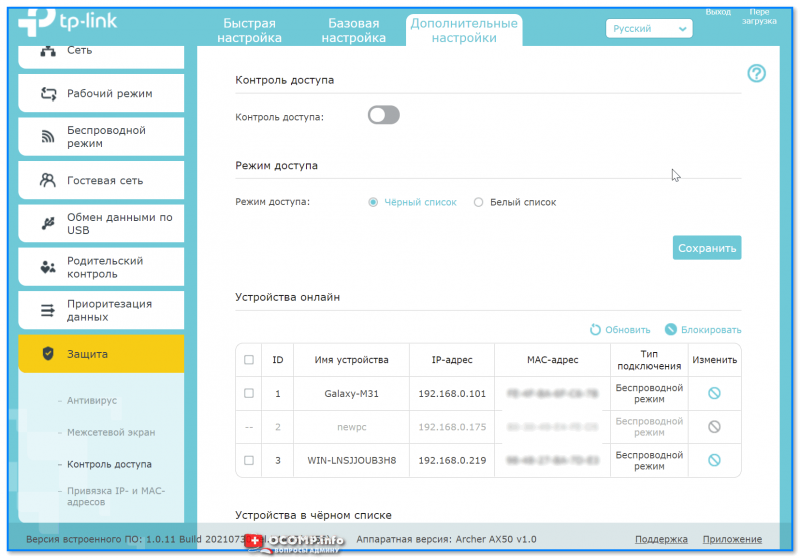
Контроль доступа
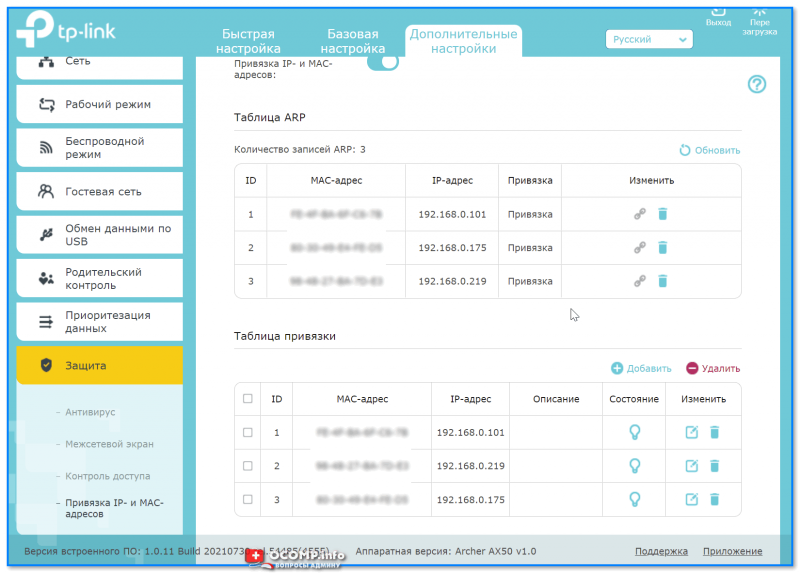
Привязка IP и MAC-адреса
*
Вкладка «NAT переадресация»
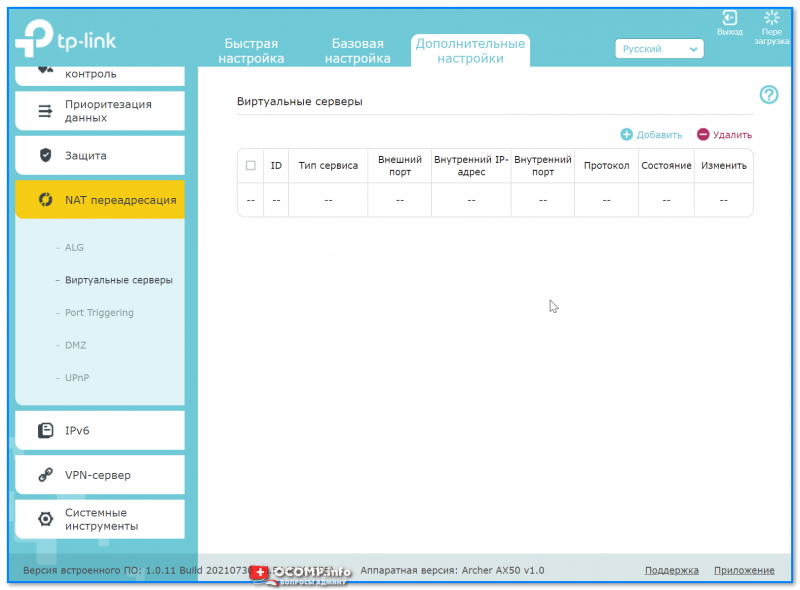
«Тонкая» настройка сети: можно создать виртуальный сервер (и разместить на нем сайт, например), пробросить порты, вкл. функцию DMZ-хост (полезна для игр, чтобы не пробрасывать «все подряд» порты) и пр.
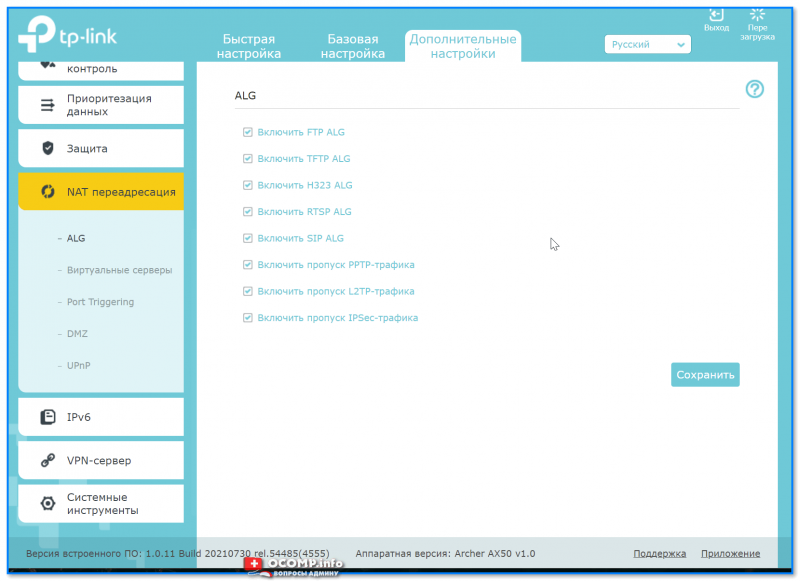
ALG
Виртуальные серверы

Port Triggering

DMZ
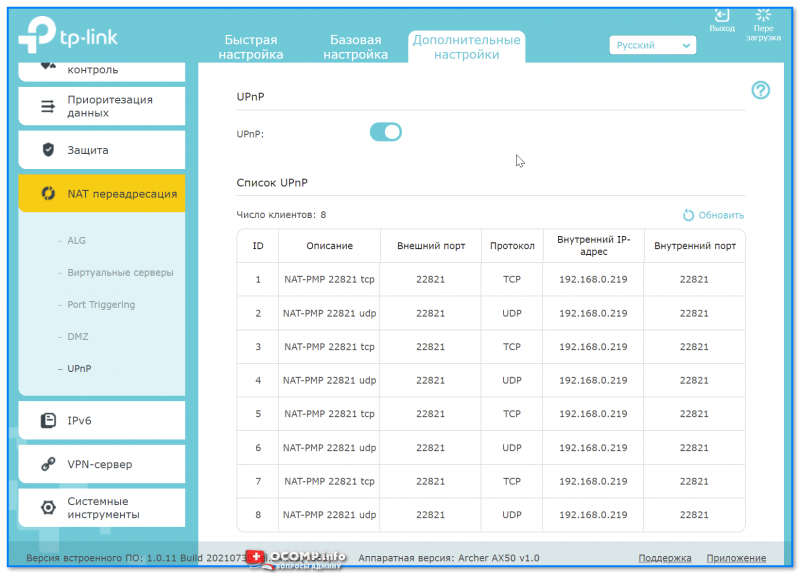
UPnP
*
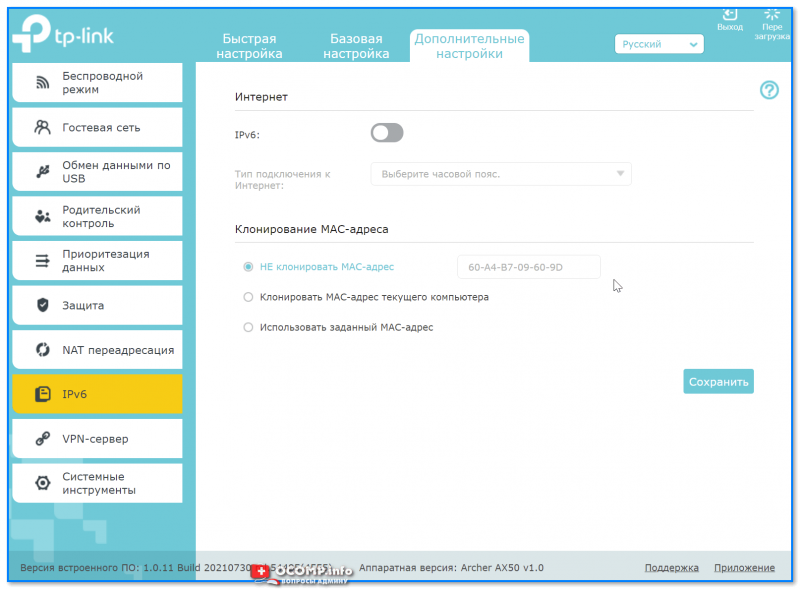
Вкладка «IPv6»
Включение и настройка протокола IPv6.
IPv6
*
Вкладка «VPN-сервер»
Предназначена для настройки VPN: причем, можно создать собственный сервер (чтобы к нему можно было подключиться издалека), так и настроить подключение к стороннему.
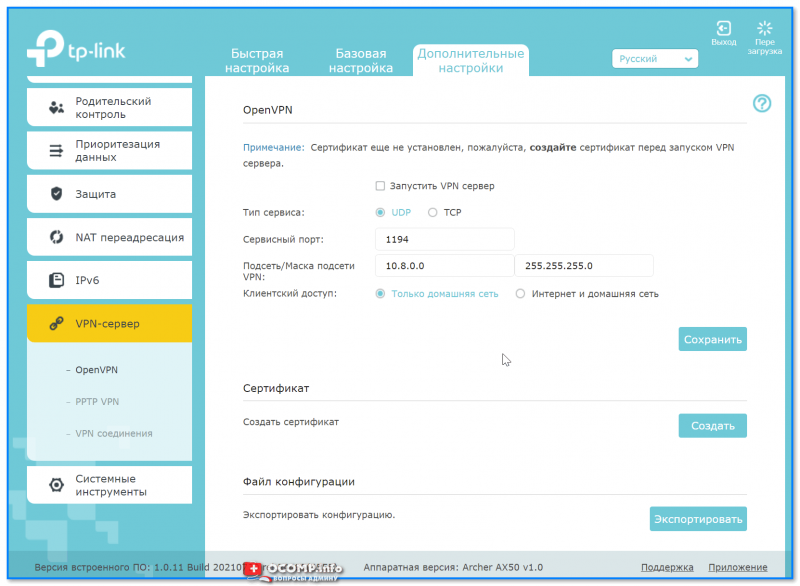
Open VPN

PPTP VPN
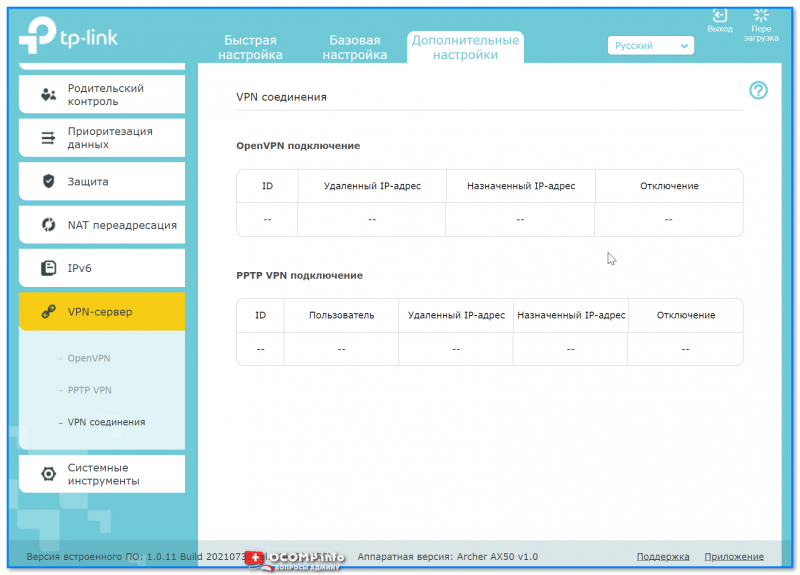
VPN соединения
*
Вкладка «Системные инструменты»
С помощью этой вкладки можно настроить системное время роутера, работу индикаторов, обновить прошивку, вкл. мониторинг трафика, проверить пинг, и др.
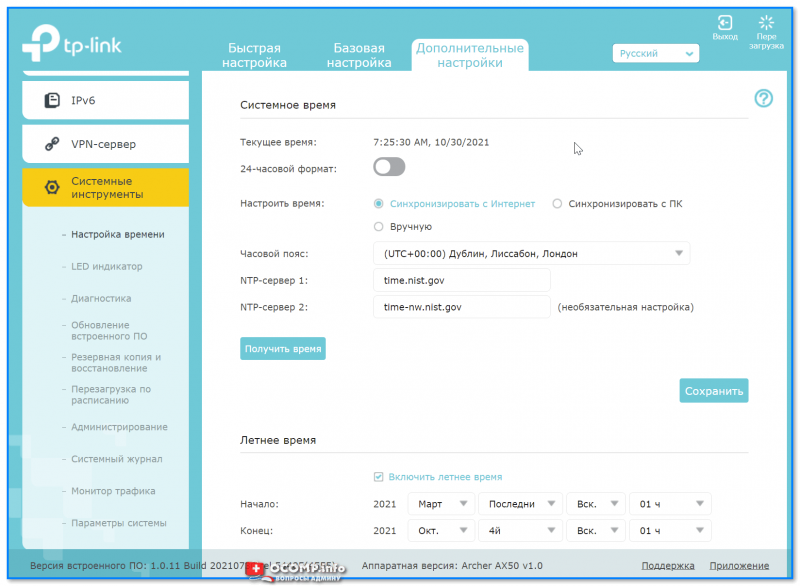
Настройка времени
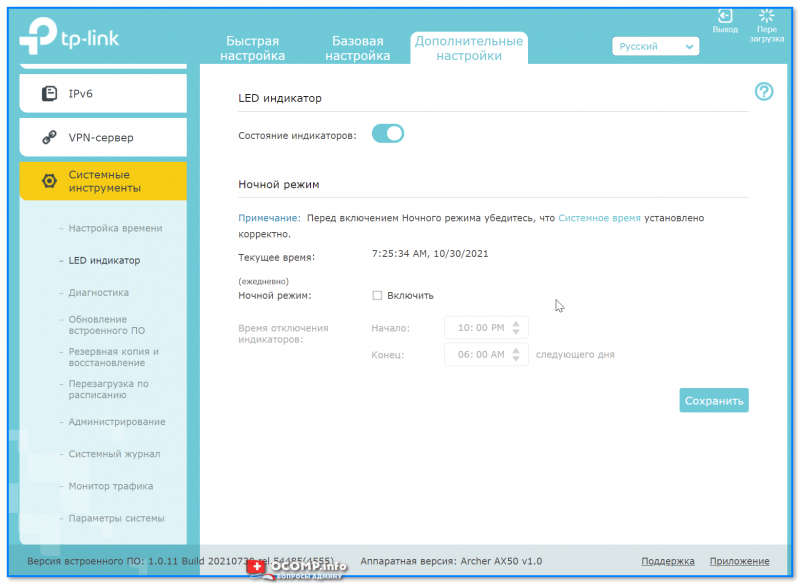
LED индикатор
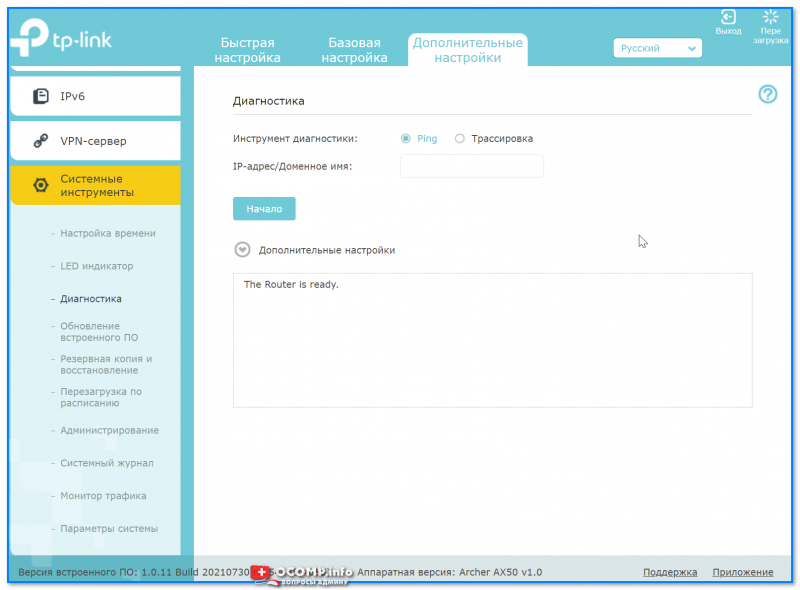
Диагностика

Монитор трафика
*
Дополнения по теме — приветствуются!
На сегодня пока все, успехов!
👋


В нашей сегодняшней статье мы рассмотрим пошаговую инструкцию по подключению и настройке гигабитного роутера TP-Link Archer AX50. Это одна из самых новых моделей в линейке маршрутизаторов от TP-Link. AX50 может работать одновременно на двух частотах — 2.4 ГГц и 5 ГГц. Оснащен пятью гигабитными портами. Ключевой особенностью Archer AX50 является поддержка стандарта Wi-Fi 6 — новейшего поколения Wi-Fi, способного обеспечить максимальную суммарную скорость передачи данных до 3000 Мбит/с. Кроме того, стандарт Wi-Fi 6 позволяет подключить к роутеру в 4 раза больше устройств, чем стандарт Wi-Fi 5. Здесь следует отметить, что для достижения таких результатов все подключаемые к роутеру устройства также должны поддерживать стандарт Wi-Fi 6.
Приступим к подключению и настройке Archer AX50.
Подключите Ваш роутер TP-Link Archer AX50 к электросети. Интернет-кабель провайдера, приходящий из подъезда в квартиру, вставьте в порт WAN (порт синего цвета).

Если Ваш интернет-провайдер использует фиксацию по mac-адресу, то Вам следует обратиться в службу техподдержки для привязки mac-адреса роутера. Без этого действия интернет работать не будет.
Теперь нужно подключиться к сети Wi-Fi. Данные для подключения указаны на нижней стороне роутера. SSID — это название сети Wi-Fi, Wireless Password/PIN — это пароль для входа в сеть.

Находим в списке доступных сетей Wi-Fi нужную нам сеть. Вводим пароль для подключения к сети.

Далее рассмотрим пошаговые действия по настройке беспроводной сети.
Шаг 1. Заходим в веб-интерфейс роутера. Для этого в браузере в верхней строке вводим:
192.168.0.1. или tplinkwifi.net.

Шаг 2. В открывшемся окне меняем язык, а также создаем пароль для входа в веб-интерфейс роутера.

Шаг 3. Проходим на вкладку «Быстрая настройка». Выбираем из списка свой часовой пояс (Москва). Нажимаем «Далее».

Шаг 4. Тип подключения к Интернет выбираем — «Динамический IP-адрес». Нажимаем «Далее».

Шаг 5. MAC-адрес — ставим галочку на пункт «Не клонировать MAC-адрес». Нажимаем «Далее».

Шаг 6. Настройки беспроводного режима. В данном разделе указаны SSID (название) и пароль сетей Wi-Fi для каждой из двух частот.

Мы можем задать свои значения для каждой сети или оставить параметры по умолчанию.

Шаг 7. Обзор настроек. Проверяем все наши введенные параметры.

Нажимаем «Сохранить».

Шаг 8. Для того, чтобы измененные параметры вступили с силу, нам нужно переподключиться к новой беспроводной сети. Находим в списке доступных Wi-Fi сетей нашу новую сеть. Подключаемся к ней.

Шаг 9. Быстрая настройка роутера Archer AX50 успешно завершена.

Шаг 10. Далее рассмотрим дополнительные настройки роутера. Проходим на вкладку «Дополнительные настройки».
Состояние. В данном разделе мы можем посмотреть состояние беспроводной сети, основной режим работы и параметры.

Беспроводные клиенты. Данная вкладка показывает, сколько и каких беспроводных устройств подключено к роутеру.

Сеть. Пройдя на данную вкладку, мы можем посмотреть и, при необходимости, изменить основные параметры беспроводной сети. Рассмотрим каждый из пунктов вкладки «Сеть» подробнее.
-
Интернет. Указаны параметры подключения к Интернету — тип подключения, IP-адрес, маска подсети, шлюз и DNS-сервер. Если тип подключения к Интернету — динамический IP, то все эти параметры роутер получает автоматически от провайдера.
-
LAN. В разделе LAN мы можем посмотреть MAC-адрес роутера, а также IP-адрес. При необходимости можно изменить IP-адрес (к примеру, роутер настраивается как дополнительный для расширения покрытия Wi-Fi).
-
DHCP — сервер. В данном разделе указаны основные характеристики DHCP. Они выставлены по умолчанию. Для домашнего пользования данные параметры вполне оптимальны, и изменять их нет необходимости.


Рабочий режим. Данная вкладка показывает, в каком режиме работает роутер. Здесь же настраивается подключение роутера как точки доступа.

Беспроводной режим. Пройдя на данную вкладку, мы можем изменить параметры беспроводного подключения.
-
Настройки беспроводного режима. Проверяем, включена ли функция OFDMA. OFDMA — технология является ключевой для всех роутеров стандарта Wi-Fi 6.
-
WPS. Функция WPS дает возможность подключаться к роутеру без ввода пароля Wi-Fi сети. Для этого нажимаем кнопку «Начало WPS» в пункте «WPS».
-
Далее в списке доступных Wi-Fi сетей на подключаемом к роутеру устройстве выбираем нужную нам сеть. Как видим, появилась надпись «Вы также можете подключиться, нажав кнопку на маршрутизаторе».

-
Нажимаем на роутере кнопку «WPS». После этого устройство подключится к Wi-Fi сети без ввода пароля.


Параметры шифрования, рабочий режим, характеристики канала — данные значения оставляем по умолчанию.


Родительский контроль. В данном разделе можно настроить ограничение доступа в Интернет для определенных устройств, запрет доступа на конкретные сайты, а также настроить расписание выхода в сеть.

Мы рассмотрели основные настройки гигабитного Wi-Fi 6 роутера TP-Link Archer AX50.
Мадина А.
Видео по настройке
-
How to Resolve Double NAT using Starlink
-
How to Configure a TP-Link Router with Starlink
-
How to Set up Address Reservation on TP-Link Routers Windows
This video will show you how to set up Address Reservation on TP-Link routers.
Больше
Меньше -
How to Set up OpenVPN on TP-Link Routers Windows
This video will show you how to set up OpenVPN on a TP-Link Wi-Fi router.
For more information, visit www.tp-link.com/support.Больше
Меньше -
How to setup PPTP VPN on TP Link routers Windows
This video will show you how to set up PPTP VPN on a TP-Link Wi-Fi router.
For more information, visit www.tp-link.com/supportБольше
Меньше -
Что делать, если нет доступа в интернет при использовании DSL-модема и роутера TP-Link?
-
Не получается выйти в интернет?
Пошаговое описание решения проблемы.
Больше
Меньше -
TP Link Archer AX Series Unboxing and Setup
Как обновить прошивку
Обновление программного обеспечения (прошивки) способно решить проблемы предыдущих версий прошивки и улучшить работу устройства. Во избежание возникновения проблем при обновлении ознакомьтесь со следующей информацией.
Проверьте соответствие аппаратной версии и версии прошивки — установка неверной версии может привести к неисправности устройства и аннулировать гарантию (обычно версия 1.x = версия 1). Как узнать аппаратную версию устройства?
Не рекомендуется устанавливать прошивку, предназначенную для другого региона. Нажмите здесь для выбора региона и загрузите последнюю версию прошивки.
Отключение питания во время обновления прошивки может привести к неисправности устройства.
Обновляйте прошивку роутера по Wi-Fi только тогда, когда это является единственно возможным способом.
Перед обновлением рекомендуется закрыть на компьютере все программы, для работы которых требуется интернет-подключение, или просто отсоединить сетевой кабель от устройства.
Перед выполнением обновления файл с прошивкой необходимо извлечь из архива с помощью архиватора (например, WinRAR или WinZIP).
Рекомендации по обновлению прошивки: Wi-Fi роутер, Wi-Fi роутер с модемом ADSL2+, усилитель Wi-Fi сигнала.
Больше
Меньше
|
Archer AX50(EU)_V1_1.0.12 Build 20230829 |
Загрузить | |
|---|---|---|
| Дата публикации: 2023-08-31 | Язык: Многоязычный | Размер файла: 29.19 MB |
|
В этой прошивке содержатся важные обновления для системы безопасности.
Изменения и исправленные ошибки |
|
Archer AX50(EU)_V1_220526 |
Загрузить | |
|---|---|---|
| Дата публикации: 2022-10-08 | Язык: Многоязычный | Размер файла: 29.18 MB |
|
Повышена безопасность устройства. |
|
Archer AX50(EU)_V1_210730 |
Загрузить | |
|---|---|---|
| Дата публикации: 2021-09-07 | Язык: Многоязычный | Размер файла: 29.20 MB |
|
Исправленные ошибки: |
Использование стороннего ПО на устройствах TP-Link
Официальное программное обеспечение устройств TP-Link может быть заменено на стороннее, например, на DD-WRT. Компания TP-Link не обязана предоставлять сервисную или техническую поддержку для устройств со сторонним ПО и не гарантирует стабильность его работы. Ущерб, нанесённый устройству в результате использования стороннего ПО, приведёт к аннулированию гарантии.
Открытый исходный код для программистов (GPL)
Следующая информация предназначена для программистов и не представляет особой значимости для большинства конечных пользователей продукции TP-Link.
Продукция TP-Link содержит код, разработанный третьими лицами, включая код, разработанный в соответствии с универсальной общественной лицензией GNU (GPL) версий 1–3 или в соответствии со универсальной общественной лицензией ограниченного применения GNU (LGPL). Вы можете использовать соответствующее программное обеспечение на условиях лицензии GPL.
Ознакомиться, распечатать и загрузить соответствующие условия лицензии GPL можно здесь. В центре исходных кодов GPL можно скачать исходный код GPL соответствующего ПО, используемого в продукции TP-Link, а также прочую информацию, включая список ПО TP-Link, содержащего исходный код GPL.
Приложение

- TP-Link Tether
-
Приложение Tether компании TP‑Link обеспечивает удобное управление сетью через любое устройство, работающее на операционной системе Android или iOS. Ознакомьтесь с дополнительной информацией о приложении Tether и списком совместимых устройств.

Примечание: для работы приложения Tether необходимо обновить прошивку устройства TP-Link до последней версии.
Эмуляторы
|
Версия прошивки |
Режим работы |
Язык |
|
|---|---|---|---|
|
190819(EU) |
— |
Многоязычный |
Выбрать |
Примечания
1. Данный эмулятор является графическим интерфейсом настройки устройства TP-Link.
2. Не все опубликованные эмуляторы основаны на последней версии прошивки.
3. Имеющиеся в эмуляторе функции могут быть недоступны в вашей стране — для более подробной информации ознакомьтесь с паспортом или веб-страницей своего устройства.