-
Contents
-
Table of Contents
-
Bookmarks
Quick Links
User Guide
AX6000 8-Stream Wi-Fi 6 Router
Archer AX6000
© 2021 TP-Link
1910013034 REV2.1.0
Related Manuals for TP-Link Archer AX6000
Summary of Contents for TP-Link Archer AX6000
-
Page 1
User Guide AX6000 8-Stream Wi-Fi 6 Router Archer AX6000 © 2021 TP-Link 1910013034 REV2.1.0… -
Page 2: Table Of Contents
5. 4. Manage the Router via the TP-Link Tether App ……25 Chapter 6 Wireless Settings 6.
-
Page 3
6. 3. 3. Push the WPS Button……….30 6. -
Page 4
13. 1. Use OpenVPN to Access Your Home Network ……. 72 13. -
Page 5: About This Guide
The Quick Installation Guide can be found where you find this guide or inside the package of the router. Specifications can be found on the product page at https://www.tp-link.com. TP-Link Community is provided for you to discuss our products and share knowledge at https://community.tp-link.com. Our Technical Support contact information can be found at the…
-
Page 6
*Maximum wireless signal rates are the physical rates derived from IEEE Standard 802.11 specifications. Actual wireless data throughput and wireless coverage are not guaranteed and will vary as a result of 1) environmental factors, including building materials, physical objects, and obstacles, 2) network conditions, including local interference, volume and density of traffic, product location, network complexity, and network overhead, and 3) client limitations, including rated performance, location, connection, quality, and client condition. -
Page 7: Chapter 1 Get To Know About Your Router
Chapter Get to Know About Your Router This chapter introduces what the router can do and shows its appearance. It chapter contains the following sections: • Product Overview • Appearance…
-
Page 8: Product Overview
OFDMA, 8×8 MU-MIMO and 1024QAM improve throughput by 4 times and dramatically increase the whole network capacity and efficiency. It’s also backwards compatible with 802.11a/b/g/n/ac. Moreover, it is simple and convenient to set up and use the TP-Link router due to its intuitive web interface and the powerful Tether app. Appearance…
-
Page 9: Side Panels
Chapter 1 Get to Know About Your Router 1 2 2 Side Panels The following parts (view from left to right) are located on the side panels. Item Description Press this button for 1 second, and immediately press the WPS button on WPS Button your client to start the WPS process.
-
Page 10: Chapter 2 Connect The Hardware
Chapter Connect the Hardware This chapter contains the following sections: • Position Your Router • Connect Your Router…
-
Page 11: Position Your Router
Chapter 2 Connect the Hardware Position Your Router • The product should not be located in a place where it will be exposed to moisture or excessive heat. • Place the router in a location where it can be connected to multiple devices as well as to a power source.
-
Page 12
Chapter 2 Connect the Hardware If your internet comes from an Ethernet outlet instead of through a DSL / Cable / Satellite modem, connect the router’s WAN port to it, then skip Step 1 and Step 2. Internet 1. Connect the powered-off modem to the router’s WAN port with an Ethernet cable. 2. -
Page 13
1 ) Tap the WPS icon on the device’s screen. Here we take an Android phone for instance. 2 ) Within two minutes, press the WPS button on your router for 1 second. WLAN TP-Link MyHome close to David HomeNetwork… -
Page 14: Chapter 3 Log In To Your Router
Chapter Log In to Your Router…
-
Page 15
Chapter 3 Log In to Your Router With a web-based utility, it is easy to configure and manage the router. The web-based utility can be used on any Windows, Mac OS or UNIX OS with a Web browser, such as Microsoft Internet Explorer, Mozilla Firefox or Apple Safari. -
Page 16: Chapter 4 Set Up Internet Connection
Furthermore, you can also set up an IPv6 connection if your ISP provides IPv6 service. It contains the following sections: • Use Quick Setup Wizard • Quick Setup Via TP-Link Tether App • Manually Set Up Your Internet Connection • Set Up the Router as an Access Point •…
-
Page 17: Use Quick Setup Wizard
• To learn more about the TP-Link Cloud service, please refer to the TP-Link Cloud Service section. • If you do not want to register a TP-Link ID now, you may click Skip to proceed. • If you have changed the preset wireless network name (SSID) and wireless password during the Quick Setup process, all your wireless devices must use the new SSID and password to connect to the router.
-
Page 18: Manually Set Up Your Internet Connection
ISP. Follow the steps below to check or modify your internet connection settings. 1. Visit http://tplinkwifi.net, and log in with your TP-Link ID or the password you set for the router.
-
Page 19
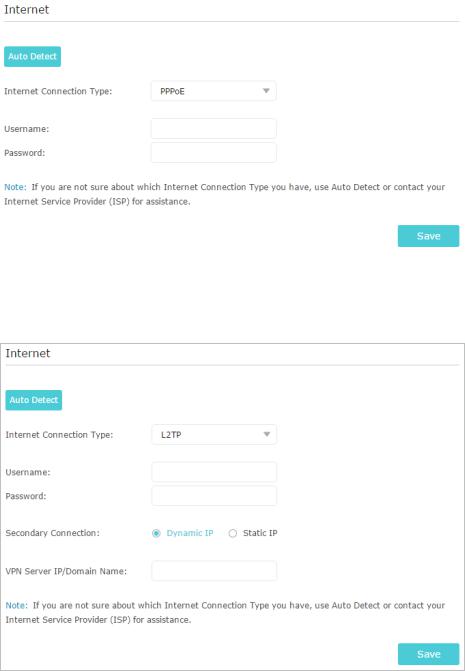
Chapter 4 Set Up Internet Connection 2 ) If you choose Static IP, enter the information provided by your ISP in the corresponding fields. 3 ) If you choose PPPoE, enter the username password provided by your ISP. PPPoE users usually have DSL cable modems. -
Page 20
Chapter 4 Set Up Internet Connection 4 ) If you choose L2TP, enter the username password and choose the Secondary Connection provided by your ISP. Different parameters are needed according to the Secondary Connection you have chosen. 5 ) If you choose PPTP, enter the username and password, and choose the Secondary Connection… -
Page 21: Set Up The Router As An Access Point
Set Up the Router as an Access Point The router can work as an access point, transforming your existing wired network to a wireless one. 1. Visit http://tplinkwifi.net, and log in with your TP-Link ID or the password you set for the router. 2. Go to Advanced >…
-
Page 22
Chapter 4 Set Up Internet Connection 2. Go to Advanced > IPv6. 3. Enable IPv6 and select the internet connection type provided by your ISP. Tips: If you do not know what your internet connection type is, contact your ISP or judge according to the already known information provided by your ISP. -
Page 23
Chapter 4 Set Up Internet Connection Note: If your ISP provides two separate accounts for the IPv4 and IPv6 connections, manually enter the username and password for the IPv6 connection. 6to4 Tunnel: An IPv4 internet connection type is a prerequisite for this connection type (Manually Set Up Your Internet Connection). -
Page 24
Chapter 4 Set Up Internet Connection 5. Configure LAN ports. Windows users are recommended to choose from the first two types. Fill in Address Prefix provided by your ISP, and click SAVE. 6. Click Status to check whether you have successfully set up an IPv6 connection. Tips: Visit the section if there is no internet connection. -
Page 25: Chapter 5 Tp-Link Cloud Service
TP-Link Cloud service provides a better way to manage your cloud devices. Log in to your router with a TP-Link ID, and you can easily monitor and manage your home network when you are out and about via the Tether app. To ensure that your router stays new and gets better over time, the TP-Link Cloud will notify you when an important firmware upgrade is available.
-
Page 26: Register A Tp-Link Id
Manage the User TP-Link IDs. • Once you have registered a TP-Link ID on the web management page, you can only register another TP-Link ID via the Tether APP. Please refer to Manage the Router via the TP-Link Tether App to install the app.
-
Page 27: Manage The User Tp-Link Ids
Password. 2. Enter the current password, then a new password twice. And click SAVE. Manage the User TP-Link IDs The TP-Link ID used to log in to the router for the first time will be automatically bound as the Admin…
-
Page 28: Add Tp-Link Id To Manage The Router
3. Click , enter another TP-Link ID as needed and click SAVE. Note: If you need another TP-Link ID, please register a new one via the Tether app. Refer to Manage the Router via the TP-Link Tether App to install the app and register a new TP-Link ID.
-
Page 29: Manage The Router Via The Tp-Link Tether App
5. Manage your router as needed. Note: If you need to remotely access your router from your smart devices, you need to: • Log in with your TP-Link ID. If you don’t have one, refer to Register a TP-Link • Make sure your smartphone or tablet can access the internet with cellular data or a Wi-Fi network.
-
Page 30: Chapter 6 Wireless Settings
Chapter Wireless Settings This chapter guides you on how to configure the wireless settings. It contains the following sections: • Specify Wireless Settings • Schedule Your Wireless Function • Use WPS for Wireless Connection • Advanced Wireless Settings…
-
Page 31: Specify Wireless Settings
The preset SSID and password can be found on the label of the router. You can customize the wireless settings according to your needs. 1. Visit http://tplinkwifi.net, and log in with your TP-Link ID or the password you set for the router.
-
Page 32
Chapter 6 Wireless Settings • To enable or disable the wireless function: 1. Go to Wireless Advanced > Wireless > Wireless Settings. 2. The wireless function is enabled by default. If you want to disable the wireless function of the router, just untick the Enable checkbox of each wireless network. -
Page 33: Schedule Your Wireless Function
The wireless network can be automatically off at a specific time when you do not need the wireless connection. 1. Visit http://tplinkwifi.net, and log in with your TP-Link ID or the password you set for the router. 2. Go to Advanced >…
-
Page 34: Connect Via The Client’s Pin
Chapter 6 Wireless Settings 1. Visit http://tplinkwifi.net, and log in with your TP-Link ID or the password you set for the router. 2. Make sure the Wi-Fi of your router is on and go to Advanced > Wireless > WPS.
-
Page 35: Advanced Wireless Settings
Chapter 6 Wireless Settings Advanced Wireless Settings Check advanced wireless settings for your device. 1. Visit http://tplinkwifi.net, and log in with your TP-Link ID or the password you set for the router. 2. Go to Advanced > Wireless > Additional Settings.
-
Page 36
Chapter 6 Wireless Settings • Short GI — This feature increases the data capacity by reducing the guard interval time. • AP Isolation — This function isolates all connected wireless stations so that wireless stations cannot access each other through WLAN. •… -
Page 37: Chapter 7 Guest Network
Chapter Guest Network This function allows you to provide Wi-Fi access for guests without disclosing your main network. When you have guests in your house, apartment, or workplace, you can create a guest network for them. In addition, you can customize guest network options to ensure network security and privacy.
-
Page 38: Create A Network For Guests
Chapter 7 Guest Network Create a Network for Guests 1. Visit http://tplinkwifi.net, and log in with your TP-Link ID or the password you set for the router. 2. Go to Advanced > Wireless > Guest Network or click Wireless on the top page. Locate Guest Network section.
-
Page 39: Customize Guest Network Options
Chapter 7 Guest Network Customize Guest Network Options 1. Visit http://tplinkwifi.net, and log in with your TP-Link ID or the password you set for the router. 2. Go to Advanced > Wireless >Guest Network. Locate the Guest Permissions section. 3. Customize guest network options according to your needs.
-
Page 40: Chapter 8 Usb Settings
Chapter USB Settings This chapter describes how to use the USB ports to share files and media from the USB storage devices over your home network locally, or remotely through the internet. The router supports USB external flash drives and hard drives. It contains the following sections: •…
-
Page 41: Access The Usb Storage Device
Chapter 8 USB Settings Access the USB Storage Device Insert your USB storage device into the router’s USB port and then access files stored there locally or remotely. Tips: • If you use USB hubs, make sure no more than 4 devices are connected to the router. •…
-
Page 42: Access The Usb Device Remotely
Chapter 8 USB Settings • Method 2: Open the Windows Explorer (or go to Computer) and type the server address \\tplinkwifi.net ftp://tplinkwifi.net in the address bar, then press Enter. Windows computer 1 ) Select > Connect to Server. 2 ) Type the server address smb://tplinkwifi.net. 3 ) Click Connect.
-
Page 43
If your ISP assigns a private WAN IP address (such as 192.168.x.x or 10.x.x.x), you cannot use this feature because private addresses are not routed on the internet. Follow the steps below to configure remote access settings. Visit http://tplinkwifi.net, and log in with your TP-Link ID or the password you set for the router. Go to Advanced >… -
Page 44: Customize The Access Settings
Visit http://tplinkwifi.net, and log in with your TP-Link ID or the password you set for the router.
-
Page 45
Chapter 8 USB Settings Now you can access the USB storage device by visiting \\MyShare (for Windows) or smb://MyShare (for Mac). • To Only Share Specific Content Focus on the File Sharing section. Specify sharing folders that you want to share and click SAVE. -
Page 46: Media Sharing
USB storage device directly from DLNA-supported devices, such as your computer, tablet and PS2/3/4. Visit http://tplinkwifi.net, and log in with your TP-Link ID or the password you set for the router. Go to Advanced >…
-
Page 47: Time Machine
Time Machine Time Machine backs up all files on your Mac computer to a USB storage device connected to your router. Visit http://tplinkwifi.net, and log in with your TP-Link ID or the password you set for the router. Go to Advanced >…
-
Page 48
Chapter 8 USB Settings Tick the checkbox to enable Time Machine. Click Select to select a location for Time Machine backups. Set the Size Limit for Backups. Note: 0 means no limit for the space. Click SAVE. -
Page 49: Chapter 9 Homecare — Parental Controls, Qos, Antivirus
Chapter HomeCare – Parental Controls, QoS, Antivirus TP-Link HomeCare provides a kit of features to help you create a personalized network that caters for the whole family. You can ensure appropriate internet access for everyone with Parental Controls, save bandwidth for the things that matter with QoS and keep your network secure with built-in Antivirus.
-
Page 50: Parental Controls
2 hours every day and block internet access during bed time (10 PM to 7 AM) on School Nights (Sunday to Thursday). How can I do that? 1 Visit http://tplinkwifi.net, and log in with your TP-Link ID or the password you set for the router. 2 Go to HomeCare >…
-
Page 51
Chapter 9 HomeCare – Parental Controls, QoS, Antivirus 3 ) Click NEXT. 5 Block content for this profile. 1 ) Select a filter level based on the age of the family member this profile belongs to. Blocked content will then be displayed in the Filter Content list. -
Page 52
Chapter 9 HomeCare – Parental Controls, QoS, Antivirus 4 ) Click NEXT. 6 Set time restrictions on internet access. 1 ) Enable Time Limits on Monday to Friday and Saturday & Sunday, then set the Daily Time Limit to 2 hours. 2 ) Enable Bed Time School Nights… -
Page 53: Scenario 2: Monitoring Internet Usage
Check which websites my child has visited and how much time they have spent online recently. How can I do that? 1 Visit http://tplinkwifi.net, and log in with your TP-Link ID or the password you set for the router. 2 Go to HomeCare >…
-
Page 54: Qos
Ensure a fast connection while I play online games with friends on my computer for the next 2 hours. How can I do that? 1 Visit http://tplinkwifi.net, and log in with your TP-Link ID or the password you set for the router. 2 Go to HomeCare >…
-
Page 55: Antivirus
Prevents infected devices from sending your sensitive information to clients outside your network or spreading security threats. • To access your router’s Antivirus settings: 1. Visit http://tplinkwifi.net, and log in with your TP-Link ID or the password you set for the router.
-
Page 56
Chapter 9 HomeCare – Parental Controls, QoS, Antivirus 2. Go to HomeCare > Antivirus Advanced > HomeCare > Antivirus. 3. Enable your desired protection types. It is recommended to keep them all enabled to ensure the best protection for your network. 4. -
Page 57: Chapter 10 Onemesh With Seamless Roaming
Chapter OneMesh with Seamless Roaming This chapter introduces the TP-Link OneMesh feature. It contains the following sections: • Set Up a OneMesh Network • Manage Devices in the OneMesh Network…
-
Page 58: Set Up A Onemesh Network
Tether app or at your router’s web management page. 10 1 Set Up a OneMesh Network 1. Visit http://tplinkwifi.net, and log in with your TP-Link ID or the password you set for the router. 2. Go to Advanced >…
-
Page 59
The extender will be listed on the router’s OneMesh page. Note: To check full list of TP-Link OneMesh devices, visit https://www.tp-link.com/onemesh/compatibility. 5. If you have set up the extender to join the OneMesh network, it will be listed on the router’s OneMesh page. -
Page 60: Manage Devices In The Onemesh Network
In a OneMesh network, you can manage all mesh devices and connected clients on your router’s web page. • To view mesh devices and connected clients in the network: 1. Visit http://tplinkwifi.net, and log in with your TP-Link ID or the password you set for the router. 2. Go to Network Map.
-
Page 61
Chapter 10 OneMesh with Seamless Roaming 4. Manage the OneMesh device as needed. You can: • Change device information. • Click Manage Device to redirect to the web management page of this device. • Click Leave OneMesh to delete this device from the OneMesh network. -
Page 62: Chapter 11 Network Security
Chapter Network Security This chapter guides you on how to protect your home network from cyber attacks and unauthorized users by implementing these three network security functions. You can protect your home network from cyber attacks, block or allow specific client devices to access your network using Access Control, or you can prevent ARP spoofing and ARP attacks using IP &…
-
Page 63: Protect The Network From Cyber Attacks
Block or allow specific client devices to access my network (via wired or wireless). How can I do that? 1 Visit http://tplinkwifi.net, and log in with your TP-Link ID or the password you set for the router. 2 Go to Advanced >…
-
Page 64
Chapter 11 Network Security 2 ) Click and select devices you want to be blocked and Click ADD. 3 ) The Operation Succeeded message will appear on the screen, which means the selected devices have been successfully added to the blacklist. To allow specific device(s): 1 ) Select Whitelist… -
Page 65: Ip & Mac Binding
Chapter 11 Network Security 3 ) The Operation Succeeded message will appear on the screen, which means the selected devices have been successfully added to the whitelist. • Add unconnected devices 1 ) Click Manually. 2 ) Enter the Device Name MAC Address of the device you want to be allowed and click ADD.
-
Page 66
Chapter 11 Network Security I want to: Prevent ARP spoofing and ARP attacks. How can I do that? 1 Visit http://tplinkwifi.net, and log in with your TP-Link ID or the password you set for the router. 2 Go to Advanced >… -
Page 67
Chapter 11 Network Security To bind the unconnected device: 1 ) Click in the Binding List section. 2 ) Enter the MAC Address IP Address that you want to bind. 3 ) Click SAVE. Done! Now you don’t need to worry about ARP spoofing and ARP attacks! -
Page 68: Chapter 12 Nat Forwarding
The TP-Link router supports four forwarding rules. If two or more rules are set, the priority of implementation from high to low is Port Forwarding, Port Triggering, UPNP and DMZ.
-
Page 69: Share Local Resources On The Internet By Port Forwarding
WAN: 218.18.232.154 How can I do that? 1 Assign a static IP address to your PC, for example 192.168.0.100. 2 Visit http://tplinkwifi.net, and log in with your TP-Link ID or the password you set for the router. 3 Go to Advanced >…
-
Page 70
Chapter 12 NAT Forwarding 5 Click VIEW COMMON SERVICES and select HTTP. The External Port, Internal Port Protocol will be automatically filled in. 6 Click VIEW CONNECTED DEVICES and select your home PC. The Device IP Address will be automatically filled in. Or enter the PC’s IP address 192.168.0.100 manually in the Device IP Address field. -
Page 71: Open Ports Dynamically By Port Triggering
VoIPs, video players and common applications including MSN Gaming Zone, Dialpad and Quick Time 4 players, etc. Follow the steps below to configure the Port Triggering rules: 1. Visit http://tplinkwifi.net, and log in with your TP-Link ID or the password you set for the router. 2. Go to Advanced >…
-
Page 72: Make Applications Free From Port Restriction By Dmz
Chapter 12 NAT Forwarding 4. Click SAVE. Tips: • You can add multiple port triggering rules according to your network need. • The triggering ports can not be overlapped. • If the application you need is not listed in the Existing Applications list, please enter the parameters manually. You should verify the external ports the application uses first and enter them into External Port field according to the…
-
Page 73: Make Xbox Online Games Run Smoothly By Upnp
NAT Forwarding How can I do that? 1 Assign a static IP address to your PC, for example 192.168.0.100. 2 Visit http://tplinkwifi.net, and log in with your TP-Link ID or the password you set for the router. 3 Go to Advanced >…
-
Page 74
Therefore, you can play Xbox online games without a hitch. INTERNET If necessary, you can follow the steps to change the status of UPnP. 1. Visit http://tplinkwifi.net, and log in with your TP-Link ID or the password you set for the router. 2. Go to Advanced >… -
Page 75: Chapter 13 Vpn Server
Chapter VPN Server The VPN (Virtual Private Networking) Server allows you to access your home network in a secured way through internet when you are out of home. The router offers two ways to setup VPN connection: OpenVPN and PPTP (Point to Point Tunneling Protocol) VPN. OpenVPN is somewhat complex but with greater security and more stable.
-
Page 76: Use Openvpn To Access Your Home Network
OpenVPN connection. INTERNET Home Network Router Remote Devices Step1 Set up OpenVPN Server on Your Router 1. Visit http://tplinkwifi.net, and log in with your TP-Link ID or the password you set for the router. 2. Go to Advanced > VPN Server >…
-
Page 77: Use Pptp Vpn To Access Your Home Network
Please follow the steps below to set up a PPTP VPN connection. Step 1 Set up PPTP VPN Server on Your Router 1. Visit http://tplinkwifi.net, and log in with your TP-Link ID or the password you set for the router.
-
Page 78
Chapter 13 VPN Server 2. Go to Advanced > VPN Server > PPTP, and tick the Enable box of PPTP. Note: Before you enable Server, we recommend you configure Dynamic DNS Service (recommended) or assign a static IP address for router’s WAN port and synchronize your System Time with internet. -
Page 79
Chapter 13 VPN Server 3 ) Click ADD. Step 2 Configure PPTP VPN Connection on Your Remote Device The remote device can use the Windows built-in PPTP software or a third-party PPTP software to connect to PPTP Server. Here we use the Windows built-in PPTP software as an example. -
Page 80
Chapter 13 VPN Server 4. Select Use my Internet connection (VPN). 5. Enter the internet IP address of the router (for example: 218.18.1.73) in the Internet address field. Click Next. -
Page 81
Chapter 13 VPN Server 6. Enter the User name Password you have set for the PPTP VPN server on your router, and click Connect. 7. The PPTP VPN connection is created and ready to use. -
Page 82
Chapter 13 VPN Server… -
Page 83: Chapter 14 Customize Your Network Settings
Chapter Customize Your Network Settings This chapter guides you on how to configure advanced network features. It contains the following sections: • Change the LAN Settings • Set Up Link Aggregation • Configure to Support IPTV Service • Specify DHCP Server Settings •…
-
Page 84: Change The Lan Settings
If the IP address conflicts with another device on your local network or your network requires a specific IP subnet, you can change it. 1. Visit http://tplinkwifi.net, and log in with your TP-Link ID or the password you set for the router. 2. Go to Advanced >…
-
Page 85: Configure To Support Iptv Service
Configure IPTV setup to enable Internet/IPTV/Phone service provided by my internet service provider (ISP). How can I do that? 1 Visit http://tplinkwifi.net, and log in with your TP-Link ID or the password you set for the router. 2 Go to Advanced >…
-
Page 86: Specify Dhcp Server Settings
IP Address Pool. You can change the settings of the DHCP Server if necessary, and you can reserve LAN IP addresses for specified client devices. 1. Visit http://tplinkwifi.net, and log in with your TP-Link ID or the password you set for the router.
-
Page 87: Set Up A Dynamic Dns Service Account
Chapter 14 Customize Your Network Settings 1. Tick the Enable checkbox. 2. Enter the starting and ending IP addresses in the IP Address Pool. 3. Enter other parameters if the ISP offers. The Default Gateway is automatically filled in and is the same as the LAN IP address of the router. 4.
-
Page 88
NO-IP or DynDNS. If you don’t have a DDNS account, you have to register first by clicking Register Now. Note: To enjoy TP-Link’s DDNS service, you have to log in with a TP-Link ID. If you have not logged in with one, click 4. Click Register in the… -
Page 89: Create Static Routes
Chapter 14 Customize Your Network Settings 5. Click LOGIN AND SAVE. Tips: If you want to use a new DDNS account, please click Logout first, and then log in with a new account. 14 6 Create Static Routes Static routing is a form of routing that is configured manually by a network administrator or a user by adding entries into a routing table.
-
Page 90
1 Change the routers’ LAN IP addresses to two different IP addresses on the same subnet. Disable Router B’s DHCP function. 2 Visit http://tplinkwifi.net, and log in with your TP-Link ID or the password you set for Router A. 3 Go to Advanced >… -
Page 91
Chapter 14 Customize Your Network Settings will be sent. This IP address must be on the same subnet with the router’s IP which sends out data. In the example, the data packets will be sent to the LAN port of Router B and then to the Server, so the default gateway should be 192.168.0.2. -
Page 92: Chapter 15 Manage The Router
Chapter Manage the Router This chapter will show you the configuration for managing and maintaining your router. It contains the following sections: • Update the Firmware • Backup and Restore Configuration Settings • Change the Login Password • Password Recovery •…
-
Page 93: Update The Firmware
Back up your router’s configurations before firmware update. • Do NOT turn off the router during the firmware update. 15 1 1 Auto Update 1. Visit http://tplinkwifi.net, and log in with your TP-Link ID or the password you set for the router. 2. Go to Advanced >…
-
Page 94: Local Update
15 1 3 Local Update 1. Download the latest firmware file for the router from www.tp-link.com. 2. Visit http://tplinkwifi.net, and log in with your TP-Link ID or the password you set for the router. 3. Go to Advanced >…
-
Page 95: Backup And Restore Configuration Settings
Moreover, if necessary you can erase the current settings and reset the router to the default factory settings. 1. Visit http://tplinkwifi.net, and log in with your TP-Link ID or the password you set for the router.
-
Page 96: Change The Login Password
Note: • During the resetting process, do not turn off the router. • After reset, you can still use the current login password or the TP-Link ID to log in to the web management page. • To reset the router to factory default settings: 1.
-
Page 97: Password Recovery
This feature allows you to recover the login password you set for you router in case you forget it. Note: If you are using a TP-Link ID to log in to the web management page, the Password Recovery feature will be disabled. To manage the TP-Link ID, go to Advanced >…
-
Page 98: Local Management
This feature allows you to limit the number of client devices on your LAN from accessing the router by using the MAC address-based authentication. 1. Visit http://tplinkwifi.net, and log in with your TP-Link ID or the password you set for the router.
-
Page 99: Remote Management
5. Click SAVE. 15 6 Remote Management This feature allows you to control remote devices’ authority to manage the router. 1. Visit http://tplinkwifi.net, and log in with your TP-Link ID or the password you set for the router. 2. Go to Advanced >…
-
Page 100
Chapter 15 Manage the Router • Allow all devices to manage the router remotely: 1. Tick the Enable checkbox of Remote Management. 2. Keep the HTTPS and HTTP port as default settings (recommended) or enter a value between 1024 and 65535. 3. -
Page 101: System Log
When the router does not work normally, you can save the system log and send it to the technical support for troubleshooting. • To save the system log locally: 1. Visit http://tplinkwifi.net, and log in your TP-Link ID or the password you set for the router. 2. Go to Advanced >…
-
Page 102
It would be great if the system logs could be sent to my mailbox at 8 a.m. every day. 1. Visit http://tplinkwifi.net, and log in with your TP-Link ID or the password you set for the router. -
Page 103: Test The Network Connectivity
Chapter 15 Manage the Router Email From: Enter the email address used for sending the system log. 2 ) Select Require Password. Tips: Generally, Require Password should be selected if the login of the mailbox requires username and password. Username: Enter the email address used for sending the system log.
-
Page 104
Chapter 15 Manage the Router 1. Visit http://tplinkwifi.net, and log in with your TP-Link ID or the password you set for the router. 2. Go to Advanced > System > Diagnostics. 3. Enter the information: 1 ) Choose Ping Traceroute as the diagnostic tool to test the connectivity;… -
Page 105: Set System Time And Language
System language is the language displayed when you log into the router. You can change the system language as needed. 1. Visit http://tplinkwifi.net, and log in with your TP-Link ID or the password you set for the router. 2. Go to Advanced >…
-
Page 106
Chapter 15 Manage the Router 4. In the NTP Server I field, enter the IP address or domain name of your desired NTP Server. 5. (Optional) In the NTP Server II field, enter the IP address or domain name of the second NTP Server. -
Page 107: Set The Router To Reboot Regularly
15 10 Set the Router to Reboot Regularly The Scheduled Reboot feature cleans the cache to enhance the running performance of the router. 1. Visit http://tplinkwifi.net, and log in with your TP-Link ID or the password you set for the router. 2. Go to Advanced >…
-
Page 108: Control The Led
The LED of the router indicates its activities and status. You can enable the Night Mode feature to specify a time period during which the LED is off. 1. Visit http://tplinkwifi.net, and log in with your TP-Link ID or the password you set for the router.
-
Page 109
Q2 What should I do if I forget my web management password? • If you are using a TP-Link ID to log in, or you have enabled the Password Recovery feature of the router, click… -
Page 110
4 ) Click LAN settings and deselect the following three options and click OK. 5 ) Go to Advanced > Restore advanced settings, click to save the settings. -
Page 111
Note: You’ll need to reconfigure the router to surf the internet once the router is reset. Q4 What should I do if I can’t access the internet even though the configuration is finished? Visit http://tplinkwifi.net, and log in with your TP-Link ID or the password you set for the router. Go to Advanced>… -
Page 112
• Restart the modem and the router. 1 ) Power off your modem and router, and leave them off for 1 minute. 2 ) Power on your modem first, and wait about 2 minutes until it gets a solid cable or Internet light. -
Page 113
• Modify the LAN IP address of the router. Note: Most TP-Link routers use 192.168.0.1/192.168.1.1 as their default LAN IP address, which may conflict with the IP range of your existing ADSL modem/router. If so, the router is not able to communicate with your modem and you can’t access the internet. -
Page 114
• Double check the internet connection type. 1 ) Confirm your internet connection type, which can be learned from the ISP. 2 ) Visit http://tplinkwifi.net, and log in with your TP-Link ID or the password you set for the router. -
Page 115
2 ) Exit the wireless configuration tool (the TP-Link Utility, for example). 3 ) Select and right click on… -
Page 116
2 ) If you cannot find the PIN or PIN failed, you may choose Connecting using a security key instead, and then type in the Wireless Password/Network Security Key. 3 ) If it continues to show note of Network Security Key Mismatch, it is suggested to confirm the wireless password of your wireless router. -
Page 117
Component Name Model I.T.E. Power S050FU1200400 Responsible party: TP-Link USA Corporation, d/b/a TP-Link North America, Inc. Address: 145 South State College Blvd. Suite 400, Brea, CA 92821 Website: http://www.tp-link.com/us/ Tel: +1 626 333 0234 Fax: +1 909 527 6803 E-mail: sales.usa@tp-link.com This equipment has been tested and found to comply with the limits for a Class B digital device, pursuant to part 15 of the FCC Rules. -
Page 118
We, TP-Link USA Corporation, has determined that the equipment shown as above has been shown to comply with the applicable technical standards, FCC part 15. There is no unauthorized change is made in the equipment and the equipment is properly maintained and operated. -
Page 119
Any changes or modifications not expressly approved by the party responsible for compliance could void the user’s authority to operate the equipment. We, TP-Link USA Corporation, has determined that the equipment shown as above has been shown to comply with the applicable technical standards, FCC part 15. -
Page 120
5250 MHz -5350 MHz (23dBm) 5470 MHz -5725 MHz (30dBm) EU Declaration of Conformity TP-Link hereby declares that the device is in compliance with the essential requirements and other relevant provisions of directives 2014/53/EU, 2009/125/EC, 2011/65/EU and (EU)2015/863. The original EU declaration of conformity may be found at… -
Page 121
UKCA Declaration of Conformity TP-Link hereby declares that the device is in compliance with the essential requirements and other relevant provisions of the Radio Equipment Regulations 2017. The original UKCA declaration of conformity may be found at https://www mercusys com/support/ukca/ National Restrictions Attention: This device may only be used indoors in Great Britain. -
Page 122
Avertissement: Le dispositif fonctionnant dans la bande 5150-5250 MHz est réservé uniquement pour une utilisation à l’intérieur afin de réduire les risques de brouillage préjudiciable aux systèmes de satellites mobiles utilisant les mêmes canaux; Les produits utilisant la technique d’atténuation DFS (sélection dynamique des fréquences) sur les bandes 5250- 5350 MHz, 5470-5600MHz et 5650-5725MHz. -
Page 123
• 注意防潮,請勿將水或其他液體潑灑到本產品上。 • 插槽與開口供通風使用,以確保本產品的操作可靠並防止過熱,請勿堵塞 或覆蓋開口。 • 請勿將本產品置放於靠近熱源的地方。除非有正常的通風,否則不可放在 密閉位置中。 • 請不要私自打開機殼,不要嘗試自行維修本產品,請由授權的專業人士進 行此項工作。 限用物質含有情況標示聲明書 設備名稱:AX6000 8-Stream Wi-Fi 6 Router 型號(型式):Archer AX6000 Equipment name Type designation (Type) 限用物質及其化學符號 Restricted substances and its chemical symbols 單元 六價鉻 多溴聯苯 多溴二苯醚 鉛 汞 鎘 Unit Hexavalent… -
Page 124
• Do not attempt to disassemble, repair, or modify the device. If you need service, please contact us. • Do not use damaged charger or USB cable to charge the device. • Do not use any other chargers than those recommended •…
инструкцияTP-Link Archer AX6000

Quick Installation Guide
Wireless Router
www.tp-link.com
7106508531 REV2.3.0
Specications are subject to change without notice. is a registered trademark of TP-Link
Technologies Co., Ltd. Other brands and product names are trademarks or registered trademarks of
their respective holders.
No part of the specications may be reproduced in any form or by any means or used to make any
derivative such as translation, transformation, or adaptation without permission from TP-Link
Technologies Co., Ltd. Copyright © 2019 TP-Link Technologies Co., Ltd. All rights reserved.
*Image may dier from your actual product.
For technical support, the user guide and more information, please visit
https://www.tp-link.com/support.
Посмотреть инструкция для TP-Link Archer AX6000 бесплатно. Руководство относится к категории маршрутизаторы (роутеры), 7 человек(а) дали ему среднюю оценку 8.5. Руководство доступно на следующих языках: русский, английский. У вас есть вопрос о TP-Link Archer AX6000 или вам нужна помощь? Задайте свой вопрос здесь
- 7106508531_封面
- SOHO无线路由(欧二16国)_QIG_V1
Главная
| TP-Link | |
| Archer AX6000 | ARCHER AX6000 V1 | |
| маршрутизатор (роутер) | |
| 0845973099763, 6935364089177, 6935364099763 | |
| русский, английский | |
| Руководство пользователя (PDF), Техническая спецификация (PDF) |
WAN подключение
| Ethernet WAN | Да |
| DSL WAN | Нет |
| Слот для SIM-карты | Нет |
| Совместимость с 3G / 4G USB модемом | Нет |
| Тип WAN соединения | RJ-45 |
Характеристики беспроводной LAN
| Wi-Fi диапазоны | Двухдиапазонный (2,4Ггц/5Ггц) |
| Основной стандарт Wi-Fi | Wi-Fi 6 (802.11ax) |
| Скорость передачи данных WLAN (макс) | 4804 Мбит/с |
| Wi-Fi стандартов | 802.11a, Wi-Fi 5 (802.11ac), Wi-Fi 6 (802.11ax), 802.11b, 802.11g, Wi-Fi 4 (802.11n) |
| Скорость передачи данных WLAN (вторая полоса) | 4804 Мбит/с |
| Скорость передачи данных WLAN (первая полоса) | 1148 Мбит/с |
| Количество соединений WLAN (макс) | 8 |
Дизайн
| Тип продукта | Настольный маршрутизатор |
| Цвет товара | Черный |
| Световой индикатор | Да |
| Вкл/Выкл переключатель | Да |
| Светодиодные индикаторы | LAN, Power, Status, USB, WAN, WLAN |
| Настенный | Да |
Свойства
| Встроенный процессор | Да |
| Тактовая частота процессора | 1860 MHz |
| Количество ядер процессора | 4 |
| Сертификация | FCC, CE, RoHS |
| Оперативная память | 1 MB |
| Флэш-память | 128 MB |
Порты и интерфейсы
| Слот(ы) для карты памяти | — |
| USB порт | Да |
| Количество портов Ethernet LAN ( RJ-45) | 8 |
| Количество портов USB 2.0 | 0 |
| Гнездо входа постоянного тока (DC) | Да |
| Количество портов USB 3.2 Gen 1 (3.1 Gen 1) Type-A | 1 |
Сеть
| Подключение Ethernet | Да |
| Тип LAN Ethernet интерфейса | Гигабитный Ethernet |
| Скорость передачи данных Ethernet LAN | 10, 1000 Мбит/с |
| Свивка кабеля | 10/100/1000Base-T(X) |
| Стандарты сети | IEEE 802.11ax, IEEE 802.11a, IEEE 802.11ac, IEEE 802.11b, IEEE 802.11g, IEEE 802.11n |
| Динамический DNS | Да |
| Чувствительность приемника | 5GHz:\n11a 6Mbps: -97dBm, 11a 54Mbps:-79dBm\n11ac VHT20_MCS0:-96dBm, 11ac VHT20_MCS11:-66dBm\n11ac VHT40_MCS0:-94dBm, 11ac VHT40_MCS11:-63dBm\n11ac VHT80_MCS0:-91dBm, 11ac VHT80_MCS11:-60dBm\n11ac VHT160_MCS0:-88dBm, 11ac VHT160_MCS11:-55dBm\n11ax HE20_MCS0:-95dBm, 11ax HE20_MCS11:-63dBm\n11ax HE40_MCS0:-92dBm, 11ax HE40_MCS11:-60dBm\n11ax HE80_MCS0:-89dBm, 11ax HE80_MCS11:-58dBm\n11ax HE160_MCS0:-85dBm, 11ax HE160_MCS11:-55dBm\n2.4GHz:\n11g 6Mbps: -97dBm, 11a 54Mbps:-79dBm\n11n HT20_MCS0:-97dBm, 11n HT20_MCS7:-78dBm\n11n HT40_MCS0:-95dBm, 11n HT40_MCS7:-75dBm\n11ac VHT20_MCS0:-96dBm, 11ac VHT20_MCS11:-67dBm\n11ac VHT40_MCS0:-94dBm, 11ac VHT40_MCS11:-64dBm\n11ax HE20_MCS0:-96dBm, 11ax HE20_MCS11:-64dBm\n11ax HE40_MCS0:-93dBm, 11ax HE40_MCS11:-61dBm |
Мобильная сеть
Энергопитание
| Тип источника питания | Постоянный ток |
| Выходное напряжение | 12 V |
| Ток на выходе | 4 A |
Вес и размеры
| Ширина | 261.3 mm |
| Глубина | 261.3 mm |
| Высота | 60.5 mm |
Условия эксплуатации
| Диапазон температур при эксплуатации | 0 — 40 °C |
| Диапазон температур при хранении | -40 — 70 °C |
| Диапазон относительной влажности при эксплуатации | 10 — 90 % |
| Диапазон относительной влажности при хранении | 5 — 90 % |
Антена
| Конструкция антенны | Внешний |
| Количество антенн | 8 |
| Съемная антенна(ы) | Да |
| Мощность передачи | CE: <20dBm(2.4GHz), <23dBm(5.15GHz~5.35GHz); <30dBm(5.47GHz~5.725GHz), FCC: <30dBm(2.4GHz & 5.15GHz~5.25GHz & 5.725GHz~5.825GHz) dBmW |
Данные об упаковке
| Количество продуктов в комплекте | 1 шт |
| Глубина упаковки | 290 mm |
| Высота упаковки | 120 mm |
| Ширина упаковки | 365 mm |
| Масса брутто | 1820 g |
Содержимое упаковки
| Сетевой адаптер в комплекте | Да |
| Краткое руководство по установке | Да |
| Поставляемые кабели | LAN (RJ-45) |
Протоколы
| DHCP клиент | Да |
| DHCP сервер | Да |
| Universal Plug and Play (UPnP) | Да |
Безопасность
| Поддержка DMZ | Да |
| Алгоритмы шифрования данных | 64-bit WEP, 128-bit WEP, WPA, WPA-PSK, WPA2, WPA2-PSK |
| Защита от DoS атаки | Да |
| Брандмауэр | Да |
| Защита с помощью брандмауэра | DoS, SPI Firewall, IP and MAC Address Binding |
| Гостевой доступ | Да |
| Список контроля доступа (ACL) | Да |
Системные требования
| Поддерживаемые операционные системы Windows | Windows 10, Windows 2000, Windows 7, Windows 8, Windows 8.1, Windows 98SE, Windows XP |
| Поддерживаемые операционные системы Linux | Да |
| Поддерживаемые операционные системы Mac | macOS |
| Совместимость с Mac | Да |
Характеристики управления
| Поддержка Quality of Service (QoS) | Да |
| Кнопка сброса установок | Да |
| WPS кнопки | Да |
показать больше
Не можете найти ответ на свой вопрос в руководстве? Вы можете найти ответ на свой вопрос ниже, в разделе часто задаваемых вопросов о TP-Link Archer AX6000.
В чем разница между роутером и модемом?
Модем обеспечивает подключение к Интернету через интернет-провайдера. Затем маршрутизатор распределяет через Интернет сигнал на подключенные к маршрутизатору устройства.
От чего зависит скорость загрузки в Интернете?
Скорость загрузки в Интернете зависит от вашего типа соединения. Если ваша скорость составляет 25 Мб/сек, это означает, что теоретически скорость загрузки будет составлять 25 Мб/сек.
Вредно ли Wi-Fi-излучение?
Wi-Fi — радиочастотный сигнал в виде неионизирующего излучения. Это излучение не может повредить клетки и ткани и, следовательно, не наносит вреда здоровью.
Какие сертификаты TP-Link Archer AX6000 имеет?
TP-Link Archer AX6000 имеет следующие сертификаты: FCC, CE, RoHS.
Какая высота TP-Link Archer AX6000?
TP-Link Archer AX6000 имеет высоту 60.5 mm.
Какая ширина TP-Link Archer AX6000?
TP-Link Archer AX6000 имеет ширину 261.3 mm.
Какая толщина TP-Link Archer AX6000?
TP-Link Archer AX6000 имеет толщину 261.3 mm.
Инструкция TP-Link Archer AX6000 доступно в русский?
Да, руководствоTP-Link Archer AX6000 доступно врусский .
Не нашли свой вопрос? Задайте свой вопрос здесь
![]()
User Guide
AX6000 Next-Gen Wi-Fi Router
Archer AX6000
REV1.1.0 1910012697
Contents
|
About This Guide |
…………………………………………………………………………………………….1 |
Chapter 1. Get to Know About Your Router . . . . . . . . . . . . . . . . . . . . . . . . . . . 3
1. 1. Product Overview . . . . . . . . . . . . . . . . . . . . . . . . . . . . . . . . . . . . . . . . . . . . . . . . . . . . . . . . . . . .4 1. 2. Appearance. . . . . . . . . . . . . . . . . . . . . . . . . . . . . . . . . . . . . . . . . . . . . . . . . . . . . . . . . . . . . . . . . .4 1. 2. 1.Top Panel . . . . . . . . . . . . . . . . . . . . . . . . . . . . . . . . . . . . . . . . . . . . . . . . . . . . . . . . . . . . . .4 1. 2. 2.The Side and Back Panel . . . . . . . . . . . . . . . . . . . . . . . . . . . . . . . . . . . . . . . . . . . . . . .5
Chapter 2. Connect the Hardware . . . . . . . . . . . . . . . . . . . . . . . . . . . . . . . . . . . 6
2. 1. Position Your Router. . . . . . . . . . . . . . . . . . . . . . . . . . . . . . . . . . . . . . . . . . . . . . . . . . . . . . . . . .7
2. 2. Connect Your Router . . . . . . . . . . . . . . . . . . . . . . . . . . . . . . . . . . . . . . . . . . . . . . . . . . . . . . . . .7
Chapter 3. Log In to Your Router . . . . . . . . . . . . . . . . . . . . . . . . . . . . . . . . . . . . 10
Chapter 4. Set Up Internet Connection. . . . . . . . . . . . . . . . . . . . . . . . . . . . . . 12
4. 1. Use Quick Setup Wizard . . . . . . . . . . . . . . . . . . . . . . . . . . . . . . . . . . . . . . . . . . . . . . . . . . . . 13 4. 2. Quick Setup Via TP-Link Tether App . . . . . . . . . . . . . . . . . . . . . . . . . . . . . . . . . . . . . . . . 13 4. 3. Manually Set Up Your Internet Connection . . . . . . . . . . . . . . . . . . . . . . . . . . . . . . . . . 14 4. 4. Set Up the Router as an Access Point. . . . . . . . . . . . . . . . . . . . . . . . . . . . . . . . . . . . . . . 18 4. 5. Set Up an IPv6 Internet Connection . . . . . . . . . . . . . . . . . . . . . . . . . . . . . . . . . . . . . . . . 19
Chapter 5. TP-Link Cloud Service . . . . . . . . . . . . . . . . . . . . . . . . . . . . . . . . . . . 23
5. 1. Register a TP-Link ID . . . . . . . . . . . . . . . . . . . . . . . . . . . . . . . . . . . . . . . . . . . . . . . . . . . . . . . 24 5. 2. Change Your TP-Link ID Information . . . . . . . . . . . . . . . . . . . . . . . . . . . . . . . . . . . . . . . . 24 5. 3. Manage the User TP-Link IDs . . . . . . . . . . . . . . . . . . . . . . . . . . . . . . . . . . . . . . . . . . . . . . . 25 5. 3. 1.Add TP-Link ID to Manage the Router . . . . . . . . . . . . . . . . . . . . . . . . . . . . . . . . 26 5. 3. 2.Remove TP-Link ID(s) from Managing the Router . . . . . . . . . . . . . . . . . . . . . 26
5. 4. Manage the Router via the TP-Link Tether App . . . . . . . . . . . . . . . . . . . . . . . . . . . . . . 27
Chapter 6. Guest Network . . . . . . . . . . . . . . . . . . . . . . . . . . . . . . . . . . . . . . . . . . 28
6. 1. Create a Network for Guests . . . . . . . . . . . . . . . . . . . . . . . . . . . . . . . . . . . . . . . . . . . . . . . 29 6. 2. Customize Guest Network Options . . . . . . . . . . . . . . . . . . . . . . . . . . . . . . . . . . . . . . . . . 30
Chapter 7. USB Settings . . . . . . . . . . . . . . . . . . . . . . . . . . . . . . . . . . . . . . . . . . . . 31
7. 1. Access the USB Storage Device . . . . . . . . . . . . . . . . . . . . . . . . . . . . . . . . . . . . . . . . . . . . 32
7. 1. 1.Access the USB Device Locally . . . . . . . . . . . . . . . . . . . . . . . . . . . . . . . . . . . . . . 32 7. 1. 2.Access the USB Device Remotely . . . . . . . . . . . . . . . . . . . . . . . . . . . . . . . . . . . . 33 7. 1. 3.Customize the Access Settings . . . . . . . . . . . . . . . . . . . . . . . . . . . . . . . . . . . . . . 35
7. 2. Media Sharing. . . . . . . . . . . . . . . . . . . . . . . . . . . . . . . . . . . . . . . . . . . . . . . . . . . . . . . . . . . . . . 37 7. 3. Time Machine . . . . . . . . . . . . . . . . . . . . . . . . . . . . . . . . . . . . . . . . . . . . . . . . . . . . . . . . . . . . . . 38
Chapter 8. HomeCare – Parental Controls, QoS, Antivirus . . . . . . . . . . . 40
8. 1. Parental Controls. . . . . . . . . . . . . . . . . . . . . . . . . . . . . . . . . . . . . . . . . . . . . . . . . . . . . . . . . . . 41 8. 1. 1.Scenario 1: Setting Up Access Restrictions . . . . . . . . . . . . . . . . . . . . . . . . . . 41 8. 1. 2.Scenario 2: Monitoring Internet Usage . . . . . . . . . . . . . . . . . . . . . . . . . . . . . . . 43
8. 2. QoS. . . . . . . . . . . . . . . . . . . . . . . . . . . . . . . . . . . . . . . . . . . . . . . . . . . . . . . . . . . . . . . . . . . . . . . . 44 8. 3. Antivirus . . . . . . . . . . . . . . . . . . . . . . . . . . . . . . . . . . . . . . . . . . . . . . . . . . . . . . . . . . . . . . . . . . . 46
Chapter 9. Network Security. . . . . . . . . . . . . . . . . . . . . . . . . . . . . . . . . . . . . . . . 48
9. 1. Firewall. . . . . . . . . . . . . . . . . . . . . . . . . . . . . . . . . . . . . . . . . . . . . . . . . . . . . . . . . . . . . . . . . . . . . 49
9. 2. Access Control. . . . . . . . . . . . . . . . . . . . . . . . . . . . . . . . . . . . . . . . . . . . . . . . . . . . . . . . . . . . . 49
9. 3. IP & MAC Binding. . . . . . . . . . . . . . . . . . . . . . . . . . . . . . . . . . . . . . . . . . . . . . . . . . . . . . . . . . . 51
Chapter 10.NAT Forwarding . . . . . . . . . . . . . . . . . . . . . . . . . . . . . . . . . . . . . . . . . 53
10. 1. Share Local Resources on the Internet by Virtual Servers . . . . . . . . . . . . . . . . . . . 54 10. 2. Open Ports Dynamically by Port Triggering . . . . . . . . . . . . . . . . . . . . . . . . . . . . . . . . . 55 10. 3. Make Applications Free from Port Restriction by DMZ. . . . . . . . . . . . . . . . . . . . . . . 56 10. 4. Make Xbox Online Games Run Smoothly by UPnP. . . . . . . . . . . . . . . . . . . . . . . . . . . 57
Chapter 11.VPN Server. . . . . . . . . . . . . . . . . . . . . . . . . . . . . . . . . . . . . . . . . . . . . . 59
11. 1. Use OpenVPN to Access Your Home Network . . . . . . . . . . . . . . . . . . . . . . . . . . . . . . 60 11. 2. Use PPTP VPN to Access Your Home Network . . . . . . . . . . . . . . . . . . . . . . . . . . . . . . 61
Chapter 12.Customize Your Network Settings . . . . . . . . . . . . . . . . . . . . . . . 67
12. 1. Change the LAN Settings . . . . . . . . . . . . . . . . . . . . . . . . . . . . . . . . . . . . . . . . . . . . . . . . . . . 68 12. 2. Set Up Link Aggregation. . . . . . . . . . . . . . . . . . . . . . . . . . . . . . . . . . . . . . . . . . . . . . . . . . . . 68 12. 3. Configure to Support IPTV Service . . . . . . . . . . . . . . . . . . . . . . . . . . . . . . . . . . . . . . . . . 69 12. 4. Specify DHCP Server Settings . . . . . . . . . . . . . . . . . . . . . . . . . . . . . . . . . . . . . . . . . . . . . 70 12. 5. Set Up a Dynamic DNS Service Account . . . . . . . . . . . . . . . . . . . . . . . . . . . . . . . . . . . . 71 12. 6. Create Static Routes . . . . . . . . . . . . . . . . . . . . . . . . . . . . . . . . . . . . . . . . . . . . . . . . . . . . . . . 73 12. 7. Specify Wireless Settings . . . . . . . . . . . . . . . . . . . . . . . . . . . . . . . . . . . . . . . . . . . . . . . . . . 75 12. 8. Use WPS for Wireless Connection . . . . . . . . . . . . . . . . . . . . . . . . . . . . . . . . . . . . . . . . . . 77
12. 8. 1.Push the WPS Button. . . . . . . . . . . . . . . . . . . . . . . . . . . . . . . . . . . . . . . . . . . . . . . 78 12. 8. 2.Connect via the Router’s PIN . . . . . . . . . . . . . . . . . . . . . . . . . . . . . . . . . . . . . . . 78
12. 8. 3.Connect via the Client’s PIN . . . . . . . . . . . . . . . . . . . . . . . . . . . . . . . . . . . . . . . . 78 12. 9. Schedule Your Wireless Function . . . . . . . . . . . . . . . . . . . . . . . . . . . . . . . . . . . . . . . . . . . 79
Chapter 13.Manage the Router . . . . . . . . . . . . . . . . . . . . . . . . . . . . . . . . . . . . . . 80
13. 1. Set Up System Time. . . . . . . . . . . . . . . . . . . . . . . . . . . . . . . . . . . . . . . . . . . . . . . . . . . . . . . . 81 13. 2. Control LEDs. . . . . . . . . . . . . . . . . . . . . . . . . . . . . . . . . . . . . . . . . . . . . . . . . . . . . . . . . . . . . . . 82 13. 3. Test the Network Connectivity. . . . . . . . . . . . . . . . . . . . . . . . . . . . . . . . . . . . . . . . . . . . . . 83 13. 4. Test Your Internet Speed . . . . . . . . . . . . . . . . . . . . . . . . . . . . . . . . . . . . . . . . . . . . . . . . . . . 84 13. 5. Upgrade the Firmware. . . . . . . . . . . . . . . . . . . . . . . . . . . . . . . . . . . . . . . . . . . . . . . . . . . . . . 85
13. 5. 1.Online Upgrade. . . . . . . . . . . . . . . . . . . . . . . . . . . . . . . . . . . . . . . . . . . . . . . . . . . . . 86 13. 5. 2.Manual Upgrade . . . . . . . . . . . . . . . . . . . . . . . . . . . . . . . . . . . . . . . . . . . . . . . . . . . . 86 13. 5. 3.Restore Interrupted Upgrade After Power Failure. . . . . . . . . . . . . . . . . . . . 87
13. 6. Backup and Restore Configuration Settings . . . . . . . . . . . . . . . . . . . . . . . . . . . . . . . . 87 13. 7. Set the Router to Reboot Regularly . . . . . . . . . . . . . . . . . . . . . . . . . . . . . . . . . . . . . . . . . 89 13. 8. Change the Administrator Account . . . . . . . . . . . . . . . . . . . . . . . . . . . . . . . . . . . . . . . . . 89 13. 9. Password Recovery . . . . . . . . . . . . . . . . . . . . . . . . . . . . . . . . . . . . . . . . . . . . . . . . . . . . . . . . 90 13. 10. Local Management. . . . . . . . . . . . . . . . . . . . . . . . . . . . . . . . . . . . . . . . . . . . . . . . . . . . . . . . . 91 13. 11. Remote Management . . . . . . . . . . . . . . . . . . . . . . . . . . . . . . . . . . . . . . . . . . . . . . . . . . . . . . 92 13. 12. System Log . . . . . . . . . . . . . . . . . . . . . . . . . . . . . . . . . . . . . . . . . . . . . . . . . . . . . . . . . . . . . . . . 93 13. 13. Monitor the Internet Traffic Statistics . . . . . . . . . . . . . . . . . . . . . . . . . . . . . . . . . . . . . . . 95 13. 14. System Parameters . . . . . . . . . . . . . . . . . . . . . . . . . . . . . . . . . . . . . . . . . . . . . . . . . . . . . . . . 96
13. 14. 1.2.4GHz/5GHz Wireless . . . . . . . . . . . . . . . . . . . . . . . . . . . . . . . . . . . . . . . . . . . . 96 13. 14. 2.2.4GHz/5GHz WDS. . . . . . . . . . . . . . . . . . . . . . . . . . . . . . . . . . . . . . . . . . . . . . . . 98 13. 14. 3.NAT . . . . . . . . . . . . . . . . . . . . . . . . . . . . . . . . . . . . . . . . . . . . . . . . . . . . . . . . . . . . . . . 99 13. 14. 4.Internet Port Negotiation Speed Setting . . . . . . . . . . . . . . . . . . . . . . . . . . . 99
13. 15. Log Out . . . . . . . . . . . . . . . . . . . . . . . . . . . . . . . . . . . . . . . . . . . . . . . . . . . . . . . . . . . . . . . . . . . . 99
Chapter 14.Work with Alexa . . . . . . . . . . . . . . . . . . . . . . . . . . . . . . . . . . . . . . . .100
|
FAQ……………………………………………………………………………………………………………… |
102 |

About This Guide
This guide is a complement of Quick Installation Guide. The Quick Installation Guide instructs you on quick internet setup, and this guide provides details of each function and shows you the way to configure these functions appropriate to your needs.
Note: Features available in this router may vary by model and software version. Router availability may also vary by region or ISP. All images, steps, and descriptions in this guide are only examples and may not reflect your actual router experience.
Conventions
In this guide the following conventions are used:
|
Convention |
Description |
|
|
Underlined |
Underlined words or phrases are hyperlinks. You can click to redirect to a |
|
|
website or a specific section. |
||
|
Teal |
Contents to be emphasized and texts on the web page are in teal, including the |
|
|
menus, items, buttons, etc. |
||
The menu structures to show the path to load the corresponding page.
>For example, Advanced > Wireless > MAC Filtering means the MAC Filtering function page is under the Wireless menu that is located in the Advanced tab.
|
Note: |
• |
Ignoring this type of note might result in a malfunction or damage to the |
|||
|
device. |
|||||
|
Tips: |
Indicates important information that helps you make better use of your device. |
||||
|
• click to edit the corresponding entry. |
|||||
|
symbols on the web |
• |
click to delete the corresponding entry. |
|||
|
page |
• |
click to enable or disable the corresponding entry. |
|||
|
• click to view more information about items on the page. |
*Maximum wireless signal rates are the physical rates derived from IEEE Standard 802.11 specifications. Actual wireless data throughput and wireless coverage are not guaranteed and will vary as a result of network conditions, client limitations, and environmental factors, including building materials, obstacles, volume and density of traffic, and client location.
*Use of MU-MIMO and 1024-QAM requires clients to also support those functions.
More Info
The latest software, management app and utility can be found at Download Center at https://www.tp-link.com/us/support/download/.
The Quick Installation Guide can be found where you find this guide or inside the package of the router.
Specifications can be found on the product page at https://www.tp-link.com.
1
TP-Link Community is provided for you to discuss our products and share knowledge at https://www.tp-link.com/us/support/download/.
Our Technical Support contact information can be found at the Contact Technical Support page at https://www.tp-link.com/support/.
2

Chapter 1
Get to Know About Your Router
This chapter introduces what the router can do and shows its appearance. It chapter contains the following sections:
•Product Overview
•Appearance
|
Chapter 1 |
Get to Know About Your Router |
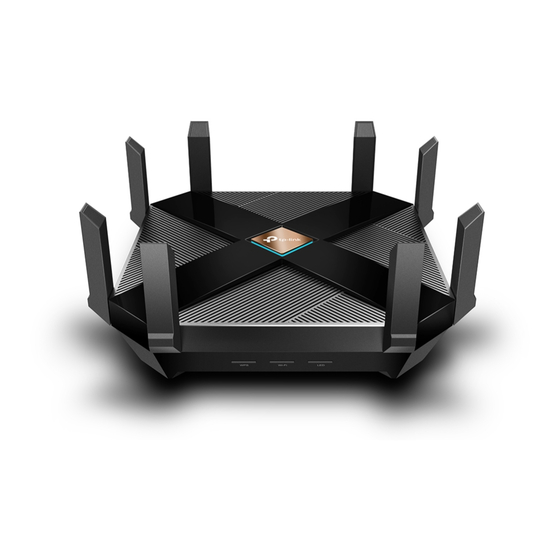
1. 1. Product Overview
Archer AX6000, TP-Link’s first router with next-generation 802.11ax Wi-Fi Technology, achieves Wi-Fi performance at its ultimate level. The revolutionary combination of OFDMA, 8×8 MU-MIMO and 1024QAM improve throughput by 4 times and dramatically increase the whole network capacity and efficiency. It’s also backwards compatible with 802.11a/b/g/n/ac.
Moreover, it is simple and convenient to set up and use the TP-Link router due to its intuitive web interface and the powerful Tether app.
1. 2. Appearance
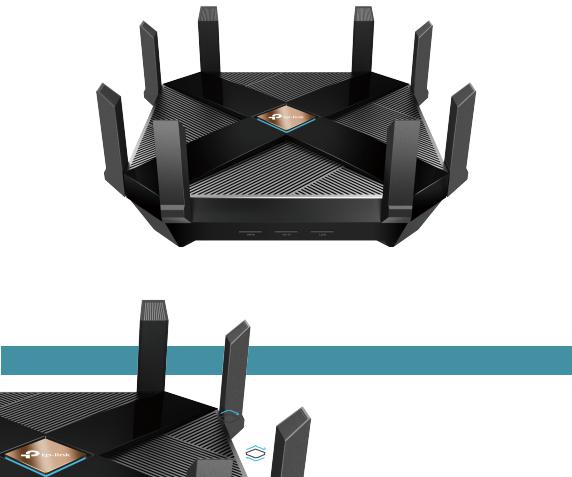
1. 2. 1. Top Panel
The router’s LED is on the top panel. You can check the router’s working status by following the LED Explanation table.
LED Explanation
|
LED |
Status |
Indication |
|
Solid Blue |
The router is working normally. |
|
|
Circulating Blue |
The system is starting up or the router is being reset. |
|
|
Circulating Blue in Parallel |
The firmware is being upgraded or WPS connection |
|
|
is being established. |
||
|
Solid Orange |
The router is connected to the internet, but the |
|
|
wireless function is off. |
||
|
Solid Red |
No internet connection. |
4

|
Chapter 1 |
Get to Know About Your Router |
1. 2. 2. The Side and Back Panel
The following parts (view from left to right) are located on the side and rear panel.
|
Item |
Description |
|
|
USB 3.0 Ports |
For connecting your USB storage devices to the router. |
|
|
(Type A + Type C ) |
||
|
Power On/Off Button |
Press this button to power on or off the router. |
|
|
2.5 Giga WAN Port |
For connecting to a DSL/Cable modem, or an Ethernet jack. |
|
|
LAN Ports (1-8) |
For connecting your PC or other wired devices to the router. |
|
|
Power Port |
For connecting the router to power socket via the provided power adapter. |
|
|
Reset Button |
Use a pin to press and hold the button until the LED begins circulating blue |
|
|
to its factory default settings. |
||
|
Item |
Description |
|
|
WPS Button |
Press the WPS button, and immediately press the WPS button on your client |
|
|
to start the WPS process. |
||
|
Wi-Fi Button |
Press and hold the Wi-Fi button for 2 seconds to turn on or off the wireless |
|
|
function of your router. |
||
|
LED Button |
Press the LED button to turn on or off the LED of your router. |
5

Chapter 2
Connect the Hardware
This chapter contains the following sections:
•Position Your Router
•Connect Your Router
![]()
|
Chapter 2 |
Connect the Hardware |
2. 1. Position Your Router
•The product should not be located in a place where it will be exposed to moisture or excessive heat.
•Place the router in a location where it can be connected to multiple devices as well as to a power source.
•Make sure the cables and power cord are safely placed out of the way so they do not create a tripping hazard.
•The router can be placed on a shelf or desktop.
•Keep the router away from devices with strong electromagnetic interference, such as Bluetooth devices, cordless phones and microwaves.
2. 2. Connect Your Router
Before you start, turn off your modem, if any, and remove the backup battery if it has one. Place the router horizontally and extend the antennas to the maximum angle.
Follow the steps below to connect your router.
If your internet connection is through an Ethernet cable from the wall instead of through a DSL / Cable / Satellite modem, connect the Ethernet cable directly to the router’s Internet port, and then follow Step 1, 5 and 6 to complete the hardware connection.
1
Internet
3
2
7
|
Chapter 2 |
Connect the Hardware |
1.Connect the modem to the router’s WAN port with an Ethernet cable.
2.Turn on the modem, and then wait about 2 minutes for it to restart.
3.Connect the power adapter to the router and turn on the router.
4. Verify the LED on the top is solid on (red or blue) before moving on.
 Note:
Note:
If the LED is off, press the LED button for about 1 second, and then check the LED again.
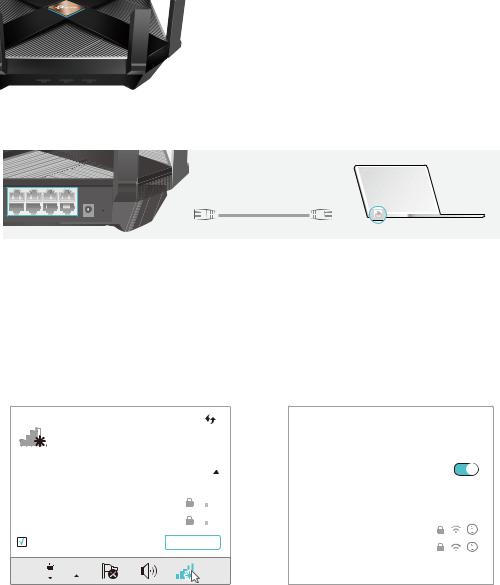
5. Connect your computer to the router.
• Method 1: Wired
Turn off the Wi-Fi on your computer and connect the devices as shown below.
Ethernet cable
•Method 2: Wirelessly
1) Find the SSID (Network Name) and Wireless Password printed on the label at the bottom of the router.
2) Click the network icon of your computer or go to Wi-Fi Settings of your smart device, and then select the SSID to join the network.
|
Computer |
Smart Device |
||||||||
|
Connections are available |
< Settings |
Wi-Fi |
|||||||
|
Wi-Fi |
|||||||||
|
Wireless Network Connection |
|||||||||
|
CHOOSE A NETWORK… |
|||||||||
|
TP-Link_XXXX |
OR |
||||||||
|
TP-Link_XXXX_5G |
TP-Link_XXXX |
||||||||
|
Connect automatically |
Connect |
||||||||
|
TP-Link_XXXX_5G |
|||||||||
Other…
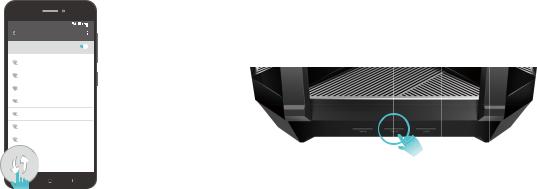
• Method 3: Use the WPS button
Wireless devices that support WPS, including Android phones, tablets, and most USB network cards, can be connected to your router through this method.
 Note:
Note:
•WPS is not supported by iOS devices.
•The WPS function cannot be configured if the wireless function of the router is disabled. Also, the WPS function will be disabled if your wireless encryption is WEP. Please make sure the wireless function is enabled and is configured with the appropriate encryption before configuring the WPS.
1) Tap the WPS icon on the device’s screen. Here we take an Android phone for instance.
8
|
Chapter 2 |
Connect the Hardware |
|
2 ) Within two minutes, press the WPS button on your router. |
WLAN
On
TP-Link
MyHome
David
HomeNetwork
TP-Link_Home
TP-Link_Router
Test
close to
9

Chapter 3
Log In to Your Router
|
Chapter 3 |
Log In to Your Router |
With a web-based utility, it is easy to configure and manage the router. The web-based utility can be used on any Windows, Mac OS or UNIX OS with a Web browser, such as Microsoft Internet Explorer, Mozilla Firefox or Apple Safari.
Follow the steps below to log in to your router.
1.Set up the TCP/IP Protocol in Obtain an IP address automatically mode on your computer.
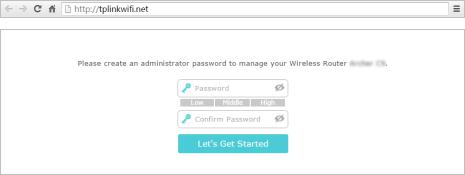
2.Visit http://tplinkwifi.net, and create a login password for secure management purposes. Then click Let’s Get Started to log in.
 Note:
Note:
•If the login window does not appear, please refer to the FAQ Section.
•If you have registered a TP-Link ID and bound your cloud router to it, the login password you created here will be invalid. Please log in to the cloud router using your TP-Link ID.
11

Chapter 4
Set Up Internet Connection
This chapter introduces how to connect your router to the internet. The router is equipped with a web-based Quick Setup wizard. It has necessary ISP information built in, automates many of the steps and verifies that those steps have been successfully completed. Furthermore, you can also set up an IPv6 connection if your ISP provides IPv6 service.
It contains the following sections:
•Use Quick Setup Wizard
•Quick Setup Via TP-Link Tether App
•Manually Set Up Your Internet Connection
•Set Up the Router as an Access Point
•Set Up an IPv6 Internet Connection
|
Chapter 4 |
Set Up Internet Connection |
4. 1. Use Quick Setup Wizard
The Quick Setup Wizard will guide you to set up your router.
 Tips:
Tips:
If you need the IPv6 internet connection, please refer to the section of Set Up an IPv6 Internet Connection.
Follow the steps below to set up your router.
1.Visit http://tplinkwifi.net, and log in with the password you set for the router.
2.Click Quick Setup on the top of the page. Then follow the step-by-step instructions to connect your router to the internet.
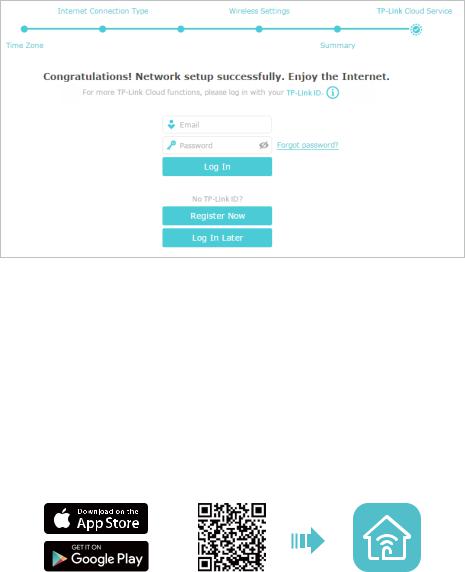
3.To enjoy a more complete service from TP-Link (remote management, TP-Link DDNS, and more.), log in with your TP-Link ID or click Resigter Now to get one. Then follow the instructions to bind the cloud router to your TP-Link ID.
 Note:
Note:
•To learn more about the TP-Link Cloud service, please refer to the TP-Link Cloud Service section.
•If you do not want to register a TP-Link ID now, you may click Log In Later to proceed.
•If you have changed the preset wireless network name (SSID) and wireless password during the Quick Setup process, all your wireless devices must use the new SSID and password to connect to the router.
4. 2. Quick Setup Via TP-Link Tether App
The Tether app runs on iOS and Android devices, such as smartphones and tablets.
1.Launch the Apple App Store or Google Play store and search “TP-Link Tether” or simply scan the QR code to download and install the app.
OR
13
|
Chapter 4 |
Set Up Internet Connection |
2.Connect your device to the router’s wireless network.
3.Launch the Tether app, tap the + button and select Archer AX6000. Follow the steps to complete the setup and connect to the internet.
4.Connect your devices to the newly configured wireless networks of the router and enjoy the internet!
4. 3. Manually Set Up Your Internet Connection
In this part, you can check your current internet connection settings. You can also modify the settings according to the service information provided by your ISP.
Follow the steps below to check or modify your internet connection settings.
1.Visit http://tplinkwifi.net, and log in with your TP-Link ID or the password you set for the router.
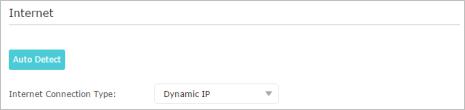
2.Go to Basic > Internet.
3.Select your internet connection type from the drop-down list.
 Note:
Note:
If you are unsure of what your connection type is, click Auto Detect. Since different connection types require different cables and connection information, you can also refer to the demonstrations in Step 4 to determine your connection type.
4.Follow the instructions on the page to continue the configuration. Parameters on the figures are just used for demonstration.
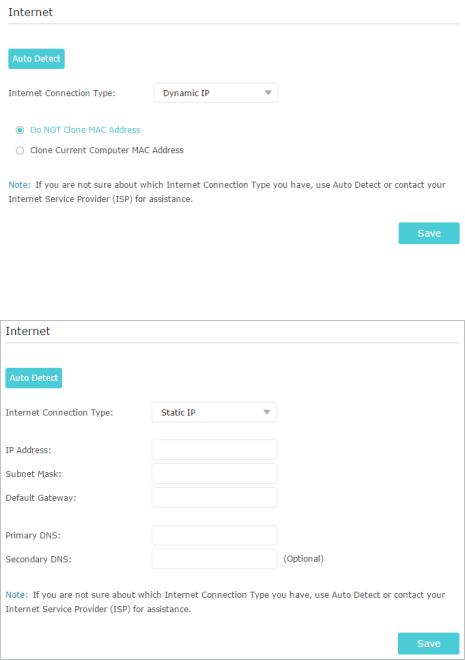
1 ) If you choose Dynamic IP, you need to select whether to clone the MAC address. Dynamic IP users are usually equipped with a cable TV or fiber cable.
14
|
Chapter 4 |
Set Up Internet Connection |
||
2 ) If you choose Static IP, enter the information provided by your ISP in the corresponding fields.
3 ) If you choose PPPoE, enter the username and password provided by your ISP. PPPoE users usually have DSL cable modems.
15
|
Chapter 4 |
Set Up Internet Connection |
||
4 ) If you choose L2TP, enter the username and password and choose the Secondary Connection provided by your ISP. Different parameters are needed according to the Secondary Connection you have chosen.
5 ) If you choose PPTP, enter the username and password, and choose the Secondary Connection provided by your ISP. Different parameters are needed according to the Secondary Connection you have chosen.
16
![]()
|
Chapter 4 |
Set Up Internet Connection |
||
5.Click Save.
6.To check your internet connection, click Network Map on the left of the page. After the connection succeeds, the screen will display as follows. Here we take PPPoE as an example.
 Note: It may take 1-2 minutes to make the settings valid.
 Tips:
Tips:
•If your internet connection type is BigPond Cable, please go to Advanced > Network > Internet to set your router.
•If you use Dynamic IP and PPPoE and you are provided with any other parameters that are not required on the page, please go to Advanced > Network > Internet to complete the configuration.
•If you still cannot access the internet, refer to the FAQ section for further instructions.
17
|
Chapter 4 |
Set Up Internet Connection |
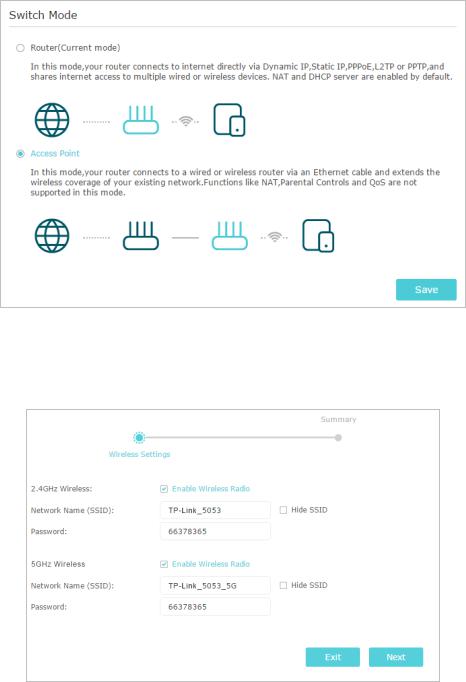
4. 4. Set Up the Router as an Access Point
The router can work as an access point, transforming your existing wired network to a wireless one.
1.Visit http://tplinkwifi.net, and log in with your TP-Link ID or the password you set for the router.
2.Go to Advanced > Operation Mode, select Access Point and click Save. The router will reboot and switch to Access Point mode.
3.After rebooting, connect the router to your existing wired router via an Ethernet cable.
4.Log in again to the web management page http://tplinkwifi.net, and click Quick Setup.
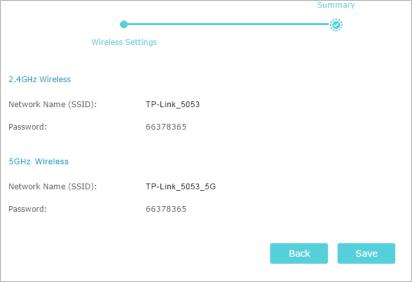
5.Configure your wireless settings and click Next.
18
|
Chapter 4 |
Set Up Internet Connection |
6. Confirm the information and click Save. Now, you can enjoy Wi-Fi.
 Tips:
Tips:
•Functions, such as Parental Controls, Qos and NAT Forwarding, are not supported in the Access Point mode.
•Functions, such as Guest Network, are the same as those in the Router mode.
4. 5. Set Up an IPv6 Internet Connection
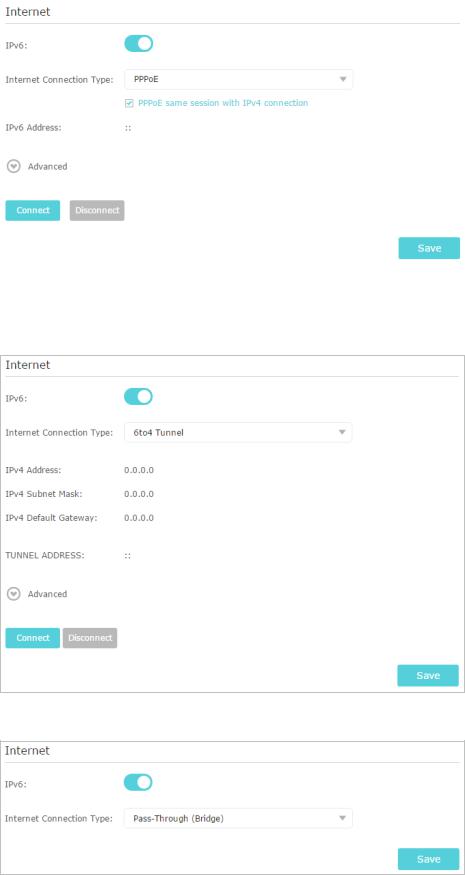
Your ISP provides information about one of the following IPv6 internet connection types: PPPoE, Dynamic IP(SLAAC/DHCPv6), Static IP, 6to4 tunnel, Pass-Through (Bridge).
1.Visit http://tplinkwifi.net, and log in with your TP-Link ID or the password you set for the router.
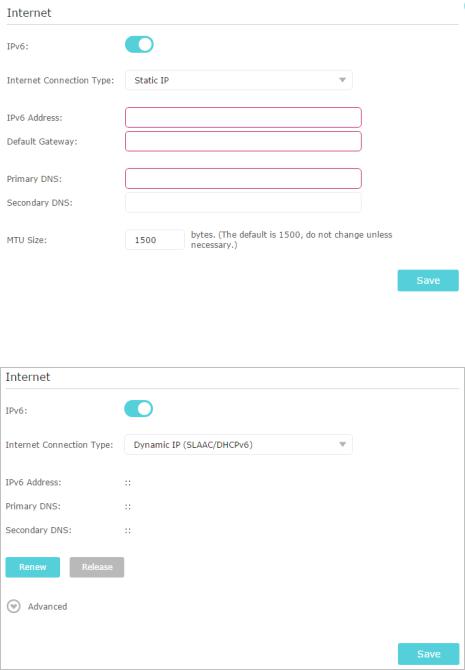
2.Go to Advanced > IPv6.
3.Enable IPv6 and select the internet connection type provided by your ISP.
 Tips:
Tips:
If you do not know what your internet connection type is, contact your ISP or judge according to the already known information provided by your ISP.
4.Fill in information as required by different connection types. Red blanks must be filled in.
1 ) Static IP: Fill in blanks and click Save.
19
|
Chapter 4 |
Set Up Internet Connection |
||
2 ) Dynamic IP(SLAAC/DHCPv6): Click Advanced to input further information if your ISP requires. Click Save and then click Renew.
3 ) PPPoE: By default, the router uses the IPv4 account to connect to the IPv6 server. Click Advanced to input further information if your ISP requires. Click Save and then click Connect.
 Note:
Note:
If your ISP provides two separate accounts for the IPv4 and IPv6 connections, please untick the Use the same session with IPv4 connection checkbox and manually enter the username and password for the IPv6 connection.
20
|
Chapter 4 |
Set Up Internet Connection |
||
4 ) 6to4 Tunnel: An IPv4 internet connection type is a prerequisite for this connection type (Manually Set Up Your Internet Connection). Click Advanced to input further information if your ISP requires. Click Save and then click Connect.
5 ) Pass-Through (Bridge): Click Save and skip to Step 6.
21
|
Chapter 4 |
Set Up Internet Connection |
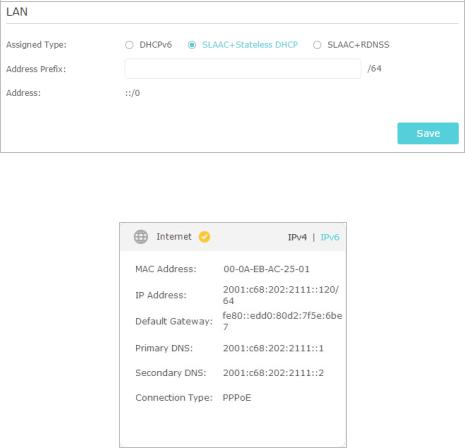
5.Configure LAN ports. Windows users are recommended to choose from the first two types. Fill in Address Prefix provided by your ISP, and click Save.
 Tips:
Tips:
Find Help on the web management page to know more about items.
6.Click Status to check whether you have successfully set up an IPv6 connection. The following figure is an example of a successful PPPoE configuration.
 Tips:
Tips:
Visit the FAQ section if there is no internet connection.
22

Chapter 5
TP-Link Cloud Service
TP-Link Cloud service provides a better way to manage your cloud devices. Log in to your router with a TP-Link ID, and you can easily monitor and manage your home network when you are out and about via the Tether app on your smartphone or tablet. To ensure that your router stays new and gets better over time, the TP-Link Cloud will notify you when an important firmware upgrade is avaliable. Surely you can also manage multiple TP-Link Cloud devices with a single TP-Link ID.
This chapter introduces how to register a new TP-Link ID, bind or unbind TP-Link IDs to manage your router, and the Tether app with which you can manage your home network no matter where you may find yourself.
It contains the following sections:
•Register a TP-Link ID
•Change Your TP-Link ID Information
•Manage the User TP-Link IDs
•Manage the Router via the TP-Link Tether App
|
Chapter 5 |
TP-Link Cloud Service |
5. 1. Register a TP-Link ID
If you have skipped the registration during the Quick Setup process, you can:
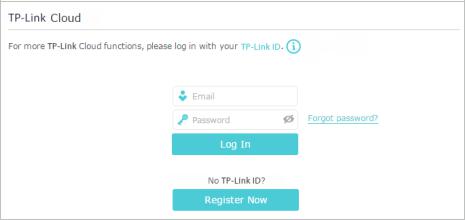
1.Visit http://tplinkwifi.net, and log in with the password you set for the router.
2.Go to Basic > TP-Link Cloud.
3.Click Register Now and follow the instructions to register a TP-Link ID.
4.After activating your TP-Link ID, come back to the TP-Link Cloud page to log in. The TP-Link ID used to log in to the router for the first time will be automatically bound as an Admin.
 Note:
Note:
•To learn more about the Admin and User TP-Link ID, refer to Manage the User TP-Link IDs.
•Once the router is bound to your TP-Link ID, you need to log in to the router with the TP-Link ID.
•Once you have registered a TP-Link ID on the web management page, you can only register another TP-Link ID via the Tether APP. Please refer to Manage the Router via the TP-Link Tether App to install the app and register a new one.
•If you want to unbind the admin TP-Link ID from your router, please go to Basic > TP-Link Cloud, an click Unbind in the Device Information section.
5. 2. Change Your TP-Link ID Information
Follow the steps below to change your email address and password of your TP-Link ID as needed.
1.Visit http://tplinkwifi.net, and log in with your TP-Link ID.
2.Go to Basic > TP-Link Cloud, and focus on the Account Information section.
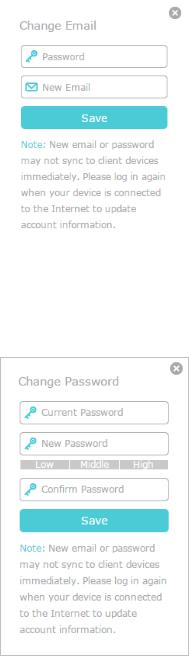
•To change your email address:
1.Click  behind the Email.
2.Enter the password of your TP-Link ID, then a new email address. And click Save.
24
|
Chapter 5 |
TP-Link Cloud Service |
|
•To change your password:
1.Click  behind the Password.
2.Enter the current password, then a new password twice. And click Save.
5. 3. Manage the User TP-Link IDs
The TP-Link ID used to log in to the router for the first time will be automatically bound as the Admin account. An admin account can add or remove other TP-Link IDs to or from the same router as Users. All accounts can monitor and manage the router locally or remotely, but user accounts cannot:
•Reset the router to its factory default settings either on the web management page or in the Tether app.
25
|
Chapter 5 |
TP-Link Cloud Service |
• Add/remove other TP-Link IDs to/from the router.
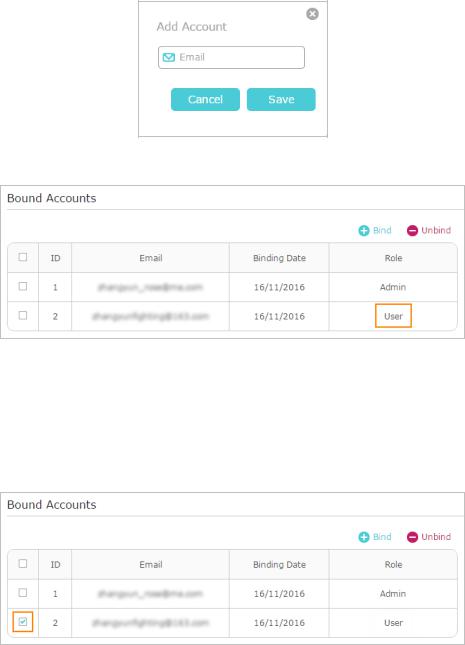
5. 3. 1. Add TP-Link ID to Manage the Router
1.Visit http://tplinkwifi.net, and log in with your TP-Link ID.
2.Go to Basic > TP-Link Cloud, and focus on the Bound Accounts section.
3.Click  , enter another TP-Link ID as needed and click Save.
 Note:
Note:
If you need another TP-Link ID, please register a new one via the Tether app.Please refer to Manage the Router via the TP-Link Tether App to install the app and register a new TP-Link ID.
4. The new TP-Link ID will be displayed in the Bound Accounts table as a User.
5. 3. 2. Remove TP-Link ID(s) from Managing the Router
1.Visit http://tplinkwifi.net, and log in with your TP-Link ID.
2.Go to Basic > TP-Link Cloud, and focus on the Bound Accounts section.
3.Tick the checkbox(es) of the TP-Link ID(s) you want to remove and click Unbind.
26
![]()
|
Chapter 5 |
TP-Link Cloud Service |
5. 4. Manage the Router via the TP-Link Tether App
The Tether app runs on iOS and Android devices, such as smartphones and tablets.
1.Launch the Apple App Store or Google Play store and search “TP-Link Tether” or simply scan the QR code to download and install the app.
OR
2.Connect your device to the router’s wireless network.
3.Launch the Tether app, select the model of your router and log in with your TP-Link ID or the password your set for the router.
4.Manage your router as needed.
 Note:
Note:
If you need to remotely access your router from your smart devices, you need:
•Log in with your TP-Link ID. If you don’t have one, refer to Register a TP-Link ID.
•Make sure your smartphone or tablet can access the internet with cellular data or a Wi-Fi network.
27

Chapter 6
Guest Network
This function allows you to provide Wi-Fi access for guests without disclosing your main network. When you have guests in your house, apartment, or workplace, you can create a guest network for them. In addition, you can customize guest network options to ensure network security and privacy.
It contains the following sections:
•Create a Network for Guests
•Customize Guest Network Options

6. 1. Create a Network for Guests
1.Visit http://tplinkwifi.net, and log in with your TP-Link ID or the password you set for the router.
2.Go to Advanced > Guest Network. Locate the Wireless section.
3.Create a guest network as needed.
1 ) Enable 2.4GHz Wireless network or 5GHz Wireless network.
2 ) Customize the SSID. Don‘t select Hide SSID unless you want your guests to manually input the SSID for guest network access.
3 ) Select the Security type.
•If No security is selected, no password is needed to access your guest network.
•If WAP/WPA2-Personal is selected, keep the default Version and Encryption values, and customize your own password.
4.Click Save. Now your guests can access your guest network using the SSID and password you set!
 Tips:
Tips:
To view guest network information, go to Advanced > Status and locate the Guest Network section.
29

6. 2. Customize Guest Network Options
1.Visit http://tplinkwifi.net, and log in with your TP-Link ID or the password you set for the router.
2.Go to Advanced > Guest Network. Locate the Settings section.
3.Customize guest network options according to your needs.
•Allow guests to see each other
Tick this checkbox if you want to allow the wireless clients on your guest network to communicate with each other via methods such as network neighbors and Ping.
•Allow guests to access my local network
Tick this checkbox if you want to allow the wireless clients on your guest network to communicate with the devices connected to your router’s LAN ports or main network via methods such as network neighbors and Ping.
4. Click Save. Now you can ensure network security and privacy!
 Tips:
Tips:
To view guest network information, go to Advanced > Status and locate the Guest Network section.
30

Chapter 7
USB Settings
This chapter describes how to use the USB ports to share files and media from the USB storage devices over your home network locally, or remotely through the internet.
The router supports USB external flash drives and hard drives. It contains the following sections:
•Access the USB Storage Device
•Media Sharing
•Time Machine

7. 1. Access the USB Storage Device
Insert your USB storage device into the router’s USB port and then access files stored there locally or remotely.
 Tips:
Tips:
•If you use USB hubs, make sure no more than 4 devices are connected to the router.
•If the USB storage device requires using bundled external power, make sure the external power has been connected.
•If you use a USB hard drive, make sure its file system is FAT32, exFat, NTFS or HFS+.
•Before you physically disconnect a USB device from the router, safely remove it to avoid data damage: Go to Advanced > USB Sharing > USB Storage Device > Device Settings and click Remove.
7. 1. 1. Access the USB Device Locally
Insert your USB storage device into the router’s USB port and then refer to the following table to access files stored on your USB storage device.
•Method 1:
Go to Computer > Network, then click the Network Server Name (TPSHARE by default) in the Computer section.
 Note:
Note:
Operations in different systems are similar. Here we take Windows 7 as an example.
Windows computer
32

•Method 2:
Open the Windows Explorer (or go to Computer) and type the server address \\tplinkwifi.net or ftp://tplinkwifi.net in the address bar, then press Enter.
Windows computer
1 ) Select Go > Connect to Server.
2 ) Type the server address smb://tplinkwifi.net.
3 ) Click Connect.
Mac
4 ) When prompted, select the Guest radio box. (If you have set up a username and a password to deny anonymous access to the USB disks, you should select the Registered User radio box. To learn how to set up an account for the access, refer to To Set up Authentication for Data Security.)
Tablet Use a third-party app for network files management.
 Tips:
Tips:
You can also access your USB storage device by using your Network/Media Server Name as the server address. Refer to To Customize the Address of the USB Storage Device to learn more.
7. 1. 2. Access the USB Device Remotely
You can access your USB disk outside the local area network. For example, you can:
33
 Loading…
![]() Loading…
Loading…
![]()
 Руководство по быстрой установке
Лучник AX6000
Маршрутизатор AX6000 8-Stream Wi-Fi 6
![]() Настроить с видео:
Настроить с видео:
Отсканируйте QR-код или посетите
https://www.tp-link.com/support/setup-video/#wi-fi-routers
 https://www.tp-link.com/support/setup-video/#wi-fi-routers
Подключите оборудование
![]()
- Отключите питание чтобы выключить модем, если он есть, и извлечь резервную батарею, если она есть.
- Разместите роутер горизонтально, а антенны расположите вертикально.

Если ваш Интернет идет от розетки Ethernet, а не через DSL / кабельный / спутниковый модем, подключите к нему WAN-порт маршрутизатора, затем выполните шаги 3 и 4, чтобы завершить аппаратное подключение.

- Подключите выключенный модем к WAN-порту маршрутизатора с помощью кабеля Ethernet.
- Включите модем и подождите примерно 2 минут для его перезапуска.
- Подключите адаптер питания к роутеру и включите его.
- Проверить
 Светодиод наверху горит (красный или синий), прежде чем двигаться дальше.
* Изображения могут отличаться от реальных товаров.
Настроить сеть
Метод XNUMX: через приложение TP-Link Tether
- Загрузите приложение Tether.
 http://www.tp-link.com/common/promos/app_tether_v2.html?ref=QRCode
 - Откройте приложение Tether и войдите в систему со своим TP-Link ID.
Примечание: Если у вас нет учетной записи, сначала создайте ее. - Нажмите кнопку в приложении Tether и выберите Archer AX6000. Следуйте инструкциям, чтобы завершить настройку и подключиться к Интернету.

![]() Наслаждайтесь интернетом!
Наслаждайтесь интернетом!
Чтобы пользоваться более полным сервисом от TP-Link, привяжите свой TP-Link ID к маршрутизатору.
Метод ВТОРОЙ: Через Web Браузер
- Подключите устройство к маршрутизатору с помощью кабеля Ethernet или через сеть Wi-Fi.
Имена беспроводных сетей (SSID) и пароли по умолчанию напечатаны на этикетке в нижней части маршрутизатора.
- Запустить web браузер и введите http://tplinkwifi.net or http://192.168.0.1 в адресной строке. Придумайте пароль для входа в систему.
Примечание: Если окно входа в систему не появляется, обратитесь к Q1 «Нужна помощь?» в этом руководстве.
- Следуйте пошаговым инструкциям, чтобы настроить подключение к Интернету и зарегистрироваться в облачном сервисе TP-Link.
![]() Наслаждайтесь Интернетом!
Наслаждайтесь Интернетом!
Светодиод Пояснение

Solid Blue
Роутер работает нормально.
Циркулирующий синий![]()
Система запускается или маршрутизатор перезагружается.
Циркуляция синего цвета параллельно![]()
Прошивка обновляется или устанавливается WPS-соединение.
Сплошной апельсин
Маршрутизатор подключен к Интернету, но функция беспроводной связи отключена.
Твердый красный
Нет соединения с интернетом.
Кнопка Описание

Кнопка WPS
Нажмите кнопку WPS на 1 секунду, а затем сразу нажмите
Кнопка WPS на вашем клиенте, чтобы запустить процесс WPS.
Кнопка Wi-Fi
Нажмите и удерживайте кнопку Wi-Fi около 2 секунд, чтобы включить или выключить беспроводную связь вашего маршрутизатора.
Светодиодная кнопка
Нажмите кнопку светодиода примерно на 2 секунды, чтобы включить или выключить светодиод маршрутизатора.
Информация по технике безопасности
- Держите устройство подальше от воды, огня, влажности или горячей среды.
- Не пытайтесь разбирать, ремонтировать или модифицировать устройство. Если вам нужна услуга, свяжитесь с нами.
- Не используйте поврежденное зарядное устройство или USB-кабель для зарядки устройства.
- Не используйте другие зарядные устройства, кроме рекомендованных.
- Не используйте устройство там, где использование беспроводных устройств запрещено.
- Адаптер должен быть установлен рядом с оборудованием и должен быть легко доступен.
Нужна помощь?

Q1. Что мне делать, если я не могу получить доступ к web страница управления?
- Перезагрузите роутер и попробуйте еще раз.
- Если для компьютера установлен статический IP-адрес, измените его настройки для автоматического получения IP-адреса.
- Подтвердите это http://tplinkwifi.net правильно введен в web браузер. Или введите http://192.168.0.1 or http://192.168.1.1 в web браузер.
- Использовать другой web браузер и попробуйте еще раз.
- Отключите и включите используемый сетевой адаптер.
Q2. Что мне делать, если я не могу получить доступ к Интернету?
- Выключите модем примерно на 5 минут, затем включите его и проверьте Интернет.
- Проверьте, нормально ли работает Интернет, подключив компьютер напрямую к модему с помощью кабеля Ethernet. Если это не так, обратитесь к своему интернет-провайдеру.
- Войти в web страницу управления маршрутизатором и перейдите на Карта сети страницу, чтобы проверить, действителен ли IP-адрес в Интернете. Если это действительно так, перейдите к Дополнительно> Сеть> Интернет, нажмите на Дополнительные настройки, наведите на Используйте следующие адреса DNS, установите первичный DNS на 8.8.8.8 и установите вторичный DNS на 8.8.4.4. Если это не так, проверьте подключение оборудования или обратитесь к поставщику услуг Интернета.
- Для пользователей кабельного модема войдите в web страницу управления роутером. Перейти к Дополнительно> Сеть> Интернет> Клонирование MAC, наведите на Клонировать текущий MAC-адрес устройства и нажмите СОХРАНИТЬ.
Затем перезагрузите модем и маршрутизатор.
Q3. Что делать, если в Tether не удается найти роутер по Bluetooth (как сбросить роутер)?
Bluetooth маршрутизатора будет включен на 30 минут после восстановления заводских настроек по умолчанию. Есть два способа сбросить настройки роутера:
- При включенном маршрутизаторе булавкой нажмите и удерживайте Сброс кнопку на задней панели маршрутизатора и удерживайте не менее 2 секунд, пока светодиодный индикатор не начнет мигать синим цветом.
- Войти в web страницу управления роутером. Перейти к Дополнительно> Система> Резервное копирование и восстановление, и нажмите ЗАВОДСКОЕ ВОССТАНОВЛЕНИЕ. Маршрутизатор автоматически перезагрузится и перезапустится.
 Для получения технической поддержки, услуг по замене, руководств пользователя и другой информации посетите https://www.tp-link.com/support.
 Чтобы общаться с пользователями или инженерами TP-Link, присоединяйтесь к сообществу TP-Link по адресу https://community.tp-link.com.
![]() Эл. адрес techwriter@tp-link.com.cn давать предложения.
Эл. адрес techwriter@tp-link.com.cn давать предложения.
© TP-Link, 2020 7106509101 REV2.0.0
Документы / Ресурсы
Рекомендации