инструкцияTP-Link Archer MR600

Quick Installation Guide
Wireless Router
www.tp-link.com
7106508531 REV2.3.0
Specications are subject to change without notice. is a registered trademark of TP-Link
Technologies Co., Ltd. Other brands and product names are trademarks or registered trademarks of
their respective holders.
No part of the specications may be reproduced in any form or by any means or used to make any
derivative such as translation, transformation, or adaptation without permission from TP-Link
Technologies Co., Ltd. Copyright © 2019 TP-Link Technologies Co., Ltd. All rights reserved.
*Image may dier from your actual product.
For technical support, the user guide and more information, please visit
https://www.tp-link.com/support.
Посмотреть инструкция для TP-Link Archer MR600 бесплатно. Руководство относится к категории маршрутизаторы (роутеры), 25 человек(а) дали ему среднюю оценку 8.4. Руководство доступно на следующих языках: русский, английский. У вас есть вопрос о TP-Link Archer MR600 или вам нужна помощь? Задайте свой вопрос здесь
- 7106508531_封面
- SOHO无线路由(欧二16国)_QIG_V1
Главная
| TP-Link | |
| Archer MR600 | ARCHER MR600 V1 | |
| маршрутизатор (роутер) | |
| 6935364084608, 6935364086145, 6935364086152, 6935364088088, 6935364089832 | |
| русский, английский | |
| Руководство пользователя (PDF), Техническая спецификация (PDF) |
Свойства
Данные об упаковке
| Количество продуктов в комплекте | 1 шт |
| Тип упаковки | Коробочная версия |
| Высота упаковки | 70 mm |
| Ширина упаковки | 307 mm |
| Глубина упаковки | 223 mm |
Содержимое упаковки
| Краткое руководство по установке | Да |
| Поставляемые кабели | LAN (RJ-45) |
| Сетевой адаптер в комплекте | Да |
Системные требования
| Поддерживаемые операционные системы Linux | Да |
| Поддерживаемые операционные системы Mac | Да |
| Поддерживаемые операционные системы Windows | Да |
Вес и размеры
| Глубина | 160 mm |
| Высота | 37 mm |
| Ширина | 229 mm |
Энергопитание
| Тип источника питания | AC, DC |
| Входящее напряжение сети | 100 — 240 V |
| Частота входящего переменного тока | 50 — 60 Hz |
| Выходное напряжение | 12 V |
| Ток на выходе | 1.5 A |
Антена
| Конструкция антенны | Внешний |
| Съемная антенна(ы) | Да |
| Количество антенн | 2 |
Характеристики управления
| Кнопка сброса установок | Да |
| WPS кнопки | Да |
| Беспроводные мультимедийные расширения | Да |
| Поддержка Quality of Service (QoS) | Да |
WAN подключение
| Ethernet WAN | Да |
| DSL WAN | Нет |
| Слот для SIM-карты | Да |
| Совместимость с 3G / 4G USB модемом | Нет |
| Тип WAN соединения | RJ-45 |
Сеть
| Чувствительность приемника | 5 GHz: 11a 54M: -74 dBm\n11ac HT20: -66 dBm\n11ac HT40: -63 dBm\n11ac HT80 : -59 dBm\n11n HT20: -73 dBm\n11n HT40: -70 dBm\n2.4 GHz: 11g 54M: -74 dBm\n11n HT20: -72 dBm\n11n HT40: -69 dBm |
| Стандарты сети | IEEE 802.11a, IEEE 802.11ac, IEEE 802.11b, IEEE 802.11g, IEEE 802.11n |
| Подключение Ethernet | Да |
| Тип LAN Ethernet интерфейса | Гигабитный Ethernet |
| Скорость передачи данных Ethernet LAN | 10,100,1000 Мбит/с |
| Поддержка VPN (виртуальной частной сети) | PPTP VPN, IPSec VPN , OpenVPN |
| Динамический DNS | Да |
| Переадресация портов | Да |
| Запуск порта | Да |
| Количество гостевых сетей (2,4 ГГц) | 1 |
| Количество гостевых сетей (5 ГГц) | 1 |
Мобильная сеть
| 3G | Да |
| 4G | Да |
| Стандарт 4G | LTE |
| Поддерживаемые 4G частоты | 700,800,850,900,1800,2100,2300,2500,2600 MHz |
| Стандарты 3G | HSPA, HSPA+, UMTS |
| Поддерживаемые UMTS частоты | 850,900,2100 MHz |
| Поддержка двух SIM-карт | Нет |
| Поколение сети мобильной связи | 4G |
| 5G | Нет |
| Тип SIM карты | MicroSIM |
Характеристики беспроводной LAN
| Wi-Fi диапазоны | Двухдиапазонный (2,4Ггц/5Ггц) |
| Основной стандарт Wi-Fi | Wi-Fi 5 (802.11ac) |
| Wi-Fi стандартов | 802.11a, 802.11b, 802.11g, Wi-Fi 4 (802.11n), Wi-Fi 5 (802.11ac) |
| Скорость передачи данных WLAN (макс) | 867 Мбит/с |
| Скорость передачи данных WLAN (первая полоса) | 867 Мбит/с |
| Скорость передачи данных WLAN (вторая полоса) | 300 Мбит/с |
Безопасность
| Алгоритмы шифрования данных | 64-bit WEP, 128-bit WEP, WPA, WPA-PSK, WPA2, WPA2-PSK |
| Брандмауэр | Да |
| Защита с помощью брандмауэра | Domain Filter, IP, MAC Address Binding |
| Поддержка DMZ | Да |
| Инспекция пакетов с хранением состояния (SPI) | Да |
| Защита от DoS атаки | Да |
| Фильтрация | Да |
| Гостевой доступ | Да |
| Родительский контроль | Да |
| Фильтрация URL-адресов | Да |
Порты и интерфейсы
| USB порт | Нет |
| Слот(ы) для карты памяти | Нет |
| Количество портов Ethernet LAN ( RJ-45) | 4 |
| Гнездо входа постоянного тока (DC) | Да |
Дизайн
| Тип продукта | Настольный маршрутизатор |
| Цвет товара | Черный |
| Настенный | Нет |
| Светодиодные индикаторы | LAN, Power, WLAN |
Протоколы
| Протокол маршрутизации | IP |
| Поддерживаемые сетевые протоколы | IPv4, IPv6 |
| DHCP клиент | Да |
| Universal Plug and Play (UPnP) | Да |
| DHCP сервер | Да |
Условия эксплуатации
| Диапазон температур при эксплуатации | 0 — 40 °C |
| Диапазон температур при хранении | -40 — 70 °C |
| Диапазон относительной влажности при эксплуатации | 10 — 90 % |
| Диапазон относительной влажности при хранении | 5 — 90 % |
Логистические данные
| Код гармонизированной системы описания (HS) | 85176990 |
показать больше
Не можете найти ответ на свой вопрос в руководстве? Вы можете найти ответ на свой вопрос ниже, в разделе часто задаваемых вопросов о TP-Link Archer MR600.
В чем разница между роутером и модемом?
Модем обеспечивает подключение к Интернету через интернет-провайдера. Затем маршрутизатор распределяет через Интернет сигнал на подключенные к маршрутизатору устройства.
От чего зависит скорость загрузки в Интернете?
Скорость загрузки в Интернете зависит от вашего типа соединения. Если ваша скорость составляет 25 Мб/сек, это означает, что теоретически скорость загрузки будет составлять 25 Мб/сек.
Вредно ли Wi-Fi-излучение?
Wi-Fi — радиочастотный сигнал в виде неионизирующего излучения. Это излучение не может повредить клетки и ткани и, следовательно, не наносит вреда здоровью.
Какие сертификаты TP-Link Archer MR600 имеет?
TP-Link Archer MR600 имеет следующие сертификаты: CE, RoHS.
Какая высота TP-Link Archer MR600?
TP-Link Archer MR600 имеет высоту 37 mm.
Какая ширина TP-Link Archer MR600?
TP-Link Archer MR600 имеет ширину 229 mm.
Какая толщина TP-Link Archer MR600?
TP-Link Archer MR600 имеет толщину 160 mm.
Инструкция TP-Link Archer MR600 доступно в русский?
Да, руководствоTP-Link Archer MR600 доступно врусский .
Не нашли свой вопрос? Задайте свой вопрос здесь
По теме:
Первичная настройка
Настройка Wi-Fi
Удалённый доступ
Статус агрегации частот
Включение агрегации частот
Выбор частоты подключения к базовой станции
Первичная настройка:
Для первичной настройки модема, в адресной строке браузера заходим по адресу 192.168.1.1
Для удобства можно выбрать русский язык
В поля вписываем пароль из ЛК(рекомендуется), он же пароль на wi-fi написан на заводской наклейке.
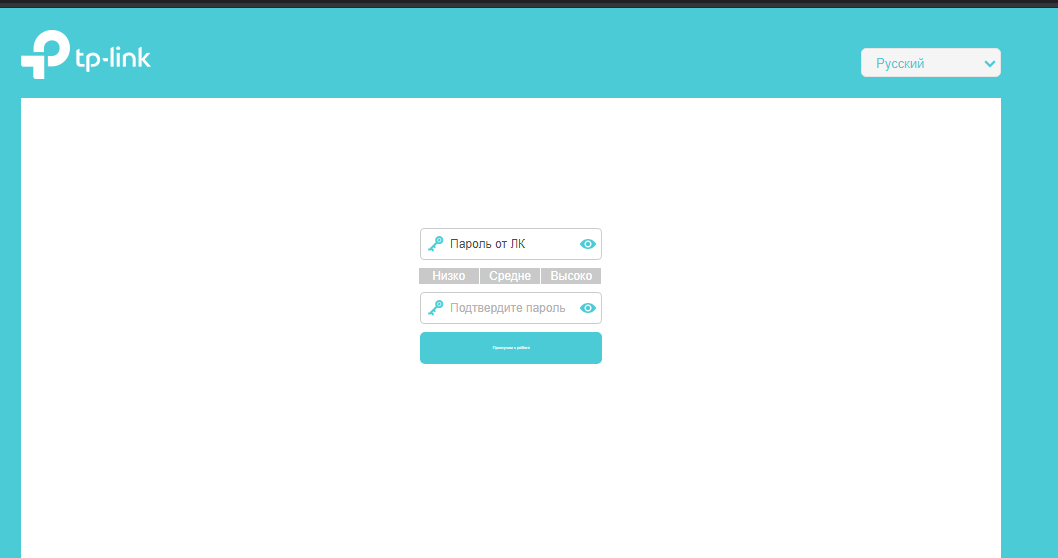
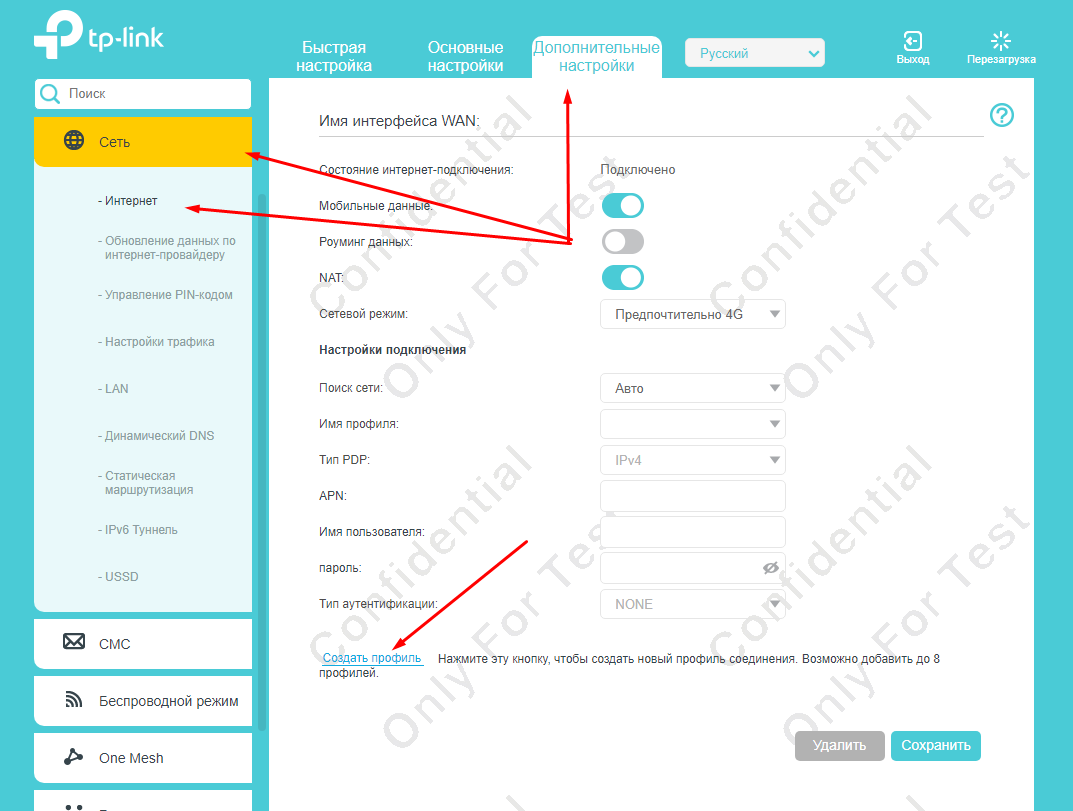
В меню Дополнительные настройки — Сеть — Интернет создаем профиль.
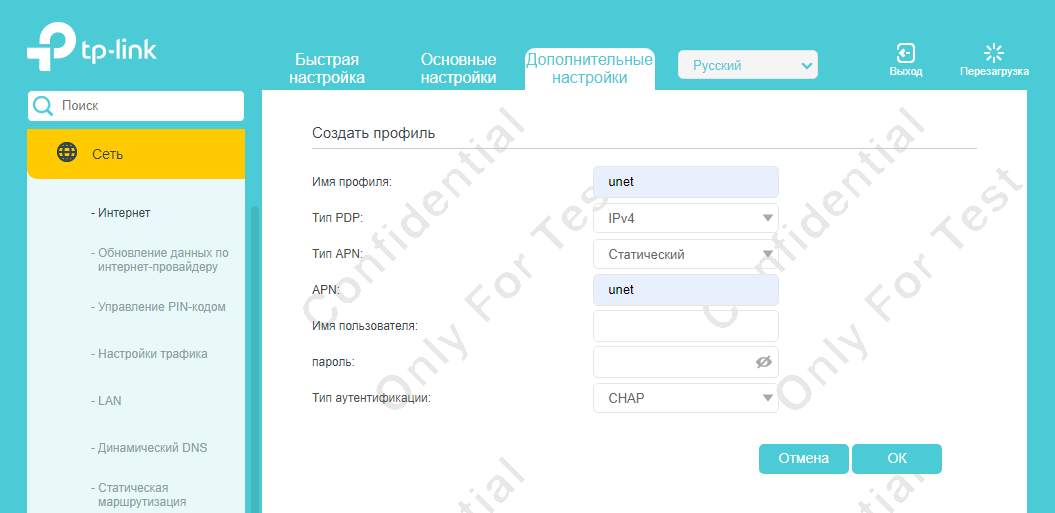
Заполняем как на скриншоте, нажимаем ОК
Затем Сохранить.
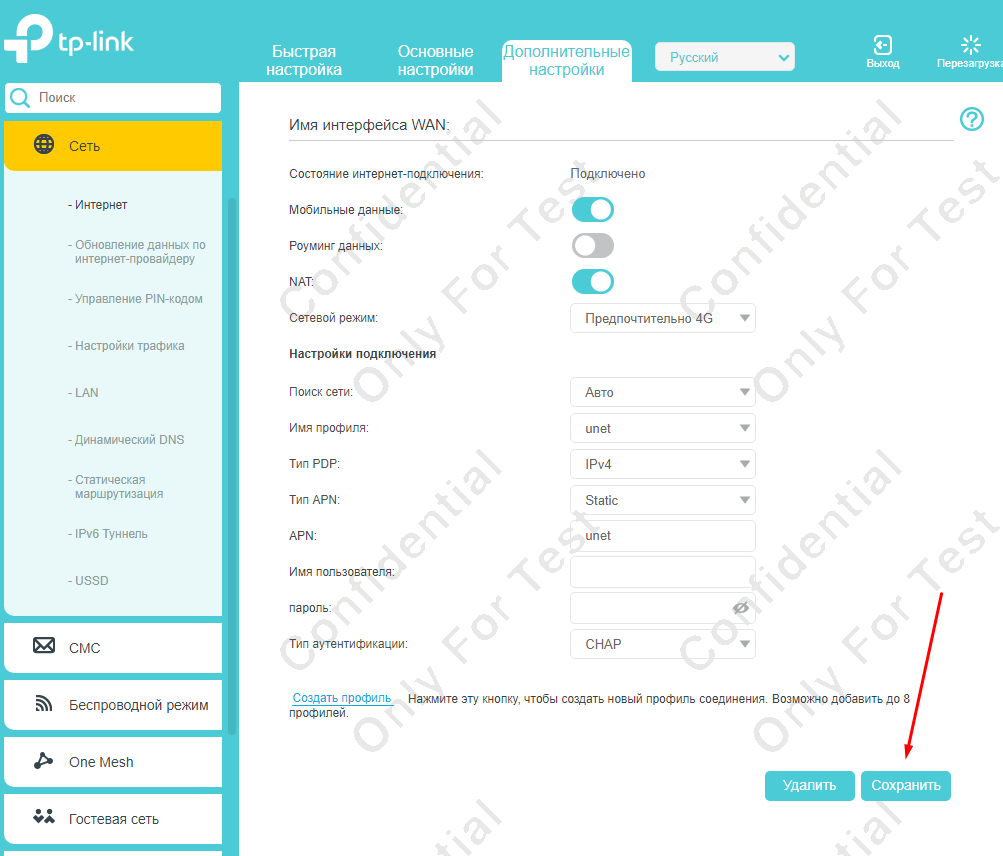
Интернет должен заработать
Переходим к настройкам Wi-Fi:
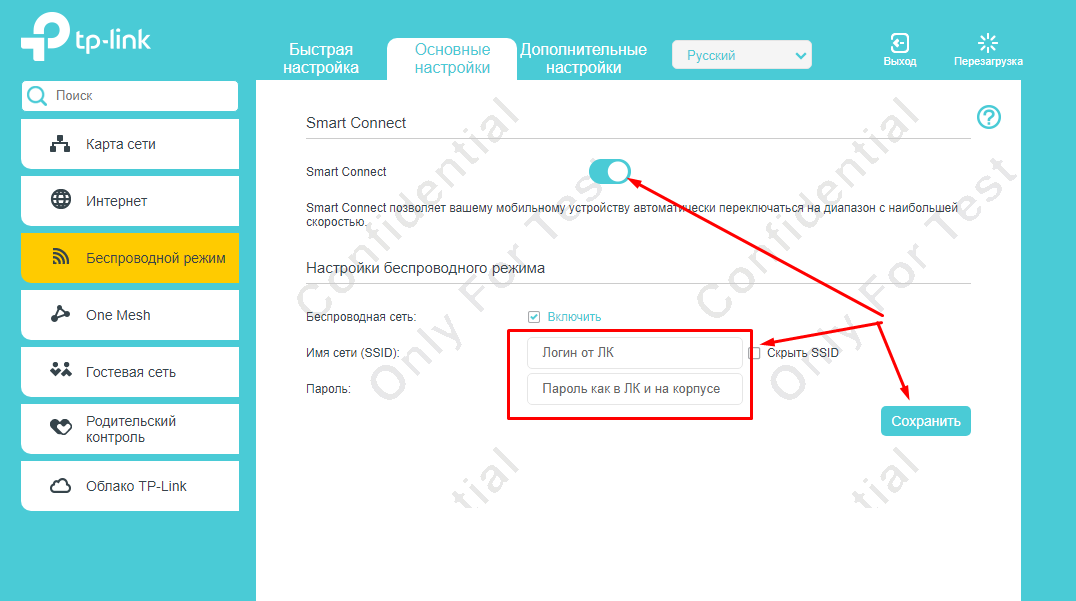
В меню Основные настройки — Беспроводной режим — включаем функцию Smart Connect, вписываем Имя сети и Пароль, нажимаем Сохранить.
Настраиваем удаленный доступ:
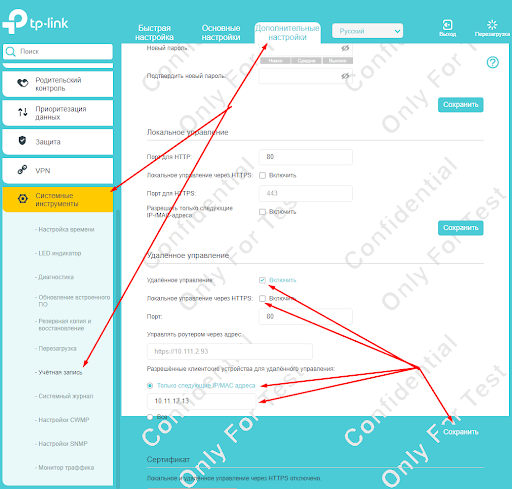
В меню Дополнительные настройки — Системные инструменты — Учетная запись проставляем галочку напротив Удалённое управление, снимаем галочку Локальное управление через HTTPS, ставим галочку Только следующие IP/MAC адреса и вписываем 10.11.12.13, нажимаем Сохранить.
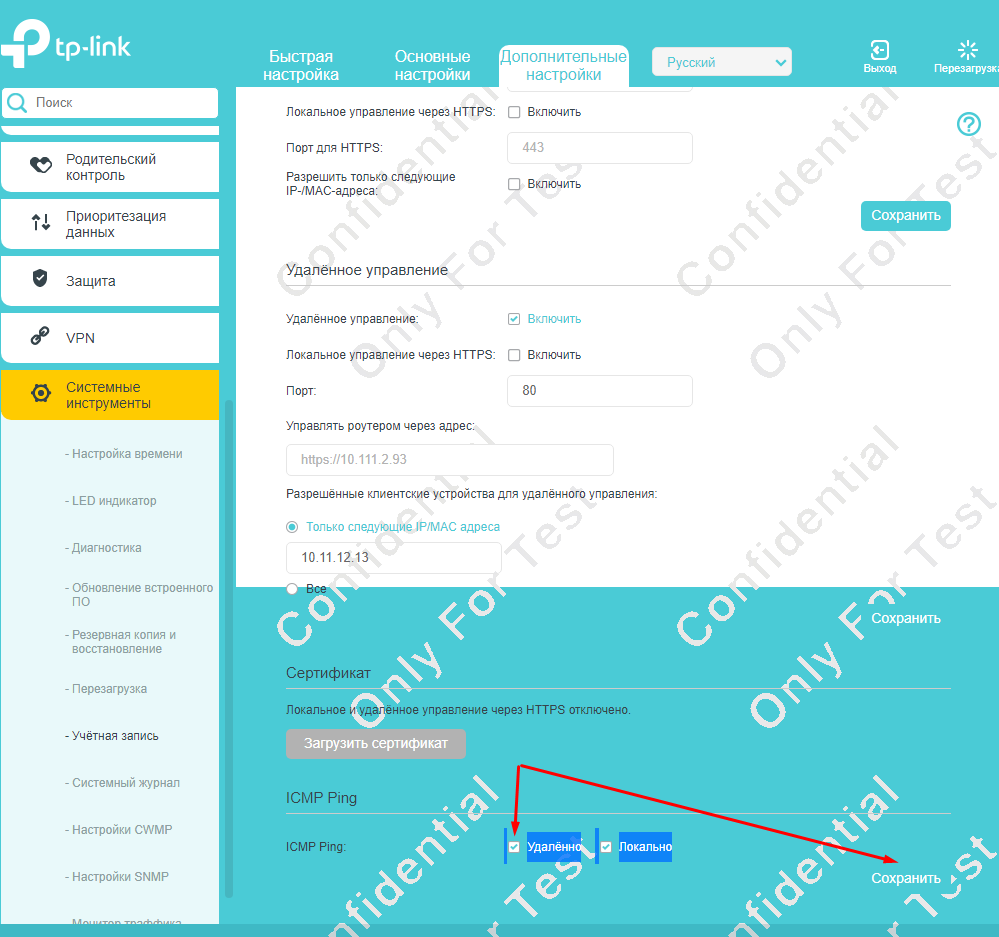
Там же ставим галочки на ICMP Ping
Готово.
Как посмотреть включена ли агрегация:
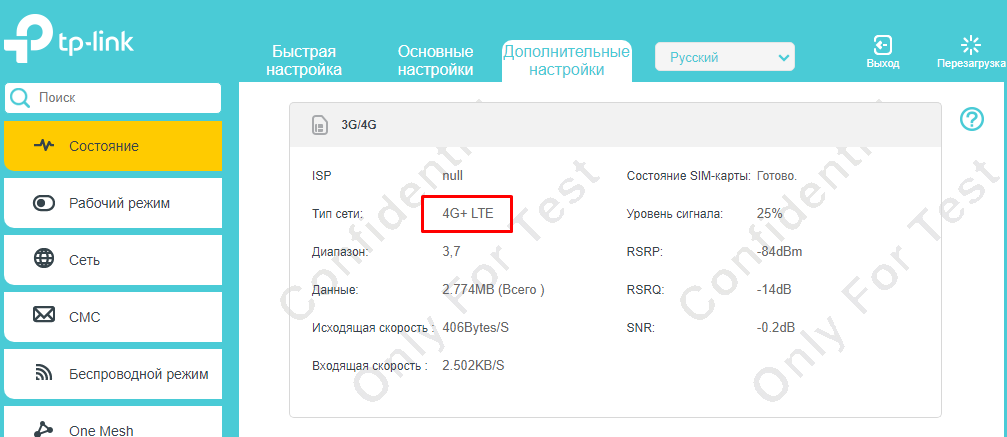
Дополнительные настройки — Состояние, в окне 3G/4G должно быть написано 4G+ LTE
Как принудительно включить агрегацию:
Никак, решение о включении агрегации принимается на стороне БС, роутер только сообщает ей о том что поддерживает ее.
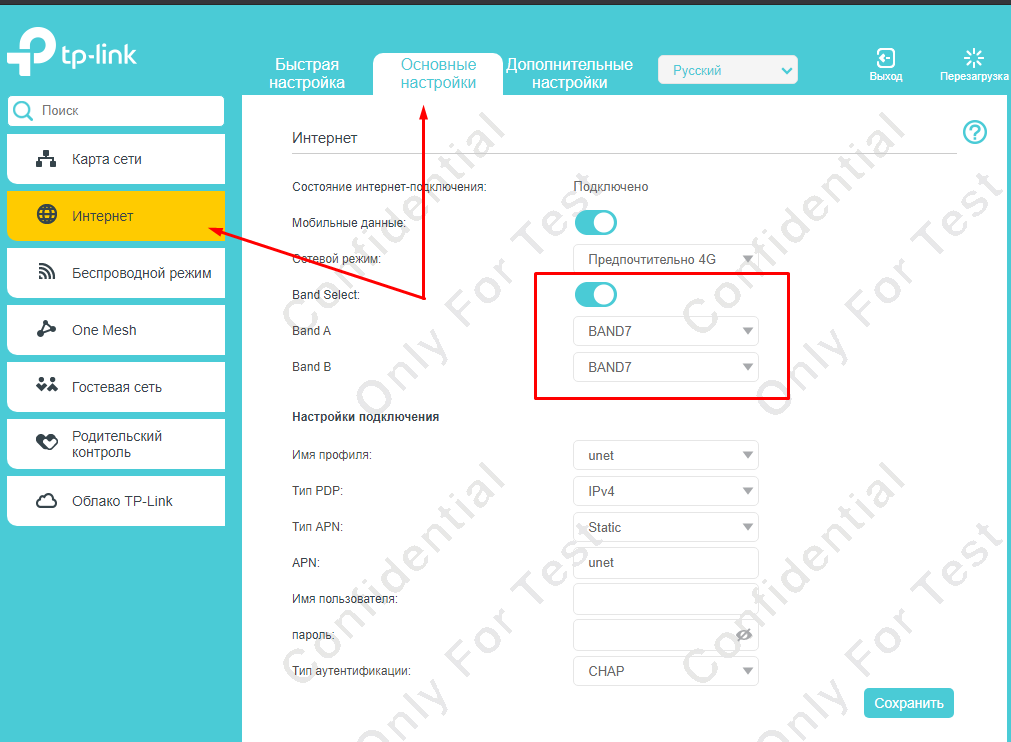
Как принудительно выбрать Band:
Переходим в меню Основные настройки — Интернет, включаем Band Select и выбираем нужную частоту:
-
Band А — Band 3
Band B — Band 3
— для подключения только на частоте 1800 МГц -
Band А — Band 7
Band B — Band 7
— для подключения на частоте 2600 МГц (если по Вашему адресу доступна агрегация, то роутер будет агрегировать Band7+Band7 ) -
Band А — Band 20
Band B — Band 20
— для подключения только на частоте 800 МГц -
Band А — Band 3
Band B — Band 7
— для подключения на частоте и 1800, и 2600 МГц (если по Вашему адресу доступна агрегация, то роутер будет агрегировать Band3+Band7) -
Band А — Band 3
Band B — Band 20— для подключения на частоте и 1800, и 800 МГц (если по Вашему адресу доступна агрегация, то роутер будет агрегировать Band3+Band20)
Подпишитесь на мобильное приложение: Viber, Telegram.
А также следите за актуальными новостями в нашем Telegram-канале.
Если у Вас возникли вопросы — напишите нам или позвоните 7778282 (любой мобильный оператор).

-
Contents
-
Table of Contents
-
Bookmarks
Quick Links
User Guide
AC1200 4G LTE Advanced Cat6 Gigabit Router
REV1.1.0 1910012622
Related Manuals for TP-Link Archer MR600
Summary of Contents for TP-Link Archer MR600
-
Page 1
User Guide AC1200 4G LTE Advanced Cat6 Gigabit Router REV1.1.0 1910012622… -
Page 2: Table Of Contents
Contents About This Guide Chapter 1 Get to Know Your 4G LTE Router 1. 1. Product Overview…………3 1.
-
Page 3
8. 1. View Messages …………. 33 8. -
Page 4
13. 4. Manage the Router via the TP-Link Tether App …… -
Page 5: About This Guide
• Specifications can be found on the product page at https://www.tp-link.com. • A Community is provided for you to discuss our products at https://community.tp-link.com. • Our Technical Support contact information can be found at the Contact Technical Support page at https://www.tp-link.com/support/.
-
Page 6: Chapter 1 Get To Know Your 4G Lte Router
Chapter Get to Know Your 4G LTE Router This chapter introduces what the router can do and shows its appearance. It contains the following sections: • Product Overview • Panel Layout…
-
Page 7: Product Overview
Chapter 1 Get to Know Your 4G LTE Router Product Overview The 4G LTE Router shares the latest generation 4G LTE network with multiple Wi-Fi devices, anywhere you want. With Ethernet ports and antennas, the router provides wired and wireless access for multiple computers and mobile devices.
-
Page 8: The Back Panel
Chapter 1 Get to Know Your 4G LTE Router Name Status Indication The router is connected to the internet. (Internet) There is no internet connection. The LTE-Advanced network is available. (4G+ network) The LTE-Advanced network is disabled. The wireless function is enabled. Flashing WPS connection is in progress.
-
Page 9
Chapter 1 Get to Know Your 4G LTE Router Item Description POWER Port For connecting the router to power socket via the provided power adapter. Press this button to power on or off the router. POWER ON/OFF Button For connecting to your PCs or other Ethernet network devices. LAN1, LAN2, LAN3, In wireless router mode, the LAN4/WAN port is used for connecting to a Cable/FTTH/ LAN4/WAN… -
Page 10: Chapter 2 Connect The Hardware
Chapter Connect the Hardware This chapter contains the following sections: • Requirements for Operation • Position Your 4G LTE Router • Connect Your 4G LTE Router…
-
Page 11: Requirements For Operation
Chapter 2 Connect the Hardware Requirements for Operation To connect and use the router for internet sharing, you must have the following: • Micro SIM card with internet access enabled. • PC with an active Ethernet Adapter and an Ethernet cable with RJ45 connectors. •…
-
Page 12
Chapter 2 Connect the Hardware Connect the power adapter and push in the POWER ON/OFF button to turn on the router. The power source shall be near the device and shall be easily accessible. Power adapter Connect your computer to the router. Method 1: Wired Connect your computer’s Ethernet port to one of the LAN ports on the router via an Ethernet cable. -
Page 13
Chapter 2 Connect the Hardware Note: The WPS function cannot be configured if the wireless function of the router is disabled. Also, the WPS function will be disabled if your wireless encryption is WEP. Please make sure the wireless function is enabled and is configured with the appropriate encryption before configuring the WPS. -
Page 14: Chapter 3 Log In To Your 4G Lte Router
Chapter Log In to Your 4G LTE Router…
-
Page 15
Chapter 3 Log In to Your 4G LTE Router With a web management page, it is easy to configure and manage the 4G LTE Router. The web management page can be used on any Windows, Macintosh or UNIX OS with a Web browser, such as Microsoft Internet Explorer, Mozilla Firefox or Apple Safari. -
Page 16: Chapter 4 Set Up Internet Connections
Chapter Set Up Internet Connections This chapter introduces how to connect your router to the internet. The router is equipped with a web-based Quick Setup wizard. It has many ISP information built in, automates many of the steps and verifies that those steps have been successfully completed.
-
Page 17: Use Quick Setup Wizard
Set Up Internet Connections Use Quick Setup Wizard To set up your router with several easy steps quickly: Visit http://tplinkmodem.net, and log in with the password or your TP-Link ID. Click Quick Setup, after configuring your time zone, confirm the parameters with the information provided by your ISP in the part and click Next.
-
Page 18
Chapter 4 Set Up Internet Connections Tips: • You can also upgrade the supported ISP information. Refer to Upgrade Your ISP Information to configure. • You can view all internet connections or edit connections that are set up manually on this page. •… -
Page 19: Set Up Ipv6 Tunnel
Chapter 4 Set Up Internet Connections Click to make the settings effective and the new profile will be used to set up a new connection. Set Up IPv6 Tunnel The IPv6 Tunnel feature helps you obtain IPv6 resources based on an IPv4 WAN connection or vice versa.
-
Page 20: Specify The 6Rd Tunnel With Parameters Provided By Your Isp
Chapter 4 Set Up Internet Connections Now you can visit the IPv6 websites with the 6to4 tunnel. Note: Still not being able to access IPv6 resources means that not any 6to4 public server was found in your network. You can contact your ISP to sign up for IPv6 connection service. 4 3 2 Specify the 6rd Tunnel with Parameters Provided by Your ISP I want to:…
-
Page 21
Chapter 4 Set Up Internet Connections Visit http://tplinkmodem.net, and log in with the password or your TP-Link ID. Go to Advanced > System Tools > Diagnostics page. Click Start to test the internet connectivity and you will see the test result in the… -
Page 22: Chapter 5 Qos
Chapter This chapter introduces how to create a QoS (Quality of Service) rule to specify prioritization of traffic and minimize the impact caused when the connection is under heavy load.
-
Page 23
How can I do that? 1 Enable QoS and set bandwidth allocation. 1 ) Visit http://tplinkmodem.net, and log in with the password or your TP-Link ID. 2 ) Go to Advanced >… -
Page 24
Chapter 5 2 ) Select By Device and then click Scan. 3 ) Choose the respective device from the list. 4 ) Click Save. Note: If you want to delete a QoS rule, click to remove the responding rule from the list. Done! Now QoS is implemented to prioritize internet traffic. -
Page 25: Chapter 6 Network Security
Chapter Network Security This chapter guides you on how to protect your home network from cyber attacks and unauthorized users by implementing these three network security functions. You can protect your home network against DoS (Denial of Service) attacks from flooding your network with server requests using DoS Protection, block or allow specific client devices to access your network using Access Control, or you can prevent ARP spoofing and ARP attacks using IP &…
-
Page 26: Protect The Network From Cyber Attacks
DoS Protection can protect your home network against DoS attacks from flooding your network with server requests. Follow the steps below to configure Firewall and DoS Protection. Visit http://tplinkmodem.net, and log in with the password or your TP-Link ID. Go to Advanced >…
-
Page 27: Service Filtering
Network Security Service Filtering With Service Filtering, you can prevent certain users from accessing the specified service, even block Internet access completely. Visit http://tplinkmodem.net, and log in with the password or your TP-Link ID. Go to Advanced >Security > Service Filtering…
-
Page 28: Access Control
I want to: Block or allow specific client devices to access my network (via wired or wireless) How can I do that? 1 Visit http://tplinkmodem.net, and log in with the password or your TP-Link ID. 2 Go to Advanced >…
-
Page 29: Ip & Mac Binding
Binding list, but unrecognized MAC address. I want to: Prevent ARP spoofing and other ARP attacks. How can I do that? 1 Visit http://tplinkmodem.net, and log in with the password or your TP-Link ID. 2 Go to Advanced >…
-
Page 30: Ipv6 Firewall
Chapter 6 Network Security 3 Bind your device(s) according to your needs. To bind the connected device(s) 1 ) Select the device(s) to be bound in the List. 2 ) Click Bind to add to the Binding List. To bind the unconnected device 1 ) Click Add.
-
Page 31
Chapter 6 Network Security Visit http://tplinkmodem.net, and log in with your TP-Link ID or the password you set for the router. Go to Advanced > Security > IPv6 Firewall. Click Add. Select an interface name from the drop-down list. Interface names are names of the internet connections you have set up. -
Page 32: Chapter 7 Parental Controls
Chapter Parental Controls This function allows you to block inappropriate, explicit and malicious websites, and control access to specified websites at specified time.
-
Page 33
I want to allow my children’s devices (e.g. a computer or a tablet) to access only www.tp-link.com and wikipedia.org, from 18:00 (6PM) to 22:00 (10PM) on weekdays only. How can I do that? 1 Visit http://tplinkmodem.net, and log in with the password or your TP-Link ID. 2 Go to Basic Advanced >… -
Page 34
Keyword. You can add up to 200 keywords for both Blacklist and Whitelist. Below are some sample entries to allow access. 1 ) Enter a web address (e.g. www.tp-link.com) or a web address keyword (e.g. wikipedia) to only allow or block access to the websites containing that keyword. -
Page 35
Chapter 7 Parental Controls 2 ) If you wish to block all internet browsing access, do not add any keyword to the Whitelist. 10 Click Save. Done! Now you can control your children’s internet access according to your needs. -
Page 36: Chapter 8 Sms
Chapter This chapter introduces how to use the SMS functions to view and write messages, keep drafts and specify the message center number. You can easily monitor your data usage by sending a message to your carrier. This chapter includes the following sections: •…
-
Page 37: View Messages
Chapter 8 View Messages Visit http://tplinkmodem.net, and log in with the password or your TP-Link ID. Go to Advanced > > Inbox page. Click the icon to unfold and read the content of the message. Tips: indicates the message is read, while indicates the message is unread.
-
Page 38: View Sent Messages
Chapter 8 View Sent Messages Visit http://tplinkmodem.net, and log in with the password or your TP-Link ID. Go to Advanced > > Outbox page. All the messages you sent are listed in the Outbox table. Tips: You can click to edit and forward the message.
-
Page 39
Chapter 8 Message Center Number is auto-populated. Change it according to your needs. Click Save to apply your settings. -
Page 40: Chapter 9 Guest Network
Chapter Guest Network This function allows you to provide Wi-Fi access for guests without disclosing your main network. When you have guests in your house, apartment, or workplace, you can create a guest network for them. In addition, you can customize guest network options to ensure network security, privacy, and fluency.
-
Page 41: Create A Network For Guests
Chapter 9 Guest Network Create a Network for Guests Visit http://tplinkmodem.net, and log in with the password or your TP-Link ID. Go to Advanced > Guest Network. Locate the Wireless section. Create a 2.4GHz or 5GHz guest network according to your needs.
-
Page 42
Chapter 9 Guest Network • Allow Guests to See Each Other Select this checkbox if you want to allow the wireless clients on your guest network to communicate with each other via methods such as network neighbors, Samba, Ping, and FTP. •… -
Page 43: Chapter 10 Nat Forwarding
TP-Link router includes four forwarding rules. If two or more rules are set, the priority of implementation from high to low is Virtual Servers, Port Triggering, UPnP and DMZ.
-
Page 44: Share Local Resources In The Internet By Virtual Server
WAN: 218.18.232.154 Home How can I do that? 1 Assign a static IP address to your PC, for example 192.168.1.100. 2 Visit http://tplinkmodem.net, and log in with the password or your TP-Link ID. 3 Go to Advanced > NAT Forwarding >…
-
Page 45: Open Ports Dynamically By Port Triggering
Chapter 10 NAT Forwarding 4 Click View Existing Services, and choose HTTP. The external port, internal port and protocol will be auto-populated. Enter the PC’s IP address 192.168.1.100 in the Internal IP field. 5 Click Save to save the settings. Note: 1.
-
Page 46
VoIPs and video players. Common applications include MSN Gaming Zone, Dialpad and Quick Time 4 players, etc. Follow the steps below to configure the port triggering rules: Visit http://tplinkmodem.net, and log in with the password or your TP-Link ID. Go to Advanced >… -
Page 47: Make Applications Free From Port Restriction By Dmz
DMZ with all ports opened. How can I do that? 1 Assign a static IP address to your PC, for example 192.168.1.100. 2 Visit http://tplinkmodem.net, and log in with the password or your TP-Link ID. 3 Go to Advanced >…
-
Page 48: Make Xbox Online Games Run Smoothly By Upnp
Therefore, you can play Xbox online games without a hitch. Xbox 4G LTE Router If necessary, you can follow the steps to change the status of UPnP. Visit http://tplinkmodem.net, and log in with the password or your TP-Link ID; Go to Advanced >…
-
Page 49: Chapter 11 Specify Your Network Settings
Chapter Specify Your Network Settings This chapter introduces how to change the default settings or adjust the basic configuration of the router using the web-based management page. This chapter contains the following sections: • Upgrade Your ISP Information • PIN Management •…
-
Page 50: Upgrade Your Isp Information
Download the latest ISP upgrade file from the Support page at https://www.tp-link.com to your computer. Visit http://tplinkmodem.net, and log in with your TP-Link ID or the password you set for the router. Go to Advanced > Network >…
-
Page 51: Data Settings
Follow the steps below to monitor your data usage. Visit http://tplinkmodem.net, and log in with the password or your TP-Link ID. Go to Advanced >…
-
Page 52: Lan Settings
IP subnet, you can change it. Follow the steps below to change your IP address. Visit http://tplinkmodem.net, and log in with the password or your TP-Link ID. Go to Advanced >…
-
Page 53: Use The 4G Lte Router As A Dhcp Server
To use the DHCP server function of the router, you must configure all computers on the LAN to obtain an IP Address automatically. Follow the steps below to configure DHCP server. Visit http://tplinkmodem.net, and log in with the password or your TP-Link ID. Go to Advanced >…
-
Page 54: Reserve Lan Ip Addresses
IP addresses, please configure Address Reservation on the router for the purpose. Follow the steps below to reserve an IP address for your device. Visit http://tplinkmodem.net, and log in with the password or your TP-Link ID. Go to Advanced >…
-
Page 55: Wireless Settings
The router’s wireless network name (SSID) , password, and security option are preset in the factory. The preset SSID and password can be found on the product label. You can customize the wireless settings according to your needs. Visit http://tplinkmodem.net, and log in with the password or your TP-Link ID. Go to Basic >…
-
Page 56
Chapter 11 Specify Your Network Settings Select Hide SSID, and your SSID will not broadcast. Your SSID won’t display when you scan for local wireless network list on your wireless device and you need to manually join the network. • To change the mode or channel: Go to Advanced… -
Page 57: Use Wps For Wireless Connection
When the Wi-Fi LED is on, the client device has successfully connected to the router. Method 2 Enter the client device’s PIN on the router Visit http://tplinkmodem.net, and log in with the password or your TP-Link ID. Go to Advanced >…
-
Page 58
Method 3 Enter the router’s PIN on your client device Use this method if your client device asks for the router’s PIN. Visit http://tplinkmodem.net, and log in with the password or your TP-Link ID. Go to Advanced >… -
Page 59: Schedule Your Wireless Function
11 5 3 Schedule Your Wireless Function You can automatically turn off your wireless network at time when you do not need the wireless connection. Visit http://tplinkmodem.net, and log in with the password or your TP-Link ID. Go to Advanced >…
-
Page 60: Advanced Wireless Settings
You can also see the wrieless details by clicking the router icon on Basic > Network Map. • To view the detailed information of the connected wireless clients: Visit http://tplinkmodem.net, and log in with the password or your TP-Link ID. Go to Advanced > Wireless > Statistics page.
-
Page 61: Set Up A Dynamic Dns Service Account
Visit http://tplinkmodem.net, and log in with the password or your TP-Link ID. Go to Advanced > Network> Dynamic DNS. Select the DDNS Service Provider: TP-Link, NO-IP or DynDNS. It is recommended to select TP-Link so that you can enjoy TP-Link’s superior DDNS service. Otherwise,…
-
Page 62
NO-IP or DynDNS. If you don’t have a DDNS account, you have to register first by clicking Go to register. Note: To enjoy TP-Link’s DDNS service, you have to log in with a TP-Link ID. If you have not logged in with one, click Click Register in the Domain Name List… -
Page 63: Create Static Routes
Chapter 11 Specify Your Network Settings Click Login and Save. Tips: If you want to use a new DDNS account, please click logout first, and then log in with a new account. 11 7 Create Static Routes A static route is a pre-determined path that network information must travel to reach a specific host or network.
-
Page 64
How can I do that? 1 Make sure the routers use different LAN IP addresses on the same subnet. Disable DHCP function of Router 2. 2 Visit http://tplinkmodem.net, and log in with the password or your TP-Link ID. 3 Go to Advanced >… -
Page 65: Set Up A Vpn Connection
Chapter 11 Specify Your Network Settings • Interface — Determined by the port that sends out the data packets. In the example, the data is sent to the gateway through the LAN port. 5 Select the checkbox to enable this entry. 6 Click Save to save the settings.
-
Page 66
1 Make sure of the topology you want to build and record site A (local network) and site B (remote network)’s LAN IP and WAN IP. 2 Configuration on site A (local network). 1 ) Visit http://tplinkmodem.net, and log in with the password or your TP-Link ID. 2 ) Go to Advanced >… -
Page 67
Chapter 11 Specify Your Network Settings 4 ) In the Remote IPSec Gateway (URL) column, Enter Site B’s WAN IP address. 5 ) To configure Site A’s LAN: In the Tunnel access from local IP addresses column, here we take Subnet Address as an example. -
Page 68: Use Openvpn To Access Your Home Network
OpenVPN connection. Home Network Router Remote Device Step1. Set up OpenVPN Server on Your Router 1. Visit http://tplinkmodem.net, and log in with the password or your TP-Link ID. 2. Go to Advanced > VPN Server >…
-
Page 69
Chapter 11 Specify Your Network Settings Note: • Before you enable VPN Server, we recommend you configure Dynamic DNS Service (recommended) or assign a static IP address for router’s WAN port and synchronize your System Time with internet. • The first time you configure the OpenVPN Server, you may need to Generate a certificate before you enable the VPN Server. -
Page 70: Use Pptp Vpn To Access Your Home Network
Please follow the steps below to set up a PPTP VPN connection. Step 1. Set up PPTP VPN Server on Your Router 1. Visit http://tplinkmodem.net, and log in with the password or your TP-Link ID. 2. Go to Advanced >…
-
Page 71
Chapter 11 Specify Your Network Settings 4. In the Username/Password filed, enter the username and password to authenticate clients to the PPTP VPN server. 5. Click Save. Step 2. Configure PPTP VPN Connection on Your Remote Device The remote device can use the Windows built-in PPTP software or a third-party PPTP software to connect to PPTP Server. -
Page 72
Chapter 11 Specify Your Network Settings 4. Select Use my Internet connection (VPN). -
Page 73
Chapter 11 Specify Your Network Settings 5. Enter the internet IP address of the router (for example: 218.18.1.73) in the Internet address field. Click Next. 6. Enter the User name Password you have set for the PPTP VPN server on your router, and click Connect. -
Page 74: Ussd
USSD (Unstructured Supplementary Service Data) is used to communicate with the service provider’s computer. You can query service data on this page. Follow the steps below to get service data. Visit http://tplinkmodem.net, and log in with the password or your TP-Link ID. Go to Advanced >…
-
Page 75: Chapter 12 Administrate Your Network
Chapter Administrate Your Network This chapter introduces how to change the system settings and administrate your router’s network. This chapter contains the following sections: • Set System Time • Control LEDs • Test the Network Connectivity • Update the Firmware •…
-
Page 76: Set System Time
Parental Controls and Wireless Schedule. You can manually set how to get the system time. Follow the steps below to set your system time. Visit http://tplinkmodem.net, and log in with the password or your TP-Link ID. Go to Advanced >…
-
Page 77: Control Leds
The router‘s LEDs indicate router’s activities and status. You can turn on or turn off the LEDs as you need. • To turn off LEDs: 1. Visit http://tplinkmodem.net, and log in with the password or your TP-Link ID. 2. Go to Advanced >…
-
Page 78: Update The Firmware
TP-Link is dedicated to improving and richening the product features, giving you a better network experience. We will inform you through the web management page if there’s any update firmware available for your router. Also, the latest firmware will be released at TP-Link official website, you can download it from the Support page of our website www.tp-link.com…
-
Page 79: Local Upgrade
4. Wait a few moments for the upgrading and rebooting. 12 4 2 Local Upgrade 1. Download the latest firmware file for the router from our website www.tp-link.com. 2. Visit http://tplinkmodem.net, and log in with the password or your TP-Link ID. 3. Go to Advanced >…
-
Page 80: Set The Router To Reboot Regularly
Chapter 12 Administrate Your Network • To restore configuration settings: Visit http://tplinkmodem.net, and log in with the password or your TP-Link ID. Click Advanced > System Tools > Backup & Restore page. Click Browse to locate the previous backup configuration file, and click Restore.
-
Page 81: Change The Administrator Account
Chapter 12 Administrate Your Network • To reboot manually: Visit http://tplinkmodem.net, and log in with the password or your TP-Link ID. Go to Advanced > System Tools > Reboot page. Click Reboot and wait a few minutes for the router to restart.
-
Page 82: Local Management
Management feature. By default all local connected devices are allowed to manage the router. You can also allow only one device to manage the router. Follow the steps below to specify the local management. Visit http://tplinkmodem.net, and log in with the password or your TP-Link ID. Go to Advanced >…
-
Page 83: Remote Management
By default, the remote devices are not allowed to manage the router from the internet. Follow the steps below to allow remote devices to manage the router. Visit http://tplinkmodem.net, and log in with the password or your TP-Link ID. Go to Advanced >…
-
Page 84: System Log
For example when your router does not work properly, you will need to save the system log and send it to the technical support for troubleshooting. Visit http://tplinkmodem.net, and log in with the password or your TP-Link ID. Click Advanced >…
-
Page 85
Chapter 12 Administrate Your Network • Save Locally — Select this option to cache the system log to the router’s local memory, select the minimum level of system log to be saved from the drop-down list. The logs will be shown in the table in descending order on the System Log page. •… -
Page 86: Cwmp Settings
The router offers CWMP feature. The function supports TR-069 protocol which collects information, diagnoses the devices and configures the devices automatically via ACS (Auto-Configuration Server). Visit http://tplinkmodem.net, and log in with the password or your TP-Link ID. Go to Advanced >…
-
Page 87: Snmp Settings
So a router contains SNMP “agent” software can be monitored and/or controlled by SNMP Manager using SNMP messages. Visit http://tplinkmodem.net, and log in with the password or your TP-Link ID. Go to Advanced >…
-
Page 88
Chapter 12 Administrate Your Network • Enable SNMP Agent/SNMP Agent for WAN — Toggle On to enable the built-in SNMP agent that allows the router to operate as the operational role in receiving and processing of SNMP messages, sending responses to the SNMP manager, and triggering SNMP traps when an event occurs. -
Page 89: Monitor The Internet Traffic Statistics
The Traffic Monitor page displays the network traffic of the LAN, WAN and WLAN sent and received packets, allowing you to monitor the volume of internet traffic statistics. Visit http://tplinkmodem.net, and log in with the password or your TP-Link ID. Go to Advanced >…
-
Page 90: Chapter 13 Tp-Link Cloud Service
TP-Link Cloud service provides a better way to manage your cloud devices. Log in to your router with a TP-Link ID, and you can easily monitor and manage your home network when you are out and about via the Tether app on your smartphone or tablet. To ensure that your router stays new and gets better over time, the TP-Link Cloud will notify you when an important firmware upgrade is avaliable.
-
Page 91: Register A Tp-Link Id
IDs. • Once the router is bound to your TP-Link ID, you need to log in to the router with the TP-Link ID. • Once you have registered a TP-Link ID on the web management page, you can only register another TP-Link ID via the Tether APP.
-
Page 92: Manage The User Tp-Link Ids
2. Enter the current password, then a new password twice. And click Save. 13 3 Manage the User TP-Link IDs The TP-Link ID used to log in to the router for the first time will be automatically bound as the Admin account.
-
Page 93: Add Tp-Link Id To Manage The Router
3. Click , enter another TP-Link ID as needed and click Save. Note: If you need another TP-Link ID, please register a new one via the Tether app.Please refer to Manage the Router via the TP-Link Tether App to install the app and register a new TP-Link ID.
-
Page 94: Manage The Router Via The Tp-Link Tether App
QR code to download and install the app. 2. Connect your device to the router’s wireless network. 3. Launch the Tether app, select the model of your router and log in with your TP-Link ID or the password your set for the router.
-
Page 95: Chapter 14 Onemesh With Seamless Roaming
Chapter OneMesh with Seamless Roaming This chapter introduces the TP-Link OneMesh feature. • Set Up a OneMesh Network • Manage Devices in the OneMesh Network…
-
Page 96
Set up a OneMesh network with a push of WPS buttons. Manage all network devices on the Tether app or at your router’s web management page. To check full list of TP-Link OneMesh devices, scan the QR code, or visit https://www.tp-link.com/One-Mesh/compatibility. -
Page 97: Set Up A Onemesh Network
Check on the router‘s web management page to see if the OneMesh network is well-configured. • If the extender is connected to this router: 1. Visit http://tplinkmodem.net, and log in with your TP-Link ID or the password you set for the router. 2. Go to Basic >…
-
Page 98: Manage Devices In The Onemesh Network
In a OneMesh network, you can manage all mesh devices and clients on your router’s web page. • To view all mesh devices and clients in the OneMesh network: 1. Visit http://tplinkmodem.net, and log in with your TP-Link ID or the password you set for the router. 2. Go to Basic >…
-
Page 99
Chapter 14 OneMesh with Seamless Roaming • To manage each OneMesh device in the network: 1. Visit http://tplinkmodem.net, and log in with your TP-Link ID or the password you set for the router. 2. Go to Basic > OneMesh Advanced >… -
Page 100
With the router powered on, press and hold the RESET button on the rear panel until the Power LED starts flashing. • Reset the router via web management page: Visit http://tplinkmodem.net, and log in with the password or your TP-Link ID. Click Advanced >… -
Page 101
1 ) Go to Start > Control Panel > Network and Internet, and click View network status and tasks. 2 ) Click Internet Options on the bottom left. 3 ) Click Connections and select Never dial a connection. 4 ) Click settings, deselect the following three options and click OK;… -
Page 102
5 ) Go to Advanced > Restore advanced settings, click to save the settings. • Use another web browser or computer to log in again. • Reset the router to factory default settings and try again. If the login still fails, please contact the technical support. -
Page 103
The 2.4GHz Wi-Fi network may be interfered. It is recommended to use the 5GHz Wi-Fi network if your devices support it. Visit http://tplinkmodem.net, and log in with the password or your TP-Link ID. Go to Basic >… -
Page 104
Q6 How to use the router as a regular wireless router to share my internet ? The router support two operation modes, 3G/4G Router Mode and Wireless Router mode. If you already have a modem or your internet comes via an Ethernet cable from the wall, you can set up the router as a regular wireless router to share the internet. -
Page 105
1 ) If you see the message Windows cannot configure this wireless connection, this is usually because windows configuration utility is disabled or you are running another wireless configuration tool to connect the wireless. 2 ) Exit the wireless configuration tool (the TP-Link Utility, for example);… -
Page 106
3 ) Select and right click on My Computer on desktop, select Manage to open Computer Management window; 4 ) Expand Services and Applications > Services, find and locate Wireless Zero Configuration in the Services list on the right side; 5 ) Select Wireless Zero Configuration, right click it, and then select Properties;… -
Page 107
6 ) Change Startup type to Automatic, click on Start button and make sure the Service status is Started. And then click OK. 7 ) Connect to wireless network. • If you can find other wireless network except your own, please follow the steps below: Check the WLAN LED indicator on your router;… -
Page 108
2 ) If you cannot find the PIN or PIN failed, you may choose Connecting using a security key instead, and then type in the Network Security Key/Wireless Password; 3 ) If it continues saying network security key mismatch, it is suggested to confirm the wireless password on your wireless router/modem;… -
Page 109
Windows was unable to connect to XXXX /Cannot join this network/Taking longer than usual to connect to this network. 1 ) Check the wireless signal strength of your network, if it is weak (1~3 bars), please move the router closer and try again; 2 ) Change the wireless Channel of the router to 1,6,or 11 to reduce interference from other networks;… -
Page 110
Specifications are subject to change without notice. is a registered trademark of TP-Link Technologies Co., Ltd. Other brands and product names are trademarks or registered trademarks of their respective holders. No part of the specifications may be reproduced in any form or by any means or used to make any derivative such as translation, transformation, or adaptation without permission from TP-Link Technologies Co., Ltd. -
Page 111
5150 MHz -5250 MHz (23dBm) EU declaration of conformity TP-Link hereby declares that the device is in compliance with the essential requirements and other relevant provisions of directives 2014/53/EU, 2009/125/EC, 2011/65/EU and (EU)2015/863. The original EU declaration of conformity may be found https://www.tp-link.com/en/ce… -
Page 112
之無線電信。低功率射頻電機需忍受合法通信或工業、科學以及醫療用電波輻射性電機 設備之干擾。 減少電磁波影響,請妥適使用。 4.7.9.1應避免影響附近雷達系統之操作。 4.7.9.2高增益指向性天線只得應用於固定式點對點系統。 BSMI Notice 安全諮詢及注意事項 • 請使用原裝電源供應器或只能按照本產品注明的電源類型使用本產品。 • 清潔本產品之前請先拔掉電源線。請勿使用液體、噴霧清潔劑或濕布進行清潔。 • 注意防潮,請勿將水或其他液體潑灑到本產品上。 • 插槽與開口供通風使用,以確保本產品的操作可靠並防止過熱,請勿堵塞或覆蓋開 口。 • 請勿將本產品置放於靠近熱源的地方。除非有正常的通風,否則不可放在密閉位置 中。 • 請不要私自打開機殼,不要嘗試自行維修本產品,請由授權的專業人士進行此項工 作。 限用物質含有情況標示聲明書 限用物質及其化學符號 鉛 鎘 汞 六價鉻 多溴聯苯 多溴二苯醚 產品元件名稱 CrVI PBDE ○ ○ ○ ○ ○ ○ 外殼… -
Page 113
Safety Information • Keep the device away from water, fire, humidity or hot environments. • Do not attempt to disassemble, repair, or modify the device. • Do not use damaged charger or USB cable to charge the device. • Do not use any other chargers than those recommended. •…
tp-link Archer MR600 4G+ Cat6 AC1200 Беспроводной двухдиапазонный гигабитный маршрутизатор Руководство по установке
Подключите оборудование

Проверьте подключение оборудования
Проверьте состояние следующих светодиодов. Если загорится индикатор Интернета ![]() горит, ваш роутер успешно подключен к Интернету.
горит, ваш роутер успешно подключен к Интернету.
Примечание: Если индикатор Интернета не загорается, см. Q2 Нужна помощь? в этом руководстве.
Для лучшего подключения к Интернету убедитесь, что горят 2 или 3 полосы светодиода силы сигнала. В противном случае попробуйте переместить маршрутизатор в место, которое может принимать более сильный сигнал мобильной сети, например, рядом с окном.
Наслаждайтесь Интернетом
- Проводная
Подключите компьютеры к портам LAN маршрутизатора с помощью кабелей Ethernet.
© TP-Link, 2019 7106508307 REV1.0.0 - Беспроводной сети
- Найдите SSID (имена сетей) и пароль беспроводной сети, напечатанные на этикетке в нижней части маршрутизатора.

- Щелкните значок сети на своем компьютере или перейдите в настройки Wi-Fi вашего смарт-устройства, а затем выберите SSID для подключения к сети.
- Найдите SSID (имена сетей) и пароль беспроводной сети, напечатанные на этикетке в нижней части маршрутизатора.
Настройте маршрутизатор 4G LTE
- Убедитесь, что ваш компьютер подключен к маршрутизатору (проводной или беспроводной).
- Запустить web браузер и введите http://tplinkmodem.net or http://192.168.1.1. Создайте новый пароль для будущих входов.
Примечание: Если страница входа не появляется, обратитесь к Q1 «Нужна помощь?» в этом руководстве.
- Следуйте пошаговым инструкциям быстрой настройки, чтобы завершить первоначальную настройку.
Примечание: Маршрутизатор также можно использовать (или настроить) в режиме беспроводного маршрутизатора для ADSL / кабельных соединений. Для более сложных конфигураций, пожалуйста, обратитесь к руководству пользователя на официальном сайте TP-Link. webсайт www.tp-link.com.
Приложение Tether
Приложение TP-Link Tether обеспечивает простой и интуитивно понятный способ доступа к роутеру и управления им.
![]() Заблокируйте нежелательных пользователей от подключения к вашей сети
Заблокируйте нежелательных пользователей от подключения к вашей сети![]() Измените основные настройки беспроводной сети
Измените основные настройки беспроводной сети![]() View информация о клиентах, подключенных к вашему роутеру
View информация о клиентах, подключенных к вашему роутеру![]() Настройте родительский контроль с указанием времени доступа
Настройте родительский контроль с указанием времени доступа
С чего начать?
- Загрузите приложение TP-Link Tether из Apple App Store или Google Play Store.
- Убедитесь, что ваше интеллектуальное устройство подключено к домашней сети по беспроводной сети.
- Запустите приложение Tether и начните управлять своей домашней сетью.
- Перейдите в раздел «Дополнительно»> «Сеть»> «Интернет», чтобы убедиться, что мобильные данные включены. Если это не так, разрешите ему доступ в Интернет.
- Уточните у своего интернет-провайдера, находитесь ли вы в зоне обслуживания роуминга. Если да, перейдите в «Дополнительно»> «Сеть»> «Интернет», чтобы включить роуминг данных.
Поддержка
![]() Для получения технической поддержки, руководства пользователя и другой информации посетите https://www.tp-link.com/support.
Для получения технической поддержки, руководства пользователя и другой информации посетите https://www.tp-link.com/support.
Информация по технике безопасности
- Держите устройство подальше от воды, огня, влажности или жарких сред.
- Не пытайтесь разбирать, ремонтировать или модифицировать устройство.
- Не используйте поврежденное зарядное устройство или USB-кабель для зарядки устройства.
- Не используйте другие зарядные устройства, кроме рекомендованных.
- Не используйте устройство там, где использование беспроводных устройств запрещено.
- Адаптер должен быть установлен рядом с оборудованием и должен быть легко доступен.
FAQ
Что мне делать, если я не могу получить доступ к web страница управления?
- Если для компьютера установлен статический IP-адрес, измените его настройки для автоматического получения IP-адреса.
- Установите http://tplinkmodem.net or http://192.168.1.1 правильно введен в web браузер.
- Использовать другой web браузер и попробуйте еще раз.
- Перезагрузите роутер и попробуйте еще раз.
- Отключите и включите активный используемый сетевой адаптер.
Что мне делать, если я не могу получить доступ к Интернету?
- Убедитесь, что ваша SIM-карта является картой LTE или WCDMA.
- Убедитесь, что ваша SIM-карта находится в зоне обслуживания вашего интернет-провайдера.
- Убедитесь, что на вашей SIM-карте достаточно средств.
- Проверьте подключение к локальной сети: откройте web браузер и введите http://tplinkmodem.net or http://192.168.1.1 в адресной строке. Если страница входа не появляется, обратитесь к Q1, а затем попробуйте
снова. - Запустить web браузер, войдите в web страницу управления и проверьте следующее:
- Перейдите в Advanced> Network> Internet, чтобы убедиться, что параметры, предоставленные вашим интернет-провайдером, введены правильно. Если параметры неверны, нажмите Create Pro.file и введите правильные параметры, затем выберите новый проfile из профиfile Список имен.
- Перейдите в раздел «Дополнительно» > «Сеть» > «Управление PIN-кодом», чтобы проверить, требуется ли PIN-код. Если это так, введите правильный PIN-код, предоставленный вашим интернет-провайдером, и нажмите «Применить».
- Перейдите в раздел «Дополнительно»> «Сеть»> «Настройки данных», чтобы проверить, не превышает ли общая / ежемесячная надбавка общая / ежемесячная надбавка. Если это так, нажмите «Правильно» и установите для параметра «Общее / ежемесячное использование» значение 0 (ноль) или отключите ограничение данных.
- Перейдите в раздел «Дополнительно»> «Сеть»> «Интернет», чтобы убедиться, что мобильные данные включены. Если это не так, разрешите ему доступ в Интернет.
- Уточните у своего интернет-провайдера, находитесь ли вы в зоне обслуживания роуминга. Если да, перейдите в «Дополнительно»> «Сеть»> «Интернет», чтобы включить роуминг данных.
Как восстановить заводские настройки маршрутизатора по умолчанию?
- Когда маршрутизатор включен, нажмите и удерживайте кнопку RESET на задней панели маршрутизатора, пока индикатор питания не начнет мигать, затем отпустите кнопку. Подождите, пока маршрутизатор перезагрузится.
- Войти в web на странице управления маршрутизатором и перейдите в раздел «Дополнительно»> «Системные инструменты»> «Резервное копирование и восстановление», нажмите «Восстановление заводских настроек» и дождитесь завершения процесса сброса.
Что мне делать, если я забыл свой web пароль страницы управления?
- Обратитесь к Q3, чтобы сбросить маршрутизатор, затем создайте новый пароль для входа в систему.
Что мне делать, если я забыл свой пароль беспроводной сети?
- Пароль беспроводной сети по умолчанию напечатан на этикетке маршрутизатора.
- Подключите компьютер напрямую к маршрутизатору с помощью кабеля Ethernet. Авторизуйтесь в роутере web на странице управления и выберите «Основные»> «Беспроводная связь», чтобы получить или сбросить пароль беспроводной сети.
Для получения технической поддержки, руководства пользователя и другой информации посетите https://www.tplink.com/support.
Информация по технике безопасности
- Держите устройство подальше от воды, огня, влажности или жарких сред.
- Не пытайтесь разбирать, ремонтировать или модифицировать устройство.
- Не используйте поврежденное зарядное устройство или USB-кабель для зарядки устройства.
- Не используйте другие зарядные устройства, кроме рекомендованных.
- Не используйте устройство там, где использование беспроводных устройств запрещено.
- Адаптер должен быть установлен рядом с оборудованием и должен быть легко доступен.
Документы / Ресурсы
 |
tp-link Archer MR600 4G+ Cat6 AC1200 Беспроводной двухдиапазонный гигабитный маршрутизатор [pdf] Руководство по установке Archer MR600, 4G Cat6 AC1200 Двухдиапазонный гигабитный беспроводной маршрутизатор, Беспроводной двухдиапазонный гигабитный маршрутизатор, 4G Cat6 AC1200 Band Gigabit Router, Band Gigabit Router, Gigabit Router, Router |
 |
tp-link Archer MR600 4G+ Cat6 AC1200 Беспроводной двухдиапазонный гигабитный маршрутизатор [pdf] Руководство пользователя Archer MR600 4G Cat6 AC1200 Двухдиапазонный беспроводной гигабитный маршрутизатор, Archer MR600, 4G Cat6 AC1200 Двухдиапазонный беспроводной гигабитный маршрутизатор, Беспроводной двухдиапазонный гигабитный маршрутизатор, Двухдиапазонный гигабитный маршрутизатор, Диапазонный гигабитный маршрутизатор, Гигабитный маршрутизатор, Маршрутизатор |
Рекомендации
