Видео по настройке
-
How to Configure a Deco System with Starlink
-
How to Resolve Double NAT using Starlink
-
How to Set up the TP-Link Deco M4 Mesh Wi-Fi System
This video guides you step by step to set up your Deco M4. With advanced Deco Mesh Technology, units work together to form one unified whole-home network with the same network name. Devices automatically switch between Decos as you move through your home for the fastest possible speeds.
For more information about TP-Link Deco M4, visit: https://bit.ly/33IRwWc
Больше
Меньше -
What to do if I fail to configure the main Deco and get stuck on “Testing Internet Connection”?
This video provides you with solutions when you fail to configure the main Deco and get stuck on the step ” Testing Internet Connection”.
Больше
Меньше -
What to do if I fail to configure the satellite Deco and get stuck on “We couldn’t find another Deco”?
This video provides you with solutions when you fail to configure the slave Deco and get stuck on the step ” We couldn’t find another Deco”.
Больше
Меньше -
What to do if I fail to configure the main Deco and get stuck on “We couldn’t find Deco”?
This video provides you with solutions when you fail to configure the main Deco and get stuck on the step ” We couldn’t find Deco”.
Больше
Меньше
Как обновить прошивку
Обновление программного обеспечения (прошивки) способно решить проблемы предыдущих версий прошивки и улучшить работу устройства. Во избежание возникновения проблем при обновлении ознакомьтесь со следующей информацией.
Проверьте соответствие аппаратной версии и версии прошивки — установка неверной версии может привести к неисправности устройства и аннулировать гарантию (обычно версия 1.x = версия 1). Как узнать аппаратную версию устройства?
Не рекомендуется устанавливать прошивку, предназначенную для другого региона. Нажмите здесь для выбора региона и загрузите последнюю версию прошивки.
Отключение питания во время обновления прошивки может привести к неисправности устройства.
Обновляйте прошивку роутера по Wi-Fi только тогда, когда это является единственно возможным способом.
Перед обновлением рекомендуется закрыть на компьютере все программы, для работы которых требуется интернет-подключение, или просто отсоединить сетевой кабель от устройства.
Перед выполнением обновления файл с прошивкой необходимо извлечь из архива с помощью архиватора (например, WinRAR или WinZIP).
Рекомендации по обновлению прошивки: Wi-Fi роутер, Wi-Fi роутер с модемом ADSL2+, усилитель Wi-Fi сигнала.
Больше
Меньше
|
Deco M4(EU)_V4_1.1.1 Build 20230201 |
Загрузить | |
|---|---|---|
| Дата публикации: 2023-03-03 | Язык: Многоязычный | Размер файла: 13.42 MB |
|
Повышена безопасность WPS. |
|
Deco M4(EU)_V4_1.1.0 Build 20230112 |
Загрузить | |
|---|---|---|
| Дата публикации: 2023-02-09 | Язык: Многоязычный | Размер файла: 13.42 MB |
|
Изменения Примечания |
|
Deco M4(EU)_V4_1.0.2_220401 |
Загрузить | |
|---|---|---|
| Дата публикации: 2022-04-26 | Язык: Многоязычный | Размер файла: 12.82 MB |
|
Повышена стабильность работы устройства и исправлены незначительные ошибки. |
Использование стороннего ПО на устройствах TP-Link
Официальное программное обеспечение устройств TP-Link может быть заменено на стороннее, например, на DD-WRT. Компания TP-Link не обязана предоставлять сервисную или техническую поддержку для устройств со сторонним ПО и не гарантирует стабильность его работы. Ущерб, нанесённый устройству в результате использования стороннего ПО, приведёт к аннулированию гарантии.
Открытый исходный код для программистов (GPL)
Следующая информация предназначена для программистов и не представляет особой значимости для большинства конечных пользователей продукции TP-Link.
Продукция TP-Link содержит код, разработанный третьими лицами, включая код, разработанный в соответствии с универсальной общественной лицензией GNU (GPL) версий 1–3 или в соответствии со универсальной общественной лицензией ограниченного применения GNU (LGPL). Вы можете использовать соответствующее программное обеспечение на условиях лицензии GPL.
Ознакомиться, распечатать и загрузить соответствующие условия лицензии GPL можно здесь. В центре исходных кодов GPL можно скачать исходный код GPL соответствующего ПО, используемого в продукции TP-Link, а также прочую информацию, включая список ПО TP-Link, содержащего исходный код GPL.
Приложение

- TP-Link Deco
-
Приложение Deco компании TP‑Link обеспечивает удобное управление Mesh‑устройствами Deco.

-
Contents
-
Table of Contents
-
Bookmarks
Quick Links
Whole Home Mesh Wi-Fi System
Seamless Roaming | Parental Controls | Easy Setup
User Guide
AC1200 Whole Home Mesh Wi-Fi System
1910013031 REV3.0.0
©2021 TP-Link
Related Manuals for TP-Link Deco M4R
Summary of Contents for TP-Link Deco M4R
-
Page 1
Whole Home Mesh Wi-Fi System Seamless Roaming | Parental Controls | Easy Setup User Guide AC1200 Whole Home Mesh Wi-Fi System 1910013031 REV3.0.0 ©2021 TP-Link… -
Page 2: Table Of Contents
Contents About This Guide ···················································· 1 Blacklist ······································································19 Appearance ······························································· 2 Upgrade Your Deco ·············································20 Set Up Your Deco ··················································· 3 WPS ··············································································21 Add More Decos ····················································· 7 Parental Controls ··················································22 Dashboard ·································································· 8 QoS···············································································23 Check Deco Status ··············································· 9 Advanced Features ·············································24 Set Main Deco ························································10 Monthly Report ······················································29…
-
Page 3: About This Guide
More Info Performance may vary depending on the client device. • Specific product information can be found on the product page at https://www.tp-link.com. • A Technical Community is provided for you to discuss our products at https://community.tp-link.com. • Our Technical Support contact information can be found at the…
-
Page 4: Appearance
Appearance Each Deco has an LED that changes color according to its status, two RJ-45 Ethernet ports, a power slot, and a Reset button. See the explanation below: Tip: The product label can be found at the bottom of the product. Yellow pulse: Deco is resetting.
-
Page 5: Set Up Your Deco
2. Log in with TP-Link ID 3. Identify your Deco Scan the QR code below or go to Google Open the app. Use your TP-Link ID to log in. If Choose your Deco model. Play or the App Store to download the Deco you don’t have a TP-Link ID, sign up first.
-
Page 6
4. Plug in and power on Deco 5. Connect to the Deco’s Wi-Fi 6. Select a location Power off your modem. Connect your Deco to Wait until the Wi-Fi Signal LED pulses blue, Select a location for this Deco. If its location the modem and power them both on. -
Page 7
7. Set up internet connection 8. Create your Wi-Fi network 9. Connect to your Wi-Fi network Select the internet connection type and enter Set a network name and a password. These Connect your phone/tablet to the Deco’s new the information. If you are not sure, contact will be the name and password you use to Wi-Fi. -
Page 8
10. Setup complete Your Deco network is now up. Connect all devices to the Deco network. You can also add more Deco units to expand the Wi-Fi coverage. -
Page 9: Add More Decos
Add More Decos After created a Deco network, you can add more Deco units to the network to expand the Wi-Fi coverage and manage them easily on your Deco app. In Overview, tap . Select the Deco model you want to add, and follow After the setup, you can find the added Deco units by tapping app instructions to complete the setup.
-
Page 10: Dashboard
Dashboard After you successfully set up your Deco network, you will see the dashboard of the Deco app. Here you can get an overview of the network status, check the connected clients, and configure more advanced features. to get an overview of the network for more features status and online clients…
-
Page 11: Check Deco Status
Check Deco Status In Overview, you can check the working status of all the Decos, check the details of each Deco unit, change the Deco’s location/name, and more. 2. Tap a Deco unit to check the details. 3. Change or customize the location/name of the Deco. 1.
-
Page 12: Set Main Deco
Set Main Deco After setup, you can replace the main Deco with any satellite Deco without resetting and reconfigure the whole network. 3. Choose a satellite Deco and follow app 1. In Overview, tap 2. Tap > Set Main Deco. instructions to complete the settings.
-
Page 13: Manage Connected Devices
Manage Connected Devices In Overview, you can check the working status of all the connected devices, view the device details, and change the device settings. 1. Tap a client to check the details. 3. Tap Belongs to to add a unique profile for the device and manage its 2.
-
Page 14: Remove/Reboot Deco
Remove/Reboot Deco You can remove or reboot your Deco easily in the Deco app. Follow the steps below. Note: Removing a Deco will reset it to factory default settings. You can also press the Reset button at the bottom of Deco for 1 second and release to quickly reset your Deco to factory default settings. 2.
-
Page 15: Create A New Network
Create A New Network In the Deco app, you can create different Deco networks linked with your TP-Link ID and manage them conveniently from the Deco app with one account. You can also help family or friends manage their network on your Deco app. Two methods are provided as below to create a new network: Method 1.
-
Page 16
Method 2. Create a new network from the Menu page 1. Tap to open the Menu. 2. Tap > CREATE NEW NETWORK. 3. Follow app instruction to complete the setup. -
Page 17: Delete A Network
Delete A Network You can delete a Deco network if you don’t need it anymore. Deleting a Deco network will reset all Decos in this network to factory default settings. 1. In Overview, tap 2. Tap > Delete.
-
Page 18: Wi-Fi Settings
Wi-Fi Settings You can change the network name and password of your main network at any time and share the network easily with family and friends. > Wi-Fi. Manage main network (eg. change your main network’s Wi-Fi name and Share your network with others. password).
-
Page 19: Guest Network
Guest Network You can create and share a separate network for guests to guarantee the security and privacy of your main network. > Wi-Fi and enable Guest Network. Set a Wi-Fi name and password for Share your guest network with others. the guest network.
-
Page 20: Network Optimization
Network Optimization Network Optimization lets your Deco intelligently scan for a clearer channel and switch your devices to it, ensuring optimal Wi-Fi performance. 1. Tap > Network Optimization. 2. The app will scan the network 3. Optimize your network for optimal 4.
-
Page 21: Blacklist
Blacklist Compile a blacklist to avoid devices added on the blacklist to access to your network, ensuring the safety of your personal information shared in the network. 1. Tap > Blacklist. 2. Tap on the top right corner and add clients or other devices to the blacklist.
-
Page 22: Upgrade Your Deco
Upgrade Your Deco TP-Link is dedicated to improving product features and providing a better customer experience. An up-to-date firmware provides better and more stable network performance. Always update your Deco to the latest firmware version when prompted in the Deco app.
-
Page 23: Wps
WPS (Wi-Fi Protected Setup) helps you to quickly and securely connect a client to a network with a tap without entering any password. 2. Tap the icon in the Deco app and 3. Your client has connected to the network 1.
-
Page 24: Parental Controls
Parental Controls Parental Controls allows you to filter content, limit time spent online and check internet history. Start by creating unique profiles for your family members. 2. Create unique profiles for family 3. Set filter level to block 4. Set daily time limits for the total 1.
-
Page 25: Qos
QoS (Quality of Service) helps you set priority for specific applications and devices, so that they can perform better with lower latency. 2. Set the total bandwidth before 3. Add devices you want to prioritize to guarantee a better network 1.
-
Page 26: Advanced Features
DHCP server, enable VLAN/IPTV/MAC Clone mode, reserve the same IP address for a specific device, set up port forwarding rules to make your local computers accessible to other devices over the internet, enable TP-Link DDNS, SIP ALG, fast roaming and beamforming, control Deco’s LED, change the working mode, and configure the notification settings.
-
Page 27
Modify LAN IP to avoid IP address Change DHCP server settings. Enable IPTV/VLAN mode to support Enable MAC Clone if Deco fails to confict. IPTV services. connect to the internet. Tip: For more about MAC Clone, refer to https://www.tp-link.com/support/faq/2925/… -
Page 28
Reserve IP addresses for specific Set up port forwarding rules to Register a TP-Link DDNS domain Enable SIP ALG to communicate devices to recognize and manage enable devices in your network name to access your router and with SIP (Session Initiation Protocol) the device more easily. -
Page 29
Enable UPNP to enable devices on Enable Fast Roaming to allow Enable Beamforming to Toggle off LED to turn off the light your local network to dynamically your wireless devices to switch concentrate Wi-Fi signal towards on Deco. Configure the Night Mode open ports for applications such connection to different Decos. -
Page 30
Change the operating mode. Set connection alerts to receive Set notifications to receive alerts in notifications once the clients connect the notification bar. Note: When the Deco works in Access Point to or disconnect from Deco. mode, advanced features such as IPv4, Address Reservation, Port Forwarding, and DHCP server are not available. -
Page 31: Monthly Report
Monthly Report Review the monthly usage statistics, such as security threats and total connected network devices each day. View monthly reports. Enable or disable monthly report. Clear monthly report data. > Monthly Report.
-
Page 32: Managers
Add friends and family members to help manage your network. Each manager should have their own TP-Link ID. > Managers, and follow app instructions to add other TP-Link ID account as manager. Then the manager can start to manage the network.
-
Page 33: Authentication
Component Name Model I.T.E POWER SUPPLY T120100-2B1 Responsible party: TP-Link USA Corporation, d/b/a TP-Link North America, Inc. Address: 145 South State College Blvd. Suite 400, Brea, CA 92821 Website: http://www.tp-link.com/us/ Tel: +1 626 333 0234 Fax: +1 909 527 6803 E-mail: sales.usa@tp-link.com…
-
Page 34
We, TP-Link USA Corporation, has determined that the equipment shown as above has been shown to comply with the applicable technical standards, FCC part 15. There is no unauthorized change is made in the equipment and the equipment is properly maintained and operated. -
Page 35
FCC Compliance Information Statement Product Name: I.T.E POWER SUPPLY Model Number: T120100-2B1 Responsible party: TP-Link USA Corporation, d/b/a TP-Link North America, Inc. Address: 145 South State College Blvd. Suite 400, Brea, CA 92821 Website: http://www.tp-link.com/us/ Tel: +1 626 333 0234 Fax: +1 909 527 6803 E-mail: sales.usa@tp-link.com… -
Page 36
We, TP-Link USA Corporation, has determined that the equipment shown as above has been shown to comply with the applicable technical standards, FCC part 15. There is no unauthorized change is made in the equipment and the equipment is properly maintained and operated. -
Page 37
5150MHz—5250MHz (23dBm) EU declaration of conformity TP-Link hereby declares that the device is in compliance with the essential requirements and other relevant provisions of directives 2014/53/EU, 2009/125/EC, 2011 /65/EU and (EU) 2015/863. The original EU declaration of conformity may be found at https://www.tp-link.com/en/support/ce/ RF Exposure Information This device meets the EU requirements (2014/53/EU Article 3.1a) on the limitation of exposure of the general public to electromagnetic fields by… -
Page 38
UKCA Mark UKCA declaration of conformity TP-Link hereby declares that the device is in compliance with the essential requirements and other relevant provisions of the Radio Equipment Regulations 2017. The original UKCA declaration of conformity may be found at https://www.tp-link.com/support/ukca National restrictions Attention: This device may only be used indoors in Great Britain. -
Page 39
Caution: The device for operation in the band 5150–5250 MHz is only for indoor use to reduce the potential for harmful interference to co-channel mobile satellite systems; Avertissement: Le dispositif fonctionnant dans la bande 5150-5250 MHz est réservé uniquement pour une utilisation à l’intérieur afin de réduire les risques de brouillage préjudiciable aux systèmes de satellites mobiles utilisant les mêmes canaux;… -
Page 40
應避免影響附近雷達系統之操作。 安全諮詢及注意事項 • 請按照本產品注明的電源類型使用本產品。 • 清潔本產品之前請先切斷電源。請勿使用液體、噴霧清潔劑或濕布進行清潔。 • 注意防潮,請勿將水或其他液體潑灑到本產品上。 • 插槽與開口供通風使用,以確保本產品的操作可靠並防止過熱,請勿堵塞或覆蓋開口。 • 請勿將本產品置放於靠近熱源的地方。除非有正常的通風,否則不可放在密閉位置中。 • 不要私自拆開機殼或自行維修,如產品有故障請與原廠或代理商聯繫。 限用物質含有情況標示聲明書 設備名稱: 型號(型式): Equipment name: Type designation (Type) AC1200 Whole Home Mesh Wi-Fi System Deco M4 限用物質及其化學符號 Restricted substances and its chemical symbols 單元 鉛 汞 鎘… -
Page 41
備考1. 超出0.1 wt %” 及 “超出0.01 wt %” 系指限用物質之百分比含量超出百分比含量基準值。 Note 1:“Exceeding 0.1 wt %” and “exceeding 0.01 wt %” indicate that the percentage content of the restricted substance exceeds the reference percentage value of presence condition. 備考2.“○”系指該項限用物質之百分比含量未超出百分比含量基準值。 Note 2:“○” indicates that the percentage content of the restricted substance does not exceed the percentage of reference value of presence. -
Page 42
• Storage Humidity: 10%~90%RH, Non-condensing Please read and follow the above safety information when operating the device. We cannot guarantee that no accidents or damage will occur due to improper use of the device. Please use this product with care and operate at your own risk. Explanation of the symbols on the product label Symbol Explanation…
TP-Link Deco M4 – одна из самых доступных Mesh Wi-Fi систем на рынке. А если рассматривать к покупке комплект из одного модуля, то он получиться даже дешевле, чем маршрутизатор примерно с такими же характеристиками. Но в случае с Deco M4, у нас всегда будет возможность в случае необходимости докупить еще один модуль и расширить Wi-Fi сеть. Ну и получить все фишки и преимущества технологии Mesh Wi-Fi. Если вы только выбираете себе систему для создания бесшовной Wi-Fi сети, то рекомендую для начала почитать обзор на TP-Link Deco M4. В этой статье я продемонстрирую весь процесс установки, подключения и настройки этой системы.
Deco M4, как и другие Mesh-системы от TP-Link настраивается очень просто. Весь процесс настройки и управления осуществляется через приложение «Deco». Установить его можно как на iPhone, или iPad, так и на любое Android-устройство. В магазине приложений, в поиске наберите «TP-Link Deco» и установите приложение.
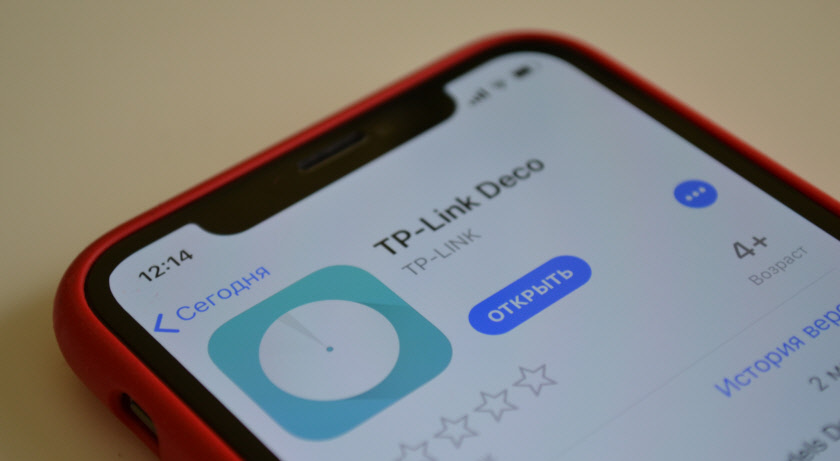 В небольшой инструкции, которая есть в комплекте, есть QR-код. Отсканировав его со своего телефона или планшета, можно сразу перейти к загрузке приложения. Приложение установите, но пока что не запускайте. Сначала выполним подключение модуля Deco M4.
Настройка TP-Link Deco M4
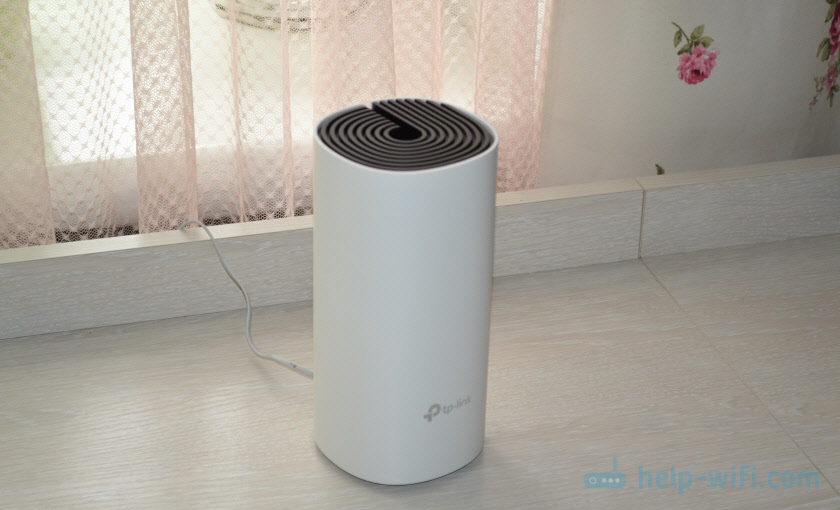
Для начала нужно распаковать и подключить первый модуль (возможно, он у вас один). Подключите адаптер питания и включите его в розетку. В один из LAN-портов подключите интернет (напрямую от провайдера, или от модема).

Когда модуль загружается, индикатор горит желтым цветом. Нужно немного подождать. Когда индикатор будет мигать синим цветом – модуль Deco готов к настройке. Возможно, он уже был настроен и индикатор не мигает синим цветом. В таком случае, нужно сбросить настройки. Для этого нажмите кнопку Reset (снизу модуля) и подержите 10-15 секунд.
Запускам приложение Deco. Если у вас уже есть аккаунт TP-Link ID, то нажмите на кнопку «Вход» и войдите в него. Если нет, то нажмите на кнопку «Регистрация» и создайте аккаунт. После чего выполните вход в приложении.
Не закрывая приложение перейдите в настройки своего мобильного устройства и подключите его к открытой Wi-Fi сети, которую транслирует модуль Deco M4. Имя сети (SSID) указано снизу модуля. После подключения вернитесь в приложение Deco и нажмите на кнопку «Приступим».
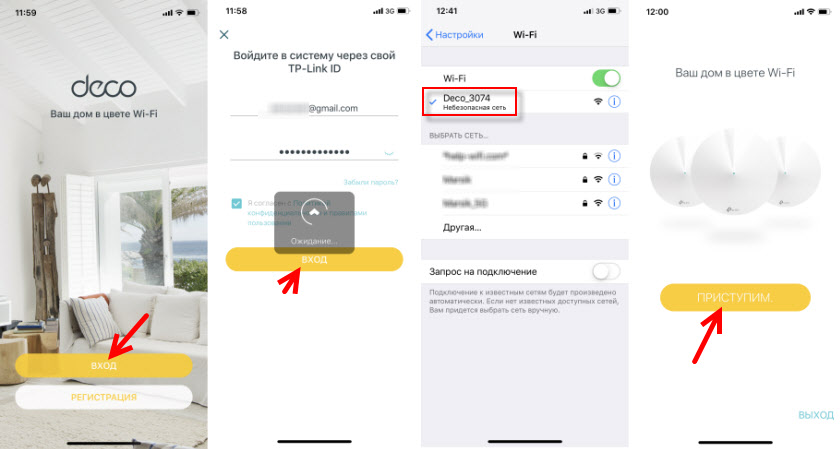
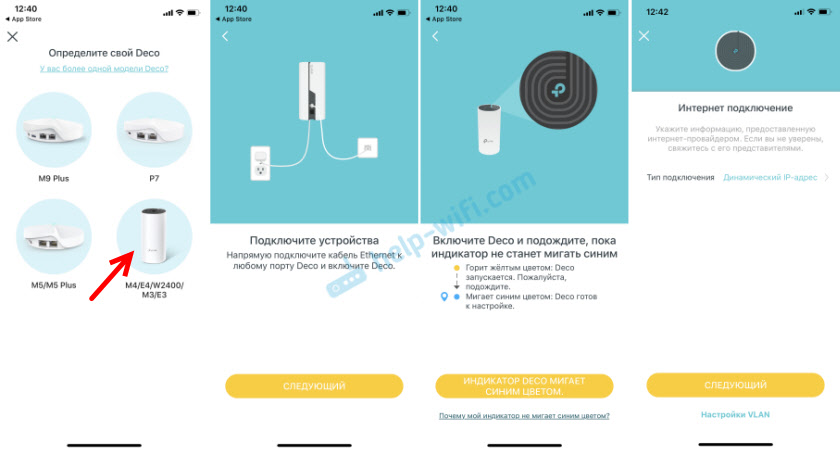
Выбираем свою систему (M4) и следуем инструкциям по подключению модуля. В окне с инструкцией по подключению к модему вы можете нажать «У меня нет модема», если интернет в вашем случае подключен напрямую к самому модулю.
В настройках интернет подключения нужно правильно выбрать тип подключения и задать необходимые параметры. Если у вас подключение PPPoE, то нужно будет указать имя пользователя и пароль, который выдает интернет-провайдер. А если L2TP, или PPTP, то кроме имени пользователя и пароль нужно указать еще адрес сервера. У меня Динамический IP, там вручную вводить настройки не нужно.
Следующий шаг – настройка Wi-Fi сети. Нужно придумать имя сети и пароль, указать их в соответствующих полях и продолжить настройку. Когда появится сообщение: «Для продолжения настройки подключите смартфон/планшет к Wi-Fi сети Deco», то зайдите в настройки Wi-Fi на своем устройстве и выполните подключение к сети, которую только что создали. Используя установленный пароль.
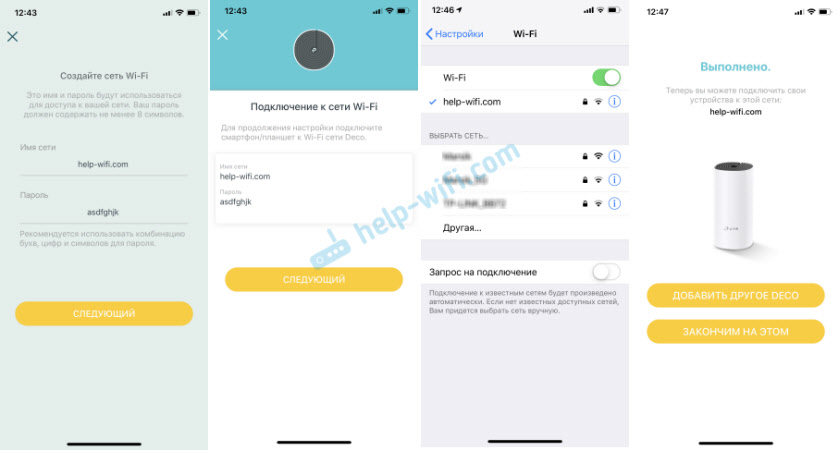
Дальше система TP-Link Deco M4 протестирует подключение к интернету. И если вы правильно задали параметры для подключения и нет никаких ограничений со стороны провайдера – выдаст сообщение, что подключение установлено. После чего предложит завершить настройку, или настроить второй модуль Deco M4. Запустить настройку второго модуля можно сразу, или в меню программы (см. ниже).
Первый модуль Mesh Wi-Fi системы полностью настроен и готов к работе.
Подключение второго модуля Deco M4
Если у вас набор из дух модулей, то установите второй модуль в другой комнате, или на другом этаже и подключите к нему питание. Он должен быть установлен в зоне стабильного покрытия Wi-Fi сети от основного модуля.
В приложении нажимаем на кнопку «+». Выбираем свой модуль, затем выбираем этаж на котором он размещен и комнату. Проверяем, мигает ли индикатор синим цветом и нажимаем на кнопку «Индикатор Deco мигает синим цветом».
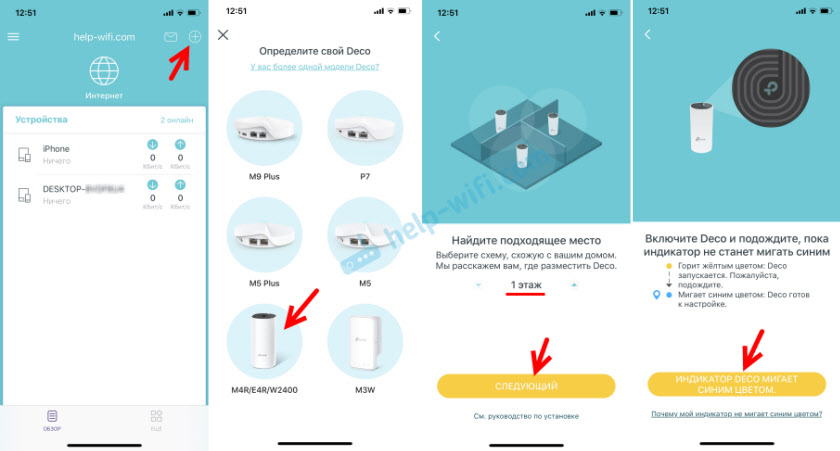
Дальше начнется процесс создания и оптимизации сети. Оба модуля будут объеденные в одну Wi-Fi сеть. После завершения настройки нажмите на кнопку «Закончим на этом». Откроется главное окно приложения Deco.
Управление Wi-Fi Mesh-системой TP-Link
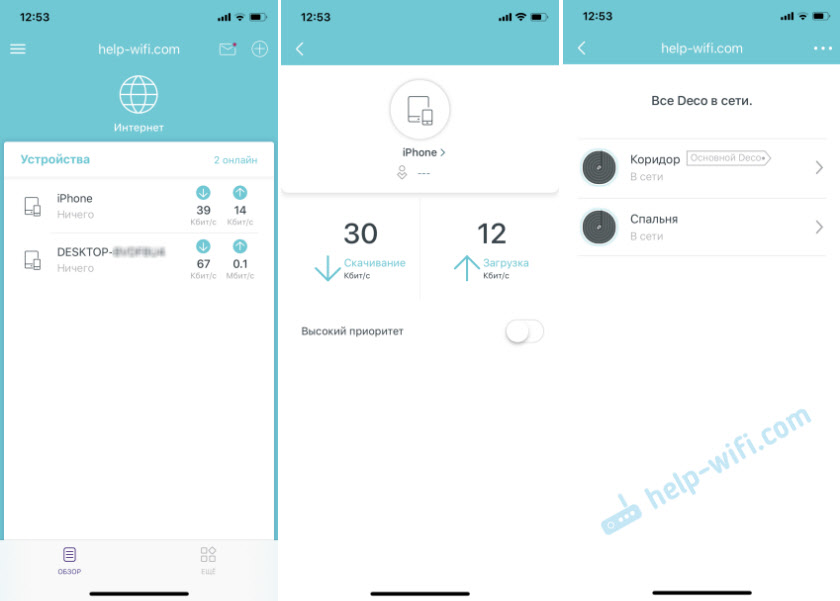
На главной странице приложения отображаются подключенные устройства. Если нажать на устройство, то можно включить для него «Высокий приоритет», или добавить в черный список (нажав на меню из трех точек).
А если на главной странице нажать на «Интернет», то мы увидим все модули Deco, которые находятся в нашей сети. Выбрав определенный модуль, можно посмотреть его статус в сети, сменит расположение, перезагрузит, или удалить.
Если снизу нажать на вкладку «Еще», то откроются расширенные настройки. Там можно сменить настройки Wi-Fi сети, посмотреть черный список устройств, обновить прошивку модулей Deco, или изменить дополнительные настройки (среди которых настройки подключения к интернет-провайдеру).
В дополнительных настройках я рекомендую только включить функцию «Быстрый роуминг». Если после включения этой функции появляться проблемы с подключением старых устройств к Wi-Fi сети, то отключите ее.

Настройка Mesh Wi-Fi системы TP-Link Deco M4 из двух модулей завершена. Если необходимо подключить какое-то устройство к интернету по кабелю, то просто соедините его с модулем с помощью сетевого кабеля, который идет в комплекте.
Вы можете отключить модуль Deco M4, перенести его в другою комнату, включить питание и он продолжит работу. Заново настраивать его не нужно. Главное, чтобы он находился в радиусе действия Wi-Fi сети основного модуля.
Через приложение Deco можно управлять Mesh-системой удаленно. Через интернет. Не обязательно, чтобы ваше устройство было подключено к домашней Wi-Fi сети.
Если вы захотите контролировать Mesh Wi-Fi систему с компьютера, и даже менять некоторые настройки, то вам для этого нужно просто открыть веб-интерфейс по адресу 192.168.68.1 или tplinkdeco.net. По сравнению с приложением Deco набор настроек там ограничен, но есть и такие возможности, которых нет в приложении. Например, системный журнал, или информация о загруженности процессора и оперативной памяти.
Report abuse
Libble takes abuse of its services very seriously. We’re committed to dealing with such abuse according to the laws in your country of residence. When you submit a report, we’ll investigate it and take the appropriate action. We’ll get back to you only if we require additional details or have more information to share.
Product:
Get your user manual by e-mail
Enter your email address to receive the manual of TP-LINK Deco M4R in the language / languages: English as an attachment in your email.
The manual is 0,54 mb in size.
You will receive the manual in your email within minutes. If you have not received an email, then probably have entered the wrong email address or your mailbox is too full. In addition, it may be that your ISP may have a maximum size for emails to receive.
The manual is sent by email. Check your email
If you have not received an email with the manual within fifteen minutes, it may be that you have a entered a wrong email address or that your ISP has set a maximum size to receive email that is smaller than the size of the manual.
The TP-LINK Deco M4R router has Gigabit WiFi, 1 N/A ETH-ports and 0 USB-ports. It has a total combined WiFi throughput of 1200 Mpbs.
Quick links:
Default password/Login
Deco M4R router specifications (specs)
System specs
CPU: 750 MHz
RAM: 128 MiB
Flash: 16 MiB
Custom firmwares: None
Connectivity
WiFi: Gigabit (abgn+ac)
WiFi bands:
n/a
WiFi throughput: 1200 Mpbs
WAN:
1 x N/A port
ETH:
1 x N/A port
USB-ports: 0
TP-LINK Deco review (quick overview)
Here is the quick comparison of how the TP-LINK Deco compares to
other routers on our site:
For a full list of routers and how they compare to the Deco M4R, check the
Router Buying Guide which will help you buy the most
price-competitive router.
Hard reset instructions
for TP-LINK Deco M4R
If your Deco M4R router is not working as it should, dropping connections or not
being
responsive, you should first do a reset of the router to see if the problems persist. Other
scenarios where you might want to reset your router is if you’ve forgotten the password or
misconfigured it and can’t get access anymore.
Your can reset your TP-LINK Deco M4R in the following way(s):
Through the web interface
- Open a browser and navigate to the web interface of the router (check default settings below)
- In the menu look for System tools and under there find the Factory defaults option
- On the Factory defaults page click on the Restore button to perform the reset.
Withe the RESET/WPS button
- Have the unit powered on
- Press and hold the reset (sometimes reset/WPS) button for 10 seconds with a paperclip or other sharp object.
- When the SYS led start blinking quickly release the reset button and wait for router to boot back up.
The 30-30-30 reset
If the above instructions don’t work you can always try the 30-30-30 reset as follows:
- When router is powered on, press the reset button and hold for 30 seconds. (Use a paper
clip
or something sharp) - While holding the reset button pressed, unplug the power of the router and hold the
reset
button for 30 seconds - While still holding the reset button down, turn on the power to the unit again and hold
for
another 30 seconds.
This process usually works for resetting any router to it’s factory setting.
If that doesn’t work be sure to check out the
questions and answers incase someone else has had similar problems resetting their router.
Note: It is worth reading more about
how to reset routers with the 30 30 30 reset and what the risks and
considerations
are when resetting your router this way, instead of just rebooting it.
Default factory settings for TP-LINK Deco M4R
If you have performed a reset of your Deco M4R device or not changed the defaults, you
should
be able to access it with the following settings:
Default subnet mask: 255.255.255.0
Note: If you are using the default settings you should change them to increase
security and prevent unathorized access to your network.
Similar routers
Report error on page
(If info is incorrect)