В компании TP-Link постарались и сделали так, что настраивать TP-Link TL-MR6400 практически не нужно. Он сам определяет SIM-карту и сразу подключается к интернету. Нам остается только настроить Wi-Fi сеть. Сменить заводское имя Wi-Fi сети, установить пароль на Wi-Fi и на сам роутер. Я решил показать весь процесс настройки TP-Link TL-MR6400 и выделить некоторые моменты. Например, если PIN код на SIM-карте не отключен, то его нужно ввести в настройках роутера и включить автоматический ввод. Так же панель управления у этого маршрутизатора на английском языке, что может вызвать дополнительные неудобства при настройке.
Если вы хотите использовать TL-MR6400 как обычный маршрутизатор и подключить к нему интернет по Ethernet-кабелю, то достаточно в панели управления сменить режим работы на Wireless Router Mode, подключить кабель в LAN/WAN порт и задать параметры для своего интернет-провайдера. В конце статьи я напишу об этом более подробно.
Для тех кто еще не купил этот Wi-Fi роутер – оставляю ссылку на мой обзор 3G/4G LTE Wi-Fi роутера TP-Link TL-MR6400 с поддержкой SIM-карт. Там вы так же сможете посмотреть тест скорости через 4G.
Перед настройкой рекомендую сделать сброс настроек. Если роутер новый и вы его еще не настраивали, то сброс можно не делать. Чтобы сбросить настройки на TL-MR6400 нужно нажать кнопку WPS/Reset и подержать ее пока не начнет активно мигать индикатор питания. После чего нужно дождаться загрузки роутера (примерно минута) и можно переходить к настройке.
Но сначала в слот «SIM Card» нужно вставить нашу SIM-карту формата micro-SIM.

Скорее всего роутер сразу подключиться к сети мобильного оператора и начнет раздавать интернет. Это можно определить по индикатору «Интернет» и уровню сети.

Но если SIM-карта новая (не отключен PIN-код), то нужно выполнить некоторые настройки. Я не уверен, но мне кажется, что новую SIM-карту нужно еще и активировать в телефоне, совершив звонок на любой номер. Возможно я ошибаюсь. Если у вас не получиться подружить роутер с SIM-картой, то попробуйте это сделать. Или посмотрите документацию от SIM-карты, там обычно написано, как начать ею пользоваться.
Вход в web-интерфейс TL-MR6400 и быстрая настройка
Подключитесь к роутеру по Wi-Fi сети (заводское имя (SSID) и пароль (Wireless Password/PIN) указаны на наклейке снизу устройства), или по сетевому кабелю.

Дальше запускаем браузер и переходим по адресу http://tplinkmodem.net. Подробнее читайте здесь: tplinkmodem.net – вход в настройки модема TP-Link. Так же можно использовать IP-адрес – 192.168.1.1. Если не удается зайти в web-интерфейс роутера, то смотрите эту статью.
Первым делом нужно установить пароль на роутер (этот пароль нужен для защиты настроек роутера). Придумайте пароль и укажите его два раза. Обязательно запишите пароль, чтобы не забыть его. Его нужно будет вводить каждый раз, когда будете заходить в настройки TL-MR6400.

Если SIM-карта заблокирована, то появится соответствующее сообщение с предложением перейти в настройки и ввести PIN-код.

Вводим PIN-код (обычно он указан в документации к самой карте) и ставим переключатель возле «Auto-unlock PIN» чтобы роутер в дальнейшем сам смог вводить этот PIN-код. Нажимаем «Save» и возвращаемся к быстрым настройкам нажав на «Quick Setup».

SIM-карта разблокирована и мы можем продолжать настройку. Выбираем свой регион.

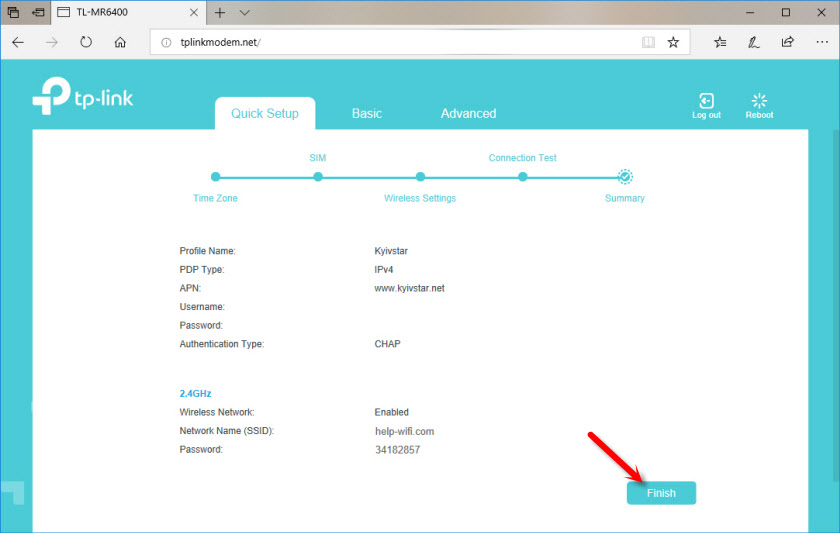
Настройка SIM-карты. У меня автоматически были прописаны параметры моего оператора Киевстар. Думаю, в вашем случае так же настраивать ничего не понадобится. Если же роутер не сможет определить настройки вашего оператора, то пропишите вручную имя точки доступа (APN).

Следующий шаг – настройка Wi-Fi. Здесь просто меняем имя Wi-Fi сети и пароль. Не рекомендую оставлять заводской пароль на Wi-Fi (как это сделал я).

Ставим переключатель возле необходимого пункта и нажимаем «Next».

Тест подключения. Нажимаем еще раз «Next». Если появится сообщение, что «Интернет не подключен. Интернет недоступен из-за отсутствия сигнала 3G или 4G», то возможно в том месте где вы сейчас находитесь действительно нет покрытия 3G/4G. Возможно, нужно использовать SIM-карту другого оператора. Или проверить эту SIM-карту в телефоне. Так же возможно есть какие-то ограничения со стороны оператора. Или вы неправильно задали настройки для своего оператора.

В следующем окне нажимаем на кнопку «Finish».
Если главная страница web-интерфейса не откроется автоматически, то просто заново перейдите по адресу tplinkmodem.net.
Там будет указана вся необходимая информация. В том числе по подключению к мобильной сети оператора. Режим сети 3G/4G, уровень сигнала и т. д.

В web-интерфейсе можно настроить необходимые дополнительные функции. Так же через настройки роутера можно просматривать и отправлять SMS (в отдельном разделе SMS), или отправлять простые USSD команды (в разделе Network – USSD). Например, для проверки баланса.
Настройка подключения через WAN – Ethernet
Если у вас интернет по кабелю, то в настройках, в разделе «Operation Mode» переводим роутер в режим «Wireless Router Mode». После сохранения настроек роутер будет перезагружен.

Кабель от провайдера нужно подключить в порт LAN/WAN.

Снова заходим в настройки и в разделе «Network» – «Internet» создаем новый профиль в котором выбираем тип подключения и задаем необходимые параметры для подключения к своему интернет-провайдеру. Все параметры вы можете уточнить у поддержки провайдера. Обратите внимание, что провайдер может делать привязку по MAC-адресу.

После настройки сохраняем профиль. Роутер должен подключиться к интернету. Статус созданного подключения должен быть «Connected».
Обратите внимание на пункт «3G/4G Backup». Его можно выключить или включить. Я так понимаю, что эта настройка позволяет использовать соединение через SIM-карту как резервное. Когда пропадает интернет по кабелю, роутер устанавливает подключение через сеть 3G/4G.

К сожалению у меня нет возможности проверить, как работает резервное подключение. Если вы уже все проверили – напишите в комментариях. Там же можете оставлять свои вопросы и дополнения к статье.
-
Contents
-
Table of Contents
-
Bookmarks
Quick Links
User Guide
300Mbps Wireless N 4G LTE Router
TL-MR6400
REV5.0.0
1910012771
Related Manuals for TP-Link TL-MR6400
Summary of Contents for TP-Link TL-MR6400
-
Page 1
User Guide 300Mbps Wireless N 4G LTE Router TL-MR6400 REV5.0.0 1910012771… -
Page 2: Table Of Contents
Chapter 5. TP-Link Cloud Service ……..19…
-
Page 3
7. 3. Access Control …………. 30 7. -
Page 4
12. 7. Set Up a Dynamic DNS Service Account ……..64 12. -
Page 5: About This Guide
• Specifications can be found on the product page at https://www.tp-link.com. • TP-Link Community is provided for you to discuss our products and share knowledge at https://community.tp-link.com. • Our Technical Support contact information can be found at the…
-
Page 6: Chapter 1. Get To Know Your 4G Lte Router
Chapter Get to Know Your 4G LTE Router This chapter introduces what the router can do and shows its appearance. It contains the following sections: • Product Overview • Panel Layout…
-
Page 7: Product Overview
Chapter 1 Get to Know Your 4G LTE Router 1. 1. Product Overview The 4G LTE Router shares the latest generation 4G LTE network with multiple Wi-Fi devices, anywhere you want. With Ethernet ports and antennas, the router provides wired and wireless access for multiple computers and mobile devices.
-
Page 8: The Back Panel
Chapter 1 Get to Know Your 4G LTE Router Name Status Indication The router is connected to the internet. (Internet) There is no internet connection. The wireless function is enabled. Flashing WPS connection is in progress. This may take up to 2 minutes. (Wi-Fi) The wireless function is disabled.
-
Page 9
Chapter 1 Get to Know Your 4G LTE Router Item Description POWER Port For connecting the router to power socket via the provided power adapter. For connecting to your PCs or other Ethernet network devices. LAN1, LAN2, LAN3, In wireless router mode, the LAN4/WAN port is used for connecting to a Cable/FTTH/ LAN4/WAN VDSL/ADSL device. -
Page 10: Chapter 2. Connect The Hardware
Chapter Connect the Hardware This chapter contains the following sections: • Position Your 4G LTE Router • Connect Your 4G LTE Router…
-
Page 11: Position Your 4G Lte Router
Chapter 2 Connect the Hardware 2. 1. Position Your 4G LTE Router With the router, you can access your network from anywhere within the wireless network coverage. However, the wireless signal strength and coverage varies depending on the actual environment where your router is in. Many obstacles may limit the range of the wireless signal, for example, concrete structures, thickness and number of walls.
-
Page 12
Chapter 2 Connect the Hardware Power adapter a. Install the antennas and position them upwards. Connect the b. Insert a micro SIM power adapter card into the slot to the router. until you hear a click. Router SIM Card Requirements Standard Micro Nano… -
Page 13
Chapter 2 Connect the Hardware WLAN WLAN TP-Link_Home My Home My Network Home Network TP-Link_Network TP-Link_Test… -
Page 14: Chapter 3. Log In To Your 4G Lte Router
Chapter Log In to Your 4G LTE Router…
-
Page 15
Chapter 3 Log In to Your 4G LTE Router With a web management page, it is easy to configure and manage the 4G LTE Router. The web management page can be used on any Windows, Macintosh or UNIX OS with a Web browser, such as Microsoft Internet Explorer, Mozilla Firefox or Apple Safari. -
Page 16: Chapter 4. Set Up Internet Connections
Chapter Set Up Internet Connections This chapter introduces how to connect your router to the internet. The router is equipped with a web-based Quick Setup wizard. It has many ISP information built in, automates many of the steps and verifies that those steps have been successfully completed.
-
Page 17: Use Quick Setup Wizard
If your ISP settings are not detected by the router, you can create an internet connection profile by following the steps below: 1. Visit http://tplinkmodem.net, and log in with your TP-Link ID or the password you set for the router.
-
Page 18
Chapter 4 Set Up Internet Connections 3. Click Create Profile. 4. Specify the Profile Name, Username and Password. Select the Type, APN Type Authentication Type according to your ISP. -
Page 19: Set Up Ipv6 Tunnel
Set up the IPv6 tunnel though my ISP doesn’t provide me with the tunnel service. How can I do that? 1. Visit http://tplinkmodem.net, and log in with your TP-Link ID or the password you set for the router. 2. Go to Advanced >…
-
Page 20: Specify The 6Rd Tunnel With Parameters Provided By Your Isp
Specify the 6rd tunnel with the parameters provided by my 6rd tunnel service provider. How can I do that? 1. Visit http://tplinkmodem.net, and log in with your TP-Link ID or the password you set for the router. 2. Go to Advanced >…
-
Page 21: Test Internet Connectivity
After manually set up the internet connection, you need to know the internet connectivity. The router provides a diagnostic tool to help you locate the malfunction. 1. Visit http://tplinkmodem.net, and log in with your TP-Link ID or the password you set for the router.
-
Page 22
Chapter 4 Set Up Internet Connections 3. Click Start to test the internet connectivity and you will see the test result in the gray box. -
Page 23: Chapter 5. Tp-Link Cloud Service
TP-Link Cloud service provides a better way to manage your cloud devices. Log in to your router with a TP-Link ID, and you can easily monitor and manage your home network when you are out and about via the Tether app on your smartphone or tablet. To ensure that your router stays new and gets better over time, the TP-Link Cloud will notify you when an important firmware upgrade is available.
-
Page 24: Register A Tp-Link Id
TP-Link ID. 4. After activating your TP-Link ID, come back to the TP-Link Cloud page to log in. The first-time login TP-Link ID will be bound automatically to your cloud router as an Admin.
-
Page 25: Manage The User Tp-Link Ids
The first-time login TP-Link ID will be bound automatically to your router as an Admin account. An admin account can add or remove other TP-Link IDs to the same router as Users. Admin account and User accounts both can monitor and manage the router locally or remotely, except that user accounts cannot: •…
-
Page 26: Add An Tp-Link Id To Manage The Router
Manage the Router via TP-Link Tether App to install the app and register a new one. 4. The new TP-Link ID will be displayed in the Bound Accounts table as a User. 5. 3. 2. Remove TP-Link ID(s) From Managing the Router 1.
-
Page 27: Manage The Router Via Tp-Link Tether App
TP-Link Tether simply scan the QR code to download and install the app. 2. Launch the Tether app, and log in with your TP-Link ID. Note: If you don’t have an account, create one first. 3. Click + on the top right corner and select Router >…
-
Page 28: Chapter 6. Qos
Chapter This chapter introduces how to create a QoS (Quality of Service) rule to specify prioritization of traffic and minimize the impact caused when the connection is under heavy load.
-
Page 29
How can I do that? 1. Enable QoS and set bandwidth allocation. 1 ) Visit http://tplinkmodem.net, and log in with your TP-Link ID or the password you set for the router. 2 ) Go to Advanced >… -
Page 30
Chapter 6 2 ) Select By Device and then click Scan. 3 ) Choose the respective device from the list. 4 ) Click Save. Note: If you want to delete a QoS rule, click to remove the responding rule from the list. Done! Now QoS is implemented to prioritize internet traffic. -
Page 31: Chapter 7. Network Security
Chapter Network Security This chapter guides you on how to protect your home network from cyber attacks and unauthorized users by implementing these five network security functions. You can protect your home network against DoS (Denial of Service) attacks from flooding your network with server requests using DoS Protection.
-
Page 32: Protect The Network From Cyber Attacks
DoS Protection can protect your home network against DoS attacks from flooding your network with server requests. Follow the steps below to configure Firewall and DoS Protection. 1. Visit http:///tplinkmodem.net, and log in with your TP-Link ID or the password you set for the router. 2. Go to Advanced >…
-
Page 33: Service Filtering
Service Filtering With Service Filtering, you can prevent certain users from accessing the specified service, even block Internet access completely. 1. Visit http://tplinkmodem.net, and log in with the your TP-Link ID or password you set for the router. 2. Go to Advanced >…
-
Page 34: Access Control
Block or allow specific client devices to access my network (via wired or wireless). How can I do that? 1. Visit http://tplinkmodem.net, and log in with the your TP-Link ID or password you set for the router. 2. Go to Advanced >…
-
Page 35: Ip & Mac Binding
Chapter 7 Network Security 2 ) Select the device(s) to be blocked in the Online Devices table. 3 ) Click Block above the Online Devices table. The selected devices will be added Devices in Blacklist automatically. To allow specific device(s) 1 ) Select Whitelist and click Save.
-
Page 36: Ipv6 Firewall
Chapter 7 Network Security 3. Bind your device(s) according to your needs. To bind the connected device(s) 1 ) Select the device(s) to be bound in the List. 2 ) Click Bind to add to the Binding List. To bind the unconnected device 1 ) Click Add.
-
Page 37
Chapter 7 Network Security 1. Visit http://tplinkmodem.net, and log in with your TP-Link ID or the password you set for the router. 2. Go to Advanced > Security > IPv6 Firewall. 3. Enable IPv6 Firewall. 4. Click Add. 5. Select an interface name from the drop-down list. Interface names are names of the internet connections you have set up. -
Page 38: Chapter 8. Parental Controls
Chapter Parental Controls This function allows you to block inappropriate, explicit and malicious websites, and control access to specified websites at specified time.
-
Page 39
18:00 (6PM) to 22:00 (10PM) on weekdays only. How can I do that? 1. Visit http://tplinkmodem.net, and log in with the your TP-Link ID or password you set for the router. 2. Go to Basic Advanced >… -
Page 40
Chapter 8 Parental Controls 4. Click Scan and select the device to be controlled. Or enter the Device Name MAC Address manually. 5. Click the icon to set the Effective Time. Drag the cursor over the appropriate cell(s) and click OK. 6. -
Page 41
Chapter 8 Parental Controls 1 ) Enter a web address (e.g. www.tp-link.com) or a web address keyword (e.g. wikipedia) to only allow or block access to the websites containing that keyword. 2 ) If you wish to block all internet browsing access, do not add any keyword to the Whitelist. -
Page 42: Chapter 9. Sms
Chapter This chapter introduces how to use the SMS functions to view and write messages, keep drafts and specify the message center number. You can easily monitor your data usage by sending a message to your carrier. This chapter includes the following sections: •…
-
Page 43: View Messages
Chapter 9 9. 1. View Messages 1. Visit http://tplinkmodem.net, and log in with your TP-Link ID or the password you set for the router. 2. Go to Advanced > > Inbox page. 3. Click the icon to unfold and read the content of the message.
-
Page 44: View Sent Messages
Chapter 9 9. 3. View Sent Messages 1. Visit http://tplinkmodem.net, and log in with your TP-Link ID or the password you set for the router. 2. Go to Advanced > > Outbox page. All the messages you sent are listed in the Outbox table.
-
Page 45
Chapter 9 1. Visit http://tplinkmodem.net, and log in with your TP-Link ID or the password you set for the router. 2. Go to Advanced > > SMS Settings page and enable Message Center. 3. The Message Center Number is auto-populated. Change it according to your needs. -
Page 46: Chapter 10. Guest Network
Chapter Guest Network This function allows you to provide Wi-Fi access for guests without disclosing your main network. When you have guests in your house, apartment, or workplace, you can create a guest network for them. In addition, you can customize guest network options to ensure network security, privacy, and fluency.
-
Page 47: Create A Network For Guests
Chapter 10 Guest Network 10. 1. Create a Network for Guests 1. Visit http://tplinkmodem.net, and log in with your TP-Link ID or the password you set for the router. 2. Go to Advanced > Guest Network. Locate the Wireless section.
-
Page 48
Chapter 10 Guest Network • Allow Guests to See Each Other Select this checkbox if you want to allow the wireless clients on your guest network to communicate with each other via methods such as network neighbors, Samba, Ping, and FTP. •… -
Page 49: Chapter 11. Nat Forwarding
TP-Link router includes four forwarding rules. If two or more rules are set, the priority of implementation from high to low is Virtual Servers, Port Triggering, UPnP and DMZ.
-
Page 50: Translate Address And Port By Alg
“control/data” protocols: FTP, TFTP, H323 etc. Enabling ALG is recommended. 1. Visit http://tplinkmodem.net, and log in with your TP-Link ID or the password you set for your router. 2. Go to Advanced >…
-
Page 51: Share Local Resources In The Internet By Virtual Server
Home How can I do that? 1. Assign a static IP address to your PC, for example 192.168.1.100. 2. Visit http://tplinkmodem.net, and log in with your TP-Link ID or the password you set for the router. 3. Go to Advanced >…
-
Page 52: Open Ports Dynamically By Port Triggering
Chapter 11 NAT Forwarding 4. Click View Existing Services, and choose HTTP. The external port, internal port and protocol will be auto-populated. Enter the PC’s IP address 192.168.1.100 in the Internal IP field. 5. Click Save to save the settings. Note: 1.
-
Page 53: Make Applications Free From Port Restriction By Dmz
VoIPs and video players. Common applications include MSN Gaming Zone, Dialpad and Quick Time 4 players, etc. Follow the steps below to configure the port triggering rules: 1. Visit http://tplinkmodem.net, and log in with your TP-Link ID or the password you set for the router. 2. Go to Advanced >…
-
Page 54: Make Xbox Online Games Run Smoothly By Upnp
DMZ with all ports opened. How can I do that? 1. Assign a static IP address to your PC, for example 192.168.1.100. 2. Visit http://tplinkmodem.net, and log in with your TP-Link ID or the password you set for the router. 3. Go to Advanced >…
-
Page 55
Therefore, you can play Xbox online games without a hitch. Xbox 4G LTE Router If necessary, you can follow the steps to change the status of UPnP. 1. Visit http://tplinkmodem.net, and log in with your TP-Link ID or the password you set for the router; 2. Go to Advanced >… -
Page 56: Chapter 12. Specify Your Network Settings
Chapter Specify Your Network Settings This chapter introduces how to change the default settings or adjust the basic configuration of the router using the web-based management page. This chapter contains the following sections: • Upgrade Your ISP Information • USSD •…
-
Page 57: Upgrade Your Isp Information
1. Download the latest ISP upgrade file from the Support page at https://www.tp-link. com to your computer. 2. Visit http://tplinkmodem.net, and log in with your TP-Link ID or the password you set for the router. 3. Go to Advanced >…
-
Page 58: Pin Management
PIN Management allows you to easily change the PIN settings of your SIM card as needed. Follow the steps below to change your PIN settings. 1. Visit http://tplinkmodem.net, and log in with your TP-Link ID or the password you set for the router. 2. Go to Advanced >…
-
Page 59: Data Settings
Follow the steps below to monitor your data usage. 1. Visit http://tplinkmodem.net, and log in with your TP-Link ID or the password you set for the router. 2. Go to Advanced >…
-
Page 60: Lan Settings
IP subnet, you can change it. Follow the steps below to change your IP address. 1. Visit http://tplinkmodem.net, and log in with your TP-Link ID or the password you set for the router. 2. Go to Advanced >…
-
Page 61: Use The 4G Lte Router As A Dhcp Server
To use the DHCP server function of the router, you must configure all computers on the LAN to obtain an IP Address automatically. Follow the steps below to configure DHCP server. 1. Visit http://tplinkmodem.net, and log in with your TP-Link ID or the password you set for the router. 2. Go to Advanced >…
-
Page 62: Reserve Lan Ip Addresses
IP addresses, please configure Address Reservation on the router for the purpose. Follow the steps below to reserve an IP address for your device. 1. Visit http://tplinkmodem.net, and log in with your TP-Link ID or the password you set for the router. 2. Go to Advanced >…
-
Page 63
Chapter 12 Specify Your Network Settings 1. Visit http://tplinkmodem.net, and log in with your TP-Link ID or the password you set for the router. 2. Go to Basic > Wireless page. • To enable or disable the wireless function: Enable the Wireless Network 2.4GHz. -
Page 64: Use Wps For Wireless Connection
Chapter 12 Specify Your Network Settings the wireless channel unless you notice interference problems with another nearby access point. • Channel Width — Select the channel width from the drop-down list. The default setting is Automatic, which can adjust the channel width for your clients automatically. •…
-
Page 65
Chapter 12 Specify Your Network Settings Method 2 Enter the client device’s PIN on the router 1. Visit http://tplinkmodem.net, and log in with your TP-Link ID or the password you set for the router. 2. Go to Advanced > Wireless >… -
Page 66: Schedule Your Wireless Function
12. 6. 3. Schedule Your Wireless Function You can automatically turn off your wireless network at time when you do not need the wireless connection. 1. Visit http://tplinkmodem.net, and log in with your TP-Link ID or the password you set for the router. 2. Go to Advanced >…
-
Page 67: View Wireless Information
Specify Your Network Settings 12. 6. 4. View Wireless Information • To view the detailed wireless network settings: 1. Visit http://tplinkmodem.net, and log in with your TP-Link ID or the password you set for the router. 2. Go to Advanced >…
-
Page 68: Set Up A Dynamic Dns Service Account
Chapter 12 Specify Your Network Settings • Beacon Interval — Enter a value between 25 and 1000 in milliseconds to determine the duration between which beacon packets are broadcasted by the router to synchronize the wireless network. The default is 100 milliseconds. •…
-
Page 69
NO-IP or DynDNS. If you don’t have a DDNS account, select a service provider and click Go to register. Note: To enjoy TP-Link’s DDNS service, you have to log in with a TP-Link ID. If you have not logged in with one, click 4. Click Register in the Domain Name List… -
Page 70: Create Static Routes
Chapter 12 Specify Your Network Settings If you have selected NO-IP or DynDNS, enter the username, password and domain name of your account. 5. Click Log in and Save. Tips: If you want to use a new DDNS account, please log out first, then log in with the new account. 12.
-
Page 71
1. Make sure the routers use different LAN IP addresses on the same subnet. Disable DHCP function of Router 2. 2. Visit http://tplinkmodem.net, and log in with your TP-Link ID or the password you set for the router. 3. Go to Advanced >… -
Page 72: Set Up A Vpn Connection
Chapter 12 Specify Your Network Settings • Network Destination — The destination IP address that you want to assign to a static route. This IP address cannot be on the same subnet with the WAN IP or LAN IP of the router. In the example, the IP address of the company network is the destination IP address, so here enters 172.30.30.1.
-
Page 73: Use Openvpn To Access Your Home Network
VPN client software on the remote device. Please follow the steps below to set up an OpenVPN connection. Step1. Set up OpenVPN Server on Your Router http://tplinkmodem.net 1. Visit , and log in with your TP-link ID or the password you set for the router. 2. Go to Advanced >…
-
Page 74: Use Pptp Vpn To Access Your Home Network
Please follow the steps below to set up a PPTP VPN connection. Step 1. Set up PPTP VPN Server on Your Router http://tplinkmodem.net 1. Visit , and log in with your TP-link ID or the password you set for the router. 2. Go to Advanced >…
-
Page 75
Chapter 12 Specify Your Network Settings Note: Before you enable Server, we recommend you configure Dynamic DNS Service (recommended) or assign a static IP address for router’s WAN port and synchronize your System Time with internet. 3. In the Client IP Address filed, enter the range of IP addresses (up to 10) that can be leased to the devices by the PPTP VPN server. -
Page 76
Chapter 12 Specify Your Network Settings 3. Select Connect to a workplace and click Next. 4. Select Use my Internet connection (VPN). -
Page 77
Chapter 12 Specify Your Network Settings 5. Enter the internet IP address of the router (for example: 218.18.1.73) in the Internet address field. Click Next. 6. Enter the User name Password you have set for the PPTP VPN server on your router, and click Connect. -
Page 78
Chapter 12 Specify Your Network Settings 7. The PPTP VPN connection is created and ready to use. -
Page 79: Chapter 13. Administrate Your Network
Chapter Administrate Your Network This chapter introduces how to change the system settings and administrate your router’s network. This chapter contains the following sections: • Set System Time • Update the Firmware • Back up and Restore Configuration Settings • Change the Administrator Account •…
-
Page 80: Set System Time
Wireless Schedule. You can manually set how to get the system time. Follow the steps below to set your system time. 1. Visit http://tplinkmodem.net, and log in with your TP-Link ID or the password you set for the router. 2. Go to Advanced >…
-
Page 81: Update The Firmware
TP-Link is dedicated to improving and richening the product features, giving you a better network experience. We will inform you through the web management page if there’s any update firmware available for your router. Also, the latest firmware will be released at TP-Link official website, you can download it from the Support page of our website www.tp-link.com…
-
Page 82: Local Upgrade
Moreover, if needed you can erase the current settings and reset the router to the default factory settings. • To back up configuration settings: 1. Visit http://tplinkmodem.net, and log in your TP-Link ID or with the password you set for the router. 2. Click Advanced >…
-
Page 83: Change The Administrator Account
Chapter 13 Administrate Your Network • To restore configuration settings: 1. Visit http://tplinkmodem.net, and log in with your TP-Link ID or the password you set for the router. 2. Click Advanced > System Tools > Backup & Restore page. 3. Click…
-
Page 84: Local Management
You can also allow only one device to manage the router. Follow the steps below to specify the local management. 1. Visit http://tplinkmodem.net, and log in with your TP-Link ID or the password you set for the router. 2. Go to Advanced >…
-
Page 85: Remote Management
By default, the remote devices are not allowed to manage the router from the internet. Follow the steps below to allow remote devices to manage the router. 1. Visit http://tplinkmodem.net, and log in with your TP-Link ID or the password you set for the router.
-
Page 86: Control Leds
The router‘s LEDs indicate router’s activities and status. You can turn on or turn off the LEDs as you need. • To turn off LEDs: 1. Visit http://tplinkmodem.net, and log in with your TP-Link ID or the password you set for the router. 2. Go to Advanced >…
-
Page 87: Set The Router To Reboot Regularly
You can reboot the router manually or set it to reboot regularly. • To reboot manually: 1. Visit http://tplinkmodem.net, and log in with your TP-Link ID or the password you set for the router. 2. Go to Advanced >…
-
Page 88: System Log
For example when your router does not work properly, you will need to save the system log and send it to the technical support for troubleshooting. 1. Visit http://tplinkmodem.net, and log in with your TP-Link ID or the password you set for the router.
-
Page 89: Monitor The Internet Traffic Statistics
The Traffic Monitor page displays the network traffic of the LAN, WAN and WLAN sent and received packets, allowing you to monitor the volume of internet traffic statistics. 1. Visit http://tplinkmodem.net, and log in with your TP-Link ID or the password you set for the router.
-
Page 90: Cwmp Settings
The router offers CWMP feature. The function supports TR-069 protocol which collects information, diagnoses the devices and configures the devices automatically via ACS (Auto-Configuration Server). 1. Visit http://tplinkmodem.net, and log in with your TP-Link ID or the password you set for the router. 2. Go to Advanced >…
-
Page 91
Chapter 13 Administrate Your Network • Enable CWMP — Toggle On to enable the CWMP (CPE WAN Management Protocol) feature. • Inform — Enable this feature to send an Inform message to the ACS (Auto Configuration Server) periodically. • Inform Interval — Enter the time in seconds when the Inform message will be sent to the ACS. -
Page 92: Snmp Settings
So a router contains SNMP “agent” software can be monitored and/or controlled by SNMP Manager using SNMP messages. 1. Visit http://tplinkmodem.net, and log in with your TP-Link ID or the password you set for the router.
-
Page 93
Chapter 13 Administrate Your Network • System Description — Displays the textual description of the managed device. This value should include the full name and version identification of the system’s hardware type, software operating-system, and networking software. • System Location — Displays the physical location of this device (e.g. -
Page 94: Faq
Q1. How do I restore my router to its factory default settings? With the router powered on, press and hold the WPS/RESET button on the rear panel until the Power LED starts flashing. Note: Once the router is reset, the current configuration settings will be lost and you will need to re-configure the router. Q2.
-
Page 95
3 ) Click Connections and select Never dial a connection. 4 ) Click settings, deselect the following three options and click OK;… -
Page 96
5 ) Go to Advanced > Restore advanced settings, click to save the settings. • Use another web browser or computer to log in again. • Reset the router to factory default settings and try again. If the login still fails, please contact the technical support. -
Page 97
2 ) Go to Advanced > Network > Internet to verify the parameters (including the APN, Username and Password) provided by your ISP are correctly entered. If the parameters are incorrect, click Create Profile and enter the correct parameters, then select the new profile from the Profile Name list. 6. -
Page 98
2. Visit http://tplinkmodem.net, and log in with your TP-Link ID or the password you set for the router. 3. Go to Advanced > Operation Mode page. 4. Select the Wireless Router Mode option and click Save to make the settings effective. -
Page 99
2 ) Exit the wireless configuration tool (the TP-Link Utility, for example); 3 ) Select and right click on… -
Page 100
4 ) Expand Services and Applications > Services, find and locate Wireless Zero Configuration in the Services list on the right side; 5 ) Select Wireless Zero Configuration, right click it, and then select Properties; 6 ) Change Startup type to Automatic, click on Start button and make sure the Service status is Started. -
Page 101
7 ) Connect to wireless network. • If you can find other wireless network except your own, please follow the steps below: 1. Check the WLAN LED indicator on your router; 2. Make sure your computer/device is still in the range of your router/modem, move closer if it is currently too far away;… -
Page 102
2 ) If you cannot find the PIN or PIN failed, you may choose Connecting using a security key instead, and then type in the Network Security Key/Wireless Password; 3 ) If it continues saying network security key mismatch, it is suggested to confirm the wireless password on your wireless router/modem;… -
Page 103
2. Windows was unable to connect to XXXX /Cannot join this network/Taking longer than usual to connect to this network. 1 ) Check the wireless signal strength of your network, if it is weak (1~3 bars), please move the router closer and try again; 2 ) Change the wireless Channel of the router to 1,6,or 11 to reduce interference from other networks;… -
Page 104
Specifications are subject to change without notice. is a registered trademark of TP-Link Technologies Co., Ltd. Other brands and product names are trademarks or registered trademarks of their respective holders. No part of the specifications may be reproduced in any form or by any means or used to make any derivative such as translation, transformation, or adaptation without permission from TP-Link Technologies Co., Ltd. -
Page 105
OPERATING FREQUENCY(the maximum transmitted power) 2400 MHz -2483.5 MHz(20dBm) EU declaration of conformity TP-Link hereby declares that the device is in compliance with the essential requirements and other relevant provisions of directives 2014/53/EU, 2009/125/EC, 2011/65/EU and (EU)2015/863. The original EU declaration of conformity may be found at https://www.tp-link.com/en/ce RF Exposure Information This device meets the EU requirements (2014/53/EU Article 3.1a) on the limitation of… -
Page 106
• 插槽與開口供通風使用,以確保本產品的操作可靠並防止過熱,請勿堵塞或覆蓋開 口。 • 請勿將本產品置放於靠近熱源的地方。除非有正常的通風,否則不可放在密閉位置 中。 • 請不要私自拆開機殼或自行維修,如產品有故障請與原廠或代理商聯繫。 限用物質含有情況標示聲明書 限用物質及其化學符號 鉛 鎘 汞 六價鉻 多溴聯苯 多溴二苯醚 產品元件名稱 CrVI PBDE ○ ○ ○ ○ ○ ○ 外殼 ○ ○ ○ ○ ○ ○ 電源供應器 − ○ ○ ○ ○ ○ 備考1. 超出0.1 wt %” 及 “超出0.01 wt %” 系指限用物質之百分比含量超出百分 比含量基準值。… -
Page 107
Explanation of the symbols on the product label Symbol Explanation DC voltage Indoor use only RECYCLING This product bears the selective sorting symbol for Waste electrical and electronic equipment (WEEE). This means that this product must be handled pursuant to European directive 2012/19/EU in order to be recycled or dismantled to minimize its impact on the environment.
Содержание
- 1 Обзор конструкции и внешнего вида
- 2 Характеристики устройства
- 3 Подключение роутера
- 4 Настройка роутера и обзор возможностей
- 5 Краткий обзор дополнительных возможностей
- 6 Сравнение версий роутера
- 7 Подводя итоги
- 8 Видео по теме
В наше время беспроводных технологий довольно трудно представить квартиру без маршрутизатора. По статистике пользователи оборудуют ими каждую вторую квартиру или дом. Наиболее типичная схема подключения к интернет-сети сейчас через Ethernet-кабель. Однако по ряду причин еще не во всех квартирах многоэтажек можно обеспечить стационарное подключение к сети интернет. А про частные дома и коттеджи в этом случае можно даже не говорить.

Если в квартире или доме описанная выше ситуация, то в этом случае решить проблему можно при помощи мобильного интернета. Надо также понимать, что проводной интернет не всегда работает безотказно. Там также случаются проблемы на провайдерской стороне, случаются отказы и поломки, которые могут лишить вас связи с внешним миром. Иногда даже пару часов без связи критично, а бывает, что это длится несколько дней. Поэтому для тех, кто пользуется интернетом непрерывно и не может пережить его отсутствие, есть смысл присмотреться к покупке стационарного 3G/4G маршрутизатора и СИМ-карты, которая имеет наиболее выгодный тарифный план для передачи данных. Поэтому данная статья расскажет про такой аппарат TP-Link модель TL-MR6400, благодаря которому вы практически всегда будете всегда иметь доступ к интернету. В данный момент этот Wi-Fi роутер имеет несколько версий. В статье описан TL-MR6400 V3, но надо заметить, что особой разницы между версиями нет. Поэтому читаем статью далее, чтобы поближе познакомиться с этим устройством.
Обзор конструкции и внешнего вида
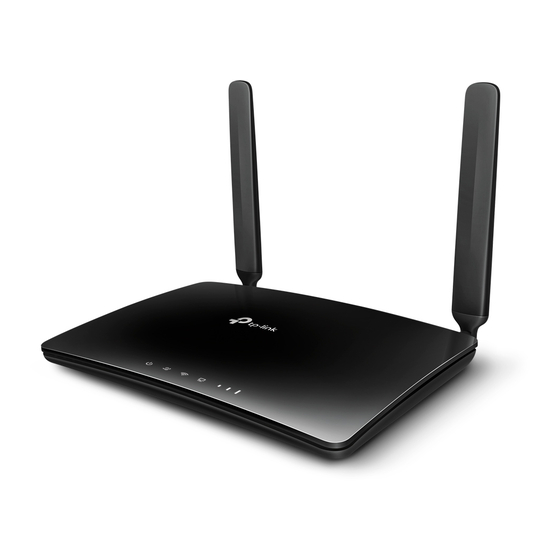
В нашем представлении маршрутизатор должен быть этаким монстром, у которого 4 или 8 антенн. Но к нам в руки сегодня попало компактное и изящное устройство TL-MR6400 от известного китайского бренда TP-Link. Данный 3G/4G LTE маршрутизатор с двумя антеннами подойдет для обеспечения мобильного интернета в квартире, доме или небольшом офисе.

Корпус устройства имеет глянцевую черную поверхность. На верхней крышке устройства по центру размещен логотип бренда.

Цвет корпуса конечно красивый, но надо сказать, что решение очень непрактичное, поверхность довольно быстро пачкается. На ней хорошо заметны следы пыли и прикасания пальцев. Без микрофибры для протирания в данном случае не обойтись, но производитель в комплект прибора ее не добавил. В передней части верхней крышки расположены светодиоды устройства голубоватого цвета, Они имеют ровное и ненавязчивое свечение без каких-либо раздражающих миганий.

Ознакомиться со всеми индикаторами можно во время загрузки устройства. В этот момент все они включаются и светятся буквально пару секунд. Индикаторы устройства: электропитание, интернет-сеть, беспроводное соединение, подключение по проводу и светодиод мобильной сети. Последний имеет 3 уровня индикации.

Сзади устройства располагаются 3 антенны, которые могут вращаться вокруг своей оси, а также отклоняться от нее (на 450 или 900). Wi-Fi роутер оборудован съемными антеннами, но при перевозке снимать их нет особой надобности, ведь их можно аккуратно сложить вдоль корпуса. Надо заметить, что внутри заводской упаковки прибор располагается именно так. Если направить их в сторону ПК или ноутбука, то улучшить скорость работы Wi-Fi соединения в этом случае не получится. Все это объясняется довольно просто. Антенны для беспроводной сети встроены внутрь прибора, а снаружи расположены антенны для мобильной сети. Изменять положение антенн нужно только для того, чтобы на панели роутера горели все 3 деления сотовой сети. Спереди и сбоку на корпусе маршрутизатора нет ничего особенного, только вентиляционные отверстия для охлаждения электронных компонентов. В комплекте с роутером идет патч-корд белого цвета, блок питания (9V, 0.85A) и руководство пользователя.
Расскажем про заднюю панель прибора. На ней размещено следующее: четыре Ethernet-порта желтого цвета, разъем для подключения блока питания («POWER), клавиша подключения-отключения питания («POWER ON/OF») и 2 маленькие кнопки — одна для включения-выключения беспроводной сети («Wi-Fi ON/OFF»), а другая комбинированная для активации WPS и сброса настроек («WPS/RESET»).

Кроме того, здесь же размещается слот для установки СИМ-карт формата Micro-SIM. Если вы планируете использовать полноразмерную симку из своего смартфона, то придется ее немного адаптировать под разъем — сделать обрезку. Но таких СИМ-карт сейчас остается все меньше и меньше, многие из них формат 4G даже не поддерживают, потому вставлять их в маршрутизатор вряд ли потребуется.

На дне устройства есть 2 пластиковые ножки для установки на горизонтальные поверхности и 2 отверстия для монтажа устройства на стенке. При монтаже на стене порты должны смотреть строго вверх или вниз, повороты устройства на 90 градусов не предусмотрены. Кроме того, есть информационная этикетка с параметрами для входа в админпанель.

Характеристики устройства
Расскажем о характеристиках данного устройства. Основные параметры маршрутизатора перечислены ниже:
- Ethernet-порты — 3 LAN-разъема с нумерацией от 1 до 3 (100 Мбит/с), 1 совмещенный разъем LAN4/WAN (100 Мбит/с). Тип портов RJ-45, цвет желтый.
- 1 разъем для карты формата Micro-SIM.
- Адаптер питания — 9V, 0.85
- Габариты — 20.2х14.5х3.4 см (ШхДхВ).
- Встроенный 3G/4G LTE модем.
- Антенны — 4 шт. (две встроенные 3G/4G LTE, 2 внешние Wi-Fi).
- Сетевые стандарты — 802.11 «b/g/n».
- Стандарты Wi-Fi — 4.
- Частотный диапазон — 2.4 ГГц.
- Максимальная скорость на частоте 2.4 GHz — 300 Мbps (Мбит/с).
- Максимальная скорость при работе в сети 4G — 150 Мbps (Мбит/с).
- Наличие резервного переключения
- Шифрование — WPA/WPA2,WPA-PSK/WPA2-PSK и WEP (64/128 бит).
- Рабочие режима — «Роутер с модемом 3G/4G», «Беспроводной роутер».
- Протокола — IPv4 и
- Администрирование доступа — родительский контроль, опция локального управления.
- Наличие одной гостевой сети на частоте 2.4 ГГц.
- USB-разъем — отсутствует.
- Переадресация портов — DMZ, UPnP, Virtual server, Port Triggering.
- Встроенный файрвол, защита от DDoS атак, фильтрация по IP и MAC-адресам, динамический DNS, VPN-сервер, DHCP-сервер.
- Вес устройства без антенн и кабелей — 0.25 кг.
- Вес устройства с упаковкой — 0.65 кг.
- Рабочая температура — 0…+400C.
- Управление — веб-интерфейс.
- Гарантия — 12 месяцев.
Подключение роутера
Необходимо сначала подсоединить антенны и направить их строго вверх. Позднее вы сможете улучшить качество сигнала в случае необходимости и расположить антенны в нужном направлении.
Затем надо вставить Micro-SIM в соответствующий слот до характерного щелчка. Потом устройство подключается к электросети при помощи блока питания, который имеет средние размеры. На нем нет никаких индикаторов. Длина кабеля блока питания составляет 0.5 м, поэтому устройство должно размещаться от электророзетки на таком расстоянии.
Автономное питание для этой модели не предусмотрено, т.к. это стационарный роутер для сетей переменного тока. Однако это не проблема, потому что маршрутизатор может быть размещен в любом месте, там где имеется бытовая электророзетка с напряжением 100-240V. Потом надо включить маршрутизатор при помощи кнопки питания «POWER ON/OF». При этом надо убедиться, что кнопка «Wi-Fi ON/OFF» устройства включена. После включения питания надо будет подождать около 1-2 минут. Затем устройство начнет раздавать интернет и можно подключать к Wi-Fi сети уже сами клиентские девайсы.

Подключение маршрутизатора к сети провайдера осуществляется с помощью патч-корда из комплекта. Для этого Ethernet-кабель надо подсоединить к совмещенному порту «LAN4/WAN». Выделенного WAN-разъема в данной модели роутера нет.
Настройка роутера и обзор возможностей
По дефолту этот роутер TP-Link TL-MR6400 предназначен раздавать мобильный интернет. Как и говорилось ранее, он нужен именно для тех мест, где стационарный интернет по ряду причин недоступен, работает нестабильно или нужен резервный вариант на случай поломки проводной сети. Как только СИМ-карта будет установлена в прибор, надо дождаться, пока загорятся следующие светодиоды: беспроводная сеть, уровень сигнала мобильной сети и интернет-сеть. Далее можно подключаться к Wi-Fi сети на клиентских устройствах. Наименование беспроводной сети («SSID») и код доступа к ней расположены на этикетке снизу устройства.

Стандартные настройки вашего провайдера услуг подразумевают то, что раздача интернета начнется сразу же, как только все необходимые манипуляции с подключением устройства будут выполнены. Однако тогда, когда для вашего тарифного плана требуются специфические настройки, например, точка доступа APN, надо будет поработать с административным интерфейсом маршрутизатора. Необходимо создать сеть при помощи проводного подключения, также придется залазить в настройки роутера. Без этих действий устройство не начнет раздавать интернет, даже если его правильно подключить Ethernet-кабелем через WAN-разъем к сети провайдера.
Настроить роутер ТП-Линк TL-MR6400, как все другие модели роутеров, довольно просто при помощи веб-интерфейса. Чтобы войти в админпанель, надо просто открыть интернет-обозреваль и в его адресной строке набрать IP-адрес «http://tplinkmodem.net» или «192.168.1.1». Хотя стандартные логин/пароль для многих модемов «admin/admin», но в нашем случае они даже не потребуются. Во время первого входа система предложит создать свой новый пароль, который в дальнейшем будет использоваться для авторизации.

Базовый для ТП-Линка вариант интерфейса включает 3 «уровня сложности», который реализован в виде соответствующих вкладок. Чтобы оперативно настроить интернет и начать его раздавать, потребуется выполнить 5 несложных шагов во вкладке «Быстрая настройка» («Quick Setup»). Руководство по быстрой настройке устройства выглядит так:
- Выбор необходимого часового пояса. Переход на следующий экран кнопка Далее («Next»), возврат в предыдущее Назад («Back»).

- Потом настраивается работа СИМ-карты.

- Далее прописываются параметры для создаваемой Wi-Fi сети — ее имя и пароль для доступа к ней.

- В следующем окошке система протестирует созданное соединение. Если все нормально, то пользователь увидит информацию об этом на экране.

- Финальный шаг: на экране отобразится информация о параметрах вновь созданной сети. Для выхода из настройки, необходимо будет кликнуть по кнопке Завершит» («Finish»). Чтобы проверить работоспособность данной сети, необходимо войти в любой интернет-обозреватель и попробовать открыть любую страничку. Если она открывается, значит все было сделано правильно. Иначе придется заново пройти все этапы настройки повторно.

Для выполнения более подробных настроек используются две другие вкладки — «Базовые настройки» («Basic») и «Расширенные настройки» («Advanced»).
Чтобы поменять вариант подсоединения к интернет-сети (мобильный на стационарный или наоборот), потребуется войти в расширенные настройки. Здесь эту процедуру можно сделать в специальном разделе «Режим работы» («Operation Mode»). Достаточно отметить чекбокс напротив нужного режима. Надо отметить, что когда в качестве основного режима установлен мобильный интернет «3G/4G роутер» («3G/4G Router»), задействование проводного подключения возможно лишь после активации режима «Беспроводной роутер» («Wireless Router»). При этом такое действие в любом случае приведет к перезагрузке устройства.

Когда в качестве основного варианта выбрано подключение по проводу, настроить как проводной, так и мобильный интернет можно через раздел «Сеть» («Network»). Для данного роутера можно создавать и сохранять несколько вариантов настроек, которые создаются для различных СИМ-карт. Кроме того, включение опции «3G/4G Backup» позволит автоматически переключиться на мобильный интернет в том случае, когда проводной интернет перестанет работать.
Причина того, почему требуется перезагрузка при переходе с мобильного интернета на проводной, заключается в следующем. Это двойное назначение комбинированного Ethernet-порта — «LAN4/WAN». Замена «Режима работы» («Operation Mode») определяет, какой тип порта будет установлен после такой процедуры изменения режима — LAN- или WAN-порт.

На основании всего вышесказанного можно сделать заключение, что режим работы «3G/4G LTE модем» подойдет в том случае, когда роутер планируется в качестве мобильной точки доступа. Мы знаем, что настройка его довольно простая, а для работы подойдет практически любая СИМ-карта. Другой режим работы «Беспроводной роутер» («Wireless Router») подойдет для применения в домах или небольших офисах, где в качестве основного варианта будет все же проводной интернет. А вот для подстраховки будет использоваться мобильный интернет, который автоматически включится после отключения проводного. Самое главное подобрать оптимальный тарифный план для СИМ-карты с учетом максимально возможного трафика в сети.
Краткий обзор дополнительных возможностей
Если сравнивать данный роутер с аналогичными устройствами серии «Archer», можно заметить, что производитель довольно сильно урезал программную и аппаратную часть TL-MR6400. Наличие одного диапазона (2.4 GHz, 802.11 «b/g/n») и максимальная скорость 300 Mbps яркий тому пример. Хотя, если честно, большей скорости для мобильного интернета и не надо, ведь сейчас наши сети все равно работают на скоростях, которые ниже возможностей этого роутера.

У данного маршрутизатора отсутствует встроенный антивирус, а родительский контроль имеет минимальный функционал. Это нельзя считать недостатком для устройства, которое нужно, чтобы легко и быстро настроить раздачу мобильного интернета по беспроводной сети. При этом надо не забывать о наличии различных сетевых функций (VPN, DDNS, IPv6, NAT переадресация), которые никуда не делись.

Функционал «QoS» позволит ограничить скорости загрузки/выгрузки контента. Кроме того, при помощи его можно разделять подключаемые клиентские приборы на 3 группы, которые имеют различные приоритеты. Wi-Fi сеть и светодиоды выключаются различными способами — в ручном режиме и согласно расписанию («ночной режим»). Можно активировать автоматическую перезагрузку маршрутизатора, например, один раз в течение суток (ночью). Такой способ используется для очистки кэша и улучшения производительности.

Функционал работы СИМ-карты улучшен. Маршрутизатор в двух рабочих режимах может получать и отправлять СМС-сообщения, а также активировать и отменять запрос PIN-кода.

При активации опции «Auto-unlock PIN», роутер в автоматическом режиме начнет делать ввод PIN-кода во время включения или перезагрузки. Довольно удобный вариант, особенно в том случае, когда в роутере используется СИМ-карта из смартфона с отключенным запросом PIN-кода, а выключать защиту не хочется.

Сравнение версий роутера
Маршрутизатор от ТП-Линк TL-MR6400 довольно популярный аппарат. На данный момент производитель выпустил уже 5 версий данного устройства. Последние модификации этого роутера на данный момент — это MR6400 V5 и MR6400 V5.2.

Особых отличий между версиями роутера на данный момент нет. Внешне TP-Link TL-MR6400 V2 чем-то схож с TL-MR6400 V4 и V5. Это сходство связано с наличием у всех этих версий широких плоских антенн. Другие версии имеют более длинные и тонкие антенны.
Питание устройства от версии к версии варьируется. На данный момент роутеры выпускались с двумя вариантами блока питания — 12V/1A и 9V/0.85A. У последней версии роутера оно составляет как раз 9 вольт, 0.85 ампер. Количество максимально подключаемых устройств к сети Wi-Fi было всегда большим и на данный момент максимальное число пользователей сети 32.
Версия TL-MR6400 V3 отличается от всех тем, что у нее производитель решил сделать внутренние антенны 3G/4G LTE, а внешние WI-Fi. У всех остальных версий модели наоборот — внутренние антенны Wi-Fi, а внешние 3G/4G LTE.
В остальном никаких различий между версиями моделей найти обычному пользователю невозможно. Скорость работы в сети Wi-Fi и 3G/4G LTE у всех версий прибора абсолютно идентичные. Производитель поработал над усовершенствованием софта, постарался устранить обнаруженные недоработки и баги. Правда иногда приобретать все же лучше последнюю версию модели. В ней учтены ошибки прошлых версий, а энергопотребление точно ниже. Вот этот фактор в наше время является точно немаловажным аспектом.
Подводя итоги
Мы рассмотрели ранее в статье маршрутизатор компании TP-Link TL-MR6400. Довольно неплохой агрегат, который отличается стабильной работой. На данный момент за его покупку говорят три причины:
- Необходимо наличие сети Wi-Fi там, где провести стационарную (кабельную) сеть по ряду причин невозможно.
- Высокая скорость передачи данных не требуется, поэтому параметры работы данного устройства вполне устраивают.
- Необходимо компактное и эстетичное устройство, которое не испортит интерьера помещения и гармонично в него впишется.
Против его покупки говорят такие вещи:
- Наличие стабильного подключения по кабелю, которое вполне справляется с поставленными задачами. В этом случае платить за дополнительный функционал 3G/4G LTE нет никакой необходимости.
- Вам требуются различные дополнительные опции, но внедрить их вы не сможете, потому что английским языком особо не владеете.