-
Contents
-
Table of Contents
-
Bookmarks
Quick Links
User Guide
300Mbps Wi-Fi Router
TL-WR820N
REV2.0.0
1910012701
Related Manuals for TP-Link TL-WR820N
Summary of Contents for TP-Link TL-WR820N
-
Page 1
User Guide 300Mbps Wi-Fi Router TL-WR820N REV2.0.0 1910012701… -
Page 2: Table Of Contents
Contents About This Guide Chapter 1 Get to Know About Your Router 1. 1. Product Overview…………3 1.
-
Page 3
4. 4. NAT Forwarding…………. 38 4. -
Page 4
5. 3. 2. Guest Network …………82 5. -
Page 5
6. 5. Backup & Restore …………121 6. -
Page 6: About This Guide
The Quick Installation Guide can be found where you find this guide or inside the package of the router. Specifications can be found on the product page at https://www.tp-link.com. TP-Link Community is provided for you to share knowledge and discuss our products at https://community.tp-link.com. Our Technical Support contact information can be found at the…
-
Page 7: Chapter 1 Get To Know About Your Router
Chapter Get to Know About Your Router This chapter introduces what the router can do and shows its appearance. It contains the following sections: • Product Overview • Panel Layout…
-
Page 8: Product Overview
Ethernet ports supply high-speed connection to your wired devices. Moreover, it is simple and convenient to set up and use the TP-Link router due to its intuitive web interface and the powerful Tether app.
-
Page 9: The Back Panel
Chapter 1 Get to Know About Your Router Indication Solid on: Router Mode: The WAN port is connected, but internet is not available. Access Point Mode: The WAN port is not connected. Range Extender Mode: The router is not connected to the host network. Orange WISP Mode: Internet is not available.
-
Page 10
Chapter 1 Get to Know About Your Router The following parts (view from left to right) are located on the rear panel. Item Description Power Port For connecting the router to a power socket via the provided power adapter. WAN Port For connecting to a DSL/Cable modem, or an Ethernet port. -
Page 11: Chapter 2 Connect To The Internet
Chapter Connect to the Internet This chapter contains the following sections: • Position Your Router • Connect to the Internet…
-
Page 12: Position Your Router
Chapter 2 Connect to the Internet Position Your Router With the router, you can access your network from anywhere within the wireless network coverage. However, the wireless signal strength and coverage vary depending on the actual environment of your router. Many obstacles may limit the range of the wireless signal, for example, concrete structures or thick walls.
-
Page 13: Wireless Router Mode
Chapter 2 Connect to the Internet 2 2 1 Wireless Router Mode Follow the steps below to connect your router. If your internet connection is through an Ethernet cable from the wall instead of through a DSL / Cable / Satellite modem, connect the Ethernet cable directly to the router’s WAN port, and then follow Step 4 and 5 to complete the hardware connection.
-
Page 14
WPS. 1 ) Tap the WPS icon on the device’s screen. Here we take an Android phone as an example. 2 ) Immediately press the WPS button on your router. WLAN TP-Link HomeNetwork Close to Office TP-Link_123… -
Page 15: Access Point Mode
Chapter 2 Connect to the Internet Note: If the above screen does not pop-up, it means that your IE Web-browser has been set to a proxy. Go to menu Tools > Internet Options > Connections > Settings, in the screen that appears, untick the Using Proxy checkbox, and click OK.
-
Page 16: Range Extender Mode
Chapter 2 Connect to the Internet Enter http://tplinkwifi.net in the address bar of a web browser. Create a password to log in. Note: If the above screen does not pop-up, it means that your IE Web-browser has been set to a proxy. Go to menu Tools >…
-
Page 17
Chapter 2 Connect to the Internet Click Change Mode in the top right corner and select Range Extender Mode. Wait for the router to reboot. Tip: You can also go to Advanced > Operation Mode to switch to Range Extender Mode. -
Page 18: Wisp Mode
Chapter 2 Connect to the Internet 2 2 4 WISP Mode This mode connectes to the ISP network wirelessly in areas without wired service. Public Wi-Fi Devices Connect the power adapter to the router and power on the router. Connect a computer to the router via an Ethernet cable or wirelessly by using the SSID (wireless name) and password printed on the bottom label of the router.
-
Page 19: Chapter 3 Log In To The Router
Chapter Log In to the Router This chapter introduces how to log in to the web management page of the router.
-
Page 20
Chapter 3 Log In to the Router With the web-based utility, it is easy to configure and manage the router. The web- based utility can be used on any Windows, Macintosh or UNIX OS with a Web browser, such as Microsoft the Internet Explorer, Mozilla Firefox or Apple Safari. Follow the steps below to log in to your router. -
Page 21: Chapter 4 Configure The Router In Wireless Router Mode
Chapter Configure the Router in Wireless Router Mode This chapter presents how to configure the various features of the router working as a wireless router. It contains the following sections: • Operation Mode • Network • Wireless • NAT Forwarding •…
-
Page 22: Operation Mode
Chapter 4 Configure the Router in Wireless Router Mode Operation Mode 1. Visit http://tplinkwifi.net, and log in with the password you set for the router. 2. Go to Advanced > Operation Mode. 3. Select the working mode as needed and click SAVE. Network 4 2 1 Status…
-
Page 23
Chapter 4 Configure the Router in Wireless Router Mode • Internet — This field displays the current settings of the internet, and you can configure them on the Advanced > Network > Internet page. • Status — Indicates whether the router has been connected to the internet. •… -
Page 24: Internet
Chapter 4 Configure the Router in Wireless Router Mode • Default Gateway — The Gateway currently used is shown here. When you use Dynamic IP as the internet connection type, click Renew Release here to obtain new IP parameters dynamically from the ISP or release them. •…
-
Page 25
Chapter 4 Configure the Router in Wireless Router Mode • MTU Size — The normal MTU (Maximum Transmission Unit) value for most Ethernet networks is 1500 Bytes. It is not recommended that you change the default MTU size unless required by your ISP. •… -
Page 26
Chapter 4 Configure the Router in Wireless Router Mode • IP Address — Enter the IP address in dotted-decimal notation provided by your ISP. • Subnet Mask — Enter the subnet mask in dotted-decimal notation provided by your ISP. Normally 255.255.255.0 is used as the subnet mask. •… -
Page 27
Chapter 4 Configure the Router in Wireless Router Mode • User Name/Password — Enter the user name and password provided by your ISP. These fields are case-sensitive. • Secondary Connection — It’s available only for PPPoE connection. If your ISP provides an extra connection type, select Dynamic IP Static IP… -
Page 28
Chapter 4 Configure the Router in Wireless Router Mode default value is 15 minutes. If you want the internet connection remains active all the time, enter 0 (zero). Note: Sometimes the connection cannot be terminated although you have specified the Max Idle Time because some applications are visiting the internet continually in the background. -
Page 29
Chapter 4 Configure the Router in Wireless Router Mode • On Demand — In this mode, the internet connection will be terminared automatically after a specified inactivity period (Max Idle Time) and be re- established when you attempt to access the internet again. •… -
Page 30: Mac Clone
Chapter 4 Configure the Router in Wireless Router Mode • VPN Server IP/ Domain Name — Enter the VPN server’s IP address or domain name provided by your ISP. • MTU Size — The default MTU size is “1420” bytes, which is usually fine. It is not recommended that you change the default MTU Size unless required by your ISP.
-
Page 31: Lan
Chapter 4 Configure the Router in Wireless Router Mode • Use Custom MAC Address — Select if your ISP requires you to register the MAC address and enter the correct MAC address in this field, in case the ISP binds the assigned IP address to the specific MAC address.
-
Page 32: Dhcp
Chapter 4 Configure the Router in Wireless Router Mode • IPTV/VLAN — Select to enable the IPTV feature. • Mode — Select the appropriate mode according to your ISP. You may need to configure different settings according to the mode you choose. •…
-
Page 33
Chapter 4 Configure the Router in Wireless Router Mode 1. Tick the Enable checkbox. 2. Enter the starting and ending IP addresses in the IP Address Pool. 3. Enter other parameters if the ISP offers. The Default Gateway is automatically filled in and is the same as the LAN IP address of the router. -
Page 34: Dynamic Dns
Chapter 4 Configure the Router in Wireless Router Mode • To check the DHCP client list: 1. Visit http://tplinkwifi.net, and log in with the password you set for the router. 2. Go to Advanced > Network > DHCP Server and locate the DHCP Client List section.
-
Page 35: Static Routing
Chapter 4 Configure the Router in Wireless Router Mode 4. Enter the Username for your DDNS account. 5. Enter the Password for your DDNS account. 6. Enter the Domain Name you received from dynamic DNS service provider here. 7. If your service provider is NO-IP, select WAN IP binding to ensure that the domain name is bound to the WAN IP of this router.
-
Page 36
Chapter 4 Configure the Router in Wireless Router Mode Router B Router A Company’s server WAN: 172.30.30.100 LAN: 192.168.0.1 LAN: 192.168.0.2 172.30.30.1 Switch 192.168.0.100 How can I do that? 1 Change the routers’ LAN IP addresses to two different IP addresses on the same subnet. -
Page 37: Wireless
Chapter 4 Configure the Router in Wireless Router Mode router’s IP which sends out data. In the example, the data packets will be sent to the LAN port of Router B and then to the Server, so the default gateway should be 192.168.0.2.
-
Page 38: Guest Network
Chapter 4 Configure the Router in Wireless Router Mode • Security — Select an option from the Security drop-down list. • None — No security. It is highly recommend you enable the wireless security to protect your wireless network from unauthorized access. •…
-
Page 39: Wireless Schedule
Chapter 4 Configure the Router in Wireless Router Mode Create a network name for your guest network. Select the Security type and create the Password of the guest network. Click SAVE. Now you guests can access your guest network using the SSID and password you set! •…
-
Page 40: Wps
Chapter 4 Configure the Router in Wireless Router Mode 2. Go to Advanced > Wireless > Wireless Schedule. 3. Enable the Wireless Schedule function. 4. Click tp specify a wireless off period during which you need the wireless off automatically, and click SAVE. Note: •…
-
Page 41
Chapter 4 Configure the Router in Wireless Router Mode 3. Follow one of the following three methods to connect your client device to the router’s Wi-Fi network. Method ONE: Using a PIN • Connects via the Client’s PIN 1. Keep the WPS Status as Enabled and select Client’s… -
Page 42: Aditional Wireless Settings
Chapter 4 Configure the Router in Wireless Router Mode Method TWO: Push the WPS Button Click Start on the screen. Within two minutes, press the WPS button on your device. Device-(XX-XX-XX-XX-XX-XX) Connected message should appear on the screen and the LED should change from blinking to solid on, indicating successful WPS connection.
-
Page 43: Nat Forwarding
LAN and realize some specific functions. The TP-Link router includes four forwarding rules. If two or more rules are set, the priority of implementation from high to low is Port Forwarding, Port Triggering, UPNP and DMZ.
-
Page 44
Chapter 4 Configure the Router in Wireless Router Mode Port Forwarding can be used to set up public services in your local network, such as HTTP, FTP, DNS, POP3/SMTP and Telnet. Different service uses different service port. Port 80 is used in HTTP service, port 21 in FTP service, port 25 in SMTP service and port 110 in POP3 service. -
Page 45: Port Triggering
Chapter 4 Configure the Router in Wireless Router Mode 5 Click VIEW COMMON SERVICES and select HTTP. The External Port, Internal Port Protocol will be automatically filled in. 6 Click VIEW CONNECTED DEVICES and select your home PC. The Device IP Address will be automatically filled in.
-
Page 46: Dmz
Chapter 4 Configure the Router in Wireless Router Mode 5. Click SAVE. Note: • You can add multiple port triggering rules as needed. • The triggering ports can not be overlapped. • If the application you need is not listed in the Common Services list, please enter the parameters manually.
-
Page 47: Upnp
Chapter 4 Configure the Router in Wireless Router Mode How can I do that? 1 Assign a static IP address to your PC, for example 192.168.0.100. 2 Visit http://tplinkwifi.net, and log in with the password you set for the router. 3 Go to Advanced >…
-
Page 48: Parental Controls
Chapter 4 Configure the Router in Wireless Router Mode Xbox Router If necessary, you can follow the steps to change the status of UPnP. 1. Visit http://tplinkwifi.net, and log in with the password you set for the router. 2. Go to Forwarding >…
-
Page 49
Chapter 4 Configure the Router in Wireless Router Mode 2. Go to Advancec > Parental Controls. 3. Click to create a profile for a family member. 4. Add basic profile information. 1 ) Enter a Name for the profile to make it easier to identify. 2 ) Under Devices, click 3 ) Select the devices that belong to this family member. -
Page 50
Chapter 4 Configure the Router in Wireless Router Mode 1 ) Enter the key word of the website that you want to block. Click if want to block multiple websites. 2 ) Click NEXT. 6 Set time restrictions on internet access. -
Page 51: Qos
Chapter 4 Configure the Router in Wireless Router Mode 1 ) Enable Time Limits on Monday to Friday and Saturday & Sunday then set the allowed online time to 2 hours each day. 2 ) Enable Bed Time on School Nights and use the up/down arrows or enter times in the fields.
-
Page 52: Security
Chapter 4 Configure the Router in Wireless Router Mode Done! You can now enjoy playing games without lag on your computer for the next 2 hours. Security This function allows you to protect your home network from cyber attacks and unauthorized users by implementing these network security functions.
-
Page 53: Access Control
Chapter 4 Configure the Router in Wireless Router Mode 4 7 2 Access Control Access Control is used to block or allow specific client devices to access your network (via wired or wireless) based on a list of blocked devices (Blacklist) or a list of allowed devices (Whitelist).
-
Page 54
Chapter 4 Configure the Router in Wireless Router Mode 2 ) Add devices to the whitelist. • Add connected devices Click Select From Device List and select the devices you want to be allowed. • Add unconnected devices Click Add Manually and enter the Device Name MAC Address… -
Page 55: Ip & Mac Binding
Chapter 4 Configure the Router in Wireless Router Mode Done! Now you can block or allow specific client devices to access your network (via wired or wireless) using the Blacklist or Whitelist. 4 7 3 IP & MAC Binding IP & MAC Binding, namely, ARP (Address Resolution Protocol) Binding, is used to bind network device’s IP address to its MAC address.
-
Page 56: Translate Address And Port By Alg
“control/data” protocols: FTP, TFTP, H323 etc. Enabling ALG is recommended. Visit http://tplinkmodem.net, and log in with the password or your TP-Link ID. Go to Advanced >…
-
Page 57: Ipv6
Chapter 4 Configure the Router in Wireless Router Mode • L2TP Pass-through: If enabled, it allows Layer 2 Point-to-Point sessions to be tunneled through an IP network and passed through the router. • IPSec Pass-through: If enabled, it allows IPSec (Internet Protocol Security) to be tunneled through an IP network and passed through the router.
-
Page 58
Chapter 4 Configure the Router in Wireless Router Mode Normal: The default connection type. 1 ) Configure the WAN settings. 2 ) Configure the LAN settings. Fill in Address Prefix provided by your ISP. 3 ) Click SAVE. -
Page 59
Chapter 4 Configure the Router in Wireless Router Mode PPPoE: Select this type if your ISP uses PPPoEv6, and provides a username and password. 1 ) Configure the WAN settings. 2 ) Configure the LAN settings. Fill in Address Prefix provided by your ISP. -
Page 60
Chapter 4 Configure the Router in Wireless Router Mode 3. Tunnel 6to4: Select this type if your ISP uses 6 to 4 deployment fort assigning address. 1 ) Configure the WAN settings. 2 ) Configure the LAN settings. • If you select Pass-Through (Bridge): Click SAVE. -
Page 61: System
4 10 1 Firmware Upgrade TP-Link is dedicated to improving and richening the product features, giving users a better network experience. We will release the latest firmware at TP-Link official website www.tp-link.com. You can download the lastest firmware file from the…
-
Page 62: Change Password
Chapter 4 Configure the Router in Wireless Router Mode • To restore configuration settings: 1. Click BROWSE to locate the backup configuration file stored in your computer, and click RESTORE. 2. Wait a few minutes for the restoring and rebooting. •…
-
Page 63: Local Management
Chapter 4 Configure the Router in Wireless Router Mode 4. Use the new password for future logins. 4 10 4 Local Management 1. Visit http://tplinkwifi.net, and log in with the password you set for the router. 2. Go to Advanced >…
-
Page 64: Remote Management
Chapter 4 Configure the Router in Wireless Router Mode 3. Click VIEW CONNECTED DEVICES and select the device to manage the router from the Connected Devices list, or enter the MAC address of the device manually. 4. Click SAVE. 4 10 5 Remote Management 1.
-
Page 65: System Log
Chapter 4 Configure the Router in Wireless Router Mode Tips: • You can find the WAN IP address of the router on Network Map > Internet. • The router’s WAN IP is usually a dynamic IP. Please refer to Dynamic DNS if you want to log in to the router through a domain name.
-
Page 66: Diagnostic
Chapter 4 Configure the Router in Wireless Router Mode 3. Click SAVE TO LOCAL to save the system logs to a local disk. 4 10 7 Diagnostic Diagnostic is used to test the connectivity between the router and the host or other network devices.
-
Page 67: Time Settings
Chapter 4 Configure the Router in Wireless Router Mode • Tracert is used to display the route (path) your router has passed to reach the tested host, and measure transit delays of packets across an Internet Protocol network. 2 ) Enter the IP Address Domain Name of the tested host.
-
Page 68
Chapter 4 Configure the Router in Wireless Router Mode • To set System Time: 1. Select the way in which the router gets its time: Get from Internet, Get from Managing Device, Manually. 2. Select your local Time Zone. 3. Enter the address or domain of the NTP Server 1 NTP Server 4. -
Page 69: Reboot
Chapter 4 Configure the Router in Wireless Router Mode 4 10 9 Reboot Some settings of the router will take effect only after rebooting, and the system will reboot automatically. You can also reboot the router to clear cache and enhance running performance.
-
Page 70
Chapter 4 Configure the Router in Wireless Router Mode 4. Specify the LED off time, and the LED will be off during this period every day. Note: The effective LED off time is based on the time of the router. You can go to Advanced >… -
Page 71: Chapter 5 Configure The Router In Wisp Mode
Chapter Configure the Router in WISP Mode This chapter presents how to configure the various features of the router working in WISP mode. It contains the following sections: • Operation Mode • Network • Wireless • NAT Forwarding • Parental Controls •…
-
Page 72: Operation Mode
Chapter 5 Configure the Router in WISP Mode Operation Mode 1. Visit http://tplinkwifi.net, and log in with the password you set for the router. 2. Go to Advanced > Operation Mode. 3. Select the working mode as needed and click SAVE. Network 5 2 1 Status…
-
Page 73
Chapter 5 Configure the Router in WISP Mode 2. Go to Advanced > Network > Status. You can view the current status information of the router. • Internet — This field displays the current settings of the internet, and you can configure them on the Advanced >… -
Page 74: Internet
Chapter 5 Configure the Router in WISP Mode • Subnet Mask — The subnet mask associated with the WAN IP address. • Default Gateway — The Gateway currently used is shown here. When you use Dynamic IP as the internet connection type, click Renew Release here to…
-
Page 75
Chapter 5 Configure the Router in WISP Mode • MTU Size — The normal MTU (Maximum Transmission Unit) value for most Ethernet networks is 1500 Bytes. It is not recommended that you change the default MTU size unless required by your ISP. •… -
Page 76
Chapter 5 Configure the Router in WISP Mode • IP Address — Enter the IP address in dotted-decimal notation provided by your ISP. • Subnet Mask — Enter the subnet mask in dotted-decimal notation provided by your ISP. Normally 255.255.255.0 is used as the subnet mask. •… -
Page 77
Chapter 5 Configure the Router in WISP Mode • User Name/Password — Enter the user name and password provided by your ISP. These fields are case-sensitive. • Secondary Connection — It’s available only for PPPoE connection. If your ISP provides an extra connection type, select Dynamic IP Static IP… -
Page 78
Chapter 5 Configure the Router in WISP Mode default value is 15 minutes. If you want the internet connection remains active all the time, enter 0 (zero). Note: Sometimes the connection cannot be terminated although you have specified the Max Idle Time because some applications are visiting the internet continually in the background. -
Page 79
Chapter 5 Configure the Router in WISP Mode • On Demand — In this mode, the internet connection will be terminared automatically after a specified inactivity period (Max Idle Time) and be re- established when you attempt to access the internet again. •… -
Page 80: Mac Clone
Chapter 5 Configure the Router in WISP Mode • VPN Server IP/ Domain Name — Enter the VPN server’s IP address or domain name provided by your ISP. • MTU Size — The default MTU size is “1420” bytes, which is usually fine. It is not recommended that you change the default MTU Size unless required by your ISP.
-
Page 81: Lan
Chapter 5 Configure the Router in WISP Mode • Use Custom MAC Address — Select if your ISP requires you to register the MAC address and enter the correct MAC address in this field, in case the ISP binds the assigned IP address to the specific MAC address. Note: •…
-
Page 82
Chapter 5 Configure the Router in WISP Mode 2. Go to Advanced > Network > DHCP Server and locate the DHCP Server section. 1. Tick the Enable checkbox. 2. Enter the starting and ending IP addresses in the IP Address Pool. -
Page 83: Dynamic Dns
Chapter 5 Configure the Router in WISP Mode • To check the DHCP client list: 1. Visit http://tplinkwifi.net, and log in with the password you set for the router. 2. Go to Advanced > Network > DHCP Server and locate the DHCP Client List section.
-
Page 84: Static Routing
Chapter 5 Configure the Router in WISP Mode 4. Enter the Username for your DDNS account. 5. Enter the Password for your DDNS account. 6. Enter the Domain Name you received from dynamic DNS service provider here. 7. If your service provider is NO-IP, select WAN IP binding to ensure that the domain name is bound to the WAN IP of this router.
-
Page 85
Chapter 5 Configure the Router in WISP Mode Router B Router A Company’s server WAN: 172.30.30.100 LAN: 192.168.0.1 LAN: 192.168.0.2 172.30.30.1 Switch 192.168.0.100 How can I do that? 1 Change the routers’ LAN IP addresses to two different IP addresses on the same subnet. -
Page 86: Wireless
Chapter 5 Configure the Router in WISP Mode router’s IP which sends out data. In the example, the data packets will be sent to the LAN port of Router B and then to the Server, so the default gateway should be 192.168.0.2.
-
Page 87: Guest Network
Chapter 5 Configure the Router in WISP Mode • Security — Select an option from the Security drop-down list. • None — No security. It is highly recommend you enable the wireless security to protect your wireless network from unauthorized access. •…
-
Page 88: Wireless Schedule
Chapter 5 Configure the Router in WISP Mode Create a network name for your guest network. Select the Security type and create the Password of the guest network. Click SAVE. Now you guests can access your guest network using the SSID and password you set! •…
-
Page 89: Wps
Chapter 5 Configure the Router in WISP Mode 1. Visit http://tplinkwifi.net, and log in with the password you set for the router. 2. Go to Advanced > Wireless > Wireless Schedule. 3. Enable the Wireless Schedule function. 4. Click tp specify a wireless off period during which you need the wireless off automatically, and click SAVE.
-
Page 90
Chapter 5 Configure the Router in WISP Mode 3. Follow one of the following three methods to connect your client device to the router’s Wi-Fi network. Method ONE: Using a PIN • Connects vis the Client’s PIN 1. Keep the WPS Status as Enabled and select Client’s… -
Page 91: Aditional Wireless Settings
Chapter 5 Configure the Router in WISP Mode Method TWO: Push the WPS Button Click Start on the screen. Within two minutes, press the WPS button on your device. Device-(XX-XX-XX-XX-XX-XX) Connected message should appear on the screen and the LED should change from blinking to solid on, indicating successful WPS connection.
-
Page 92: Nat Forwarding
LAN and realize some specific functions. The TP-Link router includes four forwarding rules. If two or more rules are set, the priority of implementation from high to low is Port Forwarding, Port Triggering, UPNP and DMZ.
-
Page 93
Chapter 5 Configure the Router in WISP Mode Port Forwarding can be used to set up public services in your local network, such as HTTP, FTP, DNS, POP3/SMTP and Telnet. Different service uses different service port. Port 80 is used in HTTP service, port 21 in FTP service, port 25 in SMTP service and port 110 in POP3 service. -
Page 94: Port Triggering
Chapter 5 Configure the Router in WISP Mode 5 Click VIEW COMMON SERVICES and select HTTP. The External Port, Internal Port Protocol will be automatically filled in. 6 Click VIEW CONNECTED DEVICES and select your home PC. The Device IP Address will be automatically filled in.
-
Page 95: Dmz
Chapter 5 Configure the Router in WISP Mode 5. Click SAVE. Note: • You can add multiple port triggering rules as needed. • The triggering ports can not be overlapped. • If the application you need is not listed in the Common Services list, please enter the parameters manually.
-
Page 96: Upnp
Chapter 5 Configure the Router in WISP Mode How can I do that? 1 Assign a static IP address to your PC, for example 192.168.0.100. 2 Visit http://tplinkwifi.net, and log in with the password you set for the router. 3 Go to Advanced >…
-
Page 97: Parental Controls
Chapter 5 Configure the Router in WISP Mode Xbox Router If necessary, you can follow the steps to change the status of UPnP. 1. Visit http://tplinkwifi.net, and log in with the password you set for the router. 2. Go to Forwarding >…
-
Page 98
Chapter 5 Configure the Router in WISP Mode 2. Go to Advancec > Parental Controls. 3. Click to create a profile for a family member. 4. Add basic profile information. 1 ) Enter a Name for the profile to make it easier to identify. 2 ) Under Devices, click 3 ) Select the devices that belong to this family member. -
Page 99
Chapter 5 Configure the Router in WISP Mode 1 ) Enter the key word of the website that you want to block. Click if want to block multiple websites. 2 ) Click NEXT. 6 Set time restrictions on internet access. -
Page 100: Security
Chapter 5 Configure the Router in WISP Mode 1 ) Enable Time Limits on Monday to Friday and Saturday & Sunday then set the allowed online time to 2 hours each day. 2 ) Enable Bed Time on School Nights and use the up/down arrows or enter times in the fields.
-
Page 101
Chapter 5 Configure the Router in WISP Mode I want to: Block or allow specific client devices to access my network (via wired or wireless). How can I do that? 1. Visit http://tplinkwifi.net, and log in with the password you set for the router. 2. -
Page 102
Chapter 5 Configure the Router in WISP Mode 2 ) Add devices to the whitelist. • Add connected devices Click Select From Device List and select the devices you want to be allowed. • Add unconnected devices Click Add Manually and enter the Device Name MAC Address… -
Page 103: Ip & Mac Binding
Chapter 5 Configure the Router in WISP Mode Done! Now you can block or allow specific client devices to access your network (via wired or wireless) using the Blacklist or Whitelist. 5 6 3 IP & MAC Binding IP & MAC Binding, namely, ARP (Address Resolution Protocol) Binding, is used to bind network device’s IP address to its MAC address.
-
Page 104: Ipv6
Chapter 5 Configure the Router in WISP Mode To add a binding entry: 1 ) Click in the Binding List section. 2 ) Click VIEW CONNECTED DEVICES and select the device you want to bind. Or enter the MAC Address IP Address that you want to bind.
-
Page 105
Chapter 5 Configure the Router in WISP Mode 2 ) Configure the LAN settings. Fill in Address Prefix provided by your ISP. 3 ) Click SAVE. PPPoE: Select this type if your ISP uses PPPoEv6, and provides a username and password. -
Page 106
Chapter 5 Configure the Router in WISP Mode 2 ) Configure the LAN settings. Fill in Address Prefix provided by your ISP. 3. Tunnel 6to4: Select this type if your ISP uses 6 to 4 deployment fort assigning address. 1 ) Configure the WAN settings. -
Page 107: System
Pass-Through (Bridge): Click SAVE. No configuration is required. System 5 8 1 Firmware Upgrade TP-Link is dedicated to improving and richening the product features, giving users a better network experience. We will release the latest firmware at TP-Link official website…
-
Page 108: Backup & Restore
1. Download the latest firmware file for the router from our website www.tp-link.com. 2. Visit http://tplinkwifi.net, and log in with the password you set for the router. 3. Go to Advanced >…
-
Page 109: Change Password
Chapter 5 Configure the Router in WISP Mode • To reset the router to factory default settings: 1. Click FACTORY RESTORE to reset the router. 2. Wait a few minutes for the restoring and rebooting. Note: • During the resetting process, do not turn off or reset the router. •…
-
Page 110
Chapter 5 Configure the Router in WISP Mode 2. Go to Advanced > System > Administration, and focus on the Local Management section. • Allow all LAN connected devices to manage the router: Select All Devices Local Managers. • Allow specific devices to manage the router: 1. -
Page 111: Remote Management
Chapter 5 Configure the Router in WISP Mode 5 8 5 Remote Management 1. Visit http://tplinkwifi.net, and log in with the password you set for the router. 2. Go to Advanced > System > Administration, and focus on the Remote Management section.
-
Page 112: System Log
Chapter 5 Configure the Router in WISP Mode • Allow a specific device to manage the router remotely: 1. Tick the Enable checkbox of Remote Management. 2. Keep the HTTP port as default setting (recommended) or enter a value between 1024 and 65535.
-
Page 113: Diagnostic
Chapter 5 Configure the Router in WISP Mode 3. Click SAVE TO LOCAL to save the system logs to a local disk. 5 8 7 Diagnostic Diagnostic is used to test the connectivity between the router and the host or other network devices.
-
Page 114: Time Settings
Chapter 5 Configure the Router in WISP Mode • Tracert is used to display the route (path) your router has passed to reach the tested host, and measure transit delays of packets across an Internet Protocol network. 2 ) Enter the IP Address Domain Name of the tested host.
-
Page 115
Chapter 5 Configure the Router in WISP Mode • To set System Time: 1. Select the way in which the router gets its time: Get from Internet, Get from Managing Device, Manually. 2. Select your local Time Zone. 3. Enter the address or domain of the NTP Server 1 NTP Server 4. -
Page 116: Reboot
Chapter 5 Configure the Router in WISP Mode 5 8 9 Reboot Some settings of the router will take effect only after rebooting, and the system will reboot automatically. You can also reboot the router to clear cache and enhance running performance.
-
Page 117
Chapter 5 Configure the Router in WISP Mode 4. Specify the LED off time, and the LED will be off during this period every day. Note: The effective LED off time is based on the time of the router. You can go to Advanced >… -
Page 118: Chapter 6 Configure The Router In Access Point Mode
Chapter Configure the Router in Access Point Mode This chapter presents how to configure the various features of the router working as an access point. It contains the following sections: • Operation Mode • • Wireless • Firmware Upgrade • Backup &…
-
Page 119: Operation Mode
Chapter 6 Configure the Router in Access Point Mode Operation Mode 1. Visit http://tplinkwifi.net, and log in with the password you set for the router. 2. Go to System > Operation Mode. 3. Select the working mode as needed and click SAVE. 1.
-
Page 120: Wireless
Chapter 6 Configure the Router in Access Point Mode 3. Select your IP type. • Dynamic IP — Your device will get its IP address from the host router. • Dynamic IP — You need to specify the IP Address (factory default — 192.168.0.1), Subnet Mask (factory default — 255.255.255.0) and…
-
Page 121: Guest Network
Chapter 6 Configure the Router in Access Point Mode • 2.4GHz — Select this checkbox to enable the 2.4GHz wireless network. • Network Name (SSID) — Enter a value of up to 32 characters. The same Name (SSID) must be assigned to all wireless devices in your network. •…
-
Page 122: Wireless Schedule
Chapter 6 Configure the Router in Access Point Mode Create a network name for your guest network. Select the Security type and create the Password of the guest network. Click SAVE. Now you guests can access your guest network using the SSID and password you set! 6 3 3 Wireless Schedule…
-
Page 123: Wps
Chapter 6 Configure the Router in Access Point Mode Note: • The effective wireless schedule is based on the time of the router. You can go to Advanced > System > Time to modify the time. • The wireless network will be automatically turned on after the time period you set. 6 3 4 WPS (Wi-Fi Protected Setup) can help you to quickly and securely connect to a network.
-
Page 124: Aditional Wireless Settings
Chapter 6 Configure the Router in Access Point Mode 2. Enter the PIN of your device and click CONNECT. Then your device will get connected to the router. • Connects via the Router’s PIN 1. Keep the WPS Status as Enabled and select Router’s…
-
Page 125
Chapter 6 Configure the Router in Access Point Mode 3. Configure the advanced settings of your wireless network and click Save. Note: If you are not familiar with the setting items on this page, it’s strongly recommended to keep the provided default values; otherwise it may result in lower wireless network performance. -
Page 126: Firmware Upgrade
Configure the Router in Access Point Mode Firmware Upgrade TP-Link is dedicated to improving and richening the product features, giving users a better network experience. We will release the latest firmware at TP-Link official website www.tp-link.com. You can download the lastest firmware file from the…
-
Page 127: Administration
Chapter 6 Configure the Router in Access Point Mode 2. Wait a few minutes for the restoring and rebooting. • To reset the router to factory default settings: 1. Click FACTORY RESTORE to reset the router. 2. Wait a few minutes for the restoring and rebooting. Note: •…
-
Page 128: Local Management
Chapter 6 Configure the Router in Access Point Mode 6 6 2 Local Management 1. Visit http://tplinkwifi.net, and log in with the password you set for the router. 2. Go to System > Administration, and focus on the Local Management section.
-
Page 129: System Log
Chapter 6 Configure the Router in Access Point Mode System Log 1. Visit http://tplinkwifi.net, and log in with the password you set for the router. 2. Go to System > System Log, and you can view the logs of the router. 3.
-
Page 130
Chapter 6 Configure the Router in Access Point Mode 3. Enter the information: 1 ) Choose Ping Tracert as the diagnostic tool to test the connectivity; • Ping is used to test the connectivity between the router and the tested host, and measure the round-trip time. -
Page 131: Time Settings
Chapter 6 Configure the Router in Access Point Mode Time Settings This page allows you to set the time manually or to configure automatic time synchronization. The router can automatically update the time from an NTP server via the internet. 1.
-
Page 132: Reboot
Chapter 6 Configure the Router in Access Point Mode 2. Select the start time from the drop-down list in the Start fields. 3. Select the end time from the drop-down list in the fields. 4. Click SAVE. Note: This setting will be used for some time-based functions such as firewall. You must specify your time zone once you log in to the router successfully;…
-
Page 133: Led Control
Chapter 6 Configure the Router in Access Point Mode 6 11 LED Control The LED of the router indicates its activities and status. You can enable the Night Mode feature to specify a time period during which the LED is off. 1.
-
Page 134: Chapter 7 Configure The Router In Range Extender Mode
Chapter Configure the Router in Range Extender Mode This chapter presents how to configure the various features of the router working as a range extender. It contains the following sections: • Operation Mode • Wireless • Firmware Upgrade • Backup & Restore •…
-
Page 135: Operation Mode
Chapter 7 Configure the Router in Range Extender Mode Operation Mode 1. Visit http://tplinkwifi.net, and log in with the password you set for the router. 2. Go to System > Operation Mode. 3. Select the working mode as needed and click SAVE. Wireless 7 2 1 Connect to Host Network…
-
Page 136: Customize Extended Network Settings
Chapter 7 Configure the Router in Range Extender Mode 2. Go to Wireless and locate the Connect to Host Network section. 3. Click Wi-Fi SCANNER to and select your host network. Then Host SSID Address will be automatically filled in. 4.
-
Page 137: Firmware Upgrade
Configure the Router in Range Extender Mode Firmware Upgrade TP-Link is dedicated to improving and richening the product features, giving users a better network experience. We will release the latest firmware at TP-Link official website www.tp-link.com. You can download the lastest firmware file from the…
-
Page 138: Administration
Chapter 7 Configure the Router in Range Extender Mode 2. Wait a few minutes for the restoring and rebooting. • To reset the router to factory default settings: 1. Click FACTORY RESTORE to reset the router. 2. Wait a few minutes for the restoring and rebooting. Note: •…
-
Page 139: Local Management
Chapter 7 Configure the Router in Range Extender Mode 7 5 2 Local Management 1. Visit http://tplinkwifi.net, and log in with the password you set for the router. 2. Go to System > Administration, and focus on the Local Management section.
-
Page 140: System Log
Chapter 7 Configure the Router in Range Extender Mode System Log 1. Visit http://tplinkwifi.net, and log in with the password you set for the router. 2. Go to System > System Log, and you can view the logs of the router. 3.
-
Page 141
Chapter 7 Configure the Router in Range Extender Mode • To set System Time: 1. Select the way in which the router gets its time: Get from Internet, Get from Managing Device, Manually. 2. Select your local Time Zone. 3. Enter the address or domain of the NTP Server 1 NTP Server 4. -
Page 142: Reboot
Chapter 7 Configure the Router in Range Extender Mode Reboot Some settings of the router will take effect only after rebooting, and the system will reboot automatically. You can also reboot the router to clear cache and enhance running performance. 1.
-
Page 143
Chapter 7 Configure the Router in Range Extender Mode 4. Specify the LED off time, and the LED will be off during this period every day. Note: The effective LED off time is based on the time of the router. You can go to Advanced >… -
Page 144: Faq
Q1 What should I do if I forget my wireless password? The default wireless password is printed on the label of the router. If the password has been altered, please connect your computer to the router using an Ethernet cable and follow the steps below: 1.
-
Page 145
4 ) Click LAN settings and deselect the following three options, and click OK. 5 ) Go to Advanced > Restore advanced settings, and click OK. -
Page 146
• Use another web browser or computer to log in again. • Reset the router to factory default settings and try again. If the login still fails, please contact the technical support. Note: You’ll need to reconfigure the router to surf the internet once the router is reset. Q4 What should I do if I cannot access the internet even though the configuration is finished? Visit http://tplinkwifi.net, and log in to with the password you set for the router. -
Page 147
• Restart the modem and the router. 1 ) Power off your modem and the router, and leave them off for 1 minute. 2 ) Power on your modem first, and wait about 2 minutes. 3 ) Power on the router, and wait another 1 or 2 minutes and check the Internet access. -
Page 148
• Modify the LAN IP address of the router. Note: Most TP-Link routers use 192.168.0.1/192.168.1.1 as their default LAN IP address, it may conflict with the IP range of your existent ADSL modem/router. If so, the router is not able to communicate with your modem and cause you can’t access the Internet. -
Page 149
6 ) Restart the modem and the router. • Please upgrade the firmware of the router. If you’ve tried every method above but cannot access the internet, please contact the technical support. Q5 What should I do if I cannot find my wireless network or I cannot connect to the wireless network? If you fail to find any wireless network, please follow the steps below: •… -
Page 150
2 ) Exit the wireless configuration tool (the TP-Link Utility, for example). 3 ) Select and right click My Computer… -
Page 151
• Windows unable to connect to XXXX / Can not join this network / Taking longer than usual to connect to this network: • Check the wireless signal strength of your network, if it is weak (1~3 bars), please move the router closer and try again. •… -
Page 152
Specifications are subject to change without notice. is a registered trademark of TP-Link Technologies Co., Ltd. Other brands and product names are trademarks or registered trademarks of their respective holders. No part of the specifications may be reproduced in any form or by any means or used to make any derivative such as translation, transformation, or adaptation without permission from TP-Link Technologies Co., Ltd. -
Page 153
OPERATING FREQUENCY (the maximum transmitted power) 2400 MHz -2483.5 MHz (20dBm) EU Declaration of Conformity TP-Link hereby declares that the device is in compliance with the essential requirements and other relevant provisions of directives 2014/53/EU, 2009/125/EC, 2011/65/EU and (EU)2015/863. The original EU declaration of conformity may be found at https://www.tp-link.com/en/ce RF Exposure Information his device meets the EU requirements (2014/53/EU Article 3.1a) on the limitation of… -
Page 154
• 插槽與開口供通風使用,以確保本產品的操作可靠並防止過熱,請勿堵塞或覆蓋開口。 • 請勿將本產品置放於靠近熱源的地方。除非有正常的通風,否則不可放在密閉位置中。 • 請不要私自拆開機殼或自行維修,如產品有故障請與原廠或代理商聯繫。 限用物質含有情況標示聲明書 限用物質及其化學符號 產品元件名 鉛 鎘 汞 六價鉻 多溴聯苯 多溴二苯醚 稱 CrVI PBDE ○ ○ ○ ○ ○ ○ 外殼 ○ ○ ○ ○ ○ ○ 電源供應器 — ○ ○ ○ ○ ○ 備考 1. » 超出 0.1 wt %» 及 » 超出 0.01 wt %» 系指限用物質之百分比含量超出百 分比含量基準值。… -
Page 155
Explanations of the symbols on the product label Symbol Explanation Class II equipment AC voltage DC voltage Polarity of output terminals Indoor use only Energy efficiency Marking RECYCLING This product bears the selective sorting symbol for Waste electrical and electronic equipment (WEEE).
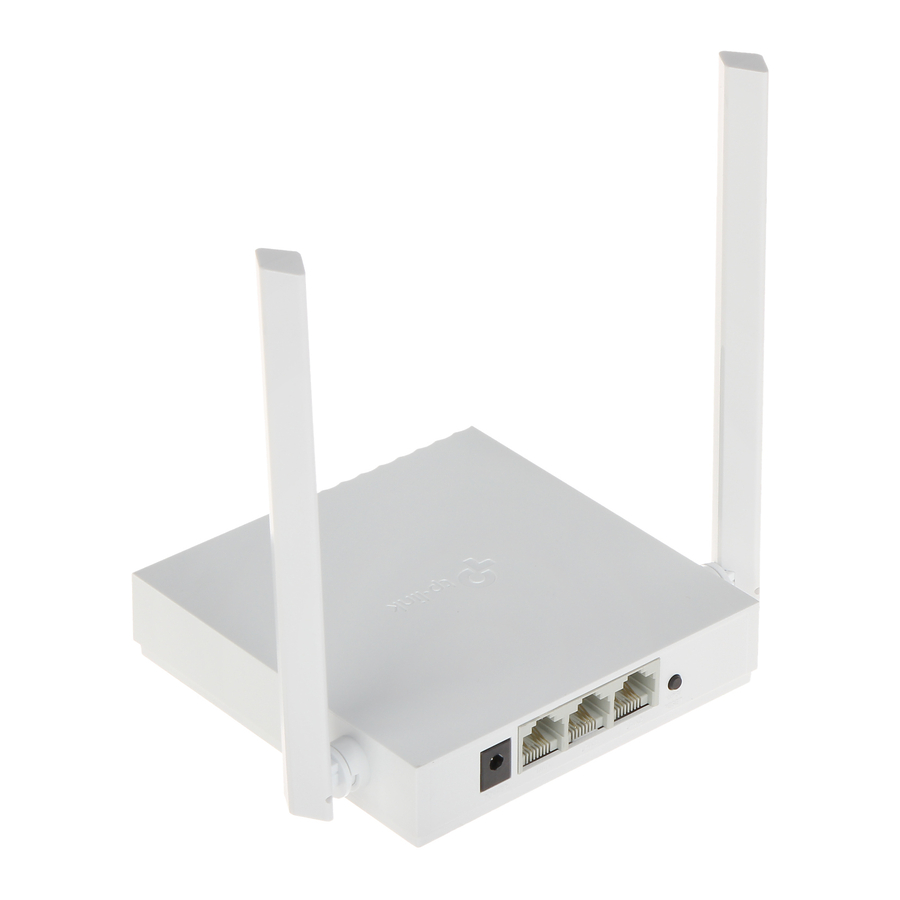
Решил подготовить подробное руководство по подключению и настройке маршрутизатора TP-Link TL-WR820N. Данный маршрутизатор только недавно появился в продаже (на момент написания этой статьи). Если вы читали мой обзор TP-Link TL-WR820N, то наверное заметили, что роутер мне понравился. Отличное решение в соотношении цена/качество. Уверен, что эта модель будет популярной. А это значит, что моя инструкция тоже будет популярной и пригодится многим. Надеюсь, что в комментариях владельцы этого роутера будут оставлять отзывы, делится полезной информацией об этом устройстве, ну и задавать вопросы.
В комплекте с роутером конечно же есть руководство по быстрой настройке. Там показано, как подключить роутер и зайти в настройки. А так же даны ответы на часто задаваемые вопросы. Но весь процесс настройки там не показан. Может это и не нужно, ведь после входа на страницу с настройками TL-WR820N, нас сразу встречает простой и понятный мастер быстрой настройки, с помощью которого буквально в несколько шагов можно выполнить настройку роутера. Но мои инструкции основаны на реальных событиях, так что более информативны 🙂 Так же на этом роутере установлена новая панель управления, а это может вызвать дополнительные неудобства даже у тех пользователей, которые раньше настраивали роутеры от TP-Link. Несмотря на то, что новый веб-интерфейс очень простой и понятный.
Как подключить TP-Link TL-WR820N?
Подключите блок питания к роутеру и включите его в розетку. На роутере должен зеленым цветом гореть индикатор Wi-Fi и оранжевым мигать индикатор WAN (Интернет). Индикатор WAN сразу мигает оранжевым цветом по той причине, что в порт WAN не подключен кабель. Подключите интернет (кабель от провайдера, или модема) в порт WAN. Только смотрите внимательно, не перепутайте порты. Дальше, в зависимости от вашего интернет провайдера может быть два варианта поведения индикатора WAN:
- Он будет гореть оранжевым цветом. Это значит, что роутер кабель видит, но нужно еще настроить подключение к интернету. Интернет через TL-WR820N пока что работать не будет. Но в настройки роутера мы сможем зайти.
- Секунд через 10-30 индикатор WAN загорится зеленым цветом. Это значит, что роутер смог автоматически подключится к интернету. Скорее всего ваш провайдер использует тип подключения «Динамический IP» (DHCP) без привязки по MAC-адресу. Дальше вам нужно будет настроить только Wi-Fi сеть. Так как интернет через роутер уже работает.
Нам нужно подключится к TP-Link TL-WR820N с какого-то устройства, чтобы выполнить настройку через браузер. Лучше всего для этого использовать компьютер, или ноутбуку и подключатся по кабелю.

Напомню, что после подключения на компьютере может быть статус «Без доступа к интернету» (ограничено). Если подключится по кабелю нет возможности (например, у вас ноутбук без LAN-порта, он не работает, или вы будете настраивать с телефона/планшета), то можно установить беспроводное соединение. Просто подключитесь к Wi-Fi сети роутера. Заводское имя сети (SSID) можно посмотреть снизу роутера. По умолчанию сеть открыта (подключение без пароля).

Возможно вы, или кто-то другой уже настраивал роутер и там установлен пароль на Wi-Fi, на страницу с настройками, или заданы какие-то другие ненужные нам параметры, которые могут помешать в процессе настройки. В таком случае нужно сделать сброс настроек.
Чтобы восстановить заводские настройки на TL-WR820N (сделать сброс), нужно включить роутер и на 8-10 секунд зажать кнопку WPS/Reset.

Все три индикатора должны загореться и погаснуть. Отпустите кнопку и подождите, пока роутер загрузится.
Переходим непосредственно к настройке.
Быстрая настройка TP-Link TL-WR820N
В настройки маршрутизатора можно зайти через интернет браузер. Запустите любой браузер (желательно стандартный), в адресной строке наберите адрес http://tplinkwifi.net и перейдите по нему. Если не получается, то посмотрите статьи: как зайти на tplinkwifi.net или как открыть настройки роутера TP-Link. Так же для входа в настройки TL-WR820N можно использовать стандартный IP-адрес 192.168.0.1.
Роутер сразу предложит нам задать пароль для входа (для защиты настроек). Нужно придумать пароль и указать его 2 раза в соответствующих полях. Запишите пароль. Если забудете его, то придется делать Reset (сброс настроек), чтобы попасть в веб-интерфейс.

Сразу запустится мастер быстрой настройки. Он поможет нам быстро задать необходимые параметры. Его, конечно, можно закрыть (нажав на кнопку «Закрыть»), но не советую это делать. Так же в правом верхнем углу можно сменить язык панели управления.
На первом этапе можно попробовать выбрать свою страну, город, интернет-провайдера и тип подключения. Если нужных настроек вы не найдете, то поставьте галочку возле «Я не нашел подходящих настроек».

Выбираем тип подключения к интернету. Все зависит от вашего поставщика интернет услуг. Если не знаете какой выбрать – уточните у поддержки провайдера.
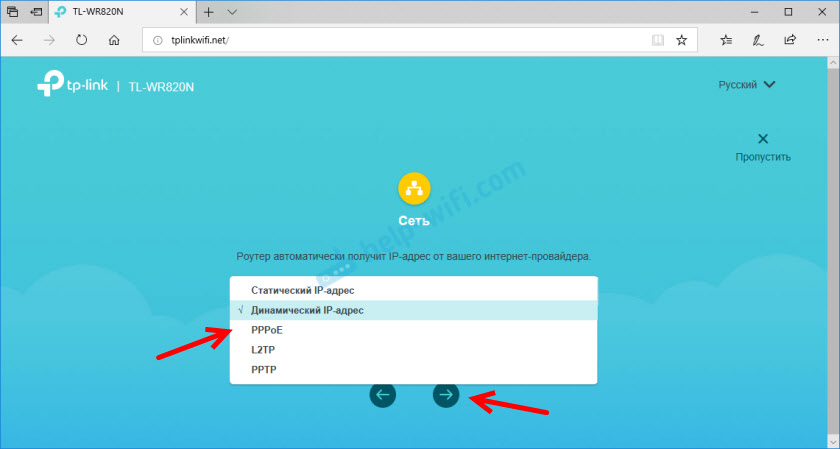
Если у вас подключение через PPPoE, PPTP, или L2TP, то на следующей странице нужно будет указать имя пользователя и пароль. А так же адрес сервера (для PPTP и L2TP). Все эти данные для подключения выдает ваш интернет-провайдер.

Если же «Динамический IP-адрес», то ничего вводить не нужно. Роутер предложит настроить IPTV. Если ваш провайдер предоставляет услугу цифрового телевидения, то можете задать необходимые параметры. Можно выбрать страну для автоматической настройки, настроить мост (указать LAN порт (1, или оба) куда будет подключена IPTV приставка), или же прописать все настройки вручную (VLAN ID). Подробнее о настройке IPTV на TP-Link TL-WR820N можно почитать в статье настройка IPTV на роутерах TP-Link.

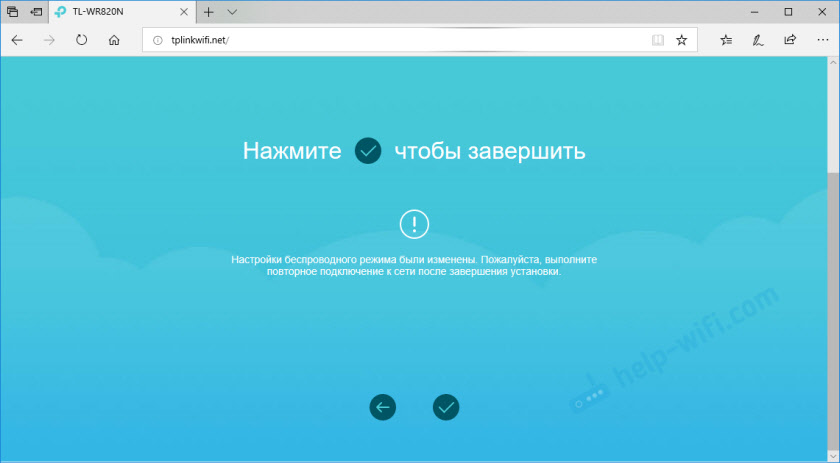
Следующий шаг – настройка беспроводной сети. Тут нужно только сменить заводское имя Wi-Fi сети (SSID) и придумать пароль на Wi-Fi. Этот пароль так же советую записать. Чтобы потом не пришлось восстанавливать пароль своей Wi-Fi сети.

Нажимаем на галочку для завершения настройки и выполняем повторное подключение к Wi-Fi сети (уже с новым именем и паролем). Если вы изначально по Wi-Fi подключались, а не по кабелю.
Автоматически должна открыться панель управления (в том окне, где мы выполняли настройку). Если не откроется – просто зайдите на страницу tplinkwifi.net (может появится запрос пароля, который мы устанавливали в самом начале) заново. Убедитесь, что вы подключены к роутеру.
На вкладке «Устройство» будет отображаться список подключенных к TL-WR820N устройств.
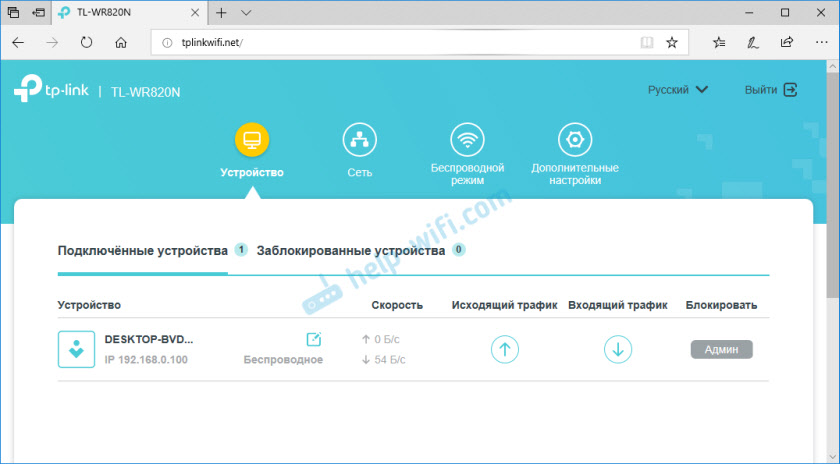
При необходимости можно:
- Заблокировать устройство (после чего оно будет отображаться на вкладке «Заблокированные устройства», где его можно разблокировать).
- Ограничить исходящую и входящую скорость для конкретного устройства.

На вкладке «Сеть» можно изменить основные настройки подключения к интернету.

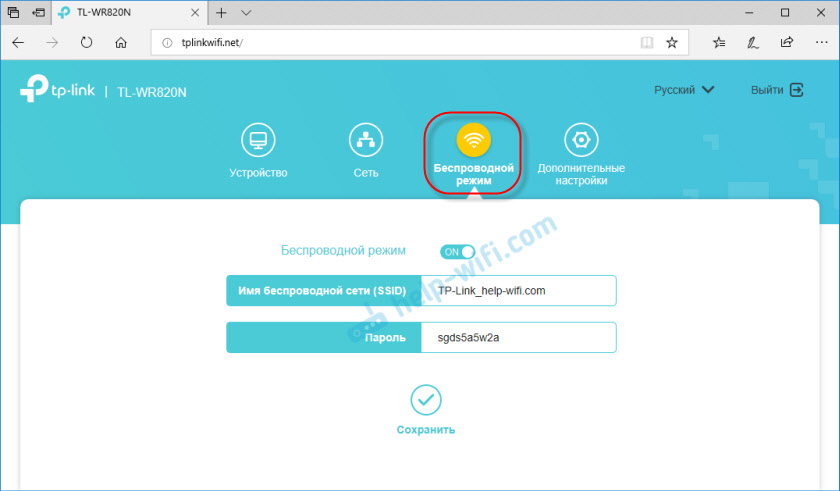
Или изменить основные настройки Wi-Fi в разделе «Беспроводной режим».
Ну и раздел «Дополнительные настройки» с множеством дополнительных настроек. Например, там можно найти расширенные настройки WAN.

Можно настроить гостевую Wi-Fi сеть. Там же можно настроить ограничение скорости для гостевой сети. И даже создать расписание работы гостевой Wi-Fi сети на TL-WR820N.

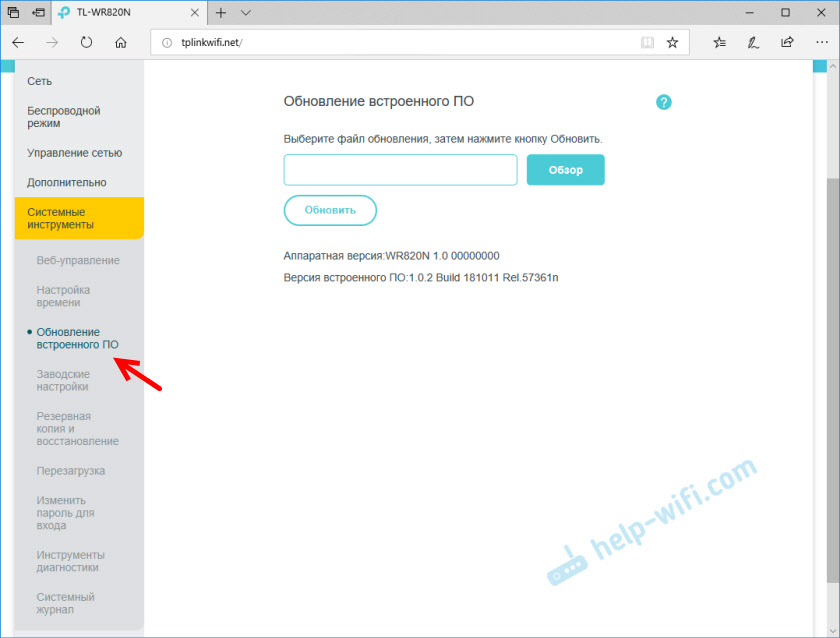
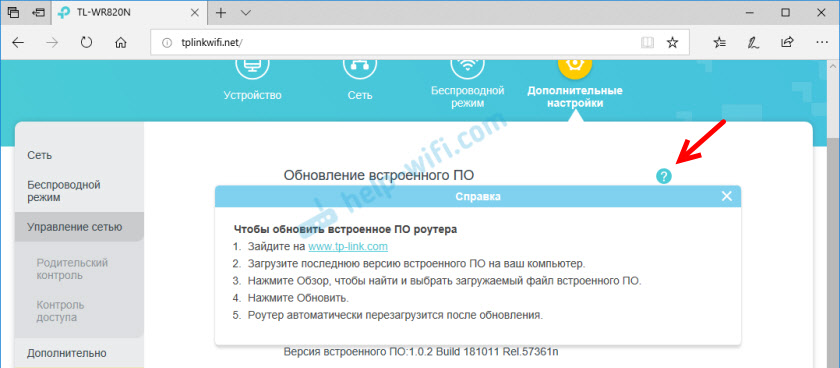
В разделе «Системные инструменты», например, можно обновить прошивку TP-Link TL-WR820N. Для этого скачайте с сайта TP-Link новую версию прошивки строго для этой модели и аппаратной версии (которая указана на наклейке снизу роутера), и обновите ее на вкладке «Обновление встроенного ПО».
Я думаю, что нет необходимости рассматривать каждую страницу веб-интерфейса. Разобраться в настройках очень просто. На каждой странице есть кнопка (?), нажав на которую появится окно с описанием настроек (откроется справка).
Если не получается настроить какую-то функцию, или у вас возникли другие вопросы связанные с этим маршрутизатором, то вы всегда можете задать мне вопрос в комментариях. Всего хорошего!
инструкцияTP-Link TL-WR820N

Quick Installation Guide
Wireless Router
www.tp-link.com
7106508256 REV2.2.1
Specications are subject to change without notice. is a registered trademark of TP-Link
Technologies Co., Ltd. Other brands and product names are trademarks or registered trademarks of
their respective holders.
No part of the specications may be reproduced in any form or by any means or used to make any
derivative such as translation, transformation, or adaptation without permission from TP-Link
Technologies Co., Ltd. Copyright © 2019 TP-Link Technologies Co., Ltd. All rights reserved.
For technical support, the user guide and other information, please visit https://www.tp-link.com/support.
*Image may dier from your actual product.
Посмотреть инструкция для TP-Link TL-WR820N бесплатно. Руководство относится к категории маршрутизаторы (роутеры), 26 человек(а) дали ему среднюю оценку 8.4. Руководство доступно на следующих языках: русский, английский. У вас есть вопрос о TP-Link TL-WR820N или вам нужна помощь? Задайте свой вопрос здесь
Главная
| TP-Link | |
| TL-WR820N | TL-WR820N | |
| маршрутизатор (роутер) | |
| 0845973099695, 6935364053086, 6935364099695 | |
| русский, английский | |
| Руководство пользователя (PDF), Техническая спецификация (PDF) |
WAN подключение
| Ethernet WAN | Да |
| DSL WAN | Нет |
| Слот для SIM-карты | Нет |
| Совместимость с 3G / 4G USB модемом | Нет |
Характеристики беспроводной LAN
| Wi-Fi диапазоны | Однодиапазонный (2,4Ггц) |
| Основной стандарт Wi-Fi | Wi-Fi 4 (802.11n) |
| Скорость передачи данных WLAN (макс) | 300 Мбит/с |
| Wi-Fi стандартов | 802.11b, 802.11g, Wi-Fi 4 (802.11n) |
| Скорость передачи данных WLAN (первая полоса) | 11 Мбит/с |
| Скорость передачи данных WLAN (вторая полоса) | 54 Мбит/с |
| Скорость передачи данных WLAN (третья полоса) | 300 Мбит/с |
Сеть
| Подключение Ethernet | Да |
| Тип LAN Ethernet интерфейса | Быстрый Ethernet |
| Скорость передачи данных Ethernet LAN | 10, 100 Мбит/с |
| Свивка кабеля | 10/100Base-T(X) |
| Стандарты сети | IEEE 802.11b, IEEE 802.11g, IEEE 802.11n |
| Переадресация портов | Да |
| Статический роутинг | Да |
| Роутинг на основе политик | Да |
| Динамический DNS | Да |
Порты и интерфейсы
| USB порт | Нет |
| Количество портов Ethernet LAN ( RJ-45) | 3 |
| Гнездо входа постоянного тока (DC) | Да |
| Слот(ы) для карты памяти | Нет |
Мобильная сеть
Безопасность
| Гостевой доступ | Да |
| Алгоритмы шифрования данных | WEP, WPA, WPA2, WPA2-PSK |
| Брандмауэр | Да |
| Фильтрация MAC-адресов | Да |
| Фильтрация | Да |
| Фильтрация URL-адресов | Да |
| Фильтрация по IP адресу | Да |
| Инспекция пакетов с хранением состояния (SPI) | Да |
| Поддержка DMZ | Да |
Протоколы
| Протокол доступа | Access Control, Local Management, Remote Management |
| DHCP клиент | Да |
| DHCP сервер | Да |
| Universal Plug and Play (UPnP) | Да |
Антена
| Конструкция антенны | Внешний |
| Коэффициент усиления антенны (макс) | 5 dBi |
Характеристики управления
| Управление через веб-интерфейс | Да |
| Кнопка сброса установок | Да |
| WPS кнопки | Да |
Дизайн
| Тип продукта | Настольный маршрутизатор |
| Цвет товара | Белый |
| Светодиодные индикаторы | Activity, LAN, WLAN |
Свойства
| Plug & Play | Да |
| Обновляемое встроенное ПО | Да |
| Сертификация | CE, RoHS |
Энергопитание
| Тип источника питания | Постоянный ток |
| Выходное напряжение | 5 V |
| Ток на выходе | 0.6 A |
Вес и размеры
| Ширина | 154 mm |
| Глубина | 114 mm |
| Высота | 36 mm |
Условия эксплуатации
| Диапазон температур при эксплуатации | 0 — 40 °C |
| Диапазон температур при хранении | -40 — 70 °C |
| Диапазон относительной влажности при эксплуатации | 10 — 90 % |
| Диапазон относительной влажности при хранении | 5 — 90 % |
Данные об упаковке
| Количество продуктов в комплекте | 1 шт |
Содержимое упаковки
| Сетевой адаптер в комплекте | Да |
| Поставляемые кабели | LAN (RJ-45) |
| Краткое руководство по установке | Да |
Системные требования
| Поддерживаемые операционные системы Windows | Windows 10, Windows 2000, Windows 7, Windows 8, Windows 8.1, Windows 98SE, Windows NT, Windows Vista, Windows XP |
| Поддерживаемые операционные системы Linux | Да |
| Совместимость с Mac | Да |
показать больше
Не можете найти ответ на свой вопрос в руководстве? Вы можете найти ответ на свой вопрос ниже, в разделе часто задаваемых вопросов о TP-Link TL-WR820N.
В чем разница между роутером и модемом?
Модем обеспечивает подключение к Интернету через интернет-провайдера. Затем маршрутизатор распределяет через Интернет сигнал на подключенные к маршрутизатору устройства.
От чего зависит скорость загрузки в Интернете?
Скорость загрузки в Интернете зависит от вашего типа соединения. Если ваша скорость составляет 25 Мб/сек, это означает, что теоретически скорость загрузки будет составлять 25 Мб/сек.
Вредно ли Wi-Fi-излучение?
Wi-Fi — радиочастотный сигнал в виде неионизирующего излучения. Это излучение не может повредить клетки и ткани и, следовательно, не наносит вреда здоровью.
Какие сертификаты TP-Link TL-WR820N имеет?
TP-Link TL-WR820N имеет следующие сертификаты: CE, RoHS.
Какая высота TP-Link TL-WR820N?
TP-Link TL-WR820N имеет высоту 36 mm.
Какая ширина TP-Link TL-WR820N?
TP-Link TL-WR820N имеет ширину 154 mm.
Какая толщина TP-Link TL-WR820N?
TP-Link TL-WR820N имеет толщину 114 mm.
Инструкция TP-Link TL-WR820N доступно в русский?
Да, руководствоTP-Link TL-WR820N доступно врусский .
Не нашли свой вопрос? Задайте свой вопрос здесь
![]()
User Guide
300Mbps Wi-Fi Router TL-WR820N
REV2.0.0 1910012701
Contents
About This Guide . . . . . . . . . . . . . . . . . . . . . . . . . . . . . . . . . . . . . . . . . . . . . . . . . . . . . 1
Chapter 1. Get to Know About Your Router . . . . . . . . . . . . . . . . . . . . . . . . . . . 2
1. 1. Product Overview . . . . . . . . . . . . . . . . . . . . . . . . . . . . . . . . . . . . . . . . . . . . . . . . . . . . . . . . . . . .3 1. 2. Panel Layout . . . . . . . . . . . . . . . . . . . . . . . . . . . . . . . . . . . . . . . . . . . . . . . . . . . . . . . . . . . . . . . . .3 1. 2. 1.Top View. . . . . . . . . . . . . . . . . . . . . . . . . . . . . . . . . . . . . . . . . . . . . . . . . . . . . . . . . . . . . . .3 1. 2. 2.The Back Panel . . . . . . . . . . . . . . . . . . . . . . . . . . . . . . . . . . . . . . . . . . . . . . . . . . . . . . . .4
Chapter 2. Connect to the Internet. . . . . . . . . . . . . . . . . . . . . . . . . . . . . . . . . . . 6
2. 1. Position Your Router. . . . . . . . . . . . . . . . . . . . . . . . . . . . . . . . . . . . . . . . . . . . . . . . . . . . . . . . . .7 2. 2. Connect to the Internet . . . . . . . . . . . . . . . . . . . . . . . . . . . . . . . . . . . . . . . . . . . . . . . . . . . . . . 7 2. 2. 1.Wireless Router Mode . . . . . . . . . . . . . . . . . . . . . . . . . . . . . . . . . . . . . . . . . . . . . . . . .8 2. 2. 2.Access Point Mode . . . . . . . . . . . . . . . . . . . . . . . . . . . . . . . . . . . . . . . . . . . . . . . . . . 10 2. 2. 3.Range Extender Mode . . . . . . . . . . . . . . . . . . . . . . . . . . . . . . . . . . . . . . . . . . . . . . . 11 2. 2. 4.WISP Mode . . . . . . . . . . . . . . . . . . . . . . . . . . . . . . . . . . . . . . . . . . . . . . . . . . . . . . . . . . 13
Chapter 3. Log In to the Router . . . . . . . . . . . . . . . . . . . . . . . . . . . . . . . . . . . . . 14
Chapter 4. Configure the Router in Wireless Router Mode. . . . . . . . . . . 16
4. 1. Operation Mode. . . . . . . . . . . . . . . . . . . . . . . . . . . . . . . . . . . . . . . . . . . . . . . . . . . . . . . . . . . . 17 4. 2. Network. . . . . . . . . . . . . . . . . . . . . . . . . . . . . . . . . . . . . . . . . . . . . . . . . . . . . . . . . . . . . . . . . . . . 17 4. 2. 1.Status . . . . . . . . . . . . . . . . . . . . . . . . . . . . . . . . . . . . . . . . . . . . . . . . . . . . . . . . . . . . . . . 17 4. 2. 2.Internet. . . . . . . . . . . . . . . . . . . . . . . . . . . . . . . . . . . . . . . . . . . . . . . . . . . . . . . . . . . . . . 19 4. 2. 3.MAC Clone . . . . . . . . . . . . . . . . . . . . . . . . . . . . . . . . . . . . . . . . . . . . . . . . . . . . . . . . . . 25 4. 2. 4. LAN . . . . . . . . . . . . . . . . . . . . . . . . . . . . . . . . . . . . . . . . . . . . . . . . . . . . . . . . . . . . . . . 26 4. 2. 5. IPTV . . . . . . . . . . . . . . . . . . . . . . . . . . . . . . . . . . . . . . . . . . . . . . . . . . . . . . . . . . . . . . . 26 4. 2. 6. DHCP . . . . . . . . . . . . . . . . . . . . . . . . . . . . . . . . . . . . . . . . . . . . . . . . . . . . . . . . . . . . . . . 27 4. 2. 7.Dynamic DNS. . . . . . . . . . . . . . . . . . . . . . . . . . . . . . . . . . . . . . . . . . . . . . . . . . . . . . . . 29 4. 2. 8.Static Routing . . . . . . . . . . . . . . . . . . . . . . . . . . . . . . . . . . . . . . . . . . . . . . . . . . . . . . . 30
4. 3. Wireless . . . . . . . . . . . . . . . . . . . . . . . . . . . . . . . . . . . . . . . . . . . . . . . . . . . . . . . . . . . . . . . . . . . 32 4. 3. 1.Wireless Settings . . . . . . . . . . . . . . . . . . . . . . . . . . . . . . . . . . . . . . . . . . . . . . . . . . . . 32 4. 3. 2.Guest Network. . . . . . . . . . . . . . . . . . . . . . . . . . . . . . . . . . . . . . . . . . . . . . . . . . . . . . . 33 4. 3. 3.Wireless Schedule . . . . . . . . . . . . . . . . . . . . . . . . . . . . . . . . . . . . . . . . . . . . . . . . . . . 34 4. 3. 4. WPS . . . . . . . . . . . . . . . . . . . . . . . . . . . . . . . . . . . . . . . . . . . . . . . . . . . . . . . . . . . . . . . 35
4. 3. 5.Aditional Wireless Settings. . . . . . . . . . . . . . . . . . . . . . . . . . . . . . . . . . . . . . . . . . . 37
4. 4. NAT Forwarding . . . . . . . . . . . . . . . . . . . . . . . . . . . . . . . . . . . . . . . . . . . . . . . . . . . . . . . . . . . . 38 4. 4. 1.Port Forwarding . . . . . . . . . . . . . . . . . . . . . . . . . . . . . . . . . . . . . . . . . . . . . . . . . . . . . 38 4. 4. 2.Port Triggering. . . . . . . . . . . . . . . . . . . . . . . . . . . . . . . . . . . . . . . . . . . . . . . . . . . . . . . 40 4. 4. 3. DMZ . . . . . . . . . . . . . . . . . . . . . . . . . . . . . . . . . . . . . . . . . . . . . . . . . . . . . . . . . . . . . . . 41 4. 4. 4. UPnP . . . . . . . . . . . . . . . . . . . . . . . . . . . . . . . . . . . . . . . . . . . . . . . . . . . . . . . . . . . . . . . 42
4. 5. Parental Controls. . . . . . . . . . . . . . . . . . . . . . . . . . . . . . . . . . . . . . . . . . . . . . . . . . . . . . . . . . . 43 4. 6. QoS. . . . . . . . . . . . . . . . . . . . . . . . . . . . . . . . . . . . . . . . . . . . . . . . . . . . . . . . . . . . . . . . . . . . . . . . 46 4. 7. Security. . . . . . . . . . . . . . . . . . . . . . . . . . . . . . . . . . . . . . . . . . . . . . . . . . . . . . . . . . . . . . . . . . . . 47 4. 7. 1.Firewall . . . . . . . . . . . . . . . . . . . . . . . . . . . . . . . . . . . . . . . . . . . . . . . . . . . . . . . . . . . . . . 47 4. 7. 2.Access Control . . . . . . . . . . . . . . . . . . . . . . . . . . . . . . . . . . . . . . . . . . . . . . . . . . . . . . 48 4. 7. 3.IP & MAC Binding . . . . . . . . . . . . . . . . . . . . . . . . . . . . . . . . . . . . . . . . . . . . . . . . . . . . 50
4. 8. Translate Address and Port by ALG . . . . . . . . . . . . . . . . . . . . . . . . . . . . . . . . . . . . . . . . . 51 4. 9. IPv6. . . . . . . . . . . . . . . . . . . . . . . . . . . . . . . . . . . . . . . . . . . . . . . . . . . . . . . . . . . . . . . . . . . . . . . . 52 4. 9. 1.IPv6 Status . . . . . . . . . . . . . . . . . . . . . . . . . . . . . . . . . . . . . . . . . . . . . . . . . . . . . . . . . . 52 4. 10. System . . . . . . . . . . . . . . . . . . . . . . . . . . . . . . . . . . . . . . . . . . . . . . . . . . . . . . . . . . . . . . . . . . . . 56 4. 10. 1.Firmware Upgrade . . . . . . . . . . . . . . . . . . . . . . . . . . . . . . . . . . . . . . . . . . . . . . . . . . 56 4. 10. 2.Backup & Restore . . . . . . . . . . . . . . . . . . . . . . . . . . . . . . . . . . . . . . . . . . . . . . . . . . 56 4. 10. 3.Change Password . . . . . . . . . . . . . . . . . . . . . . . . . . . . . . . . . . . . . . . . . . . . . . . . . . 57 4. 10. 4.Local Management . . . . . . . . . . . . . . . . . . . . . . . . . . . . . . . . . . . . . . . . . . . . . . . . . 58 4. 10. 5.Remote Management. . . . . . . . . . . . . . . . . . . . . . . . . . . . . . . . . . . . . . . . . . . . . . . 59 4. 10. 6.System Log . . . . . . . . . . . . . . . . . . . . . . . . . . . . . . . . . . . . . . . . . . . . . . . . . . . . . . . . 60 4. 10. 7.Diagnostic . . . . . . . . . . . . . . . . . . . . . . . . . . . . . . . . . . . . . . . . . . . . . . . . . . . . . . . . . 61 4. 10. 8.Time Settings . . . . . . . . . . . . . . . . . . . . . . . . . . . . . . . . . . . . . . . . . . . . . . . . . . . . . . 62 4. 10. 9.Reboot . . . . . . . . . . . . . . . . . . . . . . . . . . . . . . . . . . . . . . . . . . . . . . . . . . . . . . . . . . . . . 64 4. 10. 10.LED Control . . . . . . . . . . . . . . . . . . . . . . . . . . . . . . . . . . . . . . . . . . . . . . . . . . . . . . . 64
Chapter 5. Configure the Router in WISP Mode . . . . . . . . . . . . . . . . . . . . . 66
5. 1. Operation Mode. . . . . . . . . . . . . . . . . . . . . . . . . . . . . . . . . . . . . . . . . . . . . . . . . . . . . . . . . . . . 67 5. 2. Network. . . . . . . . . . . . . . . . . . . . . . . . . . . . . . . . . . . . . . . . . . . . . . . . . . . . . . . . . . . . . . . . . . . . 67 5. 2. 1.Status . . . . . . . . . . . . . . . . . . . . . . . . . . . . . . . . . . . . . . . . . . . . . . . . . . . . . . . . . . . . . . . 67 5. 2. 2.Internet. . . . . . . . . . . . . . . . . . . . . . . . . . . . . . . . . . . . . . . . . . . . . . . . . . . . . . . . . . . . . . 69 5. 2. 3.MAC Clone . . . . . . . . . . . . . . . . . . . . . . . . . . . . . . . . . . . . . . . . . . . . . . . . . . . . . . . . . . 75 5. 2. 4. LAN . . . . . . . . . . . . . . . . . . . . . . . . . . . . . . . . . . . . . . . . . . . . . . . . . . . . . . . . . . . . . . . 76 5. 2. 5. DHCP . . . . . . . . . . . . . . . . . . . . . . . . . . . . . . . . . . . . . . . . . . . . . . . . . . . . . . . . . . . . . . . 76 5. 2. 6.Dynamic DNS. . . . . . . . . . . . . . . . . . . . . . . . . . . . . . . . . . . . . . . . . . . . . . . . . . . . . . . . 78 5. 2. 7.Static Routing . . . . . . . . . . . . . . . . . . . . . . . . . . . . . . . . . . . . . . . . . . . . . . . . . . . . . . . 79
5. 3. Wireless . . . . . . . . . . . . . . . . . . . . . . . . . . . . . . . . . . . . . . . . . . . . . . . . . . . . . . . . . . . . . . . . . . . 81 5. 3. 1.Wireless Settings . . . . . . . . . . . . . . . . . . . . . . . . . . . . . . . . . . . . . . . . . . . . . . . . . . . . 81
5. 3. 2.Guest Network. . . . . . . . . . . . . . . . . . . . . . . . . . . . . . . . . . . . . . . . . . . . . . . . . . . . . . . 82 5. 3. 3.Wireless Schedule . . . . . . . . . . . . . . . . . . . . . . . . . . . . . . . . . . . . . . . . . . . . . . . . . . . 83 5. 3. 4. WPS . . . . . . . . . . . . . . . . . . . . . . . . . . . . . . . . . . . . . . . . . . . . . . . . . . . . . . . . . . . . . . . 84
5. 3. 5.Aditional Wireless Settings. . . . . . . . . . . . . . . . . . . . . . . . . . . . . . . . . . . . . . . . . . . 86 5. 4. NAT Forwarding . . . . . . . . . . . . . . . . . . . . . . . . . . . . . . . . . . . . . . . . . . . . . . . . . . . . . . . . . . . . 87 5. 4. 1.Port Forwarding . . . . . . . . . . . . . . . . . . . . . . . . . . . . . . . . . . . . . . . . . . . . . . . . . . . . . 87 5. 4. 2.Port Triggering. . . . . . . . . . . . . . . . . . . . . . . . . . . . . . . . . . . . . . . . . . . . . . . . . . . . . . . 89 5. 4. 3. DMZ . . . . . . . . . . . . . . . . . . . . . . . . . . . . . . . . . . . . . . . . . . . . . . . . . . . . . . . . . . . . . . . 90 5. 4. 4. UPnP . . . . . . . . . . . . . . . . . . . . . . . . . . . . . . . . . . . . . . . . . . . . . . . . . . . . . . . . . . . . . . . 91
5. 5. Parental Controls. . . . . . . . . . . . . . . . . . . . . . . . . . . . . . . . . . . . . . . . . . . . . . . . . . . . . . . . . . . 92 5. 6. Security. . . . . . . . . . . . . . . . . . . . . . . . . . . . . . . . . . . . . . . . . . . . . . . . . . . . . . . . . . . . . . . . . . . . 95 5. 6. 1.Firewall . . . . . . . . . . . . . . . . . . . . . . . . . . . . . . . . . . . . . . . . . . . . . . . . . . . . . . . . . . . . . . 95 5. 6. 2.Access Control . . . . . . . . . . . . . . . . . . . . . . . . . . . . . . . . . . . . . . . . . . . . . . . . . . . . . . 95 5. 6. 3.IP & MAC Binding . . . . . . . . . . . . . . . . . . . . . . . . . . . . . . . . . . . . . . . . . . . . . . . . . . . . 98
5. 7. IPv6. . . . . . . . . . . . . . . . . . . . . . . . . . . . . . . . . . . . . . . . . . . . . . . . . . . . . . . . . . . . . . . . . . . . . . . . 99 5. 7. 1.IPv6 Status . . . . . . . . . . . . . . . . . . . . . . . . . . . . . . . . . . . . . . . . . . . . . . . . . . . . . . . . . . 99 5. 8. System . . . . . . . . . . . . . . . . . . . . . . . . . . . . . . . . . . . . . . . . . . . . . . . . . . . . . . . . . . . . . . . . . . . 102 5. 8. 1.Firmware Upgrade . . . . . . . . . . . . . . . . . . . . . . . . . . . . . . . . . . . . . . . . . . . . . . . . . . 102 5. 8. 2.Backup & Restore. . . . . . . . . . . . . . . . . . . . . . . . . . . . . . . . . . . . . . . . . . . . . . . . . . . 103 5. 8. 3.Change Password . . . . . . . . . . . . . . . . . . . . . . . . . . . . . . . . . . . . . . . . . . . . . . . . . . 104 5. 8. 4.Local Management . . . . . . . . . . . . . . . . . . . . . . . . . . . . . . . . . . . . . . . . . . . . . . . . . 104 5. 8. 5.Remote Management . . . . . . . . . . . . . . . . . . . . . . . . . . . . . . . . . . . . . . . . . . . . . . . 106 5. 8. 6.System Log. . . . . . . . . . . . . . . . . . . . . . . . . . . . . . . . . . . . . . . . . . . . . . . . . . . . . . . . . 107 5. 8. 7.Diagnostic. . . . . . . . . . . . . . . . . . . . . . . . . . . . . . . . . . . . . . . . . . . . . . . . . . . . . . . . . . 108 5. 8. 8.Time Settings. . . . . . . . . . . . . . . . . . . . . . . . . . . . . . . . . . . . . . . . . . . . . . . . . . . . . . . 109 5. 8. 9.Reboot . . . . . . . . . . . . . . . . . . . . . . . . . . . . . . . . . . . . . . . . . . . . . . . . . . . . . . . . . . . . . 111 5. 8. 10.LED Control . . . . . . . . . . . . . . . . . . . . . . . . . . . . . . . . . . . . . . . . . . . . . . . . . . . . . . . 111
Chapter 6. Configure the Router in Access Point Mode. . . . . . . . . . . . .113
6. 1. Operation Mode. . . . . . . . . . . . . . . . . . . . . . . . . . . . . . . . . . . . . . . . . . . . . . . . . . . . . . . . . . . 114 6. 2. LAN . . . . . . . . . . . . . . . . . . . . . . . . . . . . . . . . . . . . . . . . . . . . . . . . . . . . . . . . . . . . . . . . . . . . . . . 114 6. 3. Wireless . . . . . . . . . . . . . . . . . . . . . . . . . . . . . . . . . . . . . . . . . . . . . . . . . . . . . . . . . . . . . . . . . . 115 6. 3. 1.Wireless Settings . . . . . . . . . . . . . . . . . . . . . . . . . . . . . . . . . . . . . . . . . . . . . . . . . . . 115 6. 3. 2.Guest Network. . . . . . . . . . . . . . . . . . . . . . . . . . . . . . . . . . . . . . . . . . . . . . . . . . . . . . 116 6. 3. 3.Wireless Schedule . . . . . . . . . . . . . . . . . . . . . . . . . . . . . . . . . . . . . . . . . . . . . . . . . . 117 6. 3. 4. WPS . . . . . . . . . . . . . . . . . . . . . . . . . . . . . . . . . . . . . . . . . . . . . . . . . . . . . . . . . . . . . . 118
6. 3. 5.Aditional Wireless Settings. . . . . . . . . . . . . . . . . . . . . . . . . . . . . . . . . . . . . . . . . . 119 6. 4. Firmware Upgrade. . . . . . . . . . . . . . . . . . . . . . . . . . . . . . . . . . . . . . . . . . . . . . . . . . . . . . . . . 121
6. 5. Backup & Restore . . . . . . . . . . . . . . . . . . . . . . . . . . . . . . . . . . . . . . . . . . . . . . . . . . . . . . . . . 121
6. 6. Administration . . . . . . . . . . . . . . . . . . . . . . . . . . . . . . . . . . . . . . . . . . . . . . . . . . . . . . . . . . . . 122
6. 6. 1.Change Password . . . . . . . . . . . . . . . . . . . . . . . . . . . . . . . . . . . . . . . . . . . . . . . . . . 122
6. 6. 2.Local Management . . . . . . . . . . . . . . . . . . . . . . . . . . . . . . . . . . . . . . . . . . . . . . . . . 123
6. 7. System Log . . . . . . . . . . . . . . . . . . . . . . . . . . . . . . . . . . . . . . . . . . . . . . . . . . . . . . . . . . . . . . . 124
6. 8. Diagnostic . . . . . . . . . . . . . . . . . . . . . . . . . . . . . . . . . . . . . . . . . . . . . . . . . . . . . . . . . . . . . . . . 124
6. 9. Time Settings . . . . . . . . . . . . . . . . . . . . . . . . . . . . . . . . . . . . . . . . . . . . . . . . . . . . . . . . . . . . . 126
6. 10. Reboot. . . . . . . . . . . . . . . . . . . . . . . . . . . . . . . . . . . . . . . . . . . . . . . . . . . . . . . . . . . . . . . . . . . . 127
6. 11. LED Control . . . . . . . . . . . . . . . . . . . . . . . . . . . . . . . . . . . . . . . . . . . . . . . . . . . . . . . . . . . . . . . 128
Chapter 7. Configure the Router in Range Extender Mode. . . . . . . . . .129
7. 1. Operation Mode. . . . . . . . . . . . . . . . . . . . . . . . . . . . . . . . . . . . . . . . . . . . . . . . . . . . . . . . . . . 130
7. 2. Wireless . . . . . . . . . . . . . . . . . . . . . . . . . . . . . . . . . . . . . . . . . . . . . . . . . . . . . . . . . . . . . . . . . . 130
7. 2. 1.Connect to Host Network . . . . . . . . . . . . . . . . . . . . . . . . . . . . . . . . . . . . . . . . . . . 130
7. 2. 2.Customize Extended Network Settings . . . . . . . . . . . . . . . . . . . . . . . . . . . . . .131
7. 3. Firmware Upgrade. . . . . . . . . . . . . . . . . . . . . . . . . . . . . . . . . . . . . . . . . . . . . . . . . . . . . . . . . 132
7. 4. Backup & Restore . . . . . . . . . . . . . . . . . . . . . . . . . . . . . . . . . . . . . . . . . . . . . . . . . . . . . . . . . 132
7. 5. Administration . . . . . . . . . . . . . . . . . . . . . . . . . . . . . . . . . . . . . . . . . . . . . . . . . . . . . . . . . . . . 133
7. 5. 1.Change Password . . . . . . . . . . . . . . . . . . . . . . . . . . . . . . . . . . . . . . . . . . . . . . . . . . 133
7. 5. 2.Local Management . . . . . . . . . . . . . . . . . . . . . . . . . . . . . . . . . . . . . . . . . . . . . . . . . 134
7. 6. System Log . . . . . . . . . . . . . . . . . . . . . . . . . . . . . . . . . . . . . . . . . . . . . . . . . . . . . . . . . . . . . . . 135
7. 7. Time Settings . . . . . . . . . . . . . . . . . . . . . . . . . . . . . . . . . . . . . . . . . . . . . . . . . . . . . . . . . . . . . 135
7. 8. Reboot. . . . . . . . . . . . . . . . . . . . . . . . . . . . . . . . . . . . . . . . . . . . . . . . . . . . . . . . . . . . . . . . . . . . 137
7. 9. LED Control . . . . . . . . . . . . . . . . . . . . . . . . . . . . . . . . . . . . . . . . . . . . . . . . . . . . . . . . . . . . . . . 137
FAQ . . . . . . . . . . . . . . . . . . . . . . . . . . . . . . . . . . . . . . . . . . . . . . . . . . . . . . . . . . . . . . . .139

About This Guide
This guide is a complement to Quick Installation Guide. The Quick Installation Guide provides instructions for quick internet setup, while this guide contains details of each function and demonstrates how to configure them.
 Note: Features available in the router may vary by model and software version. Router availability may also vary by region or ISP. All images, steps, and descriptions in this guide are only examples and may not reflect your actual router experience.
Conventions
In this guide the following conventions are used:
|
Convention |
Description |
|
|
Underlined |
Underlined words or phrases are hyperlinks. You can click to redirect to a |
|
|
website or a specific section. |
||
|
Teal |
Contents to be emphasized and texts on the web page are in teal, including the |
|
|
menus, items, buttons and so on. |
||
|
The menu structures to show the path to load the corresponding page. |
>For example, Advanced > Wireless > MAC Filtering means the MAC Filtering function page is under the Wireless menu that is located in the Advanced tab.
|
Note: |
Ignoring this type of note might result in a malfunction or damage to the device. |
||
|
Tips: |
Indicates important information that helps you make better use of your device. |
||
*Maximum wireless signal rates are the physical rates derived from IEEE Standard 802.11 specifications. Actual wireless data throughput and wireless coverage are not guaranteed and will vary as a result of 1) environmental factors, including building materials, physical objects, and obstacles, 2) network conditions, including local interference, volume and density of traffic, product location, network complexity, and network overhead, and 3) client limitations, including rated performance, location, connection, quality, and client condition.
More Info
The latest software, management app and utility are available from the Download Center at www.tp-link.com/support.
The Quick Installation Guide can be found where you find this guide or inside the package of the router.
Specifications can be found on the product page at https://www.tp-link.com.
TP-Link Community is provided for you to share knowledge and discuss our products at https://community.tp-link.com.
Our Technical Support contact information can be found at the Contact Technical Support page at https://www.tp-link.com/support/.
1

Chapter 1
Get to Know About Your Router
This chapter introduces what the router can do and shows its appearance. It contains the following sections:
•Product Overview
•Panel Layout
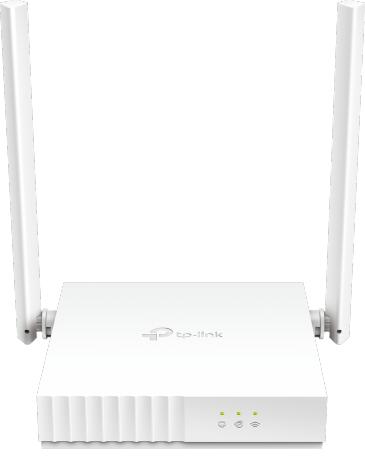
|
Chapter 1 |
Get to Know About Your Router |
1. 1. Product Overview
The TP-Link router is designed to fully meet the need of Small Office/Home Office (SOHO) networks and users demanding higher networking performance. The powerful antennas ensure continuous Wi-Fi signal to all your devices while boosting widespread coverage throughout your home, and the built-in Ethernet ports supply high-speed connection to your wired devices.
Moreover, it is simple and convenient to set up and use the TP-Link router due to its intuitive web interface and the powerful Tether app.
1. 2. Panel Layout
1. 2. 1. Top View
The router’s LEDs are located on the front panel. You can check the router’s working status by following the LED explanation table.
3
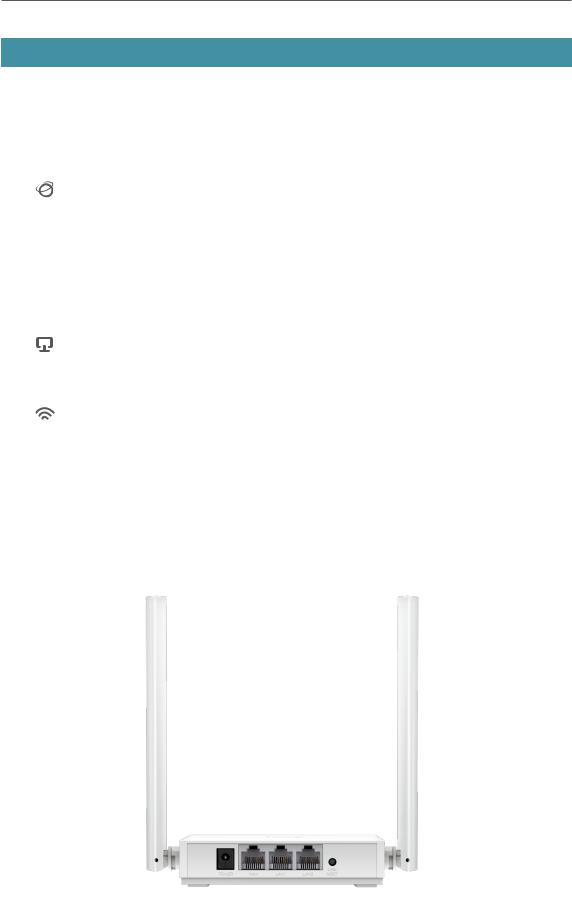
Chapter 1 Get to Know About Your Router
|
LED |
Indication |
||
|
Solid on: |
|||
|
Router Mode: The WAN port is connected, but internet is not available. |
|||
|
Access Point Mode: The WAN port is not connected. |
|||
|
Orange |
Range Extender Mode: The router is not connected to the host network. |
||
|
WISP Mode: Internet is not available. |
|||
|
Blinking: |
|||
|
Internet LED |
The WAN port is not connected while in Router Mode. |
||
|
Solid on: |
|||
|
Router/WISP Mode: Internet is available. |
|||
|
Green |
Access Point Mode: The WAN port is connected. |
||
|
Range Extender Mode: The router is connected to the host network. |
|||
|
Blinking: |
|||
|
The system is starting up or firmware is being upgraded*. |
|||
|
LAN LED |
Green |
Solid on: At least one LAN port is connected. |
|
|
Solid on: |
|||
|
Wi-Fi LED |
Green |
Wireless function is enabled. |
|
|
Blinking: |
|||
|
WPS connection is in progress. This may take up to 2 minutes. |
* To avoid device damage, do not disconnect or power off your router during the upgrade.
1. 2. 2. The Back Panel
4

|
Chapter 1 |
Get to Know About Your Router |
The following parts (view from left to right) are located on the rear panel.
|
Item |
Description |
|
|
Power Port |
For connecting the router to a power socket via the provided power adapter. |
|
|
WAN Port |
For connecting to a DSL/Cable modem, or an Ethernet port. |
|
|
LAN Ports (1/2) |
For connecting your PCs or other wired network devices to the router. |
|
|
To enable the WPS function, press this button for 1 second. If you have a |
||
|
WPS-supported device, you can press this button to quickly establish |
||
|
WPS/RESET Button |
connection between the router and the client device and automatically |
|
|
configure wireless security for your wireless network. |
||
|
Press and hold this button for more than 5 seconds until the Internet LED |
||
|
blinks to reset the router to its factory default settings. |
||
|
Antennas |
Used for wireless operation and data transmitting. Upright them for the best |
|
|
Wi-Fi performance. |
||
5
![]()
Chapter 2
Connect to the Internet
This chapter contains the following sections:
•Position Your Router
•Connect to the Internet
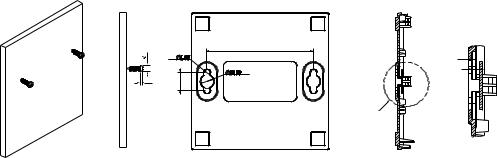
|
Chapter 2 |
Connect to the Internet |
2. 1. Position Your Router
With the router, you can access your network from anywhere within the wireless network coverage. However, the wireless signal strength and coverage vary depending on the actual environment of your router. Many obstacles may limit the range of the wireless signal, for example, concrete structures or thick walls.
For your security and best Wi-Fi performance, please:
•Do NOT locate the router in a place where it will be exposed to moisture or excessive heat.
•Keep away from the strong electromagnetic radiation and the device of electromagnetic sensitive.
•Place the router in a location where it can be connected to the various devices as well as to a power source.
•Make sure the cables and power cord are safely placed out of the way to avoid a tripping hazard.
Generally, the router is placed on a horizontal surface, such as on a shelf or desktop. The device also can be mounted on the wall as shown in the following figure.
<![if ! IE]>
<![endif]>D
H
80
1. 2 3
<![if ! IE]>
<![endif]>14
A
NOTE:
4.87<D<10.37mm A(2/1) H<3mm
 Note:
Note:
The diameter of the screw, 4.87mm<D<10.37mm, and the distance of two screws is 80mm. The screw that project from the wall need around 4mm based, and the length of the screw need to be at least 20mm to withstand the weight of the product.
2. 2. Connect to the Internet
The Router provides four working modes: Wireless Router, WISP, Range Extender and Access Point. You can choose the mode to better suit your network needs and follow the guide to complete the configuration.
7

|
Chapter 2 |
Connect to the Internet |
2. 2. 1. Wireless Router Mode
1. Follow the steps below to connect your router.
If your internet connection is through an Ethernet cable from the wall instead of through a DSL / Cable / Satellite modem, connect the Ethernet cable directly to the router’s WAN port, and then follow Step 4 and 5 to complete the hardware connection.
|
Important |
||
|
Power off the modem, and |
||
|
remove the backup battery if it |
||
|
has one. |
||
|
Power adapter |
Router |
Turn on the modem and then wait |
|
about 2 minutes for it to restart. |
||
|
Modem |
Connect the power adapter to the router.
Verify that the LED turns solid on before continuing with the configuration.
Connect to the internet
Connect to the power socket
Connect the powered-off modem to the router’s WAN port via an Ethernet cable.
|
1 ) |
Turn off the modem, and remove the backup battery if it has one. |
|
2 ) |
Connect the modem to the router’s WAN port with an Ethernet cable. |
|
3 ) |
Turn on the modem, and then wait about 2 minutes for it to restart. |
|
4 ) |
Connect the power adapter to the router. |
2.Connect your computer to the router.
• Method 1: Wired
Turn off the Wi-Fi on your computer and connect the devices as shown below.
•Method 2: Wirelessly
1 ) Find the SSID (Network Name) and Wireless Password printed on the label at the bottom of the router.
2 ) Click the network icon of your computer or go to Wi-Fi Settings of your smart device, and then select the SSID to join the network.
8

Chapter 2 Connect to the Internet
|
Computer |
Smart Device |
|||||||||||||||||
|
Connections are available |
< Settings |
Wi-Fi |
||||||||||||||||
|
Wi-Fi |
||||||||||||||||||
|
Wireless Network Connection |
OR |
|||||||||||||||||
|
CHOOSE A NETWORK… |
||||||||||||||||||
|
TP-Link_XXXX |
||||||||||||||||||
|
Connect automatically |
Connect |
TP-Link_XXXX |
||||||||||||||||
|
Other… |
||||||||||||||||||
•Method 3: Use the WPS button
Wireless devices that support WPS, including Android phones, tablets, most USB network cards, can be connected to your router through this method.
 Note:
Note:
•WPS is not supported by iOS devices.
•The WPS function cannot be configured if the wireless function of the router is disabled. Also, the WPS function will be disabled if your wireless encryption is WEP. Please make sure the wireless function is enabled and is configured with the appropriate encryption before configuring the WPS.
|
1 ) |
Tap the WPS icon on the device’s screen. Here we take an Android phone as an |
|
example. |
|
|
2 ) |
Immediately press the WPS button on your router. |
Close to
WLAN
On
TP-Link
HomeNetwork
Office
TP-Link_123
TP-Link_ABC
MyHome
Test
3.Enter http://tplinkwifi.net in the address bar of a web browser. Create a password to log in.
9
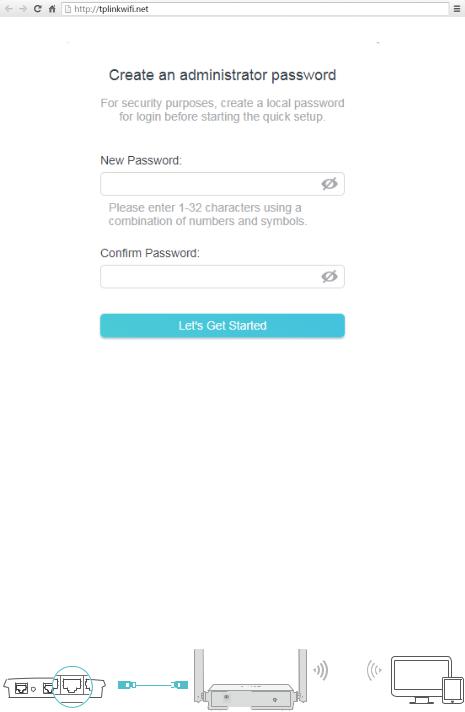
|
Chapter 2 |
Connect to the Internet |
||
 Note:
Note:
If the above screen does not pop-up, it means that your IE Web-browser has been set to a proxy. Go to menu Tools > Internet Options > Connections > LAN Settings, in the screen that appears, untick the Using Proxy checkbox, and click OK.
4.Follow the Quick Setup to set up the internet connection.
5.Enjoy! For wireless devices, you may have to reconnect to the wireless network if you have customized the SSID (wireless name) and password during the configuration.
2. 2. 2. Access Point Mode
This mode transforms your existing wired network to a wireless network.
|
Internet |
Ethernet1 |
Ethernet2 |
|
Wired Router |
Router |
Devices |
1.Connect the power adapter to the router.
2.Connect the router to your wired host router’s Ethernet port via an Ethernet cable as shown above.
3.Connect a computer to the router via an Ethernet cable or wirelessly by using the SSID (network name) and password printed on the bottom label of the router.
10

|
Chapter 2 |
Connect to the Internet |
4.Enter http://tplinkwifi.net in the address bar of a web browser. Create a password to log in.
 Note:
Note:
If the above screen does not pop-up, it means that your IE Web-browser has been set to a proxy. Go to menu Tools > Internet Options > Connections > LAN Settings, in the screen that appears, untick the Using Proxy checkbox,
and click OK.
5.Click Change Mode in the top right corner and select Access Point Mode. Wait for the router to reboot.
 Tip: You can also go to Advanced > Operation Mode to switch to Access Point Mode.
6.Follow the Quick Setup to set up the internet connection.
2. 2. 3. Range Extender Mode
This mode boosts your home wireless coverage.
1.Connect the power adapter to the router.
2.Connect a computer to the router via an Ethernet cable or wirelessly by using the SSID (wireless name) and password printed on the bottom label of the router.
3.Enter http://tplinkwifi.net in the address bar of a web browser. Create a password to log in.
11

|
Chapter 2 |
Connect to the Internet |
||
4.Click Change Mode in the top right corner and select Range Extender Mode. Wait for the router to reboot.
 Tip: You can also go to Advanced > Operation Mode to switch to Range Extender Mode.
5.Follow the Quick Setup to set up the internet connection.
6.Relocate: Place the router between your host router and the Wi-Fi dead zone. The location you choose must be within the range of your existing host network.
|
Host Network |
Extended Network |
|
|
Host Router |
Router |
Devices |
7.You can customize the SSID and password of the extended network.
8.Enjoy! Connect to the wireless network by using the SSID (network name) and password of the router.
12
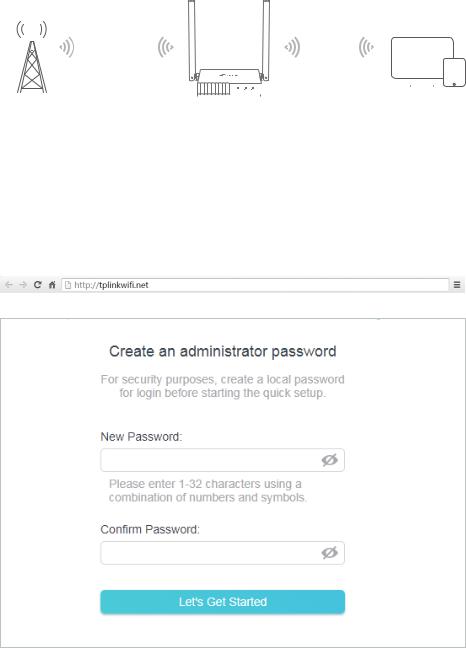
|
Chapter 2 |
Connect to the Internet |
2. 2. 4. WISP Mode
This mode connectes to the ISP network wirelessly in areas without wired service.
|
Devices |
||||||||||||||||||||
|
Public Wi-Fi |
1.Connect the power adapter to the router and power on the router.
2.Connect a computer to the router via an Ethernet cable or wirelessly by using the SSID (wireless name) and password printed on the bottom label of the router.
3.Enter http://tplinkwifi.net in the address bar of a web browser. Create a password to log in.
4.Click Change Mode in the top right corner and select WISP Mode. Wait for the router to reboot.
 Tip: You can also go to Advanced > Operation Mode to switch to WISP Mode.
5.Follow the Quick Setup to set up the internet connection.
6.Enjoy! Connect your devices to the wireless network and enjoy the internet.
13

Chapter 3
Log In to the Router
This chapter introduces how to log in to the web management page of the router.
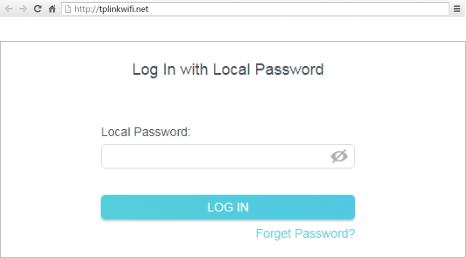
|
Chapter 3 |
Log In to the Router |
With the web-based utility, it is easy to configure and manage the router. The webbased utility can be used on any Windows, Macintosh or UNIX OS with a Web browser, such as Microsoft the Internet Explorer, Mozilla Firefox or Apple Safari.
Follow the steps below to log in to your router.
1.Set up the TCP/IP Protocol in Obtain an IP address automatically mode on your computer.
2.Visit http://tplinkwifi.net, and log in with the password you set for the router.
 Note:
Note:
If the login window does not appear, please refer to the FAQ section.
15
![]()
Chapter 4
Configure the Router in
Wireless Router Mode
This chapter presents how to configure the various features of the router working as a wireless router.
It contains the following sections:
•Operation Mode
•Network
•Wireless
•NAT Forwarding
•Parental Controls
•QoS
•Security
•IPv6
•System
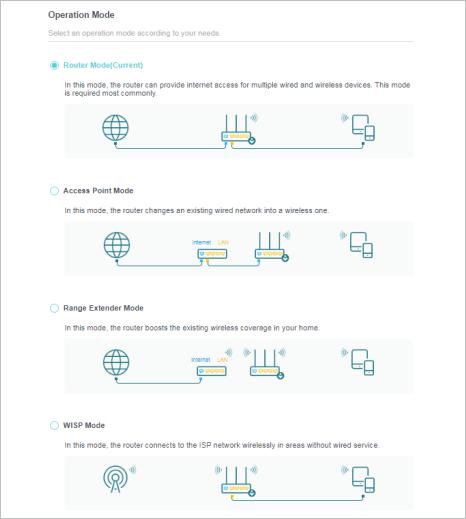
|
Chapter 4 |
Configure the Router in Wireless Router Mode |
4. 1. Operation Mode
1.Visit http://tplinkwifi.net, and log in with the password you set for the router.
2.Go to Advanced > Operation Mode.
3.Select the working mode as needed and click SAVE.
4. 2. Network
4. 2. 1. Status
4.Visit http://tplinkwifi.net, and log in with password you set for the router.
5.Go to Advanced > Network > Status. You can view the current status information of the router.
17
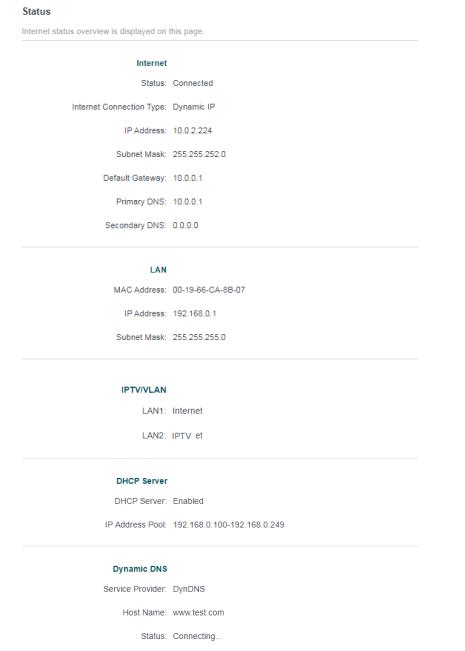
|
Chapter 4 |
Configure the Router in Wireless Router Mode |
|||||
•Internet — This field displays the current settings of the internet, and you can configure them on the Advanced > Network > Internet page.
•Status — Indicates whether the router has been connected to the internet.
•Internet Connection Type — Indicates the way in which your router is connected to the internet.
•IP Address — The WAN IP address of the router.
•Subnet Mask — The subnet mask associated with the WAN IP address.
18
|
Chapter 4 |
Configure the Router in Wireless Router Mode |
•Default Gateway — The Gateway currently used is shown here. When you use Dynamic IP as the internet connection type, click Renew or Release here to obtain new IP parameters dynamically from the ISP or release them.
•Primary & Secondary DNS — The IP addresses of DNS (Domain Name System) server.
•LAN — This field displays the current settings of the LAN, and you can configure them on the Advanced > Network > LAN page.
•MAC Address — The physical address of the router.
•IP Address — The LAN IP address of the router.
•Subnet Mask — The subnet mask associated with the LAN IP address.
•IPTV/LAN — This field displays whether your LAN ports function as the internet supplier or as the IPTV supplier. You can configure them on the Advanced > Network > IPTV/ VLAN page.
•DHCP Server — This field displays the current settings of DHCP (Dynamic Host Configuration Protocol) Server, and you can configure them on the Network > DHCP Server page.
•DHCP Server — Indicates whether the DHCP server is enabled of disabled. It is enabled by default and the router acts as a DHCP server.
•IP Address Pool — The IP address range for the DHCP server to assign IP addresses.
•Dynamic DNS — This field displays the current settings of the Dynamic DNS (Domain Name System), and you can configure them on the Advanced > Network > Dynamic DNS page.
•Service Provider — The Dynamic DNS service provider you have signed up for.
•Host Name — The Domain Name you have entered in the Dynamic DNS page.
•Status — The status of the Dynamic DNS service conenction.
4. 2. 2. Internet
1.Visit http://tplinkwifi.net, and log in with the password you set for the router.
2.Go to Advanced > Network > Internet.
3.Set up the internet connection and click SAVE.
Dynamic IP
If your ISP provides the DHCP service, please select Dynamic IP, and the router will automatically get IP parameters from your ISP.
Click Renew to renew the IP parameters from your ISP. Click Release to release the IP parameters.
19

|
Chapter 4 |
Configure the Router in Wireless Router Mode |
||
•MTU Size — The normal MTU (Maximum Transmission Unit) value for most Ethernet networks is 1500 Bytes. It is not recommended that you change the default MTU size unless required by your ISP.
•Host Name -This option specifies the name of the router.
•GetIPwithUnicastDHCP-AfewISPs’DHCPserversdosupportthebroadcastapplications. If you cannot get the IP address normally, you can choose this option (it is rarely required).
Static IP
If your ISP provides a static or fixed IP address, subnet mask, default gateway and DNS setting, please select Static IP.
20
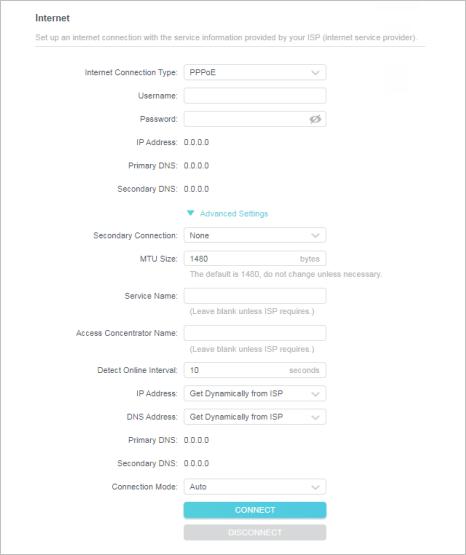
|
Chapter 4 |
Configure the Router in Wireless Router Mode |
•IP Address — Enter the IP address in dotted-decimal notation provided by your ISP.
•Subnet Mask — Enter the subnet mask in dotted-decimal notation provided by your ISP. Normally 255.255.255.0 is used as the subnet mask.
•Default Gateway — Enter the gateway IP address in dotted-decimal notation provided by your ISP.
•Primary/Secondary DNS — (Optional) Enter one or two DNS addresses in dotteddecimal notation provided by your ISP.
•MTU Size — The normal MTU (Maximum Transmission Unit) value for most Ethernet networks is 1500 Bytes. It is not recommended that you change the default MTU size unless required by your ISP.
PPPoE
If your ISP provides PPPoE connection, select PPPoE.
21
|
Chapter 4 |
Configure the Router in Wireless Router Mode |
•User Name/Password — Enter the user name and password provided by your ISP. These fields are case-sensitive.
•Secondary Connection — It’s available only for PPPoE connection. If your ISP provides an extra connection type, select Dynamic IP or Static IP to activate the secondary connection.
•MTU Size — The default MTU size is 1480 bytes. It is not recommended that you change the default MTU size unless required by your ISP.
•Service Name — The service name should not be configured unless you are sure it is necessary for your ISP. In most cases, leaving these fields blank will work.
•Access Concentrator Name — The access concentrator name should not be configured unless you are sure it is necessary for your ISP. In most cases, leaving these fields blank will work.
•Detect Online Interval — The router will detect Access Concentrator online at every interval. The default value is 10. You can input the value between 0 and 120. The value 0 means no detect.
•IP Address — The default setting is to get an IP address dynamically from your ISP. If your ISP does not automatically assign IP addresses to the router, please select Use the Following IP Address and enter the IP address provided by your ISP in dotteddecimal notation.
•DNS Address — The default setting is to get an IP address dynamically from your ISP.If your ISP does not automatically assign DNS addresses to the router, please select Use the Following DNS Addresses and enter the IP address in dotted-decimal notation of your ISP’s primary DNS server. If a secondary DNS server address is available, enter it as well.
•Connection Mode — Select an appropriate connection mode that determines how to connect to the internet.
•Auto — In this mode, the internet connection reconnects automatically any it gets disconnected.
•On Demand — In this mode, the internet connection will be terminared automatically after a specified inactivity period (Max Idle Time) and be reestablished when you attempt to access the internet again.
•Time-based — In this mode, the internet connection is only established in a specific timeframe. If this option is selected, enter the start time and end time. Both are in HH:MM format.
•Manual — In this mode, the internet connection is controlled manually by clicking the Connect/Disconnect button. This mode also supports the Max Idle Time function as On Demand mode. Enter a maximum time (in minutes), the internet connection can be inactive before it is terminated into the Max Idle Time. The
22
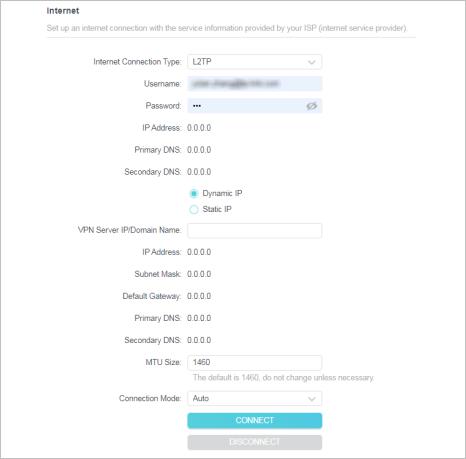
|
Chapter 4 |
Configure the Router in Wireless Router Mode |
default value is 15 minutes. If you want the internet connection remains active all the time, enter 0 (zero).
 Note:
Note:
Sometimes the connection cannot be terminated although you have specified the Max Idle Time because some applications are visiting the internet continually in the background.
L2TP
If your ISP provides L2TP connection, please select L2TP.
•Username/Password — Enter the username and password provided by your ISP. These fields are case-sensitive.
•VPN Server IP/ Domain Name — Enter the VPN server’s IP address or domain name provided by your ISP.
•MTU Size — The default MTU size is “1460” bytes, which is usually fine. It is not recommended that you change the default MTU Size unless required by your ISP.
•Connection Mode
•Auto — In this mode, the internet connection reconnects automatically any it gets disconnected.
23
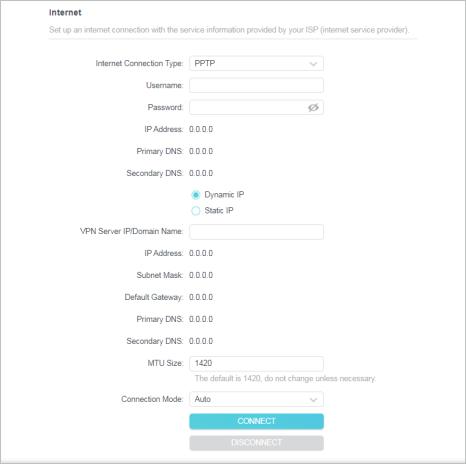
|
Chapter 4 |
Configure the Router in Wireless Router Mode |
•On Demand — In this mode, the internet connection will be terminared automatically after a specified inactivity period (Max Idle Time) and be reestablished when you attempt to access the internet again.
•Manual — In this mode, the internet connection is controlled manually by clicking the Connect/Disconnect button. This mode also supports the Max Idle Time function as On Demand mode. Enter a maximum time (in minutes), the internet connection can be inactive before it is terminated into the Max Idle Time. The default value is 15 minutes. If you want the internet connection remains active all the time, enter 0 (zero).
 Note:
Note:
Sometimes the connection cannot be terminated although you have specified the Max Idle Time because some applications are visiting the internet continually in the background.
PPTP
If your ISP provides PPTP connection, please select PPTP.
•Username/Password — Enter the username and password provided by your ISP. These fields are case-sensitive.
24
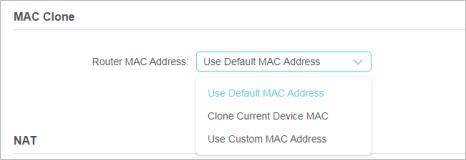
|
Chapter 4 |
Configure the Router in Wireless Router Mode |
•VPN Server IP/ Domain Name — Enter the VPN server’s IP address or domain name provided by your ISP.
•MTU Size — The default MTU size is “1420” bytes, which is usually fine. It is not recommended that you change the default MTU Size unless required by your ISP.
•Connection Mode
•Auto — In this mode, the internet connection reconnects automatically any it gets disconnected.
•On Demand — In this mode, the internet connection will be terminared automatically after a specified inactivity period (Max Idle Time) and be reestablished when you attempt to access the internet again.
•Manual — In this mode, the internet connection is controlled manually by clicking the Connect/Disconnect button. This mode also supports the Max Idle Time function as On Demand mode. Enter a maximum time (in minutes), the internet connection can be inactive before it is terminated into the Max Idle Time. The default value is 15 minutes. If you want the internet connection remains active all the time, enter 0 (zero).
 Note:
Note:
Sometimes the connection cannot be terminated although you have specified the Max Idle Time because some applications are visiting the internet continually in the background.
4. 2. 3. MAC Clone
1.Visit http://tplinkwifi.net, and log in with the password you set for the router.
2.Go to Advanced > Network > Internet and locate the MAC Clone section.
3.Configure the WAN MAC address and click SAVE.
•Use Default MAC Address — Do not change the default MAC address of your router in case the ISP does not bind the assigned IP address to the MAC address.
•Use Current MAC Address — Select to copy the current MAC address of the computer that is connected to the router, in case the ISP binds the assigned IP address to the MAC address.
25
![]()
|
Chapter 4 |
Configure the Router in Wireless Router Mode |
•Use Custom MAC Address — Select if your ISP requires you to register the MAC address and enter the correct MAC address in this field, in case the ISP binds the assigned IP address to the specific MAC address.
 Note:
Note:
•You can only use the MAC Address Clone function for PCs on the LAN.
•If you have changed the WAN MAC address when the WAN connection is PPPoE, it will not take effect until the connection is re-established.
4. 2. 4. LAN
1.Visit http://tplinkwifi.net, and log in with the password you set for the router.
2.Go to Advanced > Network > LAN.
3.Configure the IP parameters of the LAN and click SAVE.
•MAC Address — The physical address of the LAN ports. The value can not be changed.
•IP Address — Enter the IP address in dotted-decimal notation of your router (the default one is 192.168.0.1).
•Subnet Mask — An address code that determines the size of the network. Normally 255.255.255.0 is used as the subnet mask.
 Note:
Note:
•If you have changed the IP address, you must use the new IP address to log in.
•If the new IP address you set is not in the same subnet as the old one, the IP address pool in the DHCP Server will be configured automatically, but the Virtual Server and DMZ Host will not take effect until they are re-configured.
4. 2. 5. IPTV
1.Visit http://tplinkwifi.net, and log in with the password you set for the router.
2.Go to Advanced > Network > IPTV/VLAN.
3.Configure the WAN MAC address and click Save.
26
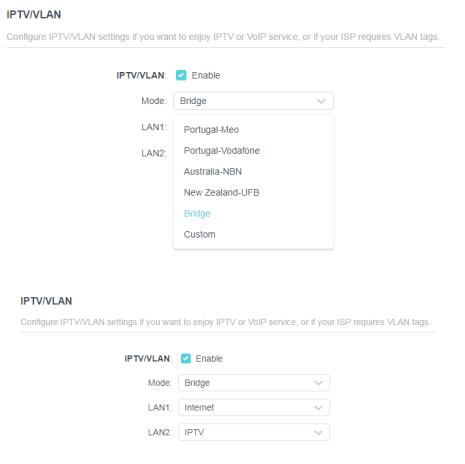
|
Chapter 4 |
Configure the Router in Wireless Router Mode |
||
•IPTV/VLAN — Select to enable the IPTV feature.
•Mode — Select the appropriate mode according to your ISP. You may need to configure different settings according to the mode you choose.
•LAN 1/2 — Assign your LAN port to whether function as the internet supplier or as the IPTV supplier.
4. 2. 6. DHCP
By default, the DHCP (Dynamic Host Configuration Protocol) Server is enabled and the router acts as a DHCP server; it dynamically assigns TCP/IP parameters to client devices from the IP Address Pool. You can change the settings of DHCP Server if necessary, and you can reserve LAN IP addresses for specified client devices.
•To specify the IP address that the router assigns:
1.Visit http://tplinkwifi.net, and log in with the password you set for the router.
2.Go to Advanced > Network > DHCP Server and locate the DHCP Server section.
27
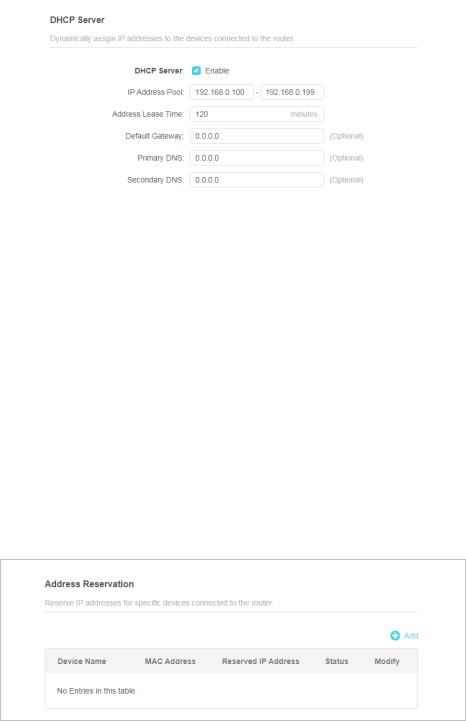
|
Chapter 4 |
Configure the Router in Wireless Router Mode |
||
1.Tick the Enable checkbox.
2.Enter the starting and ending IP addresses in the IP Address Pool.
3.Enter other parameters if the ISP offers. The Default Gateway is automatically filled in and is the same as the LAN IP address of the router.
4.Click SAVE.
 Note:
Note:
To use the DHCP server function of the router, you must configure all computers on the LAN as Obtain an IP Address automatically.
•To reserve an IP address for a specified client device:
1.Visit http://tplinkwifi.net, and log in with the password you set for the router.
2.Go to Advanced > Network > DHCP Server and locate the Address Reservation section.
3.Click Add in the Address Reservation section.
4.Click VIEW CONNECTED DEVICES and select the you device for which you want to reserve an IP. Then the MAC and IP Address will be automatically filled in. You can also enter the MAC and IP address of the client device.
28
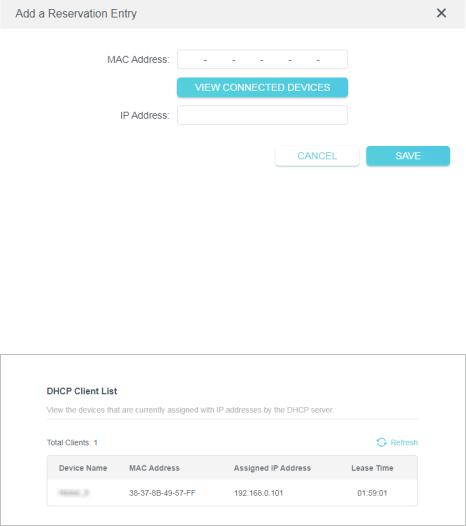
|
Chapter 4 |
Configure the Router in Wireless Router Mode |
||
•To check the DHCP client list:
1.Visit http://tplinkwifi.net, and log in with the password you set for the router.
2.Go to Advanced > Network > DHCP Server and locate the DHCP Client List section. You can see the device information of the list.
3.Click Refresh to see the current attached devices.
4. 2. 7. Dynamic DNS
The router offers the DDNS (Dynamic Domain Name System) feature, which allows the hosting of a website, FTP server, or e-mail server with a fixed domain name (named by yourself) and a dynamic IP address. Thus your friends can connect to your server by entering your domain name no matter what your IP address is. Before using this feature, you need to sign up for DDNS service providers such as www.comexe.cn, www. dyndns.org, or www.noip.com. The Dynamic DNS client service provider will give you a password or key.
1.Visit http://tplinkwifi.net, and log in with the username and password you set for the router.
2.Go to Advanced > Network > Dynamic DNS.
3.Select the DDNS Service Provider: NO-IP or DynDNS. If you don’t have a DDNS account, you have to register first by clicking Register Now.
29
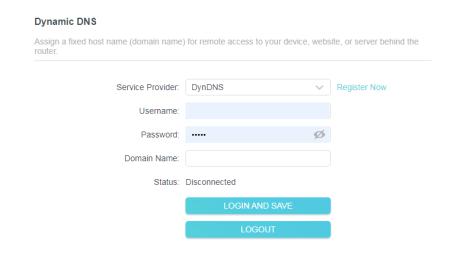
|
Chapter 4 |
Configure the Router in Wireless Router Mode |
||
4.Enter the Username for your DDNS account.
5.Enter the Password for your DDNS account.
6.Enter the Domain Name you received from dynamic DNS service provider here.
7.If your service provider is NO-IP, select WAN IP binding to ensure that the domain name is bound to the WAN IP of this router.
8.Click LOGIN AND SAVE.
4. 2. 8. Static Routing
Static Routing is a form of routing that is configured manually by a network administrator or a user by adding entries into a routing table. The manually-configured routing information guides the router in forwarding data packets to the specific destination.
I want to:
Visit multiple networks and servers at the same time.
For example, in a small office, my PC can surf the internet through Router A, but I also want to visit my company’s network. Now I have a switch and Router B. I connect the devices as shown in the following figure so that the physical connection between my PC and my company’s server is established. To surf the internet and visit my company’s network at the same time, I need to configure the static routing.
30

|
Chapter 4 |
Configure the Router in Wireless Router Mode |
|
Router A |
Router B |
Company’s server |
|
WAN: 172.30.30.100 |
||
|
LAN: 192.168.0.1 |
LAN: 192.168.0.2 |
|
|
172.30.30.1 |
||
|
Switch |
||
|
PC |
||
|
192.168.0.100 |
How can I do that?
1.Change the routers’ LAN IP addresses to two different IP addresses on the same subnet. Disable Router B’s DHCP function.
2.Visit http://tplinkwifi.net, and log in with the password you set for Router A.
3.Go to Advanced > Network > Routing and locate the Static Routing section.
4.Click Add and finish the settings according to the following explanations:
•Network Destination — The destination IP address that you want to assign to a static route. This IP address cannot be on the same subnet with the WAN IP or LAN IP of Router A. In the example, the IP address of the company network is the destination IP address, so here enter 172.30.30.1.
•Subnet Mask — The Subnet Mask determines which portion of an IP address is the network portion, and which portion is the host portion.
•Default Gateway — The IP address of the gateway device to which the data packets will be sent. This IP address must be on the same subnet with the
31
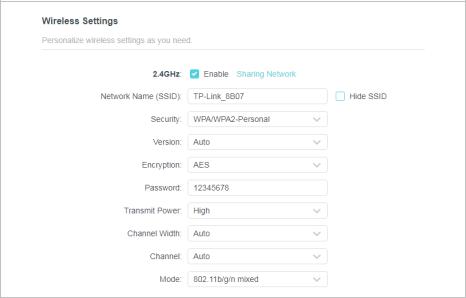
|
Chapter 4 |
Configure the Router in Wireless Router Mode |
router’s IP which sends out data. In the example, the data packets will be sent to the LAN port of Router B and then to the Server, so the default gateway should be 192.168.0.2.
•Interface: Determined by the port (WAN/LAN) that sends out data packets. In the example, the data are sent to the gateway through the LAN port of Router A, so LAN should be selected.
•Description: Enter a description for this static routing entry.
5.Click SAVE.
6.Check the Routing Table below. If you can find the entry you’ve set, the static routing is set successfully.
4. 3. Wireless
4. 3. 1. Wireless Settings
1.Visit http://tplinkwifi.net, and log in with the password you set for the router.
2.Go to Advanced > Wireless > Wireless Settings.
3.Configure the wireless settings for the wireless network and click SAVE.
•2.4GHz — Select this checkbox to enable the 2.4GHz wireless network.
•Network Name (SSID) — Enter a value of up to 32 characters. The same Name (SSID) must be assigned to all wireless devices in your network.
•Hide SSID — Select this checkbox if you want to hide the 2.4GHz network name (SSID) from the Wi-Fi network list. In this case, you need to manually join the network.
32
|
Chapter 4 |
Configure the Router in Wireless Router Mode |
•Security — Select an option from the Security drop-down list.
•None — No security. It is highly recommend you enable the wireless security to protect your wireless network from unauthorized access.
•WPA-PSK/WPA2-Personal — It’s the WPA/WPA2 authentication type based on pre-shared passphrase. It’s also the recommended security type.
•WPA /WPA2-Enterprise — It’s based on Radius Server.
•WEP — It is based on the IEEE 802.11 standard.
•Version — Keep default version value.
•Encryption — Select Select Auto, TKIP or AES. We recommend you keep the default settings.
•Transmit Power — Select High, Middle or Low to specify the data transmit power. The default and recommended setting is High.
•Channel Width — This field determines which operating frequency will be used. It is not necessary to change the wireless channel unless you notice interference problems with another nearby access point. If you select auto, then AP will choose the best channel automatically.
•Channel — This field determines which operating frequency will be used. The default channel is set to Auto. It is not necessary to change the wireless channel unless you notice interference problems with another nearby access point.
•Mode — You can choose the appropriate “Mixed” mode.
4. 3. 2. Guest Network
Guest Network allows you to provide Wi-Fi access for guests without disclosing your host network. When you have guests in your house, apartment, or workplace, you can create a guest network for them. In addition, you can customize guest network settings to ensure network security and privacy.
•Create a Guest Network
1.Visit http://tplinkwifi.net, and log in with the password you set for the router.
2.Go to Wireless or Advanced > Wireless > Guest Network.
3.Enable the Guset Network function.
33
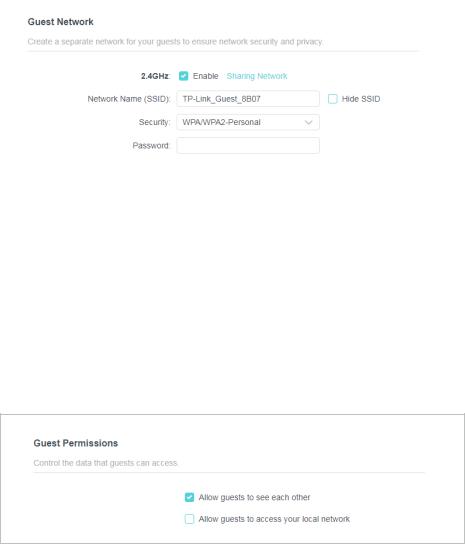
|
Chapter 4 |
Configure the Router in Wireless Router Mode |
||
4.Create a network name for your guest network.
5.Select the Security type and create the Password of the guest network.
6.Click SAVE. Now you guests can access your guest network using the SSID and password you set!
•Customize Guest Network Options
1. Visit http://tplinkwifi.net, and log in with the password you set for the router.
1.Go to Advanced > Wireless > Guest Network. Locate the Guest Permissions section.
2.Customize guest network options according to your needs.
•Allow guests to see each other
Tick this checkbox if you want to allow the wireless clients on your guest network to communicate with each other via methods such as network neighbors and Ping.
•Allow guests to access your local network
Tick this checkbox if you want to allow the wireless clients on your guest network to communicate with the devices connected to your router’s LAN ports or main network via methods such as network neighbors and Ping.
3.Click SAVE. Now you can ensure network security and privacy!
4.3. 3. Wireless Schedule
The wireless function can be automatically off at a specific time when you do not need the wireless function.
1. Visit http://tplinkwifi.net, and log in with the password you set for the router.
34
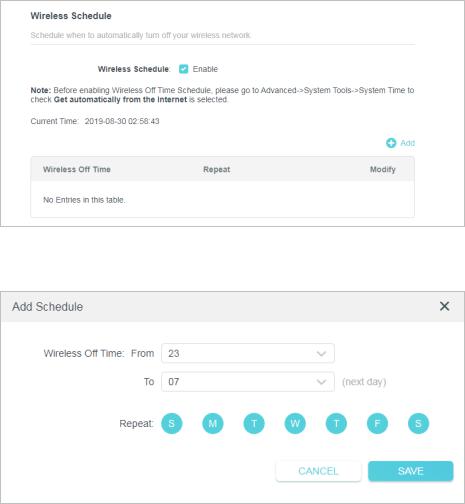
|
Chapter 4 |
Configure the Router in Wireless Router Mode |
2.Go to Advanced > Wireless > Wireless Schedule.
3.Enable the Wireless Schedule function.
4.Click Add tp specify a wireless off period during which you need the wireless off automatically, and click SAVE.
 Note:
Note:
•The effective wireless schedule is based on the time of the router. You can go to Advanced > System > Time to modify the time.
•The wireless network will be automatically turned on after the time period you set.
4. 3. 4. WPS
WPS (Wi-Fi Protected Setup) can help you to quickly and securely connect to a network. This section will guide you to add a new wireless device to your router’s network quickly via WPS.
 Note:
Note:
The WPS function cannot be configured if the wireless function of the router is disabled. Please make sure the wireless function is enabled before configuration.
1.Visit http://tplinkwifi.net, and log in with the password you set for the router.
2.Go to Advanced > Wireless > WPS.
35
![]()
|
Chapter 4 |
Configure the Router in Wireless Router Mode |
3.Follow one of the following three methods to connect your client device to the router’s Wi-Fi network.
Method ONE: Using a PIN
• Connects via the Client’s PIN
1. Keep the WPS Status as Enabled and select Client’s PIN.
2. Enter the PIN of your device and click CONNECT. Then your device will get connected to the router.
• Connects via the Router’s PIN
1. Keep the WPS Status as Enabled and select Router’s PIN.
2.Enter the PIN on your personal device. You can use the default PIN or generate a new one.
 Note:
Note:
PIN (Personal Identification Number) is an eight-character identification number preset to each router. WPS supported devices can connect to your router with the PIN. The default PIN is printed on the label of your router.
36
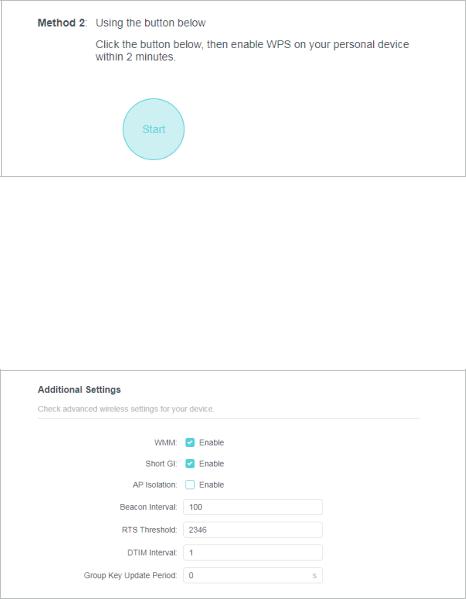
|
Chapter 4 |
Configure the Router in Wireless Router Mode |
Method TWO: Push the WPS Button
Click Start on the screen. Within two minutes, press the WPS button on your device. A Device-(XX-XX-XX-XX-XX-XX) Connected message should appear on the screen and the LED should change from blinking to solid on, indicating successful WPS connection.
 Note:
Note:
XX-XX-XX-XX-XX-XX is the MAC address of your device.
4. 3. 5. Aditional Wireless Settings
1.Visit http://tplinkwifi.net, and log in with the password you set for the router.
2.Go to Advanced > Wireless > Additional Settings.
3.Configure the advanced settings of your wireless network and click Save.
 Note:
Note:
If you are not familiar with the setting items on this page, it’s strongly recommended to keep the provided default values; otherwise it may result in lower wireless network performance.
•Enable WMM — WMM function can guarantee the packets with high-priority messages being transmitted preferentially. It is strongly recommended to enable this function.
•Enable Short GI — It is recommended to enable this function, for it will increase the data capacity by reducing the guard interval time.
37
|
Chapter 4 |
Configure the Router in Wireless Router Mode |
•AP Isolation — This function isolates all connected wireless stations so that wireless stations cannot access each other through WLAN.
•Beacon Interval — Enter a value between 40-1000 milliseconds for Beacon Interval here. Beacon Interval value determines the time interval of the beacons. The beacons are the packets sent by the router to synchronize a wireless network. The default value is 100.
•RTS Threshold — Here you can specify the RTS (Request to Send) Threshold. If the packet is larger than the specified RTS Threshold size, the router will send RTS frames to a particular receiving station and negotiate the sending of a data frame. The default value is 2346.
•DTIM Interval — This value determines the interval of the Delivery Traffic Indication Message (DTIM). A DTIM field is a countdown field informing clients of the next window for listening to broadcast and multicast messages. When the router has buffered broadcast or multicast messages for associated clients, it sends the next DTIM with a DTIM Interval value. You can specify the value between 1-255 Beacon Intervals. The default value is 1, which indicates the DTIM Interval is the same as Beacon Interval.
•Group Key Update Period — Enter a number of seconds (minimum 30) to control the time interval for the encryption key automatic renewal. The default value is 0, meaning no key renewal.
4. 4. NAT Forwarding
The router’s NAT (Network Address Translation) feature makes the devices on the LAN use the same public IP address to communicate on the internet, which protects the local network by hiding IP addresses of the devices. However, it also brings about the problem that external hosts cannot initiatively communicate with the specified devices in the local network.
With the forwarding feature, the router can traverse the isolation of NAT so that clients on the internet can reach devices on the LAN and realize some specific functions.
The TP-Link router includes four forwarding rules. If two or more rules are set, the priority of implementation from high to low is Port Forwarding, Port Triggering, UPNP and DMZ.
4. 4. 1. Port Forwarding
When you build up a server in the local network and want to share it on the internet, Port Forwarding can realize the service and provide it to internet users. At the same time Port Forwarding can keep the local network safe as other services are still invisible from the internet.
38
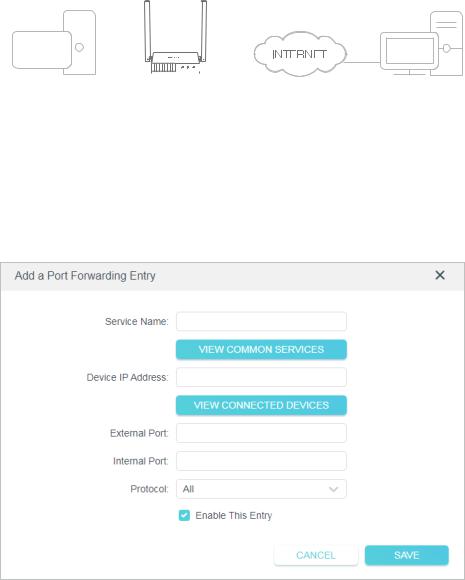
|
Chapter 4 |
Configure the Router in Wireless Router Mode |
Port Forwarding can be used to set up public services in your local network, such as HTTP, FTP, DNS, POP3/SMTP and Telnet. Different service uses different service port. Port 80 is used in HTTP service, port 21 in FTP service, port 25 in SMTP service and port 110 in POP3 service. Please verify the service port number before the configuration.
I want to:
Share my personal website I’ve built in local network with my friends through the internet.
For example, the personal website has been built in my home PC (192.168.0.100). I hope that my friends on the internet can visit my website in some way. My PC is connected to the router with the WAN IP address 218.18.232.154.
|
Personal Website |
Router |
|||||||||||||||
Home
1.Set your PC to a static IP address, for example 192.168.0.100.
2.Visit http://tplinkwifi.net, and log in with the password you set for the router.
3.Go to Advanced > NAT Forwarding > Port Forwarding.
4.Click Add.
39

|
Chapter 4 |
Configure the Router in Wireless Router Mode |
5.Click VIEW COMMON SERVICES and select HTTP. The External Port, Internal Port and Protocol will be automatically filled in.
6.Click VIEW CONNECTED DEVICES and select your home PC. The Device IP Address will be automatically filled in. Or enter the PC’s IP address 192.168.0.100 manually in the Device IP Address field.
7.Click SAVE.
 Note:
Note:
•It is recommended to keep the default settings of Internal Port and Protocol if you are not clear about which port and protocol to use.
•If the service you want to use is not in the Common Services list, you can enter the corresponding parameters manually. You should verify the port number that the service needs.
•You can add multiple virtual server rules if you want to provide several services in a router. Please note that the External Port should not be overlapped.
Done!
Users on the internet can enter http:// WAN IP (in this example: http:// 218.18.232.154)
to visit your personal website.
 Note:
Note:
•If you have changed the default External Port, you should use http:// WAN IP: External Port to visit the website.
•The WAN IP should be a public IP address. For the WAN IP is assigned dynamically by the ISP, it is recommended to apply and register a domain name for the WAN referring to Dynamic DNS. Then users on the internet can use http:// domain name to visit the website.
4. 4. 2. Port Triggering
Port triggering can specify a triggering port and its corresponding external ports. When a host in the local network initiates a connection to the triggering port, all the external ports will be opened for subsequent connections. The router can record the IP address of the host. When the data from the internet return to the external ports, the router can forward them to the corresponding host. Port triggering is mainly applied to online games, VoIPs, video players and common applications including MSN Gaming Zone, Dialpad, Quick Time 4 players and more.
Follow the steps below to configure the port triggering rules:
1.Visit http://tplinkwifi.net, and log in with the password you set for the router.
2.Go to Advanced > NAT Forwarding > Port Triggering.
3.Click Add.
4.Click VIEW COMMON SERVICES, and select the desired application. The Triggering Port, Triggering Protocol and External Port will be automatically filled in. The following picture takes application MSN Gaming Zone as an example.
40
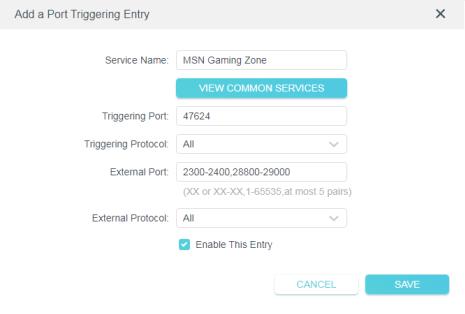
|
Chapter 4 |
Configure the Router in Wireless Router Mode |
||
5. Click SAVE.
 Note:
Note:
•You can add multiple port triggering rules as needed.
•The triggering ports can not be overlapped.
•If the application you need is not listed in the Common Services list, please enter the parameters manually. You should verify the external ports the application uses first and enter them in External Ports field. You can input at most 5 groups of ports (or port sections). Every group of ports must be set apart with “,”. For example, 2000-2038, 20502051, 2085, 3010-3030.
4. 4. 3. DMZ
When a PC is set to be a DMZ (Demilitarized Zone) host in the local network, it is totally exposed to the internet, which can realize the unlimited bidirectional communication between internal hosts and external hosts. The DMZ host becomes a virtual server with all ports opened. When you are not clear about which ports to open in some special applications, such as IP camera and database software, you can set the PC to be a DMZ host.
 Note:
Note:
DMZ is more applicable in the situation that users are not clear about which ports to open. When it is enabled, the DMZ host is totally exposed to the internet, which may bring some potential safety hazards. If DMZ is not in use, please disable it in time.
I want to:
Make the home PC join the internet online game without port restriction.
For example, due to some port restriction, when playing the online games, you can log in normally but cannot join a team with other players. To solve this problem, set your PC as a DMZ host with all ports opened.
41
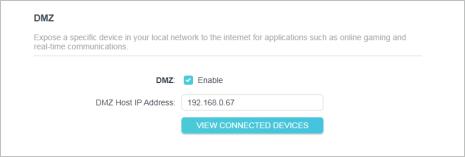
|
Chapter 4 |
Configure the Router in Wireless Router Mode |
How can I do that?
1.Assign a static IP address to your PC, for example 192.168.0.100.
2.Visit http://tplinkwifi.net, and log in with the password you set for the router.
3.Go to Advanced > NAT Forwarding > DMZ and select Enable.
4.Click VIEW CONNECTED DEVICES and select your PC. The DMZ Host IP Address will be automatically filled in. Or enter the PC’s IP address 192.168.0.100 manually in the DMZ Host IP Address field.
5. Click SAVE.
Done!
You’ve set your PC to a DMZ host and now you can make a team to game with other players.
4. 4. 4. UPnP
The UPnP (Universal Plug and Play) protocol allows the applications or host devices to automatically find the front-end NAT device and send request to it to open the corresponding ports. With UPnP enabled, the applications or host devices on the local network and the internet can freely communicate with each other realizing the seamless connection of the network. You may need to enable the UPnP if you want to use applications for multiplayer gaming, peer-to-peer connections, real-time communication (such as VoIP or telephone conference) or remote assistance, etc.
 Tips:
Tips:
•UPnP is enabled by default in this router.
•Only the application supporting UPnP protocol can use this feature.
•UPnP feature needs the support of operating system (e.g. Windows Vista/ Windows 7/ Windows 8, etc. Some of operating system need to install the UPnP components).
Forexample,whenyouconnectyourXboxtotherouterwhichisconnectedtotheinternet to play online games, UPnP will send request to the router to open the corresponding ports allowing the following data penetrating the NAT to transmit. Therefore, you can play Xbox online games without a hitch.
42
 Loading…
перейти к содержанию
![]() Loading…
Loading…
перейти к содержанию
![]()
![]()
300 Mbps
Wi-Fi маршрутизатор
Многорежимный маршрутизатор 300 Мбит / с TL-WR820N
![]()
Основные моменты
Надежное сетевое соединение
Улучшите передачу и прием беспроводного сигнала с TL-WR820N. Оснащен антеннами 5 дБи и 2 высокоскоростными портами Ethernet для обеспечения надежного Wi-Fi и проводных соединений в домах среднего размера. Пусть вся семья будет наслаждаться быстрым Wi-Fi на каждом телефоне, планшете или ноутбуке.

Универсальное управление
Встроенные инструменты упрощают управление домашней сетью, включая планирование доступа в Интернет для определенных устройств, блокировку контента или установку уровня приоритета. Независимая гостевая сеть помогает защитить личные данные от доступа гостей.

Четыре режима в одном
Режим маршрутизатора (по умолчанию)
Подключитесь к Ethernet, чтобы мгновенно создать частную беспроводную сеть и предоставить доступ в Интернет для всех ваших устройств Wi-Fi.

Режим точки доступа
Преобразуйте существующую проводную сеть в беспроводную

Режим расширителя диапазона
Увеличьте существующее покрытие беспроводной сети в вашей комнате

Режим WISP
Беспроводное подключение к сети Интернет-провайдера в регионах, где отсутствует проводная связь.

Особенности

Надежность
- 02.11n — обратная совместимость с продуктами 802.11b / g
- Качество обслуживания — приоритеты устройств для обеспечения более высокой производительности там, где это необходимо.
- Контроль доступа — создайте белый или черный список, чтобы разрешить или заблокировать доступ к Интернету для определенных устройств.
- Родительский контроль — позволяет родителям устанавливать регулируемый доступ для детей

Простота в использовании
- Интуитивный Web UI– Обеспечивает быструю и простую установку без проблем.
- Быстрое шифрование — шифрование беспроводной сети одним касанием с помощью кнопки WPS
- Беспроблемное управление с помощью приложения Tether — Управление сетью упрощается с помощью приложения TP-Link Tether, доступного на любом устройстве Android или iOS

Скорость
- Wireless N Speed - скорость Wi-Fi 300 Мбит / с соответствует вашим ежедневным потребностям в Интернете
- Высокоскоростные порты Ethernet: обеспечивают надежные Wi-Fi и проводные соединения
Характеристики
аппаратные средства
- Порты Ethernet: 2 порта LAN 10/100 Мбит / с, 1 порт WAN 10/100 Мбит / с
- Кнопки: WPS / кнопка сброса
- Антенны: 2 фиксированные всенаправленные антенны
- Внешний источник питания: 5 В постоянного тока / 0.6 А
· Размеры (Ш x Г x В): 4.5 x 4.2 x 0.96 мм (115 x 106.7 x 24.3 дюйма)

Беспроводной сети
- Стандарты беспроводной связи: IEEE 802.11n, IEEE 802.11g, IEEE 802.11b
- Частота: 2.412 ~ 2.472 ГГц
- Скорость сигнала:
11n: до 300 Мбит / с (динамически)
11g: до 54 Мбит / с (динамически)
11b: до 11 Мбит / с (динамически) - Чувствительность приема:
270M:-70dBm @ 10% OFF
130M:-74dBm @ 10% OFF
108M:-74dBm @ 10% OFF
54M:-77dBm @ 10% OFF
11M:-87dBm @ 8% OFF
6M:-90dBm @ 10% OFF
1M:-98dBm @ 8% OFF - Функция беспроводной связи: включение / отключение беспроводного радио, WMM, статистика беспроводной сети
- Безопасность беспроводной сети: WEP, WPA / WPA2, WPA-PSK / WPA2-PSK
Software
- Режимы работы: беспроводной маршрутизатор, расширитель диапазона, точка доступа, WISP
- Тип WAN: динамический IP, статический IP, PPPoE, PPTP (двойной доступ), L2TP (двойной доступ)
- DHCP: сервер DHCP, список клиентов DHCP, резервирование адресов
- Качество обслуживания: WMM, контроль пропускной способности
- Перенаправление NAT: перенаправление портов, запуск порта, UPnP, DMZ
- Динамический DNS: DynDns, NO-IP
- Безопасность межсетевого экрана: межсетевой экран SPI, привязка IP- и MAC-адресов
- Протоколы: IPv4, IPv6
- Управление: родительский контроль, контроль доступа, локальное управление, удаленное управление
- Гостевая сеть: гостевая сеть с частотой 2.4 ГГц
Другое
- Сертификация
CE, RoHS - Системные требования
Microsoft Windows 10 / 8.1 / 8/7 / Vista / XP / 2000 / NT / 98SE, MAC OS, NetWare, UNIX или Linux
Internet Explorer 11, Firefox 12.0, Chrome 20.0, Safari 4.0 или другой браузер с поддержкой Java
Кабельный или DSL-модем
Подписка у интернет-провайдера (для доступа в интернет) - Окружающая среда
Рабочая температура: 0 ℃ ~ 40 ℃ (32 ℉ ~ 104 ℉)
Температура хранения: -40 ℃ ~ 70 ℃ (-40 ℉ ~ 158 ℉)
Рабочая влажность: 10 90% ~% без конденсации
Влажность хранения: 5 90% ~% без конденсации - Комплект поставки
Беспроводной маршрутизатор TL-WR820N
Адаптер питания
Кабель Ethernet RJ-45
Руководство по быстрой установке
 Для получения дополнительной информации, пожалуйста, посетите
https://www.tp-link.com/products/details/?model=TL-WR820N_V2
или отсканируйте QR-код слева
Технические характеристики могут быть изменены без уведомления. TP-Link является зарегистрированным товарным знаком TP-Link Technologies Co., Ltd. Другие торговые марки и названия продуктов являются товарными знаками или зарегистрированными товарными знаками соответствующих владельцев. Copyright © 2020 TP-Link Technologies Co., Ltd. Все права защищены.
* Максимальная скорость беспроводного сигнала — это физическая скорость, определенная в соответствии со спецификациями стандарта IEEE 802.11. Фактическая пропускная способность беспроводной передачи данных и зона покрытия беспроводной сети не гарантируются и будут варьироваться в зависимости от условий сети, ограничений клиента и факторов окружающей среды, включая строительные материалы, препятствия и т. Д.
объем и плотность трафика, а также местонахождение клиента.
www.tp-link.com
TP-Link Wi-Fi роутер 300 Мбит / с TL-WR820N
Документы / Ресурсы
Рекомендации

TL-WR820N | Многорежимный маршрутизатор Wi-Fi 300 Мбит / с | TP-Link