-
Contents
-
Table of Contents
-
Bookmarks
Quick Links
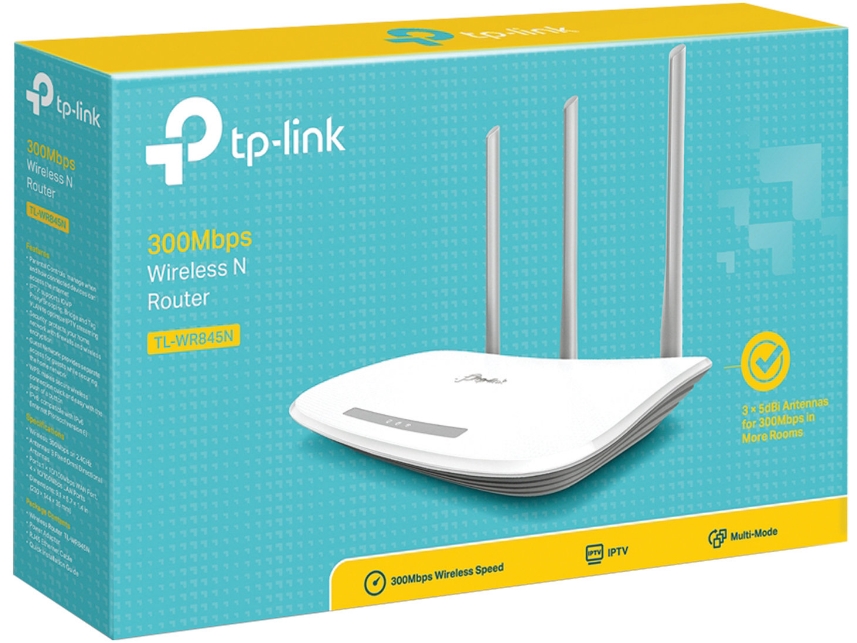
TL-WR845N
300Mbps Wireless N Router
REV1.0.0
1910011557
Related Manuals for TP-Link tl-wr845n
Summary of Contents for TP-Link tl-wr845n
-
Page 1
TL-WR845N 300Mbps Wireless N Router REV1.0.0 1910011557… -
Page 2: Fcc Statement
Specifications are subject to change without notice. is a registered trademark of TP-LINK TECHNOLOGIES CO., LTD. Other brands and product names are trademarks or registered trademarks of their respective holders. No part of the specifications may be reproduced in any form or by any means or used to make any derivative such as translation, transformation, or adaptation without permission from TP-LINK TECHNOLOGIES CO., LTD.
-
Page 3: Ce Mark Warning
Note: The manufacturer is not responsible for any radio or TV interference caused by unauthorized modifications to this equipment. Such modifications could void the user’s authority to operate the equipment. FCC RF Radiation Exposure Statement: This equipment complies with FCC RF radiation exposure limits set forth for an uncontrolled environment.
-
Page 4: Radiation Exposure Statement
Radiation Exposure Statement: This equipment complies with IC radiation exposure limits set forth for an uncontrolled environment. This equipment should be installed and operated with minimum distance 20cm between the radiator & your body. Déclaration d’exposition aux radiations: Cet équipement est conforme aux limites d’exposition aux rayonnements IC établies pour un environnement non contrôlé.
-
Page 5: Safety Information
請不要私自打開機殼,不要嘗試自行維修本產品,請由授權的專業人士進行此項工作。 Продукт сертифіковано згідно с правилами системи УкрСЕПРО на відповідність вимогам нормативних документів та вимогам, що передбачені чинними законодавчими актами України. Safety Information When product has power button, the power button is one of the way to shut off the …
-
Page 6
Explanation of the symbols on the product label Symbol Explanation DC voltage RECYCLING This product bears the selective sorting symbol for Waste electrical and electronic equipment (WEEE). This means that this product must be handled pursuant to European directive 2012/19/EU in order to be recycled or dismantled to minimize its impact on the environment. -
Page 7: Declaration Of Conformity
TP-LINK TECHNOLOGIES CO., LTD DECLARATION OF CONFORMITY For the following equipment: Product Description: 300Mbps Wireless N Router Model No.: TL-WR845N Trademark: TP-LINK We declare under our own responsibility that the above products satisfy all the technical regulations applicable to the product within the scope of Council Directives:…
-
Page 8: Table Of Contents
CONTENTS Package Contents ……………………..1 Chapter 1. Introduction …………………….. 2 Overview of the Router ………………….2 Main Features ……………………2 Panel Layout ……………………. 3 1.3.1 The Front Panel ………………….3 1.3.2 The Rear Panel ………………….4 Chapter 2. Connecting the Router ………………….6 System Requirements ………………….
-
Page 9
4.7.1 Wireless Settings ………………..43 DHCP ……………………..44 4.8.1 DHCP Settings ………………….44 4.8.2 DHCP Clients List ………………..45 4.8.3 Address Reservation ………………..45 Forwarding …………………….. 47 4.9.1 Virtual Servers ………………….47 4.9.2 Port Triggering ………………….49 4.9.3 DMZ ……………………51 4.9.4 UPnP…………………… -
Page 10
4.16.1 Comexe DDNS ………………….. 75 4.16.2 Dyndns DDNS ………………….76 4.16.3 No-ip.com DDNS ………………..76 4.17 IPv6 Support ……………………77 4.17.1 IPv6 Status ………………….78 4.17.2 IPv6 Setup ………………….79 4.18 System Tools ……………………86 4.18.1 Time Settings ………………….87 4.18.2 Diagnostic ………………….. -
Page 11: Package Contents
TL-WR845N 300Mbps Wireless N Router Package Contents The following items should be found in your package: TL-WR845N 300Mbps Wireless N Router DC Power Adapter for TL-WR845N 300Mbps Wireless N Router Quick Installation Guide Ethernet Cable …
-
Page 12: Chapter 1. Introduction
Flexible Access Control The TL-WR845N 300Mbps Wireless N Router provides flexible access control, so that parents or network administrators can establish restricted access policies for children or staff. It also supports Virtual Server and DMZ host for Port Triggering, and then the network administrators can manage and monitor the network in real time with the remote management function.
-
Page 13: Panel Layout
TL-WR845N 300Mbps Wireless N Router One 10/100M Auto-Negotiation RJ45 WAN port, four 10/100M Auto-Negotiation RJ45 LAN ports, supporting Auto MDI/MDIX. Provides WPA/WPA2, WPA-PSK/WPA2-PSK authentication, TKIP/AES encryption security. Shares data and Internet access for users, supporting Dynamic IP/Static IP/PPPoE Internet …
-
Page 14: The Rear Panel
TL-WR845N 300Mbps Wireless N Router The router’s LEDs are located on the front panel (View from left to right). Name Status Indication Power is off. The router has finished booting. (Power) Flash The router is booting or upgrading. The Wireless function is disabled.
-
Page 15
TL-WR845N 300Mbps Wireless N Router approximately 8 seconds, and then release the button and wait the router to reboot to its factory default settings. Wi-Fi/WPS: This button is used for both WPS and Wi-Fi function. Used as Wi-Fi button: Press this Wi-Fi/WPS button for more than 2 seconds to turn on or off the wireless function of your router. -
Page 16: Chapter 2. Connecting The Router
TL-WR845N 300Mbps Wireless N Router Chapter 2. Connecting the Router System Requirements Broadband Internet Access Service (DSL/Cable/Ethernet) One DSL/Cable Modem that has an RJ45 connector (which is not necessary if the router is connected directly to the Ethernet.) PCs with a working Ethernet Adapter and an Ethernet cable with RJ45 connectors …
-
Page 17
TL-WR845N 300Mbps Wireless N Router Verify that the hardware connection is correct by checking these LEDs. -
Page 18: Chapter 3. Quick Installation Guide
TL-WR845N 300Mbps Wireless N Router Chapter 3. Quick Installation Guide This chapter will show you how to configure the basic functions of your 300Mbps Wireless N Router using Quick Setup Wizard within minutes. TCP/IP Configuration The default domain name of the 300Mbps Wireless N Router is http://tplinkwifi.net, the default IP address is 192.168.0.1, and the default Subnet Mask is 255.255.255.0.
-
Page 19
TL-WR845N 300Mbps Wireless N Router If the result displayed is similar to the figure below it means the connection between your PC and the router is failed. Please check the connection following these steps: Is the connection between your PC and the router correct? … -
Page 20: Quick Installation Guide
TL-WR845N 300Mbps Wireless N Router Note: If the LAN IP of the modem connected with your router is 192.168.0.x, the default LAN IP of the router will automatically switch from 192.168.0.1 to 192.168.1.1 to avoid IP conflict. Therefore, in order to verify the network connection between your PC and the router, you can open a command prompt, and type ping 192.168.1.1, and then press Enter.
-
Page 21
TL-WR845N 300Mbps Wireless N Router Note: The Router will automatically detect the Internet connection. If the Internet is available, the Router will direct you to step 5 Wireless settings; otherwise, you need to continue with step 3 to choose WAN Connection Type. -
Page 22
TL-WR845N 300Mbps Wireless N Router If you select Auto-Detect, the router will automatically detect the connection type your ISP provides. Make sure the cable is securely plugged into the Internet port before detection. The appropriate configuration page will be displayed when an active Internet service is successfully detected by the router. -
Page 23
TL-WR845N 300Mbps Wireless N Router IP Address — This is the WAN IP address as seen by external users on the Internet (including your ISP). Enter the IP address into the field. Subnet Mask — The Subnet Mask is used for the WAN IP address, it is usually … -
Page 24
TL-WR845N 300Mbps Wireless N Router Check the radio button of Dynamic/Static IP to activate the secondary connection if your ISP provides an extra Connection type such as Dynamic/Static IP to connect to a local area network. 4) If the connection type is L2TP/Russian L2TP, the next screen will appear as shown in the figure below. -
Page 25
TL-WR845N 300Mbps Wireless N Router 5) If the connection type is PPTP/Russian PPTP, the next screen will appear as shown in the figure below. Configure the following parameters and then click Next to continue. User Name and Password — Enter the User Name and Password provided by your ISP. -
Page 26
TL-WR845N 300Mbps Wireless N Router Wireless Radio — Enable or disable the wireless radio. Wireless Network Name — Enter a string of up to 32 characters. The same name of SSID (Service Set Identification) must be assigned to all wireless devices in your network. -
Page 27
TL-WR845N 300Mbps Wireless N Router No Change — If you chose this option, wireless security configuration will not change! The above settings are only for basic wireless parameters. For advanced settings, please check “More Advanced Wireless Settings”, and then you can set the following parameters. -
Page 28: Chapter 4. Configuring The Router
TL-WR845N 300Mbps Wireless N Router Chapter 4. Configuring the Router This chapter will show each Web page’s key functions and the configuration way. Login After your successful login, you will see the main menus on the left of the Web-based utility. On the right, there are the corresponding explanations and instructions.
-
Page 29: Status
TL-WR845N 300Mbps Wireless N Router Status The Status page provides the current status information about the router. All information is read-only. Quick Setup Please refer to 3.2 Quick Installation Guide. This section will guide you to add a new wireless device to an existing network quickly by WPS (Wi-Fi Protected Setup) function.
-
Page 30
TL-WR845N 300Mbps Wireless N Router Choose menu “WPS”, and you will see the next screen (shown in the figure below ). WPS Status — Enable or disable the WPS function here. Current PIN — The current value of the router’s PIN is displayed here. The default PIN of the … -
Page 31
TL-WR845N 300Mbps Wireless N Router Step 2: Press and hold the WPS button of the client device directly. Step 3: The Wi-Fi Protected Setup LED flashes for two minutes during the Wi-Fi Protected Setup process. Step 4: When the WPS LED is on, the client device has successfully connected to the router. -
Page 32: Network
TL-WR845N 300Mbps Wireless N Router Note: The WPS LED on the router will light green for five minutes if the device has been successfully added to the network. The WPS function cannot be configured if the Wireless Function of the router is disabled.
-
Page 33
TL-WR845N 300Mbps Wireless N Router This page displays the WAN IP parameters assigned dynamically by your ISP, including IP address, Subnet Mask, Default Gateway, etc. Click the Renew button to renew the IP parameters from your ISP. Click the Release button to release the IP parameters. -
Page 34
TL-WR845N 300Mbps Wireless N Router Default Gateway — (Optional) Enter the gateway IP address in dotted-decimal notation provided by your ISP. MTU Size — The normal MTU (Maximum Transmission Unit) value for most Ethernet networks is 1500 Bytes. It is not recommended that you change the default MTU Size unless required by your ISP. -
Page 35
TL-WR845N 300Mbps Wireless N Router Dynamic IP — You can check this radio button to use Dynamic IP as the secondary connection to connect to the local area network provided by ISP. Static IP — You can check this radio button to use Static IP as the secondary connection … -
Page 36
TL-WR845N 300Mbps Wireless N Router MTU Size — The default MTU size is “1480” bytes, which is usually fine. It is not recommended that you change the default MTU Size unless required by your ISP. Service Name/AC Name — The service name and AC (Access Concentrator) name, which … -
Page 37
TL-WR845N 300Mbps Wireless N Router User Name/Password — Enter the User Name and Password provided by your ISP. These fields are case-sensitive. Auth Server — Enter the authenticating server IP address or host name. Auth Domain — Type in the domain suffix server name based on your location. -
Page 38
TL-WR845N 300Mbps Wireless N Router Connect Automatically — The connection can be re-established automatically when it was down. Connect Manually — You can click the Connect/Disconnect button to connect/disconnect immediately. This mode also supports the Max Idle Time function as Connect on Demand mode. -
Page 39
TL-WR845N 300Mbps Wireless N Router User Name/Password — Enter the User Name and Password provided by your ISP. These fields are case-sensitive. Dynamic IP/ Static IP — Choose either as you are given by your ISP. Click the Connect button … -
Page 40
TL-WR845N 300Mbps Wireless N Router User Name/Password — Enter the User Name and Password provided by your ISP. These fields are case-sensitive. Dynamic IP/ Static IP — Choose either as you are given by your ISP and enter the ISP’s IP … -
Page 41: Mac Clone
TL-WR845N 300Mbps Wireless N Router enter the number of minutes you want to have elapsed before your Internet connection terminates. Connect Automatically — Connect automatically after the router is disconnected. To use this option, click the radio button. Connect Manually — You can configure the router to make it connect or disconnect manually.
-
Page 42: Lan
TL-WR845N 300Mbps Wireless N Router Some ISPs require that you register the MAC Address of your adapter. Changes are rarely needed here. WAN MAC Address — This field displays the current MAC address of the WAN port. If your …
-
Page 43: Wireless
TL-WR845N 300Mbps Wireless N Router IP Address — Enter the IP address of your router or reset it in dotted-decimal notation (factory default: 192.168.0.1). Subnet Mask — An address code that determines the size of the network. Normally use …
-
Page 44
TL-WR845N 300Mbps Wireless N Router Wireless Network Name — Enter a value of up to 32 characters. The same name of SSID (Service Set Identification) must be assigned to all wireless devices in your network. Considering your wireless network security, the default SSID is set to be TP-LINK_XXXX (XXXX indicates the last unique four numbers of each router’s MAC address). -
Page 45
TL-WR845N 300Mbps Wireless N Router Enable Wireless Router Radio — The wireless radio of this router can be enabled or disabled to allow wireless stations access. Please use the WiFi button on this device to enable/disable radio. Enable SSID Broadcast — When wireless clients survey the local area for wireless networks … -
Page 46: Wireless Security
TL-WR845N 300Mbps Wireless N Router 4.6.2 Wireless Security Choose menu “Wireless > Wireless Security”, you can configure the security settings of your wireless network. There are five wireless security modes supported by the router: WEP (Wired Equivalent Privacy), WPA (Wi-Fi Protected Access), WPA2 (Wi-Fi Protected Access 2), WPA2-PSK (Pre-Shared Key), WPA-PSK (Pre-Shared Key).
-
Page 47
TL-WR845N 300Mbps Wireless N Router Note: If you check the WPA/WPA2 – Personal (Recommended) radio button and choose TKIP encryption, you will find a notice in red as shown in the figure below. Wireless Password — You can enter ASCII characters between 8 and 63 characters or 8 to •… -
Page 48
TL-WR845N 300Mbps Wireless N Router Radius Password — Enter the password for the Radius Server. • Group Key Update Period — Specify the group key update interval in seconds. The value • should be 30 or above. Enter 0 to disable the update. -
Page 49: Wireless Mac Filtering
TL-WR845N 300Mbps Wireless N Router 4.6.3 Wireless MAC Filtering Choose menu “Wireless > MAC Filtering”, you can control the wireless access by configuring the Wireless MAC Address Filtering function, shown in the figure below To filter wireless users by MAC Address, click Enable. The default setting is Disabled.
-
Page 50
TL-WR845N 300Mbps Wireless N Router Status — Select Enabled or Disabled for this entry on the Status pull-down list. Click the Save button to save this entry. To modify or delete an existing entry: Click the Modify in the entry you want to modify. If you want to delete the entry, click the Delete. -
Page 51: Wireless Advanced
TL-WR845N 300Mbps Wireless N Router 4.6.4 Wireless Advanced Choose menu “Wireless > Wireless Advanced”, you can configure the advanced settings of your wireless network. Transmit Power — Here you can specify the transmit power of router. You can select …
-
Page 52: Wireless Statistics
TL-WR845N 300Mbps Wireless N Router Enable WMM — WMM function can guarantee the packets with high- priority messages being transmitted preferentially. It is strongly recommended enabled. Enable Short GI — This function is recommended for it will increase the data capacity by …
-
Page 53: Guest Network
TL-WR845N 300Mbps Wireless N Router Guest Network 4.7.1 Wireless Settings Choose menu “Guest Network > Wireless Settings”, you can configure the Guest Network Wireless Settings on the page as shown in the figure below. Allow Guest To Access My Local Network — If enabled, guests can communicate with …
-
Page 54: Dhcp
TL-WR845N 300Mbps Wireless N Router Access Time — During this time the wireless stations could accessing the AP. Note: The range of bandwidth for Guest Network is calculated according to the setting of Bandwidth Control on the page “Bandwidth Control > Control Settings”.
-
Page 55: Dhcp Clients List
TL-WR845N 300Mbps Wireless N Router Address Lease Time — The Address Lease Time is the amount of time a network user will be allowed connection to the router with their current dynamic IP Address. Enter the amount of time in minutes and the user will be «leased» this dynamic IP Address. After the time is up, the user will be automatically assigned a new dynamic IP address.
-
Page 56
TL-WR845N 300Mbps Wireless N Router will always receive the same IP address each time when it accesses the DHCP server. Reserved IP addresses should be assigned to the servers that require permanent IP settings. MAC Address — The MAC address of the PC for which you want to reserve IP address. -
Page 57: Forwarding
TL-WR845N 300Mbps Wireless N Router Click the Next button to go to the next page and Click the Previous button to return the previous page. Forwarding There are four submenus under the Forwarding menu: Virtual Servers, Port Triggering, DMZ and UPnP. Click any of them, and you will be able to configure the corresponding function.
-
Page 58
TL-WR845N 300Mbps Wireless N Router To set up a virtual server entry: Click the Add New… button. (pop-up the page of Add or Modify a Virtual Server Entry Select the service you want to use from the Common Service Port list. If the Common Service Port list does not have the service that you want to use, type the number of the service port or service port range in the Service Port box. -
Page 59: Port Triggering
TL-WR845N 300Mbps Wireless N Router Note: If you set the service port of the virtual server as 80, you must set the Web management port on System Tools > Remote Management page to be any other value except 80 such as 8080.
-
Page 60
TL-WR845N 300Mbps Wireless N Router To add a new rule, follow the steps below. Click the Add New… button, the next screen will pop-up as shown in the figure below. Select a common application from the Common Applications drop-down list, then the Trigger Port field and the Incoming Ports field will be automatically filled. -
Page 61: Dmz
TL-WR845N 300Mbps Wireless N Router Incoming Port Range cannot overlap each other. 4.9.3 Choose menu “Forwarding > DMZ”, you can view and configure DMZ host in the screen.The DMZ host feature allows one local host to be exposed to the Internet for a special-purpose service such as Internet gaming or videoconferencing.
-
Page 62: Security
TL-WR845N 300Mbps Wireless N Router Current UPnP Status — UPnP can be enabled or disabled by clicking the Enable or Disable button. As allowing this may present a risk to security, this feature is enabled by default. Current UPnP Settings List — This table displays the current UPnP information.
-
Page 63: Basic Security
TL-WR845N 300Mbps Wireless N Router 4.10.1 Basic Security Choose menu “Security > Basic Security”, you can configure the basic security in the screen as shown in the figure below. Firewall — A firewall protects your network from the outside world. Here you can enable or …
-
Page 64: Advanced Security
TL-WR845N 300Mbps Wireless N Router the use of cryptographic security services. To allow IPSec tunnels to pass through the router, keep the default, Enabled. ALG — It is recommended to enable Application Layer Gateway (ALG) because ALG allows customized Network Address Translation (NAT) traversal filters to be plugged into the gateway to support address and port translation for certain application layer «control/data»…
-
Page 65
TL-WR845N 300Mbps Wireless N Router Packets Statistics Interval (5~60) — The default value is 10. Select a value between 5 and 60 seconds from the drop-down list. The Packets Statistics Interval value indicates the time section of the packets statistics. The result of the statistics is used for analysis by SYN Flood, UDP Flood and ICMP-Flood. -
Page 66: Local Management
TL-WR845N 300Mbps Wireless N Router 4.10.3 Local Management Choose menu “Security > Local Management”, you can configure the management rule in the screen as shown in the figure below. The management feature allows you to deny computers in LAN from accessing the router.
-
Page 67: Parental Control
TL-WR845N 300Mbps Wireless N Router Web Management Port — Web browser access normally uses the standard HTTP service port 80. This router’s default remote management web port number is 80. For greater security, you can change the remote management web port to a custom port by entering that number in the box provided.
-
Page 68
Website Description field. Enter the allowed domain name of the website, either the full name or the keywords (e.g. TP-LINK) in the Allowed Domain Name field. Any domain name with keywords in it will be allowed. Select from the Effective Time drop-down list the schedule (e.g. Schedule_1) you want the entry to take effect. -
Page 69
For example: If you desire that the child PC with MAC address 00-11-22-33-44-AA can access www.tp-link.com on Saturday only while the parent PC with MAC address 00-11-22-33-44-BB is without any restriction, you should follow the settings below. 1. Click “Parental Control” menu on the left to enter the Parental Control Settings page. -
Page 70: Access Control
TL-WR845N 300Mbps Wireless N Router Enter “Allow TP-LINK” in the Website Description field. Enter “www.tp-link.com” in the Allowed Domain Name field. Select “Schedule_1” you create just now from the Effective Time drop-down list. In Status field, select Enable.
-
Page 71
TL-WR845N 300Mbps Wireless N Router Enable Internet Access Control — Select the check box to enable the Internet Access Control function, so the Default Filter Policy can take effect. Rule Name — Here displays the name of the rule and this name is unique. -
Page 72
For example: If you desire to allow the host with MAC address 00-11-22-33-44-AA to access www.tp-link.com only from 18:00 to 20:00 on Saturday and Sunday, and forbid other hosts in the LAN to access the Internet, you should follow the settings below: 1. -
Page 73: Host
TL-WR845N 300Mbps Wireless N Router In Schedule field, select Schedule_1. In Action field, select Allow. In Status field, select Enable. Click Save to complete the settings. Then you will go back to the Access Control Rule Management page and see the following list.
-
Page 74: Target
TL-WR845N 300Mbps Wireless N Router Click the Next button to go to the next page, or click the Previous button return to the previous page. For example: If you desire to restrict the internet activities of host with MAC address 00-11-22-33-44-AA, you should first follow the settings below: 1.
-
Page 75
TL-WR845N 300Mbps Wireless N Router Target Description — Here displays the description about the target and this description is unique. Information — The target can be IP address, port, or domain name. Modify — To modify or delete an existing entry. -
Page 76: Schedule
2) In Domain Name field, enter the domain name, either the full name or the keywords (for example tp-link) in the blank. Any domain name with keywords in it will be blocked or allowed. You can enter 4 domain names.
-
Page 77
TL-WR845N 300Mbps Wireless N Router Schedule Description — Here displays the description of the schedule and this description is unique. Day — Here displays the day(s) in a week. Time — Here displays the time period in a day. -
Page 78: Advanced Routing
300Mbps Wireless N Router For example: If you desire to restrict the internet activities of host with MAC address 00-11-22-33-44-AA to access www.tp-link.com only from 18:00 to 20:00 on Saturday and Sunday, you should first follow the settings below: 1. Click Add New… button on the page of Advanced Schedule Settings to enter the Advanced Schedule Settings page.
-
Page 79: Static Routing List
TL-WR845N 300Mbps Wireless N Router 4.13.1 Static Routing List Choose menu “Advanced Routing > Static Routing List”, and then you can configure the static route in the next screen. A static route is a pre-determined path that network information must travel to reach a specific host or network.
-
Page 80: System Routing Table
TL-WR845N 300Mbps Wireless N Router Click the Enable All button to enable all the entries. Click the Disable All button to disable all the entries. Click the Delete All button to delete all the entries. Click the Previous button to view the information in the previous screen, click the Next button to view the information in the next screen.
-
Page 81: Control Settings
TL-WR845N 300Mbps Wireless N Router There are two submenus under the Bandwidth Control menu. Click any of them, and you will be able to configure the corresponding function. The detailed explanations for each submenu are provided below. 4.14.1 Control Settings Choose menu “Bandwidth Control >…
-
Page 82: Ip & Mac Binding
TL-WR845N 300Mbps Wireless N Router Enable — This displays the status of the rule. Modify — Click Modify to edit the rule. Click Delete to delete the rule. To add/modify a Bandwidth Control rule, follow the steps below.
-
Page 83
TL-WR845N 300Mbps Wireless N Router MAC Address — The MAC address of the controlled computer in the LAN. IP Address — The assigned IP address of the controlled computer in the LAN. Bind — Check this option to enable ARP binding for a specific device. -
Page 84: Arp List
TL-WR845N 300Mbps Wireless N Router Click the Find button in the page as shown in the figure below. Click the Enable All button to make all entries enabled. Click the Delete All button to delete all entries. 4.15.2 ARP List…
-
Page 85: Dynamic Dns
TL-WR845N 300Mbps Wireless N Router Note: An item could not be loaded to the IP & MAC Binding list if the IP address of the item has been loaded before. Error warning will prompt as well. Likewise, «Load All» only loads the items without interference to the IP &…
-
Page 86: Dyndns Ddns
TL-WR845N 300Mbps Wireless N Router Type the Password for your DDNS account. Click the Login button to log in to the DDNS service. Connection Status -The status of the DDNS service connection is displayed here. Click Logout to log out of the DDNS service.
-
Page 87: Ipv6 Support
TL-WR845N 300Mbps Wireless N Router To set up for DDNS, follow these instructions: Type the User Name for your DDNS account. Type the Password for your DDNS account. Type the Domain Name you received from dynamic DNS service provider. Click the Login button to log in the DDNS service.
-
Page 88: Ipv6 Status
TL-WR845N 300Mbps Wireless N Router 4.17.1 IPv6 Status The IPv6 Status page displays the router’s current IPv6 status and configuration. All information is read-only. Connection Type — The IPv6 connection way for WAN. • IPv6 Address — The WAN IPv6 address.
-
Page 89: Ipv6 Setup
TL-WR845N 300Mbps Wireless N Router 4.17.2 IPv6 Setup Enable IPv6 — Tick the checkbox to enable the IPv6 function. It’s enabled by default. WAN Connection Type — Choose the correct WAN connection type based on your ISP network topology.
-
Page 90
TL-WR845N 300Mbps Wireless N Router SLAAC IPv6 Address — The IPv6 address assigned by your ISP dynamically. IPv6 Address Prefix — Display the IPv6 Prefix Length in dotted-decimal notation provided by your ISP. Default Gateway — Display the default gateway in colon-hexadecimal notation provided by … -
Page 91
TL-WR845N 300Mbps Wireless N Router Address Autoconfiguration Type — RADVD (Router Advertisement Daemon) and DHCPv6 (Dynamic Host Configuration Protocol for IPv6) Server. Site Prefix Configuration Type — The type of IPv6 address prefix. Delegated — Get the IPv6 address prefix from the ISP automatically, and the device will •… -
Page 92
TL-WR845N 300Mbps Wireless N Router Primary IPv6 DNS — Enter the DNS IPv6 address in dotted-decimal notation provided by your ISP. Secondary IPv6 DNS — Enter another DNS IPv6 address in dotted-decimal notation provided by your ISP. … -
Page 93
TL-WR845N 300Mbps Wireless N Router MTU Size (in bytes) — The normal MTU (Maximum Transmission Unit) value for most Ethernet networks is 1500 Bytes. For some ISPs, you may need to modify the MTU. But this is rarely required, and should not be done unless you are sure it is necessary for your ISP connection. -
Page 94
TL-WR845N 300Mbps Wireless N Router PPPoEv6 PPPoE Session — The PPP session type for IPv6 connection. There are two types: Share with PPPoEv4 — The PPPoEv6 and PPPoEv4 use the same PPP session. • Create a new Session — The PPPoEv6 and PPPoEv4 use different PPP sessions. It is •… -
Page 95
TL-WR845N 300Mbps Wireless N Router Alway On — Connect automatically. • Connect Manual — Connect by the user manually. • Click the Connect button to connect immediately. Click the Disconnect button to disconnect immediately. Address Autoconfiguration Type — RADVD (Router Advertisement Daemon) and DHCPv6 (Dynamic Host Configuration Protocol for IPv6) Server. -
Page 96: System Tools
TL-WR845N 300Mbps Wireless N Router MTU Size — The normal MTU (Maximum Transmission Unit) value for most Ethernet networks is 1480 Bytes. For some ISPs, you may need to modify the MTU. But this is rarely required, and should not be done unless you are sure it is necessary for your ISP connection.
-
Page 97: Time Settings
TL-WR845N 300Mbps Wireless N Router 4.18.1 Time Settings Choose menu “System Tools > Time Settings”, you can configure the time on the following screen. Time Zone — Select your local time zone from this drop-down list. Date — Enter your local date in MM/DD/YY into the right blanks.
-
Page 98: Diagnostic
TL-WR845N 300Mbps Wireless N Router To set time automatically: Select your local time zone. Enter the address or domain of the NTP Server I or NTP Server II. Click the Get GMT button to get system time from Internet if you have connected to the Internet.
-
Page 99
Domain Name System (DNS) queries. IP Address/Domain Name — Type the destination IP address (such as 202.108.22.5) or Domain name (such as http://www.tp-link.com) Pings Count — The number of Ping packets for a Ping connection. -
Page 100: Firmware Upgrade
TL-WR845N 300Mbps Wireless N Router The Diagnostic Results page displays the result of diagnosis. If the result is similar to the following screen, the connectivity of the Internet is fine. Note: Only one user can use this tool at one time. Options “Number of Pings”, “Ping Size” and “Ping Timeout”…
-
Page 101: Factory Defaults
TL-WR845N 300Mbps Wireless N Router Note: 1. New firmware versions are posted at http://www.tp-link.com and can be downloaded for free. There is no need to upgrade the firmware unless the new firmware has a new feature you want to use. However, when experiencing problems caused by the router rather than the configuration, you can try to upgrade the firmware.
-
Page 102: Reboot
TL-WR845N 300Mbps Wireless N Router Click the Backup button to save all configuration settings as a backup file in your local computer. To upgrade the router’s configuration, follow these instructions. Click the Browse… button to locate the update file for the router, or enter the exact path •…
-
Page 103: Password
TL-WR845N 300Mbps Wireless N Router 4.18.7 Password Choose menu “System Tools > Password”, you can change the factory default user name and password of the router in the next screen as shown in the figure below. It is strongly recommended that you should change the factory default user name and password of the router, because all users who try to access the router’s Web-based utility or Quick Setup will be prompted for the router’s default user name and password.
-
Page 104
TL-WR845N 300Mbps Wireless N Router Auto Mail Feature — Indicates whether auto mail feature is enabled or not. Mail Settings — Set the receiving and sending mailbox address, server address, validation information as well as the timetable for Auto Mail Feature, as shown in the figure below. -
Page 105: Statistics
TL-WR845N 300Mbps Wireless N Router Note: Only when you select Authentication, do you have to enter the User Name and Password in the following fields. User Name — Your mail account name filled in the From field. The part behind @ is …
-
Page 106
TL-WR845N 300Mbps Wireless N Router Current Statistics Status — Enable or Disable. The default value is disabled. To enable, click the Enable button. If disabled, the function of DoS protection in Security settings will be disabled. Packets Statistics Interval (5-60) — The default value is 10. Select a value between 5 and … -
Page 107: Logout
TL-WR845N 300Mbps Wireless N Router The number of TCP SYN packets transmitted to the WAN per second at the specified Packets Statistics interval. It is shown like “current transmitting rate SYN Tx / Max transmitting rate”. Reset Reset the value of he entry to zero.
-
Page 108: Appendix A: Faq
TL-WR845N 300Mbps Wireless N Router Appendix A: FAQ How do I configure the router to access Internet by ADSL users? First, configure the ADSL Modem configured in RFC1483 bridge model. Connect the Ethernet cable from your ADSL Modem to the WAN port on the router. The telephone cord plugs into the Line port of the ADSL Modem.
-
Page 109
TL-WR845N 300Mbps Wireless N Router How do I configure the router to access Internet by Ethernet users? Login to the router, click the “Network” menu on the left of your browser, and click «WAN» submenu. On the WAN page, select “Dynamic IP” for «WAN Connection Type», finish by clicking “Save”. -
Page 110
TL-WR845N 300Mbps Wireless N Router Note: Your opposite side should call your WAN IP, which is displayed on the “Status” page. How to enable DMZ Host: Log in to the router, click the “Forwarding” menu on the left of your browser, and click «DMZ»… -
Page 111
TL-WR845N 300Mbps Wireless N Router I want to build a WEB Server on the LAN, what should I do? Because the WEB Server port 80 will interfere with the WEB management port 80 on the router, you must change the WEB management port number to avoid interference. -
Page 112
TL-WR845N 300Mbps Wireless N Router on the “Add or Modify a Virtual Server” page, enter “80” into the blank next to the “Service Port”, and your IP address next to the “IP Address”, assuming 192.168.0.188 for an example, remember to Enable and Save. -
Page 113: Appendix B: Configuring The Pc
TL-WR845N 300Mbps Wireless N Router Appendix B: Configuring the PC In this section, we’ll introduce how to install and configure the TCP/IP correctly in Windows 7. First make sure your Ethernet Adapter is working, refer to the adapter’s manual if needed.
-
Page 114
TL-WR845N 300Mbps Wireless N Router The following TCP/IP Properties window will display and the IP Address tab is open on this window by default. Now you have two ways to configure the TCP/IP protocol below: Setting IP address automatically… -
Page 115
TL-WR845N 300Mbps Wireless N Router Setting IP address manually Select Use the following IP address radio button. And the following items available If the router’s LAN IP address is 192.168.0.1, specify the IP address as 192.168.0.x (x is from 2 to 254), and Subnet mask is 255.255.255.0. -
Page 116
TL-WR845N 300Mbps Wireless N Router -106-… -
Page 117: Appendix C: Specifications
TL-WR845N 300Mbps Wireless N Router Appendix C: Specifications General Standards IEEE 802.3, 802.3u, 802.11b, 802.11g and 802.11n Protocols TCP/IP, PPPoE, DHCP, ICMP, NAT, SNTP One 10/100M Auto-Negotiation WAN RJ45 port, Four 10/100M Ports Auto-Negotiation LAN RJ45 ports supporting Auto MDI/MDIX 10BASE-T: UTP category 3, 4, 5 cable (maximum 100m) EIA/TIA-568 100Ω…
-
Page 118: Appendix D: Glossary
TL-WR845N 300Mbps Wireless N Router Appendix D: Glossary 802.11n — 802.11n builds upon previous 802.11 standards by adding MIMO (multiple-input multiple-output). MIMO uses multiple transmitter and receiver antennas to allow for increased data throughput via spatial multiplexing and increased range by exploiting the spatial diversity, perhaps through coding schemes like Alamouti coding.
-
Page 119
TL-WR845N 300Mbps Wireless N Router SSID — A Service Set Identification is a thirty-two character (maximum) alphanumeric key identifying a wireless local area network. For the wireless devices in a network to communicate with each other, all devices must be configured with the same SSID. This is typically the configuration parameter for a wireless PC card.
Всем привет! Наконец-то поменял свой старый роутер на новенький TP-Link TL-WR845N. Сразу скажу, что этот аппарат уже долгие годы не выходит из производства, и не зря. Для тех, кто еще сомневается, в самом начале я описал все плюсы и минусы – все коротко и по существу. Если вам это не интересно, то вы можете пропустить эту главу – далее мы сразу приступаем к подключению и настройке. Если будут какие-то вопросы, то пишите в комментариях.
Содержание
- Плюсы и минусы аппарата и мое личное мнение
- ШАГ 1: Знакомство и распаковка
- ШАГ 2: Подключение к локальной сети
- ШАГ 3: Быстрая настройка
- Настройка с компьютера
- Настройка с телефона с помощью приложения Tether
- ШАГ 4: Знакомство с дополнительными плюшками роутера (детальные настройки)
- Состояние (Status)
- Рабочие режимы
- Настройка интернета
- Изменить внутренний IP адрес роутера
- Клонирование MAC-адреса (MAC Clone)
- Беспроводной режим (Wireless)
- Фильтрация MAC-адресов (Wireless MAC Filtering)
- Гостевая сеть (Guest Network)
- DHCP
- Проброс портов
- DMZ
- Как управлять роутером из интернета (Локальное управление – Remote Management)
- Блокировка сайтов по URL (Родительский контроль – Parental Control Settings)
- Контроль пропускной способности
- Обновление прошивки
- Инструкция на русском языке (Manual)
- Эмулятор
- Задать вопрос автору статьи
Плюсы и минусы аппарата и мое личное мнение
- Стильный дизайн, который подходит почти под любой интерьер.
- Стабильно работает с нагрузкой в 6-8 устройств. Никаких перезагрузок и зависаний.
- Удобный старый олдскульный интерфейс. Если кто хоть раз видел новые прошивки от TP-Link, то меня поймет. На мой взгляд старая прошивка куда удобнее.
- Удобный режим «Быстрой настройки», где тебе не нужно выбирать тип подключения – достаточно ввести страну, регион и выбрать поставщика услуг. Удобно.
- Родительский контроль – есть возможность заблокировать ненужные сайты или установить Яндекс.ДНС, который будет блокировать опасный и ненужный контент.
- Есть проброс портов и удаленный доступ через приложение или браузер. Для, тех у кого динамический IP адрес – есть возможность использовать ДДНС.
- Хорошая сборка.
- Нет никаких проблем с перегреванием – на дне есть дырочки для отвода тепла.
- Настройку и контроль можно выполнять через приложение Tether.
- Цена – аппарат стоит достаточно дешево, учитывая его огромный функционал.
- Поддерживает все режимы работы от точки доступа до повторителя.
- В отзывах на других сайтах ребята пишут, что аппарат стабильно работает годами, и никаких проблем.
- Нет поддержки Wi-Fi 5 ГГц. Есть поддержка стандартов IEEE 802.11n/b/g и максимальная скорость в беспроводной сети – 300 Мбит в секунду. Это 4-е поколение Wi-Fi. Недавно вышло уже 6-ое WiFi поколение с большей скоростью.
- Все порты на 100 Мбит в секунду. Хочешь поставить интернет с большим каналом? Придется брать другой аппарат.
- Нет USB порта – хотя он мне и не нужен.
Это бюджетный аппарат, который подойдет почти для 90% небольших семей. Хорошо подходит для квартир до 5 комнат. В моем случае 8 устройств стабильно работают при постоянном использовании интернета. Все минусы, которые я описал, притянуты за уши, так как многим и не нужно 5-ое или 6-ое поколения Wi-Fi. Но если вы хотите посмотреть модель подороже, и с поддержкой всех современных плюх, то можете почитать обзоры вот этих аппаратов:
- TP-Link Archer AX73 (AX5400)
- TP-Link Archer AX10
Нужно только понимать, что стоят такие интернет-центры уже дороже. И уже каждый сам решает, что брать, но в качестве бюджетного варианта роутер TP-Link TL-WR845N – это идеальный выбор, почти в любую квартиру.
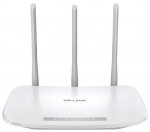
ШАГ 1: Знакомство и распаковка
Итак, 845-ый ТП-Линк идет вот в такой вот стильной коробке. Давайте посмотрим, что у нас внутри:
- Сам аппарат.
- Блок питания.
- Сетевой кабель.
- Руководство по быстрой настройке.
- Гарантийный талон.
В общем ничего особенного, как и на любых (даже не бюджетных) моделях. Давайте посмотрим, какие у нас есть индикаторы.

- Питание – включен ли наш роутер
- Wi-Fi – если просто горит, то значит беспроводная сеть работает. Если мигает, то идет передача данных.
- 4 локальных подключения к LAN портам.
- Интернет – есть ли подключение к центральному узлу провайдера.
- WPS подключение.
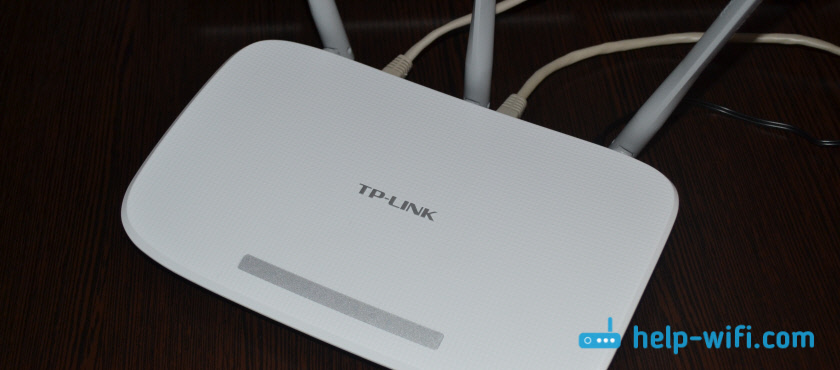
Теперь давайте посмотрим на порты сзади и сразу подключим роутер:

- Power – подключаем блок питания.
- Power On/Off – включаем роутер.
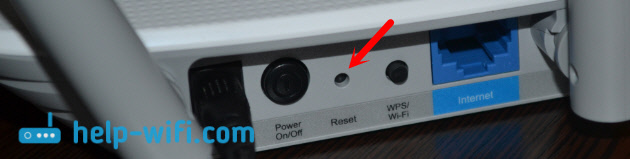
- Reset – кнопка для сброса маршрутизатора до заводских настроек. Если вы его получили с рук, то зажимаем эту кнопку на 10 секунд (при включенном роутере) и ждем, пока система полностью перегрузится.
- WPS/Wi-Fi – можно выключить или включить Wi-Fi сеть. Также нужна для подключения по WPS.
- Internet – подключаем сюда кабель, который вам прокинул провайдер.
- 1-4 – локальный порты. Сюда можно подключить компьютер, ноутбук, телевизор и другие аппараты с подобными выходами. Я лично подключил сюда комп.
Если для выхода в интернет вы используете DSL-модем, то нужно от LAN порта модема прокинуть кабель и подключить его в Internet-порт.
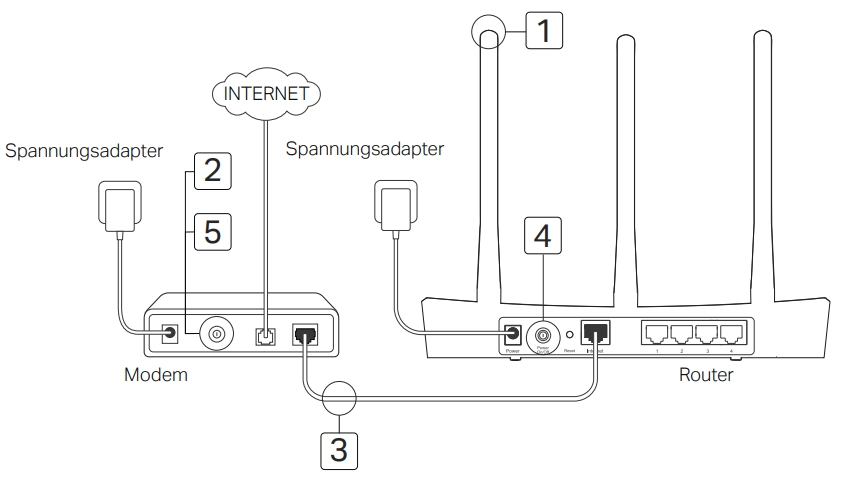
ШАГ 2: Подключение к локальной сети
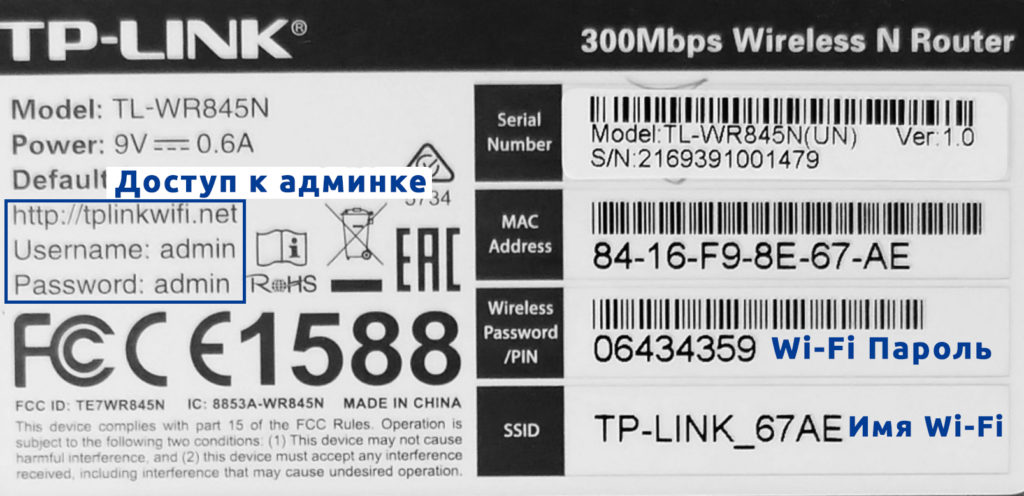
Для настроек мы будем использовать Web-интерфейс, так как он самый удобный. Но прежде, нам нужно подключиться к локальной сети маршрутизатора. Вы можете использовать проводное подключение и приконнектиться к любому LAN порту, как это сделал я. Или использовать Wi-Fi – имя (SSID) и пароль (Wireless Password/PIN) находятся на этикетке под корпусом.
Напомню, что подключиться по Wi-Fi вы можете с любого устройства, будь это телефон или даже телевизор.
ШАГ 3: Быстрая настройка
Далее у вас есть выбор, настраивать роутер через Web-интерфейс – ничего устанавливать не нужно, и вся конфигурация происходит через браузер. Второй вариант – делать настройку через приложение Tether – это очень удобное приложения для телефона и планшета. Выберите нужную вам главу.
ВНИМАНИЕ! При настройке вам скорее всего понадобятся конфигурационные данные, которые прописаны в договоре от провайдера – поэтому держите этот лист под рукой.
Настройка с компьютера
- Открываем браузер и вводим в адресную строку один из адресов:
http://tplinkwifi.net
192.168.0.1
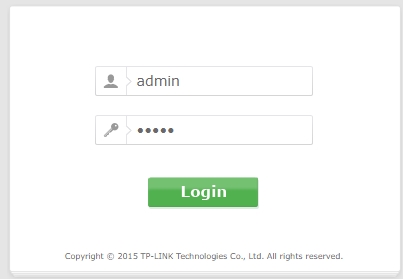
- Если вас попросят ввести логин и пароль, то вводим admin-admin. На новых прошивках логина и пароля не должно быть. Информацию можно посмотреть на этикетке – если там нет данных по этому поводу, то сбросьте аппарат до заводской конфигурации.
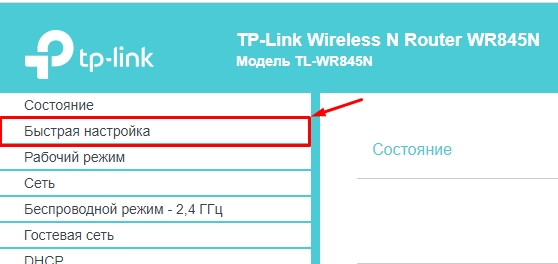
- При первом включении вас должен поприветствовать мастер быстрой настройки, если этого не произошло, то нажимаем в меню «Быстрая настройка» (Quick Setup).
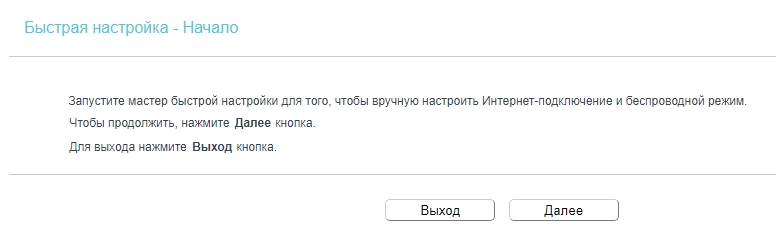
- Нажимаем «Далее» (Next).
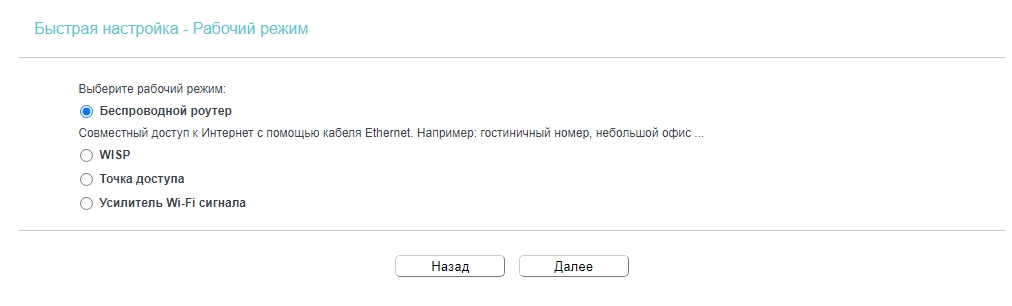
- Далее вас просят выбрать один из режимов. По умолчанию он работает как обычный беспроводной роутер.
- Можно попробовать автонастроить роутер. Для этого выбираем страну, город (регион), поставщика услуг и указываем тип подключения. Если вы не нашли своего поставщика в списке, нажмите на галочку «Я не нашел подходящих настроек».

- Если вы нажали на галочку, то вам нужно вручную выбрать тип подключения – эта информация находится в договоре от провайдера.
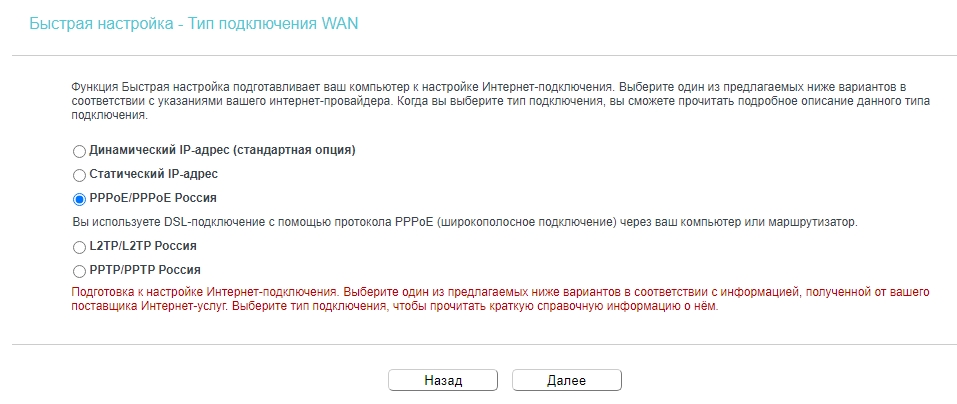
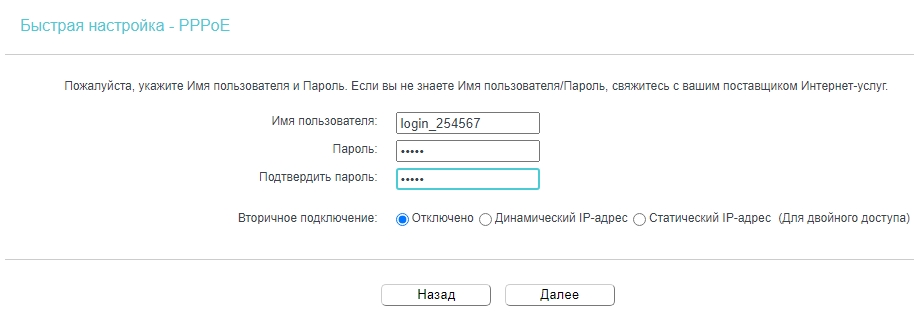
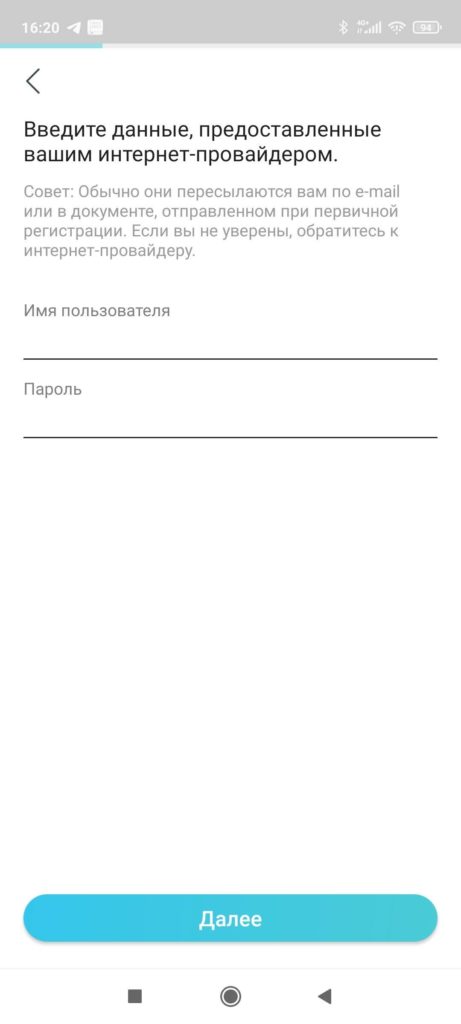
- Далее вам нужно будет ввести дополнительную информацию из договора. Также возможно понадобится вписать дополнительные данные типа IP адреса, маски и шлюза. Все это можно найти в договоре. Если вы сомневаетесь какой тип подключения вы используете, то позвоните в техническую поддержку провайдера.
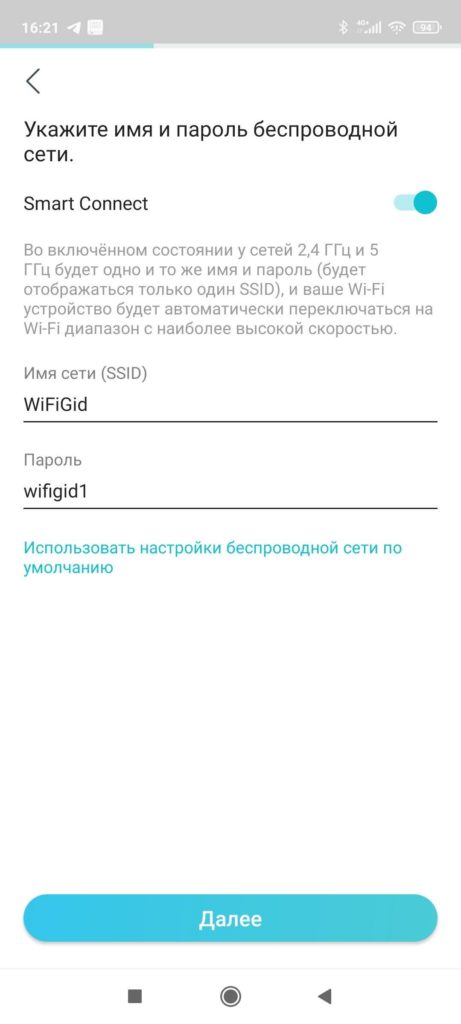
- Интернет уже должен появиться. Теперь нужно настроить Wi-Fi. «Имя беспроводной сети» (Wireless Network Name) – вписываем имя сети. В некоторых прошивках нужно также указать регион (Region) – указываем свою страну. В качестве защиты (Wireless Security) указываем «WPA2-PSK» и ниже вписываем пароль (используйте и буквы, и цифры). Нажмите на галочку «Дополнительные настройки беспроводного режима» (More Advanced Wireless Settings) и посмотрите, чтобы стояла такая же конфигурация как у меня (смотрите на картинку ниже).
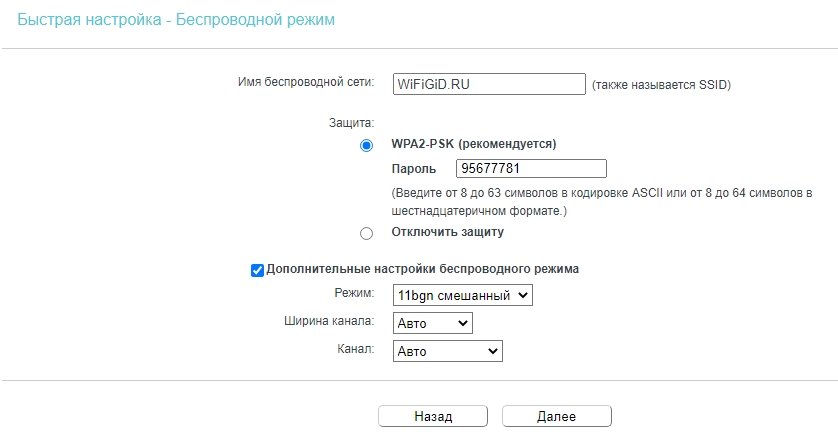
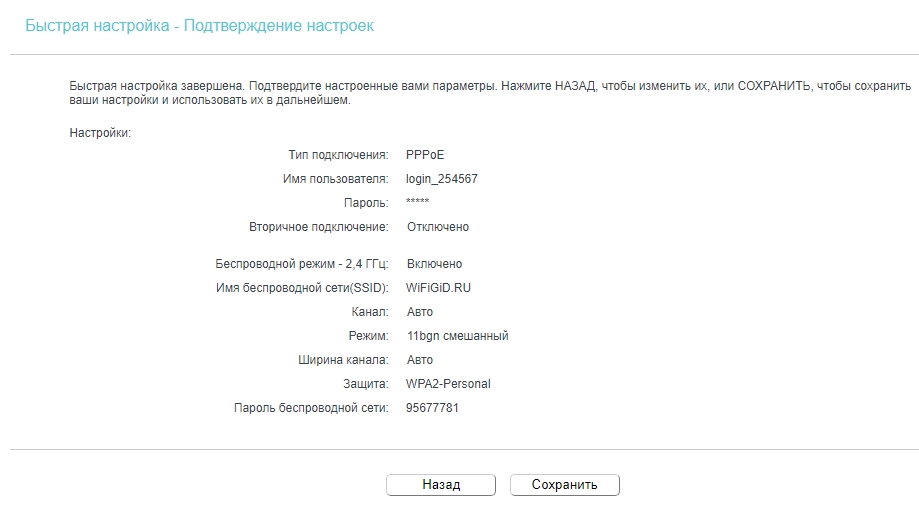
- На этом настройки завершены. Если вы все сделали верно, у вас уже должен появиться интернет, а вай-фай будет иметь новое имя и пароль. Кликаем «Сохранить».
Не спешите закрывать статью, я советую вам почитать про дополнительные плюшки аппарата в главе ниже.
Настройка с телефона с помощью приложения Tether
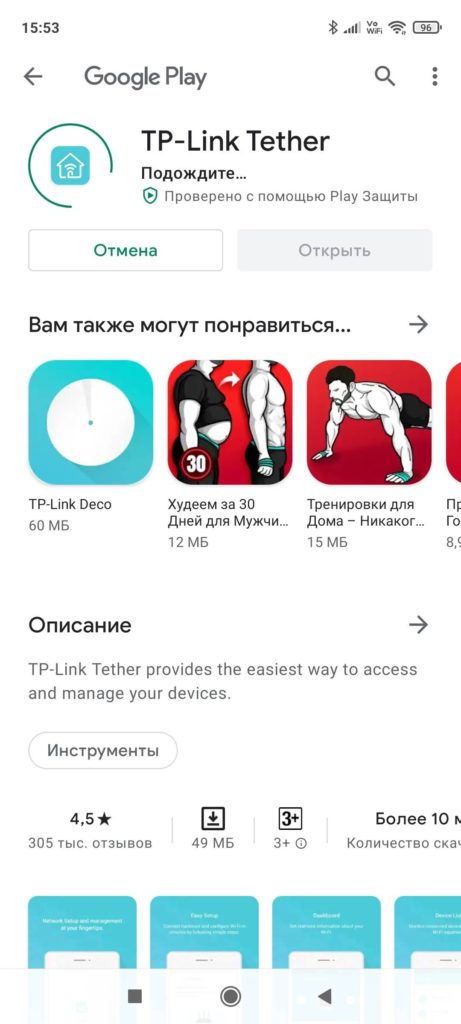
- Скачиваем программу TP-Link Tether с нужной платформы. Вы можете сами найти её или воспользоваться ссылками ниже:
- Google Play Market
- App Store
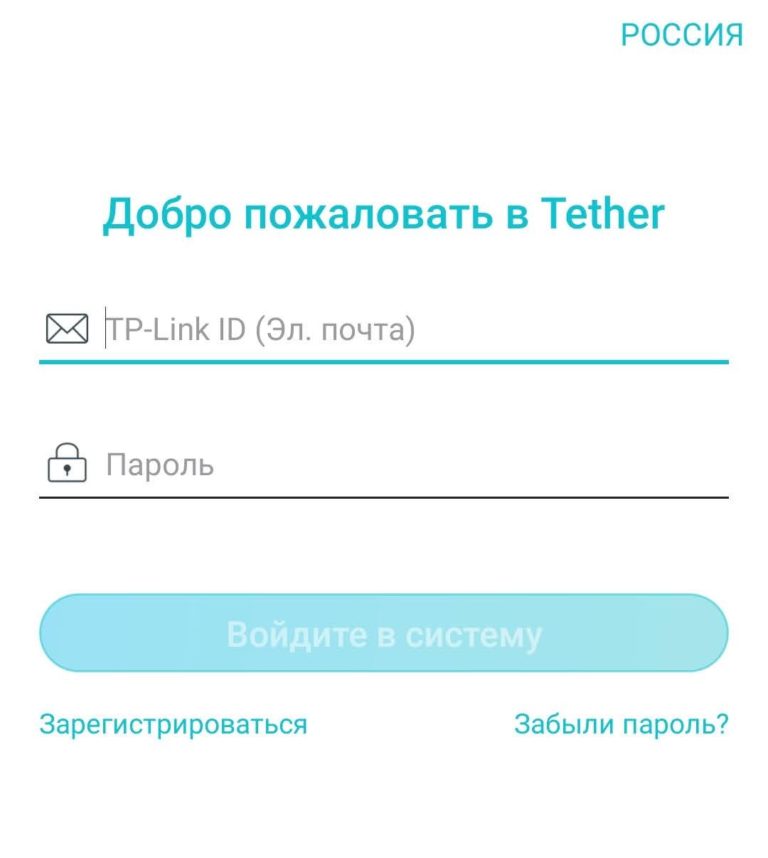
- Далее нужно будет зарегистрироваться в учетной записи TP-Link – это нужно для того, чтобы иметь удаленный доступ к роутеру из любой точки мира.
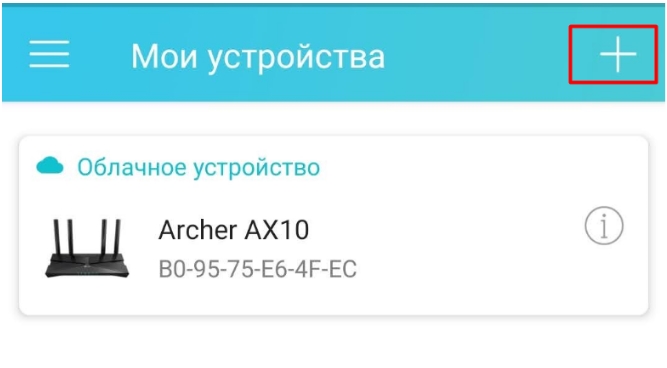
- Как только вы войдете внутрь, кликните по плюсику.
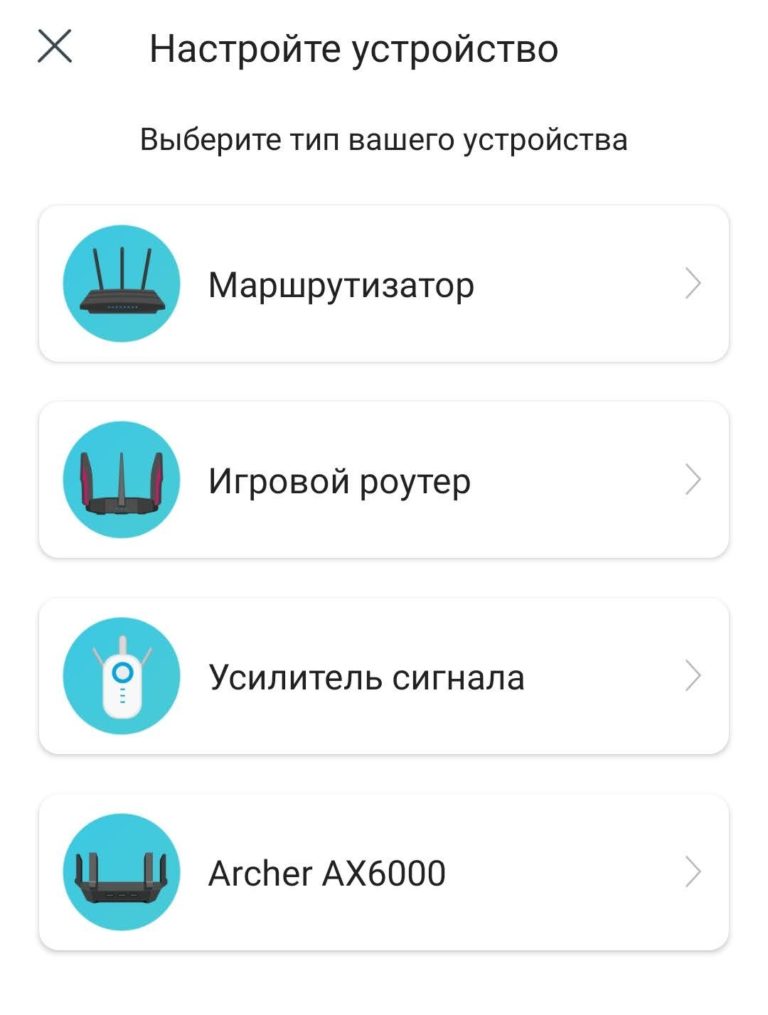
- Теперь выбираем тип устройства «Маршрутизатор».
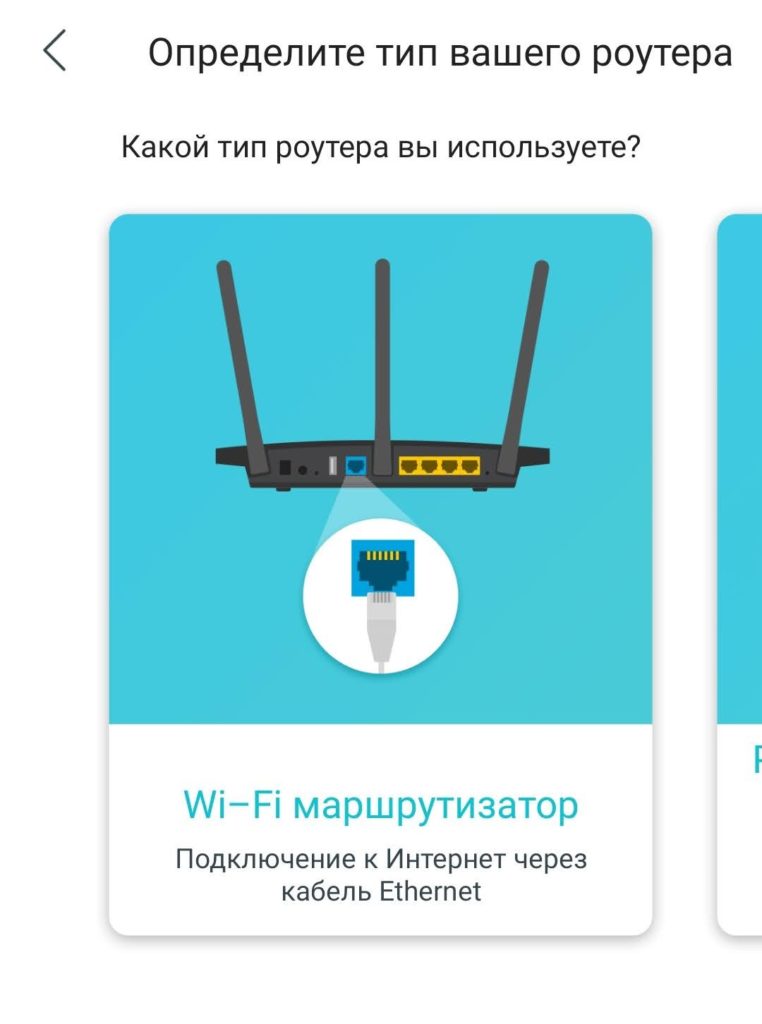
- Выбираем первый тип «Wi-Fi маршрутизатор».
- Далее идут шаги, который мы уже проделали, просто идем дальше. После этого вас попросят подключиться к Wi-Fi-сети, если вы к ней еще не подключены. Вы увидите свой роутер, нажмите по нему.

- Два раза вводим пароль от админки роутера. Запомните эту информацию, а то внутрь больше не попадете!
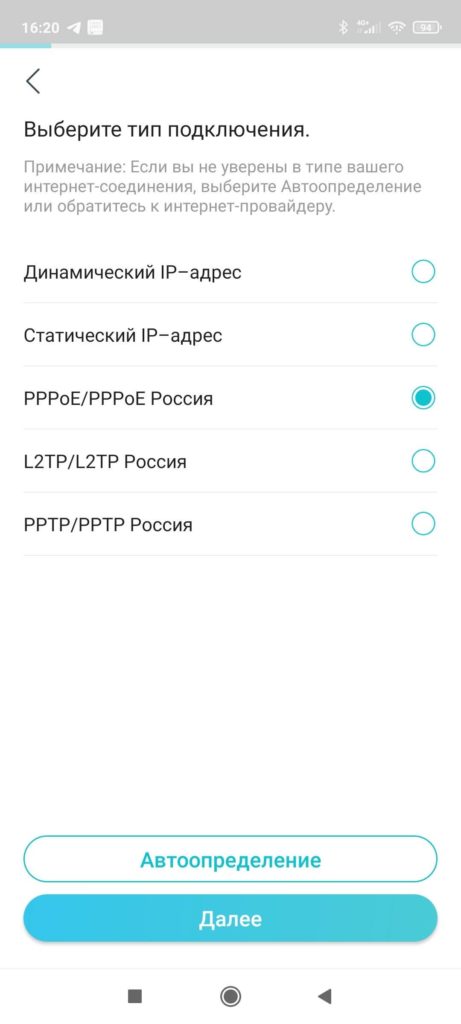
- Указываем тип подключения, который использует ваш провайдер – эту информацию смотрим в договоре. Можно попробовать нажать «Автоопределение».
- Теперь вводим дополнительные данные для авторизации в сети провайдера – списываем с договора.
- Вводим имя и ключ от вайфай сети.
- Ура, мы его настроили.
ШАГ 4: Знакомство с дополнительными плюшками роутера (детальные настройки)
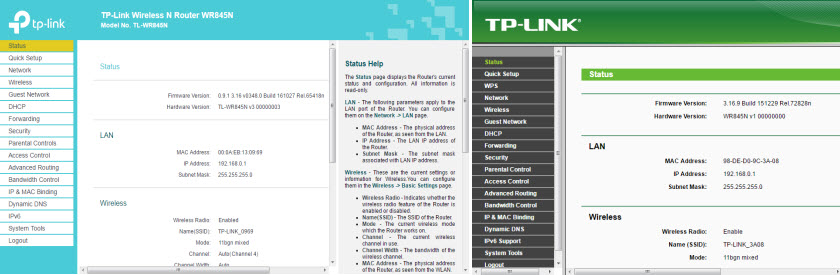
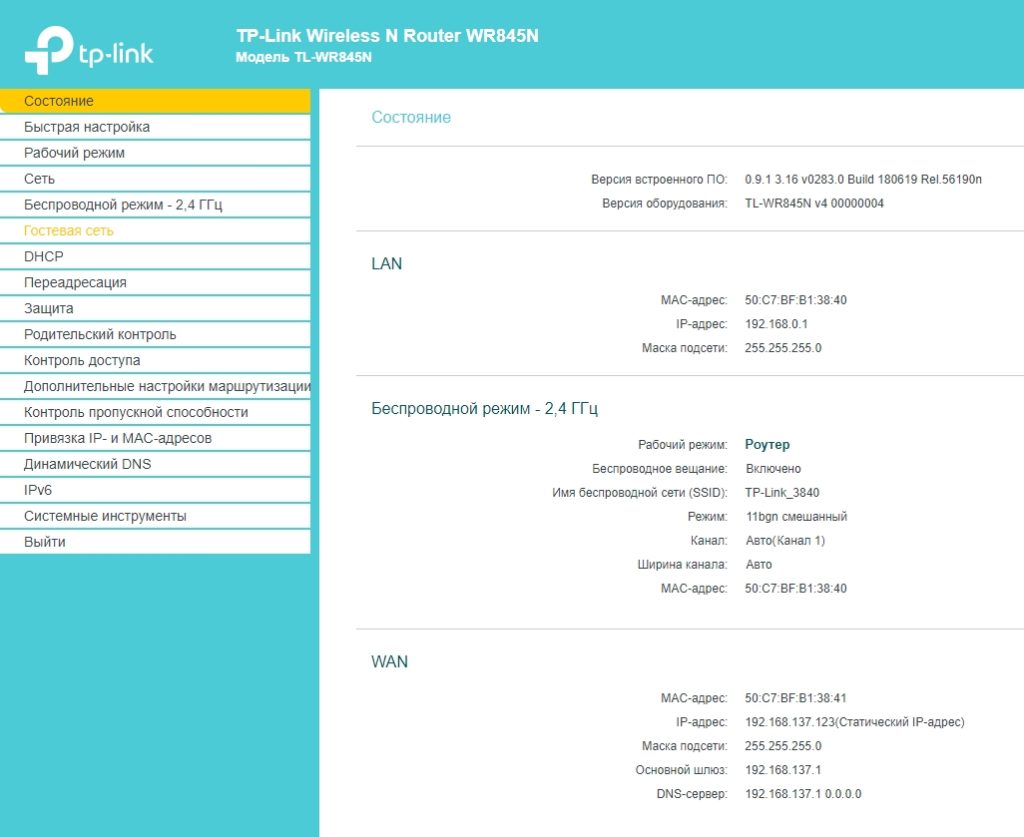
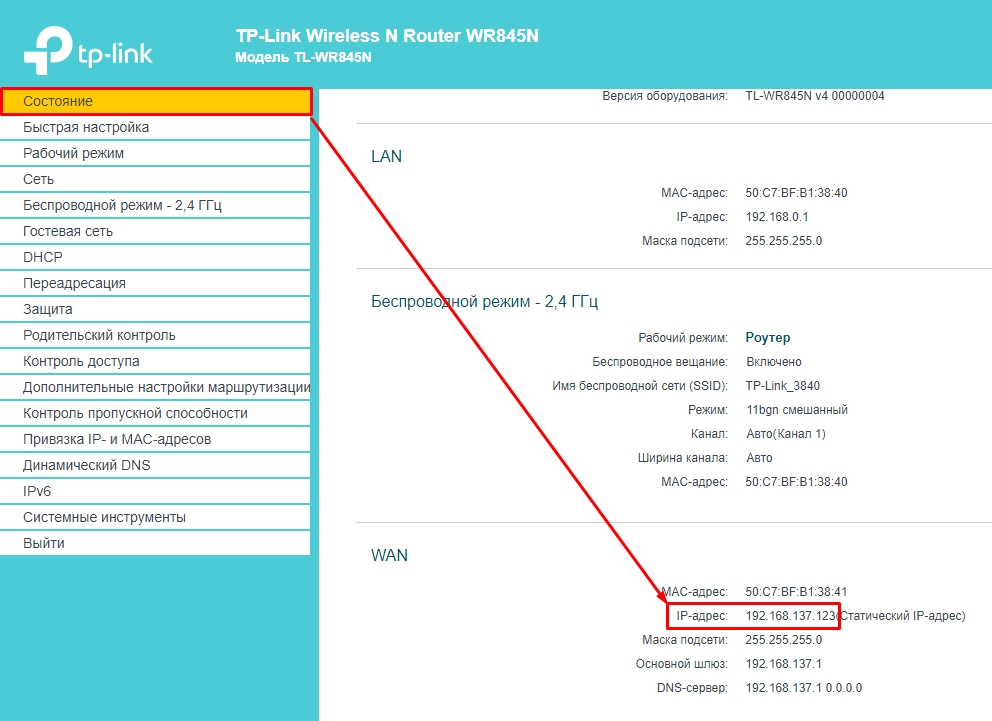
Состояние (Status)
Тут можно посмотреть статус устройства, внешний и внутренний IP, а также конфигурацию Wi-Fi. Полезная вещь, чтобы не лезть за этим в отдельные разделы системы.
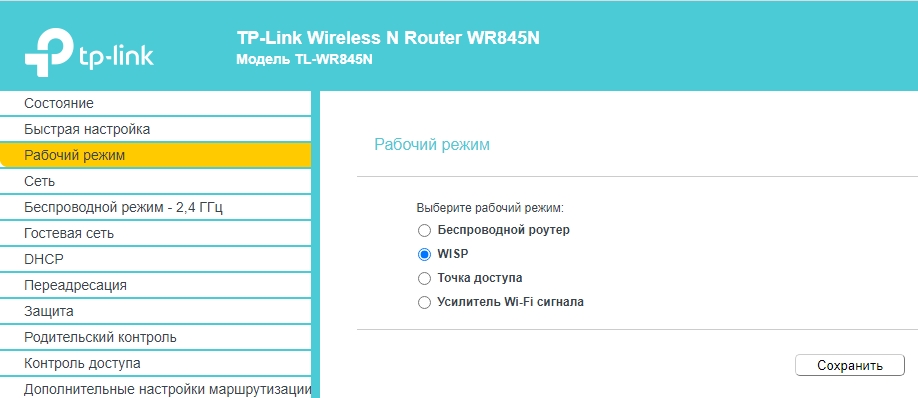
Рабочие режимы
Если вам нужно изменить рабочий режим роутера, то не нужно запускать «Быструю настройку». Про режимы я уже говорил ранее.
- Беспроводной роутер – стандартный режим.
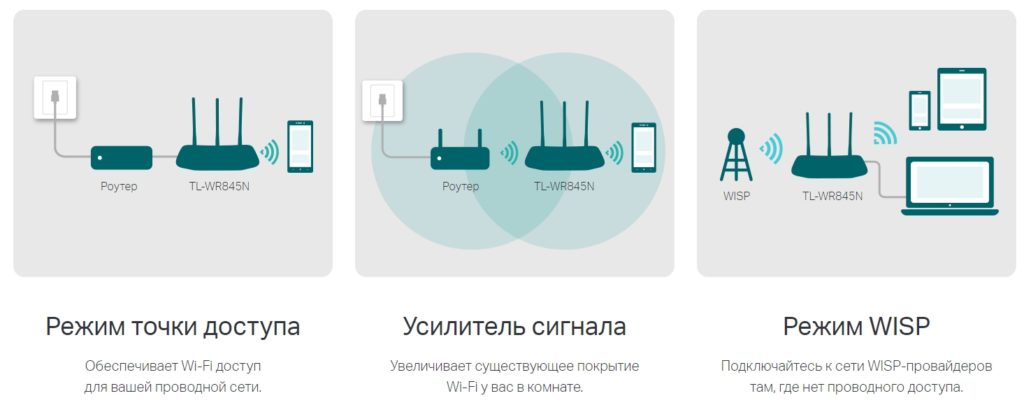
- WISP – для подключения к провайдеру по Wi-Fi. Часто используется в деревнях и селах.
- Точка доступа – подключение интернета идет от другого роутера по кабелю. Более детально про этот режим читаем тут.
- Усилитель Wi-Fi сигнала (Режим повторителя) – роутер подключается к другому маршрутизатору по Wi-Fi и просто повторяет его сигнал.
Настройка интернета
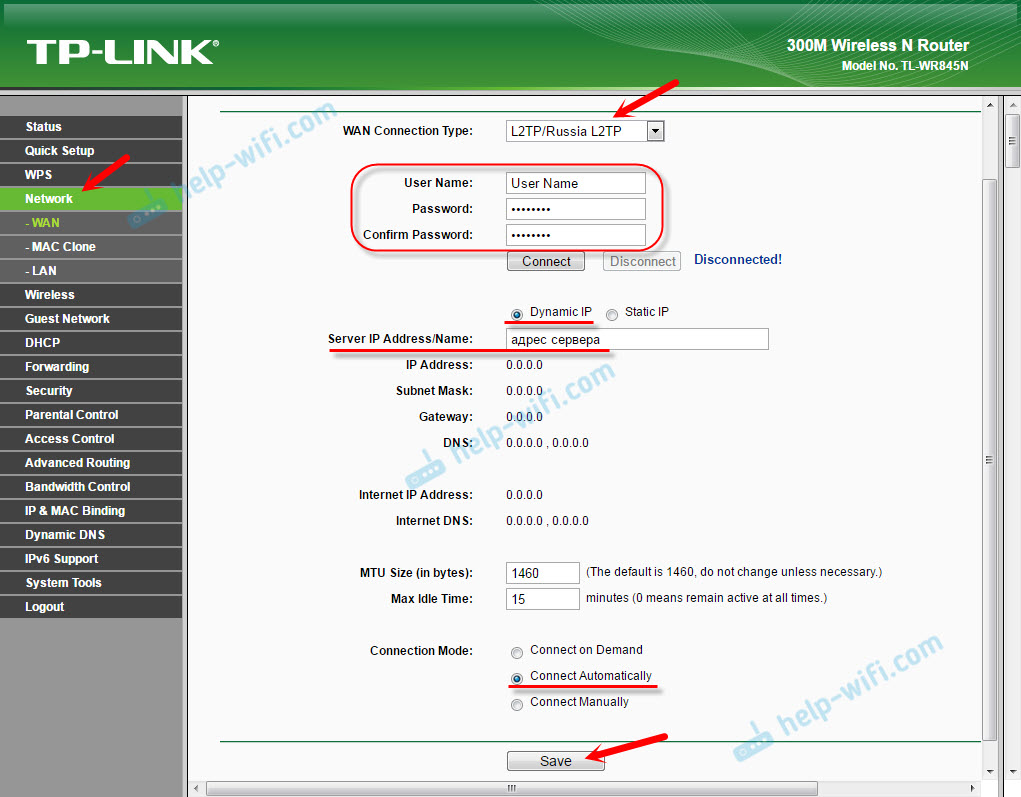
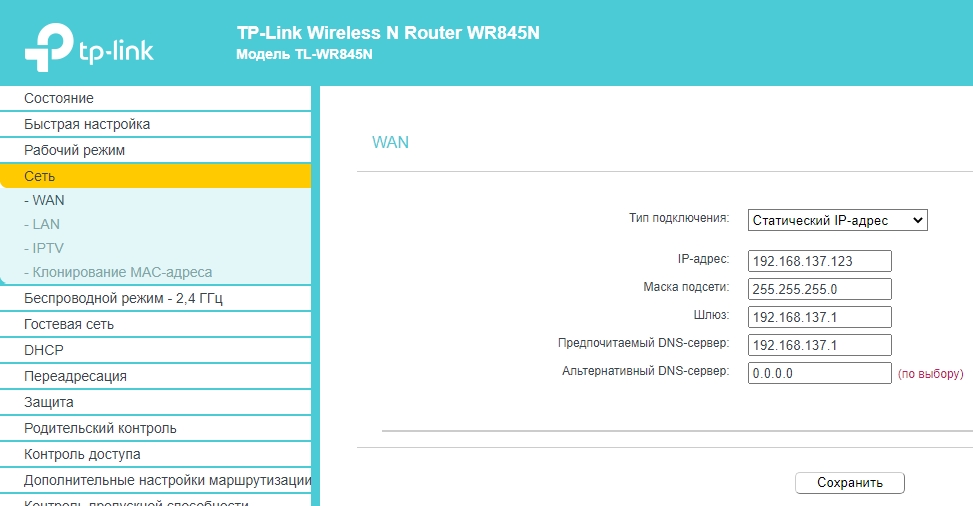
Если вы хотите изменить только настройки интернета, то просто переходим в «Сеть» (Network) – «WAN» – далее вы уже знаете, что делать.
Изменить внутренний IP адрес роутера
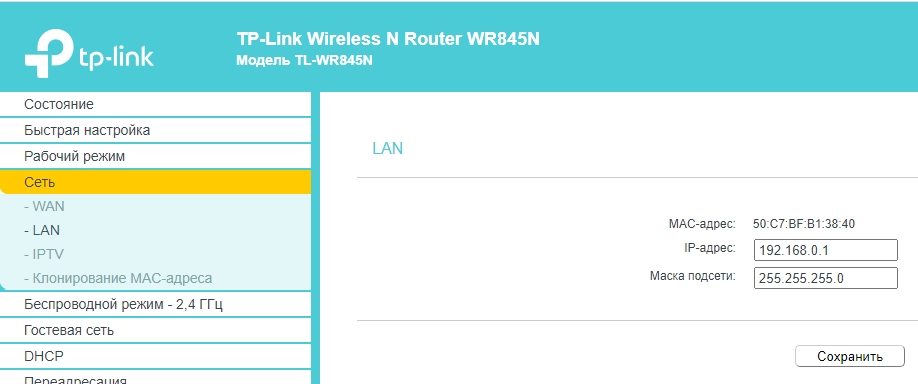
Вы можете поменять локальный айпишник на другой («Сеть» – «LAN»).
Клонирование MAC-адреса (MAC Clone)
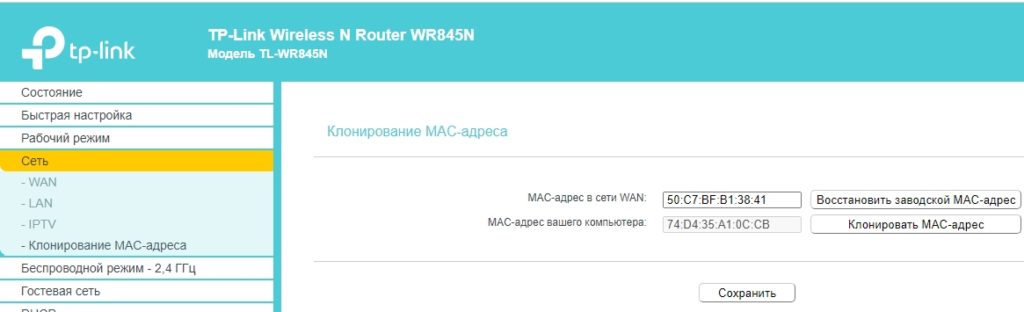
Данная штука необходима только в том случае, если ваш провайдер использует привязку по МАК-адресу.
Беспроводной режим (Wireless)
Коротко рассмотрим каждый из разделов:
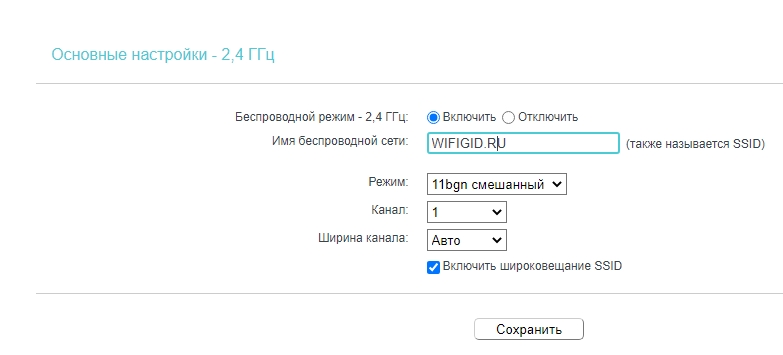
- Основные настройки (Wireless Settings) – меняем имя сети и устанавливаем основной и канальный режим.
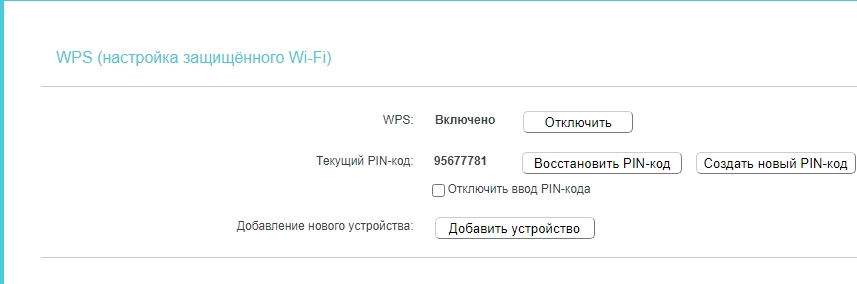
- WPS – отключите функцию, если вы не используете.
- Защита беспроводного режима (Wireless Security) – можно поменять режим шифрования и пароль от вай-фай.
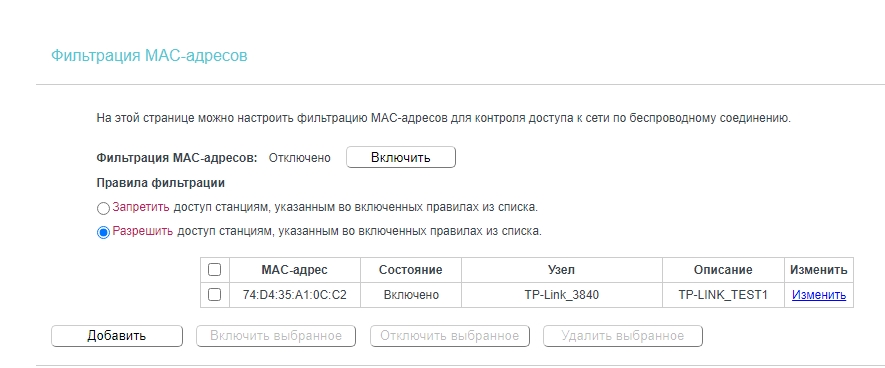
Фильтрация MAC-адресов (Wireless MAC Filtering)
Я вынес эту штуку отдельно, чтобы поговорить о ней поподробнее. Вы можете создать белый лист устройств, которые смогут иметь доступ к сети аппарата. Или заблокировать соседа, который вас взломал. Все очень просто, выбираем разрешающее (Allow) или запрещающее (Deny) правило, а уже потом добавляем устройства по МАК-адресам. Не забываем «Включить» (Enable) фильтр выше.
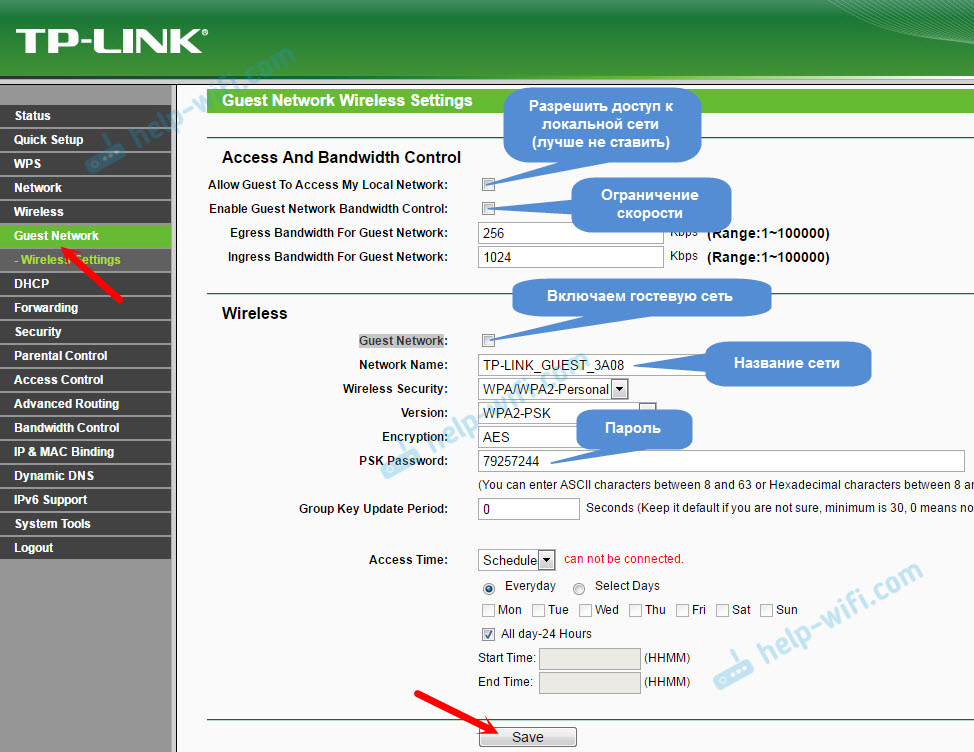
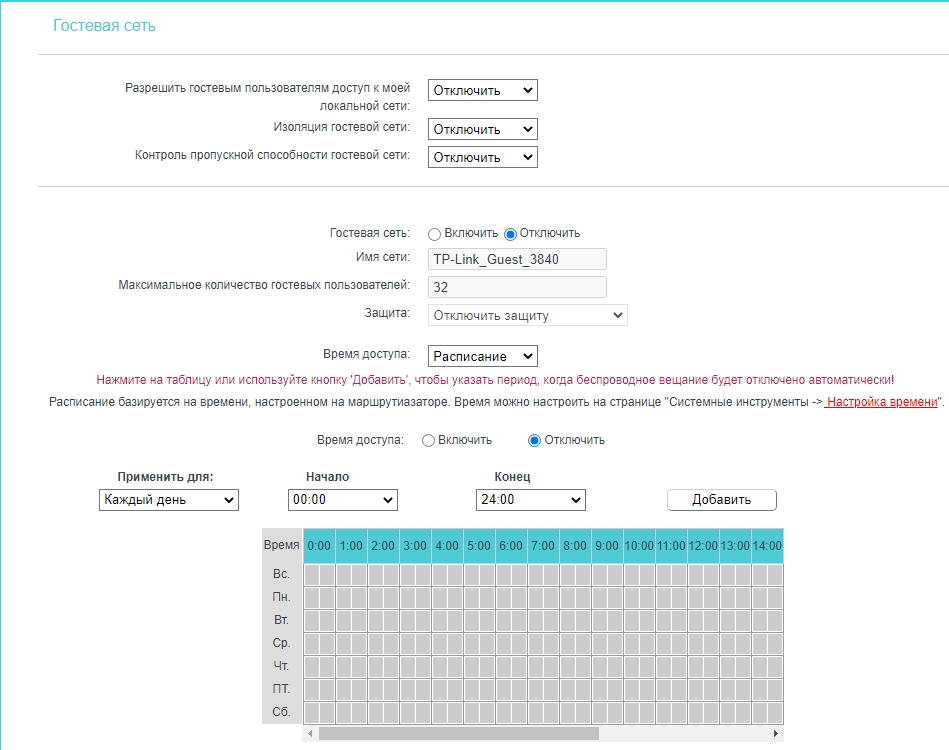
Гостевая сеть (Guest Network)
Интересная функция создания отдельной сети для сторонних пользователей. Они не смогут иметь доступ к локальной сети ваших устройств. Но все это можно более точно настроить.
DHCP
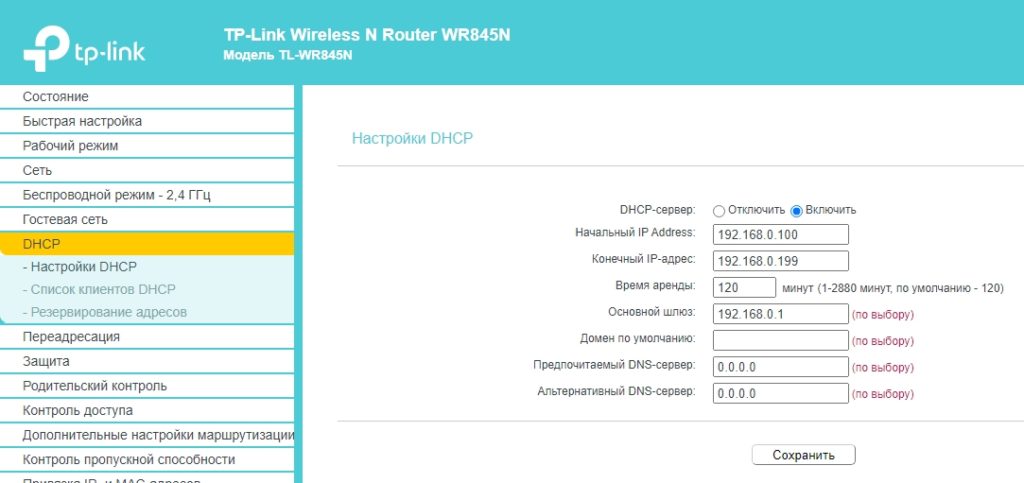
- Настройки DHCP (DHCP Settings) – Можно настроить пул адресов локальной сети.
- Список клиентов DHCP (DHCP Client List) – Просмотреть все подключенные устройства.
- Резервирование адресов (Address Reservation) – полезная штука, если вы хотите, чтобы для отдельного устройства был выделенный внутренний адрес.
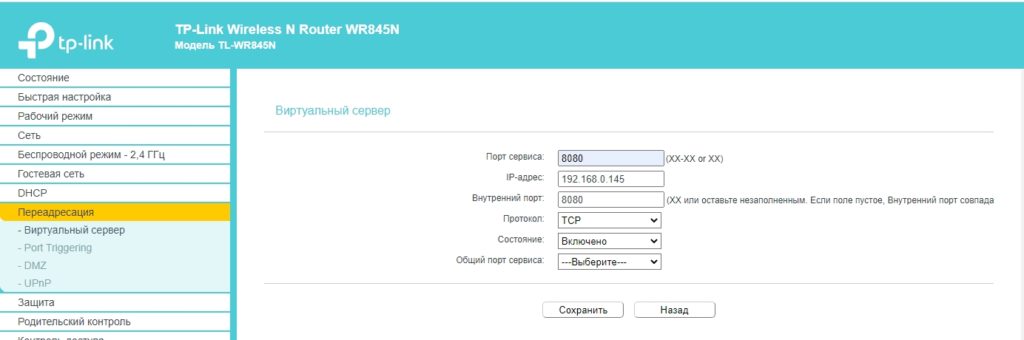
Проброс портов
Переходим в раздел «Переадресация» (Forwarding) – «Виртуальный сервер» (Virtual Servers). Вводим данные:
- Порт сервера – внешний порт.
- IP-адрес – устройство, на которое будет идти переадресация.
- Внешний порт – порт, который используется приложением или системой устройства.
- Протокол – указываем протоколы (TCP, UDP или ВСЕ)
- Состояние – ставим «Включено».
СОВЕТ! Список портов можете глянуть тут.
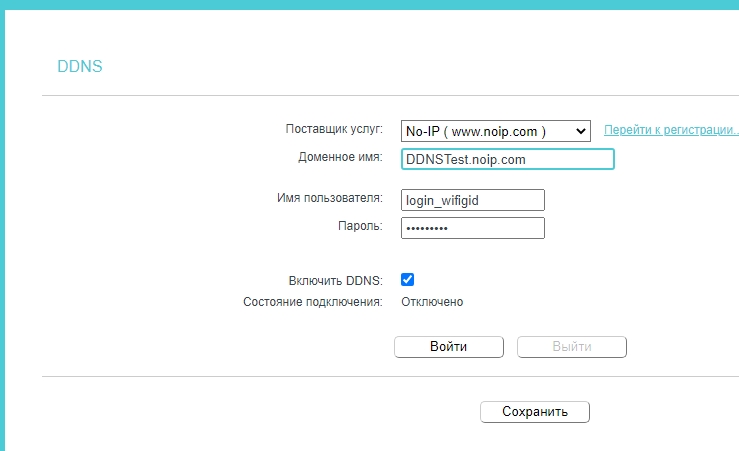
Также для проброса вам нужен белый и статический адрес. Если он у вас динамический, то для доступа можно настроить «Динамический DNS».
Переходим в DDNS. Далее вверху указываем любого поставщика и нажимаем по ссылке справа. Вас перекинет на сайт. Регистрируемся и создаем ДДНС. Далее переходим обратно и вводим Доменное имя, логин и пароль. Нажмите на галочку ниже, чтобы включить правило. Сохраняемся! После этого вы сможете иметь доступ к этому роутеру, через DDNS.
DMZ
Делает отдельное устройство полностью открытым в сети. Полезная штука, когда нужный порт занят, а времени на настройку нет. Про DMZ подробно читаем тут.
Как управлять роутером из интернета (Локальное управление – Remote Management)
Функция находится в разделе «Защита» (Security). Указываем порт управления, чаще всего используют браузеры, поэтому используем 80 или 8080. Если есть конкретный IP адрес устройства, с которого вы будете заходить из интернета, то указываем IP. Если нет, то вписываем 255.255.255.255 – чтобы использовались любые адреса.
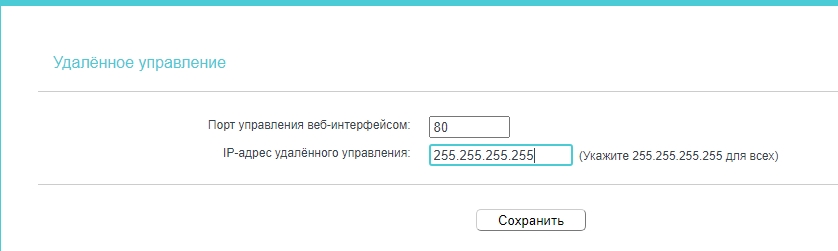
Доступ к роутеру будет по IP адресу, который можно посмотреть на вкладке «Состояние» (Status) в WAN. Далее через любой браузер вводим сначала внешний IP, а потом через двоеточие порт, который мы указали ранее. Например:
34.28.176.243:8080
ПРИМЕЧАНИЕ! При этом у вас должен быть белый статический внешний IP адрес. Про белые и серые адреса читаем тут. Если он динамический, то используйте ДДНС.
Блокировка сайтов по URL (Родительский контроль – Parental Control Settings)
- Указываем MAC-адрес ребенка.

- Можно настроить расписание. Если вы хотите, чтобы правило работало постоянно, то ничего не меняем.
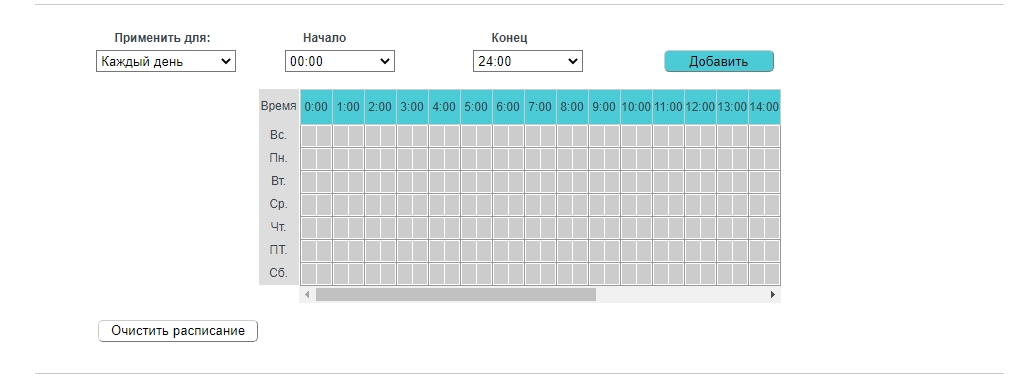
- В поле URL вводим адрес, и кликаем «Добавить». В конце жмем «Сохранить»

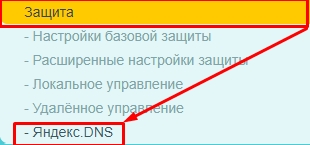
Но это еще не все. Я вам советую также использовать Яндекс.ДНС – для этого переходим в раздел «Защита».
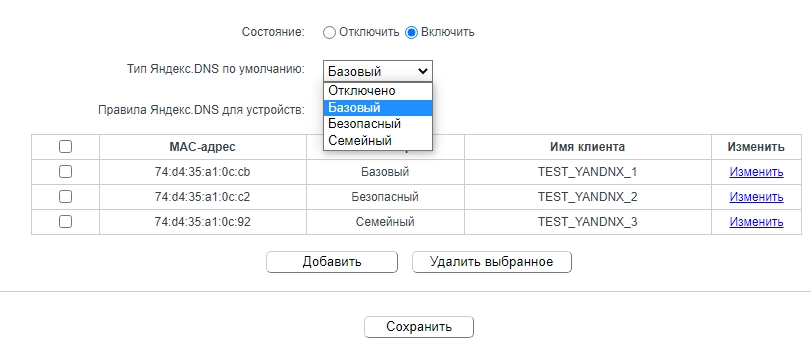
Сначала давайте я расскажу пару слов, что такое Яндекс.DNS – это ДНС сервера, которые распределены по разным типам:
- Базовый – просто быстрый ДНС.
- Безопасные – блокируют все мошеннические и опасные сайты.
- Семейный – то же самое, что безопасный, только плюсом идет блокировка взрослого контента.
Нажимаем по кнопке «Добавить». Далее выбираем MAC-адрес устройства. Ниже вводим наименование. И выбираем режим. В конце жмем сохранить.

Также смотрите, чтобы само правило было включено. В самом конце жмем еще раз «Сохранить».
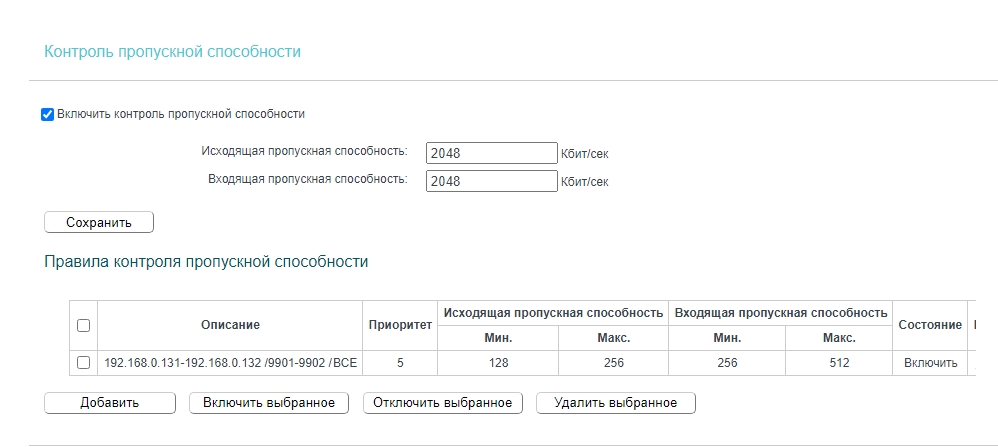
Контроль пропускной способности
Если у вас очень большая семья, а по вечерам, кто-то забирает весь интернет (запуском того же Торрента), то можно для отельных устройств назначить ограниченную пропускную способность. Там ничего сложного нет, поэтому рассказывать подробно про эту настройку не буду.
Обновление прошивки
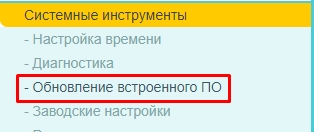
- Переходим в «Системные инструменты» (System Tools) – «Обновление встроенного ПО» (Firmware Upgrade).
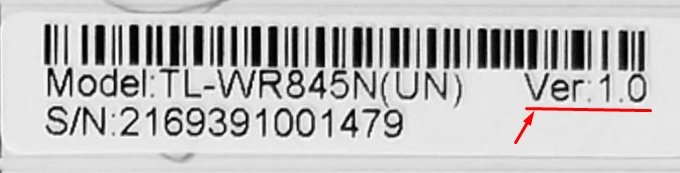
- Аппаратную версию можно посмотреть на этикетке.
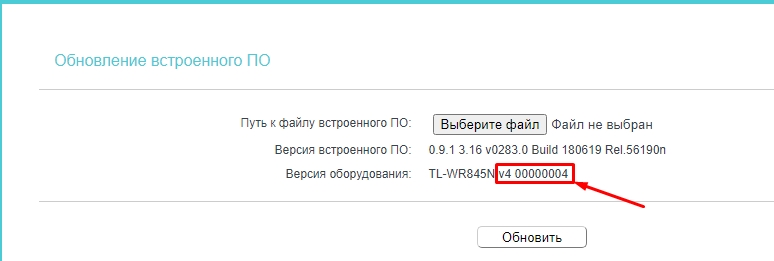
- Или можно посмотреть в строку «Версия оборудования» (Hardware Version).
- Переходим на официальную страницу аппарата. В строке выбираем нашу аппаратную версию. Внизу нажимаем по вкладке «Встроенное ПО».
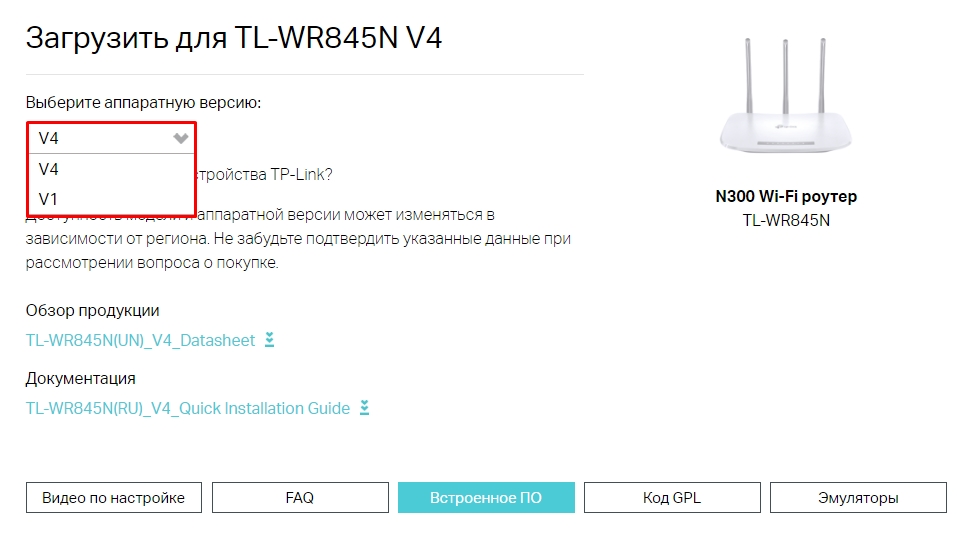
- Скачиваем его. Далее на странице маршрутизатора, нажимаем выбрать файл, и кликаем по кнопке «Обновить» (Upgrade).
Инструкция на русском языке (Manual)
Эмулятор
Ссылка на эмулятор
|
Код: 121406 Извините, товара сейчас нет в наличии
Бесплатная доставка
Извините, товара сейчас нет в наличии Сравнить Новости интернет-магазина «Лаукар»:28.03.2023 22.02.2023 13.02.2023 Дополнительная информация в категории Роутер:Таблица Авторизованных сервисных центров по брендам. Описание Инструкция Отзывы (0) В интернет-магазине бытовой техники «Лаукар» Вы можете скачать инструкцию к товару Wi-Fi роутер TP-LINK TL-WR845N совершенно бесплатно. Все инструкции, представленные на сайте интернет-магазина бытовой техники «Лаукар», предоставляются производителем товара. Для того чтобы скачать инструкцию, Вам необходимо нажать на ссылку «скачать инструкцию», расположенную ниже, а в случае, если ссылки нет, Скачать инструкцию Смотреть инструкцию
Фирма-производитель оставляет за собой право на внесение изменений в конструкцию, дизайн и комплектацию товара: Wi-Fi роутер TP-LINK TL-WR845N. Пожалуйста, сверяйте информацию о товаре с информацией на |


В этой статье я постараюсь подробно рассказать, и на примере показать процесс настройки роутера TP-Link TL-WR845N. Это особая модель маршрутизатора. И я уверен, что в ближайшее время этот роутер будет очень популярным. Он сейчас уже хорошо продается и собирает много отзывов. Почему я так решил? А все потому, что TP-Link TL-WR845N пришел на смену очень популярной модели TP-Link TL-WR841ND. Который, как я сегодня узнал, уже снят с производства.
TL-WR841ND это действительно популярная и народная модель. У меня был такой же роутер, который без проблем работает до этой поры (уже более 5 лет). Но в компании TP-Link наверное решили, что данная модель уже устарела. Хотя, он уже много раз обновлялся. Там больше 10 аппаратных версий. И на смену бюджетному, надежному и проверенному маршрутизатору выпустили новую модель TP-Link TL-WR845N. Которая должна занять место лучшего, недорогого маршрутизатора для дома, или квартиры.


Бесплатная доставка
по Красноярску
Извините, товара сейчас нет в наличии
Сравнить
Новости интернет-магазина «Лаукар»:
28.03.2023
Скидка на продукцию бренда «TOR»
22.02.2023
Ищете подарки на 8 марта? У нас большой выбор!
13.02.2023
Каким подарком порадовать защитника Отечества на 23 февраля ?
Дополнительная информация в категории Роутер:
Таблица Авторизованных сервисных центров по брендам.