В Dj программе Traktor pro, присутствует очень удобный браузер, при помощи которого можно профессионально управлять вашим музыкальным архивом. В браузере Трактор, вы можете легко создавать папки с коллекциями, плейлистами и смарт листами. Грамотно выстроенная коллекция треков, помогает диджею быстро находить треки для сета.
Браузер в Traktor pro 3 инструкция на русском языке
Браузер в Тракторе про, состоит из 8 блоков, некоторые из которых можно убирать и добавлять в меню Preferences. Рассмотрим все блоки детальнее.
Preview Player:
Проигрыватель предварительного прослушивания: вы можете предварительно прослушать треки перед их загрузкой в деку.
Включить отображения плеера предпрослушки можно в настройках.
Preferences — настройки.
Browser Details — Show Preview Player
Сведения о браузере — Показать предварительный просмотр проигрывателя
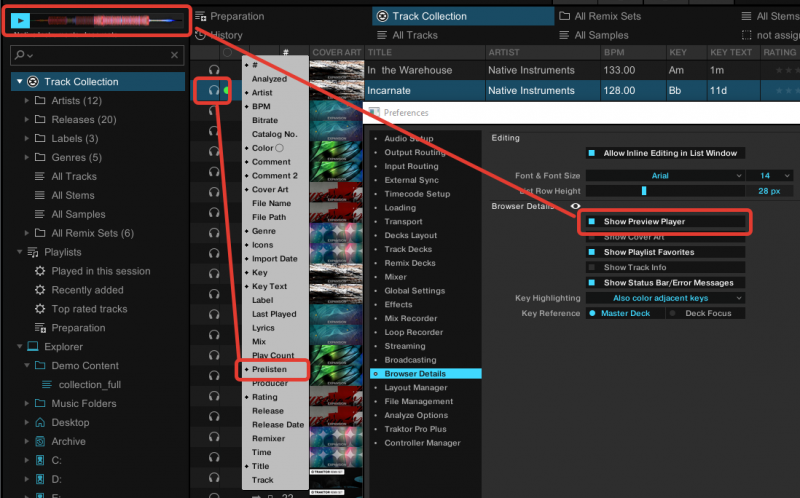
Для отображения знака наушников и возможности прослушать трек в
Preview Player, нажмите правой кнопкой на меню тегов и выберите пункт
Prelisten
Предварительное прослушивание: На рисунке ниже, выделено и отмечено желтым маркером. Нажмите на знак наушников напротив трека, который вы хотите прослушать не загружая в деку. Такими же образом вы сможете добавлять в блок тегов пункты, которые помогут вам быстрее ориентироваться в музыке и искать треки.
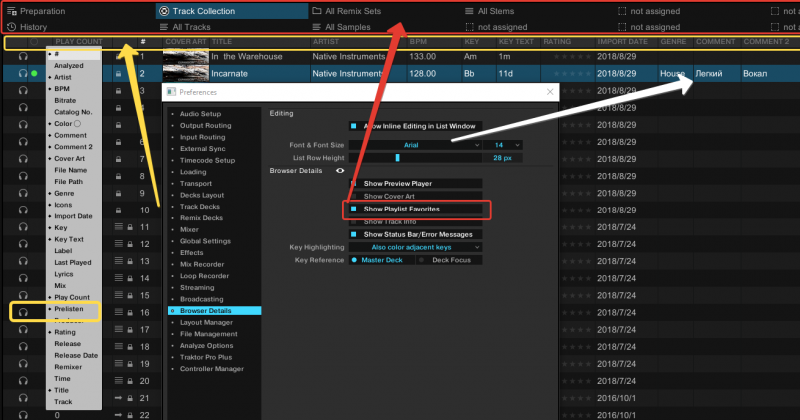
Favorites:
Избранное: для отображения блока быстрого доступа к любым папка и плейлистам, которые вы можете добавлять в него, перетаскивая их на панель избранного, зажав левую кнопку мышки. Для отображения блока Избранное, зайдите в Preferences и в меню Browser Details, отметьте пункт
Show Playlist Favorites.
Показать избранное списка воспроизведения. Отмечено красным маркером
Traktor pro русский шрифт
Для отображения русского шрифта в Traktor pro, в том же пункте меню смените Шрифт, например на Arial, отмечено белым маркером. Там же вы сможете выбрать размер шрифта и расстояние между треками в окне листа.
Allow Inline Editing in List Window:
Разрешить встроенное редактирование в окне списка: если этот флажок установлен, вы можете редактировать метаданные своих музыкальных файлов, дважды щелкнув их в списке дорожек. Если этот флажок не установлен, редактирование тегов дорожек в списке дорожек не разрешено для предотвращения нежелательных изменений, например, во время живого выступления.
Show Cover Art:
Показать обложку: Показывает или скрывает окно обложки выбранного трека. В нижнем левом углу программы Traktor Pro.
Show Track Info:
Показать информацию о треке: Показывает или скрывает панель информации о дорожке. Отображается внизу браузера под трек листом.
Show Status Bar/Error Messages:
Показывать строку состояния/Сообщения об ошибках: Отображает ход анализа дорожки, сообщения об ошибках и общее состояние Traktor Pro. Отображается там же под трек листом.
Key Highlighting:
Выделение ключей цветом:
В открывающимся меню, выбор параметра подсветки треков подходящих по ключам.
Do not color any keys — не обозначать цветом ключи.
Only color matching keys — только ключи, соответствующие цвету.
Also color adjacent keys — также цвета близкие по ключу.
Color all keys — Отображать цветом все ключи.
Для того чтобы цветом выделялись похожие ключи, нажмите на знак ноты справа от трека.
Key Reference:
Ключевая ссылка: Выбор подсветки ключа по треку в деке, Мастер дека или дека которую вы выделили. Так же детальнее на уроке Плейлисты.
Левый блок программы
Search field:
Поле поиска: живой поиск по названию и тегам треков в Коллекции. Введите имя трека в выбранном плейлисте и если нажмете интер, поиск будет по всей коллекции.
Track Collection:
Коллекция треков: Содержит все треки, импортированные в вашу коллекцию треков. Они автоматически сортируются по Художник, Выпускать, Этикетка или же Жанр.
Playlists:
Списки воспроизведения: Содержит все ваши плейлисты Traktor Pro
Explorer
Исследователь: позволяет искать треки на жестких дисках. Он также содержит Архив и папку содержащую списки воспроизведения, истории.
Audio Recordings:
Аудиозаписи: Содержит все записи, созданные с помощью AUDIO RECORDER
iTunes: обеспечивает прямой доступ к вашей медиатеке iTunes, включая все плейлисты
History:
История: Содержит последние списки воспроизведения истории. Каждый список воспроизведения истории имеет отметку времени и содержит дополнительные столбцы. Время начала, Продолжительность, Палуба для получения дополнительной информации о том, когда и как вы воспроизводили треки.
Cover Artwork:
Обложка: Отображает обложку выбранной дорожки в списке дорожек.
Status bar:
Строка состояния: Отображает ход анализа дорожки, сообщения об ошибках и общее состояние Traktor Pro.
Track List:
Список треков: Отображает дорожки в зависимости от выбранного источника (папка, список воспроизведения, результаты поиска или на основе тегов.

Действия с папками в меню Explorer.
Нажав правой кнопкой на папку в меню Explorer, откроется меню:
Refresh — Обновить список треков в выбранной папке.
Import to Collection — Импортировать в коллекцию Traktor Pro
Import Folder as Playlist — Импортировать папку как Плейлист. Импортирует папку в набор плейлистов.
Add to Music Folders — Добавить в музыкальные папки. Добавит запись о папке в Music Folders.
Reset Played-State — Сбросить игровое состояние. Удалит отметки-галочки с проигранных в деках треках.
Analyze (Async) — Анализ (асинхронный). Анализ трека.
Select All — Выбрать все треки в папке.
Действия с треком в окне треклист.
Нажмите на трек правой кнопкой мышки, в открывшимся меню вы сможете редактировать, загружать в деку трек, удалять и т.д..
Edit.
Редактирование отдельной дорожки Выберите трек в списке треков.
Щелкните трек правой кнопкой мыши, чтобы открыть контекстное меню.
- Выберите Edit.
- Список дорожек превращается в диалоговое окно редактирования.
- Отредактируйте индивидуальную информацию для вашего трека. Нажмите ОК.
- Используйте раскрывающееся меню в любом поле свойств трека, чтобы выбрать ранее сохраненный тег из вашей коллекции треков.
- Чтобы применить изменения, нажмите кнопку с надписью Apply и OK. Использовать Restore кнопку, чтобы отменить любые изменения, которые вы сделали, или используйте Cancel чтобы прервать редактирование и закрыть диалоговое окно редактирования.
Редактирование выбранных треков
Если вы хотите отредактировать набор треков, например, все треки альбома:
- Выберите дорожки в списке дорожек, удерживая кнопку Alt.
- Щелкните правой кнопкой мыши, чтобы открыть контекстное меню.
- Выберите Edit чтобы открыть диалоговое окно редактирования. Появится диалоговое окно редактирования. Установленные флажки указывают, какие из атрибутов имеют одинаковое значение для выбранных дорожек. Проверки также указывают, что все, что записано в соответствующее поле, будет сохранено в теге метаданных после применения изменений. Снятые галочки означают, что треки не имеют одинаковых значений этого поля.
- Чтобы изменить атрибут глобально для всех выбранных дорожек, убедитесь, что флажок установлен.
- Чтобы отредактировать выбранные треки один за другим, используйте Previous также Next кнопки в нижней части диалогового окна.
- Чтобы применить изменения, нажмите кнопку с надписью Apply и OK. Использовать Restore кнопку, чтобы отменить любые изменения, которые вы сделали, или используйте Cancel чтобы прервать редактирование и закрыть диалоговое окно редактирования.
Color
Задать цвет треку.
Нажать правой кнопкой на трек и в меню Color выбрать один из 7 цветов или отменить цвет заданный треку.
Например самые легкий треки в зеленый цвет, тяжелые в красный, кислотные типа Aсid в желтый, остальные цвета использую между этими тремя.
В окне тегов вы сможеет выбрать отображение колонки с цветом.
Load into Deck
Загрузить трек в Деку A, B, C, D через меню..
Нажав правой кнопкой мыши на трек, в окне треклист, вы получаете меню с выбором Деки в которую можно загрузить трек. В зависимости от выбора вида Деки в микшере или настройках, а так же загружаемого трека, у вас будут доступны Деки для загрузки.
Load into Track Deck
Load into Stem Deck
Load into Remix Deck
Load into Remix Deck: дополнительно будут доступны Slot 1, 2, 3, 4.
Import Cover — Загрузить обложку в трек
Позволяет импортировать или удалять обложки в формате .jpeg для треков из вашей коллекции треков. Импорт обложек
Чтобы импортировать или заменить обложку трека:
- Щелкните правой кнопкой мыши трек или несколько треков в списке треков, чтобы открыть контекстное меню.
- Выберите Import Cover.
- В диалоговом окне выберите файл обложки на вашем компьютере и подтвердите. Обложка теперь хранится в файлах треков.
Delete Cover — Удалить обложку
- Щелкните правой кнопкой мыши трек или несколько треков в списке треков, чтобы открыть контекстное меню.
- Выберите Delete Cover. Обложка(и) для трека(ов) удалена.
Relocate — Переместить.
Открывает диалоговое окно «Переместить»,
Если трек был перемещен или переименован или переименована папка с треками, ссылки на треки, содержащиеся в коллекции треков, приведут к отсутствующим трекам. Это можно исправить, переместив недостающие дорожки:
Нажмите Relocate, откроется окно.
В диалоговом окне просмотра перейдите к месту назначения, куда был перемещен отсутствующий трек. Чтобы найти несколько дорожек в разных папках, перейдите к папке верхнего уровня, в которой они хранятся. Вы даже можете выбрать основную папку на жестком диске.
Подтвердите свои изменения. Сейчас адрес перезаписан.
Analyze (Async)
Анализ дорожек или даже коллекций дорожек может занять очень много времени при их импорте в коллекцию дорожек или при загрузке дорожек в деки. Момент для анализа можно определить в Preferences — File Management. Вы также можете отключить его полностью. В этом случае вы можете анализировать свои треки вручную, когда не играете сет. Файлы
STEM всегда необходимо анализировать перед их загрузкой в колоду.
Щелкните правой кнопкой мыши трек или набор треков в списке треков, чтобы открыть контекстное меню. Вы также можете щелкнуть правой кнопкой мыши список воспроизведения в дереве браузера.
Выберите Analyze (Async). Анализировать открывается диалоговое окно.
Выберите параметры анализа.
Нажмите Ок чтобы начать анализ.
Параметры диалогового окна Analyze.
Диалоговое окно предлагает две опции:
All: при выборе этого параметра дорожки анализируются в соответствии с настройками по умолчанию, выбранными в Analyze Options в Настройках.
Для заблокированных дорожек All Опция не позволяет перезаписывать BPM, маркеры Beatgrid, Gain или Key.
Special: при выборе вам предоставляется более подробный диапазон настроек анализа, которые можно выполнить на дорожках:
BPM: ударов в минуту: При выборе Трактор Про анализирует трек для расчета темпа. В раскрывающемся меню ниже вы можете предварительно определить диапазон темпа. Если вы анализируете большое количество треков с очень разными темпами, выберите либо широкий диапазон, либо оставьте его автоматическим. Однако сужение диапазона темпа даст более точные результаты.
Set Beatgrid: устанавливает сетку битов на дорожку и выравнивает ее по ближайшей сильной доле. Если дорожка уже содержит сетку битов, Трактор Про переместит ее соответствующим образом. Сетку ударов нельзя установить без проверки BPM, так как эти два параметра взаимосвязаны.
Key: определение тональности дорожки.
Gain: Удаляет текущие значения усиления громкости выбранных дорожек и заменяет их значением автоматического усиления во время анализа.
Replace Locked Values: Мгновенно разблокирует дорожки, чтобы выбранные выше параметры также применялись к заблокированным дорожкам.
Parallel Processing: Включает параллельный анализ дорожек. Эта опция увеличивает нагрузку на ЦП и не должна использоваться во время игры.
Enable Analysis Lock — Включить блокировку анализа.
Disable Analysis Lock Отключить блокировку анализа.
Блокировка анализа замораживает все параметры, заданные анализом. После того, как блокировка анализа активирована для трека, параметры указанные раннее при анализе нельзя изменить вручную или в автоматическом анализе:
Show In Explorer — Показать в проводнике.
Открывает окно на компьютере с выбранным файлом.
Search in Playlists — Поиск в плейлистах.
Отображает всплывающее окно со всеми списками воспроизведения, которые содержат выбранный файл
Check Consistency — Выполнение проверки соответствия.
Щелкните правой кнопкой мыши в дереве браузера, чтобы открыть контекстное меню.
Выберите Check Consistency. После того, как TRAKTOR запустит проверку, появится отчет о проверке, показывающий результаты.
Проверка согласованности вашей коллекции треков Импорт треков без анализа, реорганизация локальных музыкальных папок и удаление треков из локальных музыкальных папок приводят к несоответствию Коллекции треков. Чтобы отслеживать свои изменения, вы можете выполнить проверку соответствия в своей коллекции треков и получить подробный результат в отчете о проверке. Отчет о проверке согласованности предоставляет обзор вашей коллекции треков и предоставляет варианты для немедленного решения проблем.
Consistency Check Report — Диалоговое окно
Show Overview — Показать вкладку «Обзор»
Total Tracks — Всего треков: общее количество треков в вашей коллекции треков.
Tracks Missing — Треки отсутствуют: общее количество дорожек, которые были удалены с жесткого диска или перемещены с исходного места.
Tracks Not Analyzed — Треки не проанализированы: общее количество дорожек, которые не были проанализированы.
Tracks Missing Stripe — Треки с отсутствующим адресом: общее количество дорожек, которые были импортированы и проанализированы, но информация о представлении адресса была перемещена или удалена.
Total Tracks To Analyze — Всего дорожек для анализа: общее количество дорожек, которые необходимо проанализировать или повторно проанализировать соответственно.
Список всех отсутствующих треков в коллекции треков.
Missing Tracks — Отсутствующие треки.
Список всех отсутствующих треков в коллекции треков.
Tracks To Analyze — Дорожки для анализа» • Перечисляет все треки в коллекции треков, которые необходимо проанализировать или повторно проанализировать соответственно.
Relocate — Перемещения кнопка: открывает диалоговое окно «Переместить», чтобы начать перемещение отсутствующих дорожек.
Remove Missing — Удалить отсутствующие треки: Удаляет ссылки на несуществующие треки из коллекции треков.
Analyze — Начинает анализ треков для анализа или повторного анализа соответственно.
Список всех отсутствующих треков в коллекции треков.
Перечисляет все треки в коллекции треков, которые необходимо проанализировать или повторно проанализировать соответственно.
Show Consistency Check Report on Startup
Выполнение проверки согласованности при запуске Трактор Про
Чтобы выполнить проверку согласованности и показать ее отчет при запуске TRAKTOR Pro:
Откройте Preferences — File Management page
Установите флажок: Show Consistency Check Report on Startup.- Показать отчет о проверке согласованности при запуске.
Проверка согласованности теперь будет выполняться каждый раз, когда вы запускаете TRAKTOR Pro. Выполнение проверки согласованности при запуске может увеличить время запуска Трактор Про.
Delete from Playlist — Удалить трек из плейлиста.
Delete from Collection — Удалить трек из коллекции.
В диалоговом окне безопасности выберите один из следующих вариантов:
- delete from collection — удалить из коллекции: Удаляет дорожки из коллекции дорожек и из всех списков воспроизведения.
- additionally remove TRAKTOR tags (may take some time): дополнительно удалите теги TRAKTOR (может занять некоторое время): Удаляет трек(и) из коллекции треков и из всех списков воспроизведения, а все теги, характерные для TRAKTOR, будут удалены из музыкальных файлов.
- additionally delete file(s) from hard drive — дополнительно удалить файл(ы) с жесткого диска: Удаляет дорожки из коллекции дорожек и из всех списков воспроизведения, а также удаляет музыкальные файлы с вашего компьютера. Треки будут удалены из вашей коллекции треков.
Удаляет дорожки из коллекции дорожек и из всех списков воспроизведения.
Append to Preparation Playlist. Добавить выбор в список воспроизведения для подготовки.
Add as Next to Preparation Playlist чтобы вставить выбранный фрагмент после последней загруженной дорожки в Preparation.
Каждая дорожка отображается со значком ромба, указывающим, что она добавлена в список воспроизведения для подготовки.
![]()

|
Table of Contents |
|
|
1. Disclaimer …………………………………………………………………………………………………… |
8 |
|
2. Welcome to TRAKTOR ………………………………………………………………………………….. |
9 |
|
2.1. Document Conventions …………………………………………………………………………. |
9 |
|
3. New in TRAKTOR PRO 3 ……………………………………………………………………………… |
10 |
|
4. The TRAKTOR Workflow ………………………………………………………………………………. |
11 |
|
5. Setting Up TRAKTOR ………………………………………………………………………………….. |
13 |
|
5.1. Importing Your Data from a Previous TRAKTOR Version …………………………….. |
14 |
|
5.2. Pre-Configuring TRAKTOR using the Setup Wizard …………………………………… |
14 |
|
5.3. Configuring TRAKTOR to Use with an External Audio Interface ……………………. |
14 |
|
5.4. TRAKTOR Layouts and Layout Switching ……………………………………………….. |
15 |
|
6. TRAKTOR Overview ……………………………………………………………………………………. |
16 |
|
6.1. Application Menu ……………………………………………………………………………….. |
17 |
|
6.2. Header ……………………………………………………………………………………………. |
17 |
|
6.3. Global Section …………………………………………………………………………………… |
18 |
|
6.3.1. Master Control Panel …………………………………………………………………. |
19 |
|
6.3.2. FX Units ………………………………………………………………………………….. |
21 |
|
6.3.3. Audio Recorder ………………………………………………………………………… |
22 |
|
6.3.4. Loop Recorder …………………………………………………………………………. |
23 |
|
6.4. Decks and Deck Types ……………………………………………………………………….. |
24 |
|
6.4.1. Common Deck Controls ……………………………………………………………… |
24 |
|
6.4.2. Track Deck ………………………………………………………………………………. |
29 |
|
6.4.3. STEM Deck ……………………………………………………………………………… |
29 |
|
6.4.4. Remix Deck …………………………………………………………………………….. |
31 |
|
6.4.5. Live Input ………………………………………………………………………………… |
32 |
|
6.4.6. Advanced Panel ……………………………………………………………………….. |
33 |
|
6.4.7. Advanced Panel on the Remix Deck ……………………………………………… |
36 |
|
6.5. Mixer ………………………………………………………………………………………………. |
37 |
|
6.5.1. Mixer Channel ………………………………………………………………………….. |
38 |
|
6.5.2. Crossfade Controls ……………………………………………………………………. |
39 |
|
6.6. Browser …………………………………………………………………………………………… |
39 |
|
7. Automatic Synchronization of Decks ……………………………………………………………….. |
41 |
|
7.1. Tempo Master and Master Clock …………………………………………………………… |
41 |
|
7.2. Beatgrid …………………………………………………………………………………………… |
41 |
|
7.3. Automatic Syncing ……………………………………………………………………………… |
41 |
|
7.4. Automatic Tempo Master Mode …………………………………………………………….. |
41 |
|
8. Basic Usage Tutorials ………………………………………………………………………………….. |
42 |
|
8.1. Importing Music to the Track Collection …………………………………………………… |
42 |
|
8.2. Browsing for Music …………………………………………………………………………….. |
42 |
|
8.2.1. Navigating through Folders in the Browser Tree ………………………………. |
42 |
|
8.2.2. Performing a Text Search ……………………………………………………………. |
43 |
2

|
8.2.3. Previewing Tracks in the Browser …………………………………………………. |
43 |
|
8.3. Loading Music into Decks ……………………………………………………………………. |
43 |
|
8.3.1. Loading Tracks from Your iTunes Library ……………………………………….. |
44 |
|
8.4. Mixing Your First Two Tracks ………………………………………………………………… |
45 |
|
8.4.1. Prerequisites ……………………………………………………………………………. |
45 |
|
8.4.2. Loading the First Track into Deck A ………………………………………………. |
45 |
|
8.4.3. Starting Playback of Deck A ………………………………………………………… |
45 |
|
8.4.4. Loading the Second Track into Deck B …………………………………………… |
46 |
|
8.4.5. Syncing the Track Tempos ………………………………………………………….. |
46 |
|
8.4.6. Starting Playback of the Second Track …………………………………………… |
46 |
|
8.4.7. Mixing in the Audio Signal …………………………………………………………… |
46 |
|
8.5. Adjusting Gain Levels for Incoming Audio Signals ……………………………………… |
47 |
|
8.5.1. Dynamic Range ………………………………………………………………………… |
47 |
|
8.5.2. Clipping ………………………………………………………………………………….. |
47 |
|
8.5.3. Headroom ……………………………………………………………………………….. |
48 |
|
8.5.4. Always Level Incoming Audio Signals ……………………………………………. |
48 |
|
8.6. Using the Equalizer …………………………………………………………………………….. |
48 |
|
8.6.1. EQing the Bass Frequencies of Tracks during Transition ……………………. |
49 |
|
8.7. Working with Mixer FX ………………………………………………………………………… |
49 |
|
8.7.1. About Mixer FX ………………………………………………………………………… |
49 |
|
8.7.2. Enabling Mixer FX …………………………………………………………………….. |
50 |
|
8.7.3. Selecting Mixer FX …………………………………………………………………… |
50 |
|
8.7.4. Applying Mixer FX …………………………………………………………………….. |
51 |
|
8.7.5. Pre-Selecting Mixer FX ………………………………………………………………. |
51 |
|
8.8. Working with Hotcue buttons and Flux Mode ……………………………………………. |
51 |
|
8.8.1. Accessing the Cue Page in the Advanced Panel ………………………………. |
51 |
|
8.8.2. Storing Cue Points using Hotcue buttons ……………………………………….. |
52 |
|
8.8.3. Storing Loops using Hotcue buttons ……………………………………………… |
52 |
|
8.8.4. Triggering Stored Hotcues …………………………………………………………… |
52 |
|
8.8.5. Remapping Stored Hotcues ………………………………………………………… |
52 |
|
8.8.6. Using Flux Mode and Reverse Mode …………………………………………….. |
53 |
|
8.9. Locking Key of Tracks …………………………………………………………………………. |
53 |
|
8.10. Working with the Waveform and the Stripe …………………………………………….. |
54 |
|
9. Advanced Usage Tutorials …………………………………………………………………………….. |
56 |
|
9.1. Working with Cue Points ……………………………………………………………………… |
56 |
|
9.1.1. About Cue Points ……………………………………………………………………… |
56 |
|
9.1.2. Cue Point Types ……………………………………………………………………….. |
56 |
|
9.1.3. Accessing the Cue Page in the Advanced Panel ………………………………. |
57 |
|
9.1.4. Setting Cue Points …………………………………………………………………….. |
57 |
|
9.1.5. Storing Cue Points …………………………………………………………………….. |
58 |
|
9.1.6. Jumping to Cue Points ……………………………………………………………….. |
58 |
|
9.1.7. Renaming Cue Points ………………………………………………………………… |
58 |
|
9.1.8. Changing the Cue Point Type ………………………………………………………. |
58 |
|
9.1.9. Deleting Cue Points …………………………………………………………………… |
59 |
|
9.1.10. Setting Fade Out and Fade In Cue Points in Tracks for Automated Mix- |
|
|
ing …………………………………………………………………………………………………. |
59 |
|
9.2. Working with Loops ……………………………………………………………………………. |
60 |
3

|
9.2.1. About Looping ………………………………………………………………………….. |
60 |
|
9.2.2. Enable Looping with a Predefined Loopsize ……………………………………. |
60 |
|
9.2.3. Enable Looping with a Customized Loop Size …………………………………. |
61 |
|
9.2.4. Disable Looping ……………………………………………………………………….. |
61 |
|
9.2.5. Storing Loops …………………………………………………………………………… |
61 |
|
9.2.6. Moving the Loop ……………………………………………………………………….. |
62 |
|
9.2.7. Moving Loop In Points and Loop Out Points ……………………………………. |
62 |
|
9.3. Working with FX Units …………………………………………………………………………. |
63 |
|
9.3.1. Assigning FX Units to Mixer Channels …………………………………………… |
63 |
|
9.3.2. Using the FX Unit in Single FX Mode …………………………………………….. |
63 |
|
9.3.3. Switching between Single FX Mode and Goup FX Mode ……………………. |
64 |
|
9.3.4. Using FX Unit in Group FX Mode ………………………………………………….. |
64 |
|
9.3.5. Saving a Snapshot of FX Parameter Settings ………………………………….. |
65 |
|
9.4. Using the Cue Channel for Mixing ………………………………………………………….. |
65 |
|
9.5. Working with STEM Decks …………………………………………………………………… |
66 |
|
9.5.1. About STEM Files …………………………………………………………………….. |
66 |
|
9.5.2. Loading a STEM File …………………………………………………………………. |
67 |
|
9.5.3. Playing Back the STEM File ………………………………………………………… |
67 |
|
9.5.4. Adjusting STEM Parts Volumes ……………………………………………………. |
67 |
|
9.5.5. Applying Filter FX to STEM Parts …………………………………………………. |
68 |
|
9.5.6. Applying FX Send to STEM Parts …………………………………………………. |
68 |
|
9.6. Working with Remix Decks …………………………………………………………………… |
69 |
|
9.6.1. About Remix Sets ……………………………………………………………………… |
69 |
|
9.6.2. Loading Remix Sets ………………………………………………………………….. |
69 |
|
9.6.3. Enabling and Adjusting the Remix Deck’s Quantize Mode ………………….. |
69 |
|
9.6.4. Triggering Samples ……………………………………………………………………. |
70 |
|
9.6.5. Switching Sample Grid Pages ……………………………………………………… |
71 |
|
9.6.6. Adjusting the Volume and Muting Sample Slots ……………………………….. |
71 |
|
9.6.7. Applying Filter Effects the Sample Slots …………………………………………. |
71 |
|
9.6.8. Locking Key for Sample Slots ………………………………………………………. |
72 |
|
9.6.9. Sending Sample Slots to FX Units ………………………………………………… |
72 |
|
9.6.10. Routing Sample Slots into the Headphones Cue Channel ………………… |
73 |
|
9.6.11. Enabling Punch Mode for the Sample Slot …………………………………….. |
73 |
|
9.7. Creating Remix Sets …………………………………………………………………………… |
73 |
|
9.7.1. Importing Samples to the Track Collection ………………………………………. |
74 |
|
9.7.2. Creating an empty Remix Set ………………………………………………………. |
74 |
|
9.7.3. Loading Samples into Samples Cells …………………………………………….. |
74 |
|
9.7.4. Capturing Samples from Tracks ……………………………………………………. |
74 |
|
9.7.5. Changing Sample Colors ……………………………………………………………. |
74 |
|
9.7.6. Adjusting Sample Parameter Settings ……………………………………………. |
75 |
|
9.7.7. Saving a Remix Set …………………………………………………………………… |
76 |
|
9.7.8. Exporting Remix Sets ………………………………………………………………… |
77 |
|
9.8. Correcting Beatgrids …………………………………………………………………………… |
77 |
|
10. Working with Playlists …………………………………………………………………………………. |
80 |
|
10.1. Creating Playlists ……………………………………………………………………………… |
80 |
|
10.2. Adding Tracks to Playlists …………………………………………………………………… |
80 |
|
10.3. Sorting Tracks in Playlists …………………………………………………………………… |
80 |
4

|
10.4. Organizing Playlists in Folders …………………………………………………………….. |
81 |
|
10.5. Exporting Playlists ……………………………………………………………………………. |
81 |
|
10.6. Importing Playlists …………………………………………………………………………….. |
82 |
|
10.7. Importing iTunes Playlists …………………………………………………………………… |
82 |
|
10.8. Using Preparation Playlist ………………………………………………………………….. |
82 |
|
10.9. History Playlists ……………………………………………………………………………….. |
83 |
|
10.10. Track Status Icons in the Track List …………………………………………………….. |
83 |
|
10.11. Playlist Maintenance ……………………………………………………………………….. |
83 |
|
10.11.1. Renaming a Playlist ……………………………………………………………….. |
84 |
|
10.11.2. Removing Tracks from Playlists ………………………………………………… |
84 |
|
10.11.3. Restore Auto GAIN value ………………………………………………………… |
84 |
|
10.11.4. Resetting Played State of Tracks ………………………………………………. |
84 |
|
10.11.5. Deleting Playlists …………………………………………………………………… |
84 |
|
10.11.6. Removing Duplicates from Playlists ……………………………………………. |
84 |
|
10.11.7. Saving Playlists as Webpage File ………………………………………………. |
85 |
|
10.11.8. Search Tracks in Playlists ………………………………………………………… |
85 |
|
10.11.9. Clearing Playlists …………………………………………………………………… |
85 |
|
11. Managing Your Track Collection ……………………………………………………………………. |
86 |
|
11.1. About the Track Collection ………………………………………………………………….. |
86 |
|
11.2. Compatible Audio File Formats ……………………………………………………………. |
86 |
|
11.3. Importing Music Files from the Local Music Folder …………………………………… |
86 |
|
11.4. Adding Music from Other Folders …………………………………………………………. |
87 |
|
11.5. Importing iTunes Tracks into Your Track Collection …………………………………… |
87 |
|
11.6. Importing Remix Sets ………………………………………………………………………… |
87 |
|
11.7. Show Tracks on Your Local Drive …………………………………………………………. |
87 |
|
11.8. Editing Track Metadata in the Track List ………………………………………………… |
88 |
|
11.9. Editing Track Metadata using the Edit Dialog ………………………………………….. |
88 |
|
11.10. Editing Track Cover Artwork ………………………………………………………………. |
89 |
|
11.11. Assigning Playlists and Folders to the Favorites …………………………………….. |
90 |
|
11.12. Track Collection Maintenance ……………………………………………………………. |
90 |
|
11.12.1. Checking Consistency of your Track Collection …………………………….. |
90 |
|
11.12.2. Analyzing Tracks Manually ………………………………………………………. |
92 |
|
11.12.3. Relocating Missing Tracks ……………………………………………………….. |
93 |
|
11.12.4. Deleting Tracks from the Track Collection ……………………………………. |
94 |
|
11.12.5. Saving Your Track Collection ……………………………………………………. |
94 |
|
11.12.6. Exporting Your Track Collection ………………………………………………… |
94 |
|
11.12.7. Restoring the Track Collection from an Automatic Backup ………………. |
95 |
|
11.12.8. Clearing Your Track Collection ………………………………………………….. |
95 |
|
12. Advanced Operation of TRAKTOR ………………………………………………………………… |
96 |
|
12.1. Synchronization using Ableton Link ………………………………………………………. |
96 |
|
12.1.1. Connecting to a Network …………………………………………………………… |
96 |
|
12.1.2. Joining and Leaving a Link Session …………………………………………….. |
96 |
|
12.1.3. Synchronizing TRAKTOR Decks to the Link Timeline ………………………. |
97 |
|
12.2. Syncing TRAKTOR via MIDI Clock ……………………………………………………….. |
99 |
|
12.2.1. Syncing TRAKTOR to External MIDI Clock Signal …………………………… |
99 |
|
12.2.2. Using TRAKTOR as Master Clock ………………………………………………. |
99 |
5

|
12.2.3. Syncing two Instances of TRAKTOR …………………………………………… |
100 |
|
12.3. Recording Your Mix with the Audio Recorder …………………………………………. |
100 |
|
12.4. Broadcasting Your Mix ……………………………………………………………………… |
101 |
|
12.4.1. Streaming Protocol …………………………………………………………………. |
102 |
|
12.5. Using Cruise Mode for Automatic Mixing ……………………………………………… |
103 |
|
12.6. Enabling FX Unit 3 and FX Unit 4 ……………………………………………………….. |
104 |
|
12.7. Configuring the FX Units to be used in Send FX Mode …………………………….. |
104 |
|
12.8. Additional Mouse Controls for Faders and Knobs ……………………………………. |
105 |
|
13. Setting up TRAKTOR for SCRATCH Control …………………………………………………… |
107 |
|
13.1. Connecting Audio Interface to Computer ………………………………………………. |
107 |
|
13.2. Connecting Audio Interface to DJ Mixer ………………………………………………… |
107 |
|
13.3. Connecting Turntables to Audio Interface ……………………………………………… |
108 |
|
13.4. Connecting CD Players to Audio Interface …………………………………………….. |
108 |
|
13.5. Connecting Amplification System to DJ Mixer ………………………………………… |
108 |
|
13.6. Connecting Headphones to DJ Mixer …………………………………………………… |
108 |
|
13.7. Final Hardware Preparations ……………………………………………………………… |
108 |
|
13.8. Configuring TRAKTOR for SCRATCH Control ……………………………………….. |
109 |
|
13.9. Control TRAKTOR using Timecode Media …………………………………………….. |
110 |
|
13.10. Switching to Scratch Playback Mode ………………………………………………….. |
111 |
|
13.11. The Control Zones on CD ………………………………………………………………… |
111 |
|
13.12. The Control Zones on Vinyl ……………………………………………………………… |
111 |
|
13.13. Tracking Modes …………………………………………………………………………….. |
112 |
|
14. Common TRAKTOR Setups ……………………………………………………………………….. |
113 |
|
14.1. Using TRAKTOR with an External Mixer ……………………………………………….. |
113 |
|
14.2. Using TRAKTOR with an Add-On Controller ………………………………………….. |
113 |
|
14.3. Integrating a Microphone to Your TRAKTOR Setup …………………………………. |
114 |
|
15. Configuring MIDI Controller for Controlling TRAKTOR ………………………………………. |
115 |
|
15.1. Importing Controller Mapping ……………………………………………………………… |
115 |
|
15.2. Controller Manager Overview …………………………………………………………….. |
115 |
|
15.2.1. Device Setup Section ………………………………………………………………. |
116 |
|
15.2.2. Assignment Table Section ………………………………………………………… |
117 |
|
15.2.3. Device Mapping Section …………………………………………………………… |
118 |
|
15.2.4. Mapping Details Section …………………………………………………………… |
118 |
|
15.2.5. Available Controller Types ………………………………………………………… |
119 |
|
15.3. Available Controller Types …………………………………………………………………. |
121 |
|
15.4. Assignment Table Section …………………………………………………………………. |
123 |
|
16. Preferences …………………………………………………………………………………………….. |
125 |
|
16.1. Preferences Dialog Overview …………………………………………………………….. |
125 |
|
16.2. Preferences – Audio Setup Page ………………………………………………………… |
127 |
|
16.3. Preferences – Output Routing Page …………………………………………………….. |
128 |
|
16.4. Preferences – Input Routing Page ………………………………………………………. |
131 |
|
16.5. Preferences – External Sync Page ………………………………………………………. |
132 |
|
16.6. Preferences – Timecode Setup Page …………………………………………………… |
133 |
|
16.7. Preferences – Loading Page ……………………………………………………………… |
135 |
6

|
16.8. Preferences – Transport Page ……………………………………………………………. |
136 |
|
16.9. Preferences – Decks Layout Page ………………………………………………………. |
139 |
|
16.10. Preferences – Track Decks Page ………………………………………………………. |
141 |
|
16.11. Preferences – Remix Decks Page ……………………………………………………… |
143 |
|
16.12. Preferences – Mixer Page ……………………………………………………………….. |
145 |
|
16.13. Preferences – Global Settings Page …………………………………………………… |
147 |
|
16.14. Preferences – Effects Page ……………………………………………………………… |
149 |
|
16.15. Preferences – Mix Recorder Page ……………………………………………………… |
151 |
|
16.16. Preferences – Loop Recorder Page …………………………………………………… |
152 |
|
16.17. Preferences – Broadcasting Page ……………………………………………………… |
153 |
|
16.18. Preferences – Browser Details Page ………………………………………………….. |
155 |
|
16.19. Preferences – Layout Manager Tab ……………………………………………………. |
156 |
|
16.20. Preferences – File Management Page ………………………………………………… |
157 |
|
16.21. Preferences – Analyze Options Page …………………………………………………. |
159 |
|
16.22. Preferences – Controller Manager Page ……………………………………………… |
161 |
|
17. Effect Reference ………………………………………………………………………………………. |
162 |
|
17.1. Delay ……………………………………………………………………………………………. |
162 |
|
17.2. Reverb ………………………………………………………………………………………….. |
163 |
|
17.3. Flanger …………………………………………………………………………………………. |
163 |
|
17.4. Flanger Pulse …………………………………………………………………………………. |
164 |
|
17.5. Flanger Flux …………………………………………………………………………………… |
164 |
|
17.6. Gater ……………………………………………………………………………………………. |
165 |
|
17.7. Beatmasher 2 …………………………………………………………………………………. |
165 |
|
17.8. Delay T3 ……………………………………………………………………………………….. |
166 |
|
17.9. Filter LFO ………………………………………………………………………………………. |
167 |
|
17.10. Filter Pulse …………………………………………………………………………………… |
167 |
|
17.11. Filter ……………………………………………………………………………………………. |
168 |
|
17.12. Filter:92 LFO ………………………………………………………………………………… |
169 |
|
17.13. Filter:92 Pulse ………………………………………………………………………………. |
169 |
|
17.14. Phaser ………………………………………………………………………………………… |
170 |
|
17.15. Phaser Pulse ………………………………………………………………………………… |
171 |
|
17.16. Phaser Flux ………………………………………………………………………………….. |
171 |
|
17.17. Reverse Grain ………………………………………………………………………………. |
172 |
|
17.18. Turntable FX …………………………………………………………………………………. |
172 |
|
17.19. Iceverb ………………………………………………………………………………………… |
173 |
|
17.20. Reverb T3 ……………………………………………………………………………………. |
173 |
|
17.21. Ring Modulator ……………………………………………………………………………… |
173 |
|
17.22. Digital LoFi …………………………………………………………………………………… |
174 |
|
17.23. Mulholland Drive ……………………………………………………………………………. |
174 |
|
17.24. Transpose Stretch ………………………………………………………………………….. |
175 |
|
17.25. BeatSlicer Buffer ……………………………………………………………………………. |
175 |
|
17.26. Formant Filter ……………………………………………………………………………….. |
176 |
|
17.27. Peak Filter ……………………………………………………………………………………. |
176 |
|
17.28. Tape Delay …………………………………………………………………………………… |
177 |
|
17.29. Ramp Delay …………………………………………………………………………………. |
177 |
|
17.30. Auto Bouncer ………………………………………………………………………………… |
178 |
|
17.31. Bouncer ………………………………………………………………………………………. |
179 |
7

Disclaimer
1. DISCLAIMER
The information in this document is subject to change without notice and does not represent a commitment on the part of Native Instruments GmbH. The software described by this document is subject to a License Agreement and may not be copied to other media. No part of this publication may be copied, reproduced or otherwise transmitted or recorded, for any purpose, without prior written permission by Native Instruments GmbH, hereinafter referred to as Native Instruments.
“Native Instruments”, “NI” and associated logos are (registered) trademarks of Native Instruments GmbH.
Mac, macOS, GarageBand, Logic and iTunes are registered trademarks of Apple Inc., registered in the U.S. and other countries.
Windows and DirectSound are registered trademarks of Microsoft Corporation in the United States and/or other countries.
Ableton Live™ and LINK™ are a trademarks of Ableton AG.
All other trademarks are the property of their respective owners and use of them does not imply any affiliation with or endorsement by them.
Document authored by: Christian Schulz
Software version: 3.0 (10/2018)
Special thanks to the Beta Test Team, who were invaluable not just in tracking down bugs, but in making this a better product.
8

Welcome to TRAKTOR
2. WELCOME TO TRAKTOR
Thank you for choosing TRAKTOR PRO 3 — it is because of customers like you that we can continue developing groundbreaking music software and hardware. TRAKTOR is the most powerful and versatile DJ software on the market. With TRAKTOR, you can mix your tracks traditionally as well as combine your tracks and loops in a non-linear way using it as a powerful live remixing tool. This documentation provides you with all the information you need to make use of TRAKTOR’s features to their full capacity.
2.1. Document Conventions
This document uses particular formatting to point out special facts and to warn you of potential issues. The icons introducing the following notes let you see what kind of information can be expected:
The speech bubble icon indicates a useful tip that may help you to solve a task more efficiently.
The exclamation mark icon highlights important information that is essential for the given context.
The warning icon warns you of serious issues and potential risks that require your full attention.
Furthermore, the following formatting is used:
•Paths to locations on your hard disk or other storage devices are printed in italics.
•Important names and concepts are printed in bold.
•Square brackets are used to reference keys on a computer’s keyboard, e.g., Press [Shift] + [Enter].
9

New in TRAKTOR PRO 3
3. NEW IN TRAKTOR PRO 3
TRAKTOR PRO 3 preserves most of the workflows of TRAKTOR PRO 3. It will install alongside TRAKTOR PRO 2 and offer you to copy your collection.
All controllers and setups supported with TRAKTOR PRO 2 remain supported with TRAKTOR PRO 3.
With the release of TRAKTOR PRO 3 you get plenty of new features and improvements, including:
Fully Overhauled User Interface
We have overhauled TRAKTOR’s user interface for extra clarity by flattening and sharpening it. Now you can see everything you need at a glance, also in challenging environments. New Master and Channel level metering means you can accurately control your mix with full visual feedback.
Improved information hierarchy, consistency in design and colours throughout all panels of the application, drop-down menus, dialogs, full width Hotcue buttons.
New Mixer Effects
Whether it’s heavy drops or smooth transitions that define your style, the new Mixer FX are designed for one-knob modulation with big-sounding results. Choose from eight extra effects and three new filters to assign to each channel, in addition to TRAKTOR’s famous Deck FX.
Traktor Pro 3 introduces the concept of easy to use, one-knob Mixer Effects located in the mixer channels. The new type of effects will be launched with a selection of eight standard effects: Reverb, Dual Delay, Dotted Delay, Flanger, Time Gater, Noise, Crush and Barber Pole.
Scratch right out of the box
TRAKTOR SCRATCH is now included in TRAKTOR PRO 3, right out of the box.
Use any soundcard
DJs using timecode vinyl can now use any soundcard they like, in addition to tried and tested, TRAKTOR SCRATCH Certified soundcards and mixers. So if there’s a model that does it for you, or if you’re playing back-to-back with somebody on a different setup, TRAKTOR can adapt.
Additional master limiter
Alternative, additional Master Limiter provides a more transparent sound.
10
![]()
The TRAKTOR Workflow
4. THE TRAKTOR WORKFLOW
The following steps outline the key workflow of using TRAKTOR. Each milestone step is briefly introduced and provides links with further information:
1.Importing Your Music: At first, you need to import your music into TRAKTOR. When you import your music, all music files get stored in the Track Collection. The Track Collection uses the track-specific metadata for categorizing the tracks by certain criteria. For more information, refer to Importing Music to the Track Collection.
2.Browsing for Music: Once your music imported in TRAKTOR, you can use the Browser to find the tracks you are looking for your mix. The Browser lets you search for your music by either performing a text search or by navigating the Browser Tree. The Track List shows the tracks of the selected folder with its metadata sorted inside a table. For more information, refer to Browsing for Music.
3.Loading Tracks into Decks: When loading a track from the Track List, TRAKTOR calculates its exact tempo and key the information. This analysis of each track can be done also before loading tracks. While analyzing, TRAKTOR creates the Beatgrid and the Waveform for each imported track. This information is then stored for each track in the Track Collection. For more information, refer to Loading Music into Decks.
4.Start Playback of a Deck: In order to hear music from the Deck you need to adjust the Mixer controls of the respective Mixer channel and set the crossfader accordingly. Then you can start the Playback and the Waveform will start moving. For more information, refer to Mixing Your First Two Tracks.
5.Finding and loading another Track: While the first track is playing you can browse for the next track in your Track Collection and load it into another Deck. For more information, refer to Mixing Your First Two Tracks.
6.Syncing the Tracks: Since TRAKTOR has calculated the tempos and the Beatgrids for both tracks, you can sync the next track with the track that is currently playing by using the SYNC button on the stopped Deck. Now when playing back the next track, the beats of both tracks will perfectly match. You can also sync the tracks manually by using the tempo and synchronization controls provided on any Deck. For more information, refer to Mixing Your First Two Tracks.
7.Previewing the transition: The Mixer provides you with the controls to preview the next track when preparing the transition, using your headphones. This allows you to find the right position for starting playback, and you can then fade the track in using the crossfader. For more information, refer to Using the Cue Channel for Mixing.
8.Using Equalizer and adding Effects: To make transitions more flawless, the Mixer is equipped with equalizer controls for tweaking frequency bands in the audio signals. Furthermore, TRAKTOR provides FX Units and Mixer FX for modulating the audio signals. For more information, refer to Using the Equalizer, Working with FX Units, Working with Mixer FX
9.Cueing using Hotcue buttons: You can create Cue points and store them on Hotcue buttons. When later loading the track, you can trigger the Hotcues and the playback will instantly continue from the stored cue point position. For more information, refer to Working with Hotcue buttons and Flux Mode, Working with Cue Points.
11

The TRAKTOR Workflow
10.Looping: TRAKTOR provides you with Loop controls for enabling Loops in pre-defined sizes. As with Cue points, Loops can be stored using the Hotcue buttons and triggered at a later time. For more information, refer to Working with Hotcue buttons and Flux Mode, Working with Loops.
11.Remixing: Using the STEM Decks, you can perform your music by taking out entire musical elements in STEM Files. You can also remix your music using Loops and One-shot Samples in Remix Decks. For more information, refer to Working with STEM Decks Working with Remix Decks.
12
Setting Up TRAKTOR
5. SETTING UP TRAKTOR
This section assumes you have already installed TRAKTOR PRO 3 using NATIVE ACCESS, and that you can start to configure TRAKTOR for its first use. If this is not the case, follow the instructions using this link Registering and Installing a Native Instruments Product using NATIVE ACCESS.
TRAKTOR can be used in various setups. Besides using TRAKTOR with a dedicated TRAKTOR KONTROL hardware controller, it can also be used with an external audio interface (with or without an external DJ Mixer).
It can also be used with a MIDI controller of another manufacturer. In this case, you need to load the specific controller mapping file or you create a custom controller mapping yourself.
TRAKTOR with External Audio Interface
This section and so this documentation assumes you are using TRAKTOR with at least an external audio interface with one stereo output and a stereo headphone output. This way we can make sure the workflows explained also apply to TRAKTOR setups using any other external audio equipment or controller with an integrated audio interface.
Of course you can use TRAKTOR with your the built-in sound card. However, you are then only using the stereo output.
The steps in this section will guide you through the process of configuring TRAKTOR using an external audio interface.
TRAKTOR Configuration Steps
When starting TRAKTOR for the first time, you need to configure TRAKTOR so that it works in your specific setup. The following steps for configuring TRAKTOR are required:
1.Importing Data from previous installations: If you have installed a previous TRAKTOR installation, TRAKTOR asks you to import the data. For more information, refer to Importing Your Data from a Previous TRAKTOR Version [14].
2.Configuring TRAKTOR using the Setup Wizard: The Setup Wizard helps to you configure TRAKTOR step-by-step. For more information, refer to Pre-Configuring TRAKTOR using the Setup Wizard [14].
3.Configuring TRAKTOR for using the external audio interface: When connecting an external audio interface, TRAKTOR automatically sets the Mixing Mode to External Mixing. For more information on setting up TRAKTOR with an external audio interface, refer to Configuring TRAKTOR to Use with an External Audio Interface [14]
4.TRAKTOR Layouts and Layout Switcing: TRAKTOR provides several Layouts that display more or less elements, depending on use case. For more information, refer to TRAKTOR Layouts and Layout Switching [15].
13

Setting Up TRAKTOR
5.1. Importing Your Data from a Previous TRAKTOR Version
When you start TRAKTOR for the first time, TRAKTOR will ask if you want to import your previous data by copying the existing user content to a new folder in your user folder. Your previous data will not be altered if you copy it to the new default folder.
5.2. Pre-Configuring TRAKTOR using the Setup Wizard
When starting TRAKTOR for the first time, you are provided with the Setup Wizard. In a few steps, the Setup Wizard guides you through the process of configuring TRAKTOR. It can also be used to reset TRAKTOR to an out-of-the-box setup.
Setup Wizard Pages
1.The WELCOME page asks you to connect any controllers and devices to your computer.
2.The MIXER SETUP page asks you to select whether or not you want to use TRAKTOR with a controller different than TRAKTOR KONTROL. If yes, on the next page you can choose the controller manufacturer and model from the drop-down lists.
3.On the DECK LAYOUT page you can select whether or not you are using Timecode vinyls or CDs to externally control TRAKTOR’s Decks. Furthermore, you can select how many Decks and the Flavors you want to use. This can also be changed from within the software.
4.The SUMMARY Page shows you the configuration of TRAKTOR. You can click Back to change the settings made, Cancel to close the Setup Wizard completely, or Finish, which confirms your configuration.
Starting the Setup Wizard
You can start the Setup Wizard in two ways:
1.Select Start Setup Wizard in the Help menu of the Application Menu bar (not visible in Fullscreen mode).
2.Or click the Setup Wizard button at the bottom left corner of the Preferences dialog window.
5.3. Configuring TRAKTOR to Use with an External Audio Interface
To use TRAKTOR’s preview feature, you need to have an audio interface with two independent stereo outputs, one for the Master Out and one for the Headphones CUE channel. Refer to the manufacturer’s manual for installing and connecting your external audio interface.
In TRAKTOR, do the following:
1.Click the Preferences button in the Header to open the Preferences.
2.Select the Audio Setup page.
3.Select your external audio interface from the Audio Device drop-down menu.
4.Open the Output Routing page.
5.Select Internal under Mixing Mode.
6.Select an output pair for Output Master and one output pair for Output Monitor.
14

Setting Up TRAKTOR
7.If your audio device provides another output, you can assign this to the Output Record.
8.Close the Preferences. TRAKTOR is now configured.
5.4. TRAKTOR Layouts and Layout Switching
TRAKTOR uses a set of user interface layouts to organize its graphical user interface. These are called Layouts. You can access them from TRAKTOR’s Layout selection drop-down menu in the software’s Header. Depending on which Layout you select, certain elements of the user interface will be displayed while others will remain hidden.
Available Layouts
The following Layouts are available:
•Mixer: The Mixer Layout is optimized for using TRAKTOR with the computer keyboard and the mouse. This Layout shows all available controls of the internal Mixer, the crossfade controls, and the Headphone Cue controls. The Decks provide all the required controls for adjusting tempo and syncing.
•Extended: The Extended view shows TRAKTOR’s Global Section with the FX Units, and extends the Decks with more controls and further track information. You are also provided with the buttons and knobs for assigning the FX Units to the Mixer channels and for applying MIXER FX.
•Essential: The Essential Layout shows TRAKTOR in a reduced appearance with the most important control elements for basic mixing. This Layout is optimized for mixing using an external controller, as the internal Mixer is not displayed. The Browser takes up the majority of the application window and the Decks only show the Waveform displays, the Stripe-view, and the transport controls.
•Browser: The Browser Layout maximizes the Browser and minimizes the Decks to only the Stripe view. The Mixer is not visible.
Besides the provided Layouts, you can adjust a graphical user interface to your needs and save it in a custom Layout that you can also select from the Layout selection drop-down menu. For more Information about creating Layouts, refer to Preferences – Layout Manager Tab [156].
Switching Layouts
To switch to another Layout:
•Select the Layout from the Layout selection drop-down menu in the Header.
15
TRAKTOR Overview
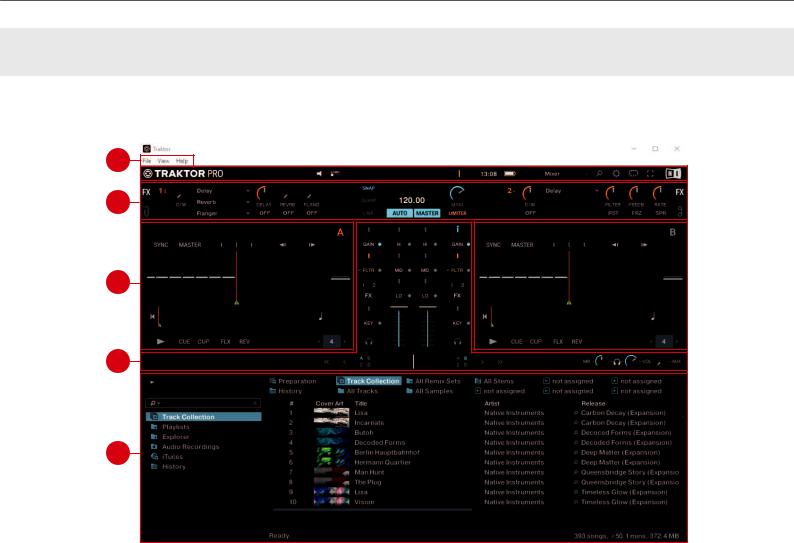
6. TRAKTOR OVERVIEW
The picture below shows the interface of TRAKTOR.
2
3
4
5
TRAKTOR PRO 3 user interface.
(1) Application menu: Provides access to basic functions and information about the software. For more information, refer to Application Menu.
(2) Header: Here you can find various status indicators and useful functions and buttons, e.g., the Preferences button. For more information, refer to Header.
(3) Global section: The Global section contains the FX Units, the Master Control panel, the AUDIO RECORDER, and the LOOP RECORDER. For more information, refer to Global Section.
(4) Decks: TRAKTOR provides you with the four virtual Decks A, B, C, and D. The Decks are where tracks, Stem files, and Samples are played back. If you previously selected to use only two Decks A and B from the Setup Wizard, you can enable the lower Decks C and D in the Preferences. For more information, refer to Decks and Deck Types [24].
(5) Mixer: The Mixer receives audio signals on its four Mixer channels, coming from the four Decks. The Mixer’s basic purpose is to adjust the relative level of each Mixer channel, to control the channels’ frequency content, possibly routing them into the FX Units, before sending the overall result to the master output. For more information, refer to Mixer [37].
(6) Browser: Lets you manage all your tracks in the Track Collection. You can group tracks in Playlists, sort them according to various attributes, and search within Playlists as well as in the entire Track Collection. For more information, refer to Browser.
16
TRAKTOR Overview
6.1. Application Menu
The Application menu provides access to File, View , and Help menus.
Application menu.
File: Contains options for setting up TRAKTOR:
•Preferences: Opens the Preferences dialog.
•Audio Setup: Directly calls up the Audio Setup page in the Preferences dialog.
•Controller Manager: Directly calls up the Controller Manager page in the Preferences dialog.
•Exit: Closes the TRAKTOR application.
View: Contains options for the TRAKTOR Layout:
•Layouts: Shows the list of available TRAKTOR Layouts you can select.
•Fullscreen: Switches the TRAKTOR application into Fullscreen view.
Help: Contains options for updating TRAKTOR and getting help:
•Check for Updates on Native Access: Calls up the Native Access application that is checking for available software updates.
•Downloads: Opens the web browser on your computer and directs you to the download page on the Native Instruments website.
•Get Started with TRAKTOR: Opens the web browser on your computer and directs you to the TRAKTOR video tutorials page on the Native Instruments website.
•Online TRAKTOR documentation: Opens the web browser on your computer and directs you to the Online TRAKTOR documentation page on the Native Instruments website.
•Start Setup Wizard: Launches the Setup Wizard for configuring TRAKTOR.
•Buy Upgrades and Accessories: Opens the web browser on your computer and directs you to the TRAKTOR products page on the Native Instruments website.
•About: Opens the about screen.
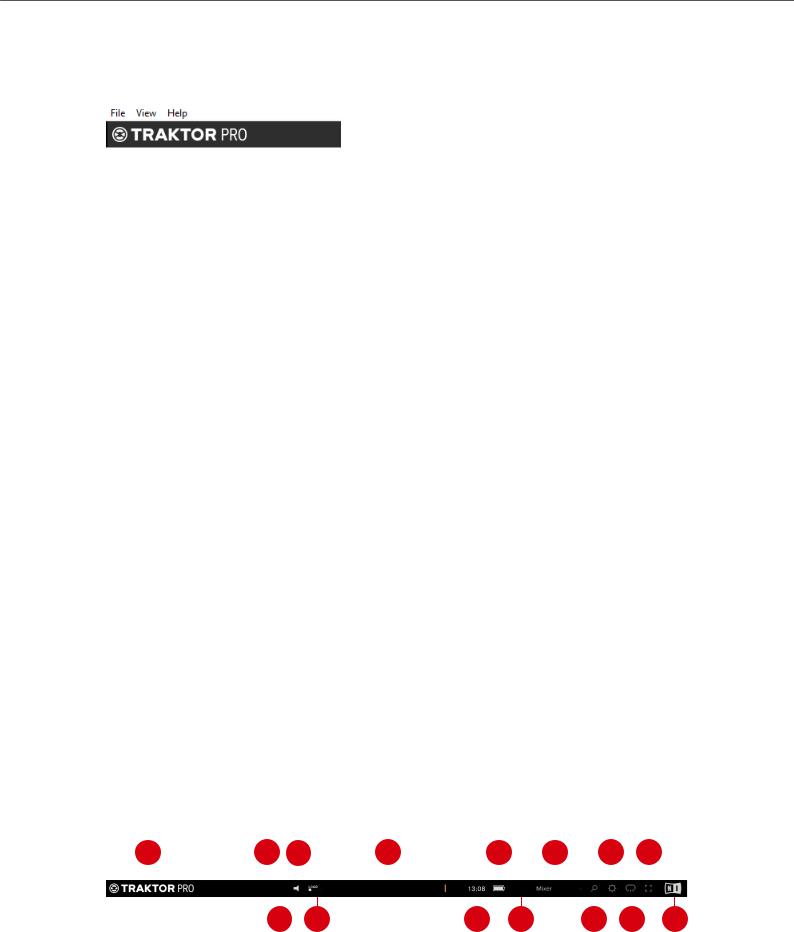
6.2. Header
The Header is located at the very top of TRAKTOR’s user interface and contains various status indicators, and useful functions and buttons.
|
1 |
4 |
6 |
8 |
10 |
14 |
|||||||||
|
5 |
9 |
15 |
||||||||||||
Header.
17

TRAKTOR Overview
(1) TRAKTOR Logo: Clicking the TRAKTOR logo displays the about screen with the current version number of the TRAKTOR software, the credits, and some additional information.
(2) MIDI indicator: Indicates the incoming MIDI and Native (NHL) signals. The indicator lights blue while a signal is received.
(3) Connection indicator: Indicates if all listed controllers are connected. The indicator lights blue if all controllers are connected, orange if some controllers are connected, unlit if no controller is connected.
(4) Audio indicator: Indicates the connection to your audio interface. It lights up blue if an audio interface is connected, red if no audio interface is connected, orange if the internal soundcard selected. For more information, refer to Preferences Audio setup.
(5) LOAD indicator: Indicates how much computing time available per audio buffer is currently used by TRAKTOR to process audio data contained in one buffer. This value shows how much CPU load the audio processing requires and how much headroom is left before audio starts dropping out. The system should be kept at values below the LOAD indicator turning red.
(6) Master Output level meter: Displays the Master Output level. For more information, refer to GAIN.
(7) System Clock: Displays the time of day derived from the system time of your computer.
(8) Battery indicator: Indicates how much power remains in your computer’s battery. It lights up blue if a power supply is connected and red when running out of battery power.
(9) Recording indicator: Indicates the status of the AUDIO RECORDER. It lights up red when recording. For more information, refer to Recording Your Mix with the Audio Recorder.
(10) Layout selector: Provides you with a list of default TRAKTOR Layouts. For more information, refer to… Layouts TRAKTOR Layouts and Layout Switching.
(11) Maximize Browser button: Maximizes the Browser view by minimizing the sizes of the Decks, the Mixer, and the Global section.
(12) Preferences button: Opens the Preferences dialog. All TRAKTOR settings are made here. For more information, refer to Preferences.
(13) Cruise Mode button: Enables Cruise mode allowing you to automatically play one track after the other from a Playlist or your Track Collection. Cruise mode seamlessly takes over playback control. For more information, refer to Using Cruise Mode for Automatic Mixing .
(14) Fullscreen button: Enables Fullscreen mode. When enabled, none of the operating system’s controls are visible.
(15) NI Logo: Displays the about screen with the current version number of the TRAKTOR software, the credits, and some additional information.
6.3. Global Section
The Global section contains five distinct panels with global controls and recording functions: FX Unit 1 and FX Unit 2, AUDIO RECORDER, LOOP RECORDER, and the Master Control panel. Not all of the panels can be displayed at once. The Master Control panel is always visible. In the left panel you can display FX Unit 1 or the LOOP RECORDER, and on the right side you can display either FX Unit 2 or the AUDIO RECORDER. The panels can be selected using the corresponding buttons at the far left and right of the Global section.
18

TRAKTOR Overview
Global Section with FX Unit 1 and 2 displayed.
(1) FX Unit 1 and FX Unit 2: TRAKTOR offers four FX Units for tweaking the audio signals in the Mixer. By default, only FX Unit 1 and FX Unit 2 are enabled. All FX Units can be freely assigned to any of the Mixer channels A — D. For more information, refer to Section 6.3.2: FX Units.
(2) Master Control panel: The Master Control panel is a central component of TRAKTOR. It lets you control the MAIN volume, and defines the behavior for setting Cue Points and Loops as well as enabling and disabling the Master Limiter. It also contains the Master Clock and works as a tempo reference for the Sync function and the effects. Here you can also join or start network sessions via Ableton Link, or send a MIDI Clock signal to external hardware and software. For more information, refer to Master Control Panel.
Global Section with the LOOP RECORDER and AUDIO RECORDER displayed.
(1) LOOP RECORDER: The LOOP RECORDER allows you to instantly create Loops from the Mixer’s main output signal, from a particular Deck, or from an external audio input. For more information, refer to Loop Recorder.
(2) AUDIO RECORDER: The AUDIO RECORDER enables you to record your mix from the main output as well as from other a physical audio inputs. For more information, refer to Audio Recorder.
6.3.1. Master Control Panel
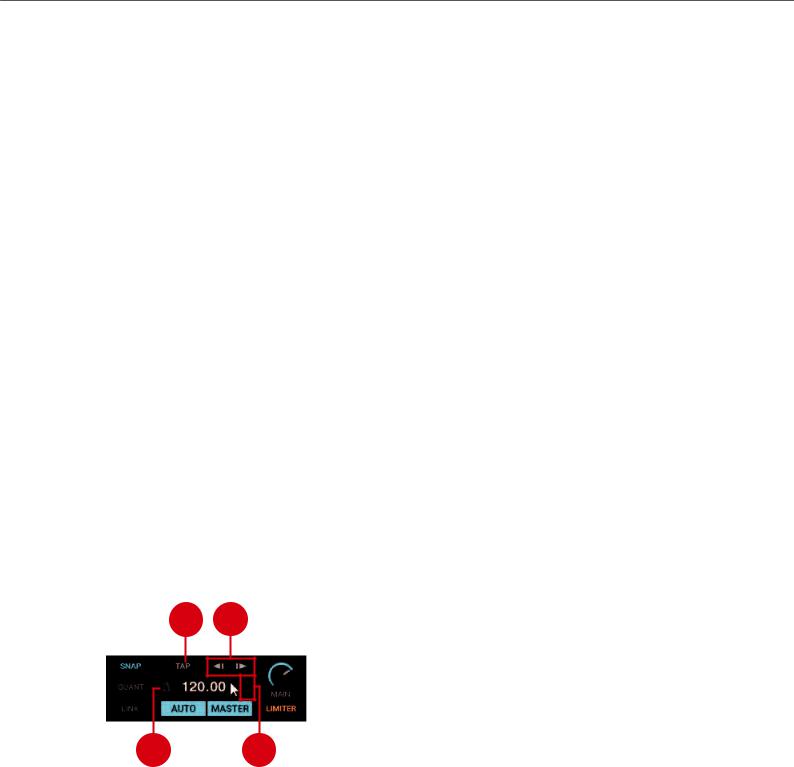
The Master Control panel is a central component of TRAKTOR. It allows you control the MAIN volume, and defines the behavior for setting Cue Points and Loops. It also contains the Master Clock and works as a tempo reference for the Sync function and for the effects. Here you can also join or start network sessions via Ableton Link, or send a MIDI Clock signal to external hardware and software.
1 2 3
8
7 5
Master Control panel.
19
TRAKTOR Overview
(1) SNAP: Enables SNAP mode. When SNAP mode is enabled, Cue Points or Loops are always set to the closest beat. The button lights up blue when enabled.
(2) MASTER CLOCK TEMPO display: Displays the current tempo and offset of the Master Clock. You can enter a new tempo with a double-click.
(3) MAIN knob: Controls the main output volume.
(4) LIMITER: Enables the Limiter for the main output signal. When enabled, the main output level meter shows the Limiter position right before the red LEDs. For more information, refer to Adjusting Gain Levels for Incoming Audio Signals.
(5) MASTER: When enabled you can play on four Decks with a stable tempo reference. It is also the mode to be used when TRAKTOR is sending out the master tempo via MIDI Clock messages to another application or hardware being slaved to TRAKTOR.
(6) AUTO: When enabled TRAKTOR automatically selects one of the Decks as Tempo Master. The Master Clock then automatically syncs to the Master Deck.
(7) LINK: Syncs TRAKTOR to an Ableton Link session and gives additional status information. For more Information, refer to Synchronization using Ableton Link. When the Enable MIDI Clock setting is enabled in the External Sync Page in the Preferences, LINK is replaced by EXT. For more information on, refer to Syncing TRAKTOR via MIDI Clock.
(8) QUANT: Enables Quantize mode. Quantize mode lets you jump between Cue Points and Stored Loops seamlessly and without losing sync. Skipping in the track in Quantize mode brings the playhead position to the next destination without losing sync. The button lights up blue when enabled.
Further Master Clock Controls
When hovering the mouse over the MASTER CLOCK display you are provided with additional Master Clock controls.
2
4 3
Master Control panel.
(1) TAP button: With this button you can tap in the desired Master Clock tempo.
(2) Master Clock Bend buttons: Slows down or speeds up the Master Tempo momentarily.
(3) MASTER CLOCK Tempo Up / Down buttons: Decreases or Increases the Master tempo step-wise.
(4) Metronome (Master Clock Tick): Toggles an audible metronome beat tick with the Master Clock as source on or off.
20
![]()
TRAKTOR Overview
Further MIDI Clock Sync Controls
When the MIDI Clock is enabled in the Preferences, the Master Control panel expands providing further MIDI Clock controls. For more information, refer to Preferences – External Sync Page.
1
2
3
Master Control panel.
(1) Offset display: Indicates the offset for the synchronization.
(2) MASTER CLOCK START: Enables or disables MIDI Clock for external synchronization.
(3) MASTER CLOCK SYNC: Resets the external devices (slaves) connected via MIDI clock.
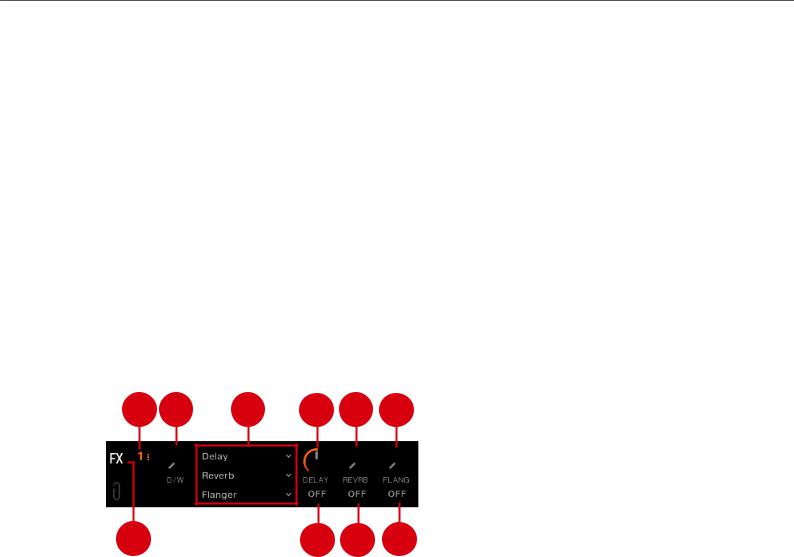
6.3.2. FX Units
TRAKTOR offers four FX Units which give you the control of adding FX to your mix. By default there are only two FX Units enabled — FX Unit 1 and FX Unit 2. Each FX Unit can be assigned to any Mixer channel individually or to more than one Mixer channel at a time. The FX Units are located on the left and the right side in the Global section. A click on the FX Unit buttons labeled FX on either end of the Global section shows the corresponding FX Unit.
The FX Units are used as insert effects by default, but you can also use them as post-fader effects and as Send effects. The FX Units are freely configurable.
Additionally, you can choose from two different FX Unit modes in TRAKTOR: Either Single FX mode, where four buttons and four knobs control one effect, or Group FX mode, where you can use chain of three three effects. For more Information on using the FX Units, refer to Working with FX Units.
FX Units in Single FX Mode
In Single FX mode you get full control over all parameters of a single effect.
FX Unit 1 in Single FX Mode.
21
TRAKTOR Overview
In Single FX mode you get full control over all parameters of a single effect.
(1) FX Unit Config drop-down menu: Opens a drop-down menu for configuring the FX Unit and taking snapshots. Additionally, the number identifies the FX Unit and the selected FX mode.
(2) D/W knob: Controls the direct-to-processed signal mix.
(3) FX Selector: Selects the effect to be controlled in the FX Unit.
(4) — (6) FX Parameter control 1 — 3: Modulates the parameters for the selected effect.
(7), (8) FX buttons 1 — 2: Controls the selected effect. The exact function depends on the selected effect.
(9) RST button: Resets all parameters for the selected effect. This button is not available for all effects.
(10) FX On button: Switches the effect on and off. If on, the buttons light up yellow.
FX Unit 1 in Group FX Mode
In Group FX mode you can control up to three FX at once in one FX Unit.
FX Unit 1 in Group FX Mode.
(1) FX Unit Config drop-down menu: Opens a drop-down menu for configuring the FX Unit and taking snapshots. Additionally, the number identifies the FX Unit and the selected FX mode.
(2) D/W knob: Controls the direct-to-processed signal mix for the entire effect chain.
(3) FX Selector 1 — 3: Selects the effect to be controlled in the FX Unit.
(4) — (6) Effect Amount knob 1 — 3: Controls the individual effect amount.
(7) — (9) Effect On buttons 1 — 3: Switches every effect in the effect chain on and off.
(10) FX On button: Switches the effect on and off.
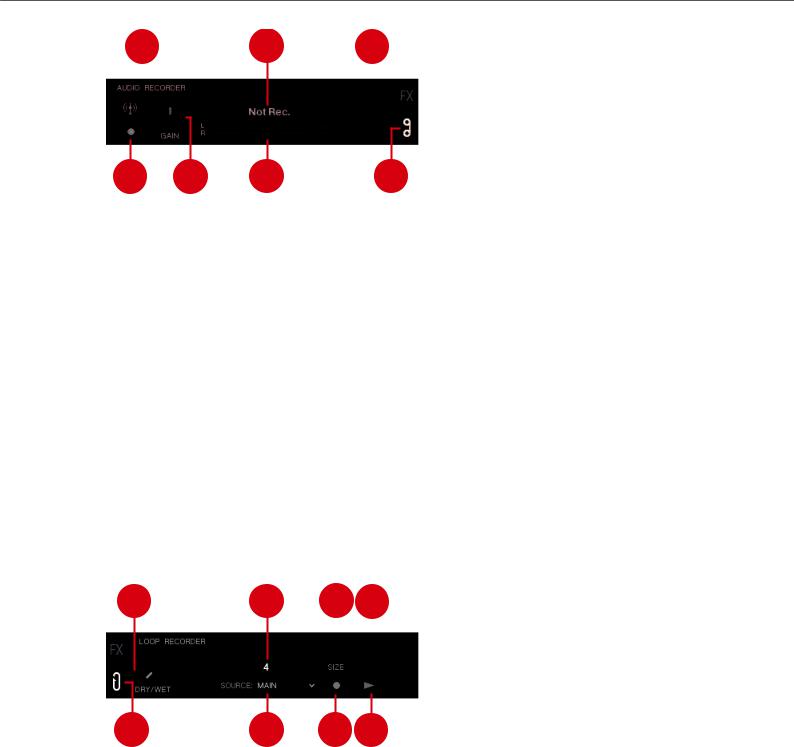
6.3.3. Audio Recorder
The Audio Recorder in TRAKTOR is used for recording your mixes or audio from an external source e.g. your mix with an external mixer, a microphone, or a turntable. It is also used for broadcasting your mix. A click on the Tape icon displays the AUDIO RECORDER in the Global Section.
22
TRAKTOR Overview
|
1 |
2 |
3 |
||
AUDIO RECORDER.
(1) Broadcast button: Starts broadcasting your mix once a server has been installed and configured.
(2) Display: Shows the actual file size and recorded time.
(3) CUT button: Saves the recording until the current recording time and seamlessly starts a new file for recording.
(4) AUDIO RECORDER button: Opens the AUDIO RECORDER. (5) Recording meter: Indicates the current recording level.
(6) Record GAIN knob: Adjusts the level for the incoming audio signal.
(7) Record button: Starts and stops recording and saves the recorded file in the Recordings folder.
6.3.4. Loop Recorder
The LOOP RECORDER allows you to record Loops from several sources on the fly. A click on the LOOP RECORDER button on the left side of the Global section displays the LOOP RECORDER.
|
1 |
2 |
4 |
|||
LOOP RECORDER.
(1) DRY/WET knob: Adjusts the ratio of main-to-recorded signal. (2) Progress bar: Displays the current length of the recording. (3) SIZE button: Determines the initial length of the recording.
(4) Delete / Undo / Redo: Deletes the recorded Loop, undoes the last overdubbing, and restores last undo.
(5) Play button: Starts and stops playback of the recording.
(6) Record button: Starts and stops the recording and the overdubbing.
23

TRAKTOR Overview
(7) Source drop-down menu: Selects the source for the recording.
(8) LOOP RECORDER button: Opens the LOOP RECORDER.
If you’re using TRAKTOR with the SCRATCH feature and are therefore in External Mixing mode, the only available recording source to select is EXT.
6.4. Decks and Deck Types
TRAKTOR provides you with four virtual Decks. These Decks can be operated in different Deck Types which are Track Deck, STEM Deck, Remix Deck, and Live Input:
The Decks contain common Deck elements and as well contain their own specific Deck elements. For more information, refer to Common Deck Controls.
•Track Deck: The Track Deck in TRAKTOR represents the equivalent of a turntable or a CD player used to play back conventional tracks in a classic mixing setup. For more information, refer to Track Deck.
•STEM Deck: The STEM Deck is capable of playing back and remixing STEM Files (.stem.mp4). The functionality is basically identical to the Track Deck, but features additional sub-mix controls for the four Slot Volumes, Filters, and FX Sends for the STEM Parts. For more information, refer to STEM Deck.
It is mandatory that STEM Files have to be analyzed before loading them into a STEM Deck. It is not possible to load and play a STEM File before it has been analyzed.
•Remix Deck: The Remix Deck provides you with four Sample Slots, for adding Samples and loops to your mix. You can load, create and save complex Remix Sets, and arrange Samples live in your mix. The Remix Deck comes with a variety of Sample-related features. For more information, refer to Remix Deck.
•Live Input: The Live Input is not a Deck, but it allows you to include live audio from an external source in your mix. This can be from any audio input, i.e. a turntable, a microphone, or a synthesizer. For more information, refer to Live Input.
6.4.1. Common Deck Controls
Besides the Live Input, any Deck provides the same synchronization, trigger, and track modification controls. The following image shows a full Deck:
24

TRAKTOR Overview
9
5 8 


6
Common Deck controls.
(1) Deck Header: Displays information about the loaded track, like the artist name or track title. By double-clicking the Deck Header, you can switch the Deck layout between five different views from minimized to full layout. For more information, refer to Deck Header.
(2) Deck Tempo display: Contains information about the track tempo. Depending on Deck Type, the contained elements and controls slightly differ. For more information, refer to Deck Tempo Display on the Remix Deck.
(3) Deck Focus: Identifies the Deck and holds a menu for selecting the Deck Flavor and the playback mode for the Deck. Each Deck is named by a letter A, B, C and D. The letter of the focused Deck is highlighted in orange.
(4) Synchronization and Tempo controls: Define if the Deck is the Tempo Master or if it is synced to the Tempo Master. The controls visualize if the track is out of sync, and they contain tempo bend controls. For more information, refer to Synchronization and Tempo Controls.
(4) Deck center: Hosts the elements and controls the characteristic of the selected Deck Flavor. For more Information, refer to Track Deck,STEM Deck,Remix Deck, and Live Input.
(5) Loop controls: Activate looping and define the loop size. For more information, refer to Loop Controls.
(6) Advanced panel: On the Track Deck and on the Stem Deck, the Advanced panel contains advanced control options for Cue Point and Loop management. On the Remix Deck the Advanced panel gives you access to the parameter settings of the individual Sample Cells. For more information, refer to Advanced Panel [33] and Advanced Panel on the Remix Deck.
(7) Advanced panel button: Shows and hides the Advanced panel below the Loop controls for Deck A and B, and for Deck C and D, respectively. It also shows and hides the Panorama controls in the Mixer for Deck A and B, and for Deck C and D, respectively.
(8) Transport controls: Contain the usual transport controls Play/Pause and CUE as well as the Flux mode and Reverse mode buttons. For more information, refer to Transport Controls.
25

TRAKTOR Overview
Deck Header
The Deck Header displays information about the loaded track, Remix Set, or STEM File such as the artist name, track title and tempo. The displayed information can be customized in the Preferences.
|
1 |
2 |
3 |
6 |
8 |
Deck Header.
(1) Track Cover Artwork: Displays the cover artwork of the track.
(2) Track title: Displays the track title.
(3) Artist name: Displays the artist name.
(4) Album title: Displays the album title.
(5) Track time: Displays the track time.
(6) Remaining track time: Displays the time remaining until the track ends.
(8) Current tempo: Displays the current tempo value in BPM, determined by the Tempo Fader position.
(7) Tempo fader position: Reflects the current Tempo fader position as a percentage.
(9) Base tempo: Represents the original track tempo.
Deck Tempo Display on the Remix Deck
The Deck Tempo display in the Remix Deck’s Header contains further controls for the Remix Deck.
3 5
8 6
Deck Tempo display on the Remix Deck.
(1) Quantize value drop-down menu: Selects the quantize value.
(2) Quantize value: Shows current quantize value for the Remix Deck.
(3) Quantize enable: The dot enables or disables Quantize mode on the Remix Deck. Quantize is enabled when the dot is lit blue.
(4) Remix Deck Tempo: Shows the current Tempo of the Deck. Dragging this value up and down changes the Tempo. A double-click resets it to the base tempo.
26

TRAKTOR Overview
(5) Tempo fader position: Represents the current Tempo fader position.
(6) Base tempo: Represents the original Remix Deck tempo. You can enter a new value by dou- ble-clicking.
(7) Capture source: Represents the selected source for capturing Samples when using hardware controllers. The triangle that appears when hovering with the mouse, opens a drop-down menu where you can select the source.
(8) Beat Count: Represents the current internal Beat Count position of the Remix Deck. Synchronization and quantize functions are based on this value.
Synchronization and Tempo Controls
Any Deck Type contains the same controls for syncing and for adjusting the tempo manually.
|
2 |
3 |
4 |
5 |
|||||||
Synchronization and Tempo controls.
(1) SYNC button: Synchronizes the current track to the Tempo Master.
(2) MASTER button: Sets the Deck to the Tempo Master.
(3) Phase meter: Visually indicates the offset of the beats when manually syncing a track to the Tempo Master or the Master Clock.
(4) Tempo bend buttons: Correct the offset of the beats when manually syncing a track to the Tempo Master or the Master Clock. The left arrow slightly slows down the tempo and the right arrow speeds it up.
(5) Tempo fader: Decreases or increases the tempo of the playing track, Remix Set, or STEM File in the respective Deck.
Transport Controls
All Deck Types contain the same transport controls, which are used for playing back tracks with TRAKTOR’s internal playback mode.
 5
5
Transport controls.
27
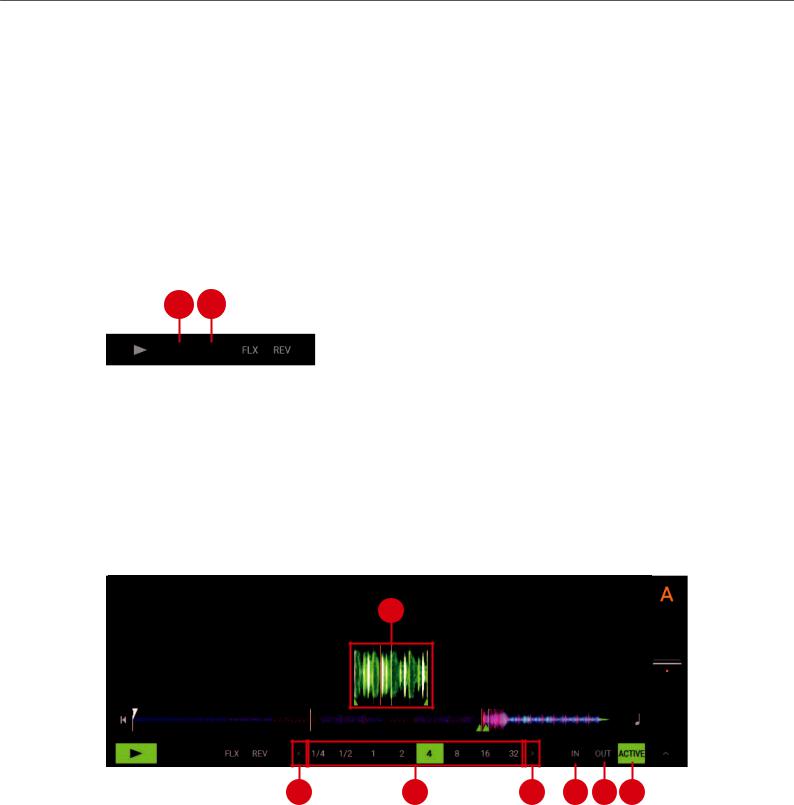
TRAKTOR Overview
(1) Play/Pause button: Starts or pauses playback of the Deck.
(2) CUE button: Depending on the playback state, this button either sets a new Floating Cue Point or jumps to the previously set Floating Cue Point. For more information on Cue points, refer to.
(3) CUP button (CUE/Play): Jumps to the current cue point and starts playback upon release.
(4) Flux Mode button: Enables Flux mode for the Deck. For more information on Flux Mode, refer to Working with Hotcue buttons and Flux Mode.
(5) Reverse Mode button: Enables Reverse mode and Flux Mode for the Deck. For more information on Reverse mode, refer to Working with Hotcue buttons and Flux Mode.
Scratch Controls
When setting the Deck’s playback mode to Scratch Control, the CUE and CUP buttons are replaced by the Absolute Mode button and the Relative Mode button.
2
Transport controls in Scratch Playback mode.
(1) Relative Mode button: Enables Relative mode for controlling the Deck with Timecode vinyl or CD.
(2) Absolute Mode button: Enables Absolute mode for controlling the Deck with Timecode vinyl or CD.
Loop Controls
The Loop controls offer the functions required for the creative usage of Loops in your mix.
1
Loop controls.
(1) Active Loop: When a Loop is enabled it is highlighted in green in the Waveform display and in the Stripe view.
(2) Arrow buttons: Clicking the left and right arrows of the Loop Size control will scroll through the list of Loop values. The Arrow buttons flash if the selected size is out of range.
(3) Loop size control: Determine the size of the enabled or disabled Loop.
28

TRAKTOR Overview
(4) Loop In button: Sets the start point for the Loop.
(5) Loop Out button: Sets the end point for the Loop. The Loop will be enabled when the playback position reaches these two points and the ACTIVE button will be highlighted.
(6) ACTIVE button: Enables/disables Looping. The button lights up green when Looping is enabled.
6.4.2. Track Deck
The Track Deck in TRAKTOR is the equivalent to a turntable or a CD player in a classic mixing setup, used to play back conventional tracks. Besides the Common Deck controls, the Track Deck’s center contains the following elements:
1
2
Track Deck.
(1) Waveform display: Visually represents a localized view of the loaded track. The brighter color shade represents higher frequencies, while the darker color shade represents lower frequencies. It also shows the Beatgrid markers, and shows zoom controls when hovering the mouse over the Waveform display.
(2) Stripe view: The Stripe view shows the entire waveform of the track including all Cue Point markers and Loop markers. You can jump back to the start of the track or directly jump within the track by clicking inside the Stripe view. You can also activate Keylock for the track.
6.4.3. STEM Deck
The STEM Deck operates in a similar way to the Track Deck, however instead of the Waveform display it provides the Multi-Track Waveform:
29

TRAKTOR Overview
1
2
STEM Deck.
(1) Multi-Track Waveform: Visually represents a localized Multi-Track Waveform of the individual STEM Channels including STEM controls of the loaded STEM File. The brighter color shade represents higher frequencies, while the darker color shade represents lower frequencies.
For more information on the Multi-Track Waveform, refer to section Section : Multi-Track Waveform.
(2) Stripe view: Shows the entire Waveform of the STEM File including all Cue Point markers and Loop markers. You can jump back to the start of the track or directly jump within the track by clicking inside the Stripe view. You can also activate Keylock for the STEM file.
Multi-Track Waveform
The Multi-Track Waveform shows the waveforms of the STEM Parts, and provides controls to adjust volumes and apply effects individually.
|
1 |
3 |
5 |
||||||
4
Multi-Track Waveform.
(1) STEM channel 1 — 4: Each of the four rows represents one STEM Channel, including the individual STEM Part name.
(2) Volume control: Every STEM Channel provides a Volume control for adjusting the volume individually. All STEM controls can be hidden using the small arrow button.
(3) Filter controls: Every STEM Channel provides Filter controls. The Filter button enables the Filter, whereby the Filter knob determines the Filter amount.
30
![]()
TRAKTOR Overview
(4) FX Send control: Every STEM channel provides FX Send controls. The FX Send button enables FX Send mode for the individual STEM Channel, whereby the FX Send knob determines the FX Send amount.
(5) Waveform: Each STEM Channel displays the waveform of the contained STEM Part in a different color, as well as the Beatgrid.
6.4.4. Remix Deck
Besides the Common Deck controls, the Remix Deck’s center contains the following elements:
1
2
Remix Deck.
(1) Sample Slot: The Remix Deck shows four Samples Slots containing the Samples, trigger controls other elements. For more information, refer to Sample Slot.
(2) Advanced panel: The Advanced panel on the Remix Deck contains options for i.e. adjusting Sample Grids. For more information, refer to Advanced Panel on the Remix Deck.
Sample Slot
A Sample Slot contains the following elements:
6

 4 5
4 5
Sample Slot.
31

TRAKTOR Overview
(1) Sample title: Displays the title of the Sample loaded in the Slot Player.
(2) Slot Player: Displays the waveform of the Sample currently loaded. A moving red playhead indicates the current playback position within the Sample. Hovering the mouse over the Slot Player shows a Mute button, which mutes/unmutes the Sample.
(3) Volume control: Controls the Sample Slot’s volume. This control is applied after the individual Gain control of a Sample Cell, which is accessible from the Advanced panel.
(4) Filter control: Applies a low-pass or high-pass filter to the Sample Slot by moving the bar downwards or upwards, respectively.
(missing) Sample Cell: Represents the container for Samples in the Sample Slot.
(5) Play Type indicator: Indicates whether the Sample Cell is set to Loop or One-shot mode. Clicking this symbol also triggers the Sample.
(6) Page Selector: Selects the current Page with Samples for the Remix Set.
1 2
Sample Slot hovered.
(1) Sample Slot parameters: Each Sample Slot has a set of parameters. Hovering the mouse over the Sample Slot Player or Sample title displays the relevant parameters:
•Keylock button: Separates the playback key from the playback speed. This control needs to be activated to adjust the Sample Cell’s pitch in the Advanced panel. Otherwise, the Sample Cell’s pitch directly relates to the Remix Deck’s tempo.
•FX button: Routes the Sample Slot through the FX Unit(s) currently assigned to the Mixer channel for the Remix Deck.
•Monitor button: Routes the Sample Slot to the Mixer’s Monitor Output (which can be monitored in headphones).
•Punch mode: When a Sample is triggered, the position of that Sample is fixed to the Remix Deck’s internal timeline.
(2) Sample Mute: Mutes/un-mutes the Sample Slot.
6.4.5. Live Input
When selecting the Deck Flavor Live Input, you can route the audio signal from an external audio source into TRAKTOR and add it to your mix. The Live Input does not provide any control elements apart from the Deck focus.
32

TRAKTOR Overview
Live Input.
6.4.6. Advanced Panel
On the Track Deck and on the STEM Deck, the Advanced panel contains advanced control options for Cue Point and Loop management, and for correcting the Beatgrids for your tracks. On the Remix Deck, the Advanced panel gives you access to the parameter settings of the individual Sample Cells. For more information on the Advanced panel on the Remix Deck, refer to Advanced Panel on the Remix Deck.
Advanced panel.
(1) Advanced panel button: Shows and hides the Advanced panel below the Loop controls for Deck A and B, and for Deck C and D, respectively. It also shows and hides the Panorama controls in the Mixer for Deck A and B, and for Deck C and D, respectively.
The Advanced panel can only be displayed when the Deck is displayed in full Deck layout and in advanced Deck layout.
(2) Advanced panel page selector: Selects one of three Advanced panel pages; MOVE, CUE, and GRID containing individual control and editing elements.
33

TRAKTOR Overview
•CUE: Provides direct access to 8 user-definable Cue/Loop In Points per track, as well as further Cue Point management controls. For more information, refer to Working with Cue Points.
•MOVE: Provides options for moving the active Loop within the track as well as jumping the current playhead position within the track by beats. For more information, refer to Working with Loops.
•GRID: Provides control over the Beatmarker, the Beatgrid, and the stored tempo of a track. For more information, refer to Correcting Beatgrids.
Advanced Panel – Cue Page
Provides direct access to eight user-definable Cue/Loop In Points per track, as well as further Cue Point management controls. For more information, refer to Section 8.8: Working with Hotcue buttons and Flux Mode, Section 9.1: Working with Cue Points, and Section 9.2: Working with Loops.
1
Advanced Panel – CUE page.
(1) Hotcue 1-8: Allows you to directly set or access eight Hotcue or Loop In Points per track.
(2) Prev Cue / Next Cue: Skips backward or forward to the previous or next stored Cue Point in the track.
(3) Cue Point Position: Displays the position of the selected Cue Point or Loop in minutes : seconds : milliseconds.
(4) Cue Point List: Selects the Cue Point.
(5) Cue Point Type menu: Provides a list of several Cue Point Types.
(6) Delete Cue Point: Deletes the selected Cue Point or Loop In Point.
(7) MAP: Enables Hotcue Mapping mode. When enabled, pressing a Hotcue button will map the displayed Cue Point or Loop In Point to it.
(8) STORE: Stores the selected Cue Point and maps it to the next free Hotcue button.
Advanced Panel – MOVE Page
The Move page provides options for moving the active Loop within the track, as well as for jumping the current playhead position withig the track by beats. For more information, refer to Working with Loops.
34

TRAKTOR Overview
|
1 |
2 |
3 |
5 |
|||
6
Advanced Panel – MOVE page.
(1) Move Mode menu: Selects one of the Move modes BeatJump, Loop, Loop In, and Loop Out.
(2) Move Size control: Selects the step size in beats.
(3) LOOP mode: Selects a step size that is based on the current Loop size for the movement.
(4) Cue Move BWD: Depending on the selected Move mode, the selected issue is moved backwards at the selected step size.
(5) Cue Move FWD: Depending on the selected Move mode, the selected issue is moved forward at the selected step size.
(6) FINE mode: Selects a fine step size for the movement. Use this for fine adjustments.
Advanced Panel – GRID Page
Provides control over the Beatmarker, the Beatgrid, and the stored tempo of a track. For more information, refer to Correcting Beatgrids.
|
3 |
4 |
6 |
8 |
||||||
|
12 |
11 |
Advanced Panel – GRID page.
(1) Move Grid BWD: Moves the Grid backward.
(2) Move Grid FWD: Moves the Grid forward.
(3) BPM INC (Increase): Precisely increases the BPM in minor steps. As a result the Beatgrid gets narrower=.
(4) BPM DEC (Decrease): Precisely decreases the BPM in minor steps. As a result the Beatgrid gets expanded.
(3) Analysis Lock button: Locks all values against future changes by the track analysis and by the user.
(4) Beat Tick: Enables an audible beat tick (metronome) to help align the Beatgrid during playback. In Internal Mixer mode, the Beat Tick is only audible on signals cued over the headphones. In External Mixer mode, the tick is laid over the Deck’s Mixer channel signal when Headphone Cue on the Internal Mixer is active.
35

TRAKTOR Overview
(5) BPM Edit Display: Shows the current BPM value of the track. A double-click enables manual tempo adjustment.
(6) Set Gridmarker: Sets a Gridmarker at the current playback position.
(7) Delete Gridmarker: Deletes the last set Gridmarker.
(8) BPM /2: Halves the BMP Edit Display.
(9) BMP x2: Doubles the BMP Edit Display.
(10) AUTO Grid: Calculates the BPM of the current track and sets a Gridmarker next to the current playback position. This function is only available for previously analyzed tracks.
(11) RESET Gridmarker: Resets the set BMP and recalculates it.
(12) TAP: Sets the BPM based on how fast or slow the button is tapped. The BPM will be adjusted after the fourth tap.
6.4.7. Advanced Panel on the Remix Deck
Each Sample Cell has a set of individual parameters, which are accessible from the Remix Deck’s Advanced Panel. The Advanced panel can only be displayed when in Full Deck Layout or Advanced Deck Layout.
|
3 |
4 |
6 |
8 |
|||||
|
13 |
11 |
Advanced Panel on the Remix Deck.
(1) SAMPLE PITCH control: Sets the pitch for the selected Sample in semitone steps.
(2) SAMPLE GAIN control: Sets the Gain level for the selected Sample.
(3) BPM x2: Doubles the tempo of the Sample.
(4) BPM Edit Display: Shows the current BPM value for the Sample. A Double-click enables manual tempo adjustment.
(5) Move Grid Left: Moves the Sample Cell’s Beatgrid to the left.
(6) Move Grid Right: Moves the Sample Cell’s Beatrgid to the right.
(7) Trigger Type: When enabled (Latch mode), a Sample will continue to play after you release the mouse button, either until the end of the Sample is reached (for One-shot Samples) or until it is stopped by some other method (like triggering a new Sample in the same Slot).
The alternative Type is Gate mode, where a Sample will only play while you’re holding down on the mouse button. Upon releasing the mouse button, the Sample will stop playing.
(8) Reverse Playback: Enables reverse playback for the Sample Cell currently being played in the Slot Player.
(9) Play Type: This property determines whether a Sample stops after reaching its end or if it continuously loops. When set to One-Shot (arrow symbol), a Sample will stop playing when it gets to
36

TRAKTOR Overview
its end. When set to Loop (ellipse symbol), the Sample will automatically return to its start and continue playing indefinitely.
(10) Sync Type: This property determines if the Sample should be synchronized to the Remix Deck’s Tempo or not. When SYNC is on, the Sample’s BPM will match the Remix Deck’s BPM. When SYNC is off, the Sample will play at its original speed.
(11) BPM Increase: Precisely decreases the BPM in minor steps. As a result the Beatgrid is expanded.
(12) BPM Decrease: Precisely increases the BPM in minor steps. As a result the Beatgrid becomes narrower.
(13) BPM /2: Halves the tempo of the Sample.
6.5. Mixer
The Mixer is the center of TRAKTOR , used to control and modulate the audio signals coming from the Decks before they are sent to the master output.
1
5
2
Mixer.
(1) Mixer channel: Contains the controls to adjust the Mixer channels’ volume and to modulate the audio signals’ frequency. Furthermore, you can assign the FX Units to the Mixer channel and route the audio signal to the Headphone Cue channel. For more information, refer to Mixer Channel.
(2) Crossfade controls: These controls allow you to make seamless transitions between various Mixer channels. For more Information, refer to Crossfade Controls
(3) Headphone Cue Mix: Let you adjust the Headphone Cue volume.
(4) Headphone Cue Vol: Determine the ratio of the cue-signal-to-master-signal in your headphones.
(5) AUX control: Controls the volume of the AUX input, which can be fed by an external signal like a microphone. For more inforamtion, refer to AUX Control.
The available Mixer controls differ depending on the current Mixing mode and the selected TRAKTOR Layout. If TRAKTOR is used in External Mixing mode, the channel faders, the crossfader, as well as Heaphone Cue controls are disabled.
37

TRAKTOR Overview
6.5.1. Mixer Channel
The Mixer channel contains the controls to adjust the Mixer channels’ volume and to modulate the audio signals’ frequency. Furthermore, you can assign the Mixer channel to the FX Units and rout the audio signal to the Headphone Cue channel.
13
13
6
11
7
9
8
Mixer channel.
(1) GAIN knob: Controls the pre-fader input level. GAIN is only visible when full size Deck Layouts are activated.
(2) GAIN View button: Enables/disables visibility of the GAIN button. When disabled, the the prefader input level cannot be adjusted manually.
(3) Channel Level Meter: Indicate the current volume of the audio signal in the Mixer channel. It also indicates if the signal is clipping.
(4) HI, MID, LOW EQ knobs: Adjusts the high frequencies in the audio signal.
(5) HI, MID, LOW Kill buttons: Complete takes out (kills) high frequencies from the audio signal.
(6) Mixer FX On button: Enables/disables the Mixer FX.
(7) Channel fader: The channel fader adjust the channel volume.
(8) CUE channel button: Sends the audio signal to the Headphone Cue channel for preview. For using the Cue function a multi-channel audio device is required. The Cue channel button is only visible when full size Decks Layout is enabled. For more information, refer to…Using the Cue Channel for Mixing.
(9) KEY button: Locks the key for the Deck.
(10) KEY knob: Controls the key of a playing track without affecting its tempo.
(11) FX Assign buttons: Assigns the individual FX Unit to the Mixer channel.
(12) Mixer FX drop-down menu: Adjusts the middle frequencies in the audio signal.
(13) Mixer FX Amount knob: The Mixer FX Amount knob controls the selected Mixer FX.
(17) PAN knob: Controls the balance between the left and right stereo channel for any Mixer channel individually. The PAN knobs are only visible when the Advanced Panels are opened.
38

TRAKTOR Overview
6.5.2. Crossfade Controls
These controls allow you to make seamless transitions between various Mixer channels.
 2 1 2 4
Crossafde controls.
(1) Crossfader: Enables transitions between Decks by dragging it from one side to the other. The crossfader curve can be adjusted individually in the Preferences.
(2) Crossfader assign buttons: Allow to assign the Mixer channels to be audible either on the left or right crossfader position.
(3) Fade left / right buttons: Let the crossfader move to the dedicated direction step by step.
(4) Auto fade left / right button: Let the crossfader automatically move from one side to the other.
6.6. Browser
TRAKTOR’s Browser lets you load tracks into Decks and provides you with tools to organize your Track Collection.


 7 2
7 2 


3
6
4
5
Browser.
(1) Preview Player: Allows you to preview tracks before loading them into a Deck. For more information, refer to Previewing Tracks in the Browser.
(2) Search field: Provides a live search based on the tags of the tracks in the Collection. For more information, refer to Browsing for Music.
(3) Browser Tree: Displays the content of the selected folder:
•Track Collection: Contains all tracks imported to your Track Collection. They are automatically sorted by Artist, Release, Label or Genre.
•Playlists: Contains all your TRAKTOR Playlists.
39

TRAKTOR Overview
•Explorer: Lets you browse your hard drives for tracks. It also contains an Archive folder containing History Playlists.
•Audio Recordings: Contains all recordings created with the AUDIO RECORDER.
•iTunes: Provides direct access to your iTunes Library including all iTunes Playlists.
•History: Contains latest history playlists.
Each History Playlist is time-stamped and contains the additional columns Start-Time, Duration, Deck for more information about when and how you have played the tracks.
(4) Cover Artwork: Displays the Cover Artwork of the selected track in the Track List.
(5) Status bar: Displays the progress of track analysis, error messages, and the overall status of TRAKTOR.
(6) Track List: Shows tracks depending on the source that is selected (folder, Playlist, search results or tag-based).
(7) Favorites: Provides direct access to favorite Playlists and favorite folders.
40
![]()
Automatic Synchronization of Decks
7. AUTOMATIC SYNCHRONIZATION OF DECKS
This section introduces you the principles of the automatic synchronization features offered by TRAKTOR.
7.1. Tempo Master and Master Clock
The Tempo Master represents the reference tempo to which all other elements can synchronize. The Tempo Master can either be TRAKTOR’s internal Master Clock, or one of the Decks. The Tempo Master does not have to be the same throughout your mix, but there can only be one Tempo Master. When activating the Sync function on a Deck, TRAKTOR synchronizes the Deck to the Tempo Master.
7.2. Beatgrid
For a Deck to provide reliable tempo and beats as a Tempo Master or for syncing, the loaded track must first be analyzed by TRAKTOR. This analysis will determine the tempo (BPM) as well as the position of the beats; the result is the so-called Beatgrid. There is a specific Beatgrid for each of your tracks.
7.3. Automatic Syncing
Samples playing in Looped mode and time-evolving FX are always automatically synced to the current tempo master.
For Track Decks, you can decide whether to use the automatic Sync function or not — for example if you want to beat match tracks manually, or if you don’t want any beat matching at all.
7.4. Automatic Tempo Master Mode
With AUTO mode activated in the Master Control panel, TRAKTOR can automatically switch the Tempo Master between Track Decks. This happens when the Track Deck currently set as Tempo Master is stopped or when you load a new track onto it. This way, you don’t have to worry about setting the Tempo Master yourself. If there is no other Track Deck playing, the Master Clock would automatically become the Tempo Master indicated by the MASTER button in the Master Control panel.
The AUTO mode is activated by default.
41

Basic Usage Tutorials
8. BASIC USAGE TUTORIALS
This section introduces you to the basics of importing, browsing and previewing tracks as well as loading music to the Decks. The tutorials also guide you through the fundamentals of mixing your tracks, using Equalizer and Hotcues as well as using Mixer FXs.
8.1. Importing Music to the Track Collection
The most convenient way to get your tracks into TRAKTOR’s Track Collection is using drag and drop:
•Drag the music files from the location on your computer and drop them on the Track Collection folder in TRAKTOR’s Browser Tree.
TRAKTOR now analyzes the metadata of the music files and stores the files in the Track Collection.
8.2. Browsing for Music
The Browser lets you conveniently find the tracks you are looking for. You can navigate along the subfolders of the Track Collection in the Browser Tree or you can perform a text search in the Search field.
8.2.1. Navigating through Folders in the Browser Tree
To navigate the Browser Tree:
1.In the Browser Tree expand the Track Collection folder to show the subfolders.
2.Expand the subfolder of the metadata category by which you want to search a track, i.e. Artists.
3.Select the subfolder named by the artist to your liking, i.e. Native Instruments. The Track List now shows all the music according to the selected artist.
4.In the Track list browse for a track to your liking.
5.Load the track into Deck A by using drag and drop.
TRAKTOR now analyzes the entire track for calculating the tempo (BPM) to create the Beatgrid and the Waveform.
42

Basic Usage Tutorials
8.2.2. Performing a Text Search
You can perform a text search for the current playlist or in the Track Collection:
1.Click in the Search field.
2.Start typing the characters in relation to the track you are looking for. This can either be the track name, the artist, or another category.
Upon typing the Track List instantly filters the selected playlist.
3.Press [Enter] on your computer keyboard.
The Track list now provides you with all the music in the Track Collection matching your search query.
8.2.3. Previewing Tracks in the Browser
TRAKTOR’S Browser provides a Preview Player to preview tracks without loading them into a Deck and without changing the played stated and play count.
To use the Preview Player you need to assign an output to «Output Preview» (for External Mixer mode) or «Output Monitor» (for Internal Mixer mode). Find these settings on the Output Routing page in the Preferences.
To preview a track in the Preview Player:
1.Drag-and-drop a track from the Browser List onto the Preview Player.
The Stripe view is visible
2.Click the play button to start preview.
3.Click inside the Stripe view to skip within the track.
4.Click the play button again to stop preview.
8.3. Loading Music into Decks
To load a track, STEM file, or Remix Set into a Deck, you may use one of the following methods: using drag and drop or using the context menu.
43

Basic Usage Tutorials
Loading Music via Drag and Drop
•Drag the selected music from the Track List and drop it into the Deck to your liking. TRAKTOR now analyzes the track for its tempo (BPM) to create the Beatgrid and the Waveform. Depending on the selected track, the Deck flavor switches, i.e to a STEM Deck. The Track information are visible in the Deck Header.
Loading Music via Browser Context Menu
1.Right-click the track in the Track list to open the context menu.
2.Select the entry for the Deck you want to load the track in to, i.e Load into Track Deck A. TRAKTOR now analyzes the track for calculating its tempo (BPM) to create the Beatgrid and the Waveform.
The entries in the context menu differ according to the selected music. When rightclicking a Remix Set, the entries change to i.e. Load into Remix Deck A. If none of the Decks is currently a Remix Deck, the corresponding entries are not available in the Browser context menu. This also applies to STEM files.
8.3.1. Loading Tracks from Your iTunes Library
You can load tracks from your iTunes Library and Playlists directly from TRAKTOR. The iTunes folder in the Browser Tree directly accesses your iTunes Library and its Playlists. Editing functions are not available.
To load a track from your iTunes Library:
1.Select the iTunes folder in the Browser Tree to display its content in the Track List. A doubleclick expands the iTunes folder.
2.Browse for a track in the Track List or in the Playlists.
3.Drag the track and drop it into a Deck to load it.
44

Basic Usage Tutorials
8.4. Mixing Your First Two Tracks
In this section you learn to mix your first two tracks using Track Deck A and Track Deck B. At first you prepare the Mixer by adjusting the control elements for mixing from Deck A to B. Then you load the first track into Deck A, and begin to perform step by step.
8.4.1. Prerequisites
1.Set the crossfader to the left-most position.
2.Assign Mixer channel A to the left crossfader position.
3.Assign Mixer channel B to the right crossfader position.
4.Set Channel fader A to maximum position.
5.Set Channel Fader B to maximum position.
6.Set the MAIN knob to center position at 0.0 dB.
7.Set the volume of your audio system or active speakers to minimum level.
8.4.2. Loading the First Track into Deck A
1. Browse for a track to your liking in the Track Collection, i.e. the demo track Berlin Hauptbahnhof by Native Instruments.
2. Drag and drop the track into Deck A to load it.
TRAKTOR now analyzes the Track for its tempo and to create the Beatgrid and the Waveform.
8.4.3. Starting Playback of Deck A
To start playback on Track Deck A:
1.Click the Play button.
The waveform starts moving and the Channel Volume meter LEDs and the MAIN Volume Level meter LEDs start to illuminate.
2.Slowly increase the volume of your audio system or active speakers to a moderate listening level.
You now hear the audio of the track in your speakers.
45

Basic Usage Tutorials
8.4.4. Loading the Second Track into Deck B
1. Browse for a track with a similar tempo to your liking in the Track Collection, i.e. Lisa. 2. Drag and drop the track into Deck B to load it.
TRAKTOR now analyzes the Track for its tempo and to create the Beatgrid and the Waveform.
8.4.5. Syncing the Track Tempos
In order to Sync the tempos both both tracks:
•Click the SYNC button on Deck B.
The tempos of both tracks are now in sync, indicated by the equal tempo value in the Deck Header. The Tempo fader on Deck B has also moved accordingly and the SYNC button lights up.
8.4.6. Starting Playback of the Second Track
When the playback time of the Track in Deck A is almost over you can start the playback of Deck
B:
•Click the Play button on Deck B.
The waveform starts moving and the Channel Volume meter LEDs in Mixer channel B illuminate. The tracks in Deck A and Deck B play beat-accurate in sync.
8.4.7. Mixing in the Audio Signal
You can now mix in the audio signal of Mixer channel B into the main signal:
1.Drag the crossfader and slowly move it towards center position and hold for a moment.
The audio signal of the track in Mixer channel B is fading into the main signal.
2.While the track in Deck A reaches its end, slowly move the crossfader to the right-most position.
46

Basic Usage Tutorials
The audio signal of Mixer channel A slowly fades out of the main signal. Only Mixer Channel B is now audible. Alternatively to the crossfader you can also use the Fade left and Fade right buttons to move the crossfader step-wise, or you can even use the Autofade buttons to let the crossfader automatically move to the opposite side. You have mixed your first two tracks.
With the end of the playback of Deck A, Deck B automatically becomes the new Tempo Master and is ready for the next transition to another Deck.
•To mix another track repeat the aforementioned steps.
8.5. Adjusting Gain Levels for Incoming Audio Signals
In this section you briefly learn about the importance of adjusting or leveling the GAIN levels for incoming audio signals in the mixer as well as adjusting the outgoing master volume level to the connected sound system or active speakers.
Adjusting the levels at the several stages the DJ controls not only supports the audio quality of the mix and ensures the best possible dynamic range. It also prevents damaging ears of the audience and protects audio equipment, i.e. power amplifiers and speakers.
8.5.1. Dynamic Range
Each track has its own dynamic range. This means the maximum volume level of a single musical element in a track can be way louder than the average volume of all musical elements together. Besides different average audio levels, also the dynamic ranges can be different between tracks. That is why it is important to align the levels of the incoming audio signals to prevent them from clipping.
The normal dynamic range for an audio signal is between -∞ to ±0 dB.
8.5.2. Clipping
If an audio signal clips, the GAIN of the audio signal is too high. An audio signal clips if it exceeds the nominal level and also the headroom – normally at +6 dB. Then the audio signal starts to distort and looses dynamics and punch. Although the audio signal then seems louder, the entire audio quality decreases significantly. This critical audio signal can damage ears and audio equipment. That is why it is important to as well adjust the GAIN levels to protect ears and electronics.
To protect the audio equipment connected to the MAIN output stage, TRAKTOR uses an integrated Limiter. The purpose of the limiter is to prevent the signal from clipping by reducing the dynamic range.
However, the Limiter in TRAKTOR can be switched off.
47

Basic Usage Tutorials
Switching off the Limiter is not recommended.
8.5.3. Headroom
Before an audio signal starts to clip there is still a reserve to buffer transient audio speaks — the so called headroom. The headroom starts where where nominal level ends – at +0 db. It normally ends before +6dB.
However, the available Headroom in TRAKTOR can be adjusted in the Preferences or entirely switched off.
Switching off the Limiter is not recommended.
8.5.4. Always Level Incoming Audio Signals
When you mix using the Auto Gain function, the incoming audio signals from the Decks are always leveled by TRAKTOR automatically. This ensures none of your tracks dominate over the others.
The Auto Gain function is active by default. However, if you prefer to adjust the GAIN level by yourself, i.e. when using an external Mixer or a controller with integrated Mixer, you can also deactivate this feature in the Preferences. In this case you always have to make sure the audio levels always stay in the area before clipping.
Each Channel Meter of the blue LEDs in the Channel Level Meters.
8.6. Using the Equalizer
The EQ knobs and EQ Kill buttons are used for making sound adjustments to tracks while cueing and while mixing.
•The EQ knobs adjust the high, middle, or low frequencies in the audio signal.
•The Kill buttons completely take out (kill) high, middle, or low frequencies from the audio signal.
Using the EQs while cueing a track can support to manually align the tempos of the tracks. For more information, refer to cuing tracks.
Using the EQs can make transitions more flawless. The following example outlines a procedure on how to use the Equalizer during a transition.
48

Basic Usage Tutorials
8.6.1. EQing the Bass Frequencies of Tracks during Transition
The most common EQing technique is to take out the bass of the next track before the transition and to gradually bring it back in during the transition.
Assuming you want to transition tracks from Deck A to Deck B:
1.Before starting the transition, turn the LOW knob on Mixer channel B to minimum position for taking out the bass frequencies of the track in Deck B.
2.Progressively mix in Mixer channel B by gradually moving the crossfader from the left to the center position.
Both tracks are audible in the Master signal but the track on Deck B has no bass.
3.When you want to bring the bass back in, gradually increase the bass amount of Mixer channel B while simultaneously decreasing that of Mixer channel A using the LOW knobs on both Mixer channels.
Both tracks are still audible in the Master signal but the track on Deck A has no bass.
4.Complete the transition by gradually moving the crossfader all the way to the right. You mixed two tracks in conjunction with the Equalizer.
Alternatively to the EQ knobs, you can also use the EQ Kill buttons. These buttons are used for immediate killing the respective the frequency band of the audio signals during transitions as well as for performances in between.
Using the EQs during a transition to take out frequencies can avoid clipping that can easily occur when two tracks play together with full volume.
8.7. Working with Mixer FX
In this section you learn how to apply Mixer FX to your mix.
8.7.1. About Mixer FX
A Mixer FX is a grouped effect which can be applied to the audio signal in the Mixer channel by just using the Mixer FX Amount knob. Besides the Filter you can choose one of four Mixer FX from the Mixer FX drop-down menu below the Mixer FX Amount knob. In total TRAKTOR provides you with eight Mixer FX of which you can pre-select four in the Preferences.
Available MIXER FX
Always when you start TRAKTOR, the Filter is selected by default. However, you can pre-select four of eight available MIXER FX:
49

Basic Usage Tutorials
•Reverb
•Dual Delay
•Noise
•Time Gater
•Flanger
•Barber Pole
•Dotted Delay
•Modern Krush
Pre-Selected Mixer FX
By default the following Mixer FX are pre-selected:
•Filter: The pointer color of the Mixer FX Amount knob is white. The Filter is not removable from the drop-down menu.
•Reverb: The pointer color of the Mixer FX Amount knob is red.
•Dual Delay: The pointer color of the Mixer FX Amount knob is green.
•NOISE: The pointer color of the Mixer FX Amount knob is blue.
•Time Gater: The pointer color of the Mixer FX Amount knob is orange.
8.7.2. Enabling Mixer FX
To enable the Mixer FX for the Mixer channel:
•Click the Mixer FX On button.
The button lights up blue, indicating the Mixer FX is enabled.
8.7.3. Selecting Mixer FX
To select another Mixer FX from the pre-selection:
1.Click the label next to the Mixer FX On button to open the Mixer FX drop-down menu.
2.Select the Mixer FX you want to use.
50
 Loading…
Основные настройки, которые следует обязательно выставлять перед началом работы с программой следующие:
1. Нажимаем File -> Preferences и откроется основное меню с настройками.
2. Audio Setup – здесь нужно в меню Audio Device выбрать устройство, которое будет проигрывать записываемую музыку. Это могут быть ваши колонки, гарнитура или что-нибудь еще.
3. Global Settings. Тут рекомендуем поставить галочку напротив пункта Show Global Section. Это откроет основную приборную панель, с которой будет намного удобнее работать в программе.
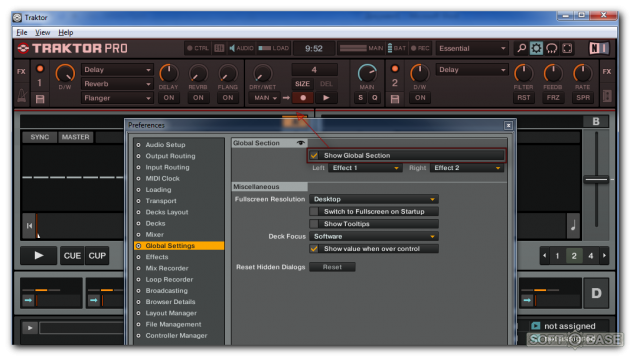
4. Mix Recorder – выберите место на жестком диске, куда будут по умолчанию сохраняться ваши миксы. Лучше всего их сохранять на НЕ системные разделы.
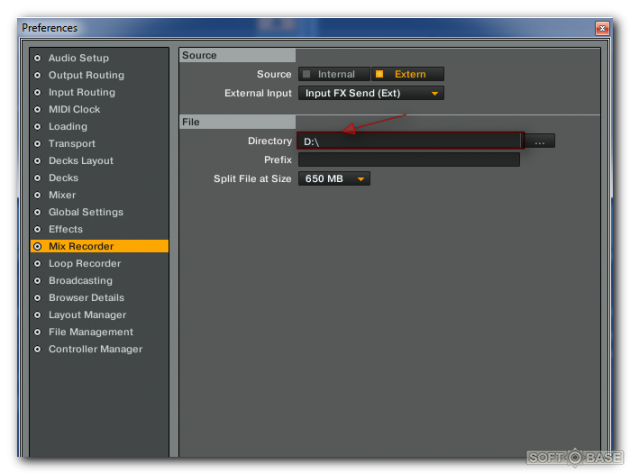
Готово. Теперь нажмите кнопку Close. Таким образом, мы настроили основные параметры и можно начинать приступать к работе с программой.
apt.ru
Timeweb — компания, которая размещает проекты клиентов в Интернете, регистрирует адреса сайтов и предоставляет аренду виртуальных и физических серверов. Разместите свой сайт в Сети — расскажите миру о себе!

Виртуальный хостинг
Быстрая загрузка вашего сайта, бесплатное доменное имя, SSL-сертификат и почта. Первоклассная круглосуточная поддержка.
Аренда VDS и VPS
Виртуальные серверы с почасовой оплатой. Меняйте конфигурацию сервера в любой момент и в пару кликов.

Выделенные серверы
Аренда физических серверов любых конфигураций — готовые сборки или под заказ.

Посмотреть инструкция для Native Instruments Traktor Pro 3 бесплатно. Руководство относится к категории без категории, 1 человек(а) дали ему среднюю оценку 7.7. Руководство доступно на следующих языках: английский. У вас есть вопрос о Native Instruments Traktor Pro 3 или вам нужна помощь? Задайте свой вопрос здесь
- Table of Contents
- 1. Disclaimer
- 2. Welcome to TRAKTOR
- 3. New in TRAKTOR PRO 3.2
- 4. The TRAKTOR Workflow
- 5. Setting Up TRAKTOR
- 6. TRAKTOR Overview
- 7. Global Concepts
- 8. Basic Usage Tutorials
- 9. Advanced Usage Tutorials
- 10. Working with Playlists
- 11. Managing Your Track Collection
- 12. Advanced Operation of TRAKTOR
- 13. Setting up TRAKTOR for SCRATCH Control
- 14. Common TRAKTOR Setups
- 15. Configuring MIDI Controller for Controlling TRAKTOR
- 16. Preferences
- 17. Effect Reference
Нужна помощь?
У вас есть вопрос о Native Instruments а ответа нет в руководстве? Задайте свой вопрос здесь Дай исчерпывающее описание проблемы и четко задайте свой вопрос. Чем детальнее описание проблемы или вопроса, тем легче будет другим пользователям Native Instruments предоставить вам исчерпывающий ответ.
Количество вопросов: 0

 Loading…
Основные настройки, которые следует обязательно выставлять перед началом работы с программой следующие:
1. Нажимаем File -> Preferences и откроется основное меню с настройками.
2. Audio Setup – здесь нужно в меню Audio Device выбрать устройство, которое будет проигрывать записываемую музыку. Это могут быть ваши колонки, гарнитура или что-нибудь еще.
3. Global Settings. Тут рекомендуем поставить галочку напротив пункта Show Global Section. Это откроет основную приборную панель, с которой будет намного удобнее работать в программе.
4. Mix Recorder – выберите место на жестком диске, куда будут по умолчанию сохраняться ваши миксы. Лучше всего их сохранять на НЕ системные разделы.
Готово. Теперь нажмите кнопку Close. Таким образом, мы настроили основные параметры и можно начинать приступать к работе с программой.
apt.ru
Timeweb — компания, которая размещает проекты клиентов в Интернете, регистрирует адреса сайтов и предоставляет аренду виртуальных и физических серверов. Разместите свой сайт в Сети — расскажите миру о себе!
Виртуальный хостинг
Быстрая загрузка вашего сайта, бесплатное доменное имя, SSL-сертификат и почта. Первоклассная круглосуточная поддержка.
Аренда VDS и VPS
Виртуальные серверы с почасовой оплатой. Меняйте конфигурацию сервера в любой момент и в пару кликов.
Выделенные серверы
Аренда физических серверов любых конфигураций — готовые сборки или под заказ.
Посмотреть инструкция для Native Instruments Traktor Pro 3 бесплатно. Руководство относится к категории без категории, 1 человек(а) дали ему среднюю оценку 7.7. Руководство доступно на следующих языках: английский. У вас есть вопрос о Native Instruments Traktor Pro 3 или вам нужна помощь? Задайте свой вопрос здесь
- Table of Contents
- 1. Disclaimer
- 2. Welcome to TRAKTOR
- 3. New in TRAKTOR PRO 3.2
- 4. The TRAKTOR Workflow
- 5. Setting Up TRAKTOR
- 6. TRAKTOR Overview
- 7. Global Concepts
- 8. Basic Usage Tutorials
- 9. Advanced Usage Tutorials
- 10. Working with Playlists
- 11. Managing Your Track Collection
- 12. Advanced Operation of TRAKTOR
- 13. Setting up TRAKTOR for SCRATCH Control
- 14. Common TRAKTOR Setups
- 15. Configuring MIDI Controller for Controlling TRAKTOR
- 16. Preferences
- 17. Effect Reference
Нужна помощь?
У вас есть вопрос о Native Instruments а ответа нет в руководстве? Задайте свой вопрос здесь Дай исчерпывающее описание проблемы и четко задайте свой вопрос. Чем детальнее описание проблемы или вопроса, тем легче будет другим пользователям Native Instruments предоставить вам исчерпывающий ответ.
Количество вопросов: 0
![]()
Главная
| Native Instruments | |
| Traktor Pro 3 | |
| без категории | |
| английский | |
| Руководство пользователя (PDF) |
Не можете найти ответ на свой вопрос в руководстве? Вы можете найти ответ на свой вопрос ниже, в разделе часто задаваемых вопросов о Native Instruments Traktor Pro 3.
Инструкция Native Instruments Traktor Pro 3 доступно в русский?
Не нашли свой вопрос? Задайте свой вопрос здесь
Нет результатов

Native Instruments Kontakt 7
инструкция358 страниц(ы)

Native Instruments Maschine Mk3
инструкция1057 страниц(ы)

Huawei Scale 3 Pro
инструкция77 страниц(ы)

Mutable Instruments Plaits
инструкция12 страниц(ы)

Mutable Instruments Marbles
инструкция16 страниц(ы)

Cricut Maker 3
инструкция48 страниц(ы)

Ampeg SVT-3 PRO
инструкция16 страниц(ы)

Cricut Explore 3
инструкция48 страниц(ы)

Mutable Instruments Rings
инструкция2 страниц(ы)

Midland BTX1 Pro S
инструкция86 страниц(ы)
Посмотреть все Native Instruments руководства Посмотреть все Native Instruments без категории руководства
Traktor Pro инструкция Браузер.
В Dj программе Traktor pro, присутствует очень удобный браузер, при помощи которого можно профессионально управлять вашим музыкальным архивом. В браузере Трактор, вы можете легко создавать папки с коллекциями, плейлистами и смарт листами. Грамотно выстроенная коллекция треков, помогает диджею быстро находить треки для сета.
Браузер в Traktor pro 3 инструкция на русском языке
Браузер в Тракторе про, состоит из 8 блоков, некоторые из которых можно убирать и добавлять в меню Preferences. Рассмотрим все блоки детальнее.
Preview Player:
Проигрыватель предварительного прослушивания: вы можете предварительно прослушать треки перед их загрузкой в деку.
Включить отображения плеера предпрослушки можно в настройках.
Preferences — настройки.
Browser Details — Show Preview Player
Сведения о браузере — Показать предварительный просмотр проигрывателя
Для отображения знака наушников и возможности прослушать трек в
Preview Player, нажмите правой кнопкой на меню тегов и выберите пункт
Prelisten
Предварительное прослушивание: На рисунке ниже, выделено и отмечено желтым маркером. Нажмите на знак наушников напротив трека, который вы хотите прослушать не загружая в деку. Такими же образом вы сможете добавлять в блок тегов пункты, которые помогут вам быстрее ориентироваться в музыке и искать треки.
Favorites:
Избранное: для отображения блока быстрого доступа к любым папка и плейлистам, которые вы можете добавлять в него, перетаскивая их на панель избранного, зажав левую кнопку мышки. Для отображения блока Избранное, зайдите в Preferences и в меню Browser Details, отметьте пункт
Show Playlist Favorites.
Показать избранное списка воспроизведения. Отмечено красным маркером
Traktor pro русский шрифт
Для отображения русского шрифта в Traktor pro, в том же пункте меню смените Шрифт, например на Arial, отмечено белым маркером. Там же вы сможете выбрать размер шрифта и расстояние между треками в окне листа.
Allow Inline Editing in List Window:
Разрешить встроенное редактирование в окне списка: если этот флажок установлен, вы можете редактировать метаданные своих музыкальных файлов, дважды щелкнув их в списке дорожек. Если этот флажок не установлен, редактирование тегов дорожек в списке дорожек не разрешено для предотвращения нежелательных изменений, например, во время живого выступления.
Show Cover Art:
Показать обложку: Показывает или скрывает окно обложки выбранного трека. В нижнем левом углу программы Traktor Pro.
Show Track Info:
Показать информацию о треке: Показывает или скрывает панель информации о дорожке. Отображается внизу браузера под трек листом.
Show Status Bar/Error Messages:
Показывать строку состояния/Сообщения об ошибках: Отображает ход анализа дорожки, сообщения об ошибках и общее состояние Traktor Pro. Отображается там же под трек листом.
Key Highlighting:
Выделение ключей цветом:
В открывающимся меню, выбор параметра подсветки треков подходящих по ключам.
Do not color any keys — не обозначать цветом ключи.
Only color matching keys — только ключи, соответствующие цвету.
Also color adjacent keys — также цвета близкие по ключу.
Color all keys — Отображать цветом все ключи.
Для того чтобы цветом выделялись похожие ключи, нажмите на знак ноты справа от трека.
Key Reference:
Ключевая ссылка: Выбор подсветки ключа по треку в деке, Мастер дека или дека которую вы выделили. Так же детальнее на уроке Плейлисты.
Левый блок программы
Search field:
Поле поиска: живой поиск по названию и тегам треков в Коллекции. Введите имя трека в выбранном плейлисте и если нажмете интер, поиск будет по всей коллекции.
Track Collection:
Коллекция треков: Содержит все треки, импортированные в вашу коллекцию треков. Они автоматически сортируются по Художник, Выпускать, Этикетка или же Жанр.
Playlists:
Списки воспроизведения: Содержит все ваши плейлисты Traktor Pro
Explorer
Исследователь: позволяет искать треки на жестких дисках. Он также содержит Архив и папку содержащую списки воспроизведения, истории.
Audio Recordings:
Аудиозаписи: Содержит все записи, созданные с помощью AUDIO RECORDER
iTunes: обеспечивает прямой доступ к вашей медиатеке iTunes, включая все плейлисты
History:
История: Содержит последние списки воспроизведения истории. Каждый список воспроизведения истории имеет отметку времени и содержит дополнительные столбцы. Время начала, Продолжительность, Палуба для получения дополнительной информации о том, когда и как вы воспроизводили треки.
Cover Artwork:
Обложка: Отображает обложку выбранной дорожки в списке дорожек.
Status bar:
Строка состояния: Отображает ход анализа дорожки, сообщения об ошибках и общее состояние Traktor Pro.
Track List:
Список треков: Отображает дорожки в зависимости от выбранного источника (папка, список воспроизведения, результаты поиска или на основе тегов.
Действия с папками в меню Explorer.
Нажав правой кнопкой на папку в меню Explorer, откроется меню:
Refresh — Обновить список треков в выбранной папке.
Import to Collection — Импортировать в коллекцию Traktor Pro
Import Folder as Playlist — Импортировать папку как Плейлист. Импортирует папку в набор плейлистов.
Add to Music Folders — Добавить в музыкальные папки. Добавит запись о папке в Music Folders.
Reset Played-State — Сбросить игровое состояние. Удалит отметки-галочки с проигранных в деках треках.
Analyze (Async) — Анализ (асинхронный). Анализ трека.
Select All — Выбрать все треки в папке.
Действия с треком в окне треклист.
Нажмите на трек правой кнопкой мышки, в открывшимся меню вы сможете редактировать, загружать в деку трек, удалять и т.д..
Edit.
Редактирование отдельной дорожки Выберите трек в списке треков.
Щелкните трек правой кнопкой мыши, чтобы открыть контекстное меню.
- Выберите Edit.
- Список дорожек превращается в диалоговое окно редактирования.
- Отредактируйте индивидуальную информацию для вашего трека. Нажмите ОК.
- Используйте раскрывающееся меню в любом поле свойств трека, чтобы выбрать ранее сохраненный тег из вашей коллекции треков.
- Чтобы применить изменения, нажмите кнопку с надписью Apply и OK. Использовать Restore кнопку, чтобы отменить любые изменения, которые вы сделали, или используйте Cancel чтобы прервать редактирование и закрыть диалоговое окно редактирования.
Редактирование выбранных треков
Если вы хотите отредактировать набор треков, например, все треки альбома:
- Выберите дорожки в списке дорожек, удерживая кнопку Alt.
- Щелкните правой кнопкой мыши, чтобы открыть контекстное меню.
- Выберите Edit чтобы открыть диалоговое окно редактирования. Появится диалоговое окно редактирования. Установленные флажки указывают, какие из атрибутов имеют одинаковое значение для выбранных дорожек. Проверки также указывают, что все, что записано в соответствующее поле, будет сохранено в теге метаданных после применения изменений. Снятые галочки означают, что треки не имеют одинаковых значений этого поля.
- Чтобы изменить атрибут глобально для всех выбранных дорожек, убедитесь, что флажок установлен.
- Чтобы отредактировать выбранные треки один за другим, используйте Previous также Next кнопки в нижней части диалогового окна.
- Чтобы применить изменения, нажмите кнопку с надписью Apply и OK. Использовать Restore кнопку, чтобы отменить любые изменения, которые вы сделали, или используйте Cancel чтобы прервать редактирование и закрыть диалоговое окно редактирования.
Color
Задать цвет треку.
Нажать правой кнопкой на трек и в меню Color выбрать один из 7 цветов или отменить цвет заданный треку.
Например самые легкий треки в зеленый цвет, тяжелые в красный, кислотные типа Aсid в желтый, остальные цвета использую между этими тремя.
В окне тегов вы сможеет выбрать отображение колонки с цветом.
Load into Deck
Загрузить трек в Деку A, B, C, D через меню..
Нажав правой кнопкой мыши на трек, в окне треклист, вы получаете меню с выбором Деки в которую можно загрузить трек. В зависимости от выбора вида Деки в микшере или настройках, а так же загружаемого трека, у вас будут доступны Деки для загрузки.
Load into Track Deck
Load into Stem Deck
Load into Remix Deck
Load into Remix Deck: дополнительно будут доступны Slot 1, 2, 3, 4.
Import Cover — Загрузить обложку в трек
Позволяет импортировать или удалять обложки в формате .jpeg для треков из вашей коллекции треков. Импорт обложек
Чтобы импортировать или заменить обложку трека:
- Щелкните правой кнопкой мыши трек или несколько треков в списке треков, чтобы открыть контекстное меню.
- Выберите Import Cover.
- В диалоговом окне выберите файл обложки на вашем компьютере и подтвердите. Обложка теперь хранится в файлах треков.
Delete Cover — Удалить обложку
- Щелкните правой кнопкой мыши трек или несколько треков в списке треков, чтобы открыть контекстное меню.
- Выберите Delete Cover. Обложка(и) для трека(ов) удалена.
Relocate — Переместить.
Открывает диалоговое окно «Переместить»,
Если трек был перемещен или переименован или переименована папка с треками, ссылки на треки, содержащиеся в коллекции треков, приведут к отсутствующим трекам. Это можно исправить, переместив недостающие дорожки:
Нажмите Relocate, откроется окно.
В диалоговом окне просмотра перейдите к месту назначения, куда был перемещен отсутствующий трек. Чтобы найти несколько дорожек в разных папках, перейдите к папке верхнего уровня, в которой они хранятся. Вы даже можете выбрать основную папку на жестком диске.
Подтвердите свои изменения. Сейчас адрес перезаписан.
Analyze (Async)
Анализ дорожек или даже коллекций дорожек может занять очень много времени при их импорте в коллекцию дорожек или при загрузке дорожек в деки. Момент для анализа можно определить в Preferences — File Management. Вы также можете отключить его полностью. В этом случае вы можете анализировать свои треки вручную, когда не играете сет. Файлы
STEM всегда необходимо анализировать перед их загрузкой в колоду.
Щелкните правой кнопкой мыши трек или набор треков в списке треков, чтобы открыть контекстное меню. Вы также можете щелкнуть правой кнопкой мыши список воспроизведения в дереве браузера.
Выберите Analyze (Async). Анализировать открывается диалоговое окно.
Выберите параметры анализа.
Нажмите Ок чтобы начать анализ.
Параметры диалогового окна Analyze.
Диалоговое окно предлагает две опции:
All: при выборе этого параметра дорожки анализируются в соответствии с настройками по умолчанию, выбранными в Analyze Options в Настройках.
Для заблокированных дорожек All Опция не позволяет перезаписывать BPM, маркеры Beatgrid, Gain или Key.
Special: при выборе вам предоставляется более подробный диапазон настроек анализа, которые можно выполнить на дорожках:
BPM: ударов в минуту: При выборе Трактор Про анализирует трек для расчета темпа. В раскрывающемся меню ниже вы можете предварительно определить диапазон темпа. Если вы анализируете большое количество треков с очень разными темпами, выберите либо широкий диапазон, либо оставьте его автоматическим. Однако сужение диапазона темпа даст более точные результаты.
Set Beatgrid: устанавливает сетку битов на дорожку и выравнивает ее по ближайшей сильной доле. Если дорожка уже содержит сетку битов, Трактор Про переместит ее соответствующим образом. Сетку ударов нельзя установить без проверки BPM, так как эти два параметра взаимосвязаны.
Key: определение тональности дорожки.
Gain: Удаляет текущие значения усиления громкости выбранных дорожек и заменяет их значением автоматического усиления во время анализа.
Replace Locked Values: Мгновенно разблокирует дорожки, чтобы выбранные выше параметры также применялись к заблокированным дорожкам.
Parallel Processing: Включает параллельный анализ дорожек. Эта опция увеличивает нагрузку на ЦП и не должна использоваться во время игры.
Enable Analysis Lock — Включить блокировку анализа.
Disable Analysis Lock Отключить блокировку анализа.
Блокировка анализа замораживает все параметры, заданные анализом. После того, как блокировка анализа активирована для трека, параметры указанные раннее при анализе нельзя изменить вручную или в автоматическом анализе:
Show In Explorer — Показать в проводнике.
Открывает окно на компьютере с выбранным файлом.
Search in Playlists — Поиск в плейлистах.
Отображает всплывающее окно со всеми списками воспроизведения, которые содержат выбранный файл
Check Consistency — Выполнение проверки соответствия.
Щелкните правой кнопкой мыши в дереве браузера, чтобы открыть контекстное меню.
Выберите Check Consistency. После того, как TRAKTOR запустит проверку, появится отчет о проверке, показывающий результаты.
Проверка согласованности вашей коллекции треков Импорт треков без анализа, реорганизация локальных музыкальных папок и удаление треков из локальных музыкальных папок приводят к несоответствию Коллекции треков. Чтобы отслеживать свои изменения, вы можете выполнить проверку соответствия в своей коллекции треков и получить подробный результат в отчете о проверке. Отчет о проверке согласованности предоставляет обзор вашей коллекции треков и предоставляет варианты для немедленного решения проблем.
Consistency Check Report — Диалоговое окно
Show Overview — Показать вкладку «Обзор»
Total Tracks — Всего треков: общее количество треков в вашей коллекции треков.
Tracks Missing — Треки отсутствуют: общее количество дорожек, которые были удалены с жесткого диска или перемещены с исходного места.
Tracks Not Analyzed — Треки не проанализированы: общее количество дорожек, которые не были проанализированы.
Tracks Missing Stripe — Треки с отсутствующим адресом: общее количество дорожек, которые были импортированы и проанализированы, но информация о представлении адресса была перемещена или удалена.
Total Tracks To Analyze — Всего дорожек для анализа: общее количество дорожек, которые необходимо проанализировать или повторно проанализировать соответственно.
Список всех отсутствующих треков в коллекции треков.
Missing Tracks — Отсутствующие треки.
Список всех отсутствующих треков в коллекции треков.
Tracks To Analyze — Дорожки для анализа» • Перечисляет все треки в коллекции треков, которые необходимо проанализировать или повторно проанализировать соответственно.
Relocate — Перемещения кнопка: открывает диалоговое окно «Переместить», чтобы начать перемещение отсутствующих дорожек.
Remove Missing — Удалить отсутствующие треки: Удаляет ссылки на несуществующие треки из коллекции треков.
Analyze — Начинает анализ треков для анализа или повторного анализа соответственно.
Список всех отсутствующих треков в коллекции треков.
Перечисляет все треки в коллекции треков, которые необходимо проанализировать или повторно проанализировать соответственно.
Show Consistency Check Report on Startup
Выполнение проверки согласованности при запуске Трактор Про
Чтобы выполнить проверку согласованности и показать ее отчет при запуске TRAKTOR Pro:
Откройте Preferences — File Management page
Установите флажок: Show Consistency Check Report on Startup.- Показать отчет о проверке согласованности при запуске.
Проверка согласованности теперь будет выполняться каждый раз, когда вы запускаете TRAKTOR Pro. Выполнение проверки согласованности при запуске может увеличить время запуска Трактор Про.
Delete from Playlist — Удалить трек из плейлиста.
Delete from Collection — Удалить трек из коллекции.
В диалоговом окне безопасности выберите один из следующих вариантов:
- delete from collection — удалить из коллекции: Удаляет дорожки из коллекции дорожек и из всех списков воспроизведения.
- additionally remove TRAKTOR tags (may take some time): дополнительно удалите теги TRAKTOR (может занять некоторое время): Удаляет трек(и) из коллекции треков и из всех списков воспроизведения, а все теги, характерные для TRAKTOR, будут удалены из музыкальных файлов.
- additionally delete file(s) from hard drive — дополнительно удалить файл(ы) с жесткого диска: Удаляет дорожки из коллекции дорожек и из всех списков воспроизведения, а также удаляет музыкальные файлы с вашего компьютера. Треки будут удалены из вашей коллекции треков.
Удаляет дорожки из коллекции дорожек и из всех списков воспроизведения.
Append to Preparation Playlist. Добавить выбор в список воспроизведения для подготовки.
Add as Next to Preparation Playlist чтобы вставить выбранный фрагмент после последней загруженной дорожки в Preparation.
Каждая дорожка отображается со значком ромба, указывающим, что она добавлена в список воспроизведения для подготовки.
Основные настройки, которые следует обязательно выставлять перед началом работы с программой следующие:
1. Нажимаем File -> Preferences и откроется основное меню с настройками.
2. Audio Setup – здесь нужно в меню Audio Device выбрать устройство, которое будет проигрывать записываемую музыку. Это могут быть ваши колонки, гарнитура или что-нибудь еще.
3. Global Settings. Тут рекомендуем поставить галочку напротив пункта Show Global Section. Это откроет основную приборную панель, с которой будет намного удобнее работать в программе.
4. Mix Recorder – выберите место на жестком диске, куда будут по умолчанию сохраняться ваши миксы. Лучше всего их сохранять на НЕ системные разделы.
Готово. Теперь нажмите кнопку Close. Таким образом, мы настроили основные параметры и можно начинать приступать к работе с программой.
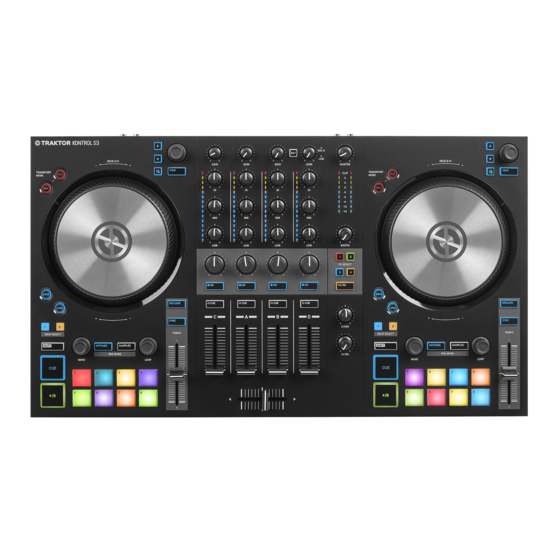
- Manuals
- Brands
- Native Instruments Manuals
- DJ Equipment
- TRAKTOR KONTROL S3
- Manual
-
Contents
-
Table of Contents
-
Bookmarks
Quick Links
Related Manuals for Native Instruments TRAKTOR KONTROL S3
Summary of Contents for Native Instruments TRAKTOR KONTROL S3
-
Page 2: Table Of Contents
Table of Contents 1. Disclaimer ……………………1 2. Welcome to TRAKTOR KONTROL S3 …………….. 2 2.1. Document Conventions ………………2 3. Setting up TRAKTOR KONTROL S3 …………….3 3.1. Connecting to the Computer …………….3 3.2. Connecting an Amplification System …………..3 3.3.
-
Page 3
5.12.6. Cuing the Next Track using the Jog Wheels ……… 33 5.12.7. Mixing in the Next Track …………..34 5.13. Using Flux and Reverse Modes …………..34 5.14. Working with the Preparation List …………..35 5.15. Correcting Beatgrids of Tracks …………… 35… -
Page 4: Disclaimer
The information in this document is subject to change without notice and does not represent a commitment on the part of Native Instruments GmbH. The software described by this document is subject to a License Agreement and may not be copied to other media. No part of this publication may be copied, reproduced or otherwise transmitted or recorded, for any purpose, without prior written permission by Native Instruments GmbH, hereinafter referred to as Native Instruments.
-
Page 5: Welcome To Traktor Kontrol S3
Welcome to TRAKTOR KONTROL S3 2. WELCOME TO TRAKTOR KONTROL S3 Thank you for choosing TRAKTOR KONTROL S3, it is because of customers like you that we can continue developing groundbreaking music software and hardware. TRAKTOR KONTROL S3 is a fully integrated hardware and software DJ performance system tailored for both TRAKTOR PRO 3 and TRAKTOR DJ 2.
-
Page 6: Setting Up Traktor Kontrol S3
Native Instruments Product using NATIVE ACCESS. This section describes how to set up the TRAKTOR KONTROL S3. When all devices are connec- ted your setup will look like a typical setup as depicted in the following illustration: TRAKTOR KONTROL S3 setup.
-
Page 7: Connecting Monitors For Dj Booth
Setting up TRAKTOR KONTROL S3 3.3. Connecting Monitors for DJ Booth To connect your monitor speakers or a second power amplifier to the TRAKTOR KONTROL S3 for use in a DJ booth: • Connect the BOOTH OUT outputs on the rear panel of the TRAKTOR KONTROL S3 to the inputs of your monitoring system using appropriate cables.
-
Page 8
Setting up TRAKTOR KONTROL S3 • Click Yes to confirm. The data is imported. Switching to TRAKTOR Default Settings When you start TRAKTOR with the S3 for the first time, TRAKTOR asks if you want to switch Mix- er FX selection and the Tempo fader range to the default setting. This is necessary to get the in- tended user experience of your S3: •… -
Page 9: Importing Music Into The Track Collection
Setting up TRAKTOR KONTROL S3 3.7. Importing Music into the Track Collection You can import your music into TRAKTOR’s Track Collection in several ways. You can drag and drop your music files from your computer into the Track Collection, you can use the context menu in the Browser tree to import the music from your local music folders, and you can use the context menu to import Remix Sets.
-
Page 10: Traktor Kontrol S3 Overview
TRAKTOR KONTROL S3 Overview 4. TRAKTOR KONTROL S3 OVERVIEW This section introduces you to the TRAKTOR KONTROL S3 and all its control elements and con- nectors. (1) Decks: You can use the Decks to control tracks and Samples, similar to DJ turntables or CD players but with additional features.
-
Page 11: Decks
TRAKTOR KONTROL S3 Overview 4.1. Decks TRAKTOR KONTROL S3 provides you with two physical Decks to control the TRAKTOR Decks. Each Deck provides you with the following control elements: (1) Browse controls: Allow you to scroll through the Track Collection to find and load tracks, as well as previewing tracks and preparing playlists.
-
Page 12: Browse Controls
TRAKTOR KONTROL S3 Overview (6) Pad section: You can use the Pads to store and trigger Cue Points and Loops, and to control Samples and STEM Files. The individual function depends on the selected Pad mode and on the selected Deck Type.
-
Page 13: Pad Section
▪ When in SAMPLES mode the Pads control the first four SAMPLE Slots of Remix Decks. 4.2. Mixer Sitting in the middle of the TRAKTOR KONTROL S3 controller, the Mixer receives the audio sig- nals coming from Decks. There is one channel for each Deck. The Mixer’s purpose is to adjust the relative level of each channel to generate the mix that is sent to your audience.
-
Page 14
TRAKTOR KONTROL S3 Overview (1) Mixer Channel A, B, C, D: The Mixer channels receive the individual audio signals from the Decks. Each Mixer channel contains controls to adjust the audio signal’s frequency content and to adjust the outgoing volume before the audio signal is sent to the MASTER output. -
Page 15
TRAKTOR KONTROL S3 Overview (8) Crossfader: Controls the mix between the Mixer channels’ signals that are assigned to the left crossfader side and the right crossfader side. At each crossfader’s end, the opposite signals are totally silent. Moving the crossfader gradually fades in and fades out the relevant audio signal in… -
Page 16: Mixer Channel
TRAKTOR KONTROL S3 Overview 4.2.1. Mixer Channel The Mixer channels receive the individual audio signals from the Decks. Each Mixer channel con- tains controls to adjust the incoming and outgoing levels, and the audio signal’s frequency content. The Mixer channels provide you with the following control elements: (1) GAIN knob: Adjusts the input level for the incoming signal of the corresponding Deck, before it passes the channel fader.
-
Page 17
TRAKTOR KONTROL S3 Overview (9) Channel Level Meter: The Channel Level Meter gives you visual feedback on the current channel volume. The blue LEDs indicate if the audio signal is below Headroom area. The red LED indicates if the audio signal is clipping. The yellow LEDs indicate if the audio signal is currently in the Headroom area before the audio signal starts to clip. -
Page 18: Tutorials
Tutorials 5. TUTORIALS The tutorials in this section introduces you the several functions and features of the S3. The follow- ing list provides you with an overview of the tutorials including the link to it: ▪ Browsing and Loading Tracks: By having your music imported in TRAKTOR, you can use the Browse controls on the S3 to find tracks for your mix.
-
Page 19: Mixing Your First Tracks Using Sync
5.1.2. Loading the First Track into Deck A Press the Browser View button to maximize the Browser view in the software. Turn the BROWSE encoder to select one of your tracks, or a demo track, for example Berlin Hauptbahnhof by Native Instruments.
-
Page 20: Starting Playback Of Deck A
Tutorials Press the BROWSE encoder to load the track into the Deck. TRAKTOR now analyzes the track to determine its tempo, and to create the Beatgrid and the Waveform. Press the Browser View button again to minimize the Browser View. 5.1.3.
-
Page 21: Loading The Second Track Into Deck B
Press the Browser View button to maximize the Browser view in the software. Turn the BROWSE encoder to select one of your tracks, or a demo track, for example Lisa by Native Instruments. Press the BROWSE encoder to load the track into the Deck.
-
Page 22: Starting Playback Of The Second Track
Tutorials The tempo of the track in Deck B is now synced to the running track, indicated by the equal tempo value in the software’s Deck Header. The SYNC button lights up on Deck B. 5.1.6. Starting Playback of the Second Track When the track in Deck A is almost over you can start the playback of the next track: •…
-
Page 23: Browsing And Loading Tracks
Tutorials The audio signal of Mixer channel A slowly fades out of the Master signal. Only Mixer chan- nel B is now audible. When the playback of Deck A ends, Deck B automatically becomes the Tempo Master and is ready to transition to the next track. 5.2.
-
Page 24: Controlling Track Playback
Tutorials Rather than selecting a Favorite folder using SHIFT, you can also scroll along the Browser Tree to select the subfolders. To implement this, you need to switch the Browse behavior for the SHIFT button on the TRAKTOR S3 page in the Preferences. 5.3.
-
Page 25: Previewing Tracks Using The Cue Channel
Tutorials ▪ When releasing the CUE button, the playback position jumps back to the Cue Point and play- back stops immediately. ▪ When pressing and holding the CUE button and later pressing the Play/Pause button, the play- back continues as normal. 5.4.
-
Page 26: Using The Equalizer To Tweak Your Sound
Tutorials 5.6. Using the Equalizer to Tweak Your Sound You can use the equalizer for adjusting the sound of your tracks while mixing. You can, for exam- ple, take out the bass frequency band of one track in order to let the bass of the other track domi- nate the mix.
-
Page 27: Locking The Key Of Tracks
Tutorials The TEMPO fader mode can be changed on the Kontrol S3 page in the TRAKTOR Preferences. 5.8. Locking the Key of Tracks When synchronizing tracks, you change their tempos and, consequently, their pitches (or keys). Slowing down a track will cause its pitch to drop while speeding up the track will cause its pitch to rise.
-
Page 28: Playing With Cue Points
Tutorials • Turn the Mixer FX Amount knob to center position. 5.10. Playing with Cue Points When mixing tracks a common technique is to mix in the next track from a particular position in that track instead from its start, for example, at a certain beat. Mixing in tracks from a particular position in that track is called “cueing”.
-
Page 29: Playing With Loops
Tutorials 5.11. Playing with Loops A Loop is a snippet of audio that repeats (loops). Loops are used as tools for remixing parts of tracks and can be used to extend track transitions. In this section you learn to play with Loops on the S3 .
-
Page 30: Mixing Tracks Using Jog Wheels
To load a track into Deck A: Press the Browser View button to maximize the Browser view in the software. Turn the BROWSE encoder to select one of your tracks in the Track List, or a demo track, for example, Berlin Hauptbahnhof by Native Instruments.
-
Page 31: Starting Playback Of Deck A
Tutorials Press the BROWSE encoder to load the track into the Deck. TRAKTOR now analyzes the Track to determine its tempo and to create the Beatgrid and the Waveform. Press the Browser View button again to minimize the Browser View. 5.12.3.
-
Page 32: Loading The Second Track Into Deck B
Press the Browser View button to maximize the Browse View in the software. Turn the BROWSE encoder to select one of your tracks in the Track List, or a demo track, for example, Lisa by Native Instruments. Press the BROWSE encoder to load the track into the Deck.
-
Page 33: Syncing Tracks Manually
Tutorials Press the Browser View button again to minimize the Browser View. Press the Play/Pause button on Deck B to start playback. The Waveform starts moving and the Channel Volume Meter LEDs in Mixer channel B illumi- nate. 5.12.5. Syncing Tracks Manually The process of manually syncing tracks consists of several steps.
-
Page 34
Tutorials Adjust the volume and the cue-master-mix signal by turning the VOL knob and MIX knob, so that you hear both tracks equally in your headphones. Adjusting the Track Tempo The Deck Headers in the software Decks indicate the current track tempos. To adjust the track tempo in Deck B to match the track tempo in Deck A, perform the following actions: If the tempo needs to be faster, move the TEMPO fader down. -
Page 35
Tutorials Hold the top plate of the Jog Wheel of Deck B. The playback of the track is held in place. While holding the Jog Wheel, turn it into any direction until you hear a beat in your head- phones. Turn the Jog Wheel counterclockwise to place the playhead position directly before that beat and hold the Jog Wheel. -
Page 36: Cuing The Next Track Using The Jog Wheels
Tutorials To slightly slow down the track’s tempo, touch the outer rim of the Jog Wheel and turn it counterclockwise. Simultaneously, move the TEMPO fader slightly up. Repeat the aforementioned steps until both tracks play perfectly in sync. 5.12.6. Cuing the Next Track using the Jog Wheels When the tracks are in sync, use your headphones and the Jog Wheel to find the right position in the next track for fading it in: Touch and hold the Jog Wheel on its top plate.
-
Page 37: Mixing In The Next Track
Tutorials Ideally the tracks now play in sync. If necessary nudge or bend the tempo by turning the Jog Wheel using its rim. 5.12.7. Mixing in the Next Track You can now mix in the next track by using the crossfader: Move the crossfader slowly towards center position: The audio signal of the track in Mixer channel B is fading into the MASTER signal.
-
Page 38: Working With The Preparation List
Tutorials The playback resumes to the original playback position. Enabling Reverse Mode To enable Reverse mode: Press and hold the REV mode button on the selected Deck. The track begins to playback in reverse. The second, virtual playhead continues forwards in the track.
-
Page 39
Tutorials Checking Beatgrid To check the Beatgrid for the selected track: Load the track into a Deck. Press Play/Pause to start playback of the track. Press the CUE button of the Mixer channel corresponding to that Deck. Press and hold the GRID button on that Deck to make the Beatgrid tick audible. Besides the beat of the track, you now hear a second beat tick (like a metronome tick) repre- senting the Beatgrid.