- Manuals
- Brands
- Peg-Perego Manuals
- Stroller
- si switch
- Instructions for use manual
-
Contents
-
Table of Contents
-
Bookmarks
Quick Links
U.S.A./CANADA/AUSTRALIA
EN Instructions for use
ES Instrucciones de uso
FR Notice d’emploi
SI_NA_FINA0801I101.indd 1
16-01-2009 9:02:09
Related Manuals for Peg-Perego Si
Summary of Contents for Peg-Perego Si
-
Page 1
U.S.A./CANADA/AUSTRALIA EN Instructions for use ES Instrucciones de uso FR Notice d’emploi SI_NA_FINA0801I101.indd 1 16-01-2009 9:02:09… -
Page 2
SI_NA_FINA0801I101.indd 2 16-01-2009 9:02:10… -
Page 3
SI_NA_FINA0801I101.indd 3 16-01-2009 9:02:11… -
Page 4
SI_NA_FINA0801I101.indd 4 16-01-2009 9:02:12… -
Page 5
SI_NA_FINA0801I101.indd 5 16-01-2009 9:02:13… -
Page 6
SI_NA_FINA0801I101.indd 6 16-01-2009 9:02:13… -
Page 7
SI_NA_FINA0801I101.indd 7 16-01-2009 9:02:14… -
Page 8
SI_NA_FINA0801I101.indd 8 16-01-2009 9:02:14… -
Page 9
Sí 1) BCAPSI… 6) SAPI6430NGR 2) BSAPSI… 7) ERSHSI00… 3) BCOPSI… ITPASI..4) MUCI5P20N ) MUCI0128N 5) BAKPSI… 10) EAPPSI00—PLTR E N• S pare parts available in different colours to be specified when ordering. E S• R epuestos disponibles en otros colores que se especificarán en el pedido. FR• P ièces de rechange disponibles en plusieurs couleurs à spécifier dans la demande. — — SI_NA_FINA0801I101.indd 9 16-01-2009 9:02:14…
 -
Page 10: Product Parts
EN_English Thank you for choosing a Peg-Pérego product. WARNING _ C AREFULLY READ INSTRUCTIONS AND KEEP FOR FUTURE USE. THE CHILD’S SAFETY COULD BE PUT AT RISK IF THE INSTRUCTIONS ARE NOT FOLLOWED. _ T HIS PRODUCT IS DESIGNED FOR A CHILD WHOSE MAXIMUM WEIGHT IS 45 POUNDS (20 KG) AND WHOSE MAXIMUM HEIGHT IS 43 INCHES (110 CM). THIS SHOPPER BASKET IS DESIGNED TO CARRY A MAXIMUM WEIGHT OF 11 POUNDS (5 KG). ANY CUPHOLDER EVENTUALLY PROVIDED WITH THIS UNIT IS DESIGNED TO CARRY A MAXIMUM WEIGHT SPECIFIED ON THE CUPHOLDER ITSELF. ANY POACH OR POCKET PROVIDED WITH THIS UNIT IS DESIGNED TO CARRY A MAXIMUM WEIGHT OF 0.44 POUNDS (0.2 KG). _ F AILURE TO FOLLOW MANUFACTURER’S SPECIFICATIONS OR USE OF ACCESSORIES OTHER THAN THOSE APPROVED BY THE MANUFACTURER MAY CAUSE THE UNIT TO BECOME UNSTABLE.
-
Page 11
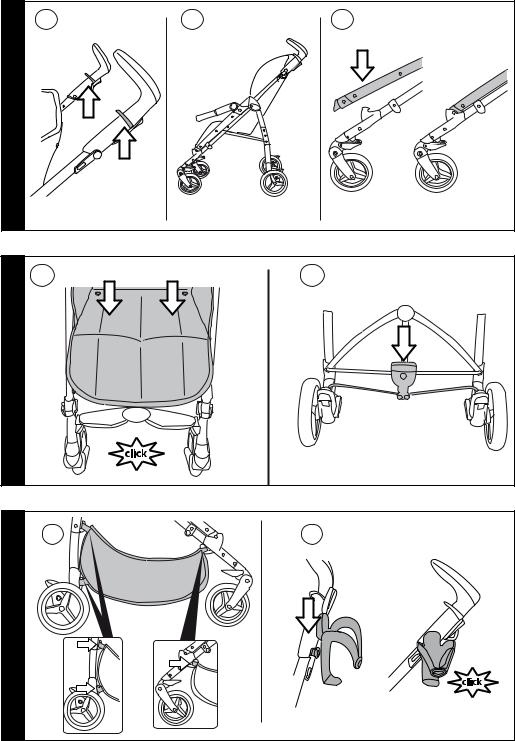
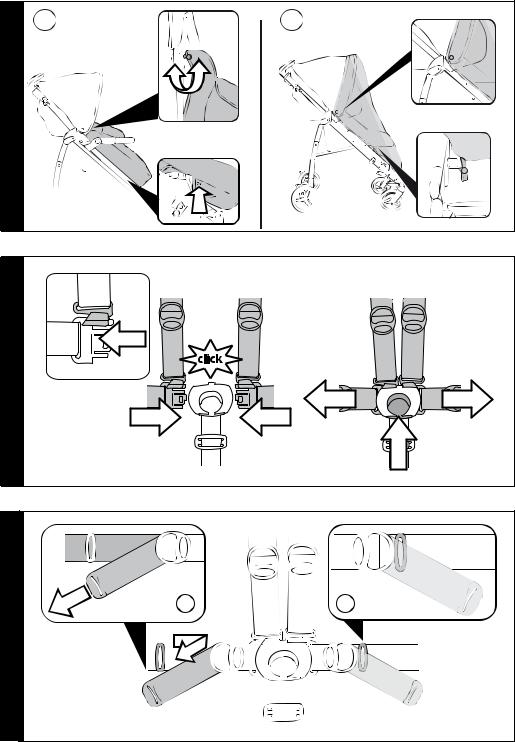
making sure that the side clips are correctly fastened (fig_c). 2 If the clips are not properly fastened, push down on the seat (fig_a) until it clicks into place. Finally, press down with your foot on the word PUSH (fig_b). 3 BASKET: To fit the basket, pull the loops over rear hooks A and B and front hook C (fig_a). CUP HOLDER: It can only be fitted to the right hand side of the stroller, using the clip which is already present on the chassis. To fit the cup holder, push until it clicks into place (fig_b). 4 HANDLE ADJUSTMENT: The handles can be set at 3 different heights. To move them into the required position, press the button and simultaneously pull the handle upwards. To lower them, press the button and push the handle down (fig_a). BRAKE: To set the brake on the stroller, lower the lever on the rear wheel unit with your foot. To release the brake, lift the lever (fig_b). When stationary, always apply the brake. 5 SWIVEL WHEELS: The wheels are already fitted to the stroller. To make the front wheels swivel, lower the lever (fig_a). To keep them fixed, lift the lever (fig_b). The rear wheels do not swivel. 6 HOOD: To fit the hood, click the fasteners onto the appropriate points and button down the hood on the rear of the stroller’s backrest (fig_a). The hood can be set in 3 different positions (fig_b) by simply pulling it forwards or backwards. The section of netting can be pulled out from the hood to protect the child from the sun (fig_c) and easily replaced back inside when it is no longer needed. 7 COVER: To fit the cover correctly (fig_a), fasten the buttons inside the stroller (fig_1) and place it underneath, covering the leg rest and fastening the buttons (fig_2). RAIN CANOPY: To fit the rain canopy, slip it onto the stroller (fig_b), button it down on the sides of the hood (fig_1) and attach the elastic loops, taking in the chassis in the lower part of the stroller (fig_2). 8 FIVE POINT SAFETY HARNESS: Equipped with joined shoulder straps and crotch straps. To fasten the safety harness, insert the two waist strap buckles (with the shoulder straps attached) into the leg divider strap until you hear a click (fig_a). To release it, press both sides of the buckle and pull the waist strap outwards at the same time (fig_b). It is possible to set the safety harness at 2 different heights, depending on how tall the child is. When the child is bigger, it is necessary to switch to the higher position (number 2). 1 0 To change the position of the safety harness, it is necessary to: _ release the two buckles on the rear of the backrest, firmly pulling the straps (fig_a). _ remove the harness from shoulder strap 2 (fig_b). -
Page 12: Cleaning And Maintenance
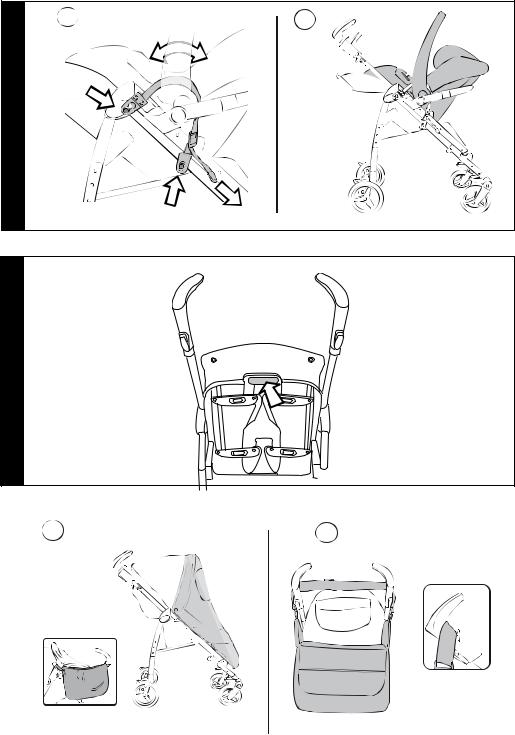
14 TRANSPORT: T he stroller can be moved with ease (with the front wheels fixed) using the central handle (fig_a). It can also be carried using the side handle (fig_b). 1 5 REMOVABLE COVERS: To remove the cover of the stroller: Release the two buckles on the rear of the backrest (fig_a). Release the two buttons on the seat (fig_b). Pull the buckle of the crotch strap out from underneath (fig_c). Release the buttons from the side of the sack (fig_d). 1 6 Pull the sack off the footrest (fig_e). To remove the safety harness, release the screws on both sides, using a screwdriver and pliers to hold the nut still (fig_f). Pull the sack upwards (fig_g). ATTACHING THE PRIMO VIAGGIO SIP 30 . 30 — PRIMO VIAGGIO (Usa) SIP (Canada, manufactured after 20 September 2007) It is necessary to apply the brake on the stroller. Do not attach the car seat to the stroller when the child is in it. Only ever attach the car seat facing the person pushing the stroller. It is necessary to attach the safety straps to the car seat before mounting it on the stroller. 1 7 To attach the straps (which are identical) to the car seat, to start with it is important to position them correctly, as shown in the figure (fig_a). After this, insert them in the side slots of the car seat (fig_b). Since there is already a hood on the car seat, for greater ease of use it is possible to remove the one on the stroller. Put the backrest of the stroller in the 2nd central position (see paragraph 12). 1 8 Position the car seat on the seat of the stroller and slot it into place, without ever releasing it. Slacken the harness by lifting the buckle (fig_c1), clip the slot of the strap onto the catch on the stroller (fig_c2) and tighten it firmly (fig_c3). Figure D shows a correctly attached car seat. Carry out the same procedure on the other side of the stroller. To release the car seat from the stroller: Loosen the buckle by raising it and release the slot of the strap from the catch on the stroller. Do not remove the straps from the car seat. ACCESSORIES 1 Changing BAG: bag with pad for changing the baby. Can be attached to the stroller.
-
Page 13: Declaration Of Conformity
CLEANING FABRIC PARTS: brush fabric parts to remove dust and wash by hand at a maximum temperature of 30°C; do not wring; do not use chlorine bleach, do not iron; do not dry clean; do not apply solvent-based stain removers and do not dry in a tumble dryer. P EG-PÉREGO S.p.A. P eg Pérego can make changes at any time to the models described in this publication for technical or commercial reasons. P EG-PÉREGO AFTER-SALES SERVICE I f any parts of your Peg Pérego product should be accidentally mislaid or damaged, use exclusively genuine original Peg Pérego replacements. For any repairs, replacements, product information, and orders for genuine original replacement parts and accessories, contact Peg Pérego After-Sales Service: U SA t el. 800.671.1701 fax 260.471.6332 call u s toll free 1.800.671.1701 website www.pegperego.com C ANADA t el. 05.83.3371 fax 05.83.542 c all us toll free 1.800.661.5050 website www.pegperego.com DECLARATION OF CONFORMITY Product name: Sì Product reference number: IPSI200—- / IPSI3000—- / IPSI2NA—- Reference Standards (origin) EN1888:2003 + A1 / A2 / A3: 2005 (EU) ASTM F833:07a EN71-3 European Directive 2005/84/CE (Phtalates Directive) European Directive 2002/61/CE (Azocolourants) Declaration of conformity PegPerego S.p.A. declares under its sole responsibility that the article to which this declaration relates has undergone internal testing and has been approved, in accordance with regulations in force, by external, independent testing laboratories.
-
Page 14: Instrucciones De Uso
ES_Español L e agradecemos haber elegido un producto Peg-Pérego. ADVERTENCIA _ LEER ATENTAMENTE ESTAS INSTRUCCIONES Y CONSERVARLAS PARA FUTURAS CONSULTAS. L A SEGURIDAD DEL NIÑO PUEDE PONERSE EN PELIGRO SI NO SE SIGUEN ESTAS INSTRUCCIONES. _ E STE PRODUCTO HA SIDO DISEÑADO PARA UN NIÑO CON UN PESO MÁXIMO DE 20 KG Y UNA ALTURA MÁXIMA DE 110 CM. LA CESTILLA HA SIDO REALIZADA PARA SOPORTAR UN PESO MÁXIMO DE 5 KG. LOS POSIBLES PORTABEBIDAS QUE VAN CON ESTE PRODUCTO ESTÁN CONCEBIDOS PARA SOPORTAR EL PESO MÁXIMO ESPECIFICADO EN EL PORTABEBIDAS EN CUESTIÓN. CUALQUIER BOLSA ENTREGADA JUNTO AL PRODUCTO ESTÁ REALIZADA PARA SOPORTAR UN PESO MÁXIMO DE 0,2 KG. _ S I NO SE RESPETAN LAS INDICACIONES ESPECIFICADAS O SI SE USAN ACCESORIOS DIFERENTES DE LOS HOMOLOGADOS POR EL FABRICANTE, EL PRODUCTO PUEDE SER INESTABLE. _ PARA EVITAR LESIONES GRAVES POR CAÍDAS O SI ESCAPA EL NIÑO DE LA SILLA DE PASEO, USAR SIEMPRE UN CINTURÓN DE SEGURIDAD DE 5 PUNTOS COMPLETO. _ N O DEJAR NUNCA AL NIÑO SIN VIGILANCIA.
-
Page 15
Comprobar que la silla de paseo esté correctamente abierta controlando el adecuado enganche de los ganchos laterales (fig_c). 2 Si los ganchos no se hubiesen enganchado correctamente, presione sobre el asiento (fig_a) hasta oír el clic de enganche. Por último, presionar hacia abajo con el pie sobre PUSH (fig_b). 3 CESTA: Para montar la cesta, abrochar los ojales a los enganches traseros A y B al enganche delantero C (fig_a). PORTABEBIDAS: Sólo puede colocarse en el lado derecho de la silla de paseo gracias al enganche ya existente en el chasis. Para aplicar el portabebidas, engancharlo hasta oír el clic (fig_b). 4 REGULACIÓN DE LAS ASAS: Las asas pueden regularse en 3 alturas diferentes. Para regularlas en la posición deseada, presionar el pulsante y simultáneamente tirar el asa hacia arriba. Para bajarlas, realizar la misma operación pero en sentido contrario (fig_a). FRENO: Para frenar la silla de paseo, bajar con el pie la palanca freno colocada sobre el grupo de ruedas traseras. Para desbloquear el freno, realizar la misma operación pero en sentido contrario (fig_b). Accionar siempre el freno estando parados. 5 RUEDAS PIVOTANTES: Las ruedas ya se encuentran enganchadas a la silla de paseo. Para que las ruedas delanteras sean pivotantes, hay que bajar la palanca (fig_a). Para que sean fijas, actuar sobre la palanca pero en sentido contrario (fig_b). Las ruedas traseras son fijas. 6 CAPOTA: Para aplicar la capota, introducir los enganches en los correspondientes alojamientos hasta oír el clic y abrochar la capota por detrás del respaldo de la silla de paseo (fig_a). La capota puede regularse en 3 posiciones (fig_b) tirando simplemente de ella hacia adelante o hacia atrás. Puede extraerse la parte de red de la capota para proteger al niño del sol (fig_c) y volver a colocarla con un simple gesto dentro de la capota cuando no sirva más. 7 CUBREPIÉS: Para aplicar correctamente el cubrepiés (fig_a), abrochar los botones en la parte interna de la silla de paseo (fig_1) y ajustarlo por debajo, incluyendo el reposapiés, abotonando los botones (fig_2). PLÁSTICO PARA LA LUVIA: Para aplicar el plástico para la lluvia, ajustarlo con la silla de paseo (fig_b), abotonarlo a ambos lados de la capota (fig_1) y abrochar los elásticos abarcando el chasis en la parta baja de la silla de paseo (fig_2). 8 CINTURÓN DE SEGURIDAD DE 5 PUNTOS: Disponen de almohadillas unidas y de tira entrepierna. -
Page 16
ventral puede apretarse hasta la arandela de retención (fig_b). 1 2 REGULACIÓN DEL REPOSAPIÉS: El reposapiés puede regularse en 2 posiciones. Para bajar el reposapiés, empujar hacia abajo las dos palancas laterales y simultáneamente bajarlo. Para levantar el reposapiés, empujarlo hacia arriba hasta oír el clic. REGULACIÓN DEL RESPALDO: El respaldo puede reclinarse en 3 posiciones. Para bajar el respaldo, levantar la palanca lateral simultáneamente de ambos lados y bajar el respaldo, bloqueándolo en la posición deseada. Para levantarlo, presionar sobre el respaldo hacia arriba. 1 3 CIERRE: Para cerrar la silla de paseo, bajar la palanca desenganche de la derecha de la silla (fig_a) hasta oír el clic y tirar hacia arriba la manija central de cierre (fig_b). Comprobar el correcto cierre controlando que la palanca de la izquierda esté bien enganchada. Cerrada permanece en pie por sí sola (fig_c). 1 4 TRANSPORTE: La silla de paseo puede transportarse fácilmente (con las ruedas delanteras fijas) empuñando la manija central (fig_a). Puede transportarse también gracias a la manija central (fig_b). 1 5 DESENFUNDABLE: Para desenfundar la silla de paseo hacer lo siguiente: Desenganchar por detrás del respaldo las dos hebillas (fig_a). Desabrochar los dos botones del asiento (fig_b). Sacar desde abajo la hebilla de la tira entrepierna (fig_c). Desabrochar los botones de la funda lateral (fig_d). 1 6 Sacar la funda por el estribo (fig_e). Para quitar el cinturón de seguridad, desatornillar (de ambos lados) los dos tornillos utilizando un destornillador y un alicate para mantener la tuerca fija (fig_f). Extraer la funda hacia arriba (fig_g). ENGANCHE PRIMO VIAGGIO SIP 30 . 30 — PRIMO VIAGGIO SIP (Usa) (Canada, fabricado después del 20 de Septiembre de 2007) Hay que frenar la silla de paseo. Enganchar la silla de auto a la silla de paseo sin que esté el bebé en su interior. Enganchar la silla de auto siempre y sólo de cara a mamá. Debe colocar los cinturones a la silla de auto antes de acoplarla a la silla de paseo. 1 7 Para poner los cinturones (que son idénticos) en la silla de auto, es importante colocarlos correctamente desde el principio tal y como se muestra en la figura (fig_a). Introducirlo posteriormente dentro de los alojamientos laterales de la silla de auto (fig_b). Se puede quitar por comodidad la capota de la silla de paseo porque también hay otra en la silla de auto. -
Page 17: Limpieza Y Mantenimiento
SOMBRILLA: Práctica sombrilla a juego. LIMPIEZA Y MANTENIMIENTO MANTENIMIENTO DEL PRODUCTO: proteger contra agentes atmosféricos (agua, lluvia o nieve). Una exposición contínua y prolongada al sol podría causar cambios de color de muchos materiales. Conservar este producto en un lugar seco. LIMPIEZA DEL CHASIS: Limpiar periódicamente las partes de plástico con un paño húmedo sin usar solventes u otros productos similares. Mantener secas todas las partes de metal para prevenir la oxidación. Mantener limpias todas las partes móviles (dispositivo de regulación, de enganche, ruedas…) quitando el polvo o la arena y, en caso necessario, engrasarlas con aceites ligeros. LIMPIEZA DEL PROTECTOR DE LLUVIA: lavar con una esponja con agua y jabón, sin usar detergentes. LIMPIEZA DE LAS PARTES DE TEJIDO: cepillar las partes de tejido quitando el polvo y lavar a mano a una temperatura máxima de 30º. No torcer, no usar lejía, no planchar, no lavar en seco, no usar solventes y no secar utilizando secadoras de tambor rotativo. P EG-PÉREGO S.p.A P eg-Pérego podrá aportar en cualquier momento modificaciones a los modelos que se describen en el presente manual por razones técnicas o comerciales. S ERVICIO DE ASISTENCIA PEG-PÉREGO E n caso de que se pierdan o se dañen partes del producto, utilizar sólo repuestos originales Peg- Pérego. Para eventuales reparaciones, cambios e informaciones sobre los productos, así como la venta de recambios originales y accesorios, contactar el Servicio de Asistencia Peg-Pérego: U SA t el. 800.671.1701 fax 260.471.6332 call u s toll free 1.800.671.1701 website www.pegperego.com DECLARACIÓN DE CONFORMIDAD Denominación del producto: Sì Código de identificación del producto: IPSI200—- / IPSI3000—- / IPSI2NA—- Normativas de referencia (origen) EN1888:2003 + A1 / A2 / A3: 2005 (EU) ASTM F833:07a EN71-3 European Directive 2005/84/CE (Phtalates Directive) European Directive 2002/61/CE (Azocolourants) Declaración de conformidad: PegPerego S.p.A. declara bajo su responsabilidad que el artículo en objeto ha sido sometido a pruebas de ensayo internas y ha sido homologado según las normativas vigentes en laboratorios exteriores e independientes.
-
Page 18: Instructions D’utilisation
_ P OUR ÉVITER DE GRAVES BLESSURES LORS DU RÉGLAGE DU PRODUIT, S’ASSURER QUE LES MEMBRES DE L’ENFANT NE SONT PAS EN CONTACT AVEC DES PIÈCES EN MOUVEMENT. _ L ’ENSEMBLE DES PROCÉDURES DE MONTAGE ET D’UTILISATION DOIT ÊTRE EFFECTUÉ PAR UN ADULTE _ S ’ASSURER QUE LA POUSSETTE EST CORRECTEMENT OUVERTE EST BLOQUÉE DANS LA POSITION CONVENANT À SON UTILISATION. _ N E PAS UTILISER CE PRODUIT À PROXIMITÉ DE MARCHES OU D’ESCALIERS; PRÊTER ATTENTION À LA MANIPULATION DU PRODUIT DANS DES ESCALIERS OU DES ESCALATORS. _ N E PAS UTILISER LE PRODUIT SI DES PIÈCES SONT MANQUANTES OU CASSÉES. _ N E PAS UTILISER PRÈS DU FEU OU D’UNE FLAMME DIRECTE. _ R EMARQUE : CET ARTICLE REMPLIT LES CONDITIONS REQUISES PAR LA NORME ASTM F833 ET RÉVISIONS RÉCENTES OU SATISFAIT À DES CONDITIONS PLUS SÉVÈRES. COMPOSANTS DE L’ARTICLE Vérifier le contenu du carton et en cas de réclamation, contacter votre magasin revendeur ou le service assistance. _ La poussette Si SPORTIVO se compose de 2 roues avant pivotantes ou fixes, 2 roues arrière, panier, porte-boisson, capote, tablier, habillage pluie, 2 protège sangles et un coussinet entre-jambes.
-
Page 19
S’assurer que la poussette est correctement ouverte en contrôlant que les crochets latéraux sont bien accrochés (fig_c). 2 Si les crochets ne sont pas correctement accrochés, appuyer sur l’assise (fig_a) jusqu’au clic d’enclenchement. Enfin, appuyer du pied vers le bas sur PUSH (fig_b). 3 PANIER : pour monter le panier, accrocher ses boucles aux crochets arrière A et B et au crochet avant C (fig_a). PORTE-BOISSONS : il se fixe du côté droit de la poussette grâce au crochet près de la poignée. Pour fixer le porte-boissons, l’insérer jusqu’au déclic (fig_b). 4 RÉGLAGE DES POIGNÉES : les poignées sont réglables en 3 hauteurs différentes. Pour régler les poignées à la position désirée, appuyer sur le bouton tout en tirant la poignée vers le haut. Pour l’abaisser, procéder à l’opération inverse (fig_a). FREIN : pour immobiliser la poussette, abaisser à l’aide du pied le levier de frein situé sur le bloc roues arrière. Pour débloquer le frein, procéder à l’opération inverse (fig_b). Toujours actionner le frein lorsque la poussette est à l’arrêt. 5 ROUES PIVOTANTES : les roues sont déjà montées sur la poussette. Pour rendre les roues avant pivotantes, abaisser le levier (fig_a). Pour les bloquer, déplacer le levier vers le haut (fig_b). Les roues arrière sont fixes. 6 CAPOTE : pour fixer la capote, enclencher ses fixations dans les emplacements prévus à cet effet et la boutonner à l’arrière du dossier (fig_a). La capote peut être réglée en 3 positions (fig_b) simplement en la tirant en avant ou en arrière. Il est possible d’étirer la visière en toile de la capote pour protéger l’enfant du soleil (fig_c) puis, lorsqu’elle n’est plus utile, de la remettre en place d’un simple geste à l’intérieur de la capote. 7 TABLIER : pour installer correctement le tablier (fig_a), accrocher les boutons à l’intérieur de la poussette (détail 1), l’enfiler en englobant le repose-pied et accrocher les boutons (détail 2). HABILLAGE PLUIE : pour fixer l’habillage pluie, le mettre en place sur la poussette (fig_b), le boutonner aux côtés de la capote (détail 1) et accrocher les élastiques sur le bas de la poussette (détail 2). 8 CEINTURE DE SÉCURITÉ À 5 POINTS : La ceinture est équipée de protège sangles assortis à la poussette et d’un coussinet entre-jambes. Pour accrocher les ceintures de sécurité, insérer jusqu’au déclic les deux boucles de la sangle ventrale (avec les bretelles attachées) dans la sangle d’entrejambes (fig_a). Pour les décrocher, appuyer sur les côtés de la boucle tout en tirant la sangle ventrale vers l’extérieur (fig_b). Il est possible de régler les ceintures de sécurité à 2 hauteurs différentes selon la taille de l’enfant. -
Page 20: Accessoires En Option
1 4 TRANSPORT : La poussette peut être facilement transportée (avec les roues avant fixes) en la saisissant par sa poignée centrale (fig_a). Elle peut également être transportée à l’aide de sa poignée latérale (fig_b). 1 5 POUR ENLEVER LA HOUSSE : pour enlever la housse de la poussette : décrocher les deux boucles à l’arrière du dossier (fig_a). défaire les deux boutons de l’assise (fig_b). faire sortir la boucle d’entrejambe par en dessous (fig_c). défaire les boutons sur les côtés de la housse (fig_d). 1 6 défaire la housse du repose-pied (fig_e). Pour enlever la ceinture de sécurité, dévisser (des deux côtés) les deux vis à l’aide d’un tournevis et d’une pince pour bloquer l’écrou (fig_f). Tirer la housse vers le haut (fig_g). FIXATION PRIMO VIAGGIO SIP 30 . 30 — PRIMO VIAGGIO SIP (Usa) (Canada, Fabriqué après le 20 septembre 2007) Immobiliser la poussette. Accrocher le siège-auto à la poussette sans que l’enfant ne soit installé à l’intérieur. Toujours installer le siège-auto en le tournant vers maman. Les sangles doivent être installées sur le siège-auto avant que celui-ci ne soit monté sur la poussette. 1 7 Pour monter les ceintures (identiques) sur le siège-auto, commencer par les positionner correctement, comme le montre la figure (fig_a). L’insérer ensuite dans les logements latéraux du siège-auto (fig_b). Pour plus de commodité, il est possible d’enlever la capote de la poussette, une autre capote étant déjà présente sur le siège-auto. Positionner le dossier de la poussette sur la 2ème position centrale (paragraphe 12). 1 8 Placer le siège-auto sur l’assise de la poussette et l’enclencher sans jamais le lâcher. Desserrer la ceinture en soulevant la boucle (fig_c1), accrocher l’anneau de la ceinture à l’élément de fixation sur le côté de la poussette (fig_c2) et tendre fortement la ceinture (fig_c3). Le siège- auto est maintenant accroché correctement (fig_d). Procéder de même de l’autre côté de la poussette. Pour décrocher le siège-auto de la poussette : desserrer la boucle en la soulevant et décrocher l’anneau de la ceinture de l’élément de fixation de la poussette. Ne pas défaire les ceintures du siège-auto.
-
Page 21: Nettoyage Et Entretien
NETTOYAGE ET ENTRETIEN ENTRETIEN DE L’ARTICLE: protéger l’article des agents atmosphériques (eau, pluie ou neige); une exposition continue et prolongée au soleil pourrait entraîner un changement de couleur de nombreux matériaux; ranger cet article dans un lieu sec. NETTOYAGE DU CHÂSSIS: nettoyer régulièrement les pièces en plastique à l’aide d’un linge humide; ne pas utiliser de solvants ou autres produits similaires. Veiller à ce que toutes les pièces métalliques restent sèches pour prévenir la formation de rouille. Maintenir le bon état de propreté de toutes les pièces mobiles (mécanismes de réglage, mécanismes de fixation, roues, etc.) en enlevant poussière ou sable; graisser avec une huile légère si nécessaire. NETTOYAGE DE L’HABILLAGE PLUIE: utiliser une éponge et de l’eau savonneuse; ne pas utiliser de détergents. NETTOYAGE DES ÉLÉMENTS EN TISSU : brosser les éléments en tissu pour enlever la poussière et laver à la main à une température maximale de 30° ; ne pas tordre ; ne pas utiliser d’eau de javel ; ne pas repasser ; ne pas laver à sec ; ne pas détacher à l’aide de solvants ; ne pas sécher dans un sèche-linge à tambour rotatif. PEG-PÉREGO S.p.A Peg-Pérego podrá aportar en cualquier momento modificaciones a los modelos que se describen en el presente manual por razones técnicas o comerciales. SERVICIO DE ASISTENCIA PEG-PÉREGO En caso de que se pierdan o se dañen partes del producto, utilizar sólo repuestos originales Peg- Pérego. Para eventuales reparaciones, cambios e informaciones sobre los productos, así como la venta de recambios originales y accesorios, contactar el Servicio de Asistencia Peg-Pérego: CANADA tel. 05.83.3371 fax 05.83.542 call us toll free 1.800.661.5050 website www.pegperego.com DECLARATION DU CONFORMITÈ Denomination du produit: Sì Identification du produit: IPSI200—- / IPSI3000—- / IPSI2NA—- Standard du referiment (origin) EN1888:2003 + A1 / A2 / A3: 2005 (EU) ASTM F833:07a EN71-3 European Directive 2005/84/CE (Phtalates Directive) European Directive 2002/61/CE (Azocolourants) Declaration du conformitè: PegPerego S.p.A. déclare, sous sa propre responsabilité, que l’article en question a été soumis à des tests d’essais internes et homologué selon les normes en vigueur par des laboratoires extérieurs et indépendants. Date et lieu du publication: Arcore, le 8 janvier 200 — 21 — SI_NA_FINA0801I101.indd 21…
-
Page 22
— 22 — SI_NA_FINA0801I101.indd 22 16-01-2009 9:02:16… -
Page 23
— 23 — SI_NA_FINA0801I101.indd 23 16-01-2009 9:02:16… -
Page 24
PEG PEREGO S.p.A. VIA DE GASPERI 50 20043 ARCORE MI ITALIA tel. 003 03 60881 fax 003 03 61586/616454 Servizio Post Vendita — After Sale: tel. 003 03 6088213 fax: 003 03 3302 PEG PEREGO U.S.A. Inc. 3625 INDEPENDENCE DRIVE FORT WAYNE INDIANA 46808 phone 260 482 811 fax 260 484 240 Call us toll free: 1 800 671 1701 PEG PEREGO CANADA Inc. 585 GRANITE COURT PICKERING ONTARIO CANADA L1W3K1 phone 05 83 3371 fax 05 83 542 Call us toll free: 1 800 661 5050 www.pegperego.com WARNING: AVOID SERIOUS INJURY FROM FALLING OR SLIDING OUT. ALWAYS USE COMPLETE 5 POINT SEAT BELT. FINA0801I101 16/01/09 SI_NA_FINA0801I101.indd 24 16-01-2009 9:02:16…
- Manuals
- Brands
- Peg-Perego Manuals
- Stroller
- si switch
- Instructions for use manual
-
Contents
-
Table of Contents
-
Bookmarks
Available languages
-
ENGLISH, page 13
-
РУССКИЙ, страница 43
-
FRANÇAIS, page 15
-
ESPAÑOL, página 20
-
DEUTSCH, seite 18
-
ITALIANO, pagina 10
-
DUTCH, pagina 25
-
PORTUGUÊS, página 23
-
DANSK, side 28
-
SUOMI, sivu 30
-
ČEŠTINA, strana 33
-
ΕΛΛΗΝΙΚΆ, σελίδα 50
-
MAGYAR, oldal 38
-
SLOVENČINA, strana 35
-
TÜRKÇE, sayfa 45
-
SLOVENŠČINA, stran 40
-
HRVATSKI, stranica 48
Quick Links
Related Manuals for Peg-Perego Si
Summary of Contents for Peg-Perego Si
-
Page 9
Sí… -
Page 10
Sí IT_Italiano • ATTENZIONE • _ IMPORTANTE: leggere attentamente queste istruzioni e conservarle per un futuro utilizzo. La sicurezza del bambino potrebbe essere messa a • rischio se non si eseguono queste istruzioni. • — 10 -… -
Page 11: Componenti Dell’ Articolo
COMPONENTI DELL’ ARTICOLO ISTRUZIONI D’USO ATTENZIONE: utilizzare il frontalino sempre istallato sul passeggino. AGGANCIO PRIMO VIAGGIO SL — 11 -…
-
Page 12: Pulizia E Manutenzione
ATTENZIONE: allungare il frontalino solo quando si vuole agganciare il Car Seat. PEG-PÉREGO S.p.A. NUMERI DI SERIE SERVIZIO ASSISTENZA PEG-PÉREGO ACCESSORI tel. numero verde: e-mail sito internet PULIZIA E MANUTENZIONE — 12 -…
-
Page 13: Product Parts
EN_English WARNING IMPORTANT: read the instructions carefully before use and keep them for future reference. The child may be hurt if you do not follow these instructions. INSTRUCTIONS WARNING: Always keep the front bar fitted to the stroller. PRODUCT PARTS — 13 -…
-
Page 14: Serial Numbers
WARNING: Only extend the front bar when attaching the Car Seat. SERIAL NUMBERS ACCESSORIES CLEANING AND MAINTENANCE ATTACHING PRIMO VIAGGIO SL — 14 -…
-
Page 15
FR_Français AVERTISSEMENT PEG-PÉREGO S.p.A. _ IMPORTANT : lire ces instructions avec attention et les conserver pour toute référence future. La sécurité de l’enfant pourrait être menacée si ces instructions ne sont pas suivies. PEG-PÉREGO AFTER-SALES SERVICE tel. e-mail website — 15 -… -
Page 16: Instructions D’utilisation
COMPOSANTS DE L’ARTICLE INSTRUCTIONS D’UTILISATION IMPORTANT :toujours utiliser le garde corps installé sur la poussette — 16 -…
-
Page 17
FIXATION PRIMO VIAGGIO SL PEG-PÉREGO S.p.A. NUMÉROS DE SÉRIE SERVICE D’ASSISTANCE PEG-PÉREGO ACCESSOIRES EN OPTION tél. e-mail site Internet NETTOYAGE ET ENTRETIEN — 17 -… -
Page 18
DE_Deutsch ARTIKEL — LIEFERUMFANG WARNUNG _ WICHTIG: Diese Anweisungen sorgfältig lesen und danach aufbewahren. Die Sicherheit des Kindes könnte bei Nichtbeachtung der Anweisungen gefährdet werden. GERAUCHSANWEISUNG ACHTUNG: Verwenden Sie den Sportwagen stets mit montiertem Sicherheitsbügel. — 18 -… -
Page 19
BEFESTIGUNG DES ZUBEHÖRS PRIMO VIAGGIO SL ACHTUNG: Den Sicherheitsbügel nur dann ausziehen, wenn der Autokindersitz montiert werden soll. SERIENNNUMMER ZUBEHÖR — 19 -… -
Page 20: Reinigung Und Pflege
ES_Español ADVERTENCIA REINIGUNG UND PFLEGE _ IMPORTANTE: léase atentamente estas instrucciones y consérvelas para futuras consultas. La seguridad del niño podría estar en peligro si no se leen dichas instrucciones. PEG-PÉREGO S.p.A. KUNDENDIENST PEG-PÉREGO Tel. E-Mail Webseite — 20 -…
-
Page 21: Instrucciones De Uso
COMPONENTES DEL ARTÍCULO INSTRUCCIONES DE USO ATENCIÓN: Utilizar sólo la barra frontal estando instalada en la silla de paseo. — 21 -…
-
Page 22: Limpieza Y Mantenimiento
LIMPIEZA Y MANTENIMIENTO ENGANCHE DE PRIMO VIAGGIO SL ATENCIÓN: Extender la barra frontal sólo cuando se desee enganchar Car Seat. PEG-PÉREGO S.p.A NÚMEROS DE SERIE SERVICIO DE ASISTENCIA PEG-PÉREGO ACCESORIOS: tel. e-mail sito internet — 22 -…
-
Page 23: Instruções De Uso
PT_Português COMPONENTES DO ARTIGO ADVERTÊNCIA IMPORTANTE: leia atentamente estas instruções e conserve-as para uma futura utilização. A segurança da criança pode vir a ser colocada em risco se estas instruções não forem efectuadas. INSTRUÇÕES DE USO — 23 -…
-
Page 24: Limpeza E Manutenção
ENCAIXE PRIMO VIAGGIO SL ATENÇÃO: esticar a barra frontal apenas quando pretender encaixar o Car Seat. NÚMEROS DE SÉRIES ACESSÓRIOS LIMPEZA E MANUTENÇÃO — 24 -…
-
Page 25
NL_Nederlands WAARSCHUWING _ BELANGRIJK: lees deze instructies aandachtig en bewaar ze voor toekomstig gebruik. Het kind kan gevaar lopen als u deze instructies niet opvolgt. PEG-PÉREGO S.p.A. SERVIÇO DE ASSISTÊNCIA PEG-PÉREGO tel. fax e-mail sito internet COMPONENTEN — 25 -… -
Page 26
GEBRUIKSAANWIJZINGEN ATTENTIE: gebruik altijd de frontstang die op de wandelwagen geplaatst zit. — 26 -… -
Page 27: Onderhoud En Reinigen
BEVESTIGING PRIMO VIAGGIO SL ONDERHOUD EN REINIGEN ATTENTIE: verleng de frontstang alleen wanneer de Car Seat bevestigd wordt. P EG-PÉREGO S.p.A. SERIENUMMERS TECHNISCHE SERVICE PEG-PÉREGO ACCESSOIRES tel. fax e-mail site internet — 27 -…
-
Page 28
DK_Dansk PRODUKTETS KOMPONENTER PAS PÅ! _ VIGTIGT: Læs denne brugsanvisning grundigt og gem den til fremtidig brug. Barnets sikkerhed kan blive udsat for risiko, hvis denne brugsanvisning ikke følges. BRUGSANVISNING PAS PÅ!: Anvend altid klapvognen med forstykket installeret. — 28 -… -
Page 29: Rengøring Og Vedligeholdelse
PAS PÅ!: Forlæng kun forstykket når du vil påhægte et Car Seat. SERIENUMMER TILBEHØR RENGØRING OG VEDLIGEHOLDELSE FASTSPÆNDING AF PRIMO VIAGGIO SL — 29 -…
-
Page 30
FI_Suomi HUOMAA _ TÄRKEÄÄ: lue ohjeet huolellisesti läpi ja säilytä ne myöhempää tarvetta varten. Lapsen turvallisuus saattaa vaarantua, jos näitä käyttöohjeita ei noudateta. PEG-PÉREGO S.p.A. SERVICEAFDELINGEN PEG-PÉREGO Tlf.: e-mail Internetside TUOTTEEN OSAT — 30 -… -
Page 31
KÄYTTÖOHJEET PRIMO VIAGGIO SL AUTOISTUINTEN KIINNITTÄMINEN — 31 -… -
Page 32: Puhdistus Ja Huolto
PEG-PÉREGO S.p.A. PEG-PÉREGO-ASIAKASPALVELU SARJANUMEROT puh. LISÄVARUSTEET s-posti Internet-sivu PUHDISTUS JA HUOLTO — 32 -…
-
Page 33
CZ_Čeština SLOŽKY VÝROBKU UPOZORNĚNÍ DŮLEŽITÉ: přečtěte si tento návod a uchovejte jej pro pozdější použití. Pokud se jím nebudete řídit, můžete ohrozit bezpečí dítěte. NÁVOD NA POUŽITÍ UPOZORNĚNÍ: kočárek vždy používejte s předním madlem. — 33 -… -
Page 34: Čištění A Údržba
UPOZORNĚNÍ: přední madlo vytahujte pouze pro připevnění Car Seat. SÉRIOVÁ ČÍSLA PŘÍSLUŠENSTVÍ ČIŠTĚNÍ A ÚDRŽBA UPEVŇOVÁNÍ AUTOSEDAČEK PRIMO VIAGGIO SL — 34 -…
-
Page 35
SK_Slovenčina OPOZORILO _ DÔLEŽITÉ: prečítajte si dôkladne tieto inštrukcie a uschovajte si je pre použitie v budúcnosti. Bezpečnosť dieťaťa by mohla byť ohrozená v prípade, že tieto inštrukcie nie sú dodržané. PEG-PÉREGO S.p.A. SERVISNÍ SLUŽBA PEG-PÉREGO tel. e-mail internetové stránky — 35 -… -
Page 36: Návod Na Použitie
ZLOŽKY VÝROBKU NÁVOD NA POUŽITIE POZOR: športový kočík používajte vždy s namontovanou prednou opierkou. PRIPEVNENIE AUTOSEDAČKY PRIMO VIAGGIO SL — 36 -…
-
Page 37: Čistenie A Údržba
POZOR: prednú opierku predĺžte, iba ak chcete pripevniť Car Seat. PEG-PÉREGO S.p.A. SERIJSKE ŠTEVILKE ASISTENČNÁ SLUŽBA SPOLOČNOSTI PEG-PÉREGO PRÍSLUŠENSTVO tel. e-mail internetová stránka ČISTENIE A ÚDRŽBA — 37 -…
-
Page 38: Használati Utasítás
HU_Magyar A TERMÉK ALKOTÓELEMEI FIGYELMEZTETÉS _ FONTOS: figyelmesen olvassák el az alábbi utasításokat és azokat őrizzék meg a későbbi alkalmazás céljából. A gyermek biztonságát veszélyeztethetik azzal, ha nem tartják be ezeket az utasításokat. HASZNÁLATI UTASÍTÁS FIGYELEM: mindig használják a sportkocsira felszerelt kapaszkodót. — 38 -…
-
Page 39: Tisztítás És Karbantartás
FIGYELEM: csak akkor hosszabbítsák meg a kapaszkodót, amikor rá kívánják kapcsolni a Car Seat-t. SOROZATSZÁMOK TARTOZÉKOK A PRIMO VIAGGIO SL AUTÓS GYEREKÜLÉSEK FELERŐSÍTÉSE TISZTÍTÁS ÉS KARBANTARTÁS — 39 -…
-
Page 40
SL_Slovenščina OPOZORILO _ POMEMBNO: natančno preberite ta navodila in jih shranite za prihodnjo uporabo. Neupoštevanje teh navodil lahko ogrozi varnost otroka. PEG-PÉREGO S.p.A. PEG-PÉREGO VEVŐSZOLGÁLAT tel. e-mail internetes weboldal SESTAVNI DELI IZDELKA — 40 -… -
Page 41: Navodila Za Uporabo
NAVODILA ZA UPORABO OPOZORILO: sprednja zapora naj bo vedno nameščena na voziček. PRITRJEVANJE AVTOSEDEŽEV PRIMO VIAGGIO SL — 41 -…
-
Page 42: Čiščenje In Vzdrževanje
OPOZORILO: sprednjo zaporo podaljšajte le, ko PEG-PÉREGO S.p.A. želite nanjo pripeti avtomobilski stolček Car Seat. CENTER ZA POMOČ UPORABNIKOM SÉRIOVÉ ČÍSLA tel. DODATKI faks e-pošta spletna stran ČIŠČENJE IN VZDRŽEVANJE — 42 -…
-
Page 43: Компоненты Изделия
RU_Pусский ПРЕДУПРЕЖДЕНИЕ ВАЖНО: внимательно прочитайте данные инструкции и храните, чтобы в дальнейшем их можно было использовать для консультации. Ребёнок может подвергаться опасности, если Вы не будете следовать данным инструкциям. КОМПОНЕНТЫ ИЗДЕЛИЯ ИНСТРУКЦИЯ ПО ЭКСПЛУАТАЦИИ — 43 -…
-
Page 44: Чистка И Уход
КРЕПЛЕНИЕ ДЕТСКИХ АВТОМОБИЛЬНЫХ КРЕСЕЛ PRIMO VIAGGIO SL СЕРИЙНЫЕ НОМЕРА АКСЕССУАРЫ (продаются отдельно) ЧИСТКА И УХОД — 44 -…
-
Page 45
TR_Türkçe UYARILAR Ürünün kurulum ve kullanımından önce tüm kullanım kılavuzunu dikkatle okuyun. Bu talimatlara uyulmaması halinde çocuğun güvenliği tehlikeye girebilir. İleride referans olması için kullanım kılavuzunu saklayın PEG-PEREGO S.p.A. СЛУЖБА ОБСЛУЖИВАНИЯ PEG-PEREGO тел.: факс e-mail сайт в интернете: Изготовитель: PEG PEREGO S.P.A. (Пег Перего С.П.А.); Адрес: Via de Gasperi 50 — 20862 ARCORE (MB), Italy (Виа де Гаспери 50 — 20862 Аркоре (МБ), Италия). Страна производства: Италия… -
Page 46: Kullanim Kilavuzu
Eksik bir parça var ise kolinin üstünde bulunan kod numaraları ile ürünü kullanmaya başlamadan önce bakım servis merkezine müracaat edin. KULLANIM KILAVUZU PRIMO VIAGGIO SL BEBEK ARABASI KOLTUKLARININ TAKILMASI — 46 -…
-
Page 47: Bakim Ve Onarim
SERİ NUMARALARI PEG-PÉREGO S.p.A. AKSESUARLAR TEKNİK / BAKIM SERVİS HİZMETİ BAKIM VE ONARIM — 47 -…
-
Page 48: Upute Za Uporabu
HR/SRB/MNE/BiH_ Hrvatski NAPOMENA UPUTE ZA UPORABU _ VAŽNO: pažljivo pročitajte ove upute i čuvajte ih radi buduće uporabe. U slučaju nepridržavanja ovih uputa postoji rizik povećanja opasnosti za vaše dijete. PAŽNJA: prednju zaštitu koristite samo ako je montirana na kolica. DIJELOVI PROIZVODA — 48 -…
-
Page 49: Čišćenje I Održavanje
SERIJSKI BROJEVI OPREMA ČIŠĆENJE I ODRŽAVANJE MONTAŽA PRIMO VIAGGIO SL PEG-PÉREGO S.p.A. — 49 -…
-
Page 50
ΕL_Eλληνικά υ ύ υ ξ ϊ ΠΡΟΕΙΔΟΠΟΙΗΣΗ _ ΣΗΜΑΝΤΙΚΟ: διαβάστε προσεκτικά τις οδηγίες αυτές και διατηρήστε τις για μελλοντική χρήση. Η ασφάλεια του παιδιού θα μπορούσε να τεθεί σε κίνδυνο, εάν δεν ακολουθήσετε τις οδηγίες αυτές. Τ ϊ υ SLUŽBA ZA PODRŠKU PEG-PÉREGO ύ Μ ϊ υ ύ υ υ β υ Τ ϊ υ β Μ υ tel. β ψ zeleni broj: Χ ζ faks υ ζ… -
Page 51: Οδηγιεσ Χρησησ
υ υ Μ β ξ ξ υ ύ υ ύ ύ υ υ ύ ζ Ρ ΕΙΔ ΙΗ Η Μ Δ Κ Γ υ υ υ υ ΕΞΑΡΤΉΜΑΤΑ ΤΟΥ ΠΡΟΪΌΝΤΟΣ υ β υ υ Ε ξ υ υ υ υ υ ύ Υ…
-
Page 52: Καθαρισμοσ Και Συντηρηση
υ ύ Η υ Ξ υ ύ υ ύ Β υ β β ύ Ξ υ υ υ ΚΑΘΑΡΙΣΜΟΣ ΚΑΙ ΣΥΝΤΗΡΗΣΗ Β ΥΝΤΗΡΗ Η Τ Υ Ρ Ϊ ΝΤ ψ Γ ζ ξ β υ ύ β · ύ υ ύ β υ…
-
Page 53
ΠΕΡΑΜΑΞ Α.Ε. & υ Ε ύ ΒΙ Ά Λ Τ PEG PEREGO ΠΑΙΔΙΚΑ ΕΙΔΗ ΒΡΕΦΑΝΑΠΤΥΞΗΣ ΚΑΙ ΠΑΙΧΝΙΔΙΑ Η Ε ύ υ ϊ ζ ξ Ο καταναλωτής πρέπει να απευθύνει πάντα το αίτημα προς τον πωλητή, ξ ύ Η ύ ύ ύ ΄ ϊ β υ υ υ… -
Page 54
— 54 -… -
Page 55
— 55 -… -
Page 56
PEG PEREGO S.p.A. Servizio Post Vendita — After Sale: PEG PEREGO U.S.A. Inc. Call us toll free: PEG PEREGO CANADA Inc. Call us toll free: www.pegperego.com Tutti i diritti di proprietà intellettuale relativi ai contenuti di questo manuale d’istruzione appartengono a PEG PEREGO S.p.A. e sono tutelati dalle leggi vigenti. All of the intellectual property rights for the contents of this instruction manual belong to PEG PEREGO S.p.A. and are protected by the laws in force.
Страница: 1
— 44 —
• Ne uporabljajte klorovega belila.
• Ne likajte.
• Ne uporabljajte kemičnega čiščenja.
• Madežev ne odstranjujte s topili.
• Ne uporabljajte sušilca za perilo z vrtljivim bobnom.
PEG-PÉREGO S.P.A.
Družba Peg Perego SpA je pridobila certifikat sistema
vodenja kakovosti s strani akreditiranega organa TÜV
Italia Srl v skladu s standardom ISO 9001.
Peg Perego se lahko kadarkoli odloči, da bo spremenil
modele, objavljene v katalogu, najsi bo to zaradi
tehničnih ali podjetniških razlogov.
CENTER ZA POMOČ UPORABNIKOM
Če izgubite ali poškodujete sestavni del izdelka,
uporabite izključno originalne rezervne dele Peg
Pérego. V primeru popravil, zamenjav, podatkov
o izdelku in naročila originalnih nadomestnih
delov in dodatkov, se obrnite na službo za pomoč
uporabnikom Peg Perego, pri tem pa navedite serijsko
številko izdelka, če je le-ta navedena.
Tel. 0039/039/6088213
Faks. 0039/039/3309992
E-pošta: assistenza@pegperego.it
E-pošta: www.pegperego.com
Vse pravice intelektualne lastnine v zvezi z vsebino
teh uporabniških navodil so last družbe PEG PEREGO
S.p.A. in so zaščitene z veljavnimi zakoni.
RU_Pусский
Благодарим вас за то, что вы выбрали продукцию
компании Peg-Pеrego.
ПРЕДУПРЕЖДЕНИЕ
_ ВАЖНО! Внимательно прочитайте эти инструкции
и сохраните их для последующего использования.
Невыполнение этих инструкций может поставить
под угрозу безопасность ребенка.
_ Данное изделие предназначено для перевозки в
коляске 1 ребенка.
_ Не используйте данное изделие для большего
числа пассажиров, чем предусмотрено
производителем.
_ Данное изделие предназначено для перевозки в
коляске детей с рождения и до достижения ими
веса 15 кг.
_ Для младенцев мы рекомендуем раскладывать
спинку полностью.
_ Si предназначен для использования со
следующими товарами Peg-Perego Ganciomatic: Si
+ детское автокресло «Primo Viaggio» (группа 0+),
предназначенное для детей от рождения и до веса
13 кг.
_ При использовании с автокреслом изделие не
заменяет детскую кроватку или кровать.
Если ваш ребенок хочет спать, его необходимо
переложить в соответствующую коляску, кроватку
или кровать.
_ ВНИМАНИЕ! Перед использованием убедитесь
в том, что корпус коляски, блок сиденья или
устройство крепления автокресла правильно
установлены; убедитесь, что изделия Peg Perego
Ganciomatic правильно прикреплены к коляске.
_ ВНИМАНИЕ! Сборка и подготовка изделия должны
выполняться взрослым.
_ Не пользуйтесь данным изделием в случае
отсутствия каких-либо деталей или при наличии
признаков неисправности.
_ ВНИМАНИЕ! Всегда пользуйтесь системой
предохранительного крепления. Обязательно
используйте систему ремней с 5-точечным
креплением. Всегда используйте ответвление
ремня вместе с поясным ремнем.
_ ВНИМАНИЕ! Никогда не оставляйте ребенка без
присмотра.
_ Всегда включайте тормоз, когда коляска находится
в неподвижном положении.
_ ВНИМАНИЕ! Перед пользованием убедитесь, что
задействованы все фиксирующие приспособления.
_ ВНИМАНИЕ! Во избежание травм при
раскладывании и складывании коляски убедитесь,
что ребенка в ней нет.
_ ВНИМАНИЕ! Не разрешайте ребенку играться с
изделием.
_ Не вставляйте пальцы в механизмы.
_ Будьте осторожны, чтобы не травмировать
ребенка при регулировке механизмов (ручки,
спинки).
_ Подвешивание тяжелых предметов на ручку или
на рукоятки может сделать коляску неустойчивой.
Соблюдайте инструкции производителя в
отношении максимальных перевозимых грузов.
Страница: 2
— 45 —
_ Передний бампер не предназначен для
выдерживания веса ребенка. Он не предназначен
для того, чтобы удерживать ребенка в кресле, и не
заменяет собой поясного ремня.
_ Не нагружайте корзины весом свыше 5 кг.
Не вставляйте в держатель стаканчика вес,
превышающий вес, указанный непосредственно
на держателе, никогда не наливайте в стаканчик
горячие напитки. Не помещайте в карманы
капюшона (при их наличии) вес, превышающий 0,2
кг.
_ Не пользуйтесь изделием вблизи лестниц или
ступенек, источников тепла, открытого пламени
или опасных предметов, находящихся в пределах
досягаемости ребенка.
_ Используйте только запасные части, поставляемые
или рекомендуемые производителем/
дистрибьютором.
_ ВНИМАНИЕ! Не используйте дождевик (при
наличии) в помещении, регулярно проверяйте,
не перегрелся ли ребенок; не оставляйте коляску
вблизи источников тепла, а также держитесь
подальше от зажженных сигарет. Дождевик нельзя
использовать на коляске без капюшона или
зонтика, который мог бы его держать. Используйте
дождевик только под присмотром взрослого.
Убедитесь, что дождевик не создает помех для
движущихся частей шасси или коляски; всегда
снимайте дождевик перед складыванием коляски.
_ ВНИМАНИЕ: Данный продукт не подходит для бега
или катания на роликовых коньках.
_ Всегда включайте тормоз, усаживая ребенка в
коляску и вынимая его.
_ ВНИМАНИЕ! Не следует класть в люльку матрац, не
одобренный производителем.
Иллюстрации, на которых изображены
элементы из ткани, могут не соответствовать
приобретенной коллекции.
Для получения более подробной информации
посетите наш веб-сайт: www.pegperego.com
ИНСТРУКЦИЯ ПО ЭКСПЛУАТАЦИИ
1• Чтобы разложить шасси, потяните вверх
рычажки на рукоятках (рис. a). одновременно с
этим поднимите шасси вверх и оно раскроется
автоматически (рис. b). Чтобы убедиться в том,
что коляска правильно разложилась, проверьте
боковые крючки (рис. c).
2• Если лямки не застегнулись, нажмите на сиденье
(рис. А), пока оно со щелчком не встанет на место.
Затем нажмите ногой на PUSH (рис. b) и поднимите
поручень на одно положение (раздел 5b).
3• КОРЗИНА: для установки корзины наденьте петли
на задние скобы A и B и на переднюю скобу C.
4• РЕГУЛИРОВКА РУКОЯТОК: по высоте рукоятки
устанавливаются в трех различных положениях. Чтобы
установить их в желаемую позицию, нажмите кнопку
и одновременно потяните рукоятку наверх. Чтобы
опустить рукоятки, действуйте наоборот (рис_ a).
ТОРМОЗ: для торможения коляски нажмите ногой
на педаль тормоза, расположенную на задней
колесной группе. Чтобы разблокировать тормоз,
поднимите его (рис_ b). Используйте тормоз во
время любой остановки.
5• ВЕРТЛЮЖНЫЕ КОЛЕСА Эти колеса постоянно
прикреплены к коляске. Для того чтобы колеса
могли вращаться вокруг вертикальной оси,
нужно опустить рычаг (стрелка 1). Чтобы
зафиксировать колеса, передвиньте рычаг в другом
направлении (стрелка 2). Задние колеса не могут
вращаться вокруг вертикальной оси. ВНИМАНИЕ:
используемая защитная панель должна быть
установлена на коляску. ЗАЩИТНАЯ ПАНЕЛЬ: уже
установлена на коляску. Регулируется в двух
положениях:
ПОЛОЖЕНИЕ 1: для использования
ПОЛОЖЕНИЕ 2: складывание.
Для регулировки нажмите на боковую кнопку
одновременно с обеих сторон (рис_b).
6• ТЕНТ: чтобы установить тент, до щелчка вставьте
крепления в соответствующие отверстия и пристегните
тент к задней части спинки коляски (рис_ a).
Тент может бать раскрыт в трех позициях (рис_ b). –
для этого просто потяните его вперёд или назад.
Простым движением вы можете выдвинуть из тента
сетку для защиты ребенка от солнца (рис_ c), и, при
необходимости, убрать ее обратно внутрь тента.
7• ПОКРЫВАЛО Чтобы правильно установить
покрывало (рис. А), нужно пристегнуть его на
кнопки с внутренней стороны коляски (рис.
1), накрыть им сиденье, закрывая подножку, и
застегнуть кнопки (рис. 2).
НАКИДКА ОТ ДОЖДЯ: для установки накидки от
дождя наденьте ее на коляску (рис_ b), прикрепив
её кнопками к краям тента (рис_ 1) и прикрепите
эластичные завязки к раме в нижней части коляски
(рис_ 2).
8• 5-ТОЧЕЧНЫЙ РЕМЕНЬ БЕЗОПАСНОСТИ Для того
чтобы застегнуть ремень безопасности, вставьте
половинки поясного ремешка (с надетыми
плечевыми лямками – стрелка а) в пряжку
центрального ремешка до щелчка (стрелка
b). Чтобы отстегнуть его, нажмите на кнопку,
находящуюся в центре застежки (стрелка «c»), и
потяните поясной ремень наружу (стрелка «d»).
9• Для затягивания поясного ремешка потяните его с
обеих сторон в направлении, указанном стрелкой
(рис. а). Если его надо ослабить – поступите
наоборот. Поясной ремешок можно затянуть
только до предохранительного стопора (рис. b).
10• В зависимости от роста ребенка ремень
безопасности можно регулировать по высоте,
фиксируя его в трех позициях. Когда ребенок
подрастет, необходимо поместить ремень в более
высокую позицию.
11• Для регулировки ремня безопасности по высоте,
отстегните обе пряжки на обратной стороне
спинки. Вытягивайте плечевые лямки на себя
(стрелка a), пока пряжки не освободятся, после чего
вставьте их в отверстия спинки (стрелка b) Выньте
плечевые лямки из обивки (стрелка c) и проденьте
их в подходящие по высоте пряжки (стрелка d),
затем заново закрепите пряжки на обратной
стороне спинки (стрелка e). Пряжки надежно
застегиваются со щелчком (рис f).
12• РЕГУЛИРОВКА ПОЛОЖЕНИЯ ПОДНОЖКИ: Подножка
может быть установлена в 2 позициях. Чтобы
опустить подножку, потяните два боковых рычага
книзу и одновременно опустите подножку. Чтобы
поднять подножку, потяните ее вверх, пока не
услышите щелчок.
РЕГУЛИРОВКА ПОЛОЖЕНИЯ СПИНКИ: Спинка
может быть установлена в 3 положениях. Чтобы
опустить спинку, приподнимите боковой рычаг
одновременно с двух сторон и опустите спинку, а
затем заблокируйте в желаемом положении. Чтобы
поднять спинку, потяните ее по направлению вверх.
Страница: 3
— 46 —
13• СКЛАДЫВАНИЕ: перед закрыванием коляски
желательно сначала опустить защитную панель в
вторую позицию (складывание). Коляску можно
сложить одной рукой. Для этого достаточно потянуть
вверх до щелчка за одну ручку, потом за другую.
14• После этого возьмитесь за центральный рычаг и
потяните его вверх, чтобы коляска сложилась (рис.
а). Убедитесь в том, что шасси коляски правильно
сложилось и крючок защелкнулся. В сложенном
состоянии коляска должна стоять (рис. b).
15• ТРАНСПОРТИРОВКА: коляску можно удобно
перевозить (зафиксировав передние колеса), держа
за центральную ручку (рис_ a). Кроме того, ее
можно носить и за боковую ручку (рис_ b).
16• СНЯТИЕ ЧЕХЛА: чтобы снять с коляски чехол:
Отстегните две застежки, расположенные на обратной
стороне спинки коляски (рис_ a). Отстегните две
застежки, расположенные на сидении (рис_ b).
Продеть снизу застежку чехла для ножек (рис_ c).
Отстегнуть застежки бокового чехла (рис_ d).
17• Снять чехол с подставки (рис_ e).
Чтобы снять ремень безопасности, отвинтите (с
обеих сторон) оба винта при помощи отвертки и
плоскогубцев удерживающих гайку (рис_ f).
Потяните чехол вверх (рис_ g).
КРЕПЛЕНИЕ ДЕТСКИХ
АВТОМОБИЛЬНЫХ КРЕСЕЛ
PRIMO VIAGGIO SL
Сначала необходимо поставить коляску на тормоз.
Нельзя устанавливать детское кресло на коляску
вместе с ребенком. Автомобильное кресло надо
устанавливать так, чтобы ребенок всегда был бы
лицом к матери. Если это необходимо, снимите
складной верх коляски. Ведь он уже установлен на
автомобильном детском кресле. Поставьте спинку
коляски во второе среднее положение (раздел 12).
Переставьте ручку автомобильного детского кресла
в положение для переноски, для того чтобы можно
было легко закрепить ремни.
18• Нажмите на кнопку под подлокотником и
освободите поручень, после чего одновременно
вытяните его с обеих сторон (рис. а).
ВНИМАНИЕ: удлиняйте защитную панель, только
если вы хотите присоединить Car Seat.
Наклонитесь и устройте поудобнее автомобильное
детское кресло на сиденье коляски (рис. b).
19• Наденьте ремень петлей на кнопку на коляске
(стрелка 1), и проведите ремень за ручкой
автомобильного креслица (стрелка 2). Застегните
свободную петлю ремня на кнопку в нижней части
коляски (стрелка 3), и туго затяните ремень, чтобы
кресло было надежно прикреплено к коляске
(стрелка 4). Повторите эти операции на другой
стороне коляски (рис. с). Правильно установленное
на коляске детское кресло (рис. d). Снятие детского
автомобильного кресла с коляски: ослабьте
ремни; отстегните петлю ремня с кнопки в нижней
части коляски; вытяните ремень из ручки кресла;
отстегните вторую петлю от кнопки на коляске.
СЕРИЙНЫЕ НОМЕРА
20• Все сведения о коляске «Si» находятся на обратной
стороне спинки: наименование изделия, дата
изготовления и серийный номер.
Эти данные необходимо указывать в любых
претензиях.
THE ORIGINAL ACCESSORY PEG-PÉREGO
Принадлежности Peg-Pérego разработаны как
полезные и практичные средства для облегчения
жизни родителей. Ознакомьтесь со всеми
принадлежностями к вашему изделию на веб-
сайте www.pegperego.com
ЧИСТКА И УХОД
Операции по чистке должны выполнять только
взрослые.
УХОДЗАИЗДЕЛИЕМ:защититеизделиеотатмосферных
осадков-снегаилидождя.Постояннаяипродолжительная
подверженностьсолнечнымлучамможетвызвать
цветовыеизменениямногихматериалов.Хранитеэто
изделиевсухомместе.Регулярноосуществляйтеосмотри
техобслуживаниеосновныхчастейустройства.
ЧИСТКА ШАССИ: периодически очищайте
пластмассовые детали влажной тряпкой, без
использования растворителей и сходных веществ.
Держите металлические части изделия сухими, чтобы
предотвратить образование ржавчины. Поддерживайте
чистоту всех движущихся деталей (регулировочные и
соединительные детали, колеса и т.д.), удаляя пыль и
песок. При необходимости, смажьте их легким маслом.
ЧИСТКА ТКАНЫХ ЧАСТЕЙ:
Почистите тканевые детали щеткой, чтобы удалить пыль.
• При стирке точно следуйте инструкциям на
этикетке, вшитой в чехол изделия.
• Не использовать хлорный отбеливатель.
• Не гладить.
• Не подвергать химической чистке.
• Не удалять пятна растворителями.
• Не сушить в сушке.
PEG-PEREGO S.P.A.
В компании Peg Perego SpA внедрена система
управления качеством, сертифицированная TÜV
Italia Srl по стандарту ISO 9001.
Компания Peg-Perego имеет право вносить в
любой момент изменения в модели, описанные в
настоящем издании, по причинам технического
или коммерческого характера.
СЛУЖБА ОБСЛУЖИВАНИЯ PEG-PEREGO
В случае утери или порчи аксессуаров, применяйте
только фирменные запасные части производства
компании Peg-Pérego. Для выполнения ремонта,
замены запасных частей и получения информации об
устройстве обращайтесь в службу послепродажного
обслуживания Peg-Pérego, сообщив, при его
наличии, серийный номер продукта:
Срок службы: 3 года
Гарантийный срок: 12 месяцев
тел.: 0039/039/60.88.213
e-mail assistenza@pegperego.it
сайт в интернете: www.pegperego.com
Изготовитель: PEG PEREGO S.P.A.
(Пег Перего С.П.А.); Адрес: Via de Gasperi 50 — 20862
ARCORE (MB), Italy (Виа де Гаспери 50,
20862 Аркоре (МБ), Италия).
Страна производства: Италия
Соответствуеттребованиям
техническогорегламентаТРТС
007/2011
![]()
IT Istruzioni d’uso
EN Instructions for use FR Notice d’emploi
DE Gebrauchsanleitung ES Instrucciones de uso PT Instruções para uso NL Gebruiksaanwijzing DK Brugsanvisning
FI Käyttöohjeet
CZ Návod na použití SK Návod na použitie HU Használati útmutató SL Navodila za uporab
RU Инструкции по пользованию TR Kullanim klavuzu
EL Οδηγίες χρήσεως
sí

|
7 |
A |
1 |
1 |
|
2 |
|||
|
2 |
|||
|
8 |
|||
|
A |
|||
|
D |
D |
||
|
B |
B |
||
|
C |
|||
|
9 |
|||
|
A |
B |

10
3
1 2
|
11 |
||||
|
C |
D |
|||
|
F |
||||
|
A |
B |
E |
||
|
12 |
A |
B |
||
|
1 |
||||
|
2 |
|
21 |
A |
||
Sí
12
8
|
1) BCAPSZ• |
7) MUCI5P22N |
|||
|
2) BSAPSZ• |
|
|||
|
3) IRBELV0007 |
9) MUCI0129N |
|||
|
4) BCOPSI• |
10) SAPI6837NGR |
|||
|
5) ERSHSI00-NY01RE01M |
11) SPST6692SN |
|||
|
6) SAPI6430NGR |
12) ITPASD00NL65 |
|||
|
IT• |
Ricambi disponibili in piú colori da specificare nella richiesta. |
|||
|
EN• Spare parts available in different colours to be specified when ordering. |
||||
|
FR• |
Pièces de rechange disponibles en plusieurs couleurs à spécifier dans la demande. |
|||
|
DE• Ersatzteile in mehr Farben vorhanden, die in der Anfrage spezifiziert werden müssen. |
||||
|
ES• |
Repuestos disponibles en otros colores que se especificarán en el pedido. |
|||
|
PT• |
Peças de reposição disponíveis em cores alternativas a serem especificadas no pedido. |
|||
|
NL• |
Reserveonderdelen verkrijgbaar in meerdere kleuren, bij bestelling te specificeren. |
|||
|
DK• Reservedele kan leveres i flere farver som bør specificeres ved bestillingen. |
||||
|
FI• |
Varaosia saatavana eri värisinä: ilmoita väri tilauksessa. |
|||
|
CZ• |
U náhradních dílů, které jsou k dispozici ve více barvách, je nutné na objednávce specifikovat příslušnou barvu. |
|||
|
SK• |
Pri náhradných dieloch, ktoré sú k dispozícii vo viacerých farbách, je potrebné pri objednávke špecifikovať želanú farbu. |
|||
|
HU• A tartalék alkatrészek különböző színekben elérhetők, melyeket rendeléskor kell kiválasztani. |
||||
|
SL• |
Rezervni deli so na voljo v več barvah, ki jih je treba navesti pri naročilu. |
|||
|
RU• Запчасти имеются различных цветов, необходимый указать в запросе. |
||||
|
TR• |
Siparişte belirtilen değişik renklerdeki yedek parçalari mevcuttur. |
|||
|
EL• |
Ανταλλακτικά διαθέσιμα σε διάφορα χρώματα. Προσδιορίστε όταν παραγγείλετε. |
— 10 —
IT_Italiano
Grazie per aver acquistato un prodotto Peg-Pérego.
 ATTENZIONE
_ IMPORTANTE: leggere attentamente queste istruzioni e conservarle per un futuro utilizzo. La sicurezza del bambino potrebbe essere messa a rischio se non si eseguono queste istruzioni.
_Questo articolo è stato progettato per il trasporto di 1 bambino nella seduta.
_Non utilizzare questo articolo per un numero di occupanti superiori a quanto previsto dal costruttore.
_ Questo articolo è omologato per bambini dalla nascita, fino a 15 kg di peso nella seduta.
_ Potrebbe essere pericoloso lasciare il vostro bambino incustodito.
_Utilizzare sempre la cintura di sicurezza a cinque punti, agganciare sempre il cinturino girovita al cinturino spartigambe.
_ Utilizzare il frontalino sempre istallato sul passeggino.
_Prestare attenzione alla presenza del bambino quando si effettuano operazioni di regolazione dei meccanismi
(maniglione, schienale).
_Azionare sempre il freno quando si è fermi e durante le operazioni di carico e scarico del bambino.
_Le operazioni di assemblaggio, preparazione dell’articolo, di pulizia e manutenzione devono essere effettuate solo da adulti.
_Non utilizzate questo articolo se presenta parti mancanti o rotture.
_ Prima dell’ uso assicurarsi che tutti i meccanismi di aggancio siano inseriti correttamente.
_ Evitare di introdurre le dita nei meccanismi.
_ Ogni carico appeso al maniglione o alle maniglie può rendere instabile l’articolo; seguire le indicazioni del costruttore riguardo ai massimi carichi utilizzabili.
_ Non introdurre nel cestello carichi per un peso superiore a 5 kg. Non inserire nei portabibite pesi superiori a quanto specificato nel portabibite stesso e mai bevande calde. Non inserire nelle tasche delle capotte (se presenti) pesi superiori a 0.2 Kg.
_ Non utilizzare l’articolo in vicinanza di scale o gradini; non utilizzare vicino a fonti di calore, fiamme libere od oggetti pericolosi a portata delle braccia del bambino.
_ Potrebbe essere pericoloso utilizzare accessori non approvati dal costruttore.
_ Questo articolo non e’ adatto per il jogging o la corsa coi pattini.
_ Non utilizzare il parapioggia (se presente) in ambienti chiusi e controllare sempre che il bambino non sia accaldato; non collocare mai vicino a fonti di calore e fare attenzione alle sigarette. Assicurarsi che il parapioggia non interferisca con nessun meccanismo in movimento del carrello o passeggino; togliere sempre il parapioggia prima di chiudere il vostro carrello o passeggino.
_ ATTENZIONE: con passeggino aperto e durante l’impiego usare il frontalino solo nella posizione 1
(sollevato), ed usare la posizione 2 (abbassato) solo col passeggino chiuso.
_ AVVERTENZA: Non aggiungere materassini.
COMPONENTI DELL’ ARTICOLO
Verificare il contenuto presente nell’imballo e in caso di reclamo prego contattare il Servizio Assistenza.
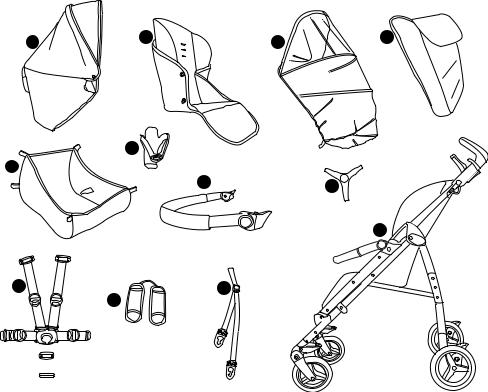
_Passeggino Sì COMPLETO è composto da: 2 ruote anteriori piroettanti o bloccabili, 2 ruote posteriori, cestello, portabibite, capottina, copertina, parapioggia, 2 spallacci per i cinturini e 1 spartigambe, 2 cinturini adattatori per aggancio Car Seat.
_Passeggino Sì CLASSICO è composto da: 2 ruote anteriori piroettanti o bloccabili, 2 ruote posteriori, cestello, portabibite, capottina, 2 spallacci per i cinturini e 1 spartigambe, 2 cinturini adattatori per aggancio Car Seat.
ISTRUZIONI D’USO
1• Per aprire il carrello, occorre tirare verso l’alto le due leve sui manici (Fig.a); contemporaneamente sollevare il carrello che si aprirà automaticamente (Fig.b).
Per verificare che il passeggino sia correttamente aperto, controllare i due ganci laterali (Fig.c).
2• Se i ganci non si fossero agganciati correttamente, fare pressione sulla seduta (fig_a) fino al click di aggancio. Infine premere verso il basso col piede su PUSH (fig_b)
e alzare il frontalino di una posizione (paragrafo 5b).
3• CESTELLO: per montare il cestello, infilare le asole ai ganci posteriori A e B e al gancio anteriore C, (fig_a).
PORTABIBITE: é applicabile solamente sul lato destro del passeggino, grazie al gancio già presente sul telaio. Per applicare il portabibite, agganciarlo fino al click (fig_b).
4• REGOLAZIONE MANICI: i manici sono regolabili in 3 differenti altezze. Per regolarli nella posizione desiderata, premere il pulsante e
contemporaneamente tirare il manico verso l’alto. Per abbassarli agire in senso contrario (fig_a).
FRENO: per frenare il passeggino abbassare col piede la leva freno posizionata sul gruppo ruote posteriori.
Per sbloccare il freno, agire in senso opposto (fig_b). Da fermi, azionare sempre il freno.
5• RUOTE PIROETTANTI: le ruote sono già agganciate al passeggino.
Per rendere le ruote anteriori piroettanti, occorre abbassare la leva (freccia 1). Per renderle fisse, agire sulla leva in senso contrario (freccia 2). Le ruote posteriori sono fisse.
ATTENZIONE: utilizzare il frontalino sempre istallato sul passeggino.
FRONTALINO: è già agganciato al passeggino.
E’ regolabile in 2 posizioni: POSIZIONE 1:d’uso POSIZIONE 2: di chiusura.
Per regolarlo, premere il pulsante laterale su entrambi i lati contemporaneamente (fig_b).
6• CAPOTTINA: per applicare la capottina, inserire gli attacchi nelle apposite sedi fino al click e abbottonare la capottina sul retro dello schienale del passeggino (fig_a).
La capottina è regolabile in 3 posizioni (fig_b) semplicemente tirandola in avanti o in dietro.
E’ possibile tirar fuori lo spicchio di rete dalla capotta per proteggere il bambino dal sole (fig_c) e con un semplice gesto riposizionarla all’interno della capottina
quando non serve più.
7• COPERTINA: per applicare correttamente la copertina
(fig_a) agganciare i bottoni nella parte interna del passeggino (fig_1), calzarla sotto la seduta
comprendendo il poggiagambe e infine agganciare i
— 11 —
bottoni (fig_2).
PARAPIOGGIA: per montare il parapioggia calzarlo sul passeggino (fig_b), abbottonarlo ai lati della capottina
(fig_1) e abbottonare gli elastici comprendendo il telaio nella parte bassa del passeggino (fig_2) .
8• CINTURA DI SICUREZZA 5 PUNTI: per agganciarle, inserire le due fibbie del cinturino girovita (con bretelle agganciate freccia a) nel cinturino spartigambe fino al click (freccia b). Per sganciarle, spingere verso l’alto il pulsante tondo posto centralmente alla fibbia (freccia c) e tirare verso l’esterno il cinturino girovita (freccia d).
9• Per stringere il cinturino girovita tirare, da entrambi i lati, nel senso della freccia (Fig.a), per allentarlo agire in senso contrario. Il cinturino girovita può essere stretto fino al fermo di sicurezza (Fig.b).
10• E’ possibile regolare le cinture di sicurezza in 3 altezze in base all’altezza del bambino. E’ necessario passare alla posizione più alta, quando il bambino è più grande.
11• Per regolare l’altezza delle cinture di sicurezza è necessario sganciare sul retro dello schienale le due fibbie. Tirare verso di se le bretelle (freccia a) fino a sganciare la fibbie
e infilarle nelle asole dello schienale (freccia b). Sfilare le bretelle dalla sacca (freccia c) e infilarle nell’asola più
idonea (freccia d), infine riagganciare le due fibbie dietro lo schienale (freccia e). Il corretto aggancio delle fibbie è
determinato dal click (fig f).
12• REGOLAZIONE POGGIAGAMBE: Il poggiagambe é regolabile in 2 posizioni. Per abbassare il poggiagambe, tirare le due levette laterali verso il
basso e contemporaneamente abbassarlo. Per alzare il poggiagambe, spingerlo verso l’alto fino al click.
REGOLAZIONE SCHIENALE: Lo schienale é reclinabile in 3 posizioni. Per abbassare lo schienale, sollevare la levetta laterale contemporaneamente su entrambi i lati e abbassare lo schienale, bloccandolo nella posizione
desiderata. Per alzarlo, spingere lo schienale verso l’alto.
13• CHIUSURA: per chiudere il passeggino, è preferibile prima abbassare il frontalino, nella posizione 2, di chiusura. É possibile chiudere il passeggino con una sola mano: tirare verso l’alto prima una leva e poi l’altra fino allo scatto.
14• Impugnare la maniglia centrale e tirarla verso l’alto fino alla chiusura (fig_a). Verificare la corretta chiusura del carrello dal gancio di sicurezza. Il carrello chiuso
rimane in piedi da solo (fig_b).
15• TRASPORTO: Il passeggino si può trasportare comodamente (tenendo le ruote anteriori fisse) impugnando la maniglia centrale (fig_a). E’ possibile trasportarlo anche grazie alla maniglia laterale (fig_b).
16• SFODERABILITA’: per sfoderare il passeggino: sganciare sul retro dello schienale le due fibbie (fig_a). Sganciare i due bottoni nella seduta (fig_b).
Sfilare da sotto, la fibbia dello spartigambe (fig_c).
Sganciare i bottoni dalla sacca laterale (fig_d). 17• Sfilare la sacca dalla pedanetta (fig_e).
Per togliere il cinturino di sicurezza, svitare (da entrambi i lati) le due viti utilizzando un cacciavire ed una pinza per tenere fermo il dado (fig_f).
Tirare la sacca verso l’alto (fig_g).
AGGANCIO PRIMO VIAGGIO TRI-FIX
E’ necessario frenare il passeggino.
Agganciare il seggiolino auto al passeggino senza il bambino all’interno.
Agganciare il seggiolino auto sempre e solo verso la mamma.
E’ possibile per comodità, togliere la capottina del passeggino perchè presente sul seggiolino auto.
Posizionare lo schienale del passeggino nella 2° posizione centrale (paragrafo 12).
Posizionare il maniglione del Car Seat nella posizione di trasporto, per facilitare l’aggancio dei cinturini.
18•Allungare il frontalino premendo il pulsante sotto il bracciolo e contemporanemente tiralo verso l’esterno, da entrambi i lati (fig. a).
ATTENZIONE: allungare il frontalino solo quando si vuole agganciare il Car Seat.
Appoggiare e incastrare il seggiolino auto sulla seduta del passeggino (fig. b).
19• Agganciare prima l’asola del cinturino al funghetto del passeggino (freccia 1) e far passare il cinturino dietro al maniglione del seggiolino auto (freccia 2) .
Agganciare poi asola del cinturino al funghetto nella parte bassa del telaio del passeggino (freccia 3) e infine tendere il cinturino fino a far aderire al massimo il Car Seat al passeggino (freccia 4). Fare lo stesso procedimento nell’altro lato del passeggino (fig.c).
Car seat agganciato correttamente sul passeggino (fig. d)
Per sganciare il seggiolino auto dal passeggino: allentare le cinture;
sganciare l’asola del cinturino nella parte bassa del telaio del passeggino;
sfilarlo da dietro il maniglione del seggiolino auto; infine sganciare l’asola del cinturino al funghetto del
passeggino.
NUMERI DI SERIE
20• Passeggino Si, riporta dietro lo schienale, informazioni relative: nome del prodotto, data di produzione e numerazione seriale dello stesso.
Queste informazioni sono indispensabili in caso di reclamo.
ACCESSORI
21• ZANZARIERA: applicabile alla capottina (fig_a).
BORSA: borsa con materassino per il cambio del bebè, applicabile al passeggino (fig_b).
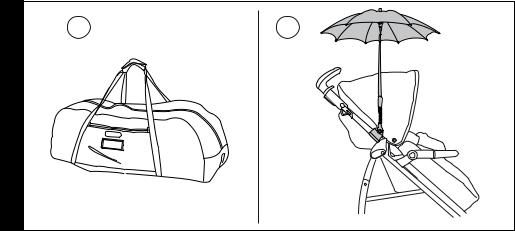
22• BORSA VIAGGIO: Pratica borsa per il trasporto aereo del passeggino (fig_a).
OMBRELLINO: pratico ombrellino coordinato (fig_b).
PULIZIA E MANUTENZIONE
MANUTENZIONE DELL’ARTICOLO: proteggere da agenti atmosferici: acqua, pioggia o neve; l’esposizione continua e prolungata al sole potrebbe causare cambiamenti di colore in molti materiali; conservare questo articolo in un posto asciutto.
PULIZIA DEL TELAIO: periodicamente pulire le parti in plastica con un panno umido senza utilizzare solventi o altri prodotti simili; mantenere asciutte tutte le parti in metallo per prevenire la ruggine; mantenere pulite tutte le parti in movimento (meccanismi di regolazione, meccanismi di aggancio, ruote…) da polvere o sabbia e se occorre, lubrificarle con olio leggero.
PULIZIA DEL PARAPIOGGIA: lavare con una spugna e
— 12 —
dell’acqua saponata, senza utilizzare detersivi.
PULIZIA DELLE PARTI IN TESSUTO: spazzolare le parti in tessuto per allontanare la polvere e lavare a mano a una temperatura massima di 30° non torcere; non candeggiare al cloro; non stirare; non lavare a secco; non smacchiare con solventi e non asciugare a mezzo
di asciugabiancheria a tamburo rotativo.
PEG-PÉREGO S.p.A.
Peg-Pérego S.p.A. è certificata ISO 9001. La certificazione offre ai clienti e ai consumatori la garanzia di una
trasparenza e fiducia nel modo di

 lavorare dell’impresa. Peg Pérego potrà apportare in qualunque momento modifiche ai modelli descritti in questa pubblicazione, per ragioni di natura tecnica o commerciale. Peg Pérego è a disposizione dei suoi Consumatori per soddisfare al meglio ogni loro esigenza. Per questo, conoscere il parere dei ns. Clienti, è per noi estremamente importante e prezioso. Le saremo quindi molto grati se, dopo aver utilizzato un ns. prodotto, vorrà compilare il QUESTIONARIO SODDISFAZIONE CONSUMATORE, segnalando eventuali osservazioni o suggerimenti, che troverà nel nostro sito internet:
www.pegperego.com
SERVIZIO ASSISTENZA PEG-PÉREGO
Se fortuitamente parti del modello vengono perse o danneggiate, usare solo pezzi di ricambio originali Peg Pérego. Per eventuali riparazioni, sostituzioni, informazioni sui prodotti, vendita di ricambi originali
e accessori, contatta il Servizio Assistenza Peg Pérego indicando, qualora fosse presente, il numero seriale del prodotto.
tel. 0039/039/60.88.213
numero verde: 800/147.414 (contattabile da rete fissa) fax 0039/039/33.09.992
e-mail assistenza@pegperego.it sito internet www.pegperego.com
EN_English
Thank you for choosing a Peg-Pérego product.
 WARNING
_ IMPORTANT: read the instructions carefully before use and keep them for future reference. The child may be hurt if you do not follow these instructions.
_ This item was designed for the transport of 1 child in the seat.
_ Do not use this item for a number of occupants greater than that intended by the manufacturer.
_ This item is approved for children from birth up to a weight of 15 kg in the seat.
_ It may be dangerous to leave your child unattended.
_Always use the 5-point harness and attach the waist strap to the leg divider strap.
_ Always keep the front bar fitted to the stroller.
_ Be careful not to hurt the child when adjusting the mechanisms (handlebar, backrest).
_Always apply the brake when stopped and when positioning the child in the seat or when removing the child from the seat.
_Assembly and preparation of the product, plus cleaning and maintenance operations, must be carried out exclusively by adults.
_ Do not use this item if there are parts missing or signs of breakage.
_ Before use check that all the attachment mechanisms are correctly insert.
_ Do not insert fingers into the mechanisms.
_Any load hanging on the handlebar or the handles can make the stroller/carriage unstable; follow the manufacturer’s instructions for max load capacity.
_ Do not place loads over 5 kilos in the basket. Do not place in the bottle holder weights heavier than stated or hot drinks. Do not place in the hood pockets (if applicable) weights over 0.2 Kg.
_ Donotusetheitemneartostairsorsteps,heatsources, naked flames or dangerous objects within reach of the child.
_ The use of accessories not approved by the manufacturer could be dangerous.
_ This item is not suitable for jogging or roller skating.
_ Do not use the rain canopy (if present) indoors and regularly check to ensure the child is not too warm; do not park the stroller close to heat sources and keep well away from lighted cigarettes. Ensure the rain canopy is not interfering with any moving parts of the carriage or stroller; always remove the rain canopy before folding your carriage or stroller.
_ WARNING: The front bar must always be in position
1 (raised) when the stroller is open and during use. It should only be in position 2 (lowered) when the stroller is folded up.
_ WARNING: Do not add a mattress.
PRODUCT PARTS
Check the package contents and contact our Customer Service for any claim.
— 13 —
_ Stroller Sì COMPLETO version is made up of the following parts: 2 swivel/lockable front wheels, 2 rear wheels, basket, cup holder, hood, cover, rain canopy, 2 shoulder straps and 1 leg divider, 2 car seat strap adaptors.
_ The Sì CLASSICO stroller comprises: 2 swivel or locking front wheels, 2 rear wheels, a basket, a drink holder, a hood, 2 shoulder padding sections for the harness and 1 leg divider strap, 2 adaptor straps for attaching the Car Seat.
8• 5-POINT SAFETY HARNESS: to fasten, insert the two buckles of the waist strap (with attached shoulder straps, arrow a) into the leg divider strap until they click into place (arrow b). To unfasten, push the round button placed in center of the buckle upwards (arrow_ c) and pull the waist strap outwards (arrow d).
9• To tighten the waist strap, pull on both sides in the direction of the arrow (Fig. a). To loosen it do the opposite. The waist strap can be tightened as far as the safety lock (Fig. b).
INSTRUCTIONS
1• To open the chassis, pull the two levers on the handlebars upwards (Fig.a); at the same time, lift the chassis and it will open automatically (Fig.b). To make sure that the stroller is correctly open, check the two side hooks (Fig.c).
2• If the straps are not fasten correctly, press onto the seat (fig_a) until it clicks into place.
Then push down into PUSH (fig. b) with your foot and lift the front bar by one position (section 5b).
3• BASKET: To fit the basket, pull the loops over rear hooks A and B and front hook C (fig_a).
CUP HOLDER: It can only be fitted to the right hand side of the stroller, using the clip which is already present on the chassis. To fit the cup holder, push until it clicks into place (fig_b).
4• HANDLE ADJUSTMENT: The handles can be set at 3 different heights. To move them into the required
position, press the button and simultaneously pull the handle upwards. To lower them, press the button and push the handle down (fig_a).
BRAKE: To set the brake on the stroller, lower the lever on the rear wheel unit with your foot. To release the brake, lift the lever (fig_b). When stationary, always apply the brake.
5• SWIVEL WHEELS: the wheels are already fixed into the stroller.
In order to make the wheels swivel, the lever (arrow 1) must be lowered. To secure the wheels, move the lever to the opposite direction (arrow 2). The rear wheels are fixed.
WARNING: Always keep the front bar fitted to the stroller.
FRONT BAR: It is already attached to the stroller. It can be put in 2 positions:
POSITION 1: Use. POSITION 2: Folding.
To adjust it, press the two side buttons at the same time (fig_b).
6• HOOD: To fit the hood, click the fasteners onto the appropriate points and button down the hood on the rear of the stroller’s backrest (fig_a).
The hood can be set in 3 different positions (fig_b) by simply pulling it forwards or backwards.
The section of netting can be pulled out from the hood to protect the child from the sun (fig_c) and easily replaced back inside when it is no longer needed.
7• COVER: in order to use the cover correctly (fig. a), fasten the buttons in the inner part of the stroller (fig.
1) and lay it beneath the seat covering the footrest, then fasten the buttons (fig. 2).
RAIN CANOPY: To fit the rain canopy, slip it onto the stroller (fig_b), button it down on the sides of the hood (fig_1) and attach the elastic loops, taking in the chassis in the lower part of the stroller (fig_2).
— 14 —
10• It is possible to set the safety harness at 3 different heights, depending on how tall the child is. As the child gets bigger, the harness must be moved to a higher position.
11• To adjust the height of the safety harnesses, release the two buckles on the rear of the backrest.
Pull the shoulder straps towards you (arrow a) until the buckles are released and insert them in the backrest loops (arrow b). Remove the shoulder straps from the sack (arrow c) and insert them in the most appropriate buckle (arrow d), then reattach the two buckles behind the backrest (arrow e). The buckles are securely attached when a click is heard (fig f).
12• LEG REST ADJUSTMENT: The leg rest can be set in 2 different positions. To lower the leg rest, pull the two side levers downwards and at the same time lower the leg rest. To raise the leg rest, push it upwards until it clicks into position.
BACKREST ADJUSTMENT: The backrest can be set in 3 positions: To lower the backrest, lift the levers on both sides at the same time and lower it, locking it in the position required. To lift the backrest, push it upwards.
13• FOLDING UP: Before folding up the stroller, it is best to lower the front bar to position 2.
The stroller can be folded up using one hand only: pull first one lever upwards and then the other, until they click.
14• Hold the central handlebar and pull it upwards until the stroller folds up (fig_a). Check the correct closure of the chassis from the safety hook. When folded, the chassis will stand upright (fig_b).
15• TRANSPORT: The stroller can be moved with ease (with the front wheels fixed) using the central handle (fig_a). It can also be carried using the side handle (fig_b).
16• REMOVABLE COVERS:To remove the cover of the stroller:
Release the two buckles on the rear of the backrest (fig_a).
Release the two buttons on the seat (fig_b).
Pull the buckle of the crotch strap out from underneath (fig_c).
Release the buttons from the side of the sack (fig_d). 17• Pull the sack off the footrest (fig_e).
To remove the safety harness, release the screws on both sides, using a screwdriver and pliers to hold the nut still (fig_f).
Pull the sack upwards (fig_g).
ATTACHING PRIMO VIAGGIO TRI-FIX
You must first set the brakes on the stroller.
Lock the car seat onto the stroller without the baby.
The car seat must be fastened facing the mother at all times.
If necessary, take off the stroller hood since it is

already fitted on the car seat.
Position the backrest of the stroller into the 2nd central position (section 12).
Position the car seat handlebar into transport position so that the straps can be easily fastened.
18•Push the button beneath the armrest and extend the front bar, then simultaneously pull it out from both sides (fig. a).
WARNING: Only extend the front bar when attaching the Car Seat.
Lean and fit-in the car seat into the seat of the stroller (fig. b).
19•First lock the strap buttonhole into the button of the stroller (arrow 1), then pass through the strap behind the handlebar of the car seat (arrow 2).
Lock the strap buttonhole into the button on the lower part of the stroller frame (arrow 3) and then tighten the strap until the car seat is completely fastened into the stroller (arrow 4).
Follow the same procedures on the other side of the stroller (fig. c).
Car seat locked correctly into the stroller (fig. d).
Releasing the car seat from the stroller: loosen the belts;
unlock the strap buttonhole from the lower part of the stroller frame; slip it off from behind the handlebar of the car seat; then, unlock the strap buttonhole from the stroller button.
SERIAL NUMBERS
20•The Stroller Si has all the following relevant information behind the backrest: product name, date of manufacture and serial number.
This information is required for any complaints.
ACCESSORIES
21• MOSQUITO NETTING: can be fastened to the hood (fig_a).
BAG: diaper-changing bag with pad for changing baby’s diaper. Attaches to the stroller (fig_b).
22• TRAVEL BAG: practical duffle bag for transporting the stroller by plane (fig_a).
UMBRELLA: practical umbrella to match (fig_b).
CLEANING AND MAINTENANCE
PRODUCT MAINTENANCE: protect from the weather: water, rain, or snow; prolonged and continuous exposure to bright sunlight may give rise to colour changes of various different materials; store this product in a dry place.
CLEANING THE CHASSIS: periodically clean all plastic parts with a damp cloth. Do not use solvent or similar cleaning products; keep all metal parts dry to prevent rusting; keep moving parts clean (adjustment mechanisms, locking mechanisms, wheels, …) and free of dust and sand and, if necessary, lubricate with light machine oil.
CLEANING THE RAIN CANOPY: wash with a sponge and soapy water; do not use detergents.
CLEANING FABRIC PARTS: brush fabric parts to remove dust and wash by hand at a maximum temperature of
30°C; do not wring; do not use chlorine bleach, do not iron; do not dry clean; do not apply solvent-based stain removers and do not dry in a tumble dryer.
PEG-PÉREGO S.p.A.
Peg-Pérego S.p.A. is an ISO 9001 certified company. This certification is a guarantee for customers and consumers of the transparency and
trustworthiness of the company’s procedures and working methods. Peg
Pérego can make changes at any time to the models described in this publication for technical or commercial reasons. Peg Pérego is at the disposal of its customers and consumers to ensure that all their demands and queries are fully satisfied. It is a key part of our policy to ensure we are always aware of our customers’ views and requirements. We would therefore be very grateful if, after using a Peg Pérego product, you take the time to fill in our CUSTOMER SATISFACTION QUESTIONNAIRE, making a note of any comments or suggestions you might have. You can find the questionnaire on the Peg Pérego website:
www.pegperego.com
PEG-PÉREGO AFTER-SALES SERVICE
If any parts of the item get lost or damaged, only use genuine Peg Pérego spare parts. For any repairs, replacements, information on the products and sales of genuine spare parts and accessories, contact the Peg Pérego Assistance Service and state the serial number of the product, if present.
tel. 0039/039/60.88.213 fax 0039/039/33.09.992
e-mail assistenza@pegperego.it website www.pegperego.com
— 15 —
FR_Français
Merci d’avoir choisi un produit Peg-Pérego.
 AVERTISSEMENT
_ IMPORTANT : lire ces instructions avec attention et les conserver pour toute référence future. La sécurité de l’enfant pourrait être menacée si ces instructions ne sont pas suivies.
_Cet article a été conçu pour transporter 1 enfant dans le siège.
_Ne pas utiliser lorsque le nombre d’occupants est supérieur aux prescriptions du fabricant.
_ Cet article est homologué pour des enfants dans le siège de la naissance jusqu’à un poids de 15 kg.
_ Il peut être dangereux de laisser l’enfant sans surveillance.
_Toujours utiliser la ceinture de sécurité à cinq points; toujours accrocher la sangle ventrale à la sangle d’entrejambes.
_ Toujours utiliser le garde corps installé sur la poussette.
_ Prêterattentionàlapositiondel’enfantlorsdesopérations deréglagedesélémentsmobiles(poignée,dossier).
_Toujours actionner le frein lorsque l’article est à l’arrêt et pendant l’installation ou la sortie de l’enfant.
_Les opérations d’assemblage, de préparation de l’article, de nettoyage et d’entretien doivent être réalisées uniquement par des adultes.
_Ne pas utiliser cet article si des pièces sont manquantes ou cassées.
_Avant l’utilisation, s’assurer que tous les mécanismes de fixation sont correctement enclenchés.
_ Éviter de mettre les doigts dans les mécanismes.
_Toute charge suspendue aux poignées peut déstabiliser le produit, suivre les recommandations du fabrication sur les charges maximales admises.
_ Ne pas utiliser le panier pour transporter des charges dont le poids dépasse 5 kg. Ne pas introduire dans le porte-boisson des charges supérieures à celles indiquées sur le porte-boisson lui-même et ne jamais
introduire de boissons chaudes. Ne pas introduire dans les poches de la capote (lorsqu’elles sont présentes) des objets dont le poids dépasse 0.2 kg.
_Ne pas utiliser l’article à proximité d’escaliers ou de marches; ne pas l’utiliser à proximité de sources de chaleur, de flammes directes ou d’objets dangereux se trouvant à la portée de l’enfant.
_L’utilisation d’accessoires n’ayant pas été approuvés par le fabricant peut se révéler dangereuse.
_ Ne pas utiliser ce produit lors d’un jogging ou avec des patins à roulettes.
_Ne pas utiliser l’habillage pluie (lorsqu’il est présent sur l’article) dans des milieux clos et toujours contrôler que l’enfant n’ait pas trop chaud; ne jamais placer à proximité de sources de chaleur et prendre garde aux cigarettes. S’assurer que l’habillage pluie n’interfère avec aucun mécanisme en mouvement du châssis ou de la poussette; toujours retirer l’habillage pluie avant de refermer le châssis ou la poussette.
_AVERTISSEMENT : quand la poussette est ouverte ou pendant l’utilisation avec l’enfant, utiliser la main courante seulement dans la position 1 (relevée) et
utiliser la position 2 (abaissée) seulement pour plier la
poussette ou la ranger.
_ Ne jamais utiliser la poussette sans la main-courante
_ AVVERTISSEMENT: Ne pas ajouter de matelas.
_ Conforme aux exigences de sécurité.
COMPOSANTS DE L’ARTICLE
Vérifier le contenu du carton et en cas de réclamation, contacter votre magasin revendeur ou le service assistance.
_La poussette Sì COMPLETO est composée de : 2 roues avant pivotantes ou avec blocage, 2 roues arrière, panier, porte-boissons, capote, tablier, habillage pluie, 2 bretelles pour les ceintures et 1 sangle d’entrejambes, 2 ceintures adaptables pour fixation du siège auto.
_La poussette Sì CLASSICO est composée de : 2 roues avant pivotantes ou avec blocage, 2 roues arrière, panier, porte-boissons, capote, 2 bretelles pour les ceintures et 1 sangle d’entrejambes, 2 ceintures adaptables pour fixation du siège auto.
INSTRUCTIONS D’UTILISATION
1• Pour ouvrir le châssis, il faut tirer vers le haut les deux leviers sur les poignées (Fig.a); soulever, en même temps, le châssis qui s’ouvrira automatiquement (Fig.b). Pour vérifier que la poussette est correctement ouverte, contrôler les deux crochets latéraux (Fig.c).
2• Si les crochets ne sont pas fixés correctement, faire pression sur l’assise (fig_a) jusqu’au déclic d’accrochage.
Enfin, appuyer vers le bas avec le pied sur PUSH
(fig_b) et soulever la main courante d’une position (paragraphe 5b).
3• PANIER : pour monter le panier, accrocher ses boucles aux crochets arrière A et B et au crochet avant C (fig_a).
PORTE-BOISSONS : il se fixe du côté droit de la poussette grâce au crochet près de la poignée.
Pour fixer le porte-boissons, l’insérer jusqu’au déclic
(fig_b).
4• RÉGLAGE DES POIGNÉES : les poignées sont réglables en 3 hauteurs différentes. Pour régler les poignées à la position désirée, appuyer sur le bouton tout en tirant la poignée vers le haut. Pour l’abaisser, procéder à l’opération inverse (fig_a).
FREIN : pour immobiliser la poussette, abaisser à l’aide du pied le levier de frein situé sur le bloc roues arrière. Pour débloquer le frein, procéder à l’opération inverse (fig_b). Toujours actionner le frein lorsque la poussette est à l’arrêt.
5• ROUES PIVOTANTES : les roues sont déjà fixées à la poussette.
Pour rendre les roues avant pivotantes, il faut baisser le levier (flèche 1). Pour les rendre fixes, agir sur le levier dans le sens opposé (flèche 2). Les roues arrière sont fixes.
IMPORTANT :toujours utiliser le garde corps installé sur la poussette
MAIN COURANTE: elle est déjà fixée à la poussette. Réglable en 2 positions: POSITION 1: avec l’enfant dans la poussette. POSITION 2: position de pliage. Pour la régler, appuyer simultanément sur les 2 boutons latéraux (Fig B)
6• CAPOTE : pour fixer la capote, enclencher ses fixations dans les emplacements prévus à cet effet et la boutonner à l’arrière du dossier (fig_a).
— 16 —
 Loading…
You can only view or download manuals with
Sign Up and get 5 for free
Upload your files to the site. You get 1 for each file you add
Get 1 for every time someone downloads your manual
Buy as many as you need