-
Page 1
BC125AT Owners Manual © 2012 Uniden America Corporation Printed in Vietnam Fort Worth, Texas U01UB370ZZB(0) -
Page 2: Precautions
WARNING! Uniden does not represent this unit to be waterproof. To reduce the risk of fire or electrical shock, do not expose this unit to rain or moisture.
-
Page 3: Table Of Contents
contents Precautions. . . . . . . . . . . . . . . . . . . . . . . . . . . . . . . . . . . . . . . . . . . . . . . . . . . . . . 2 the.Fcc.Wants.You.to.KnoW.
-
Page 4
setting.uP.Your.scanner . . . . . . . . . . . . . . . . . . . . . . . . . . . . . . . . . . . . . . . 32 SCROll CONTROl Using the Knob . -
Page 5
Close Call Only Mode . . . . . . . . . . . . . . . . . . . . . . . . . . . . . . . . . . . . . . . . . . . . . 59 Set Close Call Bands . -
Page 7: The.fcc.wants.you.to.know
the.Fcc.Wants.You.to.KnoW This scanner has been tested and found to comply with the limits for a scanning receiver, pursuant to Part 15 of the FCC Rules. These limits are designed to provide reasonable protection against harmful interference in a residential installation. This scanner generates, uses, and can radiate radio frequency energy and, if not installed and used in accordance with the instructions, may cause harmful interference to radio communications.
-
Page 8: Scanning.legally
scanning.LegaLLY Your scanner covers frequencies used by many different groups, including police and fire departments, ambulance services, government agencies, private companies, amateur radio services, military operations, pager services, and wire-line (telephone and telegraph) service providers. It is legal to listen to almost every transmission your scanner can receive.
-
Page 9: Introduction
Changes or modifications to this product not expressly approved by Uniden, or operation of this product in any way other than as detailed by this Operating Guide, could void your authority to operate this product.
-
Page 10: Feature.highlights
• Railroad • Civil Air • Military Air • CB Radio • FRS/GMRS/MURS • Racing .Feature.highLights 10.channel.storage.Banks — You can store up to 50 frequencies into each bank for a total of 500 frequencies so you can more easily identify calls. close.call™.rF.capture.technology — you can set the scanner so it detects and provides information about nearby radio transmissions…
-
Page 11
temporary.Lockout — makes it easy to temporarily lock out any channel or frequency. The lockout is cleared when you turn power off, then back on so you don’t have to remember to unlock the channels or frequencies later. triple-conversion.circuitry — virtually eliminates any interference from IF (intermediate frequency) images, so you hear only the selected frequency. -
Page 12
custom.search — lets you program up to 10 Custom Search Ranges and search any or all of these ranges. quick.search — allows you to enter a frequency and start searching up or down from that frequency. turbo.search — increases the search speed from 100 to 300 steps per second automatically for bands with 5 kHz steps. -
Page 13: Frequency.range
three.Power.options — let you power the scanner using the included two AA rechargeable or alkaline batteries or the supplied USB cable. Built-in.charger — allows you to charge Ni-MH batteries in the scanner using a USB port on any computer and the supplied USB cable.
-
Page 14
FrequencY.(Mhz) steP. Mode Band (khz) LoWer uPPer Petroleum Products & Broadcast Pickup 25.0000 27.9950 CB Class D Channel Business & Forest Products 10 Meter Amateur Band 28.0000 54.0000 VHF Low Band 6 Meter Amateur Band 108.0000 136.9916 8.33 Aircraft Band 137.0000 150.7700 150.7750… -
Page 15: Included.with.your.scanner
Contact your local Uniden Dealer or call the Uniden Parts Center at: (800)554-3988, 8:00AM to 5:00PM EST, Monday through Friday, for information about ordering these optional accessories. Note: USB cables are also available from the Uniden On-Line store. Visit http://www.uniden.com.
-
Page 16: Scanning.basics
What.is.searching? The BC125AT can search for active frequencies. This is different from scanning because you are searching for frequencies that have not been programmed into the scanner. When you select frequency bands to search, the scanner searches for any active frequency within the lower and upper limits you specify.
-
Page 17: Understanding.scanning
understanding.scanning What is CTCSS/DCS? Your scanner can monitor systems using a Continuous Tone Coded Squelch System (CTCSS) and Digital Coded Squelch (DCS) system, which allows the squelch to open only when the tone you have programmed with a specific frequency is received along with a transmission.
-
Page 18: Conventional Scanning
tone with a signal, the scanner’s squelch remains closed and you hear nothing. Refer to the Reference section of this manual for tables showing the available CTCSS frequencies and DCS codes. Conventional Scanning Conventional scanning is a relatively simple concept. Each group of users in a conventional system is assigned a single frequency (for simplex systems) or two frequencies (for repeater systems).
-
Page 19: Repeater Operation
construction job sites, and with inexpensive consumer radios such as GMRS/FRS radios. The range is typically 1-8 miles, depending upon the terrain and many other factors. Repeater Operation Repeater systems use two frequencies: one transmits from the radio to a central repeater; the other transmits from the repeater to other radios in the system.
-
Page 20: Service Search Banks
– how to program and use the scanner. The website, http://www.radioreference. com, is the Internet’s premier source for user-supported radio system information. This web sites is not affiliated with Uniden Corporation. For more information about Uniden and our other products, visit http://www.uniden.com.
-
Page 21: Connecting.the.antenna
If your scanner receives interference or electrical noise, move the scanner or its antenna away from the source. You might also try changing the height or angle of the rubber antenna. To improve the scanner’s reception, use an optional external antenna designed for multiband coverage.
-
Page 22: Connecting.an.earphone/Headphone
Note: Always use 50-ohm, RG-58, or RG-8, coaxial cable to connect an outdoor antenna. If the antenna is over 50 feet from the scanner, use RG-8 low-loss dielectric coaxial cable. If it is less than 50 feet, use RG-58. You can get a BNC adapter at local electronics stores. connecting.an.earPhone/headPhone For private listening, you can plug a 1/8-inch (3.5 mm) mini- plug earphone or stereo headphones (not supplied) into the…
-
Page 23: Powering.the.scanner
You can power the scanner using alkaline (ALK) non- rechargeable batteries (not supplied) or the included Nickel Metal-Hydride (Ni-MH) rechargeable batteries. [Uniden provides a USB cable to charge the Ni-MH batteries on initial installation and to recharge them through your computer (or through a power adapter that provides USB charge power (not included, but available at many retailers).]…
-
Page 24: Installing Rechargeable Ni-Mh Batteries
Insert the batteries as indicated by the polarity symbols (+ and -) marked inside the battery compartment. Replace the battery compartment cover. Installing Rechargeable Ni-MH Batteries You can also use two Ni-MH rechargeable batteries to power your scanner. The Ni-MH batteries included with your unit are not fully charged;…
-
Page 25: Charging The Ni-Mh Batteries
NOTE: If you connect to a computer’s USB port, the PC will prompt you for the drivers for your scanner. To download and install these drivers, go to http://info.uniden.com/UnidenMan4/BC125AT. The scanner displays Charging while it charges the batteries and Charge Complete when the Ni-MH batteries are completely charged.
-
Page 26
usB.Message Batt .. Meaning scanner. type cond . Charging Ni-MH Scanner is charging. No Battery None NO batteries in scanner. Charge Ni-MH Unit is charged. Complete Charge Off Alk./Ni- Scanner is not charg- ing (Battery selection switch is set to Alk.) Battery Error Ni-MH Batteries cannot… -
Page 27: About.your.scanner
aBout.Your.scanner We use a few simple terms in this manual to explain the features of the scanner. Familiarize yourself with these terms and the scanner’s features, and you can put the scanner to work for you right away. Simply determine the type of communications you want to receive, then set the scanner to search those communications.
-
Page 28
mode for 3 seconds and then returns to Normal mode. The scanner displays . During that 3 seconds you can press other keys and operate that function. Pressing Func again before 3 seconds returns to Normal mode and the icon disappears. In Normal mode the icon is not displayed. -
Page 29
Key/ Press.to . . . Press.Func.and. icon this.key.to . . . func • Enter Function mode for 3 seconds. • Return to Normal mode from Function mode. Hold/ Enter the Close • Hold on a current channel. Call menu. • Release hold and resume scanning/searching. -
Page 30: Turning.on.the.scanner
Key/ Press.to . . . Press.Func.and. icon this.key.to . . . Enter the Dis- • Turn scanner on and off (press play/Charge and hold). menu. • Turn backlight on and off. Pgm/E • Enter Channel • Select input data or a menu Programming item.
-
Page 31: A.look.at.the.display
a.LooK.at.the.disPLaY The display has indicators that show the scanner’s current operating status. The display information helps you understand how your scanner operates. Note: Not all of these icons may appear at the same time. 14 16 H O L D T L / O C h a n n e l N a m e ↑…
-
Page 32
item Meaning identifies a Priority channel. • BNK/SVC/SRC/BND shows banks/bands enabled for Scan/Service Search/Custom Search/Close Call Only mode. • is for the Close Call Hits bank. AM/FM/NFM shows channel/frequency modulation. • indicates Priority Scan. • indicates Priority Do-Not-Disturb. PRI+ • indicates Priority Plus Scan. -
Page 33: Setting.up.your.scanner
Using the SCROll CONTROl Knob Turn the SCROll CONTROl knob on top of the BC125AT to: • Select channels • Adjust volume • Adjust squelch •…
-
Page 34: Adjusting The Squelch
Adjusting the Squelch To adjust the squelch level, press FUNC, then press SCROll CONTROl. When the squelch level indicator and battery voltage appear, turn SCROll CONTROl to change the squelch level from 0 to 15. Press Func, then press SCROll CONTROl. The squelch level indicator and battery voltage appears.
-
Page 35: Adjusting The Contrast
• Keypress+Squelch – Both above-mentioned «Squelch» and «Keypress.» • < Back — Return to previous menu. Press Pgm/E (or press SCROll CONTROl) to save and return to the previous menu. (Default = Always Off ) Press . Clr to exit. Notes: If the backlight is set to Always On when is pressed, the backlight is turned off and the backlight setting is then set to…
-
Page 36: Setting The Charging Timer
Setting the Charging Timer The Charging Timer menu is also a submenu of the Display/ Charge menu. It sets how long the scanner will charge the batteries when you plug the supplied USB cable into a USB port and connect it to your scanner. WARNING: the.charging.timer.will.reset.to.the.set.charging.
-
Page 37: Using The Keypad Lock
Press . Clr to exit. Using the Keypad lock Use the scanner’s keypad lock to protect it from accidental program changes. When the keypad is locked, only Func, Hold, and SCROll CONTROl (volume only) operate. Press Func then l/O to toggle the keypad lock on and off. The scanner displays Keypad Lock On or Keypad Lock Off.
-
Page 38: Programming.channels
USB drivers and programming software are available for download from http://info.uniden.com/UnidenMan4/BC125AT. PrograMMing.channeLs Now that you have configured your scanner, you are ready to start using your scanner’s preprogrammed service banks, the custom search banks, the Close Call feature, or the Weather Scan/Alert feature.
-
Page 39: Programming.channel.text.tags
Press . Clr to return to the last screen. The scanner automatically rounds the entered number to the nearest valid frequency. For example, if you enter 151.473 (MHz), your scanner accepts it as 151.475. If you entered an invalid frequency, Out of Band appears and the scanner beeps three times.
-
Page 40: Setting.ctcss/Dcs.for.a.channel
Turn SCROll CONTROl to choose the characters, pressing > or < to move the cursor to the right or left. If you make a mistake, press . ClR to clear the last character. Press . ClR twice to clear all characters. To cancel and exit, press l/O. Press Pgm/E to save the tag and return to the Channel menu.
-
Page 41: Setting.channel.modulation
• CTCSS/DCS Search — the scanner displays any tone/ code being used, but opens squelch on any signal. • No Tone — indicates that the channel squelch will only open if no CTCSS/DCS is detected. • <Back — returns to Channel Menu. Note: If you select Off, CTCSS/DCS Search, or No Tone, the scanner returns to the channel menu.
-
Page 42: Setting.the.priority.channel
setting.the.PrioritY.channeL The Priority feature lets you designate one stored channel in each bank as a Priority channel. When the Priority feature is turned on, the scanner checks that bank’s priority channel for activity every 2 seconds as it scans the bank. This feature lets you scan through the channels and still not miss important or interesting calls on specific channels.
-
Page 43: Deleting.channels
Press Pgm/E to enter the Channel menu. (You can also press Hold and scroll to the channel; press Func then Pgm/E.) Scroll to Set Delay and press Pgm/e. Turn SCROll CONTROl to select the delay time from the following options: •…
-
Page 44: Clearing A Bank
Clearing a Bank You can delete all channels in a bank. Press Hold to select any channel in the bank, then enter that channel number. Press Pgm/E to enter the Channel menu. (You can also press Hold and scroll to the channel; press Func then Pgm/E.) Scroll to select Clear Bank and press Pgm/E.
-
Page 45
Enabled scan banks appear on the lowest line. Disabled scan bank numbers are not displayed. The currently scanned bank number flashes. • You can turn scan banks on/off by pressing 1-9 or 0, but one scan bank must always be enabled. If you turn off all scan banks, the scanner will display Nothing to Scan. -
Page 46: Priority Scan Modes
• To temporarily lock out a channel, press l/O. • To permanently lock out a channel, press l/O twice quickly. See Locking Out Channels on page 47. Priority Scan Modes This scanner allows four different Priority modes. These modes also function in Search and Hold modes (except Close Call Only mode and Weather modes).
-
Page 47: Manually.selecting.a.channel
ManuaLLY.seLecting.a.channeL You can continuously monitor a single channel without scanning. This is useful if you hear an emergency broadcast on a channel or if you want to monitor a specific channel. To manually select a channel, press Hold and enter the channel number.
-
Page 48: Unlocking Channels
Note: You can still manually select locked-out channels. If you lock out all channels in the selected bank, the scanner displays All Locked! on the second line. Unlocking Channels Press Hold. Enter the channel number you want to unlock and press Hold again.
-
Page 49: Service Search Receive/Hold Modes
During a Service Search, the upper line displays the current service name. The lower line displays the search frequency and the direction indicator (↑or ↓) with the modulation. Enabled service banks appear on the lowest line. Disabled service bank numbers are not displayed. The currently searched bank number flashes.
-
Page 50: Custom Search Mode
To temporarily lock out a frequency, press l/O. To permanently lock out a frequency, press l/O twice quickly. See also Search Options on page 53 for Delay, CTCSS/DCS settings, and locking out/reviewing/unlocking frequencies. Custom Search Mode Custom Search mode lets you program and search 10 custom search ranges.
-
Page 51: Custom Search Receive/Hold Modes
To start a Custom Search, press Srch/Svc. When the scanner finds a transmission, it stops on it. When the transmission ends, the scanner resumes searching according to the delay setting. While searching, the upper line displays the current search bank name.
-
Page 52: Quick Search Mode
• To store a frequency, press Pgm/E; see Storing Found Search Frequencies on page 55. • To temporarily lock out a frequency, press l/O. • To permanently lock out a frequency, press l/O twice quickly. See also Search Options on page 53 for Delay, CTCSS/DCS settings, and locking out/reviewing/unlocking frequencies.
-
Page 53: Quick Search Receive/Hold Modes
If you want to change the search direction or if it is a long transmission and you want to continue searching, turn SCROll CONTROl or press Srch/Svc. Quick Search Receive/Hold Modes To hold on a frequency press Hold. To step through the frequencies, turn SCROll CONTROl in Hold mode.
-
Page 54
setting time and then automatically resumes scanning. (Default = 2 seconds) Press Func then Pgm/E in Service, Custom, or Quick Search/Search Hold mode to view the Search menu. Scroll to Set Delay and press Pgm/E. Turn SCROll CONTROl to select the delay time from the following options: •… -
Page 55: Programming Custom Search Ranges
Turn SCROll CONTROl to select one of the following settings: • Search Off • Search On Press Pgm/E to save and return to previous menu. Programming Custom Search Ranges You can define each search range used during a Custom Search. Press Func then Pgm/E in Custom Search mode to view the Search menu.
-
Page 56: Locking Out Search Frequencies
• To store a frequency in the Close Call Hits bank to a Channel Storage Bank in Scan mode, press Func then Pgm/E. Save Frequency displays and the scanner shows the first empty channel location. To select another location, turn SCROll CONTROl to select another channel then press Pgm/E to store the frequency or .
-
Page 57: Unlocking Search Frequencies
However, if you lock out all frequencies in the selected search bank, the scanner displays All Locked! on the second line. Unlocking Search Frequencies Press Func then Pgm/E in any Search or Search Hold mode to view the Search menu. Scroll to Review Lockouts and press Pgm/E.
-
Page 58: Selecting Close Call Modes
you are scanning other frequencies, turn off normal scanning while Close Call is working, or turn off the Close Call feature and use the scanner normally. You can set the scanner so it alerts you when the Close Call feature detects a frequency. and you can also set the frequency bands where you want the scanner to look for transmissions.
-
Page 59: Close Call Only Mode
Turn SCROll CONTROl and select from the following modes: • Close Call Off — turns off Close Call. • Close Call DND — only checks for Close Call hits between transmissions avoiding breaks in current transmiss • Close Call Pri (Priority) — checks for Close Call hits every 2 seconds, even during transmissions.
-
Page 60
When the scanner finds a frequency, CCFOUND! appears in the display. The scanner will also beep or flash the display (if enabled) in the Close Call Alert option in the Close Call menu. • Press any key (other than Hold) to view the displayed frequency. -
Page 61: Set Close Call Bands
The following paragraphs describe Delay, CTCSS/DCS, Alert Settings, Setting Close Call Bands, and reviewing/unlocking frequencies. Set Close Call Bands This setting allows you to select the bands searched for all Close Call modes. Press Func then Hold to view the Close Call menu. Scroll to Close Call Bands and press Pgm/E.
-
Page 62: Close Call Hits Bank
• Alert Beep — Controls whether the scanner sounds an alert beep when Close Call detects a signal. • Alert Light — Controls whether the scanner flashes the display backlight when Close Call detects a signal. • Back — returns to previous menu. Scroll to any option you want to enable/disable and press Pgm/E.
-
Page 63: Close Call Delay
Close Call Delay This setting controls how long the scanner stays on the frequency after a transmission ends before resuming Close Call operation. If you select a minus delay time, the scanner stops on the transmission for the preset time and then automatically resumes scanning.
-
Page 64: Weather.operation
• Search Off • Search On Press Pgm/E to save and return to the Close Call menu. Weather.oPeration Your scanner has been primarily designed as a multi-band, general services scanner. While it incorporates a weather alert ability as one of its features, we recommend that you not use the scanner as your sole means for receiving emergency alerts.
-
Page 65: Weather.alert.standby
Note 1: NOAA broadcasts are continuous broadcasts. You only lose reception if you move out of a coverage area. If the signal is lost, the scanner resumes searching for a weather transmission. Note 2: You cannot lock out weather frequencies. Weather.aLert.standBY In Weather Alert mode, your scanner functions as a severe weather warning radio.
-
Page 66: Weather.alert.priority
Weather.aLert.PrioritY Enabling this setting assigns priority to weather alert scanning no matter what else the radio might be doing. Checking the weather channel every 5 seconds for a 1050Hz tone assures you of the latest occurrence of a NOAA warning. (Default = Off ) To turn Weather Alert Priority on or off, press Func then 3(WX) to view the Weather menu.
-
Page 67
Connect to PC with USB cable (5.0V DC 500mA) LCD Display: 64 X 128 Full Dot Matrix LCD with orange-color backlight. Internal Speaker: 24ohm, 32mm diameter, Dynamic Type, 0.8W Max. Certified in accordance with FCC Rules and Regulations Part 15 Sub-part C as of date of manufacture. -
Page 68
Scan Rate: 80 channels/second Search Rate: 90 steps/second 270 steps/second (5kHz step) Scan Delay: 2 seconds Audio Output Power: Internal Speaker — 360mW nominal (24ohm) Headphone (L-ch) 4mW nominal (32ohm) Antenna: 50 ohms (Impedance) Sensitivity (12dB SINAD) Nominal VHF Low Band (AM) 25.005 MHz 0.3 uV… -
Page 69
VHF High 2 Band (AM) 225.050 MHz 0.4 uV (AM) 272.950 MHz 0.4 uV (AM) 315.050 MHz 0.4 uV UHF Band (AM) 325.050 MHz 0.4 uV (NFM) 406.875 MHz 0.3 uV (NFM) 511.9125 MHz 0.3 uV Close Call Sensitivity (No Modulation) VHF Low Band (NFM) 40.8400 MHz… -
Page 70: Rbrc.information
As part of our committment to protect the environment and conserve natural resources, Uniden voluntarily participates in an RBRC industry program to collect and recycle Ni-MH batteries within the US. Please call 1-800-BATTERY for information on Ni-MH battery recycling in your area.
-
Page 71: References
reFerences ctcss.Frequencies 67.0 69.3 71.9 74.4 77.0 79.7 82.5 85.4 88.5 91.5 94.8 97.4 100.0 103.5 107.2 110.9 114.8 118.8 123.0 127.3 131.8 136.5 141.3 146.2 151.4 156.7 159.8 162.2 165.5 167.9 171.3 173.8 177.3 179.9 183.5 186.2 189.9 192.8 196.6 199.5 203.5…
-
Page 72: Dsc.codes
dsc.codes Birdies All radios can receive «birdies» (undesired signals). If your scanner stops during Scan mode and no sound is heard, it might be receiving a birdie. Birdies are internally generated signals inherent in the electronics of the receiver. Birdies are especially present at the 16MHz level (Internal CPU clock).
-
Page 73: Warranty
Warrantor: UNIDEN AMERICA CORPORATION (“Uniden”) eLeMents.oF.WarrantY: Uniden warrants, for one year, to the original retail owner, this Uniden Product to be free from defects in materials and craftsmanship with only the limitations or exclusions set out below. WarrantY.duration:.This warranty to the original user shall terminate and be of no further effect 12 months after the date of original retail sale.
-
Page 74
Uniden, or (F) installed or programmed by anyone other than as detailed by the owner’s manual for this product. stateMent.oF.reMedY: In the event that the product does… -
Page 75
Include evidence of original purchase and a note describing the defect that has caused you to return it. The Product should be shipped freight prepaid, by traceable means, to warrantor at: Uniden America Corporation Parts and Service Division 4700 Amon Carter Blvd.
-
Contents
-
Table of Contents
-
Bookmarks
Quick Links
BC125AT Owners
Manual
© 2012 Uniden America Corporation
Printed in Vietnam
Fort Worth, Texas
U01UB370ZZB(0)
Related Manuals for Uniden BC125AT
Summary of Contents for Uniden BC125AT
-
Page 1
BC125AT Owners Manual © 2012 Uniden America Corporation Printed in Vietnam Fort Worth, Texas U01UB370ZZB(0) -
Page 2: Precautions
WARNING! Uniden does not represent this unit to be waterproof. To reduce the risk of fire or electrical shock, do not expose this unit to rain or moisture.
-
Page 3: Table Of Contents
contents Precautions. . . . . . . . . . . . . . . . . . . . . . . . . . . . . . . . . . . . . . . . . . . . . . . . . . . . . . 2 the.Fcc.Wants.You.to.KnoW.
-
Page 4
setting.uP.Your.scanner . . . . . . . . . . . . . . . . . . . . . . . . . . . . . . . . . . . . . . . 32 SCROll CONTROl Using the Knob . -
Page 5
Close Call Only Mode . . . . . . . . . . . . . . . . . . . . . . . . . . . . . . . . . . . . . . . . . . . . . 59 Set Close Call Bands . -
Page 7: The.fcc.wants.you.to.know
the.Fcc.Wants.You.to.KnoW This scanner has been tested and found to comply with the limits for a scanning receiver, pursuant to Part 15 of the FCC Rules. These limits are designed to provide reasonable protection against harmful interference in a residential installation. This scanner generates, uses, and can radiate radio frequency energy and, if not installed and used in accordance with the instructions, may cause harmful interference to radio communications.
-
Page 8: Scanning.legally
scanning.LegaLLY Your scanner covers frequencies used by many different groups, including police and fire departments, ambulance services, government agencies, private companies, amateur radio services, military operations, pager services, and wire-line (telephone and telegraph) service providers. It is legal to listen to almost every transmission your scanner can receive.
-
Page 9: Introduction
Changes or modifications to this product not expressly approved by Uniden, or operation of this product in any way other than as detailed by this Operating Guide, could void your authority to operate this product.
-
Page 10: Feature.highlights
• Railroad • Civil Air • Military Air • CB Radio • FRS/GMRS/MURS • Racing .Feature.highLights 10.channel.storage.Banks — You can store up to 50 frequencies into each bank for a total of 500 frequencies so you can more easily identify calls. close.call™.rF.capture.technology — you can set the scanner so it detects and provides information about nearby radio transmissions…
-
Page 11
temporary.Lockout — makes it easy to temporarily lock out any channel or frequency. The lockout is cleared when you turn power off, then back on so you don’t have to remember to unlock the channels or frequencies later. triple-conversion.circuitry — virtually eliminates any interference from IF (intermediate frequency) images, so you hear only the selected frequency. -
Page 12
custom.search — lets you program up to 10 Custom Search Ranges and search any or all of these ranges. quick.search — allows you to enter a frequency and start searching up or down from that frequency. turbo.search — increases the search speed from 100 to 300 steps per second automatically for bands with 5 kHz steps. -
Page 13: Frequency.range
three.Power.options — let you power the scanner using the included two AA rechargeable or alkaline batteries or the supplied USB cable. Built-in.charger — allows you to charge Ni-MH batteries in the scanner using a USB port on any computer and the supplied USB cable.
-
Page 14
FrequencY.(Mhz) steP. Mode Band (khz) LoWer uPPer Petroleum Products & Broadcast Pickup 25.0000 27.9950 CB Class D Channel Business & Forest Products 10 Meter Amateur Band 28.0000 54.0000 VHF Low Band 6 Meter Amateur Band 108.0000 136.9916 8.33 Aircraft Band 137.0000 150.7700 150.7750… -
Page 15: Included.with.your.scanner
Contact your local Uniden Dealer or call the Uniden Parts Center at: (800)554-3988, 8:00AM to 5:00PM EST, Monday through Friday, for information about ordering these optional accessories. Note: USB cables are also available from the Uniden On-Line store. Visit http://www.uniden.com.
-
Page 16: Scanning.basics
What.is.searching? The BC125AT can search for active frequencies. This is different from scanning because you are searching for frequencies that have not been programmed into the scanner. When you select frequency bands to search, the scanner searches for any active frequency within the lower and upper limits you specify.
-
Page 17: Understanding.scanning
understanding.scanning What is CTCSS/DCS? Your scanner can monitor systems using a Continuous Tone Coded Squelch System (CTCSS) and Digital Coded Squelch (DCS) system, which allows the squelch to open only when the tone you have programmed with a specific frequency is received along with a transmission.
-
Page 18: Conventional Scanning
tone with a signal, the scanner’s squelch remains closed and you hear nothing. Refer to the Reference section of this manual for tables showing the available CTCSS frequencies and DCS codes. Conventional Scanning Conventional scanning is a relatively simple concept. Each group of users in a conventional system is assigned a single frequency (for simplex systems) or two frequencies (for repeater systems).
-
Page 19: Repeater Operation
construction job sites, and with inexpensive consumer radios such as GMRS/FRS radios. The range is typically 1-8 miles, depending upon the terrain and many other factors. Repeater Operation Repeater systems use two frequencies: one transmits from the radio to a central repeater; the other transmits from the repeater to other radios in the system.
-
Page 20: Service Search Banks
– how to program and use the scanner. The website, http://www.radioreference. com, is the Internet’s premier source for user-supported radio system information. This web sites is not affiliated with Uniden Corporation. For more information about Uniden and our other products, visit http://www.uniden.com.
-
Page 21: Connecting.the.antenna
If your scanner receives interference or electrical noise, move the scanner or its antenna away from the source. You might also try changing the height or angle of the rubber antenna. To improve the scanner’s reception, use an optional external antenna designed for multiband coverage.
-
Page 22: Connecting.an.earphone/Headphone
Note: Always use 50-ohm, RG-58, or RG-8, coaxial cable to connect an outdoor antenna. If the antenna is over 50 feet from the scanner, use RG-8 low-loss dielectric coaxial cable. If it is less than 50 feet, use RG-58. You can get a BNC adapter at local electronics stores. connecting.an.earPhone/headPhone For private listening, you can plug a 1/8-inch (3.5 mm) mini- plug earphone or stereo headphones (not supplied) into the…
-
Page 23: Powering.the.scanner
You can power the scanner using alkaline (ALK) non- rechargeable batteries (not supplied) or the included Nickel Metal-Hydride (Ni-MH) rechargeable batteries. [Uniden provides a USB cable to charge the Ni-MH batteries on initial installation and to recharge them through your computer (or through a power adapter that provides USB charge power (not included, but available at many retailers).]…
-
Page 24: Installing Rechargeable Ni-Mh Batteries
Insert the batteries as indicated by the polarity symbols (+ and -) marked inside the battery compartment. Replace the battery compartment cover. Installing Rechargeable Ni-MH Batteries You can also use two Ni-MH rechargeable batteries to power your scanner. The Ni-MH batteries included with your unit are not fully charged;…
-
Page 25: Charging The Ni-Mh Batteries
NOTE: If you connect to a computer’s USB port, the PC will prompt you for the drivers for your scanner. To download and install these drivers, go to http://info.uniden.com/UnidenMan4/BC125AT. The scanner displays Charging while it charges the batteries and Charge Complete when the Ni-MH batteries are completely charged.
-
Page 26
usB.Message Batt .. Meaning scanner. type cond . Charging Ni-MH Scanner is charging. No Battery None NO batteries in scanner. Charge Ni-MH Unit is charged. Complete Charge Off Alk./Ni- Scanner is not charg- ing (Battery selection switch is set to Alk.) Battery Error Ni-MH Batteries cannot… -
Page 27: About.your.scanner
aBout.Your.scanner We use a few simple terms in this manual to explain the features of the scanner. Familiarize yourself with these terms and the scanner’s features, and you can put the scanner to work for you right away. Simply determine the type of communications you want to receive, then set the scanner to search those communications.
-
Page 28
mode for 3 seconds and then returns to Normal mode. The scanner displays . During that 3 seconds you can press other keys and operate that function. Pressing Func again before 3 seconds returns to Normal mode and the icon disappears. In Normal mode the icon is not displayed. -
Page 29
Key/ Press.to . . . Press.Func.and. icon this.key.to . . . func • Enter Function mode for 3 seconds. • Return to Normal mode from Function mode. Hold/ Enter the Close • Hold on a current channel. Call menu. • Release hold and resume scanning/searching. -
Page 30: Turning.on.the.scanner
Key/ Press.to . . . Press.Func.and. icon this.key.to . . . Enter the Dis- • Turn scanner on and off (press play/Charge and hold). menu. • Turn backlight on and off. Pgm/E • Enter Channel • Select input data or a menu Programming item.
-
Page 31: A.look.at.the.display
a.LooK.at.the.disPLaY The display has indicators that show the scanner’s current operating status. The display information helps you understand how your scanner operates. Note: Not all of these icons may appear at the same time. 14 16 H O L D T L / O C h a n n e l N a m e ↑…
-
Page 32
item Meaning identifies a Priority channel. • BNK/SVC/SRC/BND shows banks/bands enabled for Scan/Service Search/Custom Search/Close Call Only mode. • is for the Close Call Hits bank. AM/FM/NFM shows channel/frequency modulation. • indicates Priority Scan. • indicates Priority Do-Not-Disturb. PRI+ • indicates Priority Plus Scan. -
Page 33: Setting.up.your.scanner
Using the SCROll CONTROl Knob Turn the SCROll CONTROl knob on top of the BC125AT to: • Select channels • Adjust volume • Adjust squelch •…
-
Page 34: Adjusting The Squelch
Adjusting the Squelch To adjust the squelch level, press FUNC, then press SCROll CONTROl. When the squelch level indicator and battery voltage appear, turn SCROll CONTROl to change the squelch level from 0 to 15. Press Func, then press SCROll CONTROl. The squelch level indicator and battery voltage appears.
-
Page 35: Adjusting The Contrast
• Keypress+Squelch – Both above-mentioned «Squelch» and «Keypress.» • < Back — Return to previous menu. Press Pgm/E (or press SCROll CONTROl) to save and return to the previous menu. (Default = Always Off ) Press . Clr to exit. Notes: If the backlight is set to Always On when is pressed, the backlight is turned off and the backlight setting is then set to…
-
Page 36: Setting The Charging Timer
Setting the Charging Timer The Charging Timer menu is also a submenu of the Display/ Charge menu. It sets how long the scanner will charge the batteries when you plug the supplied USB cable into a USB port and connect it to your scanner. WARNING: the.charging.timer.will.reset.to.the.set.charging.
-
Page 37: Using The Keypad Lock
Press . Clr to exit. Using the Keypad lock Use the scanner’s keypad lock to protect it from accidental program changes. When the keypad is locked, only Func, Hold, and SCROll CONTROl (volume only) operate. Press Func then l/O to toggle the keypad lock on and off. The scanner displays Keypad Lock On or Keypad Lock Off.
-
Page 38: Programming.channels
USB drivers and programming software are available for download from http://info.uniden.com/UnidenMan4/BC125AT. PrograMMing.channeLs Now that you have configured your scanner, you are ready to start using your scanner’s preprogrammed service banks, the custom search banks, the Close Call feature, or the Weather Scan/Alert feature.
-
Page 39: Programming.channel.text.tags
Press . Clr to return to the last screen. The scanner automatically rounds the entered number to the nearest valid frequency. For example, if you enter 151.473 (MHz), your scanner accepts it as 151.475. If you entered an invalid frequency, Out of Band appears and the scanner beeps three times.
-
Page 40: Setting.ctcss/Dcs.for.a.channel
Turn SCROll CONTROl to choose the characters, pressing > or < to move the cursor to the right or left. If you make a mistake, press . ClR to clear the last character. Press . ClR twice to clear all characters. To cancel and exit, press l/O. Press Pgm/E to save the tag and return to the Channel menu.
-
Page 41: Setting.channel.modulation
• CTCSS/DCS Search — the scanner displays any tone/ code being used, but opens squelch on any signal. • No Tone — indicates that the channel squelch will only open if no CTCSS/DCS is detected. • <Back — returns to Channel Menu. Note: If you select Off, CTCSS/DCS Search, or No Tone, the scanner returns to the channel menu.
-
Page 42: Setting.the.priority.channel
setting.the.PrioritY.channeL The Priority feature lets you designate one stored channel in each bank as a Priority channel. When the Priority feature is turned on, the scanner checks that bank’s priority channel for activity every 2 seconds as it scans the bank. This feature lets you scan through the channels and still not miss important or interesting calls on specific channels.
-
Page 43: Deleting.channels
Press Pgm/E to enter the Channel menu. (You can also press Hold and scroll to the channel; press Func then Pgm/E.) Scroll to Set Delay and press Pgm/e. Turn SCROll CONTROl to select the delay time from the following options: •…
-
Page 44: Clearing A Bank
Clearing a Bank You can delete all channels in a bank. Press Hold to select any channel in the bank, then enter that channel number. Press Pgm/E to enter the Channel menu. (You can also press Hold and scroll to the channel; press Func then Pgm/E.) Scroll to select Clear Bank and press Pgm/E.
-
Page 45
Enabled scan banks appear on the lowest line. Disabled scan bank numbers are not displayed. The currently scanned bank number flashes. • You can turn scan banks on/off by pressing 1-9 or 0, but one scan bank must always be enabled. If you turn off all scan banks, the scanner will display Nothing to Scan. -
Page 46: Priority Scan Modes
• To temporarily lock out a channel, press l/O. • To permanently lock out a channel, press l/O twice quickly. See Locking Out Channels on page 47. Priority Scan Modes This scanner allows four different Priority modes. These modes also function in Search and Hold modes (except Close Call Only mode and Weather modes).
-
Page 47: Manually.selecting.a.channel
ManuaLLY.seLecting.a.channeL You can continuously monitor a single channel without scanning. This is useful if you hear an emergency broadcast on a channel or if you want to monitor a specific channel. To manually select a channel, press Hold and enter the channel number.
-
Page 48: Unlocking Channels
Note: You can still manually select locked-out channels. If you lock out all channels in the selected bank, the scanner displays All Locked! on the second line. Unlocking Channels Press Hold. Enter the channel number you want to unlock and press Hold again.
-
Page 49: Service Search Receive/Hold Modes
During a Service Search, the upper line displays the current service name. The lower line displays the search frequency and the direction indicator (↑or ↓) with the modulation. Enabled service banks appear on the lowest line. Disabled service bank numbers are not displayed. The currently searched bank number flashes.
-
Page 50: Custom Search Mode
To temporarily lock out a frequency, press l/O. To permanently lock out a frequency, press l/O twice quickly. See also Search Options on page 53 for Delay, CTCSS/DCS settings, and locking out/reviewing/unlocking frequencies. Custom Search Mode Custom Search mode lets you program and search 10 custom search ranges.
-
Page 51: Custom Search Receive/Hold Modes
To start a Custom Search, press Srch/Svc. When the scanner finds a transmission, it stops on it. When the transmission ends, the scanner resumes searching according to the delay setting. While searching, the upper line displays the current search bank name.
-
Page 52: Quick Search Mode
• To store a frequency, press Pgm/E; see Storing Found Search Frequencies on page 55. • To temporarily lock out a frequency, press l/O. • To permanently lock out a frequency, press l/O twice quickly. See also Search Options on page 53 for Delay, CTCSS/DCS settings, and locking out/reviewing/unlocking frequencies.
-
Page 53: Quick Search Receive/Hold Modes
If you want to change the search direction or if it is a long transmission and you want to continue searching, turn SCROll CONTROl or press Srch/Svc. Quick Search Receive/Hold Modes To hold on a frequency press Hold. To step through the frequencies, turn SCROll CONTROl in Hold mode.
-
Page 54
setting time and then automatically resumes scanning. (Default = 2 seconds) Press Func then Pgm/E in Service, Custom, or Quick Search/Search Hold mode to view the Search menu. Scroll to Set Delay and press Pgm/E. Turn SCROll CONTROl to select the delay time from the following options: •… -
Page 55: Programming Custom Search Ranges
Turn SCROll CONTROl to select one of the following settings: • Search Off • Search On Press Pgm/E to save and return to previous menu. Programming Custom Search Ranges You can define each search range used during a Custom Search. Press Func then Pgm/E in Custom Search mode to view the Search menu.
-
Page 56: Locking Out Search Frequencies
• To store a frequency in the Close Call Hits bank to a Channel Storage Bank in Scan mode, press Func then Pgm/E. Save Frequency displays and the scanner shows the first empty channel location. To select another location, turn SCROll CONTROl to select another channel then press Pgm/E to store the frequency or .
-
Page 57: Unlocking Search Frequencies
However, if you lock out all frequencies in the selected search bank, the scanner displays All Locked! on the second line. Unlocking Search Frequencies Press Func then Pgm/E in any Search or Search Hold mode to view the Search menu. Scroll to Review Lockouts and press Pgm/E.
-
Page 58: Selecting Close Call Modes
you are scanning other frequencies, turn off normal scanning while Close Call is working, or turn off the Close Call feature and use the scanner normally. You can set the scanner so it alerts you when the Close Call feature detects a frequency. and you can also set the frequency bands where you want the scanner to look for transmissions.
-
Page 59: Close Call Only Mode
Turn SCROll CONTROl and select from the following modes: • Close Call Off — turns off Close Call. • Close Call DND — only checks for Close Call hits between transmissions avoiding breaks in current transmiss • Close Call Pri (Priority) — checks for Close Call hits every 2 seconds, even during transmissions.
-
Page 60
When the scanner finds a frequency, CCFOUND! appears in the display. The scanner will also beep or flash the display (if enabled) in the Close Call Alert option in the Close Call menu. • Press any key (other than Hold) to view the displayed frequency. -
Page 61: Set Close Call Bands
The following paragraphs describe Delay, CTCSS/DCS, Alert Settings, Setting Close Call Bands, and reviewing/unlocking frequencies. Set Close Call Bands This setting allows you to select the bands searched for all Close Call modes. Press Func then Hold to view the Close Call menu. Scroll to Close Call Bands and press Pgm/E.
-
Page 62: Close Call Hits Bank
• Alert Beep — Controls whether the scanner sounds an alert beep when Close Call detects a signal. • Alert Light — Controls whether the scanner flashes the display backlight when Close Call detects a signal. • Back — returns to previous menu. Scroll to any option you want to enable/disable and press Pgm/E.
-
Page 63: Close Call Delay
Close Call Delay This setting controls how long the scanner stays on the frequency after a transmission ends before resuming Close Call operation. If you select a minus delay time, the scanner stops on the transmission for the preset time and then automatically resumes scanning.
-
Page 64: Weather.operation
• Search Off • Search On Press Pgm/E to save and return to the Close Call menu. Weather.oPeration Your scanner has been primarily designed as a multi-band, general services scanner. While it incorporates a weather alert ability as one of its features, we recommend that you not use the scanner as your sole means for receiving emergency alerts.
-
Page 65: Weather.alert.standby
Note 1: NOAA broadcasts are continuous broadcasts. You only lose reception if you move out of a coverage area. If the signal is lost, the scanner resumes searching for a weather transmission. Note 2: You cannot lock out weather frequencies. Weather.aLert.standBY In Weather Alert mode, your scanner functions as a severe weather warning radio.
-
Page 66: Weather.alert.priority
Weather.aLert.PrioritY Enabling this setting assigns priority to weather alert scanning no matter what else the radio might be doing. Checking the weather channel every 5 seconds for a 1050Hz tone assures you of the latest occurrence of a NOAA warning. (Default = Off ) To turn Weather Alert Priority on or off, press Func then 3(WX) to view the Weather menu.
-
Page 67
Connect to PC with USB cable (5.0V DC 500mA) LCD Display: 64 X 128 Full Dot Matrix LCD with orange-color backlight. Internal Speaker: 24ohm, 32mm diameter, Dynamic Type, 0.8W Max. Certified in accordance with FCC Rules and Regulations Part 15 Sub-part C as of date of manufacture. -
Page 68
Scan Rate: 80 channels/second Search Rate: 90 steps/second 270 steps/second (5kHz step) Scan Delay: 2 seconds Audio Output Power: Internal Speaker — 360mW nominal (24ohm) Headphone (L-ch) 4mW nominal (32ohm) Antenna: 50 ohms (Impedance) Sensitivity (12dB SINAD) Nominal VHF Low Band (AM) 25.005 MHz 0.3 uV… -
Page 69
VHF High 2 Band (AM) 225.050 MHz 0.4 uV (AM) 272.950 MHz 0.4 uV (AM) 315.050 MHz 0.4 uV UHF Band (AM) 325.050 MHz 0.4 uV (NFM) 406.875 MHz 0.3 uV (NFM) 511.9125 MHz 0.3 uV Close Call Sensitivity (No Modulation) VHF Low Band (NFM) 40.8400 MHz… -
Page 70: Rbrc.information
As part of our committment to protect the environment and conserve natural resources, Uniden voluntarily participates in an RBRC industry program to collect and recycle Ni-MH batteries within the US. Please call 1-800-BATTERY for information on Ni-MH battery recycling in your area.
-
Page 71: References
reFerences ctcss.Frequencies 67.0 69.3 71.9 74.4 77.0 79.7 82.5 85.4 88.5 91.5 94.8 97.4 100.0 103.5 107.2 110.9 114.8 118.8 123.0 127.3 131.8 136.5 141.3 146.2 151.4 156.7 159.8 162.2 165.5 167.9 171.3 173.8 177.3 179.9 183.5 186.2 189.9 192.8 196.6 199.5 203.5…
-
Page 72: Dsc.codes
dsc.codes Birdies All radios can receive «birdies» (undesired signals). If your scanner stops during Scan mode and no sound is heard, it might be receiving a birdie. Birdies are internally generated signals inherent in the electronics of the receiver. Birdies are especially present at the 16MHz level (Internal CPU clock).
-
Page 73: Warranty
Warrantor: UNIDEN AMERICA CORPORATION (“Uniden”) eLeMents.oF.WarrantY: Uniden warrants, for one year, to the original retail owner, this Uniden Product to be free from defects in materials and craftsmanship with only the limitations or exclusions set out below. WarrantY.duration:.This warranty to the original user shall terminate and be of no further effect 12 months after the date of original retail sale.
-
Page 74
Uniden, or (F) installed or programmed by anyone other than as detailed by the owner’s manual for this product. stateMent.oF.reMedY: In the event that the product does… -
Page 75
Include evidence of original purchase and a note describing the defect that has caused you to return it. The Product should be shipped freight prepaid, by traceable means, to warrantor at: Uniden America Corporation Parts and Service Division 4700 Amon Carter Blvd.
Uniden
BC125AT Руководство по эксплуатации
Популярность:
14206 просмотры
Подсчет страниц:
76 страницы
Тип файла:
Размер файла:
1.82 Mb
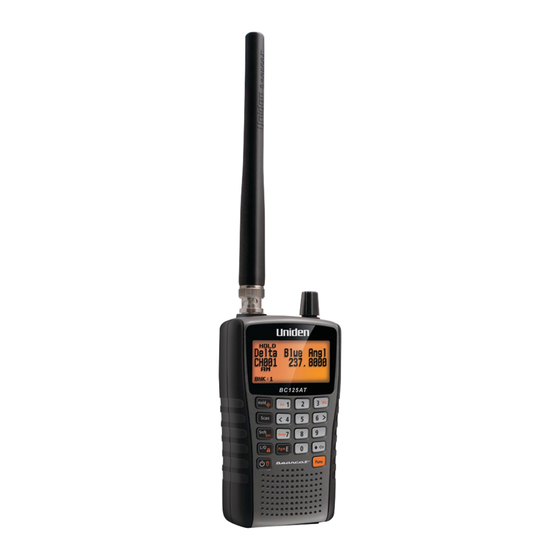
Uniden BC125AT портативный сканирующий приемник
Uniden Bearcat BC125AT портативный сканирующий приемник для начинающих любителей радиомониторинга оснащенный полноценной клавиатурой! Приемник BCT125AT предназначен для приёма каналов аналоговых конвенциональных радиосистем и представляет собой более продвинутую версию своего предшественника BC-95XLT.
Функция Close Call у сканеров Uniden означает возможность быстрого захвата и прослушивания мощных сигналов в непосредственной близости от приемника.
Главными отличиями данной модели от его предшественника является наличие участка частот 225…380 MHz, а также возможность изменения вида модуляции(AM, FM и NFM) для каждого запрограммированного канала, что позволяет обеспечить приём отечественного Си-Би диапазона (26…28 MHz) в режиме частотной модуляции, а также отечественной речной связи и прочих радиосистем, работающих на участке 225…380 MHz. Приемник имеет и прочие функциональные нововведения. Появились альфа-тэги для присвоения буквенных названий каналам, число каналов памяти увеличилось со 100 до 500 сгруппированных в 10 банках по 50 каналов, добавились тоновый/кодовый шумоподавитель и декодер CTCSS/DCS, функция Temporary Lockout обеспечивает временный пропуск заблокированного канала, а встроенный S-метр позволяет визуально определить силу принимаемого сигнала и напоследок реализована возможность программирования приёмника с компьютера. Как и прежде фирменные функции Custom Search, Service Search, Close Call (мгновенный захват частоты) являются неотъемлемыми атрибутами сканирующих приёмников Uniden.
Краткие технические характеристики приемника Uniden Bearcat BC125AT:
Диапазон частот на прием, МГц: 25-54; 108-174; 225-380; 400-512
Тип приемника: супергетеродин с тройным преобразованием
Скорость сканирования, каналов / сек: ~300 поиск, ~100 сканирование
СКАНИРОВАНИЕ СУБТОНОВ CTCSS И DCS
Виды модуляции: AM FM NFM WFM FMB
Шаг подстройки частоты, кГц: 5 6.25 7.5 8.33 12.5 (см. спецификацию по подиапазонам)
Каналов памяти: 500
Антенный разъем на приемнике: BNC-мама
Диапазон рабочих температур, °С: -20°C…+60°C
Комплект поставки портативного сканирующего приемника Uniden BC125AT:
Приемник Uniden Bearcat BC125AT
2 Ni-MH аккумулятора формата AA/LR06
Гибкая широкополосная антенна, BNC-папа
USB-кабель для зарядки аккумуляторов и соединения с персональным компьютером
Ременная клипса
Темляк (кистевой ремешок)
Руководство пользователя
Что слушать?
Автомобильные/велосипедные гонки (переговоры пилота с командой)
Каналы погодных сводок (прямой доступ к сводкам и предупреждениям Национального управления океанических и атмосферных исследований, 24 часа в сутки)
Авиационный эфир
Морской эфир
Железнодорожный эфир
Переговоры служб общественной безопасности (полиция, пожарная служба, служба скорой медицинской помощи, автомобильная инспекция, лесничество и так далее)
Переговоры обслуживающего персонала ПКиО и аттракционов
Прослушивание работы корреспондентов при освещении событий
Коротковолновая радиосвязь по всему миру
Прослушивание радио- и телевизионных передач
Приём любительских радиосообщений
| Виды модуляции | AM FMNFM WFMFMB |
| Диапазон частот на прием, МГц | 25-54; 108-174; 225-380; 400-512 |
| Скорость сканирования, каналов / сек | 100/300 |
Краткие технические характеристики приемника Uniden Bearcat BC125AT:
Диапазон частот на прием, МГц: 25-54; 108-174; 225-380; 400-512
Тип приемника: супергетеродин с тройным преобразованием
Скорость сканирования, каналов / сек: ~300 поиск, ~100 сканирование
Виды модуляции: AM FM NFM WFM FMB
Шаг подстройки частоты, кГц: 5 6.25 7.5 8.33 12.5 (см. спецификацию по подиапазонам)
Каналов памяти: 500
Антенный разъем на приемнике: BNC-мама
Диапазон рабочих температур, °С: -20°C…+60°C
Комплект поставки портативного сканирующего приемника Uniden BC125AT:
Приемник Uniden Bearcat BC125AT
2 Ni-MH аккумулятора формата AA/LR06
Гибкая широкополосная антенна, BNC-папа
USB-кабель для зарядки аккумуляторов и соединения с персональным компьютером
Ременная клипса
Темляк (кистевой ремешок)
Руководство пользователя