Как запустить игры с USB носителей? — Все очень просто — читаем и радуемся!
Владельцы приводов D3-2 вздохните свободно! Самостоятельно записанные диски ваш привод не хочет читать, но запуск игр с USB — никто не отменял. Для тех у кого привод не D3-2 — поверьте, на много удобнее и быстрее скидывать игры на USB-HDD и играть. Не надо беспокоиться о том, куда положить все эти диски, исчезнут вопросы о сохранности дисков. И, наконец, ваш диск не окажется нечитабельным в самый разгар вечеринки!
Установка USB Loader GX:
1.Скачиваем:
Скачать
Скачать
2.Скидываем на SD-карту содержимое архива и соглашаемся на слияние папок. В итоге у вас должно быть так:
apps/USB Loader/USBLoaderGX_v3.0_IOS249.dol
wad/USBLoaderGX_v3.0_IOS249.wad
Проверяйте правильность пути, иначе ничего не получиться!
[ad1]
3.Вставляем SD — карту в Wii, и устанавливаем wad-файл при помощи:YAWMM или WiiMod
4. Выходим и запускаем USB Loader GX из главного меню Wii.
5.Как скидывать игры на USB носитель читаем ЗДЕСЬ
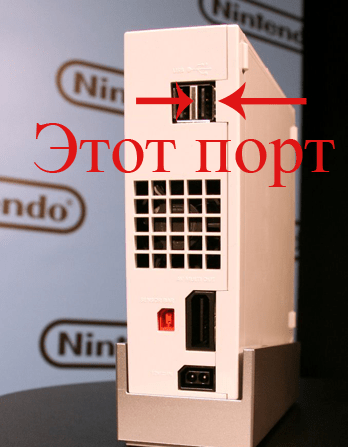
Вставлять USB-HDD для игр необходимо в левый(c лицевой) или в правый (сзади) USB порт:
P.S. Запускать игры с SD-карты ниже 10 класса не получится, лучше купите USB-HDD небольшой емкости специально для Wii.
Наиболее частые проблемы после установки лоадера:
Игры лоадер видит, но при запуске черный экран или выходит в главное меню:
Решение данной проблемы может заключаться в трех пунктах:
1.Не установлены все ios’ы — это четвертый пункт softmoda:
Этап IV:Установка необходимых cIOS и патчей System Menu IOS, просто повторите этот пункт, иногда программа устанавливает не все ios, либо установите их вручную.
2. Реже, но бывает — «битый» образ игры, т.е. просто скачайте другой образ или другую игру
3.Иногда проблема решается заменой USB накопителя, особенно если вы запускаете с USB флэшки
Это все проблемы, которые Вы сможете встретить.
Have a nice day;)
Если Вам помогла инструкция, вы можете отблагодарить автора:
Кошельки WebMoney:
R334537221223
Z101244944163
U409410162479
Yandex.Деньги:
410011738148518
Любая поддержка поможет проекту. Спасибо.
If you need help for anything regarding this tutorial, please join the RiiConnect24 Discord server (recommended) or e-mail us at [email protected].
This is a quick start guide on how to use USB Loader GX, a popular USB loader for the Wii that’s used to play games from a USB drive.
Despite its name, USB Loader GX is also capable of loading games from an SD Card.

What you need
- A Wii
- A USB drive or SD Card
- USB Loader GX
Make sure you have installed cIOS before following this!
We recommend you copy games over with Wii Backup Manager if you use Windows, Witgui if you use macOS, or Wii Backup Fusion for Windows, macOS, and Linux.
If you want to play games that are in NKit format, use this program to convert them to ISO first.
If you are not copying games using Wii Backup Manager, Witgui, or Wii Backup Fusion, make a folder on the root of the USB drive or SD card named “wbfs” and put the games in there.
To play games, we recommend using an external hard drive for your Wii. Flash drives are not recommended, and may vary in behavior even between the same product.
Make sure your USB drive is formatted as FAT32. Do not format it as other types such as exFAT or extFS.
You may format it as NTFS, but it won’t work with a majority of apps (eg. The Homebrew Channel, Nintendont)
Instructions
Downloading
- Extract USB Loader GX and put it in the
appsfolder on your USB drive or SD card. - Insert your USB drive, and SD card if you’re using one, into your Wii and launch USB Loader GX from the Homebrew Channel.
Getting Started
There is no “guide” to use the USB Loader GX app. This is intended to help you learn how to use it, by giving you a quick start. You should be able to figure out all the great features of USB Loader GX by using it.
- If USB Loader GX says “Waiting for HDD…” with a 20 seconds countdown, it’s likely that it can’t find the USB drive. Try to exit out of the app, and then relaunch it after you put the USB drive in the other port of the Wii.
- You can press the 1 Button on your Wii Remote to open up a dialog to download game covers and artwork from GameTDB. It might take a while to download the game covers and artwork, depending on how many games you have.
- There are WADs that can open up USB Loader GX if you load it from the Wii Menu. This is called a forwarder WAD. An official forwarder WAD can be found here, and a version for the vWii (Wii U) can be found here.
- GameCube or “custom” Wii games may or may not have a custom banner that USB Loader GX uses. To enable this, find or write
CustomBannersURL = http://banner.rc24.xyz/in config/GXGlobal.cfg on your USB drive. Then you can use the “Custom Banner” download by pressing the 1 Button on your Wii Remote.
User Interface
There are multiple buttons in the USB Loader GX interface.
Main Menu
These are the functions the buttons found on the top of the main menu do, from left to right:
- Star — Shows games that you have marked as “favorites”.
- Search — Lets you search for games by name.
- Sort — Cycles through sorting methods for games.
- Platform — Choose to sort games by platform.
- Category — Sorts games by category.
- List — Shows games in a list view.
- Multi-Cover View — Shows games in a multi-cover view.
- Cover Carousel View — Shows games in a carousel view.
- Wii Menu View — Shows games in a Wii Menu view.
- Parental Control — Locks USB Loader GX.
- Disc — Loads a game via disc.
Pressing any game will allow you to play the game by pressing “Start”.
There are also other buttons:
- (+) Icon — “Install” a game, i.e. loading it from disc and dumping it.
- Gears — Settings for USB Loader GX.
- SD card — Remount the SD card.
- Homebrew — Load homebrew apps.
- Wii — Open up the HOME Menu, which can also be accessed by pressing the HOME Button on the Wii Remote.
- Power Button — Turn off your Wii.
On the middle of the bottom of the screen, you can see how much space is free on your USB drive and how many games you have.
Continue to RiiTag
RiiTag is a customizable gamertag for your Wii that USB Loader GX can integrate with. This is optional to set up.
Continue to site navigation
We have many other tutorials that you might like.
USB Loader GX — это мощный инструмент, позволяющий загружать и запускать игры на Wii с USB-накопителей, таких как флешки или жесткие диски. Это одно из самых популярных приложений для модифицированных консолей Wii, которые позволяют вам насладиться огромным выбором игр без необходимости использования дисков.
Установка USB Loader GX — простой процесс. Сначала вы должны подготовить USB-накопитель, отформатировав его в формат FAT32 или NTFS. Затем загрузите последнюю версию USB Loader GX с официального сайта и скопируйте все файлы на корневую папку USB-накопителя. Подключите USB-накопитель к Wii через один из доступных портов USB.
После установки USB Loader GX вы сможете легко запускать игры с вашего USB-накопителя. Программа позволяет вам легко навигировать по вашей коллекции игр, открывая обложки, читая описания и выбирая игру, которую хотите запустить. Вы также можете установить обложки игр вручную, если они не отображаются автоматически.
USB Loader GX также предлагает ряд удобных функций для настройки игрового опыта. Вы можете настроить различные параметры эмуляции, установить персональные настройки управления и активировать различные плагины и функции, которые расширяют возможности вашей консоли.
Содержание
- Установка USB Loader GX для Wii
- Процесс установки и настройки
- Использование USB Loader GX для Wii
- Основные функции и возможности
Установка USB Loader GX для Wii
USB Loader GX — это приложение для Wii, которое позволяет запускать игры с внешнего накопителя USB. Установка USB Loader GX на Wii довольно проста, и в этом разделе мы расскажем вам, как это сделать.
- Первым шагом является разблокировка Wii, чтобы вы могли установить неавторизованные приложения. Существует несколько способов разблокировки Wii, включая использование Homebrew Channel. Пожалуйста, ознакомьтесь с инструкциями для своей конкретной модели Wii, чтобы разблокировать ее.
- После разблокировки Wii, вам потребуется установить Homebrew Channel на вашу консоль. Homebrew Channel — это канал на Wii, который позволяет запускать неавторизованные приложения. Скачайте файл установщика Homebrew Channel и скопируйте его на SD-карту.
- Вставьте SD-карту в Wii и запустите приложение «Letterbomb» из меню «Сообщения». Следуйте инструкциям на экране, чтобы установить Homebrew Channel.
- После установки Homebrew Channel, вам потребуется скачать последнюю версию USB Loader GX с официального веб-сайта. Скопируйте файл «USB Loader GX» на SD-карту.
- Вставьте SD-карту с файлом USB Loader GX в Wii и запустите Homebrew Channel. Вы увидите список доступных приложений. Выберите USB Loader GX и нажмите на кнопку «Запуск».
- USB Loader GX загрузится и отобразит список ваших игр, которые были скопированы на внешний USB-накопитель. Если у вас нет игр на USB-накопителе, вы можете скопировать их с помощью программы WBFS Manager на компьютере и затем подключить USB-накопитель к Wii.
Теперь у вас установлен USB Loader GX на Wii, и вы можете наслаждаться запуском игр с внешнего накопителя USB.
Процесс установки и настройки
Установка и настройка USB Loader GX на Wii являются весьма простыми процедурами. Для этого вам потребуются следующие компоненты и инструменты:
- Консоль Wii с доступом к интернету
- SD-карта или USB-накопитель
- USB-кабель
- Компьютер с доступом к интернету
- USB Loader GX файлы (можно загрузить с официального сайта разработчика)
Вот пошаговая инструкция по установке и настройке USB Loader GX:
- Скачайте USB Loader GX файлы с официального сайта разработчика и распакуйте их на вашем компьютере.
- С помощью SD-карты или USB-накопителя создайте следующую структуру папок:
- Apps/usbloader_gx
- usb-loader/config
- Скопируйте файлы USB Loader GX в папку «Apps/usbloader_gx» на SD-карте или USB-накопителе.
- Вставьте SD-карту или USB-накопитель в консоль Wii.
- Включите консоль Wii и запустите Homebrew Channel.
- В Homebrew Channel выберите USB Loader GX и запустите приложение.
- USB Loader GX загрузится и отобразит список доступных игр на вашем USB-накопителе или SD-карте.
- Настройте USB Loader GX согласно своим предпочтениям, выбрав нужные опции в меню настроек.
- После завершения настройки вы сможете выбирать и запускать игры прямо из интерфейса USB Loader GX.
Теперь, с помощью USB Loader GX, вы можете удобно запускать игры на консоли Wii с внешних носителей, таких как USB-накопители или SD-карты.
Использование USB Loader GX для Wii
USB Loader GX для Wii предоставляет возможность загружать и играть с игровых дисков Wii и GameCube, сохраненных на вашем внешнем USB-накопителе. Вот некоторые основные шаги, которые нужно выполнить для использования USB Loader GX:
- Установите Homebrew Channel на вашу Wii. Это позволяет загружать неофициальное программное обеспечение, такое как USB Loader GX.
- Скачайте и скопируйте последнюю версию USB Loader GX на ваш USB-накопитель, используя компьютер.
- Подключите USB-накопитель к вашей Wii через один из доступных портов USB.
- Загрузите Homebrew Channel на Wii и найдите и запустите USB Loader GX.
- Настройте USB Loader GX, указав путь к вашему USB-накопителю и настройкам игр.
- Добавьте игры на ваш USB-накопитель, скопировав их изображения ISO или WBFS файлов в соответствующую папку на USB-накопителе.
- Выберите игру в списке загружаемых игр и нажмите кнопку «Play» для запуска игры.
USB Loader GX также предлагает дополнительные функции, такие как сохранение игр, мультиплеерные возможности, настройки читерства и многое другое. Вы можете узнать больше о них, изучая документацию или руководство пользователя USB Loader GX.
Обратите внимание, что использование неофициального программного обеспечения, такого как USB Loader GX, может иметь свои риски и может быть незаконным в некоторых странах. Проверьте соответствующие законы и политику Nintendo перед использованием USB Loader GX.
Основные функции и возможности
USB Loader GX — это приложение для Wii, которое позволяет загружать игры с USB-накопителей. Оно предоставляет ряд функций и возможностей, которые значительно улучшают опыт игры и управление игровыми файлами.
- Загрузка игр с USB-накопителей: USB Loader GX позволяет загружать и играть в игры с USB-накопителей, таких как флешки или внешние жесткие диски. Это значительно упрощает процесс загрузки и хранения игровых файлов.
- Навигация по играм: Приложение предлагает удобный интерфейс, который позволяет легко найти и выбрать интересующую игру. Это включает в себя функции сортировки и поиска игр.
- Множество настроек: USB Loader GX позволяет настраивать различные параметры игр, такие как выбор языка, видеорежима и сохранения. Это дает возможность настроить игру так, как вам удобно.
- Поддержка различных форматов: Приложение поддерживает различные форматы игровых файлов, включая ISO, WBFS и FAT32. Это позволяет загружать игры, независимо от их формата.
- Обложки и дополнительная информация: USB Loader GX автоматически загружает обложки для ваших игр и отображает дополнительную информацию, такую как название, жанр и рейтинг. Это помогает вам легче ориентироваться в вашей коллекции игр.
- Мультиплоер: Приложение поддерживает мультиплеер, что позволяет играть вместе с друзьями. Вы можете подключить до четырех Wii-пультов и наслаждаться игровым процессом вместе.
- Функция возврата: Если что-то пойдет не так во время загрузки игры, USB Loader GX предлагает функцию возврата к предыдущей версии игры. Это позволяет избежать потери прогресса или сохранений.
- Обновления и поддержка: USB Loader GX регулярно обновляется и поддерживается, чтобы удовлетворять требованиям пользователей Wii и исправлять ошибки. Это гарантирует лучшую производительность и надежность при использовании приложения.
In this guide, you will be setting up USB Loader GX, an easy to use program that will allow you to backup and load games on an external USB device, load channels, homebrew apps, and more.
What you’ll need
- An SD card or USB drive formatted as FAT32.
- A games USB drive to store games on (throughout this guide, this will be referred to as your game drive). If you do not plan on backing up GameCube games, format it as NTFS. If you plan on backing up GameCube games, format it as FAT32.
- USB Loader GX
- A way to transfer files to your SD card or USB drive
Setting up USB Loader GX
Plug in your SD card or USB drive into whatever you are using to transfer files to it
Then, extract the USB Loader GX .7z that you downloaded earlier.
Inside the extracted folder, you will find a folder named apps. Transfer that to the root of your SD card or USB drive. If you already have an apps folder, it will merge with it.
Once you have done this, you may eject your SD card or USB drive.
Insert your SD card into your Wii, or if you are using a USB drive, insert it into the USB port on your Wii that is furthest away from the edge.
Insert your game drive into the USB port on your Wii that is closest to the edge.
On your Wii, open the Homebrew Channel and launch USB Loader GX. Once you launch it, you should see the USB Loader GX logo and several loading messages below it. Eventually, it should load to the main USB Loader GX interface.
USB Loader GX is now ready for use.
Backing up Wii games to your USB drive
Backing up your Wii games onto your game drive is an extremely simple process.
Insert the Wii disc that you would like to rip into the disc drive.
Once you have done that, you can either wait for the on screen prompt to show up, where you can choose to install the game, or you can press the + button in the bottom left of the menu and confirm that you would like to install the game.
USB Loader GX will now proceed to rip the disc onto your game drive. Wait for it to complete, then press OK.
Repeat this process for each of the games you wish to backup.
Downloading game covers (requires an internet connection)
USB Loader GX’s UI will show you the covers for the games you have on your game drive, but you have to download them first.
Do note that you will be required to be connected to the internet in order to do this.
Once you are connected to the internet, load USB Loader GX and press 1 on your Wii Remote. This will bring up a download menu. Ensure all the boxes are checked, and then start the download. It may take a while depending on how many games you have and your internet speed.
When it is done downloading, press OK, and your game covers will now show up.
You are now done setting up USB Loader GX and backing up your games.
You can now continue on to some things to keep in mind when running homebrew on the Wii
Down and Dirty How To in installing USB Loader GX.
NOTE: This info is rather old, but the basic info should still be usefull
This info is an exact copy of the information I found here ALL credit for this HowTo goes to ‘l2yan’ the original poster.
It doesn’t matter if you’re one of the people that has a newer wii and can’t load backups from a DVD or if you just want to play some of your backups easily from a USB, you can do it with this guide! USB Loader GX is constantly being updated and sometimes has some weird bugs on certain games. It also isn’t compatible with all types of flash drives or HDD’s yet. so check your compatibility here: http://wiki.gbatemp.net/wiki/index.php/USB_Devices_Compatibility_List
Contents
- 1 Requirements
- 2 Installation
- 3 Restoring USBLoader GC after accidental Update (SuperMario Galaxy 2)
- 3.1 DOP-Mii Checking for STUB files
- 3.2 IOS 249 Installer
- 4 References
Requirements
- Network Connection
- Homebrew Channel
- Wad Manager v1.4
- SD Card
- USB Drive or HDD
- Required Files
Installation
- First thing to do is backup everything on your SD card to your computer, seeing as though this is the easiest way for installation.
- Unzip the required files to the root of the SD card, then go put it in the SD slot of your wii.
- Turn on your wii, and once it loads up, go to the homebrew channel.
- While in the homebrew channel, click to load the Wad Manager 1.4
- Once the application loads up, choose IOS249 then select SD card installation. Once you do that choose to install «USB Loader #:GX-UNEO_Forwarder.wad» Once the installation is complete you can then press HOME on the wiimote to restart your wii.
- NOTE: By installing the previous wad file, you installed a forwarder channel for the USB Loader, that means when running the USB Loader you must have the SD card in the wii because it is running the application inadvertently from the homebrew channel
- Once you have the Forwarder channel installed, go back into the homebrew channel. Once you are there click on the cIOS38rev14 installer. Press A and choose the network installation and make sure all the files install correctly. When finished, press HOME to reboot.
- After the wii resets, go back into the homebrew channel. Once you are there again choose to load cIOS36rev10 installer. Like before, press A and choose network installation. Make sure all files are installed correctly.
After that, your USB Loader should be working! Sometimes you will get one that is password protected though, if so just enter ab121b as the password and you will be fine.
Restoring USBLoader GC after accidental Update (SuperMario Galaxy 2)
Load the We_Hack_Wii package to an SD Card
Install homebrew and boot Mii
Perform a NAND backup if necessary
Load DOP-Mii
DOP-Mii Checking for STUB files
Which IOS would you like ot use to install other IOSes?
Choose «IOS: 36»
Choose «IOS, BC, MIOS»
Press the left arrow on the D-Pad and cycle through the IOS’s.
Make sure IOS 222 and 249 are not marked (STUB) in the «Currently Installed» section (you can ignore the «Selected Version Details» section)
If either IOS 222 or 249 are marked (STUB) then uninstall them by pressing the minus (-) key on the Wiimote.
Now exit DOP-Mii and run the installer for either IOS 222 and/or 249
IOS 249 Installer
Launch the IOS 249 v19 Installer
Use the Left and Right buttons on the D-PAD to select «IOS 36» and press «A».
Press «A» again to accept the disclaimer.
Select «IOS38 v3867» as the Base IOS version.
Next choose «Network installation» as the installation more.
NOTE: turn off any proxy servers before proceeding
Press «A» to start the install.
The IOS should download and install.