1. Overview
In this tutorial, we’ll walk you through one of the easiest ways to try out Ubuntu Desktop on a virtual machine. VirtualBox is a general purpose virtualiser that is available across Linux, Mac OS and Windows. It’s a great way to experience Ubuntu regardless of your current operating system.
VirtualBox 7 and above includes a new feature called Unattended Guest OS Install which significantly streamlines the setup experience for common operating systems like Ubuntu, making it easier than ever to get started.
Note: This tutorial will also work for other distributions, so try it out with some of the Ubuntu flavours as well!
What you’ll learn
- How to install and configure VirtualBox
- How to import an Ubuntu image
- How to run a virtual instance of Ubuntu Desktop
- Further configuration options
What you’ll need
- A PC with internet access!
Download an Ubuntu Image
Duration: 3:00
You can download an Ubuntu image here. Make sure to save it to a memorable location on your PC! For this tutorial, we will use the latest Ubuntu 22.10 release.

Download and install VirtualBox
Duration: 5:00
You can download VirtualBox from the downloads page here. This page includes instructions on how to install VirtualBox for your specific OS so we won’t repeat those here.
Once you have completed the installation, go ahead and run VirtualBox.

2. Create a new virtual machine
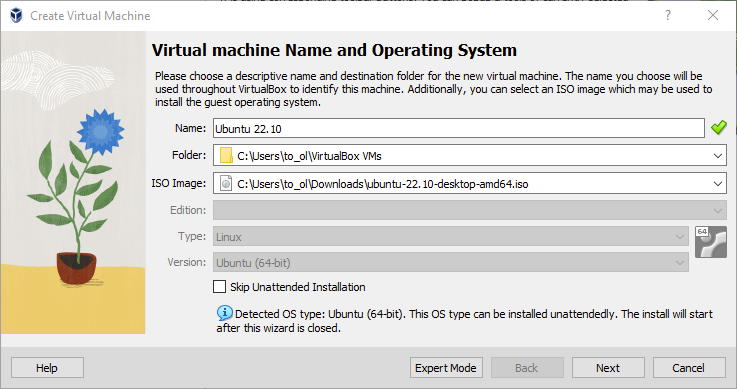
Click New to create a new virtual machine. Fill in the appropriate details:
- Name: If you include the word Ubuntu in your name the Type and Version will auto-update.
- Machine Folder: This is where your virtual machines will be stored so you can resume working on them whenever you like.
- ISO Image: Here you need to add a link to the ISO you downloaded from the Ubuntu website.
We want to install Ubuntu unattendedly so we can leave the checkbox to skip unchecked.
Create a user profile
To enable the automatic install we need to prepopulate our username and password here in addition to our machine name so that it can be configured automatically during first boot.
The default credentials are:
- Username: vboxuser
- Password: changeme
It is important to change these values since the defaults will create a user without sudo access.
Ensure your Hostname has no spaces to proceed!
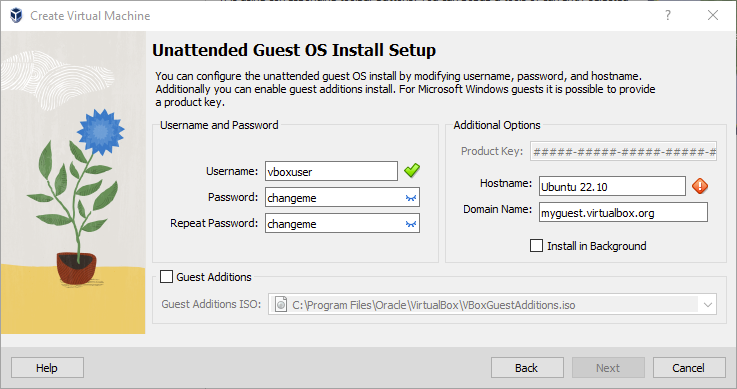
It is also recommended to check the Guest Additions box to install the default Guest Additions ISO that is downloaded as part of VirtualBox. Guest additions enables a number of quality of life features such as changing resolution and dynamic screen resizing so it is highly recommended!
Note: If you choose not to use unattended install then this step will be skipped and you will go straight to the following screen. Once your machine has been created you will be able to create a username and password by proceeding through the standard Ubuntu Desktop installation flow on first boot.
Define the Virtual Machine’s resources
In the next section we can specifiy how much of our host machine’s memory and processors the virtual machine can use. For good performance it’s recommended to provide your VM with around 8GB of RAM (althought 4GB will still be usable) and 4 CPUs. Try to remain in the green areas of each slider to prevent issues with your machine running both the VM and the host OS.

Then we need to specify the size of the hard disc for the virtual machine. For Ubuntu we recommend around 25 GB as a minimum. By default the hard disk will scale dynamically as more memory is required up to the defined limit. If you want to pre-allocate the full amount, check the ‘Pre-allocate Full Size’ check box. This will improve performance but may take up unnecessary space.
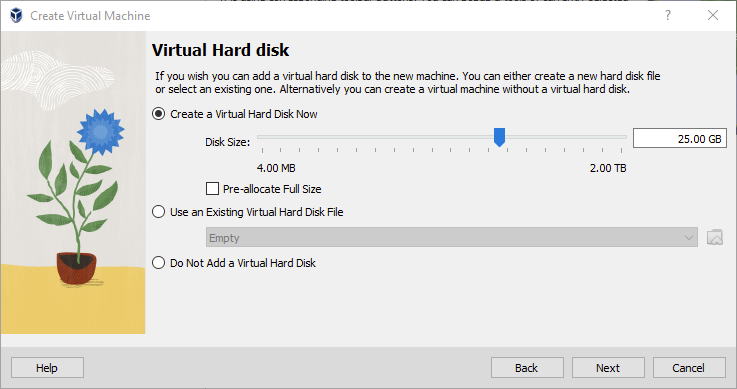
Click Next to continue and view a summary of your machine setting.

After this click Finish to initialize the machine!
3. Install your image
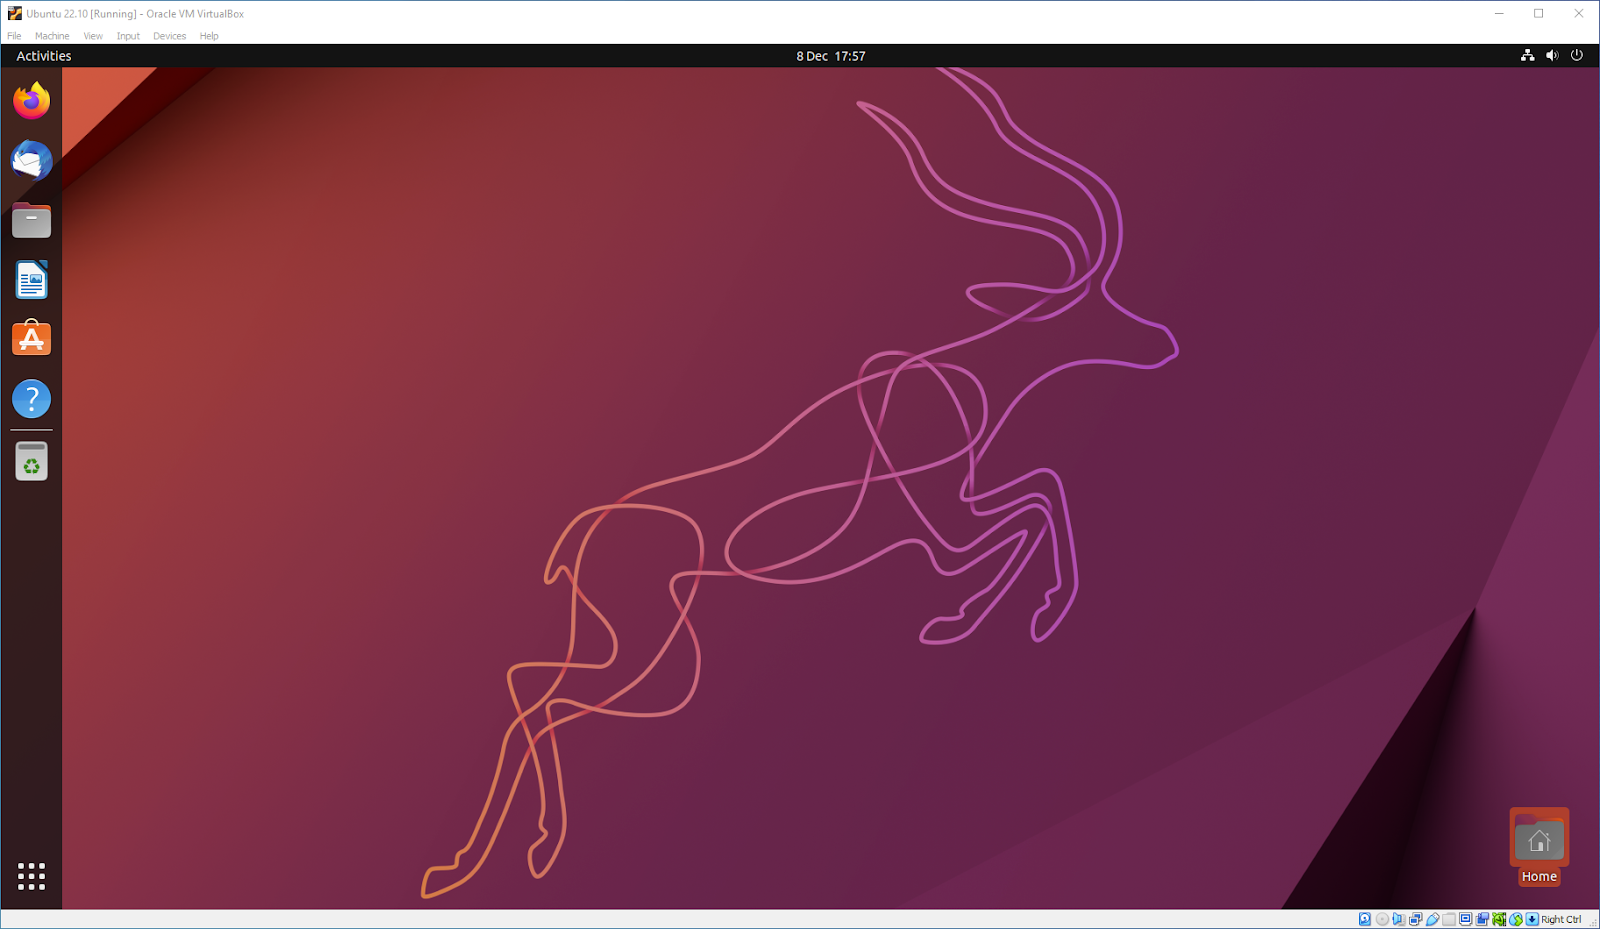
Click Start to launch the virtual machine.

You will see a message saying ‘Powering VM up …’ and your desktop window will appear.
On first boot the unattended installation will kick in so do not interact with the prompt to ‘Try and Install Ubuntu’ and let it progress automatically to the splash screen and into the installer.
Note: If you chose not to use unattended install then you will need to progress through the Ubuntu install manually. Check out our Ubuntu Desktop installation tutorial for more details.

You will notice at this stage that the resolution of the window is fixed at 800×600. This is because the Guest Additions features are not installed until after the Ubuntu installation has completed.

Once the installation completes, the machine will automatically reboot to complete the installation.

Finally you will be greeted with the Ubuntu log-in screen where you can enter your username and password defined during the initial setup (don’t forget that the default password is ‘changeme’ if you left everything as the default).

4. Explore Virtual Box
Enjoy your shiny new Ubuntu Desktop!
As always we recommend opening a terminal and running sudo apt update && sudo apt upgrade -y and then sudo snap refresh to get everything updated to the latest versions.
Once you’ve finished your session you can close your machine by clicking the X in the top right of the window and choosing whether to keep your machine frozen in its current state or shut it down completely.

As you can probably tell, there are tonnes of further configuration options available in VirtualBox and we’ve only scratched the surface.
VirtualBox allows you to create and configure multiple virtual machines, so don’t be afraid to create new instances of Ubuntu to try out different system and storage configurations to fine tune your performance.
Why not try following the tutorial above with one of the Ubuntu flavours!

Download and install VirtualBox
Duration: 5:00
You can download VirtualBox from the downloads page here. This page includes instructions on how to install VirtualBox for your specific OS so we won’t repeat those here.
Once you have completed the installation, go ahead and run VirtualBox.
2. Create a new virtual machine
Click New to create a new virtual machine. Fill in the appropriate details:
- Name: If you include the word Ubuntu in your name the Type and Version will auto-update.
- Machine Folder: This is where your virtual machines will be stored so you can resume working on them whenever you like.
- ISO Image: Here you need to add a link to the ISO you downloaded from the Ubuntu website.
We want to install Ubuntu unattendedly so we can leave the checkbox to skip unchecked.
Create a user profile
To enable the automatic install we need to prepopulate our username and password here in addition to our machine name so that it can be configured automatically during first boot.
The default credentials are:
- Username: vboxuser
- Password: changeme
It is important to change these values since the defaults will create a user without sudo access.
Ensure your Hostname has no spaces to proceed!
It is also recommended to check the Guest Additions box to install the default Guest Additions ISO that is downloaded as part of VirtualBox. Guest additions enables a number of quality of life features such as changing resolution and dynamic screen resizing so it is highly recommended!
Note: If you choose not to use unattended install then this step will be skipped and you will go straight to the following screen. Once your machine has been created you will be able to create a username and password by proceeding through the standard Ubuntu Desktop installation flow on first boot.
Define the Virtual Machine’s resources
In the next section we can specifiy how much of our host machine’s memory and processors the virtual machine can use. For good performance it’s recommended to provide your VM with around 8GB of RAM (althought 4GB will still be usable) and 4 CPUs. Try to remain in the green areas of each slider to prevent issues with your machine running both the VM and the host OS.
Then we need to specify the size of the hard disc for the virtual machine. For Ubuntu we recommend around 25 GB as a minimum. By default the hard disk will scale dynamically as more memory is required up to the defined limit. If you want to pre-allocate the full amount, check the ‘Pre-allocate Full Size’ check box. This will improve performance but may take up unnecessary space.
Click Next to continue and view a summary of your machine setting.
After this click Finish to initialize the machine!
3. Install your image
Click Start to launch the virtual machine.
You will see a message saying ‘Powering VM up …’ and your desktop window will appear.
On first boot the unattended installation will kick in so do not interact with the prompt to ‘Try and Install Ubuntu’ and let it progress automatically to the splash screen and into the installer.
Note: If you chose not to use unattended install then you will need to progress through the Ubuntu install manually. Check out our Ubuntu Desktop installation tutorial for more details.
You will notice at this stage that the resolution of the window is fixed at 800×600. This is because the Guest Additions features are not installed until after the Ubuntu installation has completed.
Once the installation completes, the machine will automatically reboot to complete the installation.
Finally you will be greeted with the Ubuntu log-in screen where you can enter your username and password defined during the initial setup (don’t forget that the default password is ‘changeme’ if you left everything as the default).
4. Explore Virtual Box
Enjoy your shiny new Ubuntu Desktop!
As always we recommend opening a terminal and running sudo apt update && sudo apt upgrade -y and then sudo snap refresh to get everything updated to the latest versions.
Once you’ve finished your session you can close your machine by clicking the X in the top right of the window and choosing whether to keep your machine frozen in its current state or shut it down completely.
As you can probably tell, there are tonnes of further configuration options available in VirtualBox and we’ve only scratched the surface.
VirtualBox allows you to create and configure multiple virtual machines, so don’t be afraid to create new instances of Ubuntu to try out different system and storage configurations to fine tune your performance.
Why not try following the tutorial above with one of the Ubuntu flavours!
5. Tell us your thoughts!
Thank you for following this tutorial, we’d love to hear how you got on.
Give us feedback in the Ubuntu Discourse if you have any issues.
To help us improve our tutorials, we’d love to hear more about you:
How will you use this tutorial?
Only read through it
Complete the exercise
What is your current level of experience?
Novice
Intermediate
Proficient
What operating system are you following this tutorial on?
Ubuntu
Other Linux OS
Windows
Mac OS
Was this tutorial useful?
Thank you for your feedback.
![]()
Загрузить PDF
![]()
Загрузить PDF
Из этой статьи вы узнаете, как на компьютере установить Ubuntu Linux в VirtualBox. VirtualBox — это программа, в которой можно установить дополнительную операционную систему, причем основная система компьютера не изменится.
-

1
Откройте веб-сайт Ubuntu. Перейдите на страницу https://www.ubuntu.com/download/desktop в веб-браузере компьютера. Здесь можно скачать образ диска (ISO-файл) Ubuntu.
-

2
Прокрутите вниз до последней версии Ubuntu. Вы найдете ее в нижней части страницы.
-

3
Щелкните по Download (Скачать). Это зеленая кнопка справа от выбранной вами версии Ubuntu. Откроется новая страница.
-

4
Прокрутите вниз и нажмите Not now, take me to the download (Не сейчас, начать загрузку). Эта ссылка находится в нижнем левом углу страницы.
-

5
Убедитесь, что началась загрузка ISO-файла. В противном случае щелкните по ссылке «Download now» (Скачать сейчас) в верхней части страницы. Пока ISO-файл будет скачиваться, создайте и настройте виртуальную машину в VirtualBox.
Реклама
-

1
Установите VirtualBox. Сделайте это, если на компьютере (с Windows или Mac OS X) нет этой программы.
-

2
Запустите VirtualBox. Дважды щелкните (или щелкните один раз на компьютере Mac) по значку программы VirtualBox.
-

3
Нажмите Создать. Это синий значок в верхнем левом углу окна VirtualBox. Откроется всплывающее меню.
-

4
Введите имя виртуальной машины. Введите любое имя (например, Ubuntu) в текстовом поле «Имя», которое находится в верхней части всплывающего меню.
-

5
Выберите «Linux» в меню «Тип». Откройте это меню и выберите «Linux».
-

6
Выберите «Ubuntu» в меню «Версия». В этом меню опция «Ubuntu» должна отобразится по умолчанию, когда вы выберете «Linux» в меню «Тип»; в противном случае откройте меню «Версия» и нажмите «Ubuntu (64-bit)».
-

7
Щелкните по Далее. Эта кнопка находится в нижней части меню.
-

8
Укажите размер оперативной памяти. Перетащите ползунок влево или вправо, чтобы уменьшить или увеличить объем оперативной памяти, который будет использоваться виртуальной машиной Ubuntu.
- По умолчанию будет выбран оптимальный объем оперативной памяти.
- Не перетаскивайте ползунок на красную область – сделайте так, чтобы выбранное значение находилось в пределах зеленой области.
-

9
Щелкните по Далее. Эта кнопка находится в нижней части меню.
-

10
Создайте виртуальный жесткий диск виртуальной машины. Виртуальный жесткий диск — это раздел на жестком диске компьютера, который будет использоваться для хранения файлов и программ виртуальной машины:
- нажмите «Создать»;
- нажмите «Далее»;
- нажмите «Далее»;
- укажите емкость виртуально жесткого диска;
- нажмите «Создать».
-

11
Проверьте, скачался ли образ Ubuntu. Если да, установите эту систему в VirtualBox.
Реклама
-

1
Дважды щелкните по имени созданной виртуальной машины. Оно находится в левой части окна VirtualBox. Откроется меню.
-

2
Щелкните по значку в виде папки. Он находится в нижней правой части меню. Откроется новое окно, в котором можно выбрать скачанный ISO-файл.
-

3
Выберите ISO-файл. Перейдите в папку со скачанным файлом и щелкните по нему.
-

4
Нажмите Открыть. Эта кнопка находится в нижнем правом углу окна. ISO-файл откроется в VirtualBox.
-

5
Нажмите Запустить. Эта опция находится в нижней части меню. Запустится установщик Ubuntu.
-

6
Щелкните по Установить Ubuntu. Эта опция находится справа в окне VirtualBox.
-

7
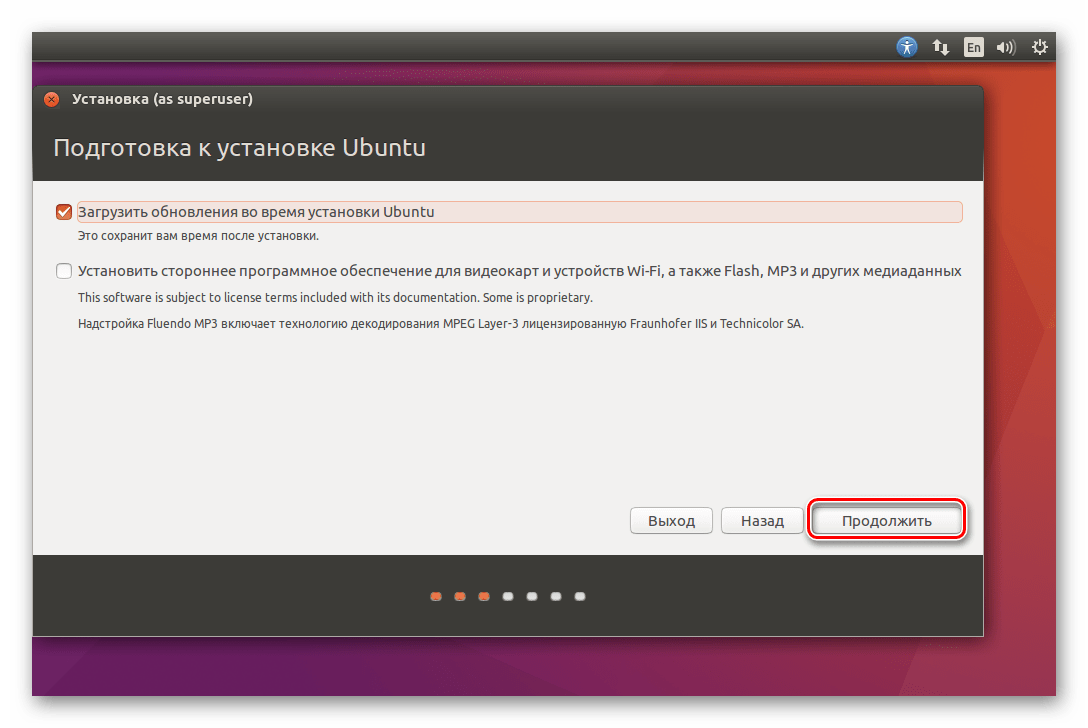
Установите флажки у обеих опций в окне «Подготовка к установке Ubuntu». Так вы установите полную версию Ubuntu.
-

8
Щелкните по Продолжить. Эта кнопка находится в нижнем правом углу страницы.
-

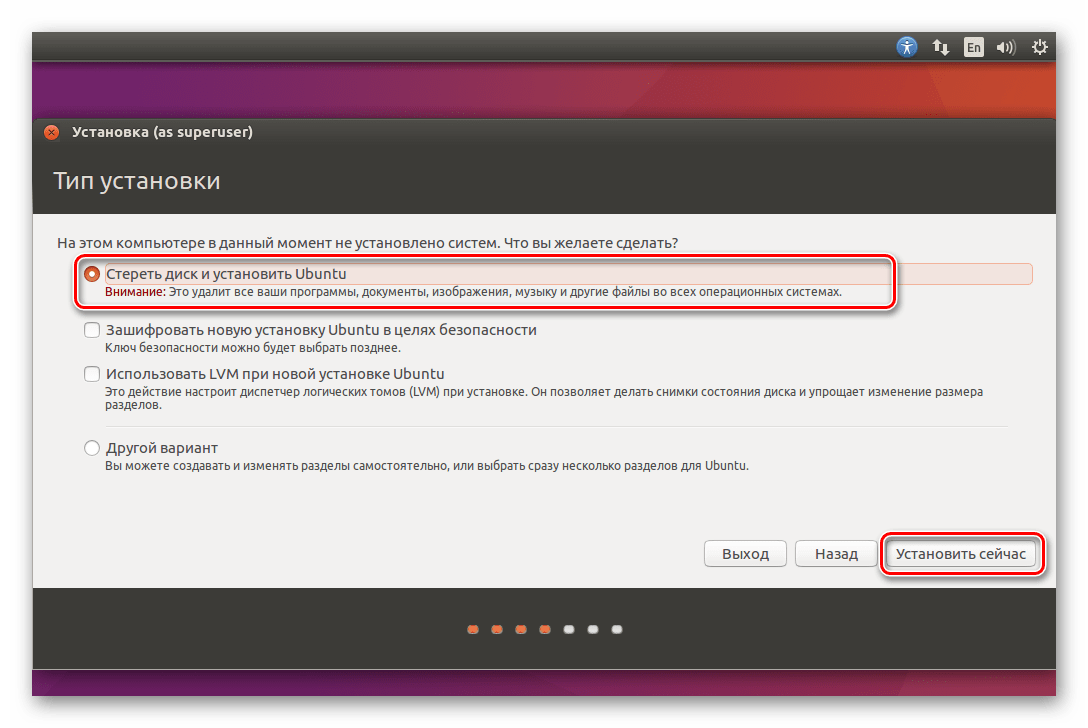
9
Установите флажок у опции «Стереть диск и установить Ubuntu». Не волнуйтесь — информация, которая хранится на жестком диске компьютера, не пострадает.
-

10
Нажмите Установить. Эта опция находится в нижнем правом углу страницы.
-

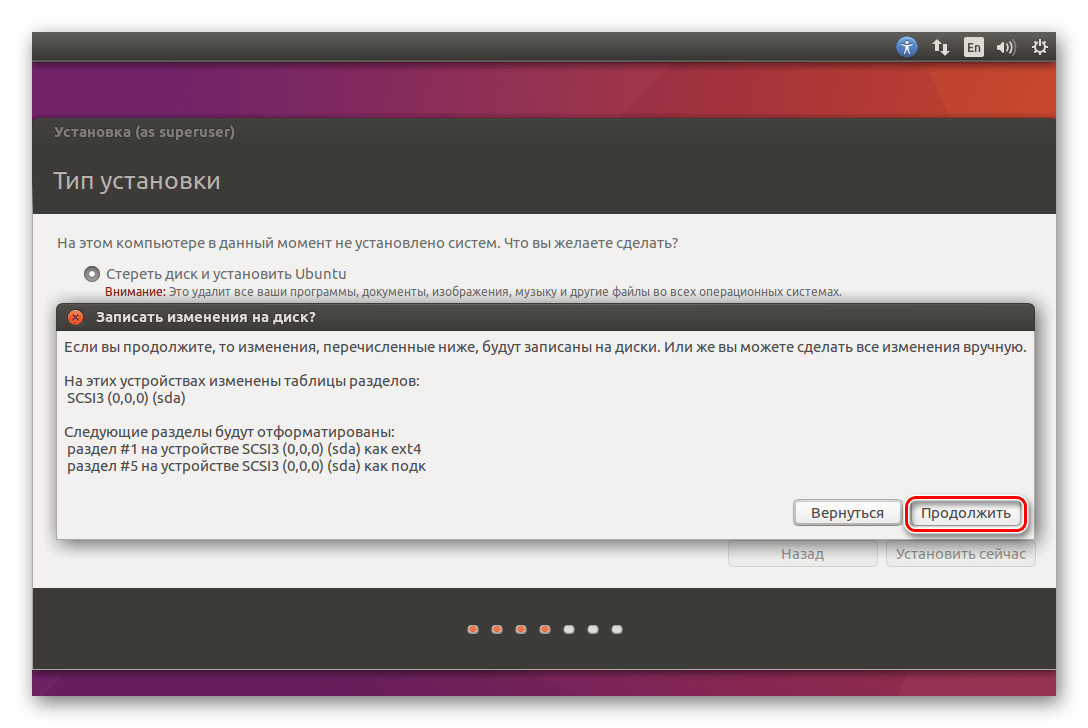
11
Щелкните по Продолжить, когда появится запрос. Так вы подтвердите, что виртуальный диск будет очищен (в любом случае на нем ничего нет); запустится процесс установки Ubuntu.
Реклама
-

1
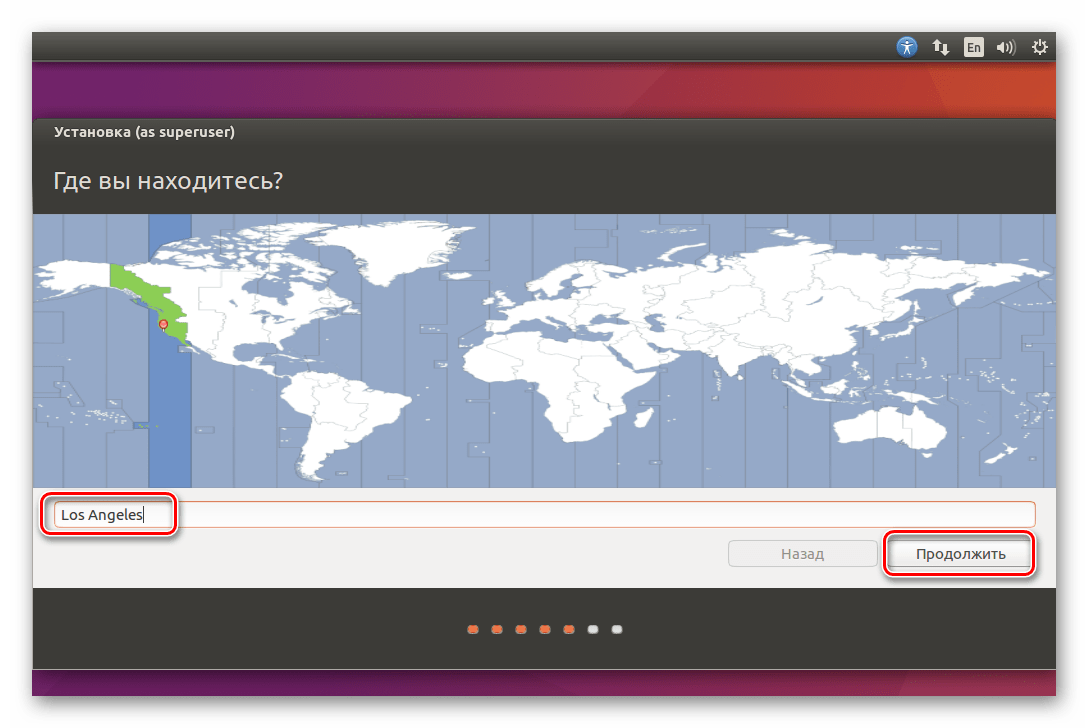
Выберите часовой пояс. На карте щелкните по часовому поясу, в котором вы находитесь.
-

2
Нажмите Продолжить. Эта кнопка находится в нижнем правом углу страницы.
-

3
Активируйте экранную клавиатуру. Щелкните по значку в виде человека в верхней правой части окна, а затем нажмите на переключатель «Экранная клавиатура», чтобы открыть ее. Чтобы пользоваться физической клавиатурой, нужны драйверы, поэтому вы не сможете работать с ней, пока не настроите Ubuntu.
-

4
Введите свое имя. Сделайте это в текстовом поле «Имя» в верхней части окна.
- Когда вы введете имя, автоматически будет создано имя компьютера в виртуальной машине; если вы хотите изменить имя компьютера, введите его в поле «Имя компьютера».
-

5
Введите имя пользователя. Сделайте это в текстовом поле «Имя пользователя».
-

6
Создайте пароль. Введите пароль в текстовом поле «Пароль», а затем еще раз введите его в текстовом поле «Подтвердить пароль».
-

7
Щелкните по Продолжить. Эта кнопка находится в нижней части страницы.
- Если нужно, измените параметры входа в систему под текстовым полем «Подтвердить пароль».
-

8
Дождитесь, когда установка Ubuntu будет завершена. На это уйдет от нескольких минут до получаса в зависимости от быстродействия компьютера.
- Весь процесс пройдет в автоматическом режиме, то есть ваше участие не требуется.
-

9
Перезапустите виртуальную машину. Когда на экране появится кнопка «Перезапустить сейчас», сделайте следующее: нажмите «Выход» в верхнем правом (Windows) или в верхнем левом (Мас) углу окна, установите флажок у «Выключить машину», нажмите «ОК», а затем дважды щелкните по имени виртуальной машины.
-

10
Войдите в виртуальную систему. Когда виртуальная машина запустится, выберите свое имя, введите пароль и нажмите «Войти». Ubuntu запустится в виртуальной машине, но с этой системой можно работать как с обычной (не виртуальной) системой.
Реклама
Советы
- В виртуальной системе можно устанавливать программы, но не забывайте, что емкость виртуального жесткого диска ограничена.
Реклама
Предупреждения
- Виртуальная система будет работать не очень быстро, но это нормально, потому что на самом деле на одном компьютере вы запустите две операционные системы.
- Убедитесь, что на физическом жестком диске достаточно места, чтобы создать виртуальный жесткий диск. Например, если VirtualBox предлагает создать виртуальный жесткий диск емкостью 8 ГБ, убедитесь, что свободное пространство физического жесткого диска превышает 8 ГБ.
Реклама
Об этой статье
Эту страницу просматривали 177 196 раз.
Была ли эта статья полезной?
Содержание
- Подробный видео-урок:
- Установка Linux Ubuntu на виртуальную машину
- Этап 1: Подготовка к установке
- Этап 2: Работа c образом диска
- Этап 3: Установка
- Этап 4: Ознакомление с операционной системой
- Вопросы и ответы
В этой статье мы детально рассмотрим то, как установить Linux Ubuntu на VirtualBox — программу для создания виртуальной машины на компьютере.
Подробный видео-урок:
Установка Linux Ubuntu на виртуальную машину
Такой подход к инсталляции поможет в удобной форме протестировать интересующую вас систему, исключив ряд сложных манипуляций, в числе которых необходимость переустановки основной ОС и разметки диска.
Этап 1: Подготовка к установке
- Для начала запустите VirtualBox. Кликните на кнопку «Создать».
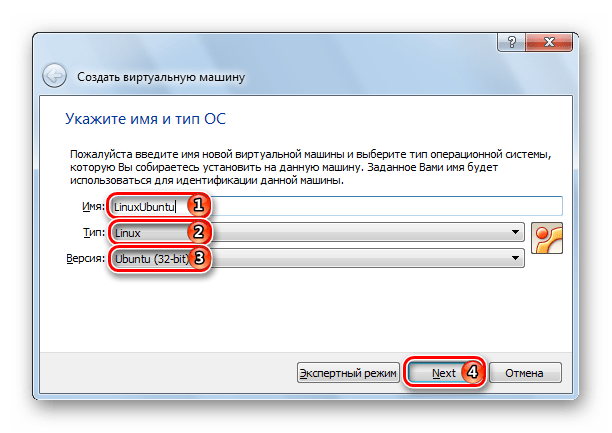
- После этого откроется небольшое окно, в котором вам предстоит вручную ввести в поле название создаваемой виртуальной машины. В выпадающих списках укажите наиболее подходящие варианты. Проверьте, совпадает ли ваш выбор с показанным на изображении. Если да, то вы все сделали верно. Жмите «Next».
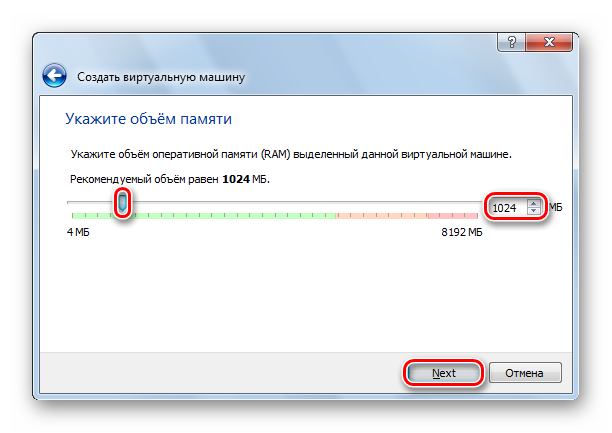
- Вы видите перед собой окно, в котором следует указать, какой объем оперативной памяти компьютера вы готовы выделить для нужд виртуальной машины. Значение можно изменить при помощи ползунка или в окне справа. Зеленым выделена область значений, которые более предпочтительны для выбора. После проведения манипуляций нажмите «Next».
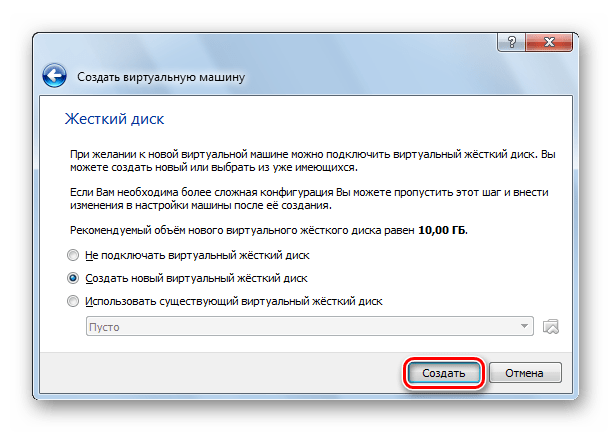
- Программа предложит вам определиться, в каком месте будет располагаться хранилище данных новой операционной системы. Рекомендуется выделить под это 10 гигабайт. Для таких ОС как Linux, этого более, чем достаточно. Оставьте выбор по умолчанию. Жмите «Создать».
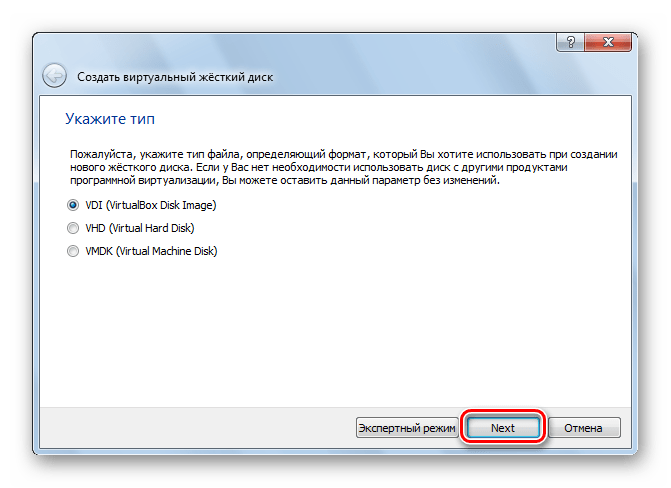
- Перед вами стоит выбор между тремя типами:
- VDI. Подойдет для простых целей, когда перед вами не стоит каких-то глобальных задач, а вы просто хотите протестировать ОС, идеально подойдет для домашнего использования.
- VHD. Его особенностями можно считать обмен данными с файловой системой, обеспечение безопасности, восстановление и резервное копирование (при необходимости), также имеется возможность конвертирования физических дисков в виртуальные.
- WMDK. Имеет схожие возможности со вторым типом. Его чаще используют в профессиональной деятельности.
Сделайте свой выбор или оставьте вариант по умолчанию. Кликните «Next».
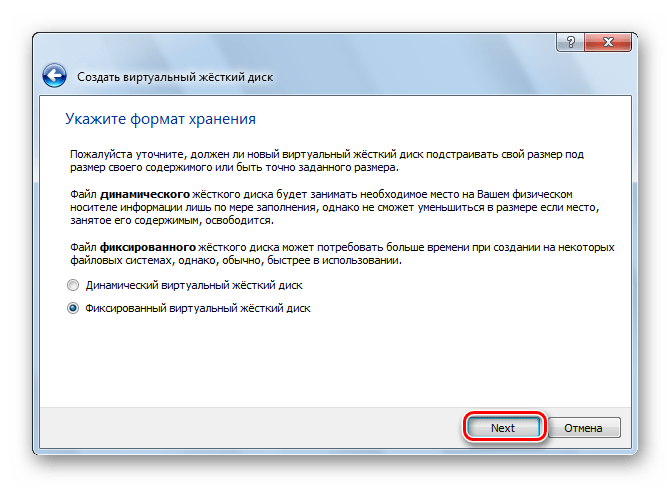
- Определитесь с форматом хранения. Если у вас очень много свободного пространства на жестком диске компьютера, смело выбирайте «Динамический», но помните, что вам будет сложно контролировать процесс распределения места в будущем. В случае, если вы хотите точно знать, какой объем памяти у вас займет виртуальная машина и не желаете, чтобы этот показатель менялся, кликайте на «Фиксированный». Нажмите кнопку «Next».
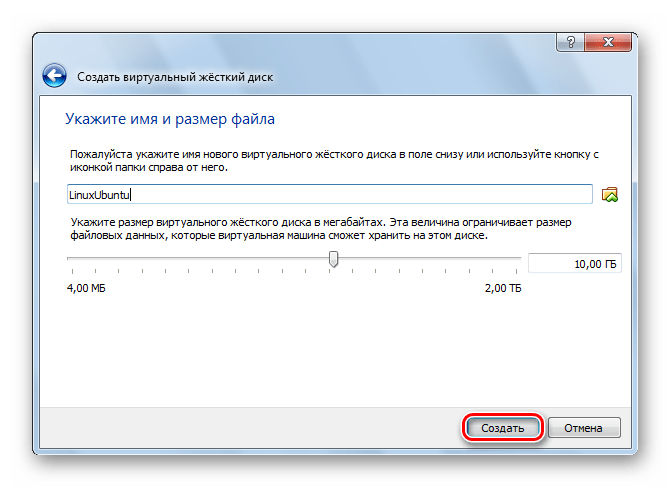
- Укажите имя и размер виртуального жесткого диска. Можете оставить значение по умолчанию. Жмите кнопку «Создать».
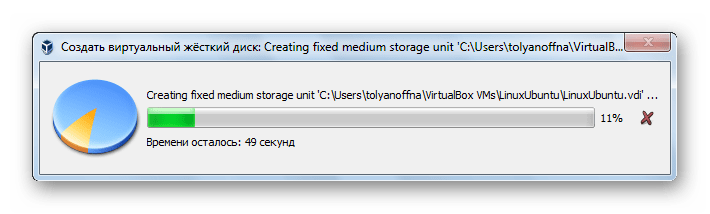
- Программе потребуется время для создания жесткого диска. Дождитесь окончания процесса.

Этап 2: Работа c образом диска
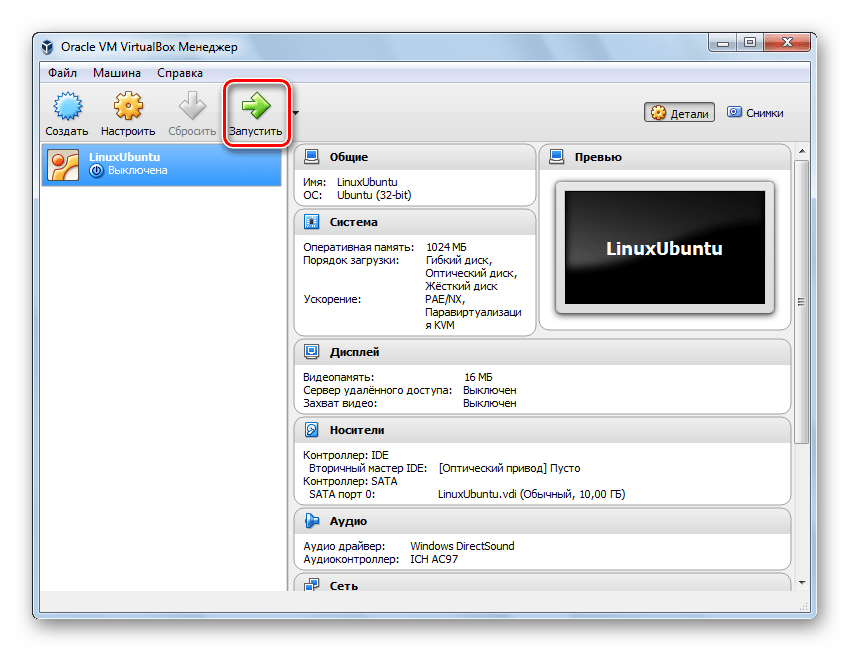
- В окне появится информация о том, что вы только что создали. Ознакомьтесь с отображаемыми на экране данными, они должны совпадать с ранее введенными. Для продолжения работы нажмите на кнопку «Запустить».
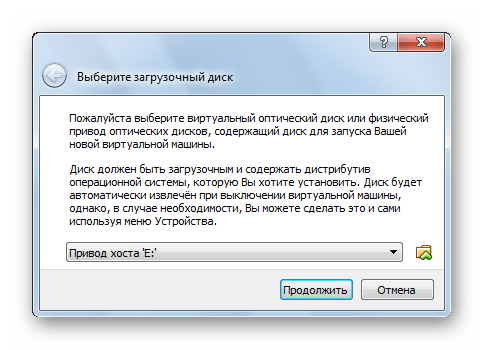
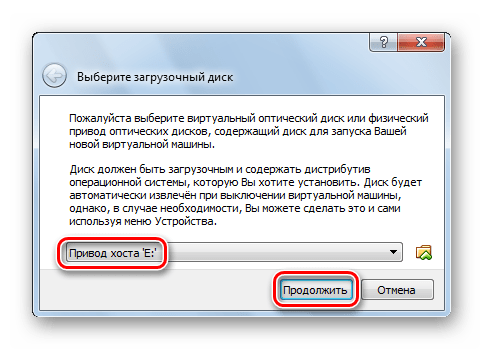
- VirtualBox попросит выбрать диск, на котором находится Ubuntu. При помощи любого из известных эмуляторов, например UltraISO, смонтируйте образ.
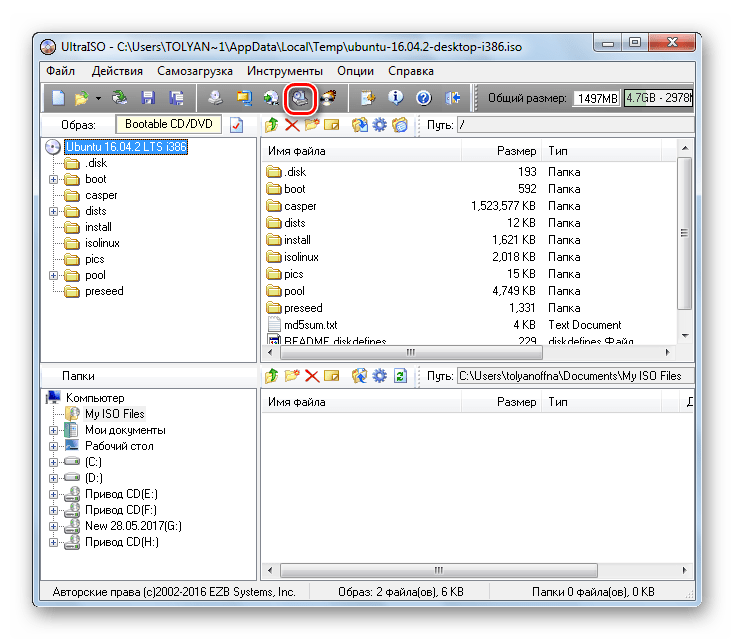
- Для того, чтобы монтировать дистрибутив в виртуальный привод, откройте его в UltraISO и нажмите кнопку «Монтировать».
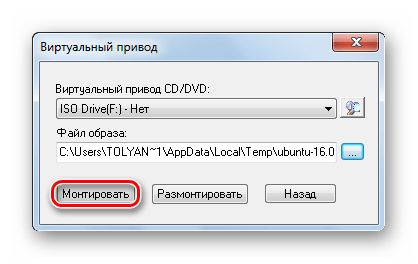
- В открывшемся небольшом окне нажмите «Монтировать».
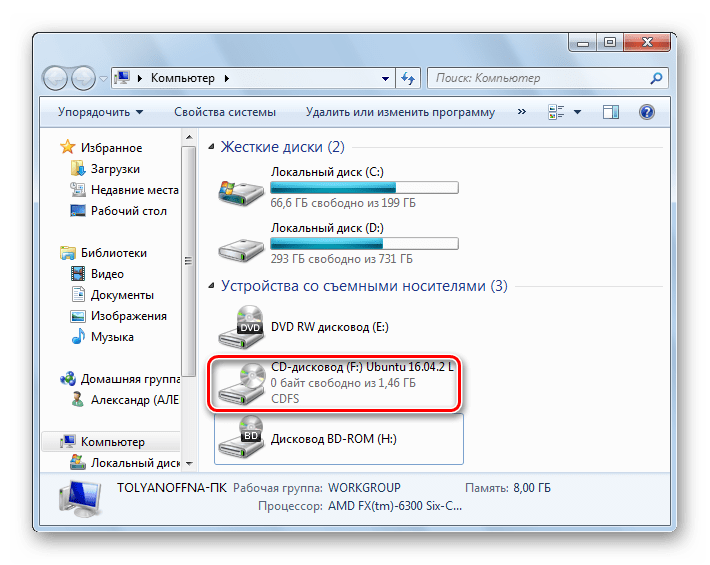
- Откройте «Мой компьютер» и удостоверьтесь, что диск смонтирован. Запомните, под какой буквой он отображается.
- Выберите букву диска и жмите «Продолжить».
Скачать Linux Ubuntu
Этап 3: Установка
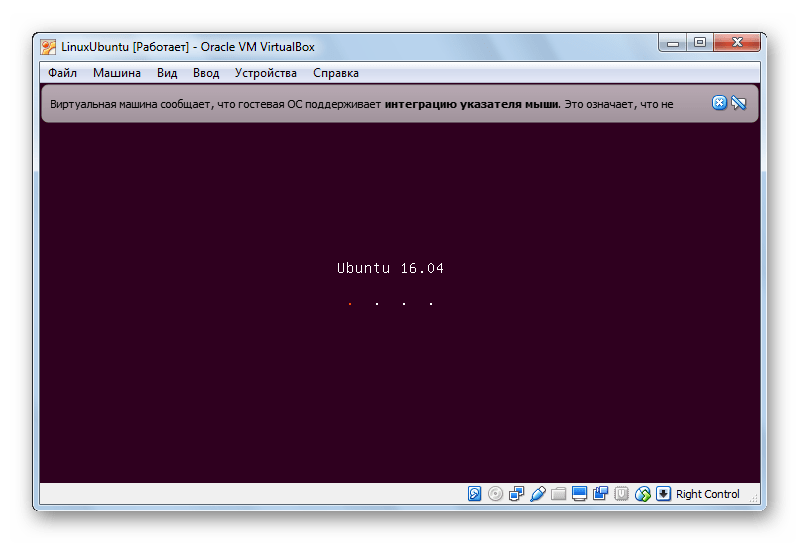
- Установщик Ubuntu запущен. Подождите, пока загрузятся необходимые данные.
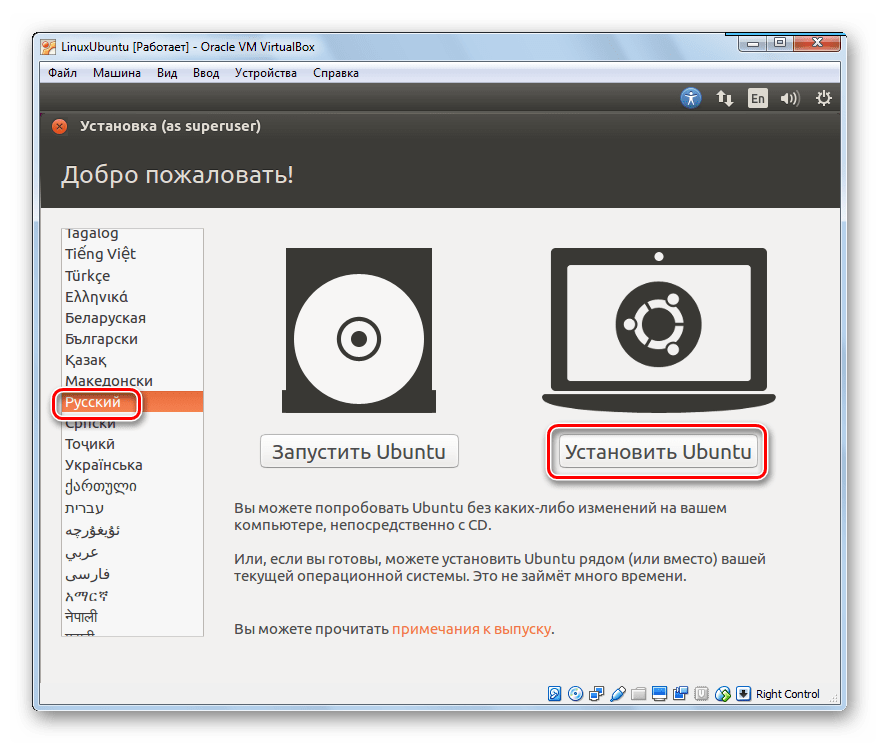
- Выберите язык из списка в левой части окна. Нажмите «Установить Ubuntu».
- Определитесь, хотите ли вы, чтобы обновления устанавливались в процессе установки либо со сторонних носителей. Нажмите «Продолжить».
- Так как на только что созданном виртуальном жестком диске нет информации, выберите первый пункт, кликните «Продолжить».
- Установщик Linux предостерегает вас от ошибочных действий. Ознакомьтесь с представленной вам информацией и смело жмите «Продолжить».
- Укажите ваше место пребывания и нажмите «Продолжить». Таким образом установщик определит, в каком часовом поясе вы находитесь и сможет правильно настроить время.
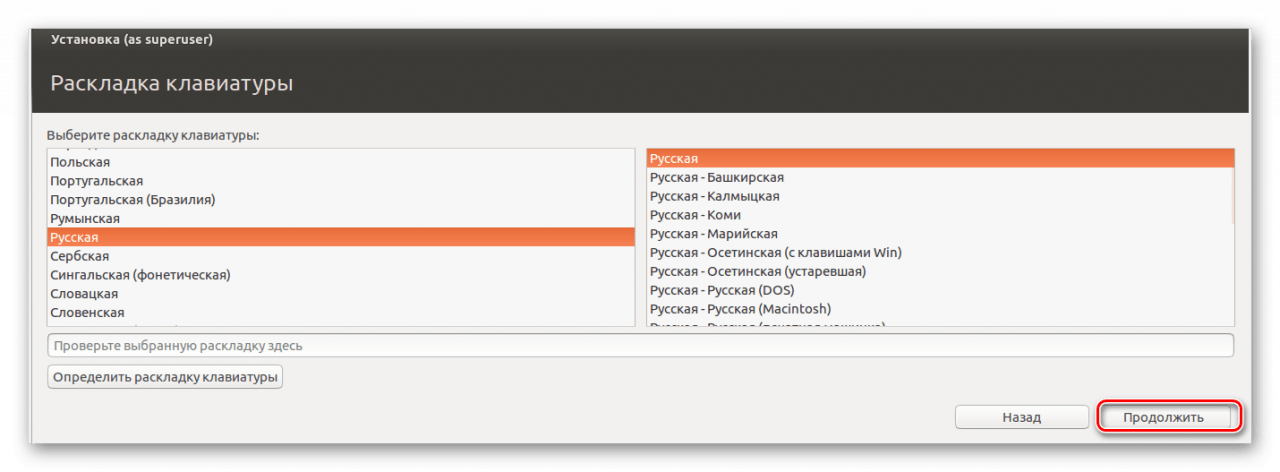
- Выберите язык и раскладку клавиатуры. продолжите установку.
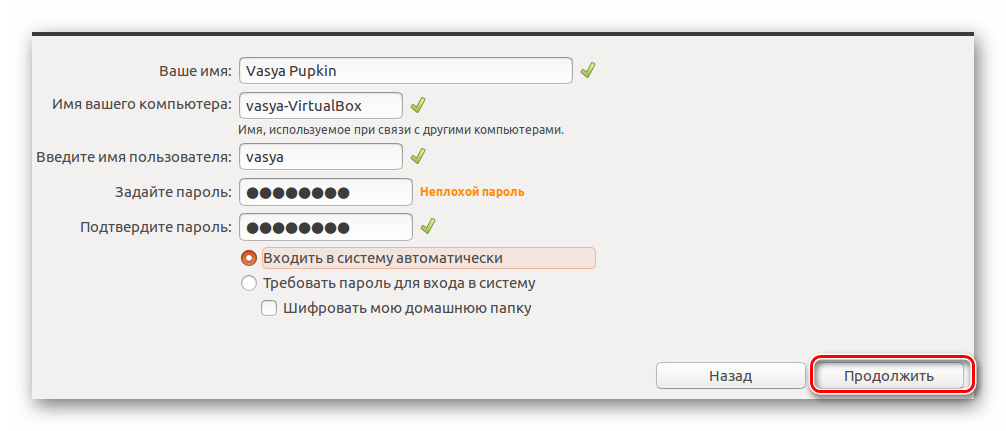
- Заполните все поля, что видите на экране. Выберите, хотите ли вы вводить пароль при входе, или же вход будет осуществляться автоматически. Нажмите кнопку «Продолжить».
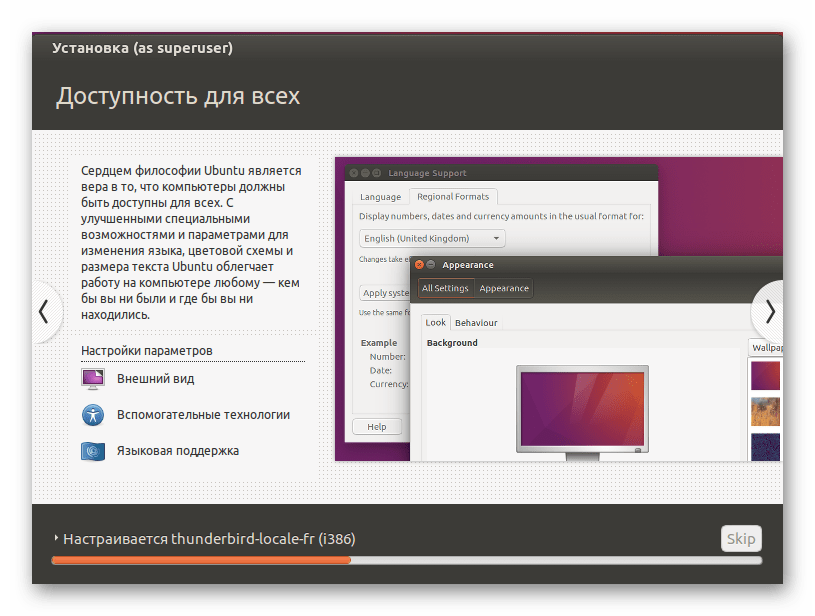
- Дождитесь окончания установки. Она может занять несколько минут. В процессе на экране будет появляться интересная, полезная информация об устанавливаемой ОС. Можете ознакомиться с ней.
Этап 4: Ознакомление с операционной системой
- После окончания установки перезапустите виртуальную машину.
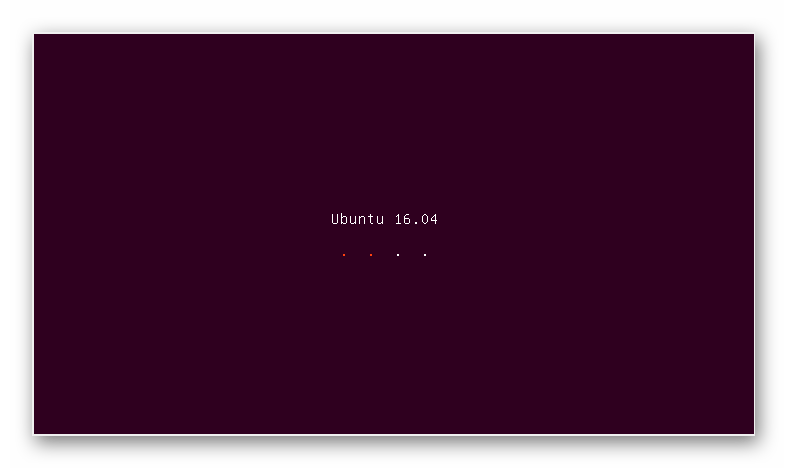
- После перезапуска будет загружена Linux Ubuntu.
- Ознакомьтесь с рабочим столом и возможностями ОС.

На самом деле, установить Ubuntu на виртуальную машину не так уж сложно. Для этого не нужно быть опытным пользователем. Достаточно лишь внимательно читать инструкции в процессе установки, и все получится!
Еще статьи по данной теме:
Помогла ли Вам статья?
Introduction
A virtual box is a software or environment that allows you to install an operating system on the virtual hard disk which provides the same functionality as physical hardware. For example, you can run Linux and Windows operating systems on your mac and Windows and mac operating system on your Linux operating system with the help of a virtual box. In simple words, you can run multiple OS on a single physical device.
In this article, I will provide you with different steps to install the Ubuntu 22.04 server in a virtual box.
Recommended System Requirements
The following prerequisites must be met before downloading and installing Ubuntu on Windows 10 using VirtualBox.
- Minimum 2 GB system memory
- Minimum 40 GB of free hard drive space
- Minimum 2 GHz dual-core processor
- Reliable internet connection to download virtual box and ubuntu 22.04 server iso file
Download the ubuntu Image
Downloading an ubuntu 22.04 server from official site of ubuntu (https://cdimage.ubuntu.com/daily-live/current/ )

Your program should prompt you to save the record. Select Save File and snap-on
Creating a virtual machine on a virtual box
After downloading the iso image of ubuntu 22.04, open the virtual box. Click new to create a virtual machine. Fill in the following information and click on next.
- Name: Name of your os
- Machine folder: This is where you stored your virtual machine
- Type: Linux
- Version: Ubuntu (64-bit)

And then select an amount of RAM to use. On the following screen, you will actually want to choose how much RAM from your fundamental PC the virtual machine will get to. For my situation, I have 8GB of actual RAM. I like to distribute however much as could reasonably be expected for Ubuntu yet leave some for my fundamental machine. I picked 4096MB for my Ubuntu server.

Create your virtual machine’s virtual hard drive. The virtual hard drive is a part of your PC’s hard drive space which will be utilised to store your virtual machine’s files. Accept the default setting of ‘Create a virtual hard drive now and press the ‘Create’ button.

Click the ‘Next’ button to accept the default ‘VDI’ drive file type.

To improve performance, change the storage type from ‘Dynamically allocated’ to ‘Fixed size.’

After that, you may choose how much space your virtual machine will take up on your hard drive.

After clicking on create button, virtual machine is initialized


In the optical drive you can browse the downloaded iso file.

Now you can start a virtual machine


Ubuntu will prompt you with a series of questions. Click the ‘Continue’ button if the default settings are OK.


Select “Erase disk and install Ubuntu” in the “Erase disk and install Ubuntu” drop-down menu. This may seem alarming, but rest assured that nothing on your computer will be lost.

In the ‘Who are you?’ discourse, enter your name, username, and secret phrase. Note that this client will have root/sudo honor. Click the ‘continue’ button.


The Ubuntu Desktop OS is prepared. You might observe the work area screen is excessively little. Sit back and relax. You can address this effectively with the “VirtualBox Guest Additions” settings.

The installation procedure is now complete. You may now use Ubuntu alongsidewithout having to create a dual boot system.
Conclusion
This article gives you an idea on Step by step installation of the Ubuntu 22.04 server in a virtual box. Thank you reading.

Karim Buzdar holds a degree in telecommunication engineering and holds several sysadmin certifications including CCNA RS, SCP, and ACE. As an IT engineer and technical author, he writes for various websites.
Virtual Machine abstracts the hardware of our personal computers such as CPU, disk drives, memory, NIC (Network Interface Card), etc, into many different execution environments as per our requirements, hence giving us a feeling that each execution environment is a single computer. For example, VirtualBox.
We can create a virtual machine for several reasons, all of which are fundamentally related to the ability to share the same basic hardware yet can also support different execution environments, i.e., different operating systems simultaneously.
To use Ubuntu along with Windows, one must have VirtualBox installed in their machine. For the installation of VirtualBox, visit How to install VirtualBox on Windows?
Downloading and Installing Ubuntu
Before, we begin with the installation process, we need to download ISO file for Ubuntu. For that, all the versions of Ubuntu are available on the official site ubuntu.com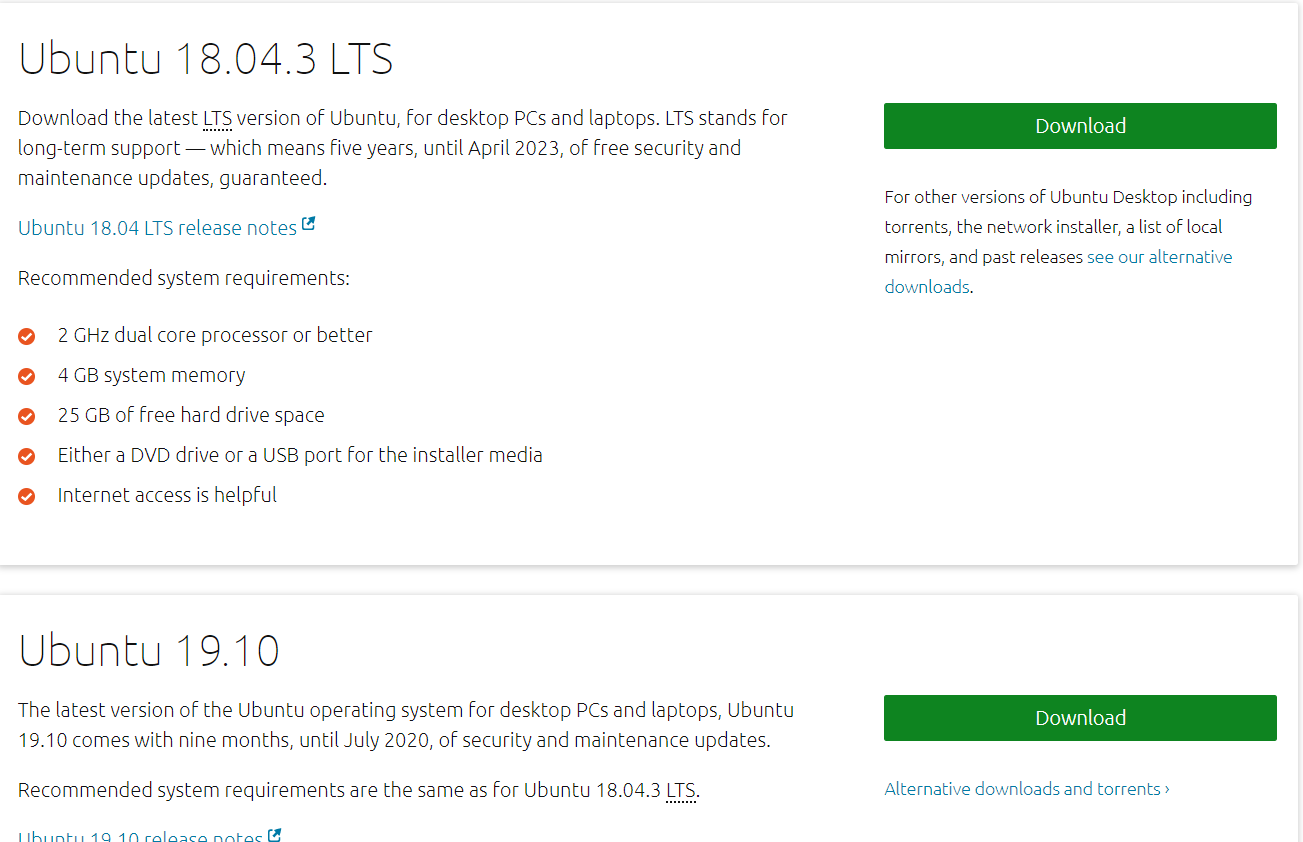
After the downloading is over, you can install Ubuntu on VirtualBox with the help of following instructions:
Step 1: Open VirtualBox and click on the New button.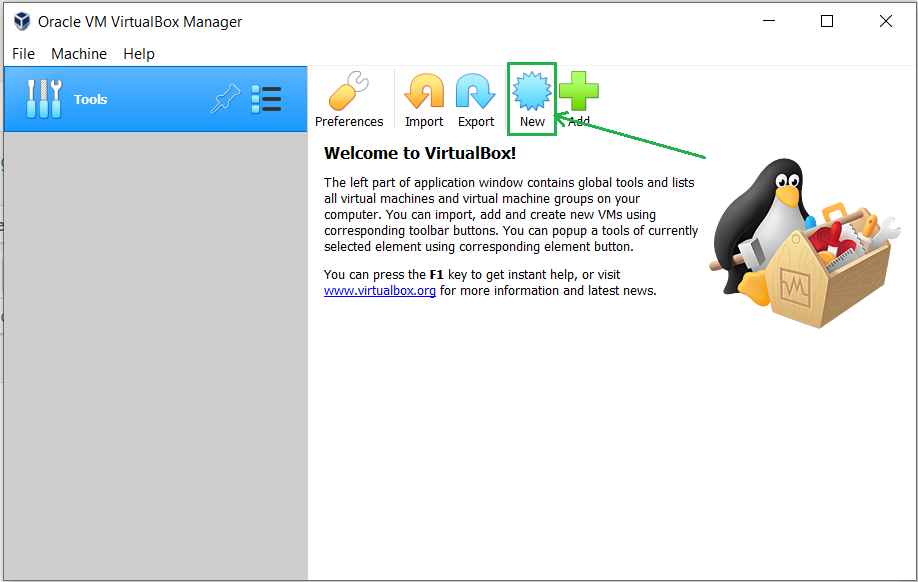
Step 2: Give a name to your Virtual Machine and select the location for it to install.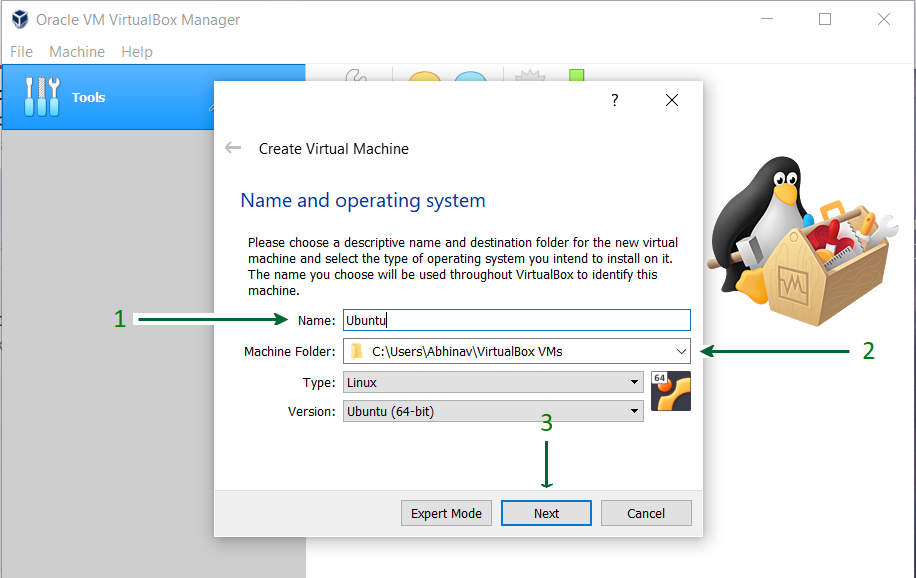
Step 3: Assign RAM size to your Virtual Machine.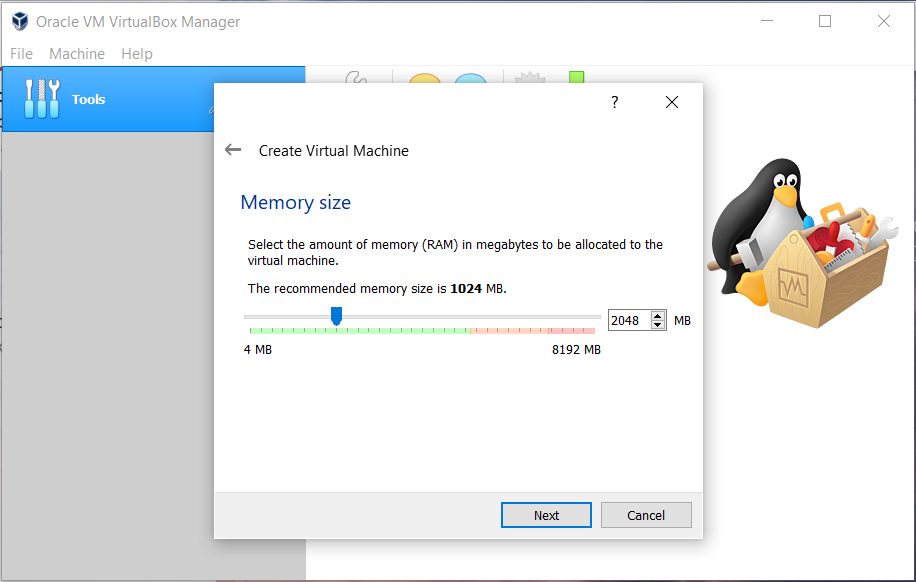
Step 4: Create a Virtual Hard disk for the machine to store files.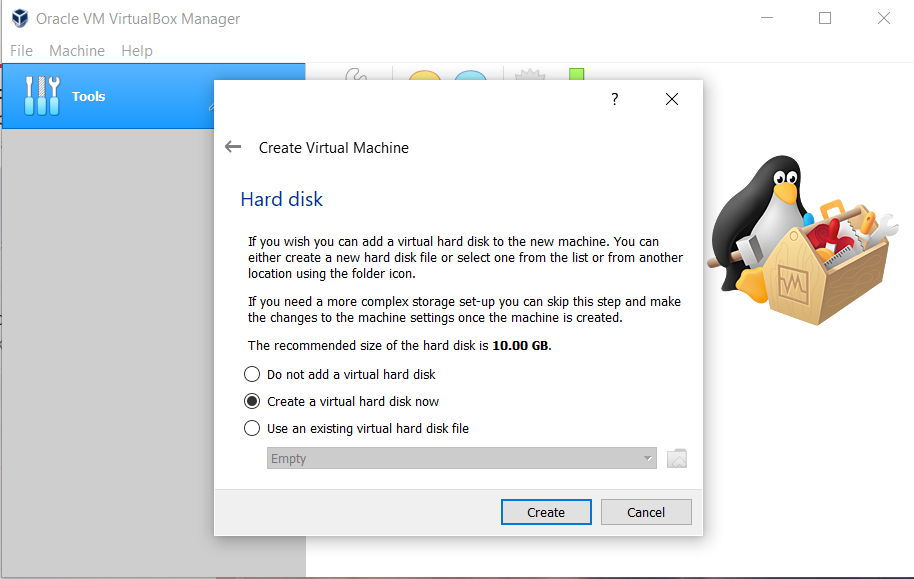
Step 5: Select the type of Hard disk. Using VDI type is recommended.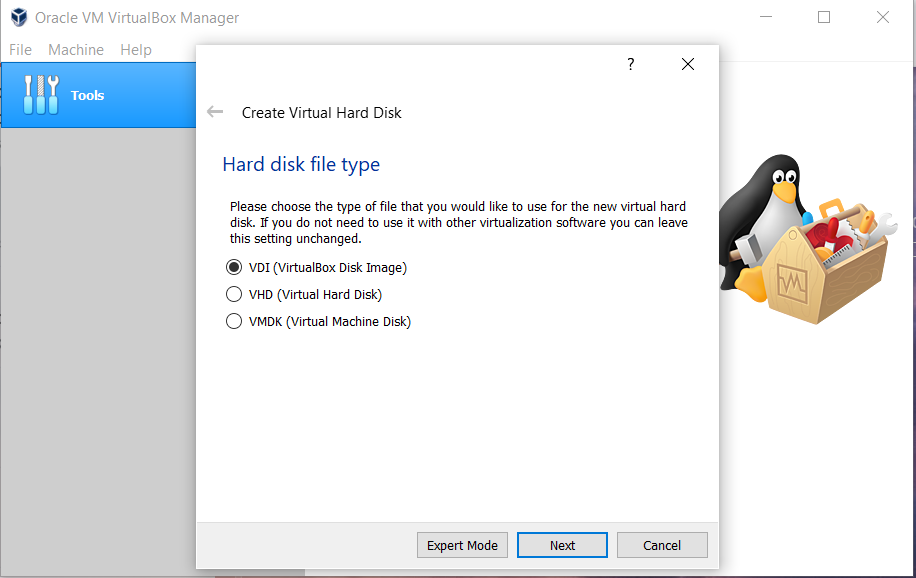
Step 6: Either of the physical storage type can be selected. Using Dynamically allocated disk is by default recommended.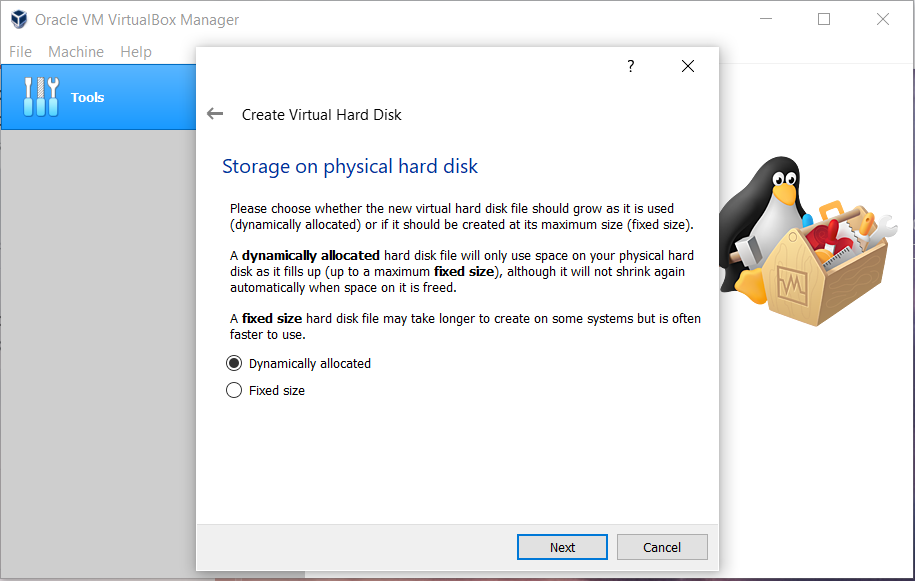
Step 7: Select disk size and provide the destination folder to install.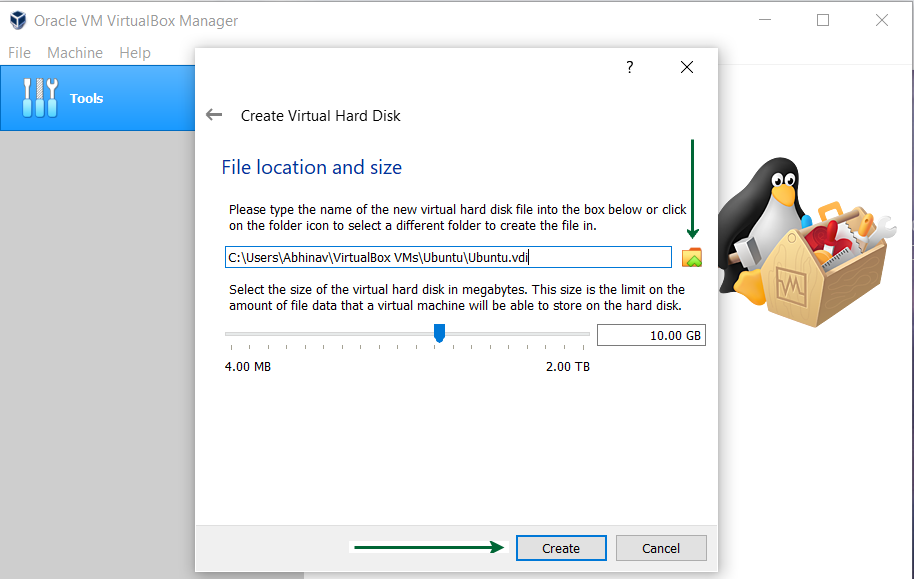
Step 8: After the Disk creation is done, boot the Virtual Machine and begin installing Ubuntu.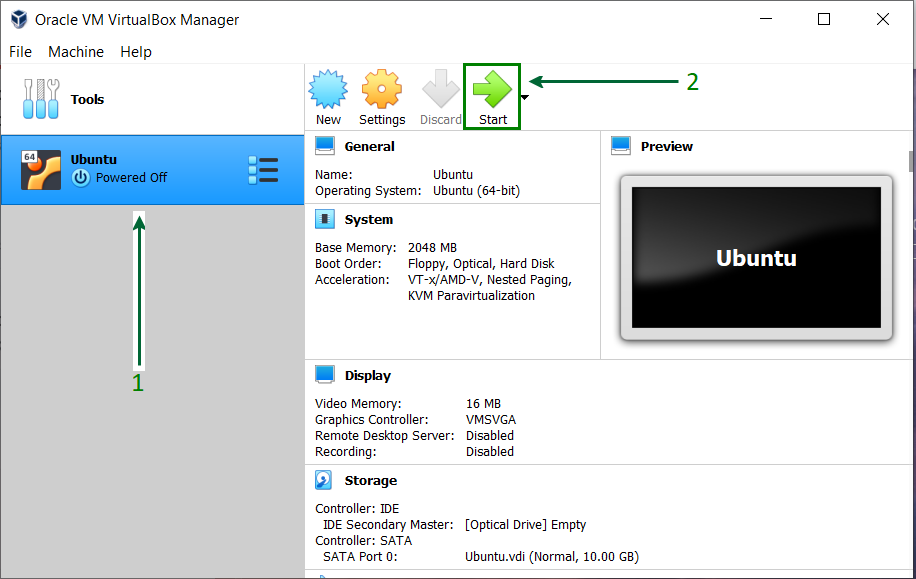
Step 9: If the installation disk is not automatically detected. Browse the file location and select the ISO file for Ubuntu.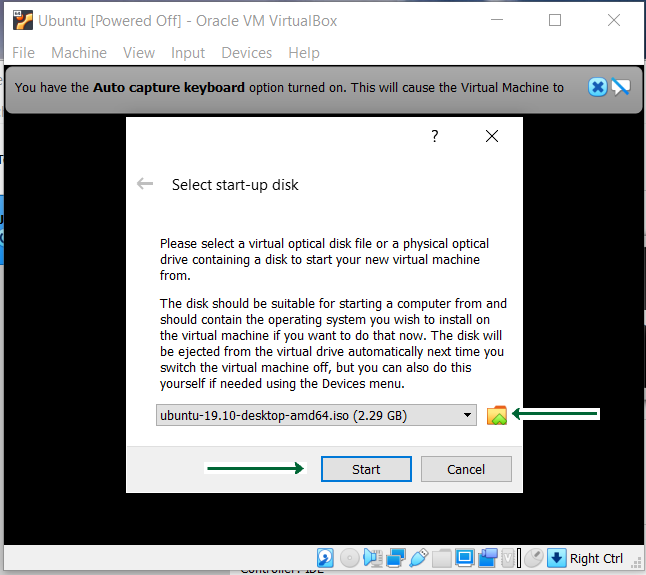
Step 10: Proceed with the installation file and wait for further options.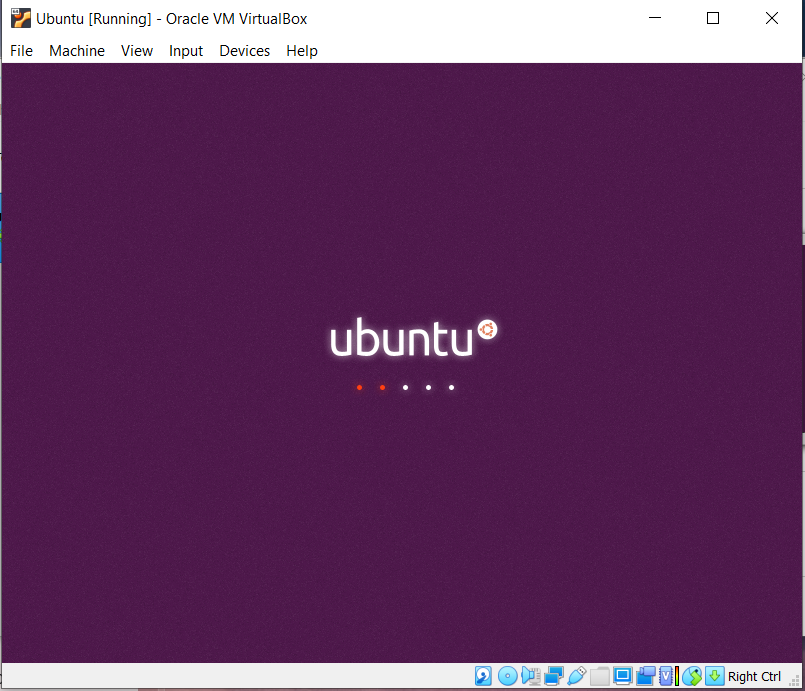
Step 11: Click on the Install Ubuntu option, this might look different for other Ubuntu versions.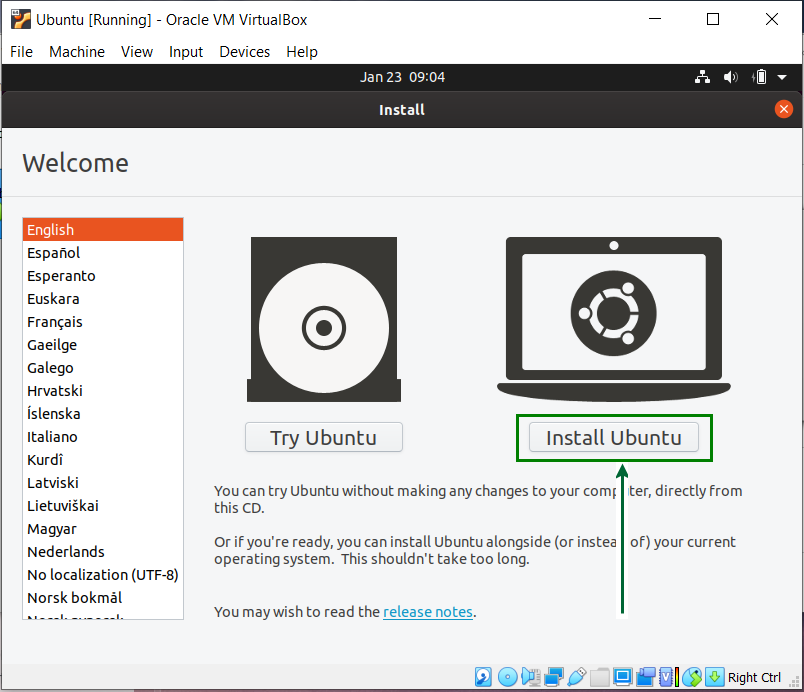
Step 12: Select Keyboard layout, if the defaults are compatible, just click on the continue button and proceed.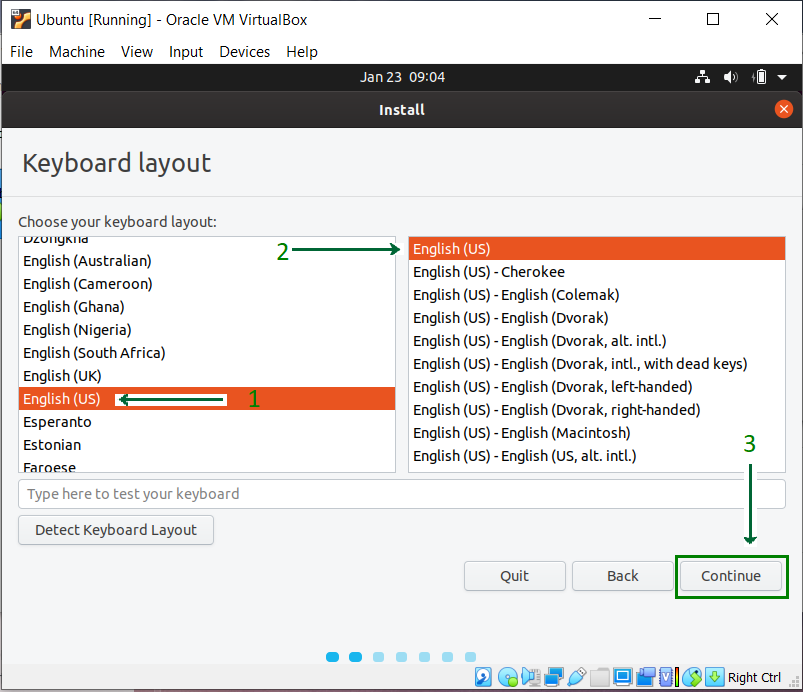
Step 13: Select installation type. By default, it is set to Normal installation, which is recommended, but it can also be changed to Minimal installation if there is no need for all Ubuntu features.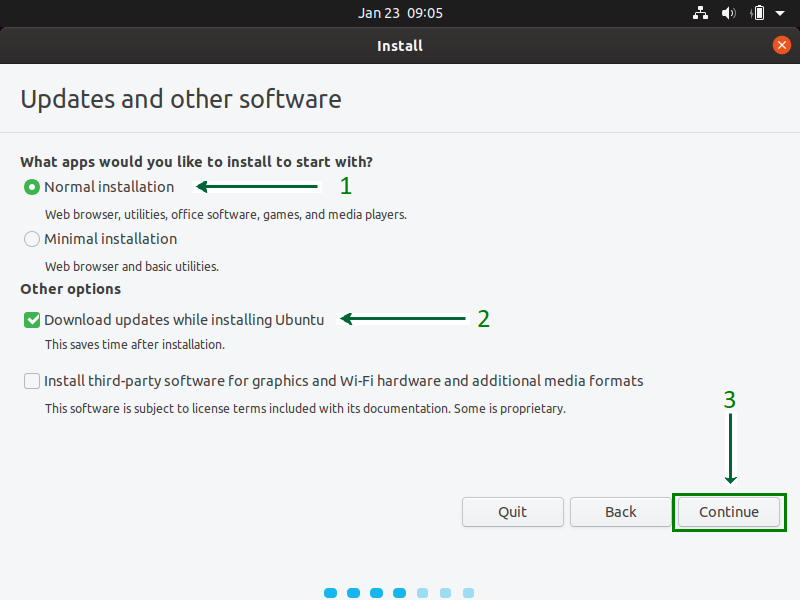
Step 14: Click on the Install Now button and carry on with the installation. Do not get worried with the Erase disk option, it will only be effective inside the virtual machine, other system files outside the VirtualBox remain intact.
Step 15: Click on the continue button, and proceed with writing changes on the disk.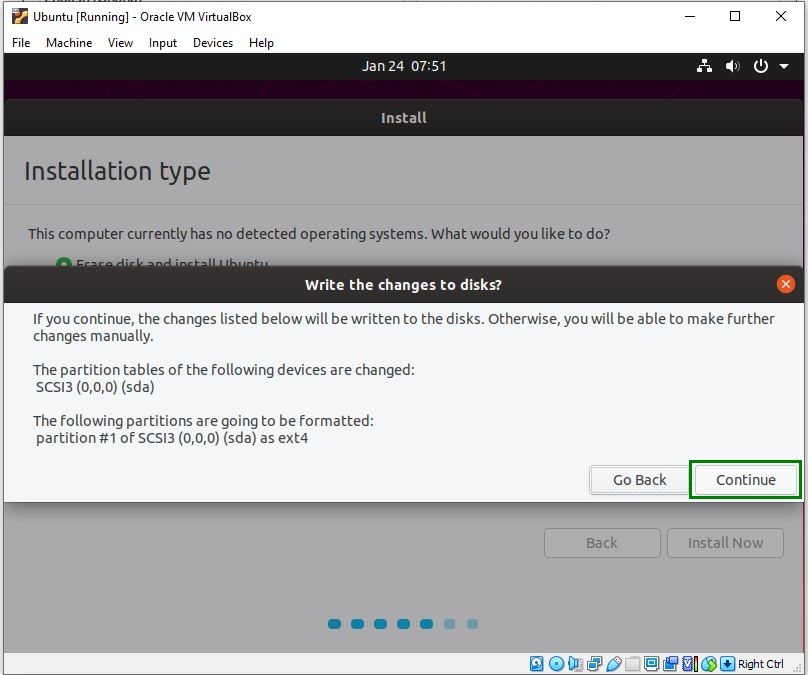
Step 16: Select your location to set the Time Zone.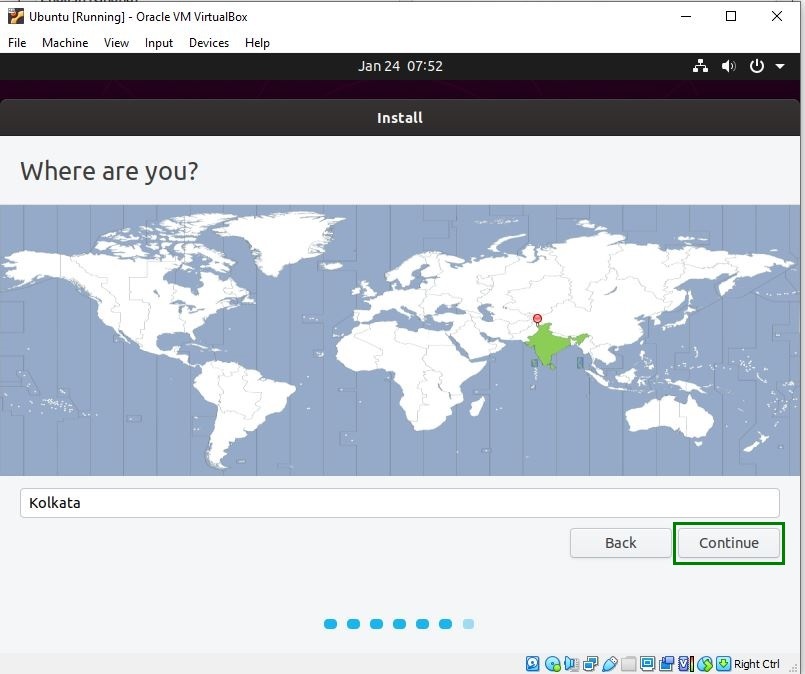
Step 17: Choose a name for your computer and set a password to secure login info.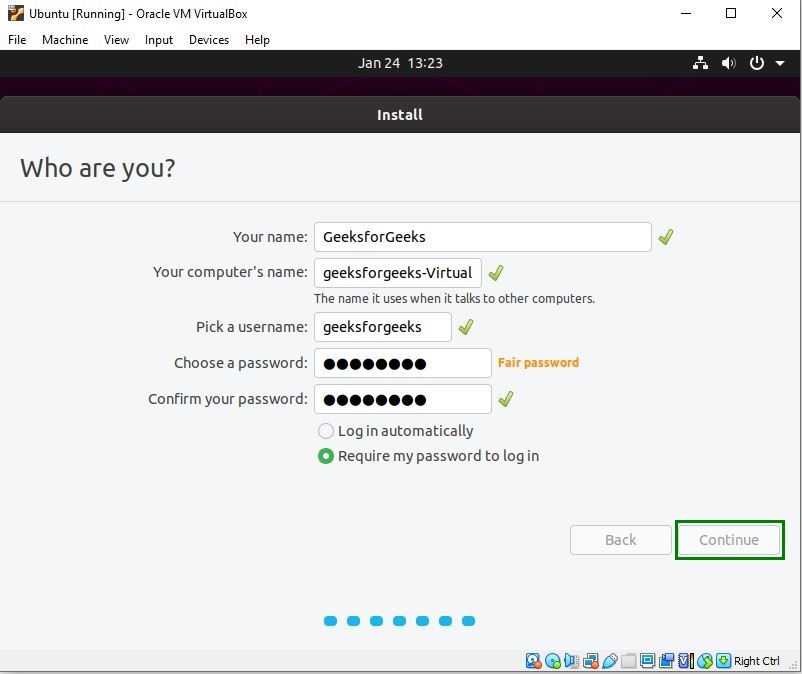
Step 18: Wait for the installation process to complete.
Step 19: Once the installation process is over, reboot your Virtual Machine.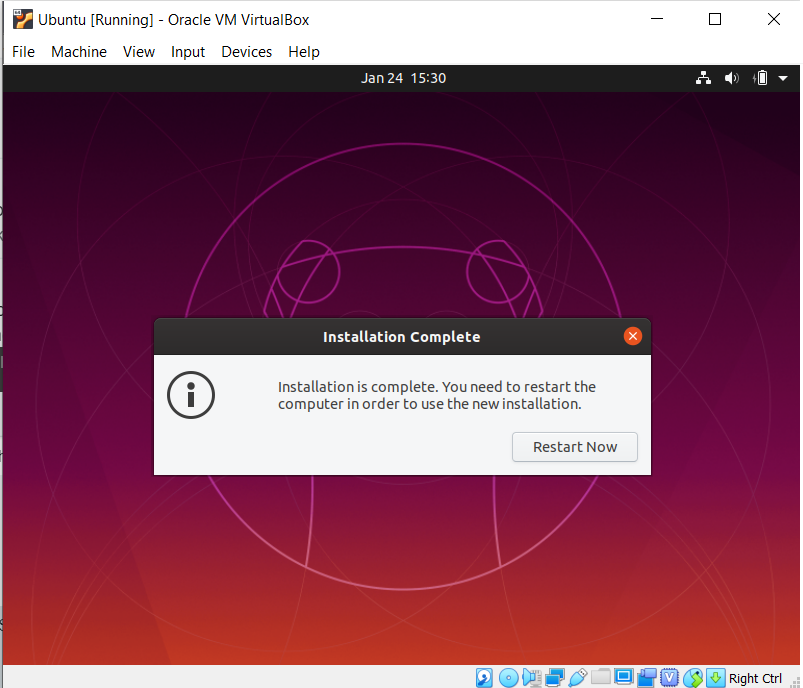
Step 20: Voila!! You’re finished with the installation process. Now you can use Ubuntu along with the Windows, without creating a dual boot.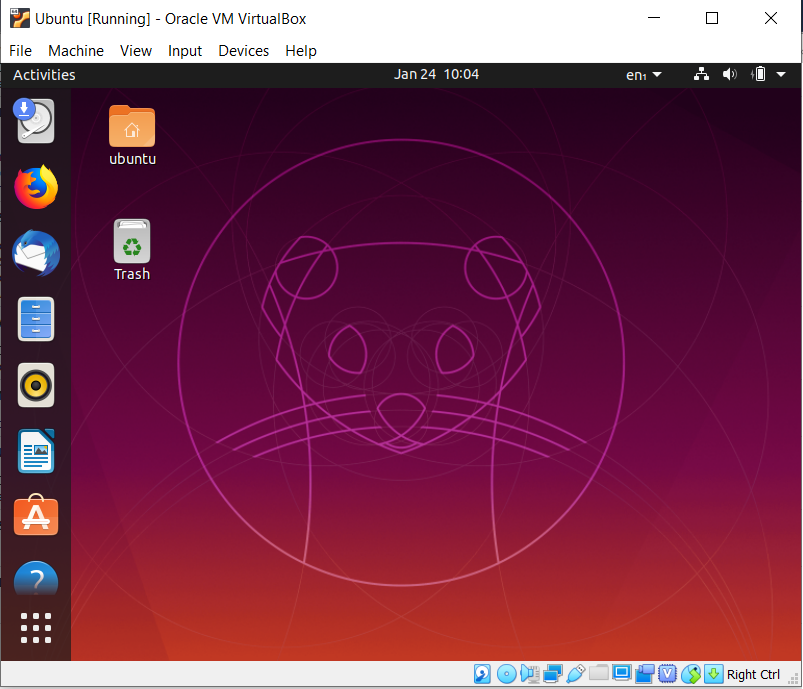
Last Updated :
06 Oct, 2021
Like Article
Save Article