- Manuals
- Brands
- Vitek Manuals
- Iron
- VT-1201
- Instruction manual
-
Contents
-
Table of Contents
-
Bookmarks
Quick Links
VT-1201.indd 1
VT-1201.indd 1
22.07.2009 17:18:44
22.07.2009 17:18:44
Related Manuals for Vitek VT-1201
Summary of Contents for Vitek VT-1201
-
Page 1
VT-1201.indd 1 VT-1201.indd 1 22.07.2009 17:18:44 22.07.2009 17:18:44… -
Page 2
VT-1201.indd 2 VT-1201.indd 2 22.07.2009 17:18:44 22.07.2009 17:18:44… -
Page 3
VT-1201.indd 3 VT-1201.indd 3 22.07.2009 17:18:44 22.07.2009 17:18:44… -
Page 4: Steam Iron
• While using the unit, make sure that the The iron’s heating element is broken water tank lid is firmly closed in during the first use; it is normal for a small amount of smoke to be released. VT-1201.indd 4 VT-1201.indd 4 22.07.2009 17:18:44 22.07.2009 17:18:44…
-
Page 5: Choice Of Water
• Set the temperature regulator (11) to the type of fabric, then use the following required ironing temperature: “•”, “••”, table to determine the proper tempera- “•••” or “max” (depending on the type ture. VT-1201.indd 5 VT-1201.indd 5 22.07.2009 17:18:44 22.07.2009 17:18:44…
-
Page 6
• Insert the power plug into the outlet. steam release OFF position. • Make sure that there is enough water in • Fill the water tank (10) till the MAX mark the water tank (10). (12). VT-1201.indd 6 VT-1201.indd 6 22.07.2009 17:18:44 22.07.2009 17:18:44… -
Page 7
• Avoid touching the iron soleplate with sharp metal objects. STORAGE • Turn the temperature regulator (11) anti- clockwise till MIN position, set the steam VT-1201.indd 7 VT-1201.indd 7 22.07.2009 17:18:44 22.07.2009 17:18:44… -
Page 8
• Vor der ersten Nutzung nehmen Sie das Bügeleisen aus der Verpackung heraus immer ab. • Der Deckel der Einfüllöffnung soll beim und entfernen Sie das Schutzmaterial von Bügeln dicht geschlossen sein. der Gleitsohle (13). VT-1201.indd 8 VT-1201.indd 8 22.07.2009 17:18:44 22.07.2009 17:18:44… -
Page 9: Auffüllen Des Wasserbehälters
Temperatur auf die niedrigste • Nach dem Bügeln schalten Sie das Gerät Stufe eingestellt werden (z.B. wenn das aus, lassen Sie es abkühlen, danach öff- Kleidungsstück zu 60% aus Polyester und VT-1201.indd 9 VT-1201.indd 9 22.07.2009 17:18:44 22.07.2009 17:18:44…
-
Page 10: Bügeln Mit Dampf
Wasser im Wasserbehälter (10) vorhan- Sie den Sprühknopf (4) einige Male drü- den ist. cken. • Stellen Sie mit dem Regler (11) die ge- • Vergewissern Sie sich, dass es genug wünschte Bügeltemperatur ein: „•••“ VT-1201.indd 10 VT-1201.indd 10 22.07.2009 17:18:44 22.07.2009 17:18:44…
-
Page 11
Wasser übrig geblieben ist und die REINIGUNG DER DAMPFKAMMER Gleitsohle (13) des Bügeleisens vollstän- dig trocken ist. Für die Erhöhung der Nutzungsfrist des Geräts wird empfohlen, die Reinigung der Dampfkammer regelmäßig durchzuführen, VT-1201.indd 11 VT-1201.indd 11 22.07.2009 17:18:45 22.07.2009 17:18:45… -
Page 12: Reinigung Und Pflege
Stelle, die für die Kinder unzugänglich ist TECHNISCHE EIGENSCHAFTEN Stromversorgung: 220-240 V ~ 50 Hz Leistung: 1850-2200 W Der Hersteller behält sich das Recht vor die Charakteristiken des Gerätes ohne Vorbescheid zu ändern. VT-1201.indd 12 VT-1201.indd 12 22.07.2009 17:18:45 22.07.2009 17:18:45…
-
Page 13: Паровой Утюг
• Пользуйтесь утюгом только на гла- ким током никогда не разбирайте утюг дильной доске. самостоятельно, при обнаружении не- • Ставьте утюг на ровную устойчивую исправности обращайтесь в автори- поверхность. зованный сервисный центр. VT-1201.indd 13 VT-1201.indd 13 22.07.2009 17:18:45 22.07.2009 17:18:45…
-
Page 14: Перед Первым Использованием
пературе глаженья: синтетику — к син- • Залейте воду в резервуар (10), плотно тетике, шерсть — к шерсти, хлопок — к закройте крышку (2). хлопку и т.д. • Утюг нагревается быстрее, чем осты- вает. Поэтому сначала рекомендуется VT-1201.indd 14 VT-1201.indd 14 22.07.2009 17:18:45 22.07.2009 17:18:45…
-
Page 15
• Когда температура подошвы утюга вания/закрывания противокапельного (13) достигнет установленной темпе- клапана, что свидетельствует о его нор- ратуры, индикатор (9) погаснет, можно мальной работе. приступать к глаженью. • Поставьте утюг на основание (8). VT-1201.indd 15 VT-1201.indd 15 22.07.2009 17:18:45 22.07.2009 17:18:45… -
Page 16
ткани. Примечание: во избежание выте- • Прежде чем убрать утюг на хранение, кания воды из паровых отверстий убедитесь, что в резервуаре (10) нет нажимайте кнопку дополнительной воды, а подошва утюга (13) сухая. VT-1201.indd 16 VT-1201.indd 16 22.07.2009 17:18:45 22.07.2009 17:18:45… -
Page 17: Уход И Чистка
• Поставьте утюг вертикально и дайте ему полностью остыть. • Храните утюг в вертикальном положе- нии в сухом прохладном месте, недо- ступном для детей. ТЕХНИЧЕСКИЕ ХАРАКТЕРИСТИКИ Напряжение питания: 220-240 В ~ 50 Гц Потребляемая мощность: 1850-2200 Вт VT-1201.indd 17 VT-1201.indd 17 22.07.2009 17:18:45 22.07.2009 17:18:45…
-
Page 18
мақсаттарда ғана пайдаланыңыз. • Электр тогының соқпауы үшін үтікті • Үтікті үтіктеуіш тақтаның үстінде ғана өз бетіңізше ашпаңыз, ақау тапқан пайдаланыңыз. жағдайда рұқсаты бар сервис • Үтікті тегіс тұрақты жерге қойыңыз. орталығына жолығыңыз. VT-1201.indd 18 VT-1201.indd 18 22.07.2009 17:18:45 22.07.2009 17:18:45… -
Page 19
• Құятын саңылаудың қақпағын жөн. ашыңыз (2). • Алдымен заттарды үтіктеу • Суды оны құюға (10), қақпақты температурасы бойынша сұырптаңыз: мықтап жабыңыз(2). синтетиканы – синтетикаға, жүнді — жүнге, мақтаны – мақтаға жəне т.б. VT-1201.indd 19 VT-1201.indd 19 22.07.2009 17:18:45 22.07.2009 17:18:45… -
Page 20
клапанның ашылып/жабылып шертілген • Үтік табанының температурасы (13) дыбысын естисіз, бұл оның қалыпты білгленген температураға жеткен жұмыс істеуін білдіреді. кезде, көрсеткіш (9) сөнеді, үтіктеуге • Үтікті оның негізіне қойыңыз (8). кірісуге болады. VT-1201.indd 20 VT-1201.indd 20 22.07.2009 17:18:45 22.07.2009 17:18:45… -
Page 21
• Қосымша бу шығару түймешігін (5) күйге. басқан кезде үтік табанының астынан • Қайнап жатқан су мен бу қақпен бірге бу аса қарқынды болып шығады. үтіктің табанындағы саңылаудан сыртқа шығарылады (13). • Резервуардағы (10) барлық су VT-1201.indd 21 VT-1201.indd 21 22.07.2009 17:18:45 22.07.2009 17:18:45… -
Page 22
• Желі шнурының ашасын розеткадан суырыңыз. • Құятын саңылау қақпағын ашыңыз (2), үтікті аударып, суға арналған резервуардан (10) қалған суды ағызып тастаңыз. • Қақпақты жабыңыз(2). • Үтікті тігінен қойып, əбден суытыңыз. • Үтікті тік күйінде сақтаңыз. VT-1201.indd 22 VT-1201.indd 22 22.07.2009 17:18:45 22.07.2009 17:18:45… -
Page 23: Środki Ostrożności
Przy pierwszym włączeniu żelazka może • Podczas korzystania z żelazka pokrywa się wydobywać niewielka ilość dymu, która otworu wlewu wody powinna być szczelnie jest spowodowana przepalaniem elementu zamknięta. grzejnego, jest to normalny objaw. VT-1201.indd 23 VT-1201.indd 23 22.07.2009 17:18:45 22.07.2009 17:18:45…
-
Page 24
• Jeżeli etykiety ze wskazówkami dotyczą- PRASOWANIA cymi prasowania brakuje, aby wybrać tem- • Umieść żelazko na podstawce (8). peraturę prasowania znając rodzaj tkaniny, • Włącz wtyczkę przewodu zasilającego do patrz tabelę. gniazdka. VT-1201.indd 24 VT-1201.indd 24 22.07.2009 17:18:45 22.07.2009 17:18:45… -
Page 25
żelazka (13). otworów parowych naciśnij przycisk do- Podczas nagrzewania i chłodzenia stopy że- datkowego wyrzutu pary (5) z 4-5 sekun- lazka (13), usłyszysz charakterne kliknięcie dowymi odstępami. otwierania /zamykania klapy zapobiegającej VT-1201.indd 25 VT-1201.indd 25 22.07.2009 17:18:45 22.07.2009 17:18:45… -
Page 26: Konserwacja I Czyszczenie
• Osad na stopie żelazka można usunąć oraz przepisem 73/23 EEC o nizko- przy pomocy szmatki zwilżonej roztworem woltowych urządzeniach. wody z octem. • Po usunięciu osadu wypoleruj powierzch- nię stopy żelazka suchą szmatką. VT-1201.indd 26 VT-1201.indd 26 22.07.2009 17:18:45 22.07.2009 17:18:45…
-
Page 27
• Zakazuje se zalévaní do nádrže aromatických Poznámky: tekutin, octu, roztok škrobu, reagenty na • Nenalívejte vodu výš než je kota MAX. odstranění usazeniny, chemické latky atd. • Když během žehlení je třeba dolít vody, VT-1201.indd 27 VT-1201.indd 27 22.07.2009 17:18:45 22.07.2009 17:18:45… -
Page 28
• Abyste unikli vzniku lesklých skvrn na sin- • Otačením regulátoru (11) nastavte potřebnou tetických a hedvabných latkách, žehlete je teplotu žehlení: «•••» nebo «MAX» a musí náruby. zasvítit indikátor (9). • Když teplota podrážky žehličky (13) dosah- VT-1201.indd 28 VT-1201.indd 28 22.07.2009 17:18:45 22.07.2009 17:18:45… -
Page 29
89/336/EEC a předpisem 73/23/ zené z otvoru podrážky žehličky (13). EEC Evropské komise o nízkona- • Trochu potřeste žehličku dopředu a dozadu, pěťových přístrojích. pokud v nádrži nebude voda (10). VT-1201.indd 29 VT-1201.indd 29 22.07.2009 17:18:45 22.07.2009 17:18:45… -
Page 30: Заходи Безпеки
• Використовуйте праску виключно з • Не використовуйте праску з метою, передбаченою інструкцією. пошкодженою мережною вилкою, • Користуйтеся праскою тільки на мережним шнуром, а також з будь- прасувальній дошці. якими іншими несправностями. VT-1201.indd 30 VT-1201.indd 30 22.07.2009 17:18:45 22.07.2009 17:18:45…
-
Page 31: Перед Першим Використанням
Перш ніж залити воду в праску, синтетика, нейлон, акрил, • поліестер (низька температура) пересвідчіться, що вона відімкнена від шовк/вовна (середня •• електромережі. температура) • Установіть регулятор постійного Бавовна/льон (висока ••• температура) подавання пари (3) у крайню ліву VT-1201.indd 31 VT-1201.indd 31 22.07.2009 17:18:45 22.07.2009 17:18:45…
-
Page 32: Сухе Прасування
регулятор температури (11) в на синтетичних і шовкових тканинах, положення «MIN». прасуйте їх з виворітного боку. • Витягніть вилку мережного шнура з розетки та дочекайтесь, доки праска УСТАНОВЛЕННЯ ТЕМПЕРАТУРИ повністю охолоне. ПРАСУВАННЯ VT-1201.indd 32 VT-1201.indd 32 22.07.2009 17:18:46 22.07.2009 17:18:46…
-
Page 33
• Розташуйте праску горизонтально Якщо під час роботи пара не подається над раковиною, встановіть і утримуйте постійно, перевірте правильність кнопку (14). положення регулятора температури • Кипляча вода та пара разом із (11). VT-1201.indd 33 VT-1201.indd 33 22.07.2009 17:18:46 22.07.2009 17:18:46… -
Page 34: Догляд Та Чищення
постійного подавання пари (3) у положення – подача пари вимкнена. • Витягніть вилку мережного шнура з розетки. • Відкрийте кришку заливального отвору (2), переверніть праску і злийте рештки води з резервуара для води (10). VT-1201.indd 34 VT-1201.indd 34 22.07.2009 17:18:46 22.07.2009 17:18:46…
-
Page 35
• Карыстайцеся прасам толькі з мэтай, адключэння праса ад сеткі. прадугледжанай у інструкцыі. • Не карыстайцеся прасам з • Карыстайцеся прасам толькі на пашкоджанай сеткавай вілкай, прасавальнай дошцы. сеткавым шнурам, а таксама з VT-1201.indd 35 VT-1201.indd 35 22.07.2009 17:18:46 22.07.2009 17:18:46… -
Page 36
Абазначэнні Тып тканіны НАПАЎНЕННЕ РЭЗЕРВУАРА ДЛЯ (тэмпература) ВАДЫ сінтэтыка, нейлон, акрыл, поліэстэр • Перад тым як заліць воду ў прас, (нізкая тэмпература) шоўк/шэрсць (сярэдняя пераканайцеся, што ён адключаны ад •• тэмпература) сеткі. VT-1201.indd 36 VT-1201.indd 36 22.07.2009 17:18:46 22.07.2009 17:18:46… -
Page 37
ў націсканнем. становішча «MIN». • Каб пазбегнуць з’яўлення бліскучых • Выцягніце вілку сеткавага шнура плям на сінтэтычных і шоўкавых з разеткі і дачакайцеся поўнага тканінах, прасуйце іх са сподняга астывання праса. боку. VT-1201.indd 37 VT-1201.indd 37 22.07.2009 17:18:46 22.07.2009 17:18:46… -
Page 38
устанавіўшы астывання праса. рэгулятар тэмпературы (11) ў становішча «MIN». УВАГА! • Выцягніце вілку сеткавага шнура з Калі пад час працы не адбываецца разеткі. пастаянная падача пары, праверце • Размясціце прас гарызантальна над VT-1201.indd 38 VT-1201.indd 38 22.07.2009 17:18:46 22.07.2009 17:18:46… -
Page 39: Догляд І Чыстка
89/336/ЕЕС, i палажэнням ЗАХАВАННЕ закона аб прытрымлiваннi • Павярніце рэгулятар тэмпературы напружання (73/23 EC) (11) супраць гадзіннікавай стрелкі да становішча «MIN», устанавіце рэгулятар пастаяннай падачы пары (3) ў становішча — подача пары выключана. VT-1201.indd 39 VT-1201.indd 39 22.07.2009 17:18:46 22.07.2009 17:18:46…
-
Page 40
• Dazmolni tekis barqaror yuzaga qo’ying. kuchlanishiga mosligiga ishonch hosil • Idishni bilan to’ldirishda doimo qiling. dazmolni tarmoqdan o’chiring. • Dazmoldan foydalanganda quyish Eslatma tuynugining qopqog’i zich yopilgan bo’lishi lozim. Birinchi yoqilganda dazmolning isitish VT-1201.indd 40 VT-1201.indd 40 22.07.2009 17:18:46 22.07.2009 17:18:46… -
Page 41
Foydalanishdan avval dazmolning tagligi yo’nalishida) ozgina bosib dazmollash (13) va suv uchun sig’im (10) toza ekanligiga lozim. ishonch hosil qilish uchun qizigan dazmolni • Sun’iy va shoyi matolarda yaltiroq dog’lar mato bo’lagida tekshiring. VT-1201.indd 41 VT-1201.indd 41 22.07.2009 17:18:46 22.07.2009 17:18:46… -
Page 42
BUG’ KAMERASINI TOZALASH bu dazmol tagligi teshiklaridan tomchilar Dazmolning xizmat qilish muddatini uzaytirish tushishining oldini oladi (13). Dazmol tagligi uchun, ayniqsa «qattiq» suvi bo’lgan VT-1201.indd 42 VT-1201.indd 42 22.07.2009 17:18:46 22.07.2009 17:18:46… -
Page 43
Кўрсатмаси асосида suv eritmasiga namlangan mato bilan белгиланган ва Қувват кучини ketkazilishi mumkin. белгилаш Қонунида (73/23 ЕЭС) • Qoplamlar ketkazilganidan keyin taglik айтилган ЯХС талабларига yuzasini quruq mato bilan silliqlab arting. мувофиқ келади. VT-1201.indd 43 VT-1201.indd 43 22.07.2009 17:18:46 22.07.2009 17:18:46… -
Page 44
Жиҳоз ишлаб чиқарилган муддат техник хусусиятлар кўрсатилган лавҳачадаги серия рақамида кўрсатилган. Серия рақами ўн битта сондан иборат бўлиб уларнинг биринчи тўрттаси ишлаб чиқарилган вақтни ифода этади. Мисол учун 0606ххххххх серия рақами жиҳоз 2006 йилнинг июн ойида (олтинчи ойда) ишлаб чиқарилганлигини билдиради. VT-1201.indd 44 VT-1201.indd 44 22.07.2009 17:18:46 22.07.2009 17:18:46…
This manual is also suitable for:
Vt-1201g
1259.indd 11259.indd 1 16.07.2010 17:15:3516.07.2010 17:15:35
2
1259.indd 21259.indd 2 16.07.2010 17:15:3716.07.2010 17:15:37
3
1259.indd 31259.indd 3 16.07.2010 17:15:3816.07.2010 17:15:38

ENGLISH
STEAM IRON
• Do not fill the water tank with scented liq-
uids, vinegar, starch solution, descaling
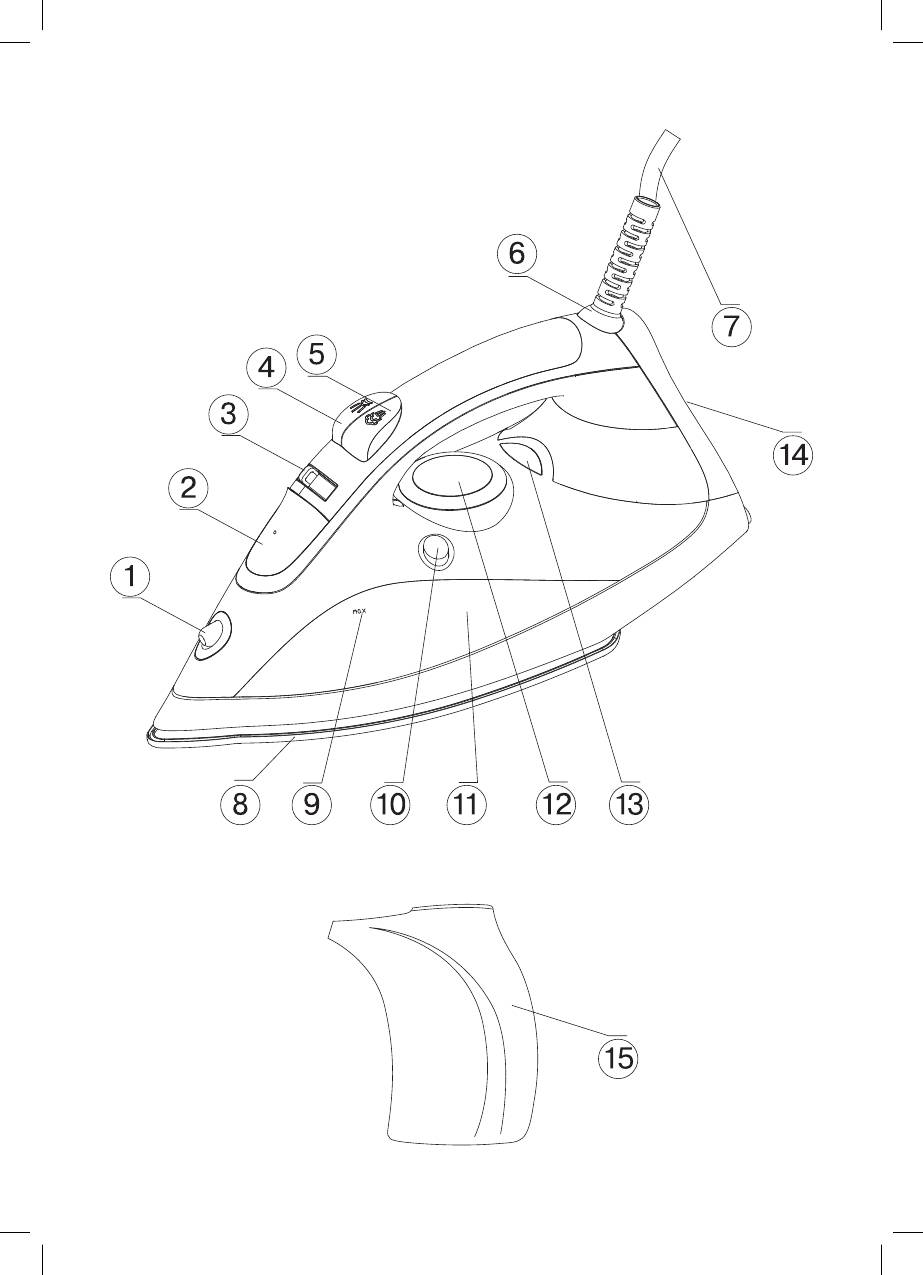
DESCRIPTION
reagents, chemical agents etc.
1. Water spray nozzle
• Avoid contact with hot surfaces or outgo-
2. Water tank lid
ing steam of the iron in order to avoid get-
3. Constant steam supply control
ting burns.
4. Spray button
• Provide that the power cord is not hang-
5. Additional steam release button
ing over the edge of the ironing board and
6. Power cord protection
make sure that it does not touch hot sur-
7. Power cord
faces.
8. Iron sole
• Before unplugging/plugging the unit, set
9. Maximal water level indicator
the temperature control to the “minimum”
10. SELF-CLEAN mode button
position.
11. Water tank
• To unplug the unit always take its plug, do
12. Temperature control
not pull the power cord.
13. Heating element on/off indicator
• In order to avoid electric shock do not im-
14. Iron base
merse the unit into water or other liquids.
15. Water bowl
• Before taking the unit away for keeping,
pour out the remaining water and let the
SAFETY MEASURES
unit cool down.
Before using the unit, please read the in-
• Pour out water only after unplugging the
structions carefully and pay attention to the
unit.
illustrations.
• Do not use the unit if the plug or the power
• Before switching on the unit, make sure
cord is damaged or if there are other dam-
that your home electricity supply corre-
ages in the unit.
sponds to the voltage of current specified
• Do not use the unit after it fell, if there are
on the unit.
visible damages in the unit or in case of
• The power cord is equipped with a euro
leakage.
plug; insert it into the socket, with a secure
• In order to avoid electric shock do not re-
grounding.
pair the unit yourself. If there are some
• In order to avoid risk of fire do not use
damages in the unit apply to the authorized
adapters while connecting the appliance to
service center.
the outlet.
• Do not allow children to use the unit as a
• In order to avoid overloading of the power
toy.
network do not switch on several appli-
• Keep the unit out of reach of children and
ances with high power consumption simul-
disabled persons. Do not allow them to use
taneously.
the unit without supervision.
• Use the unit only for the intended purpos-
• The iron is not intended for usage by chil-
es.
dren or disabled persons unless they are
• Do not use the unit outdoors.
given all the necessary instructions on
• Place the iron on a flat stable surface or
safety measures and information about
use the ironing board.
danger, which can be caused by improper
• Never leave the operating unit unattend-
usage of the unit.
ed.
• Keep the unit vertically in a dry cool place,
• Always unplug the unit if you do not use it.
out of reach of children.
• When filling the water tank with water, al-
ways unplug the unit.
FOR HOUSEHOLD USAGE
• The water tank opening should be closed
during the ironing.
4
1259.indd 41259.indd 4 16.07.2010 17:15:3816.07.2010 17:15:38
ENGLISH
BEFORE USAGE
Signs Fabric type (temperature)
• Unpack the iron; remove the protection (if
Synthetics, nylon, acryl, polyester
•
any) from the iron sole (8).
(low temperature)
• Make sure that the electrical supply volt-
•• Silk/wool (medium temperature)
age corresponds to the iron’s operating
max (•••) Cotton/flax (high temperature)
voltage.
• This table is only for smooth materials.
Note:
Fabrics of other types (crimped, raised
— When using the unit for the first time,
etc.) are best ironed at low temperature.
the heating element of the unit burns
• Firstly sort items by ironing temperature:
that is why some smoke or foreign odor
wool with wool, cotton with cotton etc
can appear. It is normal.
• The iron heats up faster than is cools down.
For this reason it is recommended to be-
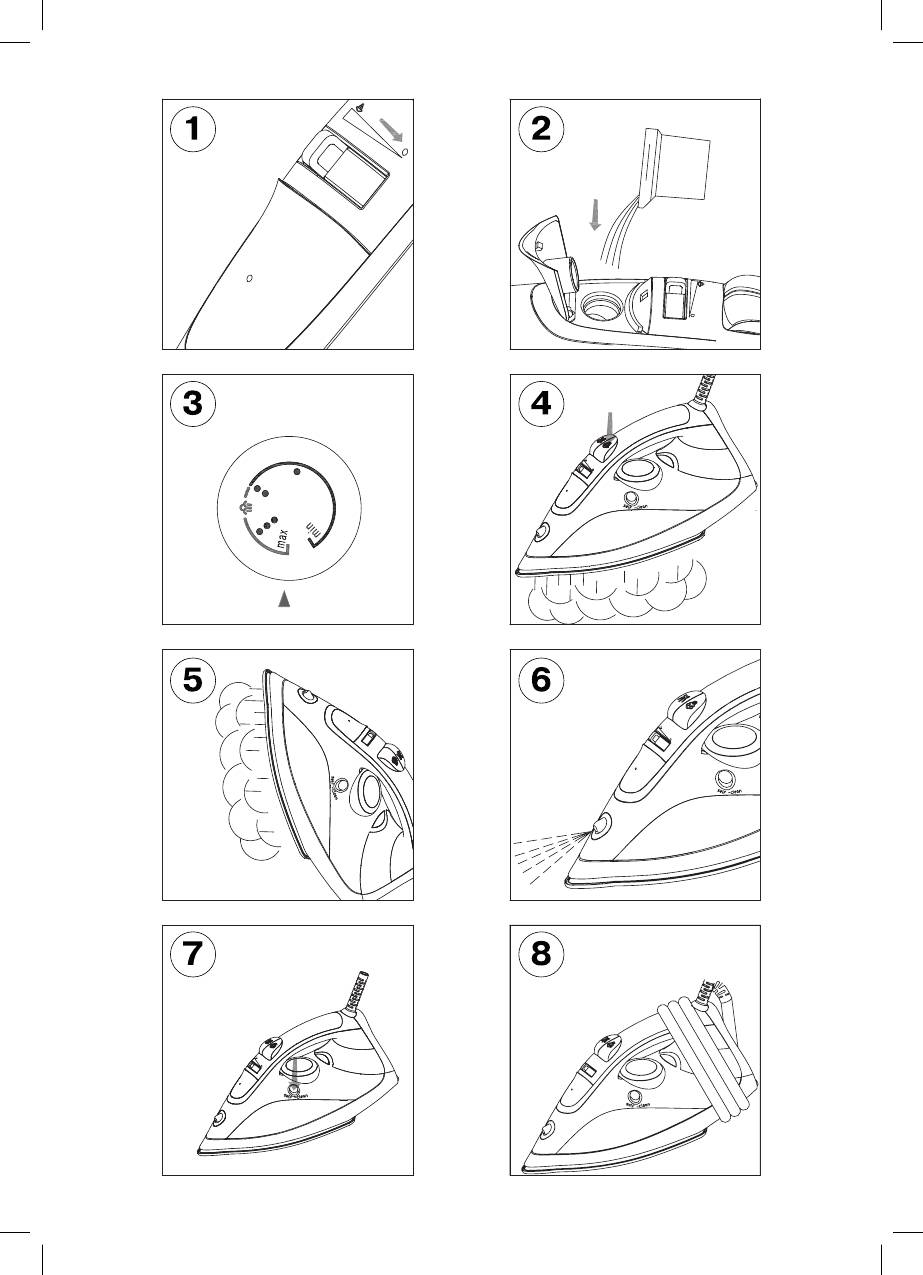
FILLING THE WATER TANK (pic. 1, 2)
gin ironing at low temperature (for instance
Make sure that the iron is disconnected from
synthetic fabrics).
electrical power before filling it with water.
• After that, move to higher temperature iron-
• Set the constant steam release regula-
ing (silk/wool). Cotton and linens should
tor (3) to the “0” position (steam supply is
be ironed last.
off).
• If an item is made from a mix of fabrics,
• Open the water tank lid (2).
then the iron should be set for the fabric
• Fill the unit with water using the water bowl
with the lowest ironing (for instance if an
(15); firmly close the lid (2).
item is made from 60% polyester and 40%
cotton, it should be ironed at the tempera-
Note:
ture used for ironing polyester “•”).
— Do not fill the unit with water above the
• If you cannot define the fabric the item is
“max” mark.
made from, find a place on it that is hid-
— If you need to refill water during iron-
den while wearing and, on practice select
ing, turn off the iron and unplug the
the ironing temperature (always start at the
power cord from the socket.
lowest and gradually raise it until you get
— After you finish ironing, switch off the
the desired result.)
unit, wait till it cools down completely,
• Corduroy and other fabrics that start glossy
open the water tank lid (2), turn over
quickly should be ironed strictly in one di-
the iron and pour out the remaining wa-
rection (along the lines) with slight pres-
ter.
sure.
• To avoid appearance of glossy spots on the
IRONING TEMPERATURE
synthetic and silk fabrics, iron them back-
Before operating test the heated iron on the
side.
old cloth to be sure that the iron sole (8) and
the water tank (11) are clean.
SETTING THE IRONING TEMPERATURE
• Always check the recommended iron tem-
• Place the iron on the base (14).
perature indicated on the tag before iron-
• Insert the power plug into the socket.
ing.
• Set the temperature regulator (12) to the
• If the tag does not list the recommended
required ironing temperature: “•”, “••”,
ironing temperature, but you know the type
“•••” or “max” (•••) (pic.3), depending
of fabric, then use the following table to
on the type of fabric, the (13) indicator will
determine the proper temperature.
light up.
• When the sole temperature (12) reaches
the desired temperature value, the (13) in-
dicator will go out, you can start ironing.
5
1259.indd 51259.indd 5 16.07.2010 17:15:3816.07.2010 17:15:38
Посмотреть инструкция для Vitek VT-1241 GY бесплатно. Руководство относится к категории утюги, 1 человек(а) дали ему среднюю оценку 8.8. Руководство доступно на следующих языках: русский, английский. У вас есть вопрос о Vitek VT-1241 GY или вам нужна помощь? Задайте свой вопрос здесь
Не можете найти ответ на свой вопрос в руководстве? Вы можете найти ответ на свой вопрос ниже, в разделе часто задаваемых вопросов о Vitek VT-1241 GY.
Что означает указанная на утюге мощность?
Утюг с высокой мощностью быстрее нагревается.
Как удалить пятна на подошве утюга?
Намочите ткань в уксусе и на полчаса поставьте утюг на эту ткань, чтобы уксус впитался в пятна. Затем удалите пятна влажной тканью.
Можно ли заливать в утюг водопроводную воду?
Да, в утюге предусмотрено использование водопроводной воды.
Инструкция Vitek VT-1241 GY доступно в русский?
Да, руководствоVitek VT-1241 GY доступно врусский .
Не нашли свой вопрос? Задайте свой вопрос здесь
| Мощность | 2200 Вт |
| Материал подошвы | керамика |
| Паровой удар | 130 г/мин |
| Вертикальное отпаривание | да |
| Система самоочистки | да |
| Функция разбрызгивания | да |
| Противокапельная система | да |
| Защита от накипи | да |
| Объeм резервуара для воды | 260 мл |
| Регулировка подачи пара | да |
| Шаровое крепление шнура | да |
| Длина сетевого шнура | 1,8 |
| Мерный стакан | да |
показать все характеристики
Придать одежде идеальный внешний вид поможет утюг VITEK VT-8308 с максимальной мощностью 2200 Вт. Подошва прибора имеет уникальное антипригарное покрытие UltraCare, благодаря которому вы можете без опасения отглаживать даже самые деликатные ткани. А чтобы минимизировать воздействие на них в утюге имеется функция вертикального отпаривания с несколькими режимами (максимальный паровой удар — 130 г/мин). Объем резервуара для воды — 260 мл. По желанию, вы можете выбрать и сухое глажение и использовать функцию разбрызгивания для дополнительного увлажнения. Температурные режимы переключаются плавно, с помощью специального регулятора. Наличие функции «антикапля», системы самоочистки и встроенной защиты от накипи обеспечивает особый комфорт в использовании устройства. Купите утюг VITEK VT-8308 и получайте удовольствие от процесса ухода за одеждой.