- Manuals
- Brands
- VDO CYTEC Manuals
- Bicycle Accessories
- C 15
- Installation and operation manual
-
Contents
-
Table of Contents
-
Troubleshooting
-
Bookmarks
Quick Links
English
Deutsch
Français
Italiano
Español
Nederlands pagina 101-120
page
1-20
Seite
21-40
page
41-60
pagine 61-80
pagina 81-100
GB
C15
D
C15
F
C15
I
C15
E
C15
NL
C15
Related Manuals for VDO CYTEC C 15
Summary of Contents for VDO CYTEC C 15
-
Page 1
English page 1-20 Deutsch Seite 21-40 Français page 41-60 Italiano pagine 61-80 Español pagina 81-100 Nederlands pagina 101-120… -
Page 2
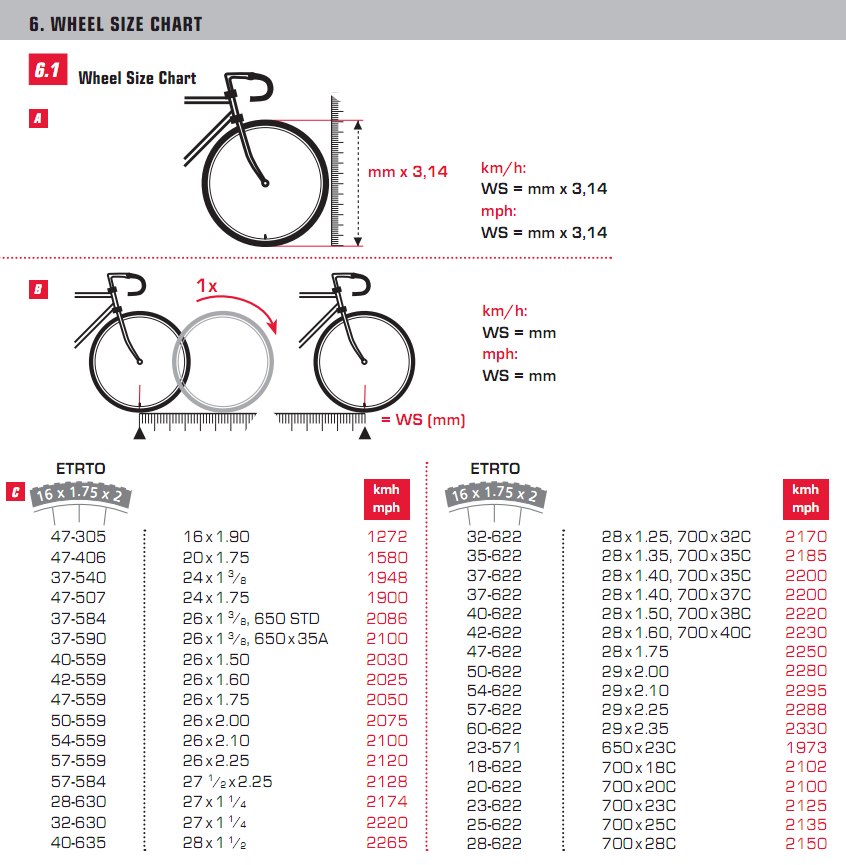
ETRTO WS in mm KMH WS in inch MPH 47-305 16×1,75 1272 50,1 47-406 20×1,75 1590 62,6 34-540 24×1 3/8 1948 76,7 47-507 24×1,75 1907 75,1 23-571 26×1 1973 77,7 40-559 26×1,5 2026 79,8 44-559 26×1,6 2051 80,7 47-559 26×1,75 2070 81,5 50-559… -
Page 3
INSTALLATION AND OPERATION MANUAL — VDO CYTEC C 15 Preface Thank you for buying a VDO CYTEC bicycle computer. The more familiar you get with this model, the more enjoyable your trips are going to be. Please read thoroughly all the information provided in this manual. You are getting important and useful hints for operation to make you fully benefit from all the technical features of your VDO CYTEC bicycle computer. -
Page 4
2. Mounting the speed transmitter The sensor should be mounted on the same side of the fork as the holder is on the handlebar. Watch out: Do not tighten the cable ties yet! Accurately position the spoke magnet and the sensor first, then tighten the cable ties. -
Page 5
In case this distance is not achievable in the current positioning, slide the sensor and the magnet on the fork or spoke accordingly. LOCK 4. Twist-Click mounting of computer onto holder The Twist-Click mounting has been exclusively developed for the new line of VDO UNLOCK CYTEC computers. -
Page 6
5. Installing battery into computer head To save battery power, your VDO CYTEC comes with the battery not yet fitted. Prior to initial use you have to install the battery first. OPEN CLOSE If you find the computer is not functioning properly after a battery change, push the AC-button (Auto Clear) on the rear side of the… -
Page 7
6. Information features of your VDO CYTEC C 15 Your VDO CYTEC C 15 provides you with following information: KMH-MPH current speed indicated in either KMH or MPH, featuring automatic conversion into MPH trip counter, counts your trip distance up to 999,99 km or miles. -
Page 8
7. Operating your VDO CYTEC C 15 Button / Key Covering Your VDO CYTEC C 15 has 3 buttons / keys Mode 1, Mode 2 and SS Function Function TCNT ODO1 ODO2 TOTODO Mode 1 Mode 2 Function STP-Start/Stop… -
Page 9
These buttons / keys have several functions. All functions of the respective buttons / keys outlined in the following chart below. Your display in Button / Key Length of What is going on? dicates following to be pushed pushing the information button / key TRP-AVS-RID-… -
Page 10
8. Scroll function To provide any information at a glance, your VDO CYTEC C 15 features a scroll function. Calling up the scroll function automatically displays information for a period of 1.5 sec. Scroll function may be called upon if any of the following information is on display: TRP-AVS-RID. -
Page 11
SS press again = stop watch continues 11. FREEZE-function Your VDO CYTEC C 15 features a FREEZE-function. Using this function, as you pass the finish line «freezes» your screen and further impulses are not processed. For triathletes, road racers and for interval-exercise the FREEZE-function provides precise… -
Page 12
12. Comparison of current and average speed MODE 1 +MODE 2 to aktivate Your VDO CYTEC C 15 compares your current speed with your average speed. The to deactivate outcome of this comparison can be seen in your display by the use of symbols. No matter which information is currently displayed, this data keeps you updated on the relation of your current speed and your average speed. -
Page 13
14. Selecting the wheelsize Your VDO CYTEC C 15 can work with two different wheelsizes (WS1 or WS2), i.e. one wheelsize for your road bike the other one for your mountain bike. When using the respective bike you can just switch to the proper wheelsize. -
Page 14
15. Entering your wheelsize You may enter two different wheelsizes into your VDO CYTEC C 15, i.e. one wheelsize for your street bike and another one for your mountain bike. Your VDO CYTEC identifies different wheelsizes as WS 1 = wheelsize 1 and WS 2 = wheelsize 2. -
Page 15
Programming (setting up) your wheelsize Step 1: Call TRP information in your display. Step 2: Press MODE 1 button for 5 sec. «WS1» is displayed along with an alternating flashing symbol for KMH and MPH. Step 3: By pressing the MODE 2 button you can choose whether you want MPH or KMH readout on your display. Watch out: Your choice of either MPH or KMH applies for both wheelsizes WS 1 and WS 2. -
Page 16
MODE 1 5sec. MODE 1 5sec. to quit MODE 2 0,1sec. to change from KMH to MPH MODE 1 0,1sec. MODE 1 0,1sec. switch to next MODE 1 MODE 2 switch to next to start to increase to switch to change from to quit KMH to MPH MODE 1 0,1sec. -
Page 17
16. Setting the clock CLK Your VDO CYTEC C 15 features a clock with hour and minute display. 12 h or 24 h display selectable. To access the clock set-up mode proceed as follows: MODE 1 5sec. Step 1: call in the CLK… -
Page 18
17. Programming (setting-up) your odometers ODO1 / ODO2 You can enter individual odometer values into your VDO CYTEC C 15 at any time, i.e. transferring data from your old computer into your new VDO CYTEC C 15 or after a battery change. -
Page 19
18. Resetting information to zero The following information may be reset to zero with your VDO CYTEC C 15. TRP-RID-AVS-MAX These information here is simultaneously reset to zero. TCNT This information is singly reset to zero. This information is singly reset to zero. -
Page 20
19. Stand-by-mode Your computer VDO CYTEC C 15 features a stand-by-mode in order to save battery power. Your computer changes into stand-by-mode if it has not received any speed impulses for 5 min or no button has been pressed in the same period of time. -
Page 21
In case of legitimate complaints, you are entitled to receive a comparable replacement model. Due to possible model changes, your model might not be available any more. You may contact your retailer or store where you purchased your VDO CYTEC or send the computer directly to us: CYCLE PARTS GMBH…

249 ₽
Инструкция (руководство пользователя) на Велокомпьютер VDO CYTEC C15 +
Артикул: vdo-cytec-c15-+
Категория: VDO
-
Описание
-
Детали
Описание
Инструкцию по эксплуатации VDO CYTEC C15 + на русском языке можно будет скачать в личном кабинете после оформления и оплаты заказа.
Детали
| Формат файла |
|
|---|---|
| Размер инструкции в кб |
318 |
Велокомпьютер штука весьма полезная, если вы катаетесь хоть немного дальше, чем в магазин за хлебом/к речке до пляжа/вокруг песочницы. Доступные функции различаются в зависимости от конкретной модели, но базовым набором отслеживаемых характеристик можно считать такой:
- текущая скорость;
- средняя скорость;
- максимальная скорость;
- текущее время;
- время в пути;
- общий пройденный путь (одометр);
- пройденный путь текущей поездки (с момента последнего сброса);
- часы.
Может быть также подсчёт калорий, термометр, пульсометр, счётчик каденса,…
Если видишь во время поездки все эти параметры, то можно контролировать нагрузку не только по ощущениям, но и по точным значениям. Опять же интересно в конце пути узнать сколько км пройдено, а на каком-нибудь форуме похвастаться максимальной скоростью. ![]()
Как правило, велокомпьютер снабжается инструкцией по установке и настройке. Но люди склонны эту инструкцию терять, а потом искать в интернете, как настроить велокомпьютер, какую ввести длину обода и прочие подобные вопросы. Поэтому кратко ответим на такие вопросы.
| Размер шины | Длина окружн. |
| 700с x 40mm | 2200 |
| 700с x 38mm | 2180 |
| 700с x 35mm | 2168 |
| 700с x 32mm | 2155 |
| 700с x 30mm | 2145 |
| 700с x 28mm | 2136 |
| 700с x 25mm | 2124 |
| 700с x 23mm | 2105 |
| 700с x 20mm | 2074 |
| 700с камерная | 2130 |
| 26″ x 1.75″ | 2035 |
| 26″ x 1.25″ | 1953 |
| 24″ x 1.9″ | 1916 |
| 650c x 23mm | 1990 |
| 16″ x 2.0″ | 1253 |
| 16″ x 1.5″ | 1206 |
| 650c x 20mm | 1945 |
| 16″ x 1.95″ | 1257 |
| 27″ x 1-1/4″ | 2161 |
| 27″ x 1-1/8″ | 2155 |
| 26″ x 2.3″ | 2135 |
| 26″ x 2.25″ | 2115 |
| 26″ x 2.1″ | 2095 |
| 26″ x 2.0″ | 2074 |
| 26″ x 1.9″ | 2055 |
| 26″ x 1.5″ | 1985 |
| 26″ x 1.0″ | 1913 |
| 20″ x 1-1/4″ | 1618 |
Установка велокомпьютера
Счётчик не зависимо от того, проводной он или беспроводной, как правило состоит из трёх частей: датчик на передней вилке, магнит на спице колеса, велокомпьютер на руле. Места установки — произвольно, по собственному выбору. Единственное — надо чтобы при вращении колеса магнит проходил близко (до 5мм) от датчика. На всё остальное — здравый смысл вам в помощь! Очевидно, что не хорошо, когда болтается провод (если проводной велокомпьютер) — естественно прикрепить его к тормозному тросику и, при необходимости, к вилке (изолента, скотч, проволока, монтажные стяжки). Сам датчик к вилке и компьютер к рулю крепятся обычно стяжками или специальным креплением.
Настройка велокомпьютера
Основная настройка состоит в том, чтобы правильно вести длину окружности колеса в миллиметрах. Исходя из неё счётчик и будет рассчитывать скорость и пройденный путь. Вы можете самостоятельно измерить эту величину или посмотреть маркировку размера на покрышке и установить значение в соответствии с таблицей настройки в велокомпьютере размеров колеса (приведена справа).
Значения ориентировочные и, если сравнить инструкции разных производителей, то можно заметить, что для одного и того же размера колеса могут отличаться. На самом деле путь проходимый колесом зависит ещё и от типа дорожного покрытия, давления в шине, веса велосипедиста. Кроме того любой велокомпьютер имеет некоторую погрешность т.ч. ошибка в несколько миллиметров в этом значении роли не играет.
Если же очень хочется добиться точности — настройте в соответствии с таблицей, проедьте по трассе с километровыми столбами несколько десятков километров, сравните с показанием счётчика, на основании полученной разницы (если будет) внесите поправку в настройку длины окружности колеса.
Сбои в работе
В какой-то момент велокомпьютер может начать сбоить. Например, скорость на ровном месте прыгать до 98 км/ч, или падать до нуля если разогнаться больше 30км/ч. Существенная часть таких проблем решается заменой батарейки в велокомпьютере и/или датчике (в случае беспроводного). Также полезно убедиться, что расстояние между магнитом на спице и датчиком на вилке не увеличилось (из-за тряски, грязи, снега, езды в густой траве, и т.п.). Если дело не в батарейках, проводе или расстоянии до магнита, то проблема, вероятно, в плате велокомпьютера — самостоятельному ремонту не подлежит, если вы не виртуоз паяльника.
Инструкции
В заключение несколько инструкций на русском языке от разных велокомпьютеров (формат pdf, можно бесплатно скачать):
- CATEYE STRADA WIRELESS CC-RD300W
- VDO CYTEC C 08
- Kellys Counter
- SIGMA Sport BC 1609 STS + CAD
- Stels BRI-3
- Ventura X (модели 244550 и 244552)
- SD-563B
Ещё может пригодиться инструкция по креплению на вилку и руль и настройку функций беспроводного велокомпьютера Sigma BC16.12 STS.
UPD 2015
C момента первоначальной публикации стали весьма популярны «найнеры» и 27,5″, поэтому добавляю ещё одну табличку по настройке велокомпьютера. Кроме того, на случай если размера вашего колеса нет в табличке, и с математикой вы категорически не дружите, на картинке приводятся два способа узнать длину окружности колеса, которую и надо ввести в качестве настройки велокомпьютера:
табличка из инструкции SIGMA с опечатками
Внимание: Эта таблица размеров содержит опечатки! Оставлена здесь для истории, правильная таблица приведена ниже.
Самые внимательные могут заметить некоторое отличие от таблицы опубликованной ранее. Что сказать, два сантиметра — это погрешность в 1%. Не зависимо от того, какое рассчётное значение является идеально верным, реальное расстояние проезжаемое за один оборот колеса будет отличаться (влияет давление в шине, плотность грунта,…). Поэтому настройка велокомпьютера всегда приблизительна и 1% роли не играет.
UPD 2016
Таблица взятая в 2015 из инструкции к велокомпьютеру Sigma содержала, как оказалось, непозволительно много опечаток (минимум две). Поэтому пришлось сделать табличку без этих ошибок с большим количеством уже рассчитанных размеров (по данным cateye):

Если вашего размера в таблице нет, вот два простых способа определить, какое значение вводить в велокомпьютер:

Если у вас уже есть велокомпьютер и вы зашли сюда лишь для того, чтобы узнать «какое значение ввести», то вам достаточно табличек приведённых выше. Если же вы ещё только выбираете велокомпьютер, то читайте под спойлером.
Несколько китайских велокомпьютеров
Меня удручают ценники у барыг в оффлайн-магазинах. Понятно, что кушать хотят все, но продавать копеечный китайский девайс в несколько раз дороже, чем закупают — это уже не «кушать», а «жрать». Более того, часто оказывается, что дешёвых велокомпьютеров не привозят вовсе, а предлагают только дорогие. Ни чего не имею против продукции Sigma, Cateye и других именитых брендов — отлично делают! Их топовые модели для тех, кто серьёзно занимается спортом, действительно хороши: помимо базовых функций имеют независимые таймеры, секундомеры, отдельный пульсометр, альтиметр, датчик каденса,… Но большинству любителей не говоря уже о городских катальцах всё это без надобности, а в младших моделях значительна переплата именно за бренд. Поэтому, если вам реально нужны только данные о скорости, пути и времени, рекомендую обратить внимание на следующие модели велокомпьютеров в онлайн-магазине dx.com.
 SunDING 1.5″ — простая «рабочая лошадка», умеет всё необходимое, дёшево стоит, неприхотлив к условиям, легко управляется парой кнопок. Питается одной батарейкой AG13 на год-два. Связь с датчиком по проводу. В добавок к обязательным функциям имеет термометр. Инструкция для настройки, стяжки для крепления, батарейка — всё, разумеется, в комплекте.
 SunDING 2.8″ — велокомпьютер для тех, кто хочет видеть сразу все данные — у него очень широкий экран на котором умещается чуть не вся доступная информация разом. Из-за размера для него на руле скорей всего окажется недостаточно места, поэтому в комплекте есть специальный кронштейн для крепления специального выноса. Приятный бонус для любителей ночных поездок — синяя подсветка экрана.
 SunDING 1.5″ Wireless — беспроводная версия первого из упомянутых. Функции и управление идентичны, достоинство — нет проводов. Хорошо как с эстетической, так и с функциональной точки зрения — меньше шансов за что-то зацепиться, дождь не замкнёт контакты на базе. Сам питается батарейкой CR2032, дополнительно радио-датчику требуется батарейка 23A 12V.
Ссылки приведены на dx.com для единообразия и удобства (и бесплатной доставки). Аналогичные велокомпьютеры можно купить, например, на aliexpress.com, ebay.com. Недостаток покупки через интернет — длительное время доставки, но если спешить некуда, например в межсезонье, то можно поучаствовать в аукционах и тем ещё больше выгадать в цене.
Смотрите также
инструкцияVDO C15+

English page 1-20
Deutsch Seite 21-40
Français page 41-60
Italiano pagine 61-80
Español pagina 81-100
Nederlands pagina 101-120
GB
C15
D
C15
F
C15
I
C15
E
C15
NL
C15
Посмотреть инструкция для VDO C15+ бесплатно. Руководство относится к категории велокомпьютеры, 1 человек(а) дали ему среднюю оценку 7.9. Руководство доступно на следующих языках: английский. У вас есть вопрос о VDO C15+ или вам нужна помощь? Задайте свой вопрос здесь
Главная
Не можете найти ответ на свой вопрос в руководстве? Вы можете найти ответ на свой вопрос ниже, в разделе часто задаваемых вопросов о VDO C15+.
Аккумулятор в моем устройстве велокомпьютер начал ржаветь. Безопасно ли пользоваться устройством?
Продукт безопасен для использования после надлежащей очистки. Извлеките аккумулятор, надев перчатки, и очистите аккумуляторный отсек зубной щеткой, смоченной уксусом. После высыхания установите в устройство новые аккумуляторы.
Что такое GPS?
GPS — это система, которая может использоваться в любой точке мира для определения вашего местоположения с помощью спутников.
Что означает аббревиатура GPS?
Аббревиатура GPS расшифровывается как Global Positioning System, т. е. система глобального позиционирования.
Необходим ли интернет для GPS?
Нет, для использования GPS не требуется интернет.
Инструкция VDO C15+ доступно в русский?
К сожалению, у нас нет руководства для VDO C15+, доступного в русский. Это руководство доступно в английский.
Не нашли свой вопрос? Задайте свой вопрос здесь
Table of Contents for VDO CYTEC C 15:
-
1-5mm 1-5mm 1.LOCK 2.CLICK 1.PRESS 2.UNLOCK LOCK UNLOCK GB C 15 3 In case this distance is not achievable in the current positioning, slide the sensor and the magnet on the fork or spoke accordingly. 4. Twist-Click mounting of computer onto holder The Twist-Click mounting has been exclusively developed for the new line of VDO CYTEC computers. The computerhead is put onto the handlebar and by a right turn of the computerhead (TWIST) fixed to the holder (CLICK). It is just as easy to remove the computerhead from the handlebar holder. Slightly push the
-
GB C 15 5 6. Information features of your VDO CYTEC C 15 Your VDO CYTEC C 15 provides you with following information: KMH-MPH current speed indicated in either KMH or MPH, featuring automatic conversion into MPH TRP trip counter, counts your trip distance up to 999,99 km or miles. RID trip timer, keeps track of the actual riding time featuring automatic start/stop function, up to 9:59:59 (hrs:min:sec) STP manual stop watch, counting up to 9:59:59 (hrs:min:sec) AVS average speed, accurate to two dec
-
WS in mm / inch 1x GB C 15 12 15. Entering your wheelsize You may enter two different wheelsizes into your VDO CYTEC C 15, i.e. one wheelsize for your street bike and another one for your mountain bike. Your VDO CYTEC identifies different wheelsizes as WS 1 = wheelsize 1 and WS 2 = wheelsize 2. following defaults are entered wheelsize 1 = WS1 = 2155 mm wheelsize 2 = WS2 = 2000 mm Watch out: Above defaults are automatically applied after a battery change. After a battery change, the correct wheelsizes fo
-
to aktivate to deactivate MODE 1 +MODE 2 Your current speed is faster than your average speed. Accuracy +/- 1 KMH/MPH You are currently riding as fast as your average speed. Accuracy +/- 1 KMH/MPH Your current speed is slower than your average speed. Accuracy +/- 1 KMH/MPH Activating the FREEZE-function The FREEZE-function can be activated
-
GB C 15 2 2. Mounting the speed transmitter The sensor should be mounted on the same side of the fork as the holder is on the handlebar. Watch out: Do not tighten the cable ties yet! Accurately position the spoke magnet and the sensor first, then tighten the cable ties. 3. Mounting the spoke magnet Distance between magnet and sensor should be approx. 1-5 mm.
-
GB C 15 7 These buttons / keys have several functions. All functions of the respective buttons / keys outlined in the following chart below. Your display in Button / Key Length of What is going on? dicates following to be pushed pushing the information button / key TRP-AVS-RID- MODE 1 brief (0.1 sec) next information from MODE 1 is indicated STP-MAX TCNT-CLK-TOT- MODE 1 brief (0.1 sec) computer changes display information from MODE 2 data to ODO1-ODO2
-
MODE 1 5sec. to quit MODE 1 0,1sec. switch to next MODE 2 0,1sec. to increase START MODE 1 5sec. GB C 15 16 17. Programming (setting-up) your odometers ODO1 / ODO2 You can enter individual odometer values into your VDO CYTEC C 15 at any time, i.e. transferring data from your old computer into your new VDO CYTEC C 15 or after a battery change. Watch out: after a battery change, your data for totals ODO 1, ODO 2 and TOTODO are reset to zero. TIP: If you want to re-enter y
-
Function TRP RID AVS STP MAX Mode 1 Function TCNT CLK TOT ODO1 ODO2 TOTODO Mode 2 SS Function STP-Start/Stop GB C 15 6 7. Operating your VDO CYTEC C 15 Button / Key Covering Your VDO CYTEC C 15 has 3 buttons / keys Mode 1, Mode 2 and SS
-
Hg GB C 15 18 malfunction possible cause solutions irregular LCD readout (i.e. after battery change) speed display does not appear check for proper distance between sensor and magnet cable from sensor to computer broken check cable and replace if necessary computerhead is incorrectly twisted on place computerhead on handlebar holder and twist until detent (CLICK) no wheelsize entered enter y
-
English page 1-20 Deutsch Seite 21-40 Français page 41-60 Italiano pagine 61-80 Español pagina 81-100 Nederlands pagina 101-120 GB C15 D C15 F C15 I C15 E C15 NL C15
-
GB C 15 11 13. Set-up mode Your VDO CYTEC C 15 features the following set-up procedures wheelsize 1 = WS1 set-up starts out of TRP in display wheelsize 2 = WS2 set-up starts out of TRP in display clock = CLK set-up starts out of CLK in display odometers = ODO1,ODO2 set-up starts out of ODO1, ODO2 in display Trip Counter=TCNT set up starts out of TCNT in display No matter which set-up mode is used for your VDO CYTEC , the procedure is the same. You can start the set-up mode for a certain display by pressing the MODE 1 button for 5 sec. Wit
-
SS START/STOP Press MODE 2 5sec. Reset GB C 15 9 10. Manual stop-watch STP Your VDO CYTEC C 15 features a manual stop-watch.With information STP being displayed, you may operate your stop-watch with the SS-button. SS press when STP is displayed = starting the stop-watch SS press again = interrupt the stop-watch SS press again = stop watch continues 11. FREEZE-function Your VDO CYTEC C 15 features a FREEZE-function. Using this function, as you pass the finish line «freezes» your screen and further impuls
-
MODE 2 0,1sec. to change from KMH to MPH MODE 2 0,1sec. to increase MODE 1 5sec. MODE 1 5sec. to quit MODE 1 0,1sec. switch to next MODE 1 0,1sec. switch to next MODE 1 0,1sec. switch to next MODE 1 0,1sec. switch to next MODE 2 to increase to change from KMH to MPH MODE 1 to start to switch to quit MODE 1 0,1sec. switch to next GB C 15 14
-
SCROLL Press MODE 1 1,5 sec. Start Scroll Press MODE 2 5sec. Reset GB C 15 8 8. Scroll function To provide any information at a glance, your VDO CYTEC C 15 features a scroll function. Calling up the scroll function automatically displays information for a period of 1.5 sec. Scroll function may be called upon if any of the following information is on display: TRP-AVS-RID. Scroll function is activated by pressing the MODE 1 button for 1.5 sec.
-
MODE 2 0,1sec. MODE 2 MODE 1 0,1sec. switch to next MODE 2 0,1sec. to increase MODE 1 0,1sec. switch to next MODE 1 5sec. to quit MODE 1 5sec. to start MODE 1 0,1sec. switch to next GB C 15 15 16. Setting the clock CLK Your VDO CYTEC C 15 features a clock with hour and minute display. 12 h or 24 h display selectable. To access the clock set-up mode proceed as follows: Step 1: call in the CLK information into your display Step 2: Press the MODE 1 button for 5 sec. The set-up mode f
Questions, Opinions and Exploitation Impressions:
You can ask a question, express your opinion or share our experience of VDO CYTEC C 15 device using right now.