- Manuals
- Brands
- DVC Manuals
- Color Camera
- DVC-340
- Technical manual
-
Contents
-
Table of Contents
-
Bookmarks
Quick Links
TECHNICAL MANUAL FOR
DVC-340 CAMERAS
Manual Number: 86-0340-01
Release Date: August 24, 2006
Summary of Contents for DVC DVC-340
-
Page 1
TECHNICAL MANUAL FOR DVC-340 CAMERAS Manual Number: 86-0340-01 Release Date: August 24, 2006… -
Page 2: Table Of Contents
INTRODUCTION …………………..4 RECEIVING AND UNPACKING………………5 EQUIPMENT SUPPLIED………………..5 3.1……….5 MPORTANT INFORMATION REGARDING THE POWER SUPPLY 3.2…………………….5 PTIONAL ITEMS INSTALLATION ……………………5 4.1………………5 OST COMPUTER REQUIREMENTS 4.1.1. Operating system:…………………..5 4.1.2. Hardware, CameraLink configuration:…………..6 4.1.3. Hardware, Gigabit Ethernet configuration:……………6 4.2….6 NSTALLING THE IGABIT THERNET OR…
-
Page 3
APPENDIX B: DESCRIPTION OF DVC-340 AUXILIARY AND POWER SUPPLY CONNECTORS……………………..23 ………………….23 UXILIARY CONNECTOR Auxiliary Connector Pin Signal list: ………………23 Pin 1, ENL……………………..23 Pin 2, DIFF_RESET_OUT………………….23 Pin 3, TTL_RESET……………………24 Pin 4, GND……………………..24 Pin 5, ENF……………………..24 Pin 6, STROBE (and programmable output) …………….24 ……………..24… -
Page 4: Introduction
We thank you for purchasing from the DVC-340 product line. The DVC-340 cameras are based on the Kodak KAI-0340 interline CCD, which provides 640(H) x 480 (V) pixel resolution and 7.4 µm square pixels with high quantum efficiency and low noise. The DVC- 340 is available with either Gigabit Ethernet or CameraLink digital video and control interface.
-
Page 5: Receiving And Unpacking
Receiving and Unpacking Your DVC-340 camera was thoroughly tested and carefully packed at the factory. Once the camera shipment is accepted for delivery, the carrier assumes full responsibility for its safe arrival. Should you receive your shipment with any damage—concealed or apparent—please contact the carrier at once. The carrier will instruct you on how to initiate a damage claim.
-
Page 6: Hardware, Cameralink Configuration
4.3. Installing the Software Place DVC Software installation CD in the CD or DVD drive. The installer will launch automatically and guide each installation step. 4.4. Installing the camera hardware This camera contains sensitive electronic devices that can be damaged by static discharge.
-
Page 7: Operating Speed
The DVC-340 has five basic operating modes described in detail below. Each mode can be operated at either 20 or 40 MHz and can support binning and region of interest. All operational modes are initiated by a trigger signal. In the continuous modes, the trigger initiates the stream and the camera continues to run in streaming mode until disabled by the host computer.
-
Page 8: Continuous, Overlapped, Extended-Exposure Mode
(falling) edge of the external or CameraLink control lines, with an exposure time set by software. Alternatively, the exposure can be initiated by the host via the DVC API. The exposure and readout sequence is the same as the non-…
-
Page 9: Bulb (Pulse-Width Exposure) Mode
Bulb mode in the DVC-340 is analogous in that the CCD exposes as long as the trigger signal is asserted (a low logic level on the external trigger or a low command on the CameraLink CC1 control line).
-
Page 10: Region Of Interest
The KAI-0340 CCD is a high-performance image sensor with remarkably ideal behavior over a wide operating range. To be as versatile as possible, the DVC-340 camera exploits as much of the CCD capability as possible and provides the user a great degree of control over the CCD functions. As a result, it is possible to observe some interesting, low-level CCD phenomena under certain extreme conditions.
-
Page 11: Maintenance
To minimize the need to clean the optical surfaces, do not remove the protective lens mount cap shipped with the DVC-340 camera until you are ready to mount the camera to the optical system.
-
Page 12
• dry location where it is safe to use flammable solvents (please see caution below) Carefully loosen the lens mount lock ring using the supplied DVC lock ring • wrench. Orient the camera so that the lens mount is pointing downward and carefully •… -
Page 13: Infra-Red Filter Removal And Installation
Caution: This procedure will cause the focus calibration to be lost. Readjustment of the lens back-focus will be required after reassembly Loosen the lens mount lock ring with the wrench supplied by DVC Unscrew the lens mount/filter assembly ring from the camera body and remove the lock…
-
Page 14
Remove the filter from the filter ring with lens tissue and store in a protective container Replace the lens ring on to the filter ring and screw on clockwise Remove the lens ring from the lens cap Screw the lock ring back onto the lens mount ring and screw both back onto the camera. Adjust focus by loosening the lock ring and rotating the lens mount ring to adjust the lens-to-CCD distance. -
Page 15: Cleaning The Ccd Faceplate
Use a CLEAN, DRY (preferably brand-new), camel-hair lens cleaning brush • (such as those used by photographers) to gently wipe the contaminants off of the CCD Faceplate. If in doubt, or if the CCD faceplate surface is very dusty, please call DVC • customer service before proceeding. •…
-
Page 16: Warranty And After-Sale Service
DVC such as lenses, optical and electro-optical assemblies, power supplies, cables, image processor boards and software are warranted by the original manufacturer. This warranty is in lieu of all other warranties expressed or implied. DVC shall not be liable for any collateral or consequential damages.
-
Page 17
In no event will DVC be liable for any direct, indirect, special, incidental or consequential damages, including lost profits, lost business, or lost data, resulting from the use or reliance upon the information, whether or not DVC has been advised of the possibility of such damages. -
Page 18: Appendix A: Exposure Timing Diagrams
Appendix A: Exposure Timing Diagrams Continuous, overlapped, electronic-shuttered exposure mode In the continuous, overlapped exposure mode, the camera remains in an idle state until the falling edge of the trigger. A first exposure is made, followed by the typical, interline CCD overlapped exposure/readout cycle.
-
Page 19
Continuous, overlapped, extended-exposure mode This mode is similar to the overlapped, electronic-shuttered exposure mode except that the electronic shutter is not enabled and the exposure times are greater than one readout cycle (frame time). As a result, readout frame rate will decrease as exposure time is increased, but the overlapping exposure and readout provide the maximum frame rate for a given exposure time. -
Page 20
Continuous, non-overlapped exposure mode This mode is similar to the overlapped exposure mode except that the exposure and readout periods are separate and do not overlap. As a result, readout frame rate will decrease as exposure time is increased. This mode also offers much longer integration times than overlapped exposure mode, and exposures are controlled via software. -
Page 21
Edge-triggered exposure (single frame capture) mode Edge-triggered exposure mode operates almost identically to the first frame of the non-overlapped continuous mode except that instead of continuing to run, the camera returns to the armed state, waiting for another trigger. Exposure is controlled by software. trigger ignored during exposure and readout trigger ignored during exposure and readout software… -
Page 22
Bulb (pulse-width exposure) mode Bulb mode allows the camera exposure to be controlled by the external trigger signal. The leading edge of the trigger signal initiates the exposure, and the camera will continue to expose until the trailing edge of the trigger, as shown. The readout sequence begins immediately after the trigger signal trailing edge, and at the end of readout, the camera returns to the armed state, awaiting the next trigger. -
Page 23: Appendix B: Description Of Dvc-340 Auxiliary And Power Supply Connectors
Appendix B: description of DVC-340 auxiliary and power supply connectors Auxiliary connector The auxiliary connector on the DVC-340 camera allows the user access certain camera control and internal status signals. The following section describes each signal. Illustration of the auxiliary connector on the rear of the DVC-340 camera…
-
Page 24: Pin 3, Ttl_Reset
DIFF_RESET_OUT is labeled INPUT_1 on older DVC cameras and on the Mini-DIN- to-BNC cable accessory sold by DVC. Pin 3, TTL_RESET TTL_RESET is a TTL input used to trigger exposures. It functions identically to the CameraLink CC1 signal. TTL_RESET is also labeled VRST_INT on older DVC cameras and on the Mini-DIN-to-BNC cable accessory sold by DVC.
-
Page 25: Appendix C: Specifications
Appendix C: Specifications 340M KAI-0340 progressive scan interline KAI-0340 progressive scan interline Active Pixels Active Pixels 640 X 480 640 X 480 Pixel Size Pixel Size 7.4 µm X 7.4 µ m 7.4 µm X 7.4 µ m Imager Size Imager Size 5.92 mm (diagonal) 5.92 mm (diagonal)
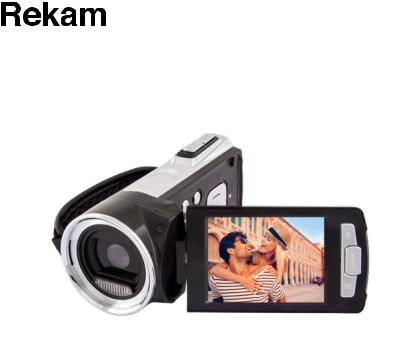
DIGITAL CAMCORDER
DVC-340
USER MANUAL
|
CONTENTS |
||
|
1. PARTS OF THE DIGITAL VIDEO CAMERA . . . . . . . . . . . . . . . . . . . . . . . . . . . . . . . . . . . . . . . . . . . . . . . . . |
. 4 |
|
|
2. SETUP GUIDE .. .. .. .. .. .. .. .. .. .. .. .. .. .. .. .. .. .. .. .. .. .. .. .. .. .. .. .. .. .. .. .. .. .. .. .. .. .. .. .. .. .. .. .. .. .. .. .. .. .. .. .. .. .. .. .. .. .. .. .. .. .. .. .. .. .. .. .. .. .. .. .. .. .. |
.. 5 |
|
|
2..1 |
HOW TO INSTALL THE BATTERY . . . . . . . . . . . . . . . . . . . . . . . . . . . . . . . . . . . . . . . . . . . . . . . . . . . . . . . . . . . . . . . . . |
. 5 |
|
2..2 HOW TO CHARGE THE BATTERY . . . . . . . . . . . . . . . . . . . . . . . . . . . . . . . . . . . . . . . . . . . . . . . . . . . . . . . . . . . . . . . . . |
. 6 |
|
|
2..3 HOW TO INSERT THE MEMORY CARD . . . . . . . . . . . . . . . . . . . . . . . . . . . . . . . . . . . . . . . . . . . . . . . . . . . . . . . . . . . . |
. .7 |
|
|
2..4 HOW TO FORMAT THE MEMORY CARD . . . . . . . . . . . . . . . . . . . . . . . . . . . . . . . . . . . . . . . . . . . . . . . . . . . . . . . . . . . |
. 8 |
|
|
2..5 |
HOW TO SELECT A LANGUAGE . . . . . . . . . . . . . . . . . . . . . . . . . . . . . . . . . . . . . . . . . . . . . . . . . . . |
. .9. . . . . . |
|
2..6 HOW TO SET THE DATE AND TIME . . . . . . . . . . . . . . . . . . . . . . . . . . . . . . . . . . . . . . . . . . . . . . . . . . . . . . . . . . . . . . . |
10 |
|
|
2..7 EXPLANATION OF THE MONITOR SCREEN DISPLAY . . . . . . . . . . . . . . . . . . . . . . . . . . . . . . . . . . . . . . . . . . . . |
.11 |
|
|
3. HOW TO USE THE DIGITAL VIDEO CAMERA . . . . . . . . . . . . . . . . . . . . . . . . . . . . . . . . . . . . . . . . . . . . . . |
18 |
|
|
3..1 HOW TO TURN THE DIGITAL VIDEO CAMERA ON AND OFF .. .. .. .. .. .. .. .. .. .. .. .. .. .. .. .. .. .. .. .. .. .. .. .. .. .. .. .. .. .. .. .. .. .. .. .. .. .. .. |
18 |
|
|
3..2 HOW TO CHANGE THE RECORD MODE . . . . . . . . . . . . . . . . . . . . . . . . . . . . . . . . . . . . . . . . . . |
18. . . . . . . |
|
|
3..3 HOW TO RECORD A VIDEO CLIP .. .. .. .. .. .. .. .. .. .. .. .. .. .. .. .. .. .. .. .. .. .. .. .. .. .. .. .. .. .. .. .. .. .. .. .. .. .. .. .. .. .. .. .. .. .. .. .. .. .. .. .. .. .. .. .. .. .. .. .. .. .. .. .. .. |
19 |
|
|
3..4 |
HOW TO TAKE STILL IMAGES . . . . . . . . . . . . . . . . . . . . . . . . . . . . . . . . . . . . . . . . . . . . . . . . . . . . . . . . . . . . . . . . . . . . |
20 |
|
3..5 HOW TO USE THE SELF-TIMER .. .. .. .. .. .. .. .. .. .. .. .. .. .. .. .. .. .. .. .. .. .. .. .. .. .. .. .. .. .. .. .. .. .. .. .. .. .. .. .. .. .. .. .. .. .. .. .. .. .. .. .. .. .. .. .. .. .. .. .. .. .. .. .. .. .. |
21 |
|
|
3..6 |
HOW TO RECORD AUDIO . . . . . . . . . . . . . . . . . . . . . . . . . . . . . . . . . . . . . . . . . . . . . . . . . . . . . . . . . . . . . . . . . . . . . . . . |
22 |
|
4. HOW TO USE THE MENU IN RECORD MODE . . . . . . . . . . . . . . . . . . . . . . . . . . . . . . . . . . . . . |
22. . . . . . . |
|
|
4..1 MENU IN CAPTURE MODE . . . . . . . . . . . . . . . . . . . . . . . . . . . . . . . . . . . . . . . . . . . . . . . . . . . . |
22. . . . . . . |
|
|
4..2 |
CAPTURE MENU LIST . . . . . . . . . . . . . . . . . . . . . . . . . . . . . . . . . . . . . . . . . . . . . . . . . . . . . . . . . . . . . . . . . . . . . . . . . . . |
23 |
|
4..3 MENU IN VIDEO MODE . . . . . . . . . . . . . . . . . . . . . . . . . . . . . . . . . . . . . . . . . . . . . . . . . . . . |
27. . . . . . . |
|
|
4..4 |
SETUP MENU . . . . . . . . . . . . . . . . . . . . . . . . . . . . . . . . . . . . . . . . . . . . . . . . . . . . . . . . . . . . . . . . . . . . . . . . . . . . . . . . . . . |
29 |
|
5. PLAYBACK . . . . . . . . . . . . . . . . . . . . . . . . . . . . . . . . . . . . . . . . . . . . . . . . . . . . . . . . . . . . . . . . . . . . . . . . . . . . . |
31 |
|
|
5..1 HOW TO PLAYBACK MOVIE CLIPS . . . . . . . . . . . . . . . . . . . . . . . . . . . . . . . . . . . . . . . . . . . . . . . . . . . . . . . . . . . . . |
31. . |
|
|
5..2 |
HOW TO PLAYBACK STILL IMAGES . . . . . . . . . . . . . . . . . . . . . . . . . . . . . . . . . . . . . . . . . . . . . . . . . . . . . . . . . |
31. . . . . |
|
5..3 |
HOW TO PLAYBACK AUDIO FILES . . . . . . . . . . . . . . . . . . . . . . . . . . . . . . . . . . . . . . . . . . . . . . . . . . . . |
32. . . . . . . . |
|
5..4 HOW TO VIEW THUMBNAILS . . . . . . . . . . . . . . . . . . . . . . . . . . . . . . . . . . . . . . . . . . . . . . . . . . . . . . . . . . . . . . . . . . . . |
32 |
|
|
5..5 MENU IN PLAYBACK MODE . . . . . . . . . . . . . . . . . . . . . . . . . . . . . . . . . . . . . . . . . . . . . . . . . . . . . . |
.33. . . . . . . |
6. HOW TO CONNECT THE DIGITAL VIDEO CAMERA TO A TV/HDTV/PC . . . . . . . . . . . . . . . . . . . . . . 35 6..1 HOW TO CONNECT THE DIGITAL VIDEO CAMERA TO A TV . . . . . . . . . . . . . . . . . . . . . . . . . . . . . . . . . . . . . . . .35 6..2 HOW TO CONNECT THE DIGITAL VIDEO CAMERA TO A HDTV . . . . . . . . . . . . . . . . . . . . . . . . . . . . . . . . . . . . . 36 6..3 HOW TO CONNECT THE DIGITAL VIDEO CAMERA TO A PC .. .. .. .. .. .. .. .. .. .. .. .. .. .. .. .. .. .. .. .. .. .. .. .. .. .. .. .. .. .. .. .. .. .. .. .. .. .. .. .. 37 6..4 HOW TO USE THE CARD READER . . . . . . . . . . . . . . . . . . . . . . . . . . . . . . . . . . . . . . . . . . . . . . . . . . . . . . . . . . . . . . . . 37 6..5 HOW TO CONNECT THE DIGITAL VIDEO CAMERA TO A PC WITH A USB CABLE . . . . . . . . . . . . . . . .38. . . .
7. TECHNICAL SPECIFICATIONS . . . . . . . . . . . . . . . . . . . . . . . . . . . . . . . . . . . . . . . . . . . . . . . . . . . . . . . . . . . 39
Please read these operating instructions carefully in order to use the digital video camera correctly.. Keep the instructions in a safe place after reading so that you can refer to them later.. Precautions:
Before using the digital video camera, please ensure that you read and understand the safety precautions described below..
•Should the digital video camera malfunction in any way, do not attempt to repair it yourself.. Maintenance and repairs should only be carried out by authorized service providers..
•Keep the digital video camera away from water and other liquids.. Do not use the camcorder with wet hands.. Never use the camcorder in the rain or snow.. Moisture creates the risk of electric shock..
•Use only the recommended power accessories.. Use of power sources not expressly recommended for this unit may lead to overheating, distortion of the equipment, fire, electrical shock or other hazards..
3
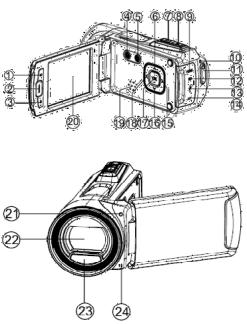
1.PARTS OF THE DIGITAL VIDEO CAMERA
1.Playback Button..
2.Menu Button..
3.Delete..
4.Power Button..
5.Mode Button..
6.Up Button..
7.Zoom In Button..
8.Zoom Out Button..
9.HDMI Jack..
10.Power/Charging Indicator Light..
11.Shutter Button..
12.SD Card Slot..
13.USB Jack..
14.AV Out Jack..
15.Right/LED On/Off Button..
16.Down Button..
4

17. OK Button..
18.Left/Display
Button..
19.Speaker..
20.LCD Screen..
21.Self-timer LED..
22.Lens..
23.LED Light..
24.Microphone..
25.Tripod Socket..
26.Battery Cover.. 27. Wrist Strap..
2.SETUP GUIDE
2.1HOW TO INSTALL THE BATTERY
1.Slide the battery cover and open it..
5
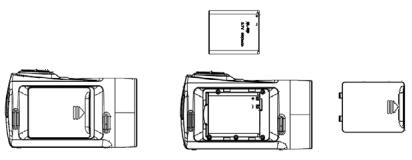
2.Place the accessory li-ion battery into the compartment.. Please note: The metallic contacts must be aligned with the contacts in the compartment..
3.After the battery is properly installed, close the battery cover..
2.2HOW TO CHARGE THE BATTERY
Charge the battery for at least eight hours prior to first use.
a.Power OFF and connect the USB cable to the digital video camera and the computer for battery charging..
b.Charging starts when charging LED turns BLUE.. The charge indicator
6
light turns OFF when charging is completed.. c. Disconnect the camcorder..
2.3 HOW TO INSERT THE MEMORY CARD
This digital video camera has no internal memory, it can’t record pictures or movie clips.. If you want record you have to use a SD or MMC card (The MAX..SD/MMC card that this digital video camera could support is up to 32GB)..Turn off the digital video camera before inserting or removing the memory card.. Be sure to align and position the card correctly when inserting it.. Never try to force the memory card into the slot if you feel resistance.. The memory card has a write protect switch which used to protect data from accidental deletion.. Therefore,whenever you want to record,format or delete files in the
SD card, disable the write protection beforehand..
7
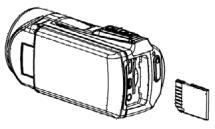
1.Turn off the camcorder..
2.Find the rubber cover at the side of digital video camera and then you will see the SD card slot..
3.Insert the memory card as illustrated..
4.Close the rubber cover..
5.To release the memory card, press the edge of the card gently..
2.4HOW TO FORMAT THE MEMORY CARD
It is important to format the memory card the first time you use this digital video camera.. All data will be deleted including protected files.Be sure to download the important files to your computer before formatting..
8
1.Turn the power on, and set the digital video camera to the Setup Menu..
2.Press the UP or DOWN buttons to select [Format], then press OK button to launch the submenu..
3.Press the UP or DOWN buttons to select the item [YES] and then press the OK button to erase all data..
2.5HOW TO SELECT A LANGUAGE
Be sure to choose a language and set the date & time before first time
using the digital video camera..
1.Turn the power on, and set the digital video camera to the Setup Menu..
2.Press the UP or DOWN buttons to select [Language] then press OK button to launch the submenu..
3.Press the UP or DOWN buttons to select the desired language and then press the OK button to confirm the setting and exit the menu..
9
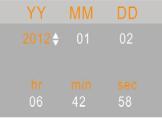
2.6HOW TO SET THE DATE AND TIME
1.Turn the power on, press the MENU button to display the menu, and then press the RIGHT button twice to select [Setup] Menu..
2.Press the UP or DOWN buttons to select [Set Date] then press the OK button to launch the submenu..
3.Press the UP or DOWN buttons to change the highlighted value.. Press the LEFT or RIGHT buttons to move the cursor between settings..
4.Press the OK button to confirm the setting and close the menu..
10
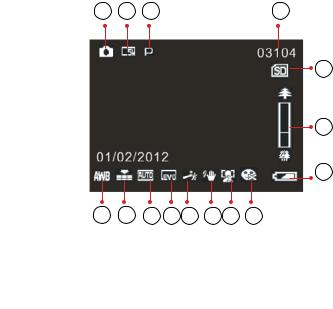
2.7 EXPLANATION OF THE MONITOR SCREEN DISPLAY
5
6
7
15 14 13 12 11 10 9 8
|
Capture Mode:[ |
] |
||
|
1.. Camera Mode |
|||
|
Still Image Capture |
|||
11
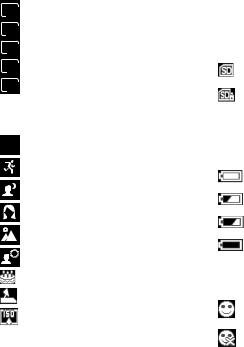
2.. Image Size..
21M 5616×3744
12M 4000×3000
8M 3264×2448
5M 2592×1944
3M 2048×1536
3.. Scene Mode..
P Auto
Sport
Night
Portrait
Landscape
Backlight
Party
Beach
High Sensitivity
4..Number of pictures available in SD Card..
5..SD Card inserted..
No protect status
Protect status
6..Zoom Value Level..
7..Battery Power Level..
Full
Medium
Low
None
8.. Smile Capture..
On
Off
12
|
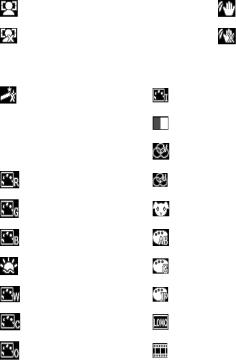
9.. Face Detect.. |
10.. Anti-Shake.. |
|
On |
On |
|
Off |
Off |
|
11.. Effect.. |
|
|
Normal |
IR |
|
B & W |
Binary |
|
Sepia |
Vivid |
|
Red |
Undertone |
|
Green |
Dog Eye |
|
Blue |
Aibao |
|
Sunset |
Gothic |
|
Warm |
Japan Style |
|
Cool |
LOMO |
|
Over Exposure |
Negative |
13
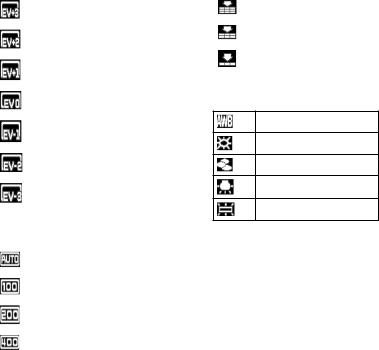
12.. Exposure..
+3
+2
+1
0
-1
-2
-3
13.. ISO..
Auto
100
200
400
14.. Image Quality..
Super Fine
Fine
Normal
15.. White Balance..
Auto
Daylight
Cloudy
Tungsten
Fluorescent
16.. Date Imprint..
14
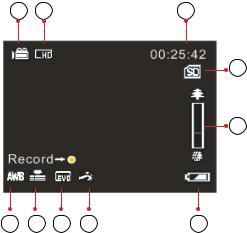
Video Record Mode: [  ]
]
4
5
|
10 |
9 |
8 |
7 |
6 |
1..Video recording icon..
2..Video size..
3..Recording time available..
4..SD Card inserted..
5..Zoom value level..
6..Battery power level..
15

7..Effect..
8..Exposure..
9..Video Quality..
10..White Balance..
Audio Mode:[  ]
]
3
4
1..Audio recording icon..
2..Audio recording time available..
3..SD Card inserted..
4..Battery power level..
16

Playback Mode: [  ]
]
4
7
6 5
|
1.. |
Playback still image icon.. |
Playback movie clips icon..
Playback audio recording icon..
2..Image/Video size..
3..File catalogue on SD card / Current Image Number#/Video#..
4..Video recording time..
17
5..Battery Power Level..
6..Date Imprint..
7.Press the shutter button to playback video file.
3.HOW TO USE THE DIGITAL VIDEO CAMERA
3.1HOW TO TURN THE DIGITAL VIDEO CAMERA ON AND OFF
1.Open the LCD panel to power on the digital video camera and close the LCD panel to turn off the digital video camera..
2.You can also press the POWER button to turn on the digital video camera and press it again for 3 second to turn it off..
To save battery power, you can change the power-off time by setting the function [Power Save] in the Setup menu..
3.2 HOW TO CHANGE THE RECORD MODE
There are four modes in this digital video camera.. Press the MODE button to change the mode, each time the MODE button is press the mode is changed..
18

|
Display |
Title |
Description |
|
Capture mode |
For taking still photos.. |
|
|
Video mode |
For recording movie clips.. |
|
|
Audio mode |
For recording audio files. |
|
|
Playback mode |
For previewing record files. |
Please Note: Press the playback button to enter playback mode.
3.3HOW TO RECORD A VIDEO CLIP
1.Turn on the digital video camera and set it to video record mode ( )..
)..
2.Zooming: Press the UP or DOWN buttons to zoom in or zoom out the subject. The value of magnification level appears on the LCD monitor..
3.Press the SHUTTER button to start recording..
4.Press the OK button to pause and press it again to continue to recording..
19
5.Press the SHUTTER button again to end the recording.. If the memory is full the video camera will stop recording automatically..
•On the upper of the LCD monitor displays the recorded time..
•When the light is insufficient press the RIGHT/LED ON/OFF button to turn on the compensating lamp and when the light is enough press the RIGHT/LED ON/OFF button again to turn off..
3.4HOW TO TAKE STILL IMAGES
1.Set the digital video camerar to capture mode, the icon appears on the LCD screen.. 
2.Zooming: Press the ZOOM IN or ZOOM OUT buttons to zoominorzoomoutthescreen.Thevalueofmagnification level appears on the LCD monitor..
3.Hold the camcorder steady and then press the SHUTTER
button down to take a picture..
• When the light is insufficient press the RIGHT/LED ON/OFF button to turn on the compensating lamp and when the light is enough press the RIGHT/LED ON/OFF button again to turn off..
20

3.5 HOW TO USE THE SELF-TIMER
Use the self-timer to set a delay from the time the shutter button is pressed to the time the image is shot..
1.Turn the power on, and set the digital video camera to the Capture mode..
2.Press the MENU button to display the capture menu, and then press the LEFT or RIGHT buttons select [Shooting] Menu..
3.Press the UP or DOWN buttons to select the items [Self Timer] or [Multi-Snapshot].. And press the OK button to launch the submenu:
Off: Don’t use self-timer without delay..
Self-timer 2S: The shutter release will delay for 2 seconds..
Self-timer 5S: The shutter release will delay for 5 seconds..
Self-timer 10S: The shutter release will delay for 10 seconds..
Multi-Snapshot: Press the shutter button once to take three pictures continuously..
21

4.Press the UP or DOWN buttons to select the desired item, and then press OK button to confirm the setting and close the menu..
5.Press the SHUTTER button to take picture..
3.6HOW TO RECORD AUDIO
1.Turn on the digital video camera and set it to audio record
mode ( )..
2.Press the SHUTTER button to start recording..
3.Press the SHUTTER button again to end the recording.. If the memory is full the video camera will stop recording automatically..
4.HOW TO USE THE MENU IN RECORD MODE
When a menu is displayed, the UP, DOWN and OK buttons is used to make the desired setting..
4.1MENU IN CAPTURE MODE
1.Turn on the digital video camera and set it to capture mode..
22

2.Press the MENU button to display the menu, and press the LEFT or RIGHT buttons to select the desired menu..
3.Press the UP or DOWN buttons to select an item..
4.Press the OK button to enter the submenu..
5.Use the UP or DOWN buttons to select the desired item..
6.Press the OK button to confirm the setting and close the menu..
4.2CAPTURE MENU LIST
|
Menu item |
Function |
|
|
You can select the scene mode according to the image |
||
|
Mode Set: |
your wish to capture.. There are 10 available modes.. |
|
|
[Auto]/[Sport]/[Night]/[Portrait]/[Landscape]/[Backlight]/ |
||
|
[Party]/[Beach]/[High Sensitivity]/[Cancel].. |
||
|
There are six options for choice: |
||
|
Size: |
[21M]: 5616×3744; [12M]: 4000×3000; [8M]: 3264×2448; |
|
|
[5M]: 2592×1944; [3M]: 2048×1536; |
||
|
[Cancel].. |
||
|
Face Detect: |
Use this function to detect our faces when taking pictures.. |
|
|
There are three options for choice.. [On]/[Off]/[Cancel].. |
||
|
Sets smile capture is on, Face Detect will be automatically |
||
|
Smile Capture: |
opened.. Once it detects smile, the digital video camera will |
|
|
automatically take a picture.. [On]/[Off]/[Cancel].. |
23

|
Menu item |
Function |
||
|
Use this function to take 3 pictures |
|||
|
continuously.. |
|||
|
[Single]: Press the shutter button once to |
|||
|
Multi-Snapshot: |
take one picture.. |
||
|
[Continuous]: Press the shutter button |
|||
|
once to take three pictures continuously.. |
|||
|
[Cancel]: Cancel this operation.. |
|||
|
Use the function to shoot an entire |
|||
|
surrounding area.. Shooting the |
|||
|
Panorama: |
directional position at 180 degrees |
||
|
Shooting: |
horizontally and 90 degrees vertically.. |
||
|
[Off]/[Up]/[Right]/[Cancel].. |
|||
|
Use the function to overlap two scene im- |
|||
|
Multi-Exposure: |
ages into a image for the special effect.. |
||
|
[Off]/[Double Exposure]/ |
|||
|
[Long Exposure]/[3D Capture]/[Cancel] |
|||
|
Use the self-timer to set a delay from the |
|||
|
Self-Timer: |
time the shutter button is pressed to the |
||
|
time the image is shot.. |
|||
|
[Off]/[2 Sec..]/[5 Sec..]/[10 Sec..]/[Cancel].. |
|||
|
Cancel: |
Cancel this operation.. |
||
|
The ISO menu allows you to set the level |
|||
|
Capture Setting: |
ISO: |
of sensitivity that your camera has to light |
|
|
in the surrounding environment.. |
|||
|
[Auto]/[100]/[200]/[400]/[Cancel].. |
24

|
Menu item |
Function |
||
|
Use the function to aviod our hands |
|||
|
Anti-Shake: |
shaking when taking pictures..There are |
||
|
three options for choice.. |
|||
|
[On]/[Off]/[Cancel].. |
|||
|
Best Shutter |
It is used to anti-shake for shooting |
||
|
images.. There are three options |
|||
|
Selector: |
|||
|
for choice..[On]/[Off]/[Cancel].. |
|||
|
This function can be used to add a date |
|||
|
Capture Setting: |
or time to your pictures as you take them.. |
||
|
There are four items for option: |
|||
|
[Off]: Do not add the recording date & |
|||
|
Imprint: |
time to printed images.. |
||
|
[Date]: Only add the recording date to |
|||
|
printed images.. |
|||
|
[Date & Time]: Add the recording date & |
|||
|
time to printed images.. |
|||
|
[Cancel]: Cancel this operation.. |
|||
|
Cancel: |
Cancel this operation.. |
||
|
Adjust the white balance to suit different |
|||
|
Image Setting: |
White Balance: |
light sources.. There are six items for |
|
|
option:[Auto]/[Daylight]/[Cloudy]/ |
|||
|
[Tungsten]/[Fluorescent]/[Cancel].. |
|||
25

|
Menu item |
Function |
|
|
Set the exposure value manually to |
||
|
compensate for unusual lighting |
||
|
Exposure: |
conditions such as indirect indoor |
|
|
lighting, dark backgrounds, and strong |
||
|
backlighting.. The exposure value range |
||
|
is –3 to +3.. |
||
|
Light Frequency should be set to either |
||
|
Light Frequency: |
60Hz or 50Hz depending on your region.. |
|
|
[50HZ]/[60HZ]/[Canel].. |
||
|
Image Setting: |
||
|
Select a lower image quality to decrease |
||
|
Quality: |
the image size in order to capture more |
|
|
images.. There are four options for choice: |
||
|
[Super Fine]/[Fine]/[Normal]/[Cancel].. |
||
|
You can set the level of sharpness in |
||
|
the images taken with your camera.. The |
||
|
Sharpness: |
sharpness level dictates if the edges of |
|
|
objects in the image are more or less |
||
|
distinct.. |
||
|
[Soft]/[Normal]/[Vivid]/[Cancel].. |
||
26
 Loading…
4 . Время видеозаписи.
5 . Уровень заряда батареи.
6 . Штамп даты.
7 . Нажмите кнопку спуска затвора для воспроизведения
видео файлов.
3.
КАК ПОЛЬЗОВАТЬСЯ ЦИФРОВОЙ
ВИДЕОКАМЕРОЙ
КАК ВКЛЮЧИТЬ ЦИФРОВУЮ ВИДЕОКАМЕРУ
3.1
Включение и выключение:
1 . Откройте LCD экран, чтобы включить питание цифро-
вой видеокамеры, и закройте LCD экран, чтобы выклю-
чить цифровую видеокамеру.
2 . Так же включить цифровую видеокамеру можно нажав
кнопку питания; что бы выключить цифровую видеока-
меру нажмите кнопку питания снова, и удерживайте ее
3 секунды.
58
Инструкцию для Rekam DVC-340 на русском языке, в формате pdf можно скачать с нашего сайта. Наш каталог предоставляем Вам инструкцию производителя фирмы Rekam, которая была взята из открытых источников. Ознакомившись с руководством по эксплуатации от Rekam, Вы на все 100% и правильно сможете воспользоваться всеми функциями устройства.
Для сохранения инструкции «Видеокамера Full HD Rekam DVC-340» на русском языке на вашем компьютере либо телефоне, нажмите кнопку «Скачать инструкцию». Если активна кнопка «Инструкция онлайн», то Вы можете просмотреть документ (manual), в своём браузере онлайн.
Если у Вас нет возможности скачать инструкцию по эксплуатации либо просмотреть её, Вы можете поделиться ссылкой на эту страницу в социальных сетях и при удобном моменте скачать инструкцию. Либо добавьте эту страницу в закладки Вашего браузера, нажав кнопку «Добавить страницу в закладки браузера».
