Как один из самых профессиональных электронная система дверного замка гостиницы поставщиков в Китае, мы столкнулись со многими клиентами, которые консультировались с нами по поводу Руководство по устранению неполадок дверного замка Vingcard и замена старого дверного замка Vingcard проблемы.
Мы будем рады помочь вам решить проблемы с дверными замками Vingcard и заменить или обновить старые дверные замки Vingcard. Для получения дополнительной информации, пожалуйста, проверьте наш Решения по модернизации и замене старых дверных замков отеля.
Итак, эта статья поможет вам с необходимым ручным устранением неисправностей дверного замка Vingcard. Давайте начнем.
Что такое Вингкард?

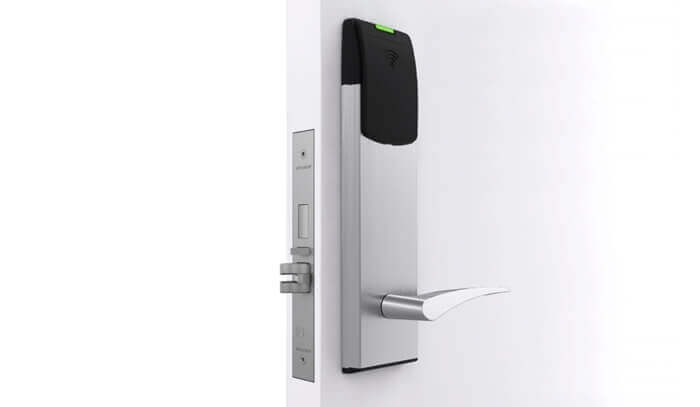
Vingcard — это система дверных замков производства Assa Abloy. Это один из наиболее часто устанавливаемых электронных дверных замков в мире, который используется в гостиницах, больницах, офисных зданиях и других учреждениях. Замки Vingcard производятся в Норвегии, где они имеют репутацию высококачественных продуктов, которые намного надежнее традиционных механических замков.
Зачем использовать гостиничный замок Vingcard?
VingCard Hotel Lock — это интеллектуальная система запирания, которая предлагает ряд преимуществ для владельцев и операторов отелей:
- Бюджетный. Гостиничные замки Vingcard доступны по цене и просты в установке, что делает их отличным выбором для отелей с ограниченным бюджетом.
- Надежность. Замки Vingcard изготовлены из прочных материалов, способных выдержать даже самые суровые условия вашего гостиничного бизнеса. Они также спроектированы так, чтобы быть энергоэффективными и потреблять меньше электроэнергии, чем другие типы дверных замков.
- Интеграция с другими системами. Если у вас уже есть система электронных ключей в отеле, интеграция замков Vingcard упростит для сотрудников или гостей безопасный доступ в номера и здания без необходимости использования нескольких ключей или карт (что экономит время).
- Безопасность. VingCard Hotel Lock — это инновационный способ защиты вашего помещения, предлагающий всестороннюю защиту от кражи и несанкционированного доступа. Замок можно использовать с другими электронными системами для повышения безопасности, позволяя гостям разблокировать номер в отеле с помощью мобильного телефона или ключ-карта.
- Удобство для гостей. Уникальной особенностью VingCard Hotel Lock является ее способность при необходимости действовать как обычная ключевая система — это означает, что гости могут легко открыть дверь отеля без ключ-карты или мобильный телефон, когда они возвращаются в отель после вечерней прогулки.
Наиболее часто используемые модели замков Vingcard.
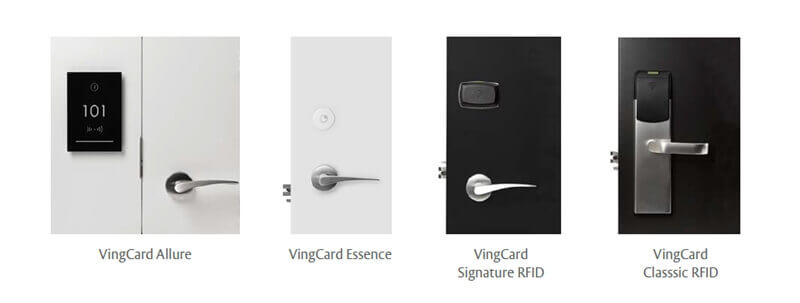
VingCard производит множество различных типов замков; если вы ищете надежный и простой в использовании замок для дома или офиса, VingCard — лучший вариант. К наиболее распространенным относятся следующие:
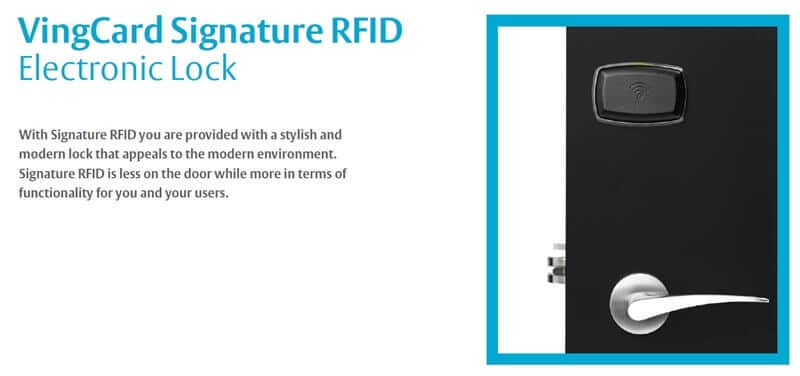
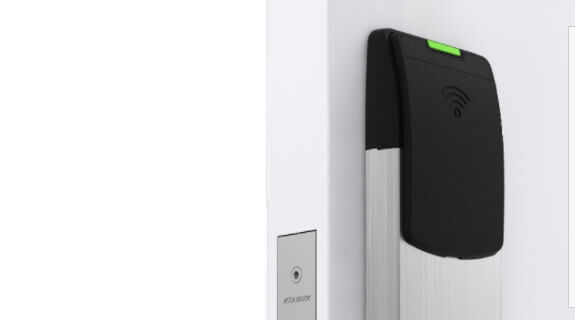
- Подпись VingCard RFID: С подписью RFID дверной замок отеля, у вас есть стильный и современный замок, который подходит для современной обстановки. Signature RFID не так прост и функционален для вас и ваших пользователей.
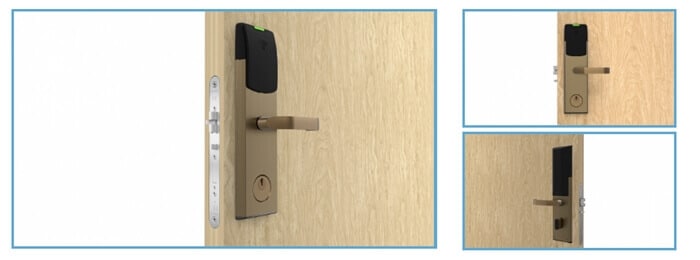
- Сущность VingCard RFID: VingCard Essence революционизирует индустрию электронных замков, размещая все компоненты замка внутри двери, включая считывающее устройство и мобильную плату доступа. VingCard Essence всегда поставляется с готовым мобильным доступом. С платой Mobile Access внутри считывателя ваша собственность может использовать мобильный телефон в качестве ключа от гостевой комнаты, когда это необходимо.
- Очарование ВингКард: VingCard Allure — это инновационное решение для электронных замков с уникальным, гибким дизайном и большим количеством функций, чем когда-либо ранее доступных в системе запирания. Изысканная, современная и интуитивно понятная концепция и технология были созданы с мыслью об элегантном дизайнере.
- Вингкард Классик RFID: Classic RFID предлагает новейшую технологию радиочастотной идентификации (RFID) и кратчайший путь к бесконтактной системе, если в настоящее время у вас установлены стандартные электронные замки Classic VingCard.
Что включает в себя гостиничная замковая система Vingcard?
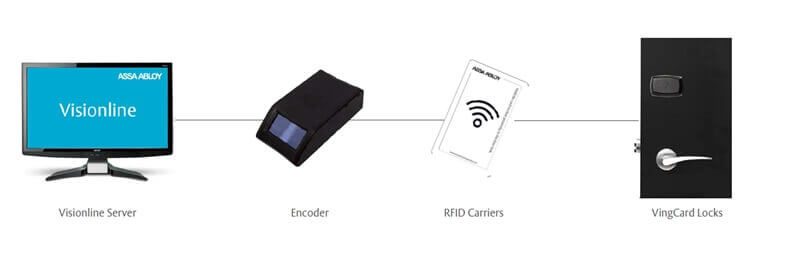
Для новой системы VingCard Hotel Lock предусмотрено следующее:
- Кодировщик VingCard. Основным компонентом системы является устройство контроля доступа к дверям отеля для записи. ключ-карты отеля. Он принимает карточки-ключи RFID и генерирует уникальный код для каждого пользователя.
- Блокировка ВингКард. Замки используются для комнатных дверей, но вы также можете найти их и на других дверях.
- RFID-карты-ключи. Эти карты позволяют гостям получить доступ к своим номерам с помощью карты-ключа, сгенерированной кодировщик ключей отеля или запирать при регистрации на стойке регистрации или в киосках самостоятельной регистрации (при наличии).
- ВингКард Visionline Программное обеспечение системы блокировки дверей отеля совместим с любым ПК на базе Windows, но должен быть установлен на сервере или ПК с доступом в Интернет. Программное обеспечение позволяет вам настраивать и контролировать списки гостей и графики работы персонала, создавать карточки-ключи и назначать их разным гостям, отслеживать количество посетителей, входящих в каждую комнату, записывать проблемы с обслуживанием и создавать отчеты. Карты технологии RFID (транспондер) также могут удаленно управлять функциями контроля доступа, такими как запирание или отпирание дверей. Программное обеспечение можно легко обновлять по мере изменения ваших потребностей с помощью интуитивно понятного графического интерфейса пользователя.

Для старых гостиничных замков Vingcard используются следующие компоненты:
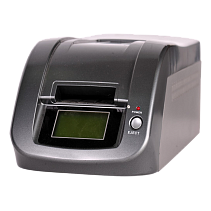
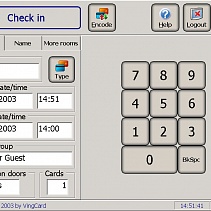
- VingCard 2800 «Цветная» система регистрации

Серия VingCard 2800 может использоваться как автономная система или встраиваться в сеть отеля, что позволяет ей взаимодействовать с другими системами в здании и обмениваться информацией. Компактный дизайн упрощает установку и обслуживание, а интуитивно понятный пользовательский интерфейс упрощает работу с гостями и сотрудниками.
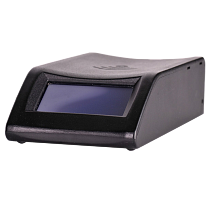
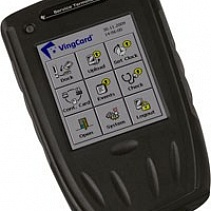
- Портативный компьютер VingCard 2100
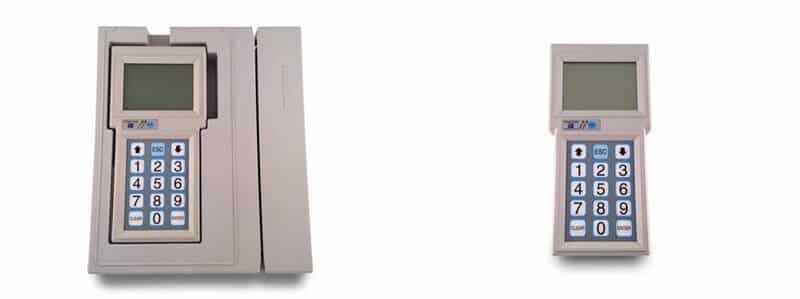
Портативный компьютер VingCard 2100 представляет собой портативный компьютер повышенной прочности, созданный для использования в гостиничном бизнесе. Благодаря большому экрану и эргономичному дизайну это устройство идеально подходит для общественных мест, где одновременно дежурят несколько пользователей. Он также обладает превосходной долговечностью благодаря степени защиты IP54, которая выдерживает попадание пыли и брызг воды под любым углом до 60° (в любом направлении).
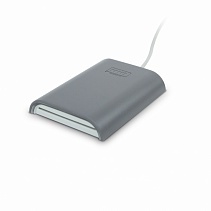
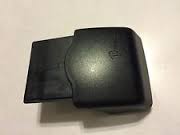
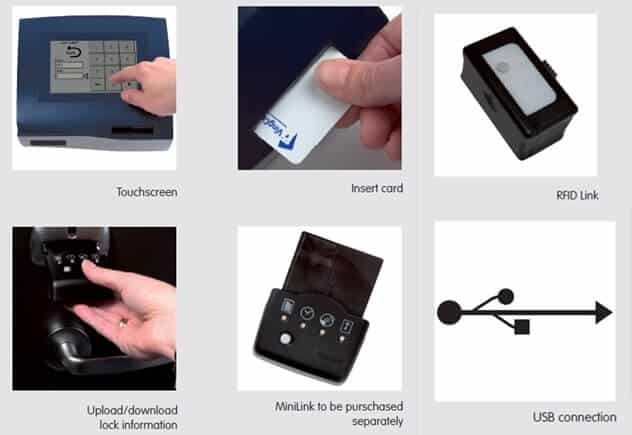
- Программатор замков Vingcard.
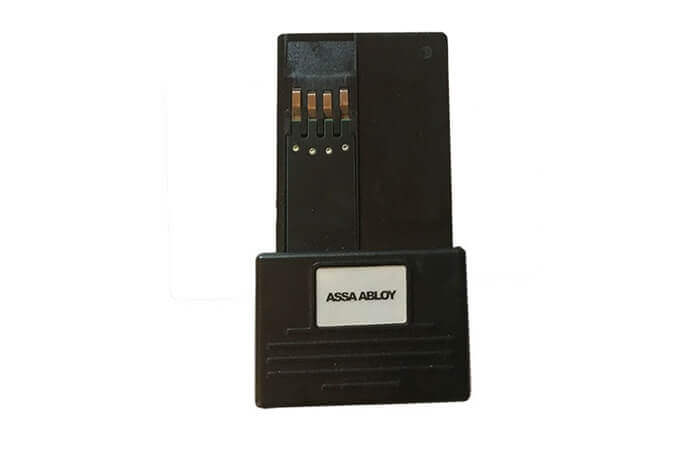
Это основной компонент этой системы безопасности, позволяющий вам программировать свои карты, проверять их статус и многое другое. Программатор замков поставляется с программным обеспечением для компьютеров Windows и Mac, поэтому вы можете использовать его независимо от того, какой компьютер у вас дома или на работе.
Световые коды VingCard
На передней панели засова VingCard могут появиться следующие световые коды:
- Зелёная – Замок готов принять ключ-карту.
- Жёлтые – Замок находится в режиме программирования.
- Red – Замок находится в режиме аудита. Его не следует использовать в качестве дверной ручки, пока он не вернется в зеленый (готовый) статус или не перезагрузится с помощью кнопки сброса, которая есть на большинстве моделей, которую также можно использовать, когда отображаются мигающие красные огни. Другой информации о том, что их вызвало, нет.
- Красный миг – Дверь не открылась; проверьте уровень заряда батареи и питания на наличие признаков того, что разрядка слишком мала для нормальной работы, или убедитесь, что никакие препятствия не препятствуют доступу через эту дверь (например, если произошло какое-либо повреждение).
- Красная вспышка – Кто-то пытался проникнуть в ваше здание без разрешения.
- Мигает зеленым, а затем красным означает, что батарейки сели. Вам нужно будет заменить их на новые.
- Он трижды мигает зеленым, а затем гаснет; есть проблема со считывателем двери или его подключением. Убедитесь, что все проводные соединения надежны и нет ли коррозии на металлических частях дверного считывателя.
- Мигает красным каждые несколько секунд или минут может быть из-за плохой электропроводки в вашем доме или многоквартирном доме.
- Четыре коротких ЖЕЛТЫХ мигания с последующим быстрым ЗЕЛЕНЫМ миганием.: сигнал батареи, доступ разрешен (сигнал батареи с последующим сигналом доступа)
- Четыре коротких ЖЕЛТЫХ мигания: сигнал батареи, доступ запрещен
- Долгая ЗЕЛЕНАЯ вспышка: при первом поднесении функциональной карты к замку функция активируется (стойка открыта, блокировка, конфиденциальность)
- Две короткие ЗЕЛЕНЫЕ вспышки: второй раз, когда функциональная карта предлагается на замке, операция деактивируется (пустой стенд, блокировка, конфиденциальность)
- Три быстрых КРАСНЫХ мигания: считываемая карта заполнена — ошибка обмена системным идентификатором — ошибка открытия питания
- Три кратких ЖЕЛТЫХ мигания: замок заперт
- Три очень коротких ЖЕЛТЫХ мигания, за которыми следуют три коротких ЖЕЛТЫХ мигания: предупредить персонал о том, что замок заблокирован для одной или нескольких групп пользователей
- ЖЕЛТЫЙ непрерывный свет: замок связывается с картой отмены, картой инициации, календарной картой, картой считывания или расширенной картой считывания; предупреждает пользователя не извлекать карту до тех пор, пока не прозвучит завершающий звуковой сигнал и короткая зеленая вспышка, в противном случае операция не будет выполнена успешно.
- ЖЕЛТЫЙ непрерывный свет: если блок постоянно горит желтым светом без поднесения карты к замку, блок необходимо перепрограммировать
Примечание. Есть два возможных звука аварийного открытия. Независимо от того, открыта ли у вас обычная или аварийная дверь, зависит от того, открыта ли она у вас. Наличие аварийных стоек означает, что дверь должна быть заперта аварийной картой после того, как она была открыта одной. - Короткая ЗЕЛЕНАЯ вспышка Звук: регулярное аварийное открытие
- Одна короткая и одна длинная ЗЕЛЕНАЯ вспышка: аварийная стойка открыта, установлена
- Короткая ЗЕЛЕНАЯ вспышка Звук: аварийная стойка открыта, ясно
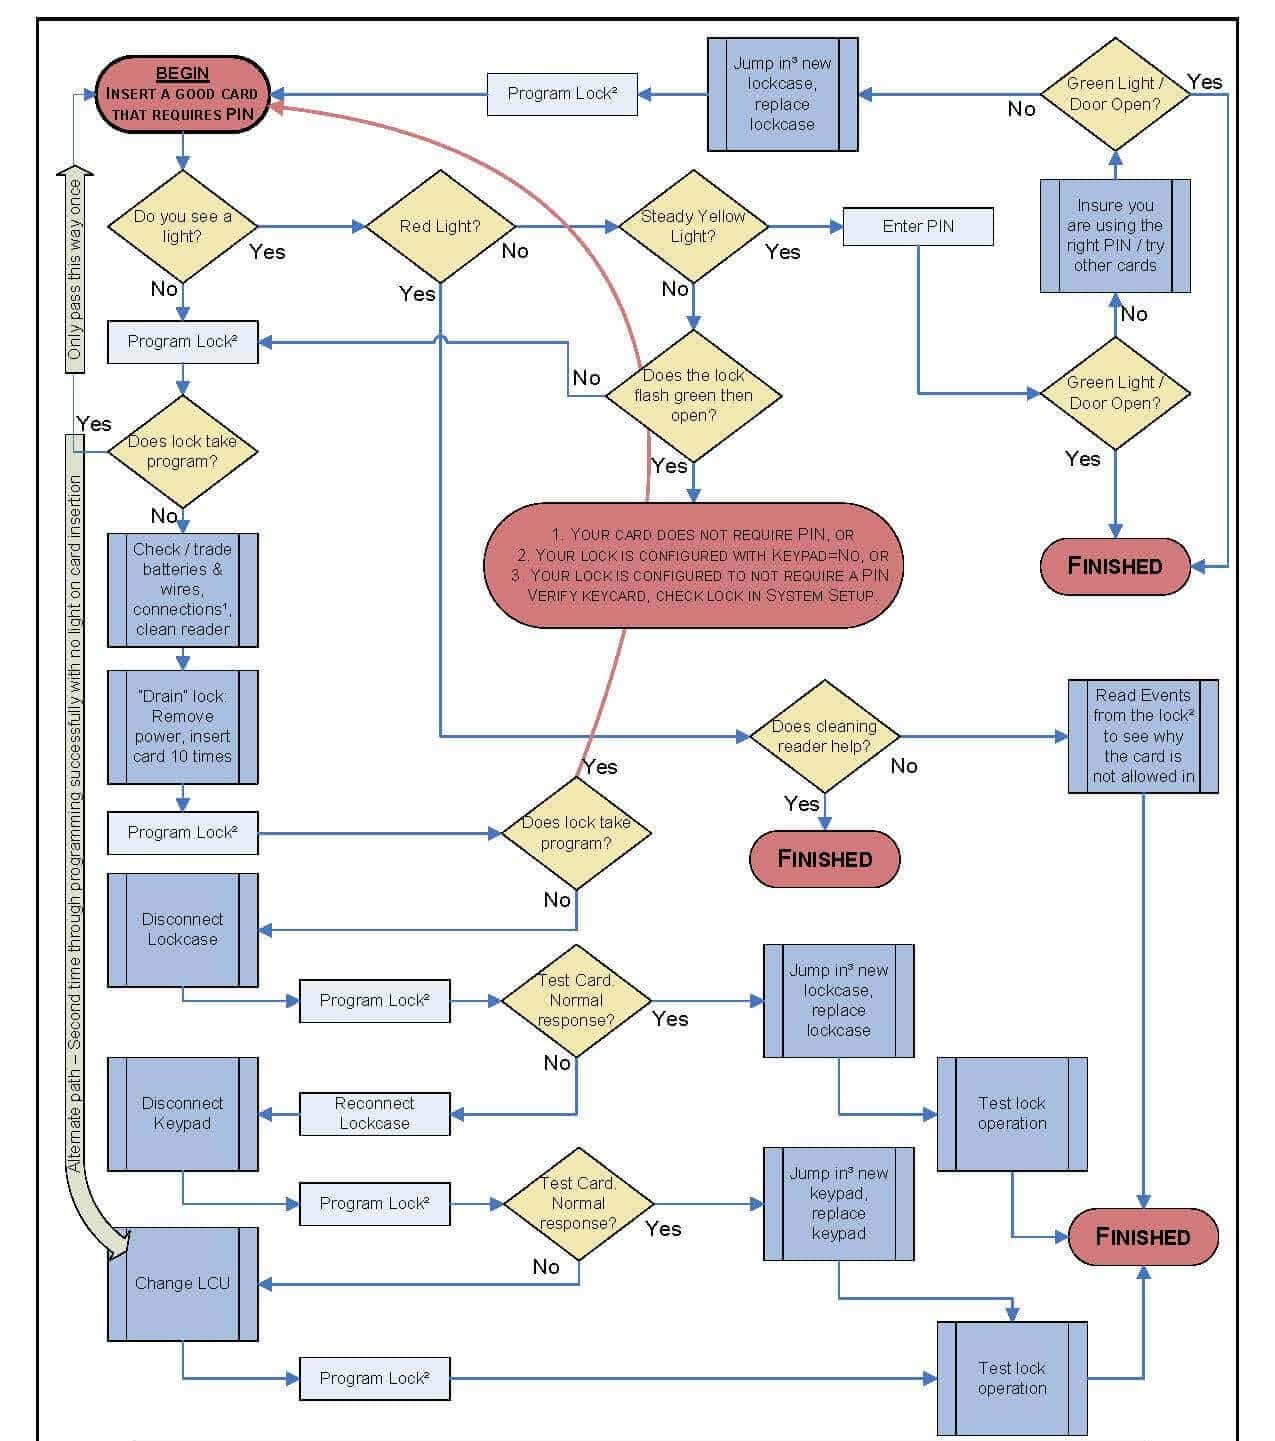
Действия по устранению неполадок блокировки VingCard
Если блокировка Vingcard не работает, попробуйте выполнить следующие действия:
- Проверить ключ-карту: Убедитесь, что вы правильно использовали свой ключ, и повторите попытку. Если вы используете карту, убедитесь, что она не повреждена и не просрочена.
- Проверьте аккумулятор: Убедитесь, что в батарейном отсеке достаточно энергии, проверив его индикатор (если применимо), затем замените его при необходимости.
- Проверьте дверь. Убедитесь, что все панели на месте, включая наклейки или наклейки на стеклянных дверях (если применимо).
- Проверьте сам замок. Если какие-либо части вашего замка погнуты или сломаны, немедленно свяжитесь с Vingcard!
- Компьютер: Это может быть первое, что нужно проверить, если ваш кард-ридер не работает. Убедитесь, что ваш компьютер включен, и попробуйте подключить другое устройство. Если это ничего не дает, перезагрузите систему, выключив и снова включив ее.
- Программного обеспечения: Программное обеспечение может быть еще одним источником проблем с замками VingCard. Вам необходимо убедиться, что вы используете последнюю версию программного обеспечения.
- Линия электропередачи: Проверьте, есть ли проблема с блоком питания, прежде чем пытаться выполнить другие шаги по устранению неполадок, такие как проверка кабелей или сброс настроек после выключения из-за того, что что-то пошло не так в процессе установки и т. д.
Если эти шаги не работают, свяжитесь напрямую с VingCard и уточните, что происходит, когда вы используете свой замок, и как часто это происходит.
Обратите внимание, что Замки ShineACS просто пишет статью об устранении неполадок с замками VingCard и предлагает возможные варианты обслуживания, а не предлагает послепродажное обслуживание.. Если вы не можете окончательно решить свою проблему с содержанием нашей статьи, свяжитесь с официальным вторичным рынком.
Но если вы хотите сменить дверной замок в отеле, проверьте наши Система дверных замков TThotel чтобы помочь вам управлять дверью вашего гостиничного номера более безопасно, удаленно и удобно с помощью телефона.
Общие проблемы блокировки VingCard и устранение неполадок.
Блокировка VingCard перестала работать.
Если у вас возникла проблема с неработающим замком VingCard, вы можете проверить несколько вещей, чтобы определить причину.
- Сначала убедитесь, что блок питания подключен и включен.
- Если он подключен и включен, но не работает, попробуйте отключить и снова подключить его.
Блокировка VingCard пищит
Замок VingCard издает звуковой сигнал при включении. Это может произойти по нескольким причинам, в том числе из-за проблем с аккумулятором или из-за того, что два или более устройств используют один и тот же код доступа. Убедитесь, что вы правильно вставили карту VingCard в считывающее устройство и не вынули ее, находясь дома.
Если ваш замок VingCard издает звуковой сигнал, и вы не можете его выключить, это, вероятно, признак того, что батареи разряжены. Замените их новыми батареями того же типа и размера, а затем проверьте, работает ли замок.
Батарея замка VingCard
Если ваш дверной замок VingCard не реагирует, когда вы нажимаете какие-либо кнопки или пытаетесь использовать приложение, чтобы открыть или закрыть его, возможно, что-то не так с его батареей (или батареями).
Это может означать, что их необходимо заменить, но перед этим убедитесь, что все остальные части вашей дверной системы не сломаны и не работают со сбоями!
Ваша карта блокировки VingCard не работает.
Если ваша карта блокировки VingCard не работает, вы должны сначала проверить, не истек ли срок ее действия и не была ли она заблокирована системой. Вы можете сделать это, поднеся карту к панели управления доступом и посмотрев на дисплей.
Если система показывает сообщение об ошибке, возможно, срок действия вашей карты истек или она была заблокирована руководством.
Если нет, используйте другую VingCard, чтобы проверить, есть ли проблемы со считывателями других карт.
Если ни на одном из этих экранов не отображается никаких ошибок, вероятно, возникла проблема с вашим устройством чтения карт VingCard (если вы его используете) или что-то пошло не так с конфигурацией его программного обеспечения.
Предположим, в вашем здании установлено несколько считывателей, и только один из них работает неправильно. Возможно, стоит проверить их все, прежде чем предположить, что это не связано с неправильной настройкой или чем-то подобным — это может быть просто из-за неисправных аппаратных компонентов, а не из-за чего-то еще!
Замок VingCard мигает
это означает, что необходимо заменить батарею или пульт дистанционного управления работает неправильно. Попробуйте заменить батарейку или изменить ее положение в связке ключей;
Блокировка VingCard вообще не работает
попробуйте несколько раз нажимать, пока он не разблокируется, а затем посмотрите, открывается ли он с помощью вашей карты-ключа. Если это не сработает, проверьте датчики на наличие препятствий или проверьте свободное пространство в другом месте (например, поместите предметы на верхнюю часть шкафа).
Если при попытке разблокировки авторизованной картой вместо открытия подается звуковой сигнал:
Проверьте, не блокирует ли что-нибудь его путь; иногда они могут вызывать ложные тревоги, поскольку они вызывают вибрации, которые сбивают с толку датчики приближения, заставляя их думать, что кто-то еще пытался получить к ним доступ, хотя попытки еще не были предприняты!
Устранение неполадок системы стойки регистрации Vingcard 2800
Система регистрации VingCard 2800 — это современное решение для контроля доступа, которое обеспечивает повышенную гибкость и эффективность для вашего отеля, курорта или казино.
Система стойки регистрации VingCard 2800 повышает безопасность, обеспечивая безопасный процесс регистрации гостей и предлагая несколько инструментов управления, упрощающих наблюдение за работой стойки регистрации в любом месте здания.
Система регистрации VingCard 2800 обеспечивает простой, безопасный и удобный способ управления потребностями контроля доступа. Систему можно настроить по-разному: от одиночных считывателей карт у дверей или лифтов до комплексного управления дверными замками и кнопками вызова лифта. Полная система включает в себя следующие компоненты:
- Панель управления – откуда отправляются все команды, такие как системное программирование и изменение прав доступа пользователей. Он также отображает сообщения о любых проблемах с вашими дверями или лифтами (см. ниже).
- Кард-ридер – считывает ваш значок, когда вы проводите им по экрану, чтобы только авторизованные люди могли получить доступ к зданиям/лифтам/и так далее.
Перед устранением неполадок системы регистрации VingCard 2800 проверьте следующее:
- Подключена ли система регистрации VingCard 2800 к источнику питания?
- Все ли кабели подключены правильно?
- Ваша операционная система обновлена?
- Устанавливали ли вы какие-либо необходимые обновления программного обеспечения за последние недели?
Если у вас возникли проблемы с системой регистрации VingCard 2800, попробуйте выполнить следующие действия:
- Сброс системы
- Первым шагом к устранению неполадок любого электронного устройства является его сброс: отключите его от источника питания и оставьте отключенным на несколько минут, прежде чем снова подключить. Это сбрасывает все цепи в системе, что может помочь устранить такие проблемы, как сигнал или повреждена память.
- Очистка сенсорной панели
- Если вам кажется, что ваша система регистрации VingCard 2800 реагирует медленно или вообще не реагирует, убедитесь, что ничто не блокирует ее сенсорную панель (обычно расположенную рядом с тем местом, куда люди кладут руки, когда сканируют свои карты).
Все еще не можете решить проблему? Попробуйте заменить старую систему гостиничных замков
Проверьте нашу систему RFID-замков для отелей
Бесплатное программное обеспечение · Постоянный действующий регистрационный код · 2 года гарантии
Поддержка блокировки VingCard
VingCard блокирует техническую поддержку.
Если ваша карта VingCard перестала работать, возможно, это техническая проблема, которую необходимо устранить как можно скорее. Вам поможет служба технической поддержки замков VingCard! Вы можете позвонить им по следующему телефону:
Для круглосуточной поддержки звоните нам по телефону:
- США: +1 954 923 2209
- ЕВРОПА: +47 32 99 40 26
- ИТАЛИЯ: +47 21 89 89 10
Партнер Вингкард
Кроме того, вы можете попробовать найти партнера Vingcard для получения поддержки: https://www.assaabloyglobalsolutions.com/en/about/local-contacts.
Вингкарта инструкция
Если вы ищете VingCard дверной замок ручной, мы можем помочь. Пожалуйста, ознакомьтесь со следующим руководством пользователя Vincard для справки:
- Руководство пользователя VingCard Classic RFID
- Руководство пользователя Vingcard Allure
- Руководство пользователя Vingcard Essence
- Руководство пользователя Vingcard Vision (версия 5.10)
- Руководство пользователя Vingcard VISION LINE (версия 1.12.0)
- Руководство пользователя системы регистрации Vingcard 2800
Сброс блокировки VingCard
Чтобы сбросить блокировку, выполните следующие действия:
- Поверните ручку в положение разблокировки и удерживайте ее в этом положении около 20 секунд. Индикатор перестанет мигать и начнет постоянно светиться. Теперь вы находитесь в режиме программирования!
- Нажмите и отпустите свой старый мастер-код на дверном замке VingCard Classic или Encore так же, как если бы вы открывали дверь ключом (если вы не знаете, что такое мастер-код, он должен быть указан в ваших инструкциях).
- По завершении этого шага выключите питание кард-ридера с первой попытки, быстро нажав на одну из его кнопок в течение 10-20 секунд, пока он не выключится автоматически;
- затем вытащите аккумулятор (если применимо) на 10-15 минут, прежде чем снова вставить его в отсек по истечении времени.
Замена замка VingCard
Если у вас есть замок VingCard, есть несколько способов изменить его.
Во-первых, вы можете попросить управляющего домом прислать к вам слесаря. установить новый гостиничный замок. Это самый удобный вариант, но и самый дорогой.
Если у вас возникли проблемы с замком VingCard, не волнуйтесь! Вот несколько шагов, которые могут помочь вам исправить это.
- Во-первых, вам понадобится отвертка и сменный картридер.
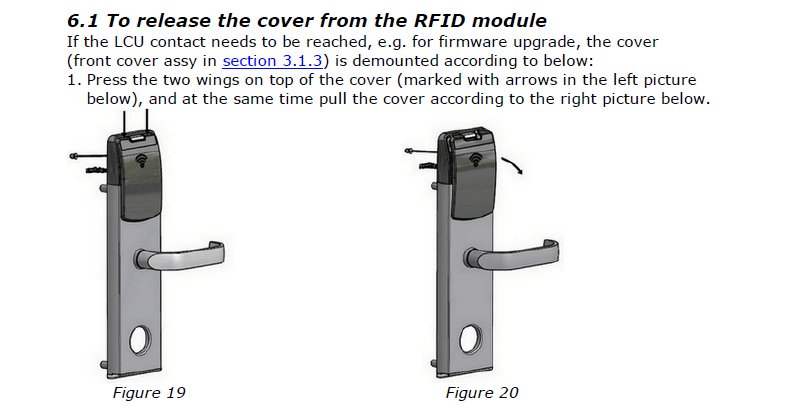
- Затем открутите винты с лицевой панели на двери. Их должно быть два: по одному на каждом конце верхнего края пластины и еще два между ними у нижнего края; при этом будьте осторожны, чтобы не повредить электрическую проводку или компоненты!
- После того, как все четыре винта будут удалены, осторожно потяните одну сторону лицевой панели, пока она окончательно не оторвется, и отложите ее в безопасное место, чтобы не потерять мелкие детали, такие как винты или шарниры, которые могут выпасть во время разборки (или если они уже развязались).
- После снятия с места проверьте, отсутствуют ли какие-либо детали, прежде чем устанавливать новый сменный блок Vingcard.
Но обратите внимание: замена или модернизация дверного замка отеля — непростая работа; вам придется учитывать многие вещи; для получения дополнительной информации, пожалуйста, проверьте эту статью: Заменить дверной замок для гостиничных номеров: какие факторы нужно учитывать?
Установка замка Вингкард.
Не следует торопиться с установкой замка Vingcard, так как в дальнейшем это, скорее всего, приведет к проблемам.
Прежде чем начать, убедитесь, что у вас есть все необходимые инструменты и оборудование. Для начала вам понадобится дрель, набор бит и отвертка.
Если вы устанавливаете ее на дверь, рекомендуется использовать дрель; в противном случае в большинстве случаев подойдут ручные инструменты.
После того, как вы собрали все необходимые инструменты и оборудование для установки, найдите время, чтобы внимательно прочитать наши инструкции, прежде чем приступить к работе над новым замком.
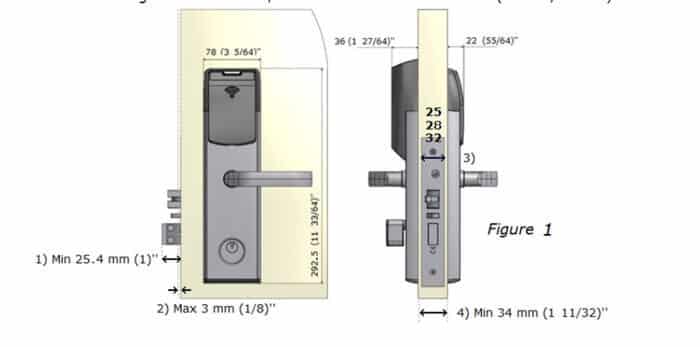
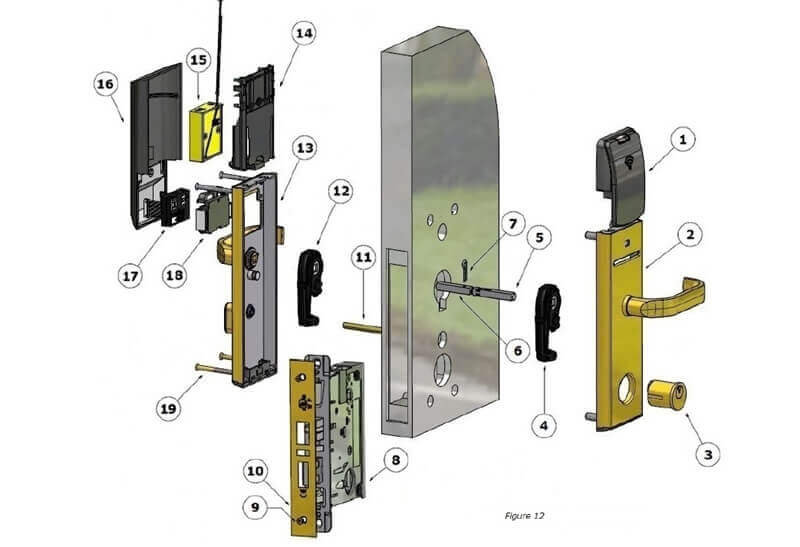
Установка замка Vingcard проста, если у вас есть подходящее оборудование. Руководство по установке замка Vingcard можно найти в Интернете, и оно расскажет вам все, что вам нужно знать об установке замка Vingcard.
1. Поместите корпус замка в край двери и закрепите его двумя передними винтами замка.
2. Установите шпиндель в корпус замка снаружи. Предохранительный штифт удерживает шпиндель рукоятки в неправильном положении. Вставьте штифт в отверстие через внутренний шпиндель.
3. Установите внешнюю накладку на шпиндель.
4. Вставьте шпиндель с ручкой в корпус замка, пока он не упрется в наружную накладку.
5. Установите внутреннюю накладку, включая фиксатор ручки, следующим образом: установите поворотную ручку вертикально, в то время как засов втянут.
6. Перед установкой внутренней накладки на дверь убедитесь, что:
- – Внешний шпиндель и внутренний шпиндель правильно встали на свои места;
- убедитесь, что между ними есть 3/4 оборота (обычно фиксируется уже при доставке).-
- Внутренние и внешние держатели ручек установлены правильно в соответствии с обращением с дверью;
- Кабель к аккумулятору правильно проходит через прорезь в верхней части накладки.
- Оставьте разъемы доступными с внутренней стороны двери.
7. Подсоедините кабель от корпуса замка к LCA.
8. Закрепите внешнюю и внутреннюю накладки четырьмя винтами, но не затягивайте их.
9. Подготовьте цилиндр следующим образом: Вставьте рабочий ключ и поверните цилиндр так, чтобы рычаг цилиндра оказался в положении на 6 часов. Вставьте цилиндр в корпус замка и расположите его заподлицо с внешней накладкой.- Закрепите цилиндр на месте с помощью набора инструментов для крепежных винтов следующим образом:
- a) С помощью L-образного шестигранного ключа закрепите крепежный винт без головки на Т-образном инструменте, как показано на рисунке в коробке.
- б) С помощью Т-образного инструмента закрутите фиксирующий винт, как показано, чтобы зафиксировать цилиндр. При затягивании винта нажимайте на шестигранный ключ, а не на Т-образную рукоятку, чтобы избежать чрезмерной затяжки. Убедитесь, что фиксирующий винт цилиндра сжат в цилиндре.
- c) Освободите Т-образный инструмент от фиксирующего винта, удерживая Т-образный инструмент в жестком положении, одновременно поворачивая шестигранный ключ против часовой стрелки, пока устройство не освободится, затем отвинтите инструмент. Если в вашем замке есть цилиндр Hydra, перейдите к шагу 12.
10. С помощью шестигранного ключа установите и закрепите цилиндр с помощью установочного винта цилиндра. При использовании стандартного цилиндра с корпусом замка ADB используйте дополнительный короткий винт, как описано в соответствующем Приложении A (ANSI DA), Приложении B (ANSI DB) или Приложении C (ЕВРО).
11. Установите аккумулятор, подключив кабель к аккумулятору. Примечание. Желтый индикатор должен мигнуть один раз после подключения аккумулятора.
12. Если крышка батарейного отсека металлическая, перед подключением кабеля необходимо навинтить крышку батарейного отсека на батарею (только для батарей 9 В / 6).
13. Закрепите запертую переднюю панель винтами запорной передней панели. Убедитесь, что антифрикционная защелка вышла.
14. Затяните четыре винта накладки, убедившись, что внутренняя и внешняя стороны совмещены.
Заключение
Устранение неполадок дверного замка Vingcard может быть сложным, но не беспокойтесь; наше пошаговое руководство решит проблему. Мы надеемся, что эта статья помогла вам устранить неполадки в дверных замках Vingcard и обеспечить их правильную работу!
Связаться с надежной слесарной компанией — не самая плохая идея, если ничего не помогает.
-

Винсент Чжу имеет 10-летний опыт работы с системами интеллектуальных замков и специализируется на предоставлении систем дверных замков для гостиниц и решений для систем дверных замков для дома, начиная с проектирования, настройки, установки и устранения неполадок. Если вы хотите установить дверной замок без ключа RFID для своего отеля, дверной замок без ключа для двери вашего дома или у вас есть какие-либо другие вопросы и запросы по устранению неполадок, связанных с умными дверными замками, не стесняйтесь обращаться ко мне в любое время.
Посмотреть все сообщения
Другие статьи об устранении неполадок в системе дверных замков отеля
Система VISION — система управления электронными гостиничными замками VingCard для экономичных и полнофункциональных гостиниц любого размера.
Разработана для платформы Windows, в качестве базы данных использует Sybase Adaptive Server Anywhere. Обеспечивает полный контроль за изготовлением ключей и вообще за всеми действиями с системой. Запись на все 3-и дорожки магнитной полосы, смарт-чип и карты RFID включена в базовый пакет. Может устанавливаться на неограниченное количество рабочих станций (включено в базовый пакет). Поддерживает различные типы энкодеров, вплоть до вседорожечных сетевых (для магнитной полосы) и RFID. Различные конфигурации оборудования и программного обеспечения. Интеграция с системами управления гостиницами (АСУ). Постоянные обновления программного обеспечения.
Общие данные о системе VISION by VingCard
- поддержка всех типов замков одновременно: с магнитной полосой и RFID
- парольное меню — выбор: 4 цифры, 6 цифр, логин-пароль
- база данных Sybase Adaptive Server Anywhere
- технология Клиент-Сервер
- 256 групп пользователей
- 16000 уникальных пользователей одновременно
- неограниченное количество секций
- 8 таблиц времени
- 30 типов карточек
- 53 общих двери
- «чёрный список» на 20 пользователей в каждом замке
- блокировка как отдельных пользователей, так и целых групп
- работа с картами с магнитной полосой, смарт-чипами, комбинированными картами (с магнитной полосой + смарт-чип), картами — брелками — браслетами RFID
- 3-и режима работы замков: гостевой номер, офис (режим «свободного прохода»), автоматический
- специальные карточки: аварийные (на случай отключения электроэнергии), экстренные (открывают все двери в экстренных случаях, даже закрытые на ригель), блокировочные (блокируют номера), карточки офис/номер (перевод номера в режим офиса и обратно), карточки «чёрного списка»
- любой путь установки — на локальный или сетевой диск
- автоматическое резервное копирование без остановки приложений Live Backup™
- карточки мини-мастера (как для гостей, так и персонала) — до 5-и номеров на карту
- уникальный идентификатор для каждого гостя
- ФИО в отчётах — как сотрудников, так и гостей
- отмена любой отдельно взятой карточки
- интерфейс и интеграция с АСУ Гостиница (RS232, DLL, TCP/IP)
- запись на все 3-и дорожки магнитной полосы карточки
- возможность изменения информации на 1-ой и 2-ой дорожках, оставляя неизменной информацию на 3-ей дорожке
- утилита Uninstall
- отложенное поселение
- возможность проверки специальных карточек
- отчёты в форматах TXT, RTF и PDF
- выбор разрешения событий: 5 минут или 1 минута
- специальные функции смарт-карт: сервисная карта (считывание сервисной информации из замка), карта получения отчётов от замка
- экстренное открывание дверей с помощью ЛокЛинка — 10 дверей в течение часа
- использование стандартных Windows Mobile устройств в качестве сервисного устройства
- варианты программного обеспечения Basic (базовая конфигурация) и Advanced (полная версия)
- дизайн в стиле Windows XP
- файлы помощи
- инструкция на CD-ROM на 2-х языках (английский/русский)
- ПО для удалённого администрирования (опция)
- дополнительное ПО — модуль МАСЕ — для работы с системами от других производителей
Система состоит из следующих частей* (поставляется заводом-производителем):
- программное обеспечение;
- энкодер(ы);
- ЛокЛинк
* Для работы системы понадобится персональный компьютер с операционной системой Windows 98/NT4SR4/2000/XP/Vista/7/8
Минимальные требования: 100 МHz Pentium; 32 Mb RAM; 512 Mb HDD; RS232C (для одного энкодера); 1 параллельный порт для принтера; экран с разрешением 800х600 VGA. Необязательные требования: + 1 RS232C (для интерфейса с АСУ Гостиница); сетевая карта для работы в ЛВС по протоколу TCP/IP.
Программное обеспечение VISION by VingCard
Программное обеспечение VISION — разработано так, чтобы им было легко пользоваться. Деление на модули облегчает и упрощает работу, сокращая время каждой операции и минимизируя возможность ошибок. Поддержка сенсорных экранов делает работу не только лёгкой, но и занятной. Большое количество настроек позволяет поселить гостя, используя всего 3 нажатия кнопок.
Программное обеспечение можно настроить таким образом, чтобы сотрудник службы поселения имел доступ только к своему приложению — экрану поселения гостей. При этом, поскольку для работы нужно авторизоваться (ввести свой идентификатор — пароль или связку логин-пароль), всегда можно определить, что делал тот или иной человек. Службе безопасности обычно поручают делать карты-ключи служащим и снимать отчёты от системы и замков для последующего анализа. Системный администратор следит за базой данных системы электронных замков, делает резервные копии, изменяет конфигурацию системы, если это необходимо.
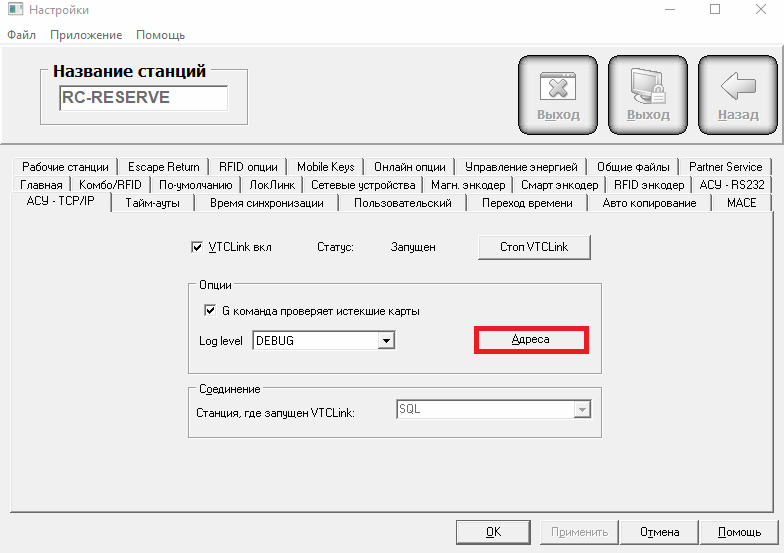
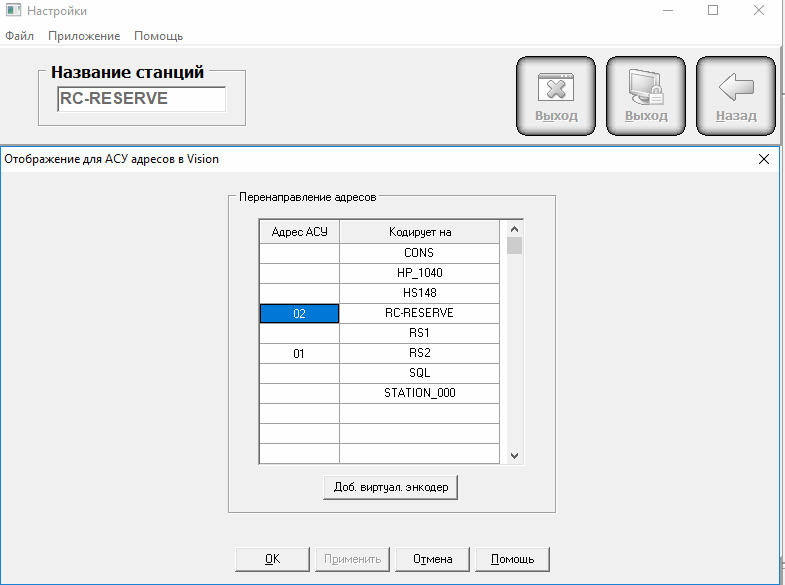
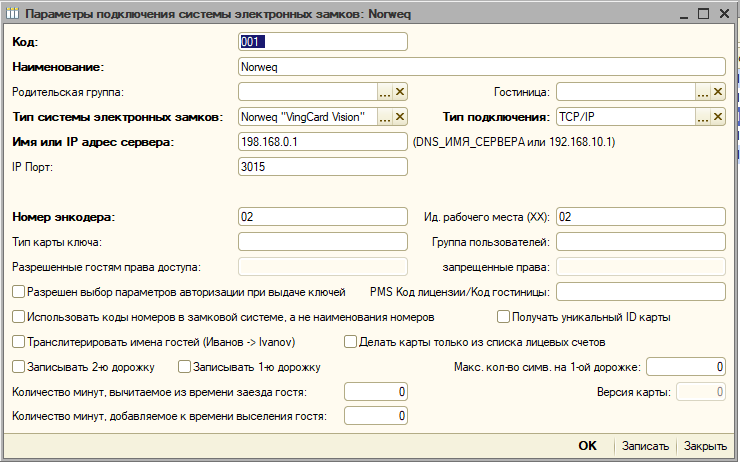
ПО VISION легко интегрируется с системами управления гостиницами (АСУ Гостиница) и другими гостиничными системами, например системами безналичных платежей. Могут быть использованы RS232, DLL или TCP/IP интерфейсы. При интерфейсе с АСУ Гостиница программное обеспечение системы электроных замков невидимо, оно работает в фоновом режиме, отслеживая все действия с системой. Записывать информацию можно на все три дорожки магнитной полосы карты или в соответствующие сектора RFID карты.
При интеграции с АСУ Гостиница можно использовать экраны выдачи карточек системы VISION если это необходимо.
Есть два варианта программного обеспечения — базовая версия (Basic) и полная (Advanced).
Различия между базовой и полной версиями программного обеспечения VISION
|
VISION |
VISION |
|
| База данных SQL | Да | Да |
| Опции взаимодействия с АСУ Гостиница | RS-232 | RS-232, TCP/IP, DLL |
| Макс. кол-во замков | 200 | 10000 |
| Макс. кол-во рабочих станций | 99 | 99 |
| Макс. кол-во групп пользователей | 32 | 256 |
| Макс. кол-во типов карточек | 4 | 30 |
| Кол-во точек доступа | 4 | 53 |
| Карточка с магнитной полосой | Да | Да |
| Комбинированная карточка | Да | Да |
Что особенно важно?
- важно, например, то, что можно использовать разные типы замков одновременно, таким образом выделяя гостей друг от друга. Например, если Ваша гостиница имеет этаж(и) для ВИП-гостей или т.н. гостиницу в гостинице (5-ти звёздочный этаж в 3-х звёздочной гостинице), то можно установить на этаже повышенной комфортности замки Signature или Essence, на все остальные этажи — Classic, а на служебные помещения — Alfa. При этом на двери коттеджей, например, лучше установить замки Classic в специальной климатической отделке — они более стойки к коррозии;
- важно то, что каждый сотрудник, имеющий доступ к системе в той или иной степени, может быть однозначно авторизован и можно посмотреть, что он делал с системой;
- важно то, что база данных Sybase — это профессиональная устойчивая база данных, при этом не требующая специальных знаний от вашего персонала;
- важно то, что в отчётах можно получить имена не только сотрудников, но и гостей!
Есть ещё много важных факторов, которые необходимо учитывать, спросите нас о них!
Для чего нужны энкодеры?
Для кодирования карточек с магнитной полосой используются энкодеры — однодорожечные, вседорожечные сетевые. Все эти устройства — с электроприводом. Для кодирования карт со смарт-чипом — специальные энкодеры для смарт-карт, для кодирования RFID карт, брелоков и браслетов — используются энкодеры RFID.

Винсент Чжу имеет 10-летний опыт работы с системами интеллектуальных замков и специализируется на предоставлении систем дверных замков для гостиниц и решений для систем дверных замков для дома, начиная с проектирования, настройки, установки и устранения неполадок. Если вы хотите установить дверной замок без ключа RFID для своего отеля, дверной замок без ключа для двери вашего дома или у вас есть какие-либо другие вопросы и запросы по устранению неполадок, связанных с умными дверными замками, не стесняйтесь обращаться ко мне в любое время.
Посмотреть все сообщения


.jpg")