
Данный раздел представляет большой выбор инструкций по эксплуатации стиральных машин Whirlpool. Вы можете бесплатно скачать любое руководство.
Whirlpool Corporation — крупнейший мировой производитель «белой бытовой техники». Компания существует на мировом рынке более 100 лет, на российском — более 20. Сегодня Whirlpool имеет более 70 производственных и технических центров по всему миру и насчитывает более 100 000 сотрудников. Купить продукцию компании возможно в 170 странах мира.
Бумажное руководство, даже если имеется, не всегда удобно в использовании, поэтому мы собрали некоторое количество инструкций на нашем сайте. Вы можете абсолютно бесплатно скачать любую из инструкций в формате pdf или воспользоваться просмотром в браузере.
Whirlpool Top Loading Washing Machine Owners Manual

WASHER SAFETY
Your safety and the safety of others are very important.
We have provided many important safety messages in this manual and on your appliance. Always read and obey all safety messages.
This is the safety alert symbol.
This symbol alerts you to potential hazards that can kill or hurt you and others.
All safety messages will follow the safety alert symbol and either the word «DANGER» or «WARNING.» These words mean:
You can be killed or seriously injured if you don’t immediately follow instructions.
You can be killed or seriously injured if you don’t follow WARNING instructions.
All safety messages will tell you what the potential hazard is, tell you how to reduce the chance of injury, and tell you what can happen if the instructions are not followed.
IMPORTANT SAFETY INSTRUCTIONS
To reduce the risk of fire, electric shock, or injury to persons when using the washer, follow basic precautions, including the following:
- Read all instructions before using the washer.
- Do not wash articles that have been previously cleaned in, washed in, soaked in, or spotted with gasoline, dry-cleaning solvents, other flammable, or explosive substances as they give off vapors that could ignite or explode.
- Do not add gasoline, dry-cleaning solvents, or other flammable, or explosive substances to the wash water. These substances give off vapors that could ignite or explode.
- Under certain conditions, hydrogen gas may be produced in a hot water system that has not been used for 2 weeks or more. HYDROGEN GAS IS
- EXPLOSIVE. If the hot water system has not been used for such a period, before using the washing machine, turn on all hot water faucets and let the water flow from each for several minutes. This will release any accumulated hydrogen gas. As the gas is flammable, do not smoke or use an open flame during this time.
- Do not allow children to play on or in the washer. Close supervision of children is necessary when the washer is used near children.
- Before the washer is removed from service or discarded, remove the door or lid.
- Do not reach into the washer if the drum, tub or agitator is moving.
- Do not install or store the washer where it will be exposed to the weather.
- Do not tamper with controls.
- Do not repair or replace any part of the washer or attempt any servicing unless specifically recommended in this manual or in published user-repair instructions that you understand and have the skills to carry out.
- See Installation Instructions for grounding instructions.
SAVE THESE INSTRUCTIONS
INSTALLATION REQUIREMENTS
Tools and Parts
Gather required tools and parts before starting installation.
Tools needed

Pliers that open to 1¾»

Level

Wood Block

Ruler or measuring tape

Bucket
Parts supplied:
NOTE: All parts supplied for installation are in cardboard insert in the top of the washer.

Drain hose with clamp, U-form, and cable tie
Parts needed (Not supplied with washer):

Inlet hoses with flat washers
Location Requirement
Select proper location for your washer to improve performance and minimize noise and possible «washer walk». Install your washer in a basement, laundry room, closet, or recessed area.
You will need
- A water heater set to 120°F (49°C).
- A grounded electrical outlet located within 4 ft. (1.2 m) of power cord on back of washer.
- Hot and cold water faucets located within 3 ft. (0.9 m) of hot and cold water fill valves on washer, and water pressure of 20-100 psi (138-690 kPa).
- A level floor with maximum slope of 1″ (25 mm) under entire washer. Installing on carpet is not recommended.
- Floor must support washer’s total weight (with water and load) of 315 lbs (143 kgs).
Do not install, store, or operate washer where it will be exposed to weather or in temperatures below 32°F (0°C).Water remaining in washer after use may cause damage in low temperatures. See the «Winter Storage Care» section for winterizing information.
Proper installation is your responsibility.
Recessed area or closet installation
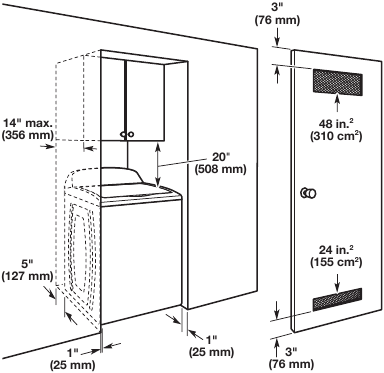
Dimensions show recommended spacing allowed, except for closet door ventilation openings which are minimum required. This washer has been tested for installation with spacing of 0″ (0 mm) clearance on the sides. Consider allowing more space for ease of installation and servicing, and spacing for companion appliances and clearances for walls, doors, and floor moldings. Add spacing of 1″ (25 mm) on all sides of washer to reduce noise transfer. If a closet door or louvered door is installed, top and bottom air openings in door are required.
Drain System
Drain system can be installed using a floor drain, wall standpipe, floor standpipe, or laundry tub. Select method you need.
Floor standpipe drain system
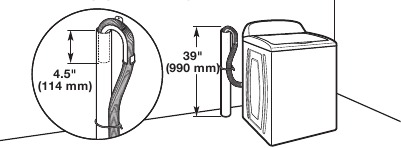
Minimum diameter for a standpipe drain: 2″ (51 mm). Minimum carry-away capacity: 17 gal. (64 L) per minute. Top of standpipe must be at least 39″ (990 mm) high; install no higher than 96″ (2.44 m) from bottom of washer. If you must install higher than 96″ (2.44 m), you will need a sump pump system.
Wall standpipe drain system

See requirements for floor standpipe drain system.
Floor drain system
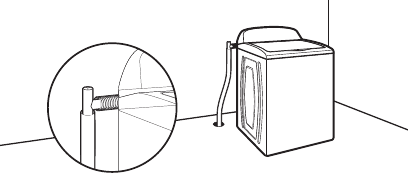
Floor drain system requires a Siphon Break Kit
(Part Number 285834), 2 Connector Kits (Part Number 285835), and an Extension Drain Hose (Part Number 285863) that may be purchased separately. To order, please see toll-free phone numbers in «Assistance or Service» section. Minimum siphon break: 28″ (710 mm) from bottom of washer. (Additional hoses may be needed.)
Laundry tub drain system

Minimum capacity: 20 gal. (76 L). Top of laundry tub must be at least 39″ (990 mm) above floor; install no higher than 96″ (2.44 m) from bottom of washer.
To avoid siphoning, no more than 4.5″ (114 mm) of drain hose should be inside standpipe or below the top of wash tub. Secure drain hose with cable tie.
Electrical Requirements

Electrical Shock Hazard
Plug into a grounded 3 prong outlet.
Do not remove ground prong.
Do not use an adapter.
Do not use an extension cord.
Failure to follow these instructions can result in death, fire, or electrical shock.
- A 120 V, 60 Hz., AC only, 15 or 20 A, fused electrical supply is required. A time-delay fuse or circuit breaker is recommended. It is recommended that a separate circuit breaker serving only this appliance be provided.
- This washer is equipped with a power supply cord having a 3 prong grounding plug.
- To minimize possible shock hazard, the cord must be plugged into a mating, 3 prong, grounding-type outlet, grounded in accordance with local codes and ordinances. If a mating outlet is not available, it is the personal responsibility and obligation of the customer to have the properly grounded outlet installed by a qualified electrician.
- If codes permit and a separate ground wire is used, it is recommended that a qualified electrician determine that the ground path is adequate.
- Do not ground to a gas pipe.
- Check with a qualified electrician if you are not sure the washer is properly grounded.
- Do not have a fuse in the neutral or ground circuit.
GROUNDING INSTRUCTIONS
For a grounded, cord-connected washer:
This washer must be grounded. In the event of a malfunction or breakdown, grounding will reduce the risk of electrical shock by providing a path of least resistance for electric current. This washer is equipped with a cord having an equipment-grounding conductor and a grounding plug. The plug must be plugged into an appropriate outlet that is properly installed and grounded in accordance with all local codes and ordinances.
Improper connection of the equipment-grounding conductor can result in a risk of electric shock. Check with a qualified electrician or serviceman if you are in doubt as to whether the appliance is properly grounded.
Do not modify the plug provided with the appliance — if it will not fit the outlet, have a proper outlet installed by a qualified electrician.
For a permanently connected washer:
This washer must be connected to a grounded metal, permanent wiring system, or an equipment grounding conductor must be run with the circuit conductors and connected to the equipment-grounding terminal or lead on the appliance.
INSTALLATION INSTRUCTIONS
Excessive Weight Hazard
Use two or more people to move and install washer.
Failure to do so can result in back or other injury.
Before you start: Remove shipping materials.
It is necessary to remove all shipping materials for proper operation and to avoid excessive noise from washer.
- Move washer
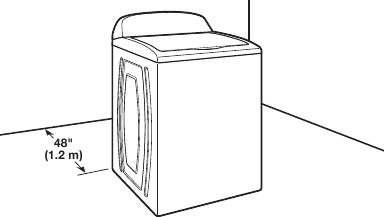
Move washer to within 4 ft. (1.2 m) of its final location; it must be in a fully upright position.
NOTE: To avoid floor damage, set washer onto cardboard before moving it and make sure lid is taped shut. - Remove shipping base
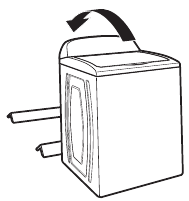

To avoid damaging floor, place cardboard supports from shipping carton on floor behind washer. Tip washer back and place on cardboard supports. Remove shipping base. Set washer upright.
Removing shipping base is necessary for proper operation. If your washer includes a sound shield, please refer to the instructions included with the sound shield to install it at this time. - Remove packing tray from tub
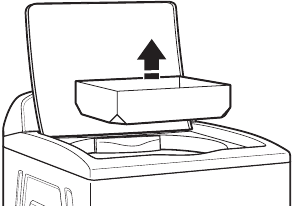
Remove tape from washer lid, open lid, and remove cardboard packing tray from tub. Remove all other packaging materials from washer tub. Be sure to remove all parts from tray.
NOTE: Keep tray in case you need to move washer later. - Free power cord
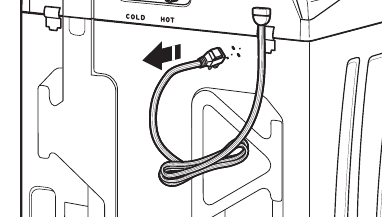
Firmly grasp power cord plug and pull to free from rear panel.
Gently place power cord over console to allow free access to back of washer.
Connect Drain Hose
- Attach drain hose to drain port
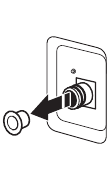
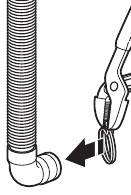
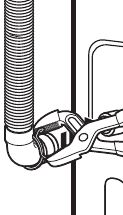
Remove the red plastic plug from the black drain port on the back of the washer.
If clamp is not already in place on elbow end of drain hose, slide it over end as shown. Squeeze clamp with pliers and slide black elbow end of drain hose onto black drain port and secure with clamp.
For a laundry tub or standpipe drain, go to step 6.
For a floor drain, remove the preinstalled drain hose form as shown in Step 7. You may need additional parts with separate directions. See the «Tools and Parts» section. - Place drain hose in standpipe
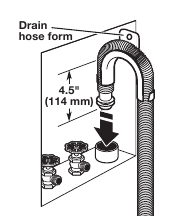
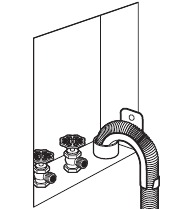
Place hose into standpipe (shown in picture) or over side of laundry tub.
4.5″ (114 mm) of drain hose should be inside standpipe; do not force excess hose into standpipe or lay on bottom of laundry tub. Drain hose form must be used. - Remove drain hose form (floor drain installations only)
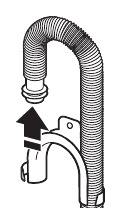
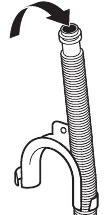
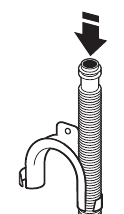
For floor drain installations, you will need to remove the drain hose form from the end of the drain hose. You may need additional parts with separate directions. See the «Tools and Parts» section.
Connect Inlet Hoses
Washer must be connected to water faucets with new inlet hoses with flat washers (not provided). Do not use old hoses.
NOTE: Both hoses must be attached and have water flowing to inlet valves. If you are only connecting to a cold water faucet, you must use a Y-adapter (not provided).
- Connect inlet hoses to water faucets
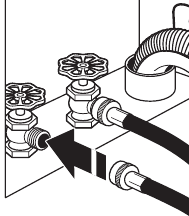
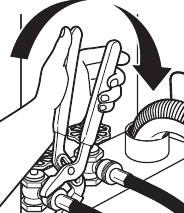
Attach hose to hot water faucet. Screw on coupling by hand until it is seated on washer. Use pliers to tighten couplings an additional two-thirds turn. Repeat this step with second hose for cold water faucet.
Do not overtighten or use tape or sealants on valve when attaching to faucets or washer. Damage can result. - Clean water lines
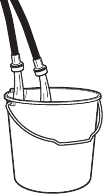
Run water for a few seconds through hoses into a laundry tub, drainpipe, or bucket to avoid clogs. Water should run until clear.
Make note of which hose is connected to hot water to help in attaching hoses to washer correctly. - Connect inlet hoses to washer
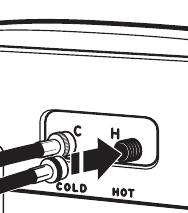
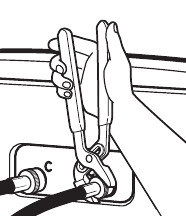
Attach hot water hose to hot water inlet valve marked with a red ring. Screw coupling by hand until it is snug. Use pliers to tighten couplings an additional two-thirds turn. Repeat with cold water inlet valve.
To reduce risk of hose failure, replace the hoses every five years. Record hose installation or replacement dates for future reference.- Periodically inspect and replace hoses if bulges, kinks, cuts, wear, or leaks are found.
- Check for leaks

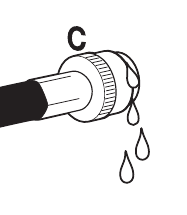
Turn on water faucets to check for leaks. A small amount of water may enter washer. It will drain later. - Secure drain hose
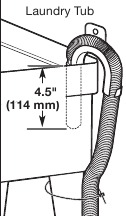
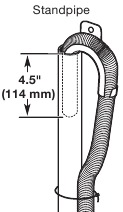
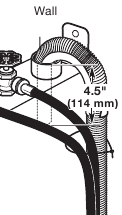
Secure drain hose to laundry tub leg, drain standpipe, or inlet hoses for wall standpipe with cable tie.
Level Washer
Level washer properly to reduce excess noise and vibration.
- Check levelness of washer
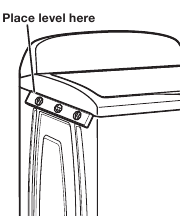
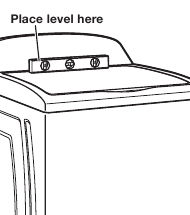
Move the washer to its final location. Place a level on top edges of washer. Use side seam as a guide to check levelness of sides. Check levelness of front using lid, as shown. Rock washer back and forth to make sure all four feet make solid contact with floor. If washer is level, skip to step 15.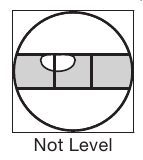
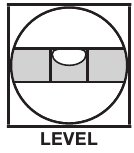
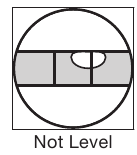
- Adjust leveling feet
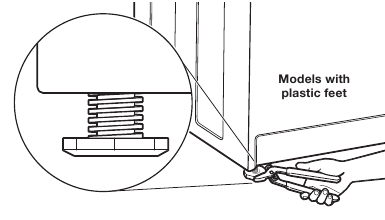
If washer is not level:
Use adjustable pliers to turn the plastic leveling foot counterclockwise to lower the washer or clockwise to raise the washer. On all models, recheck levelness of washer and repeat as needed.
HELPFUL TIPS:- You may need to adjust two different feet to level your unit. Ensure each foot remains secured to the washer’s base.
- You may want to prop up the front of the washer about 4″ (102 mm) with a wood block or similar object that will support the weight of the washer when making the adjustments.

Electrical Shock Hazard
Plug into a grounded 3 prong outlet.
Do not remove ground prong.
Do not use an adapter.
Do not use an extension cord.
Failure to follow these instructions can result in death, fire, or electrical shock.
- Plug into a grounded 3 prong outlet
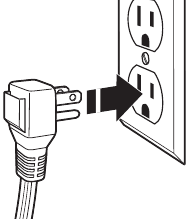
Complete Installation Checklist
❑ Check electrical requirements. Be sure you have correct electrical supply and recommended grounding method.
❑ Check that all parts are now installed. If there is an extra part, go back through steps to see what was skipped.
❑ Check that you have all of your tools.
❑ Check that shipping materials were completely removed from washer.
❑ Check that the washer is level.
❑ Check that water faucets are on.
❑ Check for leaks around faucets and inlet hoses.
❑ Remove protective film from console and any tape remaining on washer.
❑ Check that washer is plugged into a grounded 3 prong outlet.
❑ Dispose of/recycle all packaging materials.
❑ Read the «Washer Care» section in this book.
❑ To test and clean your washer, measure 1/2 of normal recommended amount of powdered or liquid detergent and pour it into washer basket or detergent dispenser (on some models). Close lid. Select any cycle. Start washer and allow to complete full cycle.
WASHER MAINTENANCE AND CARE
WATER INLET HOSES
Replace inlet hoses after 5 years of use to reduce the risk of hose failure. Periodically inspect and replace inlet hoses if bulges, kinks, cuts, wear, or leaks are found.
When replacing your inlet hoses, mark the date of replacement on the label with a permanent marker.
NOTE: This washer does not include inlet hoses. See the «Installation & Care Instructions Manual» for more information.
WASHER CARE
Recommendations to Help Keep Your Washer Clean and Performing at its Best
- Always use High Efficiency (HE) detergents and follow the HE detergent manufacturer’s instructions regarding the amount of HE detergent to use. Never use more than the recommended amount because that may increase the rate at which detergent and soil residue accumulate inside your washer, which in turn may result in undesirable odor.
- Use warm and hot wash water settings sometimes (not exclusively cold water washes), because they do a better job of controlling the rate at which soils and detergent accumulate.
- Always leave the washer lid open between uses to help dry out the washer and prevent the buildup of odor-causing residue.
Cleaning Your Top Loading Washer
Read these instructions completely before beginning the routine cleaning processes recommended below. This Washer Maintenance Procedure should be performed, at a minimum, once per month or every 30 wash cycles, whichever occurs sooner, to control the rate at which soils and detergent may otherwise accumulate in your washer.
Cleaning the Inside of the Washer
To keep your washer odor-free, follow the usage instructions provided above, and use this recommended monthly cleaning procedure:
Clean Washer Cycle
This washer has a special cycle that uses higher water volumes in combination with affresh® Washer Cleaner or liquid chlorine bleach to clean the inside of the washer.
Begin procedure
- affresh® Washer Cleaner Cycle Procedure (Recommended for Best Performance):
- Open the washer lid and remove any clothing or items.
- Place an affresh® Washer Cleaner tablet in the bottom of the washer basket.
- Do not place an affresh® Washer Cleaner tablet in the detergent dispenser.
- Do not add any detergent or other chemical to the washer when following this procedure.
- Close the washer lid.
- Select the CLEAN WASHER cycle.
- Touch and hold the START/PAUSE button to begin the cycle. The Clean Washer Cycle Operation is described below.NOTE: For best results, do not interrupt cycle. If cycle must be interrupted, touch POWER. After the Clean Washer cycle has stopped, run a RINSE & SPIN cycle to rinse cleaner from washer.
- Chlorine Bleach Procedure (Alternative):
- Open the washer lid and remove any clothing or items.
- Add 1 cup (236 mL) of liquid chlorine bleach to the bleach compartment.
NOTE: Use of more liquid chlorine bleach than is recommended above could cause washer damage over time. - Close the washer lid.
- Do not add any detergent or other chemical to the washer when following this procedure.
- Select the CLEAN WASHER cycle.
- Touch and hold the START/PAUSE button to begin the cycle. The Clean Washer Cycle Operation is described below.
NOTE: For best results, do not interrupt cycle. If cycle must be interrupted, touch POWER. After the Clean Washer cycle has stopped, run a RINSE & SPIN cycle to rinse cleaner from washer.
Description of Clean Washer Cycle Operation:
- This cycle will fill to a water level higher than in normal wash cycles to provide rinsing at a level above the water line for normal wash cycle.
- During this cycle, there will be some agitation and spinning to increase the removal of soils. After this cycle is complete, leave the lid open to allow for better ventilation and drying of the washer interior.
Cleaning the Dispensers
After a period of using your washer, you may find some residue buildup in the washer’s dispensers. To remove residue from the dispensers, wipe them with a damp cloth and towel dry. Do not attempt to remove the dispensers or trim for cleaning. The dispensers and trim are not removable. If your model has a dispenser drawer, however, remove the drawer and clean it before or after you run the Clean Washer cycle. Use an all purpose surface cleaner, if needed.
Cleaning the Outside of the Washer
Use a soft, damp cloth or sponge to wipe away any spills. Use only mild soaps or cleaners when cleaning external washer surfaces.
To avoid damaging the washer’s finish, do not use abrasive products.
NON-USE AND VACATION CARE
Operate your washer only when you are home. If moving, or not using your washer for a period of time, follow these steps:
- Unplug or disconnect power to washer.
- Turn off water supply to washer, to avoid flooding due to water pressure surge.
CLEANING YOUR DISPENSER
(*Varies according to model)
You may find laundry product residue leftover in your dispenser drawer or in bulk dispenser. To remove residue, follow below recommended cleaning procedures:
Dispenser Drawer
- Pull drawer out until you feel resistance.
- Push 2 tabs downward, and then continue pulling out.
- Wash in warm, soapy water, using a mild detergent.
- Rinse with warm water.
- Air dry, or dry with a towel, then place back into slot.
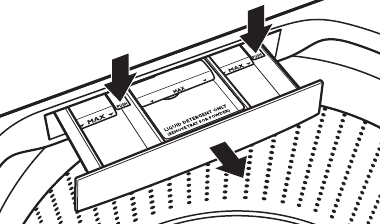
Dispenser drawer and tray are not dishwasher safe.
Bulk Dispenser
- Pull drawer completely out.
- Open dispenser lid.
- Rinse with warm water.
- Air dry or dry with a towel, then place back into slot.

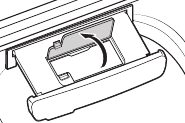
Bulk dispenser and tray are not dishwasher safe.
WINTER STORAGE CARE
To avoid damage, install and store washer where it will not freeze. Because some water may stay in hoses, freezing can damage washer. If storing or moving during freezing weather, winterize your washer.
To winterize washer:
- Shut off both water faucets; disconnect and drain water inlet hoses.
- Put 1 qt. (1 L) of R/V/-type antifreeze into empty basket.
- Unplug washer or disconnect power.
TRANSPORTING YOUR WASHER
- Shut off both water faucets. Disconnect and drain water inlet hoses.
- If washer will be moved during freezing weather, follow WINTER STORAGE CARE directions before moving.
- Disconnect drain hose from drain system and drain any remaining water into a pan or bucket. Disconnect drain hose from back of washer.
- Unplug power cord.
- Place inlet hoses and drain hose inside washer basket.
- Drape power cord over edge and into washer basket.
- Place packing tray from original shipping materials back inside washer. If you do not have packing tray, place heavy blankets or towels into basket opening. Close lid and place tape over lid and down front of washer. Keep lid taped until washer is placed in new location. Transport washer in upright position.

Electrical Shock Hazard
Plug into a grounded 3 prong outlet.
Do not remove ground prong.
Do not use an adapter.
Do not use an extension cord.
Failure to follow these instructions can result in death, fire, or electrical shock.
REINSTALLING/USING WASHER AGAIN
To reinstall washer after non-use, vacation, winter storage, or moving:
- Refer to «Installation & Care Instructions Manual» to locate, level, and connect washer.
- Before using again, run washer through the following recommended procedure:
To use washer again:
- Flush water pipes and hoses. Reconnect water inlet hoses. Turn on both water faucets.
- Plug in washer or reconnect power.
- Run washer through BEDDING cycle to clean washer and remove antifreeze, if used. Use only HE (High Efficiency) detergent. Use ½ the manufacturer’s recommended amount for a medium-size load.
©2019 All rights reserved.
Videos
How to Install Your Whirlpool Top Load Washing Machine Мшвущ
Documents / Resources
Download manual
Here you can download full pdf version of manual, it may contain additional safety instructions, warranty information, FCC rules, etc.
Download Whirlpool Top Loading Washing Machine Owners Manual
 WB70803-1 Верхняя загрузка 7 кг
Стиральная машина
Руководство пользователя
ИНСТРУКЦИЯ ПО ЭКСПЛУАТАЦИИ
![]() ПРЕДУПРЕЖДЕНИЕ
ПРЕДУПРЕЖДЕНИЕ![]()
Пожароопасность
Никогда не кладите в стиральную машину предметы,ampзалит бензином или другими легковоспламеняющимися жидкостями.
Никакая шайба не может полностью удалить масло.
Не сушите предметы, на которых когда-либо было какое-либо масло (включая кулинарные масла).
Это может привести к смерти, взрыву или пожару.
ПРЕДУПРЕЖДЕНИЕ: Чтобы снизить риск возгорания, поражения электрическим током или получения травм, прочтите ВАЖНЫЕ ПРАВИЛА ТЕХНИКИ БЕЗОПАСНОСТИ, содержащиеся в руководстве пользователя вашего устройства, перед тем, как использовать его.
ШАГ 1. ДОБАВЬТЕ МОЮЩЕЕ СРЕДСТВО
Предназначен для использования только моющих средств HE (высокой эффективности).

ПРИМЕЧАНИЕ: См. ДОБАВЛЕНИЕ СРЕДСТВ ДЛЯ ПРАЧЕЧНЫХ (ниже) для получения дополнительной информации о добавлении моющего средства HE, смягчителя ткани и / или отбеливателя.
ШАГ 2. ЗАГРУЗИТЕ ОДЕЖДУ
Для достижения наилучших результатов загружайте одежду неплотной кучей равномерно по стенке корзины.

ШАГ 3. НАЖМИТЕ ПИТАНИЕ, ЧТОБЫ ВКЛЮЧИТЬ СТИРАЛЬНУЮ МАШИНУ

ШАГ 4. ВЫБЕРИТЕ ЖЕЛАТЕЛЬНЫЙ ЦИКЛ ДЛЯ СВОЕЙ НАГРУЗКИ *

ШАГ 5. ОТРЕГУЛИРУЙТЕ НАСТРОЙКИ ЦИКЛА, ПРИ ЖЕЛАЕМОСТИ

ШАГ 6. ВЫБЕРИТЕ ДОПОЛНИТЕЛЬНЫЕ ОПЦИИ *

ШАГ 7. НАЖМИТЕ И УДЕРЖИВАЙТЕ СТАРТ/ПАУЗУ, ЧТОБЫ НАЧАТЬ ЦИКЛ

ПРИМЕЧАНИЕ: Чтобы запустить цикл, необходимо удерживать кнопку «Пуск» в течение 1 секунды. Как только индикаторы состояния загорятся, отпустите кнопку запуска.
* Не все циклы, настройки или опции доступны для всех моделей.
ДОБАВЛЕНИЕ ПРАЧЕЧНЫХ СРЕДСТВ
ВАЖНАЯ ИНФОРМАЦИЯ: Использование моющего средства, отличного от HE, вероятно, приведет к увеличению продолжительности цикла и снижению эффективности полоскания. Это также может привести к неисправности компонентов и со временем к образованию плесени или грибка. Моющие средства HE должны быть мало пенообразующими и быстро диспергируемыми, чтобы производить нужное количество пены для достижения наилучших результатов.
ДОБАВЛЕНИЕ МОЮЩЕГО СРЕДСТВА В КОРЗИНУ
Добавьте в корзину отмеренное количество моющего средства HE или одноразовых пакетов для белья. Если вы используете бустеры кислородного типа, безопасный для цвета отбеливатель или кристаллы кондиционера для белья, добавьте их на дно корзины стиральной машины перед тем, как добавить одежду. ПРИМЕЧАНИЕ: Следуйте инструкциям производителя, чтобы определить количество используемых средств для стирки.
ДОБАВЛЕНИЕ ЖИДКОГО ХЛОРИНОВОГО ОТБЕЛИВАТЕЛЯ
Не переполняйте, не разбавляйте и не используйте более 1 чашки (236 мл). Не используйте безопасный для цвета отбеливатель или кислородосодержащие продукты в том же цикле, что и жидкий хлорный отбеливатель.

ДОБАВЛЕНИЕ ЖИДКОГО СМЯГЧИТЕЛЯ ДЛЯ ТКАНИ
Если вы хотите использовать с этой стиральной машиной жидкий кондиционер для белья, Whirlpool предлагает использовать дозатор Downy Ball®. Налейте отмеренное количество жидкого кондиционера для белья в дозатор Downy Ball®, плотно потяните кольцо, чтобы оно закрылось, и поместите его поверх загрузки. Следуйте инструкциям производителя по правильному количеству кондиционера для белья в зависимости от объема загрузки. Затем с помощью кнопки «Параметры полоскания» выберите «Смягчитель ткани». Дозатор Downy Ball ® автоматически выдает кондиционер для белья в нужное время цикла. Для предложений по использованию диспенсера Downy Ball ® посетите www.downy.com.

ДОБАВЛЕНИЕ ЖИДКОГО МЯГЧИТЕЛЯ ДЛЯ ТКАНИ ВРУЧНУЮ
Перед запуском цикла выберите параметр «Смягчитель ткани» на панели управления.
Во время последнего полоскания подождите, пока стиральная машина не заполнится, и нажмите кнопку «Старт/Пауза», чтобы приостановить работу стиральной машины. Поднимите крышку и добавьте рекомендуемое количество жидкого кондиционера для белья. Закройте крышку, нажмите и удерживайте кнопку «Старт/Пауза», чтобы возобновить цикл.
ПАНЕЛЬ УПРАВЛЕНИЯ И ОСОБЕННОСТИ

*Внешний вид может отличаться в зависимости от модели.
- МОЩНОСТЬ
Нажмите, чтобы включить / выключить или остановить / отменить цикл. - РУЧКА ЦИКЛА
Поверните ручку, чтобы выбрать желаемый цикл. - СТАРТ / ПАУЗА
Нажмите и удерживайте кнопку «Пуск / Пауза» в течение 1 секунды, пока не загорятся все индикаторы состояния, затем отпустите, чтобы начать цикл. Нажмите во время цикла, чтобы приостановить цикл и разблокировать крышку.
ПРИМЕЧАНИЕ: Если машина вращается, разблокировка крышки может занять больше времени. - МОДИФИКАТОРЫ ЦИКЛА (не все модификаторы доступны для всех циклов)
TEMP
Нажмите, чтобы изменить доступные температуры цикла (холодная, холодная, холодная, теплая или горячая).
ПРИМЕЧАНИЕ: Нажатие кнопки «Температура» переключает доступные параметры температуры. Если индикаторы в столбце температуры не горят, выбранная температура — холодный кран.
ОПЦИИ ПРОМЫВКИ
Нажмите, чтобы изменить доступные параметры полоскания. Нажмите один раз для кондиционера для белья, два раза для дополнительного полоскания и трижды для активации обоих.
- КОНДИЦИОНЕР ДЛЯ БЕЛЬЯ
Выберите этот параметр, чтобы сообщить машине, когда вы добавили жидкий кондиционер для белья. - ДОПОЛНИТЕЛЬНОЕ ПОЛОСКАНИЕ
Выберите этот вариант, чтобы добавить второе полоскание.
ОПЦИИ
Нажмите, чтобы добавить или удалить параметры для каждого цикла. Нажмите один раз, чтобы добавить 30 минут PreSoak, дважды, чтобы активировать Deep Water, и трижды для обоих.
- ГЛУБОКАЯ ВОДА
Используйте эту опцию для автоматического добавления воды в цикл стирки.
Вы также можете использовать эту опцию, чтобы уменьшить вероятность появления белых пятен на темной одежде. - 30 МИН ПРЕДВАРИТЕЛЬНЫЙ ДУБ
Нажмите, чтобы добавить 30-минутный период предварительного замачивания, чтобы помочь растворить стойкие пятна. Стиральная машина наполнится, сделает паузу для замачивания, а затем начнет выбранный цикл.
КРАН
Нажмите, чтобы получить доступ к мгновенной струе воды. Используйте эту функцию, чтобы убрать одежду и другие вещи прямо в стиральную машину. Вы также можете использовать эту функцию, чтобы вручную долить воду в машину по желанию.
ПРИМЕЧАНИЕ: Стиральная машина сливает воду в начале цикла, если обнаруживается большой объем воды, чтобы машина могла правильно определить размер загрузки.
ПРИМЕЧАНИЕ: Если стиральная машина обнаруживает состояние дисбаланса, она может приостановить работу и попытаться исправить ситуацию. В это время на короткое время загорятся индикаторы состояния Sense и Wash.
ПРЕДУПРЕЖДЕНИЕ: Не стирайте водостойкую или водоотталкивающую одежду.
Несоблюдение этих инструкций может привести к аномальной вибрации и дисбалансу, что может привести к телесным повреждениям, повреждению имущества и/или повреждению прибора.
ВЫБОР ПРАВИЛЬНОГО ЦИКЛА
Руководство по эксплуатации вашей стиральной машины можно найти в Интернете по адресу www.водоворот.com.
Документ поможет определить, какой цикл выбрать для различных типов нагрузки, а также параметры цикла по умолчанию.
Для бывшихample, мы рекомендуем использовать НОРМАЛЬНЫЙ цикл с теплой водой для хлопка, белья и смешанных вещей.
ПРЕДВАРИТЕЛЬНАЯ ОБРАБОТКА ПЕРЕД ЦИКЛОМ СТИРКИ
 Нажмите кнопку Faucet один раз, чтобы включить его, и нажмите еще раз, чтобы выключить.
- Смеситель автоматически отключится через 10 минут или при достижении максимального уровня воды.
- Вода автоматически сливается, если уровень воды становится слишком высоким. Вода также сливается через 10 минут, если крышка остается открытой, или через 3 часа, если крышка остается закрытой.
БОЛЬШЕ ВОДЫ, КОГДА ХОТИТЕ

АВТОМАТИЧЕСКОЕ ОПРЕДЕЛЕНИЕ И ГЛУБОКАЯ ВОДА
- Стиральная машина отрегулирует уровень воды до оптимального количества для высокоэффективной стирки с определенным объемом загрузки.
- Нажмите Deep Water, чтобы автоматически добавить больше воды в цикл стирки.
- Рекомендуется использовать цикл BULKY ITEMS с опцией Deep Water для нагрузок, где требуется максимальный уровень воды.
- Ожидайте более продолжительное время цикла из-за увеличенной продолжительности заполнения при использовании опции Deep Water.
ОЧИСТКА МЕНЬШЕ ВОДЫ

Стиральная машина была разработана и оптимизирована для обеспечения тщательной очистки с меньшим расходом воды для экономии энергии и ресурсов.
Как шайба dampПосле того, как груз переместится, уровень предметов будет оседать в корзине. Это нормально и не указывает на необходимость добавления дополнительных элементов.
ВАЖНО: Вы не увидите полную корзину с водой, как в старых, менее эффективных стиральных машинах. Это нормально, если часть груза находится выше ватерлинии.
Подробные инструкции по установке и обслуживанию, а также советы по зимнему хранению и транспортировке см. в руководстве пользователя, прилагаемом к машине.
ПОМОЩЬ ИЛИ СЕРВИС И ДОПОЛНИТЕЛЬНАЯ ИНФОРМАЦИЯ
Для получения информации о любом из следующих элементов, полном руководстве по циклу, гарантии, подробных размерах продукта или полных инструкциях по использованию и установке, пожалуйста, посетите www.whirlpool.com/owners, или в Канаде www.whirlpool.ca/владельцы. Это может сэкономить вам расходы на обращение в службу поддержки.
| Зарегистрировать продукт | Расписание обслуживания | Как сделать и часто задаваемые вопросы | Руководства и Скачать |
Добавить план обслуживания | Запчасти | Аксессуары |
 |
 |
 |
 |
 |
 |
 |

Чтобы поговорить с представителем службы поддержки клиентов или задать дополнительные вопросы, позвоните нам по бесплатному номеру 1-866-698-2538, а в Канаде — по телефону 1-800-807-6777.
Вы можете написать с любыми вопросами или проблемами по адресу:
| Бытовая техника Whirlpool Центр обслуживания клиентов 533 Benson Road Бентон-Харбор, Мичиган, 49022-2692 |
Бытовая техника Whirlpool Центр обслуживания клиентов Блок 200-6750 проспект Века Миссиссауга, Онтарио L5N 0B7 |
Пожалуйста, укажите в переписке дневной номер телефона.
W11428539D
 ® /™ © 2022 Whirlpool.
Все права защищены.
Используется по лицензии в Канаде.
Документы / Ресурсы
Рекомендации
Стиральная
машина Whirlpool AWSE 7100– бережная забота о ваших вещах!
Загрузка в 7 кг
Благодаря максимальной
загрузке белья в 7 кг, вы сможете с
удобством стирать в машине сразу много одежды. Отлично войдут в бак и объемные
вещи, например, зимние куртки.
Высокое качество стирки
Машина
оснащена 14 автоматическими программами, которые позволят подобрать оптимальные
настройки для каждой вашей вещи. Благодаря этому даже одежда из тонких и
деликатных тканей великолепно сохранит свой цвет и форму.
Если
вам не хочется самому подбирать режим – можно доверить это машине.
Интеллектуальная система сама выставить лучшие настройки для одежды.
Великолепный отжим
Скорость
отжима машины до 1000 оборотов в минуту, поэтому вещи после стирки будут
сохнуть очень быстро. Благодаря технологии 6th
Sense будут стираться особенно бережно.
Под защитой
Корпус
стиральной машины имеет защиту от протечек, что особенно важно, если вы
собираетесь пользоваться прибором часто.
