Пришло время обновить свою Xpenology(Synology) до DSM 7.1. Шаг это не столько сложный, сколько затратный по времени
Требования
- Бэкапим все на отдельный диск. При установке все HDD будут подвергнуты форматированию
- Платформа должна быть Intel, сетевая карта встроенная
- USB флешка что будет «жить» в Synology не меньше 2 Гб
- Монитор и клавиатура с мышкой что подключены к ПК на который ставим Synology. Это нужно только на время установки. Можно обойтись и без них, но будет нереально отловить проблемы если они возникают
- ПК на который хотим установить Synology должен быть в одной локальной сети с ПК на котором производим настройку
Создание USB накопителя
Если с первым вариантом справились, переходим к подготовительную процессу созданию USB загрузчика. Все также будет торчать флешка, но процедура стала менее странной по созданию
- Скачиваем Rufus для записи образа на флешку https://rufus.ie/ru/
- Скачиваем iso образ https://github.com/pocopico/tinycore-redpill
Для UEFI биоса выбираемtinycore-redpill-uefi.v0.8.0.0.img.gz
Для Legacy биоса (старый биос)tinycore-redpill.v0.8.0.0.img.gz - Записываем образ на флешку
Работа с загрузчиком
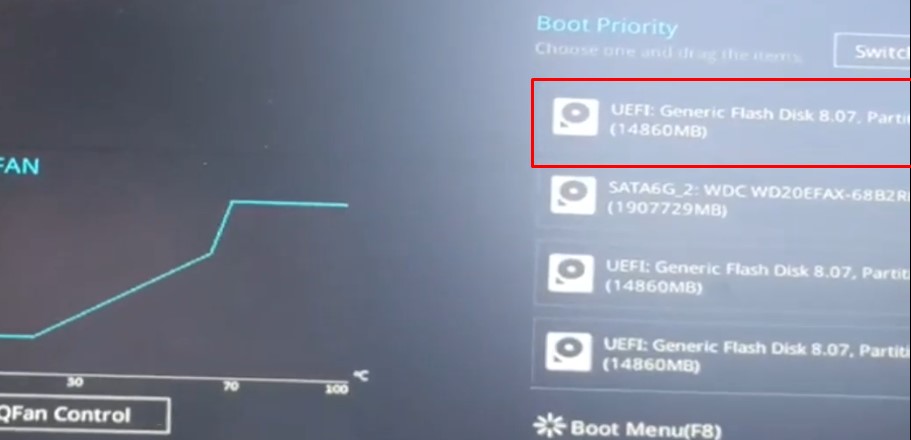
- В биосе выбираем загрузку с USB накопителя
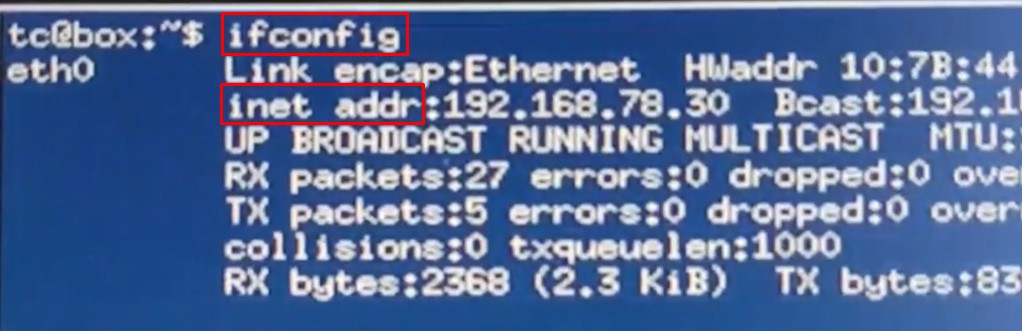
- После появления интерфейса загрузчика переходим в Terminal, затем вводим команду
ifconfigи нажимаем Enter - Запоминаем IP что получили от роутера по DHCP
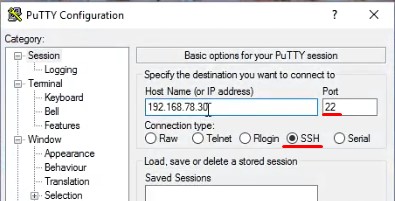
- Скачиваем Putty https://www.chiark.greenend.org.uk/~sgtatham/putty/latest.html
- Запускаем Putty и вводим IP что был выдан на прошлом шаге. Протокол для подключения SSH
Перечень команд которые вводим по очереди:
Логин: tc
Пароль: P@ssw0rd
Внимательно смотрите что выдает консоль в результате ввода команд, возможно там будут ошибки или предупреждения. Каждую команду нужно подтверждать вводом Y
Обновляем загрузчик до последней версии:
./rploader.sh update now
./rploader.sh fullupgrade now
Считываем и подставляем в конфиг VID и PID флешки
./rploader.sh identifyusb nowСчитываем и подставляем в конфиг структуру Sata контроллеров
./rploader.sh satamap nowГенерируем и подставляем в конфиг случайные sn и mac. Если хотите использовать например DS3615xs, укажите это вместо DS920+
./rploader.sh serialgen DS920+ realmacЗапускаем генерацию загрузчика. Перечень доступных систем:
apollolake DS918+
bromolow DS3615xs
broadwell DS3617xs
broadwellnk DS3622xs+
v1000 DS1621+
denverton DVA3221
geminilake DS920+
dva1622 DVA1622
Выберите какую версию хотите установить используя команду
./rploader.sh -versionЗатем создайте загрузчик
./rploader.sh build geminilake-7.1.0-42661В новой версии загрузчика используется следующая команда
./rploader.sh build ds920p-7.1.1-42962Бэкапим созданную конфигурацию (только если USB накопитель больше 4 ГБ)
./rploader.sh backupПерезагружаем систему
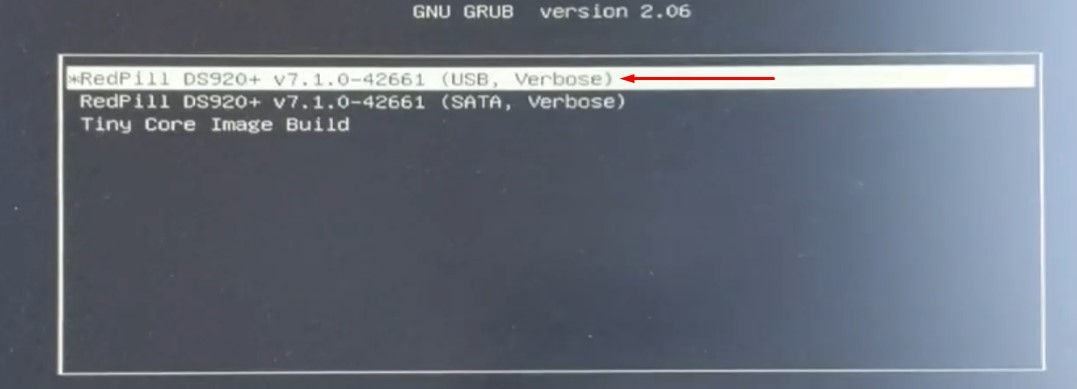
exitcheck.sh rebootПосле перезагрузки проверьте чтобы система загружалась в нормальном режиме
Режим Tity Core Image Build это режим для управления загрузчиком. К нему вернемся немного позже
Установка системы
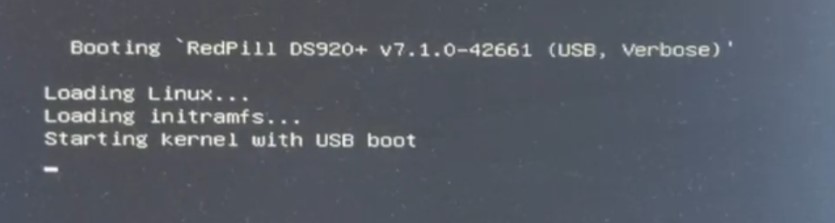
- В нормальном режиме система грузится со следующей информацией на вывод
- Скачиваем Synology Assistant для поиска устройства в локальной сети
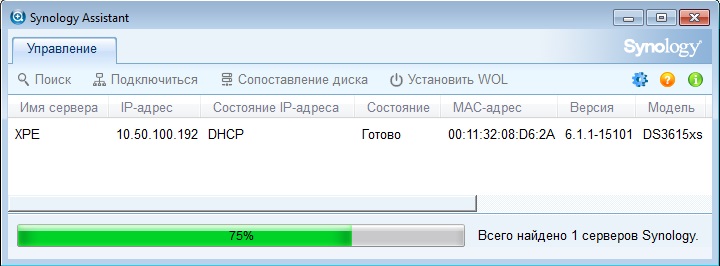
- Выполняем поиск в локальной сети. Если устройство найдено, увидите что то в этом роде

- Скачиваем pat файл для установки. Если загрузчик подготавливали для DS920+, то и файл скачиваем для DS920+
- По старой привычке я отключал интернет от Synology (именно кабель провайдера от роутера, не Synology от роутера). Если не хотите заворачиваться, попробуйте не отключать
- Далее выбираем файл pat и следуем инструкции установщика
- Ждем 10 мин, затем система перезагрузится. Снова с помощью Synology Assistant ищем девайс в сети
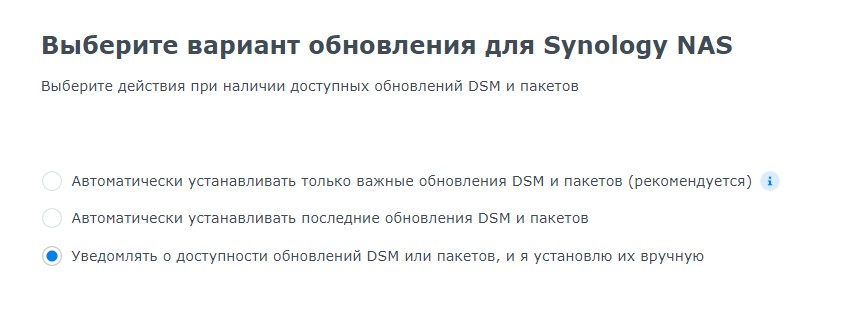
- Обязательно отключите автоматические обновления
- Устройство готово к работе
Проблемы и их решение
Проблема 1. Загрузчик автоматически не распознает новые HDD
Я подключил только один HDD во время установки системы, остальные HDD не распознались.
Варианты решения:
1. Не отключайте HDD во время установки системы
2. Пересоздать загрузчик
- Загружаемся снова в режиме Tity Core Image Build
- После появления интерфейса загрузчика переходим в Terminal, затем вводим команду
ifconfigи нажимаем Enter - Запоминаем IP что получили от роутера по DHCP
- Запускаем Putty и вводим IP что был выдан на прошлом шаге. Протокол для подключения SSH
- Перечень команд которые вводим по очереди:
Логин:tc
Пароль:P@ssw0rd
./rploader.sh satamap now
./rploader.sh build geminilake-7.1.0-42661
./rploader.sh backup
exitcheck.sh reboot- В Synology отобразятся все HDD что подключены к материнской плате
Проблема 2: Synology не видится в локальной сети после создания загрузчика
Решение:
- Возвращаемся к Работа с загрузчиком
- Вместо команды
./rploader.sh serialgen DS920+ realmacиспользуем./rploader.sh serialgen DS920+ now - Дальше все согласно мануалу
Старая версия Synology 6.2
Также рассмотрите возможность покупки белого SN для максимальной производительности вашего Xpenology
https://bc.saniaowner.space/xpenology.html
Установим ОС Synologys DSM на ПК с помощью загрузчика Xpenology, и с ее помощью заставим работать старый NAS Acer H340.
XPEnology — это не операционная система Linux, такая как Ubuntu или другой распространенный дистрибутив. Это загрузчик для операционной системы Synologys DSM, которую они используют на своих устройствах NAS. DSM работает на специальной версии Linux, разработанной Synology, поэтому ее нельзя напрямую сравнивать с настольными и серверными дистрибутивами. Он оптимизирован для работы на NAS устройствах со всеми предоставляемыми ими функциями.
XPEnology дает возможность запускать DSM на любом устройстве, к примеру, старом ПК, сервере или NAS. Таким образом, вы можете сделать из него аппаратное сетевое NAS хранилище с мультимедийными и облачными функциями операционной системы DSM.
DiskStation Manager (DSM) — это интуитивно понятная операционная система с веб-интерфейсом, которая помогает пользователям управлять файлами. Далее в статье, я представлю полную пошаговую инструкцию по установке операционной системы DSM с помощью загрузчика XPEnology на сетевое хранилище Acer H340. Следуя ей вы сможете установить эту ОС на любой ПК или подобное устройство.
В моем случае данное NAS не получилось сбросить к заводским настройкам и установить стандартную операционную систему, в следствии чего было принято решение установить на него операционную систему DSM с помощью загрузчика XPEnology.
Как подключить видеокарту к Acer H340
Данная модель NAS позволяет подключить к нему видеокарту для дальнейшей настройки. При подключении видеокарты выяснилось, что с внутренней флеш памяти операционная система не может завершить установку и в следствии ошибки: устройство не доступно по сети.
Для вывода изображения на экран потребуется видеокарта формата PCIEx X1. Так как это довольно редкая карта я использовал специальный переходник с формата Х1 на Х16.
Настройка загрузки с USB накопителя
Далее нам нужно будет попасть в BIOS, чтобы настроить загрузку с внешнего USB накопителя.
Для входа в BIOS, сперва на выключенном устройстве нужно установить перемычку и замкнуть два контакта. Затем подключить к устройству USB флешку с загрузчиком, клавиатуру, мышку и сетевой кабель.
Далее включаем NAS, и чтобы войти в BIOS жмем на клавиатуре клавишу F2.
Переходим в раздел Boot, в данном списке определяем нашу флешку и переносим ее вверх списка клавишей плюс.
И далее нажимаем F10 чтобы сохранить измененные настройки и перезагрузить устройство, после чего NAS хранилище будет грузится с флешки. Чтобы сбросить настройки загрузки достаточно убрать перемычку.
Как создать загрузочную флешку с XPEnology загрузчиком
Итак, с настройкой самого устройства мы разобрались теперь давайте рассмотрим, как установить DSM. Для упрощения процесса скачайте утилиту XPEnology Tool.
Далее нужно определится с выбором версии системы Synology DSM в соответствии с материнской платой вашего компьютера. Если это старый компьютер, который не поддерживает UEFI, рекомендуется использовать DSM 5.2 или попробовать DSM 6.2.1 с загрузкой 1.04b.
Запускаем XPEnology Tool, открываем вкладку «Загрузки», здесь выбираем нужную версию загрузчика, мне нужна версия 1,03 для устройства DS3617, уже проверенная рабочая версия загрузчика.
Скачиваем архив synoboot.zip
И далее нужно будет скачать DSM соответствующей версии – 6,2 – 1,03 – DS3617.
Распаковываем архив с файлом образа synoboot.ISO, и копируем в ту же папку файл с расширением – .path.
Теперь можно создать загрузочную флешку. Этот USB-накопитель станет частью системы, с которого будет выполнятся загрузка начальных драйверов и загрузчика, по объему подойдет и старая флешка на 4 Гб. Далее нужно выполнить монтирование образа загрузчика и его дальнейшее редактирование.
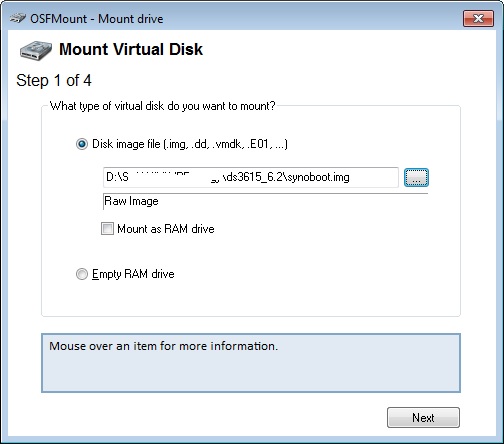
В окне программы XPEnology Tool открываем вкладку – Portable tools и запускаем программу монтирования OSF Mount.
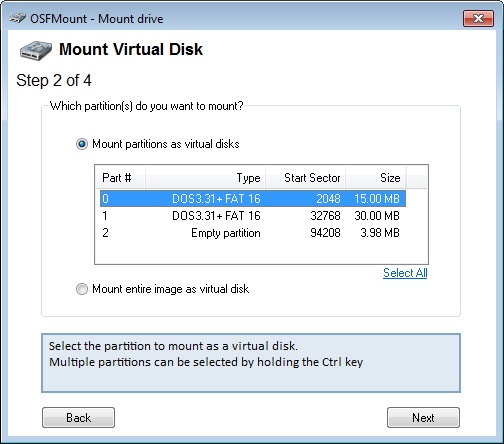
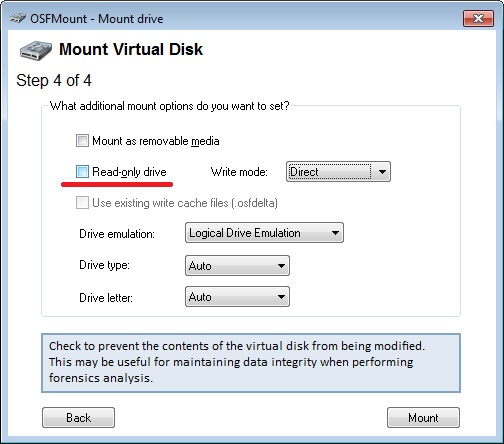
Жмем «Mount new», указываем путь к файлу ISO образа, выделяем его и жмем «Открыть», выбираем здесь нулевой раздел, или вписываем в поле 2048, ниже снимаем отметку напротив Read-only и устанавливаем напротив Mount as removable media – Ok.
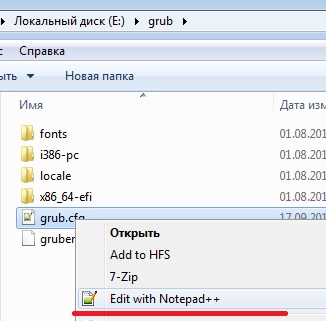
Открываем его, кликнув два раза левой кнопкой мыши, переходим в папку grub, ищем файл grub.cfg и открываем его в блокноте. В данном файле нужно заменить поля vid и pid, вписать туда значения нашей флешки. Узнать их можно в свойствах накопителя.
Из приложения XPEnology Tool, запускаем программу USB Device view, здесь флешка отображается как Mass Storage, чтобы убедится, что это та, что нам нужно, можно ее открыть. Копируем и переносим значение – Product и Vendor ID в файл .cfg.
Далее нужно изменить еще один параметр, а именно серийный номер устройства, в этом поле. Для того чтобы получить серийный номер запускаем программку Serial generator, здесь выбираем модель, в соответствии со скачанными файлами у меня это DS3617 и жмем «Сгенерировать». Копируем и вставляем его в файл, а после сохраняем изменения. Отмонтируем его в программе OSF Mount и выходим из нее.
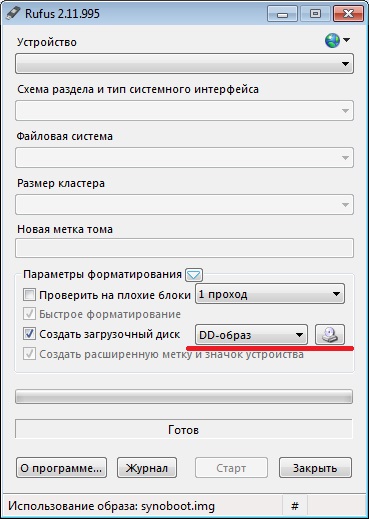
Теперь этот измененный образ нужно записать на подготовленный USB накопитель. Открываем Rufus и создаем загрузочную флешку. Выбираем накопитель, затем файл образа – Старт.
Как установить Synology DSM
Загрузочный накопитель готов, теперь можно приступать к установке. Вытаскиваем флешку с ПК и вставляем в сетевое хранилище. Включаем NAS, ранее я уже настроил в BIOS загрузку с USB, если все прошло успешно вы увидите черное окно с белыми буквами. Выбираем первый пункт и жмем Enter. Загрузчик готов к установке.
Для запуска установки, переходим к ПК с которого будем управлять данным устройством и запускаем Synology Assistant, разрешаем доступ брандмауэру. После запуска программы автоматически начнется поиск устройств. В списке должно появится устройство DiskStation с состоянием – Не установлено. Выбираем его и жмем Подключится.
В открывшемся окне браузера вы увидите начальный экран установки операционной системы DSM. Жмем здесь «Установить», а затем выбираем ручную установку.
Указываем путь к ранее скачанному – .path файлу, и кликаем «Установить сейчас». Всплывающее окно предупредит что все данные на диске будут удалены, соглашаемся – Ок. После начнется форматирование раздела и установка менеджера. Продолжительность процесса установки зависит от скорости жесткого диска. Ждем пока устройство не перезагрузится. Через пару минут после перезагрузки NAS должен появится в сети.
Система установлена, далее нужно указать имя сервера, пользователя и пароль.
Отключаем автоматическое обновление, выбираем из списка – уведомлять, и жмем «Далее». QuickConnect для неофициальной версии лучше пропустить, если нужно, его можно будет настроить позже. На этом процесс установки DSM окончен, устройство готово к использованию. Далее можно собрать из дисков RAID массив, настроить сетевой доступ и добавить общедоступные папки.
Как создать RAID масив на Acer H340
Для объединения дисков в массив, кликните по кнопке «Меню» и откройте диспетчер хранения.
Здесь перейдите в раздел «Пул ресурсов хранения» и для того, чтобы создать новый пул нажмите «Создать».
Выберите тип будущего пула, «Улучшенная производительность» или «Дополнительная гибкость». Выберите нужный тип RAID массива и нажмите «Далее».
Перетащите диски, из которых будет состоять будущий RAID, в правую часть окна – Далее. Система предупредит что все данные на дисках будут удалены, жмем «Ок» для продолжения. В следующем окне проверяем параметры и жмем «Применить».
После система выведет сообщение о том, что перед тем как начать использовать пространство пула нужно создать том – жмем Ок. Для создания тома, открываем пункт меню «управления разделами» и жмем «Создать».
Выбираем пул – Далее. Если нужно в следующем окне меняем размер – и жмем «Далее», выбираем файловую систему – Далее, и в следующем окне для подтверждения настроек жмем «Применить».
Как создать папку с общим доступом
После создания массива и разделов появится возможность добавить общедоступную сетевую папку.
Для этого откройте «Панель управления» – «Папка общего доступа» – «Создать».
Введите имя папки, описание, выбираем местоположение, снимает ограничение разрешения и жмем далее, если нужно задаем пароль и для подтверждения внесенных изменений жмем «Применить». В следующем окне устанавливаем разрешения для пользователей – и жмем Ок.
Заключение
Что касается XPEnology – то это отличное и дешевое решение для домашнего проекта. Если вы ищете надежную ОС для NAS бизнес-уровня, лучше приобрести настоящее устройство от Synology.
Полную версию статьи со всеми дополнительными видео уроками смотрите в источнике. А также зайдите на наш Youtube канал, там собраны более 400 обучающих видео.
![]()
Пробуем установить операционную систему от известного производителя сетевых накопителей на обычный ПК.
Что необходимо:
Usb флэшка – на ней располагается загрузчик, большой объем не нужен. Перед тем как установить bootloader, нужно отредактировать grub.cfg
Был использован загрузчик v1.02a под DS3615xs
Генерируем серийный номер для устройства DS3615xs. Для этого есть специальный файл.
Генерируем мак адрес для сетевой карты. Первые 3 октета у вендора Synology 001132.
Узнаем VID & PID флэшки (в свойствах устройства в Диспетчере устройств)
Монтируем образ загрузчика – synoboot.img с помощью OSFMount, открываем grub.conf с помощью Notepad++
Меняем параметры на свои
set vid=0x****
set pid=0x****
set sn=B3LWN0****
set mac1=001132******
Размонтируем synoboot.img и запишем synoboot.img на USB-flash помощью Rufus
Загружаем компьютер с USB. Запустим Synology assistant, выполним поиск устройств. В web-интерфейсе xpenology выбираем .pat-файл прошивки и устанавливаем систему.
DSM_DS3615xs_15101.pat
На этом всё, остальные настройки производятся через web-интерфейс Synology, или другими доступными способами.
Настроим SSH
Панель управления -> Терминал и SNMP -> Терминал -> Включить службу SSH

желательно сменить стандартный порт
Права root можно получить с помощью в консоли ssh
зайти с УЗ администратора

sudo -i

Если нужно, можно активировать пользователя root

synouser --setpw root ПарольДляRoot

Далее можно заходить под root используя установленный пароль
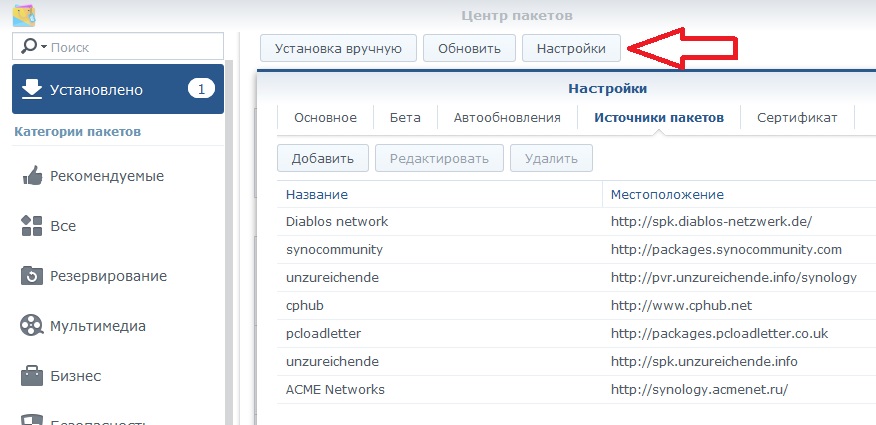
Установим дополнительные репозитории
Источники пакетов -> Добавить

http://spk.diablos-netzwerk.de
http://packages.synocommunity.com
http://pvr.unzureichende.info/synology
http://www.cphub.net
http://packages.pcloadletter.co.uk
http://spk.unzureichende.info
http://synology.acmenet.ru
Все файлы, указанные в данной записи, можно скачать тут.
9 507
**We take no responsibility for any loss of data or any other problem caused by following this tutorial.
* We highly advise making an offsite backup of all your data before and during your use of xpenology.
How do I install DSM 7 on my Xpenology hardware?
** All DSM 7 guides were posted by users on our official xpenology.org Facebook group but none of these guides have been tested by the xpenology.org team. Hence, we take no responsibility in any way.
* We highly advise making an offsite backup of all your data before and during your use of xpenology.
DSM 7 Installation – Guide 1 by “Greek Guy” – specifically for physical hardware (aka bare-metal servers)
Original post by Greek Guy in our official Facebook group
Note: If you can’t install DSM 7 directly in physical computer, or you just want to install it on Proxmox, follow Guide 2 by “Greek Guy” (you can find it just below this guide)
This is the best way I found in order to install DSM 7 in bare-metal server with the necessary drivers to be included:
1. Backup your files.
2. Download the tinycore-redpill.v#.#.#.img.gz file from here:
https://github.com/pocopico/tinycore-redpill
3. Decompress it.
4. Burn the .img file to USB.
5. Plug the usb to the machine that is going to be used as server and boot via it.
6. Open the command prompt (bottom right icon).
7. Execude one by one the following commands:
./rploader.sh identifyusb now
Y
./rploader.sh satamap now
Y
./rploader.sh serialgen DS3615xs *If you want version other than DS3615xs check PS1.
Y
/rploader.sh backup now
Y
./rploader.sh build bromolow-7.0.1-42218 *If you want version other than DS3615xs check PS1.
8. Reboot the device from UI (bottom left icon).
Bootloader is now ready!
9: Download DSM 7 *If you want version other than DS3615xs check PS1.:
https://global.download.synology.com/…/DSM_DS3615xs…
10: You can find your server from another PC in http://find.synology.com/ and install the DSM 7 file that you downloaded at step 9. While you install DSM 7, make sure that you will select Notify me when DSM or package updates are available and I will install them manually.
P.S.1: If you want to set up a system version other than DS3615xs you have to replace the ./rploader.sh serialgen DS3615xs with ./rploader.sh serialgen of your own system version. You also have to change ./rploader.sh build bromolow-7.0.1-42218 with ./rploader.sh your_build_package_arch-7.0.1-42218. You can find your package arch here https://kb.synology.com/…/What_kind_of_CPU_does_my_NAS…. Last but not least you have to download DSM 7 for your own system version from here: https://www.synology.com/en-global/support/download
P.S.2: tinycore-redpill automatically downloads necesary drivers your PC needs to properly use DSM. If nevertheless you done the process and you can’t find your server in http://find.synology.com/ or you can’t find your hard disks, or you notice another malfunction, then you are probably have driver incompatibility and you have to contact with pocopico here in order to include the proper driver to the project: https://xpenology.com/forum/profile/23713-pocopico/ When I needed him he helped me and I’m really grateful! I am also really grateful for the tinycore-redpill project he made! If the problem can not be solved this way, then you have to try the following guide that is probably going to solve it:
https://www.facebook.com/…/permalink/2883181031973143
P.S.3: I am beginner and so this #tutorial may need improvement. This is just a presentation of what steps I followed. I made this guide noob friendly because I am also a beginner (I think most of us are) and i had to do a lot of research in order to make DSM 7 work in my PC. For this reason I would really like to kindly request you not just uploading a screenshot of things you managed to do but also explain it analytically with beginner’s words in order all of us to make it work. As I already mentioned most of us are beginners and we need it. It also saves time.
DSM 7 Installation – Guide 2 by “Greek Guy” – specifically with proxmox
Original Proxmox post by Greek Guy in our official Facebook group
Note: If you want to install DSM 7 in physical computer follow Guide 1 by “Greek Guy” instead. (you can find it just above this guide)
This is the best way I found in order to install DSM 7 in PCs that can’t do it directly through tinycore-redpill due to driver incompatibility:
1. Backup your files because they are going to be erased.
2. Download Proxmox from here:
https://www.proxmox.com/en/downloads/category/iso-images-pve
3. Burn the iso file to USB.
4. Plug the usb to the machine that is going to be used as server and boot via it.
5. Select Install Proxmox VE.
6. Through Target Harddisk option, select the hard disk that you want Proxmox to be installed.
7. Make true Location and Time Zone selection for proper operation of Proxmox.
8. Insert the credentials you want to have on Proxmox.
9. Make sure that the default Network Configuration of the server is correct and if it doesn’t, correct it.
10. After reboot login to the given link from another PC, using the credentials you choose at step 9.
11. Select OK.
12. Select Create VM (it is located up right).
13. Hold the given ID and click Next.
14. Select Do not use any media and click Next.
15. Change Machine to q35 and click Next.
16. Add the disks that you want to use to your server in SATA Bus/Device and then for every disk choose the desirable capacity in GiB and make sure to choose Raw Format and Write back Cache. Subsequently click Next.
17. Select how many sockets and cores of server’s cpu you want to be used by DSM.
18. Select how much RAM you want to be used by DSM and then click Next.
19. Click Next again.
20. Click Finish without selecting Start after created.
21. Open the pve tree menu that is located up left. Select the created VM. Then, select Hardware. Select Add and choose Serial Port. Click Add.
22. Select Options. Then select Boot order. Drag ide2 to the top and make sure it is selected and all the others dont. Click OK.
23. Download FileZilla from here, install it and run it:
https://filezilla-project.org/download.php?type=client
24. Connect to Proxmox through FileZilla, using the credentials you used in step 10 (before ip type sftp://).
25. Download the tinycore-redpill.v#.#.#.img.gz file from here:
https://github.com/pocopico/tinycore-redpill
26. Decompress it.
27. Through FileZilla, navigate to /var/lib/vz/images/ , create a folder and name it with the ID you hold since step 13. Then move the img file inside there.
28. Through Proxmox enviroment, select pve (it is located up left) and then select >_ Shell.
29. Copy the following command and change 100 with the ID you hold since step 13:
echo “args: -device ‘nec-usb-xhci,id=usb-bus0,multifunction=on’ -drive ‘file=/var/lib/vz/images/100/tinycore-redpill.v0.4.4.img,media=disk,format=raw,if=none,id=drive-disk-bootloader’ -device ‘usb-storage,bus=usb-bus0.0,port=1,drive=drive-disk-bootloader,id=usb-disk-bootloader,bootindex=999,removable=on’” >> /etc/pve/qemu-server/100.conf
30. Paste it to >_ Shell and press enter.
31. Select the VM, then select >_ Console and start VM.
32. When boot is done, open the command prompt (bottom right icon of VM’s UI).
33. Execude one by one the following commands:
./rploader.sh identifyusb now
Y
./rploader.sh satamap now
Y
./rploader.sh serialgen DS3615xs *If you want version other than DS3615xs check PS1.
Y
./rploader.sh backup now
Y
./rploader.sh build bromolow-7.0.1-42218 *If you want version other than DS3615xs check PS1.
34. Reboot tinycore-redpill from it’s own UI (bottom left icon).
Bootloader is now ready!
35. Download DSM 7 *If you want version other than DS3615xs check PS1.:
https://global.download.synology.com/…/DSM_DS3615xs…
36. You can find your server from another PC in http://find.synology.com/ and install the DSM 7 file that you downloaded at step 35. While you install DSM 7, make sure that you will select Notify me when DSM or package updates are available and I will install them manually.
37. When you finish the installation of DSM 7, from Proxmox enviroment click on the created VM on the left. Select Options, then select Start at boot and choose Yes.
P.S.1: If you want to set up a system version other than DS3615xs you have to replace the ./rploader.sh serialgen DS3615xs with ./rploader.sh serialgen of your own system version. You also have to change ./rploader.sh build bromolow-7.0.1-42218 with ./rploader.sh your_build_package_arch-7.0.1-42218. You can find your package arch here https://kb.synology.com/…/What_kind_of_CPU_does_my_NAS…. Last but not least you have to download DSM 7 for your own system version from here: https://www.synology.com/en-global/support/download
P.S.2: I am really grateful for:
1. The tinycore-redpill that pocopico made.
2. The following courses that LearnLinuxTV uploaded and helped me to enter Proxmox world: https://www.youtube.com/playlist…
3. The following video that CassTechSolutions uploaded and gave me important information about installing tinycore-redpill on Proxmox: https://www.youtube.com/watch?v=5yu_gId1f4g
P.S.3: I am beginner and so this #tutorial may need improvement. This is just a presentation of what steps I followed. I made this guide noob friendly because I am also a beginner (I think most of us are) and i had to do a lot of research in order to make DSM 7 work in my PC. For this reason I would really like to kindly request you not just uploading a screenshot of things you managed to do but also explain it analytically with beginner’s words in order all of us to make it work. As I already mentioned most of us are beginners and we need it. It also saves time.
How do I install Xpenology? Quick steps!
- Download XPEnology – both the boot image and DSM Software
- Unpack two files: synobot-xxx.img and XPEnology-xxxx.pat
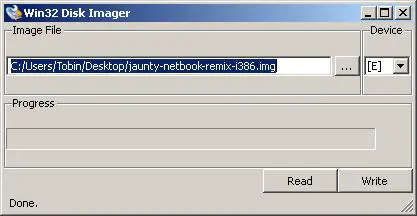
- Download win32diskimager : http://sourceforge.net/projects/win32diskimager/
- Load win32diskimager, Select the synoboot-xxx.img file and the USB drive then press Write and wait.
- Boot from USB drive (Yeah Pic are from Virtual Machine, but you got the same screen) and wait 1 min.
- Download and install Synology Assistant and click search
- Install with the XPEnology-xxx.pat file with assistant and conf it.
- Connect to your new NAS 😉
- Reboot, enter in your BIOS and set USB drive as first boot device.
The USB drive is used by XPEnology to boot, so you must always keep it connected.
How do I install Xpenology? In-depth!
Before setting up Xpenology, there are a few things that you need to do first. You will need a computer (obviously) and a USB stick; you can just use an old one you have at home. Be sure to back up all files and date the USB stick beforehand. During the process, you will format the USB drive and delete all the data, so backing up your files is a must!
To start, download Xpenology. You can find the software to do this here. You will want both the boot image and the DSM software. Next, unpack two files: synobot-xxx.img and XPEnology-xxxx.pat.
Next, download win32diskimager. Again use the link to find the file and download it. Once downloaded, load win32diskimager and select the synoboot-xxx.img file and the USB drive. Press write and then wait.
Then, you will want to boot the USB drive and wait for a minute. Download and install Synology Assistant. Once downloaded, click search. You will want to install it with the XPEnology-xxx.pat file with the assistant and configure it.
Once done, you can connect to your new NAS. Reboot your computer and ensure in your BIOS. Once done, set up your USB drive as the first boot device. XPEnology uses the USB drive to boot, so you have to keep the USB connected at all times.
Once these steps are complete, though, you are done! If you are completely new to the Xpenology world, there are more detailed guides and video tutorials that you can follow.
How do I install XPEnoboot?
Installing XPEnoboot works similarly to installing Xpenology, as we looked at earlier. You can follow the steps outlined above to install XPEnoboot, just be sure to click on the right link when redirected!
Start by downloading the latest version of XPEnoboot here. You can then scroll to the correct file that you need:
http://download.xpenology.me/xpenoboot/5.2-5644.5/XPEnoboot_DS3615xs_5.2-5644.5.img
Once downloaded, you can follow the steps as prompted on your screen. You will then need to download the PAT file, downloading the latest one where possible.
Next, install the Win32Diskimager software and the Synology Assistant software. You will need to confirm that you trust the software before installing it. Once installed, you can create a bootable USB drive in the Win32Diskimager and write it to the USB drive.
You will then want to plug the USB into the port located on your motherboard. You will then want to start up your Synology Assistant and download a DSM. You can browse to find the large PAT file we downloaded earlier and use that.
These are fairly straightforward to run and shouldn’t take you too long. There are plenty of video tutorials and articles online that can assist you too! Don’t forget to check forums for advice from other users; it can be invaluable! Again follow the installation steps as they appear on your screen.
How do I install Xpenology on Linux?
To install Xpenology on Linux, you will first need a 64-bit version of Linux with virtualization turned on in your system’s BIOS settings. You will also want the Haswell generation processor or newer. If you have older hardware, you can run loaders and find these on forums if needed.
To install it on a Linux device, first, download Jun’s Loader; you can find it here. Once the download completes, extract the files and place the synoboot.img file in a location of your choice. Once stored, you can navigate there and run the command below to convert the image into a QCOW2 image:
Qemu-img convert -f raw -0 qcow2 synoboot.img syno-ds918-qcow2.img
Once the image is created, create a new Virtual Machine in the Virtual Machine Manager. Select Import existing disk image and browse to locate the file we just created. You can then specify the RAM and CPUs that you want to allocate to the Virtual Machine.
To finish, give your Virtual Machine a name by selecting customize configuration before install and hit finish. You can continue to customize the machine further, adjusting storage types, network providers, and boots. Customize them as you see fit (there are tutorials available for assistance if needed).
Once complete, you can download the software. Again, you can find this here if needed or access other available versions in forums if needed. Follow the steps prompted when you hit install, and before you know it, Xpenology will be downloaded on your Linux device. If you run into any issues, there are plenty of tutorials and step-by-step guides in forums that you can use for further assistance.
Can I update Xpenology?
Yes, you can update Xpenology! Their website states a minor update that you can complete to get the latest major DSM version. Updating Xpenology is fairly straightforward to do and can be done following the steps below.
- Login to Synology DSM with your login details.
- Locate the control panel and click on it
- Next, find the update and restore.
- Select the download option and wait.
- Once the download completes, do not press update.
- Instead, using PuTTY, connect to the IP of your DSM. Log in as a root, not admin here.
- You will then need to type the following commands: sed ‘s/flashupdateDeb/flashupdateDeb1/autopd@te.info > /autoupd@te.info1 mv/autoupd@te.info1 / autoupd@te.info
- Go back to your DSM webpage
- Press update.
- Wait for the update and restart to complete.
Once these steps are complete, you will have the latest version of Xpenology. Now, it’s worth noting that this only applies to the minor version, like from DSM 6.1.3 to DSM 6.1.4, and it’s fairly easy to do. The minor releases of the updates don’t often offer much difference but are a fantastic way to eliminate any bugs that could be problematic.
Major updates might require a fresh reinstall to prevent running into big issues. Remember to check our download links page to find out where you can download the newest version of xpenology!
How do I update my Xpenology DSM?
To update your Xpenology DSM, you can follow the steps listed above for the minor update. It works similarly and can take a little time, so be patient and allow it to do its thing! You can either use the auto-updates or manually update your Xpenology DSM, depending on your personal preference. We find it easier to do the manual updates when they roll around, but the choice is yours!
To update your DSM, go to the control panel and locate the Update and Restore section. Next, click on DSM Update and scroll until you see Manual DSM update. Then you can click browse and find the file you downloaded and updated.
Click OK to start the update. It will then update the system and restart once the update is complete. If you encounter any problems along the way, there are plenty of video tutorials and detailed guides that can walk you through the process! Remember to keep the USB plugged in for Xpenology to run correctly.
INSTALLING ESXi – SYNOLOGY DSM ON NON SYNOLOGY HARDWARE – INTERACTIVE GUIDE
Need the hardware first? Check this tutorial!
Here’s the first ESXi tutorial. First thing you do is find a Universal USB Installer – we prefer the SanDisk Cruizer Fit (check for price) because it’s nice and slim. Two, select the ISO and write it to the drive, not going to detail with this as it is super simple.
Okay, once that’s done, we switch over to our server. Plug USB Panel, boot it up. Make sure your BIOS is set to your USB drive and the ESXi set up will begin. Select the first, obviously, you don’t want to boot from the local disk. And this is highly sped up, it usually takes about 5 minutes to boot. It’s going to probably take about 30 for you. Just be patient and it will load eventually.
Okay, once the first bit is loaded up the next bit will load. Eventually, you’ll come to a screen that says, “EXSi Installed” or something like that. It says, “Welcome to the VMware ESXi 5.1.0 Installation”. Now, you can actually skip the part of this video depending on how much RAM you have in your system. If you have 1 or 2 gigs of RAM, then you do not need to do any of this command and stuff I’m about to do. However, even if I do have 1, 2 gigs of RAM, for the purpose of the video, I will do this anyway.
So, if you don’t have enough RAM, you need to wait for auto-scanner. And now, at this point, press O and F1. It will bring you up to command link prompt asking you for a login. The username is “root” and your password. Just type in the command on screen, “cd/usr/lib/vmware/weasel/utils”.
Okay, so “rm upgrade_precheck.pyc”, make sure it’s the C version. You don’t want to remove the non-compile location. And the “upgrade_precheck.py” to “upgrade_precheck.py.old”. Next, we copy the upgrade .old file back to the “upgrade_precheck.py” file.
I’m not sure why you need to do this, but it doesn’t work in the CD. Now, we add the upgrade_precheck type “/MIN” and you should find a line that says something along “MEM_MIN_SIZE”. Okay, now you should press I and basically add it that to anything that’s lower than your actual amount.
So, in this case, it’s currently set at 2 × 1024 by 32. We’ll just set it to 1024 by itself. Once I’m done, press escape and type in “w!”, and then escape, carry on “q”, then “ps -c grep weas”. And you shall find a result that shows the python ID. So, “kill -9” space the I.D.
We will actually use the USB Drive (SanDisk Ultra Fit USB 3.0 Low-Profile) to install ESXi and select language and password, the usual installation stuff. It will scan the system. It might take a little while; again this is sped up for your convenience. Okay. Now are we sure we want to install? Yes, of course, we are. And again, this will take quite a while, but it’s sped up in the video. Okay, and the installation is finished.
The installation disk needs to be removed. Obviously, your USB drive, so removed the USB Drive. Shutting down, well, rebooting whatever. Okay, and that will boot up. Please keep in mind that I’m actually using two USB panel, one for the EXSi install and one that was being installed to. Once it boots it will take a little while.
It’s not so often this boots up, I understand. It’s designed to be that done, so it takes a while to boot, but that’s fine.
Okay, eventually, we should get back to the yellow and black screen like this just loading the final modules and stuff. And then, voilà! VMware ESXi 5.1.0 VMKernel Release Build, HP ProLiant MicroServer, and then we’re game.
**Video provided by Cyan Labs** Full video transcription below
Установочный FAQ / Часто задаваемые вопросы по установке
Перевод. Оригинал здесь https://xpenology.com/forum/topic/9394-installation-faq/
Целью данного руководства являются ответы на обычно задаваемые вопросы! Это не раздел, где просят о помощи. Для этой цели Вы можете использовать форум.
1. Откуда я могу загрузить (скачать) загрузчики?
Загрузчики, как текущая версия, так и предыдущие версии могут быть найдены здесь:
https://xpenology.com/forum/topic/7848-links-to-loaders/
Настоятельно рекомендуется прочитать тему (по крайней мере основной пост), сделанную инициатором/разработчиком загрузчика, @jun:
https://xpenology.com/forum/topic/6253-dsm-6xx-loader/
2. Есть ли какое-нибудь руководство по установке / обновлению системы DSM на baremetal?
Смотрите инструкцию, доступную здесь:
https://xpenology.com/forum/topic/7973-tutorial-installmigrate-dsm-52-to-61x-juns-loader/
3. Как мне использовать SHR (Synology Hybrid RAID) в DSM 6?
SHR может быть переподключен путём правки файла ‘synoinfo.conf’ , расположенного в ‘/etc.defaults/’
Закомментируйте (или удалите строку):
Цитата
supportraidgroup=»yes»
и добавьте
Цитата
support_syno_hybrid_raid =»yes»
4. Сколько дисков я могу использовать?
Члены сообщества опробовали системы, содержащие вплоть до 24 дисков, и они были стабильны. Физический предел 26 дисков из-за ограничений в технологии адресации дисков в Линукс.
5. Могу ли я загружаться с HDD, а не с USB?
Нет, рекомендуется и поддерживается конфигурация загрузки с USB.
6. Требуется ли мне подключение последовательного порта?
Последовательный порт необходим для просмотра расширенной информации о загрузке / загрузке драйвера и ошибок, для проведения диагностики, но не требуется для обычного использования.
7. После меню загрузки Grub, мой монитор показывает сообщение ‘booting from kernel’ (загрузка из ядра) и больше ничего — что не так?
Это нормально для загрузчика XPE 6 — подключите последовательный порт для просмотра дополнительных диагностических данных или используйте Synology Assistant для подключения к NAS.
8. Нужны ли мне постоянно подключенные клавиатура и монитор?
Клавиатура и монитор полезны для начальной настройки, чтобы выбрать опцию меню загрузки grub и проверить начальную загрузку, после чего они не требуются.
9. Как мне настроить автоматические обновления DSM?
Автоматические обновления DSM должны быть отключены в панели управления > обновление и восстановление, чтобы избежать выхода из строя Вашей системы, в том случае, если обновление не совместимо с загрузчиком. Всегда проверяйте информацию на форуме, прежде чем применять обновление вручную.
10. Какой MAC адрес я должен использовать в настройках конфигурации grub?
Рекомендуется, но не требуется, чтобы MAC адрес конфигурации grub был таким же, как и в установленном сетевом адаптере. Вы можете проверить MAC адрес вашей сетевой карты, посмотрев в BIOS или запустив live ОС, например Ubuntu.
11. Номера слотов HDD в менеджере хранения не совпадают с портами на моем контроллере диска — почему?
Диспетчер хранилища определяет номера дисков на основе перечисления контроллеров на уровне шины / слота, которые нельзя изменить. Рекомендуется вручную записывать дисковые слоты/серийные номера/порты контроллера.
12. Как восстановить большие объемы зарезервированной памяти при просмотре монитора ресурсов DSM?
Добавьте
Цитата
disable_mtrr_trim
в строку ‘set common_args_3615’ в файл grub.cfg содержащийся в загрузчике (применимо к загрузчику jun’s). Это должно выглядеть примерно так:
Цитата
set common_args_3615=’disable_mtrr_trim syno_hdd_powerup_seq=0 HddHotplug=0 syno_hw_version=DS3615xs vender_format_version=2 console=ttyS0,115200n8 withefi elevator=elevator quiet’
Это должно вернуть Вам весь объём зарезервированной ОЗУ.
Примечание: DS3617xs использует строку ‘set common_args_3617’ и DS916+ использует строку ‘set common_args_916’
13. Мне нужно / я хочу переустановить DSM. Я беспокоюсь о своих данных. Что мне нужно сделать?
Повторная переустановка DSM не влияет на Ваши данные, так как пользовательские данные хранятся на другом разделе в отличие от DSM. Однако может потребоваться переустановка всех пакетов и перенастройка параметров.
Edited March 14, 2018 by joseph
опечатки