-
Contents
-
Table of Contents
-
Troubleshooting
-
Bookmarks
Quick Links
Owner’s Manual
EN
DE
FR
EN
ES
Related Manuals for Yamaha PORTABLEGRAND DGX-220
Summary of Contents for Yamaha PORTABLEGRAND DGX-220
-
Page 1
Owner’s Manual… -
Page 2: Special Message Section
Yamaha. This product should be used only with the components supplied or; a cart, rack, or stand that is recommended by Yamaha. If a cart, etc., is used, please observe all safety markings and instructions that accom- pany the accessory product.
-
Page 3
Compliance with FCC regulations does * This applies only to products distributed by YAMAHA CORPORATION OF AMERICA. OBSERVERA! Apparaten kopplas inte ur växelströmskällan (nätet) så länge som den ar ansluten till vägguttaget, även om själva apparaten har stängts av. -
Page 4
• Only use the voltage specified as correct for the instrument. The required voltage is printed on the name plate of the instrument. • Use the specified adaptor (PA-5D or an equivalent recommended by Yamaha) only. Using the wrong adaptor can result in damage to the instrument or overheating. -
Page 5
fluids, or chemical-impregnated wiping cloths. Yamaha cannot be held responsible for damage caused by improper use or modifications to the instrument, or data that is lost or destroyed. Always turn the power off when the instrument is not in use. -
Page 6: Copyright Notice
Devices. It allows “hot swapping” (connecting peripheral devices while the power to the com- puter is on). STYLE FILE The Style File Format is Yamaha’s original style file format which uses a unique conversion system to pro- vide high-quality automatic accompaniment based on a wide range of chord types. DGX-220/YPG-225 Owner’s Manual Can’t Help Falling In Love…
-
Page 7: Accessories
Congratulations and thank you for purchasing the Yamaha DGX-220/YPG-225 Portable Grand! Please read this owner’s manual carefully before using the instrument in order to take full advantage of its various features. Make sure to keep this manual in a safe and handy place even after you finish reading, and refer to it often when you need to better understand an operation or function.
-
Page 8: Special Features Of The Dgx-220/Ypg-225
Special Features of the DGX-220/YPG-225 ■ Play a Variety of Instrument Voices The instrument voice that sounds when you play the keyboard can be changed to violin, flute, harp, or any of an extensive range of voices. You can change the mood of a song written for piano, for example, by using violin to play it instead.
-
Page 9: Table Of Contents
Copyright Notice … 6 Panel Logos … 6 Accessories… 7 Special Features of the DGX-220/YPG-225 … 8 Setting Up Power Requirements … 10 Connecting Headphones (PHONES/OUTPUT Jack)… 11 Connecting a Footswitch (SUSTAIN Jack) … 11 Connecting to a Computer (USB Terminal) … 11 Turning the Power On…
-
Page 10: Setting Up
Be sure to do the following operations BEFORE turning on the power. Power Requirements Although the instrument will run either from an optional AC adaptor or batteries, Yamaha recommends use of an AC adaptor whenever possible. An AC adaptor is more environmentally friendly than batteries and does not deplete resources.
-
Page 11: Connecting Headphones (Phones/Output Jack)
Connecting a Footswitch (SUSTAIN Jack) The sustain function lets you produce a natural sustain as you play by pressing a footswitch. Plug the Yamaha FC4 or FC5 footswitch into this jack and use it to switch sustain on and off.
-
Page 12: Panel Controls And Terminals
Panel Controls and Terminals Front Panel Song Category List (page 27) Front Panel q [STANDBY/ON] switch … page 11 w [MASTER VOLUME] control… pages 11, 50 e [P.A.T. ON/OFF] button… page 30 r [MUSIC DATABASE] button … page 42 t [FUNCTION] button … page 75 y LESSON [L], [R], [START] buttons .
-
Page 13: Rear Panel
Voice Category List (page 100) @6 @7 @8 @2 Number buttons [0]–[9], [+] and [-] buttons… pages 51, 75 @3 [DEMO] button … page 26 @4 REGIST MEMORY [MEMORY/BANK], [1], [2] buttons … page 73 @5 [PORTABLE GRAND] button … page 17 @6 [SPLIT ON/OFF] button …
-
Page 14: Try Playing A Variety Of Instrument Voices
Try Playing a Variety of Instrument Voices Quick Guide In addition to piano, organ, and other “standard” keyboard instruments, this instrument has a large range of voices that includes guitar, bass, strings, sax, trumpet, drums and percussion, sound effects … a wide variety of musical sounds.
-
Page 15: Play Two Voices Simultaneously-Dual
Play Two Voices Simultaneously—DUAL You can select a second voice which will play in addition to the main voice when you play the keyboard. The second voice is known as the “dual” voice. Press the [DUAL ON/OFF] button. The [DUAL ON/OFF] button turns the dual voice on or off. When turned on the dual voice icon will appear in the display.
-
Page 16: Play Different Voices With The Left And Right Hands-Split
Try Playing a Variety of Instrument Voices Play the keyboard. Try selecting and playing a range of dual voices. Play Different Voices with the Left and Right Hands—SPLIT In the split mode you can play different voices to the left and right of the keyboard “split point”. The main and dual voices can be played to the right of the split point, while the voice played to the left of the split point is known as the “split voice”.
-
Page 17: Play The Grand Piano Voice
Select the desired split voice. Watch the displayed split voice and rotate the dial until the voice you want to use is selected. The voice selected here becomes the split voice which will play to the left of the keyboard split point. For this example try selecting the “033 Folk Guitar”…
-
Page 18: Fun Sounds
This instrument includes a range of drum kits and unique sound effects you can use for entertainment. Laughter, babbling brooks, jet fly-bys, eerie effects, and much more. These sounds can be a great way to enhance the mood at parties. Drum kits are collections of drum and percussion instruments.
-
Page 19: Playing Styles
Playing Styles This instrument has an auto accompaniment feature that produces accompaniment (rhythm + bass + chords) in the style you choose to match chords you play with your left hand. You can select from 150 dif- ferent styles covering a range of musical genres and time signatures (see page 106 for a complete list of the available styles).
-
Page 20: Play Along With A Style
Playing Styles Play Along with a Style You learned how to select a style rhythm on the preceding page. Here we’ll see how to add bass and chord accompaniment to the basic rhythm to produce a full, rich accom- paniment that you can play along with. Press the [STYLE] button and select the desired style.
-
Page 21
Play a left-hand chord to start the style. You can still “play” chords even if you don’t actually know any chords. This instrument will recognize even a single note as a chord. Try play- ing from one to three notes at the same time to the left of the split point. The accompaniment will change according to the left-hand notes you play. -
Page 22: Playing The Chord Progressions
Playing Styles Styles Are More Fun When You Understand Chords Chords, created by playing multiple notes at the same time, are the basis for harmonic accompaniment. In this section we’ll take a look at sequences of different chords played one after another, or “chord sequences”.
-
Page 23
Recommended Style —3-chord boogie-woogie— Press the [INTRO/ENDING/rit.] button. This progression provides varied harmonic backing with just three chords. When you get a feel for the progression in the score, try changing the order of the chords! Recommended Style —Bossa nova with jazz-style chords— Press the [INTRO/ENDING/rit.] button. -
Page 24: Playing Auto-Accompaniment Chords
Playing Styles Playing Auto-accompaniment Chords There are two ways of playing auto-accompaniment chords: ● Easy Chords ● Standard Chords The instrument will automatically recognize the different chord types. This function is called Multi Fingering. Press the [ACMP ON/OFF] button to turn auto-accompaniment on (page 20). The keyboard to the left of the split point (default: 54/F#2) becomes the “accompaniment range”.
-
Page 25: Using Songs
Using Songs With this instrument the term “song” refers the data that makes up a piece of music. You can simply enjoy listening to the 30 internal songs, or use them with just about any of the many functions provided—the performance assistant technology feature, lessons, and more.
-
Page 26: Song Fast Forward, Fast Reverse, And Pause
Using Songs 001–030 Built in Songs (see next page) 031–035 User Songs (Songs you record yourself). 036– Songs transferred from a computer (pages 82–84) Listen to the song. Press the [START/STOP] button to begin playback of the selected song. You can stop playback at any time by pressing the [START/STOP] but- ton again.
-
Page 27: Song List
● Song List These 30 songs include songs that effectively demonstrate the instrument’s easy song arranger feature, songs that are ideally suited for use with the performance assistant technology feature, and more. The “Sug- gested Uses” column provides some ideas as to how the songs can most effectively used. Category CHORD Magnetic…
-
Page 28: Types Of Songs
Using Songs Types of Songs The following three types of songs can be used by the DGX-220/YPG-225. ● Preset Songs (the 30 songs built into the instrument) …Song numbers 001–030. ● User Songs (recordings of your own performances) …Song numbers 031–035. ●…
-
Page 29: The Easy Way To Play Piano
The Easy Way to Play Piano This instrument includes a performance assistant technology feature that lets you play along with a song and sound like a great pianist (even though you might be making lots of mistakes)! In fact, you can play any notes and still sound good! So even if you can’t play piano and can’t read a note of music, you can have some musical fun.
-
Page 30: Chord Type-Play With Both Hands
The Easy Way to Play Piano CHORD Type—Play with Both Hands Press the [P.A.T. ON/OFF] button. This turns on the performance assistant technology feature. The P.A.T. icon will appear when the performance assistant technology feature is on. Press the [P.A.T. ON/OFF] button to turn the function on or off.
-
Page 31: Button
Press the [START/STOP] button. Song playback will begin. The basic pattern will play repeatedly. Listen to the basic pattern for four measures while getting a feel for the basic pattern, then begin play- ing yourself from the fifth measure. Play on the keyboard. Before Try playing the score on the left with both hands.
-
Page 32: Chd/Free Type-Applying The Chord Type To The Left Hand Only
The Easy Way to Play Piano CHD/FREE Type—Applying the Chord Type to the Left Hand Only Press the [P.A.T. ON/OFF] button. This turns on the performance assistant technology feature. The P.A.T. icon will appear when the performance assistant technology feature is on. Press the [P.A.T.
-
Page 33
Press the [START/STOP] button. Song playback will begin. Play on the keyboard. Play to the right of the split point with your right hand, and to the left of the split point with your left hand. Split point With this type notes played on the left-hand side of the split point will actually sound an octave higher. -
Page 34: Use The Performance Assistant To Play Like A Pro
The Easy Way to Play Piano Use the Performance Assistant to Play Like a Pro! Here are a few hints for using the Chord type. If you select Chord/Free, the left-hand section of the keyboard becomes the Chord type section, so use these hints on the lefthand section of the keyboard.
-
Page 35: Change The Song Tempo
The Easy Way to Play Piano Change the Song Tempo When using the performance assistant technology or in other situations in which the tempo of the song is too fast or too slow for you, you can change the tempo as required. Press the [TEMPO/TAP] button. The tempo display will appear and you can use the dial, the [+] and [-] buttons, or the [0] to [9] number buttons to set to tempo to anywhere from 011 and 280 quarter-note beats per minute.
-
Page 36: Select A Song For A Lesson
Select a Song For a Lesson Yamaha Education Suite You can select song you like and use it for a left-hand, right-hand, or both-hands lesson. You can also use songs (only SMF format 0) down- loaded from the Internet and saved to flash memory. (pages 82–84) Dur- ing the lesson you can play as slowly as you like, and you can even play wrong notes.
-
Page 37
Select the part you want to practice. Press the [R] button for a right-hand lesson, [L] button for a left-hand lesson, or press both the [R] and [L] buttons simultaneously for a both- hands lesson. The currently selected part is shown in the display. Start Lesson 1. -
Page 38
Select a Song For a Lesson Play the note shown in the display. When you play the correct note, the next note you need play is shown. The song will wait until you play the correct note. Left-hand part Stop the Lesson mode. You can stop the Lesson mode at any time by pressing the [START/ STOP] button. -
Page 39: Lesson 2-Your Tempo
Lesson 2—Your Tempo Learn to play the correct notes with the correct timing. Song playback tempo will vary to match the speed you are playing at. The song will slow down when you play wrong notes, so you can learn at your own pace.
-
Page 40: Lesson 3-Minus One
Select a Song For a Lesson Lesson 3—Minus One Here’s where you can perfect your technique. The song will play at the normal tempo, minus the part you have chosen to play. Play along while listening to the song. Select the song and part you want to practice (steps 1 and 2 on pages 36, 37).
-
Page 41: Practice Makes Perfect-Repeat And Learn
Practice Makes Perfect—Repeat and Learn Use this feature when you want to start again just ahead of a section on which you made a mistake, or to repeatedly practice a section you find difficult. Press the [REPEAT & LEARN] button during a lesson. The song location will move back four measures from the point at which you pressed the button, and playback will begin after a one-mea- sure count-in.
-
Page 42: Play Using The Music Database
Play Using the Music Database You want to play music in your favorite style, but you’re not sure how to select the best voice and style for the type of music you want to play … simply select the appropriate style from the Music Database. The panel settings will automatically be adjusted for the ideal combination of sounds and style! Press the [MUSIC DATABASE] button.
-
Page 43: Change A Song’s Style
Change a Song’s Style In addition to each song’s default style, you can select any other style to play the song with the Easy Song Arranger feature. This means that you can play a song that is normally a ballad, for example, as a bossa nova, as a hip-hop tune, etc.
-
Page 44: Select A Style
Change a Song’s Style Listen to the song. Press the [START/STOP] button to begin playback of the song. Move on to the next step while the song is playing. Press the [EASY SONG ARRANGER] button. The style number and name will be displayed. You can use the dial to select a different style.
-
Page 45: Record Your Own Performance
Record Your Own Performance You can record up to 5 of your own performances and save them as user songs 031 through 035. The recoreded song can be played back on the instrument. ■ Recordable Data You can record to a total of 6 tracks: 5 melody tracks and 1 style (chord) track. Each track can be recorded individually.
-
Page 46
Record Your Own Performance Select the track(s) you want to record to and confirm your selection on the display. ◆ Record a Melody Track and the Accompaniment Track Together Press the melody track button [1]–[5] you want to record to while hold- ing the [REC] button. -
Page 47
If you press the [INTRO/ENDING/rit.] button while recording the style track an appropriate ending pattern will play and then recording will stop. When recording stops the current measure number will return to 001 and the recorded track numbers in the display will light. ●… -
Page 48: Song Clear-Deleting User Songs
Record Your Own Performance Song Clear—Deleting User Songs This function clears an entire user song (all tracks). Press the [SONG] button, then select the user song (031– 035) you want to clear. Press and hold the SONG MEMORY [1] button for longer than a second while holding the SONG MEMORY [A] button.
-
Page 49: Backup And Initialization
Backup and Initialization Backup The following settings are always backed up, and are maintained even when the power is turned off. If you want to initialize the settings, use the Initialize operation as explained below. ● The Backup Parameters • User Songs •…
-
Page 50: Basic Operation And Displays
Basic Operation and Displays Basic Operation Overall DGX-220/YPG-225 control is based on the following simple operations. Press a button to select a basic function. Use the dial to select an item or value. Start a function. Start a function. ● Volume Adjustment Adjusts the volume of the sound heard via the instrument’s speakers or a pair of headphones plugged into the PHONES jack.
-
Page 51: Dial
Use the dial to select an item or value. When you select a basic function, the item corresponding to that function will be displayed. You can then use the dial or the number buttons [0]–[9] to select the desired item. ForElise ■…
-
Page 52: Display Items
Basic Operation and Displays Display Items The display shows all of the current basic settings: song, style, voice. It also includes a range of indicators that show the on/off status of a range of functions. Notation Displays the melody and chord notes of a song when the Easy Performer function is in use, or the notes of chords you specify…
-
Page 53: Adding Effects
Reference Adding Effects Harmony This feature adds harmony notes to the main voice. Press the [HARMONY ON/OFF] button to turn Harmony feature on. To turn Harmony off, press the [HARMONY ON/OFF] button again. When harmony is on the harmony icon will appear in the display.
-
Page 54: Adding Reverb
Adding Effects Adding Reverb Reverb lets you play with a rich concert hall type ambience. When you select a style or song the optimum reverb type for the voice used is automatically selected. If you want to select a different reverb type, use the procedure described below.
-
Page 55: Adding Chorus
Adding Chorus The chorus effect creates a thick sound that is similar to many of the same voices being played in unison. When you select a style or song the optimum chorus type for the voice used is automatically selected. If you want to select a different chorus type, use the procedure described below.
-
Page 56: Handy Performance Features
Handy Performance Features The Metronome The instrument includes a metronome with adjustable tempo and time signature. Use it to set the tempo that is most comfortable for you. ■Start the metronome ● ● ● ● ● ● ● ● ● ● Turn the metronome on and start it by pressing the [METRONOME ON/OFF] button.
-
Page 57
■Setting the Number of Beats per Measure, and the Length of Each Beat ● ● ● ● ● ● ● ● ● ● ● ● ● ● ● ● ● ● In this example we’ll set up a 5/8 time signature. Press and hold the [METRONOME ON/ OFF] button for longer than a second to select the number of beats per measure… -
Page 58: Tap Start
Handy Performance Features Tap Start You can start the song/style by simply tapping the [TEMPO/TAP] button at the required tempo—4 times for time signatures in 4, and three times for time signatures in 3. You can change the tempo during song playback by pressing the button just twice.
-
Page 59: Panel Sustain
Panel Sustain This function adds sustain to the keyboard voices. Use it when you want to add sustain to the voices at all times, regardless of footswitch operation. The sustain function does not affect split voice. Press the [FUNCTION] button. Use the CATEGORY [ ] and [ ] but- tons to select the Sustain item.
-
Page 60: Pitch Controls
Handy Performance Features Pitch Controls ◆ Large Pitch Changes (Transpose) The overall pitch of the instrument can by shifted up or down by a maximum of 1 octave in semitone increments. Press the [FUNCTION] button. Use the CATEGORY [ ] and [ ] but- tons to select the Transpose item.
-
Page 61: One Touch Setting
One Touch Setting Sometimes selecting the ideal voice to play with a song or style can be confusing. The One Touch Setting feature automatically selects a well-balanced voice for you when you select a style or song. Simply select voice number “000” to activate this feature. Select voice number “000”…
-
Page 62: Adjusting The Harmony Volume
Handy Performance Features Adjusting the Harmony Volume Press the [FUNCTION] button. Use the CATEGORY [ ] and [ ] but- tons to select the Harmony Volume item. HarmVol Select an EQ Setting for the Best Sound Five different master equalizer (EQ) settings are provided to give you the best possible sound when listen- ing through different reproduction systems—the instrument’s internal speakers, headphones, or an external speaker system.
-
Page 63: Style (Auto-Accompaniment) Functions
Style (Auto-accompaniment) Functions Basic operation of the Style (auto-accompaniment) feature is described on page 19 of the Quick Guide. Here are some other ways you can play the styles, the style volume adjustment proce- dure, how you can play chords using the styles, and more. Pattern Variation (Sections) The DGX-220/YPG-225 features a wide variety of style “sections”…
-
Page 64
Style (Auto-accompaniment) Functions Press the [MAIN/AUTO FILL] button. MAIN A The name of the selected section— MAIN A or MAIN B—will be displayed. Press the [INTRO/ENDING/rit.] button. INTRO≥A You’re now ready to play the intro. As soon as you play a chord with your left hand, the Intro of the selected Style starts. -
Page 65: Adjusting The Style Volume
Adjusting the Style Volume Press the [STYLE] button to engage the style function. Press the [FUNCTION] button. Setting the Split Point The initial default split point is key number 54 (the F#2 key), but you can change it to another key using the procedure described below.
-
Page 66: Play A Style With Chords But No Rhythm (Stop Accompaniment)
Style (Auto-accompaniment) Functions Play a Style with Chords but No Rhythm (Stop Accompaniment) When auto accompaniment is on (the ACMP ON icon is showing) and Synchro Start is off, you can play chords in the left-hand accompaniment range of the keyboard while the style is stopped and still hear the accompaniment chords.
-
Page 67: Loading Style Files
Loading Style Files This instrument features 150 internal styles, but other styles, such as those provided on the CD-ROM and others that can be obtained from the internet (only styles with the “.sty” suffix), can be loaded into style number 151 and used in the same way as the internal styles. In order to use the style file load function, the file must already have been transferred from the computer to the instrument.
-
Page 68: Chord Basics
Style (Auto-accompaniment) Functions Chord Basics Two or more notes played together constitute a “chord”. The most basic chord type is the “triad” consisting of three notes: the root, third, and fifth degrees of the corresponding scale. A C major triad, for example, is made up of the notes C (the root), E (the third note of the C major scale), and G (the fifth note of the C major scale).
-
Page 69
■Recognized Standard Chords All chords in the chart are “C-root” chords. Chord Name/[Abbreviation] Major [M] Add ninth [(9)] Sixth [6] Sixth ninth [6(9)] Major seventh [M7] Major seventh ninth [M7(9)] Major seventh add sharp eleventh [M7(#11)] Flatted fifth [(b5)] Major seventh flatted fifth [M7b5] Suspended fourth [sus4] Augmented [aug] Major seventh augmented [M7aug]… -
Page 70: Looking Up Chords Using The Chord Dictionary
Style (Auto-accompaniment) Functions Looking Up Chords Using the Chord Dictionary The Dictionary function is essentially a built-in “chord book” that shows you the individual notes of chords. It is ideal when you know the name of a certain chord and want to quickly learn how to play it. Press and hold the LESSON [START] button for longer than a second.
-
Page 71: Song Settings
Song Settings Song Volume Press the [FUNCTION] button. Use the CATEGORY [ ] and [ ] but- tons to select the Song Volume item. SongVol Song volume A-B Repeat You can specify a section of a song—“A” is the start point and “B” is the end point—for repeat playback.
-
Page 72: Muting Independent Song Parts
Song Settings Muting Independent Song Parts Each “track” of a song plays a different part of the song—melody, percussion, accompaniment, etc. You can mute individual tracks and play the muted part on the keyboard yourself, or simply mute tracks other than the ones you want to listen to. Use the SONG MEMORY [1]–[5] and [A] buttons to mute or un-mute the corresponding tracks.
-
Page 73: Memorize Your Favorite Panel Settings
Memorize Your Favorite Panel Settings This instrument has a Registration Memory feature that lets you save your favorite set- tings for easy recall whenever they’re needed. Up to 16 complete setups can be saved (8 banks of two setups each). 8 Banks Saving to the Registration Memory Set the panel controls as required—…
-
Page 74: Recalling A Registration Memory
Memorize Your Favorite Panel Settings Recalling a Registration Memory Press the [MEMORY/BANK] button. A bank number will appear in the dis- play when you release the button. Bank Bank number Use the dial or the [1]–[8] number but- tons to select bank you want to recall. Press the REGIST MEMORY button, [1] or [2], containing the settings you want to recall.
-
Page 75: The Functions
The Functions The “Functions” provide access to a range of detailed instrument parameters for tun- ing, setting the split point, and adjusting the voices and effects. Take a look at the func- tion list starting on the opposite page. There are 47 function parameters in all. When you locate a function you want to set up, simply select the function’s display name (shown to the right of the function name in the list) and adjust as required.
-
Page 76
The Functions ● Function Setting List Setting Item title Style Volume StyleVol Song Volume SongVol Transpose Transpos Tuning Tuning Pitch Bend Range PBRange Split Point SplitPnt Touch Sensitivity TouchSns Fingering Chord ChdFing Main Voice Volume M.Volume Main Voice Octave M.Octave Main Voice Pan M.Pan Main Voice Reverb Level… -
Page 77
Setting Item title Reverb Type Reverb Chorus Type Chorus Panel Sustain Sustain Master EQ Type MasterEQ Harmony Type HarmType Harmony Volume HarmVol Performance assistant PAT Type technology Type Style File Load Sff Load PC mode PC mode Local On/Off Local External Clock ExtClock Keyboard Out… -
Page 78: Connecting To A Computer
Connecting to a Computer Nearly all of the electronic musical instruments made today—particularly synthesizers, sequencers and computer music related devices—use MIDI. MIDI is a worldwide stan- dard that allows these devices to send and receive performance and setting data. Natu- rally, this instrument lets you save or send your keyboard performance as MIDI data, as well as the songs, styles and panel settings.
-
Page 79: Connecting A Personal Computer
● Channel Messages This instrument is capable of handling 16 MIDI channels simultaneously—meaning it can play up to sixteen different instruments at the same time. Channel messages transmit information such as Note ON/OFF, Program Change, for each of the 16 channels.
-
Page 80: Transferring Performance Data To And From A Computer
Connecting to a Computer Transferring Performance Data to and from a Computer By connecting the instrument to a computer, the instrument’s performance data can be used on the com- puter, and performance data from the computer can be played on the instrument. ●…
-
Page 81: Remote Control Of Midi Devices
■PC Mode ● ● ● ● ● ● ● ● ● ● ● ● ● ● ● ● ● ● ● A number of MIDI settings need to be made when you want to transfer performance data between the computer and the instrument. The PC Mode item can conveniently make multiple settings for you in one operation.
-
Page 82: Initial Send
Connecting to a Computer Initial Send This function lets you send the panel setup data to a computer. Before you record performance data to a sequencer application running on your computer, it is a good idea to first send and record the panel setup data before the actual performance data.
-
Page 83
● Backup files can be transferred from the instru- ment to a computer and back. ⇒ refer to the procedure described on page 84. Use the Musicsoft Downloader application with Internet Explorer 5.5 or higher. ■Use Musicsoft Downloader To Transfer Songs From the Accessory CD-ROM To the Instrument’s flash memory NOTE… -
Page 84
Connecting to a Computer Close the window to end the Musicsoft Downloader. NOTE • End the Musicsoft Downloader to playback the song transferred from your computer. To playback a song stored in flash memory, press the [SONG] button. Use the dial to select the song you want to play, then press the [START/STOP] button to start playback. -
Page 85: Accessory Cd-Rom Installation Guide
• Yamaha makes no representations or warranties with regard to the use of the software and documentation and can- not be held responsible for the results of the use of this manual and the software.
-
Page 86: Cd-Rom Contents
Accessory CD-ROM Installation Guide CD-ROM Contents Folder Name Application / Data Name MSD_ Musicsoft Downloader DMN_FlashDemo Flash Demo DMN_DemoSong Demo Song SongBook Song Book USB-MIDI Driver (Windows 98/Me) USB-MIDI Driver USBdrv2k (Windows 2000/XP) SongData MIDI 70 songs StyleData 5 style files In order to view PDF scores, you will need to install Adobe Reader in your computer.
-
Page 87: System Requirements
System Requirements Application/Data Windows 98SE/Me/2000/ Musicsoft Downloader XP Home Edition/ XP Professional USB Driver for Windows Windows 98/Me 98/Me USB Driver for Windows Windows 2000/XP Home 2000/XP Edition/XP Professional ® Windows Digital Music Notebook Professional Edition, SP1a more ® Windows XP Home Digital Music Notebook Edition, SP1a more…
-
Page 88
When the system detects the driver on the CD-ROM and is ready for installation, it is shown as a message on the screen. Make sure that the “YAMAHA USB MIDI Driver” is listed, and click [Next]. The sys- tem starts the installation. -
Page 89: Downloader And Digital Music Notebook Applications
“Help”. * You can obtain the latest version of the Musicsoft Downloader at the following Internet URL. http://music.yamaha.com/download/ IMPORTANT • Only Musicsoft Downloader can be used to transfer files between this instrument and a computer. No other file transfer application can be used.
-
Page 90
When the instrument is recognized cor- rectly, double-click “System” in the Con- trol Panel to open the System window. Double-click the “Device Manager” tab, select “YAMAHA USB MIDI Driver” and delete it. Use the MS-DOS prompt or Explorer to delete the following three files. -
Page 91
(14) days from the date of receipt, as evidenced by a copy of the receipt. Yamaha’s entire liability and your exclusive remedy will be replacement of the defective media if it is returned to Yamaha or an authorized Yamaha dealer within fourteen days with a copy of the receipt. -
Page 92: Troubleshooting
Appendix Troubleshooting Problem When the instrument is turned on or off, a popping sound is temporarily produced. When using a mobile phone, noise is produced. There is no sound even when the keyboard is played or when a song or style is being played back. Playing keys in the right hand area of the keyboard does not produce any sound.
-
Page 93
Memo DGX-220/YPG-225 Owner’s Manual… -
Page 94: Scores
Scores This demo is an example of how the Easy Song Arranger can be used to change styles throughout a piece. q q q q =123 Song No. (Function Demo for Easy Song Arranger) Hallelujah Chorus DGX-220/YPG-225 Owner’s Manual…
-
Page 95
Scores DGX-220/YPG-225 Owner’s Manual… -
Page 96
Scores This score is provided with the intent that the pitch will be corrected by the performance assistant technol- ogy feature. If you play the “Play These Notes” part using the performance assistant technology feature, the part will be corrected and played so that it matches the backing part. q q q q =61 Song No. -
Page 97
Scores DGX-220/YPG-225 Owner’s Manual… -
Page 98
Scores This score is provided with the intent that the pitch will be corrected by the performance assistant technol- ogy feature. If you play the “Play These Notes” part using the performance assistant technology feature, the part will be corrected and played so that it matches the backing part. q q q q =108 Song No. -
Page 99
Scores DGX-220/YPG-225 Owner’s Manual… -
Page 100: Voice List
Voice List ■ Maximum Polyphony ● ● ● ● ● ● ● ● ● ● ● ● ● ● ● ● ● ● The instrument has 32-note maximum polyphony. This means that it can play a maximum of up to 32 notes at once, regard- less of what functions are used.
-
Page 101
Bank Select MIDI Voice Program Change# (0–127) (0–127) (1–128) Sawtooth Lead Analogon Fargo Star Dust Voice Lead Brightness SYNTH PAD Xenon Pad Equinox Fantasia Dark Moon Bell Pad PERCUSSION Vibraphone Marimba Xylophone Steel Drums Celesta Music Box Tubular Bells Timpani DRUM KITS Standard Kit 1 Standard Kit 2… -
Page 102
Voice List Bank Select MIDI Voice Program Change# (0–127) (0–127) (1–128) Guitar Harmonics Guitar Feedback Guitar Harmonics 2 BASS Acoustic Bass Jazz Rhythm Velocity Crossfade Upright Bass Finger Bass Finger Dark Bass & Distorted Electric Guitar Finger Slap Bass Finger Bass 2 Modulated Bass Pick Bass Muted Pick Bass… -
Page 103
Bank Select MIDI Voice Program Voice Name Change# (0–127) (0–127) (1–128) Choir Pad Itopia Bowed Pad Metallic Pad Halo Pad Sweep Pad SYNTH EFFECTS Rain African Wind Carib Sound Track Prologue Crystal Synth Drum Comp Popcorn Tiny Bells Round Glockenspiel Glockenspiel Chimes Clear Bells Chorus Bells… -
Page 104: Drum Kit List
Drum Kit List • “ ” indicates that the drum sound is the same as “Standard Kit 1”. • Each percussion voice uses one note. • The MIDI Note # and Note are actually one octave lower than keyboard Note # and Note. For example, in “117: Standard Kit 1”, the “Seq Click H”…
-
Page 105
Voice No. MSB (0–127) / LSB (0–127) / PC (1–128) Keyboard MIDI Alternate assign Note# Note Note# Note C# -1 D# -1 G# -1 127/000/001 127/000/113 127/000/033 Standard Kit 1 Dance Kit Jazz Kit Surdo Mute Surdo Open Hi Q Whip Slap Scratch H Scratch L… -
Page 106: Style List
Style List Style No. Style Name 8BEAT 8BeatModern Cool8Beat 60’sGuitarPop 8BeatAdria 60’s8Beat BubblegumPop BritPopSwing 8Beat OffBeat 60’sRock HardRock RockShuffle 8BeatRock 16BEAT 16Beat PopShuffle1 PopShuffle2 GuitarPop 16BeatUptempo KoolShuffle JazzRock HipHopLight BALLAD PianoBallad LoveSong 6/8ModernEP 6/8SlowRock 6/8OrchBallad OrganBallad PopBallad 16BeatBallad1 16BeatBallad2 DANCE EuroTrance Ibiza DreamDance…
-
Page 107: Music Database List
Music Database List MDB No. Song Name MDB No. AlvFever CoinLane Croco Rk DayPdise DwnTown EasySday GoMyWay HowDeep! HurryLuv I breath I’lBTher I’m Torn Imagine ISurvive JustCall JustWay LeadPack LoveFeel LoveMeT LveMeDo Mi Shell My Baby NikitTrp NoMatter ProudGtr RainOnMe SailngSx SeeAgain Sept.Pop…
-
Page 108: Songs Provided On The Supplied Cd-Rom
Songs Provided On the Supplied CD-ROM File Name 001Nutcr.mid Danse des Mirlitons from “The Nutcracker” 002Orphe.mid “Orphée aux Enfers” Ouverture 003Slavo.mid Slavonic Dances op.72-2 004Prima.mid La Primavera (from Le Quattro Stagioni) 005Medit.mid Méditation (Thaïs) 006Guill.mid Guillaume Tell 007Fruhl.mid Frühlingslied 008Ungar.mid Ungarische Tänze Nr.5 009Fruhl.mid Fruhlingsstimmen…
-
Page 109: Effect Type List
Effect Type List ● Harmony Types Harmony Type Duet Trio Block Country Octave Trill 1/4 note Trill 1/6 note Trill 1/8 note Trill 1/12 note Trill 1/16 note Trill 1/24 note Trill 1/32 note Tremolo 1/4 note Tremolo 1/6 note Tremolo 1/8 note Tremolo 1/12 note Tremolo 1/16 note…
-
Page 110: Midi Implementation Chart
MIDI Implementation Chart DGX-220/YPG-225 Owner’s Manual…
-
Page 111
MIDI Implementation Chart DGX-220/YPG-225 Owner’s Manual… -
Page 112: Midi Data Format
MIDI Data Format NOTE: 1 By default (factory settings) the instrument ordinarily functions as a 16-channel multi-timbral tone generator, and incoming data does not affect the panel voices or panel settings. How- ever, the MIDI messages listed below do affect the panel voices, auto accompaniment, and songs.
-
Page 113: Specifications
• Headphones: HPE-150 * Specifications and descriptions in this owner’s manual are for information purposes only. Yamaha Corp. reserves the right to change or modify products or specifications at any time without prior notice. Since specifications, equipment or op- tions may not be the same in every locale, please check with your Yamaha dealer.
-
Page 114: Index
Index Panel controls and terminals +/– … 13, 51 … 50 0–9 … 13, 51 A-B REPEAT … 12, 71 ACMP ON/OFF … 12, 20 CATEGORY [ ] and [ ] … 12, 51 DC IN 12V … 10, 13 DEMO …
-
Page 115
notation … 52 One Touch Setting … 61 Panel Sustain … 59 PC Mode … 81 Performance assistant technology … 29 Pitch Bend Range … 76 Power Adaptor … 10 Preset Song … 25, 27–28 Recording … 45 Registration Memory … 73 Remote control … -
Page 116: Limited Warranty
DGX, YPG SERIES OF Portable Grand ELECTRONIC KEYBOARDS If during the first 90 days that immediately follows the purchase date, your new Yamaha product covered by this warranty is found to have a defect in material and/or workmanship, Yamaha and/or its authorized representative will repair such defect without charge for parts or labor.
-
Page 117
For details of products, please contact your nearest Yamaha representative or the authorized distributor listed below. Pour plus de détails sur les produits, veuillez-vous adresser à Yamaha ou au distributeur le plus proche de vous figurant dans la liste suivante. -
Page 118
Yamaha Home Keyboards Home Page (English Only) http://music.yamaha.com/homekeyboard Yamaha Manual Library http://www.yamaha.co.jp/manual/ U.R.G., Pro Audio & Digital Musical Instrument Division, Yamaha Corporation © 2006 Yamaha Corporation WG28010 XXXPOXXX.X-01A0 Printed in China…
Раздел: Музыкальное Оборудование
Тип: Синтезатор
Инструкция к Синтезатору Yamaha DGX-220

SPECIAL MESSAGE SECTION
This product utilizes batteries or an external power supply (adapter).
This product may also use “household” type batteries. Some of these
DO NOT connect this product to any power supply or adapter other
may be rechargeable. Make sure that the battery being charged is a
than one described in the manual, on the name plate, or specifically
rechargeable type and that the charger is intended for the battery being
recommended by Yamaha.
charged.
This product should be used only with the components supplied or; a
When installing batteries, do not mix batteries with new, or with batter-
cart, rack, or stand that is recommended by Yamaha. If a cart, etc., is
ies of a different type. Batteries MUST be installed correctly. Mis-
used, please observe all safety markings and instructions that accom-
matches or incorrect installation may result in overheating and battery
pany the accessory product.
case rupture.
SPECIFICATIONS SUBJECT TO CHANGE:
Warning:
The information contained in this manual is believed to be correct at the
Do not attempt to disassemble, or incinerate any battery. Keep all bat-
time of printing. However, Yamaha reserves the right to change or mod-
teries away from children. Dispose of used batteries promptly and as
ify any of the specifications without notice or obligation to update exist-
regulated by the laws in your area. Note: Check with any retailer of
ing units.
household type batteries in your area for battery disposal information.
This product, either alone or in combination with an amplifier and head-
Disposal Notice:
phones or speaker/s, may be capable of producing sound levels that
Should this product become damaged beyond repair, or for some rea-
could cause permanent hearing loss. DO NOT operate for long periods
son its useful life is considered to be at an end, please observe all local,
of time at a high volume level or at a level that is uncomfortable. If you
state, and federal regulations that relate to the disposal of products that
experience any hearing loss or ringing in the ears, you should consult
contain lead, batteries, plastics, etc. If your dealer is unable to assist
an audiologist.
you, please contact Yamaha directly.
IMPORTANT: The louder the sound, the shorter the time period before
damage occurs.
NAME PLATE LOCATION:
The name plate is located on the bottom of the product. The model
NOTICE:
number, serial number, power requirements, etc., are located on this
Service charges incurred due to a lack of knowledge relating to how a
plate. You should record the model number, serial number, and the date
function or effect works (when the unit is operating as designed) are not
of purchase in the spaces provided below and retain this manual as a
covered by the manufacturer’s warranty, and are therefore the owners
permanent record of your purchase.
responsibility. Please study this manual carefully and consult your
dealer before requesting service.
Model
ENVIRONMENTAL ISSUES:
Yamaha strives to produce products that are both user safe and envi-
ronmentally friendly. We sincerely believe that our products and the pro-
duction methods used to produce them, meet these goals. In keeping
Serial No.
with both the letter and the spirit of the law, we want you to be aware of
the following:
Purchase Date
Battery Notice:
This product MAY contain a small non-rechargeable battery which (if
applicable) is soldered in place. The average life span of this type of
battery is approximately five years. When replacement becomes neces-
sary, contact a qualified service representative to perform the replace-
ment.
PLEASE KEEP THIS MANUAL
92-BP (bottom)
2 DGX-220/YPG-225 êÛÍÓ‚Ó‰ÒÚ‚Ó ÔÓθÁÓ‚‡ÚÂÎfl

FCC INFORMATION (U.S.A.)
1. IMPORTANT NOTICE: DO NOT MODIFY THIS UNIT!
not guarantee that interference will not occur in all installations. If
This product, when installed as indicated in the instructions con-
this product is found to be the source of interference, which can be
tained in this manual, meets FCC requirements. Modifications not
determined by turning the unit “OFF” and “ON”, please try to elimi-
expressly approved by Yamaha may void your authority, granted by
nate the problem by using one of the following measures:
the FCC, to use the product.
Relocate either this product or the device that is being affected by
the interference.
2. IMPORTANT: When connecting this product to accessories and/
or another product use only high quality shielded cables. Cable/s
Utilize power outlets that are on different branch (circuit breaker or
supplied with this product MUST be used. Follow all installation
fuse) circuits or install AC line filter/s.
instructions. Failure to follow instructions could void your FCC
In the case of radio or TV interference, relocate/reorient the
authorization to use this product in the USA.
antenna. If the antenna lead-in is 300 ohm ribbon lead, change the
lead-in to co-axial type cable.
3. NOTE: This product has been tested and found to comply with the
requirements listed in FCC Regulations, Part 15 for Class “B” digital
If these corrective measures do not produce satisfactory results,
devices. Compliance with these requirements provides a reason-
please contact the local retailer authorized to distribute this type of
able level of assurance that your use of this product in a residential
product. If you can not locate the appropriate retailer, please contact
environment will not result in harmful interference with other elec-
Yamaha Corporation of America, Electronic Service Division, 6600
tronic devices. This equipment generates/uses radio frequencies
Orangethorpe Ave, Buena Park, CA90620
and, if not installed and used according to the instructions found in
The above statements apply ONLY to those products distributed by
the users manual, may cause interference harmful to the operation
Yamaha Corporation of America or its subsidiaries.
of other electronic devices. Compliance with FCC regulations does
* This applies only to products distributed by YAMAHA CORPORATION OF AMERICA.
(class B)
OBSERVERA!
Apparaten kopplas inte ur växelströmskällan (nätet) så länge som den ar
ansluten till vägguttaget, även om själva apparaten har stängts av.
ADVARSEL: Netspæendingen til dette apparat er IKKE afbrudt, sålæenge
netledningen siddr i en stikkontakt, som er t endt — også selvom der or
slukket på apparatets afbryder.
VAROITUS: Laitteen toisiopiiriin kytketty käyttökytkin ei irroita koko laitetta
verkosta.
(standby)
Entsorgung leerer Batterien (nur innerhalb Deutschlands)
Leisten Sie einen Beitrag zum Umweltschutz. Verbrauchte Batterien oder
Akkumulatoren dürfen nicht in den Hausmüll. Sie können bei einer Sam-
melstelle für Altbatterien bzw. Sondermüll abgegeben werden. Informieren
Sie sich bei Ihrer Kommune.
(battery)
DGX-220/YPG-225 êÛÍÓ‚Ó‰ÒÚ‚Ó ÔÓθÁÓ‚‡ÚÂÎfl 3
èêÄÇàãÄ íÖïçàäà ÅÖáéèÄëçéëíà
ÇçàåÄíÖãúçé èêéóàíÄâíÖ, èêÖÜÑÖ óÖå èêàëíìèÄíú ä ùäëèãìÄíÄñàà
* ï‡ÌËÚ ˝ÚÓ ÛÍÓ‚Ó‰ÒÚ‚Ó ‚ ·ÂÁÓÔ‡ÒÌÓÏ ÏÂÒÚÂ. éÌÓ ‚‡Ï ¢ ÔÓ̇‰Ó·ËÚÒfl.
èêÖÑìèêÖÜÑÖçàÖ
ÇÓ ËÁ·ÂʇÌË Ò¸ÂÁÌ˚ı Ú‡‚Ï Ë ‰‡Ê ÒÏÂÚË ÓÚ Û‰‡‡ ˝ÎÂÍÚ˘ÂÒÍËÏ ÚÓÍÓÏ, ‡ Ú‡ÍÊ ÍÓÓÚÍÓ„Ó Á‡Ï˚͇ÌËfl,
ÔÓ‚ÂʉÂÌËfl Ó·ÓÛ‰Ó‚‡ÌËfl, ÔÓʇ‡ Ë ‰Û„Ëı Ë̈ˉÂÌÚÓ‚ ‚Ò„‰‡ Òӷ≇ÈÚ ÒÎÂ‰Û˛˘Ë ÏÂ˚ ·ÂÁÓÔ‡ÒÌÓÒÚË:
àÒÚÓ˜ÌËÍ ÔËÚ‡ÌËfl/‡‰‡ÔÚ ÔÂÂÏÂÌÌÓ„Ó ÚÓ͇
ظ ÓÚ ‚Ó‰˚
• àÒÔÓθÁÛÈÚ ÚÓθÍÓ Ì‡ÔflÊÂÌËÂ, Á‡‰‡ÌÌÓ ‰Îfl ËÌÒÚÛÏÂÌÚ‡.
• Å„ËÚ ËÌÒÚÛÏÂÌÚ ÓÚ ‰Óʉfl, Ì ËÒÔÓθÁÛÈÚÂ Â„Ó fl‰ÓÏ Ò ‚Ó‰ÓÈ,
ùÚÓ Ì‡ÔflÊÂÌË Û͇Á‡ÌÓ Ì‡ ËÌÒÚÛÏÂÌÚÂ.
‚ ÛÒÎÓ‚Ëflı Ò˚ÓÒÚË Ë ÔÓ‚˚¯ÂÌÌÓÈ ‚·ÊÌÓÒÚË; Ì ÒÚ‡‚¸Ú ̇ Ì„Ó
• àÒÔÓθÁÛÈÚ ÚÓθÍÓ Û͇Á‡ÌÌ˚È ‡‰‡ÔÚ (PA-5D ËÎË ‡Ì‡Îӄ˘Ì˚È, ÂÍÓ-
ÂÏÍÓÒÚË Ò ÊˉÍÓÒÚ¸˛, ÍÓÚÓ‡fl ÏÓÊÂÚ ‡ÁÎËÚ¸Òfl Ë ÔÓÔ‡ÒÚ¸ ‚ÌÛÚ¸.
ÏẨӂ‡ÌÌ˚È ÍÓÔÓ‡ˆËÂÈ Yamaha). àÒÔÓθÁÓ‚‡ÌË ÌÂÔ‡‚ËθÌÓ„Ó
• çËÍÓ„‰‡ Ì ‚ÒÚ‡‚ÎflÈÚÂ Ë Ì ‚˚ÌËχÈÚ ‚ËÎÍÛ ˝ÎÂÍÚÓËÌÒÚÛÏÂÌÚ‡
‡‰‡ÔÚ‡ ÏÓÊÂÚ ÔË‚ÂÒÚË Í ÔÓ‚ÂʉÂÌ˲ ËÎË ÔÂÂ„Â‚Û ËÌÒÚÛÏÂÌÚ‡.
ÏÓÍ˚ÏË Û͇ÏË.
• èÂËӉ˘ÂÒÍË ÔÓ‚ÂflÈÚ ‚ËÎÍÛ ˝ÎÂÍÚÓËÌÒÚÛÏÂÌÚ‡ Ë Û‰‡ÎflÈÚÂ Ò ÌÂÂ
„flÁ¸ Ë Ô˚θ.
ظ ÓÚ Ó„Ìfl
• òÌÛ ‡‰‡ÔÚ‡ ÔÂÂÏÂÌÌÓ„Ó ÚÓ͇ Ì ‰ÓÎÊÂÌ Ì‡ıÓ‰ËÚ¸Òfl fl‰ÓÏ Ò ËÒ-
• ç ÒÚ‡‚¸Ú ̇ ËÌÒÚÛÏÂÌÚ „Ófl˘Ë Ô‰ÏÂÚ˚, ̇ÔËÏ ҂˜Ë.
ÚÓ˜ÌË͇ÏË ÚÂÔ· (̇„‚‡ÚÂÎflÏË, ‡‰Ë‡ÚÓ‡ÏË Ë ‰.). ç ‰ÓÔÛÒ͇ÈÚÂ
ÉÓfl˘ËÈ Ô‰ÏÂÚ ÏÓÊÂÚ ÛÔ‡ÒÚ¸ Ë ‚˚Á‚‡Ú¸ ÔÓʇ.
Ú‡ÍÊ ˜ÂÁÏÂÌÓ„Ó Ò„Ë·‡ÌËfl Ë ÔÓ‚ÂʉÂÌËfl ¯ÌÛ‡, Ì ÒÚ‡‚¸Ú ̇ Ì„Ó
ÚflÊÂÎ˚ Ô‰ÏÂÚ˚ Ë ‰ÂÊËÚÂ Â„Ó ‚ Ú‡ÍÓÏ ÏÂÒÚÂ, „‰Â ̇ ÌÂ„Ó ÌÂθÁfl
Ç̯ڇÚÌ˚ ÒËÚÛ‡ˆËË
̇ÒÚÛÔËÚ¸, Á‡‰ÂÚ¸ ÌÓ„ÓÈ ËÎË ˜ÚÓ-ÌË·Û‰¸ ÔÓ ÌÂÏÛ ÔÂÂ͇ÚËÚ¸.
• Ç ÒÎÛ˜‡Â ËÁÌÓÒ‡ Ë ÔÓ‚ÂʉÂÌËfl ¯ÌÛ‡ ËÎË ‚ËÎÍË ‡‰‡ÔÚ‡ ÔÂÂÏÂÌ-
ÌÓ„Ó ÚÓ͇, ‡ Ú‡ÍÊ ÔË ‚ÌÂÁ‡ÔÌÓÏ ËÒ˜ÂÁÌÓ‚ÂÌËË Á‚Û͇ ‚Ó ‚ÂÏfl ˝ÍÒ-
ç ÓÚÍ˚‚‡Ú¸
ÔÎÛ‡Ú‡ˆËË, ÔË ÔÓfl‚ÎÂÌËË ÌÂÓ·˚˜ÌÓ„Ó Á‡Ô‡ı‡ Ë ‰˚χ ÌÂωÎÂÌÌÓ ÓÚ—
• ç ÓÚÍ˚‚‡ÈÚ ËÌÒÚÛÏÂÌÚ Ë Ì Ô˚Ú‡ÈÚÂÒ¸ ‡ÁÓ·‡Ú¸ ËÎË ÏÓ‰ËÙˈË-
Íβ˜ËÚ ˝ÎÂÍÚÓÔËÚ‡ÌËÂ, ‚˚̸Ú ‚ËÎÍÛ ‡‰‡ÔÚ‡ ËÁ ÓÁÂÚÍË Ë Ó·‡ÚË-
Ó‚‡Ú¸ Â„Ó ‚ÌÛÚÂÌÌË ÍÓÏÔÓÌÂÌÚ˚. Ç ËÌÒÚÛÏÂÌÚ ÌÂÚ ÍÓÏÔÓÌÂÌÚÓ‚,
ÚÂÒ¸ Á‡ ÔÓÏÓ˘¸˛ Í ÒÔˆˇÎËÒÚ‡Ï ˆÂÌÚ‡ ÚÂıÌ˘ÂÒÍÓ„Ó Ó·ÒÎÛÊË‚‡ÌËfl
ÍÓÚÓ˚ ‰ÓÎÊÂÌ Ó·ÒÎÛÊË‚‡Ú¸ ÔÓθÁÓ‚‡ÚÂθ. èË ÔÓfl‚ÎÂÌËË ÌÂËÒÔ‡‚-
ÍÓÔÓ‡ˆËË Yamaha.
ÌÓÒÚË ÌÂωÎÂÌÌÓ ÔÂ͇ÚËÚ ˝ÍÒÔÎÛ‡Ú‡ˆË˛ Ë Ó·‡ÚËÚÂÒ¸ Á‡ ÔÓÏÓ˘¸˛
Í Í‚‡ÎËÙˈËÓ‚‡ÌÌ˚Ï ÒÔˆˇÎËÒÚ‡Ï ˆÂÌÚ‡ ÚÂıÌ˘ÂÒÍÓ„Ó Ó·ÒÎÛÊË‚‡-
ÌËfl ÍÓÔÓ‡ˆËË Yamaha.
ÇçàåÄçàÖ!
ÇÓ ËÁ·ÂʇÌËÂ
̇ÌÂÒÂÌËfl Ò¸ÂÁÌ˚ı Ú‡‚Ï ÒÂ·Â Ë ÓÍÛʇ˛˘ËÏ, ‡ Ú‡ÍÊ ÔÓ‚ÂʉÂÌËfl ËÌÒÚÛÏÂÌÚ‡
Ë ‰Û„Ó„Ó ËÏÛ˘ÂÒÚ‚‡, ÔÓÏËÏÓ ÔÓ˜Ëı,
‚Ò„‰‡ Òӷ≇ÈÚ ÒÎÂ‰Û˛˘Ë ÏÂ˚ ·ÂÁÓÔ‡ÒÌÓÒÚË:
àÒÚÓ˜ÌËÍ ÔËÚ‡ÌËfl/‡‰‡ÔÚ ÔÂÂÏÂÌÌÓ„Ó ÚÓ͇
• ÖÒÎË ·‡Ú‡ÂË ‡Áfl‰ËÎËÒ¸ ËÎË ËÌÒÚÛÏÂÌÚ Ì ·Û‰ÂÚ ËÒÔÓθÁÓ‚‡Ú¸Òfl
‰ÎËÚÂθÌÓ ‚ÂÏfl, ‚Ó ËÁ·ÂʇÌËfl ÔÓÚÂ͇ÌËfl ·‡Ú‡ÂÈ, Û‰‡ÎËÚ Ëı ËÁ
• èË ÓÚÍβ˜ÂÌËË Í‡·ÂÎfl ÓÚ ËÌÒÚÛÏÂÌÚ‡ ËÎË ÓÚ ˝ÎÂÍÚÓÒÂÚË ·ÂËÚÂÒ¸
ËÌÒÚÛÏÂÌÚ‡.
Á‡ ‚ËÎÍÛ, ‡ Ì Á‡ ͇·Âθ.
• ç ‰‡‚‡ÈÚ ·‡Ú‡ÂË ‰ÂÚflÏ.
• äÓ„‰‡ ËÌÒÚÛÏÂÌÚ Ì ËÒÔÓθÁÛÂÚÒfl, ‡ Ú‡ÍÊ ‚Ó ‚ÂÏfl „ÓÁ˚ ÓÚÍβ-
˜‡ÈÚ ‡‰‡ÔÚ ÔÂÂÏÂÌÌÓ„Ó ÚÓ͇.
• ÖÒÎË ·‡Ú‡ÂË ÔÓÚÂÍÎË, ËÁ·Â„‡ÈÚ ÍÓÌÚ‡ÍÚ‡ Ò ‚˚ÚÂͯÂÈ ÊˉÍÓÒÚ¸˛.
Ç ÒÎÛ˜‡Â ÔÓÔ‡‰‡ÌËfl ˝ÚÓÈ ÊˉÍÓÒÚË ‚ „·Á‡, ÓÚ ËÎË Ì‡ ÍÓÊÛ, ÌÂωÎÂÌ-
• ç ÔÓ‰Íβ˜‡ÈÚ ËÌÒÚÛÏÂÌÚ Í Ó‰ÌÓÈ ˝ÎÂÍÚ˘ÂÒÍÓÈ ÓÁÂÚÍÂ Ò ‰Û„ËÏË
ÌÓ ÔÓÏÓÈÚ Ëı ‚Ó‰ÓÈ Ë Ó·‡ÚËÚÂÒ¸ Í ‚‡˜Û. ÜˉÍÓÒÚ¸, ËÒÔÓθÁÛÂχfl
ÛÒÚÓÈÒÚ‚‡ÏË (̇ÔËÏÂ, ˜ÂÂÁ ÚÓÈÌËÍ). ùÚÓ ÏÓÊÂÚ ÔË‚ÂÒÚË Í ÒÌË-
‚ ·‡Ú‡Âflı, – ˝ÚÓ Â‰ÍÓ ‚¢ÂÒÚ‚Ó, ÒÔÓÒÓ·ÌÓ ‚˚Á‚‡Ú¸ ÔÓÚ² ÁÂÌËfl
ÊÂÌ˲ ͇˜ÂÒÚ‚‡ Á‚Û͇ ËÎË ÔÂÂ„Â‚Û ÓÁÂÚÍË.
ËÎË ıËÏ˘ÂÒÍË ÓÊÓ„Ë.
ŇڇÂfl
åÂÒÚÓ ÛÒÚ‡ÌÓ‚ÍË
• ÇÒ„‰‡ ÔÓ‚ÂflÈÚÂ, ˜ÚÓ ·‡Ú‡ÂË ‚ÒÚ‡‚ÎÂÌ˚ Ô‡‚ËθÌÓ ‚ ÒÓÓÚ‚ÂÚÒÚ‚ËË
• ÇÓ ËÁ·ÂʇÌË ‰ÂÙÓχˆËË Ô‡ÌÂÎË Ë ÔÓ‚ÂʉÂÌËfl ‚ÌÛÚÂÌÌËı ÍÓÏÔÓ-
Ò ÔÓÎflÌÓÒÚ¸˛ +/-. çÂÒӷβ‰ÂÌË ˝ÚÓ„Ó Ô‡‚Ë· ÏÓÊÂÚ ÔË‚ÂÒÚË
ÌÂÌÚÓ‚ ·Â„ËÚ ËÌÒÚÛÏÂÌÚ ÓÚ ˜ÂÁÏÂÌÓÈ Ô˚ÎË Ë ÒËθÌÓÈ ‚Ë·‡ˆËË
Í Ô„‚Û, ÔÓÊ‡Û ËÎË ÔÓÚÂ͇Ì˲ ·‡Ú‡ÂÈ.
Ë Ì ËÒÔÓθÁÛÈÚÂ Â„Ó ÔË Ó˜Â̸ ‚˚ÒÓÍÓÈ ËÎË ÌËÁÍÓÈ ÚÂÏÔ‡ÚÛ (̇ÔË-
• ÇÒ„‰‡ Á‡ÏÂÌflÈÚ ӉÌÓ‚ÂÏÂÌÌÓ ‚Ò ·‡Ú‡ÂË. ç ËÒÔÓθÁÛÈÚ ÌÓ‚˚Â
ÏÂ, ̇ ÒÓÎ̈Â, fl‰ÓÏ Ò Ì‡„‚‡ÚÂÎÂÏ ËÎË ‚ χ¯ËÌ ‚ ‰Ì‚ÌÓ ‚ÂÏfl).
·‡Ú‡ÂË ‚ÏÂÒÚ ÒÓ ÒÚ‡˚ÏË. ç ËÒÔÓθÁÛÈÚ ·‡Ú‡ÂË ‡ÁÌ˚ı ÚËÔÓ‚,
• ç ËÒÔÓθÁÛÈÚ ËÌÒÚÛÏÂÌÚ ‚ ÌÂÔÓÒ‰ÒÚ‚ÂÌÌÓÈ ·ÎËÁÓÒÚË ÓÚ ÚÂ΂Ë-
̇ÔËÏ ˘ÂÎÓ˜Ì˚ ‚ÏÂÒÚÂ Ò Ï‡„‡ÌˆÂ‚˚ÏË, ·‡Ú‡ÂË ‡ÁÌ˚ı ÔÓËÁ-
ÁÓ‡, ‡‰ËÓÔËÂÏÌË͇, ÒÚÂÂÓÓ·ÓÛ‰Ó‚‡ÌËfl, ÏÓ·ËθÌÓ„Ó ÚÂÎÂÙÓ̇
‚Ó‰ËÚÂÎÂÈ ËÎË ‡ÁÌ˚ ÚËÔ˚ ·‡Ú‡ÂÈ Ó‰ÌÓ„Ó ÔÓËÁ‚Ó‰ËÚÂÎfl, Ú‡Í Í‡Í
Ë ‰Û„Ëı ˝ÎÂÍÚÓÔË·ÓÓ‚. Ç ÔÓÚË‚ÌÓÏ ÒÎÛ˜‡Â ‚ ËÌÒÚÛÏÂÌÚÂ, ÚÂ΂Ë-
˝ÚÓ ÏÓÊÂÚ ÔË‚ÂÒÚË Í Ô„‚Û, ÔÓÊ‡Û ËÎË ÔÓÚÂ͇Ì˲ ·‡Ú‡ÂÈ.
ÁÓ ËÎË ‡‰ËÓÔËÂÏÌËÍ ÏÓ„ÛÚ ‚ÓÁÌËÍÌÛÚ¸ ÔÓÏÂıË.
• ç ‰ÂÊËÚ ·‡Ú‡ÂË ·ÎËÁÍÓ Í Ó„Ì˛.
• ÇÓ ËÁ·ÂʇÌË ÒÎÛ˜‡ÈÌÓ„Ó Ô‡‰ÂÌËfl ËÌÒÚÛÏÂÌÚ‡ Ì ÓÒÚ‡‚ÎflÈÚ „Ó
• ç Ô˚Ú‡ÈÚÂÒ¸ ÔÂÂÁ‡fl‰ËÚ¸ ·‡Ú‡ÂË, Ì Ô‰̇Á̇˜ÂÌÌ˚ ‰Îfl
‚ ÌÂÛÒÚÓȘ˂ÓÏ ÔÓÎÓÊÂÌËË.
ÔÂÂÁ‡fl‰ÍË.
(4)-10 1/2
4 DGX-220/YPG-225 êÛÍÓ‚Ó‰ÒÚ‚Ó ÔÓθÁÓ‚‡ÚÂÎfl
• è‰ ÔÂÂÏ¢ÂÌËÂÏ ËÌÒÚÛÏÂÌÚ‡ ÓÚÒÓ‰ËÌËÚ ÔÓ‰Íβ˜ÂÌÌ˚È Í ÌÂÏÛ
åÂ˚ ·ÂÁÓÔ‡ÒÌÓÒÚË ÔË ˝ÍÒÔÎÛ‡Ú‡ˆËË
‡‰‡ÔÚÂ Ë ‰Û„Ë ͇·ÂÎË.
• ç ‚ÒÚ‡‚ÎflÈÚ ԇθˆ˚ ËÎË ÛÍÛ ‚ ÓÚ‚ÂÒÚËfl ËÌÒÚÛÏÂÌÚ‡.
• è‰ ̇ÒÚÓÈÍÓÈ ËÌÒÚÛÏÂÌÚ‡ ۷‰ËÚÂÒ¸, ˜ÚÓ ËÒÔÓθÁÛÂχfl
• çËÍÓ„‰‡ Ì Á‡ÒÓ‚˚‚‡ÈÚÂ Ë Ì ÓÌflÈÚ ·Ûχ„Û, ÏÂÚ‡Î΢ÂÒÍËÂ Ë ÔÓ˜ËÂ
˝ÎÂÍÚÓÓÁÂÚ͇ ΄ÍÓ ‰ÓÒÚÛÔ̇. Ç ÒÎÛ˜‡Â ‚ÓÁÌËÍÌÓ‚ÂÌËfl ͇ÍËı-ÎË·Ó
Ô‰ÏÂÚ˚ ‚ ÓÚ‚ÂÒÚËfl ̇ Ô‡ÌÂÎË Ë Í·‚ˇÚÛÂ. ÖÒÎË ˝ÚÓ ÒÎÛ-˜ËÎÓÒ¸,
ÌÂÔÓ·‰ÓÍ ÌÂωÎÂÌÌÓ ‚˚Íβ˜ËÚ ËÌÒÚÛÏÂÌÚ Ë ÓÚÍβ˜ËÚÂ Â„Ó ÓÚ
ÌÂωÎÂÌÌÓ ‚˚Íβ˜ËÚ ËÌÒÚÛÏÂÌÚ Ë ‚˚̸Ú ͇·Âθ ÔËÚ‡ÌËfl ËÁ
˝ÎÂÍÚÓÒÂÚË.
ÓÁÂÚÍË. á‡ÚÂÏ Ó·‡ÚËÚÂÒ¸ Á‡ ÔÓÏÓ˘¸˛ Í ÒÔˆˇÎËÒÚ‡Ï ˆÂÌÚ‡
• àÒÔÓθÁÛÈÚ ÚÓθÍÓ ÔÓ‰ÒÚ‡‚ÍÛ, ÒÔˆˇθÌÓ Ô‰̇Á̇˜ÂÌ-
ÌÛ˛ ‰Îfl
ÚÂıÌ˘ÂÒÍÓ„Ó Ó·ÒÎÛÊË‚‡ÌËfl ÍÓÔÓ‡ˆËË Yamaha.
ËÌÒÚÛÏÂÌÚ‡. ÑÎfl ÍÂÔÎÂÌËfl ÒÚÓÈÍË ËÎË ÔÓ‰ÒÚ‡‚ÍË ËÒÔÓθÁÛÈ-
Ú ÚÓθÍÓ
• ç Í·‰ËÚ ̇ ËÌÒÚÛÏÂÌÚ Ô‰ÏÂÚ˚ ËÁ ‚ËÌË·, Ô·ÒÚχÒÒ˚ ËÎË ÂÁË-
‚ËÌÚ˚, ÔÓÒÚ‡‚ÎflÂÏ˚ ‚ ÍÓÏÔÎÂÍÚÂ. Ç ÔÓÚË‚ÌÓÏ ÒÎÛ˜‡Â ‚ÓÁ-ÏÓÊÌÓ
Ì˚: ˝ÚÓ ÏÓÊÂÚ ‚˚Á‚‡Ú¸ ‚˚ˆ‚ÂÚ‡ÌË ԇÌÂÎË ËÎË Í·‚ˇÚÛ˚.
ÔÓ‚ÂʉÂÌË ‚ÌÛÚÂÌÌËı ÍÓÏÔÓÌÂÌÚÓ‚ Ë Ô‡‰ÂÌË ËÌÒÚÛÏÂÌÚ‡.
• ç ӷÎÓ͇˜Ë‚‡ÈÚÂÒ¸ ̇ ËÌÒÚÛÏÂÌÚ, Ì ÒÚ‡‚¸Ú ̇ ÌÂ„Ó ÚflÊÂÎ˚ Ô‰-
ÏÂÚ˚ Ë Ì ÔËÍ·‰˚‚‡ÈÚ ÒÎ˯ÍÓÏ ·Óθ¯ÓÈ ÒËÎ˚ ÔË ÔÓθÁÓ‚‡ÌËË
èÓ‰Íβ˜ÂÌËÂ
ÍÌÓÔ͇ÏË, ‚˚Íβ˜‡ÚÂÎflÏË Ë ‡Á˙ÂχÏË.
• è‰ ÔÓ‰Íβ˜ÂÌËÂÏ ËÌÒÚÛÏÂÌÚ‡ Í ‰Û„ËÏ ˝ÎÂÍÚÓÌÌ˚Ï ÍÓÏÔÓÌÂÌ-
• ç ÒΉÛÂÚ ‰ÓÎ„Ó ‡·ÓÚ‡Ú¸ Ò ‚˚ÒÓÍËÏ ËÎË ÌÂÍÓÏÙÓÚÌ˚Ï ÛÓ‚ÌÂÏ
Ú‡Ï ÓÚÍβ˜ËÚ Ëı ÔËÚ‡ÌËÂ. è‰ ‚Íβ˜ÂÌËÂÏ ËÎË ÓÚÍβ˜ÂÌËÂÏ
„ÓÏÍÓÒÚË, Ú‡Í Í‡Í ˝ÚÓ ÏÓÊÂÚ ÔË‚ÂÒÚË Í ÔÓÚ ÒÎÛı‡. èË ÛıÛ‰¯ÂÌËË
˝ÎÂÍÚÓÌÌ˚ı ÍÓÏÔÓÌÂÌÚÓ‚ ÛÒÚ‡ÌÓ‚ËÚ ÏËÌËχθÌ˚È ÛÓ‚Â̸ „ÓÏ-
ÒÎÛı‡ ËÎË Á‚ÓÌ ‚ Û¯‡ı Ó·‡ÚËÚÂÒ¸ Í ‚‡˜Û.
ÍÓÒÚË. ì·Â‰ËÚÂÒ¸ Ú‡ÍÊ ‚ ÚÓÏ, ˜ÚÓ Ì‡ ‚ÒÂı ÍÓÏÔÓÌÂÌÚ‡ı ÛÒÚ‡ÌÓ‚ÎÂÌ
ÏËÌËχθÌ˚È ÛÓ‚Â̸ „ÓÏÍÓÒÚË, ‡ ‚Ó ‚ÂÏfl Ë„˚ ̇ ËÌÒÚÛÏÂÌÚÂ
ëÓı‡ÌÂÌË ‰‡ÌÌ˚ı
ÔÓÒÚÂÔÂÌÌÓ Û‚Â΢¸Ú „ÓÏÍÓÒÚ¸ ‰Ó ÌÛÊÌÓÈ.
ëÓı‡ÌÂÌËÂ Ë ÂÁ‚ÌÓ ÍÓÔËÓ‚‡ÌË ‰‡ÌÌ˚ı
èË ÓÚÍβ˜ÂÌËË ÔËÚ‡ÌËfl ËÌÒÚÛÏÂÌÚ‡ ̇ÒÚÓÈÍË Ô‡ÌÂÎË Ë ÌÂÍÓÚÓ˚Â
é·ÒÎÛÊË‚‡ÌËÂ
‰Û„Ë ÚËÔ˚ ‰‡ÌÌ˚ı ·Û‰ÛÚ ÔÓÚÂflÌ˚. ëÓı‡ÌflÈÚ ‰‡ÌÌ˚Â
• ÑÎfl ˜ËÒÚÍË ËÌÒÚÛÏÂÌÚ‡ ÔÓθÁÛÈÚÂÒ¸ Ïfl„ÍÓÈ ÒÛıÓÈ Ú̸͇˛. çËÍÓ„‰‡ ÌÂ
‚ „ËÒÚ‡ˆËÓÌÌÓÈ Ô‡ÏflÚË (ÒÚ. 73).
ËÒÔÓθÁÛÈÚ ÔflÚÌÓ‚˚‚Ó‰ËÚÂÎË, ‡ÒÚ‚ÓËÚÂÎË, ÊˉÍË ӘËÒÚËÚÂÎË ËÎË
ëÓı‡ÌÂÌÌ˚ ‰‡ÌÌ˚ ÏÓ„ÛÚ ·˚Ú¸ ÔÓÚÂflÌ˚ ËÁ-Á‡ ÌÂËÒÔ‡‚ÌÓÒÚË ËÎË
˜ËÒÚfl˘Ë ҇ÎÙÂÚÍË Ò ÔÓÔËÚÍÓÈ.
ÌÂÔ‡‚ËθÌÓÈ ‡·ÓÚ˚.
ëÓı‡ÌflÈÚ ‚‡ÊÌ˚ ‰‡ÌÌ˚ ̇ ‚̯Ì ÛÒÚÓÈÒÚ‚Ó ı‡ÌÂÌËfl ‰‡ÌÌ˚ı,
̇ÔËÏ ̇ ÍÓÏÔ¸˛Ú (ÒÚ. 84).
êÂÁ‚ÌÓ ÍÓÔËÓ‚‡ÌË ̇ ‚̯ÌË ÌÓÒËÚÂÎË
•
óÚÓ·˚ ‰‡ÌÌ˚ Ì ÔÓÔ‡ÎË ËÁ-Á‡ ÔÓ‚ÂʉÂÌËfl ÌÓÒËÚÂÎfl,
ÂÍÓÏẨÛÂÚÒfl ÒÓı‡ÌflÚ¸ ̇˷ÓΠ‚‡ÊÌ˚ ‰‡ÌÌ˚ ̇ ‰‚Ûı
‚̯ÌËı ÌÓÒËÚÂÎflı.
äÓÔÓ‡ˆËfl Yamaha Ì ÌÂÒÂÚ ÓÚ‚ÂÚÒÚ‚ÂÌÌÓÒÚË Á‡ ÔÓ‚ÂʉÂÌËfl, ‚˚Á‚‡ÌÌ˚ ÌÂÔ‡‚ËθÌÓÈ ˝ÍÒÔÎÛ‡Ú‡ˆËÂÈ ËÎË ÏÓ‰ËÙË͇ˆËÂÈ
ËÌÒÚÛÏÂÌÚ‡, ‡ Ú‡ÍÊ Á‡ ÔÓÚÂflÌÌ˚ ËÎË ËÒÔÓ˜ÂÌÌ˚ ‰‡ÌÌ˚Â.
ÇÒ„‰‡ ‚˚Íβ˜‡ÈÚ ËÌÒÚÛÏÂÌÚ, ÂÒÎË Ì ËÒÔÓθÁÛÂÚ „Ó.
èË ËÒÔÓθÁÓ‚‡ÌËË ‡‰‡ÔÚ‡ ÔÂÂÏÂÌÌÓ„Ó ÚÓ͇, ‰‡Ê ÂÒÎË ‚˚Íβ˜‡ÚÂθ ÔËÚ‡ÌËfl ̇ıÓ‰ËÚÒfl ‚ ÒÓÒÚÓflÌËË STANDBY, ËÌÒÚÛÏÂÌÚ ÔÓ‰ÓÎʇÂÚ ÔÓÚ·ÎflÚ¸
˝ÎÂÍÚÓ˝Ì„˲ ̇ ÏËÌËχθÌÓÏ ÛÓ‚ÌÂ. ÖÒÎË ËÌÒÚÛÏÂÌÚ Ì ËÒÔÓθÁÛÂÚÒfl ‰ÎËÚÂθÌÓ ‚ÂÏfl, ÓÚÍβ˜ËÚ ‡‰‡ÔÚ ÔÂÂÏÂÌÌÓ„Ó ÚÓ͇ ÓÚ ÓÁÂÚÍË.
ìÚËÎËÁËÛÈÚ ËÒÔÓθÁÓ‚‡ÌÌ˚ ·‡Ú‡ÂË ‚ ÒÓÓÚ‚ÂÚÒÚ‚ËË Ò Ô‡‚Ë·ÏË, ÔËÌflÚ˚ÏË ‚ ‚‡¯ÂÏ Â„ËÓÌÂ.
àÎβÒÚ‡ˆËË Ë ËÒÛÌÍË Üä-˝Í‡ÌÓ‚ Ô˂‰ÂÌ˚ ‚ ÛÍÓ‚Ó‰ÒÚ‚Â ÔÓθÁÓ‚‡ÚÂÎfl ÚÓθÍÓ ‚ ͇˜ÂÒÚ‚Â ÔËÏÂÓ‚ Ë Ì‡ ‚‡¯ÂÏ ËÌÒÚÛÏÂÌÚ ÏÓ„ÛÚ
·˚Ú¸ ‰Û„ËÏË.
● íÓ‚‡Ì˚ Á̇ÍË
®
•Windows является зарегистрированным товарным знаком корпорации Microsoft
.
•азвания компаний и продуктов в данном руководстве пользователя являются товарными знаками или зарегистрированными
товарными знаками соответствующих компаний.
(4)-10 2/2
DGX-220/YPG-225 êÛÍÓ‚Ó‰ÒÚ‚Ó ÔÓθÁÓ‚‡ÚÂÎfl 5

삉ÓÏÎÂÌË ӷ ‡‚ÚÓÒÍËı Ô‡‚‡ı
иже указаны названия песен, встроенных в эту электронную клавиатуру, и список обладателей авторских
и других прав.
Mona Lisa
Can’t Help Falling In Love
from the Paramount Picture CAPTAIN CAREY, U.S.A.
from the Paramount Picture BLUE HAWAII
Words and Music by Jay Livingston and Ray Evans
Words and Music by George David Weiss,
Copyright © 1949 (Renewed 1976) by Famous Music Corporation
Hugo Peretti and Luigi Creatore
International Copyright Secured All Rights Reserved
Copyright © 1961 by Gladys Music, Inc.
Copyright Renewed and Assigned to Gladys Music
Composition Title : Against All Odds
All Rights Administered by Cherry Lane Music Publishing Com-
Composer’s Name : Collins 0007403
pany, Inc. and Chrysalis Music
Copyright Owner’s Name : EMI MUSIC PUBLISHING LTD /
International Copyright Secured All Rights Reserved
HIT & RUN MUSIC LTD
се права защищены. есанкционированное копирование, публичное воспроизведение и трансляция строго
запрещены.
Этот продукт включает компьютерные программы и содержимое, авторские права на которые принадлежат
корпорации Yamaha или право на использование которых получено по лицензии от других фирм.
материалам, защищенным авторскими правами, относятся все без ограничения компьютерные программы,
файлы стиля, файлы MIDI, данные WAVE и музыкальные звукозаписи. юбое несанкционированное
использование таких программ и содержимого, выходящее за рамки личного пользования, запрещено
соответствующими законами. юбое нарушение авторских прав преследуется по закону.
ОАА, АОАЯ ОЬУ АО О.
этом устройстве могут использоваться различные типы или форматы музыкальных данных путем
преобразования их в музыкальные данные необходимого формата для дальнейшего использования. аким
образом, при воспроизведении данных устройством звучание может несколько отличаться от исходного.
опирование коммерческих музыкальных данных, включая MIDI-данные и/или аудиоданные, но не
ограничиваясь ими, строго запрещается, за исключением использования в личных целях.
ãÓ„ÓÚËÔ˚ ̇ Ô‡ÌÂÎË
GM System Level 1
«GM System Level 1» – это дополнение к MIDI-стандарту, благодаря которому любые GM-
совместимые музыкальные данные могут быть точно воспроизведены любым GM-совместимым тон-
генератором независимо от фирмы-изготовителя. аркировка GM ставится на все программное
обеспечение и оборудование, поддерживающее стандарт GM System Level.
XGlite
«XGlite» – это упрощенная версия формата высококачественных тон-генераторов XG корпорации
Yamaha. азумеется, с помощью тон-генератора XGlite можно воспроизвести любую песню
в формате XG. Однако имейте в виду, что из-за сокращенного набора параметров управления
и эффектов некоторые песни могут воспроизводиться не так, как оригинал.
USB
USB – это сокращение от Universal Serial Bus (универсальная последовательная шина). Это
последовательный интерфейс для связи компьютера с периферийными устройствами. Он позволяет
осуществлять «горячую» замену периферийных устройств (без выключения питания компьютера).
STYLE FILE
Style File Format – это оригинальный формат файла стиля, разработанный корпорацией Yamaha,
в котором используется уникальная система преобразования, позволяющая автоматически создавать
высококачественный аккомпанемент на основе большого количества типов аккордов.
6 DGX-220/YPG-225 êÛÍÓ‚Ó‰ÒÚ‚Ó ÔÓθÁÓ‚‡ÚÂÎfl
оздравляем и благодарим за приобретение
Yamaha DGX-220/YPG-225 Portable Grand!
еред использованием инструмента внимательно прочитайте это руководство,
чтобы в полной мере воспользоваться его преимуществами.
осле прочтения руководства храните его в надежном и удобном месте,
чтобы можно было обращаться к нему в дальнейшем за более подробной
информацией об операциях или функциях.
ÑÓÔÓÎÌËÚÂθÌ˚ ÔË̇‰ÎÂÊÌÓÒÚË
комплект поставки DGX-220/YPG-225 входят следующие принадлежности (удостоверьтесь, что
все они имеются в наличии).
• êÛÍÓ‚Ó‰ÒÚ‚Ó ÔÓθÁÓ‚‡ÚÂÎfl
• è˛ÔËÚ
• äÓÏÔ‡ÍÚ—‰ËÒÍ
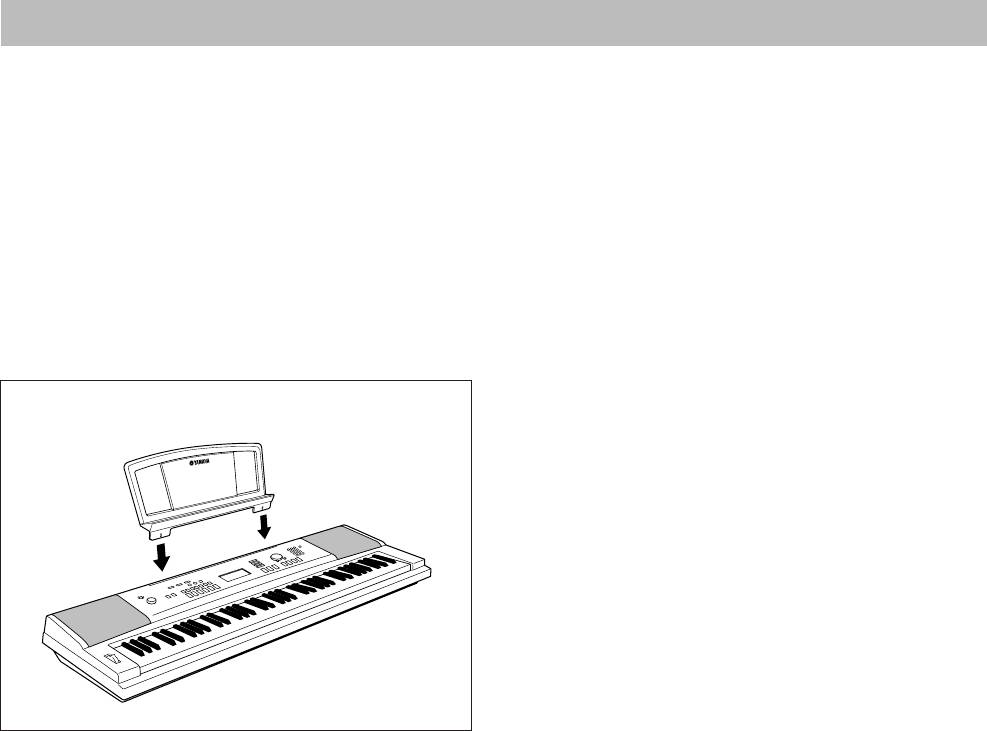
● è˛ÔËÚ
ÇÒÚ‡‚¸Ú ԲÔËÚ ‚ „ÌÂÁ‰‡,
Í‡Í ÔÓ͇Á‡ÌÓ Ì‡ ËÒÛÌÍÂ.
DGX-220/YPG-225 êÛÍÓ‚Ó‰ÒÚ‚Ó ÔÓθÁÓ‚‡ÚÂÎfl 7

ëÔˆˇθÌ˚ ‚ÓÁÏÓÊÌÓÒÚË ËÌÒÚÛÏÂÌÚ‡ DGX-220/YPG-225
■ ÇÓÒÔÓËÁ‚‰ÂÌË ‡ÁÌ˚ı ËÌÒÚÛÏÂÌڇθÌ˚ı ÚÂÏ·Ó‚ ÒÚ. 14
ожно выбрать тембр инструмента, звучащий во время игры на
клавиатуре. Это может быть тембр скрипки, флейты, арфы или любой
другой из множества различных тембров. апример, можно изменить
настроение песни, написанной для фортепиано, используя для ее
воспроизведения тембр скрипки. Откройте для себя мир музыкального
разнообразия!
■ à„‡ ‚ ÓÔ‰ÂÎÂÌÌÓÏ ÒÚËΠÒÚ. 19
отите играть с полным аккомпанементом? опробуйте стили
автоаккомпанемента.
PopBossa
тили аккомпанемента позволяют создать полное оркестровое звучание
087
со множеством стилей от вальса до 8-beat и евротранса. ыберите стиль,
подходящий для музыки, которую вы хотите сыграть, или для
расширения своих музыкальных горизонтов поэкспериментируйте
с новыми стилями.
■ íÂıÌÓÎÓ„Ëfl Performance assistant (èÓÏÓ˘ÌËÍ ÏÛÁ˚͇ÌÚ‡) ÒÚ. 29
грайте на клавиатуре инструмента одновременно с пением, и ваше
исполнение всегда будет идеальным… даже если вы нажимаете
неправильные клавиши! се, что нужно делать, – это играть на
клавиатуре или, например, на ее левой или правой части. вучание будет
профессиональным, пока вы соблюдаете ритм.
■ ê‡Áۘ˂‡Ú¸ ÏÛÁ˚͇θÌ˚ ÔÓËÁ‚‰ÂÌËfl ΄ÍÓ Ë ‚ÂÒÂÎÓ ÒÚ. 36
данному инструменту прилагается целый ряд песен в различных
жанрах, которые можно послушать или поиграть одновременно с ними.
ы можете начать упражняться, играя только одной рукой, можно даже
Excellen
играть в своем собственном темпе, нажимая на клавиши как угодно
медленно, пока вы не научитесь играть с необходимой скоростью.
оспроизведение песни автоматически настраивается в соответствии
с вашим темпом. ля уроков можно также использовать песни,
загруженные из нтернета, то есть ваши музыкальные ресурсы практи-
чески не ограничены! нструмент может даже оценить вашу игру!
8 DGX-220/YPG-225 êÛÍÓ‚Ó‰ÒÚ‚Ó ÔÓθÁÓ‚‡ÚÂÎfl
ëÓ‰ÂʇÌËÂ
삉ÓÏÎÂÌË ӷ ‡‚ÚÓÒÍËı Ô‡‚‡ı ………………………………………………… 6
ëÔ‡‚Ó˜ÌËÍ
ãÓ„ÓÚËÔ˚ ̇ Ô‡ÌÂÎË………………………………………………………………………. 6
ÑÓÔÓÎÌËÚÂθÌ˚ ÔË̇‰ÎÂÊÌÓÒÚË ………………………………………………… 7
ÑÓ·‡‚ÎÂÌË ˝ÙÙÂÍÚÓ‚ 53
ëÔˆˇθÌ˚ ‚ÓÁÏÓÊÌÓÒÚË ËÌÒÚÛÏÂÌÚ‡ DGX-220/YPG-225…………… 8
ɇÏÓÌËÁ‡ˆËfl……………………………………………………………………………….53
ÑÓ·‡‚ÎÂÌË ‚·‡ˆËË ……………………………………………………………54
ç‡ÒÚÓÈ͇ 10
ÑÓ·‡‚ÎÂÌË ıÓÛÒ‡……………………………………………………………………….55
í·ӂ‡ÌËfl Í ˝ÎÂÍÚÓÔËÚ‡Ì˲ …………………………………………………….. 10
èÓ‰Íβ˜ÂÌË ̇ۯÌËÍÓ‚ (‡Á˙ÂÏ PHONES/OUTPUT) ………………….. 11
èÓÎÂÁÌ˚ ËÒÔÓÎÌËÚÂθÒÍË ÙÛÌ͈ËË 56
èÓ‰Íβ˜ÂÌË Ô‰‡ÎË („ÌÂÁ‰Ó SUSTAIN) ………………………………………. 11
åÂÚÓÌÓÏ……………………………………………………………………………………..56
èÓ‰Íβ˜ÂÌËÂ Í ÍÓÏÔ¸˛ÚÂÛ (USB-ÔÓÚ)……………………………………….. 11
á‡ÔÛÒÍ ÍÌÓÔÍÓÈ «Tap» …………………………………………………………………..58
ÇÍβ˜ÂÌË ÔËÚ‡ÌËfl …………………………………………………………………….. 11
óÛ‚ÒÚ‚ËÚÂθÌÓÒÚ¸ Í ÒËΠ̇ʇÚËfl ………………………………………………..58
ùÙÙÂÍÚ Sustain…………………………………………………………………………….59
è‡ÌÂθ ÛÔ‡‚ÎÂÌËfl Ë ‡Á˙ÂÏ˚ 12
Pitch Bend (àÁÏÂÌÂÌË ‚˚ÒÓÚ˚ Á‚Û͇)……………………………………………59
è‰Ìflfl Ô‡ÌÂθ…………………………………………………………………………. 12
ùÎÂÏÂÌÚ˚ ÛÔ‡‚ÎÂÌËfl ‚˚ÒÓÚÓÈ Á‚Û͇……………………………………………60
ᇉÌflfl Ô‡ÌÂθ…………………………………………………………………………….. 13
One Touch Setting………………………………………………………………………….61
ç‡ÒÚÓÈ͇ „ÓÏÍÓÒÚË „‡ÏÓÌËË……………………………………………………..62
Ç˚·Ó ̇ÒÚÓÂÍ ˝Í‚‡Î‡ÈÁ‡ ‰Îfl Ó·ÂÒÔ˜ÂÌËfl
ä‡ÚÍÓ ÛÍÓ‚Ó‰ÒÚ‚Ó
̇ËÎÛ˜¯Â„Ó Á‚Û˜‡ÌËfl………………………………………………………………62
ÇÓÒÔÓËÁ‚‰ÂÌË ‡ÁÌ˚ı ËÌÒÚÛÏÂÌڇθÌ˚ı ÚÂÏ·Ó‚ 14
îÛÌ͈ËË ÒÚËÎfl (‡‚ÚÓ‡ÍÍÓÏÔ‡ÌÂÏÂÌÚ) 63
Ç˚·Ó Ë ‚ÓÒÔÓËÁ‚‰ÂÌË ÚÂÏ·‡ — ÂÊËÏ MAIN (éÒÌÓ‚ÌÓÈ) ……… 14
ó‡ÒÚË ÒÚËÎfl ………………………………………………………………………………….63
é‰ÌÓ‚ÂÏÂÌ̇fl Ë„‡ ‰‚ÛÏfl ÚÂÏ·‡ÏË — ÂÊËÏ DUAL
ç‡ÒÚÓÈ͇ „ÓÏÍÓÒÚË ÒÚËÎfl…………………………………………………………..65
(ç‡ÎÓÊÂÌË ÚÂÏ·Ó‚)…………………………………………………………….. 15
ìÒÚ‡Ìӂ͇ Ô‡‡ÏÂÚ‡ Split Point…………………………………………………….65
à„‡ ‡ÁÌ˚ÏË ÚÂÏ·‡ÏË Ô‡‚ÓÈ Ë Î‚ÓÈ ÛÍÓÈ — ÂÊËÏ SPLIT
ÇÓÒÔÓËÁ‚‰ÂÌË ÒÚËÎfl Ò ‡ÍÍÓ‰‡ÏË, ÌÓ ·ÂÁ ËÚχ
(ê‡Á‰ÂÎÂÌË ÚÂÏ·Ó‚) ……………………………………………………………. 16
(ÓÒÚ‡Ìӂ͇ ‡ÍÍÓÏÔ‡ÌÂÏÂÌÚ‡)……………………………………………………66
à„‡ ÚÂÏ·ÓÏ Grand Piano …………………………………………………………… 17
ÇÓÒÔÓËÁ‚‰ÂÌË ÒÚËÎÂÈ Ò ËÒÔÓθÁÓ‚‡ÌËÂÏ ‚ÒÂÈ Í·‚ˇÚÛ˚………..66
ᇄÛÁ͇ Ù‡ÈÎÓ‚ ÒÚËÎÂÈ……………………………………………………………….67
á‚ÛÍÓ‚˚Â ˝ÙÙÂÍÚ˚ 18
éÒÌÓ‚˚ ‡ÍÍÓ‰Ó‚………………………………………………………………………….68
燷Ó˚ Û‰‡Ì˚ı………………………………………………………………………….. 18
èÓËÒÍ ‡ÍÍÓ‰Ó‚ ‚ ÒÎÓ‚‡Â …………………………………………………………….70
á‚ÛÍÓ‚˚Â ˝ÙÙÂÍÚ˚ …………………………………………………………………….. 18
ç‡ÒÚÓÈ͇ ÔÂÒÂÌ 71
ÇÓÒÔÓËÁ‚‰ÂÌË ÒÚËÎÂÈ 19
ÉÓÏÍÓÒÚ¸ ÔÂÒÌË …………………………………………………………………………..71
Ç˚·Ó ËÚχ ÒÚËÎfl ……………………………………………………………………… 19
A-B Repeat ……………………………………………………………………………………71
à„‡ ÒÓ ÒÚËÎÂÏ ……………………………………………………………………………. 20
èË„ÎÛ¯ÂÌË ÓÚ‰ÂθÌ˚ı ˜‡ÒÚÂÈ ÔÂÒÌË ………………………………………….72
àÒÔÓÎÌÂÌË ‡ÍÍÓ‰Ó‚ ‡‚ÚÓ‡ÍÍÓÏÔ‡ÌÂÏÂÌÚ‡…………………………………. 24
àÁÏÂÌÂÌË ÚÂÏ·‡ ÏÂÎÓ‰ËË ………………………………………………………….72
àÒÔÓθÁÓ‚‡ÌË ÔÂÒÂÌ 25
ëÓı‡ÌÂÌË ËÁ·‡ÌÌ˚ı ̇ÒÚÓÂÍ Ô‡ÌÂÎË ÛÔ‡‚ÎÂÌËfl 73
Ç˚·Ó Ë ÔÓÒÎۯ˂‡ÌË ÔÂÒÌË…………………………………………………….. 25
ëÓı‡ÌÂÌË ̇ÒÚÓÂÍ ‚ „ËÒÚ‡ˆËÓÌÌÓÈ Ô‡ÏflÚË…………………………..73
èÂÂÏÓÚ͇ ÔÂÒÌË ‚Ô‰ Ë Ì‡Á‡‰ Ë ÛÒÚ‡Ìӂ͇ ̇ Ô‡ÛÁÛ ………………… 26
ᇄÛÁ͇ ‰‡ÌÌ˚ı ËÁ „ËÒÚ‡ˆËÓÌÌÓÈ Ô‡ÏflÚË………………………………..74
íËÔ˚ ÔÂÒÂÌ………………………………………………………………………………….. 28
îÛÌ͈ËË 75
èÓÒÚÂȯ‡fl ÚÂıÌË͇ Ë„˚ ̇ ÙÓÚÂÔ¸flÌÓ 29
Ç˚·Ó Ë Ì‡ÒÚÓÈ͇ ÙÛÌ͈ËÈ………………………………………………………….75
íËÔ CHORD — Ë„‡ ‰‚ÛÏfl Û͇ÏË ……………………………………………….. 30
èÓ‰Íβ˜ÂÌËÂ Í ÍÓÏÔ¸˛ÚÂÛ 78
íËÔ CHD/FREE — ÔËÏÂÌÂÌË ÚËÔ‡ Chord
ÚÓθÍÓ Í Î‚ÓÈ ÒÚÓÓÌ ………………………………………………………….. 32
óÚÓ ÓÁ̇˜‡ÂÚ MIDI? ………………………………………………………………………78
àÁÏÂÌÂÌË ÚÂÏÔ‡ ÔÂÒÌË ………………………………………………………………. 35
èÓ‰Íβ˜ÂÌË ÔÂÒÓ̇θÌÓ„Ó ÍÓÏÔ¸˛Ú‡……………………………………..79
艇˜‡ ‰‡ÌÌ˚ı Ó· ËÒÔÓÎÌÂÌËË Ì‡ ÍÓÏÔ¸˛ÚÂ
Ç˚·Ó ÔÂÒÌË ‰Îfl ÛÓ͇ 36
Ë ÔËÂÏ Ò ÍÓÏÔ¸˛Ú‡……………………………………………………………..80
ìÓÍ 1 — Waiting …………………………………………………………………………. 36
ÑËÒڇ̈ËÓÌÌÓ ÛÔ‡‚ÎÂÌË MIDI-ÛÒÚÓÈÒÚ‚‡ÏË……………………………..81
ìÓÍ 2 — Your Tempo…………………………………………………………………… 39
Initial Send (èÂÂÒ˚Î͇ ̇˜‡Î¸ÌÓÈ ÍÓÌÙË„Û‡ˆËË)………………………….82
ìÓÍ 3 — Minus One …………………………………………………………………….. 40
艇˜‡ ‰‡ÌÌ˚ı ÏÂÊ‰Û ÍÓÏÔ¸˛ÚÂÓÏ Ë ËÌÒÚÛÏÂÌÚÓÏ………………..82
èÓ‚ÚÓÂÌË — χڸ Û˜ÂÌËfl …………………………………………………………. 41
êÛÍÓ‚Ó‰ÒÚ‚Ó ÔÓ ÛÒÚ‡ÌÓ‚Í ÔÓ„‡ÏÏ
ÇÓÒÔÓËÁ‚‰ÂÌËÂ Ò ÔÓÏÓ˘¸˛ ÏÛÁ˚͇θÌÓÈ ·‡Á˚ ‰‡ÌÌ˚ı 42
̇ ÍÓÏÔ‡ÍÚ-‰ËÒÍ «Accessory CD-ROM» 85
LJÊ̇fl ËÌÙÓχˆËfl Ó ÍÓÏÔ‡ÍÚ-‰ËÒÍ …………………………………………..85
àÁÏÂÌÂÌË ÒÚËÎfl ÔÂÒÌË 43
ëÓ‰ÂÊËÏÓ ÍÓÏÔ‡ÍÚ-‰ËÒ͇………………………………………………………….86
èÓÒÎۯ˂‡ÌË ‰ÂÏÓÌÒÚ‡ˆËÓÌÌÓÈ ÔÂÒÌË ‰Îfl ÙÛÌ͈ËË
ëËÒÚÂÏÌ˚ Ú·ӂ‡ÌËfl…………………………………………………………………87
Easy Song Arranger…………………………………………………………………. 43
ìÒÚ‡Ìӂ͇ ÔÓ„‡ÏÏÌÓ„Ó Ó·ÂÒÔ˜ÂÌËfl ………………………………………….87
àÒÔÓθÁÓ‚‡ÌË ÙÛÌ͈ËË Easy Song Arranger ………………………………… 43
á‡ÔËÒ¸ ÒÓ·ÒÚ‚ÂÌÌÓ„Ó ÔÓËÁ‚‰ÂÌËfl 45
èËÎÓÊÂÌËÂ
äÓÌÙË„Û‡ˆËfl ‰ÓÓÊÍË……………………………………………………………….. 45
ìÒÚ‡ÌÂÌË ÌÂÔÓ·‰ÓÍ ……………………………………………………………….92
èӈ‰ۇ Á‡ÔËÒË ……………………………………………………………………….. 45
è‡ÚËÚÛ˚…………………………………………………………………………………..94
쉇ÎÂÌË ÔÂÒÌË — Û‰‡ÎÂÌË ÔÂÒÂÌ ÔÓθÁÓ‚‡ÚÂÎÂÈ………………………. 48
ëÔËÒÓÍ ÚÂÏ·Ó‚ ………………………………………………………………………..100
Track Clear — Û‰‡ÎÂÌË ÓÔ‰ÂÎÂÌÌÓÈ ‰ÓÓÊÍË ËÁ ÔÂÒÌË
ëÔËÒÓÍ Û‰‡Ì˚ı ÛÒÚ‡ÌÓ‚ÓÍ ………………………………………………………104
ÔÓθÁÓ‚‡ÚÂÎfl…………………………………………………………………………. 48
ëÔËÒÓÍ ÒÚËÎÂÈ…………………………………………………………………………..106
ëÔËÒÓÍ ÏÛÁ˚͇θÌ˚ı ·‡Á ‰‡ÌÌ˚ı …………………………………………….107
êÂÁ‚ÌÓ ÍÓÔËÓ‚‡ÌËÂ Ë ËÌˈˇÎËÁ‡ˆËfl 49
èÂÒÌË Ì‡ ÔË·„‡ÂÏÓÏ ÍÓÏÔ‡ÍÚ-‰ËÒÍÂ……………………………………..108
êÂÁ‚ÌÓ ÍÓÔËÓ‚‡ÌË ………………………………………………………………. 49
íËÔ˚ ˝ÙÙÂÍÚÓ‚…………………………………………………………………………109
àÌˈˇÎËÁ‡ˆËfl……………………………………………………………………………. 49
퇷Îˈ‡ ı‡‡ÍÚÂËÒÚËÍ MIDI-ËÌÚÂÙÂÈÒ‡………………………………..110
éÒÌÓ‚Ì˚ ÓÔ‡ˆËË Ë ˝Í‡Ì˚ 50
îÓÏ‡Ú MIDI-‰‡ÌÌ˚ı …………………………………………………………………112
íÂıÌ˘ÂÒÍË ı‡‡ÍÚÂËÒÚËÍË……………………………………………………113
éÒÌÓ‚Ì˚ ÓÔ‡ˆËË…………………………………………………………………….. 50
ùÎÂÏÂÌÚ˚ ÓÚÓ·‡ÊÂÌËfl………………………………………………………………. 52
è‰ÏÂÚÌ˚È Û͇Á‡ÚÂθ……………………………………………………………..114
DGX-220/YPG-225 êÛÍÓ‚Ó‰ÒÚ‚Ó ÔÓθÁÓ‚‡ÚÂÎfl 9
ç‡ÒÚÓÈ͇
é·flÁ‡ÚÂθÌÓ ‚˚ÔÓÎÌËÚ ÒÎÂ‰Û˛˘Ë ‰ÂÈÒÚ‚Ëfl, èêÖÜÑÖ óÖå ‚Íβ˜‡Ú¸ ÔËÚ‡ÌËÂ.
í·ӂ‡ÌËfl Í ˝ÎÂÍÚÓÔËÚ‡Ì˲
отя инструмент может работать как от дополнительного блока питания переменного тока, так и от батарей,
корпорация Yamaha рекомендует по возможности использовать блок питания. Он безопаснее батарей
с экологической точки зрения и гораздо экономичнее.
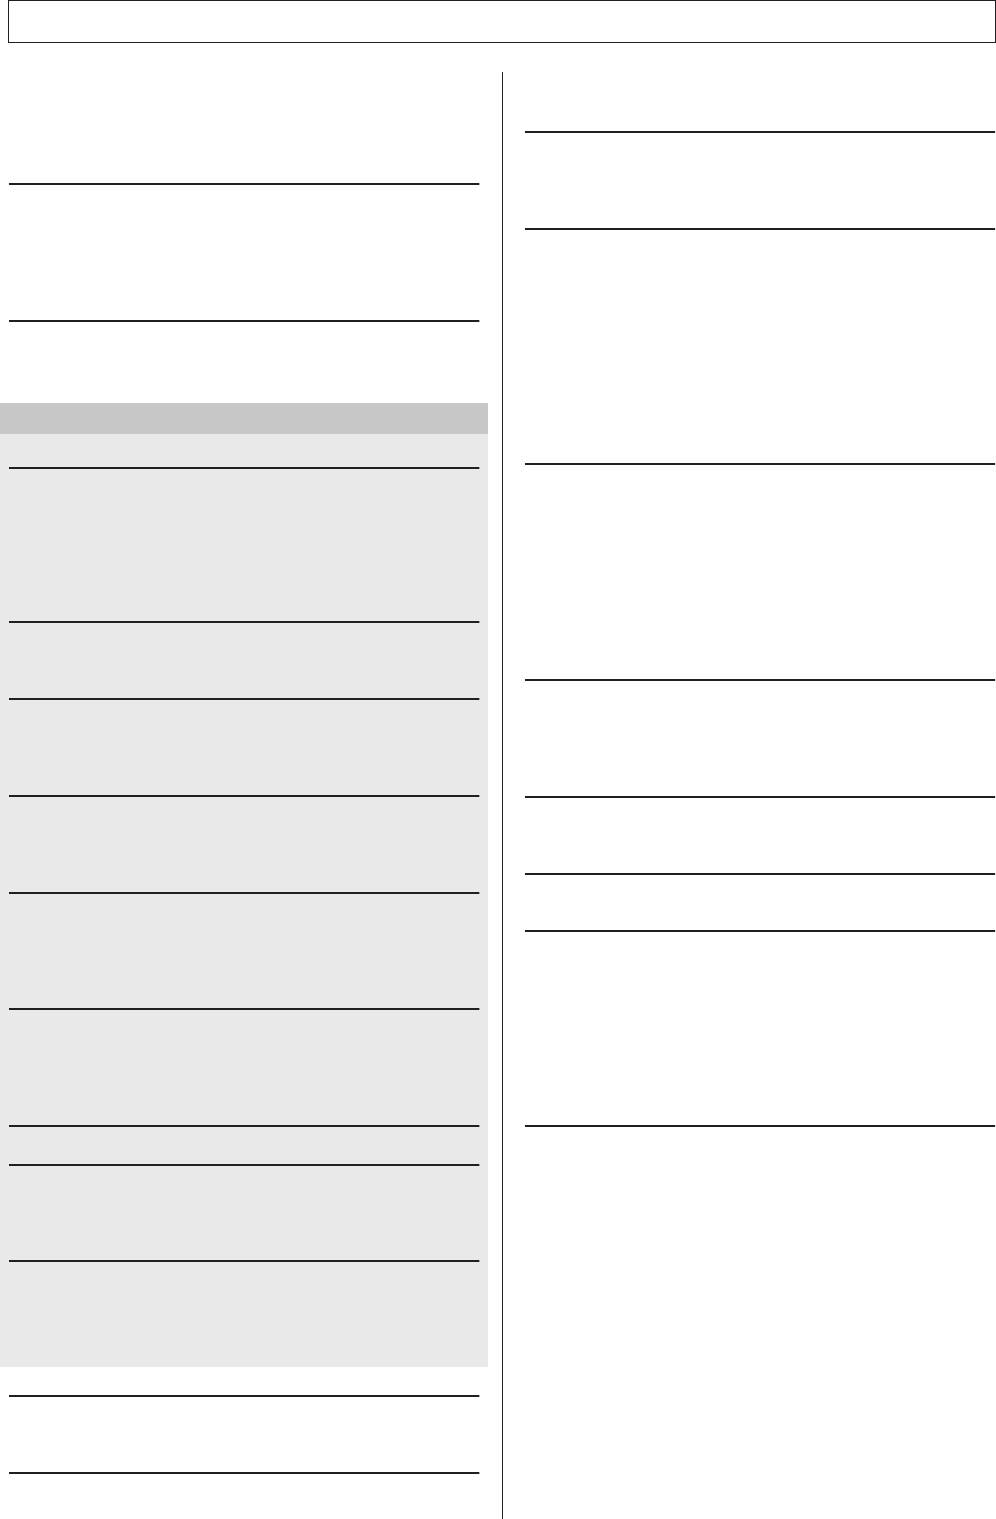
■ ÅÎÓÍ ÔËÚ‡ÌËfl ÔÂÂÏÂÌÌÓ„Ó ÚÓ͇
Установите переключатель [STANDBY/ON]
в положение STANDBY.
• ÑÎfl ÔËÚ‡ÌËfl ËÌÒÚÛÏÂÌÚ‡ ÓÚ ˝ÎÂÍÚÓÒÂÚË ËÒÔÓθÁÛÈÚ íéãúäé ·ÎÓÍ
ÔËÚ‡ÌËfl ÔÂÂÏÂÌÌÓ„Ó ÚÓ͇ Yamaha PA-5D (ËÎË ·ÎÓÍ ÔËÚ‡ÌËfl,
ÂÍÓÏẨӂ‡ÌÌ˚È ÍÓÔÓ‡ˆËÂÈ Yamaha). èË ËÒÔÓθÁÓ‚‡ÌËË ‰Û„Ëı
·ÎÓÍÓ‚ ÔËÚ‡ÌËfl ÏÓÊÌÓ Ì‡ÌÂÒÚË ÌÂÔÓÔ‡‚ËÏ˚È ‚‰ Ò‡ÏÓÏÛ ·ÎÓÍÛ
Ë ËÌÒÚÛÏÂÌÚÛ.
одключите блок питания переменного тока
(PA-5D или блок, рекомендованный корпорацией
Yamaha) к разъему питания инструмента.
одключите блок питания к электросети.
• éÚÍβ˜‡ÈÚ ·ÎÓÍ ÔËÚ‡ÌËfl ÔÂÂÏÂÌÌÓ„Ó ÚÓ͇, ÂÒÎË ËÌÒÚÛÏÂÌÚ ÌÂ
ËÒÔÓθÁÛÂÚÒfl, ‡ Ú‡ÍÊ ‚Ó ‚ÂÏfl „ÓÁ˚.
ÑÎfl ‡·ÓÚ˚ ËÌÒÚÛÏÂÌÚ‡ Ú·ÛÂÚÒfl ¯ÂÒÚ¸ ·‡Ú‡ÂÈ 1,5 Ç
‡Áχ «D», R20P (LR20) ËÎË ‡Ì‡Îӄ˘Ì˚Â. (êÂÍÓÏÂÌ‰Û˛ÚÒfl
˘ÂÎÓ˜Ì˚ ·‡Ú‡ÂË.) ÖÒÎË Á‡fl‰‡ ·‡Ú‡ÂË Ì ı‚‡Ú‡ÂÚ ‰Îfl
Ô‡‚ËθÌÓ„Ó ÙÛÌ͈ËÓÌËÓ‚‡ÌËfl ËÌÒÚÛÏÂÌÚ‡, ÌÂÓ·ıÓ‰ËÏÓ
Á‡ÏÂÌËÚ¸ ·‡Ú‡ÂË, Òӷ≇fl ÓÒÌÓ‚Ì˚ ÏÂ˚
Ô‰ÓÒÚÓÓÊÌÓÒÚË, Ô˂‰ÂÌÌ˚ ÌËÊÂ.
èË ÌÂÓ·ıÓ‰ËÏÓÒÚË ÒÓı‡ÌËÚ ‚Ò ‚‡ÊÌ˚ ‰‡ÌÌ˚Â
(ÒÏ. ÒÚ. 49), ÔÓÒÍÓθÍÛ ÔË Á‡ÏÂÌ ·‡Ú‡ÂÈ Ô‡‡ÏÂÚ˚
̇ÒÚÓÈÍË Ô‡ÌÂÎË ·Û‰ÛÚ ÛÚÂflÌ˚.
PA-5D
ùÎÂÍÚÓÓÁÂÚ͇
■ ŇڇÂË
Откройте крышку отсека для батарей,
расположенную на нижней панели инструмента.
ставьте шесть новых батарей. Обратите
внимание на маркировку полярности
внутри отсека.
акройте и защелкните крышку отсека.
• èË ÔÓ‰Íβ˜ÂÌËË ·ÎÓ͇ ÔËÚ‡ÌËfl ÔÂÂÏÂÌÌÓ„Ó ÚÓ͇ ÔËÚ‡ÌË ‡‚ÚÓχÚ˘ÂÒÍË
̇˜Ë̇ÂÚ ÔÓÒÚÛÔ‡Ú¸ ÓÚ ˝ÎÂÍÚÓÒÂÚË, ‰‡Ê ÂÒÎË ‚ ÒËÌÚÂÁ‡ÚÓÂ
ÛÒÚ‡ÌÓ‚ÎÂÌ˚ ·‡Ú‡ÂË.
10 DGX-220/YPG-225 êÛÍÓ‚Ó‰ÒÚ‚Ó ÔÓθÁÓ‚‡ÚÂÎfl
• àÒÔÓθÁÛÈÚ ÚÓθÍÓ Ï‡„‡ÌˆÂ‚˚ ËÎË ˘ÂÎÓ˜Ì˚ ·‡Ú‡ÂË. ÑÛ„Ë ÚËÔ˚
·‡Ú‡ÂÈ (‚Íβ˜‡fl ‡ÍÍÛÏÛÎflÚÓÌ˚Â) ÏÓ„ÛÚ ‚˚Á‚‡Ú¸ ÔÂÂÔ‡‰˚ ̇ÔflÊÂÌËfl
ÔË ÔÓÌËÊÂÌËË Á‡fl‰‡ ·‡Ú‡ÂË. ùÚÓ ÏÓÊÂÚ ÔË‚ÂÒÚË Í ÔÓÚ ‰‡ÌÌ˚ı ‚Ó
Ùν¯-Ô‡ÏflÚË.
•ìÒÚ‡ÌÓ‚ËÚ ÌÓ‚˚ ·‡Ú‡ÂË, Òӷ≇fl Ô‡‚ËθÌÛ˛ ÔÓÎflÌÓÒÚ¸
(Í‡Í ÔÓ͇Á‡ÌÓ). çÂÔ‡‚ËθÌÓ ÛÒÚ‡ÌÓ‚ÎÂÌÌ˚ ·‡Ú‡ÂË ÏÓ„ÛÚ ÒÚ‡Ú¸ Ô˘ËÌÓÈ
Ô„‚‡, ÔÓʇ‡ ËÎË ÛÚ˜ÍË Â‰ÍËı ıËÏË͇ÚÓ‚.
• èË ‡Áfl‰Í ·‡Ú‡ÂÈ Á‡ÏÂÌËÚ ‚ÂÒ¸ ̇·Ó ËÁ ¯ÂÒÚË ·‡Ú‡ÂÈ. çÖ
àëèéãúáìâíÖ ÒÚ‡˚ ·‡Ú‡ÂË ‚ÏÂÒÚÂ Ò ÌÓ‚˚ÏË. ç ËÒÔÓθÁÛÈÚÂ
Ó‰ÌÓ‚ÂÏÂÌÌÓ ‡ÁÌ˚ ÚËÔ˚ ·‡Ú‡ÂÈ (̇ÔËÏÂ, ˘ÂÎÓ˜Ì˚Â Ë Ï‡„‡ÌˆÂ‚˚Â).
• ÖÒÎË ËÌÒÚÛÏÂÌÚ Ì ·Û‰ÂÚ ËÒÔÓθÁÓ‚‡Ú¸Òfl ‚ Ú˜ÂÌË ‰ÎËÚÂθÌÓ„Ó
‚ÂÏÂÌË, ËÁ‚ÎÂÍËÚ ·‡Ú‡ÂË, ˜ÚÓ·˚ ËÁ·Âʇڸ ‚ÓÁÏÓÊÌÓÈ ÛÚ˜ÍË
˝ÎÂÍÚÓÎËÚ‡.
• èË Ô‰‡˜Â ‰‡ÌÌ˚ı ‚Ó Ùν¯-Ô‡ÏflÚ¸ ÔÓθÁÛÈÚÂÒ¸ ·ÎÓÍÓÏ ÔËÚ‡ÌËfl
ÔÂÂÏÂÌÌÓ„Ó ÚÓ͇. ÇÓ ‚ÂÏfl Ú‡ÍÓÈ ÓÔ‡ˆËË ·‡Ú‡ÂË (‚Íβ˜‡fl
‡ÍÍÛÏÛÎflÚÓÌ˚Â) ÏÓ„ÛÚ ·˚ÒÚÓ ‡Áfl‰ËÚ¸Òfl. ÖÒÎË ÔË Ô‰‡˜Â
‰‡ÌÌ˚ı ·‡Ú‡ÂË ‡Áfl‰ËÎËÒ¸, ‚Ò Ô‰‡ÌÌ˚Â Ë Ô‰‡‚‡ÂÏ˚ ‰‡ÌÌ˚Â
·Û‰ÛÚ ÛÚÂflÌ˚.
ç‡ÒÚÓÈ͇
ÇÒ ÌÂÓ·ıÓ‰ËÏ˚ ÔÓ‰Íβ˜ÂÌËfl ÒΉÛÂÚ ‚˚ÔÓÎÌËÚ¸ Ñé ‚Íβ˜ÂÌËfl ÔËÚ‡ÌËfl.
èÓ‰Íβ˜ÂÌË ̇ۯÌËÍÓ‚
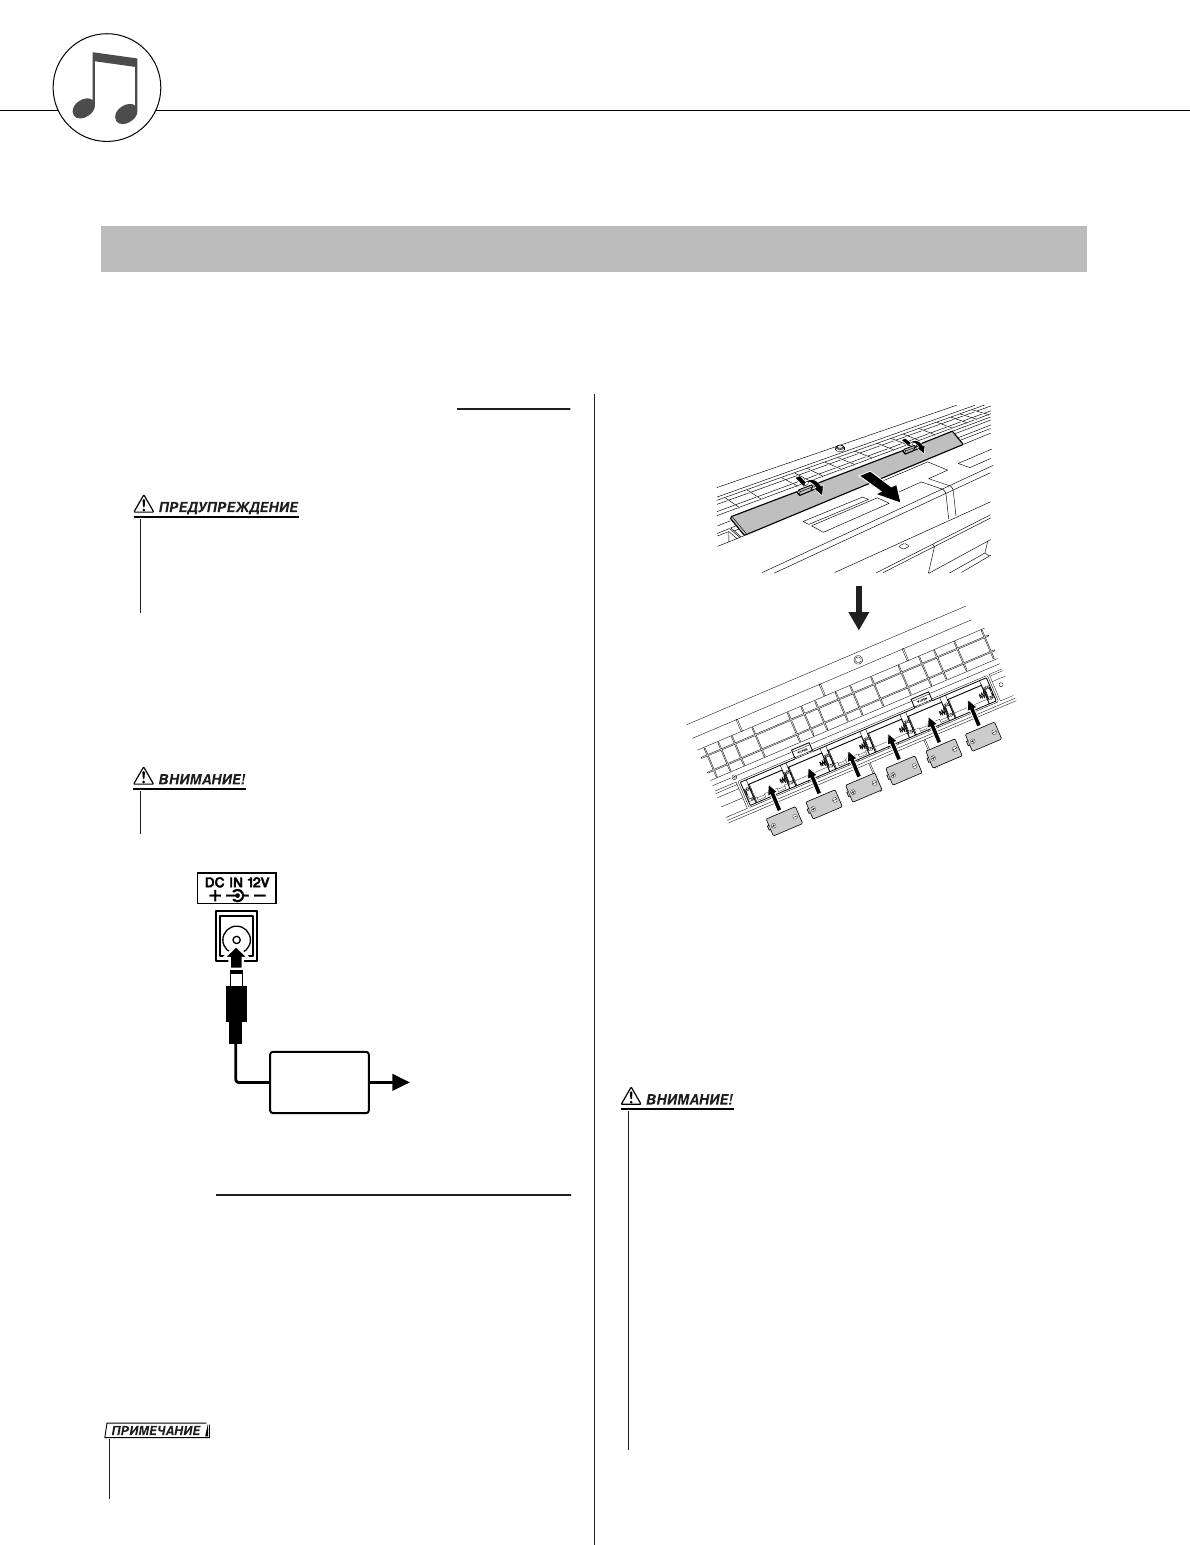
èÓ‰Íβ˜ÂÌËÂ Í ÍÓÏÔ¸˛ÚÂÛ (USB-ÔÓÚ)
(‡Á˙ÂÏ PHONES/OUTPUT)
ри подключении шнура к этому гнезду колонки
DGX-220/YPG-225 автоматически отключаются.
оединив USB-порт инструмента с USB-портом
нездо PHONES/OUTPUT можно также
компьютера, вы можете осуществлять обмен
использовать как внешний выход. гнезду
данными исполнения и песенными файлами между
PHONES/OUTPUT можно подключить усилитель
этими устройствами (стр. 79). ля использования
клавиатуры, стереосистему, микшер, магнитофон
функций передачи данных USB выполните
или другое линейное устройство для передачи
следующие действия:
выходного сигнала от инструмента к подключенному
•ì·Â‰ËÚÂÒ¸, ˜ÚÓ ÔÂÂÍβ˜‡ÚÂθ POWER ËÌÒÚÛÏÂÌÚ‡
устройству.
ÛÒÚ‡ÌÓ‚ÎÂÌ ‚ ÔÓÎÓÊÂÌË OFF, Á‡ÚÂÏ ‚ÓÒÔÓθÁÛÈÚÂÒ¸
͇·ÂÎÂÏ USB ‰Îfl ÔÓ‰Íβ˜ÂÌËfl ËÌÒÚÛÏÂÌÚ‡ Í ÍÓÏÔ¸˛ÚÂ-
Û. èÓ‰Íβ˜Ë‚ ͇·Âθ, ‚Íβ˜ËÚ ÔËÚ‡ÌË ËÌÒÚÛÏÂÌÚ‡.
• ç ÒΉÛÂÚ ‰ÓÎ„Ó ËÒÔÓθÁÓ‚‡Ú¸ ̇ۯÌËÍË ÔË ÔÓ‚˚¯ÂÌÌÓÏ ÛÓ‚ÌÂ
•ìÒÚ‡ÌÓ‚ËÚ ̇ ÍÓÏÔ¸˛Ú ‰‡È‚ USB MIDI.
„ÓÏÍÓÒÚË. ùÚÓ ÏÓÊÂÚ ÔË‚ÂÒÚË Í Ì‡Û¯ÂÌ˲ ÒÎÛı‡.
Установка драйвера USB MIDI описана на стр. 87.
• Ç‡Ï ÔÓÚ·ÛÂÚÒfl ÔËÓ·ÂÒÚË Í‡·Âθ USB (҉·ڸ ˝ÚÓ ÏÓÊÌÓ ‚ ÏÛÁ˚͇θÌÓÏ
χ„‡ÁËÌÂ, ÍÓÏÔ¸˛ÚÂÌÓÏ Ï‡„‡ÁËÌ ËÎË ‚ χ„‡ÁËÌ ˝ÎÂÍÚÓÔË·ÓÓ‚).
• óÚÓ·˚ Ì Ôӂ‰ËÚ¸ ‰Ë̇ÏËÍË, Ô‰ Ëı ÔÓ‰Íβ˜ÂÌËÂÏ ÛÒÚ‡ÌÓ‚ËÚÂ
ÏËÌËχθÌÛ˛ „ÓÏÍÓÒÚ¸ ̇ ‚̯ÌËı ÛÒÚÓÈÒÚ‚‡ı. çÂÒӷβ‰ÂÌË ˝ÚÓ„Ó
Ô‡‚Ë· ÏÓÊÂÚ ÔË‚ÂÒÚË Í ÔÓ‡ÊÂÌ˲ ˝ÎÂÍÚ˘ÂÒÍËÏ ÚÓÍÓÏ ËÎË
ÔÓ‚ÂʉÂÌ˲ Ó·ÓÛ‰Ó‚‡ÌËfl. ìÒÚ‡ÌÓ‚ËÚ ̇ ‚ÒÂı ÛÒÚÓÈÒÚ‚‡ı
ÇÍβ˜ÂÌË ÔËÚ‡ÌËfl
ÏËÌËχθÌÛ˛ „ÓÏÍÓÒÚ¸ Ë ‚Ó ‚ÂÏfl Ë„˚ ̇ ËÌÒÚÛÏÂÌÚ ÔÓÒÚÂÔÂÌÌÓ
Û‚Â΢˂‡Èڠ ‰Ó ÌÂÓ·ıÓ‰ËÏÓ„Ó ÛÓ‚Ìfl.
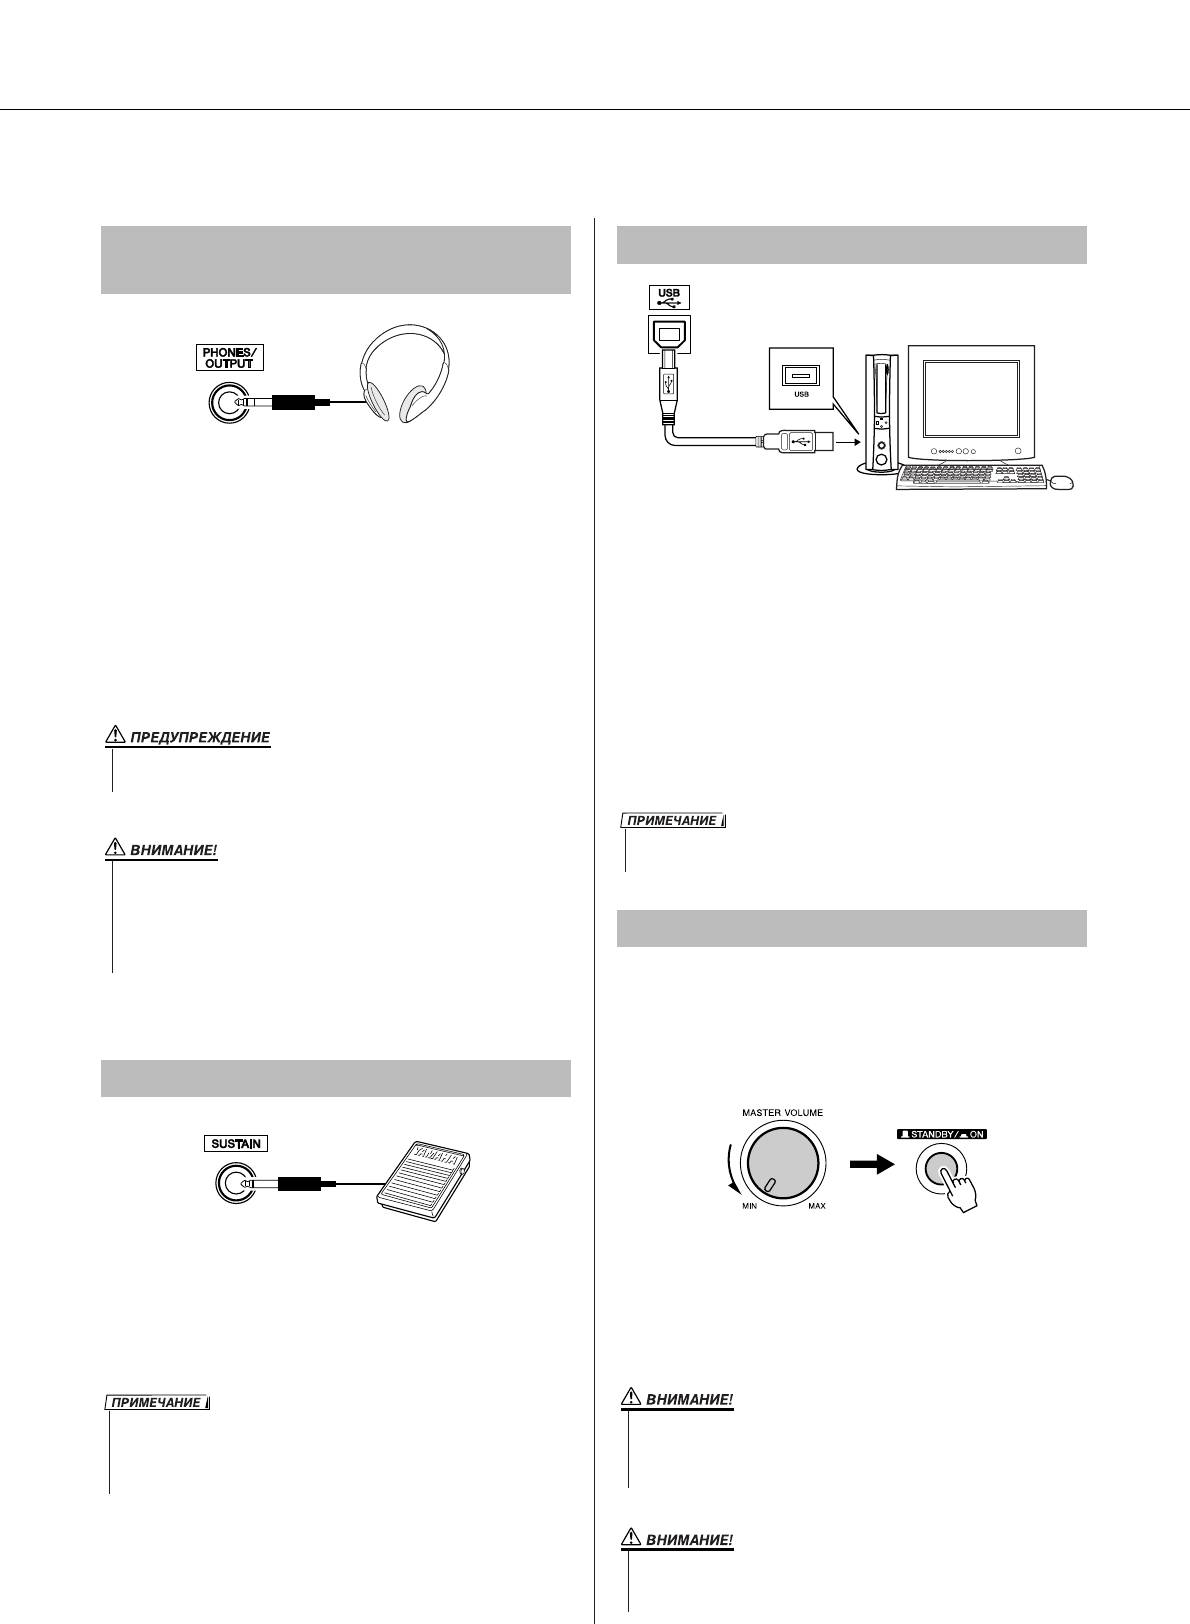
Установите минимальную громкость, повернув
регулятор [MASTER VOLUME] влево, и включите
питание, нажав переключатель [STANDBY/ON].
тобы выключить питание, снова нажмите кнопку
[STANDBY/ON].
èÓ‰Íβ˜ÂÌË Ô‰‡ÎË („ÌÂÁ‰Ó SUSTAIN)
ри включении питания сохраненные во флэш-
ункция сустейна позволяет воспроизвести
памяти данные загружаются в инструмент. сли во
длительное звучание нот при нажатии педали.
флэш-памяти не сохранена резервная копия данных,
одключите к этому разъему педальный
при включении питания восстанавливаются
переключатель FC4 или FC5 и используйте его для
исходные настройки производителя.
включения или выключения эффекта «сустейн».
• è‰ ‚Íβ˜ÂÌËÂÏ ÔËÚ‡ÌËfl ۷‰ËÚÂÒ¸, ˜ÚÓ Ô‰‡Î¸Ì˚È ÔÂÂÍβ˜‡ÚÂθ
Ô‡‚ËθÌÓ ÔÓ‰ÒÓ‰ËÌÂÌ Í „ÌÂÁ‰Û SUSTAIN.
• ç ̇ÊËχÈÚ ̇ Ô‰‡Î¸ ‚ ÏÓÏÂÌÚ ‚Íβ˜ÂÌËfl ÔËÚ‡ÌËfl. èË ˝ÚÓÏ ËÁÏÂÌflÂÚÒfl
ÔËÌflÚ‡fl ÔÓÎflÌÓÒÚ¸ Ô‰‡ÎË, ˜ÚÓ Ô˂‰ÂÚ Í Â ӷ‡ÚÌÓÏÛ ‰ÂÈÒڂ˲.
DGX-220/YPG-225 êÛÍÓ‚Ó‰ÒÚ‚Ó ÔÓθÁÓ‚‡ÚÂÎfl 11
• чÊ ÂÒÎË ÍÌÓÔ͇ ÔËÚ‡ÌËfl ̇ıÓ‰ËÚÒfl ‚ ÔÓÎÓÊÂÌËË STANDBY, ËÌÒÚÛÏÂÌÚ
ÔÓ‰ÓÎʇÂÚ ‚ ÏËÌËχθÌÓÏ ÍÓ΢ÂÒÚ‚Â ÔÓÚ·ÎflÚ¸ ˝ÎÂÍÚÓ˝Ì„˲. ÖÒÎË
ËÌÒÚÛÏÂÌÚ ‰ÓÎ„Ó Ì ËÒÔÓθÁÛÂÚÒfl, ÓÚÍβ˜ËÚ ÓÚ ÒÂÚË ·ÎÓÍ ÔËÚ‡ÌËfl
ÔÂÂÏÂÌÌÓ„Ó ÚÓ͇ Ë/ËÎË ‚˚̸Ú ·‡Ú‡ÂË.
• çË ‚ ÍÓÂÏ ÒÎÛ˜‡Â Ì ÓÚÍβ˜‡ÈÚ ÔËÚ‡ÌËÂ, ÂÒÎË Ì‡ ˝Í‡Ì ‚˚‚‰ÂÌÓ
ÒÓÓ·˘ÂÌË «WRITING!». ùÚÓ ÏÓÊÂÚ Ôӂ‰ËÚ¸ ‚ÌÛÚÂÌÌ˛˛ Ùν¯-Ô‡ÏflÚ¸
Ë ÔË‚ÂÒÚË Í ÔÓÚ ‰‡ÌÌ˚ı.
è‡ÌÂθ ÛÔ‡‚ÎÂÌËfl Ë ‡Á˙ÂÏ˚
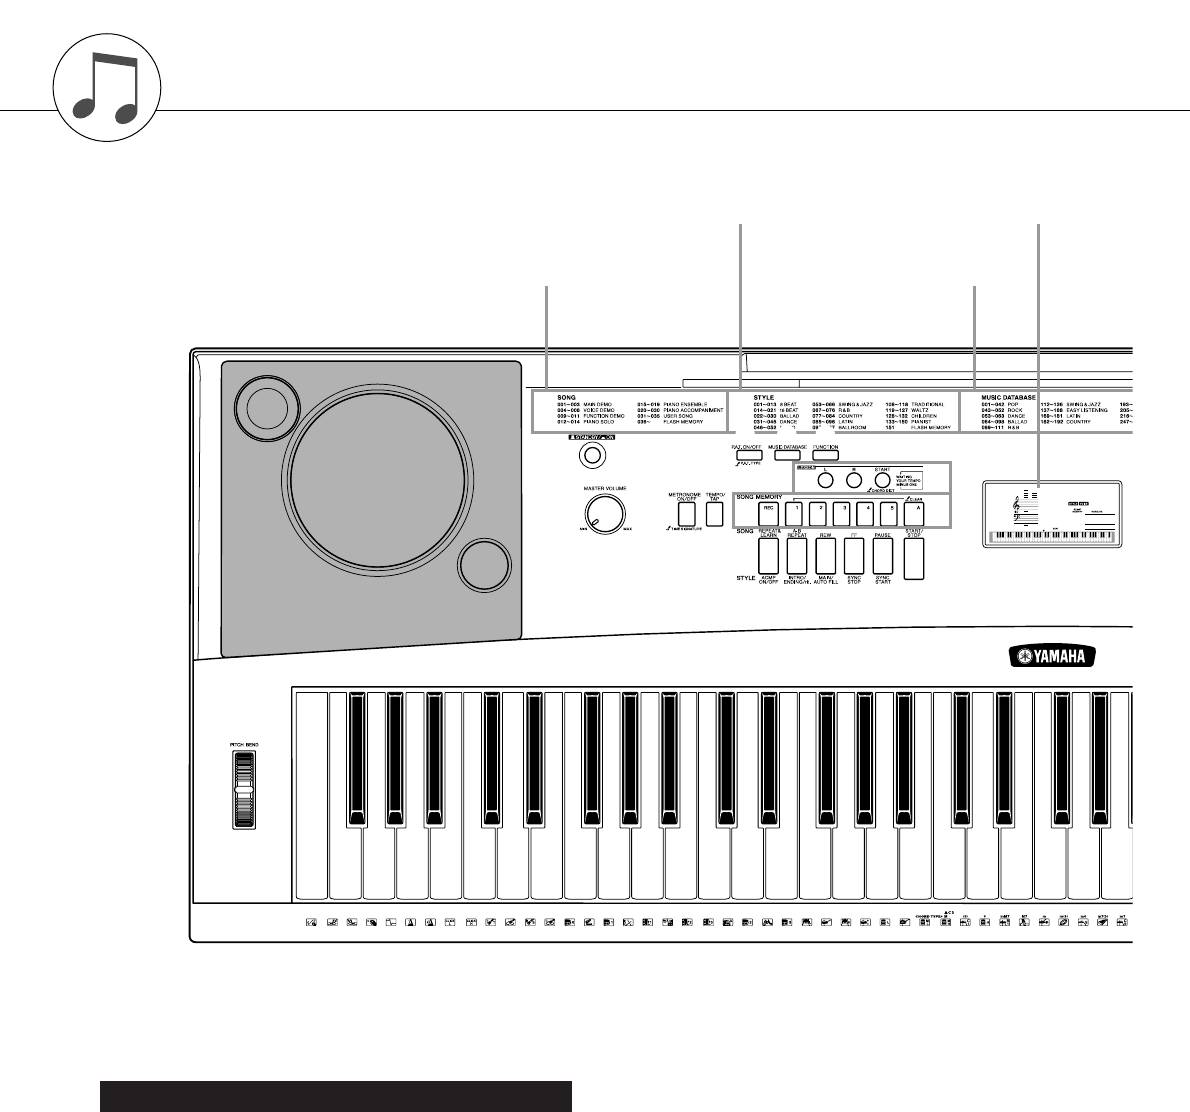
è‰Ìflfl Ô‡ÌÂθ
q èÂÂÍβ˜‡ÚÂθ [STANDBY/ON]……………….. ÒÚ. 11
!2 äÌÓÔ͇ [REW]/[MAIN/AUTO FILL] …………ÒÚ. 26, 64
w ê„ÛÎflÚÓ [MASTER VOLUME]…………….ÒÚ. 11, 50
!3 äÌÓÔ͇ [FF]/[SYNC STOP]…………………….ÒÚ. 26, 64
e äÌÓÔ͇ [P.A.T. ON/OFF] …………………………….ÒÚ. 30
!4 äÌÓÔ͇ [PAUSE]/[SYNC START] …………..ÒÚ. 26, 63
r äÌÓÔ͇ [MUSIC DATABASE] ……………………..ÒÚ. 42
!5 äÌÓÔ͇ [START/STOP] ……………………ÒÚ. 19, 26, 51
t äÌÓÔ͇ [FUNCTION] ………………………………….ÒÚ. 75
!6 äÌÓÔ͇ [SONG]………………………………………….ÒÚ. 25
y äÌÓÔÍË LESSON [L], [R], [START] ……………..ÒÚ. 37
!7 äÌÓÔ͇ [EASY SONG ARRANGER]…………….ÒÚ. 43
u äÌÓÔ͇ [METRONOME ON/OFF]………………… ÒÚ. 56
!8 äÌÓÔ͇ [STYLE]…………………………………………ÒÚ. 19
i äÌÓÔ͇ [TEMPO/TAP]………………………………..ÒÚ. 35
!9 äÌÓÔ͇ [VOICE]…………………………………………ÒÚ. 14
o äÌÓÔÍË SONG MEMORY [REC],
@0 ÑËÒÍ ÛÔ‡‚ÎÂÌËfl ………………………………..ÒÚ. 51, 75
[1]–[5], [A]………………………………………………….ÒÚ. 45
@1 äÌÓÔÍË CATEGORY [ ] Ë [ ]……………..ÒÚ. 51, 75
!0 äÌÓÔ͇ [REPEAT & LEARN]/
[ACMP ON/OFF]…………………………………… ÒÚ. 41, 20
!1 äÌÓÔ͇ [A-B REPEAT]/
[INTRO/ENDING/rit.] ……………………………..ÒÚ. 71, 64
12 DGX-220/YPG-225 êÛÍÓ‚Ó‰ÒÚ‚Ó ÔÓθÁÓ‚‡ÚÂÎfl
f
è‰Ìflfl Ô‡ÌÂθ
ëÔËÒÓÍ Í‡Ú„ÓËÈ ÒÚËÎÂÈ (ÒÚ. 106) ùÍ‡Ì (ÒÚ. 52)
ëÔËÒÓÍ Í‡Ú„ÓËÈ ÔÂÒÂÌ (ÒÚ. 27)
ëÔËÒÓÍ ÏÛÁ˚͇θÌ˚ı ·‡Á
‰‡ÌÌ˚ı (ÒÚ. 107)
e r t
q
u
i
y
GrandPno
001
w
o
001
!0 !1 !2 !3 !4 !5
@9
r
è‡ÌÂθ ÛÔ‡‚ÎÂÌËfl Ë ‡Á˙ÂÏ˚
001
ᇉÌflfl Ô‡ÌÂθ
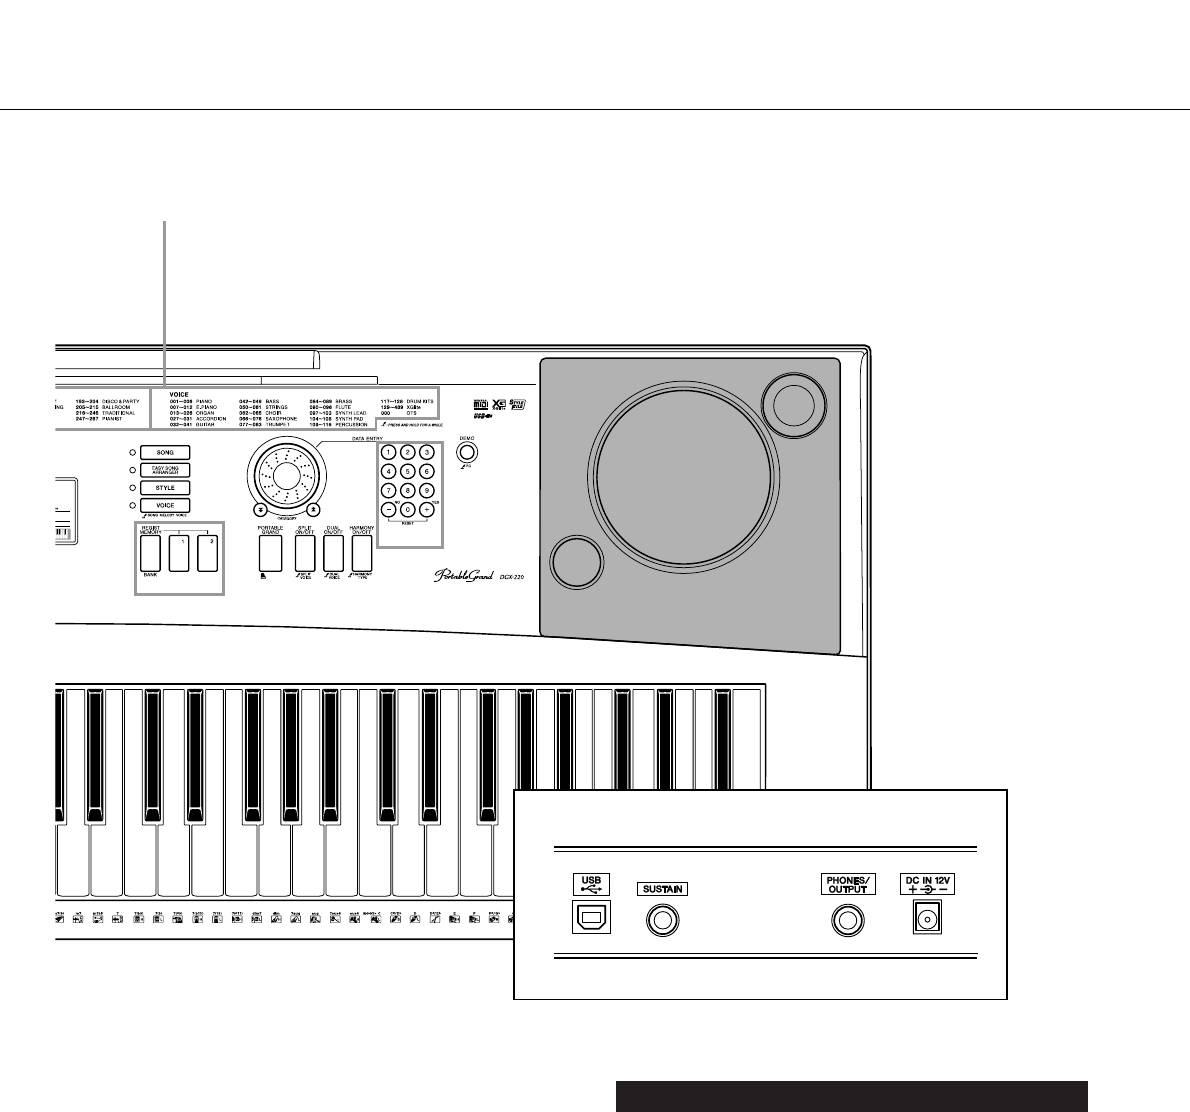
#0 USB-ÔÓÚ …………………………………………….ÒÚ. 11, 79
#1 ê‡Á˙ÂÏ SUSTAIN……………………………………….ÒÚ. 11
#2 ê‡Á˙ÂÏ PHONES/OUTPUT …………………………ÒÚ. 11
#3 ê‡Á˙ÂÏ DC IN 12V ……………………………………..ÒÚ. 10
DGX-220/YPG-225 êÛÍÓ‚Ó‰ÒÚ‚Ó ÔÓθÁÓ‚‡ÚÂÎfl 13
n
ëÔËÒÓÍ Í‡Ú„ÓËÈ ÚÂÏ·Ó‚ (ÒÚ. 100)
!6
@3
!7
@0
o
!8
!9
@1
@2
@5
@6 @7 @8
@4
ᇉÌflfl Ô‡ÌÂθ
#0 #1 #2 #3
@2 ñËÙÓ‚˚ ÍÌÓÔÍË [0]–[9],
ÍÌÓÔÍË [+] Ë [-] …………………………………….ÒÚ. 51, 75
@3 äÌÓÔ͇ [DEMO] …………………………………………ÒÚ. 26
@4 äÌÓÔÍË REGIST MEMORY
[MEMORY/BANK], [1], [2]…………………………… ÒÚ. 73
@5 äÌÓÔ͇ [PORTABLE GRAND]…………………….ÒÚ. 17
@6 äÌÓÔ͇ [SPLIT ON/OFF] …………………………….ÒÚ. 16
@7 äÌÓÔ͇ [DUAL ON/OFF] …………………………….ÒÚ. 15
@8 äÌÓÔ͇ [HARMONY ON/OFF]……………………..ÒÚ. 53
@9 äÓÎÂÒÓ PITCH BEND …………………………………ÒÚ. 59
Û
Í
Ó
‚
Â
Ó
Ó
‰
Í
Ò
Ú
Ú
‡
‚
Ó
ÇÓÒÔÓËÁ‚‰ÂÌË ‡ÁÌ˚ı ËÌÒÚÛÏÂÌڇθÌ˚ı ÚÂÏ·Ó‚
ä
ä‡ÚÍÓ ÛÍÓ‚Ó‰ÒÚ‚Ó
Ç ‰ÓÔÓÎÌÂÌËÂ Í ÚÂÏ·‡Ï ÙÓÚÂÔ¸flÌÓ, Ó„‡Ì‡ Ë ‰Û„Ëı Ú‡‰ËˆËÓÌÌ˚ı Í·‚˯Ì˚ı
ËÌÒÚÛÏÂÌÚÓ‚ ÏÓÊÌÓ ‚ÓÒÔÓËÁ‚Ó‰ËÚ¸ ÏÌÓÊÂÒÚ‚Ó ‰Û„Ëı ÚÂÏ·Ó‚ Ë Ì‡Ò·ʉ‡Ú¸-
Òfl Á‚Û˜‡ÌËÂÏ „ËÚ‡˚, ·‡Ò-„ËÚ‡˚, ÒÚÛÌÌ˚ı, Ò‡ÍÒÓÙÓ̇, ÚÛ·˚, Û‰‡Ì˚ı Ë ÔÂÍÛÒ-
ÒËÓÌÌ˚ı ËÌÒÚÛÏÂÌÚÓ‚, ÒÔˆ˝ÙÙÂÍÚÓ‚ … Ó„ÓÏÌ˚Ï ÏÛÁ˚͇θÌ˚Ï ‡ÁÌÓÓ·‡ÁËÂÏ.
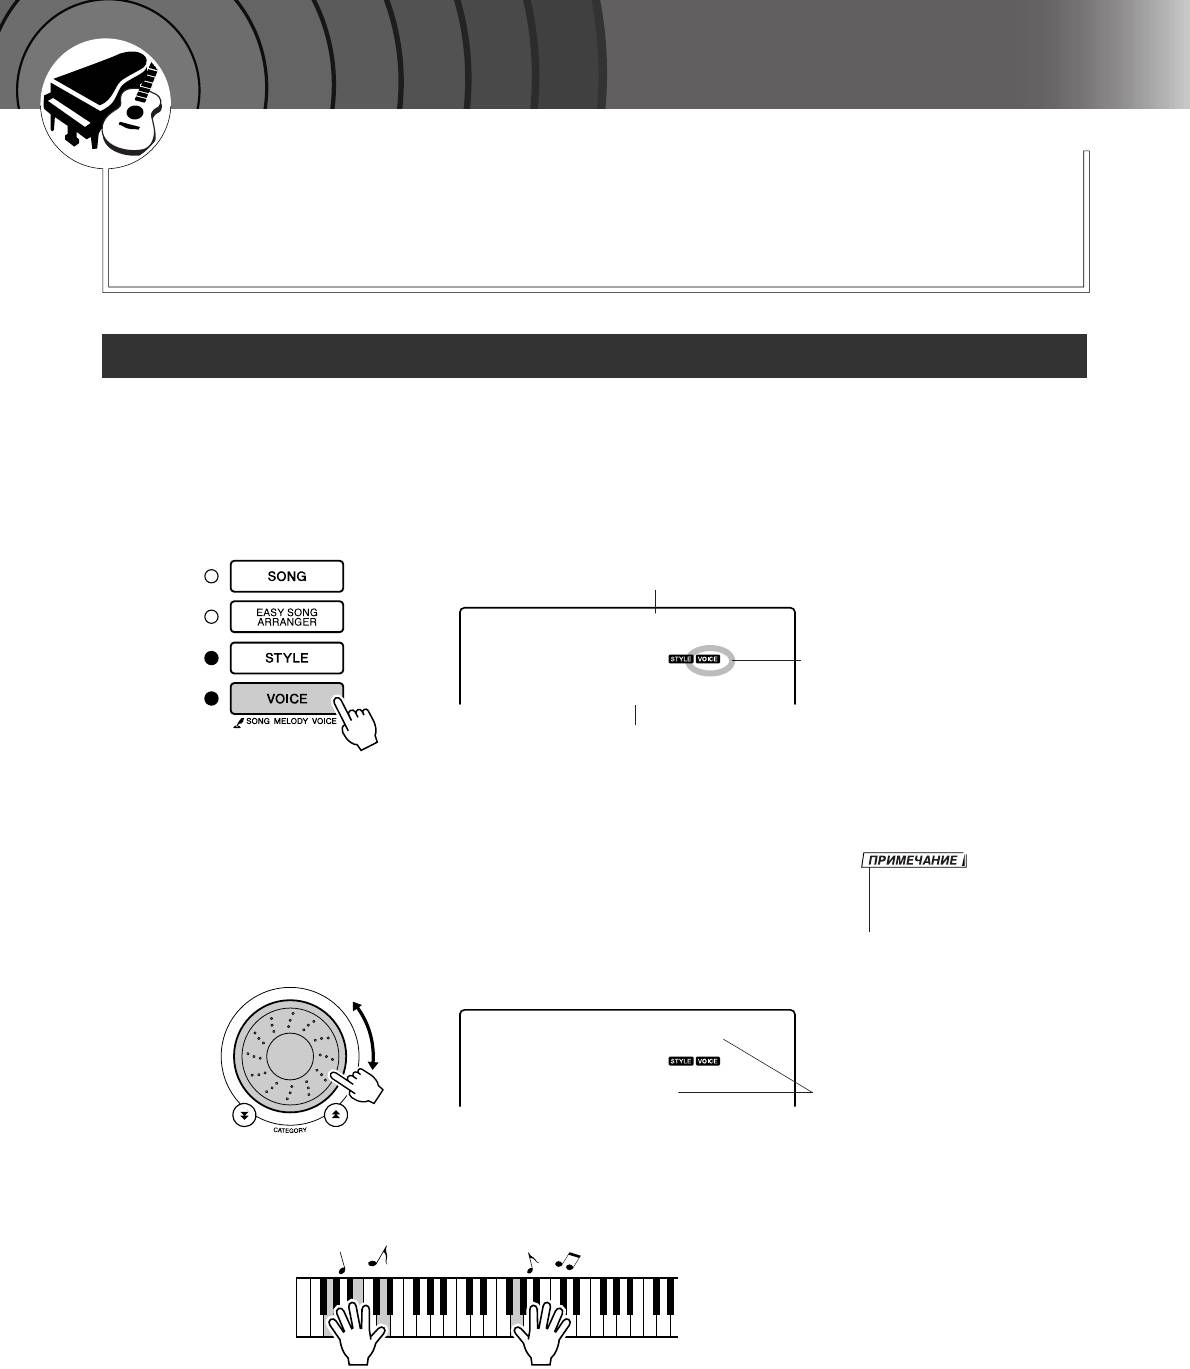
Ç˚·Ó Ë ‚ÓÒÔÓËÁ‚‰ÂÌË ÚÂÏ·‡ — ÂÊËÏ MAIN (éÒÌÓ‚ÌÓÈ)
ыделенный в этой процедуре тембр будет звучать во время игры на клавиатуре.
ç‡ÊÏËÚ ÍÌÓÔÍÛ [VOICE].
1
Отобразится номер и название тембра.
ç‡Á‚‡ÌË ÚÂÏ·‡
GrandPno
èÓfl‚ÎflÂÚÒfl ‚ ÂÊËÏ Voice.
001
çÓÏÂ ÚÂÏ·‡
Ç˚·ÂËÚ ÚÂÏ·, ÍÓÚÓ˚È ‰ÓÎÊÂÌ Á‚Û˜‡Ú¸.
2
ри появлении на экране названия тембра поверните диск. удут
• Ç˚·ÂËÚ ÌÛÊÌ˚È ÚÂÏ· Ò ÔÓÏÓ˘¸˛
последовательно выбираться и отображаться доступные тембры.
ÍÌÓÔÓÍ CATEGORY [ ] Ë [ ] ÔÓÒÎÂ
f
r
ыбранный тембр становится основным.
̇ʇÚËfl ÍÌÓÔÍË [VOICE]. (ëÚ. 51)
этом примере выбирается тембр «092 Flute».
Flute
092
Ç˚·‡ÌÓ «092 Flute»
à„‡ÈÚ ̇ Í·‚ˇÚÛÂ.
3
опробуйте выбрать другие тембры и играть с их помощью.
14 DGX-220/YPG-225 êÛÍÓ‚Ó‰ÒÚ‚Ó ÔÓθÁÓ‚‡ÚÂÎfl
ÇÓÒÔÓËÁ‚‰ÂÌË ‡ÁÌ˚ı ËÌÒÚÛÏÂÌڇθÌ˚ı ÚÂÏ·Ó‚
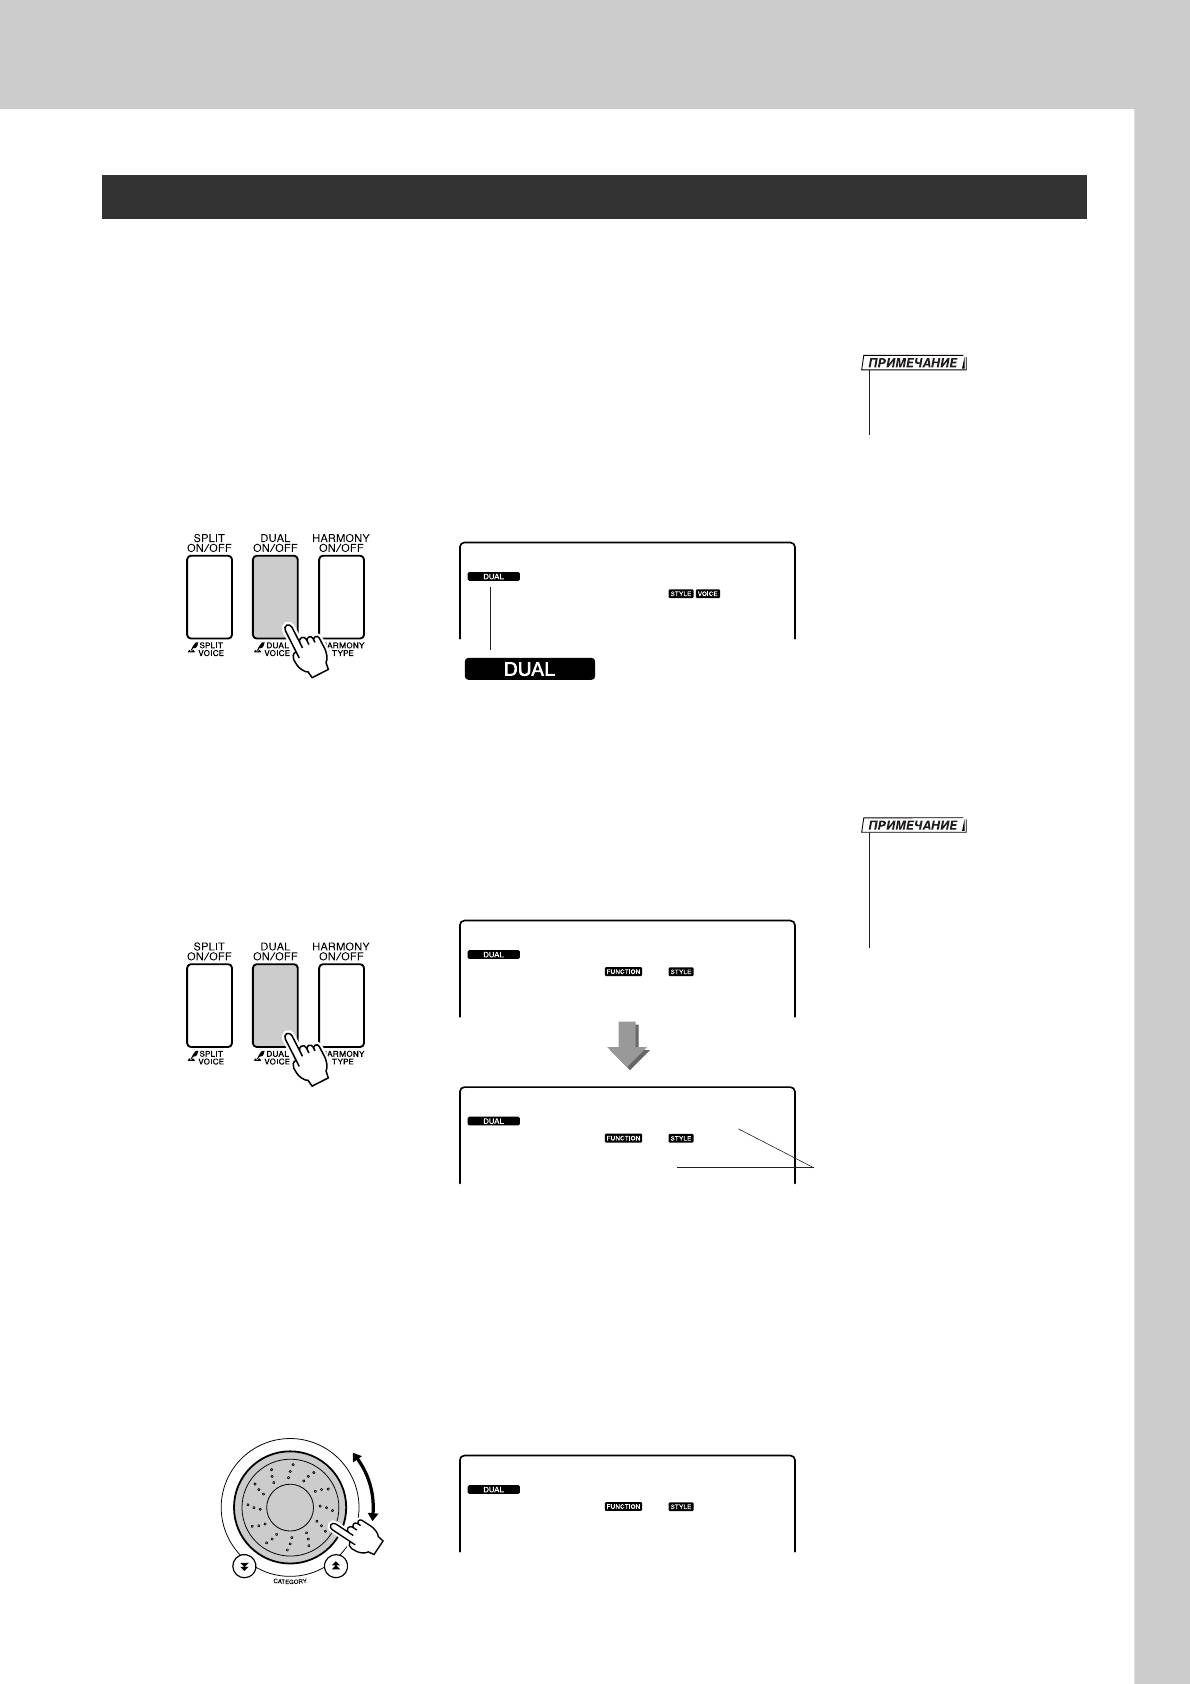
é‰ÌÓ‚ÂÏÂÌ̇fl Ë„‡ ‰‚ÛÏfl ÚÂÏ·‡ÏË — ÂÊËÏ DUAL (ç‡ÎÓÊÂÌË ÚÂÏ·Ó‚)
ожно выбрать второй тембр, который будет дополнять основной во время игры на клавиатуре.
гра с двумя тембрами называется игрой в режиме наложения тембров.
ç‡ÊÏËÚ ÍÌÓÔÍÛ [DUAL ON/OFF].
1
нопка [DUAL ON/OFF] используется для включения
• îÛÌÍˆË˛ ̇ÎÓÊÂÌËfl ÚÂÏ·Ó‚
и выключения режима наложения тембров.
ÌÂθÁfl ËÒÔÓθÁÓ‚‡Ú¸ ‚ ÂÊËÏÂ
сли функция включена, на экране отображается соответствующий
‡Áۘ˂‡ÌËfl ÔÂÒÌË (ÒÚ. 36).
значок. ыбранный дополнительный тембр будет звучать вместе
с основным во время игры на клавиатуре.
Flute
092
á̇˜ÓÍ Ì‡ÎÓÊÂÌËfl ÚÂÏ·Ó‚
ì‰ÂÊË‚‡ÈÚ ̇ʇÚÓÈ ÍÌÓÔÍÛ [DUAL ON/OFF] ‰Óθ¯Â
2
Ó‰ÌÓÈ ÒÂÍÛ̉˚.
а экране на несколько секунд появится сообщение «D.VOICE»
• ÑÎfl ‰ÓÒÚÛÔ‡ Í ˝Í‡ÌÛ
(аложение тембров), а затем – название выбранного
‰ÓÔÓÎÌËÚÂθÌÓ„Ó ÚÂÏ·‡ ÏÓÊÌÓ
дополнительного тембра.
Ú‡ÍÊ ̇ʇڸ ÍÌÓÔÍÛ [FUNCTION],
‡ Á‡ÚÂÏ Ò ÔÓÏÓ˘¸˛ ÍÌÓÔÓÍ
CATEGORY [ ] Ë [ ] ‚˚·‡Ú¸
f
r
˝ÎÂÏÂÌÚ «D.Voice».
D.Voice
ì‰ÂÊË‚‡ÈÚÂ
Marimba
ÍÌÓÔÍÛ Ì‡Ê‡ÚÓÈ
‰Óθ¯Â ÒÂÍÛ̉˚
íÂÍÛ˘ËÈ ‰ÓÔÓÎÌËÚÂθÌ˚È
110
ÚÂÏ·
Ç˚·ÂËÚ ‰ÓÔÓÎÌËÚÂθÌ˚È ÚÂÏ·.
3
ри появлении на экране названия дополнительного тембра
поверните диск, чтобы выбрать нужный тембр. ыбранный тембр
становится дополнительным.
этом примере попробуйте выбрать тембр «109 Vibraphone».
Vibes
109
DGX-220/YPG-225 êÛÍÓ‚Ó‰ÒÚ‚Ó ÔÓθÁÓ‚‡ÚÂÎfl 15
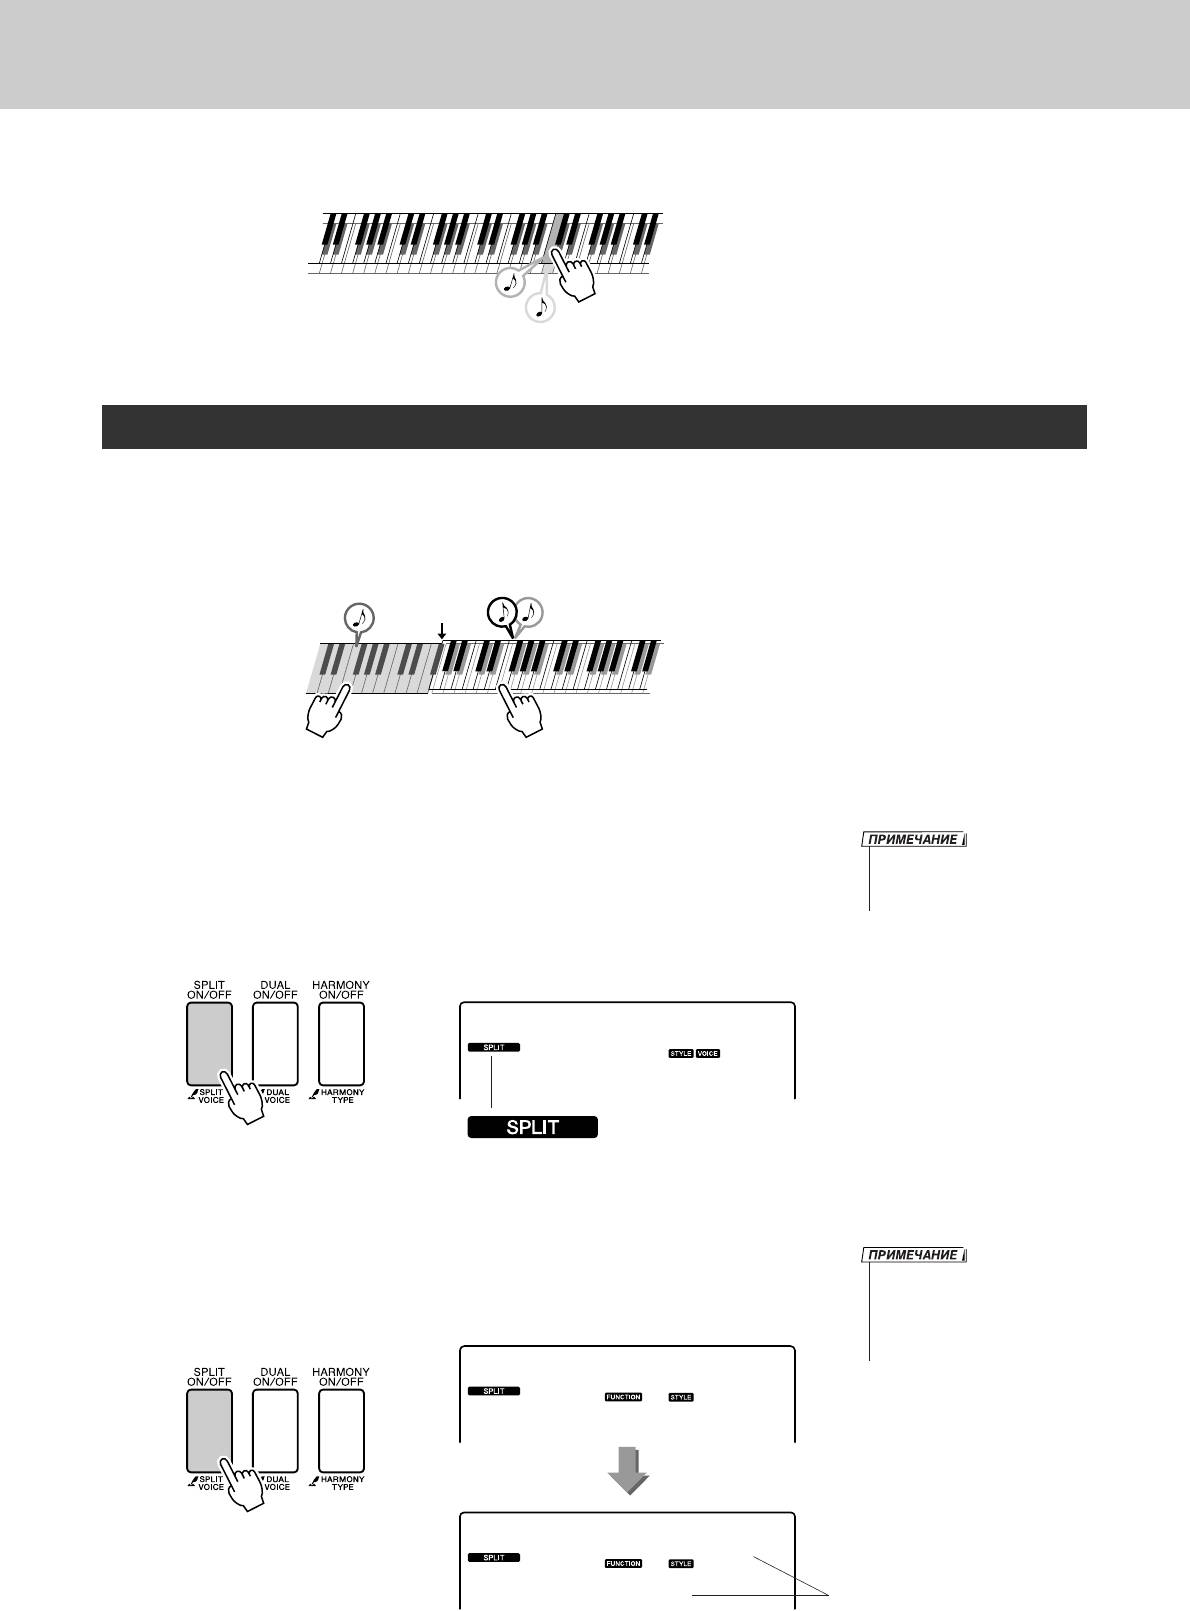
ÇÓÒÔÓËÁ‚‰ÂÌË ‡ÁÌ˚ı ËÌÒÚÛÏÂÌڇθÌ˚ı ÚÂÏ·Ó‚
à„‡ÈÚ ̇ Í·‚ˇÚÛÂ.
4
Ñ‚‡ ÚÂÏ·‡ Á‚Û˜‡Ú Ó‰ÌÓ‚ÂÏÂÌÌÓ.
опробуйте выбрать другие дополнительные тембры и играть в них.
à„‡ ‡ÁÌ˚ÏË ÚÂÏ·‡ÏË Ô‡‚ÓÈ Ë Î‚ÓÈ ÛÍÓÈ — ÂÊËÏ SPLIT (ê‡Á‰ÂÎÂÌË ÚÂÏ·Ó‚)
режиме разделения тембров можно играть разные тембры слева и справа от точки разделения
клавиатуры. Основной и дополнительный тембры можно играть справа от точки разделения
клавиатуры, а слева от нее играть еще один тембр, который называется «нижним тембром».
оложение точки разделения клавиатуры можно изменить по желанию (стр. 65).
íӘ͇
‡Á‰ÂÎÂÌËfl
éÒÌÓ‚ÌÓÈ Ë ‰ÓÔÓÎÌËÚÂθÌ˚È ÚÂÏ·˚ê‡Á‰ÂÎÂÌË ÚÂÏ·Ó‚
̇ Í·‚ˇÚÛÂ
ç‡ÊÏËÚ ÍÌÓÔÍÛ [SPLIT ON/OFF].
1
нопка [SPLIT ON/OFF] используется для включения
• îÛÌÍˆË˛ ‡Á‰ÂÎÂÌËfl ÚÂÏ·Ó‚
и выключения режима разделения тембров.
ÌÂθÁfl ËÒÔÓθÁÓ‚‡Ú¸ ‚ ÂÊËÏÂ
сли функция включена, на экране отображается соответствующий
‡Áۘ˂‡ÌËfl ÔÂÒÌË (ÒÚ. 36).
значок. ыбранный нижний тембр будет звучать во время игры
слева от точки разделения клавиатуры.
Flute
092
á̇˜ÓÍ ‡Á‰ÂÎÂÌËfl ÚÂÏ·Ó‚
ì‰ÂÊË‚‡ÈÚ ̇ʇÚÓÈ ÍÌÓÔÍÛ [SPLIT ON/OFF] ‰Óθ¯Â
2
Ó‰ÌÓÈ ÒÂÍÛ̉˚.
а экране на несколько секунд появится сообщение «S.VOICE»
• ÑÎfl ‰ÓÒÚÛÔ‡ Í ˝Í‡ÌÛ ÌËÊÌ„Ó
(азделение тембров), а затем – название выбранного
ÚÂÏ·‡ ÏÓÊÌÓ Ú‡ÍÊ ̇ʇڸ ÍÌÓÔÍÛ
нижнего тембра.
[FUNCTION], ‡ Á‡ÚÂÏ Ò ÔÓÏÓ˘¸˛
ÍÌÓÔÓÍ CATEGORY [ ] Ë [ ]
f
r
‚˚·‡Ú¸ ˝ÎÂÏÂÌÚ «S.Voice».
S.Voice
ì‰ÂÊË‚‡ÈÚ ÍÌÓÔÍÛ Ì‡Ê‡ÚÓÈ
FngrBass
‰Óθ¯Â ÒÂÍÛ̉˚
íÂÍÛ˘ËÈ ÌËÊÌËÈ ÚÂÏ·
042
16 DGX-220/YPG-225 êÛÍÓ‚Ó‰ÒÚ‚Ó ÔÓθÁÓ‚‡ÚÂÎfl

ÇÓÒÔÓËÁ‚‰ÂÌË ‡ÁÌ˚ı ËÌÒÚÛÏÂÌڇθÌ˚ı ÚÂÏ·Ó‚
Ç˚·ÂËÚÂ ÌËÊÌËÈ ÚÂÏ·.
3
ри появлении на экране названия нижнего тембра поверните диск,
чтобы выбрать нужный тембр. Этот выбранный тембр будет
звучать в качестве нижнего во время игры слева от точки
разделения клавиатуры. этом примере попробуйте выбрать тембр
«033 Folk Guitar».
Folk Gtr
033
ë˚„‡ÈÚ ̇ Í·‚ˇÚÛÂ.
4
опробуйте выбрать другие нижние тембры и играть в них.
à„‡ ÚÂÏ·ÓÏ Grand Piano
сли вы хотите просто играть в тембре рояля, то все, что нужно сделать, – это нажать одну кнопку.
ç‡ÊÏËÚ ÍÌÓÔÍÛ [PORTABLE GRAND].
ыбирается тембр «001 Grand Piano».
• èË Ì‡Ê‡ÚËË ÍÌÓÔÍË
[PORTABLE GRAND] Ò·‡Ò˚‚‡˛ÚÒfl
‚Ò ̇ÒÚÓÈÍË, ÍÓÏÂ
˜Û‚ÒÚ‚ËÚÂθÌÓÒÚË Í·‚ˇÚÛ˚
Í Ì‡Ê‡Ú˲. êÂÊËÏ˚ ̇ÎÓÊÂÌËfl
Ë ‡Á‰ÂÎÂÌËfl ÚÂÏ·Ó‚ Ú‡ÍÊÂ
ÓÚÍβ˜‡˛ÚÒfl, Ë ‚Òfl Í·‚ˇÚÛ‡
Á‚Û˜ËÚ ‚ ÚÂÏ·Â Grand Piano.
DGX-220/YPG-225 êÛÍÓ‚Ó‰ÒÚ‚Ó ÔÓθÁÓ‚‡ÚÂÎfl 17
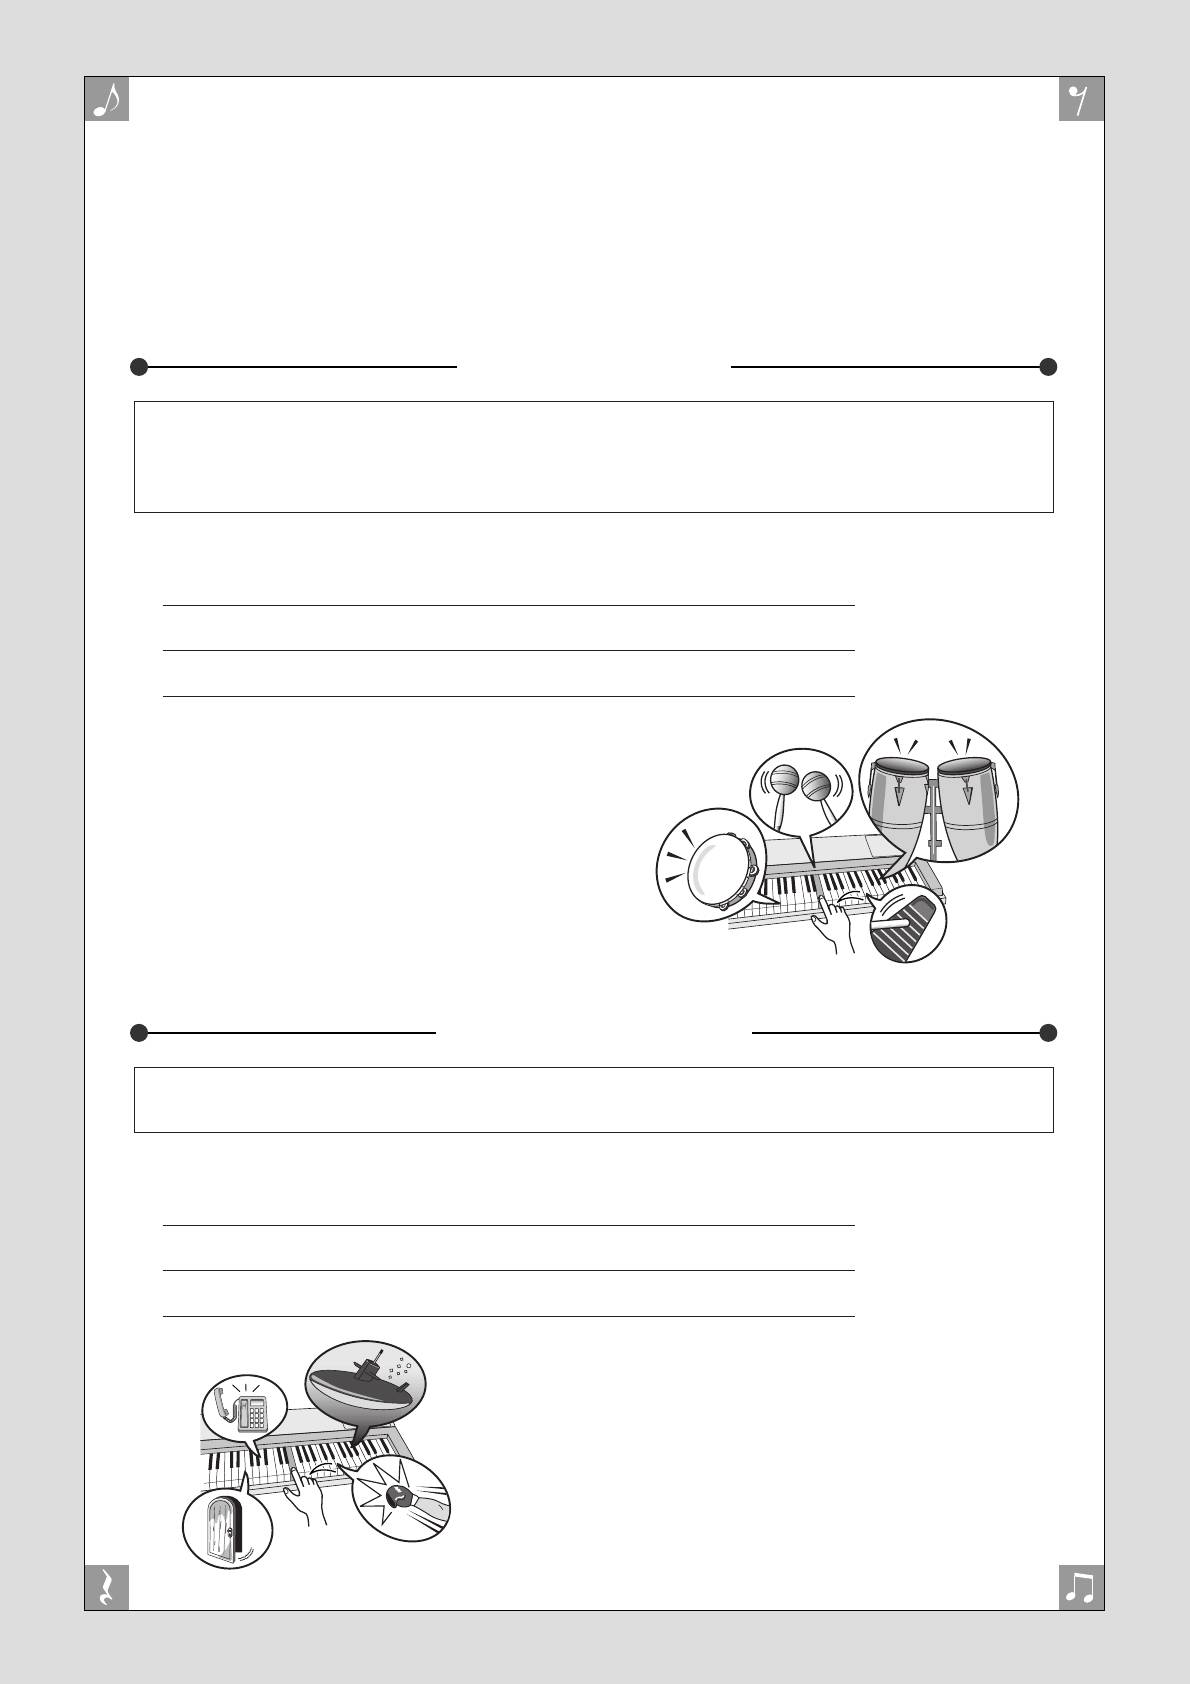
á‚ÛÍÓ‚˚Â ˝ÙÙÂÍÚ˚
à„‡fl ̇ ˝ÚÓÏ ËÌÒÚÛÏÂÌÚÂ, ‚˚ ÏÓÊÂÚ ËÒÔÓθÁÓ‚‡Ú¸ ÚÂÏ·˚ ‡Á΢Ì˚ı ̇·ÓÓ‚ Û‰‡Ì˚ı
Ë ÛÌË͇θÌ˚ Á‚ÛÍÓ‚˚ ˝ÙÙÂÍÚ˚, ÍÓÚÓ˚ ÔÓÏÓ„ÛÚ ‚‡Ï ‚ÌÂÒÚË ˝ÎÂÏÂÌÚ Ë„˚ ‚ Ò‚ÓÂ
‚˚ÒÚÛÔÎÂÌËÂ. àÒÔÓθÁÛÈÚ ÒÏÂı, ÊÛ˜‡ÌË ‚Ó‰˚, Á‚ÛÍ ÔÓÎÂÚ‡˛˘Ëı Ò̇fl‰Ó‚, ÊÛÚÍËÂ
Á‡‚˚‚‡ÌËfl Ë Ú‡Í ‰‡ÎÂÂ. ùÚÓ ÓÚ΢Ì˚È ÒÔÓÒÓ· ÛÎÛ˜¯ËÚ¸ ̇ÒÚÓÂÌË ÒÎÛ¯‡ÚÂÎÂÈ.
燷Ó˚ Û‰‡Ì˚ı
Ударные – это набор барабанных и перкуссионных инструментов. сли в качестве основного выбран
тембр скрипки или другого традиционного инструмента, все клавиши передают звук этой скрипки,
варьируется только высота звука. сли же выбран тембр Drum Kit (абор ударных), каждая клавиша
передает звук отдельного барабана или перкуссионного инструмента.
◆ Ç˚·Ó ̇·Ó‡ Drum Kit ➔ (ÒÏ. ‰ÂÈÒÚ‚Ëfl 1 Ë 2 ̇ ÒÚ. 14)
1 ç‡ÊÏËÚ ÍÌÓÔÍÛ [VOICE].
2 ë ÔÓÏÓ˘¸˛ ‰ËÒ͇ ‚˚·ÂËÚ «117 Std.Kit1».
3 ç‡ÊÏËÚ ‚Ò Í·‚Ë¯Ë ÔÓ Ó˜ÂÂ‰Ë Ë Ì‡Ò·‰ËÚÂÒ¸ Á‚Û͇ÏË Û‰‡Ì˚ı!
ажмите все клавиши по очереди и наслади-
тесь звуками ударных! е забудьте про
черные клавиши! ы услышите треугольник,
маракасы, бонго, барабаны … полный набор
звуков ударных и перкуссионных инструмен-
тов. одробные списки инструментов,
входящих в каждый набор ударных (номера
тембров с 117 по 128), см. в разделе «ëÔËÒÓÍ
Û‰‡Ì˚ı ÛÒÚ‡ÌÓ‚ÓÍ» на стр. 104.
á‚ÛÍÓ‚˚Â ˝ÙÙÂÍÚ˚
вуковые эффекты входят в группу тембров Drum Kit (номера тембров 127 и 128). огда выбраны эти
тембры, каждая клавиша клавиатуры передает определенный звуковой эффект.
◆ Ç˚·Ó Á‚ÛÍÓ‚˚ı ˝ÙÙÂÍÚÓ‚ ➔ (ÒÏ. ‰ÂÈÒÚ‚Ëfl 1 Ë 2 ̇ ÒÚ. 14)
1 ç‡ÊÏËÚ ÍÌÓÔÍÛ [VOICE].
2 ë ÔÓÏÓ˘¸˛ ‰ËÒ͇ ÛÔ‡‚ÎÂÌËfl ‚˚·ÂËÚ «128 SFX Kit2».
3 ç‡ÊÏËÚ Í·‚Ë¯Ë ÔÓ Ó˜ÂÂ‰Ë Ë ÔÓÒÎÛ¯‡ÈÚ Á‚ÛÍÓ‚˚ ˝ÙÙÂÍÚ˚.
ажимая разные клавиши, вы услышите шум подводной
лодки, телефонный звонок, скрип двери, смех и много дру-
гих интересных эффектов. абор «127 SFX Kit1» включает
удар молнии, журчание бегущей воды, лай собаки и так
далее. екоторым клавишам не назначены звуковые
эффекты. акие клавиши нажимаются беззвучно.
одробные списки инструментов с встроенным набором
звуковых спецэффектов («SFX Kit 1» и «SFX Kit 2»),
см. в разделе «ëÔËÒÓÍ Û‰‡Ì˚ı ÛÒÚ‡ÌÓ‚ÓÍ» на стр. 104.
18 DGX-220/YPG-225 êÛÍÓ‚Ó‰ÒÚ‚Ó ÔÓθÁÓ‚‡ÚÂÎfl
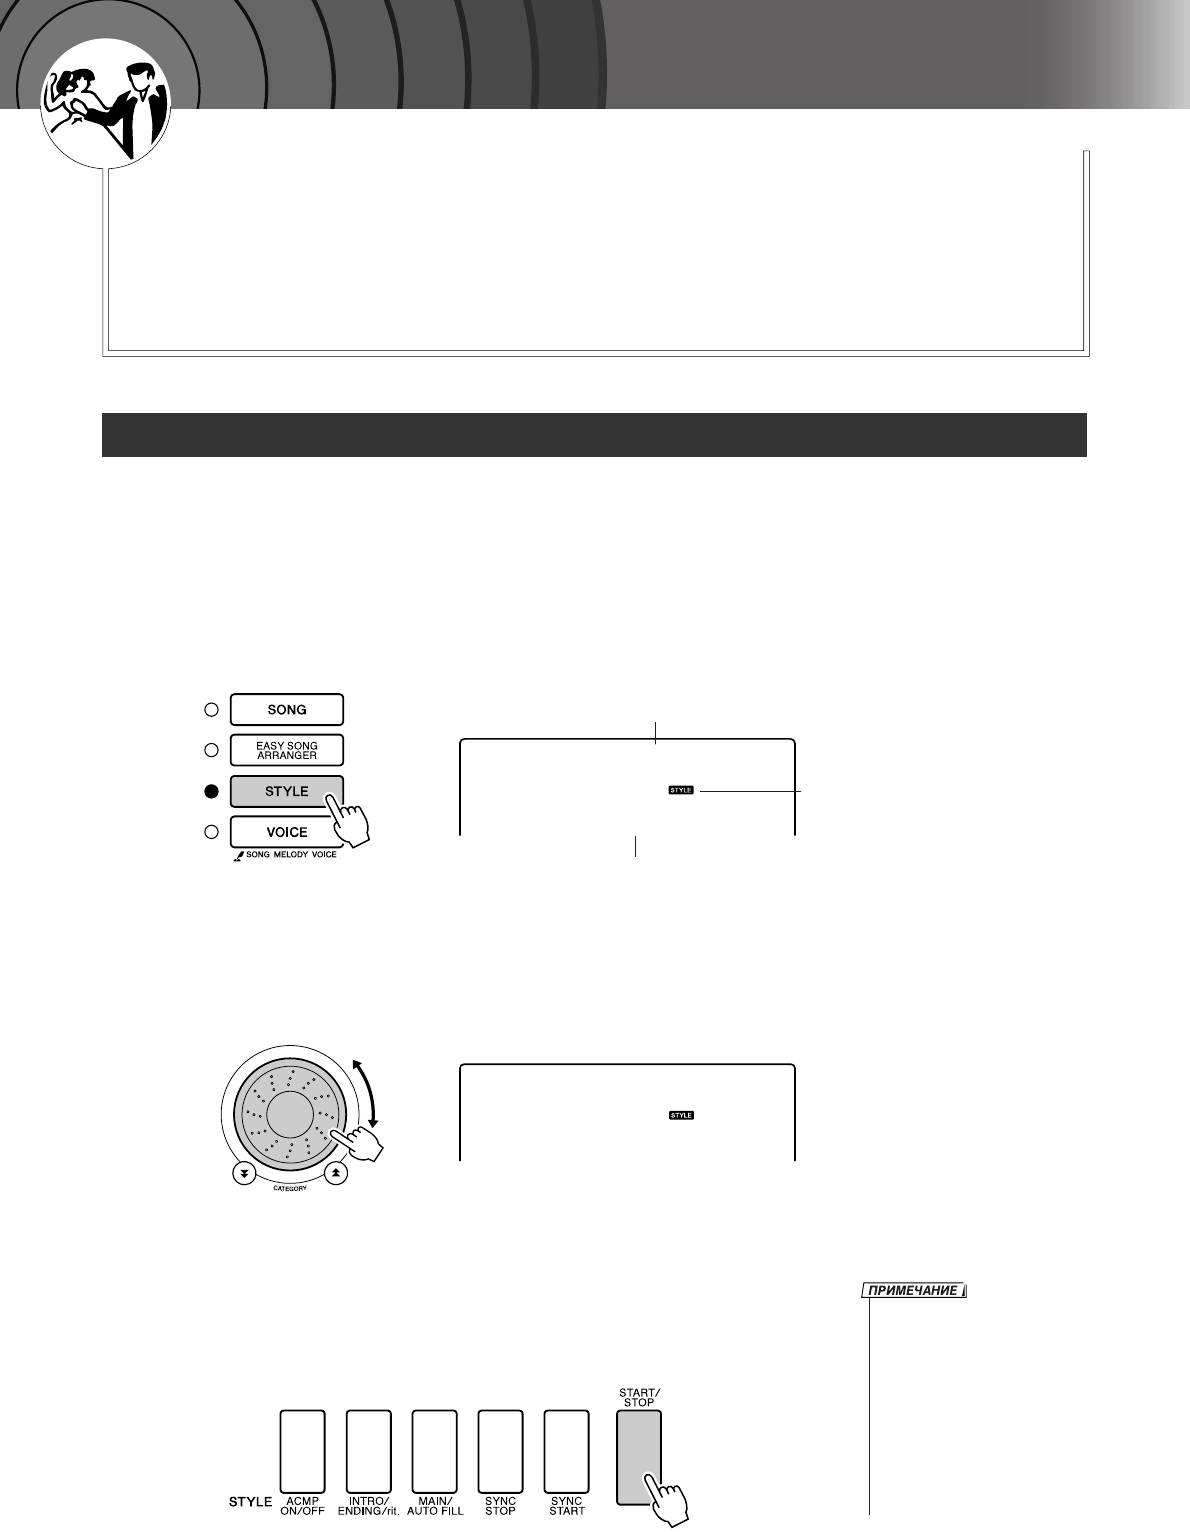
Û
Í
Ó
‚
Â
Ó
Ó
‰
Í
Ò
Ú
Ú
‡
‚
Ó
ÇÓÒÔÓËÁ‚‰ÂÌË ÒÚËÎÂÈ
ä
Å·„Ó‰‡fl ÙÛÌ͈ËË ‡‚ÚÓ‡ÍÍÓÏÔ‡ÌÂÏÂÌÚ‡ ‚˚ ÏÓÊÂÚ ‚Íβ˜ËÚ¸ ÏÛÁ˚͇θÌÓÂ
ÒÓÔÓ‚ÓʉÂÌË ‡ÍÍÓ‰Ó‚, Ë„‡ÂÏ˚ı ΂ÓÈ ÛÍÓÈ, ‚ ‚˚·‡ÌÌÓÏ ‚‡ÏË ÒÚËÎÂ
(ËÚÏ + ·‡Ò + ‡ÍÍÓ‰˚). 150 ‡Á΢Ì˚ı ÒÚËÎÂÈ Óı‚‡Ú˚‚‡˛Ú Ó·¯ËÌ˚È ‰Ë‡Ô‡ÁÓÌ
ÏÛÁ˚͇θÌ˚ı ʇÌÓ‚ Ë Ú‡ÍÚÓ‚˚ı ‡ÁÏÂÓ‚ (ÔÓÎÌ˚È ÒÔËÒÓÍ ‰ÓÒÚÛÔÌ˚ı
ÒÚËÎÂÈ ÒÏ. ̇ ÒÚ. 106).
àÁ ˝ÚÓ„Ó ‡Á‰Â· ‚˚ ÛÁ̇ÂÚÂ, Í‡Í ÔÓθÁÓ‚‡Ú¸Òfl ÙÛÌ͈ËÂÈ ‡‚ÚÓ‡ÍÍÓÏÔ‡ÌÂÏÂÌÚ‡.
Ç˚·Ó ËÚχ ÒÚËÎfl
ольшинство стилей включают ритмическую партию. оступно множество типов ритмических
партий в различных жанрах, включая рок, блюз, евро-транс и многое другое. ля начала прослушаем
простой базовый ритм. ритмической партии используются только ударные инструменты.
ç‡ÊÏËÚ ÍÌÓÔÍÛ [STYLE].
1
а экране отобразятся номер и название стиля.
ç‡Á‚‡ÌË ÒÚËÎfl
8BtModrn
ÇÏÂÒÚÂ Ò ÌÓÏÂÓÏ Ë Ì‡Á‚‡ÌËÂÏ ÒÚËÎfl
ÓÚÓ·‡ÁËÚÒfl ˝ÚÓÚ Á̇˜ÓÍ.
001
çÓÏÂ ÒÚËÎfl
Ç˚·ÂËÚ ÒÚËθ.
2
ля выбора нужного стиля используйте диск управления.
писок доступных стилей приведен на стр. 106.
PopBossa
087
ç‡ÊÏËÚ ÍÌÓÔÍÛ [START/STOP].
3
ачнется воспроизведение ритма стиля.
•Ç ÒÚËÎflı Ò ÌÓχÏË 121, 133–150
тобы прервать воспроизведение, повторно нажмите
ÌÂÚ ËÚÏ˘ÂÒÍÓÈ Ô‡ÚËË, ÔÓ˝ÚÓÏÛ
кнопку [START/STOP].
ÔË ËÒÔÓθÁÓ‚‡ÌËË Ëı ‚ ‰‡ÌÌÓÏ
ÔËÏ ‚˚ Ì ÛÒÎ˚¯ËÚ ËÚχ.
Ç˚·‡‚ Ó‰ËÌ ËÁ ˝ÚËı ÒÚËÎÂÈ,
‚Íβ˜ËÚ ÙÛÌÍˆË˛
‡‚ÚÓ‡ÍÍÓÏÔ‡ÌÂÏÂÌÚ‡, Í‡Í ÓÔËÒ‡ÌÓ
̇ ÒÚ. 20, Ë Ì‡ÊÏËÚ ÍÌÓÔÍÛ
[START/STOP]. ÇÓ ‚ÂÏfl Ë„˚ Ò΂‡
ÓÚ ÚÓ˜ÍË ‡Á‰ÂÎÂÌËfl Í·‚ˇÚÛ˚
·Û‰ÛÚ ‚ÓÒÔÓËÁ‚Ó‰ËÚ¸Òfl ·‡ÒÓ‚‡fl
Ô‡ÚËfl Ë ‡ÍÍÓ‰˚ ‡ÍÍÓÏÔ‡ÌÂÏÂÌÚ‡.
DGX-220/YPG-225 êÛÍÓ‚Ó‰ÒÚ‚Ó ÔÓθÁÓ‚‡ÚÂÎfl 19
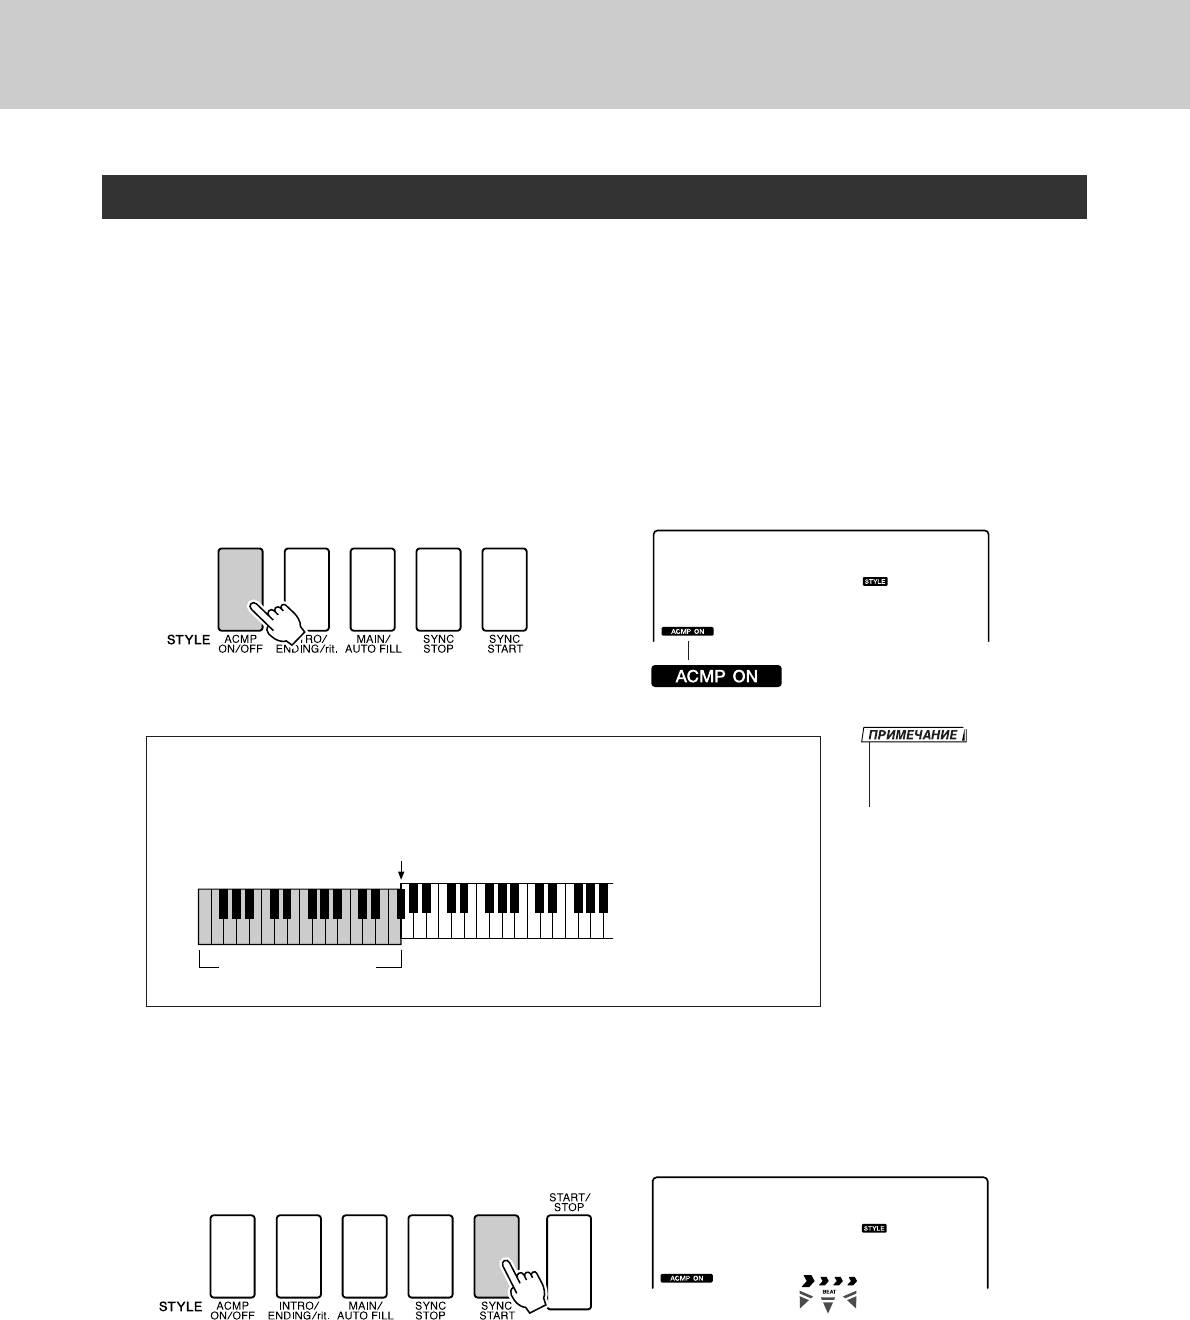
ÇÓÒÔÓËÁ‚‰ÂÌË ÒÚËÎÂÈ
à„‡ ÒÓ ÒÚËÎÂÏ
а предыдущей странице рассматривался выбор ритма стиля.
еперь вы научитесь добавлять к простому ритму басовую часть и аккорды аккомпанемента для
эффектного и насыщенного сопровождения исполняемой мелодии.
ç‡ÊÏËÚ ÍÌÓÔÍÛ [STYLE] Ë ‚˚·ÂËÚ ÌÛÊÌ˚È ÒÚËθ.
1
ÇÍβ˜ËÚ ‡‚ÚÓ‡ÍÍÓÏÔ‡ÌÂÏÂÌÚ.
2
ажмите кнопку [ACMP ON/OFF].
ри повторном нажатии кнопки автоаккомпанемент отключится.
PopBossa
087
ùÚÓÚ Á̇˜ÓÍ ÔÓfl‚ÎflÂÚÒfl, ÍÓ„‰‡ ‚Íβ˜Â̇
ÙÛÌ͈Ëfl ‡‚ÚÓ‡ÍÍÓÏÔ‡ÌÂÏÂÌÚ‡.
•èÓÎÓÊÂÌË ÚÓ˜ÍË ‡Á‰ÂÎÂÌËfl
● огда автоаккомпанемент включен…
ÏÓÊÌÓ ËÁÏÂÌËÚ¸ ÔÓ Ê·Ì˲:
Область клавиатуры слева от точки разделения (54: F#2) служит
ÒÏ. ÒÚ. 65.
только для указания аккордов аккомпанемента.
íӘ͇ ‡Á‰ÂÎÂÌËfl (54: F#2)
é·Î‡ÒÚ¸
‡‚ÚÓ‡ÍÍÓÏÔ‡ÌÂÏÂÌÚ‡
ÇÍβ˜ËÚ ÒËÌıÓÌÌ˚È Á‡ÔÛÒÍ.
3
ля включения функции синхронного запуска нажмите
кнопку [SYNC START].
PopBossa
087
åË„‡ÂÚ ‚ ÂÊËÏÂ
ÒËÌıÓÌÌÓ„Ó Á‡ÔÛÒ͇.
режиме синхронного запуска при нажатии клавиш слева от точки
разделения клавиатуры воспроизводятся басовая партия и аккорды
аккомпанемента, которые включены в стиль. ля выключения
функции синхронного запуска нажмите кнопку еще раз.
20 DGX-220/YPG-225 êÛÍÓ‚Ó‰ÒÚ‚Ó ÔÓθÁÓ‚‡ÚÂÎfl
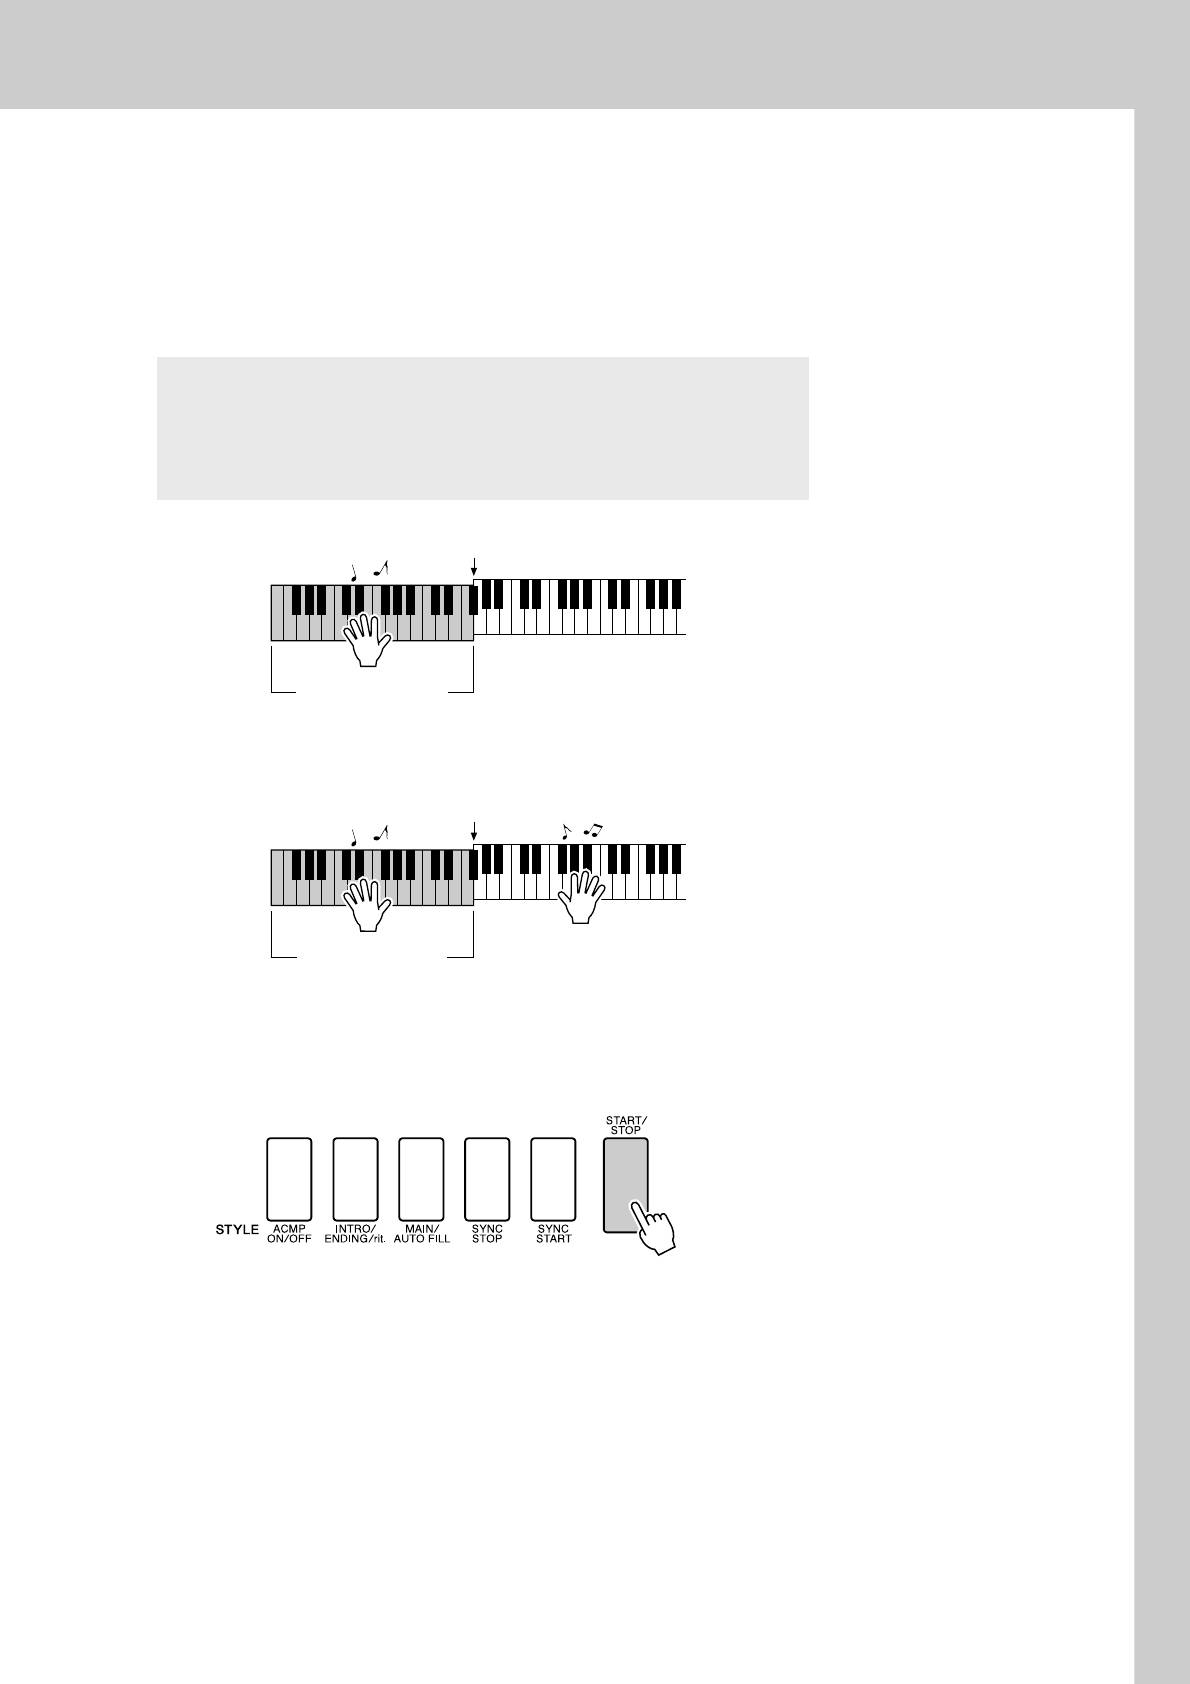
ÇÓÒÔÓËÁ‚‰ÂÌË ÒÚËÎÂÈ
ë˚„‡ÈÚ ‡ÍÍÓ‰ ΂ÓÈ ÛÍÓÈ ‰Îfl ‚Íβ˜ÂÌËfl ÒÚËÎfl.
4
ля «проигрывания» аккордов вам не обязательно точно знать их.
нструмент может распознать нужный аккорд по одной ноте.
опробуйте сыграть слева от точки разделения, нажимая от одной
до трех клавиш одновременно. Аккомпанемент подстраивается под
ноты, сыгранные левой рукой.
èÓÔÓ·ÛÈÚ ÒÎÂ‰Û˛˘ÂÂ
а стр. 22 приведено несколько партитур для
последовательностей аккордов. этих примерах подобраны
удачные сочетания аккордов и стилей.
íӘ͇ ‡Á‰ÂÎÂÌËfl
é·Î‡ÒÚ¸
‡‚ÚÓ‡ÍÍÓÏÔ‡ÌÂÏÂÌÚ‡
à„‡Èڠ΂ÓÈ ÛÍÓÈ ‡Á΢Ì˚ ‡ÍÍÓ‰˚, ‡ Ô‡‚ÓÈ – ÏÂÎӉ˲.
5
íӘ͇ ‡Á‰ÂÎÂÌËfl
é·Î‡ÒÚ¸
‡‚ÚÓ‡ÍÍÓÏÔ‡ÌÂÏÂÌÚ‡
á‡ÍÓ̘˂ Ë„‡Ú¸, ̇ÊÏËÚ ÍÌÓÔÍÛ [START/STOP] ‰Îfl
6
ÓÒÚ‡ÌÓ‚ÍË ÒÚËÎfl.
ожно чередовать части стиля, что делает аккомпанемент более
разнообразным. м. раздел «ó‡ÒÚË ÒÚËÎfl» на стр. 63.
DGX-220/YPG-225 êÛÍÓ‚Ó‰ÒÚ‚Ó ÔÓθÁÓ‚‡ÚÂÎfl 21
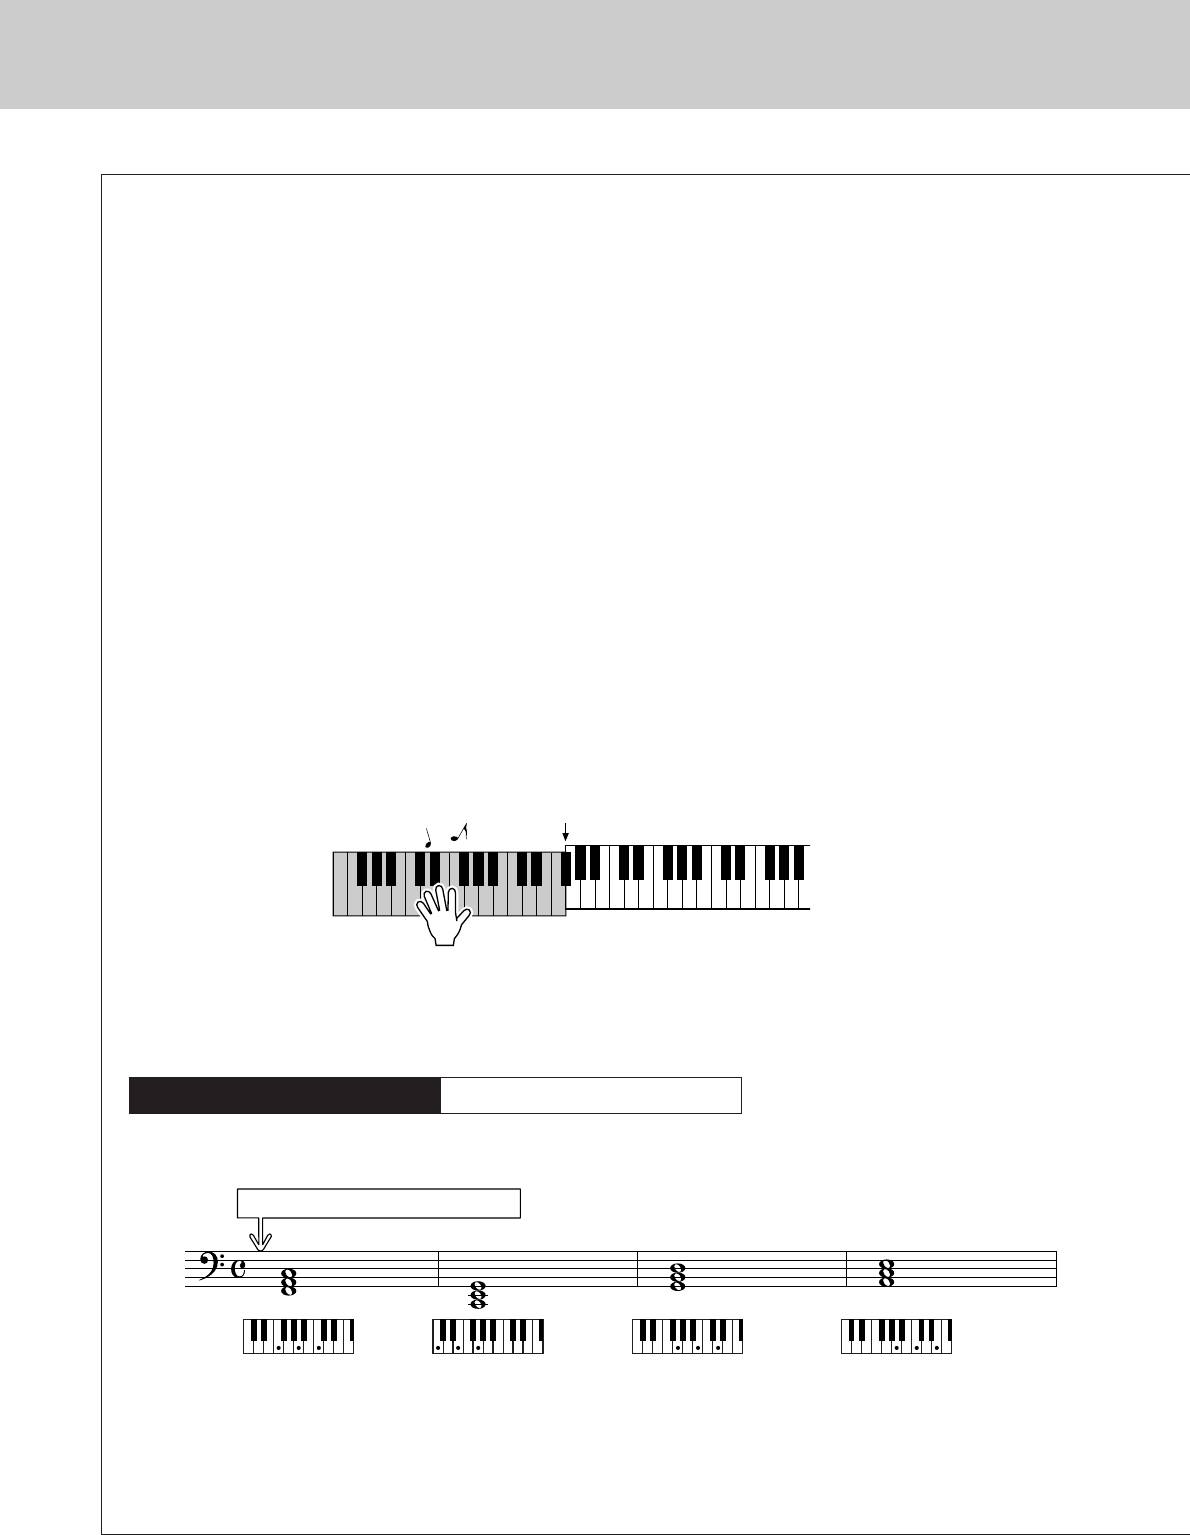
ÇÓÒÔÓËÁ‚‰ÂÌË ÒÚËÎÂÈ
á̇ÌË ‡ÍÍÓ‰Ó‚ – ˝ÚÓ ÔÂËÏÛ˘ÂÒÚ‚Ó ÔË ‡·ÓÚ ÒÓ ÒÚËÎÂÏ
Основу гармонического аккомпанемента составляют аккорды – сочетания нот, звучащих
одновременно. этом разделе рассматриваются последовательности различных аккордов, или
аккордовые последовательности. оскольку у каждого аккорда есть свой уникальный оттенок
(даже если аккорды отличаются только аппликатурой), выбор последовательности аккордов
очень сильно влияет на общее впечатление от исполняемой музыки.
а стр. 20 вы узнали об использовании стилей с характерным аккомпанементом. Однако, зная
аккорды и умея составлять аккордовые последовательности, вы сможете вносить интересные
вариации и исполнять аккомпанемент на качественно новом уровне.
алее вы познакомитесь с тремя простыми последовательностями аккордов. опробуйте
исполнить эти последовательности с включенными стилями аккомпанемента. тиль будет соот—
ветствовать последовательности аккордов, которую вы играете, и получится законченная песня.
■àÒÔÓÎÌÂÌË ÔÓÒΉӂ‡ÚÂθÌÓÒÚË ‡ÍÍÓ‰Ó‚ ● ● ● ● ● ● ● ● ● ● ● ● ● ● ● ● ● ● ● ● ● ● ● ●
ыграйте партитуру левой рукой.
еред исполнением партитуры выполните действия 1 – 3 из раздела «
à„‡ ÒÓ ÒÚËÎÂÏ» на стр. 20.
* è˂‰ÂÌÌ˚ Á‰ÂÒ¸ Ô‡ÚËÚÛ˚ ÓÚ΢‡˛ÚÒfl ÓÚ Ô‡ÚËÚÛ Ó·˚˜Ì˚ı ÔÂÒÂÌ. ùÚÓ ÛÔÓ˘ÂÌÌ˚ ‚ÂÒËË, ̇ ÓÒÌÓ‚Â ÍÓÚÓ˚ı ‰ÂÏÓÌÒÚËÛÂÚÒfl
‚˚·Ó ÌÓÚ, ËÒÔÓθÁÛÂÏ˚ı ‚ ‡ÍÍÓ‰Ó‚˚ı ÔÓÒΉӂ‡ÚÂθÌÓÒÚflı.
íӘ͇ ‡Á‰ÂÎÂÌËfl
à„‡ÈÚ Ò΂‡ ÓÚ ÚÓ˜ÍË ‡Á‰ÂÎÂÌËfl.
êÂÍÓÏẨӂ‡ÌÌ˚È ÒÚËθ
031 Euro Trance
—í‡ÌˆÂ‚‡Î¸Ì‡fl ÏÛÁ˚͇ Ò ÔÓÒÚ˚ÏË ‡ÍÍÓ‰‡ÏË—
ç‡ÊÏËÚ ÍÌÓÔÍÛ [INTRO/ENDING/rit.].
F
C G Am
Эта последовательность аккордов проста, но эффектна. оиграйте партитуру до конца и начните
заново. аканчивая исполнение, нажмите кнопку [INTRO/ENDING/rit.], и функция
автоаккомпанемента воспроизведет идеальный финальный фрагмент.
22 DGX-220/YPG-225 êÛÍÓ‚Ó‰ÒÚ‚Ó ÔÓθÁÓ‚‡ÚÂÎfl
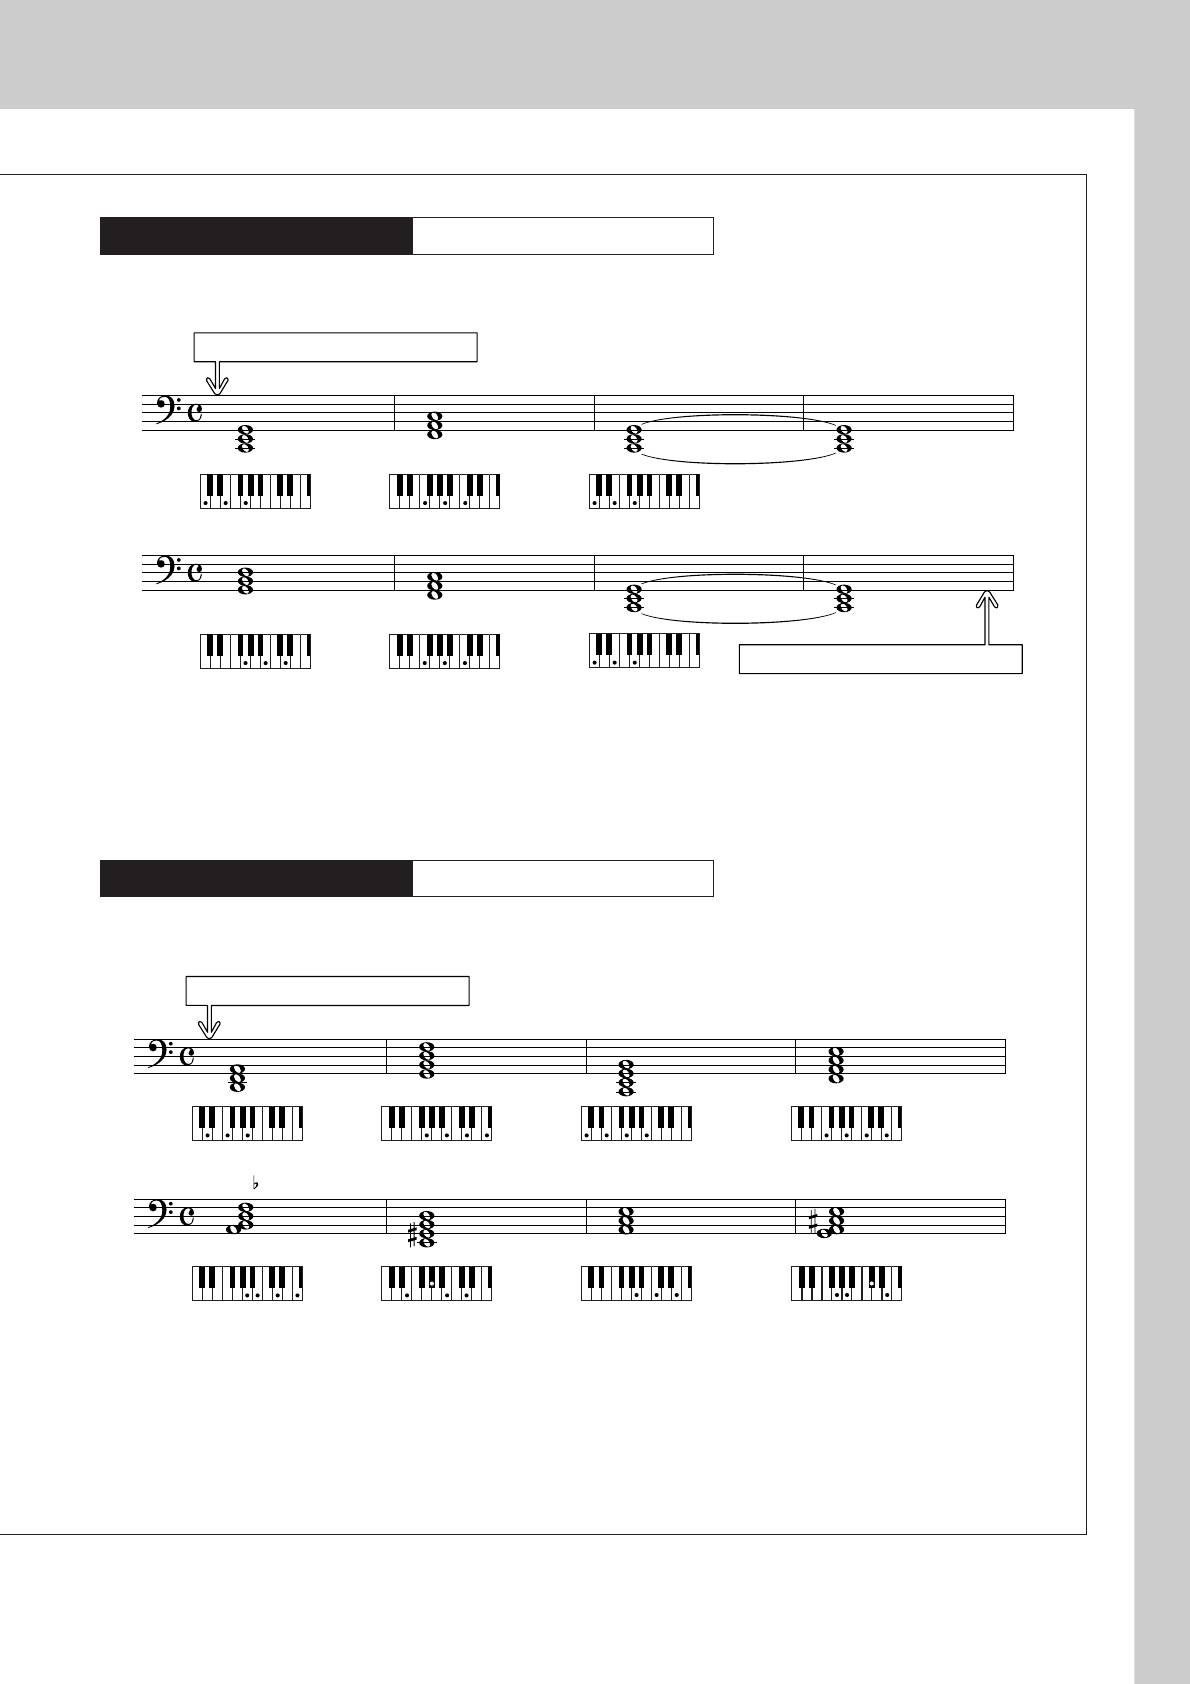
ÇÓÒÔÓËÁ‚‰ÂÌË ÒÚËÎÂÈ
êÂÍÓÏẨӂ‡ÌÌ˚È ÒÚËθ
138 Piano Boogie
—ÅÛ„Ë-‚Û„Ë Ì‡ ÓÒÌÓ‚Â ÚÂı ‡ÍÍÓ‰Ó‚—
ç‡ÊÏËÚ ÍÌÓÔÍÛ [INTRO/ENDING/rit.].
C C
F
G
F
C
ç‡ÊÏËÚ ÍÌÓÔÍÛ [INTRO/ENDING/rit.].
Эта последовательность позволяет создать богатое гармоническое сопровождение всего лишь из
трех аккордов. огда вы почувствуете, что требуется развитие партитуры, попробуйте поменять
аккорды местами!
êÂÍÓÏẨӂ‡ÌÌ˚È ÒÚËθ
086 Bossa Nova
—ÅÓÒÒ‡ÌÓ‚‡ Ò ‰Ê‡ÁÓ‚˚ÏË ‡ÍÍÓ‰‡ÏË—
ç‡ÊÏËÚ ÍÌÓÔÍÛ [INTRO/ENDING/rit.].
Dm CM7
G7
FM7
Bm7
5
E7
Am A7
Эта последовательность представляет собой джазовую формулу II-V. ыграйте ее семь раз
подряд. тобы закончить исполнение, нажмите кнопку [INTRO/ENDING/rit.].
DGX-220/YPG-225 êÛÍÓ‚Ó‰ÒÚ‚Ó ÔÓθÁÓ‚‡ÚÂÎfl 23
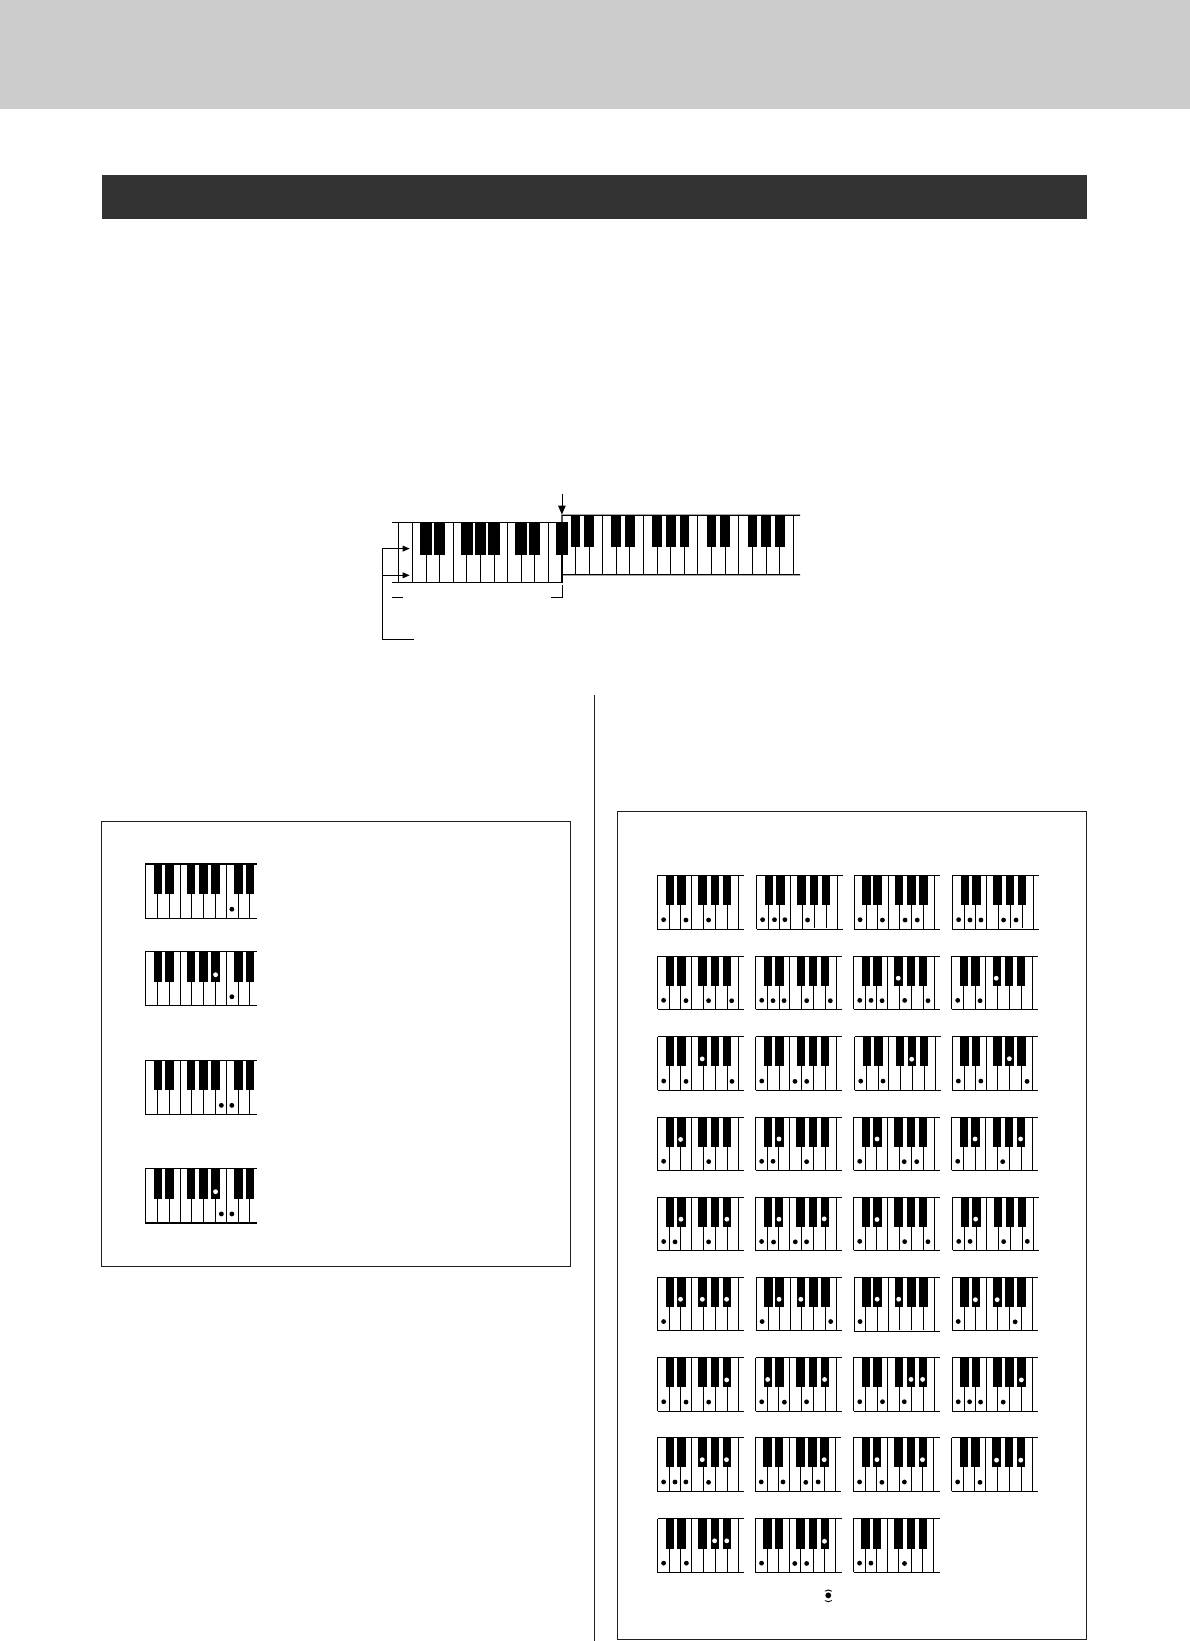
ÇÓÒÔÓËÁ‚‰ÂÌË ÒÚËÎÂÈ
àÒÔÓÎÌÂÌË ‡ÍÍÓ‰Ó‚ ‡‚ÚÓ‡ÍÍÓÏÔ‡ÌÂÏÂÌÚ‡
ожно исполнять аккорды аккомпанемента двух типов:
● ã„ÍË ‡ÍÍÓ‰˚
● ëڇ̉‡ÚÌ˚ ‡ÍÍÓ‰˚
нструмент автоматически распознает аккорды других типов. оддержка нескольких методов игры
аккордами обеспечивается функцией Multi Fingering.
ажмите кнопку [ACMP ON/OFF], чтобы включить автоаккомпанемент (стр. 20). Область
клавиатуры слева от точки разделения (по умолчанию 54/F#2) служит для исполнения
аккомпанемента. грайте в этой области клавиатуры аккорды аккомпанемента.
íӘ͇ ‡Á‰ÂÎÂÌËfl (ÔÓ ÛÏÓΘ‡Ì˲ 54/F#2)
D
b
E
b
F
#
G
#
B
b
D
b
E
b
F
#
C
DEFGABCDEF
ê‡Á‰ÂÎ ‡ÍÍÓÏÔ‡ÌÂÏÂÌÚ‡
Í·‚ˇÚÛ˚
éÒÌÓ‚Ì˚ ÚÓ̇ Ë ÒÓÓÚ‚ÂÚÒÚ‚Û˛˘Ë ËÏ Í·‚˯Ë
■ã„ÍË ‡ÍÍÓ‰˚ ● ● ● ● ● ● ● ● ● ● ● ● ● ● ●
■ëڇ̉‡ÚÌ˚ ‡ÍÍÓ‰˚ ● ● ● ● ● ● ● ● ● ● ●
Этот метод позволяет легко играть аккорды
Этот метод позволяет исполнять аккомпанемент,
в разделе аккомпанемента, используя только
играя аккорды с помощью обычной аппликатуры
один, два или три пальца.
в разделе аккомпанемента клавиатуры.
C
• óÚÓ·˚ Ò˚„‡Ú¸ χÊÓÌ˚È ‡ÍÍÓ‰,
нажмите клавишу основного тона
аккорда.
Cm
• óÚÓ·˚ Ò˚„‡Ú¸ ÏËÌÓÌ˚È ‡ÍÍÓ‰,
одновременно нажмите клавишу
основного тона и ближайшую
черную клавишу слева от нее.
C7
• óÚÓ·˚ Ò˚„‡Ú¸ ÒÂÔÚ‡ÍÍÓ‰,
одновременно нажмите клавишу
основного тона и ближайшую
белую клавишу слева от нее.
Cm7
• óÚÓ·˚ Ò˚„‡Ú¸ ÏËÌÓÌ˚È ÒÂÔÚ‡ÍÍÓ‰,
одновременно нажмите клавишу
основного тона с ближайшими белой
и черной клавишами слева от нее.
24 DGX-220/YPG-225 êÛÍÓ‚Ó‰ÒÚ‚Ó ÔÓθÁÓ‚‡ÚÂÎfl
● à„‡ Òڇ̉‡ÚÌ˚ı ‡ÍÍÓ‰Ó‚
[èËÏÂ˚ ‡ÍÍÓ‰Ó‚ Ò ÓÒÌÓ‚Ì˚Ï ÚÓÌÓÏ C (‰Ó)]
(
9
)
(
9
)
C
C
C6
C6
( )
( )
(
9
)
(
#11
)
(
b5
)
CM7
CM7
CM7
C
( )
( )
( )
(
b5
)
CM7
Csus4
Caug
CM7aug
( )
(
9
)
Cm
Cm
Cm6
Cm7
( )
(
9
)
(
11
)
(
9
)
Cm7
Cm7
CmM7
CmM7
( )
( )
( )
( )
( )
(
b5
)
(
b5
)
Cm7
CmM7
Cdim
Cdim7
(
b9
)
(
b13
)
(
9
)
C7
C7
C7
C7
( )
( )
( )
(
#11
)
(
13
)
(
#9
)
(
b5
)
C7
C7
C7
C7
( )
( )
( )
C7aug
C7sus4
C1+2+5
( )
*çÓÚ˚, Û͇Á‡ÌÌ˚ ‚ ÒÍӷ͇ı ( ), ÌÂÓ·flÁ‡ÚÂθÌ˚; ‡ÍÍÓ‰˚
‡ÒÔÓÁ̇˛ÚÒfl Ë ·ÂÁ ÌËı.
Аннотации для Синтезатора Yamaha DGX-220 в формате PDF
Топ 10 инструкций
Другие инструкции
Как использовать наш сайт инструкций OnlineManuals.ru
Наша цель состоит в том, чтобы предоставить вам быстрый доступ к содержанию инструкции для синтезатора, цифрового пианино Yamaha DGX-220.
С помощью онлайн просмотра, Вы можете быстро просмотреть содержимое инструкции и найти решение проблемы с синтезатора, цифрового пианино Yamaha DGX-220.
Для Вашего удобства
Если листать руководство пользователя синтезатора, цифрового пианино Yamaha DGX-220 прямо на сайте, не очень удобно для Вас, есть два возможных решения:
• Просмотр в полноэкранном режиме — легко просмотреть руководство пользователя (без загрузки его на свой компьютер), Вы можете использовать режим полноэкранного просмотра.
Для просмотра инструкции пользователя синтезатора, цифрового пианино Yamaha DGX-220 на полном экране, используйте кнопку «Открыть в Pdf-viewer».
• Загрузка на компьютер — Вы можете также скачать Руководство пользователя синтезатора, цифрового пианино Yamaha DGX-220 на свой компьютер и сохранить его в файлах.
Многие люди предпочитают читать документы не на экране, а в печатной версии.
Возможность печати руководства пользователя также была предусмотрена на нашем сайте,
и вы можете использовать ее, нажав на иконку «печать» в Pdf-viewer.
Нет необходимости печатать все руководство синтезатора, цифрового пианино Yamaha DGX-220, можно выбрать только нужные страницы инструкции.
-
Страница 1
ES FR DE EN Owner ’ s Manual EN[…]
-
Страница 2
2 DGX-220/YPG-225 Owner’s Manual PLEASE KEEP THIS MANU AL This product utilizes batteries or an e xternal power supply (adapter). DO NO T connect this product to any po wer supply or adapter other than one described in the manual, on the name plate, or specifically recommended by Y amaha. This product should be used only with the components supp[…]
-
Страница 3
DGX-220/YPG-225 Owner’s Manual 3 1. IMPORT ANT NOTICE: DO NO T MODIFY THIS UNIT! This product, when installed as indicated in the instructions con- tained in this manual, meets FCC requirements . Modifications not expressly appro ved by Y amaha ma y void your authority , granted by the FCC, to use the product. 2. IMPORT ANT: When connecting this[…]
-
Страница 4
4 DGX-220/YPG-225 Owner’s Manual PRECAUTIONS PLEASE READ CAREFULL Y BEFORE PROCEEDING * Please keep this man ual in a safe place f or future ref erence. W ARNING Always follow the basic precautions listed below to avoid the possibility of serious injury or even death from electrical shock, short-circuiting, damages, fire or other hazards. These […]
-
Страница 5
DGX-220/YPG-225 Owner’s Manual 5 • Before moving the instrument, remove all connected adaptor and other cables. • When setting up the instrument, make sure that the AC outlet you are using is easily accessible. If some trouble or malfunction occurs, immediately turn off the power switch and disconnect the plug from the outlet. • Use only th[…]
-
Страница 6
6 DGX-220/YPG-225 Owner’s Manual The follo wing is the title, credits and copyright notices for the song pre-installed in this electronic ke yboard: Mona Lisa from the Paramount Picture CAPT AIN CAREY , U.S.A. W ords and Music by Jay Livingston and Ray Evans Copyright © 1949 (Renewed 1976) by F amous Music Corporation International Copyright Sec[…]
-
Страница 7
DGX-220/YPG-225 Owner’s Manual 7 Congratulations and thank you for purc hasing the Y amaha DGX-220/YPG-225 P ortable Grand! Please read this o wner’ s manual carefully before using the instrument in order to tak e full advantage of its various features. Mak e sure to keep this manual in a saf e and handy place even after you finish reading, an[…]
-
Страница 8
8 DGX-220/YPG-225 Owner’s Manual Special Features of the DGX-220/YPG-225 ■ Pla y a V ariety of Instrument V oices P age 14 The instrument voice that sounds when you play the k eyboard can be changed to violin, flute, harp, or any of an e xtensi ve range of v oices. Y ou can change the mood of a song written for piano, for example, by using vio[…]
-
Страница 9
DGX-220/YPG-225 Owner’s Manual 9 Copyright Notice ………………………………………………………….. 6 Panel Logos ………………………………………………………………… 6 Accessories…………………………………………………………………. 7 Special Features of the DGX-220/YPG-225 …….[…]
-
Страница 10
10 DGX-220/YPG-225 Owner’s Manual Setting Up Be sure to do the follo wing operations BEFORE turning on the power . Although the instrument will run either from an optional A C adaptor or batteries, Y amaha recommends use of an A C adaptor whene ver possible. An AC adaptor is more en vironmentally friendly than batteries and does not deplete resou[…]
-
Страница 11
Setting Up DGX-220/YPG-225 Owner’s Manual 11 Make all necessary connections below BEFORE turning the power on. The DGX-220/YPG-225 speakers are automatically shut of f when a plug is inserted into this jack. The PHONES/OUTPUT jack also functions as an exter — nal output. Y ou can connect the PHONES/OUTPUT jack to a ke yboard amplifier , stereo s[…]
-
Страница 12
12 DGX-220/YPG-225 Owner’s Manual Panel Contr ols and T erminals q [ST ANDBY/ON] s witch ……………….. page 11 w [MASTER V OLUME] contr ol …. pages 11, 50 e [P .A.T . ON/OFF] button ……………….. page 30 r [MUSIC D A T AB ASE] button ………… page 42 t [FUNCTION] button ……………………. page 75 y LESSON [L], [R], [ST […]
-
Страница 13
Panel Controls and Terminals DGX-220/YPG-225 Owner’s Manual 13 #0 USB terminal ……………………….pages 11, 79 #1 SUST AIN jac k …………………………….. page 11 #2 PHONES/OUTPUT jack ………………. page 11 #3 DC IN 12V jack …………………………… page 10 Rear P anel 001 n o #0 #1 #2 #3 !6 !7 !8 !9 @4 @2 @3 @5 […]
-
Страница 14
14 DGX-220/YPG-225 Owner’s Manual Q u i c k G u i d e T ry Playing a V ariety of Instrument V oices In addition to piano, organ, and other “standard” keyboard instruments, this instrument has a large range of v oices that includes guitar , bass, strings, sax, trumpet, drums and percussion, sound effects … a wide variety of m usical sounds. […]
-
Страница 15
Try Playing a Variety of Instrument Voices DGX-220/YPG-225 Owner’s Manual 15 Y ou can select a second voice which will play in addition to the main v oice when you play the k eyboard. The second voice is known as the “dual” voice. 1 Press the [DU AL ON/OFF] b utton. The [DU AL ON/OFF] button turns the dual voice on or off. When turned on the […]
-
Страница 16
Try Playing a Variety of Instrument Voices 16 DGX-220/YPG-225 Owner’s Manual 4 Play the ke yboard. T ry selecting and playing a range of dual v oices. In the split mode you can play different voices to the left and right of the k eyboard “split point”. The main and dual voices can be played to the right of the split point, while the v oice pl[…]
-
Страница 17
Try Playing a Variety of Instrument Voices DGX-220/YPG-225 Owner’s Manual 17 3 Select the desired split v oice . W atch the displayed split voice and rotate the dial until the v oice you want to use is selected. The voice selected here becomes the split voice which will play to the left of the k eyboard split point. For this example try selecting[…]
-
Страница 18
18 DGX-220/YPG-225 Owner’s Manual Fun Sounds This instrument includes a range of drum kits and unique sound effects y ou can use for entertainment. Laughter , babbling br ooks, jet fly-bys, eerie effects, and mu ch more . These sounds can be a great way to enhance the mood at parties. ◆ Drum Kit Selection Procedure ➔ (refer to steps 1 and 2 […]
-
Страница 19
DGX-220/YPG-225 Owner’s Manual 19 Q u i c k G u i d e Playing Styles This instrument has an auto accompaniment feature that pr oduces accompaniment (rhythm + bass + c hords) in the style y ou choose to match chor ds you pla y with your left hand. Y ou can select fr om 150 dif- ferent styles co vering a rang e of musical genres and time signatures[…]
-
Страница 20
Playing Styles 20 DGX-220/YPG-225 Owner’s Manual Y ou learned how to select a style rhythm on the preceding page. Here we’ll see how to add bass and chord accompaniment to the basic rh ythm to produce a full, rich accom- paniment that you can play along with. 1 Press the [STYLE] button and select the desired style. 2 T urn automatic accompanime[…]
-
Страница 21
Playing Styles DGX-220/YPG-225 Owner’s Manual 21 4 Play a left-hand c hord to start the style . Y ou can still “play” chords even if you don’t actually know an y chords. This instrument will recognize even a single note as a chord. Try play- ing from one to three notes at the same time to the left of the split point. The accompaniment will […]
-
Страница 22
Playing Styles 22 DGX-220/YPG-225 Owner’s Manual Styles Are More Fun When Y ou Understand Chor ds Chords, created by playing multiple notes at the same time, are the basis for harmonic accompaniment. In this section we’ll take a look at sequences of different chords played one after another, or “chord sequences”. Since each chord has it’s[…]
-
Страница 23
Playing Styles DGX-220/YPG-225 Owner’s Manual 23 —3-chor d boogie-woogie— This progression provides varied harmonic backing with just three chords. When you get a feel for the progression in the score, try changing the order of the chords! —Bossa nov a with jazz-style chor ds— This progression includes jazzy “tw o-five” (II-V) change[…]
-
Страница 24
Playing Styles 24 DGX-220/YPG-225 Owner’s Manual There are two ways of playing auto-accompaniment chords: ● Easy Chords ● Standard Chor ds The instrument will automatically recognize the dif ferent chord types. This function is called Multi Fingering. Press the [A CMP ON/OFF] button to turn auto-accompaniment on (page 20). The ke yboard to th[…]
-
Страница 25
DGX-220/YPG-225 Owner’s Manual 25 Q u i c k G u i d e Using Songs With this instrument the term “song” refer s the data that makes up a piece of music. Y ou can simply enjo y listening to the 30 internal songs, or use them with just about any of the man y functions pro vided—the performance assistant tec hnology feature, lessons, and more .[…]
-
Страница 26
Using Songs 26 DGX-220/YPG-225 Owner’s Manual 3 Listen to the song. Press the [ST AR T/STOP] b utton to begin playback of the selected song. Y ou can stop playback at any time by pressing the [ST AR T/STOP] b ut- ton again. These are just like the transport controls on a cassette deck or CD player , letting you fast forward [FF], re wind [REW] an[…]
-
Страница 27
Using Songs DGX-220/YPG-225 Owner’s Manual 27 ● Song List These 30 songs include songs that effectively demonstrate the instrument’ s easy song arranger feature, songs that are ideally suited for use with the performance assistant technology feature, and more. The “Sug- gested Uses” column provides some ideas as to how the songs can most […]
-
Страница 28
Using Songs 28 DGX-220/YPG-225 Owner’s Manual The following three types of songs can be used by the DGX-220/YPG-225 . ● Preset Songs (the 30 songs built into the instrument) ……………. Song numbers 001–030. ● User Songs (recordings of your own perf ormances) ……………… Song numbers 031–035. ● External song files (song dat[…]
-
Страница 29
DGX-220/YPG-225 Owner’s Manual 29 Q u i c k G u i d e The Easy W ay to Play Piano This instrument includes a perf ormance assistant technology feature that lets y ou play along with a song and sound like a great pianist (e ven though y ou might be making lots of mistakes)! In fact, you can pla y any notes and still sound good! So even if y ou can[…]
-
Страница 30
The Easy Way to Play Piano 30 DGX-220/YPG-225 Owner’s Manual 1 Press the [P .A.T . ON/OFF] button. This turns on the performance assistant technology feature. The P .A.T . icon will appear when the performance assistant technology feature is on. 2 Select the CHORD type. Press and hold the [P .A.T . ON/OFF] button for longer than a second. “P A […]
-
Страница 31
The Easy Way to Play Piano DGX-220/YPG-225 Owner’s Manual 31 4 Press the [ST ART/ST OP] button. Song playback will begin. The basic pattern will play repeatedly . Listen to the basic pattern for four measures while getting a feel for the basic pattern, then be gin play- ing yourself from the fi fth measure. 5 Play on the ke yboard. T ry playing […]
-
Страница 32
The Easy Way to Play Piano 32 DGX-220/YPG-225 Owner’s Manual 1 Press the [P .A.T . ON/OFF] button. This turns on the performance assistant technology feature. The P .A.T . icon will appear when the performance assistant technology feature is on. 2 Select the CHD/FREE type. Press and hold the [P .A.T . ON/OFF] button for longer than a second. “P[…]
-
Страница 33
The Easy Way to Play Piano DGX-220/YPG-225 Owner’s Manual 33 4 Press the [ST ART/ST OP] button. Song playback will begin. 5 Play on the ke yboard. Play to the right of the split point with your right hand, and to the left of the split point with your left hand. Play the Nocturne melody with your right hand. Continually play an F- A-C arpeggio sho[…]
-
Страница 34
The Easy Way to Play Piano 34 DGX-220/YPG-225 Owner’s Manual Use the P erformance Assistant to Pla y Like a Pr o! Here are a few hints for using the Chord type. If you select Chord/Free, the left-hand section of the k eyboard becomes the Chord type section, so use these hints on the lefthand section of the ke yboard. To begin, try to feel the rhy[…]
-
Страница 35
The Easy Way to Play Piano DGX-220/YPG-225 Owner’s Manual 35 When using the performance assistant technology or in other situations in which the tempo of the song is too fast or too slow for you, you can change the tempo as required. Press the [TEMPO/TAP] b utton. The tempo display will appear and you can use the dial, the [+] and [-] b uttons, o[…]
-
Страница 36
36 DGX-220/YPG-225 Owner’s Manual Q u i c k G u i d e Select a Song For a Lesson Y amaha Education Suite Y ou can select song you like and use it f or a left-hand, right-hand, or both-hands lesson. Y ou can also use songs (only SMF f ormat 0) down- loaded from the Internet and sa ved to flash memor y . (pages 82–84) Dur- ing the lesson y ou ca[…]
-
Страница 37
Select a Song For a Lesson DGX-220/YPG-225 Owner’s Manual 37 2 Select the part you want to practice. Press the [R] button for a right-hand lesson, [L] button for a left-hand lesson, or press both the [R] and [L] b uttons simultaneously for a both- hands lesson. The currently selected part is shown in the display . 3 Start Lesson 1. Press the LESS[…]
-
Страница 38
Select a Song For a Lesson 38 DGX-220/YPG-225 Owner’s Manual Play the note shown in the display . When you play the correct note, the next note you need play is shown. The song will wait until you play the correct note. 4 Stop the Lesson mode. Y ou can stop the Lesson mode at an y time by pressing the [ST AR T/ STOP] b utton. Once you’ ve maste[…]
-
Страница 39
Select a Song For a Lesson DGX-220/YPG-225 Owner’s Manual 39 Learn to play the correct notes with the correct timing. Song playback tempo will v ary to match the speed you are playing at. The song will slow down when you play wrong notes, so you can learn at your o wn pace. 1 Select the song and part you want to practice (steps 1 and 2 on pages 3[…]
-
Страница 40
Select a Song For a Lesson 40 DGX-220/YPG-225 Owner’s Manual Here’ s where you can perfect your technique. The song will play at the normal tempo, minus the part you ha ve chosen to play . Play along while listening to the song. 1 Select the song and part you want to practice (steps 1 and 2 on pages 36, 37). 2 Start Lesson 3. Each time the LESS[…]
-
Страница 41
Select a Song For a Lesson DGX-220/YPG-225 Owner’s Manual 41 Use this feature when you w ant to start again just ahead of a section on which you made a mistak e, or to repeatedly practice a section you fi nd difficult. Press the [REPEA T & LEARN] button during a lesson. The song location will move back four measures from the point at which […]
-
Страница 42
42 DGX-220/YPG-225 Owner’s Manual Q u i c k G u i d e 1 Press the [MUSIC D A T ABASE] b utton. A Music Database list will appear in the display. 2 Select a Music Database. Referring to the list on the panel or Music Database List on page 107 of the manual, use the dial to select a music database. Select one that matches the image of the song you […]
-
Страница 43
DGX-220/YPG-225 Owner’s Manual 43 Q u i c k G u i d e Change a Song’ s Style In addition to each song’ s default style, you can select an y other style to play the song with the Easy Song Arranger feature. This means that y ou can play a song that is normall y a ballad, for e xample , as a bossa nov a, as a hip-hop tune , etc. Y ou can create[…]
-
Страница 44
Change a Song’s Style 44 DGX-220/YPG-225 Owner’s Manual 3 Listen to the song. Press the [ST AR T/STOP] b utton to begin playback of the song. Mo ve on to the next step while the song is playing. 4 Press the [EASY SONG ARRANGER] button. The style number and name will be displayed. Y ou can use the dial to select a different style. 5 Select a sty[…]
-
Страница 45
DGX-220/YPG-225 Owner’s Manual 45 Q u i c k G u i d e Recor d Y our Own Performance Y ou can record up to 5 of y our own perf ormances and save them as user songs 031 through 035. The recoreded song can be pla yed back on the instrument. ■ Recordab le Data Y ou can record to a total of 6 tracks: 5 melody tracks and 1 style (chord) track. Each t[…]
-
Страница 46
Record Your Own Performance 46 DGX-220/YPG-225 Owner’s Manual 2 Select the track(s) y ou want to record to and confirm y our selection on the display . ◆ Record a Melody T rack and the Accompaniment T rack To g ether Press the melody track button [1]–[5] you want to record to while hold- ing the [REC] button. Next, press the [A] button while[…]
-
Страница 47
Record Your Own Performance DGX-220/YPG-225 Owner’s Manual 47 If you press the [INTRO/ENDING/rit.] button while recording the style track an appropriate ending pattern will play and then recording will stop. When recording stops the current measure number will return to 001 and the recorded track numbers in the display will light. 5 When the reco[…]
-
Страница 48
Record Your Own Performance 48 DGX-220/YPG-225 Owner’s Manual This function clears an entire user song (all tracks). 1 Press the [SONG] button, then select the user song (031– 035) y ou want to clear . 2 Press and hold the SONG MEMOR Y [1] b utton for longer than a second while holding the SONG MEMOR Y [A] b utton. A confirmation message will […]
-
Страница 49
DGX-220/YPG-225 Owner’s Manual 49 Backup and Initialization The following settings are always backed up, and are maintained even when the po wer is turned off. If you want to initialize the settings, use the Initialize operation as e xplained below . This function erases all backup data in the instrument’s flash memory and restores the initial[…]
-
Страница 50
50 DGX-220/YPG-225 Owner’s Manual Basic Operation and Displays Overall DGX-220/YPG-225 control is based on the follo wing simple operations. 1 Press a b utton to select a basic function. Basic Operation 1 Press a button to select a basic function. 2 Use the dial to select an item or value. 3 Start a function. 001 001 GrandPno Display (page 52) ?[…]
-
Страница 51
Basic Operation and Displays DGX-220/YPG-225 Owner’s Manual 51 2 Use the dial to select an item or v alue . When you select a basic function, the item corresponding to that function will be displayed. Y ou can then use the dial or the number buttons [0]–[9] to select the desired item. ■ Changing V alues ● ● ● ● ● ● ● ● ● ●[…]
-
Страница 52
Basic Operation and Displays 52 DGX-220/YPG-225 Owner’s Manual The display shows all of the current basic settings: song, style, v oice. It also includes a range of indicators that sho w the on/off status of a range of functions. Display Items 001 001 GrandPno Indicates that Harmony is turned on. (see page 53) Indicates that the Dual v oice is tu[…]
-
Страница 53
R e f e r e n c e DGX-220/YPG-225 Owner’s Manual 53 Adding Ef fects This feature adds harmony notes to the main voice. 1 Press the [HARMONY ON/OFF] b utton to turn Harmony feature on. To turn Harmony of f, press the [HARMONY ON/OFF] button again. When you press the [HARMONY ON/OFF] button to turn this feature on, the appropriate harmony type for […]
-
Страница 54
54 DGX-220/YPG-225 Owner’s Manual Adding Effects Re verb lets you play with a rich concert hall type ambience. When you select a style or song the optimum re verb type for the voice used is automatically selected. If you w ant to select a different rev erb type, use the procedure described below . 1 Press the [FUNCTION] button. 2 Use the CA TEGOR[…]
-
Страница 55
Adding Effects DGX-220/YPG-225 Owner’s Manual 55 The chorus effect creates a thick sound that is similar to man y of the same voices being played in unison. When you select a style or song the optimum chorus type for the v oice used is automatically selected. If you want to select a different chorus type, use the procedure described belo w . 1 Pr[…]
-
Страница 56
R e f e r e n c e 56 DGX-220/YPG-225 Owner’s Manual Handy Performance Featur es The instrument includes a metronome with adjustable tempo and time signature. Use it to set the tempo that is most comfortable for you. ■ Star t the metr onome ● ● ● ● ● ● ● ● ● ● T urn the metronome on and star t it by pressing the [METRONOME ON[…]
-
Страница 57
Handy Performance Features DGX-220/YPG-225 Owner’s Manual 57 ■ Setting the Number of Beats per Measure, and the Length of Each Beat ● ● ● ● ● ● ● ● ● ● ● ● ● ● ● ● ● ● In this example we’ll set up a 5/8 time signature. 1 Press and hold the [METRONOME ON/ OFF] button f or long er than a second to select the […]
-
Страница 58
58 DGX-220/YPG-225 Owner’s Manual Handy Performance Features Y ou can start the song/style by simply tapping the [TEMPO/TAP] b utton at the required tempo—4 times for time signatures in 4, and three times for time signatures in 3. Y ou can change the tempo during song playback by pressing the button just twice. When touch response is on you can[…]
-
Страница 59
Handy Performance Features DGX-220/YPG-225 Owner’s Manual 59 This function adds sustain to the k eyboard voices. Use it when you want to add sustain to the voices at all times, regardless of footswitch operation. The sustain function does not af fect split voice. 1 Press the [FUNCTION] button. 2 Use the CA TEGOR Y [ ] and [ ] but- tons to select […]
-
Страница 60
60 DGX-220/YPG-225 Owner’s Manual Handy Performance Features ◆ Large Pitch Chang es (T ranspose) The ov erall pitch of the instrument can by shifted up or down by a maximum of 1 octave in semitone increments. 1 Press the [FUNCTION] button. 2 Use the CA TEGOR Y [ ] and [ ] but- tons to select the T ranspose item. 3 Use the dial to set the transp[…]
-
Страница 61
Handy Performance Features DGX-220/YPG-225 Owner’s Manual 61 Sometimes selecting the ideal voice to play with a song or style can be confusing. The One T ouch Setting feature automatically selects a well-balanced v oice for you when you select a style or song. Simply select v oice number “000” to activ ate this feature. 1 Select voice number […]
-
Страница 62
62 DGX-220/YPG-225 Owner’s Manual Handy Performance Features 1 Press the [FUNCTION] button. 2 Use the CA TEGOR Y [ ] and [ ] but- tons to select the Harmony V olume item. 3 Use the dial to set the harmony volume between 000 and 127. Fi ve dif ferent master equalizer (EQ) settings are pro vided to giv e you the best possible sound when listen- ing[…]
-
Страница 63
R e f e r e n c e DGX-220/YPG-225 Owner’s Manual 63 Style (Auto-accompaniment) Functions Basic operation of the Style (auto-accompaniment) feature is described on page 19 of the Quick Guide. Here are some other ways y ou can play the styles, the style volume adjustment pr oce- dure, how y ou can play c hords using the styles, and more . The DGX-2[…]
-
Страница 64
64 DGX-220/YPG-225 Owner’s Manual Style (Auto-accompaniment) Functions 4 Press the [MAIN/A UT O FILL] button. 5 Press the [INTRO/ENDING/rit.] button. Y ou’ re now ready to play the intro. 6 As soon as you play a chor d with your left hand, the Intro of the selected Style star ts. For this example, play a C major chord (as shown belo w). For inf[…]
-
Страница 65
Style (Auto-accompaniment) Functions DGX-220/YPG-225 Owner’s Manual 65 Press the [STYLE] button to engag e the style function. 1 Press the [FUNCTION] button. 2 Use the CA TEGOR Y [ ] and [ ] but- tons to select the Style V olume item. 3 Use the dial to set the style volume between 000 and 127. The initial default split point is key number 54 (the[…]
-
Страница 66
66 DGX-220/YPG-225 Owner’s Manual Style (Auto-accompaniment) Functions When auto accompaniment is on (the A CMP ON icon is showing) and Synchro Start is off, you can play chords in the left-hand accompaniment range of the k eyboard while the style is stopped and still hear the accompaniment chords. This is “Stop Accompaniment”, and an y of th[…]
-
Страница 67
Style (Auto-accompaniment) Functions DGX-220/YPG-225 Owner’s Manual 67 This instrument features 150 internal styles, b ut other styles, such as those pro vided on the CD-ROM and others that can be obtained from the internet (only styles with the “.sty” suf fix), can be loaded into style number 151 and used in the same w ay as the internal st[…]
-
Страница 68
68 DGX-220/YPG-225 Owner’s Manual Style (Auto-accompaniment) Functions Tw o or more notes played together constitute a “chord”. The most basic chord type is the “triad” consisting of three notes: the root, third, and fifth degrees of the corresponding scale. A C major triad, for example, is made up of the notes C (the root), E (the third[…]
-
Страница 69
Style (Auto-accompaniment) Functions DGX-220/YPG-225 Owner’s Manual 69 ■ Recognized Standard Chor ds ● ● ● ● ● ● ● ● ● ● ● ● ● ● ● ● ● ● ● ● ● ● ● ● ● ● ● ● ● ● ● ● ● ● ● All chords in the chart are “C-root” chords. * These chords are not shown in the Dictionar y function[…]
-
Страница 70
70 DGX-220/YPG-225 Owner’s Manual Style (Auto-accompaniment) Functions The Dictionary function is essentially a b uilt-in “chord book” that shows you the individual notes of chords. It is ideal when you know the name of a certain chord and w ant to quickly learn how to play it. 1 Press and hold the LESSON [ST ART] button f or long er than a s[…]
-
Страница 71
R e f e r e n c e DGX-220/YPG-225 Owner’s Manual 71 Song Settings 1 Press the [FUNCTION] button. 2 Use the CA TEGOR Y [ ] and [ ] but- tons to select the Song V olume item. 3 Use the dial to set the song volume between 000 and 127. Y ou can specify a section of a song—“ A” is the start point and “B” is the end point—for repeat playbac[…]
-
Страница 72
72 DGX-220/YPG-225 Owner’s Manual Song Settings Each “track” of a song plays a different part of the song—melody , percussion, accompaniment, etc. Y ou can mute individual tracks and play the muted part on the keyboard yourself, or simply mute tracks other than the ones you w ant to listen to. Use the SONG MEMOR Y [1]–[5] and [A] buttons […]
-
Страница 73
R e f e r e n c e DGX-220/YPG-225 Owner’s Manual 73 Memorize Y our Favorite Panel Settings This instrument has a Registration Memory feature that lets y ou save y our fav orite set- tings for easy recall whene ver they’ re needed. Up to 16 complete setups can be saved (8 banks of two setups eac h). 1 Set the panel controls as required— select[…]
-
Страница 74
74 DGX-220/YPG-225 Owner’s Manual Memorize Your Favorite Panel Settings 1 Press the [MEMOR Y/BANK] b utton. A bank number will appear in the dis- play when y ou release the button. 2 Use the dial or the [1]–[8] n umber but- tons to select bank you want to recall. 3 Press the REGIST MEMORY b utton, [1] or [2], containing the settings y ou want t[…]
-
Страница 75
R e f e r e n c e DGX-220/YPG-225 Owner’s Manual 75 The Functions The “Functions” pr ovide access to a range of detailed instrument parameters f or tun- ing, setting the split point, and adjusting the voices and eff ects. T ake a look at the func- tion list starting on the opposite page . There are 47 function parameters in all. When y ou loc[…]
-
Страница 76
76 DGX-220/YPG-225 Owner’s Manual The Functions ● Function Setting List Setting Item title Range/Settings Description Style V olume StyleVol 000–127 Determines the volume of the Style. Song V olume SongVol 000–127 Determines the volume of the Song. Tr anspose Transpos -12–12 Determines the pitch of the instr ument by semitone increments .[…]
-
Страница 77
The Functions DGX-220/YPG-225 Owner’s Manual 77 * All these settings can be con veniently reset to their initial def ault values b y pressing the [+] and [-] buttons sim ultaneousl y. (The exception to this is Initial Send, which is an operation, not a setting.) Rev erb T ype Reverb 01–10 Determines the Reverb type , including off (10). (See th[…]
-
Страница 78
R e f e r e n c e 78 DGX-220/YPG-225 Owner’s Manual Connecting to a Computer Nearly all of the electr onic musical instruments made toda y—particularly synthesizers, sequencers and computer m usic related devices—use MIDI. MIDI is a world wide stan- dard that allo ws these devices to send and receive perf ormance and setting data. Natu- rally[…]
-
Страница 79
Connecting to a Computer DGX-220/YPG-225 Owner’s Manual 79 ● Channel Messag es This instrument is capable of handling 16 MIDI channels simultaneously—meaning it can play up to sixteen different instruments at the same time. Channel messages transmit information such as Note ON/OFF , Program Change, for each of the 16 channels. ● System Mess[…]
-
Страница 80
80 DGX-220/YPG-225 Owner’s Manual Connecting to a Computer By connecting the instrument to a computer, the instrument’ s performance data can be used on the com- puter , and performance data from the computer can be played on the instrument. ● When the instrument is connected with computer, it transmits/receives performance data. ■ MIDI set[…]
-
Страница 81
Connecting to a Computer DGX-220/YPG-225 Owner’s Manual 81 ■ PC Mode ● ● ● ● ● ● ● ● ● ● ● ● ● ● ● ● ● ● ● A number of MIDI settings need to be made when you want to transfer performance data between the computer and the instrument. The PC Mode item can con veniently make multiple settings for you in one op[…]
-
Страница 82
82 DGX-220/YPG-225 Owner’s Manual Connecting to a Computer This function lets you send the panel setup data to a computer. Before you record performance data to a sequencer application running on your computer, it is a good idea to fi rst send and record the panel setup data before the actual performance data. 1 Press the [FUNCTION] button. 2 Us[…]
-
Страница 83
Connecting to a Computer DGX-220/YPG-225 Owner’s Manual 83 ● Backup files can be transferred from the instru- ment to a computer and back. ⇒ refer to the pr ocedure described on page 84. ■ Use Musicsoft Downloader To T ransf er Songs Fr om the Accessory CD-ROM T o the Instrument’ s flash memory ● ● ● ● ● 1 Install the Musicsof[…]
-
Страница 84
84 DGX-220/YPG-225 Owner’s Manual Connecting to a Computer 8 Close the window to end the Musicsoft Downloader . 9 To pla yback a song stored in flash memory , press the [SONG] button. Use the dial to select the song you want to play , then press the [ST ART/ST OP] button to start playback. Style files (files with the “.STY” e xtension) can[…]
-
Страница 85
R e f e r e n c e DGX-220/YPG-225 Owner’s Manual 85 Accessory CD-ROM Installation Guide This CD-R OM is copy-protected. Y amaha makes no representations or warranties with re gard to any problems while attempting to copy the CD-R OM or software and cannot be held responsible for the results of attempts to copy the data. • The software and this […]
-
Страница 86
86 DGX-220/YPG-225 Owner’s Manual Accessory CD-ROM Installation Guide In order to view PDF scores , you will need to install Adobe Reader in y our computer . Y ou can download the Adobe Reader . Please check the f ollowing URL: http://www .adobe.com/ ■ Using the CD-R OM ● ● ● ● ● ● ● ● ● ● ● Please read the Software Licens[…]
-
Страница 87
Accessory CD-ROM Installation Guide DGX-220/YPG-225 Owner’s Manual 87 ■ Installing the USB-MIDI Driver ● ● ● ● In order to be able to communicate with and use MIDI devices connected to your computer, the appropriate driv er software must be properly installed on your computer . The USB-MIDI driver allo ws sequence softw are and similar […]
-
Страница 88
88 DGX-220/YPG-225 Owner’s Manual Accessory CD-ROM Installation Guide Installing the driver on Windows 98/Me 1 Start the computer . 2 Insert the supplied CD-ROM into the CD- ROM drive. A star t window will appear automatically . 3 First, make sure the PO WER switc h on the instrument is set to OFF , then use a USB cable to connect the USB termina[…]
-
Страница 89
Accessory CD-ROM Installation Guide DGX-220/YPG-225 Owner’s Manual 89 Installing the driver on Windows XP 1 Start the computer and use the “Adminis- trator” account to log into Windows. 2 Select [Start] ➔ [Control P anel]. If the control panel appear s as “Pick a cate- gory”, click “Switch to Classic View” in the upper left of the w[…]
-
Страница 90
90 DGX-220/YPG-225 Owner’s Manual Accessory CD-ROM Installation Guide ■ Tr oubleshooting • Is the USB cable connected corr ectly? Check the USB cable connection. Disconnect the USB cable, then connect it ag ain. • Is the USB function enabled on y our com- puter? When you connect the instrument to the computer for the first time, if the “[…]
-
Страница 91
Accessory CD-ROM Installation Guide DGX-220/YPG-225 Owner’s Manual 91 4 Disconnect the USB cable. 5 Restart the computer . 6 Re-install the driver . A TTENTION SOFTW ARE LICENSE AGREEMENT PLEASE READ THIS SOFTW ARE LICENSE A GREEMENT (“ AGREE- MENT”) CAREFULL Y BEFORE USING THIS SOFTW ARE. YOU ARE ONL Y PERMITTED TO USE THIS SOFTW ARE PURSU A[…]
-
Страница 92
92 DGX-220/YPG-225 Owner’s Manual Tr oubleshooting Problem P ossible Cause and Solution When the instrument is tur ned on or off, a popping sound is temporarily produced. This is normal and indicates that the instr ument is receiving electrical power . When using a mobile phone, noise is produced. Using a mobile phone in close proximity to the in[…]
-
Страница 93
DGX-220/YPG-225 Owner’s Manual 93 Memo[…]
-
Страница 94
94 DGX-220/YPG-225 Owner’s Manual Scor es This demo is an example of how the Easy Song Arranger can be used to change styles throughout a piece. Hallelujah Chorus Song No . 9 q q q q =123 (Function Demo f or Easy Song Arranger)[…]
-
Страница 95
Scores DGX-220/YPG-225 Owner’s Manual 95[…]
-
Страница 96
Scores 96 DGX-220/YPG-225 Owner’s Manual This score is provided with the intent that the pitch will be corrected by the performance assistant technol- ogy feature. If you play the “Play These Notes” part using the performance assistant technology feature, the part will be corrected and played so that it matches the backing part. Ave Maria Son[…]
-
Страница 97
Scores DGX-220/YPG-225 Owner’s Manual 97[…]
-
Страница 98
Scores 98 DGX-220/YPG-225 Owner’s Manual This score is provided with the intent that the pitch will be corrected by the performance assistant technol- ogy feature. If you play the “Play These Notes” part using the performance assistant technology feature, the part will be corrected and played so that it matches the backing part. Nocturne op.9[…]
-
Страница 99
Scores DGX-220/YPG-225 Owner’s Manual 99[…]
-
Страница 100
100 DGX-220/YPG-225 Owner’s Manual V oice List ■ Maximum P olyphony ● ● ● ● ● ● ● ● ● ● ● ● ● ● ● ● ● ● The instrument has 32-note maximum polyphon y . This means that it can play a maximum of up to 32 notes at once, re gard- less of what functions are used. Auto accompaniment uses a number of the av ailable […]
-
Страница 101
Voice List DGX-220/YPG-225 Owner’s Manual 101 ● XGlite V oice/XGlite Optional V oice* List 098 000 112 082 Sawtooth Lead 099 000 115 082 Analogon 100 000 119 082 F argo 101 000 112 099 Star Dust 102 000 112 086 V oice Lead 103 000 112 101 Brightness SYNTH PAD 104 000 112 092 Xenon P ad 105 000 112 095 Equinox 106 000 112 089 F antasia 107 000 1[…]
-
Страница 102
Voice List 102 DGX-220/YPG-225 Owner’s Manual 225 000 000 032 Guitar Harmonics 226 000 065 032 Guitar Feedbac k 227 000 066 032 Guitar Harmonics 2 BASS 228 000 000 033 Acoustic Bass 229 000 040 033 Jazz Rh ythm 230 000 045 033 V elocity Crossf ade Upright Bass 231 000 000 034 Finger Bass 232 000 018 034 Finger Dark 233 000 040 034 Bass & Dist[…]
-
Страница 103
Voice List DGX-220/YPG-225 Owner’s Manual 103 The voice n umber with an asterisk (*) is XGlite optional voice. 361 000 000 092 Choir P ad 362 000 066 092 Itopia 363 000 000 093 Bowed P ad 364 000 000 094 Metallic P ad 365 000 000 095 Halo P ad 366 000 000 096 Sweep P ad SYNTH EFFECTS 367 000 000 097 Rain 368 000 065 097 African Wind 369 000 066 0[…]
-
Страница 104
104 DGX-220/YPG-225 Owner’s Manual Drum Kit List •“ ” indicates that the dr um sound is the same as “Standard Kit 1”. • Each percussion voice uses one note. • The MIDI Note # and Note are actually one octav e lower than k eyboard Note # and Note. For example , in “117: Standard Kit 1”, the “Seq Clic k H” (Note# 36/Note C1) c[…]
-
Страница 105
Drum Kit List DGX-220/YPG-225 Owner’s Manual 105 Voice No. 117 123 124 125 126 127 128 MSB (0–127) / LSB (0–127) / PC (1–128) 127/000/001 127/000/113 127/000/033 127/000/041 127/000/049 126/000/001 126/000/002 Keyboard MIDI Key Off Alternate assign Standard Kit 1 Dance Kit Jazz Kit Brush Kit Symphony Kit SFX Kit 1 SFX Kit 2 Note# Note Note#[…]
-
Страница 106
106 DGX-220/YPG-225 Owner’s Manual Style List Style No. Style Name 8BEAT 001 8BeatModern 002 Cool8Beat 003 60’sGuitarPop 004 8BeatAdria 005 60’s8Beat 006 BubblegumPop 007 BritPopSwing 008 8Beat 009 OffBeat 010 60’sRock 011 HardRock 012 RockShuffle 013 8BeatRock 16BEAT 014 16Beat 015 PopShuffle1 016 PopShuffle2 017 GuitarPop 018 16BeatUptemp[…]
-
Страница 107
DGX-220/YPG-225 Owner’s Manual 107 Music Database List MDB No. Song Name POP 001 AlvFever 002 CoinLane 003 Croco Rk 004 DayPdise 005 DwnTown 006 EasySday 007 GoMyWay 008 HowDeep! 009 HurryLuv 010 I breath 011 I’lBTher 012 I’m Torn 013 Imagine 014 ISurvive 015 JustCall 016 JustWay 017 LeadPack 018 LoveFeel 019 LoveMeT 020 LveMeDo 021 Mi Shell […]
-
Страница 108
108 DGX-220/YPG-225 Owner’s Manual Songs Pr ovided On the Supplied CD-ROM The easy song arranger can only be used with songs that include chord data. File Name Song Name Composer 001Nutcr.mid Danse des Mirlitons from “The Nutcracker” P.I. Tchaikovsky 002Orphe.mid “Orphée aux Enfers” Ouverture J. Offenbach 003Slavo.mid Slavonic Dances op.[…]
-
Страница 109
DGX-220/YPG-225 Owner’s Manual 109 Ef fect T ype List ● Harmony T ypes ● Reverb T ypes ● Chorus T ypes No. Harmony T ype Description 01 Duet Harmony types 01–05 are pitch-based and add one-, two- or three-note harmonies to the sin- gle-note melody pla yed in the right hand. These types sound when chords are pla yed in the auto accompanime[…]
-
Страница 110
110 DGX-220/YPG-225 Owner’s Manual MIDI Implementation Chart YAMAHA [ Portable Grand ] Date: 17-NOV-2005 Model DGX-220/YPG-225 MIDI Implementation Chart Version:1.0 Transmitted Recognized Remarks Function… Basic Default 1 — 16 1 — 16 Channel Changed x x Default 3 3 Mode Messages x x Altered ************** x Note 0 — 127 0 — 127 Number : True vo[…]
-
Страница 111
MIDI Implementation Chart DGX-220/YPG-225 Owner’s Manual 111 Prog o 0 — 127 o 0 — 127 Change : True # ************** System Exclusive o o : Song Pos. x x Common : Song Sel. x x : Tune x x System : Clock o o Real Time: Commands o o Aux :All Sound OFF x o(120,126,127) : Reset All Cntrls x o(121) :Local ON/OFF x o(122) :All Notes OFF x o(123-125) Me[…]
-
Страница 112
112 DGX-220/YPG-225 Owner’s Manual MIDI Data Format NO TE: 1 By default (f actor y settings) the instrument ordinar ily functions as a 16-channel multi-timbral tone generator , and incoming data does not affect the panel v oices or panel settings. How- ev er , the MIDI messages listed below do affect the panel voices , auto accompaniment, and son[…]
-
Страница 113
DGX-220/YPG-225 Owner’s Manual 113 Specifications Ke yboards • 76 box type keys (E0–G6), with Touch Response. Display • LCD display (backlit) Setup • STANDBY/ON • MASTER VOLUME: MIN–MAX P anel Controls • SONG, VOICE, STYLE, EASY SONG ARRANGER, P.A.T. ON/OFF, LESSON L, LESSON R, LESSON START, METRONOME ON/OFF, PORTABLE GRAND, DEMO, […]
-
Страница 114
114 DGX-220/YPG-225 Owner’s Manual Index +/– ………………………………………….. 13, 51 ……………………………………………….. 50 0–9 ………………………………………….. 13, 51 A-B REPEAT …………………………… 12, 71 ACMP ON/OFF ……………………….. 12, 20 CATEGORY [ ] and [[…]
-
Страница 115
Index DGX-220/YPG-225 Owner’s Manual 115 N notation …………………………………………. 52 O One Touch Setting ………………………….. 61 P Panel Sustain …………………………………. 59 PC Mode ……………………………………….. 81 Performance assistant technology …….. 29 Pitch Bend Range ……[…]
-
Страница 116
116 DGX-220/YPG-225 Owner’s Manual L imited W arr anty 90 D A YS LABOR 1 YEAR P ARTS Y amaha Corporation of America, hereafter referred to as Y amaha, warrants to the original consumer of a product included in the categories listed below , that the product will be free of defects in materials and/or workmanship for the periods indicated. This war[…]
-
Страница 117
For details of products, please contact your nearest Y amaha representativ e or the authorized distributor listed below . Pour plus de détails sur les produits, v euillez-vous adresser à Y amaha ou au distributeur le plus proche de v ous figurant dans la liste suiv ante. Die Einzelheiten zu Produkten sind bei Ihrer unten aufgeführten Niederlass[…]
-
Страница 118
U.R.G., Pro Audio & Digital Musical Instrument Division, Yamaha Corporation © 2006 Yamaha Corporation WG28010 XXXPOXXX.X-01A0 Printed in China Yamaha Home Keyboards Home Page (English Only) http://music.yamaha.com/homekeyboard Yamaha Manual Library http://www.yamaha.co.jp/manual/[…]
PDF файл инструкции на русском языке к синтезатору, цифровому пианино Yamaha DGX-220. Примерные размер файла 4.2 Мб. Данное руководство пользователя поможет использоваться для ознакомления с условиями эксплуатации, характеристиками и правилами использования.
Не соблюдения рекомендуемых условий использования может привести к поломке, нанесению вреда пользователю и отказу компании производителя от гарантийного обслуживания.
Для скачивания инструкции нажмите на название файла. Вы можете помочь проекту поделившись информацией о нас на своей странице.
Подпишитесь на наши сообщества!