-
Page 1
RX-V457 AV Receiver OWNER’S MANUAL… -
Page 2: Important Safety Instructions
IMPORTANT SAFETY INSTRUCTIONS IMPORTANT SAFETY INSTRUCTIONS CAUTION RISK OF ELECTRIC SHOCK DO NOT OPEN CAUTION: TO REDUCE THE RISK OF ELECTRIC SHOCK, DO NOT REMOVE COVER (OR BACK). NO USER-SERVICEABLE PARTS INSIDE. REFER SERVICING TO QUALIFIED SERVICE PERSONNEL. • Explanation of Graphical Symbols The lightning flash with arrowhead symbol, within an equilateral triangle, is intended to alert you to the presence of uninsulated “dangerous voltage”…
-
Page 3
This product, when installed as indicated in the instructions contained in this manual, meets FCC requirements. Modifications not expressly approved by Yamaha may void your authority, granted by the FCC, to use the product. 2 IMPORTANT: When connecting this product to accessories and/or another product use only high quality shielded cables. -
Page 4
Retain this Owner’s Manual in a safe place for future reference. Since hearing damage from loud sounds is often undetectable until it is too late, YAMAHA and the Electronic Industries Association’s Consumer Electronics Group recommend you to avoid prolonged exposure from excessive volume levels. -
Page 5: Table Of Contents
INTRODUCTION FEATURES… 2 GETTING STARTED… 3 Supplied accessories … 3 Installing batteries in the remote control … 3 CONTROLS AND FUNCTIONS … 4 Front panel … 4 Remote control… 6 Using the remote control … 7 Front panel display … 8 Rear panel …
-
Page 6: Features
Center: 85 W Surround: 85 W + 85 W Surround back: 85 W Sound field features Proprietary YAMAHA technology for the creation of sound fields Dolby Digital/Dolby Digital EX decoder DTS/DTS-ES Matrix 6.1, Discrete 6.1, DTS Neo:6, DTS 96/24 decoder…
-
Page 7: Getting Started
Supplied accessories Please check that you received all of the following parts. Remote control CODE SET TRANSMIT Batteries (4) SYSTEM POWER POWER STANDBY POWER (AAA, R03, UM-4) MD/CD-R TUNER SLEEP DTV/CBL V-AUX MULTI CH IN TV VOL TV CH VOLUME TV MUTE TV INPUT MUTE…
-
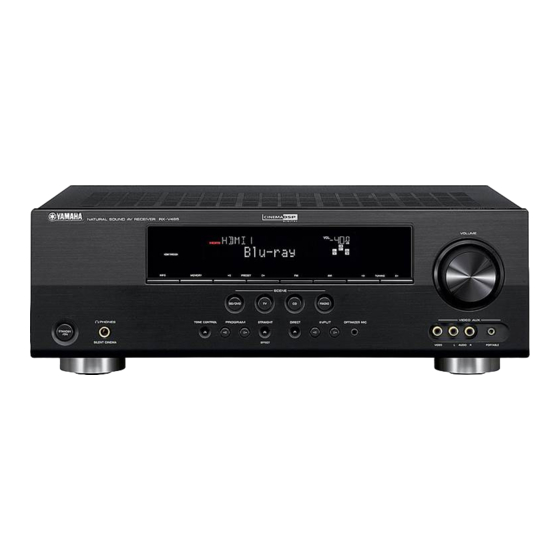
Page 8: Controls And Functions
CONTROLS AND FUNCTIONS CONTROLS AND FUNCTIONS Front panel STANDBY SEARCH MODE PHONES SPEAKERS SILENT CINEMA 1 STANDBY/ON Turns on this unit or sets it to the standby mode. When you turn on this unit, you will hear a click and there will be a 4 to 5-second delay before this unit can reproduce sound.
-
Page 9
CONTROLS AND FUNCTIONS 0 VIDEO AUX jacks Input audio and video signals from a portable external source such as a game console. To reproduce source signals from these jacks, select V-AUX as the input source. A VOLUME Controls the output level of all audio channels. This does not affect the REC OUT level. -
Page 10: Remote Control
CONTROLS AND FUNCTIONS Remote control This section describes the function of each control on the remote control used to control this unit. To operate other components, see “REMOTE CONTROL FEATURES” on page 63. CODE SET TRANSMIT POWER POWER STANDBY MD/CD-R TUNER DTV/CBL V-AUX…
-
Page 11: Using The Remote Control
B SYSTEM POWER Turns on the power of this unit. C SLEEP Sets the sleep timer. D MULTI CH IN Selects multi-channel input when using an external decoder (etc.). E AMP Selects the AMP mode. You must select the AMP mode to control the main unit.
-
Page 12: Front Panel Display
CONTROLS AND FUNCTIONS Front panel display VIRTUAL SILENT CINEMA MATRIX DISCRETE DIGITAL STANDARD ZONE2 ZONE2 NIGHT PL x 1 Decoder indicators When any of this unit’s decoders function, the respective indicator lights up. 2 VIRTUAL indicator Lights up when Virtual CINEMA DSP is active (see page 31).
-
Page 13
CONTROLS AND FUNCTIONS K 96/24 indicator Lights up when a DTS 96/24 signal is input to this unit. L LFE indicator Lights up when the input signal contains the LFE signal. M Input channel indicators/speaker indicators Indicate the channel components of the current digital input signal. -
Page 14: Rear Panel
CONTROLS AND FUNCTIONS Rear panel MULTI CH INPUT AUDIO VIDEO VIDEO FRONT DTV/ SURROUND DIGITAL CENTER INPUT WOOFER OPTICAL DTV/CBL (PLAY) CD-R VIDEO (REC) WOOFER MONITOR OUT COAXIAL AUDIO OUTPUT 1 DIGITAL INPUT jacks See pages 15, 17 and 18 for details. 2 MULTI CH INPUT jacks See page 16 for connection information.
-
Page 15: Speaker Setup
Place this speaker directly behind the listening position and at the same height as the surround speakers. Subwoofer The use of a subwoofer, such as the YAMAHA Active Servo Processing Subwoofer System, is effective not only for reinforcing bass frequencies from any or all channels,…
-
Page 16: Speaker Connections
SPEAKER SETUP Speaker connections Be sure to connect the left channel (L), right channel (R), “+” (red) and “–” (black) properly. If the connections are faulty, no sound will be heard from the speakers, and if the polarity of the speaker connections is incorrect, the sound will be unnatural and lack bass.
-
Page 17
Connect surround speakers (6, 7) to these terminals. SUBWOOFER jack Connect a subwoofer with built-in amplifier (1), such as the YAMAHA Active Servo Processing Subwoofer System, to this jack. SURROUND BACK terminals Connect a surround back speaker (5) to these terminals. -
Page 18: Connections
CONNECTIONS Before connecting components CAUTION Do not connect this unit or other components to the mains power until all connections between components are complete. Cable indications For analog signals left analog cables right analog cables For digital signals optical cables coaxial cables For video signals video cables…
-
Page 19: Connecting Video Components
CONNECTIONS Connecting video components Connections for DVD playback Note Be sure to connect your video source components in the same way you connect your video monitor to this unit. For example, if you connect your video monitor to this unit using a VIDEO connection, connect your video source components to this unit using the VIDEO connections.
-
Page 20: Connecting To Multi Ch Input Jacks
CONNECTIONS Connecting to the MULTI CH INPUT jacks This unit is equipped with 6 additional input jacks (left and right FRONT, CENTER, left and right SURROUND and SUBWOOFER) for discrete multi-channel input from a multi-format player, external decoder, sound processor or pre- amplifier.
-
Page 21
Connections for other video components Note • Be sure to connect your video source components in the same way you connect your video monitor to this unit. For example, if you connect your video monitor to this unit using a VIDEO connection, connect your video source components to this unit using the VIDEO connection. -
Page 22: Connecting Audio Components
CONNECTIONS VIDEO AUX VIDEO AUDIO Audio out R Audio out L Video out Connecting audio components Connections for audio components Audio out CD player Coaxial out Game console or video camera DIGITAL INPUT ( PLAY ) CD-R ( REC ) COAXIAL AUDIO (U.S.A.
-
Page 23: Connecting The Fm And Am Antennas
AM antenna is connected to this unit. • A properly installed outdoor antenna provides clearer reception than an indoor one. If you experience poor reception quality, an outdoor antenna may improve the quality. Consult the nearest authorized YAMAHA dealer or service center about outdoor antennas. CONNECTIONS…
-
Page 24: Connecting The Power Supply Cord
CONNECTIONS Connecting the power supply cord Connecting the AC power cord Plug the power cord into an AC wall outlet. AC OUTLET(S) (SWITCHED) U.K. and Australia models … 1 outlet Korea model …None Other models …2 outlets Use these outlets to connect the power cords from your other components to this unit.
-
Page 25: Speaker Impedance Setting
Speaker impedance setting CAUTION If you are using 4 or 6 ohm speakers, set the impedance to 4 or 6 ohms as follows before turning on the power. Be sure this unit is in the standby mode. Turn off the power to this unit, and while holding down STRAIGHT (EFFECT), press STANDBY/ON.
-
Page 26: Basic Setup
BASIC SETUP The basic setup feature is a useful way to set up your system quickly and with minimal effort. • If you wish to configure the unit manually using more precise adjustments, use the detailed parameters in SOUND MENU (page 56) instead of using BASIC SETUP.
-
Page 27
Press d to display the SPEAKERS parameter. PRESET/CH ENTER Press j / i to select the number of speakers you connected. SPEAKERS .. 6spk Choices Display Front L/R 2spk SL SB SR SL SB SR Front L/R, Center L L C R 3spk SL SB SR Front L/R, Surround L/R… -
Page 28
BASIC SETUP To balance the speaker levels Perform the following steps after step 13 (see page 23). V-AUX DTV/CBL The unit outputs the test tone from the selected speaker and the left front (or left surround) speaker in turn. The indicator of the speaker currently outputting the test tone flashes in the front panel display. -
Page 29: Playback
Basic operations STANDBY PRESET/TUNING FM/AM A/B/C/D/E l PRESET/TUNING/CH h MEMORY TUNING MODE SEARCH MODE CATEGORY DISPLAY EDIT NEXT LEVEL MAN’L/AUTO FM AUTO/MAN’L MONO INPUT STRAIGHT PROGRAM PHONES SPEAKERS INPUT MODE MULTI CH INPUT EFFECT TONE CONTROL BASS/TREBLE SILENT CINEMA CODE SET TRANSMIT SYSTEM POWER…
-
Page 30
PLAYBACK Select a sound field program if desired. Press PROGRAM l / h repeatedly (or press AMP to select the AMP mode, then press one of the sound field program buttons on the remote control) to select a sound field program. (See page 49 for details about sound field programs.) PROGRAM Front panel… -
Page 31: Selecting Sound Field Programs
Selecting MULTI CH INPUT Press MULTI CH INPUT (or MULTI CH IN on the remote control) so that “MULTI CH INPUT” appears in the front panel display. MULTI CH INPUT Front panel MULTI CH INPUT Note When “MULTI CH INPUT” is shown in the front panel display, no other source can be played.
-
Page 32: Remote Control Operation
PLAYBACK Remote control operation CODE SET TRANSMIT TV VOL TV CH SYSTEM POWER POWER STANDBY POWER TV MUTE TV INPUT MD/CD-R TUNER SLEEP STEREO MUSIC DTV/CBL V-AUX MULTI CH IN STANDARD SELECT SPEAKERS PRESET/CH TV VOL TV CH VOLUME LEVEL TITLE BAND TV MUTE…
-
Page 33
Notes • Some 6.1-channel compatible discs do not have a signal (flag) which this unit can automatically detect. When playing these kinds of discs with 6.1-channel, select a decoder manually (PLIIx Music, EX/ES or EX). • 6.1-channel playback is not possible even if EXTD SUR. is pressed in the following cases: –… -
Page 34: Night Listening Modes
PLAYBACK Listening to high fidelity stereo sound (Direct Stereo) Direct Stereo allows you to bypass this unit’s decoders and DSP processors to enjoy pure high fidelity sound from 2- channel PCM and analog sources. Press PROGRAM l / h repeatedly (or press AMP to select the AMP mode, then press DIRECT ST.
-
Page 35: Selecting Input Modes
Downmixing to 2 channels You can enjoy 2-channel stereo playback even from multi- channel sources. Press PROGRAM l / h repeatedly (or press AMP to select the AMP mode, then press STEREO on the remote control) to select 2ch Stereo. PROGRAM Front panel Remote control…
-
Page 36
PLAYBACK Notes • When playing a DTS-CD/LD, be sure to set INPUT MODE to DTS. • If the digital output data of the player has been processed in any way, you may not be able to perform DTS decoding even if you make a digital connection between this unit and the player depending on the player. -
Page 37: Fm/Am Tuning
Automatic and manual tuning There are 2 tuning methods; automatic and manual. Automatic tuning is effective when station signals are strong and there is no interference. Automatic tuning STANDBY PRESET/TUNING FM/AM A/B/C/D/E l PRESET/TUNING/CH h MEMORY TUNING MODE SEARCH MODE CATEGORY DISPLAY EDIT…
-
Page 38: Presetting Stations
FM/AM TUNING Manual tuning If the signal from the station you want to select is weak, tune into it manually. Manually tuning into an FM station will automatically switch the tuner to monaural reception to increase the signal quality. Select TUNER and the reception band following steps 1 and 2 as described in “Automatic tuning”.
-
Page 39
Press and hold MEMORY (MAN’L/AUTO FM) for more than 3 seconds. The preset number, the MEMORY and AUTO indicators flash. After about 5 seconds, automatic presetting starts from the frequency currently displayed and proceeds toward the higher frequencies. MEMORY MAN’L/AUTO FM V-AUX DTV/CBL MD/CD-R… -
Page 40: Selecting Preset Stations
FM/AM TUNING Press PRESET/TUNING/CH l / h to select a preset station number (1 to
while the MEMORY indicator is flashing. Press h to select a higher preset station number. Press l to select a lower preset station number. l PRESET/TUNING/CH h LEVEL V-AUX…
-
Page 41: Exchanging Preset Stations
Press PRESET/TUNING/CH l / h (or PRESET/CH u / d on the remote control) to select a preset station number (1 to 8). The preset group and number appear in the front panel display along with the station band, frequency and the TUNED indicator lights up.
-
Page 42
FM/AM TUNING Select preset station “A5” using A/B/C/D/E and PRESET/TUNING/CH l / h. “A5” and the MEMORY indicator flash in the front panel display. l PRESET/TUNING/CH h A/B/C/D/E CATEGORY NEXT V-AUX DTV/CBL Press PRESET/TUNING (EDIT) again. The stations stored at the two preset assignments are exchanged. -
Page 43: Xm Satellite Radio Tuning
XM SATELLITE RADIO TUNING What is XM Satellite Radio? XM Satellite Radio is the satellite radio service with millions of listeners across the U.S., broadcasting live daily. XM’s channel lineup includes more than 130 digital channels of choice from coast to coast: 68 commercial- free music channels, featuring hip hop to opera, classical to country, bluegrass to blues;…
-
Page 44: Activating Xm Satellite Radio
XM SATELLITE RADIO TUNING Remote control functions Note The following controls are only available when the unit is in the TUNER mode. To switch to the TUNER mode, press TUNER to select TUNER as the input source. TV VOL TV CH VOLUME TV MUTE TV INPUT…
-
Page 45: Basic Xm Satellite Radio Operations
Press PRESET/TUNING/CH l / h (or PRESET/CH u / d on the remote control) to select channel “0”. l PRESET/TUNING/CH h LEVEL A-E/CAT. Front panel Note You cannot select channel “0” if the “All Channel Search mode” (see page 42) is not selected. Check the XM Satellite Radio ID number displayed in the front panel display and write it down.
-
Page 46: Xm Satellite Radio Search Modes
XM SATELLITE RADIO TUNING Switching XM information You can display XM information (such as channel number/name, category, or artist name/song title) for the channel currently selected in the front panel display. Press DISPLAY on the unit (or remote control during the TUNER mode) repeatedly to toggle between the following XM information display modes.
-
Page 47
To change the channel category, press CATEGORY (or A-E/CAT. j / i on the remote control) repeatedly. A/B/C/D/E CATEGORY NEXT A-E/CAT. Front panel Remote control To search a channel within all channels, press PRESET/TUNING/CH l / h (or PRESET/CH u / d on the remote control) repeatedly. -
Page 48: Preset Search Mode
XM SATELLITE RADIO TUNING Preset Search mode Prior to selecting a preset channel in the Preset Search mode, you should preset XM Satellite Radio channels. For details, see “Setting XM Satellite Radio preset channels” on page 45. All preset channels (A1 to E8) recalls “001 Preview”…
-
Page 49: Setting Xm Satellite Radio Preset Channels
Press the numeric buttons to enter the desired channel number. For example, to enter the number 123, press the numeric buttons as shown below. STEREO MUSIC The display changes as follows. V-AUX DTV/CBL MD/CD-R <XM> —1 V-AUX DTV/CBL MD/CD-R <XM> -12 V-AUX DTV/CBL MD/CD-R…
-
Page 50
XM SATELLITE RADIO TUNING While the MEMORY indicator is flashing, press CATEGORY (or A-E/CAT. j / i on the remote control) to select a preset group (A to E). The group letter appears. A/B/C/D/E CATEGORY NEXT A-E/CAT. Front panel DTV/CBL MD/CD-R V-AUX C [040] Deep… -
Page 51
Status and error messages If an operation takes longer than usual or an error occurs, one of the following messages may appear in the front panel display. In this case, read the cause and follow the corresponding remedies. Message CHECK ANTENNA The XM Connect and Play digital antenna accessory is not connected, or does not work properly. -
Page 52: Recording
RECORDING Recording adjustments and other operations are performed from the recording components. Refer to the operating instructions for those components. STANDBY l PRESET/TUNING/CH h PRESET/TUNING FM/AM A/B/C/D/E MEMORY SEARCH MODE CATEGORY EDIT NEXT LEVEL MAN’L/AUTO FM INPUT PHONES SPEAKERS STRAIGHT PROGRAM INPUT MODE EFFECT…
-
Page 53: Sound Field Program Descriptions
The YAMAHA CINEMA DSP modes are compatible with all Dolby Digital, DTS, and Dolby Surround sources. Set the input mode to AUTO (see page 31) to enable this unit to automatically switch to the appropriate digital decoder according to the input signal.
-
Page 54
SOUND FIELD PROGRAM DESCRIPTIONS Remote control Program button MOVIE THEATER Spectacle MOVIE THEATER Sci-Fi MOVIE THEATER Adventure MOVIE THEATER General SUR. STANDARD SUR. ENHANCED Features CINEMA DSP processing. This program creates the extremely wide sound field of a 70-mm movie theater. It precisely reproduces the source sound in detail, making both the video and the sound field incredibly real. -
Page 55: For Music Sources
For music sources You can select from the following sound fields when playing music sources, like CD, FM/AM broadcasting, tapes, etc. Program selection methods vary depending on sound field program types. For details on how to select sound field programs, see “Selecting sound field programs” on pages 27 to 31. Remote control Program…
-
Page 56: Advanced Operation
ADVANCED OPERATIONS Using the sleep timer Use this feature to automatically set this unit in the standby mode after a certain amount of time. The sleep timer is useful when you are going to sleep while this unit is playing or recording a source. The sleep timer also automatically turns off any external components connected to AC OUTLET(S).
-
Page 57: Manually Adjusting Speaker Levels
Manually adjusting speaker levels You can adjust the output level of each speaker while listening to a music source. This is also possible when playing sources through the MULTI CH INPUT jacks. Please note that this operation will override the level adjustments made in “BASIC SETUP”…
-
Page 58: Set Menu
SET MENU You can use the following parameters in SET MENU to adjust a variety of system settings and customize the way this unit operates. Change the initial settings (indicated in bold under each parameter) to reflect the needs of your listening environment.
-
Page 59: Using Set Menu
Using SET MENU Use the remote control to access and adjust each parameter. TV VOL TV CH VOLUME TV MUTE TV INPUT MUTE STEREO MUSIC ENTERTAIN MOVIE STANDARD SELECT EXTD SUR. DIRECT ST. SPEAKERS NIGHT STRAIGHT ENT. EFFECT PRESET/CH SET MENU LEVEL TITLE FAVOR.
-
Page 60: Sound Menu
SET MENU 1 SOUND MENU Use to manually adjust any speaker setting or compensate for video signal processing delays when using LCD monitors or projectors. Most of the SOUND MENU parameters are set automatically when you perform “BASIC SETUP” (see page 22). Speaker settings A)SPEAKER SET Use to manually adjust any speaker setting.
-
Page 61
Speaker level B)SP LEVEL Use these settings to manually balance the level of each speaker selected in SPEAKER SET (page 56). Choices: –10.0 dB to +10.0 dB • FL adjusts the balance of the front left speaker. • FR adjusts the balance of the front right speaker. •… -
Page 62: Input Menu
SET MENU Audio settings G)AUDIO SET Use to customize this units overall audio settings. Muting type MUTE TYP. Use to adjust how much the mute function reduces the output volume. Choices: FULL, –20dB • Select FULL to completely halt all output of sound. •…
-
Page 63: Option Menu
Input mode B)INPUT MODE Use this feature to designate the input mode for sources connected to the DIGITAL INPUT jacks when you turn on this unit (see page 31 for details about the input mode). Choices: AUTO, LAST • Select AUTO to allow this unit to automatically detect the type of input signal and select the appropriate input mode.
-
Page 64
SET MENU Zone set D) MULTI ZONE Use to specify the location of speakers connected to the SPEAKERS B terminals. Speaker B setting SP B Use this feature to select the location of the front speakers connected to the SPEAKERS B terminals. Choices: FRONT, ZONE B •… -
Page 65: Advanced Setup Menu
ADVANCED SETUP MENU The ADVANCED SETUP menu is displayed in the front panel display. • During the advanced setup procedure, audio output is muted. • During the advanced setup procedure, only the STANDBY/ON, STRAIGHT (EFFECT) and PROGRAM l / h buttons on the front panel are available for operation.
-
Page 66
ADVANCED SETUP MENU ADVANCED SETUP menu items Change the initial settings (indicated in bold under each parameter) to reflect the needs of your listening environment. Speaker impedance SP IMP. Use to switch the speaker impedance for this unit. Choices: 8 Ω MIN, 4 Ω MIN •… -
Page 67: Remote Control Features
REMOTE CONTROL FEATURES In addition to controlling this unit, the remote control can also operate other A/V components made by YAMAHA and other manufacturers. To control other components, you must set up remote control with the appropriate remote control codes.
-
Page 68: Setting Remote Control Codes
Note You may not be able to operate your YAMAHA component even if a YAMAHA remote control code is initially set as listed above. In this case, try to set other YAMAHA remote control code(s). Press an input selector button or select the component you want to set up.
-
Page 69: Controlling Other Components
Controlling other components Once you set the appropriate remote control codes, you can use this remote to control your other components. Note that some buttons may not correctly operate the selected component. Use the input selector buttons to select the component you want to operate. The remote control automatically switches to the appropriate control mode for that component.
-
Page 70: Switching Library Codes
To operate this unit 9992 using an alternative code. When using multiple YAMAHA receivers/amplifiers, you may be able to operate the other components simultaneously with the default code setting. In this case, set one of the alternative codes to operate this unit separately.
-
Page 71: Editing Sound Field Parameters
The acoustics in your room could be changed to those of a concert hall, a dance floor, or virtually any size room at all. This ability to create sound fields at will is exactly what YAMAHA has done with the digital sound field processor. EDITING SOUND FIELD PARAMETERS…
-
Page 72
EDITING SOUND FIELD PARAMETERS Repeat steps 2 through 4 as necessary to change other program parameters. Note You cannot change parameter values when “MEMORY GUARD” is set to ON. If you want to change the parameter values, set “MEMORY GUARD” to OFF (see page 59). Memory back-up The memory back-up circuit prevents the stored data from being lost even if this unit is set in the standby… -
Page 73: Sound Field Parameter Descriptions
SOUND FIELD PARAMETER DESCRIPTIONS You can adjust the values of certain digital sound field parameters so the sound fields are recreated accurately in your listening room. Not all of the following parameters are found in every program. DSP LEVEL (DSP level) Function: Adjusts the level of all the DSP effect sounds within a narrow range.
-
Page 74
SOUND FIELD PARAMETER DESCRIPTIONS For 6ch Stereo: Function: These parameters adjust the volume level for each channel in 6-channel stereo mode. Control range: 0 to 100% CT LEVEL (Center level) SL LEVEL (Surround left level) SR LEVEL (Surround right level) SB LEVEL (Surround back level) For PRO LOGIC IIx Music and PRO LOGIC II Music: PANORAMA (Panorama) -
Page 75: Troubleshooting
Refer to the chart below when this unit does not function properly. If the problem you are experiencing is not listed below or if the instruction below does not help, set this unit to the standby mode, disconnect the power cord, and contact the nearest authorized YAMAHA dealer or service center. General…
-
Page 76
TROUBLESHOOTING Problem The sound suddenly The protection circuitry has been activated goes off. because of a short circuit, etc. The sleep timer has turned the unit off. The sound is muted. Only the speaker on Incorrect cable connections. one side can be heard. -
Page 77
Problem Dolby Digital or DTS The connected component is not set to sources cannot be output Dolby Digital or DTS digital played. (Dolby Digital signals. or DTS indicator in The input mode is set to ANALOG. the front panel display does not light up.) A “humming”… -
Page 78
TROUBLESHOOTING Tuner Problem FM stereo reception is The characteristics of FM stereo noisy. broadcasts may cause this problem when the transmitter is too far away or the antenna input is poor. There is distortion, and There is multipath interference. clear reception cannot be obtained even with a good FM antenna. -
Page 79: Resetting The Factory Presets
RESETTING THE FACTORY PRESETS If you want to reset all of your unit’s parameters for any reason, do the following. This procedure completely resets ALL parameters, including the SET MENU, level, assign and tuner presets. Be sure this unit is in standby mode. STANDBY PRESET/TUNING FM/AM…
-
Page 80: Glossary
GLOSSARY Audio formats Dolby Digital Dolby Digital is a digital surround sound system that gives you completely independent multi-channel audio. With 3 front channels (left, center, and right), and 2 surround stereo channels, Dolby Digital provides 5 full-range audio channels. With an additional channel especially for bass effects, called LFE (low frequency effect), the system has a total of 5.1-channels (LFE is counted as 0.1 channel).
-
Page 81: Sound Field Programs
SILENT CINEMA YAMAHA has developed a natural, realistic sound effect DSP algorithm for headphones. Parameters for headphones have been set for each sound field so that accurate representations of all the sound field programs can be enjoyed on headphones.
-
Page 82: Video Signal Information
GLOSSARY Video signal information Component video signal With the component video signal system, the video signal is separated into the Y signal for the luminance and the P and P signals for the chrominance. Color can be reproduced more faithfully with this system because each of these signals is independent.
-
Page 83: Specifications
AUDIO SECTION • Minimum RMS Output Power for Front, Center, Surround, Surround back 20 Hz to 20 kHz, 0.06% THD, 8 Ω … 85 W • Maximum Power (EIAJ) [Asia, Korea and General models] 1 kHz, 10% THD, 8 Ω … 125 W •…
-
Page 84: List Of Remote Control Codes
LIST OF REMOTE CONTROL CODES ELIN ELTA A TANDY 0941 EMERSON ABEX 1151 ADMIRA 1141 ADVENTURA 1131 AIKO 1121 AIWA 1481 AKAI 0331, 1101, 1111 ALBA 0431 ALLERON 1091 ENVISION AMBASSADOR 1081 ERRES AMSTRAD 0481, 1081 ETRON ANAM 0251, 1041, 1051, FERGUSON 1061, 1071 FINLUX…
-
Page 85
0971, 0991, 1031, SYSTEM 1091, 1111, 1771 WATSON 1001 REALISTIC XOGEGO 1611, 1621, 1661, REGENCY/EASTERN0686 1741, 1761 RUNCO YAMAHA 0361, 1031, 1111, SAMSUNG 1951, 1961, 1971, SCIENTIC ATLANTA 1981 YOKO 1001 SCIENTIFIC ATLANTA 175/475 ZENITH 0011, 0041, 0891, 0991, 1771… -
Page 86: Dvd Player
0202, 0432, 0602, 0632, 0692, 0912, 0922, 0932 WARDS PENTAX 0592, 0602 PERDIO 0992 PHILCO 0002, 0932 PHILIPS 0002, 0282, 0402, YAMAHA 0492, 0932 ZENITH PILOT 0912 PIONEER 0442, 0542 PROSCAN 1002, 1012, 1022, DVD PLAYER 1032, 1042, 1052, 1062…
-
Page 87
IMPORTANT SAFETY INSTRUCTIONS IMPORTANT SAFETY INSTRUCTIONS CAUTION RISK OF ELECTRIC SHOCK DO NOT OPEN CAUTION: TO REDUCE THE RISK OF ELECTRIC SHOCK, DO NOT REMOVE COVER (OR BACK). NO USER-SERVICEABLE PARTS INSIDE. REFER SERVICING TO QUALIFIED SERVICE PERSONNEL. • Explanation of Graphical Symbols The lightning flash with arrowhead symbol, within an equilateral triangle, is intended to alert you to the presence of uninsulated “dangerous voltage”… -
Page 88
YAMAHA ELECTRONICS (UK) LTD. YAMAHA HOUSE, 200 RICKMANSWORTH ROAD WATFORD, HERTS WD18 7GQ, ENGLAND YAMAHA SCANDINAVIA A.B. J A WETTERGRENS GATA 1, BOX 30053, 400 43 VÄSTRA FRÖLUNDA, SWEDEN YAMAHA MUSIC AUSTRALIA PTY, LTD. 17-33 MARKET ST., SOUTH MELBOURNE, 3205 VIC., AUSTRALIA…
Страницы и текст этой инструкции
 Руководство пользователя ресивера и усилителя Yamaha RX-V475_RX-V575
 Информация отображена на картинке
 Информация отображена на картинке
 Информация отображена на картинке
 Информация отображена на картинке
Как использовать наш сайт инструкций OnlineManuals.ru
Наша цель состоит в том, чтобы предоставить вам быстрый доступ к содержанию инструкции для ресивера и усилителя Yamaha RX-V475_RX-V575.
С помощью онлайн просмотра, Вы можете быстро просмотреть содержимое инструкции и найти решение проблемы с ресивера и усилителя Yamaha RX-V475_RX-V575.
Для Вашего удобства
Если листать руководство пользователя ресивера и усилителя Yamaha RX-V475_RX-V575 прямо на сайте, не очень удобно для Вас, есть два возможных решения:
• Просмотр в полноэкранном режиме — легко просмотреть руководство пользователя (без загрузки его на свой компьютер), Вы можете использовать режим полноэкранного просмотра.
Для просмотра инструкции пользователя ресивера и усилителя Yamaha RX-V475_RX-V575 на полном экране, используйте кнопку «Открыть в Pdf-viewer».
• Загрузка на компьютер — Вы можете также скачать Руководство пользователя ресивера и усилителя Yamaha RX-V475_RX-V575 на свой компьютер и сохранить его в файлах.
Многие люди предпочитают читать документы не на экране, а в печатной версии.
Возможность печати руководства пользователя также была предусмотрена на нашем сайте,
и вы можете использовать ее, нажав на иконку «печать» в Pdf-viewer.
Нет необходимости печатать все руководство ресивера и усилителя Yamaha RX-V475_RX-V575, можно выбрать только нужные страницы инструкции.
Caution: Read this before operating your unit.
1 To assure the finest performance, please read this manual   17 Be sure to read the “Troubleshooting” section on common
carefully. Keep it in a safe place for future reference.  operating errors before concluding that this unit is faulty.
2 Install this sound system in a well ventilated, cool, dry, clean   18 Before moving this unit, press ASTANDBY/ON to set this
place – away from direct sunlight, heat sources, vibration,   unit in the standby mode, and disconnect the AC power plug
dust, moisture, and/or cold. Allow ventilation space of at least   from the wall outlet.
30 cm on the top, 20 cm on the left and right, and 20 cm on   19 VOLTAGE SELECTOR (Asia and General models only)
the back of this unit.                       The VOLTAGE SELECTOR on the rear panel of this unit
3 Locate this unit away from other electrical appliances, motors,   must be set for your local main voltage BEFORE plugging
or transformers to avoid humming sounds.     into the AC wall outlet. Voltages are:
.......AC 110/120/220/230–240 V, 50/60 Hz (General model)
4 Do not expose this unit to sudden temperature changes from
cold to hot, and do not locate this unit in an environment with   ..........................AC 220/230–240 V, 50/60 Hz (Asia model)
high humidity (i.e. a room with a humidifier) to prevent   20 The batteries shall not be exposed to excessive heat such as
condensation inside this unit, which may cause an electrical   sunshine, fire or like.
shock, fire, damage to this unit, and/or personal injury.  21 Excessive sound pressure from earphones and headphones can
cause hearing loss.
5 Avoid installing this unit where foreign objects may fall onto
this unit and/or this unit may be exposed to liquid dripping or   22 When replacing the batteries, be sure to use batteries of the
splashing. On the top of this unit, do not place:  same type. Danger of explosion may happen if batteries are
– Other components, as they may cause damage and/or   incorrectly replaced.
discoloration on the surface of this unit.  WARNING
– Burning objects (i.e. candles), as they may cause fire,   TO REDUCE THE RISK OF FIRE OR ELECTRIC
damage to this unit, and/or personal injury.
SHOCK, DO NOT EXPOSE THIS UNIT TO RAIN
– Containers with liquid in them, as they may fall and liquid
may cause electrical shock to the user and/or damage to   OR MOISTURE.
this unit.
6 Do not cover this unit with a newspaper, tablecloth, curtain,   As long as this unit is connected to the AC wall outlet,
etc. in order not to obstruct heat radiation. If the temperature   it is not disconnected from the AC power source even
inside this unit rises, it may cause fire, damage to this unit,   if you turn off this unit by ASTANDBY/ON. In this
and/or personal injury.                    state, this unit is designed to consume a very small
7 Do not plug in this unit to a wall outlet until all connections   quantity of power.
are complete.
8 Do not operate this unit upside-down. It may overheat,   ¦ For U.K. customers
possibly causing damage.                  If the socket outlets in the home are not suitable for the
9 Do not use force on switches, knobs and/or cords.  plug supplied with this appliance, it should be cut off and
10 When disconnecting the power cable from the wall outlet,   an appropriate 3 pin plug fitted. For details, refer to the
grasp the plug; do not pull the cable.    instructions described below.
11 Do not clean this unit with chemical solvents; this might
damage the finish. Use a clean, dry cloth.  Note
12 Only voltage specified on this unit must be used. Using this
The plug severed from the mains lead must be destroyed, as a
unit with a higher voltage than specified is dangerous and may   plug with bared flexible cord is hazardous if engaged in a live
cause fire, damage to this unit, and/or personal injury. Yamaha   socket outlet.
will not be held responsible for any damage resulting from use
¦ Special Instructions for U.K. Model
of this unit with a voltage other than specified.
13 To prevent damage by lightning, keep the power cord and
IMPORTANT
outdoor antennas disconnected from a wall outlet or the unit   THE WIRES IN MAINS LEAD ARE COLOURED IN
during a lightning storm.
ACCORDANCE WITH THE FOLLOWING CODE:
14 Do not attempt to modify or fix this unit. Contact qualified
Yamaha service personnel when any service is needed. The   Blue: NEUTRAL
cabinet should never be opened for any reasons.  Brown: LIVE
15 When not planning to use this unit for long periods of time   As the colours of the wires in the mains lead of this apparatus
(i.e. vacation), disconnect the AC power plug from the wall   may not correspond with the coloured markings identifying
outlet.                                    the terminals in your plug, proceed as follows:
The wire which is coloured BLUE must be connected to the
16 Install this unit near the AC outlet and where the AC power
terminal which is marked with the letter N or coloured
plug can be reached easily.                BLACK. The wire which is coloured BROWN must be
connected to the terminal which is marked with the letter L or
coloured RED.
Making sure that neither core is connected to the earth
terminal of the three pin plug.
Caution-i En
-
Contents
-
Table of Contents
-
Troubleshooting
-
Bookmarks
Quick Links
U
RX-V465
AV Receiver
OWNER’S MANUAL
Related Manuals for Yamaha RXV465 — RX AV Receiver
Summary of Contents for Yamaha RXV465 — RX AV Receiver
-
Page 1
RX-V465 AV Receiver OWNER’S MANUAL… -
Page 3: Important Safety Instructions
FCC requirements. Modifications turning the unit “OFF” and “ON”, please try to eliminate the not expressly approved by Yamaha may void your authority, problem by using one of the following measures: granted by the FCC, to use the product.
-
Page 4
Pour éviter les chocs électriques, introduire la lame la cause fire, damage to this unit, and/or personal injury. Yamaha plus large de la fiche dans la borne correspondante de will not be held responsible for any damage resulting from use la prise et pousser jusqu’au fond. -
Page 5: Table Of Contents
Connecting a TV monitor or projector ….14 DSP Parameter…………43 Connecting other components ……… 15 Memory Guard…………43 Connecting a Yamaha iPod universal dock or Controlling other components with the remote Bluetooth™ wireless audio receiver….16 control…………..44 Using the VIDEO AUX jacks on the front panel ..16 Setting remote control codes……..
-
Page 6: Introduction
• Audio/Visual input DOCK terminal [Audio] Digital input (coaxial) x 2, digital input • DOCK terminal to connect a Yamaha iPod universal (optical) x 2, analog input x 2 dock (such as YDS-11, sold separately) or Bluetooth [Video] Component video x 2, composite video x 4 wireless audio receiver (such as YBA-10, sold •…
-
Page 7: About This Manual
HD Master Audio are trademark of DTS, Inc. © 1996-2007 DTS, Inc. All Rights Reserved. iPod™ “SILENT CINEMA” is a trademark of Yamaha Corporation. “iPod” is a trademark of Apple Inc., registered in the U.S. and other countries. Supplied accessories Check that you received all of the following parts.
-
Page 8: Part Names And Functions
Part names and functions Front panel VOLUME HDMI THROUGH MEMORY TUNING INFO PRESET SCENE BD/DVD RADIO VIDEO AUX PHONES TONE CONTROL PROGRAM STRAIGHT DIRECT INPUT OPTIMIZER MIC STANDBY SILENT CINEMA EFFECT VIDEO AUDIO PORTABLE STANDBY/ON DIRECT Switches this unit between standby and on (see page 17). Changes a sound field program to direct mode (see page 22).
-
Page 9: Rear Panel
AV 5 AV 6 AUDIO1 AUDIO2 DOCK terminal For connecting an optional Yamaha iPod universal dock (YDS- 11) or Bluetooth wireless audio receiver (YBA-10) (see page 16). HDMI OUT/HDMI 1-4 For connecting an HDMI-compatible video monitor or external components for HDMI inputs 1-4 (see page 15).
-
Page 10: Front Panel Display
Part names and functions Front panel display VOL. SLEEP STEREO MUTE TUNED SBL SB SBR HDMI indicator Lights up during normal communication when HDMI is selected as an input source. CINEMA DSP indicator Lights up when a sound field program that uses CINEMA DSP is selected.
-
Page 11: Remote Control
VOLUME +/– Adjust the volume of this unit (see page 21). DISPLAY Changes the operation mode of the iPod connected to the Yamaha iPod universal dock (see page 30). Remote control signal transmitter MUTE Transmits infrared signals. Turns the mute function of the sound output on and off (see TRANSMIT page 22).
-
Page 12: Quick Start Guide
☞P. 11 • Connecting speakers Front right speaker Video monitor • This unit has a YPAO (Yamaha Parametric Room Acoustic Optimizer) that automatically optimizes this unit based on room acoustic Subwoofer characteristics (audio characteristics of the speakers, speaker positions, Front left speaker and room acoustics, etc.).
-
Page 13: Preparation
PREPARATION Preparing remote control Installing batteries in the remote Using the remote control control The remote control transmits a directional infrared ray. Be sure to aim the remote control directly at the remote control sensor on this unit during operation. Remote control sensor window within 6 m (20 ft) Take off the battery compartment cover.
-
Page 14: Connections
(LFE) sounds included in Dolby Digital 80˚ and DTS signals. Use a subwoofer with a built-in amplifier, such as the Yamaha Active Servo Processing Subwoofer System. Place it exterior to the front left and right speakers facing slightly inward to reduce reflections…
-
Page 15: Connecting Speakers
To obtain the d Surround speaker L SURROUND (L) balanced sound during playback, set the speaker output characteristics in advance using the Yamaha Parametric e Surround speaker R SURROUND (R) Room Acoustic Optimize (YPAO, see page 18) or…
-
Page 16
Connections Connecting the speaker cable Caution • A speaker cable is a pair of insulated cables running side by side in general. One of the cables is colored differently or striped to indicate a polarity. Connect one end of the colored/striped cable to the “+” (red) terminal of this unit and the other end to that of your speaker, and connect one end of the other cable to the “–”… -
Page 17: Information On Jacks And Cable Plugs
Connections Information on jacks and cable plugs This unit has the following input and output jacks. Use jacks and cables appropriate for components that you are connecting. ■ ■ Audio jacks Video/audio jacks Jack and cables Description Jack and cables Description AUDIO jacks To transmit conventional analog…
-
Page 18: Connecting A Tv Monitor Or Projector
Connections Connecting a TV monitor or projector Connect a video monitor such as a TV or projector to an output terminal of this unit. You can select one of the following three types according to the input signal format supported by the video monitor. Note •…
-
Page 19: Connecting Other Components
VIDEO • Input sources in parentheses are recommended to connect to the respective jacks. If your Yamaha component has the Remote in/out terminal, you can switch the input source to that component with a single key operation using the SCENE function (see page 21).
-
Page 20: Connecting A Yamaha Ipod Universal Dock Or Bluetooth™ Wireless Audio Receiver
This unit has the DOCK jack, to which you can connect a turn down the volume of this unit and other components Yamaha iPod universal dock (YDS-11, sold separately) or before making connections. a Bluetooth wireless audio receiver (YBA-10, sold separately).
-
Page 21: Connecting The Fm And Am Antennas
• Position the AM loop antenna away from this unit. • If you cannot get good reception, we recommend that you use an outdoor Press ASTANDBY/ON (or fPOWER) again antenna. For more details, consult the nearest authorized Yamaha dealer or service center. to turn off this unit (standby mode).
-
Page 22: Optimizing The Speaker Setting For Your Listening Room (Ypao)
Optimizing the speaker setting for your listening room (YPAO) This unit has a Yamaha Parametric Acoustic Optimizer (YPAO). With the YPAO, this unit automatically adjusts the output characteristics of your speakers based on speaker position, speaker performance, and the acoustic characteristics of the room.
-
Page 23
Optimizing the speaker setting for your listening room (YPAO) To select a sound character for adjustment, Notes press nCursor k to select “EQ” and then • When “E-xx” (xx indicates the number) appears during Auto Setup, it means that measurement is canceled due to an error. For press nCursor l / h. -
Page 24: When An Error Message Is Displayed During Measurement
Optimizing the speaker setting for your listening room (YPAO) When an error message is displayed When a warning message is displayed during measurement after measurement If a problem occurs during measurement, “W-xx” (xx Select “Retry” or “Exit” using nCursor l / h indicates the number) is displayed on the front panel and then press nENTER.
-
Page 25: Basic Operation
BASIC OPERATION Playback Basic procedure Using the SCENE function This unit has a SCENE function that allows you to change Turn on external components (TV, DVD input sources and sound field programs with one key. Four player, etc.) connected to this unit. scenes are available for different usages, such as playing movies or music.
-
Page 26: Muting Audio Output Temporarily (Mute)
Playback Press gInput selection keys on the Enjoying pure hi-fi sound remote control for the input source whose Use Direct mode to enjoy the pure high fidelity sound of remote control code was registered in step 1 the selected source. When Direct mode is activated, this for about 3 seconds while pressing down unit plays back the selected source with the least circuitry.
-
Page 27: Displaying Input Signal Information
Playback Displaying input signal information Changing information on the front panel display You can display information on audio/video signals input to this unit for each input source. Information displayed on the front panel display can be changed by pressing CINFO (or iINFO). Select the desired input source, and press The following information can be displayed according to mOPTION.
-
Page 28: Enjoy The Sound Field Programs
Enjoy the sound field programs This unit is also equipped with a Yamaha digital sound field processing (DSP) chip. You can enjoy multi-channel sounds for almost all input sources using various sound field programs stored on the chip and a variety of surround decoders.
-
Page 29
Enjoy the sound field programs Program Descriptions Drama This sound field features stable reverberations that match a wide range of movie genres from serious dramas to musicals and comedies. The reverberations are modest but offer an optimum 3D feeling, reproducing effects tones and background music softly but cubically around clear words and center positioning in a way that does not fatigue the listener even after long hours of viewing. -
Page 30
Enjoy the sound field programs For Multi-channel stereo reproduction Program Descriptions 7ch Stereo Use this program to output sound from all speakers. When you play back multi-channel sources, this unit downmixes the source to 2 channels, and then outputs the sound from all speakers. This program creates a larger sound field and is ideal for background music at parties, etc. -
Page 31: Enjoying Unprocessed Input Sources (Straight Decoding Mode)
Enjoy the sound field programs Enjoying unprocessed input sources Enjoy sound field programs with (Straight decoding mode) headphones (SILENT CINEMA™) In straight decoding mode, sounds are reproduced without SILENT CINEMA allows you to enjoy multi-channel sound field effect. 2-channel stereo sources are output sources with your headphones.
-
Page 32: Fm/Am Tuning
FM/AM tuning The FM/AM tuner of this unit provides the following two • You can switch between stereo and monaural for FM broadcast in the modes for tuning. option menu (see page 34). ■ Frequency tuning mode (Auto tuning / To tune in by direct frequency tuning, enter Manual tuning) the frequency of the desired station using…
-
Page 33
FM/AM tuning During the automatic station preset, the upper area of Calling a preset station (Preset tuning) the screen changes as follows: READY → SEARCH → MEMORY each time a station is registered. You can call preset stations registered by automatic station When registration is complete, “FINISH”… -
Page 34: Using Ipod
• Some features may not be compatible depending on the model or the software version of your iPod. • Some features may not be available depending on the model of Yamaha iPod universal dock. The following sections describe the procedure when using the YDS-11.
-
Page 35
Using iPod™ Shuffle/repeat playback You can use a special playback function such as shuffle playback and repeat playback by setting the option menu. Press pDISPLAY to switch to menu browse mode while “DOCK” is selected as the input source. The option menu can be displayed only in menu browse mode. -
Page 36: Using Bluetooth™ Components
Using Bluetooth™ components You can connect a Yamaha Bluetooth wireless audio receiver (such as YBA-10, sold separately) to the DOCK terminal of this unit and enjoy the music contents stored in your Bluetooth component (such as a portable music player) without wiring between this unit and the Bluetooth component.
-
Page 37: Advanced Operation
ADVANCED OPERATION Setting the option menu for each input source (OPTION menu) This unit has an OPTION menu of frequently used menu items for input sources compatible with this unit. The procedure for setting the OPTION menu items is described below. Select an input source using NINPUT l / h OPTION menu items (or gInput selection keys).
-
Page 38: Signal Info
Setting the option menu for each input source (OPTION menu) ■ Decoder Mode Signal Info Input source: HDMI1-4, AV1-4 Input source: HDMI1-4, AV1-4 Auto*/DTS Choices: Displays information on audio and video signals on the Selects DTS digital audio signals for reproduction. front panel display.
-
Page 39: Auto Preset
Setting the option menu for each input source (OPTION menu) ■ Auto Preset Input source: TUNER Automatically detects radio stations in the FM frequency band and registers them as preset stations (see page 28). ■ Clear Preset Input source: TUNER Clears the preset stations (see page 29).
-
Page 40: Editing Surround Decoders/Sound Field Programs
Editing surround decoders/sound field programs To end the edit, press nRETURN. Selecting a decoder used with a sound field program To initialize the parameters of the selected sound field program, nCursor n repeatedly to select “Initialize” When using sound field programs for movies or TV and then press, nCursor h.
-
Page 41
Editing surround decoders/sound field programs ■ Straight Enhancer/7ch Enhancer only EFCT LVL Choices: High*/Low Adjusts the Compressed Music Enhancer effect level. When the high-frequency signals of the source is emphasized too much, set the effect level to “Low.” To reduce the effect, set this parameter to “Low.” To increase the effect, set it to “High.”… -
Page 42: Operating Various Settings For This Unit (Setup Menu)
Operating various settings for this unit (Setup menu) You can call the setup menu using the remote control and change the settings of various menus. You can change the following settings in the setup menu. For details, read “Basic operation of the setup menu” first, and see the respective pages.
-
Page 43: Basic Operation Of The Setup Menu
Operating various settings for this unit (Setup menu) Basic operation of the setup menu Speaker Setup You can set various items for speakers. Two kinds of Press lSETUP on the remote control. adjustments are available. One is “Auto Setup (YPAO)” The setup menu screen appears.
-
Page 44
Operating various settings for this unit (Setup menu) Low-frequency components of other channel signals Small Select this when small surround speakers are connected. Low-frequency components of Front Other Parameter Subwoofer surround channels are output from a speakers speakers subwoofer. If a subwoofer is not connected Both they are output from front speakers. -
Page 45: Sound Setup
Operating various settings for this unit (Setup menu) ■ B)Level Adjustable range: -10.0dB to +10.0dB (0.5 dB step) 63Hz/160Hz/400Hz/1kHz/2.5kHz/ Choices: Defaults: “FL/FR/SW” 0dB* 6.3kHz/16kHz “C/SL/SR/SBL/SBR” -1.0dB Adjustable range: -6.0dB to 0dB* to +6.0dB (0.5 dB step) Separately adjusts volume of each speaker so that the Adjusts sound quality of each speaker using a graphic sounds form speakers are at the same volume at the equalizer.
-
Page 46: Function Setup
Operating various settings for this unit (Setup menu) Auto 2 Display Adjustable range: 0 to 240ms (1 ms step) Enables manual fine adjustment of the correction time You can set items for the front panel display. when “HDMI Auto” is set to “On.” ■…
-
Page 47: Dsp Parameter
Operating various settings for this unit (Setup menu) ■ MaxVol DSP Parameter Adjustable range: -30.0dB to +15.0dB/+16.5dB* (5.0 dB step) You can set parameters for the sound field programs. For Sets the maximum volume level so that the volume will details, see page 36.
-
Page 48: Controlling Other Components With The Remote Control
Default Input source Category Manufacturer Turns on and off an external component. code nCursor, ENTER, RETURN [DOCK] DOCK Yamaha 5011 Operates the menus of external components. [A]/[B] — — — pDISPLAY “—” indicates no assignment Switches between the screens of external components.
-
Page 49: Advanced Setup
Two IDs are provided for the remote control of this unit. If change settings. another Yamaha amplifier is in the same room, setting a different remote control ID to this unit prevents unwanted Set this unit to the standby mode.
-
Page 50: Appendix
Refer to the table below when this unit does not function properly. If the problem you are experiencing is not listed below or if the instruction below does not help, turn off this unit, disconnect the power cable, and contact the nearest authorized Yamaha dealer or service center. General…
-
Page 51
Troubleshooting Problem Cause Remedy page No picture. An appropriate video input is not selected Select an appropriate video input on the monitor. — on the monitor. The composite output terminals are used If your monitor does not support the HDMI to output a component video signal, or the connection, connect it to the COMPONENT OUT COMPONENT VIDEO jacks are used to… -
Page 52
Troubleshooting Problem Cause Remedy page No sound is heard “Bass Out” of “A)Config” in “Speaker Set “Bass Out” to “SWFR” or “Both.” from the subwoofer. Setup” of the setup menu (Speaker Setup→Manual Setup→A)Config) is set to “Front” when a Dolby Digital, DTS or AAC signal is being played. -
Page 53: Hdmi
Troubleshooting Problem Cause Remedy page The picture is The video software is copy-protected. disturbed. This unit suddenly The internal temperature becomes too Wait about 1 hour for this unit to cool down and then — enters the standby high and the overheat protection circuitry turn it back on.
-
Page 54: Remote Control
Connect error There is a problem with the signal path Turn off this unit and reconnect the Yamaha iPod from your iPod to this unit. universal dock to the DOCK terminal of this unit. Remove your iPod in the Yamaha iPod universal dock and then place it back in the dock.
-
Page 55: Bluetooth
• Warning message “W-2” or “W-3” indicates that the adjusted settings may not be optimal. • Depending on the speakers, warning message “W-1” may appears even if the speaker connections are correct. • If error message “E-10” occurs repeatedly, contact a qualified Yamaha service center. Before Auto Setup…
-
Page 56
Check whether the speakers are properly placed and connected. The optimizer microphone or OPTIMIZER MIC jack may be defective. Contact the nearest Yamaha dealer or service center. E-9:USER CANCEL “Auto Setup” was cancelled due to an Run “Auto Setup” again. -
Page 57: Glossary
Glossary ■ ■ Audio and video synchronization (lip sync) Dolby Digital Surround EX Lip sync, an abbreviation for lip synchronization, is a technical term Dolby Digital EX creates 6 full-bandwidth output channels from 5.1- that involves both a problem and a capability of maintaining audio and channel sources.
-
Page 58: Dts Digital Surround
Glossary ■ ■ HDMI Direct Stream Digital (DSD) technology stores audio signals on HDMI (High-Definition Multimedia Interface) is the first industry- digital storage media, such as Super Audio CDs. Using DSD, signals supported, uncompressed, all-digital audio/video interface. Providing are stored as single bit values at a high-frequency sampling rate of an interface between any source (such as a set-top box or AV receiver) 2.8224 MHz, while noise shaping and oversampling are used to and an audio/video monitor (such as a digital television), HDMI…
-
Page 59: Sound Field Program Information
Yamaha original sound field compression artifact. As a result, flattened complexity due to the loss technology combined with various digital audio systems.
-
Page 60: Specifications
Specifications AUDIO SECTION VIDEO SECTION • Video Signal Type (Gray Back) • Minimum RMS Output Power for Front, Center, Surround, [U.S.A., Canada, Korea and General models]…….NTSC Surround back [Other models]…………….PAL [U.S.A. and Canada models] 1 kHz, 0.9% THD, 8 Ω …………105 W •…
-
Page 61: Index
Index ■ Numerics Connecting set-top box ……..15 IniVol, 3 Volume, function setup ….43 INPUT l / h, front panel ……4 Connecting speaker ……..11 1 Dynamic Range, sound setup ……41 Input selection key, remote control ….7 Connecting speaker cable ……
-
Page 62
Index ■ SCENE, remote control ……..7 Sci-Fi, sound field program ……24 VIDEO jack …………13 Selecting SCENE ……….. 21 Video jack …………13 Setting remote control code ……44 VIDEO jack, front panel ……..4 Set-top box connection ……..15 Video/audio jack ……….13 Setup menu ………… -
Page 63: List Of Remote Control Codes
List of remote control codes Ausind 0249 Clatronic 0243, 0249, 0259, Durabrand 0077, 0097, 0133, Autovox 0249, 0257, 0259, 0260, 0261, 0262, 0225 A.R. Systems 0274 0260, 0328 0268, 0269, 0273, 0271 Acme 0260 Aventura 0097 0274, 0328 Dwin 0224 Acura 0261, 0273 0327, 0328…
-
Page 64
Fujitsu Siemens 0425, 0426, 0427, Hinari 0261, 0262, 0266, Kaisui 0260, 0261, 0262, Magnavox 0072, 0088, 0090, 0428, 0429 0268, 0271, 0273, 0270, 0273, 0274, 0091, 0095, 0096, Funai 0033, 0034, 0035, 0274 0327, 0328 0098, 0114, 0115, 0036, 0037, 0097, Hisawa 0262, 0270, 0275 Kamosonic… -
Page 65
Neckermann 0243, 0257, 0260, 0114, 0135, 0143, 0071, 0072, 0073, SEI-Sinudyne 0257, 0263, 0265 0264, 0268, 0269, 0176, 0178, 0189, 0074, 0075, 0090, Seleco 0264, 0265, 0266 0271, 0274, 0328 0210, 0212, 0232, 0099, 0102, 0103, Sencora 0261, 0273 0268, 0271, 0274 0233, 0257, 0260, 0109, 0120, 0179, Sentra… -
Page 66
1020 1079, 1090 Tokai 0268, 0274, 0328 Xrypton 0274 CyberPower 1066 Headquarter 1019 Tokyo 0260, 0327 Yamaha 0000, 0001, 0002, Daewoo 1023, 1075, 1076, Hewlett Packard 1066 Tomashi 0270 0003, 0004, 0005, 1091, 1116, 1141 Hinari 1074, 1079, 1090, Toshiba… -
Page 67
Loewe Opta 1077, 1078 1111, 1113, 1122, Solavox 1076 XR-1000 1022, 1023 Logik 1079, 1090 1124, 1127, 1128, Sonic Blue 1041, 1068 Yamaha 1018, 1019 Lumatron 1075, 1091 1129 Sonneclair 1090 Yamishi 1079, 1090 Luxor 1090 Philips Magnavox 1030 Sonoko… -
Page 68
ATACOM 2318 Enzer 2302 2080, 2107, 2115, 2252, 2256, 2260, Audiovox 2111, 2199 Epson 2165 2116, 2141, 2188, 2268, 2282, 2332, Avious 2317 2219 2211, 2215, 2237, 2333, 2343, 2344, 2313 Finlux 2304, 2312, 2317 2239, 2285, 2293, 2345, 2367, 2371, Axion 2171 Fintec… -
Page 69
Archer 3020 3018 Sony 2005, 2006, 2007, Yamada 2097, 2313, 2315 Arcon 3048 NET Brazil 3007 2020, 2021, 2022, Yamaha 2000, 2001, 2002, AT&T 3013 Nokia 3051 2023, 2024, 2025, 2003, 2011, 2018, Axis 3048 Noos 3055 2069, 2072, 2073,… -
Page 70
Viewmaster 3045 Condor 4074, 4090, 4137 Fuba 4074, 4083, 4090, Lasat 4074, 4088, 4090, Vision 3045 Connexions 4074, 4092 4092, 4093, 4101, 4100, 4133, 4134, Visiopass 3051, 3054, 3055 Conrad 4074, 4133, 4136, 4133 4137 Vortex View 3045 4137 Galaxis 4074, 4087, 4090, Lasonic 4062… -
Page 71
Tandberg 4102 Zodiac 4086 Quelle 4093, 4133, 4137 Tandy 4086 Quiero 4102 Tantec 4084 RadioShack 4065 4090 Yamaha 5000, 5013 Radiola 4101, 4103 Techniland 4094 CD Recoder Radix 4092, 4119 TechniSat 4071, 4072, 4073, Rainbow 4086 4092, 4103, 4116, Yamaha… -
Page 72
© 2009 Yamaha Corporation All rights reserved. Printed in China WQ95630… -
Page 73
UCRTKALBGEF RX-V565/V465 The letters in circles and the numbers in squares correspond to those in the Owner’s Manual. Les lettres dans les cercles et les numéros dans les carrés correspondent à ceux du mode d’emploi. Die Buchstaben in Kreisen und die Nummern in Kästchen entsprechen denen in der Bedienungsanleitung. Bokstäverna i cirklarna och siffrorna i rutorna motsvarar de i bruksanvisningen. -
Page 74
■ Remote control/Boîtier de télécommande/Fernbedienung/Fjärrkontrollen/ Telecomando/Mando a distancia/Afstandsbediening/Пульт ДУ/ 遥控器 / 리모콘 TRANSMIT CODE SET POWER POWER SOURCE SLEEP HDMI AUDIO V-AUX [ A ] [ B ] DOCK TUNER PRESET TUNING INFO MEMORY ENHANCER SUR. DECODE MOVIE MUSIC STEREO STRAIGHT DIRECT SCENE…
This manual is also suitable for:
Rxv465